No Coding, No Hassle: Launch Your Store’s Mobile App with Knowband

Customers increasingly prefer shopping on their mobile devices, and providing them with a seamless app experience can boost engagement, loyalty, and sales. However, creating a mobile app may seem like a daunting task, especially if you lack technical expertise. That’s where Knowband’s Mobile App Builder comes in. With no coding required, Knowband enables store owners on platforms like Prestashop, Opencart, WooCommerce, and Magento 2 to create fully functional, feature-rich mobile apps effortlessly.

Why Your eCommerce Store Needs a Mobile App?

A mobile app is more than just an additional channel for selling products—it’s a powerful tool to connect with your customers. Here’s why every eCommerce business should consider going mobile:

Improved Customer Experience: Apps provide a smoother and faster shopping experience compared to mobile websites.

Increased Conversion Rates: Push notifications, personalized recommendations, and easy navigation drive more conversions.

Enhanced Brand Loyalty: A well-designed app strengthens your brand identity and fosters long-term customer relationships.

Greater Accessibility: Customers can shop anytime, anywhere, making your store accessible 24/7.

With these benefits in mind, it’s clear why creating a mobile app for your eCommerce store is a game-changer.

Meet Knowband’s eCommerce Mobile App Builder!

Knowband’s Mobile App Builder is the ultimate solution for eCommerce store owners who want to launch a mobile app without technical complications. Furthermore, designed specifically for Prestashop, Opencart, WooCommerce, and Magento 2 platforms, it offers a hassle-free way to go mobile.
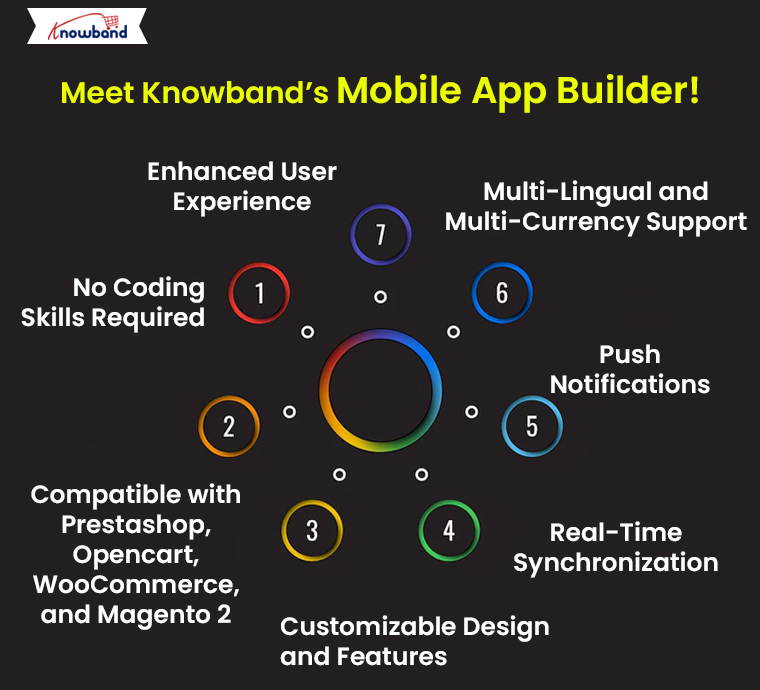
Let’s explore its key features and advantages:

1. No Coding Skills Required:

Forget hiring expensive developers or learning complex programming languages. Knowband’s Mobile App Builder allows you to create your app without writing a single line of code. Furthermore, the user-friendly interface lets you customize your app’s design, features, and layout effortlessly.

2. Compatible with Prestashop, Opencart, WooCommerce, and Magento 2:

No matter which platform your store operates on, Knowband has you covered. The Mobile App Builder supports Prestashop, Opencart, WooCommerce, and Magento 2, ensuring seamless integration and optimal performance.

3. Customizable Design and Features:

With Knowband’s Mobile App Builder, you can customize the app’s look and feel to match your brand identity. Choose from various layouts, color schemes, and navigation styles to create an app that resonates with your audience.

4. Real-Time Synchronization:

Say goodbye to manual updates. The Mobile App Builder ensures that your app stays synchronized with your eCommerce store in real-time. Whether you add new products, change prices, or update stock, the changes are instantly reflected in your app.

5. Push Notifications:

Engage your customers like never before with push notifications. Notify them about new arrivals, special discounts, or abandoned carts. Moreover, the push notifications are an effective way to drive traffic and boost sales.

6. Multi-Lingual and Multi-Currency Support:

Expand your reach with Knowband’s Mobile App Builder. The app supports all the languages including RTL.

7. Enhanced User Experience:

The Mobile App Builder ensures that your app is fast, responsive, and user-friendly. Features like a simple checkout process, intuitive navigation, and advanced search options improve the overall shopping experience.

Why Choose Knowband for Mobile App Development?

Here’s why Knowband stands out as the go-to solution for eCommerce mobile app creation:

Trusted by Thousands: Knowband is a renowned name in the eCommerce industry, trusted by thousands of store owners worldwide.

24/7 Customer Support: Need assistance? Knowband’s dedicated support team is always ready to help.

Affordable Pricing: Get a high-quality mobile app without breaking the bank.
Build Android and iOS App for Your Prestashop Store

No Coding Skills Required

SHOP NOW

Why Choose Knowband’s Mobile App Builder Addon?

Knowband’s Prestashop Android and iOS Mobile App Builder Addon stands out for its flexibility, affordability, and ease of use.

How to Launch Your Mobile App with Knowband!

Launching your mobile app with Knowband is a straightforward process. Follow these simple steps:

Install the Plugin: Download and install the Mobile App Builder plugin for your platform (Prestashop, Opencart, WooCommerce, or Magento 2).

Customize Your App: Use the intuitive interface to design your app. Customize the layout, colors, and features to suit your needs.

Publish to App Stores: Once your app is ready, Knowband helps you publish it on Google Play Store and Apple App Store.

That’s it! Your app is now live, ready to deliver a seamless shopping experience to your customers.

Boost Your Business with Knowband!

A mobile app is an investment that pays off in terms of increased sales, improved customer retention, and enhanced brand visibility. Furthermore, Knowband’s Prestashop Mobile App Builder simplifies the process, making it accessible to all eCommerce store owners, regardless of technical expertise.

Whether you’re running a store on Prestashop, Opencart, WooCommerce, or Magento 2, Knowband provides the tools you need to succeed in the competitive eCommerce landscape. Don’t let the lack of coding skills hold you back—take your store mobile today with Knowband.

Final Thoughts!

In an era where mobile commerce dominates, having a mobile app for your eCommerce store is a strategic move. Therefore, with Knowband’s Mobile App Builder, you can create a stunning, fully functional app without the hassle of coding. Compatible with leading platforms like Prestashop, Opencart, WooCommerce, and Magento 2, it’s the perfect solution for businesses looking to enhance their online presence.

So, what are you waiting for? Launch your mobile app with Knowband today and watch your eCommerce business thrive!

How to save and display a custom form field value using the PrestaShop hook

PrestaShop is a robust open-source e-commerce platform designed for flexibility and customization. It allows developers to modify and enhance its core functionality using hooks, which are predefined entry points in the system. These hooks enable seamless integration of custom features, ensuring that updates and maintenance of the core system remain hassle-free.

This blog provides a comprehensive guide to adding, saving, and displaying custom fields for both product and customer forms in PrestaShop.

By the end of this blog, you will have a thorough understanding of how to create custom form fields in Prestashop, store their data in the database, and display this information in the Admin panel.

Step 1: Adding Custom Fields to Product and Customer Forms-

The first step in customizing PrestaShop involves injecting new fields into the forms for products and customers.

Adding Custom Fields to the Product Form

For this, we will use the displayAdminProductsExtra hook to append the custom field to the product form. This hook is triggered whenever a product is edited in the admin panel.

Hook Overview: This hook allows you to add any extra fields or information to the product creation/edit page.

Explanation of Code:

The example provided demonstrates how to fetch existing data for a custom field from the database and display it in the form. The product ID is retrieved dynamically from the $params, ensuring that the data displayed corresponds to the product being edited.

Add Custom Fields on the Customer Registration Form

Custom Registration Fields – Prestashop Addons

SHOP NOW

Adding Custom Fields to the Customer Form

Similarly, the displayAdminCustomersForm hook provides an entry point for injecting fields into the customer form.

Hook Overview: This hook is triggered when rendering the customer creation/edit form.

By assigning Smarty variables, the template for the custom field is seamlessly integrated into the admin interface.

Step 2: Creating the Database Fields-

Why Modify the Database?

PrestaShop adheres to a relational database model. By adding custom columns to the ps_product and ps_customer tables, you ensure that your custom data remains associated with its respective product or customer.

SQL Queries:

The provided SQL scripts demonstrate how to add columns to the ps_product and ps_customer tables. These queries are executed once to prepare the database for storing the custom field values.

SQL Query for Product:

SQL Query for Customer:

Best Practices:

  • Ensure creating a backup of the database before implementing or proceeding with displayAdminProductsExtra any schema changes.
  • Use column names that clearly describe their purpose to avoid confusion.

Step 3: Designing the Custom Form Templates-

Templates play a vital role in ensuring that custom fields blend seamlessly into the PrestaShop admin UI. Using Smarty, PrestaShop’s templating engine, you can design user-friendly and responsive forms.

Product Form Template (custom_product_form.tpl):

Customer Form Template (custom_customer_form.tpl):

Enhancements:

  • Add validation: Use JavaScript to validate user input before submission.
  • Styling: Enhance the form with CSS classes for a consistent look and feel.

Step 4: Saving the Custom Field Values-

Once the form fields are submitted, the values need to be saved to the database. PrestaShop hooks like actionProductSave and actionCustomerSaveAfter allow developers to execute custom logic during the save operation.

Saving Product Field Values

The actionProductSave hook ensures that the custom field data is saved when a product is saved/updated:

Saving Customer Field Values

The actionCustomerSaveAfter hook is used to save the custom customer field data:

Step 5: Displaying Custom Field Values-

Displaying custom fields involves retrieving the stored values and rendering them appropriately in the admin interface.

Displaying Product Custom Field Values

Use the same displayAdminProductsExtra hook to show the custom field value alongside other product details. The retrieved data can be displayed in either a read-only or editable format, depending on the use case.

Displaying Customer Custom Field Values

Similarly, the displayAdminCustomersForm hook retrieves and displays the custom field value on the customer form.

Additional Tips for Developers

1. Testing and Debugging:

  • Use PrestaShop’s debug mode to identify issues.
  • Test your custom fields with various inputs to ensure compatibility.

2. Scalability:

  • If you want to use multiple custom fields, consider creating a separate table to store them dynamically.
  • Use indexed columns for faster queries.

3. Security:

  • Always validate and sanitize user inputs using pSQL().
  • Restrict access to these fields based on user roles, if required.

4. Future Compatibility:

  • Use hooks exclusively to avoid modifying core files.
  • Regularly update your code to remain compatible with newer PrestaShop versions.

Conclusion

Adding custom fields to products in PrestaShop is a simple yet powerful way to extend the platform’s functionality. By following this guide, you can ensure that your customizations remain modular, maintainable, and compatible with future PrestaShop updates.

Feel free to adapt these techniques to other areas of your PrestaShop store, and share your results in the comments below!

What’s New in PrestaShop v9.0: Is it Time to Migrate?

PrestaShop v9.0 marks a significant milestone in the evolution of this open-source e-commerce platform. Packed with new features, enhancements, and a focus on modernizing the framework, this release aims to provide store owners and developers with a more robust and future-proof solution.

But is it the right time for you to migrate?

Let’s delve into the new PrestaShop v9.0 to help you make an informed decision.

New Features in PrestaShop v9.0!
Symfony Framework Upgrade to Version 6.4:

PrestaShop has been updated to Symfony 6.4, the latest long-term support (LTS) version, ensuring improved performance, security, and access to modern development features.
This version of Symfony will receive bug fixes till November 2026 and security fixes till November 2027 making it more reliable and future-ready.
The previous version of PrestaShop i.e., v8.1 was compatible with Symfony 4.4 which was introduced in Nov 2019. This upgrade brings the platform in line with modern PHP and Symfony standards.

Enhanced PHP Compatibility:

The platform now supports PHP versions 8.1, 8.2, and 8.3, allowing store owners to leverage the latest PHP improvements for better performance, faster execution, and enhanced security. At least PHP version 8.1 is required to run PrestaShop v9.0, ensuring your store benefits from cutting-edge features and optimizations.

Introduction of a Modern API Platform:

A new, flexible API based on the API Platform version 3 framework has been introduced, facilitating seamless integration with third-party applications, headless commerce setups, and custom developments. This API overhaul ensures scalability and better support for modern e-commerce ecosystems.

Revamped Back Office Layout Using Symfony:

The back office has undergone a comprehensive redesign powered by Symfony and Twig components, offering a more responsive, intuitive, and user-friendly interface. This redesign aims to make store management more efficient and accessible, even for those new to e-commerce platforms.

Notable Changes for Developers:

guzzlehttp/guzzle Library Replaced with Symfony HTTP Client: The guzzlehttp/guzzle library has been replaced with Symfony’s native HTTP Client, providing a more streamlined and efficient way to handle HTTP requests.

swiftmailer/swiftmailer Library Replaced with Symfony Mailer: The deprecated SwiftMailer library has been replaced with Symfony Mailer, which aligns PrestaShop with modern email-sending practices and improves the overall email management system.

Back Office Login Migration to Symfony: The Back Office login process has been fully migrated to Symfony, resulting in the removal of the following admin hooks:

  • actionAdminLoginControllerBefore
  • actionAdminLoginControllerLoginBefore
  • actionAdminLoginControllerLoginAfter
  • actionAdminLoginControllerForgotBefore
  • actionAdminLoginControllerForgotAfter
  • actionAdminLoginControllerResetBefore
  • actionAdminLoginControllerResetAfter

A new hook, actionBackOfficeLoginForm, has been introduced to allow developers to customize the Admin login form.

Twig Template Improvements:

  • The transition to Twig templates in both the Back Office and Front Office allows for cleaner, reusable, and modern templating practices.
  • This transition also reduces reliance on legacy Smarty templates, ensuring compatibility with modern development standards.

Is PrestaShop v9.0 Ready for Production?

While PrestaShop v9.0 introduces numerous advancements, it’s essential to approach migration with careful planning:

  • Thorough Testing: The alpha version is available for testing, and community feedback is crucial to identify and resolve any issues before the stable release. This iterative testing process ensures a more stable and reliable final product.
  • Compatibility Checks: Store owners should verify the compatibility of their custom themes and Prestashop modules with v9.0 to ensure a smooth transition. Some outdated plugins may require updates to work with the new framework and PHP versions.
    Migration Best Practices:
  • Backup: Ensure all store data, including files and databases, are thoroughly backed up.
  • Staging Environment: Test the upgrade in a staging environment before applying changes to the live site.
  • Community and Support: The active PrestaShop community provides extensive documentation, forums, and resources to assist with the migration process. Developers and store owners can also leverage the support network for troubleshooting and guidance.

Generate and Translate the Content for Prestashop Effortlessly with AI

Read More..

SHOP NOW

Why Migrate to PrestaShop v9.0?

Upgrading to PrestaShop v9.0 offers several benefits:

  1. Future-Proofing Your Store: The adoption of Symfony 6.4 and support for the latest PHP versions ensure your store remains technically advanced and ready for future updates.
  2. Improved User Experience: A modernized back office and enhanced performance contribute to a more efficient management experience and happier customers.
  3. Enhanced Security: Integration of advanced security protocols provides peace of mind for both store owners and customers.

Conclusion!

PrestaShop v9.0 marks a significant step forward for the platform, introducing cutting-edge features and essential enhancements to meet the demands of modern e-commerce. While migrating requires careful planning, the benefits in terms of performance, security, and flexibility make it a worthwhile investment for most store owners.

It is important to note that PrestaShop v9.0 is currently in the testing phase. Store owners and developers are encouraged to explore its capabilities in a staging environment to provide feedback and prepare for the stable release. With proper preparation, you can unlock the full potential of PrestaShop v9.0 and position your store for long-term success.

So, are you ready to take the leap into the future of e-Commerce?


OpenCart 4 vs OpenCart 3 – Which Version Offers Greater Stability?

OpenCart has remained a go-to choice for e-commerce store owners for its user-friendly interface, extensive customization options, and cost-effectiveness. With the release of OpenCart 4, store owners and developers alike are questioning whether it surpasses its predecessor, OpenCart 3, in terms of stability, performance, and features. In this blog, we’ll analyze both versions to help you determine which is the most stable version of OpenCart for your online business.

Introduction to OpenCart 3

OpenCart 3, released in 2017, marked a significant improvement over earlier versions, introducing features that streamlined store management and enhanced performance. Some highlights include:

  1. Twig Templating System: Replacing the older PHP templates, the Twig engine improved code readability and security.
  2. Multistore Management: Seamless handling of multiple stores under a single admin panel.
  3. Extension Marketplace: Simplified access to third-party extensions.
  4. Enhanced SEO Features: Built-in tools to improve store visibility.
  5. Admin Interface Overhaul: A more modern and intuitive dashboard.

Pros of OpenCart 3:

  • Extensive documentation and tutorials due to its long-standing user base.
  • A large library of extensions and themes developed specifically for this version.
  • Proven stability after years of updates and bug fixes.

Cons of OpenCart 3:

  • Compatibility issues with older extensions when moving from earlier versions.
  • Performance challenges when scaling to larger stores without additional optimization.
  • Limited built-in security features, requiring reliance on third-party tools.

What’s New in OpenCart 4?

OpenCart 4, launched in 2022, brings a host of updates designed to modernize the platform and address the limitations of previous versions. Here are the standout features:

  1. Event System: Enables developers to modify core functionality without changing the source code, improving extensibility.
  2. Improved Extension Framework: Better handling of extensions to minimize conflicts and ensure smoother integration.
  3. Enhanced Security: Token-based authentication and improved validation protocols to safeguard against vulnerabilities.
  4. PHP 8 Compatibility: Fully optimized for the latest PHP versions, ensuring better performance and future readiness.
  5. Refined Admin Panel: A cleaner, more responsive interface for easier store management.

Pros of OpenCart 4:

  • Significant performance boost thanks to optimized code and PHP 8 support.
  • Reduced reliance on third-party plugins for basic features like security.
  • A more developer-friendly architecture with the event-driven system.

Cons of OpenCart 4:

  • Newer version means fewer extensions and themes are compatible out of the box.
  • Some bugs and instability issues typical of early stages of release.
  • Steeper learning curve for users transitioning from older versions.

Stability Comparison!

To determine which version is more stable, we’ll evaluate several critical factors:

1. Performance:

  • OpenCart 3: Performs well for small to medium-sized stores. However, high-traffic stores may require caching and performance tuning.
  • OpenCart 4: Optimized for speed with PHP 8 support, offering faster load times and better handling of high traffic.

Winner: OpenCart 4, due to its modern architecture and support for newer PHP versions.

2. Extension Compatibility:

  • OpenCart 3: A well-established ecosystem of Opencart extensions and themes makes it easier to customize your store.
  • OpenCart 4: Retains some backward compatibility, but many extensions need updates to work correctly with the new framework.

Winner: OpenCart 3, as it has a broader and more mature extension library.

3. Security:

  • OpenCart 3: Relies heavily on third-party tools for enhanced security measures.
  • OpenCart 4: Includes robust built-in security features, reducing the need for external plugins.

Winner: OpenCart 4, for its enhanced security capabilities out of the box.

4. Ease of Use:

  • OpenCart 3: Familiar to a vast majority of users, with extensive community support and documentation.
  • OpenCart 4: A cleaner interface and streamlined workflows make it more user-friendly for beginners.

Winner: Tie. OpenCart 3 is easier for existing users, while OpenCart 4 is better suited for new users.

5. Bug Fixes and Updates:

  • OpenCart 3: After years of updates, most major bugs have been resolved, offering a stable experience.
  • OpenCart 4: As a newer version, it’s still undergoing refinements, with patches being released regularly.

Winner: OpenCart 3, for its time-tested stability.

Want to Build No-Code Apps for Your Opencart Store?

Click Here

Which Version Should You Choose?

The choice between OpenCart 3 and OpenCart 4 depends largely on your current setup and business needs:

When to Choose OpenCart 3:

  • You’re running a stable store that doesn’t require immediate upgrades.
  • Your extensions and themes are specifically designed for OpenCart 3.
  • You value a platform with extensive community support and a proven track record.

When to Choose OpenCart 4:

  • You’re starting a new store and want to future-proof your platform.
  • Performance and security are top priorities.
  • You’re willing to invest time in adapting extensions and themes for the new version.

Sum up

Both OpenCart 3 and OpenCart 4 have their unique strengths. OpenCart 3 is a tried-and-tested version with extensive community support and a stable environment. On the other hand, OpenCart 4 brings modern features, improved performance, and enhanced security, making it a strong contender for future e-commerce stores.

If stability and a wide range of compatible Opencart extensions are your primary concerns, OpenCart 3 remains a reliable choice. However, for those looking to leverage cutting-edge features and better performance, OpenCart 4 is well worth considering. Ultimately, your decision should align with your business goals, technical expertise, and readiness to adapt to a newer platform.

Unlock the Power of AI for Opencart: Generate and Translate Content with ChatGPT

Running an online store can be challenging, especially when it comes to creating high-quality content and translating it for a global audience. Fortunately, technology is evolving to make these tasks easier and more efficient. Enter the newly introduced Opencart ChatGPT Content Generator Extension by Knowband, an innovative solution designed to simplify content creation and translation for Opencart store owners.

This module leverages artificial intelligence to help you generate SEO-friendly content, translate it into multiple languages, and manage your store more effectively. Whether you are looking for product descriptions, product titles, category titles, category descriptions, product & category meta titles, the Opencart ChatGPT Content Generator Plugin has you covered.

What Is the Opencart ChatGPT Content Generator?

The Opencart ChatGPT Content Generator Extension is a cutting-edge tool that integrates OpenAI’s ChatGPT technology into your Opencart store. This powerful module enables store owners to create engaging, high-quality content effortlessly. From product descriptions to other SEO rich contents, the AI content generator for Opencart eliminates the need to hire professional writers or spend hours brainstorming.

Not only does this tool generate content, but it also supports translations, making it a must-have for store owners targeting international markets. With the Opencart ChatGPT Content Translator Extension, you can easily translate your store content into multiple languages, ensuring your products reach a wider audience.

Why Choose the ChatGPT Extension for Opencart?

In a competitive eCommerce environment, the quality of your content can make or break your success.
Here’s how the ChatGPT Extension for Opencart helps you stand out:

Effortless Content Creation: The AI-powered content generator for Opencart produces high-quality, SEO-optimized content tailored to your needs.

Seamless Translations: With the Opencart Translator Extension, you can translate your store content into various languages effortlessly. Furthermore, the AI-powered translation extension for Opencart ensures accurate and context-aware translations, allowing you to connect with international customers.

Save Time and Resources: Writing and translating content manually can be time-consuming and expensive. On the other hand, the Opencart ChatGPT Content Generator Plugin automates these tasks, saving you both time and money.

Boost SEO Performance: The Opencart ChatGPT SEO Content Generator helps improve your store’s search engine rankings by creating keyword-rich, high-quality content.

User-Friendly Interface: Designed with simplicity in mind, the Opencart ChatGPT Content Generator Extension is easy to use, even for beginners. You don’t need technical expertise to create or translate content using this plugin.

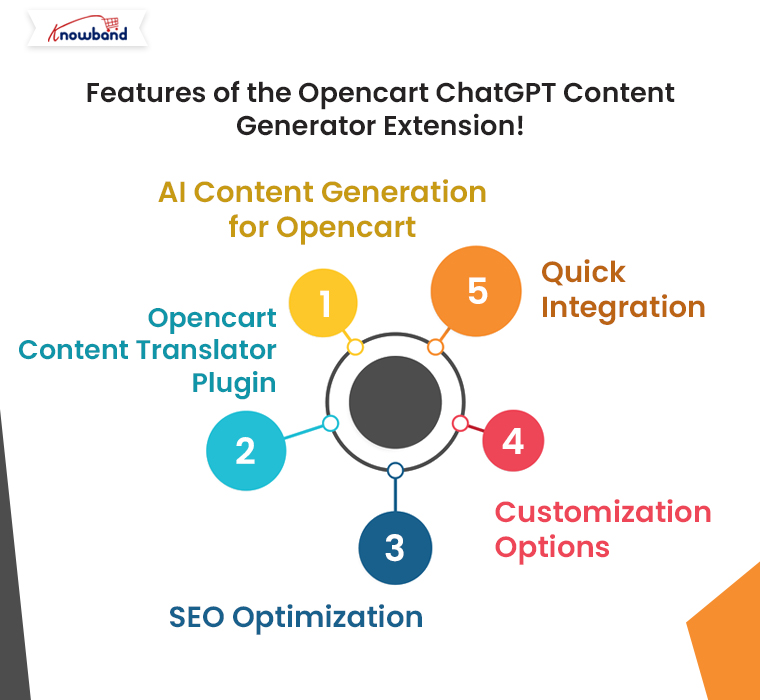
Features of the Opencart ChatGPT Content Generator Extension!

Knowband’s Opencart ChatGPT Content Generator Plugin comes packed with features to help you manage your store content more effectively.
Some of its standout features include:

AI Content Generation for Opencart: Generate unique, high-quality content for product pages, blogs, and more.

Opencart Content Translator Plugin: Translate your content into multiple languages to reach a global audience.

SEO Optimization: Create content optimized for search engines to improve your store’s visibility.

Customization Options: Tailor the generated content to fit your brand’s tone and style.

Quick Integration: Seamlessly integrate the plugin with your Opencart store.

With these features, the Opencart ChatGPT Content Translator Extension empowers store owners to take their content strategy to the next level.

Check What’s New in the Mobile App Builder v4.5

Use Code: MOBI40 for Extra 40% OFF

SHOP NOW

How Does the Opencart ChatGPT Content Generator Work?

Using the Opencart ChatGPT Content Generator and Translator Plugin is simple:

Install the Plugin: Download and install the Opencart ChatGPT Content Generator Plugin from the Knowband website.

Select Your Content Needs: Choose the type of content you need, such as product descriptions, blog posts, or website copy.

Generate Content: Input a few keywords or a brief description of your requirements. The AI content generator for Opencart will create high-quality, SEO-friendly content in seconds.

Translate (If Needed): Use the Opencart Translator Extension to translate the generated content into your desired languages.

Publish and Optimize: Review the content, make any necessary tweaks, and publish it to your store. With minimal effort, you’ll have professional-grade content ready to engage your customers.

Benefits of the Opencart ChatGPT Content Generator Extension!

The Opencart ChatGPT Content Generator Extension offers a host of benefits for store owners, including:

Improved Customer Experience: Provide high-quality content and accurate translations to enhance the shopping experience.

Scalability: Generate and translate content quickly, even as your store grows.

Cost Savings: Reduce reliance on costly freelancers or agencies for content needs.

Final Thoughts!

In today’s competitive eCommerce landscape, leveraging AI tools like the Opencart ChatGPT Content Translator can give you a significant edge. This powerful plugin simplifies content creation and translation, allowing you to focus on growing your business.

Whether you’re looking to enhance your SEO, reach international customers, or save time on content management, the Opencart ChatGPT Content Generator Plugin is the ultimate solution.

Ready to unlock the power of AI for your Opencart store? Try the Opencart ChatGPT Content Generator and Translator Extension today and take your content strategy to the next level.

Magento 2 ® ChatGPT Content Generator/Translator Extension – User Manual

The Magento 2 ChatGPT Content Generator and Translator Plugin is a powerful tool designed to streamline content management for Magento 2 stores. With advanced AI technology, it simplifies content creation and translation, making it a must-have for modern eCommerce businesses. This plugin enables you to create engaging product and category descriptions, attractive titles, and SEO-friendly content to boost your store’s visibility and enhance customer experience.

Beyond generating content, the plugin integrates seamlessly with Magento 2 and includes a translation feature. The AI-powered Magento 2 ChatGPT Content Translator helps store owners expand into new markets with accurate and context-aware translations.

Whether you’re managing multilingual content or improving your content strategy, the Magento 2 ChatGPT Content Generator saves time and effort. By leveraging ChatGPT Engines 3.5 and 4.0, it delivers high-quality, multilingual content that takes your online store to the next level.

Key Features of Knowband’s Magento 2 ChatGPT Content Generator/Translator Plugin:

1. Effortless Content Creation

Easily generate high-quality product titles, detailed descriptions, and optimized meta tags, ensuring consistency across your store while saving time.

2. Advanced Dual AI Engine Support

Powered by ChatGPT models 3.5 and 4.0, the plugin delivers advanced content creation and precise translations, catering to bulk product needs.

3. SEO-Friendly Content

Create optimized content that enhances your store’s search engine rankings and attracts more visitors.

4. Seamless AI-Powered Translation

Translate store content into multiple languages effortlessly, paving the way for global business expansion.

5. User-Friendly Design

With an intuitive interface, the plugin is easy to use, even for store admins with no technical expertise.

6. Category and Meta Tag Management

Simplify the creation and translation of category names and meta descriptions for a professional and polished look.

7. Bulk Content Processing

Perfect for stores with large inventories, the plugin allows batch processing of items to save time and increase efficiency.

8. Streamlined Operations

Simplify content-related tasks for smoother product updates and better operational efficiency, regardless of business size.

9. Multi-Language Support

Compatible with all languages, including RTL scripts, the plugin ensures flexibility for businesses worldwide.

2.0 Setting Up the ChatGPT Key for Your Plugin

Follow these simple steps to configure the API key and activate ChatGPT functionalities in your Magento 2 plugin:

Step 1: Generate an API Key

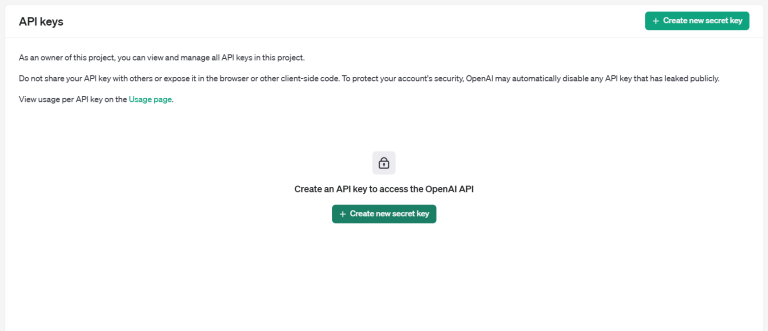
  1. Visit the OpenAI API Key Generation page.
  2. Log in to your OpenAI account or create one if you don’t have an account yet.

  1. Click on “Create new secret key” to generate a unique API key.
  2. Copy and securely save the key, as it will only be displayed once.

Important: Verify Billing Status

To ensure uninterrupted functionality, make sure your OpenAI account has an active billing setup:

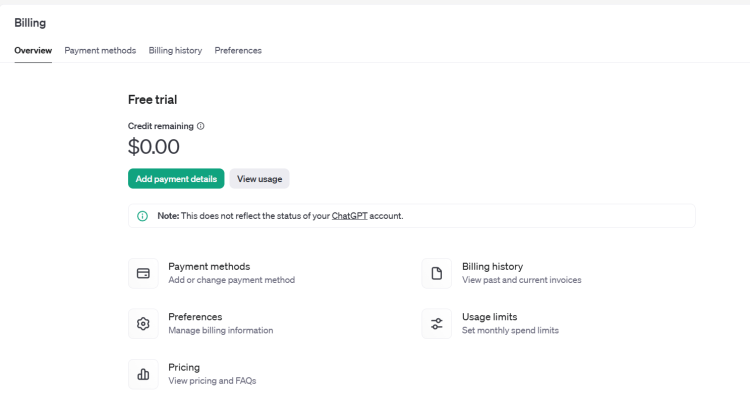
  1. Visit the OpenAI Billing Overview page.
  2. Check your account balance and add funds if necessary.
  3. Remember, insufficient credits can cause API requests to fail.

Once you’ve set up the API key and verified billing, your Magento 2 ChatGPT plugin will be fully configured and ready to generate and translate high-quality content for your store.

Also Available for Prestashop eCommerce Platform

SHOP NOW

Admin Panel Overview:

The Magento 2 AI Content Translator provides the store admin with an easy-to-manage and intuitive module dashboard. Let’s have a quick overview on all the different options provided in module backend.

Configurations:

Enable Disable the Extension: This button is used to enable/disable the module.

API Key: Insert the API key generated by following the steps in point 2.

ChatGPT Engine for Content Generation: The Content Generator and Translator Plugin for Magento 2 comes with 4 powerful ChatGPT Engines to take care of all your SEO rich content needs.

GPT-4: Highly capable model designed for complex tasks, offering superior accuracy and depth.

GPT-4o: Optimized for balancing cost and performance.

GPT-3.5-turbo: Cost-effective, suitable for general tasks.

GPT-4-turbo: Advanced model with improved accuracy and context handling.

Select the engine for content generation.

ChatGPT Engine for Translations: Choose the suitable engine for content translation from the dropdown list.

Temperature: Enter the value between 0.1 to 0.9. This value defines the creativity and uniqueness of the content. Where the lower number stands for more precise data, increasing the temperature could lead to more optimized and creative content generation.

Max Token: Enter the number of maximum tokens used in a single prompt execution.

Default Language for Translation/Content Generation: Select the default language for content generation on your store.

Languages to Translate Content: Choose the languages to translate the content.

ChatGPT Prompts:

Generate Product Description: Generate a detailed SEO-Friendly and engaging product description for the following product {product_name}. Make sure the description includes the main features, benefits, and use cases of the product. Please use HTML tags for formatting so the content is ready for a web page. The product is listed in the {category} category.

Generate Product Meta Title: Generate a concise and catchy meta title for a product named “{product_name}” in the “{category}” category. Keep the title under 60 characters. Avoid using double quotes. The title should include the main keyword and attract potential customers.

Generate Product Meta Description: Generate a compelling meta description for the product named {product_name} which lies in the category {category}. Limit the description to about 140 characters.

Translate Product Title: Translate the following product title and make sure to give translated content only.

Translate Product Description: Translate the following product description and preserve the HTML structure and tags, and only translate the visible text content and make sure to give translated content only.

Translate Product Meta Title: Translate the following product Meta Title and make sure to give translated content only.

Translate Product Meta Description: Translate the following product Meta Description and make sure to give translated content only.

Generate Category Meta Title: Generate a concise and catchy meta title for a “{category}” category. Keep the title under 60 characters. The title should include the main keyword, attract potential customers, and avoid using double quotes.

Generate Category Meta Description: Generate a compelling meta description for the category {category}. Limit the description to about 140 characters and avoid using double quotes.

Translate Category Title: Translate the following category title and make sure to give translated content only.

Translate Category Meta Title: Translate the following Category Meta Title and make sure to give translated content only.

Translate Category Meta Description: Translate the following category meta description and make sure to give translated content only.

3. ChatGPT Prompts Task Log:

The following tab displays a detailed record of completed tasks for the admin. It includes information such as the executed prompt type, product name, product category, language, previous content, and newly generated content.

Admins can also filter the task log using criteria such as Filter ID, Prompt Type, or Product Name, making it easier to locate specific data.

How to Use ChatGPT Prompts?

To use ChatGPT prompts, store admins can go to Catalog >> Products in the admin panel.

Executing Prompts with the Magento 2 AI Content Generator Plugin

  1. Select the products you want to update from the list.
  2. Open the Bulk Actions tab, as illustrated in the guide.
  3. Choose the desired prompt to perform the required action on the selected products.

This efficient workflow enables admins to generate or translate content for multiple products simultaneously, saving time and effort.

WooCommerce ChatGPT Content Generator Plugin – User Manual

The WooCommerce ChatGPT Content Generator Plugin is an advanced AI-based tool designed to simplify content management for your WooCommerce store. Powered by advanced OpenAI’s ChatGPT technology, this innovative plugin makes bulk content creation effortless, making it an essential resource for modern eCommerce businesses. With this tool, you can quickly craft engaging product and category descriptions, compelling titles, and SEO-optimized content to improve your store’s visibility and enhance customer satisfaction.

Designed to seamlessly integrate with WooCommerce, the plugin streamlines content generation, saving time and effort for merchants. Thus, utilizing the capabilities of ChatGPT Engines 3.5 and 4.0, helps you deliver high-quality content that not only helps you grow your online store’s performance but also saves time in manual content writing.

Key Features of Knowband’s WooCommerce ChatGPT Content Generator Plugin

Effortless Content Creation: Easily generate high-quality product titles, detailed descriptions, and optimized meta tags, ensuring consistent and professional content across your store while saving valuable time.

4 AI Engine Support: Powered by advanced ChatGPT models GPT-4.0, GPT-4-turbo, GPT-4, and GPT-3.5-turbo, the WooCommerce ChatGPT Plugin caters to diverse content generation needs, making it ideal for businesses of all sizes.

SEO-Optimized Output: Create SEO-friendly content effortlessly to enhance your store’s search engine rankings and drive more organic traffic.

User-Friendly Interface: Designed with simplicity in mind, the plugin offers an intuitive setup process, making it accessible for store admins without technical expertise.

Category and Meta Tags Management: Quickly generate category names and meta descriptions for a polished and organized presentation.

Bulk Content Generation: Streamline operations by processing multiple products at once, perfect for stores with extensive catalogs.

Enhanced Store Operations: Simplify content-related tasks to ensure smooth and efficient product updates, optimizing your store’s overall performance.

Global Flexibility: With support for various languages, including RTL scripts, the plugin accommodates businesses targeting diverse markets.

This streamlined tool empowers WooCommerce store owners to create and manage content effectively, enhancing productivity and boosting online presence.Top of Form

Setting Up the ChatGPT Key for Your Plugin

Follow these simple steps to enable ChatGPT functionalities in your WooCommerce plugin:

Step 1: Generate Your API Key

  1. Visit the OpenAI API Key Generation page.
  2. Log in to your OpenAI account or create one if you don’t have an account yet.
  3. Click on “Create new secret key” to generate a unique API key.

Copy and securely save the generated key, as it will be visible only once.

Important: Verify Billing Status

To ensure uninterrupted functionality, confirm that your OpenAI account has an active billing setup and sufficient credits:

  1. Visit the OpenAI Billing Overview page.
  2. Check your account balance.
  3. Add funds if necessary to prevent API request failures.

Once you’ve set up your API key and verified your billing, your WooCommerce ChatGPT plugin will be fully operational, ready to streamline content generation for your store.

Installation Guide

Follow these simple steps to install the WooCommerce AI Content Generator Module on your WooCommerce site:

Step 1: Purchase the Plugin

Buy the WooCommerce plugin from the Knowband store. Upon purchase, you’ll receive a zipped file containing the module’s source code.

Step 2: Access the WordPress Dashboard

Navigate to your WordPress Dashboard and go to Plugins → Add New.

Step 3: Upload the Plugin

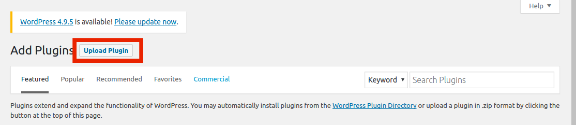
You’ll be directed to a new interface. Click on Upload Plugin.

Step 4: Upload the File

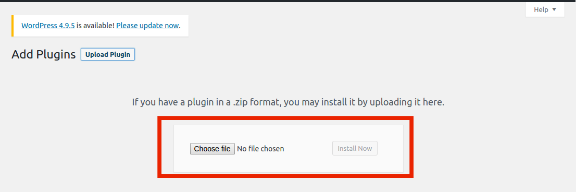
Click Choose File, select the zipped file you received, and upload it.

Once uploaded, activate the plugin, and it will be ready to enhance your WooCommerce site with AI-powered content generation capabilities.

Admin Panel Overview:

The WooCommerce AI Product Description Generator Plugin comes with an intuitive admin dashboard that allows the admin to handle all the content creation tasks efficiently.

1. Connection Setting:

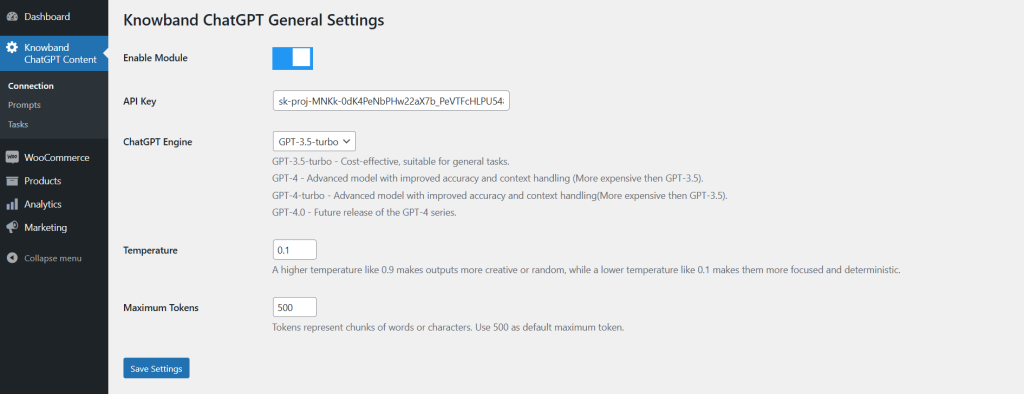
Enable Module: The store admin can activate/deactivate the extension using the following button.

API Key: Insert the obtained ChatGPT API key in this section. Please follow the steps mentioned above to get the ChatGPT API key for your module.

ChatGPT Engine: The plugin comes with 4 powerful ChatGPT engines to streamline the content management on your store.

  • GPT-3.5-turbo – Cost-effective, suitable for general tasks.
  • GPT-4 – Advanced model with improved accuracy and context handling (More expensive than GPT-3.5).
  • GPT-4-turbo – Advanced model with improved accuracy and context handling(More expensive than GPT-3.5).
  • GPT-4.0 – Future release of the GPT-4 series.

Select the one that suits your needs the best.

Temperature: The following text field accepts values between 0.1 and 0.9. Whereas, the lowest value 0.1 generates more focused and simple content. On the other hand, the highest value 0.9 generates more creative and refined content.

Maximum Tokens: Tokens represent chunks of words or characters. Use 500 as the default maximum token.

Also Available for Prestashop eCommerce Platform

SHOP NOW

2. ChatGPT Prompts

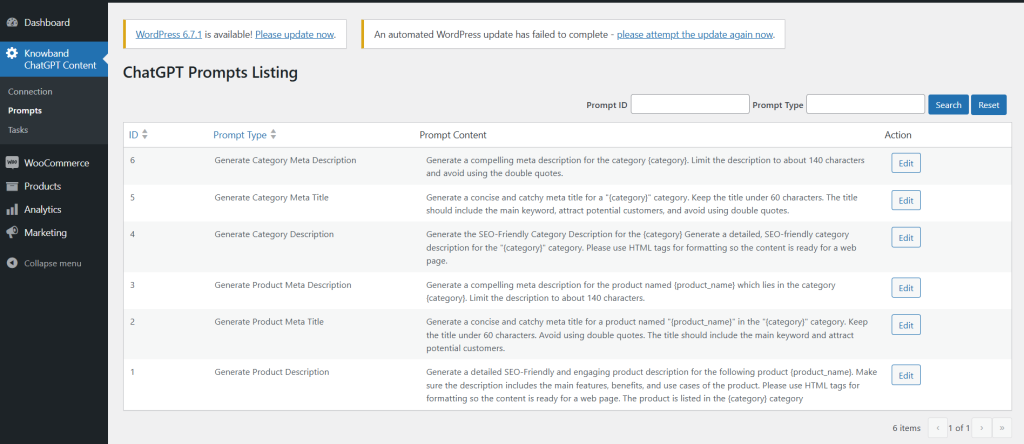
Generate Category Meta Description: Generate a compelling meta description for the category {category}. Limit the description to about 140 characters and avoid using the double quotes.

Generate Category Meta Title: Generate a concise and catchy meta title for a “{category}” category. Keep the title under 60 characters. The title should include the main keyword, attract potential customers, and avoid using double quotes.

Generate Category Description: Generate the SEO-Friendly Category Description for the {category} Generate a detailed, SEO-friendly category description for the “{category}” category. Please use HTML tags for formatting so the content is ready for a web page.

Generate Product Meta Description: Generate a compelling meta description for the product named {product_name} which lies in the category {category}. Limit the description to about 140 characters.

Generate Product Meta Title: Generate a concise and catchy meta title for a product named “{product_name}” in the “{category}” category. Keep the title under 60 characters. Avoid using double quotes. The title should include the main keyword and attract potential customers.

Generate Product Description: Generate a detailed SEO-Friendly and engaging product description for the following product {product_name}. Make sure the description includes the main features, benefits, and use cases of the product. Please use HTML tags for formatting so the content is ready for a web page. The product is listed in the {category} category.

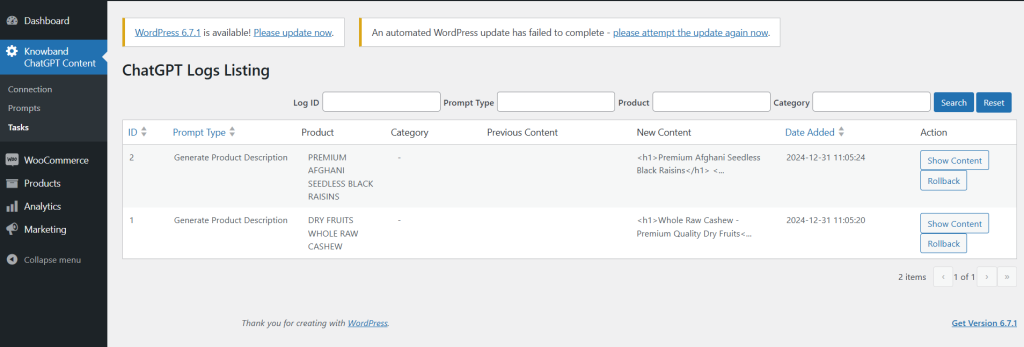
3. ChatGPT Logs Listing

This tab provides the admin with a comprehensive overview of completed tasks. It displays details such as the executed prompt type, product name, product category, previous content, and the newly generated content.

Additionally, the store admin can filter the data using criteria like Filter ID, Prompt Type, and Product Name for easy navigation and organization.

How to Use ChatGPT Prompts

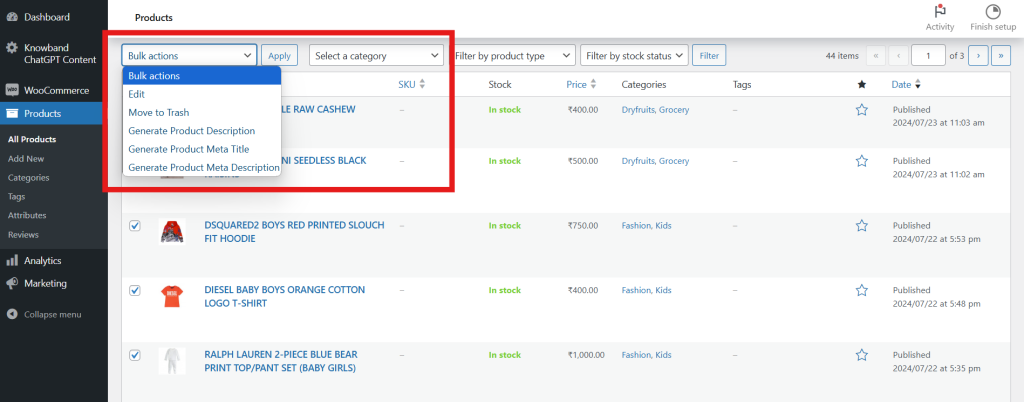
Store administrators can easily utilize ChatGPT prompts by following these steps:

  1. Navigate to Catalog → Products in the admin panel.
  2. Select the desired products from the list.
  3. Access the Bulk Actions tab.
  4. Choose the appropriate prompts to perform actions on the selected products.

This streamlined process enables admins to efficiently generate content for multiple products at once, saving time and effort.

Opencart ChatGPT Content Generator | Opencart AI Translator Extension – User Manual

The Opencart ChatGPT Content Generator/Translator Plugin introduces a cutting-edge solution to simplify content management for your Opencart store. Utilizing advanced AI technology, this innovative plugin makes content creation and translation effortless, positioning itself as an essential tool for modern eCommerce businesses. Furthermore, with the Opencart ChatGPT Content Generator, you can craft captivating product and category descriptions, compelling product and category titles, and SEO-optimized content that enhances both your store’s visibility and customer satisfaction.

This AI-driven content generator goes beyond basic text generation by integrating seamlessly with Opencart, offering translation feature. The built-in Opencart ChatGPT Content Translator empowers store owners to enter new markets with contextually accurate, AI-powered translations.

Whether you’re managing multilingual content or aiming to enhance your overall content strategy, the Opencart ChatGPT Content Generator streamlines the process. Thus, combining ChatGPT Engines 3.5 and 4.0, this plugin helps merchants save time while delivering exceptional, multilingual content to elevate their online stores.

1.0 Key Features of Knowband’s Opencart ChatGPT Content Generator/Translator Plugin

  • Effortless Content Creation: Quickly generate high-quality product titles, detailed descriptions, and optimized meta tags with ease, all while ensuring consistency across your store while saving valuable time.
  • Dual AI Engine Support: Powered by ChatGPT models 3.5 and 4.0, the plugin provides advanced content generation and accurate translations tailored to diverse business requirements for products in bulk.
  • SEO-Optimized Output: Leverage AI to produce SEO-friendly content that boosts your store’s search engine rankings and drives increased traffic.
  • Simplified AI Translation: Effortlessly translate store content into multiple languages with this AI-powered translation tool, enabling global expansion with minimal effort.
  • User-Friendly Interface: Designed for store admins of no technical skills, the plugin features a straightforward setup process for seamless integration.
  • Category and Meta Tags Management: Efficiently generate and translate category names and meta descriptions for a polished, professional presentation.
  • Bulk Content Generation: Ideal for stores with large catalogs, the plugin allows batch processing of multiple items, significantly enhancing efficiency.
  • Enhanced Store Operations: Streamline content-related tasks for smoother product updates and improved operational performance, whether for small or large-scale businesses.
  • Multi-Language Compatibility: Supporting all languages, including RTL scripts, the plugin offers flexibility for global businesses.

2.0 Setting Up the ChatGPT Key for Your Plugin

To activate ChatGPT functionalities in your Opencart plugin, follow these steps to configure the API key:

Step 1: Generate an API Key

  1. Visit the OpenAI API Key Generation page.
  2. Log in to your OpenAI account or create one if you haven’t already.
  3. Click on “Create new secret key” to generate a unique API key.

Copy and securely save this key, as it will only be displayed once.

Important: Ensure Billing is Active

To avoid interruptions, confirm your OpenAI account has sufficient credits:

  1. Go to the OpenAI Billing Overview page.
  2. Check your balance and add funds if needed.
  3. Note that insufficient balance may cause API requests to fail.

With the API key in place and billing verified, your Opencart ChatGPT plugin will be ready to deliver exceptional content generation and translation capabilities for your store.

3.0 Installation Guide

Setting up the Opencart ChatGPT Plugin is straightforward. Follow the simple steps outlined below to complete the installation process with ease.

When you purchase the Knowband ChatGPT Content Generator/Translator Plugin, you will receive the following files:

  • A zipped file containing the source code for the Opencart ChatGPT Content Translator Extension.
  • A user manual for the extension to assist you further.

Steps to Install the Extension:

1. Unzip the Downloaded File:

Locate the zipped file in your account under My Account > Downloads and extract it. Once unzipped, you’ll see folders similar to those shown in the illustration below:

2. Transfer Files to the Root Directory

Use an FTP manager to copy all the files and folders from the unzipped folder to the root directory of your Opencart setup.

3. Complete the Installation

The module is now successfully installed and ready for configuration.

4. Access and Configure the Extension

Navigate to the Admin Panel > Main Menu > Extensions as displayed below:

Select the AI Content Generator Plugin by Knowband extension from the list of available extensions and click on the Edit button to begin customization.

4.0 Admin Panel Overview:

The module is equipped with an intuitive admin dashboard, enabling store administrators to manage it seamlessly, even without technical expertise.

1. General Settings Tab

Activate/Deactivate the Module: A simple toggle button lets the store admin enable or disable the module as needed.

API Key for ChatGPT Integration: Enter your ChatGPT API key to ensure the module functions smoothly. Refer to the steps above for generating the API key in just a few steps.

ChatGPT Engine for Content Creation:

The Opencart Content Generator/Translator Plugin Module supports two robust ChatGPT models:

GPT-3.5-turbo: A cost-effective and efficient choice for standard tasks.

GPT-4-turbo: A more advanced model, offering superior accuracy and enhanced contextual understanding.

Select the preferred engine from the dropdown menu.

ChatGPT Engine for Translations: Specify the ChatGPT model to be used for translating content into different languages.

Default Language for Translation/Content Generation: Select the default language for Content Generation and Translation.

Languages to Translate Content: Select the languages to translate the content.

Maximum Tokens: Enter the value of maximum tokens.

 2. ChatGPT Prompts:

1. Generate Product Description:
Create a detailed, SEO-friendly, and engaging description for the product {product_name} in the {category} Highlight key features, benefits, and use cases. Include HTML tags to make the content ready for web publishing.

2. Generate Product Meta Title:
Craft a concise, attention-grabbing meta title for the product {product_name} in the {category} Limit it to 60 characters, avoid double quotes, and incorporate the primary keyword to attract customers.

3. Generate Product Meta Description:
Write a compelling meta description for {product_name} in the {category} category, keeping it under 140 characters.

4. Translate Product Title:
Translate the provided product title, ensuring that only the translated content is returned.

5. Translate Product Description:
Translate the given product description while maintaining the HTML structure. Translate only the visible text and return the translated content.

6. Translate Product Meta Title:
Translate the provided product meta title, returning only the translated text.

7. Translate Product Meta Description:
Translate the specified product meta description, ensuring only the translated content is returned.

8. Generate Category Description:
Create an SEO-friendly description for the {category} The output should be detailed, formatted with HTML tags, and ready for a web page.

9. Generate Category Meta Title:
Develop a concise meta title for the {category} Limit it to 60 characters, include the main keyword, and make it appealing to potential customers while avoiding double quotes.

10. Generate Category Meta Description:
Write a compelling meta description for the {category} category, keeping it under 140 characters and avoiding double quotes.

11. Translate Category Title:
Translate the given category title, returning only the translated content.

12. Translate Category Description:
Translate the specified category description while preserving its HTML tags and structure. Only the visible text should be translated, and the translated content must be returned.

13. Translate Category Meta Title:
Translate the provided category meta title and return only the translated text.

14. Translate Category Meta Description:
Translate the given category meta description, ensuring that only the translated content is provided.

3.0 Task Log:

The following tab provide the admin with the data of performed tasks. You can find all the details including executed prompt type, product name, product category, language, previous content, and new content.

Also Available for Prestashop eCommerce Platform

SHOP NOW

The store admin also gets the option to filter out the data by filter ID, Prompt Type, and Product Name.  

5.0 How to Use ChatGPT Prompts?

To utilize the ChatGPT prompts, store administrators can navigate to Catalog >> Products within the admin panel.

Executing Prompts with the Opencart AI Content Generator

  1. Select the desired products from the list.
  2. Access the Bulk Actions tab, as shown in the image above.
  3. Choose the appropriate prompts to perform the required actions on the selected products.

This streamlined process allows admins to efficiently generate or translate content for multiple products in one go.

GA4 & GTM Events for WooCommerce: Unlock Advanced Tracking with Ease

In today’s competitive eCommerce landscape, data-driven decision-making is key to success. For WooCommerce store owners, understanding customer behavior is critical to optimizing sales and improving marketing strategies. With the right tools, tracking advanced eCommerce events can be a breeze. Introducing Knowband WooCommerce Google Tag Manager Module, a solution that simplifies the integration of GTM and GA4, allowing store owners to unlock the full potential of their analytics.

Why Use Google Tag Manager for WooCommerce?

Google Tag Manager for WooCommerce enables you to manage tags and track events without touching your website’s code. With the WooCommerce GTM Module, you can seamlessly implement and track events like page views, add-to-cart actions, purchases, and more.

Thus, integrating GA4 with your WooCommerce store through the WooCommerce GA4 Integration Module provides deeper insights into user behavior. This data allows you to make informed decisions, create targeted campaigns, and improve your store’s overall performance.

Key Benefits of Using the WooCommerce GTM Extension!

Streamlined Tag Management:

The WooCommerce Google Marketing Integration Plugin simplifies the implementation of tracking tags for your store. Moreover, you can easily manage all your tags from a single GTM interface, saving time and effort.

Advanced Event Tracking:

The Custom Event Tracking WooCommerce Plugin enables you to track specific customer interactions, such as product views, clicks, and purchases. This level of detail helps you understand the customer journey and optimize your sales funnel.

Enhanced Marketing Integrations:

With the WooCommerce Google Marketing Integration, you can connect your store with essential Google tools like GA4, gtag, and Ads. 

Accurate eCommerce Data:

The WooCommerce GA4 eCommerce Events feature allows you to collect accurate data about sales, revenue, and customer behavior. This data is invaluable for improving your store’s performance.

Ease of Use:

The WooCommerce Google Analytics Integration Plugin is designed with user-friendliness in mind. Thus, even if you’re not a tech expert, you can set up and manage the integration with minimal effort.

How the WooCommerce Google Tag Manager Module Works?

The WooCommerce Google Tag Manager Module acts as a bridge between your store and Google’s analytics tools. It allows you to:

  • Add and manage Google Tag Manager snippets to your WooCommerce store.
  • Configure GA4 tracking and events without coding.
  • Track key eCommerce actions such as purchases, cart updates, and product views.
  • Monitor custom events specific to your store’s requirements using the WooCommerce Google Event Tracker Plugin.

Once integrated, the WooCommerce GTM Extension ensures that all tracking data is sent to Google Analytics 4 in real-time. Furthermore, this seamless process eliminates the need for manual tracking setups and reduces errors.

Key Features of the WooCommerce GA4 Integration Addon!

The WooCommerce GA4 Integration Addon comes with several features designed to meet the unique needs of WooCommerce store owners:

Pre-configured Events: Automatically track essential events like product impressions, clicks, and transactions.

Customizable Tracking: Use the WooCommerce gtag Integration Plugin to create custom event tracking tailored to your business goals.

Real-time Analytics: Access real-time data for a comprehensive understanding of user behavior.

eCommerce Reporting: The WooCommerce eCommerce Measure Module provides detailed reports on sales performance, revenue, and conversions.

Multi-platform Integration: Works seamlessly with other Google tools, ensuring your marketing efforts are cohesive and effective.

Integrate Advanced Analytics to Your Store

SHOP NOW

Why Choose the WooCommerce GA4 Integration Plugin?

The WooCommerce GA4 Integration Plugin is a game-changer for eCommerce businesses. By leveraging the power of WooCommerce Google Analytics Integration, store owners can gain a deeper understanding of their customers.
Here’s why this plugin is a must-have:

  • It automates complex tracking processes.
  • It provides accurate insights into customer behavior.
  • It empowers you to create data-driven marketing strategies.
  • It helps you optimize your sales funnel based on real-time data.

Setting Up the WooCommerce gtag Integration Extension!

Getting started with the WooCommerce gtag Integrator is quick and easy:

Install the Plugin: Download and install the WooCommerce gtag Integration Extension from the plugin repository or your provider.

Connect to Google Tag Manager: Link your GTM account to the plugin.

Enable GA4 Tracking: Set up the WooCommerce GA4 Integration Module to track key events.

Customize Events: Use the plugin’s features to track custom events for your store.

Monitor Results: Access detailed analytics in GA4 to monitor performance and make data-driven decisions.

Conclusion!

The GA4 & GTM Events for WooCommerce integration is essential for any store owner looking to optimize their analytics and enhance their marketing efforts. Therefore, by using the WooCommerce Google Tag Manager Module, you can easily track advanced eCommerce events, gain valuable insights, and drive growth.

Whether you’re a small business owner or managing a large-scale eCommerce platform, the WooCommerce Google Analytics Integration Extension empowers you to unlock the full potential of your store’s data. Don’t let valuable insights go untapped—invest in the WooCommerce GTM Module today and take your analytics to the next level.

How to Setup SEO-Friendly URLs for your PrestaShop Store – A Comprehensive Guide

PrestaShop is a powerful eCommerce platform that enables businesses to create and manage online stores efficiently. One crucial aspect of running a successful online store is ensuring your website is optimized for search engines. A significant part of SEO (Search Engine Optimization) is creating clean, descriptive, and user-friendly URLs. In this guide, we’ll explore the steps to set up SEO-friendly URLs for your PrestaShop store.

Why Are SEO-Friendly URLs Important?

SEO-friendly URLs are crucial for improving visibility on search engines and enhancing user experience:

  • Improved Rankings: Search engines rely on URLs to interpret a page’s content. You can boost your search rankings by adding more descriptive URLs with relevant keywords
  • User Experience: Clean and readable URLs help users understand what to expect on a page.
  • Increased Click-Through Rates: Well-structured URLs encourage users to click on your links in search results.

Steps to Create SEO-Friendly URLs in PrestaShop

1. Enable Friendly URLs in PrestaShop

PrestaShop includes a built-in feature to generate friendly URLs. Follow these steps to enable it:
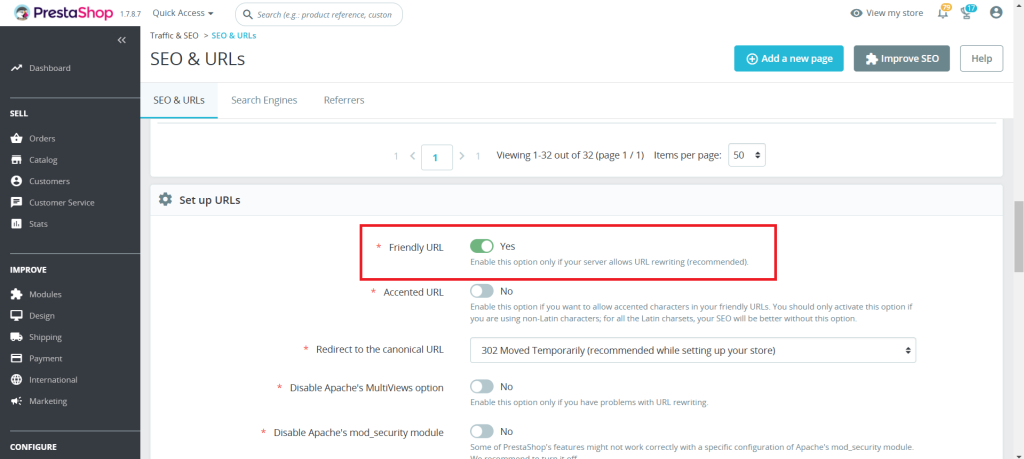
Log in to your PrestaShop Admin Panel.

Navigate to Shop Parameters > Traffic & SEO.

Scroll down to the Set Up URLs section.

Toggle the Friendly URL option to “Yes.”

Click Save.

2. Configure URL Settings

1. In the same Traffic & SEO page, you can configure:

  • Accented URL: Decide if your URLs should include special characters.
  • Redirect to the Canonical URL: Enable this to avoid duplicate content issues.

2. Customize the Base URLs for your store’s language preferences if you run a multilingual store.

3. Optimize Individual Product URLs

PrestaShop allows you to manually edit URLs for products, categories, CMS pages, and more. Below are the steps showing how to make the Product URLs SEO-Friendly:

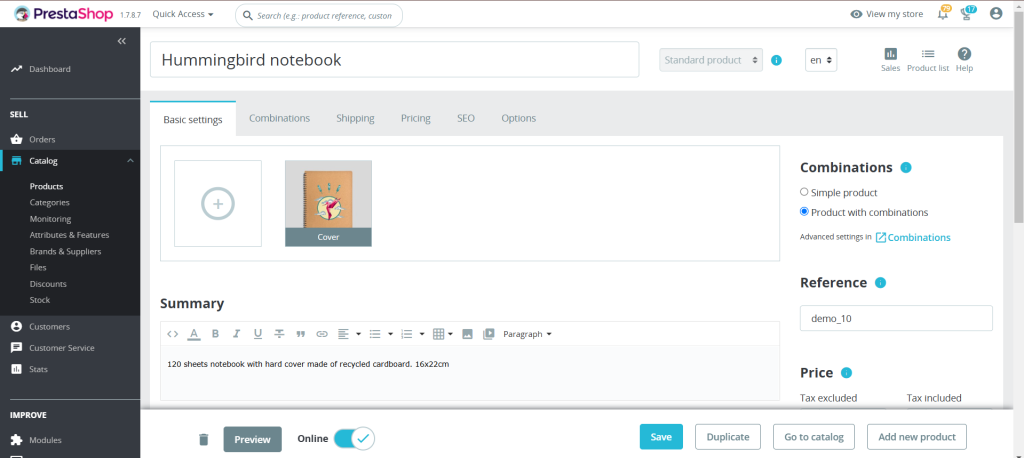
1. In the Admin panel, Open Catalog > Products:

2. Select the product you want to edit.

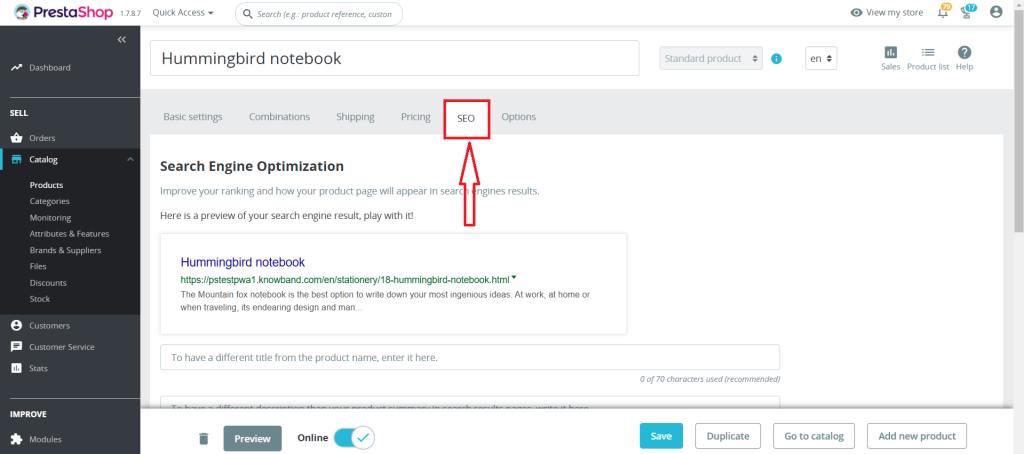
3. Navigate to the SEO tab.

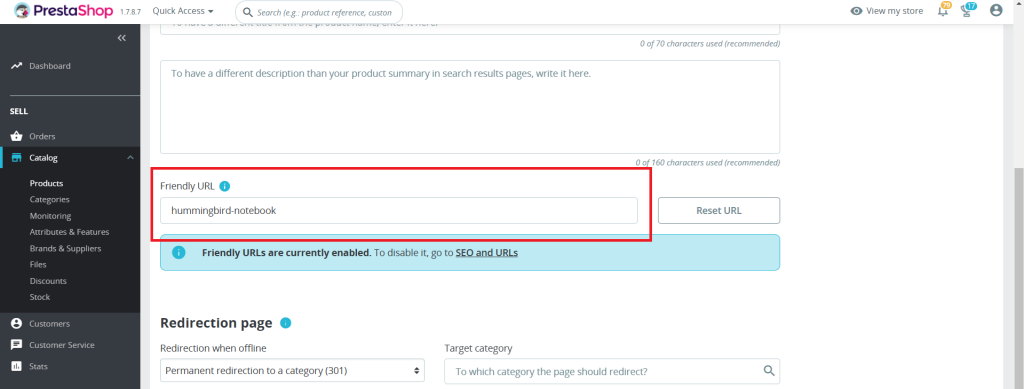
4. Optimize the Friendly URL field by using a concise, keyword-rich URL.

For example:
Instead of the product?id=123, use handmade-ceramic-mug.

5. Save your changes.

Add Clean URLs & 301/302/303 redirection

SHOP NOW

4. Use Keywords Strategically

When crafting your URLs:

  • Include primary keywords related to the page’s content.
  • Avoid stuffing URLs with unnecessary words or repetitive terms.
  • It is recommended to use hyphens (-) for separating the words instead of underscores (_).

5. Avoid URL Parameters

Dynamic URLs with parameters like ?id=123&ref=456 are harder for search engines and users to understand. Use PrestaShop’s friendly URL feature to replace these with clean, descriptive URLs.

6. Redirect Old URLs to New Ones

Implementing a 301 redirect from the old URL to the new one is an essential step that one should ensure while updating the SEO URLs. This helps maintain SEO rankings and prevents users from encountering 404 errors. Redirects can be managed through your server’s .htaccess file or an SEO module.

7. Test Your URLs

After configuring your URLs:

  • Verify they are working correctly.
  • Use online tools like Google’s URL Inspection Tool to check how search engines view your URLs.
  • Test for broken links and resolve them promptly.

Additional Tips for SEO-Friendly URLs

  • Use Lowercase Letters: URLs are case-sensitive. Stick to lowercase letters for consistency.
  • Avoid Stop Words: Words like “and,” “or,” “the” can be omitted unless necessary for clarity.
  • Limit URL Length: Keep URLs concise while still descriptive.
  • Update Sitemap: After making changes, update your sitemap and submit it to Google Search Console.

Recommended Modules for SEO in PrestaShop

To enhance your SEO efforts, consider using these modules:

Conclusion

SEO-friendly URLs are a cornerstone of an effective eCommerce SEO strategy. By following this guide, you can ensure your PrestaShop store’s URLs are optimized for search engines and user-friendly. Regularly review and update your URLs to maintain their effectiveness as your store grows.

Adopting these practices can significantly improve your website’s visibility on search engines, drive higher volumes of targeted traffic, and ultimately lead to an increase in conversions and overall engagement.
Happy optimizing!

Appendix: Common Issues and Troubleshooting

Friendly URLs Not Working

  • Ensure that your server supports URL rewriting (mod_rewrite for Apache).
  • Verify that the .htaccess file is correctly configured and writable.
  • Check permissions for the /var/www/html/ folder if hosted on a Linux server.

Broken Links after URL Changes

  • Whenever you modify URLs on your website, promptly update your sitemap to reflect these changes and resubmit it to Google Search Console. This ensures that search engines quickly discover, crawl, and index the updated URLs, preserving your site’s visibility and SEO performance.
  • Use a redirect manager module or .htaccess to map old URLs to new ones seamlessly.

3. Multilingual Store Challenges

  • Incorporate language-specific keywords in your URLs to enhance localization.
  • Make sure each language version of your store has a unique URL structure.

4. Duplicate Content Due to Canonical Issues

  • Enable “Redirect to Canonical URL” in Traffic & SEO settings.
  • Review all indexed pages using tools like Screaming Frog to detect duplicates.