
1.0 Introduction
Most customers already have WhatsApp on their phones. They check it more often than email, and they respond faster there, too. For a PrestaShop store, that creates a real opportunity to reach customers where they actually pay attention.
The Knowband PrestaShop WhatsApp CRM Module ties your store directly to the WhatsApp Business API. Order confirmations go out automatically when a purchase is placed. Status change alerts fire when an order ships or is delivered. Your support team chats with customers in real time from the PrestaShop admin. And when you want to run a promotional campaign, you can send an approved marketing template to a segmented contact list on a schedule you control.
This guide walks through every section of the PrestaShop WhatsApp Integration Module. Whether you are setting it up for the first time or trying to configure a specific feature, every tab and field is documented here, from what is visible in the admin panel.
Compatible with PrestaShop 1.7.x through 9.x.
1.1 Who Is This Module For
This module works well for:
- Store owners who want automated WhatsApp order notifications set up without relying on a developer.
- Support staff who need to chat with customers from inside the PrestaShop backend.
- Marketing teams that send WhatsApp promotions to specific customer groups.
- Agencies handling PrestaShop builds for clients who need WhatsApp Business API integration.
2.0 Installation Guide of the PrestaShop WhatsApp CRM Module
2.1 System Requirements
- PrestaShop 1.7.x, 8.x, or 9.x
- A WhatsApp Business Account that is active
- A phone number registered as a WhatsApp Business number
- A Meta Developer App with WhatsApp Business API access configured
2.2 Installing the PrestaShop WhatsApp Module
- Open your PrestaShop admin panel. Head to Modules, then Module Manager, and hit Upload a Module at the top right.
- Pick the ZIP file you got from Knowband and click Open. PrestaShop takes it from there, uploads the file, and extracts everything automatically.
- Once the upload is done, hit Install when it appears. After that finishes, click Configure to get into the module settings.
- If the module does not show up on its own, type Knowband WhatsApp CRM into the Module Manager search bar and hit Configure from there.
2.3 Common Installation Issues
Upload fails: Your server’s PHP upload limit is probably too low. Ask your host to bump upload_max_filesize and post_max_size to at least 32 MB.
Module not visible after install: Clear the PrestaShop cache under Advanced Parameters, then Performance. Run the Module Manager search again.
Configuration page looks broken: Clear your browser cache and the theme cache under Design, Theme and Logo, then Advanced Settings.
3.0 Admin Panel Overview of the PrestaShop WhatsApp CRM Module
Once the PrestaShop WhatsApp Integration Module is installed, a dedicated menu section appears in your PrestaShop admin sidebar. Here is what each tab does:
- Module/API Settings: Where you enter your WhatsApp Business API credentials.
- Order Settings: Controls which WhatsApp order notifications fire and when.
- Message Templates: Where you build and submit templates for WhatsApp approval.
- Order Status Templates: Maps each order status to the template that gets sent.
- CRM: The live chat panel for two-way messaging with customers.
- Promotions: Runs scheduled campaigns to contact lists.
- WhatsApp Lists: Named groups of contacts used as campaign targets.
- WhatsApp Contacts: Full contact database with import and export options.
- Chatbox Settings: Controls the floating WhatsApp icon shown on your storefront.
- WhatsApp Agents: The support agents shown inside the storefront chat pop-up.
- Message Logs: A record of every message sent and received through the PrestaShop WhatsApp Module.
4.0 Module/API Settings
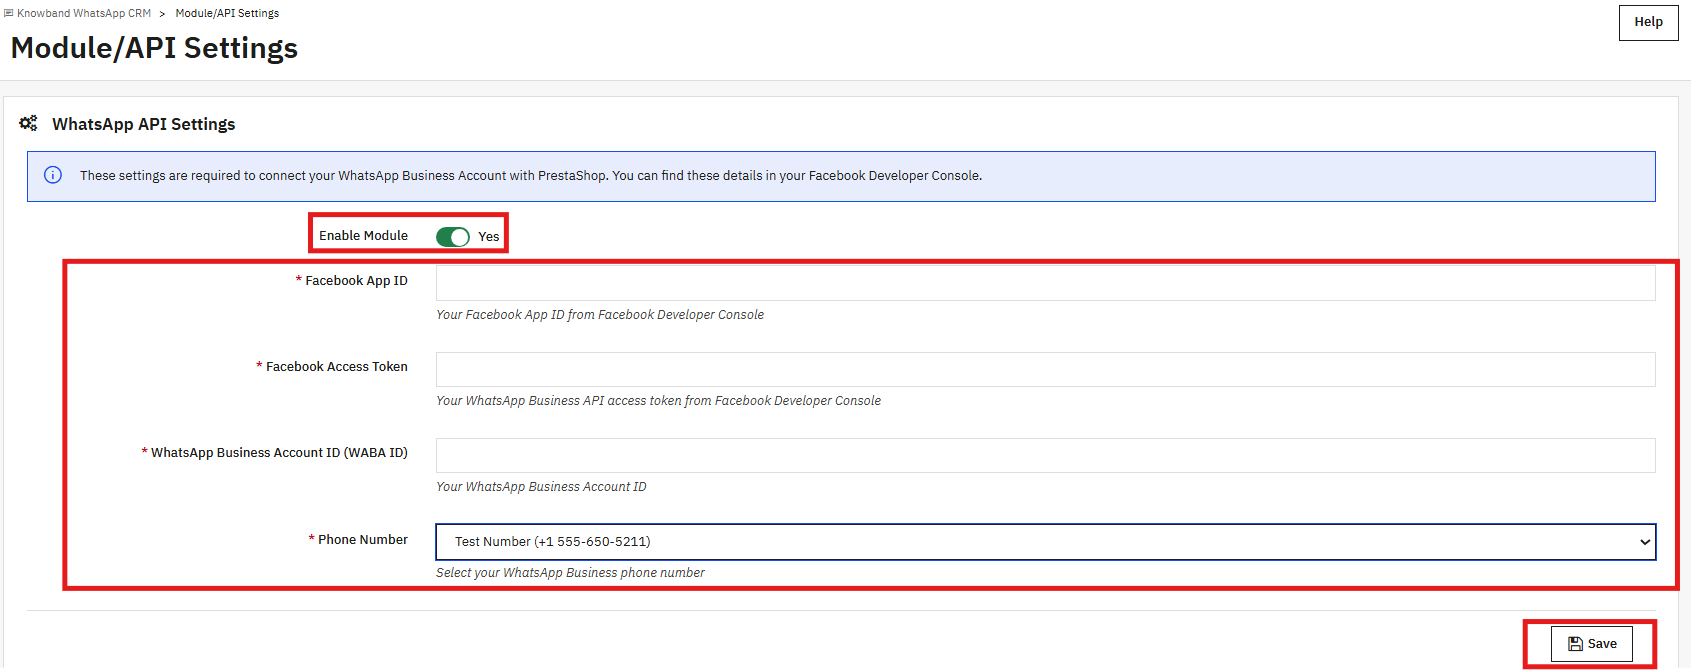
Start here. Before anything else in the PrestaShop WhatsApp CRM Module works, you need to connect it to the WhatsApp Business API. There are four fields, and all four are required.
4.1 WhatsApp API Settings
Enable Module: The on/off switch for the whole module. Switch it off, and no messages go out; the chatbox disappears from the storefront.
Facebook App ID: Copy this from your Meta Developer Console. It tells the API which app is making the connection.
Facebook Access Token: This has to be a permanent token, not the temporary one shown during API Setup. To get a permanent token, go to Meta Business Settings, create a System User, assign your app and WABA with full control, and generate a token using these permissions: whatsapp_business_messaging, whatsapp_business_management, and business_management. Paste that token here.
WhatsApp Business Account ID (WABA ID): Found in the Meta Developer Console under your app’s WhatsApp configuration. This is the account ID for your WhatsApp Business Account.
Phone Number: Pick your registered WhatsApp Business number from the dropdown. Every automated and manual message goes out from this number.
Fill all four fields and click Save. Wrong or missing values show a validation error right away. An expired or invalid access token also triggers an error on save.
4.2 Webhook Setup
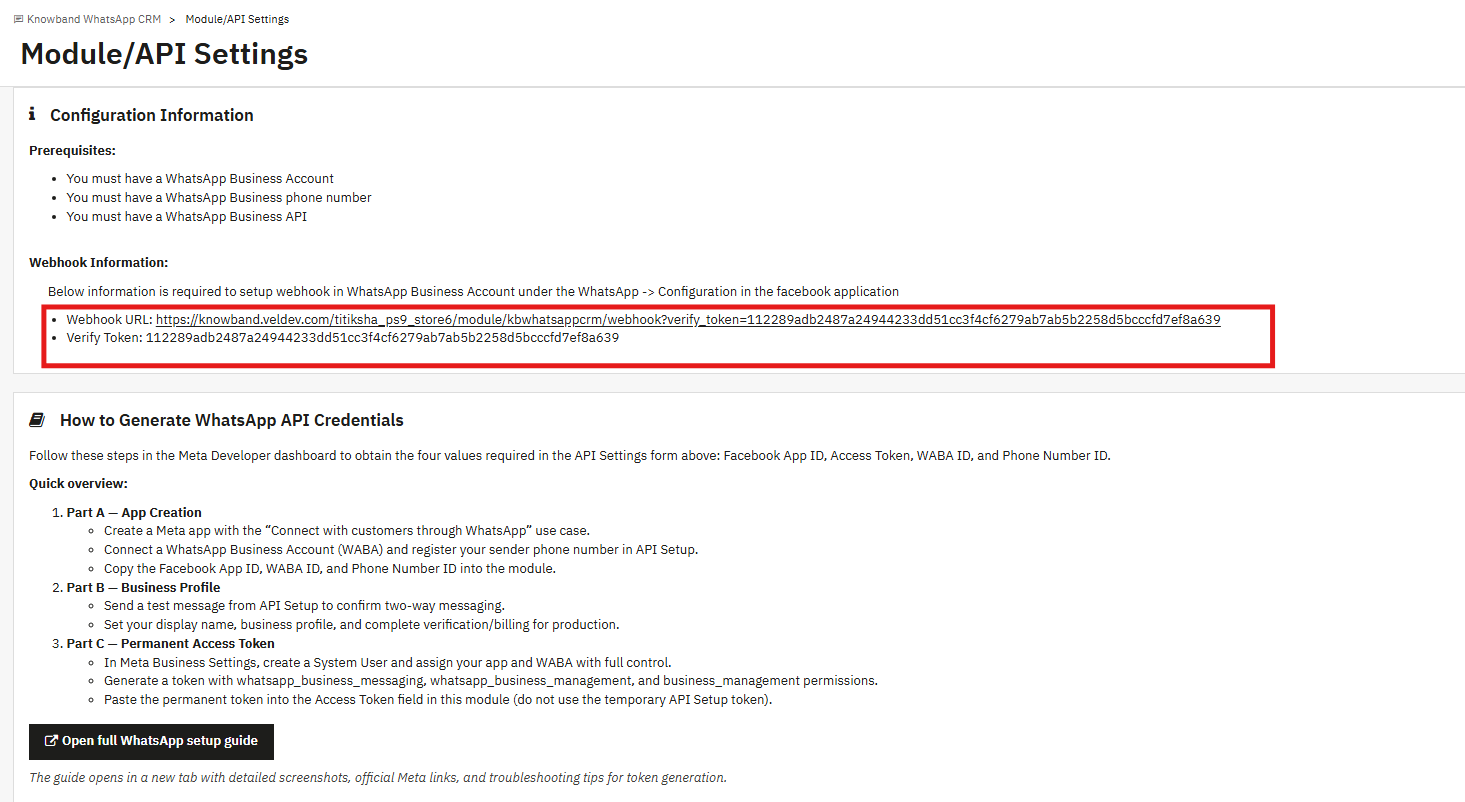
Scroll below the API form, and you will see the Configuration Information panel. It shows two things: a Webhook URL and a Verify Token, both specific to your store.
Take these over to the Meta Developer Console. Open your app, go to WhatsApp, then Configuration, and paste them into the webhook fields there. Once that is done, the module can receive inbound messages and pick up template approval status changes without you manually refreshing anything.
If you have not set up the webhook yet, you can still check template statuses by going to Message Templates and clicking Sync Templates. That pulls the latest approval data directly from WhatsApp.
5.0 Order Settings
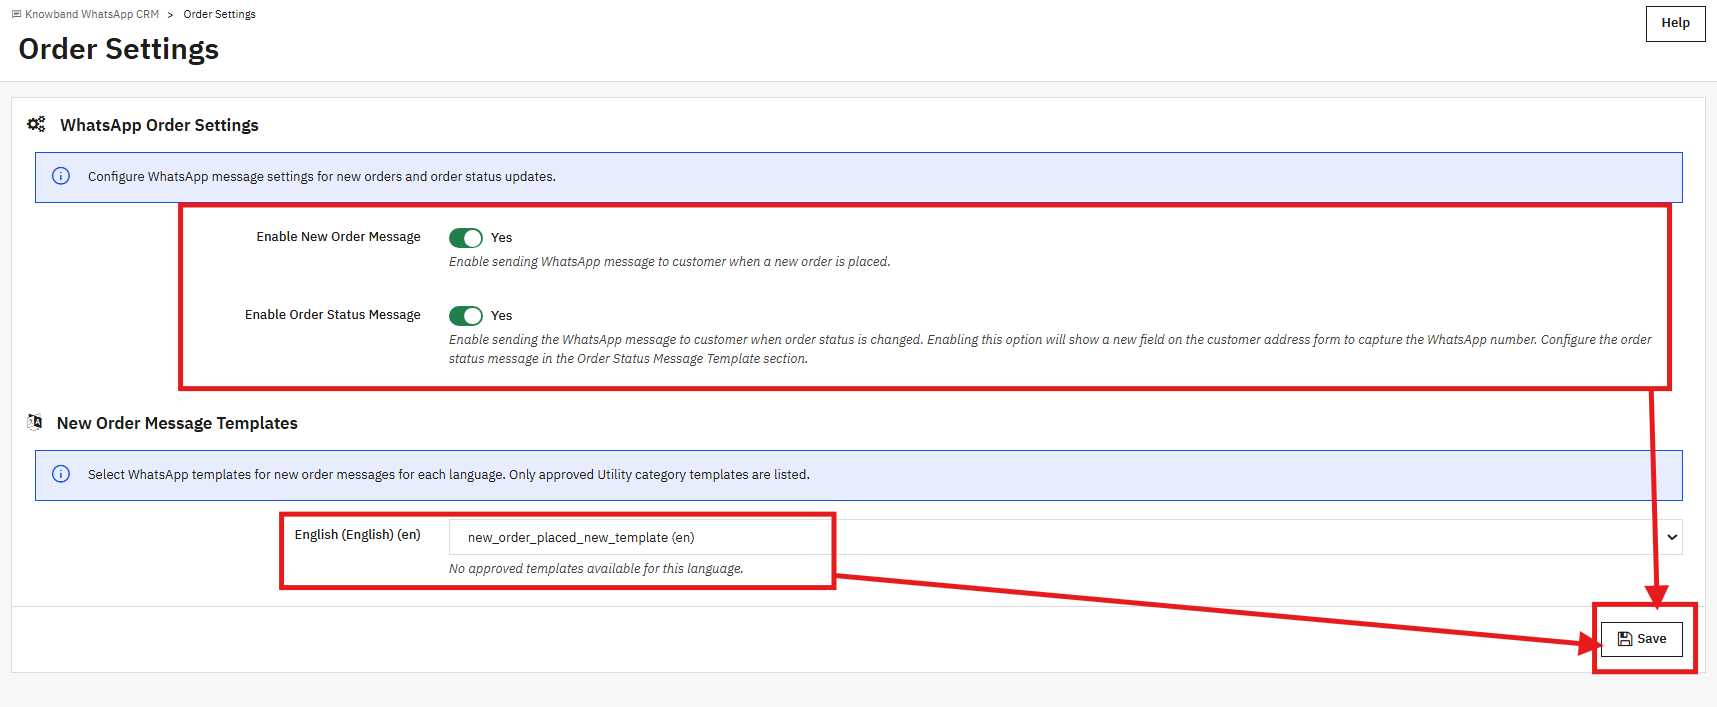
This tab is where you decide when the PrestaShop WhatsApp CRM Module sends automated messages during the order process.
5.1 WhatsApp Order Settings
Enable New Order Message: Turn this on, and the PrestaShop WhatsApp Messenger sends a WhatsApp message to the customer every time a new order is placed on your store.
Enable Order Status Message: Turn this on, and customers get a WhatsApp alert each time their order status changes. A WhatsApp number field also appears on the customer address form so people can add the number where they want updates delivered.
5.2 New Order Message Templates
For each language your store runs, pick the approved Utility template you want to send when an order comes in. The dropdown only shows templates that are categorised as Utility and have been approved by WhatsApp.
Nothing in the dropdown? Either your templates are still waiting on WhatsApp review, or they are in the Marketing category instead of Utility. Build a Utility template in the Message Templates tab, wait for the approval, then come back here. Click Save once you have made your selections.
6.0 Message Templates
This is where WhatsApp message templates are built and submitted. Every template needs WhatsApp approval before it can be used anywhere in the module. The Knowband PrestaShop WhatsApp CRM Module handles the whole process from submission to tracking inside this tab.
6.1 Templates List
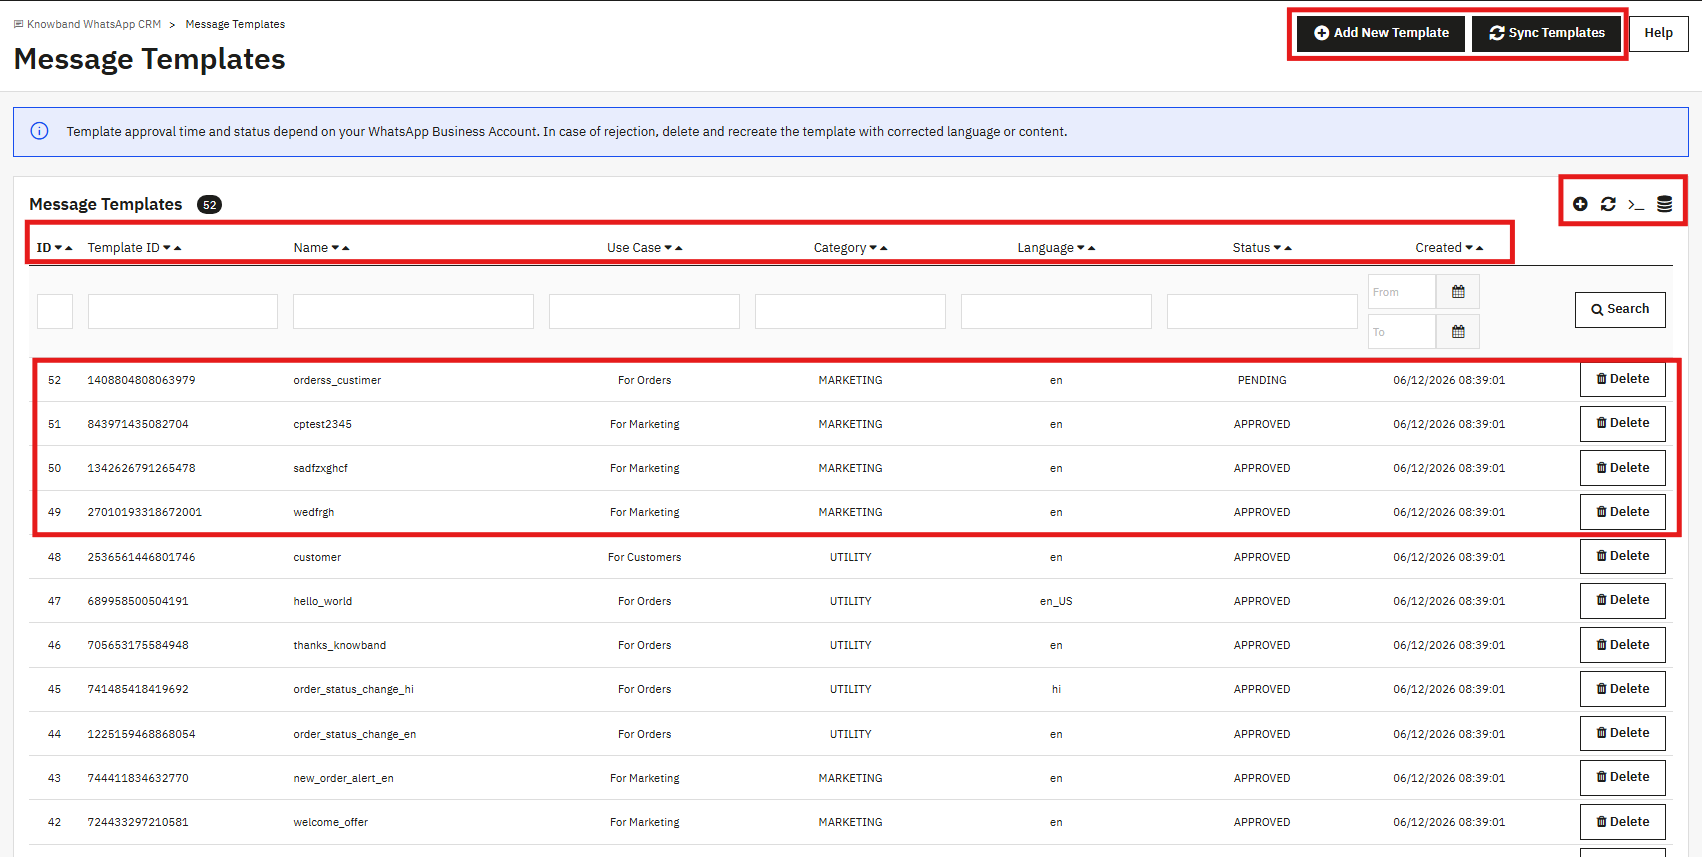
The table shows all templates connected to your WhatsApp Business Account. Each row has: Template ID, Name, Use Case, Category, Language, Status, and the date it was created. A template can be Pending, Approved, or Rejected.
Hit Sync Templates any time you want to refresh the approval status straight from WhatsApp. The search fields let you narrow down by name, category, language, or date range.
6.2 Creating a New Template
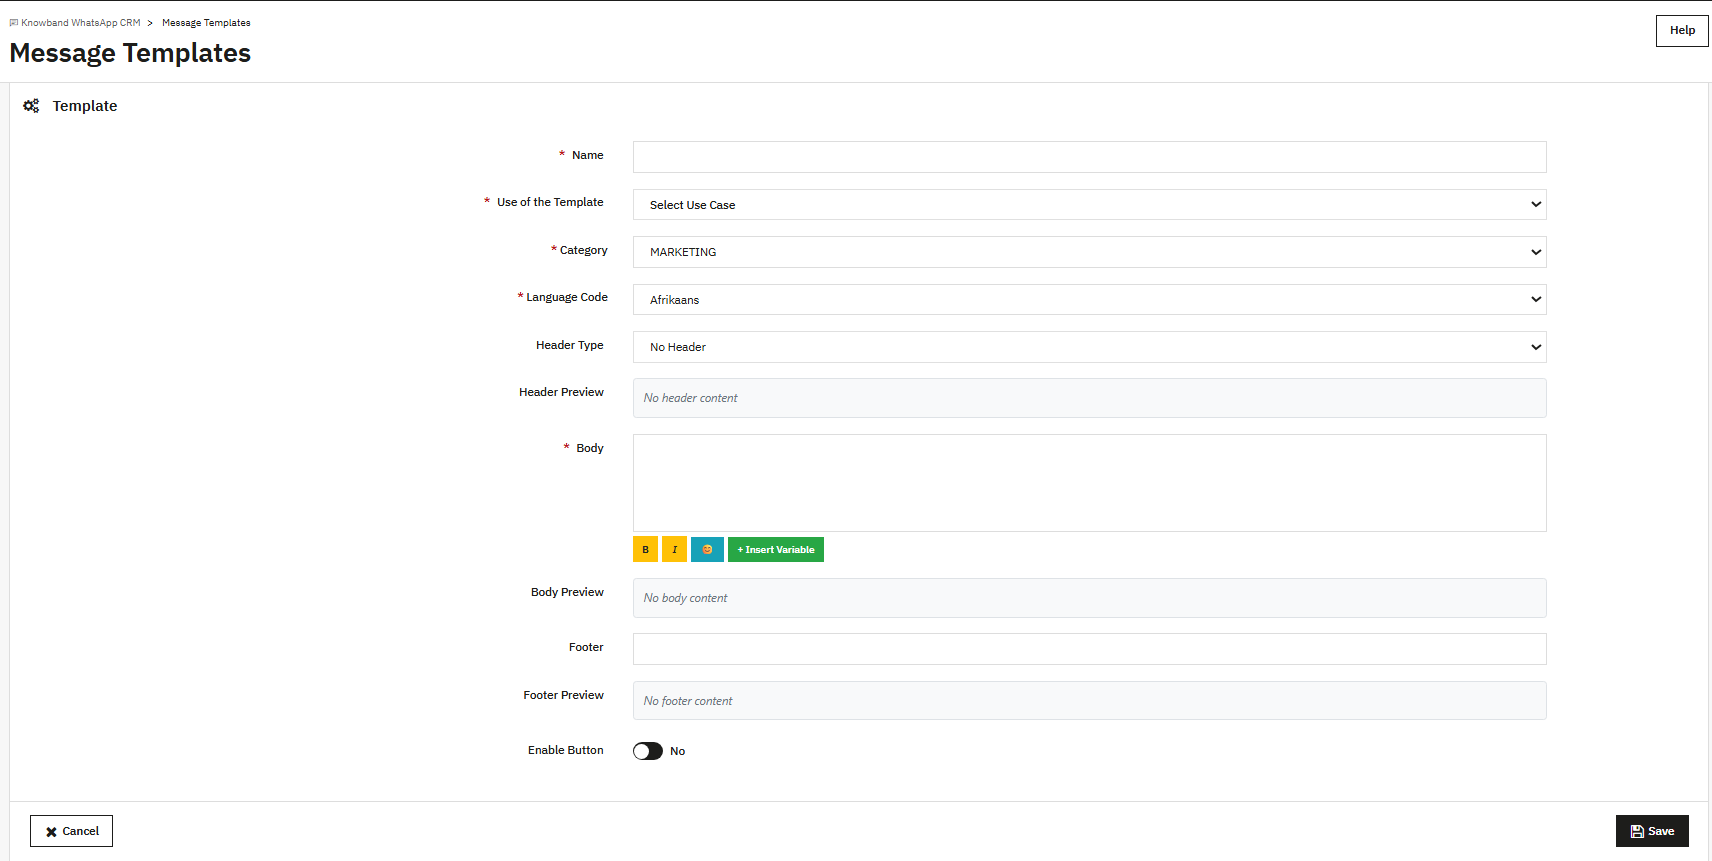
Name: Lowercase, underscores only. No spaces, no special characters.
Use of the Template: Choose For Orders, For Marketing, or For Customers, depending on where this template will be used.
Category: Choose MARKETING or UTILITY. Templates tied to order notifications must be Utility. If the body reads like a promo, WhatsApp may move it to Marketing on its own.
Language Code: Pick the language this template is written in. If your store has multiple languages, build one template per language.
Header Type: Optional field. Leave it as No Header or pick Text, Image, Video, or Document if you want something at the top.
Body: The main text of the message. Bold, italic, and strikethrough formatting is available through the B, I, and strikethrough buttons. Click Insert Variable to pull in things like the customer name, order ID, or order total. The Body Preview below the editor shows how the final message will look.
Footer: Optional. Text that appears below the body is rendered smaller.
Enable Button: Turn this on to add a button to the message. Fill in the Button Text and the Button URL.
Click Save when you are done. WhatsApp receives the template for review. Approvals usually come through within a few minutes, though some templates take a few hours. Once approved, the template is available in Order Settings, Order Status Templates, and the CRM template picker.
7.0 Order Status Templates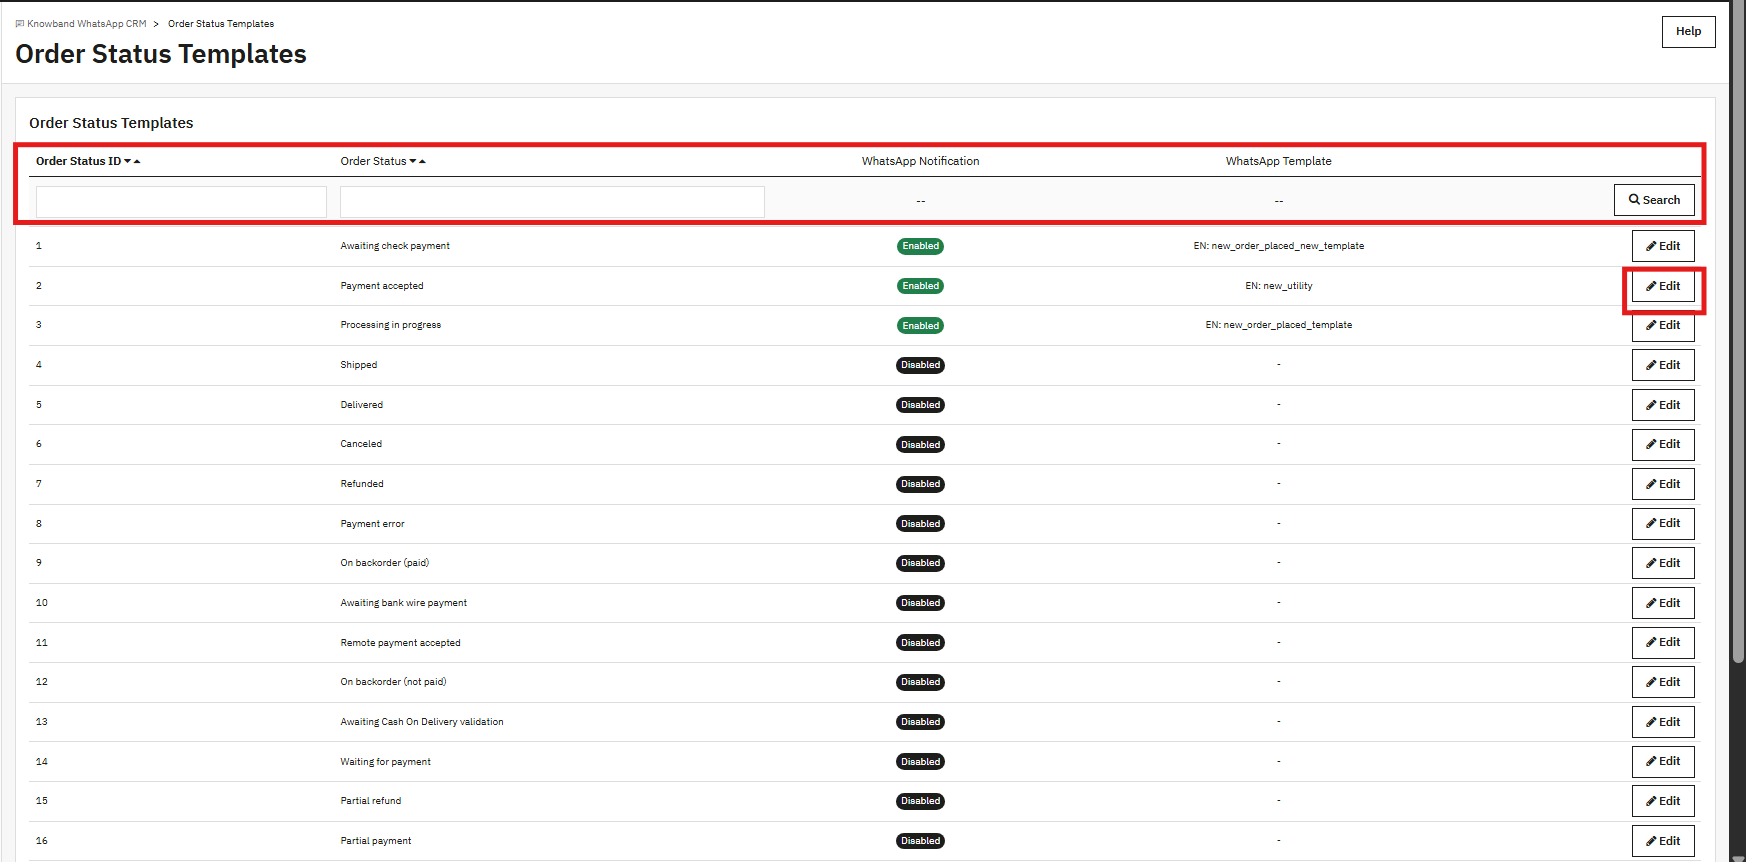
Every order status in PrestaShop can be mapped to a specific Utility template here. When an order reaches a status that has a template assigned, the PrestaShop WhatsApp Messenger sends that template to the customer as a WhatsApp order notification.
The full list of order statuses appears in the table: Awaiting check payment, Payment accepted, Processing in progress, Shipped, Delivered, Canceled, Refunded, and the rest. Each row shows whether notifications are Enabled or Disabled, and which template is currently assigned.
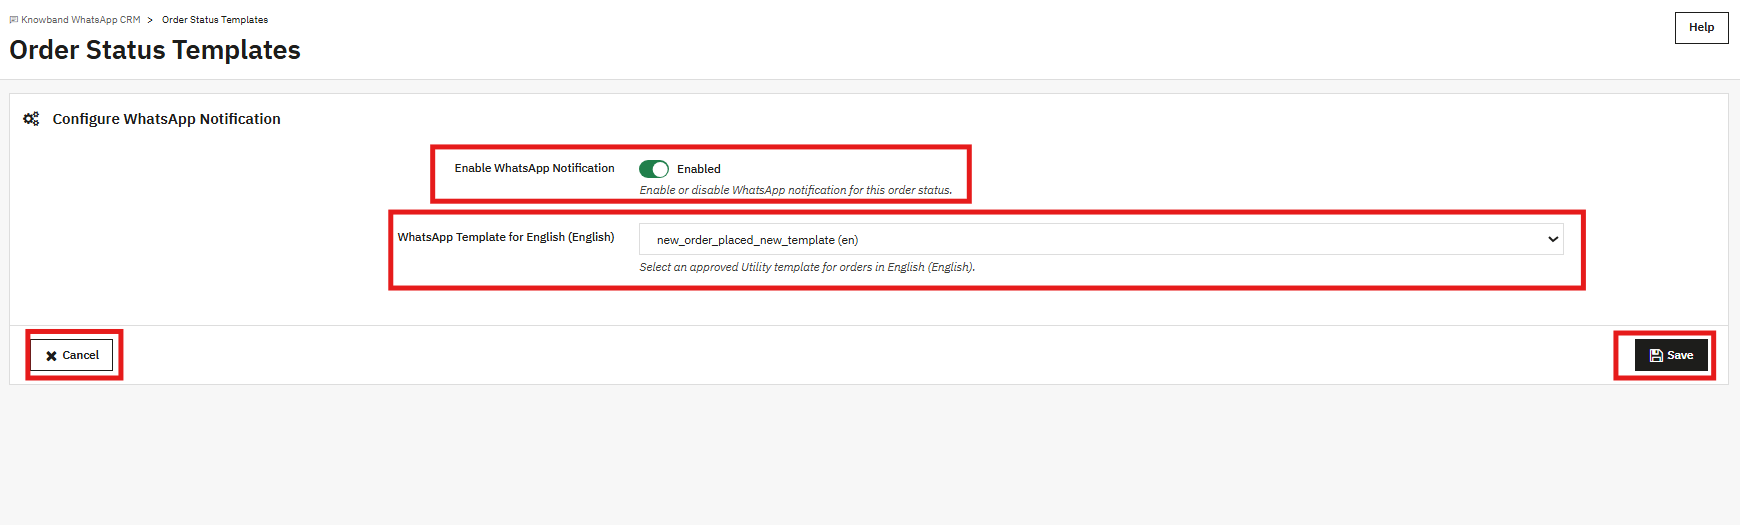
Click Edit on any row. Flip the Enable WhatsApp Notification toggle to Enabled, pick an approved Utility template from the dropdown for each store language, and save. The row updates to reflect the change right away.
8.0 CRM: Live Two-Way Chat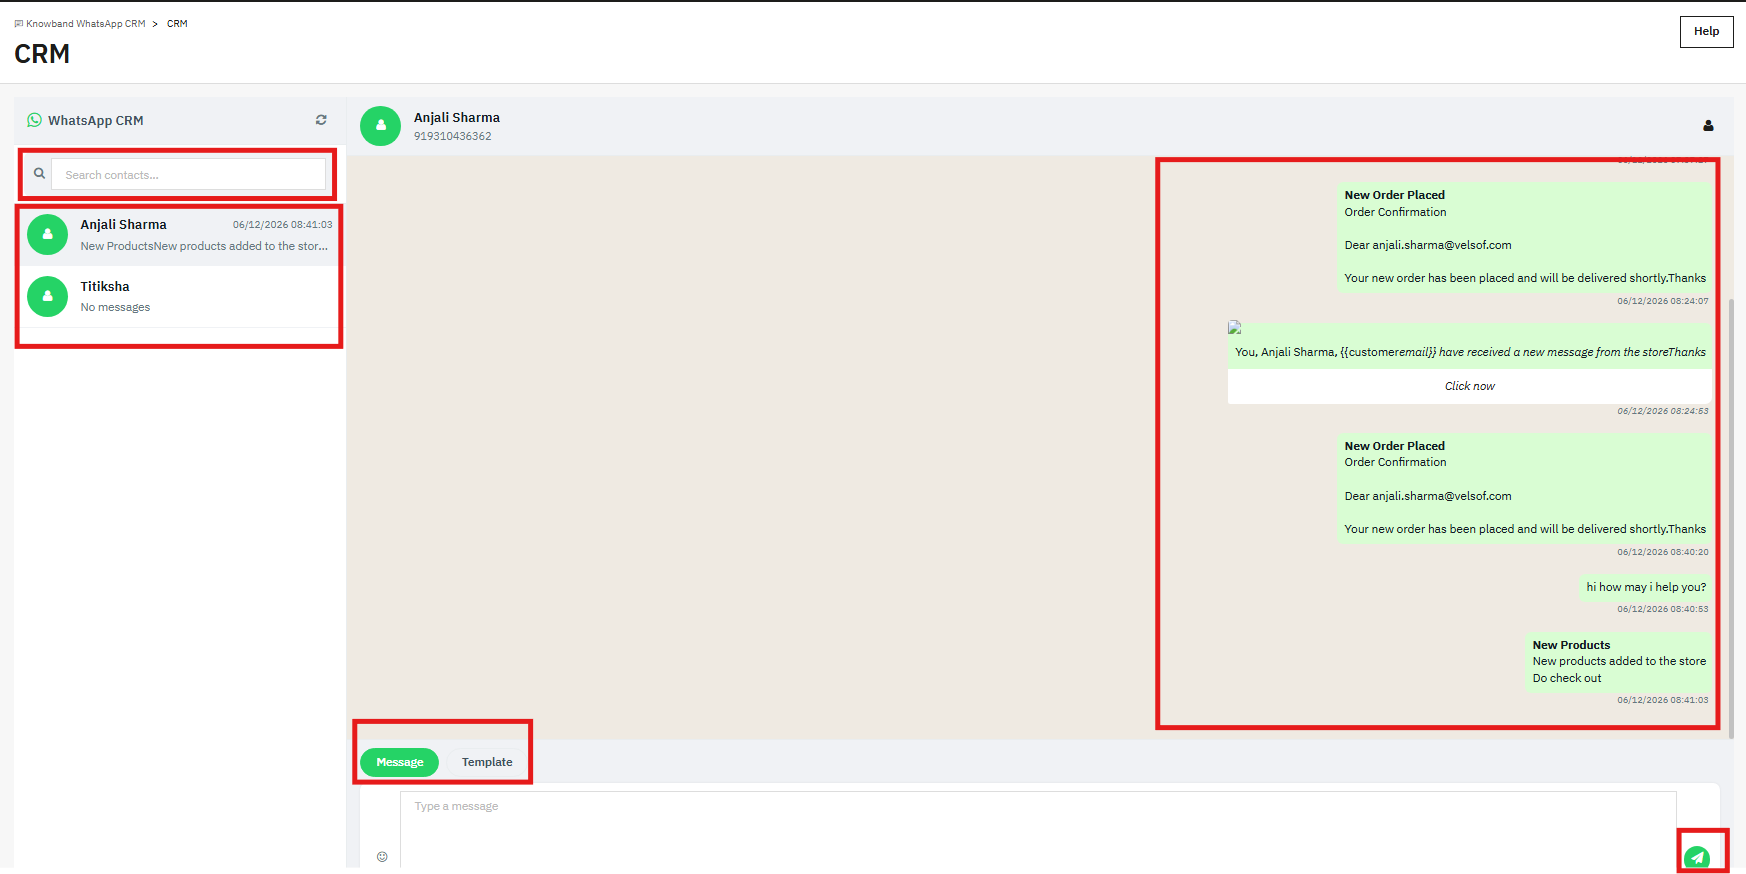
The CRM tab is the messaging center for this PrestaShop WhatsApp chat addon. All your contacts appear in a sidebar on the left. Clicking one opens the full conversation on the right.
At the bottom of the conversation, there are two tabs: Message and Template. The message is for free-text replies, but that only works inside the 24-hour window that opens when a customer sends you something first. Once that window closes, use the Template tab to send an approved marketing template that works at any time.
Every automated order notification the module sends also shows up in the CRM thread. Your support team can see exactly what a customer received and when, which makes it easier to respond in context.
9.0 Promotions
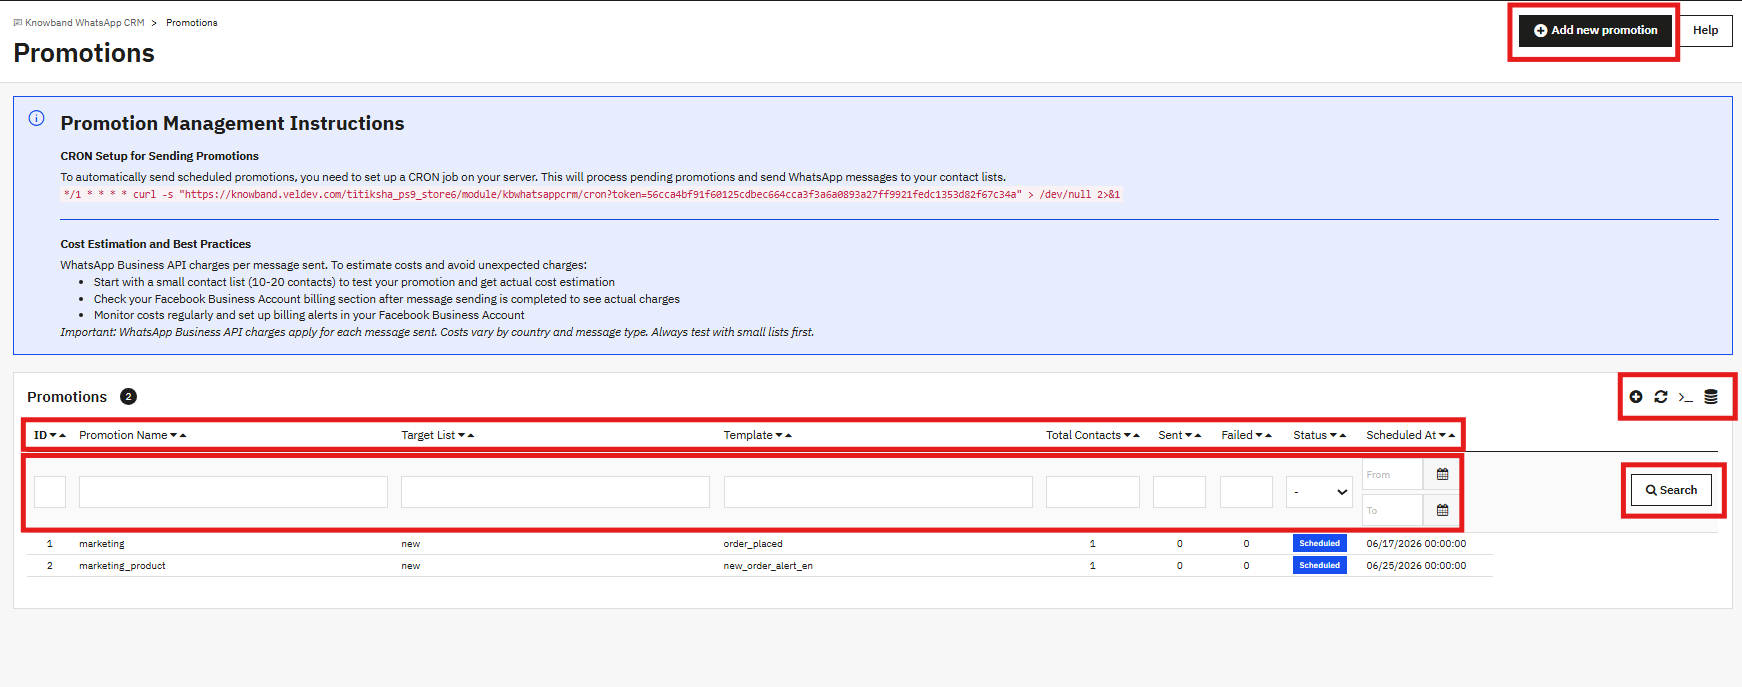
The Promotions tab is where you put together WhatsApp marketing campaigns. Pick a contact list, pick a template, set a time, and the module takes care of sending it.
9.1 Creating a Promotion
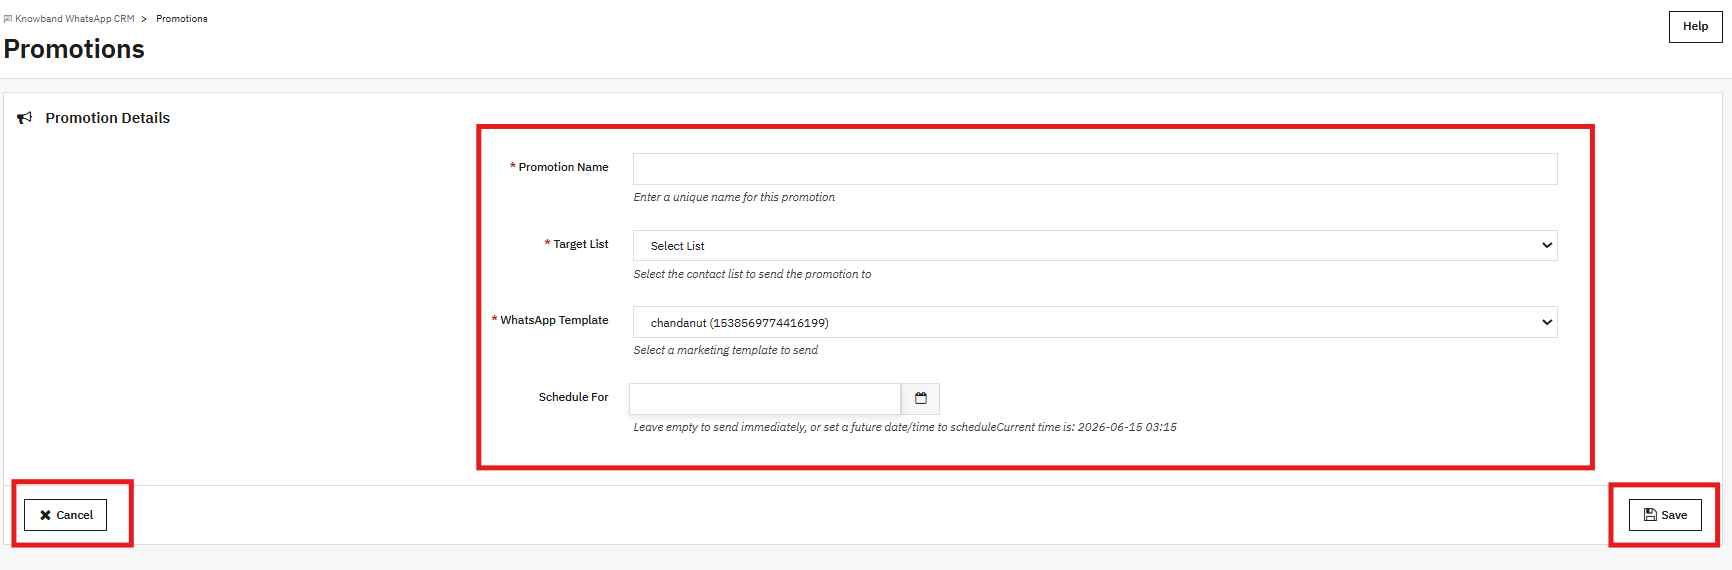
Promotion Name: An internal name you will recognise. It does not appear in the message.
Target List: Select one of your WhatsApp Lists from the dropdown. Every contact on that list gets the message.
WhatsApp Template: Select a Marketing category template. Only approved Marketing templates show up here.
Schedule For: Pick a date and time in the future. Past timestamps are not accepted. Leave the field empty if you want it to send on the next CRON run.
Click Save. The campaign shows as scheduled in the list. For it to send automatically, the CRON command shown at the top of the Promotions page needs to be added to your server. It runs every minute and picks up any campaigns whose scheduled time has passed.
Once a campaign finishes running, the Sent and Failed counts fill in. The WhatsApp Business API bills per message, so it is worth running a small test batch of 10 to 20 contacts before sending to your full list.
10.0 WhatsApp Lists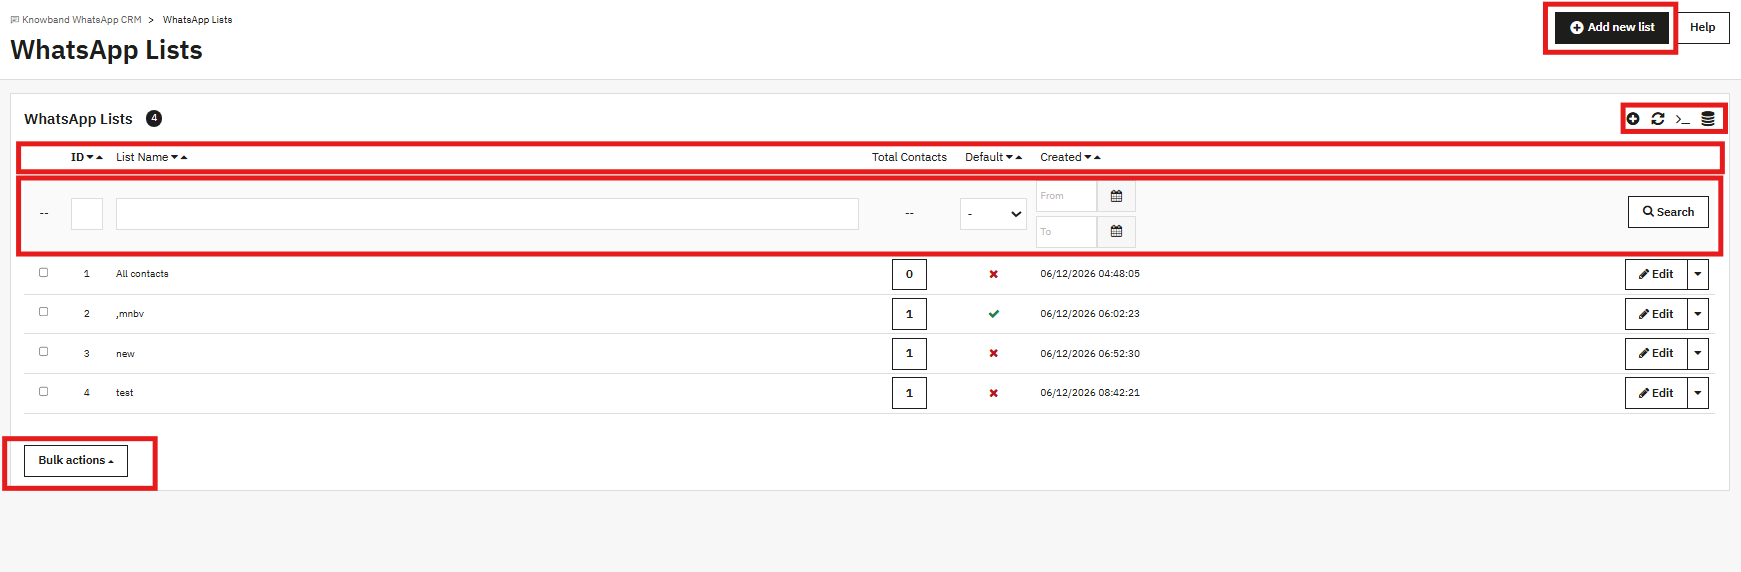

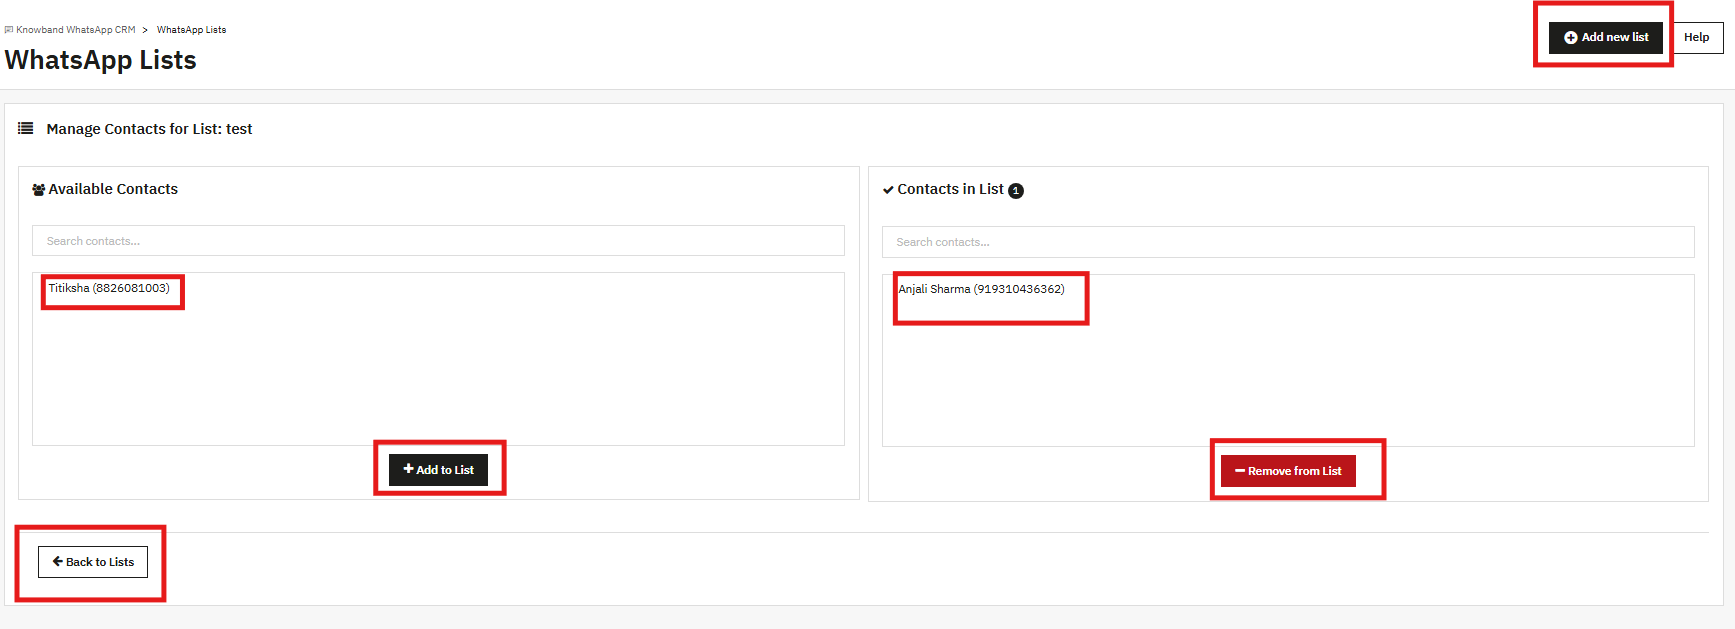
Lists are named groups of contacts. A promotion targets one list at a time. Click Add new list, give it a name, and save it. That is the whole process. You can mark one list as the Default if you want new contacts added to it automatically.
Contacts get assigned to lists from the WhatsApp Contacts tab. One contact can be on as many lists as you need.
11.0 WhatsApp Contacts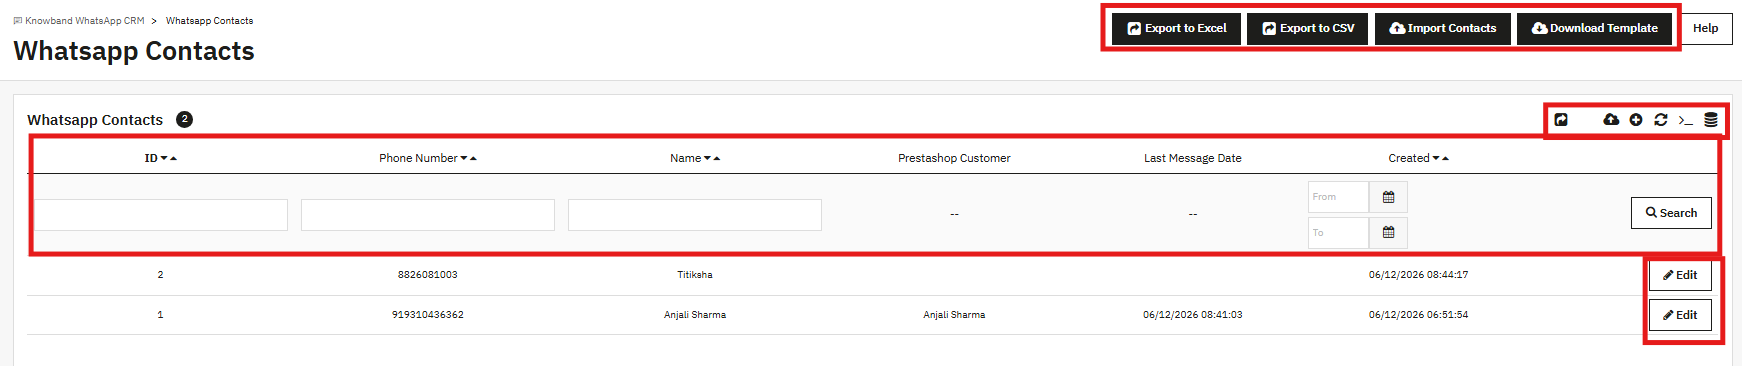
Every phone number you want to message through the module lives here. Each contact has a number, a name, and the option to link to a PrestaShop customer account.
11.1 Adding a Contact Manually
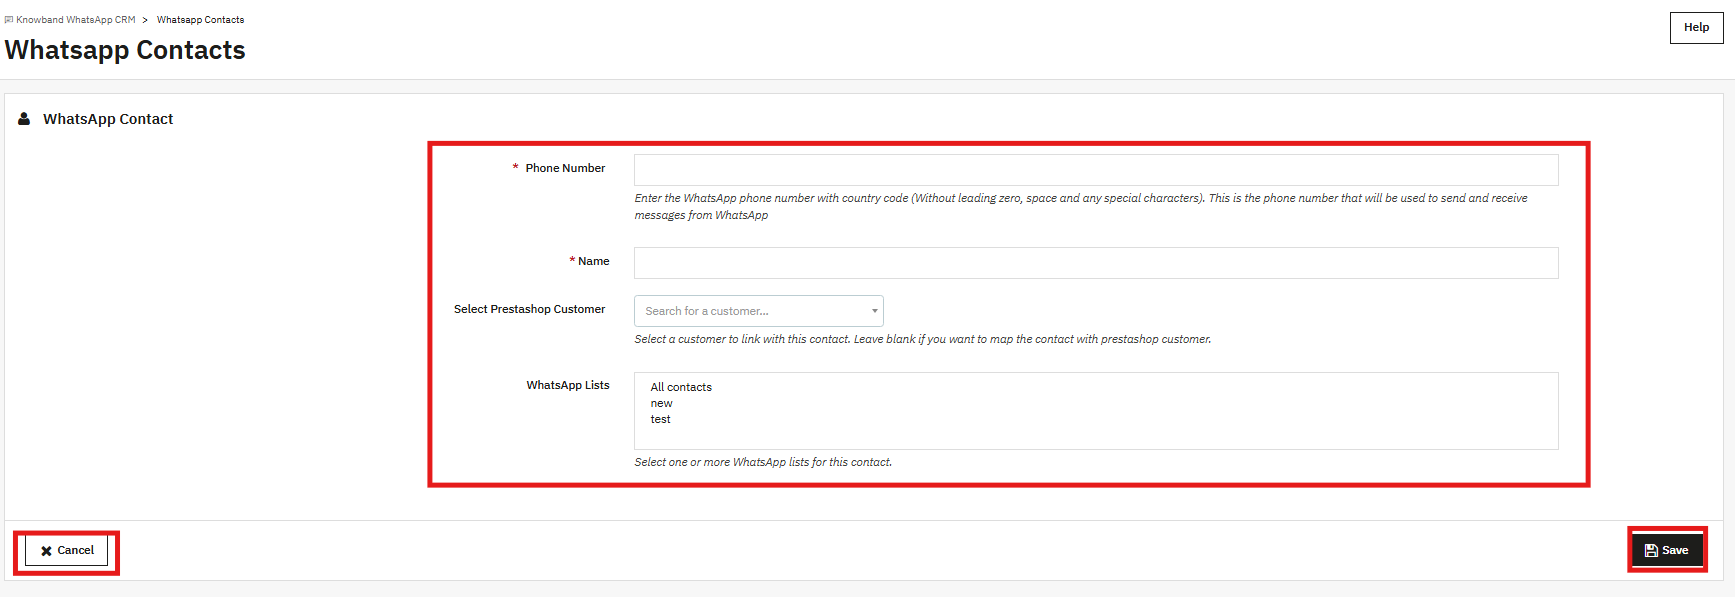
Phone Number: Country code first, no leading zero, no spaces, no dashes or plus signs (for example, 91xxxxxxxxxx for an Indian number).
Name: The display name for this contact.
Select PrestaShop Customer: Search for an existing customer account to link this contact to. Leave it blank if this is a standalone contact with no store account.
WhatsApp Lists: Pick one or more lists to add this contact to. Multi-select works here.
Click Save to add the contact.
11.2 Importing Contacts in Bulk
Click Download Template to grab the CSV format. Add your contacts, then come back and click Import Contacts to upload the file. If a number already exists in the module, that record gets updated. New numbers get added fresh. Export to Excel and Export to CSV are both available if you need to pull the full contact list.
12.0 Chatbox Settings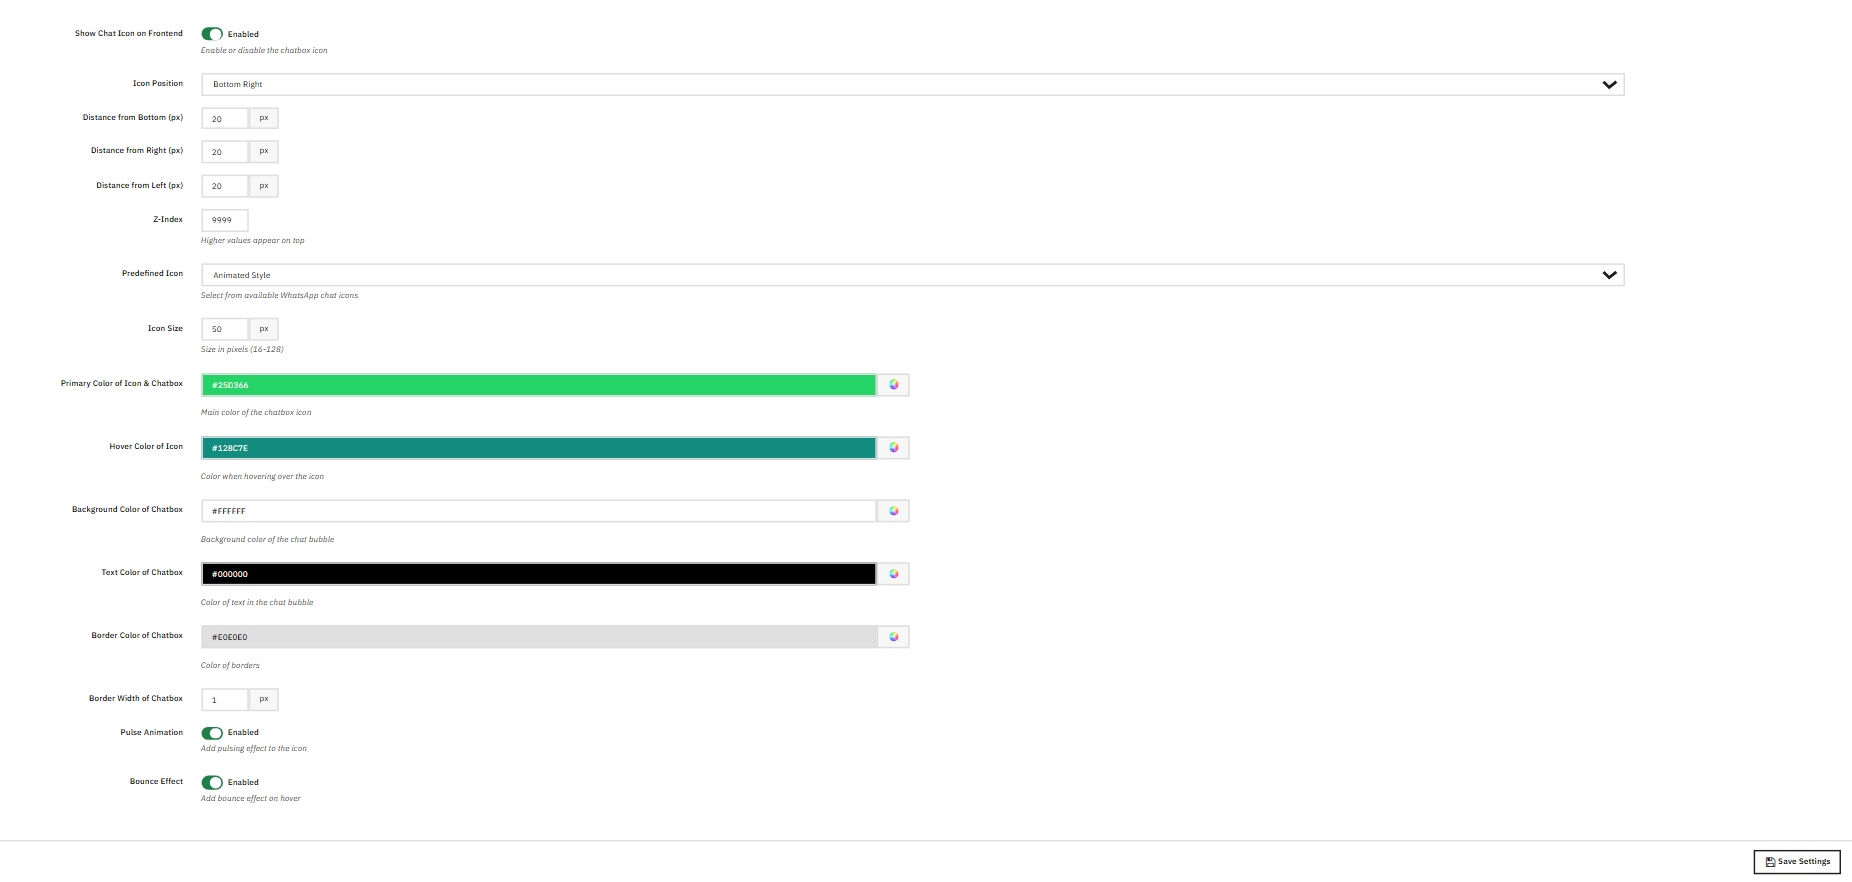
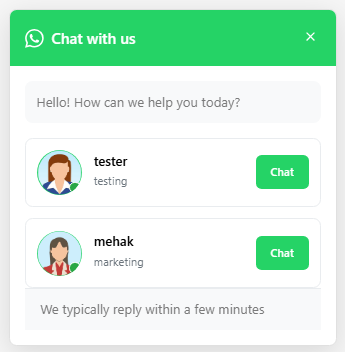
This tab controls the WhatsApp icon that floats on your storefront. Visitors click it, see a pop-up with your available agents, and tap Chat next to whoever they want to reach. That opens a WhatsApp conversation on their phone directly.
Show Chat Icon on Frontend: Turns the icon on or off.
Icon Position: Bottom Right, Bottom Left, or other available positions.
Distance from Bottom / Right / Left (px): How far the icon sits from each edge. Default is 20px on all sides.
Z-Index: Layer order relative to other elements on the page. Default is 9999.
Predefined Icon: Choose from available icon styles, including Animated Style.
Icon Size: Diameter in pixels. Accepted range is 16 to 128. The default is 50.
Primary Color of Icon and Chatbox: The main background color. Default is WhatsApp green, #25D366.
Hover Color of Icon: The color that appears when a visitor hovers over the icon. Default is #128C7E.
Background Color of Chatbox: The background of the chat popup. Default is #FFFFFF.
Text Color of Chatbox: Text color inside the pop-up. Default is #000000.
Border Color of Chatbox: The border around the pop-up. Default is #E0E0E0.
Border Width of Chatbox: How thick the border is in pixels. Default is 1.
Pulse Animation: When enabled, a pulsing ring plays around the icon.
Bounce Effect: When enabled, the icon bounces when a visitor hovers over it.
Click Save Settings when done.
13.0 WhatsApp Agents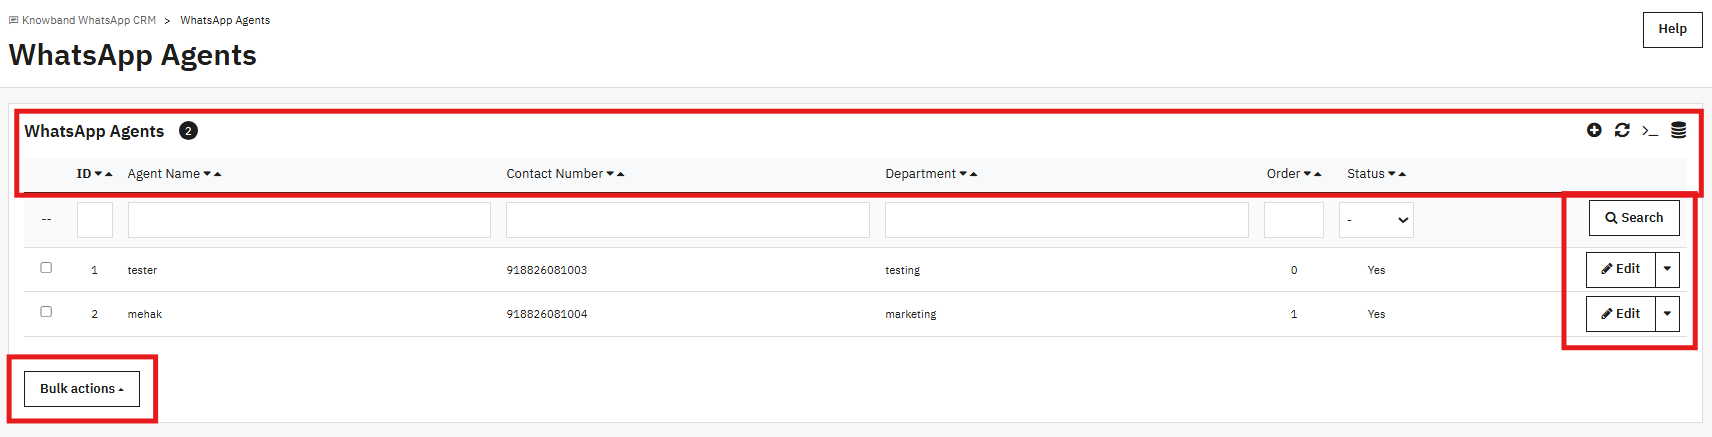
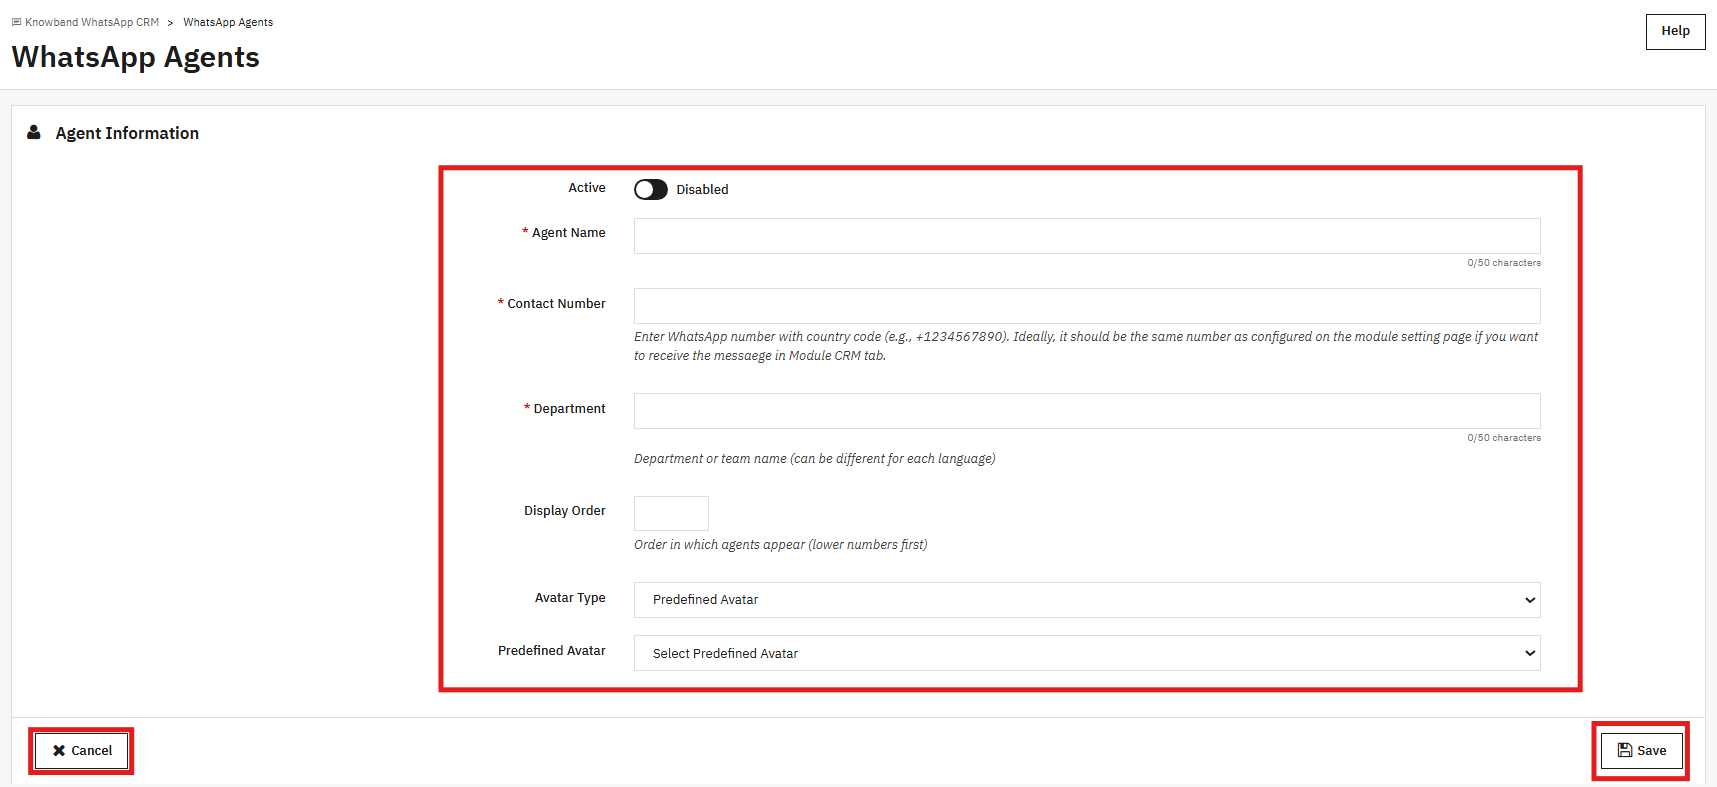
Agents are the team members displayed inside the storefront popup. Each one shows a name, department, and a Chat button that visitors tap to open a WhatsApp conversation with that person directly.
Active: Show or hide this agent in the pop-up.
Agent Name: The name displayed in the pop-up, up to 50 characters.
Contact Number: The agent’s WhatsApp number with country code (for example, +91xxxxxxxxxx). If you use the same number as the one in the API settings, conversations also appear in the CRM tab.
Department: The team or role shown under the agent’s name. Up to 50 characters, and this can be different per language.
Display Order: The position of this agent in the pop-up relative to others. Lower numbers come first.
Avatar Type: Use a Predefined Avatar or upload a custom image.
14.0 Message Logs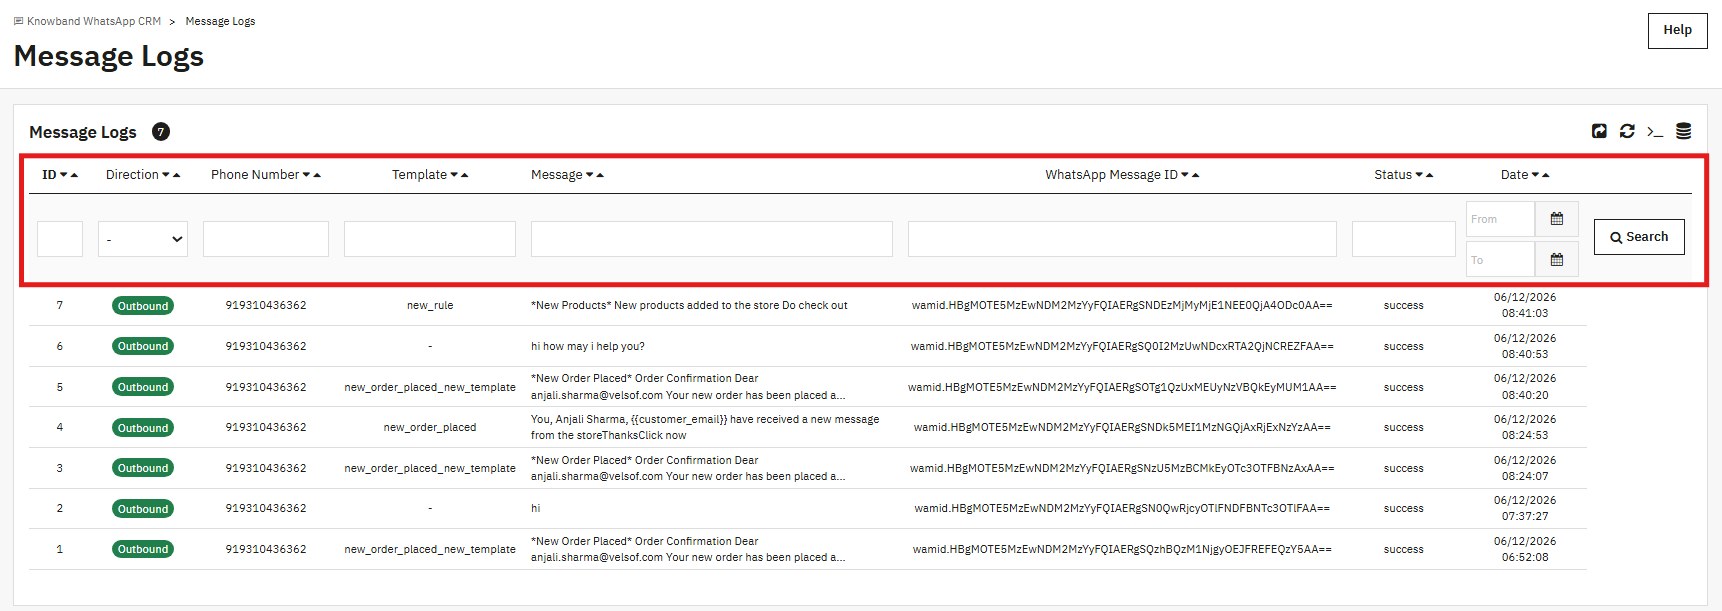
Every message the PrestaShop WhatsApp CRM Module sends or receives is recorded here. Each row shows the Direction (Outbound or Inbound), the phone number, the template name if one was used, a preview of the message, the WhatsApp Message ID, the delivery status, and the date and time.
Order notifications, CRM messages, and campaign deliveries all show up in this list. A success status means the WhatsApp API accepted the message. Use the date, phone number, and template filters to narrow down what you are looking for. This is the first place to check when a message did not go through as expected.
15.0 Frequently Asked Questions
Q: What does the PrestaShop WhatsApp CRM Module do?
The Knowband PrestaShop WhatsApp CRM Module connects your PrestaShop store through a full PrestaShop WhatsApp Business API integration. New order messages and order status change notifications go out automatically via the WhatsApp Business API. Your team can handle two-way WhatsApp messaging with customers in real time from inside the admin. Marketing promotions can be sent to contact lists on a schedule. A WhatsApp chatbox widget on the storefront lets customers reach your agents directly on WhatsApp.
Q: Is a WhatsApp Business Account required for the PrestaShop WhatsApp live chat addon?
Yes, it is. PrestaShop WhatsApp Manager needs a WhatsApp Business Account, a registered WhatsApp Business phone number, and a Meta Developer App with API access. Without those three things, the API fields in Module/API Settings stay empty, the WhatsApp message templates cannot be submitted for approval, and the module cannot send anything.
Q: Why are no templates appearing in the Order Settings dropdown?
The dropdown in Order Settings only shows Utility WhatsApp message templates that WhatsApp has approved. If nothing is listed, either the templates are still pending review or they ended up in the Marketing category. Go to Message Templates, create a Utility template, wait for the approval to come through, then return to Order Settings. You can also click Sync Templates to pull the latest status without waiting for the webhook.
Q: How do WhatsApp order notifications PrestaShop stores send when an order status changes?
Once Enable Order Status Message is turned on, a WhatsApp number field appears on the customer address form. When a customer fills that in, and their order triggers an order status change notification mapped in Order Status Templates, the module sends the assigned WhatsApp order notifications to their number. You can assign a different template to each status.
Q: What is the difference between a Utility template and a Marketing template?
Utility templates are for messages tied directly to something the customer did, such as placing an order or having an order shipped. Marketing templates are for outbound promotional content sent to contact lists. Order Settings and Order Status Templates use Utility templates only. The Promotions tab and the CRM Template picker use Marketing templates only.
Q: How do I run a PrestaShop WhatsApp marketing Module promotion to a contact list?
Open the Promotions tab and click Add new promotion. Give it a name, pick a Target List, choose a Marketing template, and set a future date and time. For the PrestaShop WhatsApp marketing Module campaign to send automatically, paste the CRON command from the Promotions page into your server to enable the CRON job for WhatsApp campaigns. The CRON runs every minute and sends any campaigns due at that time. Before you run a big campaign, test it on a list of 10 to 20 contacts to get a sense of API costs.
Q: Can I import my existing contacts using the PrestaShop WhatsApp live chat addon?
Yes. Click Download Template in the WhatsApp Contacts tab to get the right CSV layout. Fill in your contact data, then upload it via Import Contacts. Numbers that already exist get updated. New numbers are added to the contact list. Once imported, contacts can be assigned to any WhatsApp List for WhatsApp contact list segmentation and use in promotions.
Q: How does the CRM live chat work in this PrestaShop WhatsApp live chat addon?
The CRM tab shows all contact threads on the left. Click any contact to open the full chat history. The Message tab lets you type a free reply as long as the customer messaged you within the last 24 hours, supporting real two-way WhatsApp messaging between your team and the customer. After that window closes, use the Template tab to send an approved Marketing template. All automated order notifications appear in the same thread, so your team has the full picture in one place.
Q: Which versions of PrestaShop does this PrestaShop WhatsApp Module support?
The Knowband PrestaShop WhatsApp CRM Module runs on PrestaShop 1.7.x, 8.x, and 9.x. Setting up PrestaShop WhatsApp Business API integration requires a Meta Developer App; full setup instructions are in the Meta Developer Console WhatsApp configuration section of this guide. Check the module product page on the Knowband website for any version-specific notes or updates that may have been released since this guide was written.
16.0 Conclusion
The Knowband PrestaShop WhatsApp CRM Module brings WhatsApp-based customer communication into your PrestaShop admin. Order alerts go out without manual effort. Your team handles support from the CRM tab without switching tools. Promotions reach customers on a list you control, at a time you set.
The only setup work that happens outside the PrestaShop WhatsApp Manager is generating your API credentials in the Meta Developer Console. Everything else, templates, order mappings, contact lists, agents, and campaigns, is configured from inside PrestaShop.
For any help with setup or questions about specific features, reach out to the Knowband support team at support@knowband.com. Product documentation and setup videos are also available on the Knowband website.


