
1.0 Introduction
Nowadays, every eCommerce store owners are busy with the other work and they don’t have time to sync the email manually. Every store owner is going for automation to remove manual labor and errors. If you are a Prestashop store owner, then this Prestashop MailChimp automation integrator addon will definitely work for you. Prestashop MailChimp Automation Module provided by Knowband synchronizes your customer’s email IDs, orders and cart information along with the product with MailChimp store. The automated approach of the Prestashop MailChimp cart integrator extension reduces efforts and the time consumed in data synchronization. With easy integration and usage, the merchant can create effective email campaigns. By setting up the cron job, the store owners can synchronize the required data with the MailChimp account in a few simple steps.
This Prestashop mailchimp product integrator extension by Knowband will not help the eCommerce store merchant to reduce the time and efforts but will also help the admin to track the ROI of marketing activities which is a great plus point.
1.1 Project Objectives
The e-merchants can achieve following objectives with the intuitive and feature-rich module.
1. The Prestashop MailChimp integration module offers easy eCommerce store and MailChimp synchronization.
2. The Prestashop addon even allows the store owners to create MailChimp stores from the back-end of the admin panel. The products, customer’s personal information, their cart and order history can be synced with each store. Thus, the email marketing campaign can be segmented and targeted accordingly. Not just this, the admin can even create MailChimp lists as per the requirement.
3. The admin can remind the customer about the abandoned cart or suggest products based on their previous purchases easily.
4. The addon even allows the admin to keep a check on the synchronization jobs. Any error occurred in the process is notified and can be rectified accordingly.
1.2 Benefit of the Merchant
1- This Prestashop cart integrator addon allows the store admin to integrate the Prestashop store with the MailChimp account.
2- This store admin can enable/disable the addon as per need.
3- The Prestashop and MailChimp integrator gives the option to the store admin to set the cookie expiry date.
4- The Prestashop mailchimp integrator addon allows the merchant to add the new mailchimp store according to his/her desires and they can also edit the exiting store settings.
5- The Prestashop mailchimp automation addon allows the merchant to add the cron to your store via control panel/putty to sync MailChimp store data automatically.
6- The admin can easily synchronize the data by clicking on the button sync store. This Prestashop addon gives the 4 options to the admin i.e. they can synchronize the product, customer, cart or order synchronization a job will be created in the admin interface.
7- This Prestashop addon gives the option to the merchant send email to the customer when the synchronization is completed.
8- If they want, they can delete the mailchimp store anytime.
9- The Prestashop mailchimp automation addon allows the admin to abort the jobs and delete the already created jobs.
10- This Prestashop mailchimp product integrator have a functionality to sync the mailchimp list automatically and they notify the consumer about the cancellation success.
11- This Prestashop extension saves a lot of time to the Prestashop store owner.
12- This Prestashop mailChimp cart integrator helps admin to increase the conversion of the website.
13- This Prestashop mailchimp integrator addon reduces the cart abandon rate of the website.
2.0 Installation
The PrestaShop module can be purchased from the Knowband store. After completing the transaction, you will get the following files as listed below:
1. mailchimpautomation.zip (contains source code of the module)
2. User Manual
Follow the below-mentioned steps in order to install the addon on your store:
1. Unzip the folder. It contains the files and folders as shown below –
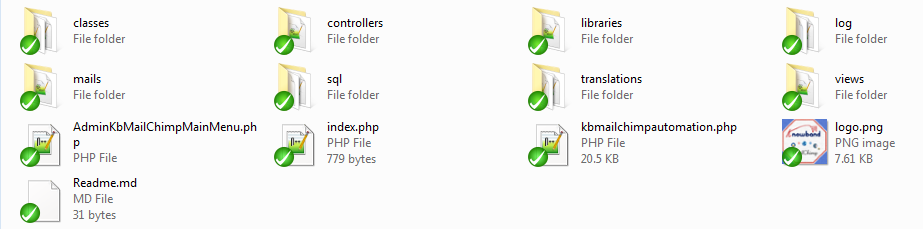
2. Copy all the files and folders contained in the mailchimpautomation.zip folder into your store “Modules” directory. Follow the path – Root Directory/modules/.
3. This Prestashop mailchimp automation addon is now ready to be installed.You can find it in Store Admin -> Modules and Services. It would shown as below –

In case, you are not able to find it in the admin modules list, you may search for it with the Keyword Knowband MailChimp Automation.
4. Click on “Install” button. It would show a pop-up for your confirmation. Click on “Proceed with the installation” option. This step will install the module and show notification – “Module(s) installed successfully”.
3.0 Admin Interface
This Prestashop mailchimp product integrator extension is easy to understand and it’s user is required to have almost no technical knowledge. It’s admin interface offers three customization options. They are mentioned below:
- General Setting
- MailChimp Store
- Jobs
- Audit Log
Let is discuss them in details.
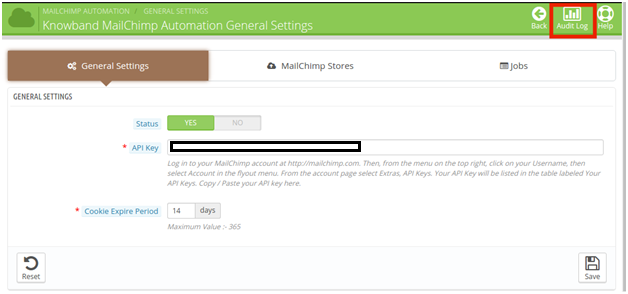
3.1 General Setting
The ‘General Setting’ tab of the Prestashop mailchimp automation module offers the basic configuration options. Here’s how the module can be enabled and configured.
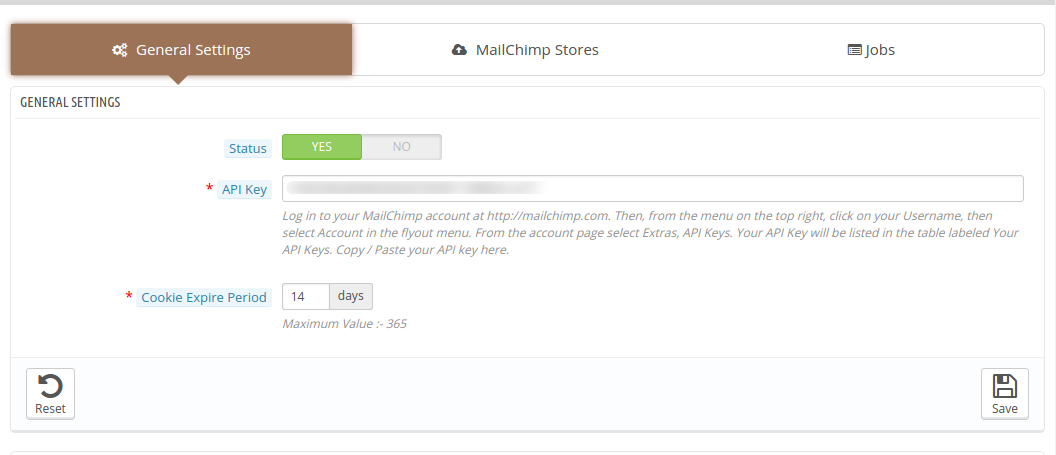
3.1.1 Module Status
The button can be toggled to enable or disable the addon from the Prestashop store.
3.2.2 API Key
Once the Prestashop mailchimp product integrator extension is enabled, the admin is required to enter the API key of his MailChimp account in order to sync it with your web store. Follow the below-mentioned steps for the API key:
Step 1: Log in to your MailChimp account at https://mailchimp.com.
Step 2: Click on your Username from the menu on the top right corner.
Step 3: Select the Account in the flyout menu.
Step 4: From the account page select Extras and then API Keys.
Step 5:Your API Key will be listed in the table labeled Your API Keys. Copy from there and paste in the web interface.
Once this is done, the MailChimp account is synchronized.
3.3.3 Cookies Expire Period
The cookies are required to track the email campaigns that are delivered to the customers. The expiry time specifies the number of days after which these cookies will expire.
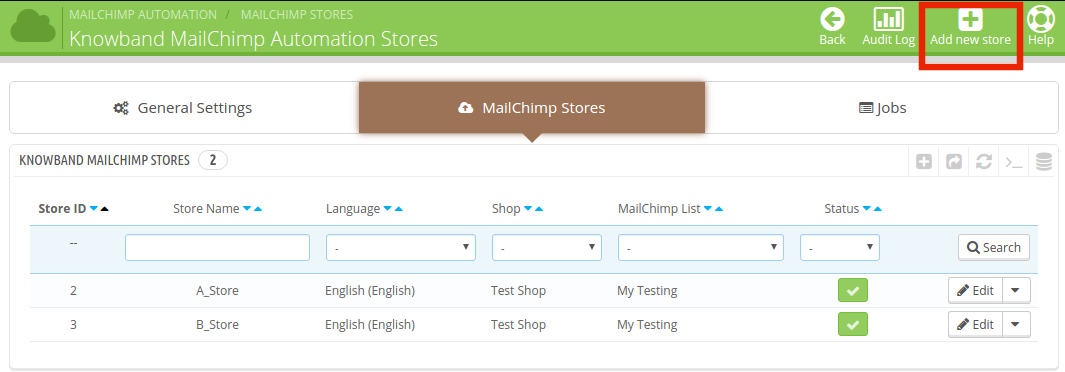
3.2 MailChimp Stores
In order to create the stores, you need to go to the ‘MailChimp Store’ tab. For new store creation, click on the ‘Add New Store’ button at the top on the right hand side.
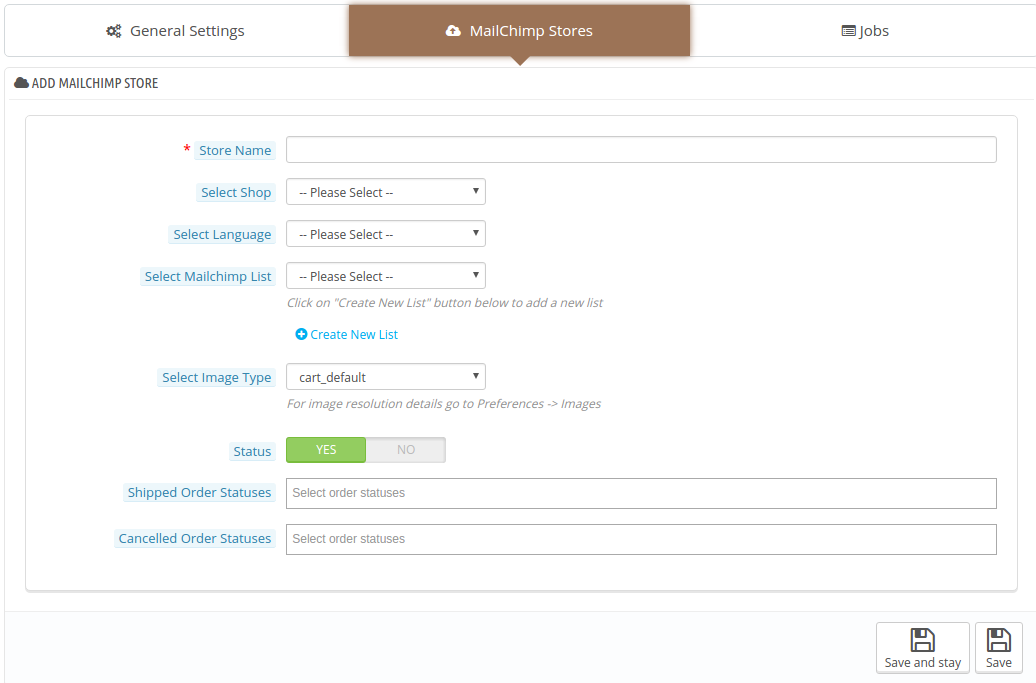
This will redirect to the store creation page. The admin is required to enter the necessary information. The information fields are mentioned below.
The various fields are discussed in details below.
Store Name: It specifies the name of the MailChimp store. The admin can enter any name as per his/her requirement.
Select Shop: The admin can select the Prestashop store that he wants to integrate with the MailChimp. The various options are provided in the dropdown list.
Select Language: The Prestashop store merchant can select any language for the functioning. The Prestashop mailchimp automation extension supports multiple languages.
Select MailChimp List: The admin can select the MailChimp list in which he wants to synchronize the data of the Prestashop store. Any list can be selected from the already created ones.
Not just this, even the option for creation for new list is provides in the interface.

The information required for the MailChimp list creation is divided into 3 segments.
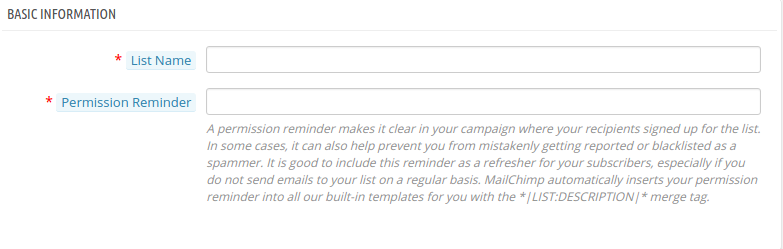
1. Basic Information
The store admin is required to enter the ‘Name of the List’ as well as the ‘Permission Reminder‘. The permission reminder is a little blurb in your email specifying how you got the email details of the recipient. This helps to prevent the mails from getting reported or blacklisted as a spammer.
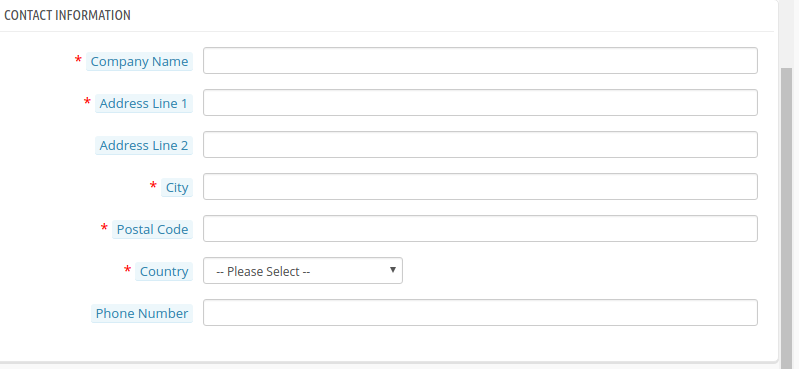
2. Contact Information
It includes the contact details of the company including it’s name, address and contact details of the company.
3. Campaign Defaults
This includes the default settings of the campaigns. The admin need to enter the Name and Email Id of the Sender that is being used as an default option for the email campaigns. The Subject line includes the subject that will be send with the emails. The admin can choose from the multiple language options offered.

Select image Type: The image resolution details in the Preference -> Images tab of the main menus.
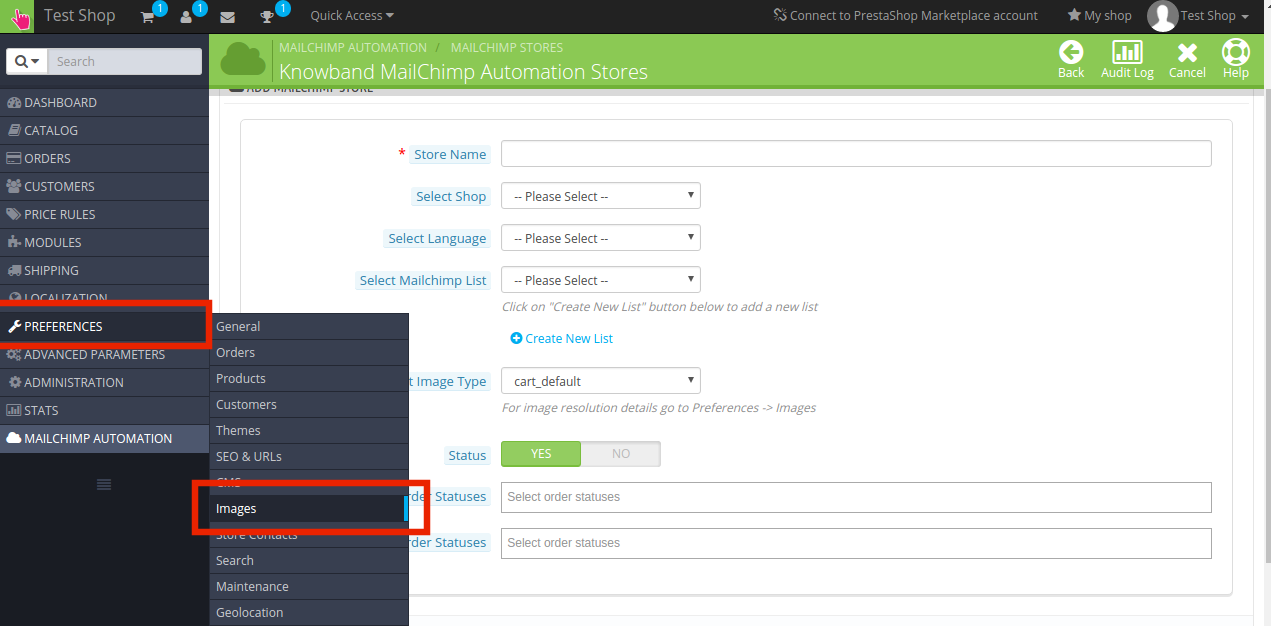
The admin can select the image types from the already created options.
Status: In case, the admin doesn’t want to sync the data with the MailChimp account, then, he can disable the functionality by switching off the button.
Shipped Order Statuses: This can be used to send the Shipped Order notifications to the customers via MailChimp.
Canceled Order Status: In case, the customer cancels any others, the notification can be send through email.
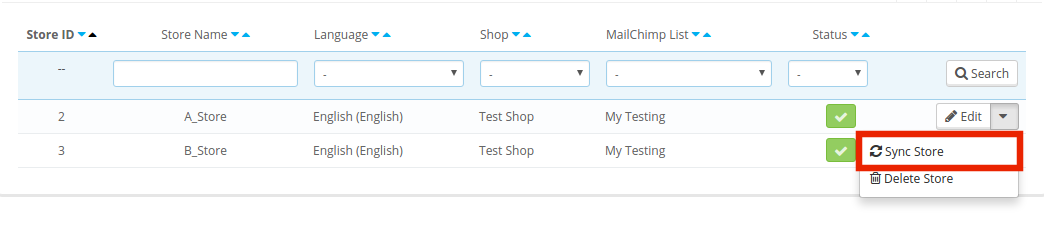
The list of the stores created can be viewed in the admin interface.
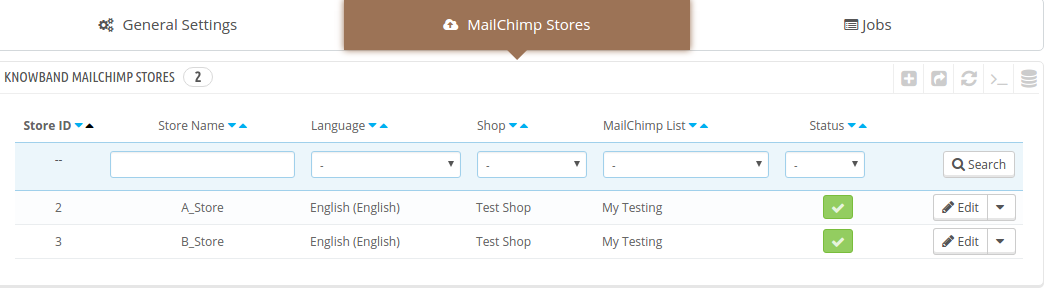
Any changes required in the stores can be done at the click of a button.
Once the MailChimp store is created, the data can be synchronized by clicking on the ‘Sync Store’.
The Prestashop MailChimp cart integrator addon offers 4 synchronization options namely Sync All Carts, Orders, Products and Customers.
The online shoppers can check on the data that he wants to sync with the account. Once it is checked, the module will ask to enter the time period. The entire data within that duration will be synced with the MailChimp store.
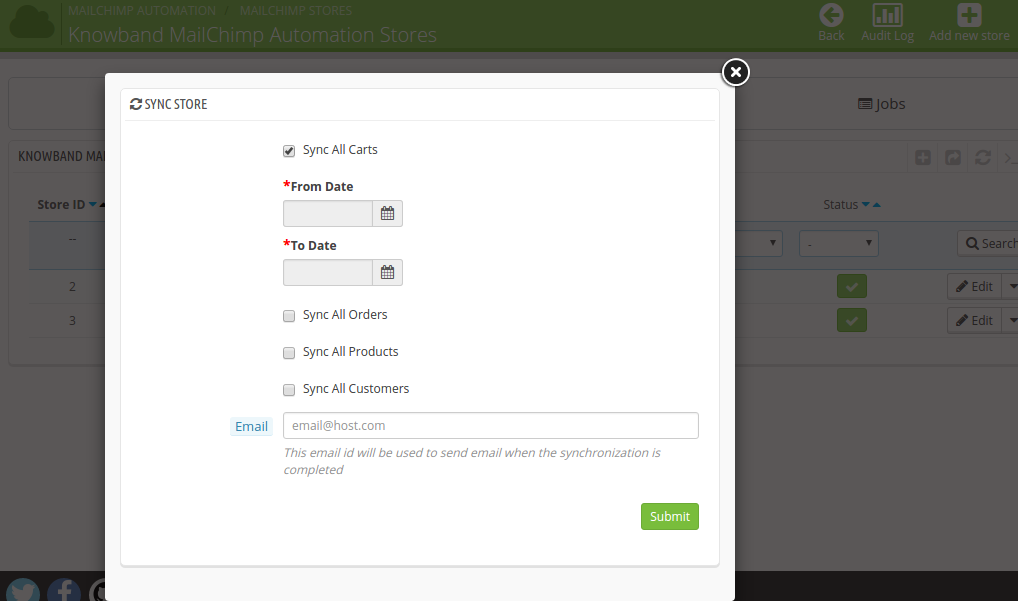
The same procedure is followed for all the four data to be integrated.
Next, the admin is required to enter the Email ID with which the emails will be send.
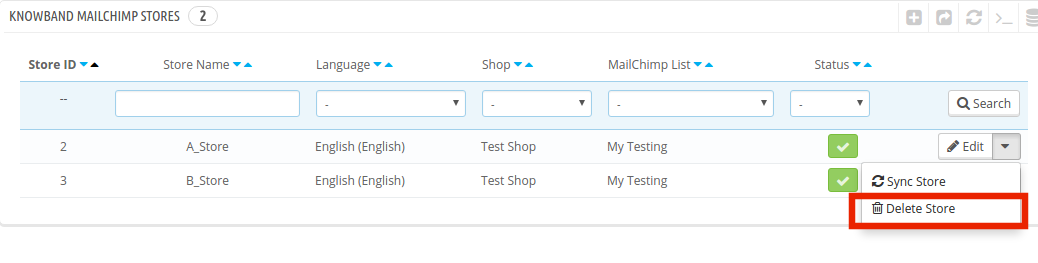
The admin can even remove any of the store from the list just by clicking on the ‘Delete’ button.
3.3 How are the Jobs handled?
For every data type synchronized, the module will create a job. The status of the job can be viewed in the ‘Jobs’ tab as shown in the image below.
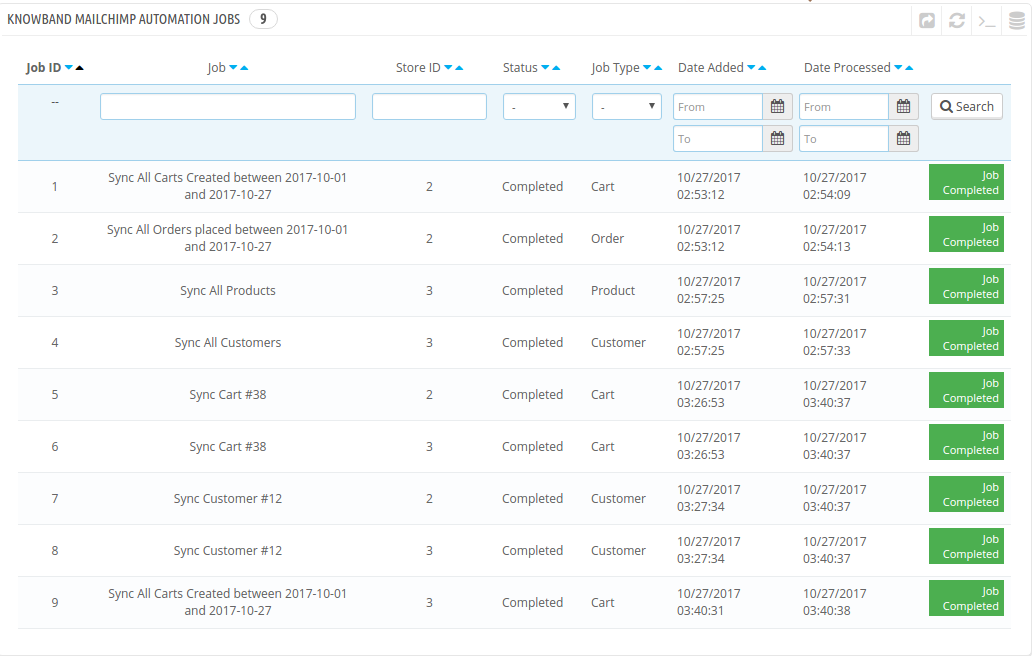
The incomplete jobs can be aborted in the course of time.
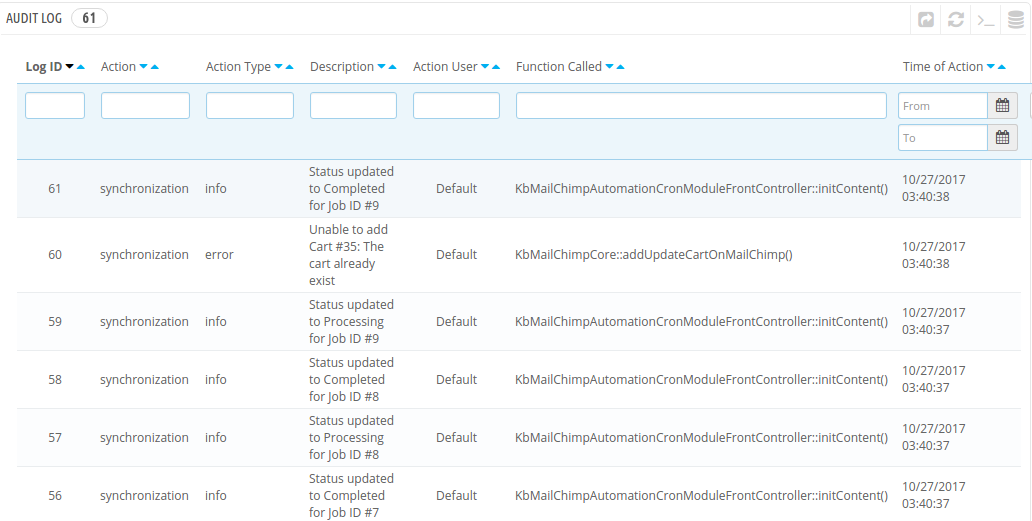
3.4 Audit Log
The entire synchronization process can be viewed in the ‘Audit Log’ option.
The audit log tab includes the status information of the entire synchronization processes. Any error occurred during this is reported in the ‘Description’ section. The same can be rectified as per the suggestion made.
You can try Prestashop MailChimp Automation addon for on your Prestashop website. KnowBand’s Prestashop MailChimp integrator extension helps you increase customer engagement to your store & reduce the cart abandon rate of the website.
Video Link
Admin Demo Link
Front Demo Link
Addon Store Link
Please contact us at support@knowband.com for any query or custom change request as per your business requirement.
