1.0 Introduction
Having a Facebook store is one of the intelligent ways to hike your business growth. One of the best steps to recognize your business globally is to step into a social community, one amongst them is Facebook. It allows you to seek attention of your new audiences and thereby generate more customers for the store. The best part is that you can easily share your content with ease, market your store product and services. Opening a Prestashop Facebook Store is a no-brainer that improves your site sales from the bottom line.
PrestaShop is a free e-commerce platform where anyone can create his/her shop with just few steps. After having a shop, the main concern comes up to every shop owner is the marketing and making his products/brand more and more exposed to the world. As the Facebook claims, there are over 2 billion active users on Facebook by the year 2017. Here, we have made your work easier with Prestashop Facebook Store Addon.
- Now you can have your Facebook Shop, change layout, template, and module with no design or coding skills required.
- KnowBand Prestashop Facebook Store module helps you connect your PrestaShop store with Facebook and help you showcase your products to a very wide range of people.
1.1. Benefits of Prestashop Facebook Store Module for merchant
The store owner can increase the number of visitors and potential buyers on his/her PrestaShop store and boost their Facebook community with the help of this Facebook store integration Prestashop module.
- The Prestashop Facebook integration module integrates your fan page on Facebook with your PrestaShop store.
- The Facebook store integration with Prestashop offers auto listing of products on your Facebook store.
- The Prestashop Facebook shop integration module has the option to display categories and featured products, etc.
- The Prestashop Facebook Store Integration module increases your revenue and increase customer following/loyalty to your brand.
- The Prestashop Facebook store module increase the genuine likes and followers on your Facebook Page.
- The Prestashop Facebook Store Setup module creates a Shop tab inside your Facebook fan page to allow users to see products.
- The Prestashop Facebook Integration module analyzes the change in sale with Google Analytics.
- Change look and feel of the Prestashop Facebook shop anytime.
- The Prestashop Facebook Shop Addon displays the desired products and categories.
1.2. Benefits of the Prestashop Facebook Store Integration for customers
With this Prestashop Facebook integration module by Knowband, the customer can have a look at your shop/products without actually visiting your PrestaShop store.
- The Prestashop Facebook store module can be translated into desired language.
- The prices of the Prestashop Facebook shop module can be changed to the local currency.
- After clicking the “Add to cart” button corresponding to a product on FB Store, the customer is taken to the store to have an authenticated shopping experience.
2.0 Installation of Prestashop Facebook Shop Module
After purchasing the Prestashop Facebook shop module, you will get following files as listed below:
- facebookstore.zip (contains source code of the module)
- User Manual
Follow the following steps to install the Prestashop Facebook shop module:
Step 1: Unzip the facebookstore.zip file. It would contain files and folders as shown below –
Step 2: Copy all the files and folders of unzipped folder into your store “modules” directory on the path – Root Directory/modules/.
Step 3: Now the Prestashop Facebook Store module is ready to be installed on your store and you can find that in Store Admin -> Modules and Services. It would shown as below –
In case, you are not able to find this Prestashop Facebook shop module in admin modules list, please try searching module with following details –
Keyword – Fb Store
Category – Front office
Filter By – Installed & Not Installed / Enabled & Disabled
Step 4: Click on “Install” button to install the Prestashop Facebook shop module. It would show a pop-up for your confirmation. Click on “Proceed with the installation” option. This step will install the Prestashop Facebook store module and show notification – “Module(s) installed successfully”.
3.0 System Setup of Prestashop Facebook Store Addon
Before proceeding ahead, it is important to know that what is the correct flow of actions to setup this system as there are several things which are dependent of other things and if we do not take care of them then it would become difficult to process smoothly or may be error prone.
4.0 Facebook App Creation
Facebook App can be created by following below mentioned steps:-
Step 1: Go to given url :https://developers.facebook.com/apps/
Step 2: Click on the “Add a New App”button.
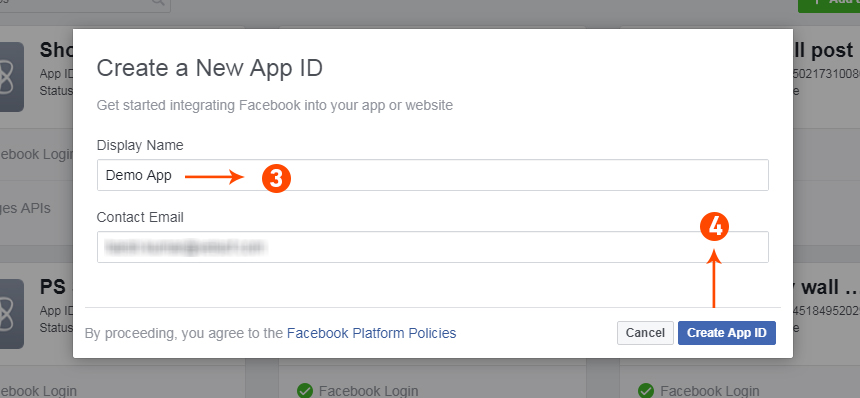
Step 3&4: Enter your App name and email id, then click on “Create App ID” button.
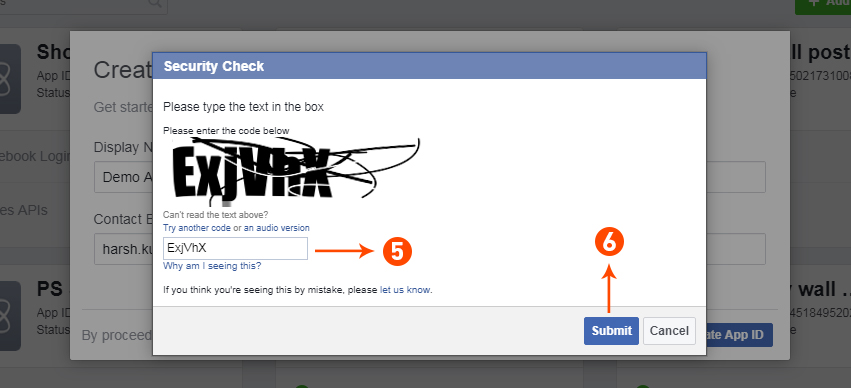
Step 5&6: After clicking on Create App ID you will have to go through a security check as shown:
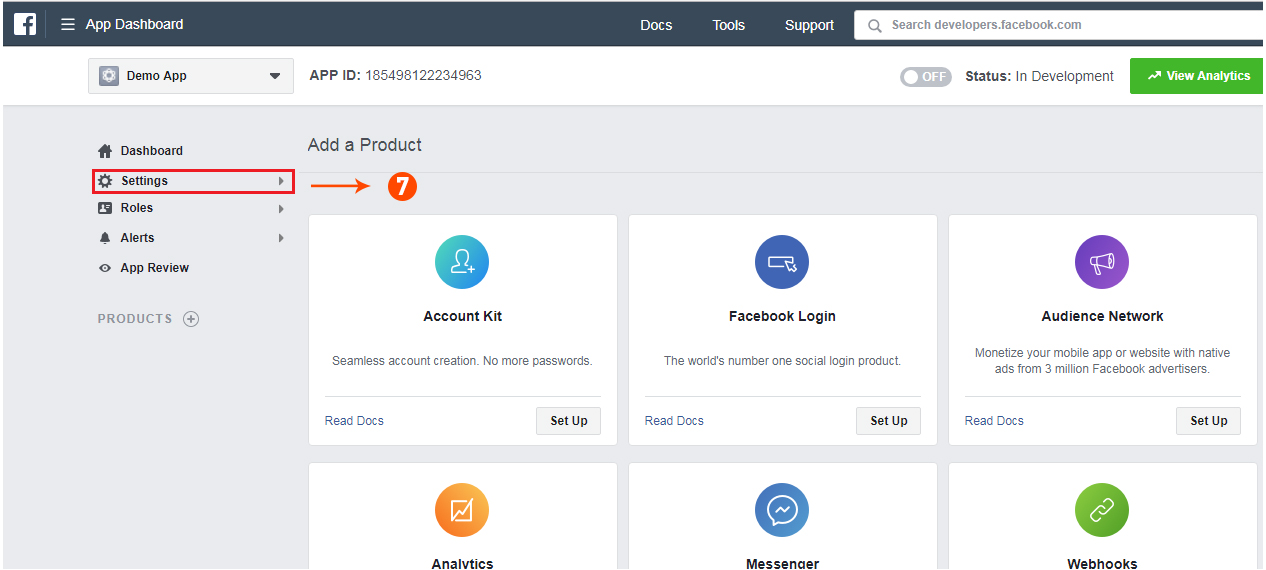
Step 7: Click on “Setting” tab of Prestashop Facebook Store Addon.
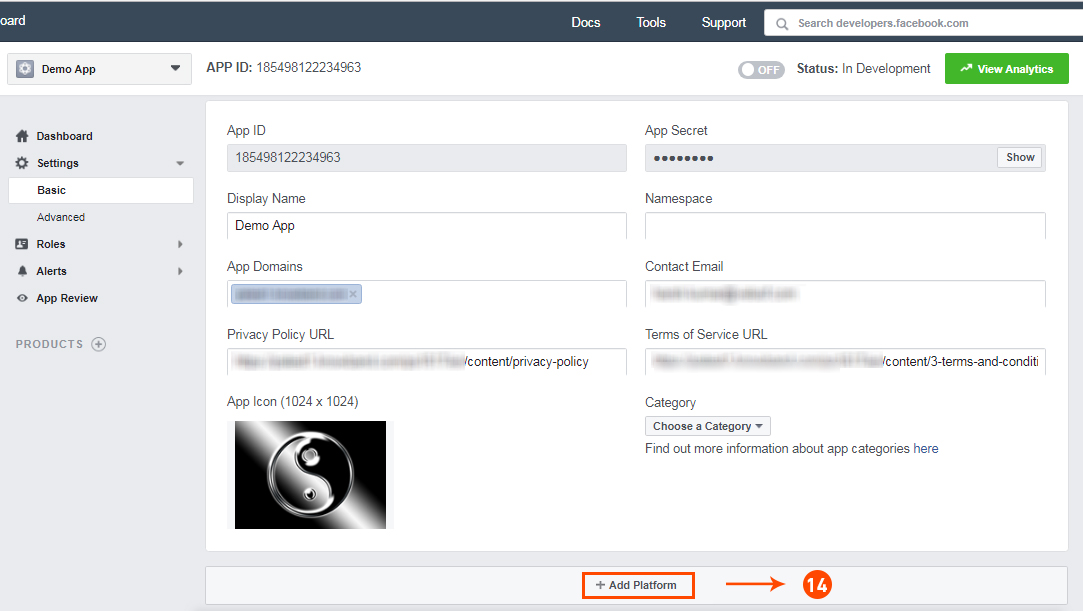
Step 8-13: Two option will be available in the dropdown, Basic and Advanced, click on “Basic”. And then enter your “App Domain”, “Contact Email”, ”Privacy URL”, ”Terms and Conditions URL”, ”Add Logo”, ”Select Category” and click on “Save Changes” button.
App Domains:
yourdomain.com is correct
yourdomain.com/store is incorrect
www.domain.com is incorrect
Step 14: Now click on “+Add Platform”.
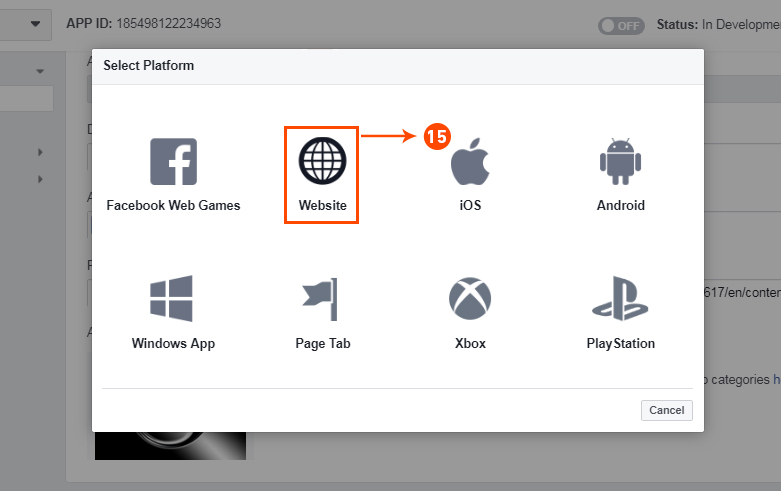
Step 15: And select Website as Platform
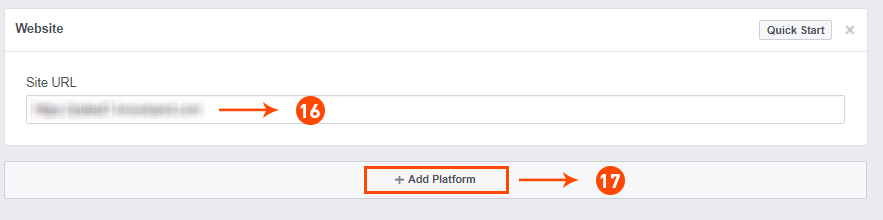
Step 16&17: Now Enter your site URL and Click on “+Add Platform”.
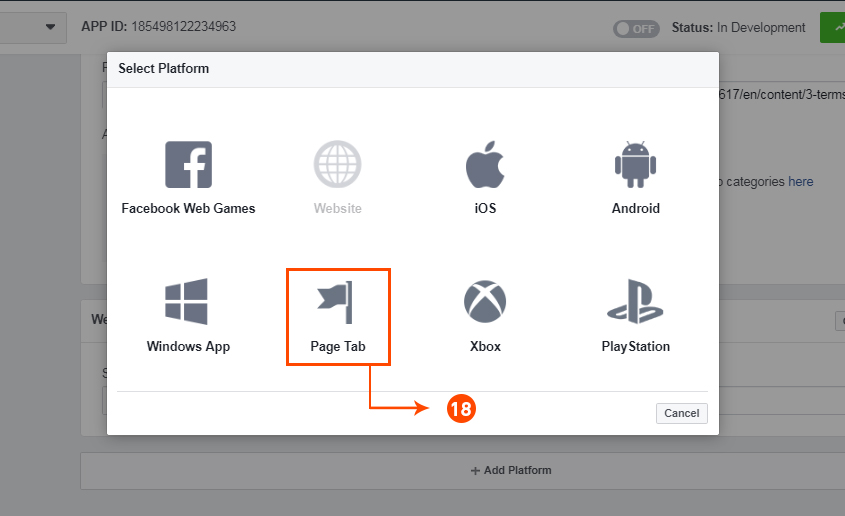
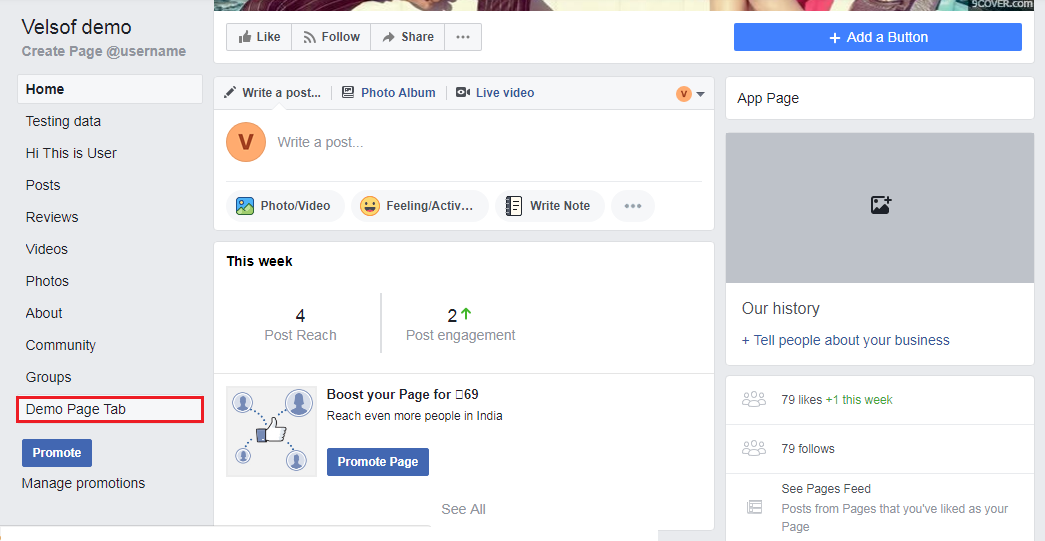
Step 18: This time select “Page Tab” as your platform.
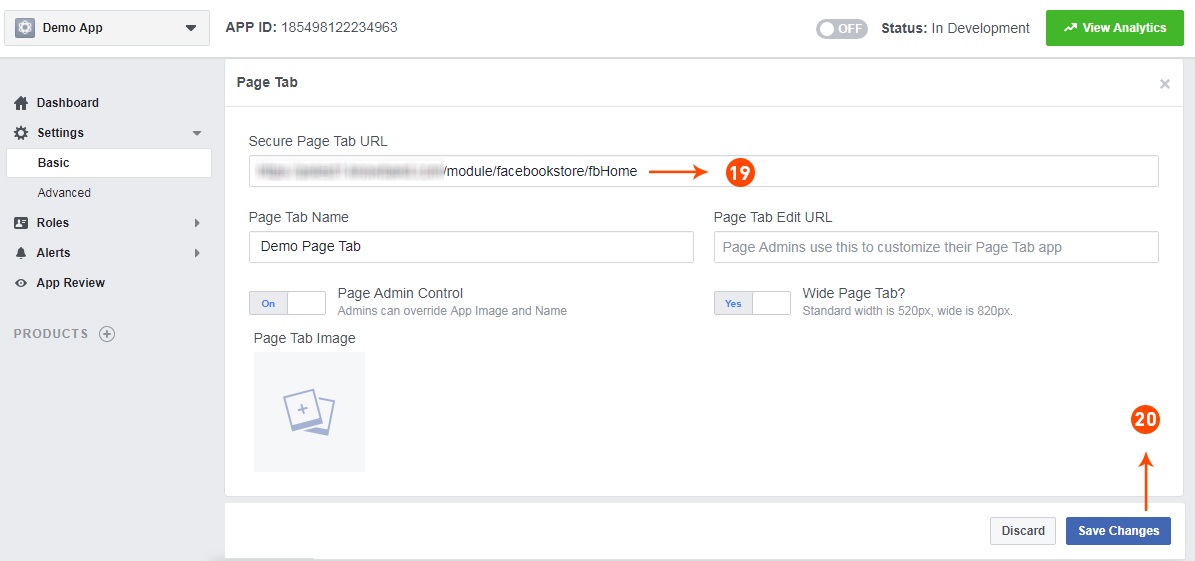
Step 19&20: Add Page tab URL and Save changes. If the changes are not saved, it means you have not configured the app properly. Check again the app domain, privacy policy, terms and condition URLs and website URL and try again.
Page Tab URL: www.example.com/module/facebookstore/fbHome
If URL is not SEO friendly then use, Page Tab URL:
https://www.example.com/index.php?fc=module&module=facebookstore&controller= fbHome
Page Tab Name: Enter a Name of the tab.
Step 21&22: Click on “App review”. And mark “Make ‘your app name’ Public” to Yes.
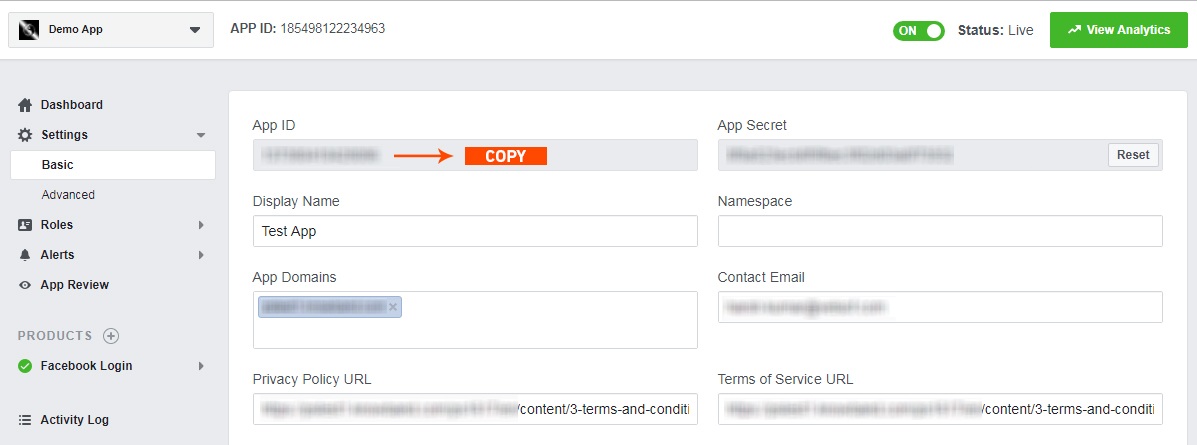
Step 23: Copy the App ID and paste it into the fields provided in the module.
5.0 Admin Interface of Prestashop Facebook Store Module
The admin interface of the facebook store integration with Prestashop is designed in such a way that a PrestaShop store owner can make the changes to his/her Facebook Store have the changes without wasting the time. Once the Prestashop module is setup completely, then the store owner can change the logo, banners and the layout of the shop.
Following are the steps which will help you setup your admin interface of the Facebook store plugin by Knowband:
5.1 How To Start configuration process of Prestashop Facebook Store Addon?
On clicking configure from Prestashop Facebook shop integration module listing page, the admin will be redirected to configuration page to save the “Facebook App Id” as shown below:-
- Facebook App Id:- This field of the Prestashop Facebook Store Integration module is for Facebook App Id created for this Facebook shop module.
Click on the following link to create App Id:
https://developers.facebook.com/docs/apps/register/
2. Next:- On Clicking this button, Facebook App ID will be saved in Db
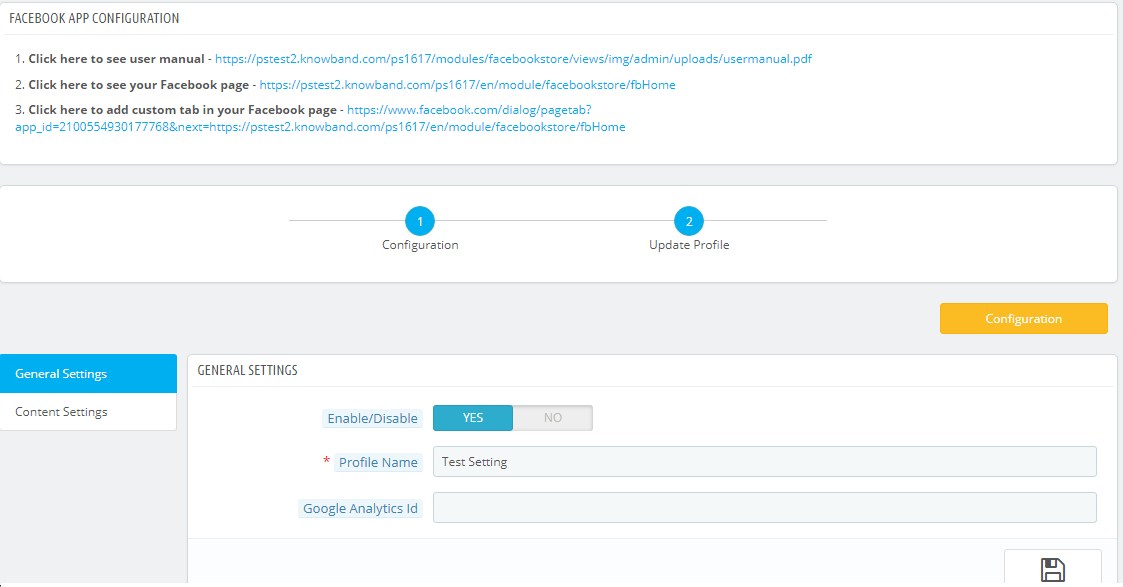
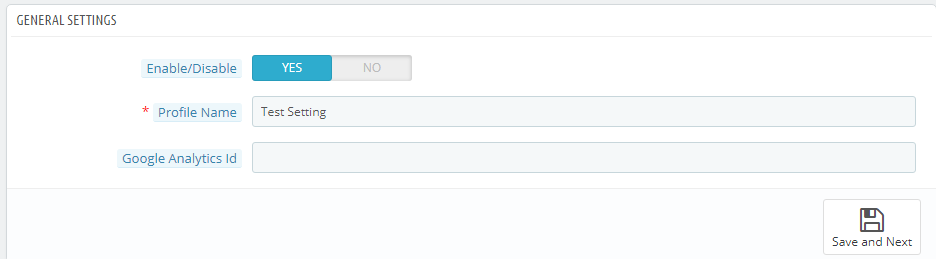
5.2 How To Add Profile?
After successfully saving the App Id you will be redirected to the General settings page.
Add Profile Form has mainly two sections:-
- General Settings
- Content Settings
5.2.1 General Settings
In general settings tab of Prestashop Facebook Store Addon, the Prestashop Admin has an option to add the profile name, option to enable and diable the Profile and Integration with the Google analytics using Google analytics ID.
Save and Next: Clicking on this button will save the settings and will create a profile.
- Enable:- Facebook Tab content will be enabled or disables using this setting of the Prestashop Facebook Integration module.
- Profile Name:- This field of the Prestashop Facebook Shop Addon is for the profile name for differentiating Profiles.
- Google Analytics Id:- This field of Prestashop facebook shop integration module, the admin can enter Google analytics id to track the performance of the pages of Prestashop Facebook store.
5.2.2 Content Settings:–
All home page content settings of the Prestashop Facebook integration module will be saved from here:-
- Logo: System will pick the default logo from the PrestaShop. If user wants, he/she can upload new logo which will be displayed on Prestashop Facebook Shop Page.
- Home Page Banner: In this field of Facebook store integration with Prestashop plugin, the admin can upload a banner image which will be displayed on the home page.
- Home Page Content: In this field of Prestashop Facebook Store Setup module, added text will be displayed on Home Page of Prestashop Facebook shop tab.
- Menu Items: Admin can select the menu items from Predefined list of the Prestashop Facebook shop integration module, which will be displayed on Facebook Shop tab. As of now keep the menu as single level which will be displayed on the Facebook Store tab.
Possible Menu Items which user can select.
- Home Page
- Categories
- Best Sellers
- New Products
- Facebook Page Color: This option of Prestashop Facebook shop integration addon will be the color of all buttons and menu of Facebook Store Page.there will be option to reset to FB original color any time on clicking reset button. Default color will be :”#48649f”
- Max No of featured Categories: Admin can select max number of featured categories to be shown on Home page under this field of Prestashop Facebook Store Integration module.
- Featured Categories: In this field of Prestashop Facebook store module, the admin user can select the categories which will be displayed on the Home Page.
- Product To be shown: In this field of Prestashop Facebook Store Integration module, system will ask the type of product to be shown on home page, i.e. From selected from below options or as shown on main website home page. It will be a dropdown.
- Max No of featured Products: This field of Prestashop Facebook Store Setup module by Knowband allows the admin to select max number of featured products to be shown on Home page.
- Featured Products On Home: In this field of Prestashop Facebook integration module, the admin user can select the products which will be displayed on the Home Page of the Facebook store.
- Product Image Size: In this field of Prestashop Facebook Integration module by Knowband, the system will ask the size of image, i.e. small or big.
- Footer Content: In this field of Facebook store integration with Prestashop module, the admin can add the content in the footer. Added text will be displayed on Home Page of Prestashop Facebook shop tab.
5.2.2 How to add a Custom tab in the FB page?
After saving the General settings and Content settings, you will have to add the Custom tab in the FB page. And to do this, click on the link to add the Custom tab as shown in the Screenshot below:
After clicking on this link you will be directed to page shown below:
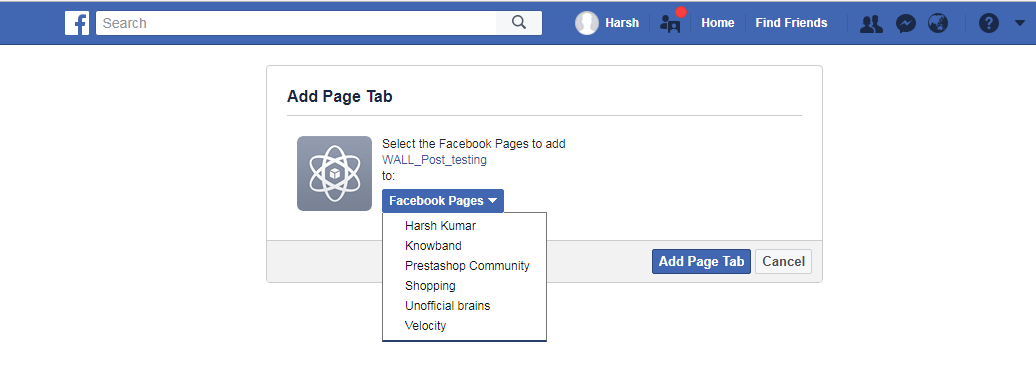
You can select the page where you want to add the Custom tab. After selecting the page click on Add Page tab. After clicking on this button you will be directed to the page shown below:
This page will display how the Custom tab will look.
After this, you can go to the FB page where you have added the Custom Tab. You can see it will be added to the FB page as shown below:
The Custom Tab will look as shown as below:
6.0 Facebook Tab UI
Clicking on the Added Tab from the Facebook page, Facebook Shop home page will be displayed.
6.1 Home Page
Home page will have the UI similar as mentioned below displaying the following:
- Top bar
- Header section
- Menu bar
- Text
- Featured categories
- Featured products, etc.
- Top Bar: Top bar of the Prestashop facebook integration plugin will have Home link, Language Selection Dropdown & Currency Selection Dropdown if store is having multiple language or currency. Option to Go to Online will also be there (Go to Shop)
- Header Section: Header section of the Prestashop Facebook store will have the logo, Search bar and Go to Store link.
- Menu Bar: In thi field of Prestashop Facebook store module, based on the selection of Menu Items, Menu will be displayed. All the links needs to be opened in facebook iframe itself instead of redirecting user to Website.
- Banner Image: In this field of Prestashop Facebook Store Setup addon, the admin can upload the banner image as well. If uploaded from Admin Panel, Home page of the Prestashop Facebook store will display the banner on Home page.
- Text: If any text added in admin, Home page of the Prestashop Facebook store will display the text block otherwise it will be not be displayed.
- Featured Categories: Featured categories section of the Prestashop Facebook Store Setup module will be displayed after “Text” section. Feature categories section will have category image, name of the category. Clicking on the same will redirect user to respective category page.
- Featured Products: Featured Products will be shown as per profile settings.
6.2 Other Pages
New Products page, Best sellers, category pages layout will be similar to below screen.
Now you are ready to have your Prestashop Facebook Shop giving your customers a way to connect with you with just one click. Clicking on the “Add to cart” option, the customer is redirected to your store to have a secure shopping experience.
Find below more details about this Prestashop Facebook Store Addon by Knowband:
Prestashop Facebook Store Module Link: https://www.knowband.com/prestashop-fb-store
Prestashop Facebook Store Module Admin Demo Link: https://ps.knowband.com/demo2/16/admin1/index.php?controller=AdminLogin&token=aea1bb3fb1bab860c86c4db00ce5949e&redirect=AdminModules&demo_lang=en
Prestashop Facebook Store Front Demo Link: https://www.facebook.com/knowbanddemo/app/227556457771171/?ref=page_internal
Get this Prestashop Facebook Store Plugin by Knowband on Addon Store as well. Visit: https://addons.prestashop.com/en/products-on-facebook-social-networks/28252-knowband-fb-store.html
Please contact us at support@knowband.com for any query or custom change request as per your business requirement.
You Might Also Like: