1.0 Introduction
eBay Marketplace Integrator for Magento 2 offers the quickest means to the Magento 2 store owners to integrate their store with the very popular eBay marketplace. The eBay integration allows the merchants to manage the inventory and orders from a single interface.
Headquartered in San Jose, California, eBay is a multinational eCommerce corporation that popular as an online auction and shopping site. It facilitates consumer-to-consumer and business-to-consumer sales and offers an easy and customizable interface for sellers across the globe to list and sell their products effortlessly. eBay operates in over 30 nations. The product listing of eBay combines 800+ million product listings that are not just unique but are even coupled with great deals.
eBay Marketplace connector module for Magento 2 offers a smart solution to the e-merchants to integrate their store with the eBay Marketplace. The store admin can list products to the marketplace and sync the orders from the marketplace to their Magento 2 store.
1.1 Merchant benefits of eBay Integrator for Magento 2:
- The Magento 2 eCommerce sites can easily expand their reach by integrating their store with the popular marketplace with the help of this eBay integrator for Magento 2.
- The eBay API integrator for Magento 2 allows the store admin to sell their products to a larger audience base.
- eBay integration for Magento 2 allows the sellers to sync their site with any of the eBay sites.
- The eBay connector module for Magento 2 offers multi-currency and multi-lingual support that helps you offer the services according to the target customer.
- The eBay integration plugin for Magento 2 is easy-to-understand and the admin can start selling in the marketplace in a few simple steps.
- The user-friendly interface of the eBay connector extension for Magento 2 makes it easier for the store admin to manage their merchandise from a single platform.
- The merchants can add/remove the product, manage the details and inventory from the admin panel of the eBay integration plugin for Magento 2.
- The admin can manage the shipping methods for the eBay store from the admin panel of the eBay Marketplace connector extension for Magento 2.
- Profile-based product listing of the eBay API integration module for Magento 2 makes it easier for the merchants to list the products in bulk.
- Even the order processing becomes easier with the robust eBay API integrator for Magento 2.
- The seller can check the reason for the error product rejection and rectify accordingly from the back-end of the eBay integrator for Magento 2.
- The eBay API integration plugin for Magento 2 comes with free support for 3 months.
- The eBay connector extension for Magento 2 is easy-to-use. Further, the admin can configure it with the least effort.
2.0 Installation
Follow the following steps for installing the eBay Magento Marketplace integration extension:
1. Download the Magento 2 eBay connector extension package.
2. Unzip the package in your root folder of Magento setup via FTP manager (like Filezilla or WinSCP – download here: https://filezilla-project.org/).
3. In the admin panel, go to eBay Marketplace in the main menu.
4. The Magento 2 eBay Marketplace connector module is now ready for use.
This User Manual will guide the users through the Magento 2 eBay integration extension configuration and settings.
2.1 eBay Marketplace Integration- Seller Account Setup
To start selling on eBay Marketplace you need to have a seller account on eBay. In this section, we are listing all the steps to create a seller account on eBay. Please find them below –
- Go to the link – https://go.developer.ebay.com/

- Click on the “Register” button for registration.

- After filling-in valid data click on join and you will head to the application creation page.

- Enter the application name and click on ‘Create a keyset’ under the Production section, a new form will be opened.

- Enter the details and click on Continue to create Keys.
- The application keys will be shown.

- To create a user token, click on the User Tokens link in the above image.

- Click on ‘Sign in to Production’ to get a token.

- Fill in the details and click on “Sign in to eBay to get a Token”.
- Sign into an already created eBay Seller account or register as shown below:

11. On clicking register and filling in details you will head to your Seller eBay account.

2.2 To Get a token from eBay via your application
- To create a user token, click on the User Tokens link in the below image.
Steps to reach this screen:-
A. Login into your developer’s eBay account.
B. On successful login, you will see the below-added screen.

- Click on “Get a Token from eBay Via Your Application.”
Steps to reach this screen:-
A. Click on “User Tokens” from the above screen.


- Click on add eBay redirect URL and fill the form and save.

- On clicking I agree from the right side form, you will head to the authentication page.

3.0 Admin Interface of eBay Integrator for Magento 2:
The Admin Panel of the eBay API Integration extension for Magento 2 offers 8 configuration options.
- General Settings
2. Shipping Templates
3. Profile Management
4. Product Listing
5. Order Setting
6. Order Listing
7. Synchronization
8. Audit Log

3.1 General Settings
Once you have created a seller’s account, you need to fill-up the form to validate the synchronization of the store with the marketplace. Navigate to Admin Interface>eBay Marketplace>General Settings.
Fill out the form shown in the General settings section. Each field for the configuration panel of the eBay connector plugin for Magento 2 is explained below:-

1. Enable/Disable
Enable/disable the eBay API integrator for Magento 2 by toggling this button.
2. Account Type
The admin can either choose the Sandbox account or the Production eBay account. The sandbox account is for testing purposes. While the Production account is for the final store integration.
3. Dev Id
Enter the Dev ID of your eBay account in this section. To find your Dev ID, sign in to the eBay developer account. In the application key section, you’ll find App ID, Dev ID, and Cert ID as shown in the image below.

4. App Id
Copy the App ID from your eBay account and copy the same in this field.
5. Cert Id
Enter the Cert Id of the eBay account in this section. You can find the Cert Id as shown in the above image.
6. RU Name
Enter the RU Name of the eBay account. To obtain your RU name, go to the ‘Get a Token from eBay via Your Application’ tab after adding a redirect URL.

7. Paypal Email
Enter a valid PayPal ID connected to your eBay account. Follow the steps mentioned below:
- Log in to your eBay seller account.
- Click on account settings from the top-left dropdown and click on Paypal account.

- Now Sign up or link your already created PayPal account with the eBay seller account.

- On clicking Sign Up, you will move to the PayPal account creation page. Just create a profile by filling in the details and linking it to your seller’s account.

8. Token Listing Link
Click on this link to add the tokens for eBay countries. To get the access token, you need to click on Sign in to Production as shown in the below image.

Sign in to the account from the form below:-

Click on I agree and get access tokens.

3.2 Shipping Templates
The Magento 2 store admin gets to create an N number of shipping templates from the back-end of the eBay Integration extension for Magento 2.
3.2.1 How to create New Shipping Templates?
To create new shipping templates, click on the ‘Add New’ button.

You’ll move to the shipping template creation page.
- Select eBay Site: First, select the eBay site for which you are creating the shipping template.

- Shipping Template Name: Enter a name for the shipping template.
- Shipping Service Type: Select the shipping service type.
- International Shipping Allowed: Switch on the button if you want to allow international shipping.
- Excluded Location: Select the locations (if any) that you want to exclude from this shipping method.

Fill the below-mentioned fields for domestic shipping:
- Domestic Shipping Service: Select the domestic shipping service from here.
- Free Shipping Allowed: Select ‘Yes’ if you want to allow free shipping services.
- Shipping Priority: Set the priority for the shipping methods. The options will display in the front-end as per the priority set.
- Shipping Cost: Enter the Shipping Cost that is chargeable.
- Additional Cost: Specify the additional cost that is chargeable.
3.2.2 How to Edit/Delete Shipping Templates?
The admin can edit/delete the shipping template by entering the Edit or Delete button as highlighted in the image below:

3.3 Profiles Management
The eBay Marketplace Integrator plugin for Magento 2 offers an option of the profile-based product listing. The profiles created in the admin interface of the eBay connector plugin for Magento 2 can be viewed in this tab. The admin can create a new profile and edit or delete the already created profiles.
3.3.1 How to Add New Profiles?
Follow the steps, to create new profiles, Go to the Admin Panel>eBay Marketplace>Profile Management.
Click on the ‘Add New’ button as shown below:

The profile creation tab of the eBay Integration plugin for Magento 2 is categorized into three tabs. They are:
- General Setting
- Profile Return
- Profile Specifics
3.3.1.1 General Settings

Once the admin selects the eBay site, he has to enter the following information.
eBay Currency: The currency will be automatically selected as per the eBay site selected by the admin. The store admin can even change the currency if required.
Store Language: The store admin needs to select the language as per the selected eBay site.
Shipping Template: The shipping options created in the Shipping Template Tab will be listed here. Select the shipping option that you want to display to the marketplace customer.

eBay Category: Select the eBay category from the dropdown menu in which you want to map the categories of the store.
Store Categories: Check the categories that you want to map in the selected category of eBay. The eBay integrator for Magento 2 allows the admin to map multiple categories of the Magento 2 store with a single category of eBay. To list multiple eBay categories, you are supposed to create multiple profiles.
Listing Duration: Select the duration for which the products of the profile are to be listed in the marketplace.
Product Condition: The default conditions are listed in the drop-down menu. Select the condition of your product.
Product Quantity: Enter the quantity of the product here.
Maximum Product Dispatch Time: Enter the maximum expected product dispatch time.
Allowed Payment Methods: Select the payment methods that you want to allow for this particular profile.

3.3.1.2 Profile Returns
The store admin can manage the return requests of the marketplace from the back-end of the eBay API integrator for Magento 2. Here are some of the customization options offered in this tab.

Return Allowed: Enable the button if you want to allow the return option in this profile.
Return Within: Enter the maximum number of days within which the return request should be initiated.
Refund will Process: As selected how the refund will be offered to the customer.
Return Shipping Paid by?: Select who will pay for the shipping cost of the returned product.
Return Description: Enter a short description for the return option here.
3.3.1.3 Profile Specifics
Profile specifics will appear as per the category of eBay selected in the General Setting tab of the Profile Management. This tab includes fields like Type, Brand, Model, Color, Features, and others. Fill up the fields as per the category selected and the product mapping will be done accordingly. The specifics marked by * are mandatory. Other specifics can be left blank.

3.3.2 How to Edit/Delete the existing Profile?
Click on the ‘Edit or Delete’ button to edit/delete the profile as shown in the image:

The admin can enable/disable the Profiles by selecting the option in the ‘Active’ tab.
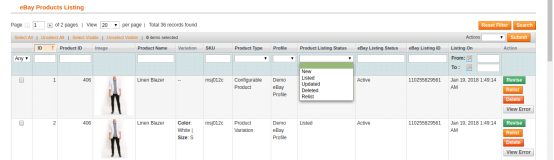
3.4 Product Listing
The store admin can view all the products listed in the marketplace from the Product Listing tab of the eBay Integration extension for Magento 2.
Here are some of the listing options offered in this tab of the eBay connector plugin for Magento 2.

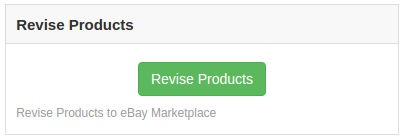
Revise
The store admin can click on the ‘Revise’ button to update any change in the product detail. Whether you make a change in the product description, pricing, or quantity of the products, all the changes will be updated in the marketplace by this button.
Delete
This option allows the admin to delete the product from eBay Marketplace. Click on the “Delete” action corresponding to each product listing if you want to remove it from eBay.com.
Disable Products
The admin can disable the products that are listed For this, click on the ‘Disable Product’ action.
Adding products from the product listings tab
If you want to add a product to the product listing tab, the admin has to create a profile of the product in the Profile section of the module. There you will get a step-by-step procedure of creating a profile and adding the product in the products listing tab.
Different statues in the filter of the product listing
Here are some different statuses in the filter of the product listing.

- New: After applying this filter, the admin can view the new products listed on the Marketplace.
- Listed: After applying this filter, the admin can view the listed products listed on the Marketplace.
- Updated: After applying this filter, the admin can view the updated products listed on the Marketplace.
- Deleted: After applying this filter, the admin can view the list of disabled products.
- Relist: After applying this filter, the admin can view the relist products listed on the Marketplace.
3.5 Orders Settings
The eBay connector for Magento 2 offers two-way integration. The admin can mark which status will display when an order syncs.
It includes three options:

Order Default State: Select the default status of the orders that will display in the marketplace.
Order Shipped State: Select the status for shipped orders.
Note –
- The default status is the first status of the order when it is placed in the store.
- Shipped status means that ordered items have been shipped.
To update the change in the order status by executing cron in the Synchronization tab of the eBay Marketplace connector plugin for Magento 2.
3.6 Orders Listing
The orders available from the marketplace will sync to the Magento 2 store. Furthermore, when the cron executes in the Synchronization tab.
The orders are listed as shown in the image below. To view the details and process the same click on the ‘View’ button corresponding to each order.
The store admin can now see the following details of each order.
It offers basic information like order date, status, billing and shipping address, payment information, gift options, item ordered, comments history.
3.7 Synchronization
The eBay integration for Magento 2 allows easy synchronization between both stores. All the synchronization jobs can be performed from this tab.
The synchronization tab of the eBay connector module for Magento 2 offers two synchronization options. That is Product and Order synchronization.

3.7.1 How to sync the products on eBay Marketplace?
Click on the “Sync Product Listing” button as shown below.

It will add products in the marketplace with the respective product details.
3.7.2 How to Relist the product on the eBay Marketplace?
Click on the “Relist Products” button as shown below.

This will relist the expired products in the marketplace. It will update the listing of the products whose relisting was initiated in the Product Listing tab.
3.7.3 How to Revise the product on the eBay Marketplace?
Click on the ‘Revise Product’ as shown below to revise the products on the marketplace. Any change in the product details, image, pricing, etc can sync by executing this cron offered by eBay Integrator for Magento 2.
3.7.4 How to Remove a product on the eBay Marketplace?
Click on the ‘Delete Products’ as shown below to remove products from the marketplace. The admin has to click on the ‘Delete’ button in the products listing tab before executing this cron eBay Integrator for Magento 2.

3.7.5 How to Import the listing report from the eBay Marketplace?
By executing ‘Get Products Listing Report’, the admin can import the report of the product listing from the marketplace. The eBay status column will fill up when this action executes by eBay Integrator for Magento 2.

3.7.6 How to sync Orders from the eBay Marketplace?
Click on the “Sync Orders Listing” button as shown below.

It would perform the following actions:
- The plugin will sync the Orders and related details from eBay Marketplace to the Magento 2 store.
- It creates the orders in the Magento 2 store as per the details of the order received from the Marketplace.
3.7.7 How to sync Order Status to the eBay Marketplace?
Click on the “Update Order Status on eBay” button as shown below.

It would perform the following actions
- The cron checks if there is any status update recorded by the eBay integrator for any order.
- The updates are then synchronized accordingly.
- It updates the Status of Orders as per the configuration settings modification in the “Order Settings” tab of the admin interface of the eBay Integration module for Magento 2.
3.8 Audit Log
This tab offers an overview of all the tasks being performed in the back-end of the eBay Integrator extension for Magento 2.

