Social Logins buttons on eCommerce sites can present retailers with a wealthy of opportunities if used rightly. Further, social logins are viewed as a required registration solution by 77% of users. According to studies, the 18-25 year (38 percent) and 25-35 year (33 percent) age groups are the most likely to use social logins.
Social login buttons come with various advantages, one of them is easy login and boost in consumer retention and visitation. In this blog, we will talk about other potential benefits of social login buttons in eCommerce.
Advantages of using social logins in eCommerce you must know
Customers get wide login options
If the business does not incorporate social login options, customers must register an account manually and log in to make purchases on the website. What about the use of social logins? Customers can choose and log in with the help of social networks with which they are already accustomed. Isn’t it true that having many options is preferable to having none?
Easily remember passwords and simplify authorization
One of the most significant benefits of social login is that it eliminates the need to memorize passwords. Customers find it irritating to have to create a new account and password every time they log in to another website. However, remembering all of the passwords for all of the accounts on those websites is a lot more difficult.
According to a survey, 86% of users are hesitant to create a new account simply because they don’t want to remember any more passwords.
Increase potential users
This feature is best for customers who abandon a purchase simply because they are having trouble creating an account or because they are lazy and find the processes to create an account to be tiring. As a result, easy account creation via social login aids businesses in growing their prospective client base by increasing the number of customers that create accounts.
Accuracy data gathering
When making accounts on websites, many people supply false personal information. They normally simply create an account to place a purchase because they don’t expect to return. This makes it harder for the company to gather data and assess customers. It is also more difficult to contact customers or send emails to notify and introduce products in the future.
When checking in using social login, however, the situation is different; all of the customer’s personal information is accurate. The company will then be able to tackle the difficulty mentioned above as well as have a reliable supply of client data.
Prestashop Social Loginizer Addon
Prestashop Social Loginizer Addon is one of the most useful modules for Prestashop store owners who want to improve their store’s user experience. Moreover, the addon results in higher sales and conversions.
Key benefits of Prestashop Social Loginizer Addon:
Store owners get a simple to use interface
The registration and login process becomes simple.
Store merchants receive the customized and mobile-friendly design.
14 different social login possibilities with the settings setup.
Offers both creating as well as tracking reports.
Social Login for Opencart
Installing Social Login for Opencart offers easy leads for your business that can be utilized for re-targeting as well as re-marketing to boost your online sales. Furthermore, the plugin permits your visitors to login with the assistance of social media networks. These even allow them to access your website swiftly and quickly. This addon even reduces online stores’ cart abandonment rate.
Key Features of Social Login for Opencart:
If the store admin allows customers, he/she can login using social login options.
With the assistance of the plugin, merchants can easily set up Facebook, Google, and Twitter and eight more social login options.
Boosts eCommerce store registrations.
Multiple stores are supported by the OpenCart Twitter Login plugin.
Compatible with a variety of themes.
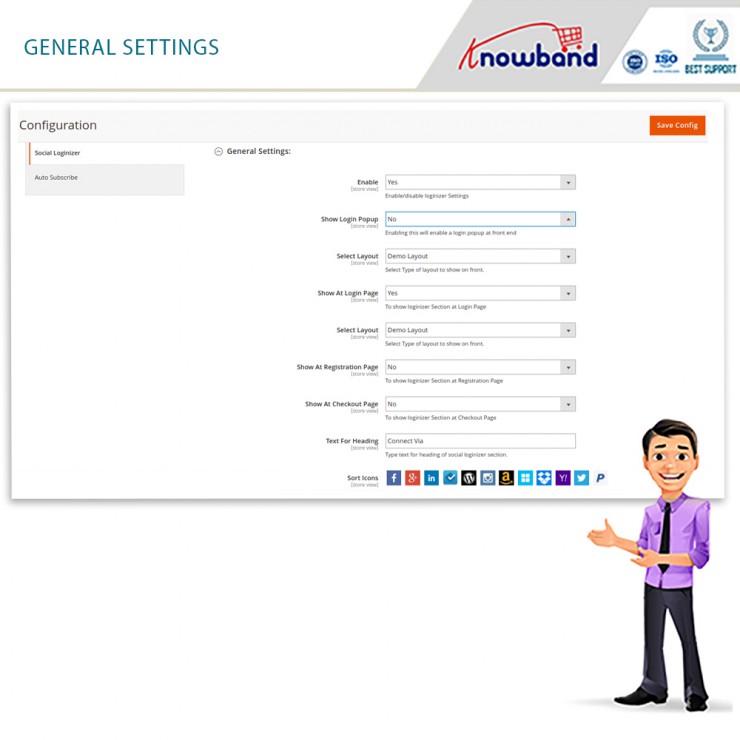
Magento social loginizer
Magento Social Loginizer improves their store’s user experience hence it’s great for store merchants. Furthermore, the plugin helps in improving sales as well as conversions.
Key benefits of Magento Social Loginizer:
The plugin offers an easy interface.
The plugin provides easy registering as well as a logging-in process.
Provide mobile-friendly design as well as customized.
Each with its setup settings offers 15 different social login choices.
Offers a feature of creating and tracking reports.
Magento Social Loginizer (12 in 1)
Magento Social Loginizer (12 in 1) is a popular andbeneficial login/signup method these days is a social login. The addon enhances online user engagement by permitting users to join/login without having to create an account. Due to this add-on, clients don’t have to fill out a tedious form. Moreover, store admin can login easily and quickly by integrating social networking sites without any complicated implementation.
In case users already have social media accounts on Facebook, Twitter, LinkedIn, Instagram, and a variety of other networks can sign up immediately with this Magento 2 Social Media Login extension.
Key Features of Magento 2 Social Media Login Extension:
Provides online users with a simple login/signup mechanism.
Allows you to choose from a total of 12 Social login choices and each with its own set of customizable options.
Permit to generate and track social login/signup reports.
Allows customizing and styling the style and feel of the social login/signup buttons.
In case you face any difficulty, feel free to write us at support@knowband.com.
Prestashop Social login module by Knowband allows your customers to register and login to your Prestashop store by using their social accounts from 13 social networks such as Facebook, Google Plus, Twitter, Foursquare, Live, WordPress, etc. This social login Prestashop module not only enhances your user’s experience but also increases sales and conversions.
Why use this Prestashop social media login plugin?
Prestashop Facebook login addon reduces the login/registration time of the customer.
This twitter login addon offers 14 social login/registration options.
Prestashop Google+ login addon offers a user-friendly interface.
Social login addon enhances user experience.
Prestashop social media login addon is fully customizable.
Installation steps of Prestashop Social Media Login Plugin:
The folder structure of the Prestashop Social Login plugin folder.
Copy the whole folder named as social loginizer into your modules folder of the root directory of your PrestaShop store through FTP.
You can also upload the zip folder of the module by clicking on Add New Module button, which should appear just in the top right corner of the module listing page.
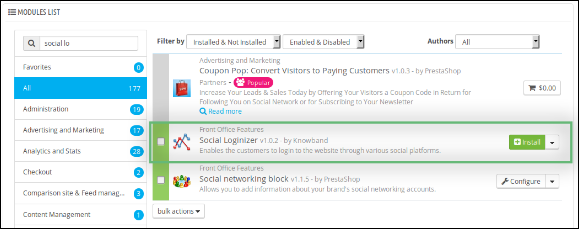
After that, you will be able to find the Prestashop social login plugin ready to be installed in the Modules in your PrestaShop store as shown below.
Click on the Install link to install this Prestashop social media login addon.
Admin Module of Social login Prestashop module
Here, the store owner can change the various settings of this Prestashop twitter login module by Knowband according to the requirements, which will be reflected at the front end as well as in the admin panel of the Prestashop Facebook login plugin.
After installing the social login Prestashop module into the store, this Prestashop plugin will provide the following tabs in the interface:General Settings
Facebook Settings
Google Plus Settings
Live Settings
LinkedIn Settings
Yahoo Settings
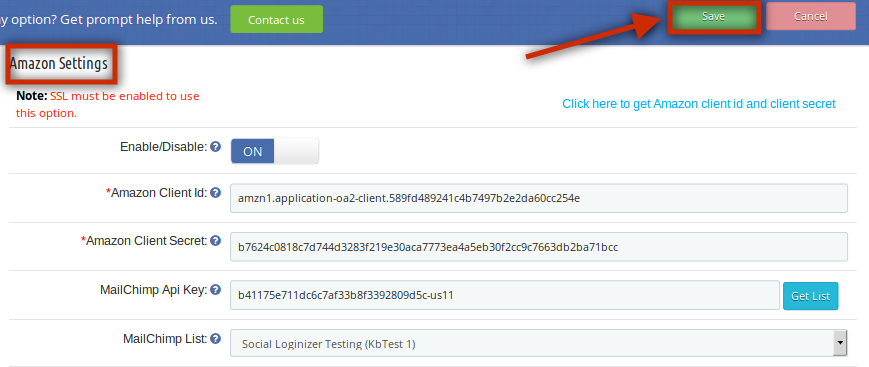
Amazon Settings
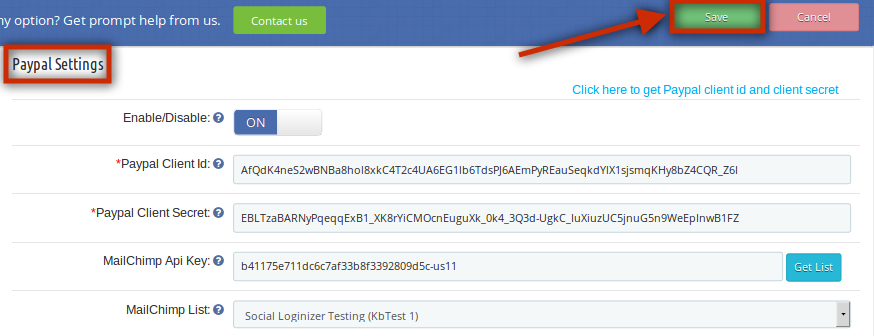
Paypal Settings
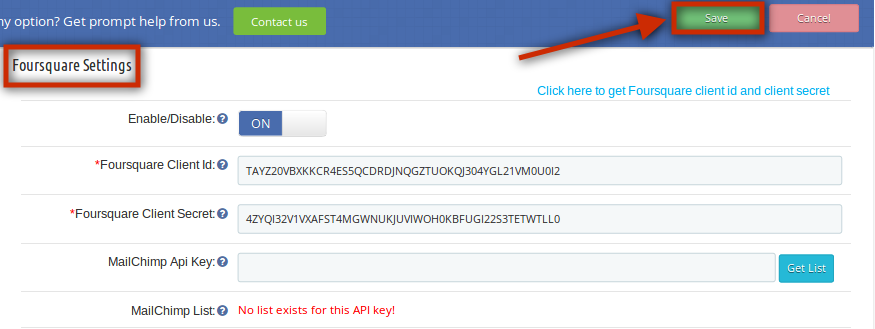
Foursquare Settings
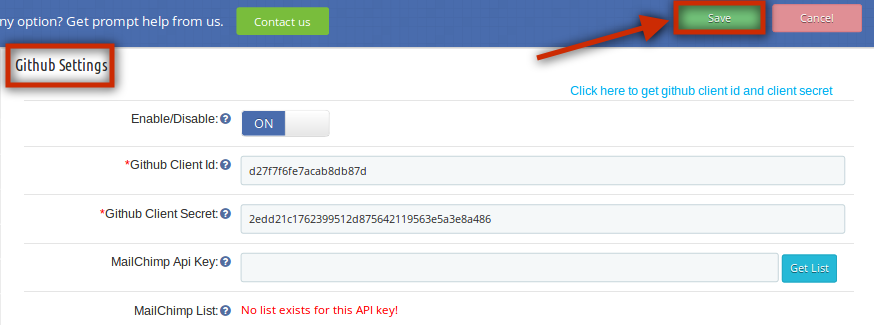
Github Settings
Disqus Settings
Vkontakte Settings
WordPress Settings
Dropbox Settings
FAQs
Suggestions
Other Plugins
Each tab is explained below.
General setting of Prestashop social login plugin:
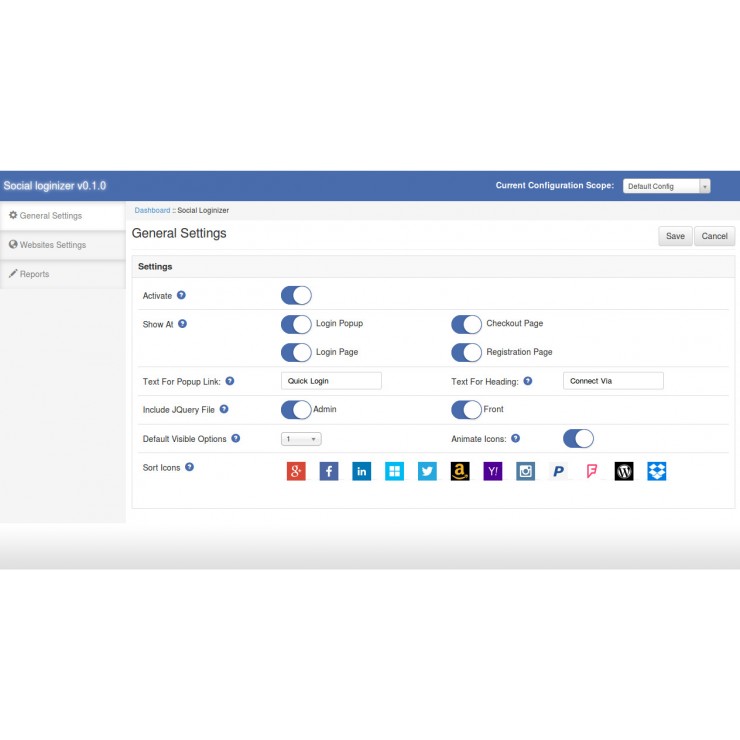
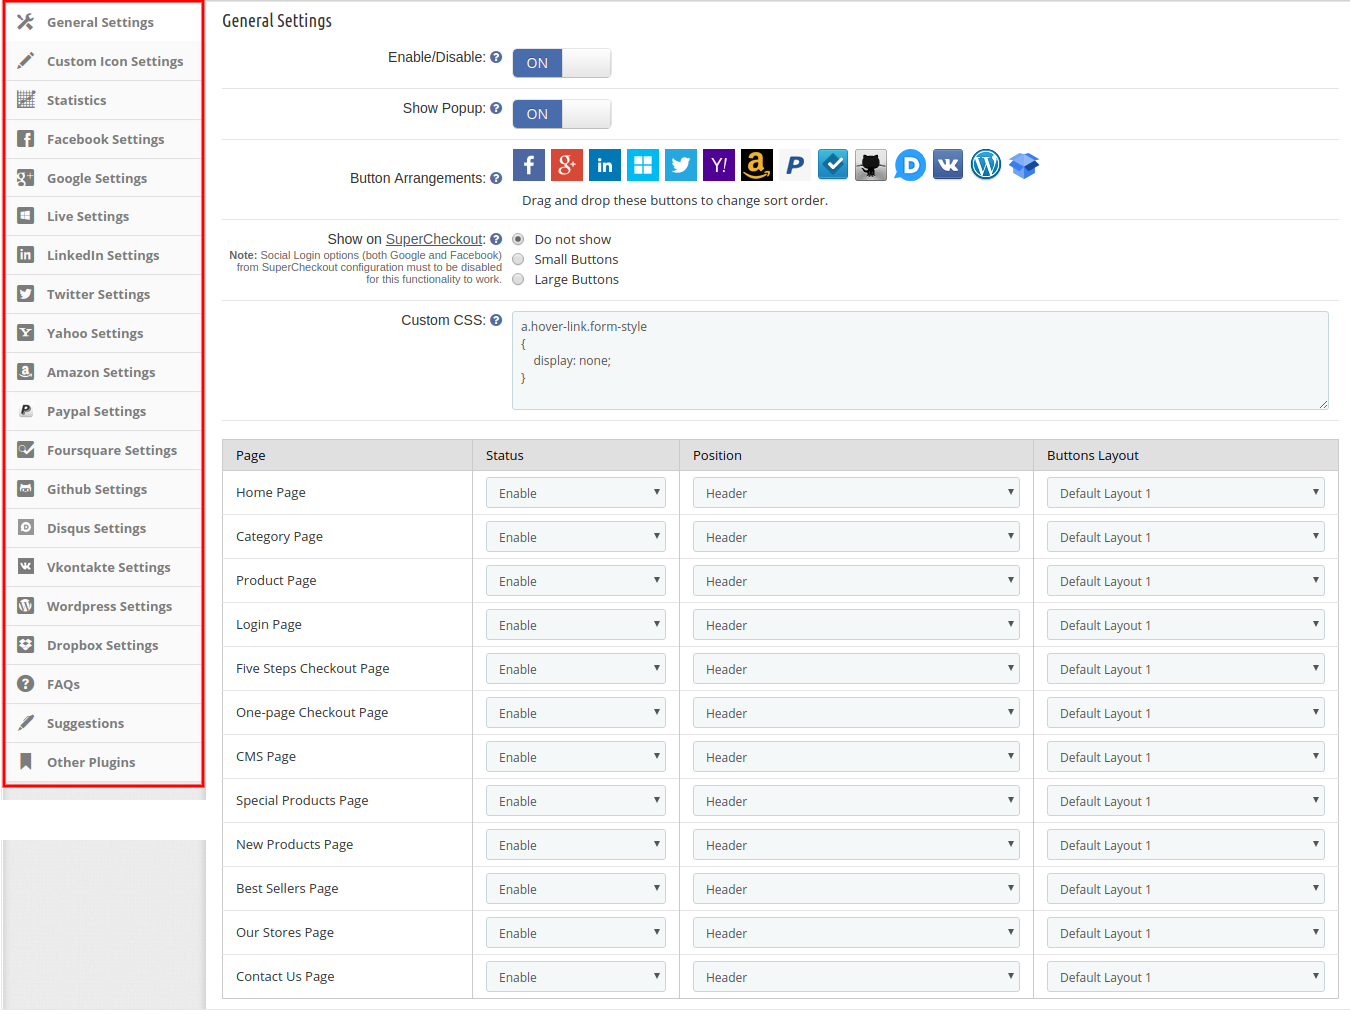
On clicking on the configure link on the module listing page (configure link will automatically appear once you install the plugin), the system will open the general settings tab of the Prestashop google+ login plugin by default as shown in the screenshot below:
Initially, fields in the above form will be already filled with their default values.
Enable/Disable: Initially, this field of the Prestashop social login plugin will be OFF. Admin can enable/disable the Prestashop social media login module by turning ON/OFF in this setting.
show Popup: After enabling this field of the Prestashop social media login plugin by Knowband, it will show the login popup when the customer will click on any of the social login options.
Button Arrangement: Here, in this field of the social login Prestashop module, the admin can change the sequence of the buttons as they appear at the front-end just by dragging and dropping the icon.
show on SuperCheckout: This field of the Prestashop google+ login plugin module allows the admin to show this Prestashop social media login plugin on the SuperCheckout page. The admin can also select the button sizes either small or large. If he doesn’t want to show this social login option, then he can disable this by selecting the “Do Not Show” option.
Custom CSS & JS: The Knowband Prestashop social media login plugin allows the admin to change the look and feel of the social login Prestashop plugin as per his choices.
The admin can also manage the status, position, and button size of the Prestashop social login plugin. Such as, at which page he wants to show the extension (Home Page/Category Page/Product Page/Login Page etc.), what would be the position of this Prestashop extension (Header/Footer/Left Column/Right Column), and what would be the size (Small/Large).
Custom Icon Settings of this Social login options module:
In Custom icon settings, the online store merchant can manage the look and feel of social login icons. There will be a list of layouts that can be added, updated, and deleted at any time as per the requirements. The list is shown below:
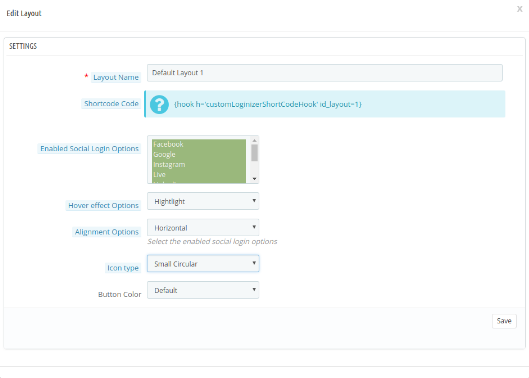
There are multiple customization options as shown below:
Layout name: Enter the name of the layout. Admin can also update the name of previously added layouts.
Shortcut code: Admin can copy and paste the shortcode in tpl to show the social login option as per your chosen position.
Enable social login options: Admin can select from various social login options for showing on the website front-end.
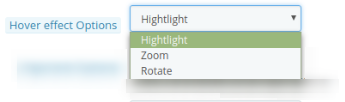
Hover effect option: Admin can select from several hover effects like he can highlight, rotate or zoom the social login icons.
Alignment options: Admin can align the social login options horizontally or vertically.
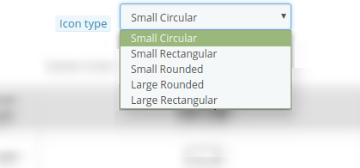
Icon type: Admin can set the icon type as small circular, small rectangular, small rounded, large rounded, and large rectangular.
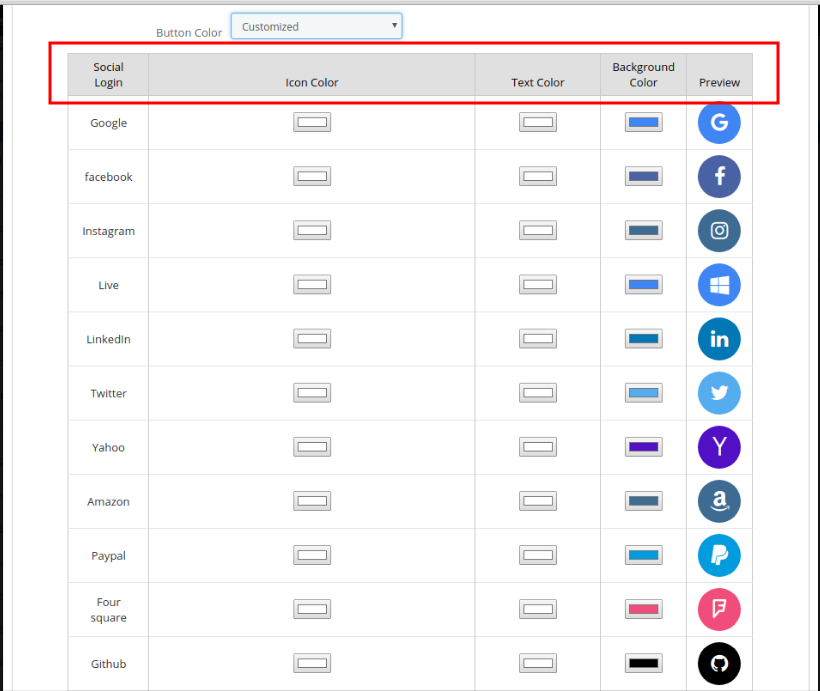
Button color: There are two options for button color. Admin can select the default button color or customize the button colors accordingly. Admin can select different colors from the color picker tool in the advance color selection option.
Statistics of Prestashop social login module
This field of the Prestashop twitter login module allows the store owner to view the report of Login and Registered users in graphical and tabular format. (Whether it is the social login or login with email id and password)
Facebook Settings:
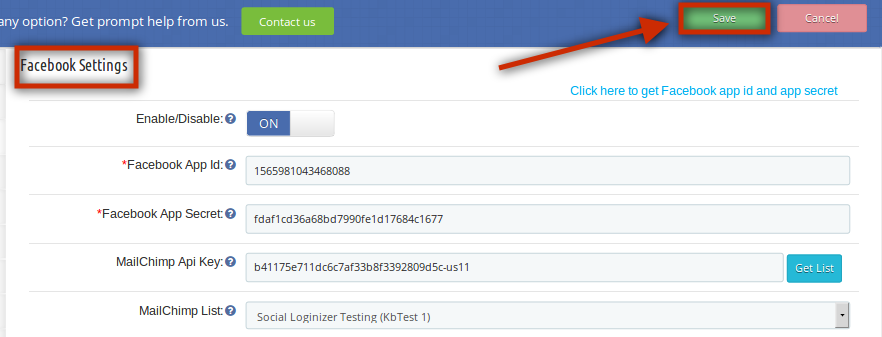
In this tab of the Prestashop Facebook login module, the admin can enable/disable Facebook login at the front end. Fill in the details and click on the ‘Save’ option. The following fields are mandatory:
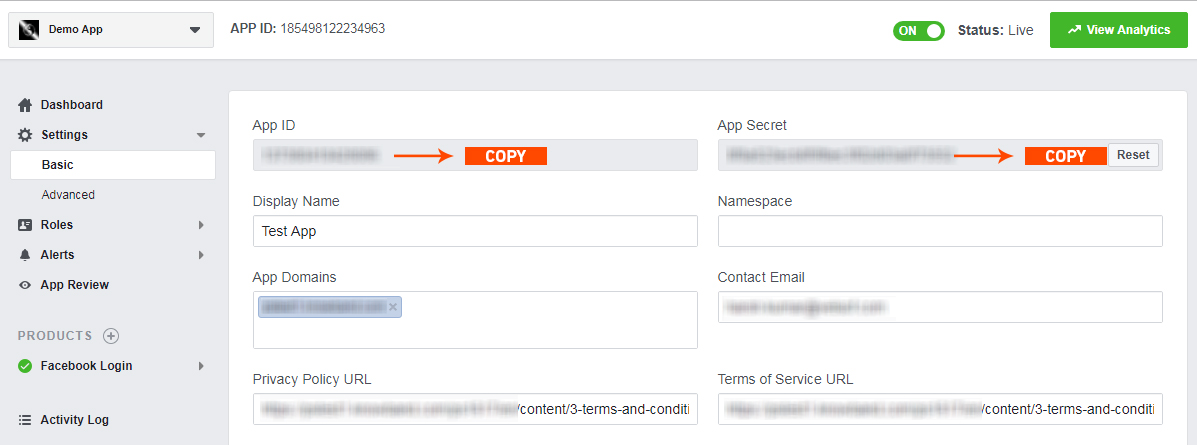
Facebook App Id
Facebook App secret
The above field values will be available once you create a Facebook App in the respective developer’s console.
Google Plus Settings:
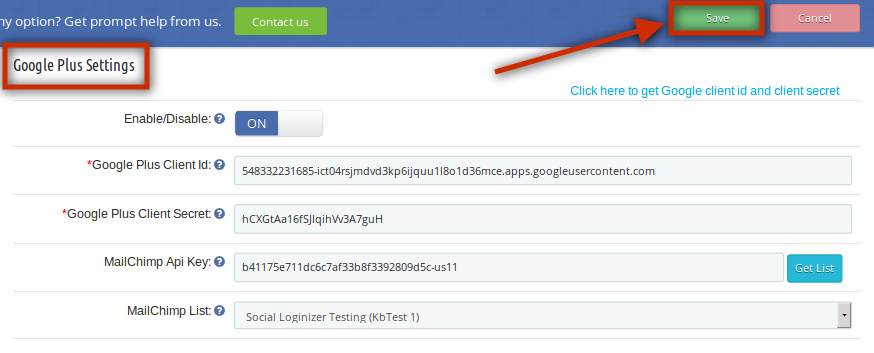
This tab of the Prestashop google+ login plugin allows the admin to enable/disable Google Plus login at the front end. Fill in the details and click on the ‘Save’ option. The following fields are mandatory:
Google Plus Client Id
Google Plus Client Secret:
The above field values will be available once you create a Google Plus App in the respective developer’s console
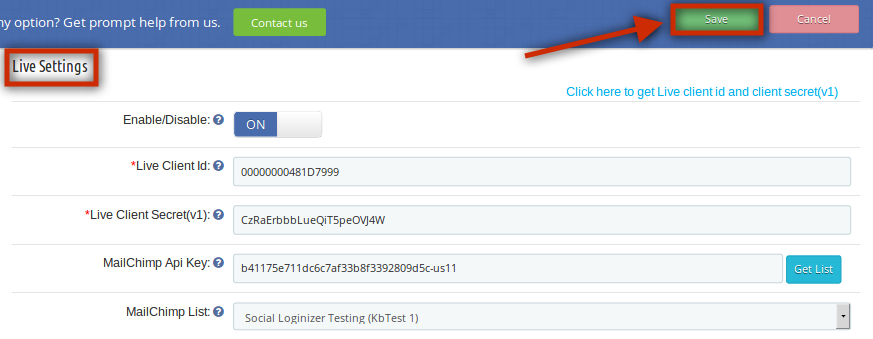
Live Settings:
In this tab of the Prestashop social media login plugin, the admin can enable/disable live login at the front end. Fill in the details and click on the ‘Save’ option. The following fields are mandatory:
Live Client Id
Live Client secret(v1)
The above field values will be available once you create a Windows Live App in the respective developer’s console
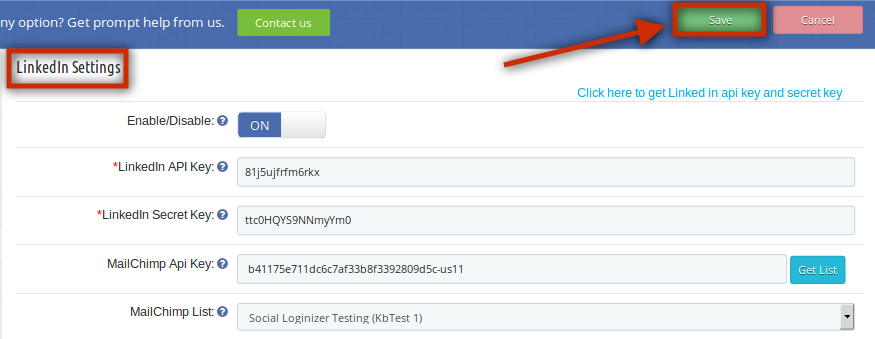
LinkedIn Settings:
In this tab of Prestashop social login extension by Knowband, the admin can enable/disable Linkedin login at the front end. Fill in the details and click on the ‘Save’ option. The following fields are mandatory:
LinkedIn API Key
LinkedIn Secret Key
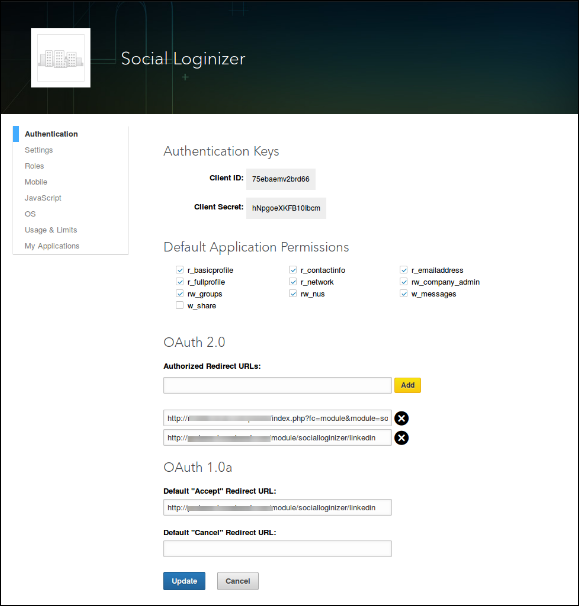
The above field values will be available once you create a LinkedIn App in the respective developer’s console.
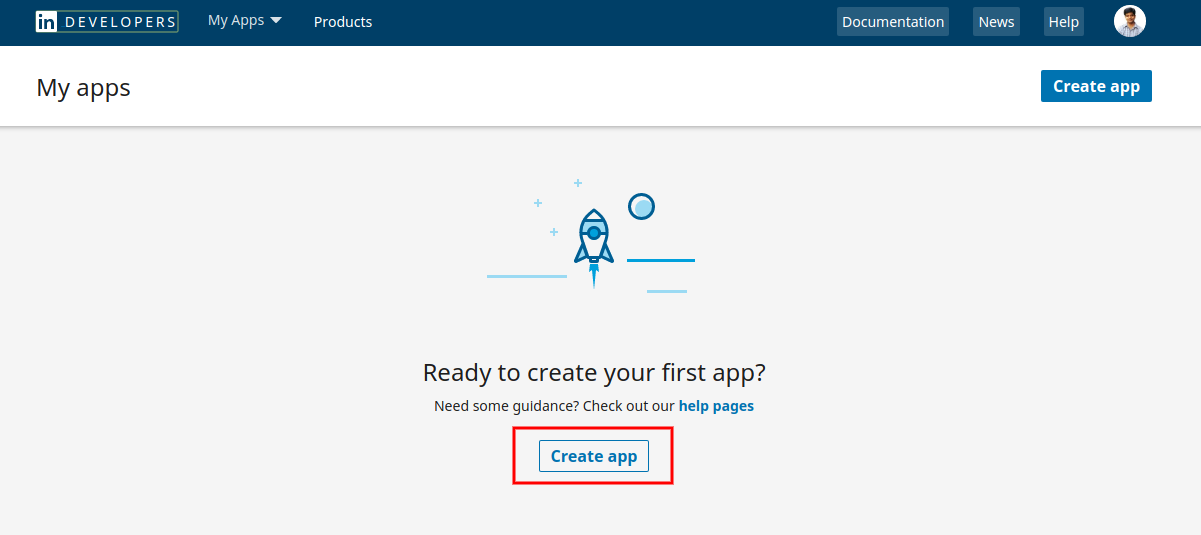
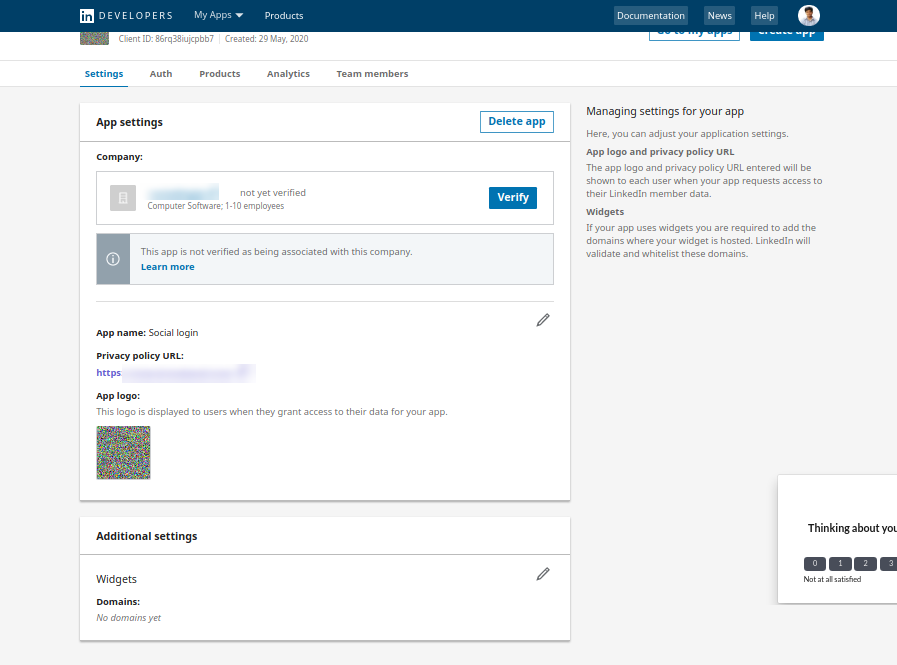
For setup, the admin needs to follow these steps:
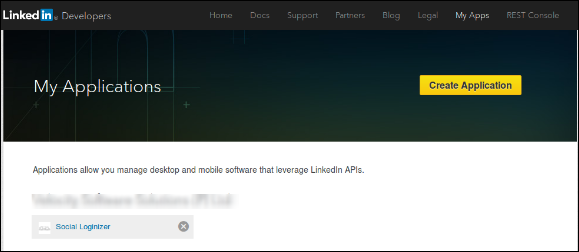
First of all, go to https://www.linkedin.com/developers/apps
Click on Create App option.
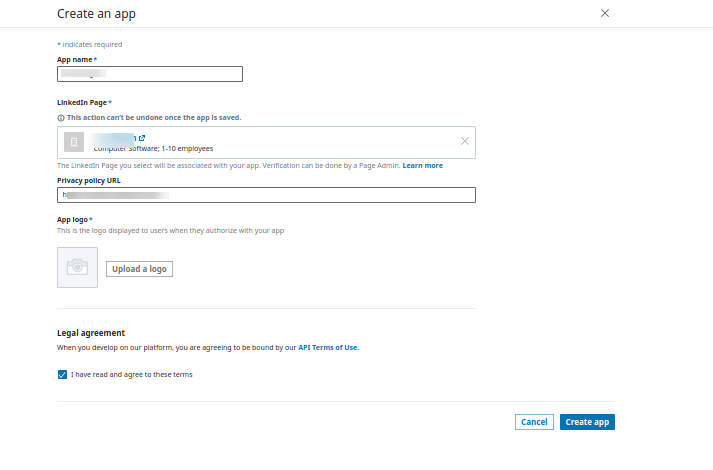
Now, Enter the details on the available form to register a new application. The website URL must be your Store URL like https://www.example.com.
After that, click on the create app button.
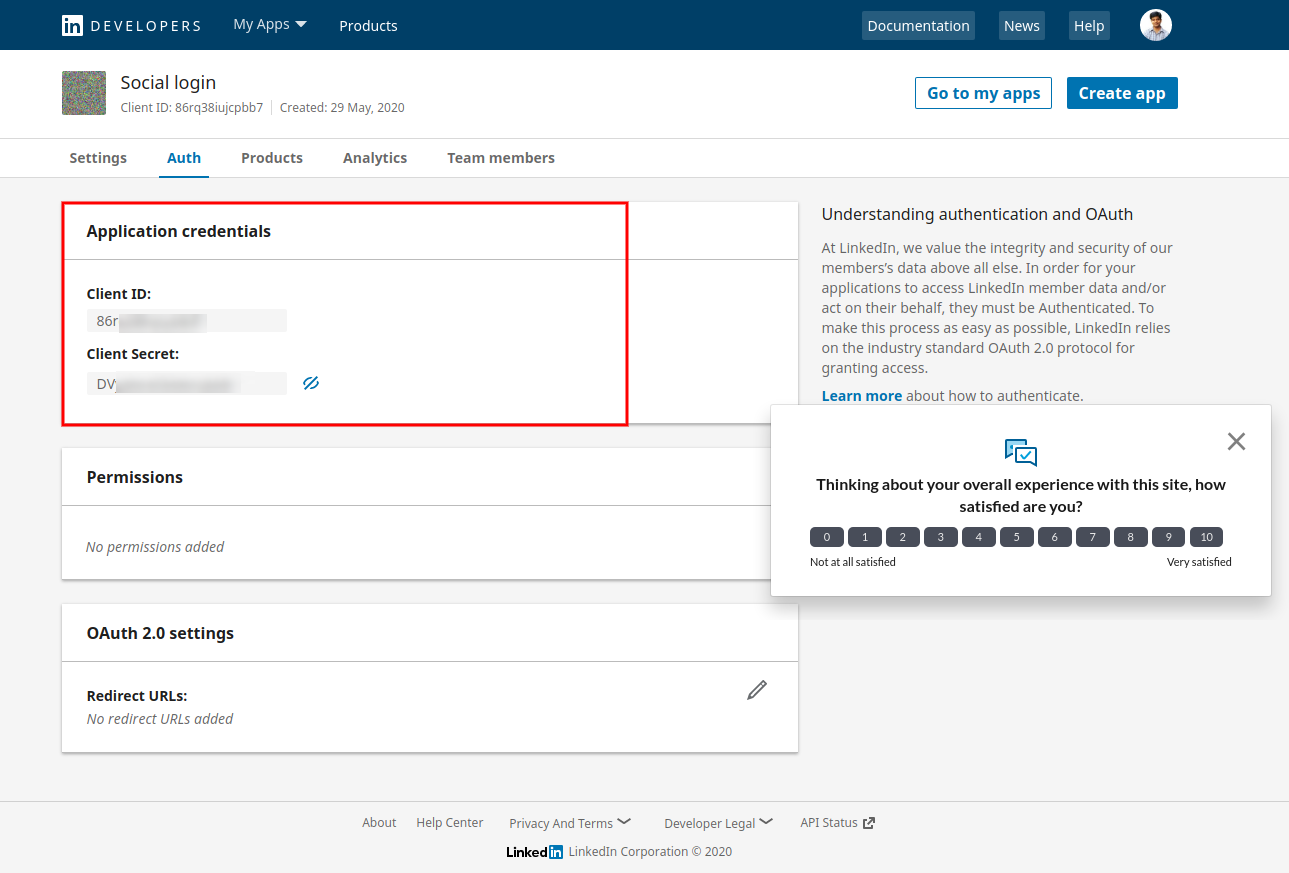
In the second option which is the auth section, the e-merchant can view the app Id and secret as shown below:
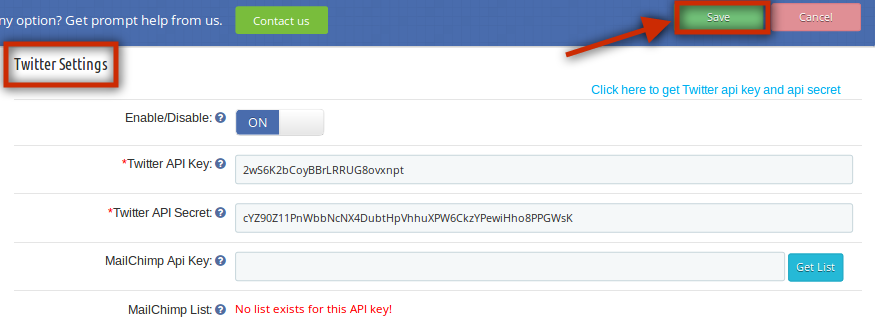
Twitter Settings:
This tab of the Prestashop social media login plugin allows the admin to enable/disable Twitter login at the front end. Fill in the details and click on the ‘Save’ option. The following fields are mandatory:
Twitter API Key
Twitter API Secret
The above field values will be available once you create a Twitter App in the respective developer’s console.
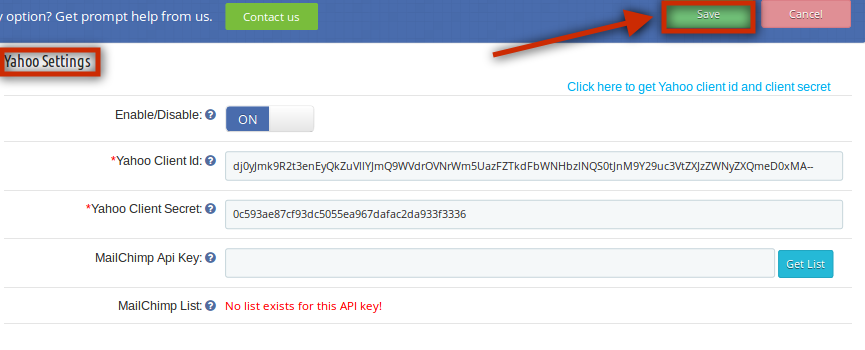
Yahoo Settings:
In this tab of the social media login Prestashop plugin, the admin can enable/disable Yahoo login at the front end. Fill in the details and click on the ‘Save’ option. The following fields are mandatory:
Yahoo Client ID
Yahoo Client Secret
The above field values will be available once you create a Yahoo App in the respective developers console.
Amazon Settings:
In this tab of the Prestashop social login plugin, the admin can enable/disable Amazon login at the front end. Fill in the details and click on the ‘Save’ option. The following fields are mandatory:
Amazon Client Id
Amazon Client Secret
The above field values will be available once you create an Amazon App in the respective developer’s console.
Paypal Settings:
In this tab of Prestashop google+ login addon, the admin can enable/disable Paypal login at the front end. Fill the details and click on the ‘Save’ option. The following fields are mandatory:
Paypal Client ID
Paypal Client Secret
The above field values will be available once you create a Paypal App in the respective developer’s console.
Foursquare Settings:
This tab of the Knowband Prestashop social login plugin allows the admin to enable/disable Foursquare login at the front end. Fill in the details and click on the ‘Save’ option. The following fields are mandatory:
Foursquare Client ID
Foursquare Client Secret
The above field values will be available once you create a Foursquare App in the respective developer’s console.
Github Settings:
In this tab of the Prestashop social media login module, the admin can enable/disable Github login at the front end. Fill in the details and click on the ‘Save’ option. The following fields are mandatory:
Github Client ID
Github Client Secret
The above field values will be available once you create a Github App in the respective developer’s console.
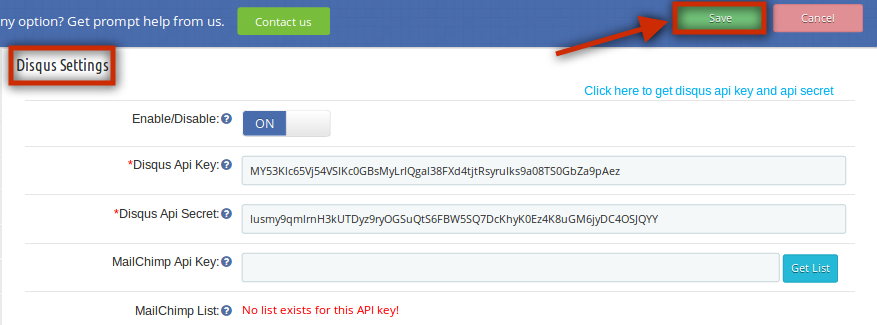
Disqus Settings:
In this tab of the Prestashop social media login plugin, the admin can enable/disable Disqus login at the front end. Fill the details and click on the ‘Save’ option. The following fields are mandatory:
Disqus API Key
Disqus API Secret
The above field values will be available once you create a Disqus App in the respective developer’s console.
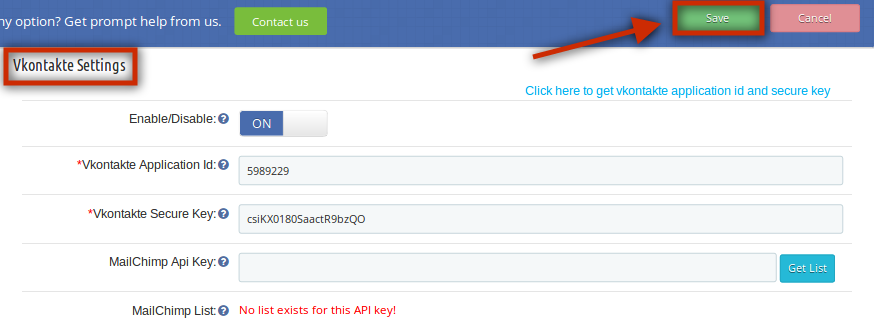
Vkontakte Settings:
In this tab of the Prestashop social login plugin by Knowband, the admin can enable/disable Vkontakte login at the front end. Fill in the details and click on the ‘Save’ option. The following fields are mandatory:
Vkontakte Application ID
Vkontakte Secure Key
The above field values will be available once you create a Vkontakte App in the respective developer’s console.
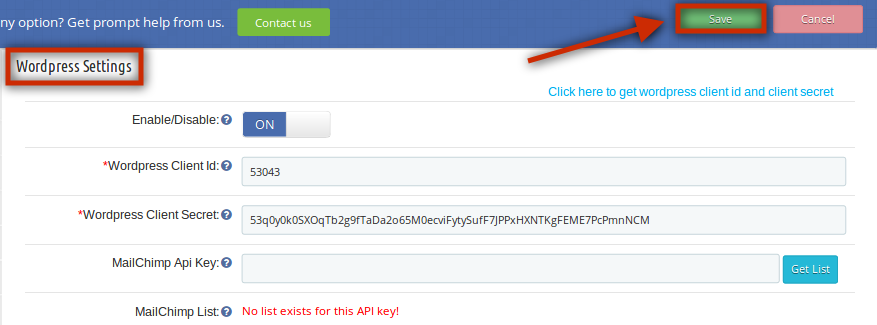
WordPress Settings:
This tab of the Prestashop social login module allows the admin to enable/disable WordPress login at the front end. Fill in the details and click on the ‘Save’ option. The following fields are mandatory:
WordPress Client ID
WordPress Client Secret
The above field values will be available once you create a WordPress App in the respective developer’s console.
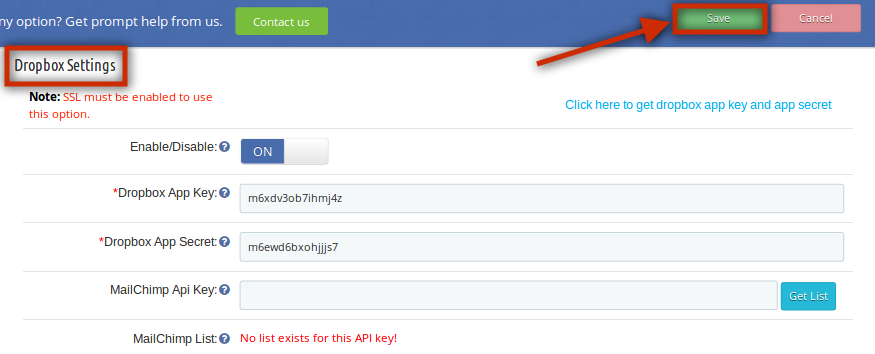
Dropbox Settings:
In this tab of the Prestashop Facebook login module, the admin can enable/disable Dropbox login at the front end. Fill the details and click on the ‘Save’ option. The following fields are mandatory:
Dropbox App Key
Dropbox App Secret
The above field values will be available once you create a Dropbox App in the respective developer’s console.
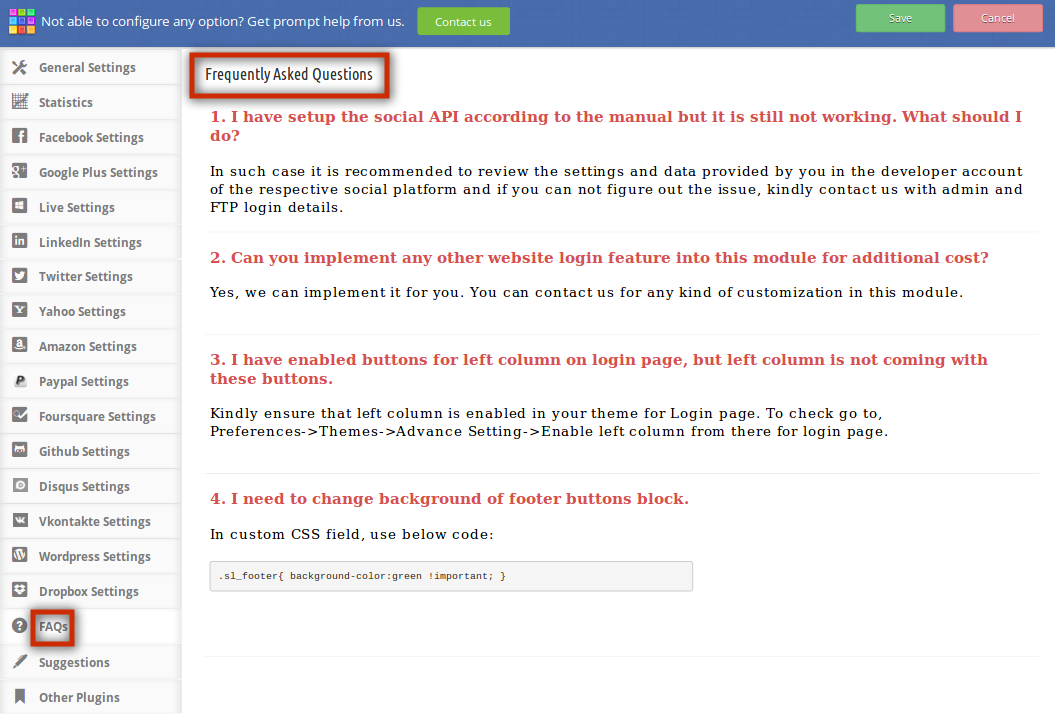
FAQs:
This tab of the social login Prestashop module contains several questions (with answers to them) that are asked by our customers. We recommend you go through the questions before raising any ticket for this Prestashop Facebook login plugin.
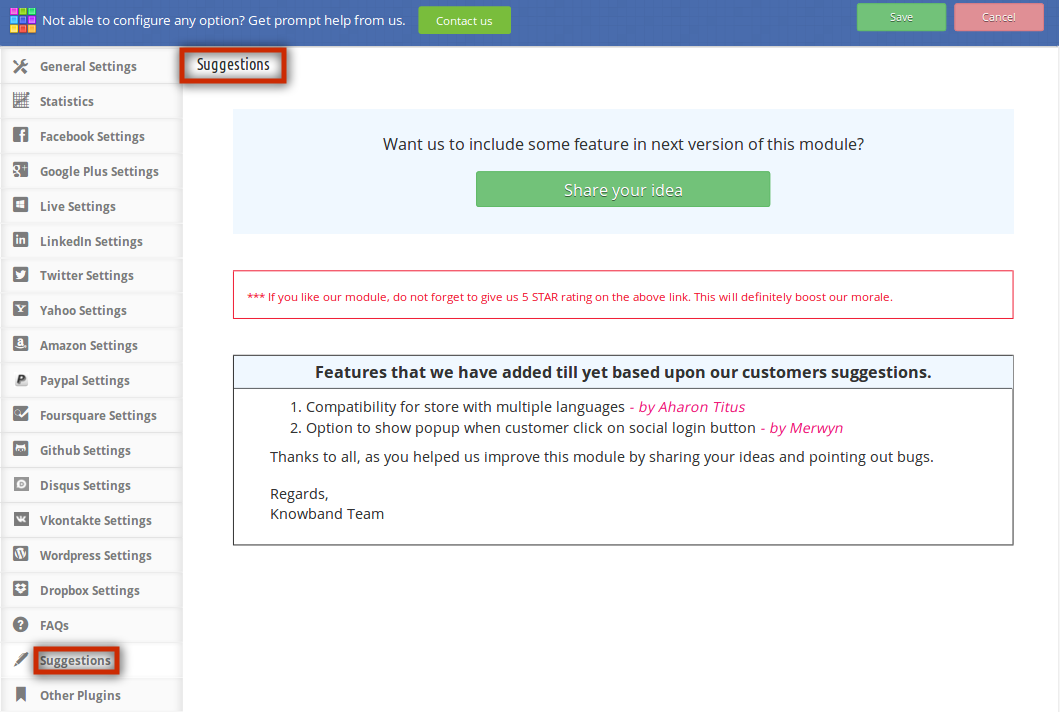
Suggestions:
In case you want to give any suggestions for some new features to be included in the new version of this Prestashop Google+ login plugin then you can use this tab.
Other Plugins:
This tab redirects to our developer page having the list of other plugins developed by us. If you like this Prestashop social media login plugin then you can try our other Prestashop plugins as well.
Front End Prestashop social login module:
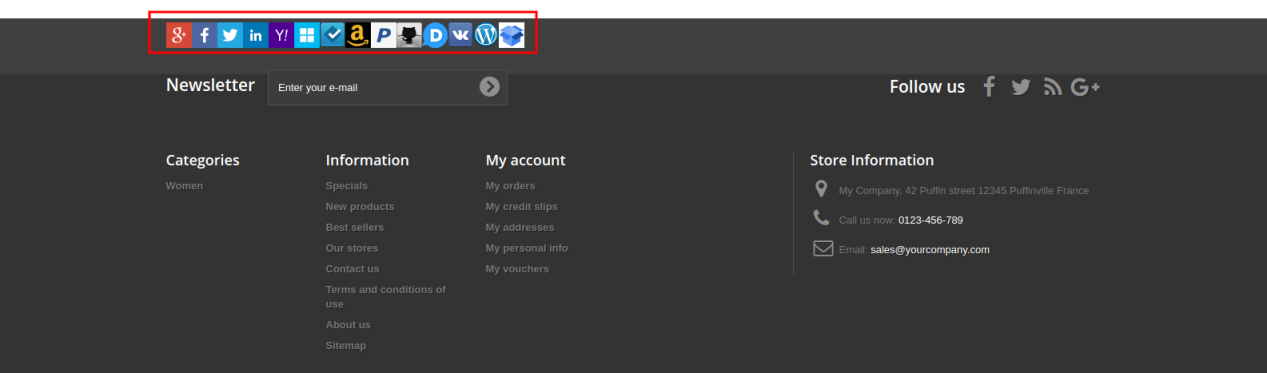
At the footer, the customers can view the social login options as shown below:
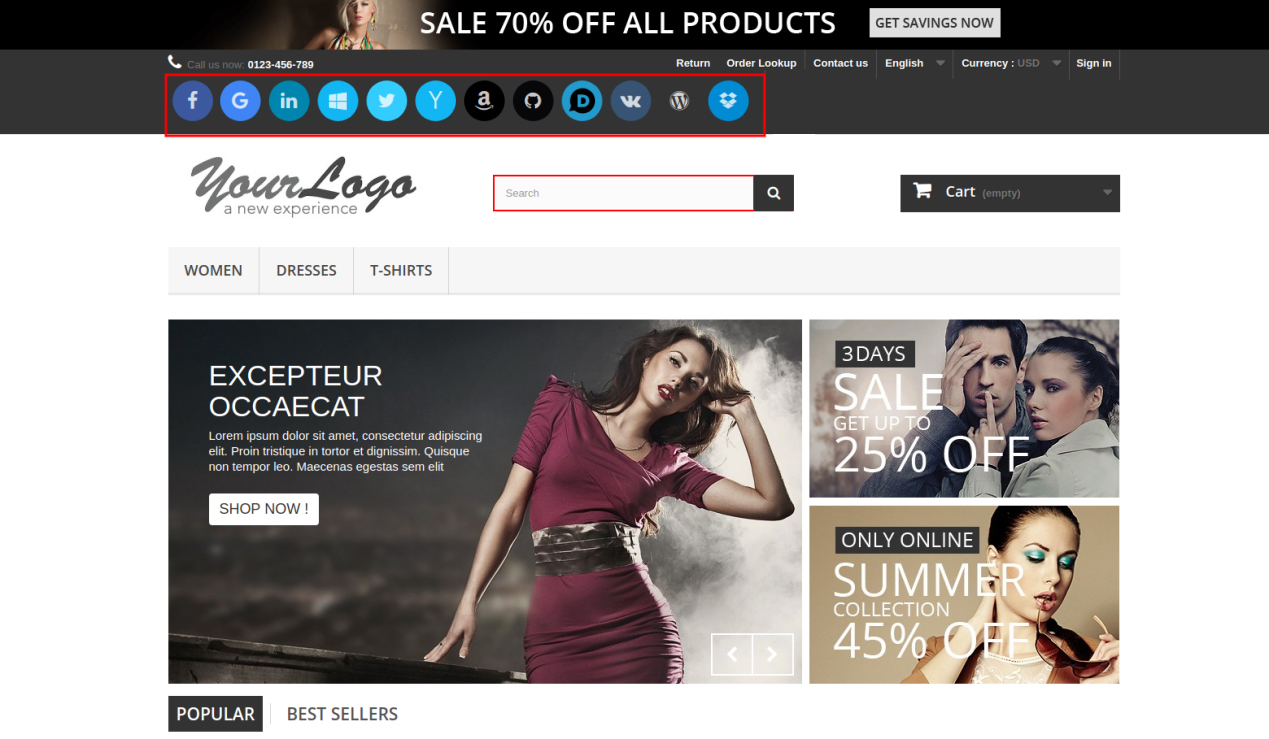
On the front end of this Prestashop social login plugin, customers can see the social login buttons near the ‘Sign in’ option as we have set the small button in the header of the website. Below is the screenshot of the same:
Short Code Functionality
In case you want to display social login buttons somewhere else where the module has no access. So, there is shortcode functionality providing you a way to display social login buttons anywhere throughout your site. To do this, you just have to put a line of code in your respective tpl file accordingly. The line of code is given below:
Code for display small icon: hook h=’customLoginizerShortCodeHook’ size=’small’
Code for display large icon: hook h=’customLoginizerShortCodeHook’ size=’large’
Recommendations:-
Refresh the home page of your store every time you enable/disable social media login Prestashop plugin. If Prestashop social login plugin is not working after installation then please check permissions on the modules folder. The folder should be writable. Please make the folder permission to 755.
How to get Facebook App details?
Facebook App can be created by following the below-mentioned steps:-
Step 1: Go to the given URL: https://developers.facebook.com/apps/
Step 2: Click on the “Add a New App” button.
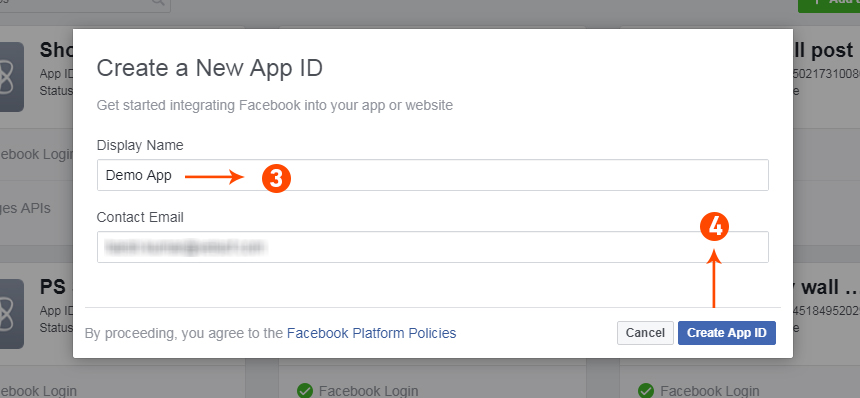
Step 3&4: Enter your App name and email id, then click on “Create App ID” button.
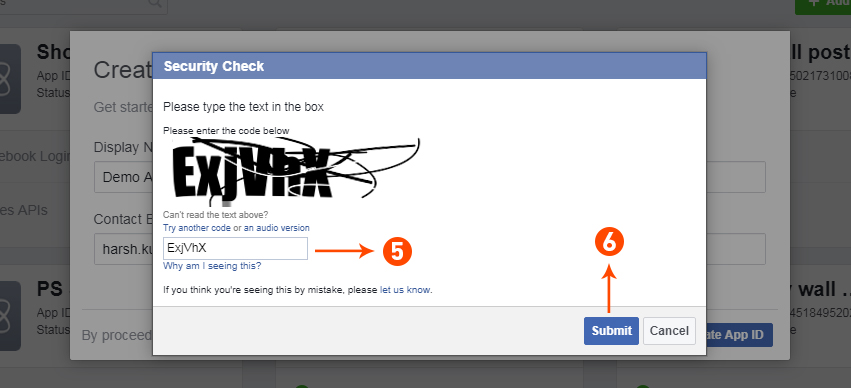
Step 5&6: After clicking on Create App ID you will have to go through a security check as shown:
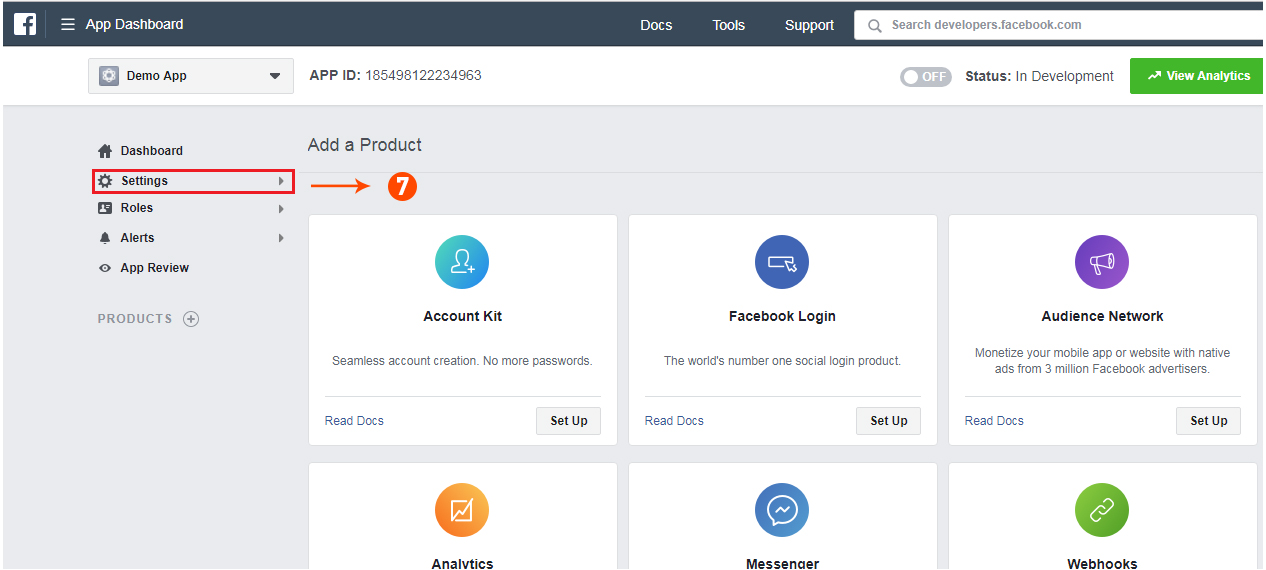
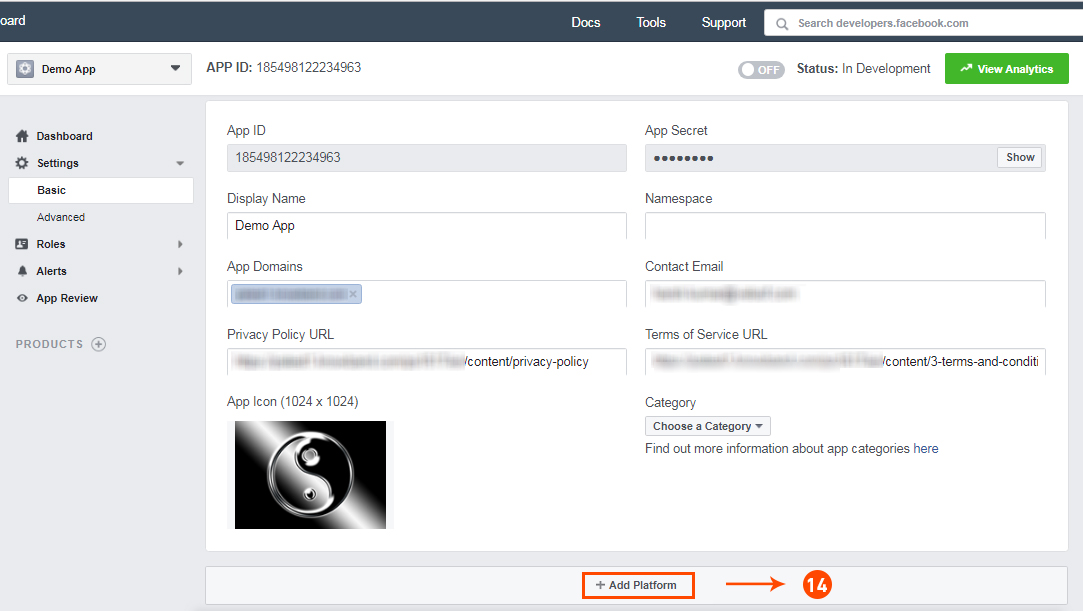
Step 7: Click on “Setting” tab.
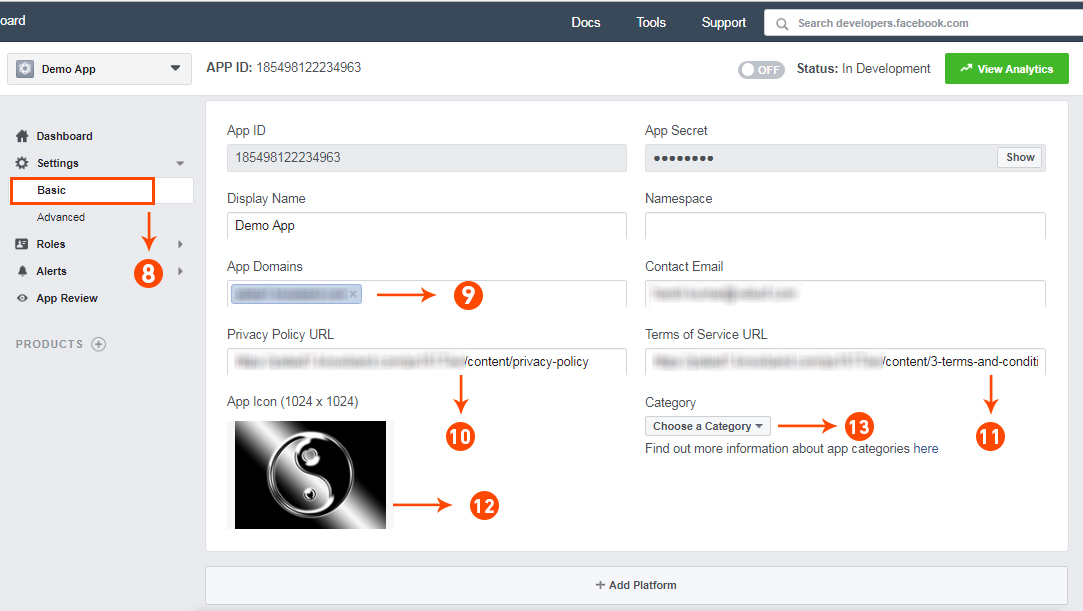
Step 8-13: Two options will be available in the dropdown, Basic and Advanced, click on “Basic”. And then enter your “App Domain”, “Contact Email”, ”Privacy URL”, ”Terms and Conditions URL”, ”Add Logo”, ”Select Category” and click on the “Save Changes” button.
App Domains:
yourdomain.com is correct
yourdomain.com/store is incorrect
www.domain.com is incorrect
Step 14: Now click on “+Add Platform”.
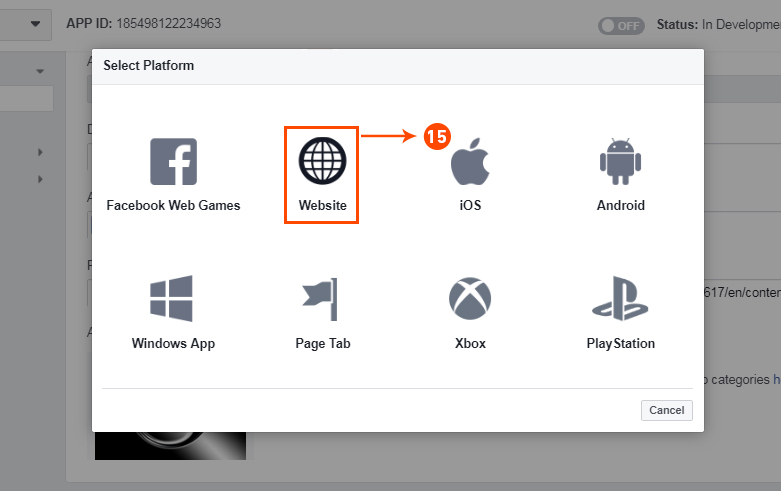
Step 15: And select Website as Platform
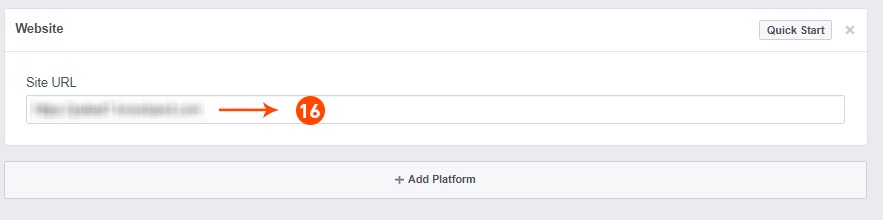
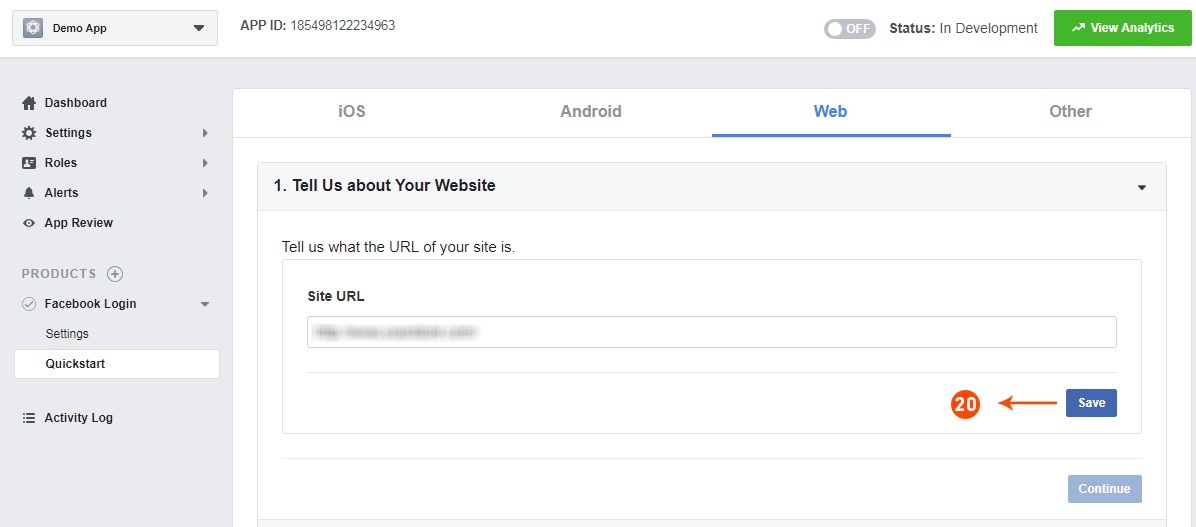
Step 16: Now Enter your site URL.
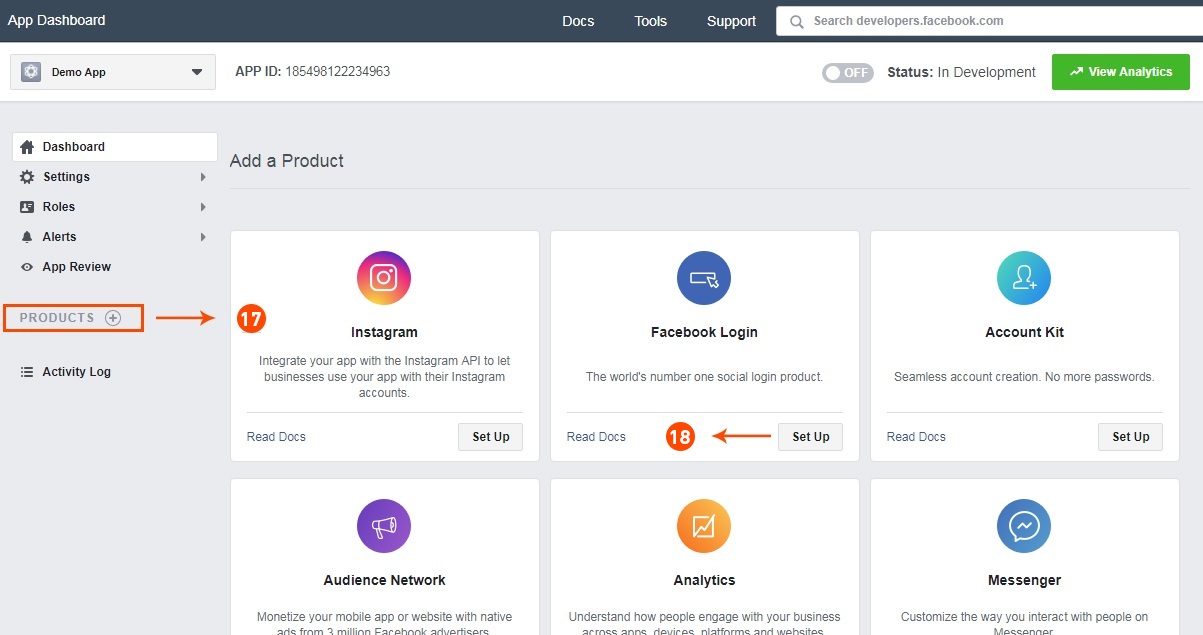
Step 17&18: Click on “Products+” and select Facebook login.
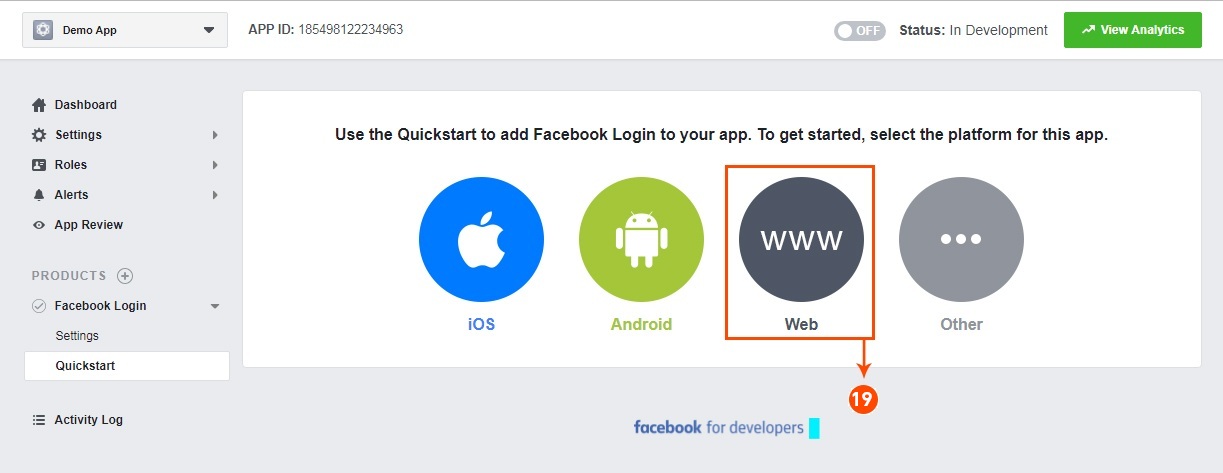
Step 19: Select web as the platform for the app.
Step 20: Now click on save.
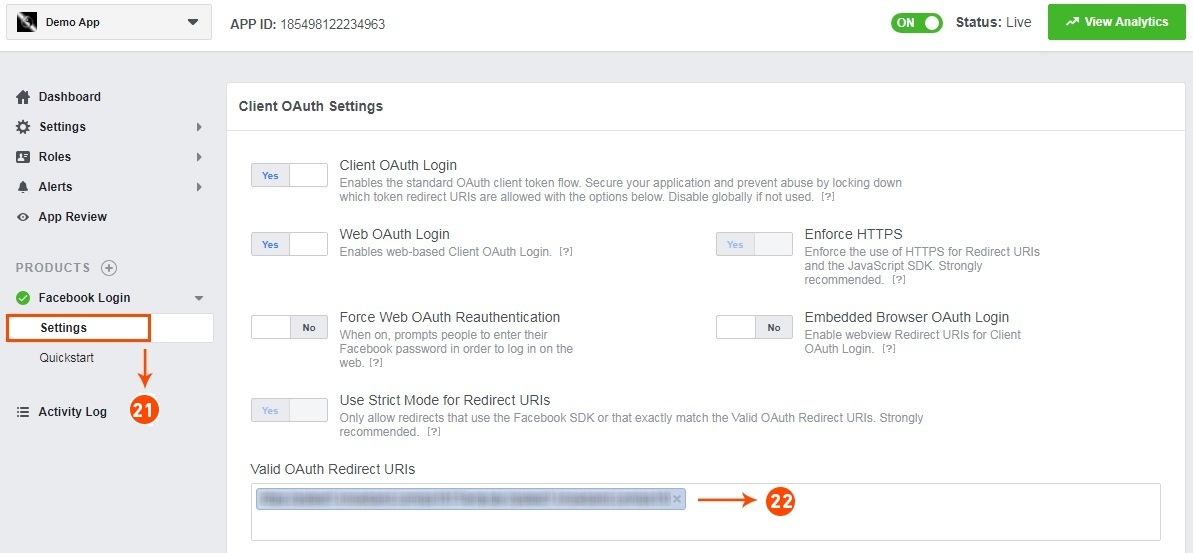
Step 21&22: Click on Settings and add a Valid OAuth Redirect URIs.
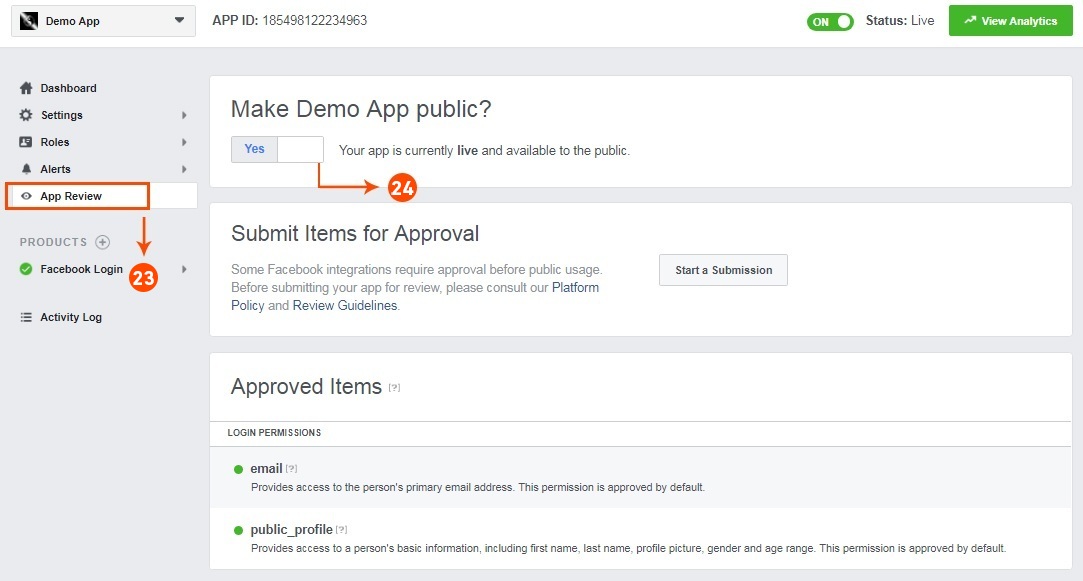
Step 23&24: Click on “App review”. And mark “Make ‘your app name’ Public” to Yes.
Final Step: Copy the App ID and App Secret and paste it into the fields provided in the module.
How to get Google App details?
Go to Google Developers Console (https://console.developers.google.com/project) or click on the link given top right of the respective tab on the module configuration page.
Now click on Create Project on the left of the page.
Enter a name for your project and proceed to the next step.
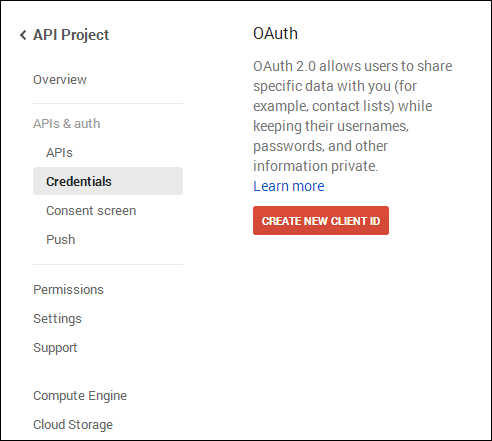
Now click on APIs and auth-> Credentials from the left menu as shown below.
Click Create New Client ID button from the right panel of the screen.
You may have to fill the form for Consent Screen before proceeding. To do so, that you have to click on Consent Screen in the left menu as shown in the image above.
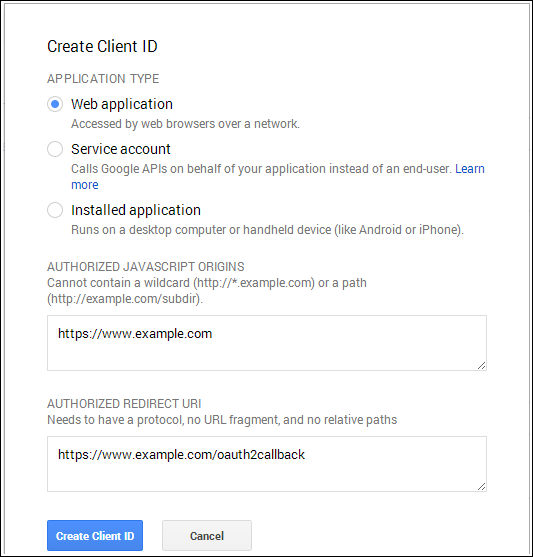
Fill the pop-up form with below details:
Application Type: Web Application.
Authorized JavaScript Origins: Your store domain name (https://www.yourstore.com).
Authorized redirect URI or URI of Loginizer redirect page:
In case you are using SEO Friendly URL for your store then use this –
Please make sure that the Default Application Permissions are selected properly in order to use the app. As shown in the above image.
Now you can use the API details of the app to let your customers login to your store using their linkedIn account.
How to get Live App details?
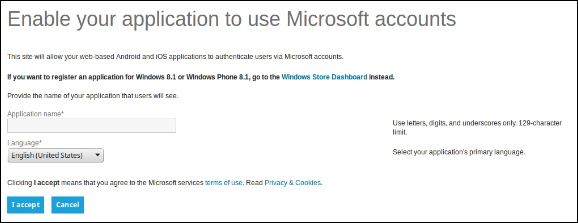
Go to Microsoft Development Center (https://account.live.com/developers/applications/create) or click on the link given top right of the respective tab on the module configuration page.
Enter the Application Name and click the I Accept button.
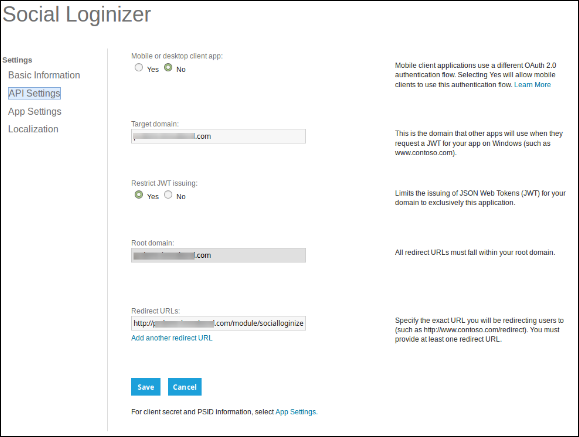
From the left menu select API Settings.
Now provide your store domain and Loginizer Redirect URL as
In Target Domain enter your domain name (example:- https://www.yourstore.com)
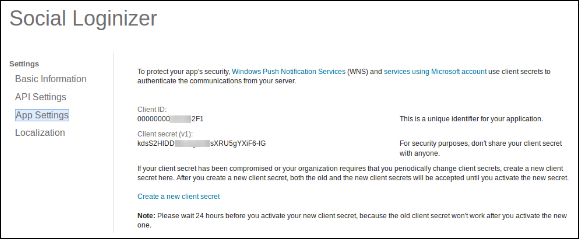
Now from the left menu click App Settings and copy your Client ID and Client Secret.
Now you can use the details of the application to let your customers login to your store using their Live or Microsoft Account.
How to get Twitter App details?
Go to Twitter App Management (https://dev.twitter.com/apps) or click on the link given top right of the respective tab on the module configuration page.
Click Create New App button.
Enter Application Details as follows:
Application Name: Name of your Application.
Description: 10 to 200 characters description of your application.
Website: Your store URL.
Callback URL: Loginizer redirects the page URL of your store.
In case you are using SEO Friendly URL for your store then use this for redirect URL –
Now, Click Yes, I agree, and then click Create your Twitter application.
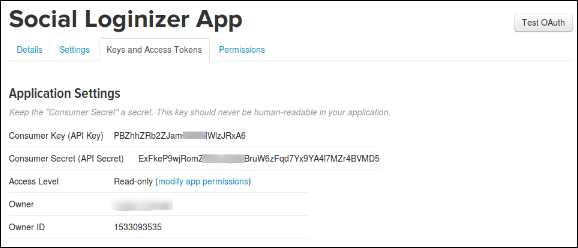
Next, select the Keys and Access Tokens from the menu below your Application Name and copy your API Key and API Secret.
Now you can use the details of the application to let your customers login to your store using their twitter account.
How to get Yahoo App details?
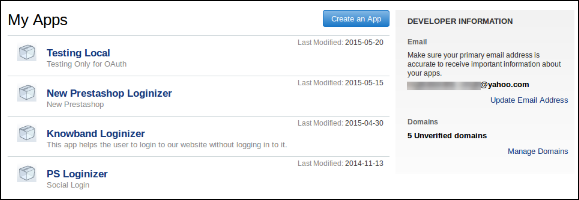
Go to Yahoo Developer Network (https://developer.apps.yahoo.com/projects) or click on the link given top right of the respective tab on module configuration page. Click on Create an App button to proceed.
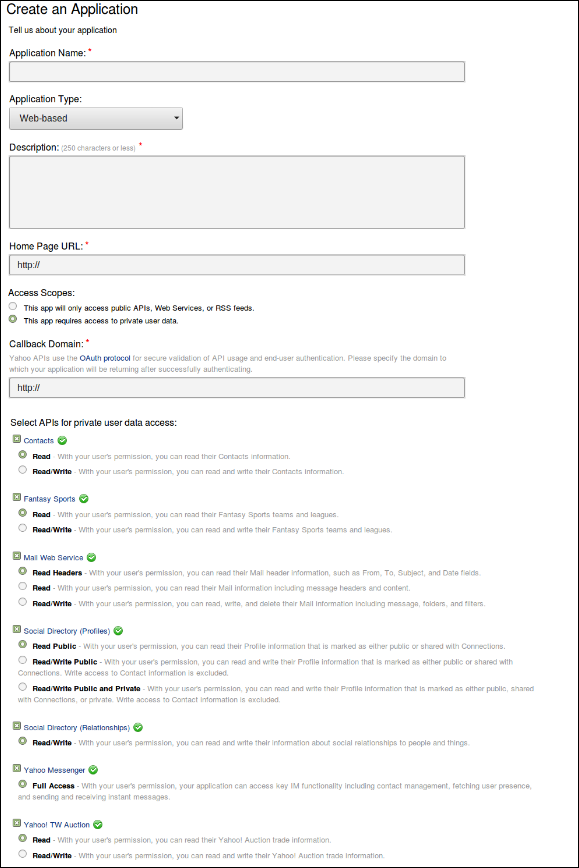
Fill in the required details as per instructions. Home URL will be your Store URL.
In case you are using SEO Friendly URL then use this for the callback domain:
Please make sure that the permissions for the app are properly selected while creating the App as shown in the image above.
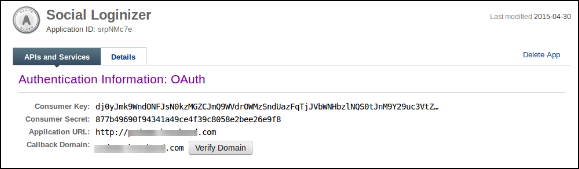
Once the application is created you can copy your Consumer Key and Consumer Secret.
Now you can use the details of the application to let your customers log in to your store using their yahoo account.
How to get Amazon App details?
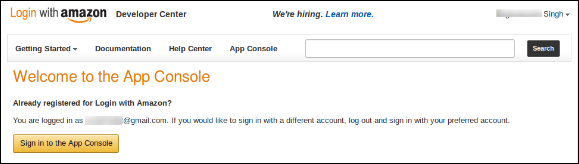
Go to Amazon Developer Network (https://login.amazon.com/manageApps) or click on the link given top right of the respective tab in the module configuration page.
Click on the Sign in to App Console button.
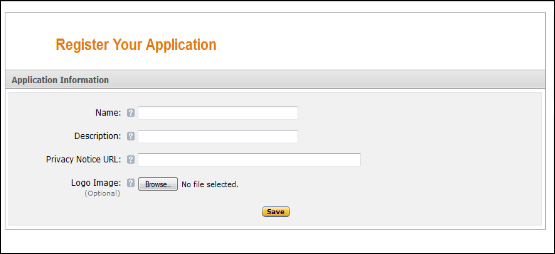
After successful login to App Console click on the Register New Application button in top right of the page and you will be redirected to the following page.
Enter Application Details as follows:
Name: Name of your Application.
Description: Description of your application.
Privacy Notice URL: Url of privacy policy page of your store.
Logo Image: Select the optional logo image of your store.
Click the Save button.
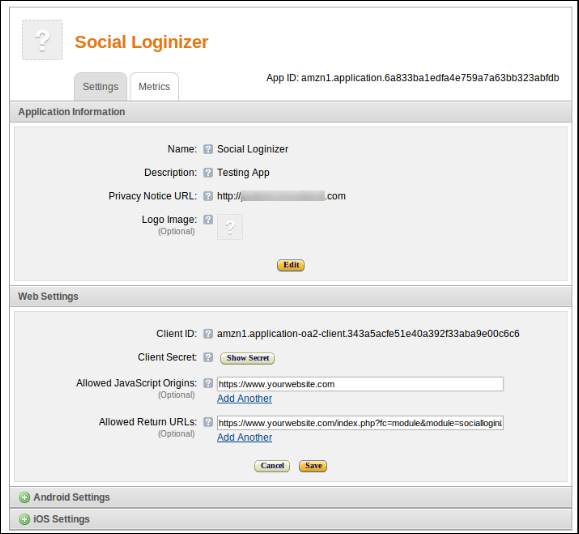
Now click on Web Settings to get your client id and secret.
Allowed Return URL: Loginizer redirects page URL of your store.
In case you are using SEO Friendly URL for your store then use this for redirect URL –
Note: To enable Amazon login into your website, your website must be secure with HTTPS otherwise Amazon login will not work.
Now you can use the client secret and client ID to let your customers login to your store using their amazon account.
How to get Paypal App details?
Go to Paypal Developer Network (https://developer.paypal.com/webapps/developer/applications/myapps) or click on the link given top right of the respective tab on the module configuration page.
Click on Create App button.
Now enter the name of your Application and click Create App Button.
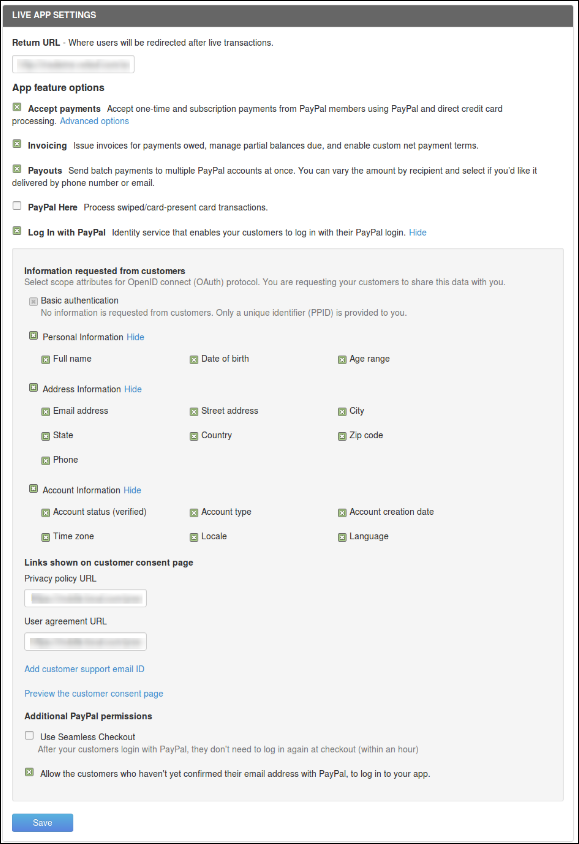
Set App return URL (live) as plugin redirect page URL of your store.
In case you are using SEO Friendly URL for your store then use this for redirect URL –