It’s 2020 & by now most online businesses have realized the importance of mobile applications. Mobile devices, especially smartphones, always remain switched on & connected to the internet & more importantly, they are in quick reach of the smartphone users. For businesses, this makes mobile devices the best medium to be present.
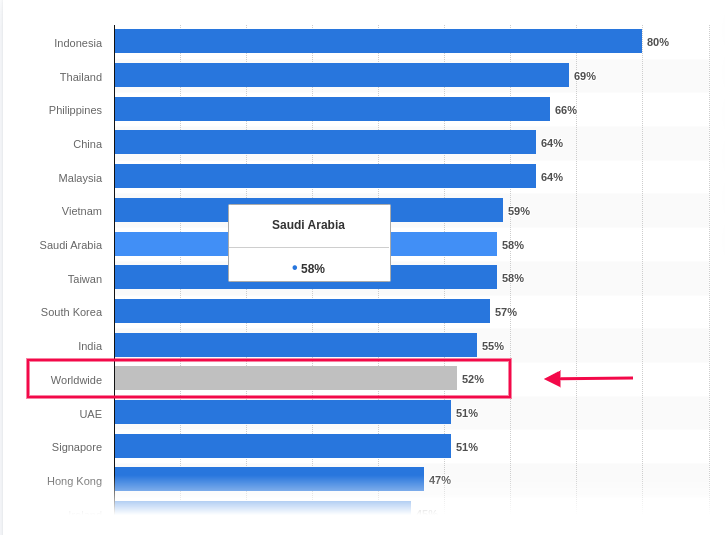
Based on a report by Statista, the global average percentage of online shoppers, who used their mobile devices to shop online, was 52%. This clearly states the urgency to provide a better shopping experience on mobile devices. Native Mobile Applications & Progressive Web Apps are a great solution to this.
Out of these, Progressive Web Apps (PWA) have been around for only 5 years now but in just a short amount of time, they have gained huge popularity among smartphone users as well as businesses. Upon transitioning to PWA, almost every eCommerce business has reported an exponential increase in conversion rates, app downloads & a lot more. You can check out the reports of Starbucks, Flipkart, Alibaba, etc. for your reference.
Building & launching is indeed very convenient for e-merchants now because of technological advancements & automated tools. In this write-up, we will elaborate on how you can also grow your eCommerce business, built on Magento 2, using a readymade tool.
The Magento 2 PWA Mobile App Creator extension is that ultimate tool. Whether you have a single-vendor Magento 2 website or a multi-vendor Magento 2 website, you can easily use this PWA maker tool on your website to automatically build a PWA Mobile App for your online store.
Doesn’t it seem magical? Well, it’s just the perfect use of web technologies.
How Does A Magento PWA Mobile App Builder Tool Work?
Just like any other Magento 2 extension, this PWA Maker tool is also a Magento 2 extension. Upon installing this extension on a Magento 2 website, it builds a customizable PWA derived from the data of that website. This keeps both the website & the PWA in live synchronization with each other.
Speaking of a customizable PWA, the Magento 2 PWA Maker tool provides the store-admins with various easy-to-use editing tools on the backend using which they can customize their PWA while it’s live. There is no need to worry about any downtime. Also, on the user-end, all the best & latest UI/ UX elements are equipped to provide an excellent user experience.
How Can Netizens Install A PWA?
Progressive Web Apps aren’t published in any of the app stores. Instead, they are made live on the website (on which this extension is installed). This means whenever netizens visit such a PWA active mobile-website, they are greeted with an ‘Add-To-HomeScreen’ popup at the bottom of the screen. Once they click it, the PWA automatically gets installed on their mobile device & appears to work just like any other mobile app on the mobile device.
How Store Owners Can Launch A PWA Using The Magento 2 PWA Builder?
Step 2: Install this extension on your Magento 2 website.
Step 3: Fill the app pre-requisite form & review your app before making it live on your mobile website.
Features Of The Magento 2 PWA Builder Plugin:
#1. Simplified PWA Admin Panel:
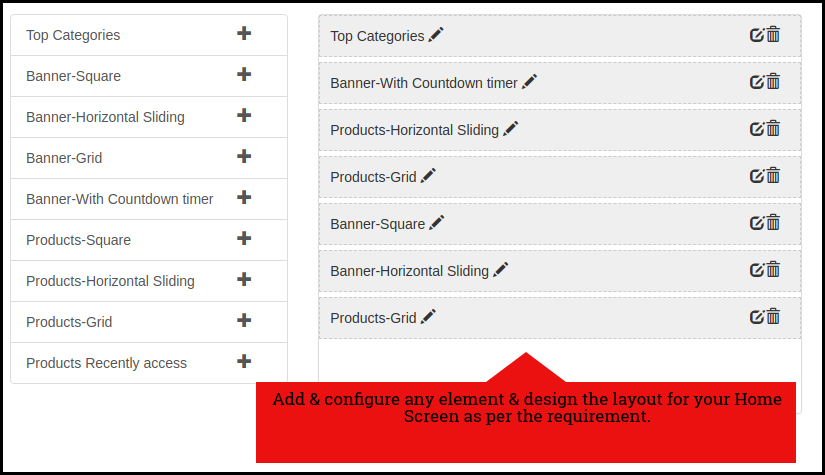
The store owners and admins can easily configure their PWA App, set its color theme, logo, design the home-page layout, & do a lot more without a hassle. For their home-page, they can use any of the predefined components (like sliders, banners, product blocks, countdown-timer banner, etc.), configure it & rearrange them the way they want.
#2. Unlimited Push Notifications:
Store admins can send an unlimited number of push notifications to their app users and keep them engaged. Admins can also send personalized notifications & also automate & schedule some of the common ones like the abandoned cart notifications, order status notification. Admins can also use relevant graphics and catchy messages with desired redirect links on your Push Notifications.
#3. Multi-lingual & Multi-currency Support:
The Magento 2 PWA App built using this tool supports multiple currencies and multiple languages including RTL scripts like Arabic, Persian, etc. The Progressive Web Apps are capable of expanding your business reach across borders simply without any additional effort.
#4. Offline Accessibility:
By default, the Progressive Web Apps support offline access. Because of data caching, PWA Apps work even when the app user is offline or under slow internet connection.
#5. All Payment & Shipment Methods:
All of the payment and shipment methods active on your Magento 2 website will automatically be active and fully functional on your Magento 2 PWA App.
#6. Social Login & Quick Sharing:
App users can easily onboard your Magento 2 PWA App with hassle-free social login options i.e. via Facebook & Google accounts. The PWA App built using this readymade tool also has a quick sharing link on the product pages. App users can hence easily share their choice of products on any of their social media handles.
#7. Order Tracking:
App users can also track all of their active orders and stay updated with the status of their order’s delivery. Any changes/ updates in the status of the order instantly reflect on the app & in the form of an order status push notification.
#8. Quick Login Options:
With traditional E-mail sign up & login options, the Magento 2 PWA Mobile App comes with inbuilt Google and Facebook login allowing users to seamlessly access the app in no time.
#9. Customizable Home Screen:
The PWA mobile app for Magento 2 comes with a customizable home screen whose layout can be designed from the admin panel. The store admin gets to craft and makes changes in the home screen as per any festival, sales or any other occasion.
Apart from just having a mobile-optimized eCommerce website &/or native mobile application (on the app store), having a PWA gives businesses more opportunity to reach all kinds of audiences with fewer efforts. With the use of a powerful ready-made tool like the Magento 2 PWA Mobile App Builder, building, launching & managing a PWA becomes a thousand times more convenient than building one from scratch.
So why wait longer? If you have a Magento 2 website for which you need a PWA, reach out to our experts at support@knowband.com or simply own your PWA maker tool from the Knowband e-store.
Being in the retail eCommerce industry, you must have come across the word PWA (Progressive Web App). If yes, you must be also aware of the capability they carry as a shopping application. In case not, you’ve landed in the right place. With the constant growth in the usage of shopping apps (both native & PWA), online stores are shifting to PWA Mobile App development for their businesses. Launching a Progressive Web App is quite a simpler and affordable task these days.
KnowBand has launched Magento 2 PWA Mobile App, a complete no-code and automated tool to launch a Progressive Web App. In simple words, whenever any user opens your store URL on the mobile browser, he will get a prompted message of “Add To Home Screen”. The Magento 2 Progressive Web App will be added in the user’s device like any other app and online purchasing can be done on the go.
1.1 View Demo App:
Explore Progressive Web App demo for Magento 2 and take a glance at how your final apps will look and work:
–> iOS devices do not offer any inbuilt “Add To Home Screen” prompt. Users need to manually add the Magento 2 PWA Mobile App to the home screen of iPhone or iPad.
–> iOS does not support web push notifications. The push notifications can only be sent to the Android device from the admin panel of Magento 2 PWA Mobile App Builder.
The Magento 2 PWA Mobile App Creator now supports all worldwide languages including RTL (Right To Left). The PWA Mobile App for Magento 2 can have languages like Arabic, Hebrew, Persian, etc. The store owner can offer all website languages on the Progressive Web App and can even add new ones.
2.0 Admin Panel Screens:
With the friendly admin panel backend, the store admin can configure and customize the look, feel, and working of the PWA Mobile Application. It’s just a matter of a few clicks and mouse toggles to make changes in the Magento 2 Progressive Web Apps. Let’s take a detailed overview of the Admin panel screens:
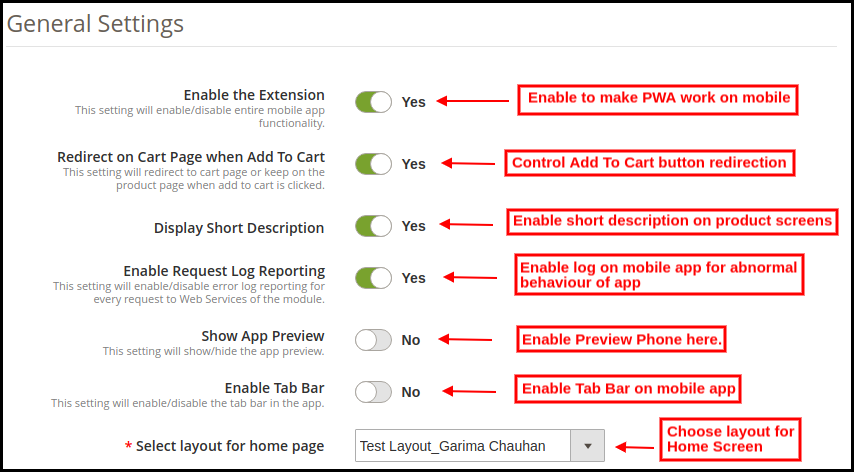
2.1 General Settings:
a) Enable the Extension: Enable Magento 2 PWA module to make web app work on the users’ smartphones.
b) Redirect on Cart Page when Add To Cart: Enable to re-direct users to shopping cart or disable to keep them on the product screen.
c) Display Short Description: Enable to add & display a short description on the product screen of Progressive Web App.
d) Enable Request Log Reporting: Enable this tab to activate the log file on the PWA Mobile App. This log file can be used to rectify any abnormal behavior of Progressive Web Application.
e) Show App Preview: Enable to add a preview phone in the admin panel. All color, font, home screen changes will be displayed in real-time preview phone.
f) Enable Tab Bar: Add a bottom tab bar on the Magento 2 PWA Mobile App.
g) Select Layout for Home Page: Choose desired layouts from the added ones and improve look and feel of app.
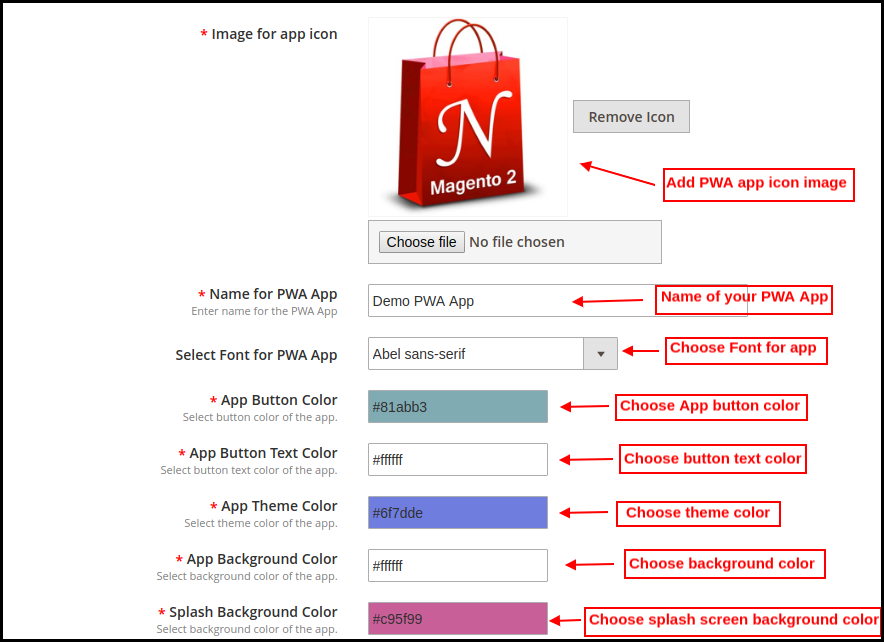
h) Image for App Icon: Upload Magento 2 PWA app icon on your own and change the same as well if required.
i) Name For PWA App: Enter the name of the Magento 2 Progressive Web App.
j) Select Font For PWA App: Choose the font of your PWA app for Magento 2.
k) App Button Color: Choose button color for your PWA Mobile App.
l) App Button Text Color: Choose the button text color for your Magento 2 Progressive Web App.
m) App Theme Color: Choose the theme color (header) of your web application.
n) App Background Color: Choose the background color of the Progressive Web Application.
o) Splash Screen Background Color: Choose the right color option for the background of the PWA app splash screen.
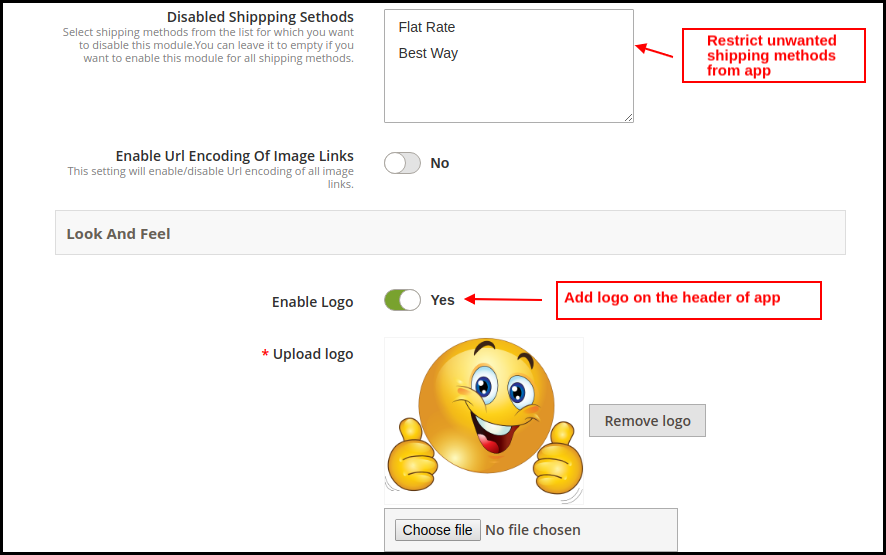
p) Disabled Shipping Methods: Choose shipping methods to be restricted from working in Magento 2 PWA mobile app.
q) Enable & Upload Logo: Add the logo image of your store to be displayed on the header of the PWA Mobile app.
2.2 Push Notifications Settings:
The Magento 2 Progressive Web App offers unlimited push notifications to market and promotes store deals and products. The store admin will get push notifications for a lifetime with no additional charges.
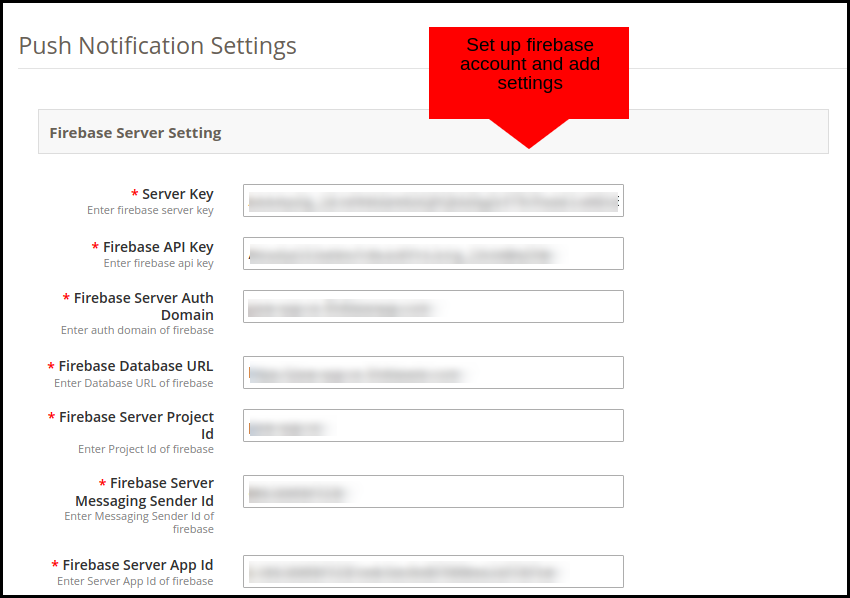
The various fields under this setting tab require a Firebase Account set up. Here’s how you may set one:
How to set up a Firebase Account?
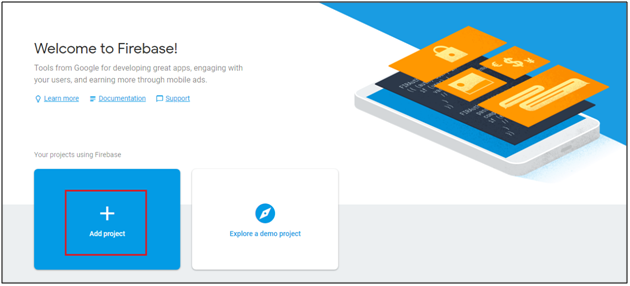
Step 1: Login Google Firebase
Step 2: Create a New Project
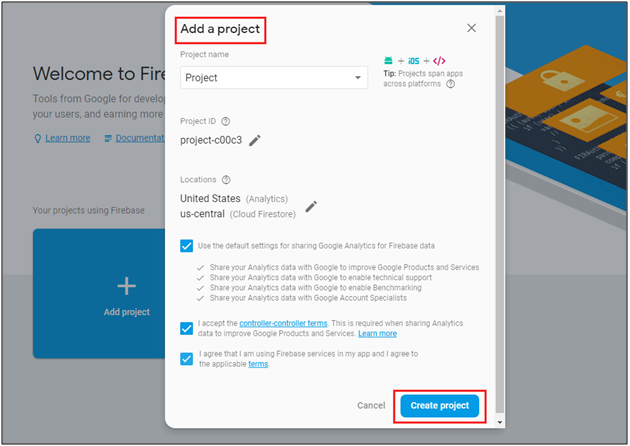
As you click on Add Project, the following dialog box will pop up:
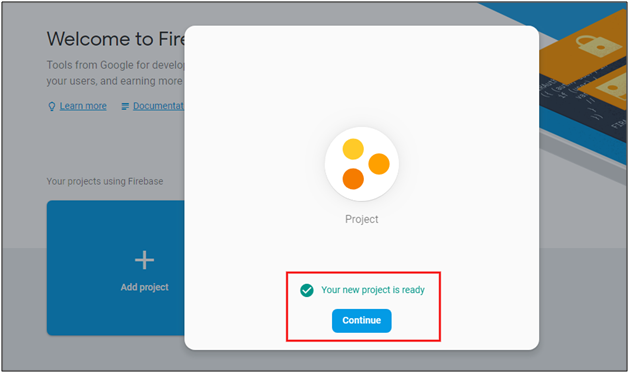
It will take a few seconds to create the project. Once the project is ready, click continue.
Step 3: Manage Project Settings
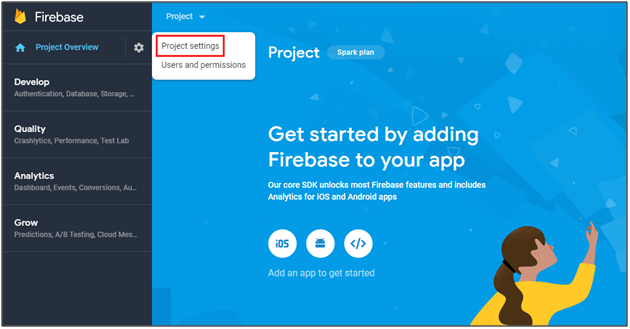
Once the project is created, click on Project Settings.
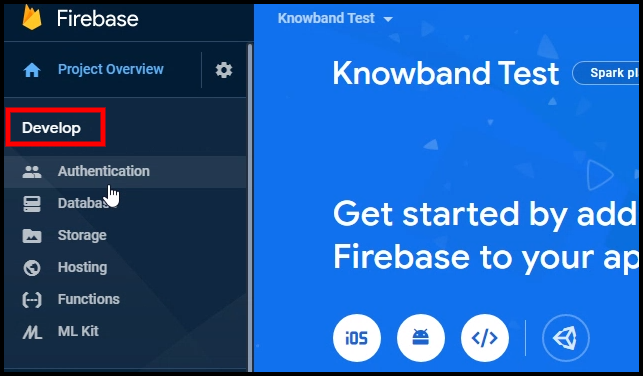
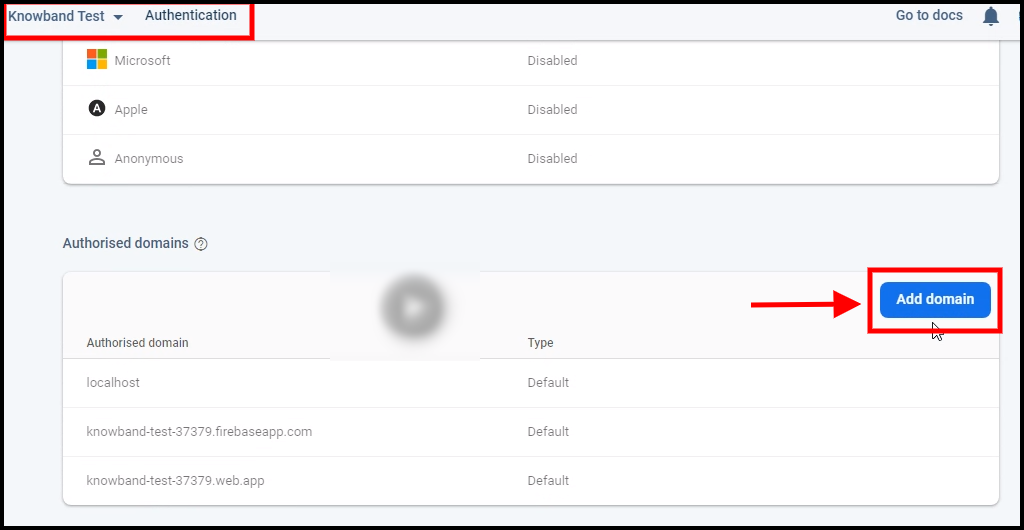
Step 4: Go to Authentication options:
Step 5: Find Firebase Keys
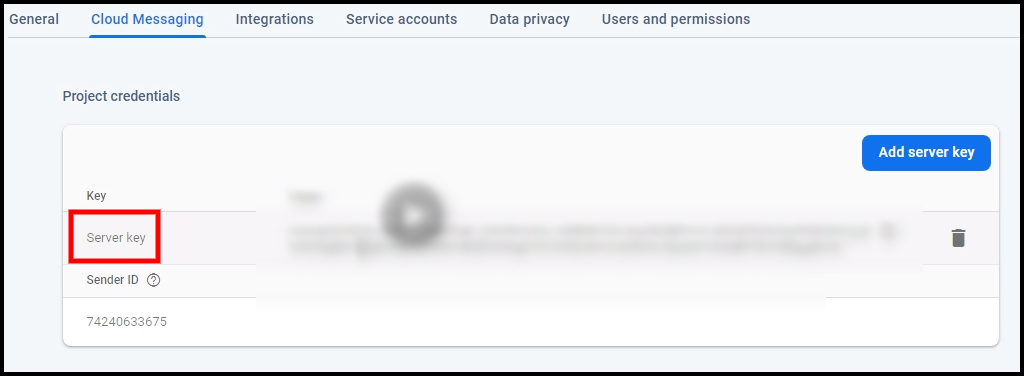
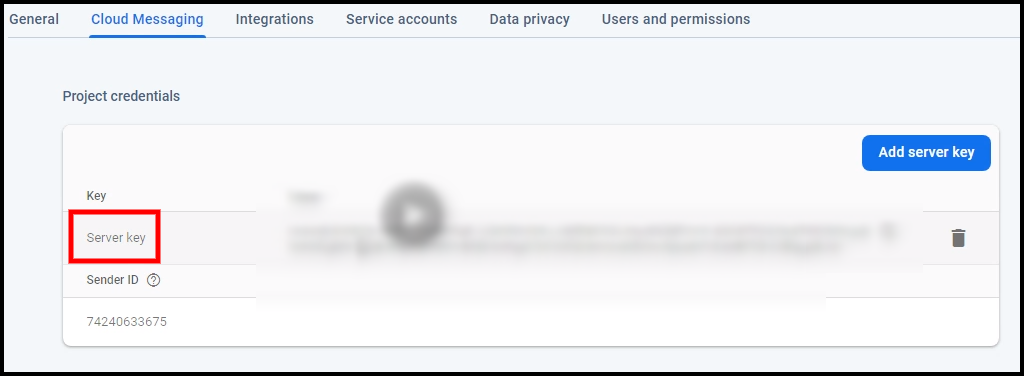
In the project settings, click on Cloud messaging settings. From here, you can directly get the server key.
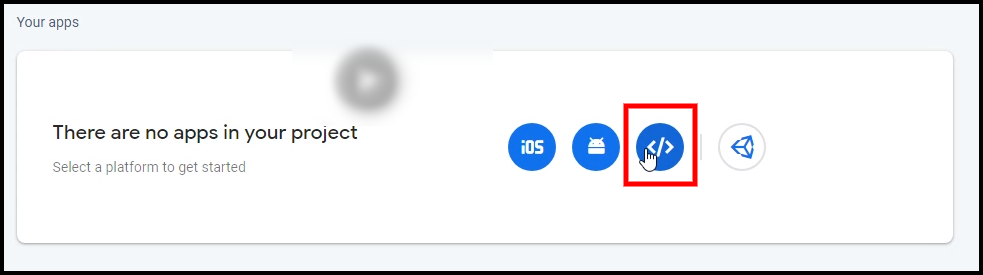
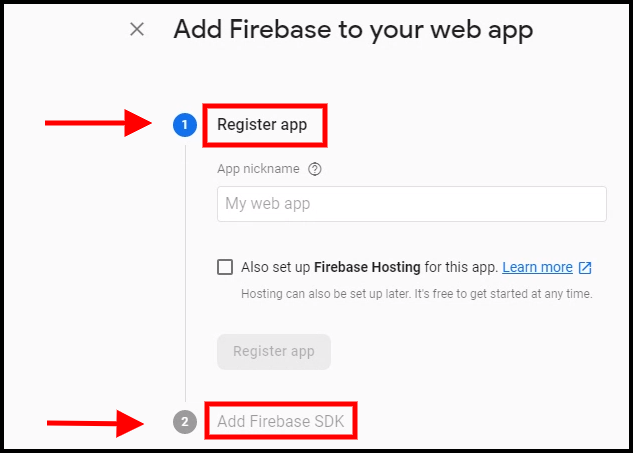
Step 6: Add your Web-App to Firebase
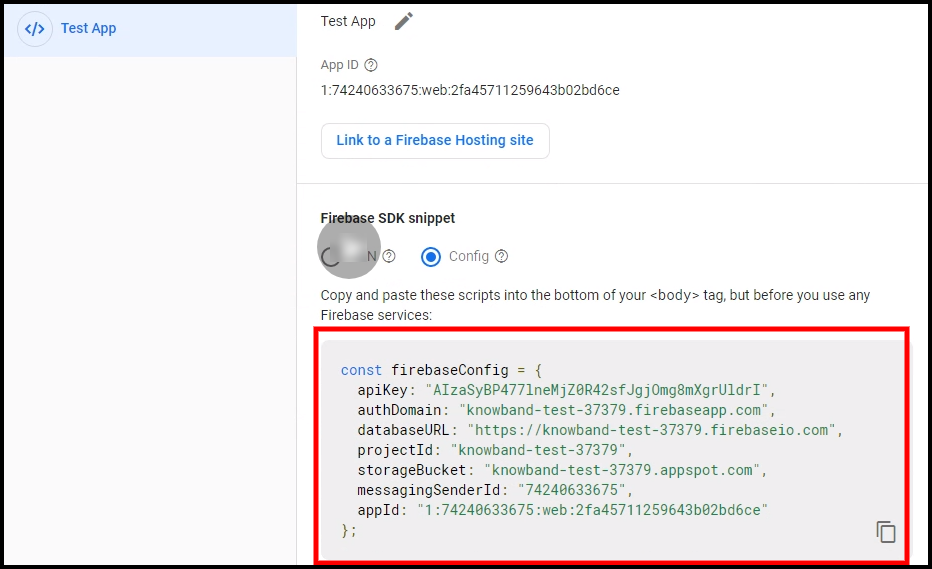
Step 7: Get other firebase related details and paste the same in PWA module admin panel.
Step 8: Get firebase server key from cloud messaging tab in Settings:
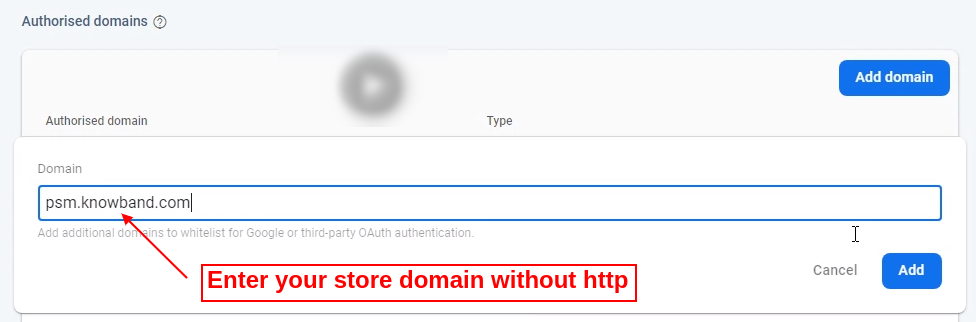
Step 9: Add your domain in authentication>>sign-in.
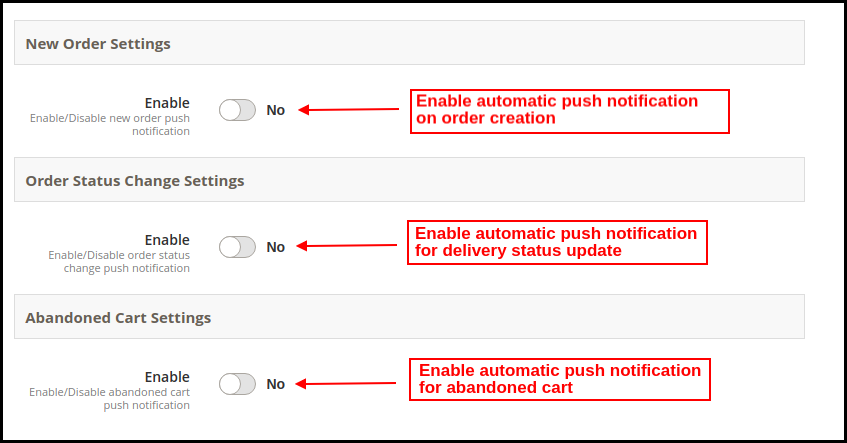
2.21 Automated Push Notifications:
The store admin gets to schedule automated notification sending for the following cases:
a) New Order Settings: Whenever any new order is placed from the Magento 2 PWA Mobile App.
b) Order Status Change Settings: Whenever the delivery status of any order gets changed/updated.
c) Abandoned Cart Settings: Whenever any user leaves product in cart and abandon Progressive Web App.
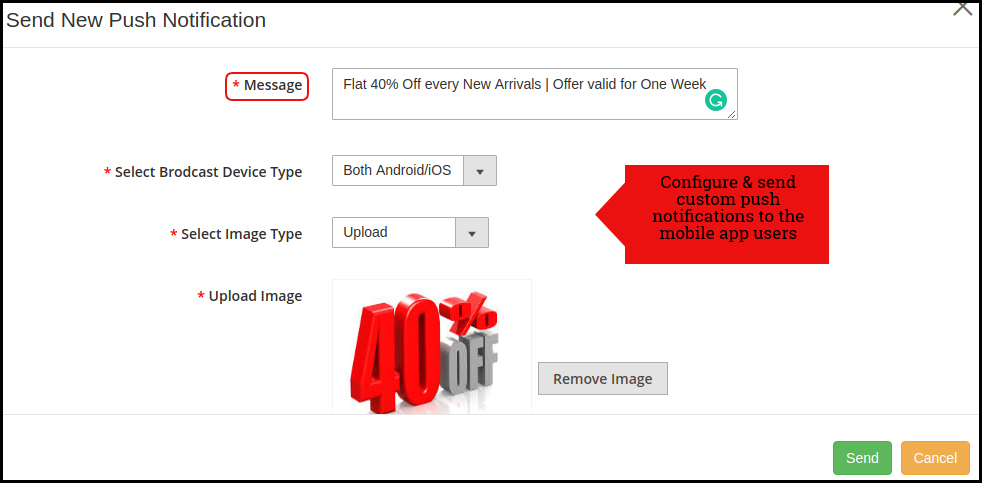
2.22 Manual Push Notification:
As shown in the above snapshot, the store admin can personalize and send manual push notifications to PWA Mobile App users. The message, image, discount offered, redirection link can be added/edited to improve the efficiency of notification and bring more sales.
2.3 Home Page Layout:
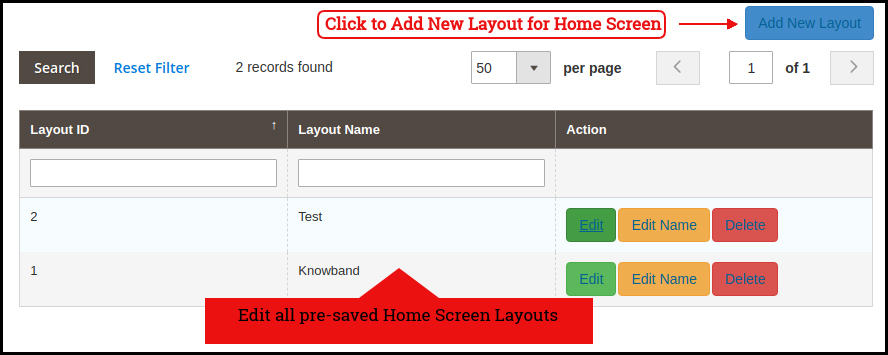
The Magento 2 PWA Mobile App Builder offers a fully customizable DIY editor panel to customize and configure the look and feel of Progressive Web Application. Various new layouts can be added to the admin panel based on upcoming festivals and occasions.
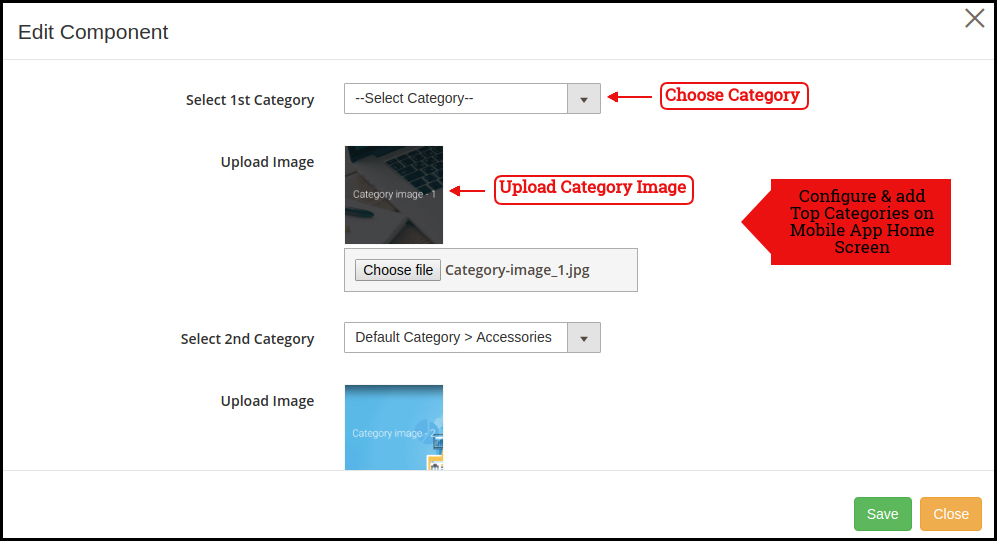
2.31 Top Categories:
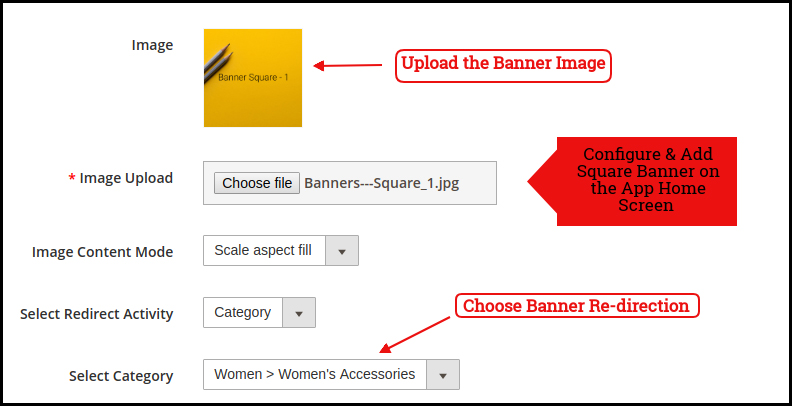
2.32 Square Banner:
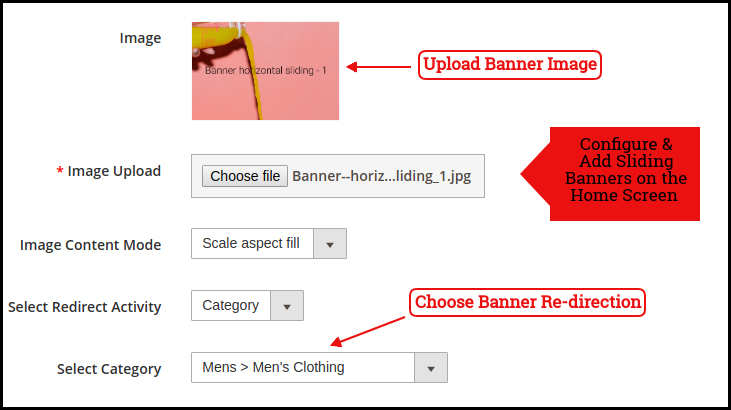
2.33 Sliding Banner:
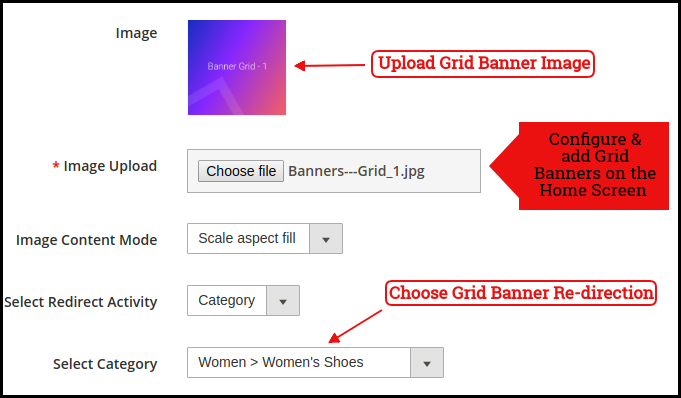
2.34 Grid Banner:
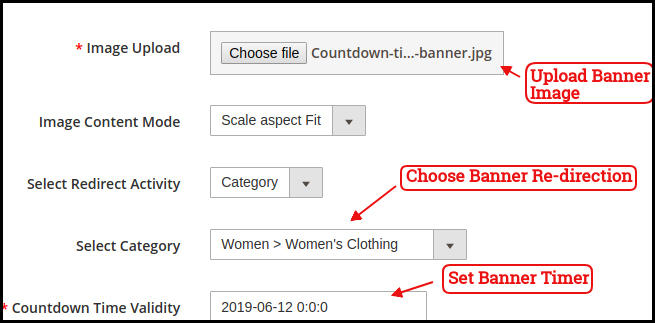
2.35 Countdown Timer Banner
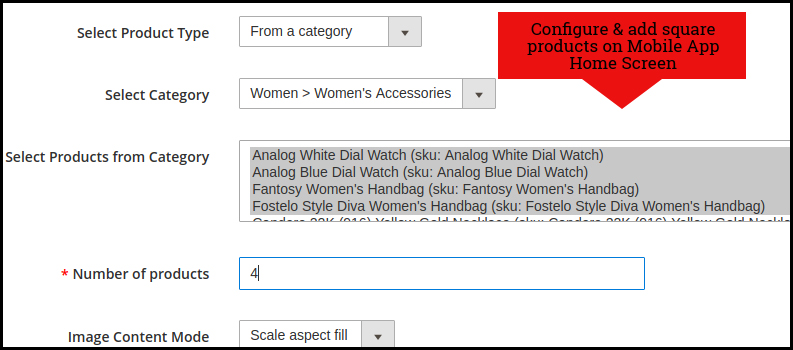
2.36 Square Products:
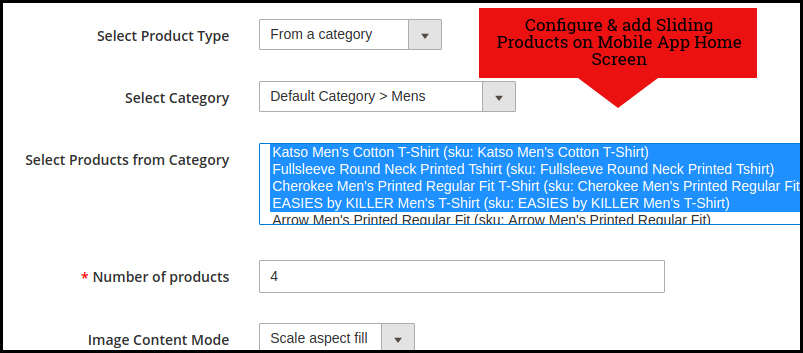
2.37 Sliding Products:
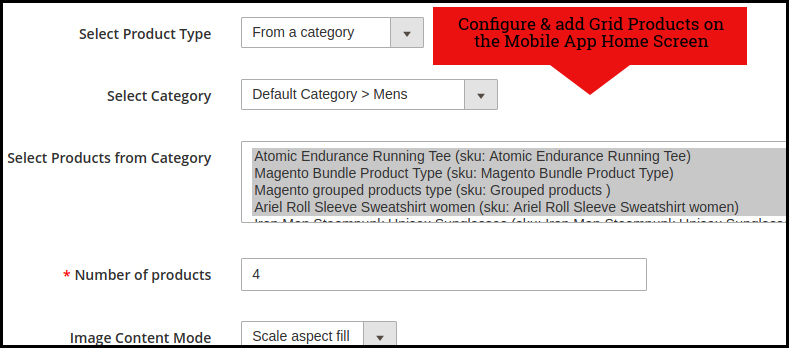
2.38 Grid Products:
How to get Facebook App details?
Facebook App can be created by following below-mentioned steps:-
Step 1: Go to given URL: https://developers.facebook.com/apps/
Step 2: Click on the “Add a New App” button.
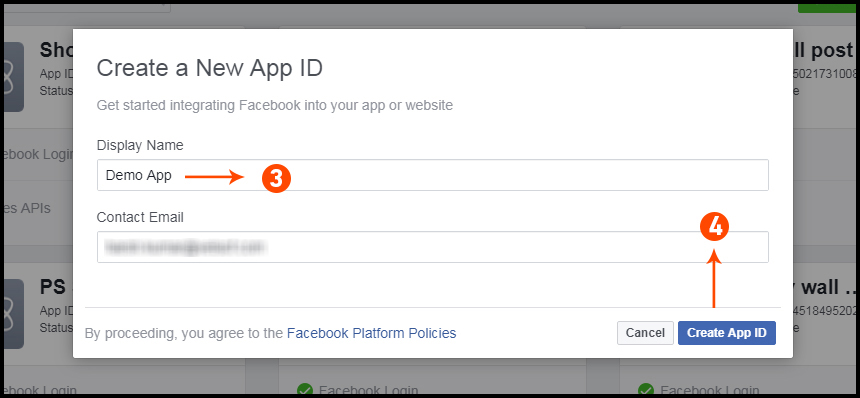
Step 3&4: Enter your App name and email id, then click on “Create App ID” button.
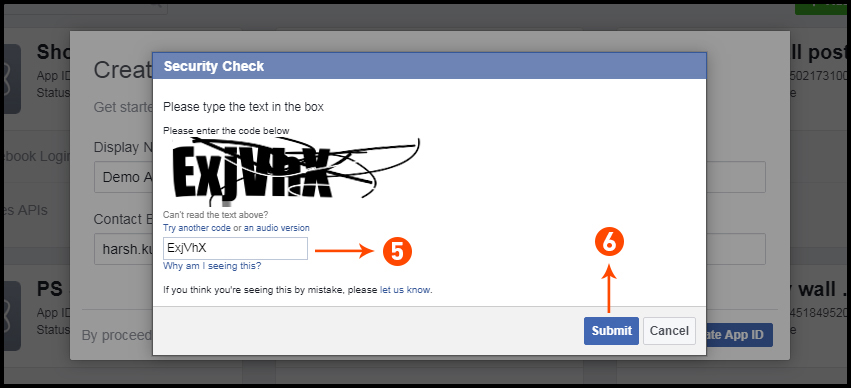
Step 5&6: After clicking on Create App ID you will have to go through a security check as shown:
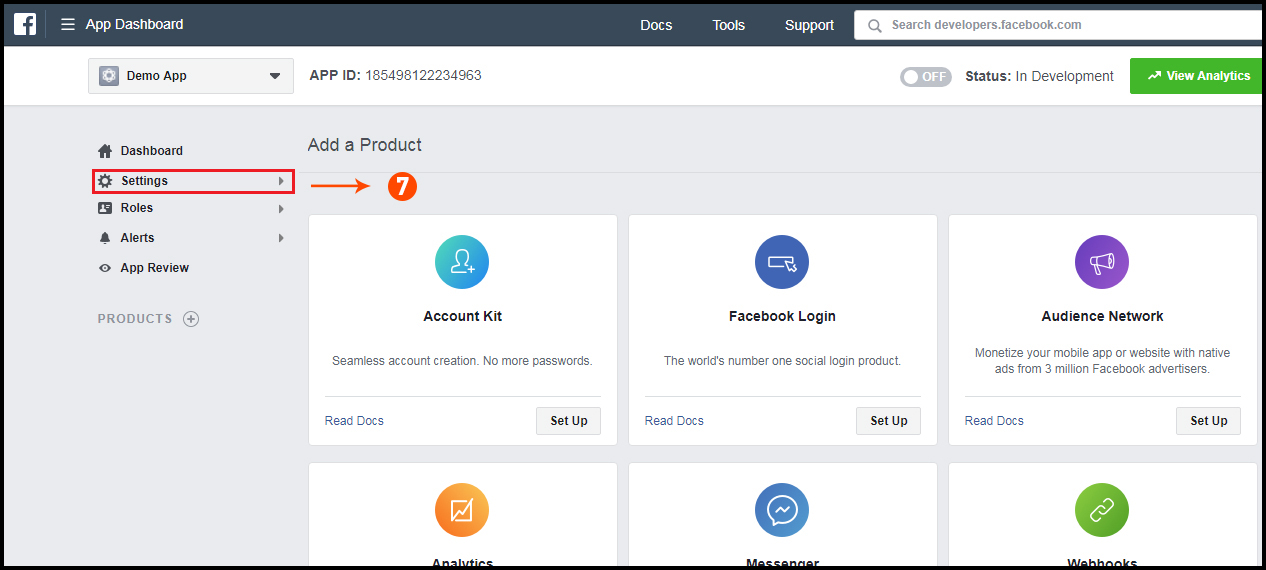
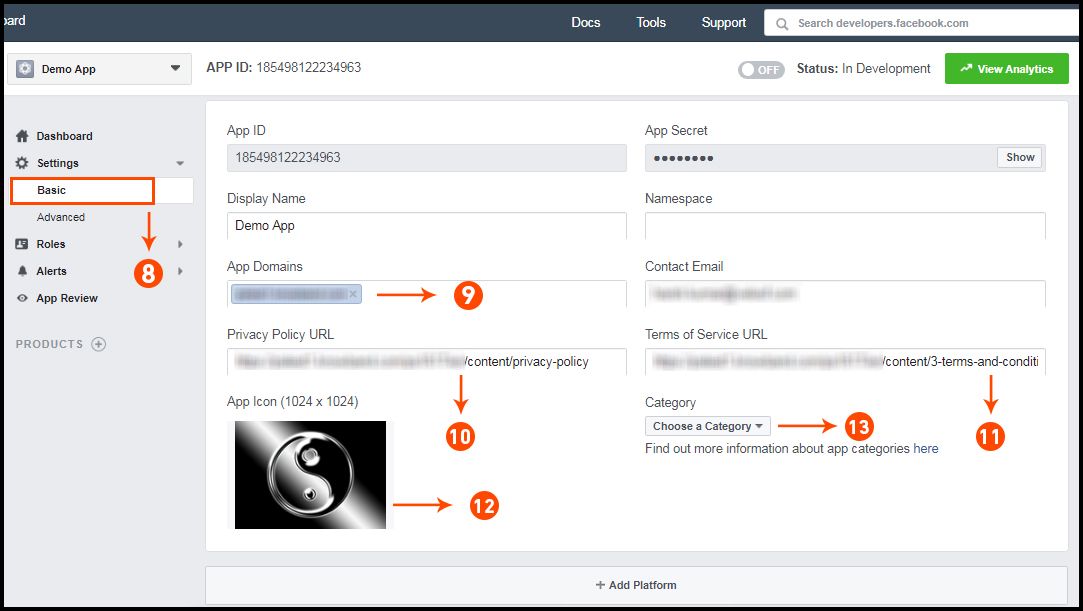
Step 7: Click on “Setting” tab.
Step 8-13: Two option will be available in the dropdown, Basic and Advanced, click on “Basic”. And then enter your “App Domain”, “Contact Email”, ”Privacy URL”, ”Terms and Conditions URL”, ”Add Logo”, ”Select Category” and click on “Save Changes” button.
App Domains:
yourdomain.com is correct
yourdomain.com/store is incorrect
www.domain.com is incorrect
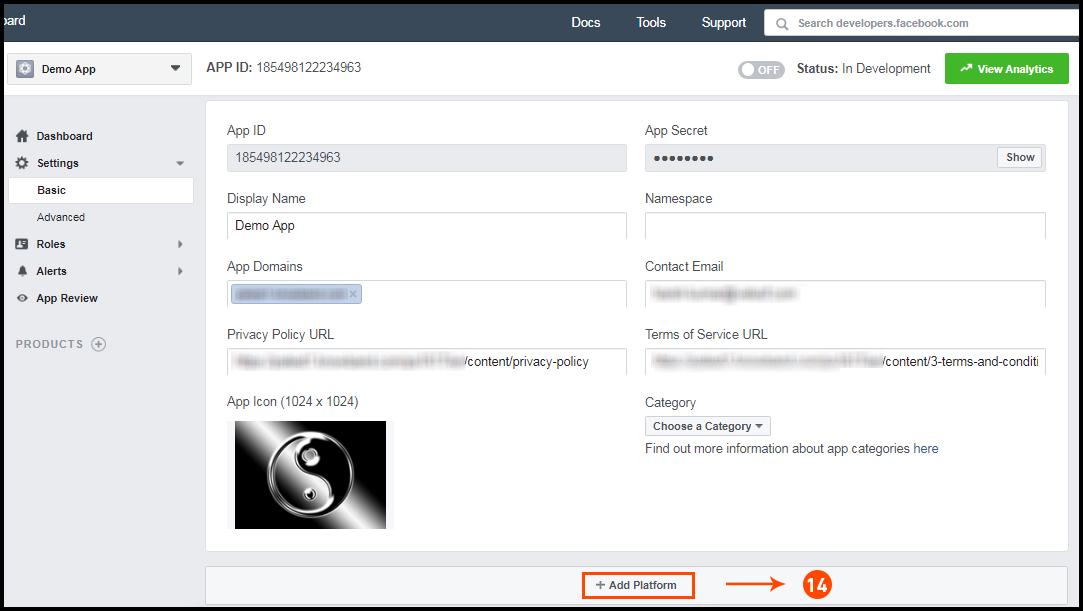
Step 14: Now click on “+Add Platform”.
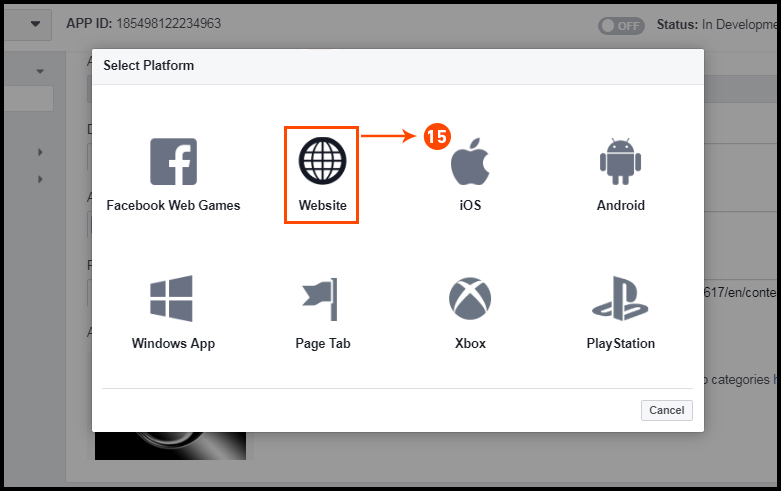
Step 15: And select Website as Platform.
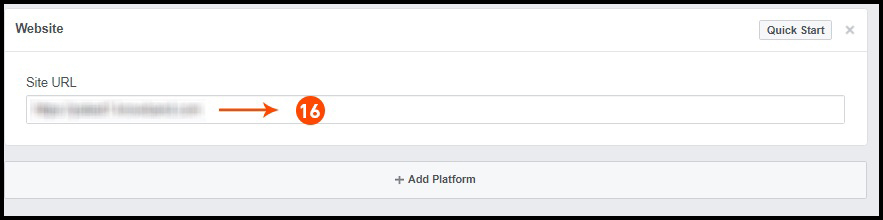
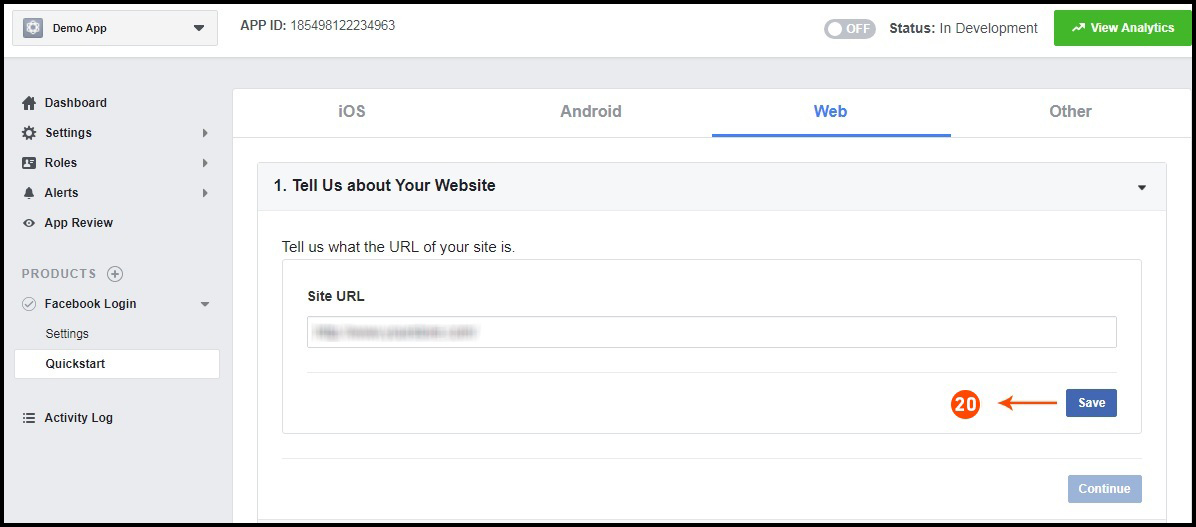
Step 16: Now Enter your site URL.
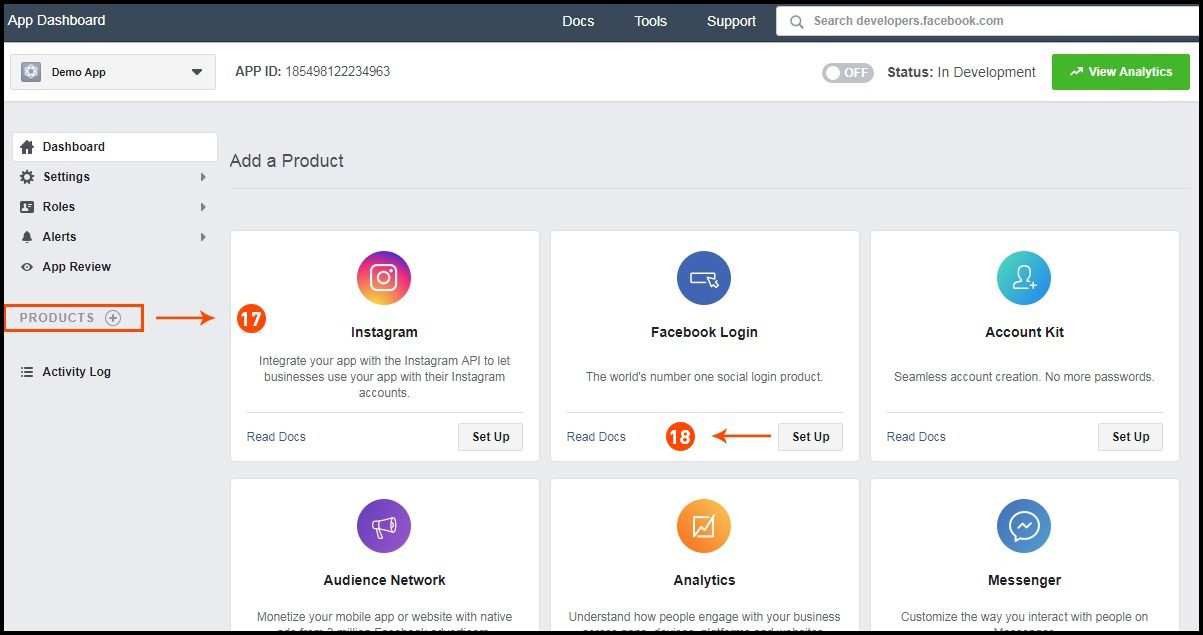
Step 17&18: Click on “Products+” and select Facebook login.
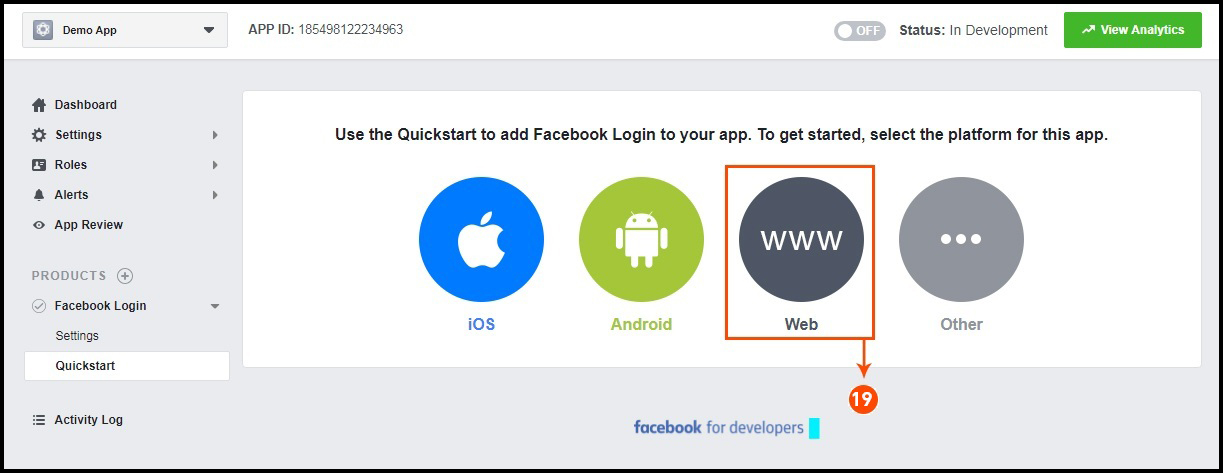
Step 19: Select web as the platform for the app.
Step 20: Now click on save.
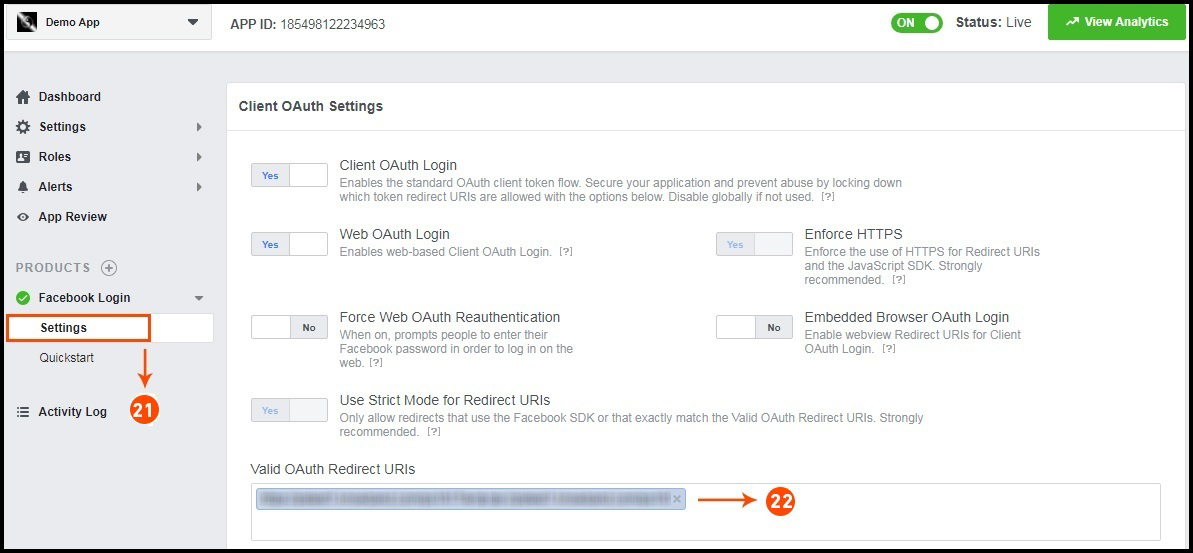
Step 21&22: Click on Settings and add a Valid OAuth Redirect URIs.
Valid OAuth Redirect URIs:
https://example.com/pwa-app/login
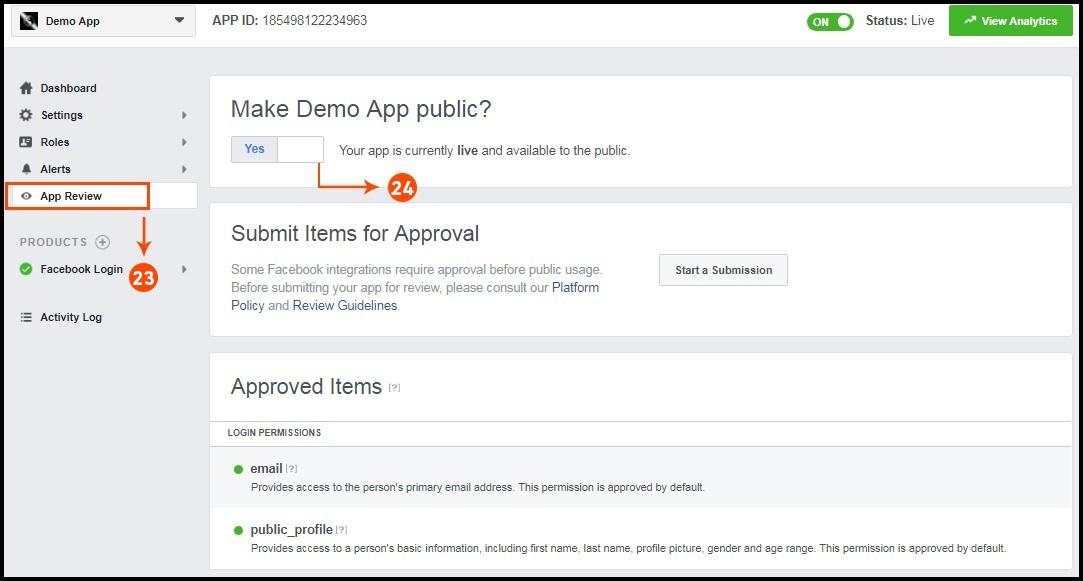
Step 23&24: Click on “App review”. And mark “Make ‘your app name’ Public” to Yes.
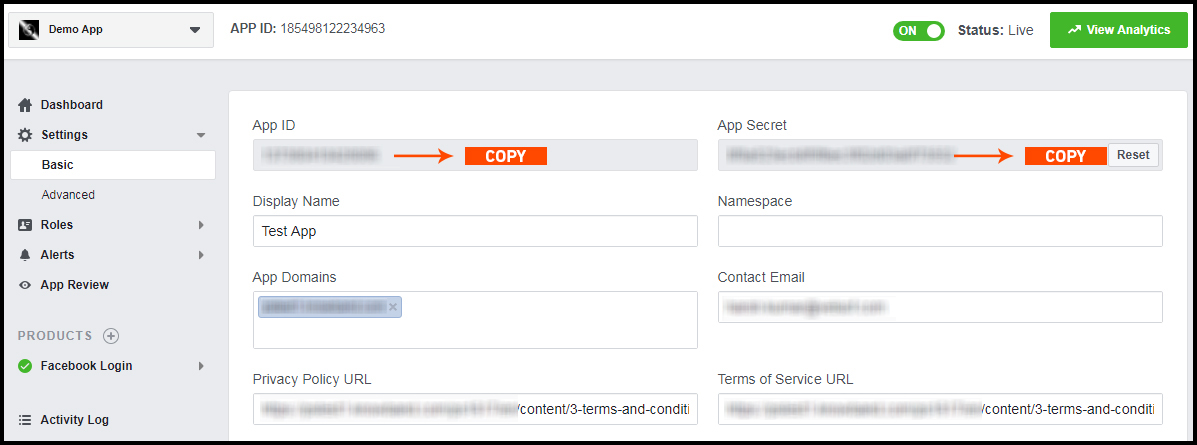
Final Step: Copy the App ID and App Secret and paste it into the fields provided in the module.
How to get Google App details?
Go to Google Developers Console
(https://console.developers.google.com/project) or click on link given top right of the respective tab in module configuration page.
Now click on Create Project on the left of the page.
Enter a name for your project and proceed to the next step.
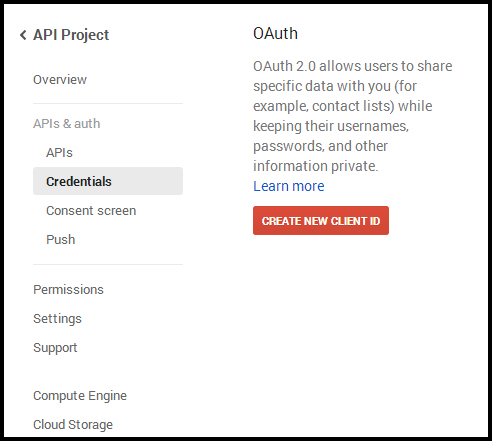
Now click on APIs and auth-> Credentials from the left menu as shown below.
Click Create New Client ID button from the right panel of the screen.
You may have to fill the form for Consent Screen before proceeding. To do so, that you have to click on Consent Screen in the left menu as shown in the image above.
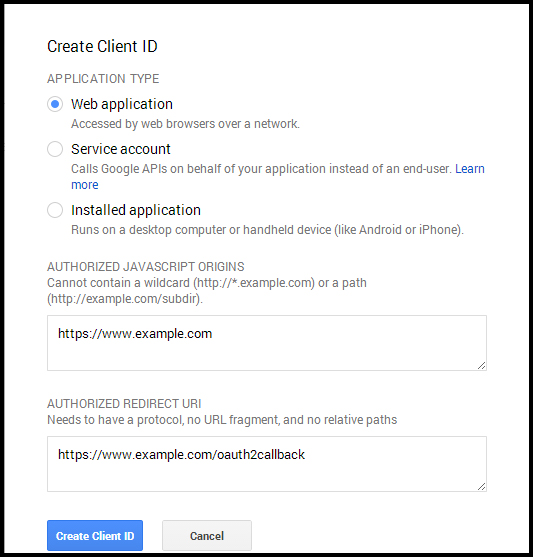
Fill the pop-up form with below details:
Application Type: Web Application. Authorized JavaScript Origins: Your store domain name (https://www.yourstore.com). Authorized redirect URI or URI of Loginizer redirect page:
https://example.com/pwa-app/login
Now click Create Client ID button to get your Client ID and Client Secret Key.
Now you can use the client secret and client ID to let your customers login to your store using their Google account.
3.0 Front End PWA App Screens:
Take a quick glance on seamlessly designed screens of Progressive Web App for Magento 2:
3.1 Home Screen:
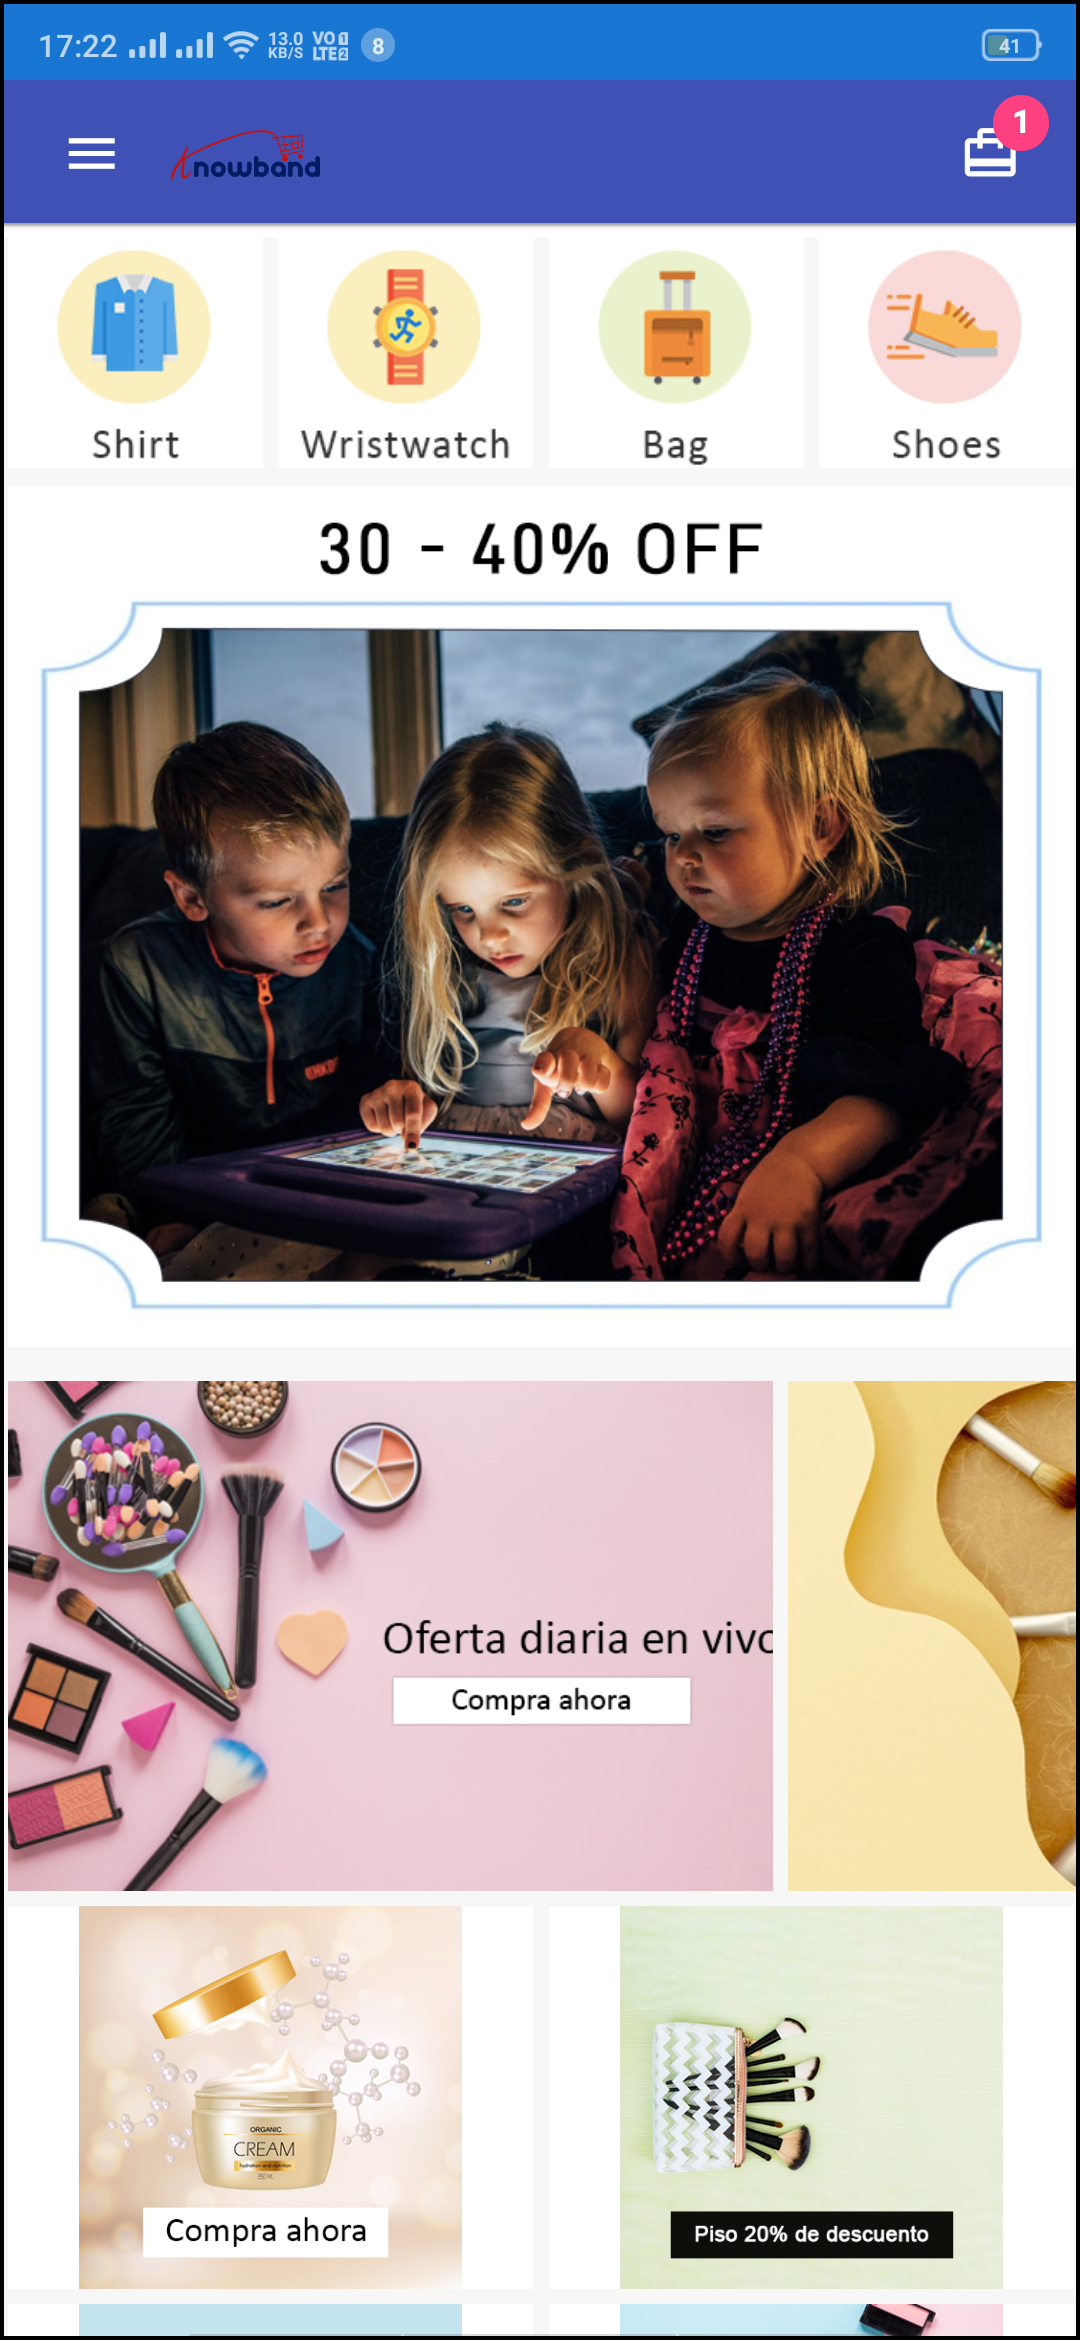
The home screen of the Magento 2 Progressive Web App is fully customizable from the admin panel of the module. You can design the layout of app screens the way you want. Custom layouts can be designed in the admin panel based on events, festivals, occasions, etc. and used whenever required.
1. Dynamic Layout:
Using various designing elements (banners, sliders, categories, etc), the store admin can create dynamic layout as per the need.
2. Store Logo:
Add store logo on the header of the PWA app.
3. Shopping Cart:
The shopping cart icon on the top-right corner of the home screen allows users to switch on cart screen.
4. Navigation Menu:
Browse the categories in the apps with left navigation menu on the home screen.
3.2 Left Navigation Menu:
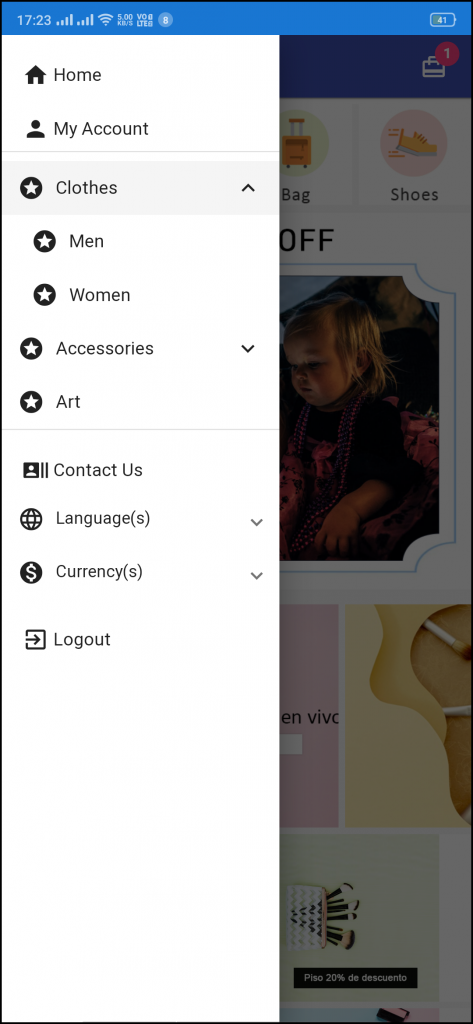
The Magento 2 PWA Mobile Apps come up with seamless categorization of products. The categories on the PWA Mobile App will be the same as available on the website. Online shoppers can easily browse products from multiple categories without any hassle. Various CMS pages can also be added to the left navigation menu using the admin panel.
1. My Account:
My Account option contains all the user personal, shipping, order information. The PWA app shoppers get to view all the stored data related to them & can update the same as well.
2. Categories
Categories displayed in left navigation menu of PWA app are the same as of your website.
3. CMS Pages:
Various CMS pages like About Us, Contact Us, Terms & Conditions, etc. Can be accessed from here.
4. Language(s)
The language option allows PWA app users to view the web-app in their desired language. All available languages are displayed under this option only.
5. Currency(s)
All available currencies on your website are displayed here on Magento 2 PWA app.
6. Login/Logout
Users can easily sign-in/sign-out from Magento 2 PWA app via this option.
3.3 Category Screen:
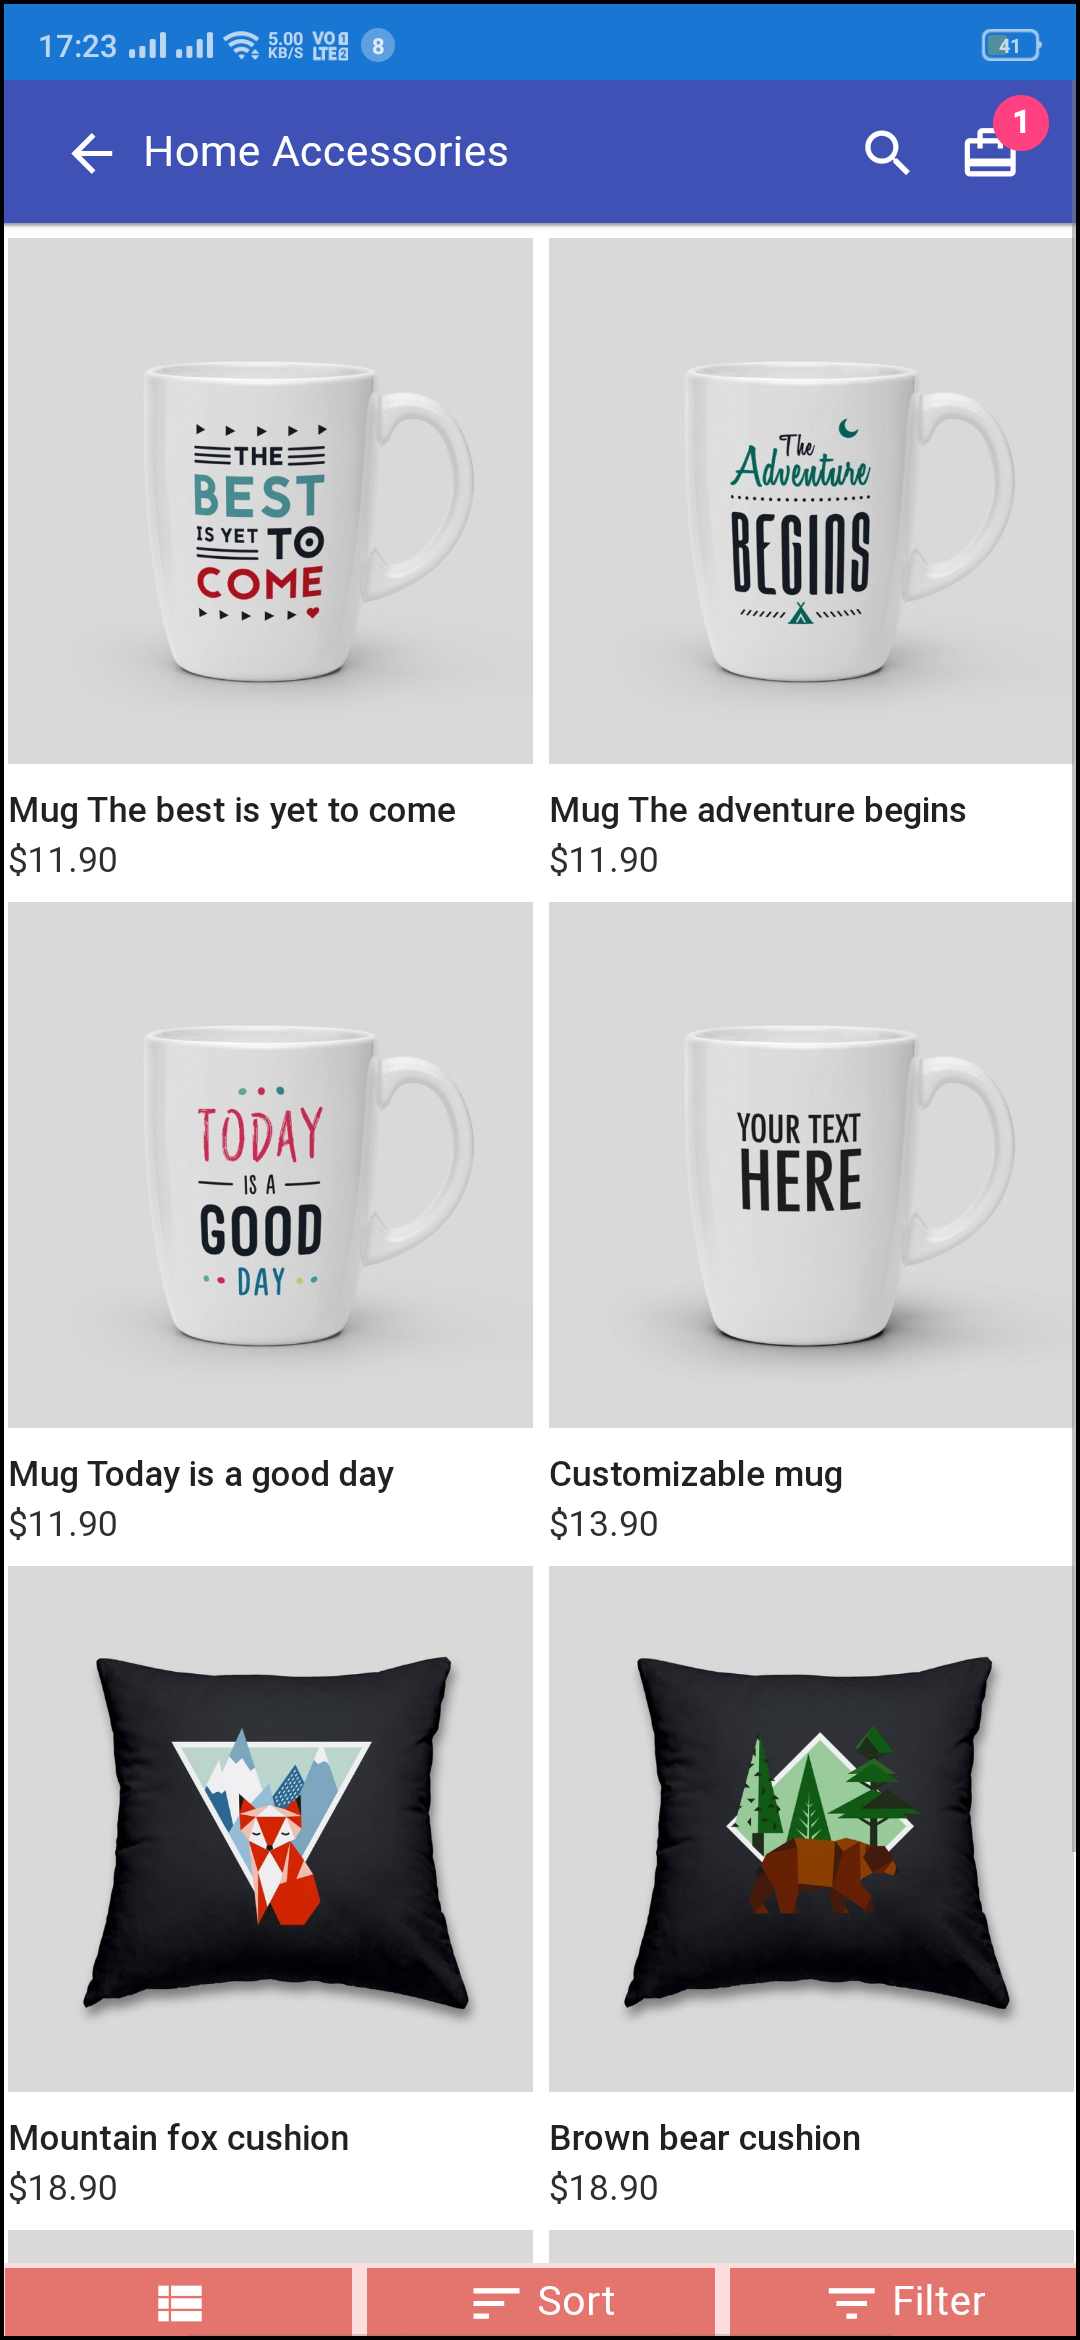
1. Multiple Views:
The categories on PWA app for Magento 2 can be viewed in both list and grid view.
2. Sorting:
This option allows the online shoppers to choose the sort order in order to narrow down the search and get desired product with ease.
3. Filter:
Option to filter products simplifies product search. Users can filter all products under categories using various attributes like size, color, price etc.
3.4 Product Screen:
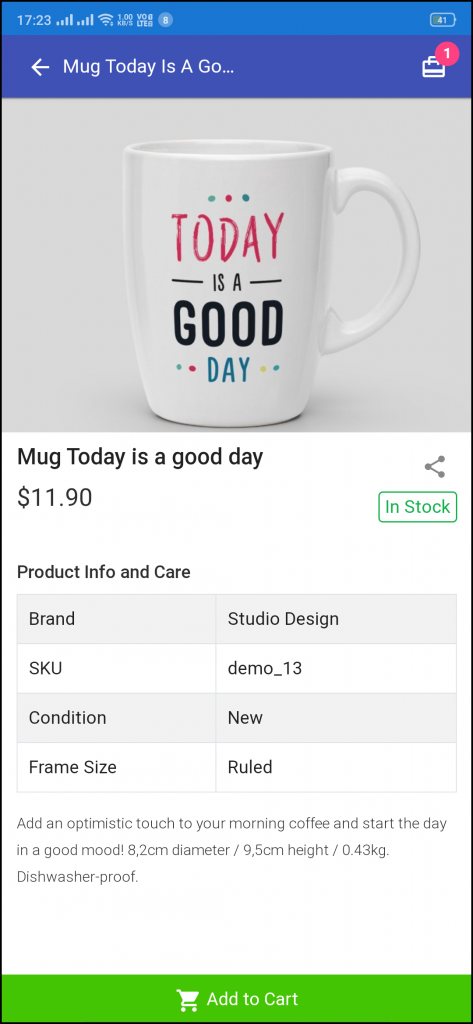
The product screen of the Magento 2 Progressive Web App contains all necessary product information the same as of your store. From multiple product images to short and long description helps in making user’s mind for purchase. The product availability is signaled as “In Stock” or “Out Of Stock” based on inventory status.
1. Product Info & Care
The complete product information as available in the inventory will be displayed here.
2. Short Description
Users get to read the short description of your product to quickly make up their minds about the purchase.
3. Product Options:
All the options related to the product like size, color, etc. are displayed here.
5. Add To Cart:
This button allows users to add products into the cart. The users can further process the cart for purchase.
6. Product Social Sharing:
The sharing option for the product allows users to share products on multiple social channels.
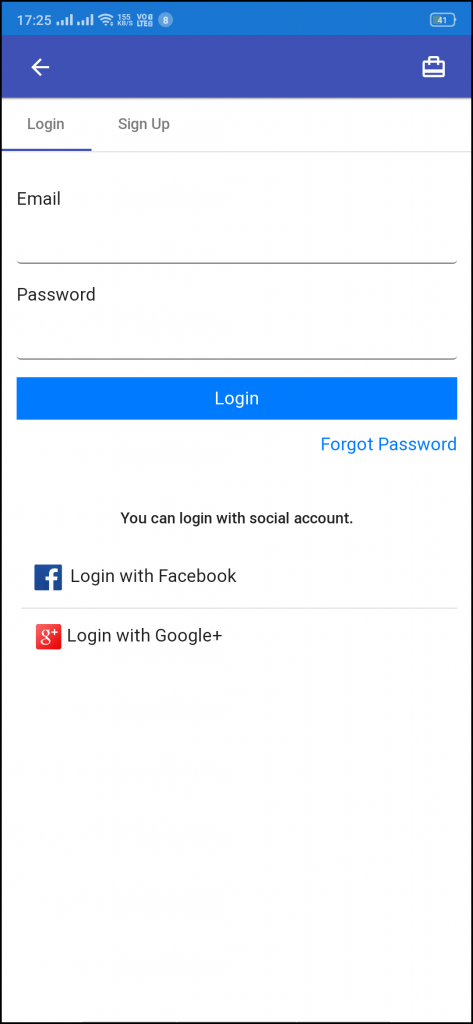
3.5 Login Screen
The Magento 2 Progressive Web App offers quick one-tap login options & make sign-in/registration process more seamless:
– Email Login
– Google Login
– Facebook Login
1. Login
The app users can easily authenticate & login to PWA apps using their previous email login credentials.
2. Sign Up
All the new app users can sign-up & create their account on the store from the Magento 2 PWA App. The sign-up form asks for only the necessary details to create an account.
3. Login with Facebook
The users can log in into the PWA app using their Facebook Account Credentials.
4. Login with Google+
The users can log in into the PWA app using their Google Account Credentials.
3.6 Shopping Cart Screen:
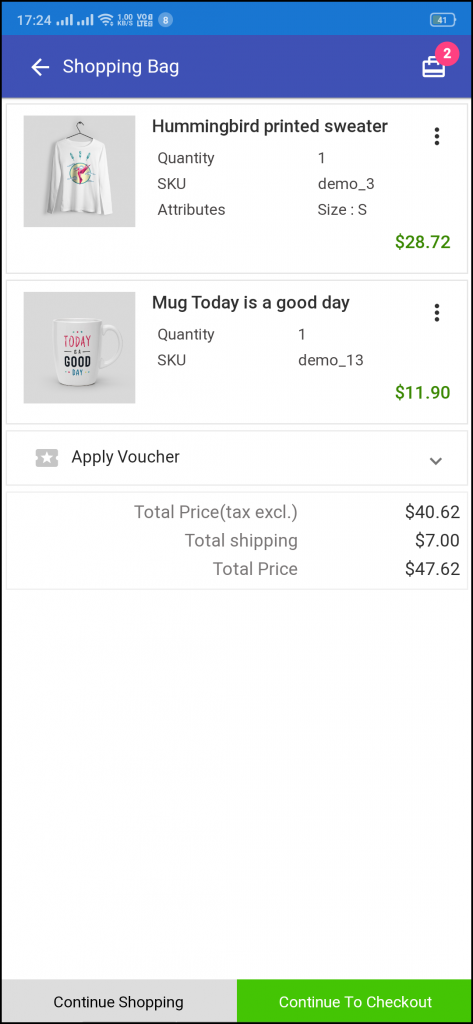
The shopping bag of Magento 2 PWA apps will display all added products along with their quantity and price to pay. The app users can view product details as well to be sure before purchasing one.
1. Apply Voucher:
This option allows users to use website coupons and grab discount offers.
2. Total Product Price:
The users get to view the complete cost of their shopping bag before proceeding further. It is automatically updated according to any update with product quantity or new addition.
3. Update Product Quantity:
The PWA app users can even update the product quantity with the “Update Quantity” option.
4. Remove Product:
The app users can simply remove the product from the cart by simply tapping the “Remove” option.
5. Continue Shopping:
The app users can leave the cart to browse more products on your app.
6. Continue To Checkout:
The PWA app users can proceed further to the checkout & payment screens just by tapping the “Continue To Checkout” option.
3.7 Checkout Screen:
The PWA Mobile apps for Magento 2 comes with a single screen clutter-free checkout with only relevant & necessary fields required. App users get a complete overview of the order before actually making the payment like shipping details, billing details, order summary, order comment, payment summary.
1. Shipping & Billing Details
This screen provides details of the shipping & billing addresses saved by the user. The user can also edit/save the new shipping address if needed.
2. Order Summary
The app users get to view product details before making payment.
3. Shipping Methods
All available shipping methods are displayed here. Users can choose the one suiting their need.
4. Order Comment
Users can also add any comment related to their order which will be visible to store admin on the order web-page in the backend.
6. Payment Summary
This section displays the complete breakdown payment details involved with the purchase.
7. Proceed To Payment
The PWA app users will be re-directed to the Payment screen after tapping the “Proceed To Payment” button.
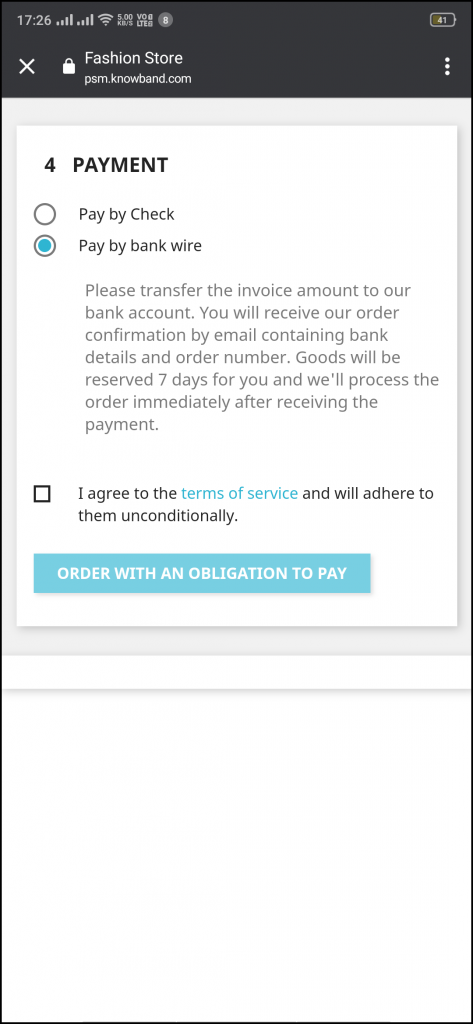
3.8 Payment Screen:
Magento 2 PWA App brings all web-view (website) payments on the app. The app users will find same payment options here as available on the applications. The payment screen of Magento 2 Progressive Web App is fully optimized for app view.
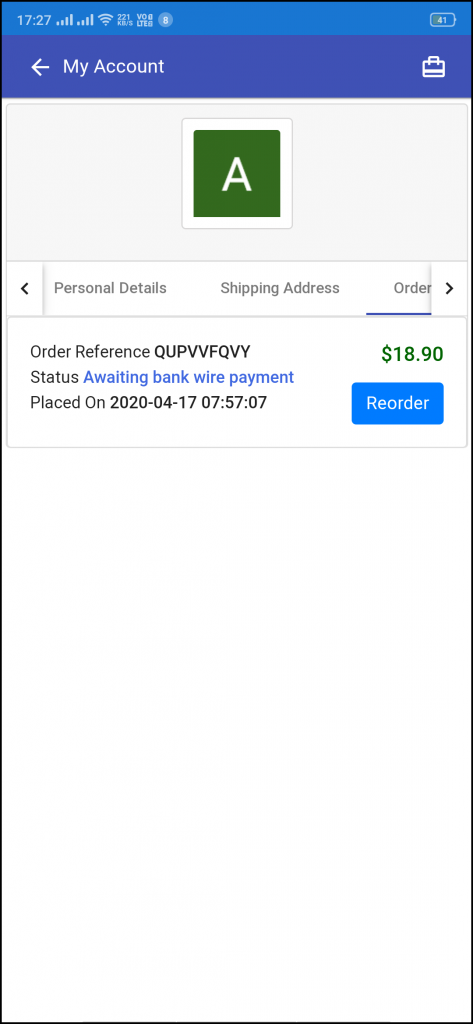
3.9 My Account Screen:
My account screen of the Magento 2 PWA app offers all users details available on the Progressive Web App. The online shoppers get to view the personal details, shipping address, order details, etc.
1. Personal Details
Users can also view & update their pre-saved profile details.
2. Shipping Address(s)
The app users can see the complete list of pre-saved shipping addresses in the PWA app.
3. Order Details
The app users can get to view the complete list of the previously placed orders from the PWA app and their details.
4. Re-order feature
There is a direct re-order button on the My Account screen of the PWA app. All the previous products under this order will be added into the cart with just a single button.
3.10 Order Detail Screen
The Magento 2 Progressive Web App displays complete order details of previous app orders. This screen contains Order Details, Status History, Shipping & Billing Addresses, etc. for every order placed through the Magento 2 PWA app. The app users can quickly view the entire order summary and get to keep track of delivery status as well.