W dzisiejszych czasach ka?dy chce pozby? si? spamu na swojej stronie, niezale?nie od tego, czy jest to spam w komentarzach, wiadomo?ci spamowe, czy ruch spamowy w Twojej witrynie. Aby chroni ? swj? Witryn ? przed spamowaniem, jednym z najlepszych i naj?atwiejszych sposob�w jest u?ycie Google reCAPTCHA.
Dawniej ludzie umieszczali na ekranie losow ? liczb ? lub ci?g znak�wi weryfikowali je po stronie serwera.
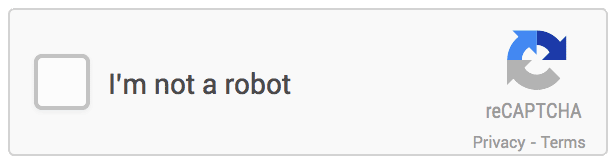
Ale ta metoda jest star ? méthode ? je plaisante czasoch?onna dla wielu u?ytkownik�w, podczas gdy metoda Google reCAPTCHA plaisanterie ?atwa wu?yciu i zajmuje mniej czasu, co zapewnia lepsze wra?enia u?ytkownika. Wystarczy jedno klikni?cie, aby udowodni?, ?es? lud?mi, un nie robotami. Google reCAPTCHA jest bardzo ?atwy do zaimplementowania w skrypcie PHP.
Na tym blogu dowiesz si?, jak krok po kroku zintegrowa? google reCAPTCHA n’est plus stronie z PHP.
Crok 1 : Aby pobra ? klucz API reCAPTCHA
Aby uzyska? klucz API do korzystania z reCAPTCHA, musisz zarejestrowa ? swj? Witryn ? pod adresem – https://www.google.com/recaptcha/admin. Zrzuty ekranu znajduj ? si? poni?ej dla Twojej pomocy :
Nazwa U?yj w?asnej etykiety, aby ?atwo par?o rozpozna? Witryn ? w przysz?o?ci.
tapez reCAPTCHA : Wybierz dowolny typ reCAPTCHA, kt�ry preferujesz dla swojej witryny. Obecnie dost?pne s? dwa typique, tj. reCAPTCHA v3 et reCAPTCHA v2. W przyk?adowym projekcie zastosowali?my reCAPTCHA v2.
Domeny : Tutaj musisz poda ? nazz? swojej strony internetowej, dla ktrej b?dziesz wdra?a? funkcjonalno?? reCAPTCHA. Dotyczy to domen, ktre tutaj wpisujesz, a tak?e ich subdomen. Na przyk?ad rejestracja dla abc.com rejestruje r�wnie? xyz.abc.com.
Teraz po prostu zaznacz pôle wyboru Zaakceptuj Warunki korzystania z us?ugi reCAPTCHA i kliknij na przycisku Prze?lij.
Teraz masz klucz witryny i tajny klucz dla swojej witryny.
Krok 2:?Wdro?enie funkcji reCAPTHA?w swojej witrynie
Aby doda ? reCAPTCHA najpierw musisz do??czy? bibliotèque ? JavaScript reCAPTCHA ne swojego kodu HTML.
Teraz dodaj ten kod HTML, w kt�rym chcesz pokaza ? wid?et reCAPTCHA.
Zast?p?site_key? kluczem witryny dostarczonym przez Google dla Twojej witryny.
Zrobione teraz, po prostu od?wie? stron?, un zobaczysz wid?et reCAPTCHA na swojej stronie.
Krok 3 : “Weryfikowanie odpowiedzi u?ytkownika”
Teraz musisz zweryfikowa ? odpowied?, gdy u?ytkownik kliknie wid?et reCAPTCHA. Kod PHP do weryfikacji odpowiedzi u?ytkownika jest podany poni?ej :
sukces) { $succMsg = 'Twoja pro?ba o kontakt zosta?a pomy?lnie przes?ana.'; } else { $errMsg = 'Weryfikacja robota nie powiod?a si?, spr�buj ponownie.'; } } ?>
Dodaj sw�j rzeczywisty tajny klucz w powy?szym kodzie i gotowe.
W dzisiejszych czasach ka?dy chce pozby? si? spamu na swojej stronie, niezale?nie od tego, czy jest to spam w komentarzach, wiadomo?ci spamowe, czy ruch spamowy w Twojej witrynie. Aby Chroni? swoj? witryn? przed spamowaniem, jednym z najlepszych i naj?atwiejszych sposob�w jest u?ycie Google reCAPTCHA.
Dawniej ludzie umieszczali na ekranie losow? licz? lub ci?g znak�wi weryfikowali je po stronie serwera.
Ale ta metoda Scherzstern? Methode? i scherz czasoch?onna dla wielu u?ytkownik�w, podczas gdy metoda Google reCAPTCHA scherz ?atwa wu?yciu i zajmuje mniej czasu, co zapewnia lepsze wra?enia u?ytkownika. Wystarczy jedno klikni?cie, aby udowodni?, ?es? lud?mi, ein nie robotami. Google reCAPTCHA ist ein Scherz, der zaimplementowania w skrypcie PHP implementiert.
Na tym blogu dowiesz si?, jak krok po kroku zintegrowa? google reCAPTCHA mit PHP-Swojej-Stroni.
Krok 1: Aby pobra? kluzz-API reCAPTCHA
Aby Uzyska? klucz API funktioniert korzystania z reCAPTCHA, musisz zarejestrowa? swoj? witryn? pod adresem – https://www.google.com/recaptcha/admin. Zrzuty ekranu znajduj? si? poni?ej dla Twojej pomocy:
Nazwa U?yj w?asnej etykiety, aby ?atwo by?o rozpozna? witryn? w przysz?o?ci.
Geben Sie reCAPTCHA ein: Wybierz dowolny typ reCAPTCHA, kt�ry Preferredujesz dla swojej witryny. Obecnie dost?pne s? dwa typy, tj. reCAPTCHA v3 und reCAPTCHA v2. W przyk?adowym projekcie zastosowali?my reCAPTCHA v2.
Domeny: Tutaj musisz poda? nazw? swojej strony internetowej, dla kt�rej b?dziesz wdra?a? funcjonalno?? reCaptcha. Dotyczy to domen, kt�re tutaj wpisujesz, a tak?e ich subdomen. Na przyk?ad rejestracja dla abc.com rejestruje r�wnie? xyz.abc.com.
Teraz po prostu zaznacz pole wyboru Zaakceptuj Warunki korzystania z us?ugi reCAPTCHA i kliknij na przycisku Prze?lij.
Teraz masz klucz witryny i tajny klucz dla swojej witryny.
Krok 2:?Wdro?enie funkcji reCAPTHA?w swojej witrynie
Aby doda? reCAPTCHA najpierw musisz do??czy? bibliotek? JavaScript reCAPTCHA swojego kodu HTML.
Teraz dodaj ten kod HTML, w kt�rym chcesz pokaza? wid?et reCAPTCHA.
Zast?p?site_key? kluczem witryny dostarczonym przez Google dla Twojej witryny.
Zrobione teraz, po prostu od?wie? stron?, a zobaczysz wid?et reCAPTCHA na swojej stronie.
Krok 3: „Weryfikowanie odpowiedzi u?ytkownika“
Teraz musisz zweryfikowa? odpowied?, gdy u?ytkownik kliknie wid?et reCAPTCHA. Kod PHP weryfikacji odpowiedzi u?ytkownika jest podany poni?ej:
sukces) { $succMsg = 'Twoja pro?ba o kontakt zosta?a pomy?lnie przes?ana.'; } else { $errMsg = 'Weryfikacja robota nie powiod?a si?, spr�buj ponownie.'; } } ?>
Dodaj sw�j rzeczywisty tajny klucz w powy?szym kodzie i gotowe.
W dzisiejszych czasach ka?dy chce pozby? si? spamu na swojej stronie, niezale?nie od tego, czy jest to spam w komentarzach, wiadomo?ci spamowe, czy ruch spamowy w Twojej witrynie. Aby chroni? swoj? Witryn? przed spamowaniem, jednym z najlepszych i naj?atwiejszych sposob�w jest u?ycie Google reCAPTCHA.
Dawniej ludzie umieszczali na ekranie losow? liczb? lub ci?g znakwi weryfikowali je po stronie serwera.
Ale ta metóda scherzo star? metodo? io scherzo czasoch?onna dla wielu u?ytkownik�w, podczas gdy metoda Google reCAPTCHA scherzo ?atwa wu?yciu i zajmuje mniej czasu, co zapewnia lepsze wra?enia u?ytkownika. Wystarczy jedno klikni?cie, aby udowodni?,?es? lud?mi, un nie robotami. Google reCAPTCHA scherzo bardzo?atwy do zaimplementowania w skrypcie PHP.
Na tym blogu dowiesz si?, jak krok po kroku zintegrowa? Google reCAPTCHA con codice PHP.
Krok 1: Aby Pobra? klucz API reCAPTCHA
Aby Uzyska? klucz API do korzystania z reCAPTCHA, musisz zarejestrowa? swoj? Witryn? baccello adresem – https://www.google.com/recaptcha/admin. Zrzuty ekranu znajduj? si? poni?ej dla Twojej pomocy:
Nazwa U?yj w?asnej etykiety, aby ?atwo by?o rozpozna? Witryn? w przysz?o?ci.
digita reCAPTCHA: Wybierz dowolny typ reCAPTCHA, kt�ry preferujesz dla swojej witryny. Obecnie dost?pne s? dwa tipo, tj. reCAPTCHA v3 e reCAPTCHA v2. W przyk?adowym projekcie zastosowali?my reCAPTCHA v2.
Domenico: Tutaj Musisz poda? no? swojej strony internetowej, dla kt�rej b?dziesz wdra?a? funkcjonalno?? reCAPTCHA. Dotyczy to domen, kt�re tutaj wpisujesz, a tak?e ich subdomen. Na przyk?ad rejestracja dla abc.com rejestruje r�wnie? xyz.abc.com.
Teraz po prostu zaznacz pole wyboru Zaakceptuj Warunki korzystania z us?ugi reCAPTCHA i kliknij na przycisku Prze?lij.
Teraz masz klucz witryny i tajny klucz dla swojej witryny.
Krok 2:?Wdro?enie funkcji reCAPTHA?w swojej witrynie
Aby Doda? reCAPTCHA najpierw musisz do??czy? biblioteca? JavaScript reCAPTCHA fa swojego kodu HTML.
Teraz dodaj ten kod HTML, w kt�rym chcesz pokaza? wid?et reCAPTCHA.
Zast?p?site_key? kluczem witryny dostarczonym przez Google dla Twojej witryny.
Zrobione teraz, po prostu od?wie? stron?, a zobaczysz wid?et reCAPTCHA na swojej stronie.
Krok 3: “Weryfikowanie odpowiedzi u?ytkownika”
Teraz musisz zweryfikowa? odpowied?, gdy u?ytkownik kliknie wid?et reCAPTCHA. Kod PHP do weryfikacji odpowiedzi u?ytkownika jest podany poni?ej:
sukces) { $succMsg = 'Twoja pro?ba o kontakt zosta?a pomy?lnie przes?ana.'; } else { $errMsg = 'Weryfikacja robota nie powiod?a si?, spr�buj ponownie.'; } } ?>
Dodaj sw�j rzeczywisty tajny klucz w powy?szym kodzie i gotowe.
W obecnychch czasach ka?dy chce pozby? si? spamu na swojej stronie, niezale?nie od tego, czy jest to spam w komentarzach, wiadomo?ci spamowe, czy ruch spamowy w Twojej witrynie. Aby przewlekle? swoj? witrynę? przed spamowaniem, jednym z najlepszych i najlepszych sposobów na wykorzystanie Google reCAPTCHA.
Dawniej ludzie umieszczali na miejscu losow? liczba? lub ci?g znak�wi weryfikowali je po stronie serwera.
Ale ta metoda jest gwiazdą? metoda? i jest czasoch?onna dla wielu u?ytkowników, podczas gdy metoda Google reCAPTCHA jest ?atwą wu?yciu i zapewnia mniej czasu, zapewnia lepsze wdro?enie u?ytkownika. Wystarczy jedno kliknięcie, aby udowodnić, ?es? lud?mi, a nie robotami. Google reCAPTCHA jest bardzo ?atwy do zaimplementowania w skrypcie PHP.
Na tym blogu dowiesz si?, jak krok po kroku prowadzi? google reCAPTCHA na swojej stronie z PHP.
Krok 1: Aby pobra? Klucz API reCAPTCHA
Aby uzyskać? klucz API do korzystania z reCAPTCHA, musisz zarejestrowa? swoj? witrynę? pod adresem – https://www.google.com/recaptcha/admin. Zrzuty ekranu znajduj? si? poni?ej dla Twojej pomocy:
Nazwa U?yj w?asnej etykiety, aby ?atwo by?o rozpozna? witrynę? w przyszłoci.
wpisz reCAPTCHA: Wybierz dowolny typ reCAPTCHA, kt�ry preferujesz dla swojej witryny. obecnie dost?pne s? dwa typy, tj. reCAPTCHA v3 i reCAPTCHA v2. W przyk?adowym projekcie projekt?my reCAPTCHA v2.
Domena: Musisz tutaj? nazw? Swojej strony internetowej, dla kt�rej b?dziesz wdra?a? funkcjonalno?? reCAPTCHA. Dotyczy domen, których poddomenę wpisujesz tutaj. Na przyk?ad rejestracja dla abc.com rejestruje r�wnie? xyz.abc.com.
Teraz po prostu zaznacz pole wyboru Zaakceptuj Warunki korzystania z nas?ugi reCAPTCHA i kliknij na przełomie XIX i XX wieku.
Teraz masz klucz witryny i tajny klucz dla swojej witryny.
Krok 2:?wdro?enie funkcji reCAPTHA?w swojej witrynie
Aby doda? reCAPTCHA najpierw musisz do??czy? biblioteka? JavaScript reCAPTCHA do swojego kodu HTML.
Teraz dodaj ten kod HTML, w kt�rym chcesz pokaza? widżet reCAPTCHA.
Zast?p?site_key? witryny witryny. przez Google dla Twojej witryny
Zrobione teraz, po prostu od?wie? stron?, a zobaczysz, że zobaczysz reCAPTCHA na swojej stronie.
Krok 3: �Weryfikowanie odpowiedzi u?ytkownika”
Teraz musisz zweryfikować? odpowied?, gdy u?ytkownik kliknie wid?et reCAPTCHA. Kod PHP do weryfikacji odpowiedzi u?ytkownika jest kodem poni?ej:
sukces) { $succMsg = 'Twoja pro?ba o kontakt zosta?a pomy?lnie przes?ana.'; } else { $errMsg = 'Weryfikacja robota nie powiod?a si?, spr�buj ponownie.'; } } ?>
Dodaj sw�j rzeczywisty tajny klucz w powy?szym kodzie i gotowe.
W dzisiejszych czasach ka?dy chce pozby? si? spamu na swojej stronie, niezale?nie od tego, czy jest to spam w komentarzach, wiadomo?ci spamowe, czy ruch spamowy w Twojej witrynie. Aby Chroni? swoj? witryn? przed spamowaniem, jednym z najlepszych i naj?atwiejszych sposob�w jest u?ycie Google reCAPTCHA.
Dawniej ludzie umieszczali na ekranie losow? liczb? lub ci?g znakwi weryfikowali je po stronie serwera.
Ale ta metoda jest star? método? i jest czasoch?onna dla wielu u?ytkownikw, podczas gdy metoda Google reCAPTCHA jest ?atwa wu?yciu i zajmuje mniej czasu, co zapewnia lepsze wra?enia u?ytkownika. Wystarczy jedno klikni?cie, aby udowodni?, ?es? lud?mi, um nie robotami. Google reCAPTCHA jest bardzo ?atwy do zaimplementowania w skrypcie PHP.
Na tym blogu dowiesz si?, jak krok po kroku zintegrowa? google reCAPTCHA na swojej stronie z PHP.
Krok 1: Aby pobra? klucz API reCAPTCHA
Aby uzyska? klucz API do korzystania z reCAPTCHA, musisz zarejestrowa? swoj? witryn? pod adresem – https://www.google.com/recaptcha/admin. Zrzuty ekranu znajduj? si? poni?ej dla Twojej pomocy:
Nazwa U?yj w?asnej etykiety, aby ?atwo por?o rozpozna? witryn? w przysz?o?ci.
digite reCAPTCHA: Wybierz dowolny typ reCAPTCHA, ktry preferujesz dla swojej witryny. Obecnie dost?pne s? dwa tipy, tj. reCAPTCHA v3 e reCAPTCHA v2. W przyk?adowym projekcie zastosowali?my reCAPTCHA v2.
Domínio: Tutaj musisz poda? nazw? swojej strony internetowej, dla ktýrej b?dziesz wdra?a? funkcjonalno?? reCAPTCHA. Dotyczy to domen, ktýre tutaj wpisujesz, a tak?e ich subdomen. Na przyk?ad rejestracja dla abc.com rejestruje r�wnie? xyz.abc. com.
Teraz po prostu zaznacz pole wyboru Zaakceptuj Warunki korzystania z us?ugi reCAPTCHA i kliknij na przycisku Prze?lij.
Teraz masz klucz witryny i tajny klucz dla swojej witryny.
Krok 2:?Wdro?enie funkcji reCAPTHA?w swojej witrynie
Aby doda? reCAPTCHA najpierw musisz do??czy? biblioteca? JavaScript reCAPTCHA do swojego kodu HTML.
Teraz dodaj ten kod HTML, w ktrym chcesz pokaza? wid?et reCAPTCHA.
Zast?p?site_key? kluczem witryny dostarczonym przez Google dla Twojej witryny.
Zrobione teraz, po prostu od?wie? stron?, a zobaczysz wid?et reCAPTCHA na swojej stronie.
Krok 3: �Weryfikowanie odpowiedzi u?ytkownika”
Teraz musisz zweryfikowa? odpowied?, gdy u?ytkownik kliknie wid?et reCAPTCHA. Kod PHP do weryfikacji odpowiedzi u?ytkownika jest podany poni?ej:
sukces) { $succMsg = 'Twoja pro?ba o kontakt zosta?a pomy?lnie przes?ana.'; } else { $errMsg = 'Weryfikacja robota nie powiod?a si?, spr?buj ponownie.'; } } ?>
Dodaj swj rzeczywisty tajny klucz w powy?szym kodzie i gotowe.
The relational database management system MySQL is free and open-source. The word “My” is a combination of “SQL,” the acronym for a structured query language, and “My,” the name of co-founder Michael Widenius’s daughter.
A relational database arranges data into one or more tables where it is possible for the data to be related to one another. The relational database’s data can be created, modified, and extracted using the SQL programming language, which is also used to manage user access to the database. An RDBMS, such as MySQL, works with an operating system to implement a relational database in a computer’s storage system, manages users, permits network access, and makes it easier to test database integrity and create backups.
Under the terms of the GNU General Public License, MySQL is free and open-source software. It is also accessible under a number of proprietary licences. Sun Microsystems acquired the Swedish company MySQL AB, which owned and sponsored MySQL (now Oracle Corporation).
Objectives of the blog
To learn how to fix the issue “The user specified as a definer (‘xyz’@’localhost’) does not exist” in MySQL. It can be any value in place of ‘xyz’.
This error has occurred because you have defined different users in Definer and using other accounts in MySQL.
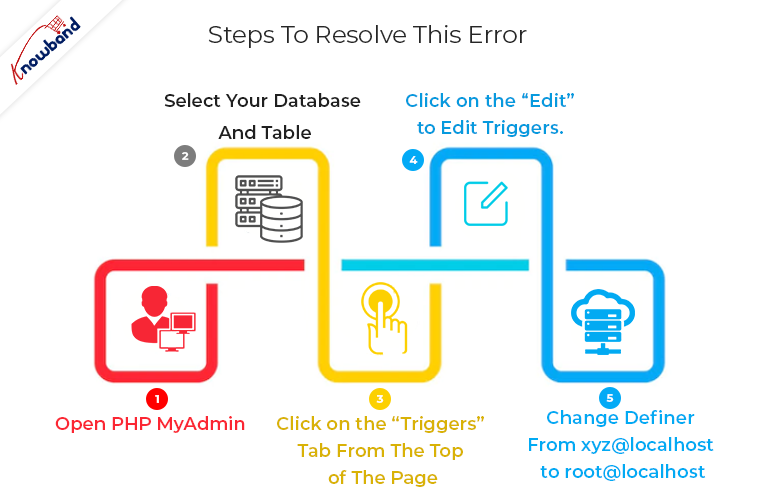
So while creating Triggers, you should use the “root@localhost” in the Definer. Follow the below steps to resolve this error:
Step 1: Open phpMyAdmin
Step 2: Select your database and table
Step 3: Click on the “Triggers” tab from the top of the page
Step 4: Click on the “Edit” to edit triggers.
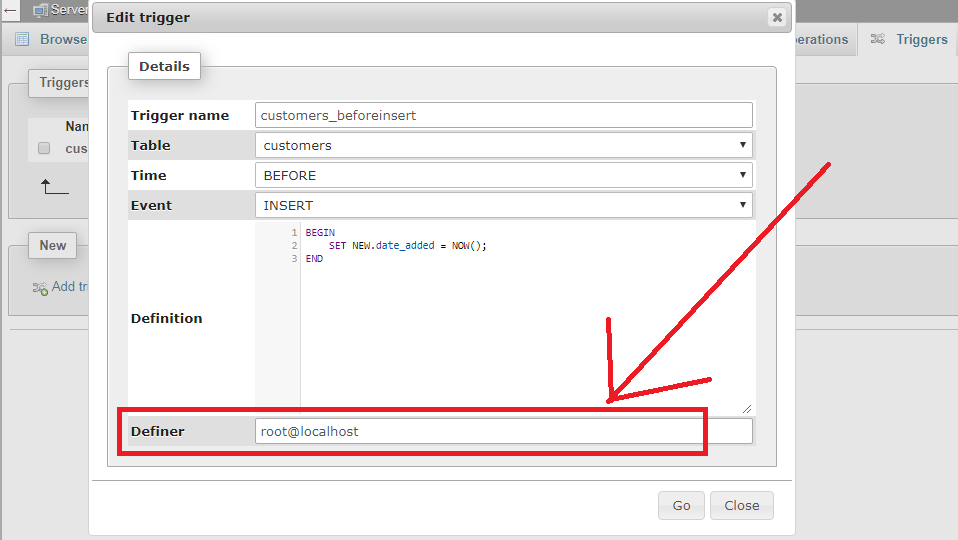
Step 5: Change Definer from xyz@localhost to root@localhost
For more details check this screenshot:
You can contact us at support@knowband.com if you have any questions. Best-in-class solutions for all things eCommerce are offered by Knowband. Additionally, we offer custom development services for a variety of platforms like Prestashop, Opencart, Magento 2, and Magento 2.
Knowband offers Magento 2 Preferred delivery time module by which the online store merchant can allow the customers to select the preferred delivery date and time for receiving the order. The online users can select the preferred date from the available calendar and time from the drop-down list. This way, the online merchant can deliver the products as per the customer’s requirements. The Magento 2 Delivery Date and Time Extension makes it easy to implement preferred delivery date-time functionality implementation. Customers can also get an option to change their preferences after placing their order. The Magento 2 Delivery Date and Time module is mobile responsive and offers smooth functioning.
1.1 Magento 2 Order Delivery Date and Time Extension Features
The online store merchant can use Magento 2 Preferred Delivery Time Module for implementing preferred date-time selection functionality.
The online store merchant can set delivery days gap and select calendar days from which customers can select the preferred delivery dates.
The online store merchant has an option to define the time slot and time slot range from the Magento 2 Delivery Date and Time Extension admin interface.
The Magento 2 Delivery Date and Time Extension allows admin to select weekdays on which delivery will be unavailable.
There is an option for online users to change their order delivery preferences even after placing the order. The e-merchant can set the time limit and order status on which customers can change their delivery preferences.
Ready-made email templates are available in Magento 2 Delivery Date and Time module which can be further customized for sending an order confirmation email to the customers.
There is an option to set weekdays on which order delivery will not be available for the consumers.
This Magento 2 Delivery Time/Date module is mobile responsive and offers smooth functioning.
The delivery time slot selection module for Magento 2 offers a user-friendly interface.
2.0 Installation
After purchasing Magento 2 Preferred Delivery Time extension, the store admin will get the following files:
1.Preferreddeliverytime.zip which has the source code of this Magento 2 Preferred Delivery Time Module.
2.User Manual, with all the basic details and information.
The steps to install the Magento 2 Preferred Delivery Time Module are mentioned below:
Buy the Magento 2 Preferred Delivery Time Module from Knowband. You can download the extension package.
The package has a zipped file that contains the user manual and the source code of Magento 2 Preferred Delivery Time Module. Now, Unzip this package.
Create a folder {Magentoroot}/app/code/Knowband/Preferreddeliverytime
Upload the extracted content in the above folder via FTP manager (like Filezilla or WinSCP – download here: https://filezilla-project.org/).
Now run below commands to install the plugin:
1.php bin/magento module:enable Knowband_Preferreddeliverytime
2. php bin/magento setup:upgrade
3. php bin/magento setup:di:compile
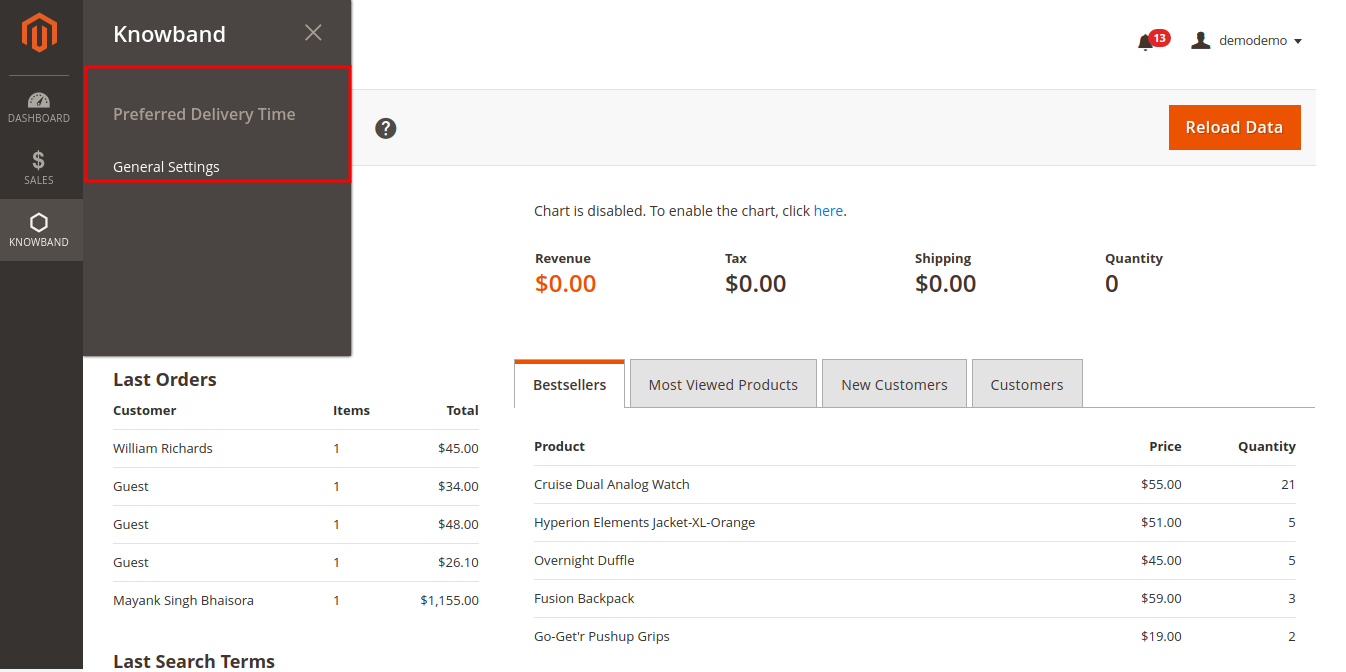
The extension is now installed and ready for use. In Admin Panel go to “Knowband Extensions > Preferred Delivery Time”.
You can now configure and use the Knowband Magento 2 Preferred Delivery Time Module.
3.0 Admin Settings
After successful installation, the online store admin can apply settings for implementing the preferred delivery date and time option for the customers. These are the configuration options as shown below:
3.1 General Settings
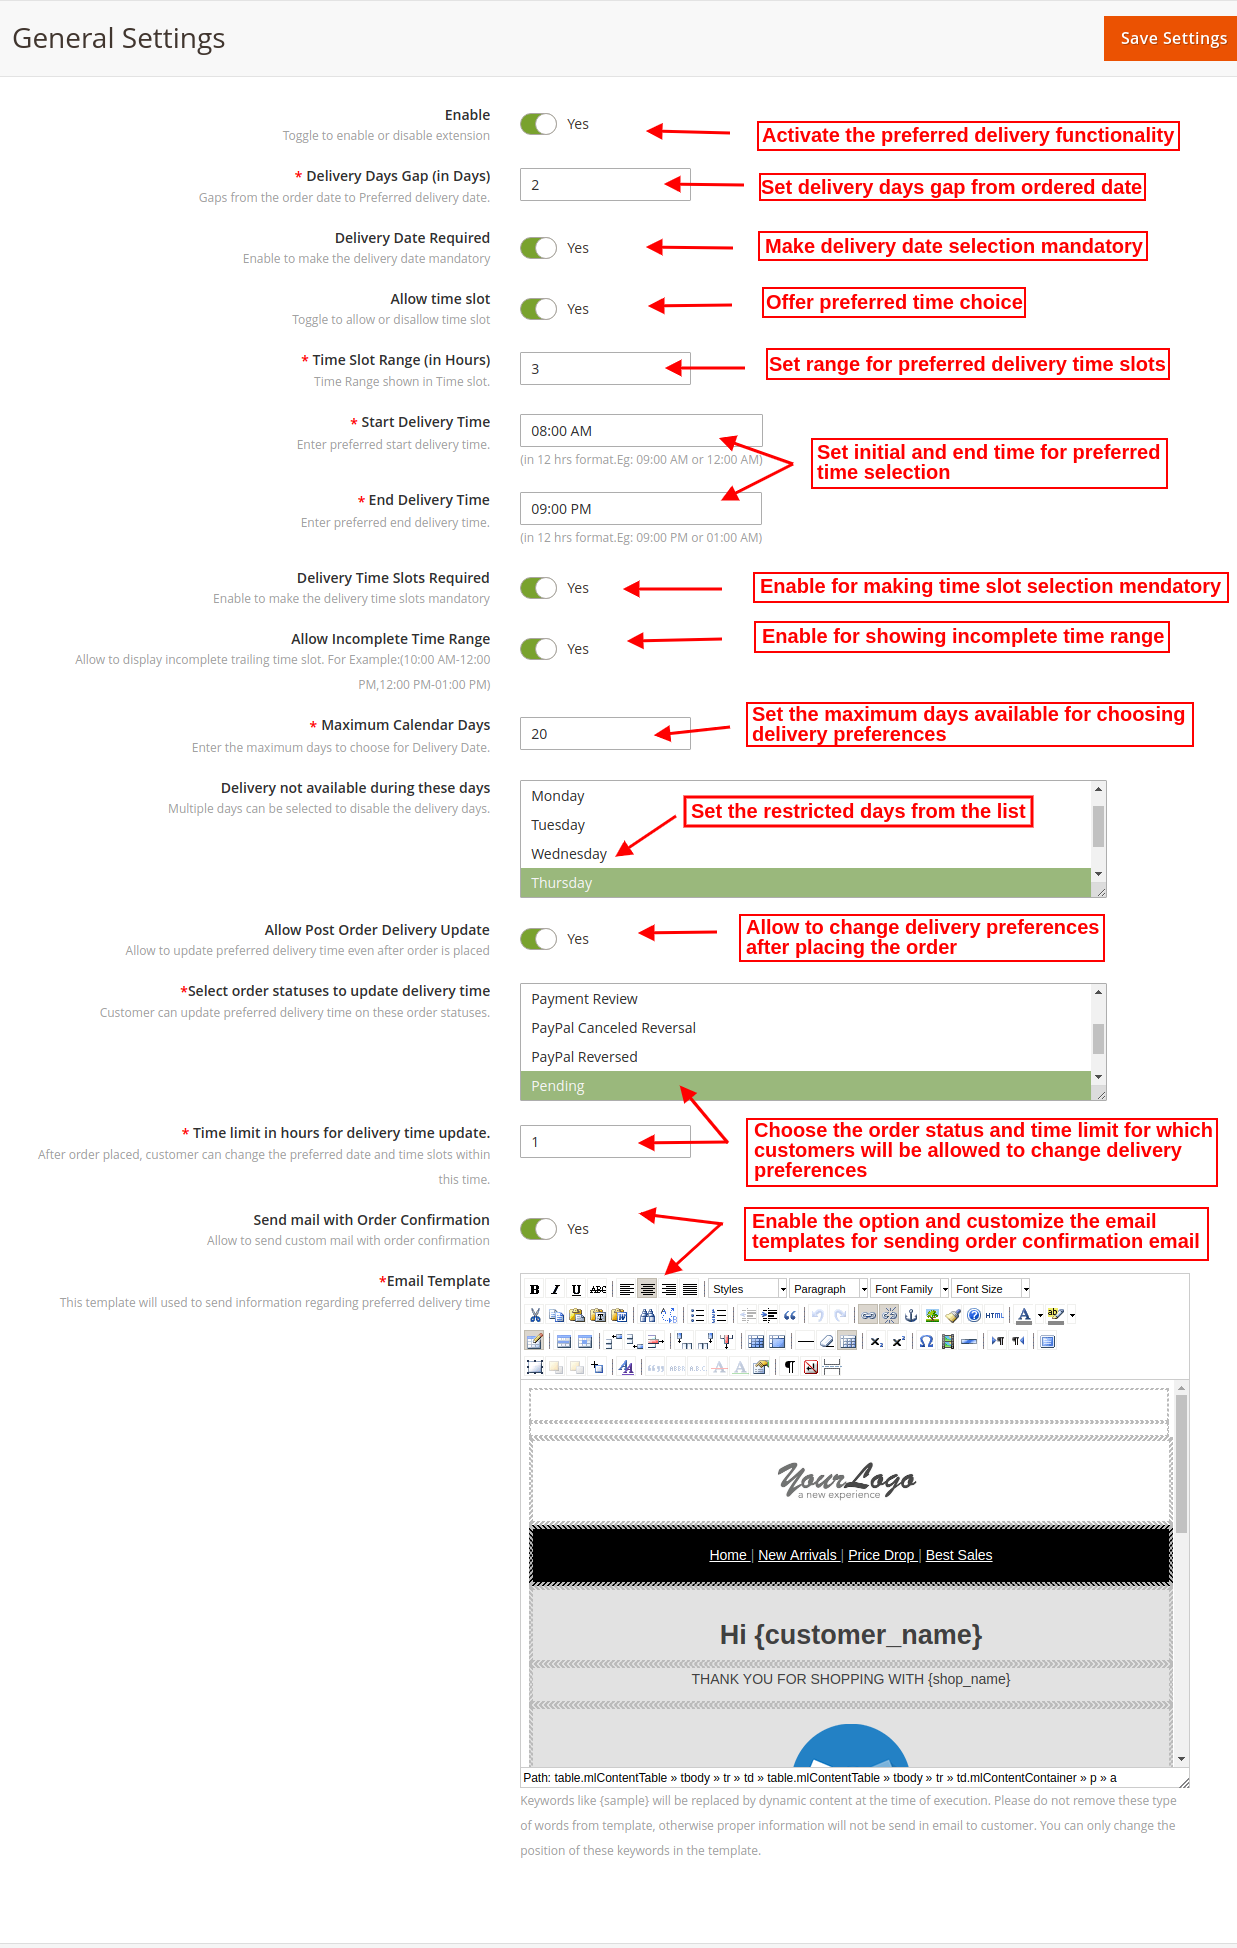
In the General Settings tab, the online store merchant can apply these settings as shown below:
Enable: The online store merchant can activate or deactivate the module functionality by a single button toggle.
Delivery Days Gap(in Days): Set the delivery days gap which you want to show while selecting the preferred delivery date.
Delivery Date Required: Set delivery date selection mandatory for the customers.
Allow Time Slot: Allow customers to select a time slot for receiving the order.
Time Slot Range(in Hours): The eCommerce store merchant can set a time slot range from the admin interface.
Start Delivery Time: Set the Preferred start delivery time in 12 hours format.
End Delivery Time: Set preferred end delivery time in 12 hours format.
Delivery Time Slot Required: Make time slot selection mandatory for the customers by enabling the option.
Allow Incomplete Time Range: Enable this option if you want to allow showing incomplete time range ie 8 PM to 10 PM and 10 PM to 11 PM.
Maximum Calendar Days: Admin can set the maximum days available for selecting preferred delivery.
Delivery not Available During These days: Select the days on which delivery will not be available. Customers will not be able to select these days for delivery preference.
Allow Post Order delivery Update: Enable this option if you want to allow the customers to update delivery preferences after placing the orders.
Select Order Statuses to Update Delivery time: The e-merchant can also select the order status on which customers can change their preferred delivery date and time. Admin can select multiple statuses at a time.
Time Limit in hours for delivery time update: Admin can set the hours limit for allowing customers to update their preferred delivery date and time. Customers can update their preferred delivery date and time within the provided time limit.
Send mail with order confirmation: The online merchant can enable this option for sending an order confirmation email to the customers along with the date-time preference details.
Email templates: The online store merchant can customize the email templates for sending an order confirmation email to the customers.
4.0 Front-end Interface
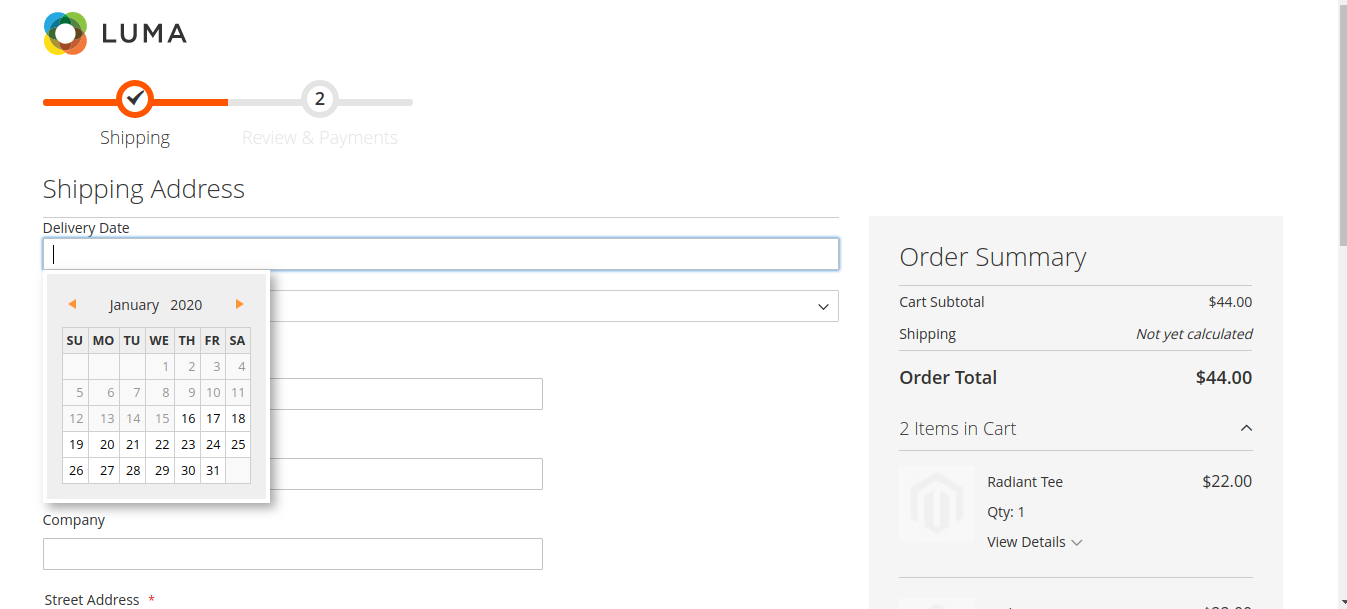
The online users can view the delivery date preference option while checkout. The online users can select the preferred date from the available dates from the calendar as shown below:
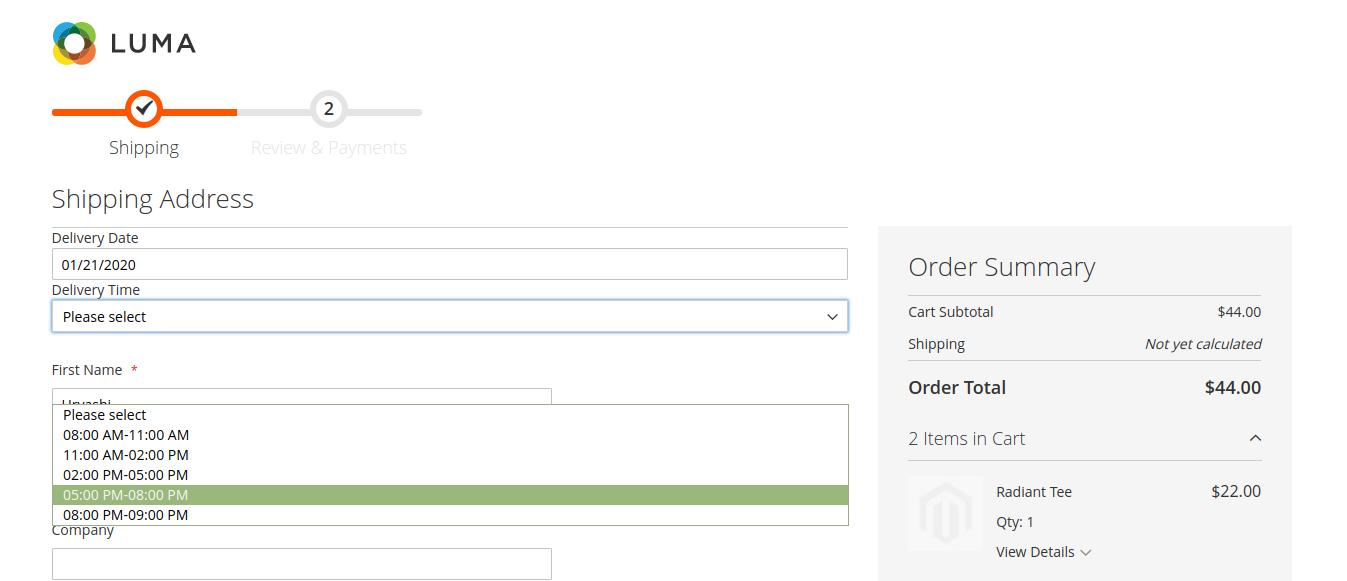
The e-Commerce store merchant can select the preferred time slot from the drop-down list as shown below:
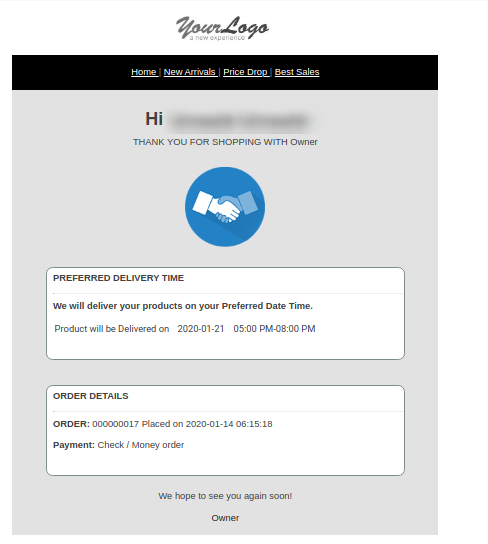
The online users can get an order confirmation email on their registered email id.
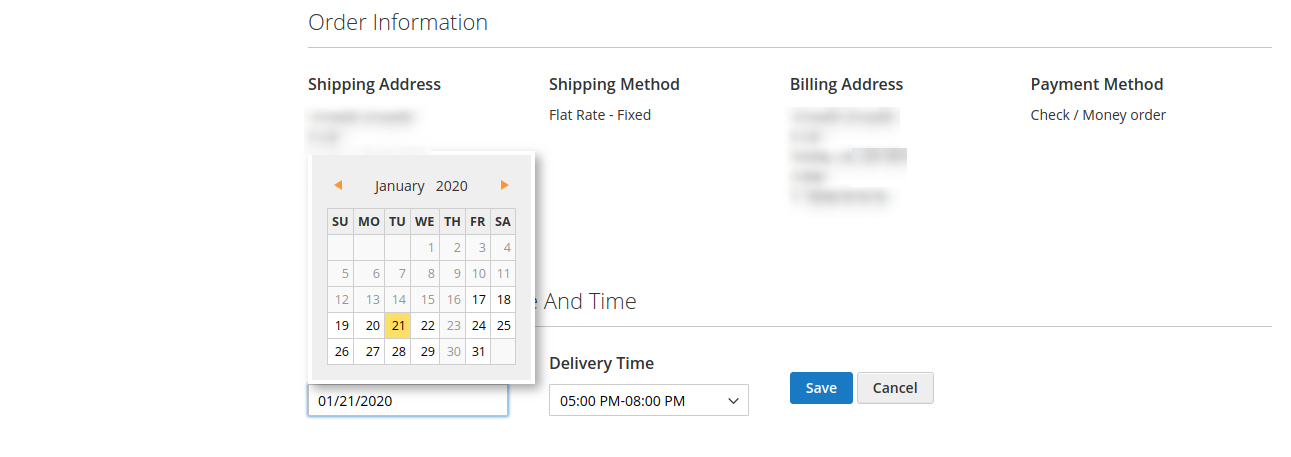
The online users can also update their delivery preferences from their order section. They just can need to click on “update” button as shown below:
The online users just need to click on the calendar date from available dates as shown below:
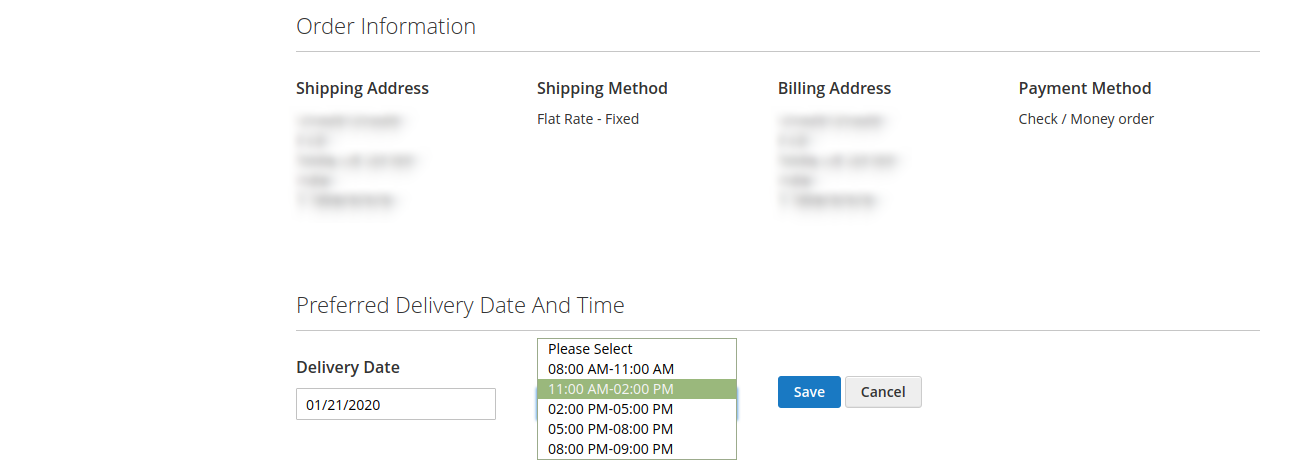
They can also select a different time slot from the available drop-down list:
This way, they can successfully update the preferred delivery date and time.
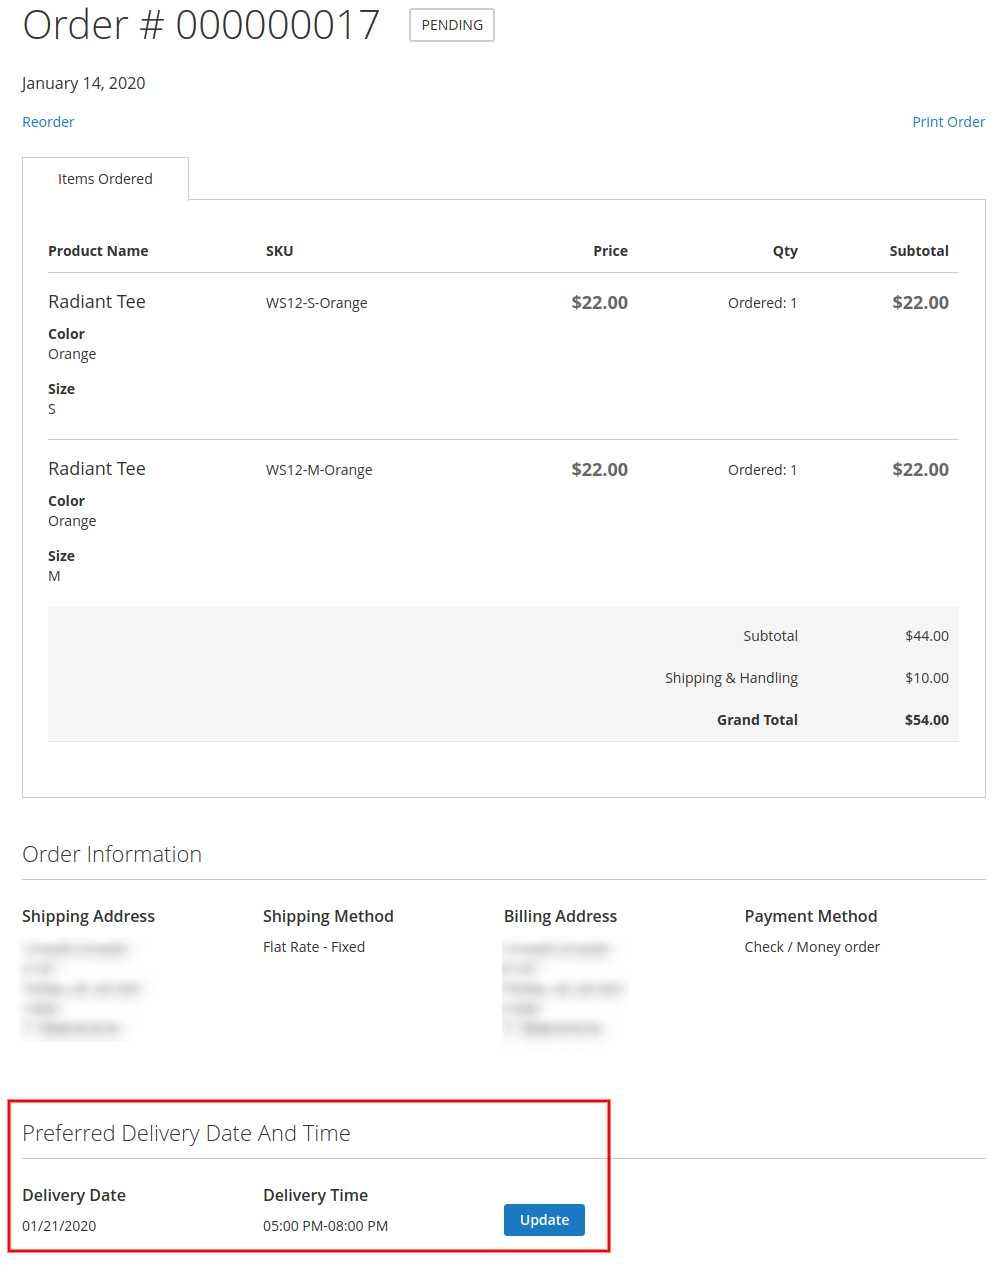
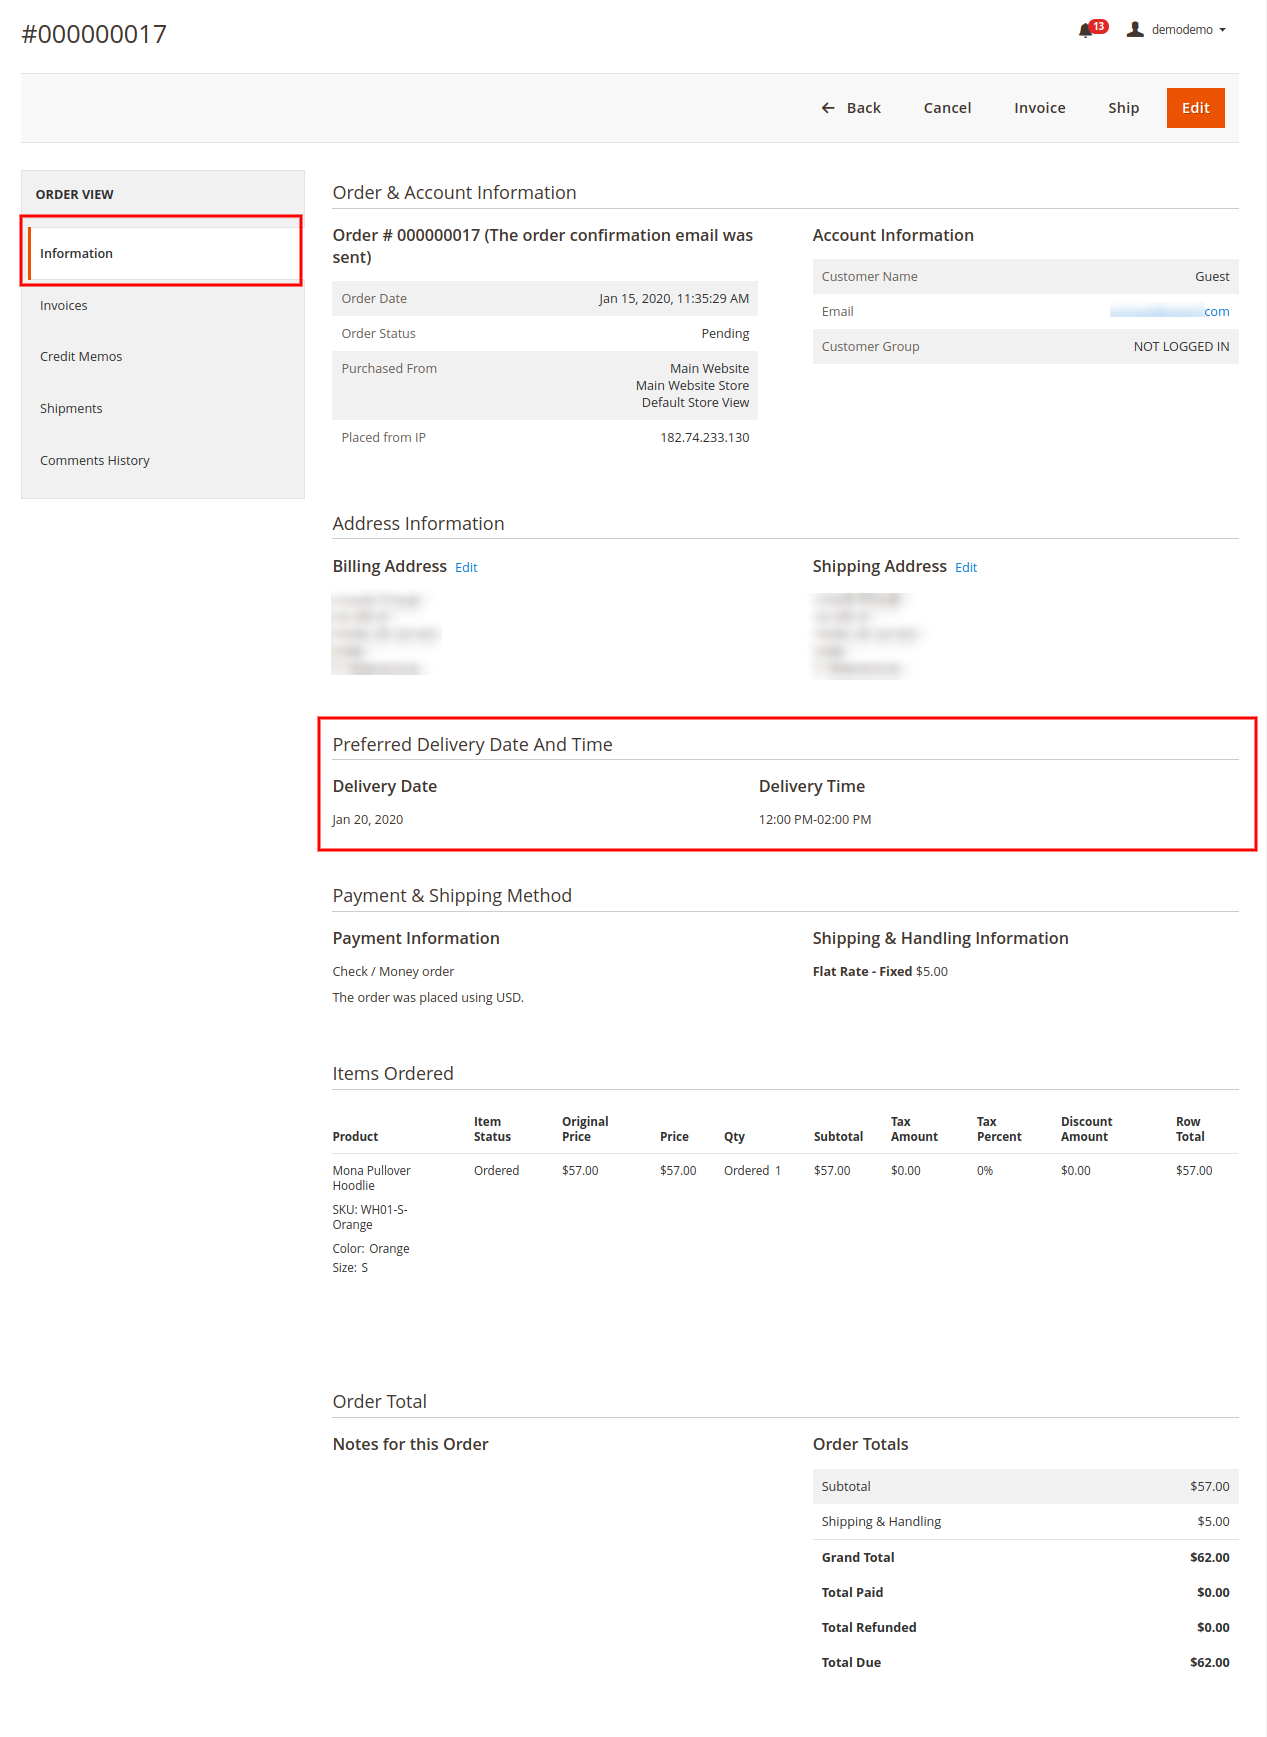
Preferred delivery date and time view on the Admin interface:
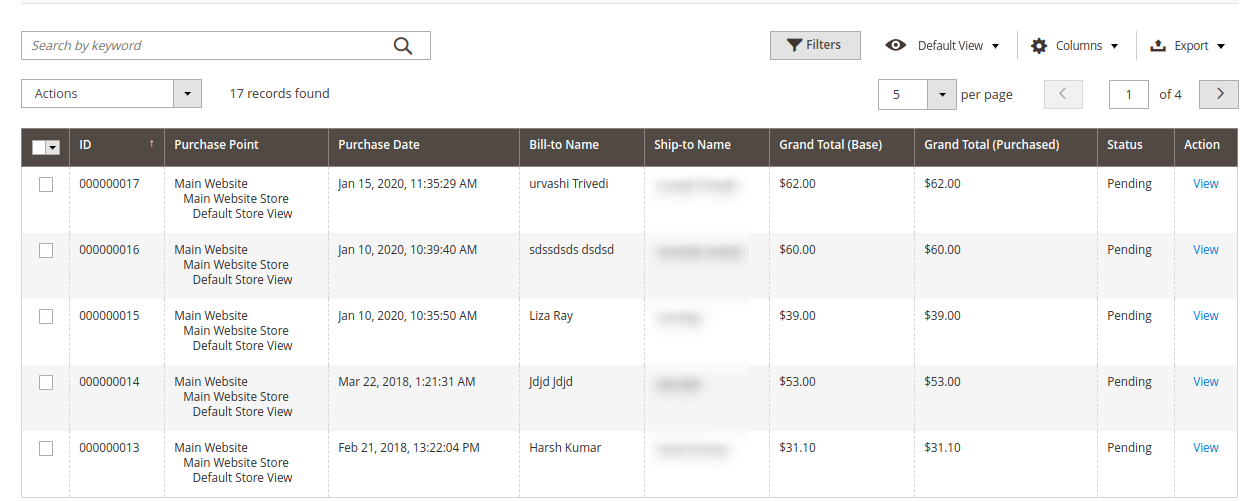
The e-merchant can also view the customers preferred delivery date and time by viewing orders from the admin interface.
Admin can click on the view button for checking the delivery preferences.
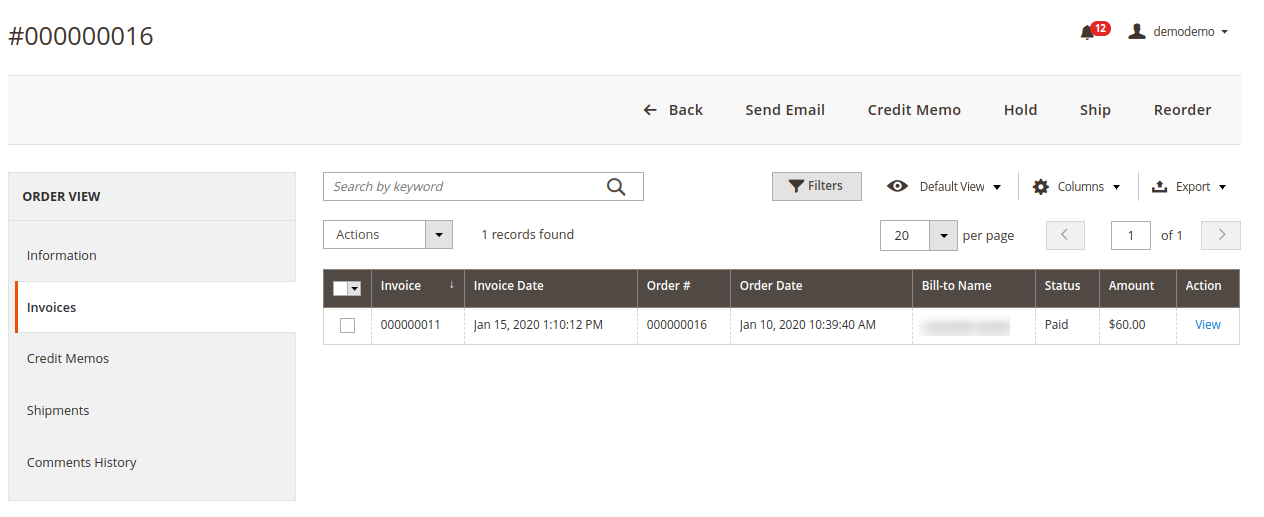
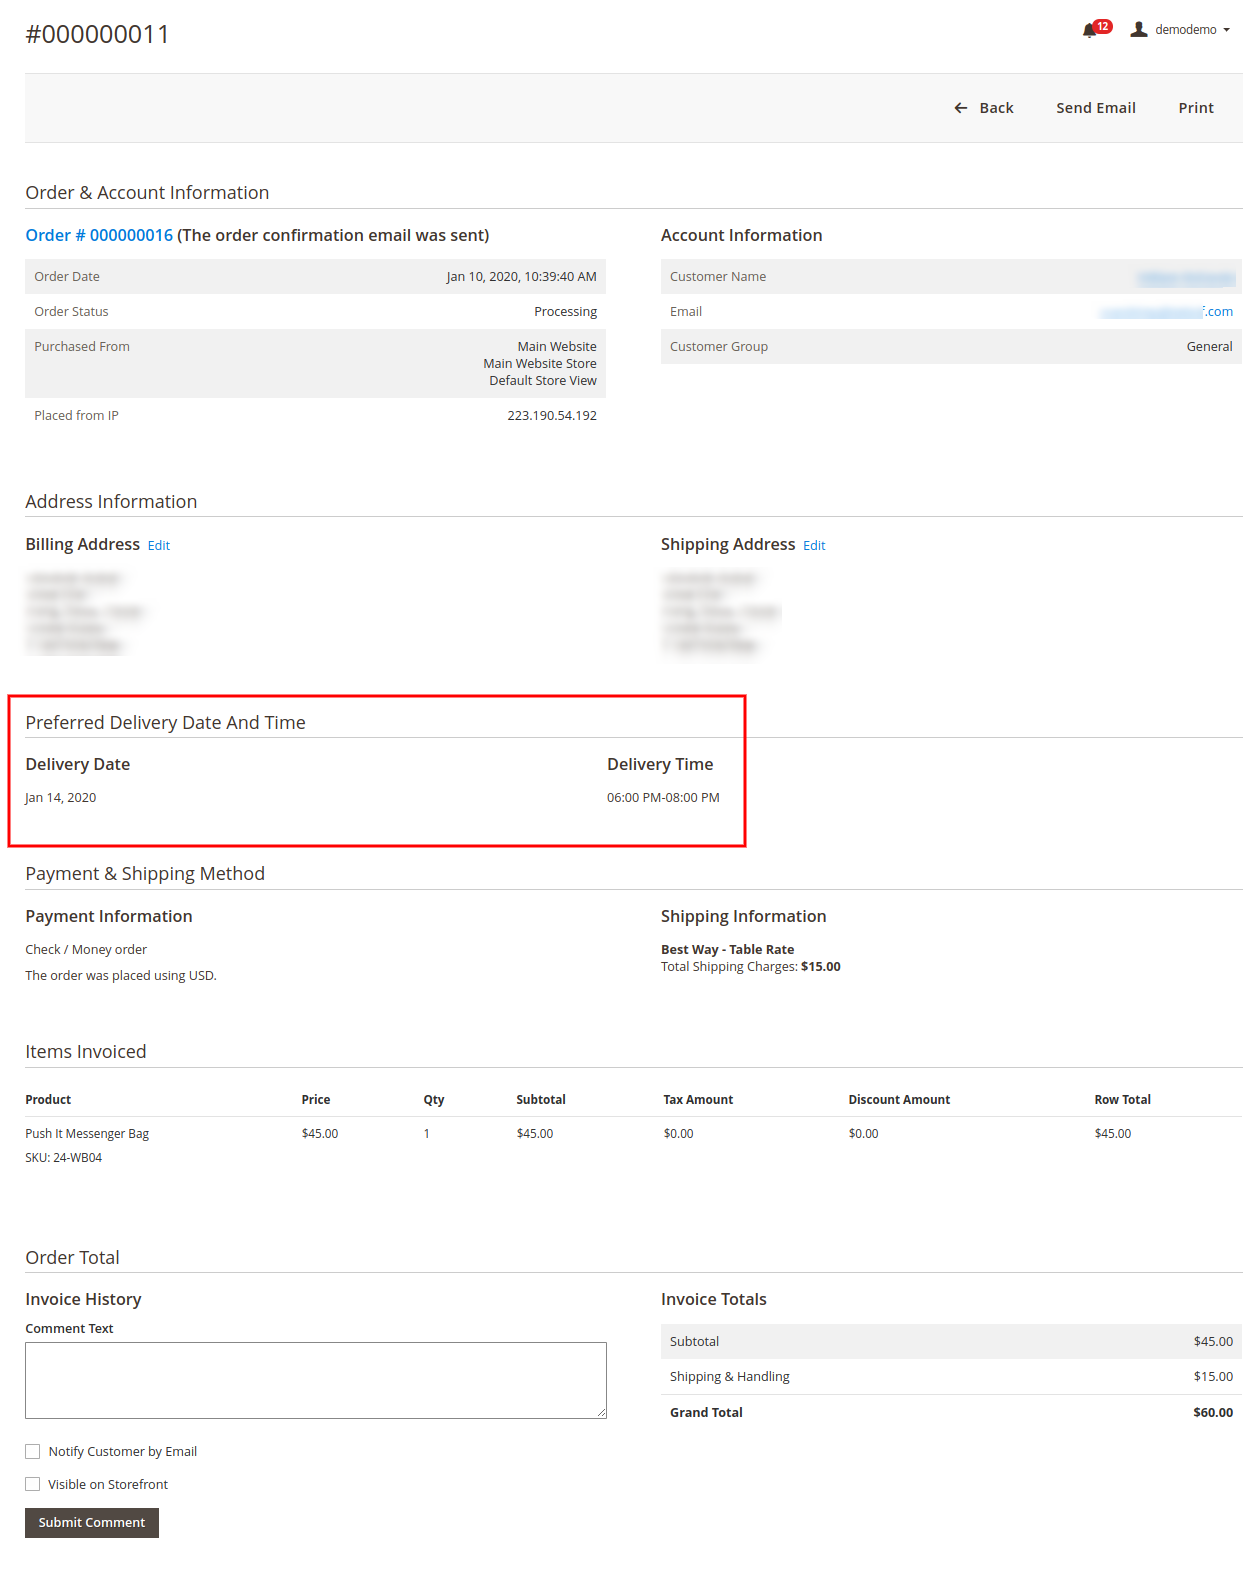
This Magento 2 Preferred Delivery Time Module also shows preferred delivery date and time in invoice. The customers can go to the invoice section after generating invoice as shown below:
The online store admin can click on view to check the delivery preferences details in the order invoice:
First, we should know about the term “bounce rate”
In easy words we can say, bounce rate is the ratio between the number of visitors comes on our site and the number of visitors leaves our site from the landing page without navigating to another page.
When visitors or customers land on our website from any other external link for example advertisement, search result, shared link, etc but if they do not visit internal links of the site. This will increase the bounce rate as the server of Google Analytics will not be triggered due to no engagement.
So this will lower our ranking in Search Engine Results which is definitely a great loss for the growth of our website.
When the bounce rate matter
We should keep in mind that if the objective of our website is to share information then bounce does not matter for us. Let us take an example if our webpage gives any text-based information and if visitors came and read the articles and leave our sites. Here the job is done as the visitor got the information.
But the bounce rate really matters if we are looking forward to getting more and more active visitors engaged on our sites.
The major reason for the bounce rate
The website is taking more time to load.
Bad user interface and content management.
The UI of the landing page is complex which not easily understandable for every type of user.
Visitors didn’t get the information in the smart way which they looked for.
Internal links of our website are not clearly highlighted for the visitors.
Unwanted popup on the landing pages.
How to measure the bounce rate
Google provides many useful services for our website. To measure the bounce rate we can use Google Analytics which tracks and monitor the traffics coming on our websites. It calculates the total behavior on our website. So it is a great tool to measure the bounce rate of our website.
To use these tools we just need a Google account and link our website with Google Analytics. Note: If you need any help to use this tool please write the query in the comment box given at the bottom of the page.
According to Google
The bounce rate is a single-page session divided by all the sessions or the percentage of all sessions on your site in which users viewed only a single page and triggered only a single request to the Analytics server.
How To Minimize The Bounce Rate Of Our Website?
A Good Landing Page
A landing page is the first page where our visitors enter in our website by clicking on the links of search engine results. The first impression is the last impressions so landing page must have a clear and user-friendly interface.
The landing page plays an important role in the good conversions rate. A good landing page should an attractive offer and able to explain why it is valuable for money in concise terms. There should be an “About” section on the landing page and also navigation links should be clearly visible.
The landing page of Knowband is a good example of the landing page.
Reduce Page Load Time
As a user, we can know how irritating to browse the slow pages. Visitors simply press the back button if a page takes more than 5 seconds to load. Unwanted third party scripts on our website also increase the page load time. If we are showing an unoptimized image it also takes more time to load.
Tips:According to Google, a good score for page speed is 85 or above. We can know about the speed of our pages using the Google Analytics tool.
Remove Unwanted Pop-Ups
Unwanted pop-ups and ads on the pages are also responsible to increase the bounce rate.
AB Testing
AB Testing is a useful experiment where two or more designs of the same page will show randomly to the visitors. By seeing the report of the AB Testing we can analyze which design had performed better and given more conversion.
CTA: Call To Action
CTA is just like a hidden trap or baits on our landing page. Newsletter subscription, download button, internal links are some good examples of CTA. These things should be clearly visible on our pages.
Thanks for reading this blog. Hope all five mentioned tips will help you to reduce the bounce rate of your website. You can consider these points according to your business need.
California Consumer Privacy Act ie CCPA is one of the most detailed privacy law. CCPA targets those companies and firms that collect and/or sell customer’s personal information. California Consumer Privacy Act provides overall control to the online users of California over their data. The deadline for CCPA implementation is January 1, 2020.
The difference between GDPR and CCPA is that the GDPR centers around all information identified with the EU customers however though the CCPA considers both the buyer and family unit as recognizable elements and, now and again, just considers information gave by the shopper rather than information sourced or obtained from outsiders.
Knowband offers PrestaShop CCPA Addon by which the online store merchant can easily make his store CCPA compatible. The store merchant can meet all the CCPA requirements easily without any hassle. With this PrestaShop CCPA Compliance module, the online merchant can cover all the rights of the consumers provided by CCPA. The online merchant can also provide a simple and user-friendly interface to the customers for accessing CCPA rights.
With this CCPA PrestaShop compliance module, the online users will get these rights:
Right to Access Personal Data
Right to Data Portability
Right to be Forgotten
Right to Data Rectification
Right to User Consent
The online users can access their CCPA rights by sending requests from the front-end interface of this PrestaShop CCPA Compliance module.
1.1 Features Offered by PrestaShop CCPA Module
Simple to meet CCPA Requirements: The online store merchant can use the PrestaShop CCPA Compliance addon and meet all the CCPA requirements easily without any complicated implementation.
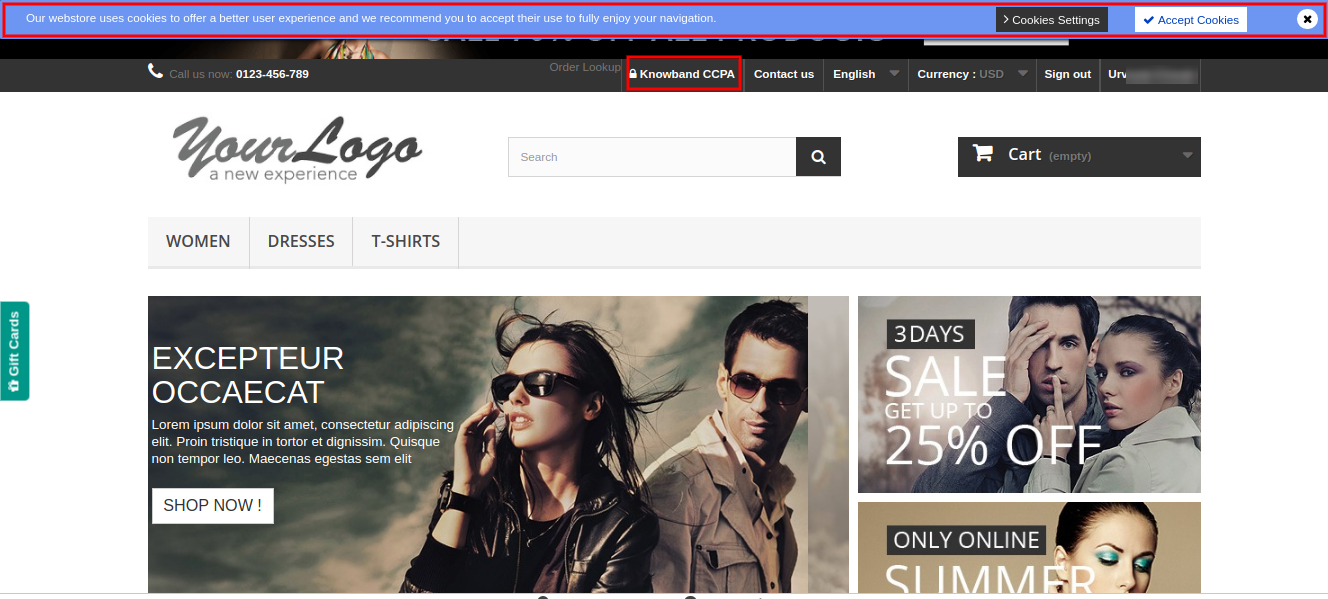
Cookie usages and setting: The PrestaShop California Consumer Privacy Act Module allows the online merchant to set up and show a Cookie consent bar on the website front-end. This way, the online users can understand the use of cookies and accept it.
Show CCPA Header Link on the Website: The online store merchant can show a header link to the customers. The online merchant can also set the text for the header link. The online users can click on this header link and access their CCPA rights.
Right to access Personal Data: The online store admin can allow the customers to access personal data by requesting for it. They just need to enter their email id for accessing their personal data.
Data portability: With this PrestaShop CCPA plugin, The online store merchant can allow Californian users to access and download their personal information, address and order details.
Offer Right to be forgotten: The online merchant can allow the users to send forget the request. This way the online users can enter their email id and request for deleting personal information.
Right to Data Rectification: The online store admin can allow the online users to send a request for data rectification. This way, the online users can update their personal information easily.
Right to User Consent: The online users of California can also update their user consent data if they wish to do so.
2.0 Installation
First of all, purchase the PrestaShop CCPA Addon and download the zip file of the CCPA module from the Downloads section of your Knowband account.
After that, you will get:
1) CCPA.zip (source code of the module)
2) User Manual
To install the module in the store follow the below-mentioned steps:
1) Unzip the ccpa.zip file.
2) Copy the entire content, that is, the files and folders of the unzipped folder. Paste the same into the “Modules” folder of your store’s directory. Follow the below-mentioned address path – Root Directory/modules/.
3) The Prestashop CCPA plugin is all set to be installed in the store. Go to the Store Admin and then to ‘Modules and Services’.
4) Click on the “Install” button just next to your module. It would show a pop-up for your confirmation. Click on “Proceed with the installation” option. This step will install the module and show notification – “Module(s) installed successfully”.
5) Once the installation is complete, you will get access to the admin interface of the module by clicking on the “Configure” button.
3.0 Admin Settings
After the successful installation of the PrestaShop CCPA module, the online store admin can configure CCPA and implement the functionality easily by following the configuration steps.
These are the configuration options:
CCPA Settings
Cookie Consent Bar
User Consent
CCPA Data Portability
CCPA Forgot Request
CCPA Rectification Request
CCPA Personal Data Request
CCPA Email Template
CCPA Geo-Targeting
CCPA CRONS
CCPA User Consent Data
3.1 CCPA Settings
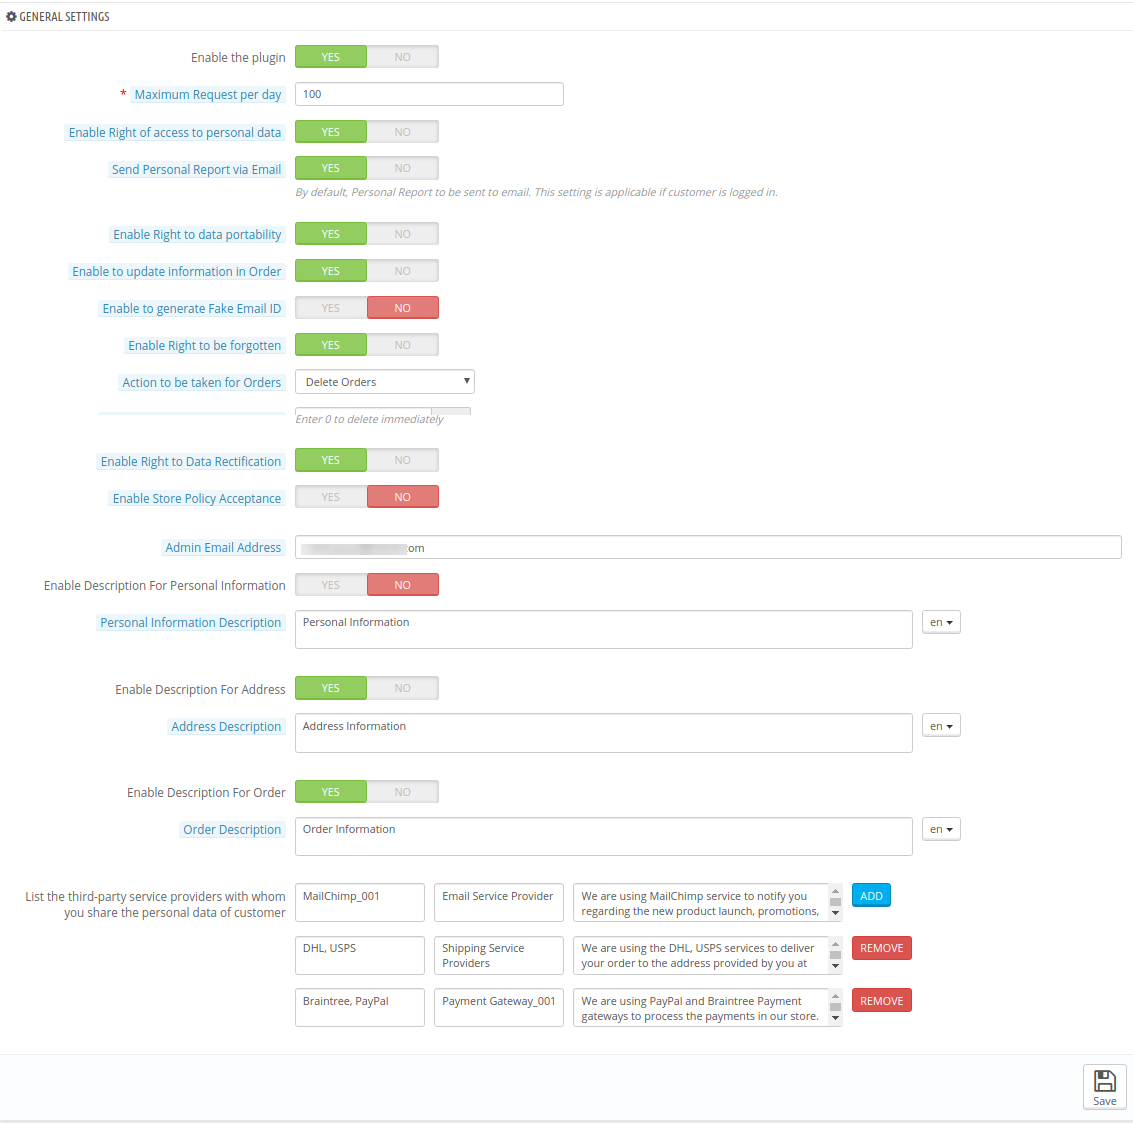
In CCPA Settings, the online store merchant can apply general settings related to CCPA implementation. Please check the available configuration options below:
Enable The Plugin: Toggle the button to yes for enabling the CCPA functionality.
Maximum Request per Day: Enter the number of requests customers can send on a single day.
Enable Right of access to personal data: The online store merchant can allow the online users to send personal data access requests and get personal data like account details, orders and address details in CSV format.
Send Personal Report via Email: Enable this option if you want to send a personal report to the users via email.
Enable Right to data portability: Allow/disallow online users to download personal data by enabling this option. The online users can request for data portability from the admin interface of this PrestaShop CCPA plugin.
Enable to update information in order: The online store admin can enable this option for updating the order information if the customer asks to delete his account.
Enable To Generate Fake Email ID: Enable the option for generating fake email id in case of customer data deletion. This way, the e-merchant can save the customer’s email id with this fake email id.
Enable Right to be forgotten: You can enable or disable the right to be forgotten option by selecting yes or no. The online users can request to be forgotten by sharing their email id.
Action to be taken for orders: Admin can delete orders, fill random data or take no action when customers request to be forgotten.
Time to process request deletion: Enter the days after which the action will be taken to forget the request.
Enable Right to Data Rectification: Admin can enable this option for showing the data rectification option. Customers can update personal details using this option.
Enable Store policy acceptance: The online users will be restricted to accept store policy before accessing CCPA rights.
Store Policy Page: Select the page for showing to the customers for store policy.
Physical Location of your Server with hosting details: Admin needs to enter the country name where the server is located.
Purge Request Day: Admin can enter the days after which the customer’s details will be deleted.
Display Header Menu: Admin can select yes to show the header menu.
Header menu Text: Admin can Enter the text in various languages for showing on the header menu.
Admin Email Address: Enter the email id where you want to get all the email notifications related to CCPA requests.
Enable Description for Personal Information: The online store merchant can enable this option if he wants to show a description of the personal information field.
Personal Information Description: Enter Personal Information Description here in various languages.
Enable Description for Address: Enable to show address description.
Address Description: Enter Address Description here in various languages.
Enable Description for Orders: Enable to show order description.
Order Description: Enter Order Description here in various languages.
List the third-party service providers with whom you share the personal data of customer: Admin needs to enter third-party service providers name with whom store admin shares customer data. Admin needs to enter the service provider name, service type and description.
3.2 Cookie Consent Bar
The online store merchant can also show a cookie consent bar at the website front end. The online users can accept or discard it. Admin has an option to customize the appearance of the cookie bar from the admin interface.
3.2.1 Cookie Bar Settings
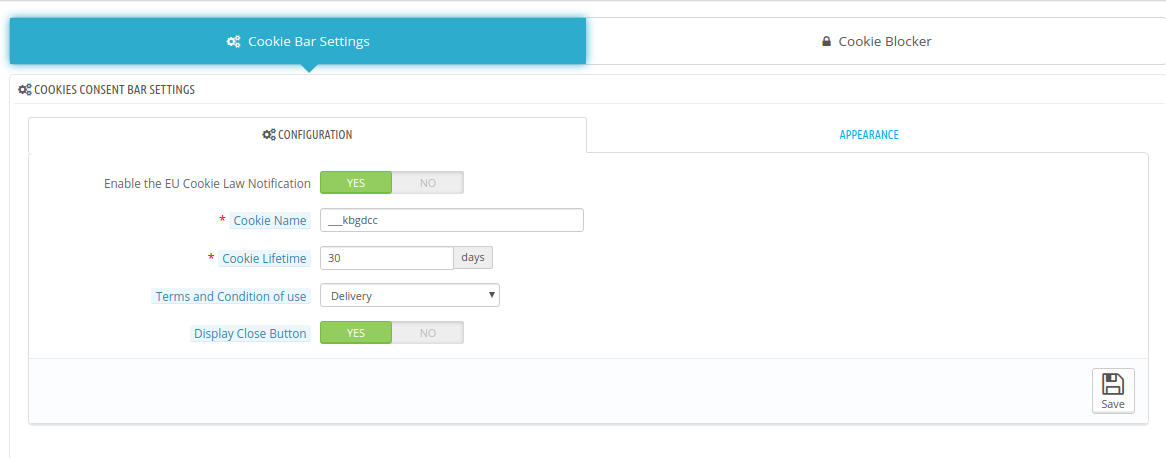
1. Cookie Consent Bar:
Enable the EU Cookie Law Notification: Enable the field for showing a cookie bar on the store front-end interface.
Cookie Name: Enter the cookie name without any space.
Cookie Lifetime: Set the cookie duration ie how long the cookie will be stored on the user’s device.
Terms and Condition of use: List the details of the cookies on a Cookie Policy page and select that page from here.
Display Close Button: The store merchant has an option to remove the Close button from the Cookie Consent Bar.
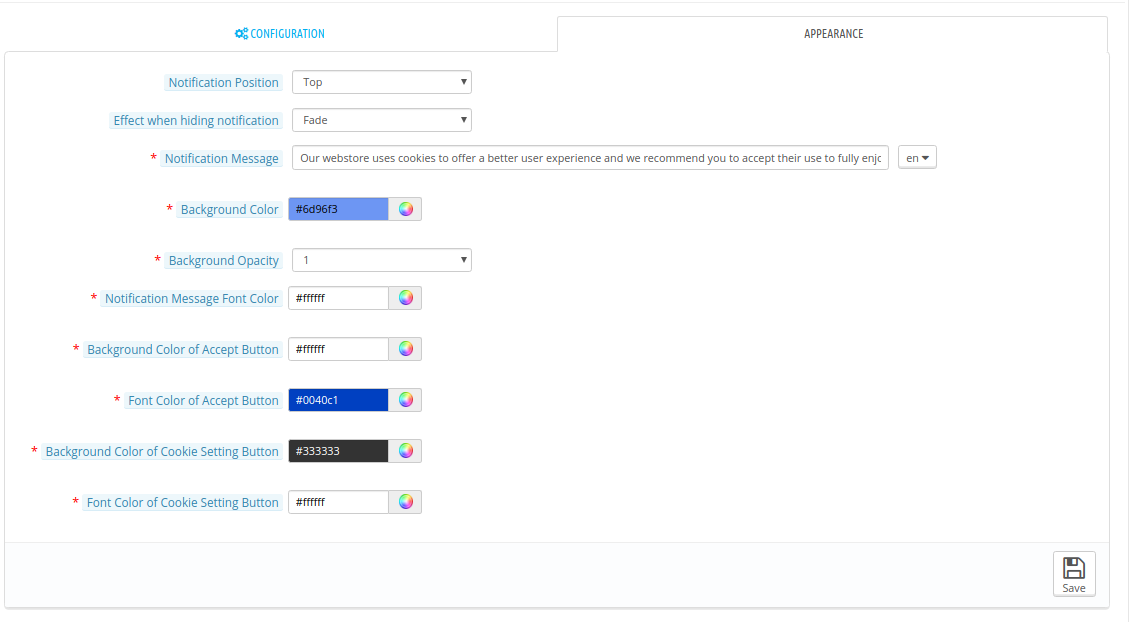
2. Appearance Settings:
Admin can easily set the look and feel Cookie Consent Bar:
Notification Position: Set the cookie bar position on the website bottom or top.
Effect when hiding the notification: Admin can select the options like Fade, Hide or Slide from the drop-down list.
Notification Message: Set the notification message in multiple languages.
Background Color: Set-Cookie bar background color.
Background Opacity: Set the background opacity from here.
Notification Message Font Color: Set the font color of the notification message.
Background Color of Accept Button: Set the accept button background color from the available color options.
Font Color of Accept Button: Choose the font color of the accept button.
Background Color of Cookie Settings Button: Set BG color of cookie settings button.
Font Color of Cookie Settings Button: Set font color of more cookie settings button.
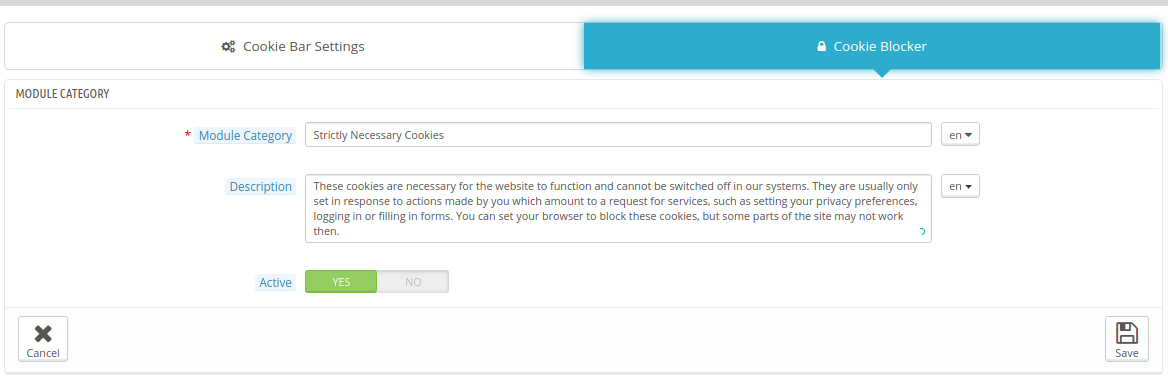
3.2.1 Cookie Blocker
‘Cookie Blocking‘ functionality works based on disabling the module functionality. If cookies of any particular module are already created & the user opts to disable that module then the cookie will remain in the browser but module functionality will stop working so there will not be any use of those cookies. For example, If Google Analytics cookies are already created in the browser & user blocks the Google Analytics module, then the cookies will remain in the browser but the Google Analytics module will not be able to send the tracking data to Google.
Admin can also add a new cookie blocker, Edit the cookie blocker and add modules in available cookie blocker.
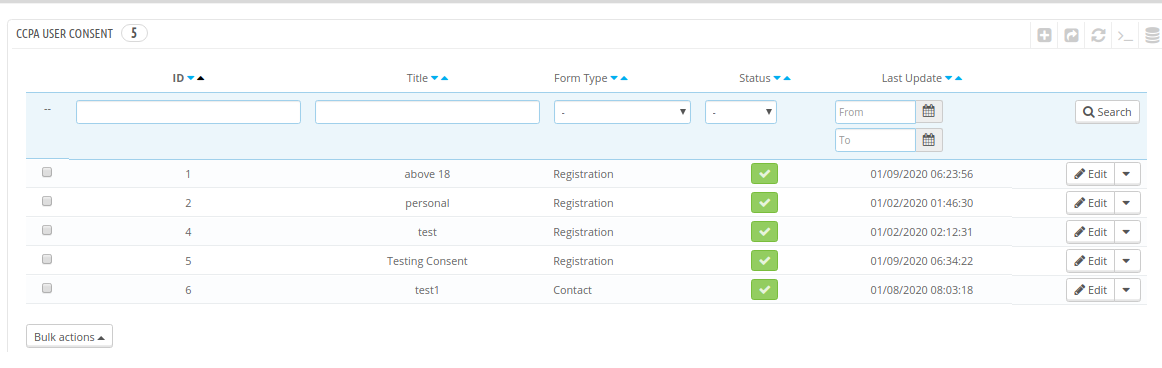
3.3 CCPA User Consent
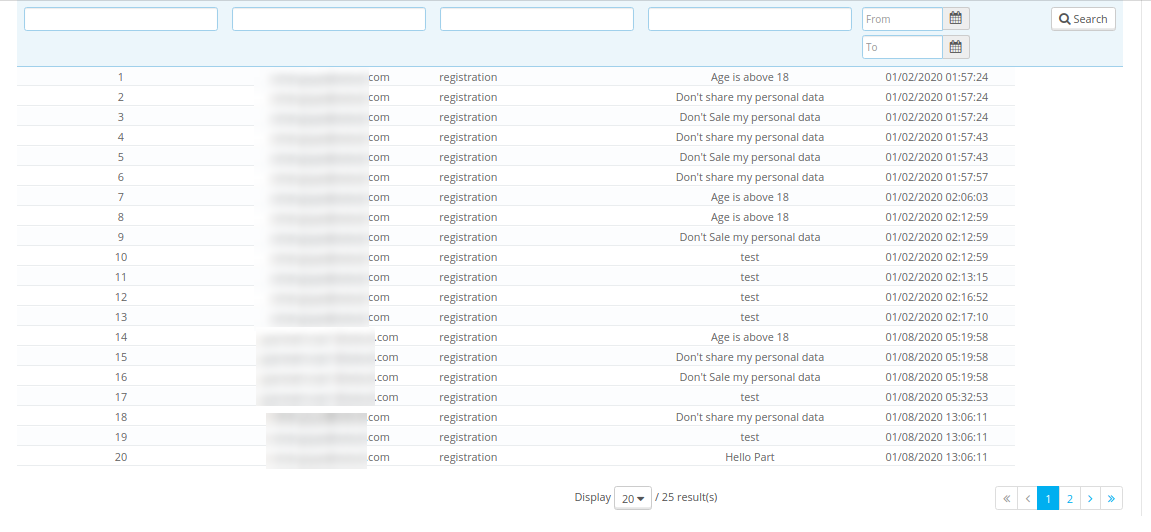
The store merchant can view a user consent list in the CCPA User Consent section.
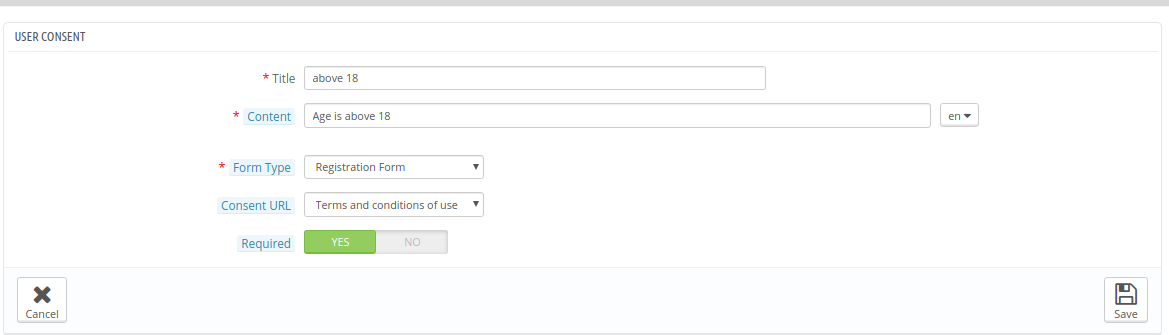
Admin has an option to add, delete and modify the user consents as per the requirements. Click on the “+” button for adding new user consent. These are the configuration options:
Title: Set the user consent title here.
Content: Write a description for user consent here.
Form type: Select form type as registration form or Contact form.
Consent URL: Select the page URL where you want to redirect the online users.
Required: Enable this option to make this field a required field.
3.4 CCPA Data Portability
The online store admin can check the log of the data portability requests from the back-end interface of this PrestaShop CCPA Module.
3.5 CCPA Forgot Request
From here, the online merchant can view the forget requests log easily. The admin can view a list of users who have requested for data deletion requests.
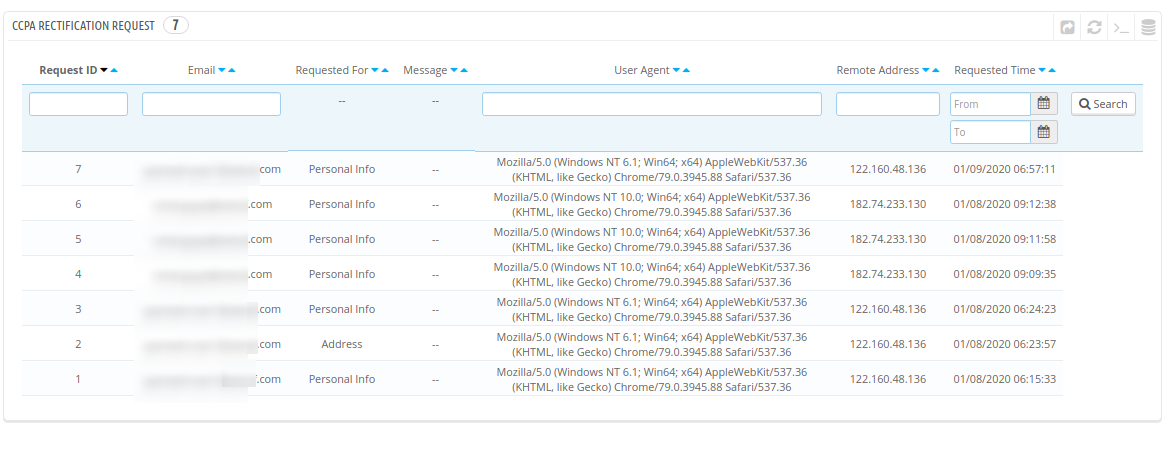
3.6 CCPA Rectification Request
The PrestaShop CCPA Compliance module keeps the log of the data rectification requests. This information can be used for modifying the customer data on the third party services.
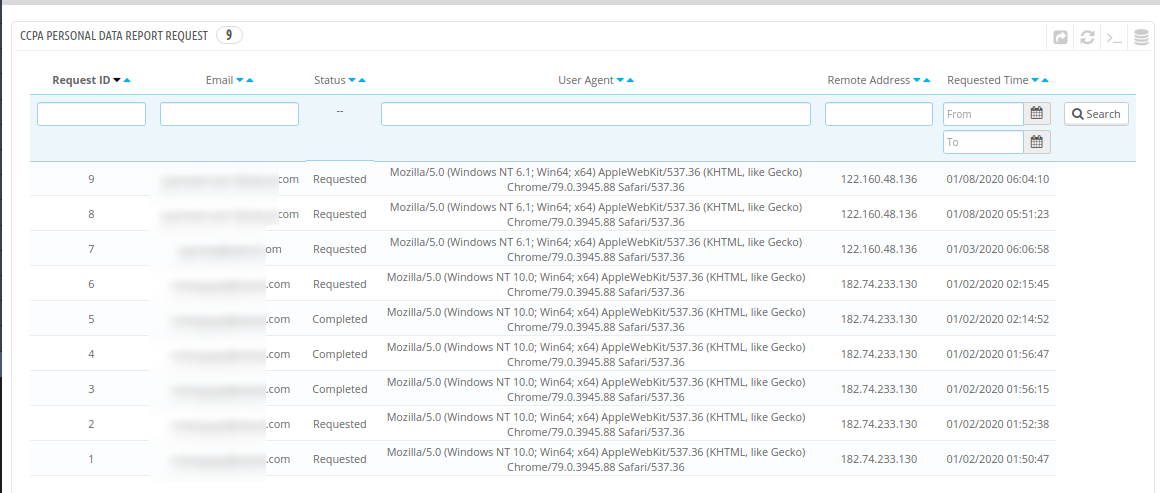
3.7 CCPA Personal Data Request
CCPA module for PrestaShop keeps the log of all the personal data requests. The store admin can view these requests from CCPA personal data Request section.
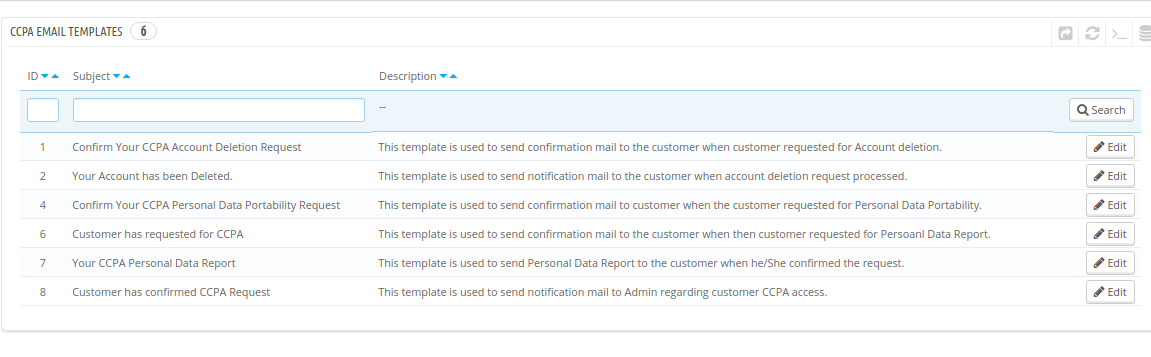
3.8 CCPA Email Template
CCPA PrestaShop compliance module has customizable email templates for sending emails to the customers on various requests.
Confirm Your CCPA Account Deletion Request: This template is used to send a confirmation mail to the customer when the customer requested for Account deletion.
Your Account has been deleted: Send a confirmation mail to the customers after account deletion.
Confirm Your CCPA Personal Data Portability Request: This template is used to send a confirmation mail to the customer when a customer requested for Personal Data Portability.
Customer has requested for CCPA: This template is used to send a confirmation mail to the customer when the customer requested for Personal Data Report.
Your CCPA Personal Data Report: This template is used to send Personal Data Report to the customer when he/She confirmed the requests.
Customer has confirmed CCPA Request: This template is used to send a notification mail to Admin regarding customer CCPA access.
3.9 CCPA Geo-Targeting
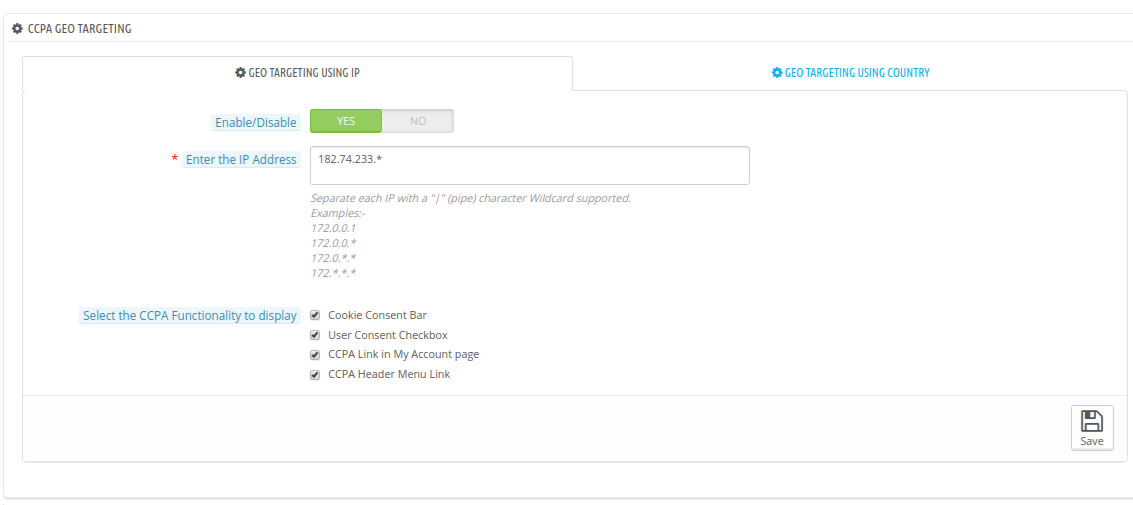
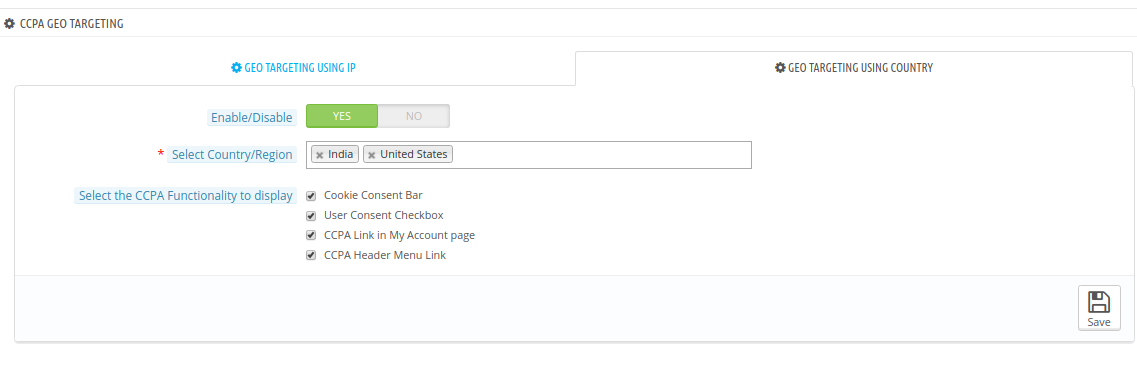
In the CCPA Geo-Targeting field, the online store merchant can select the IP and countries for showing specific functionality.
1. Geo-targeting using IP
Enable/disable: The online merchant can activate or deactivate the functionality as per the requirements.
Enter the IP address: Enter the IP address here.
Select the CCPA Functionality to Display: Select the functionality which you want to show to the selective customers.
2. Geo-targeting using Country
Enable/Disable: Activate or deactivate this functionality.
Select Country/Region: Select the country/region from here.
Select the CCPA Functionality to Display: Choose the functionality you want to show on selected countries.
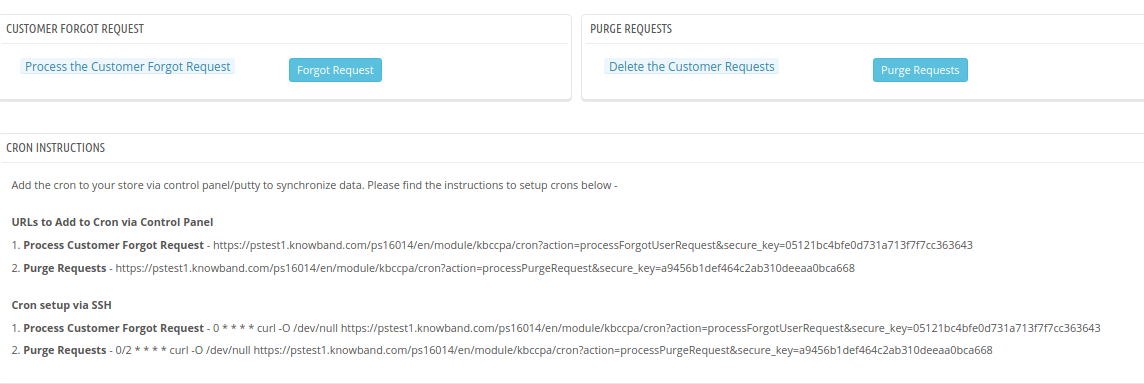
3.10 CCPA CRONS
The online merchant can setup Cron for processing the customer’s forget to request and deleting customer’s requests on a single click.
3.11 CCPA User Consent Data
In user consent data details, the e-merchant can view the user consent data list in which he can check the consents accepted by customers.
4.0 Front-end Interface
The e-buyers can click on “Knowband CCPA” header link and view cookie bar :
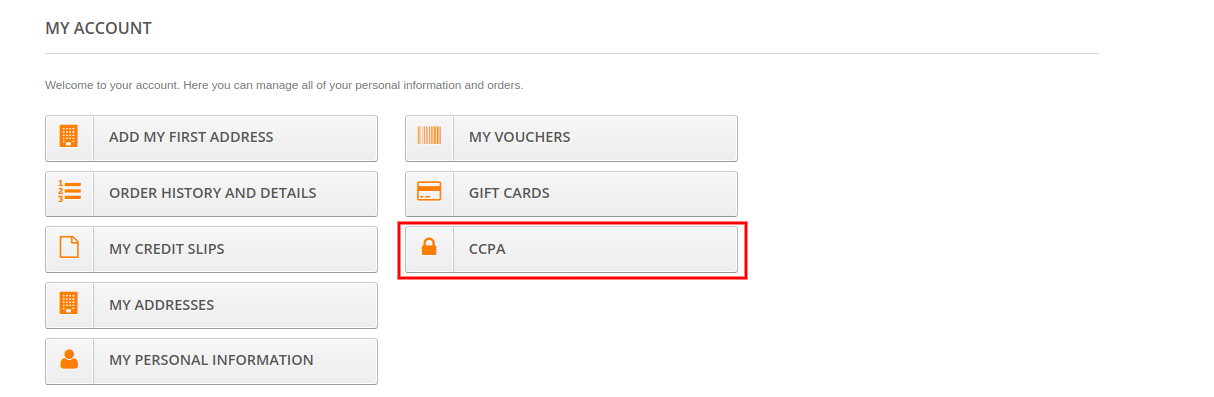
The online users can also access CCPA rights from CCPA Tab available in my account section as shown below:
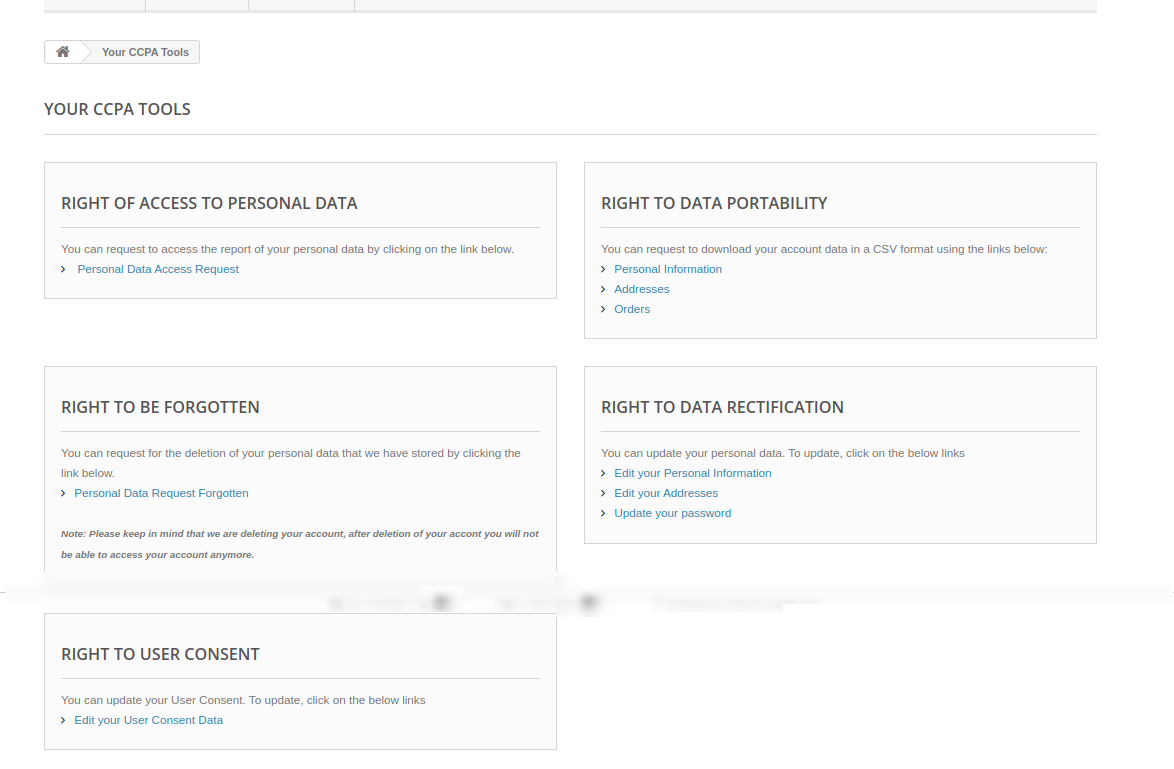
Ones they click on this CCPA link, online users will get these options:
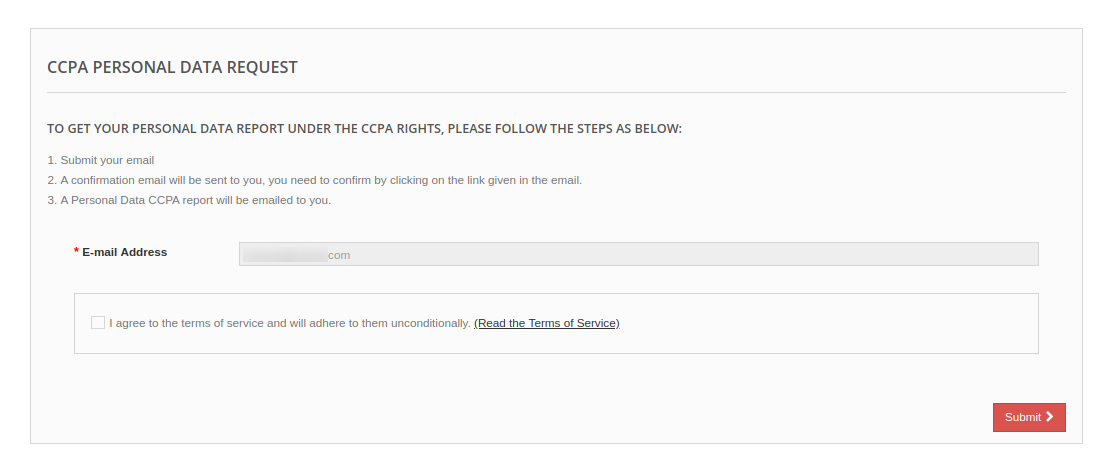
1. Right to Access Personal Data: Online users can click on “CCPA Personal Data Access Request” for getting personal data reports. They need to enter email id and click on the search option.
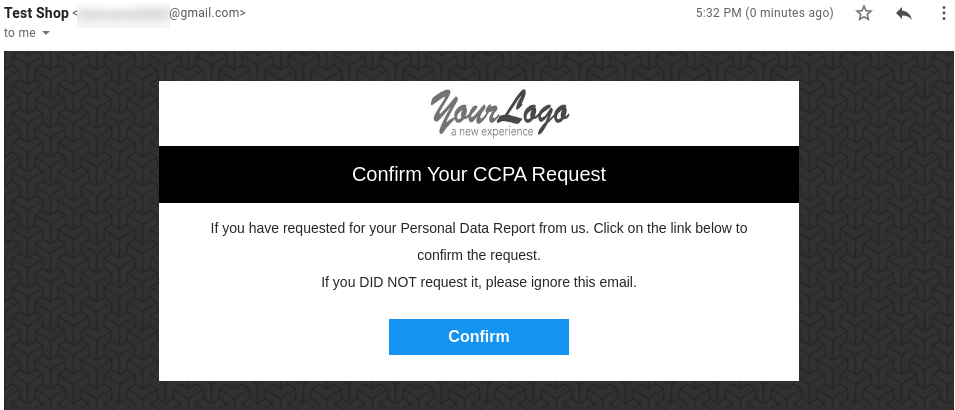
Ones the online user submits the personal data access request, they will get a confirmation request as shown below:
After confirmation, the online users can get an email along with the account details, address information, order details, Third-party service provider details and CCPA Requests details.
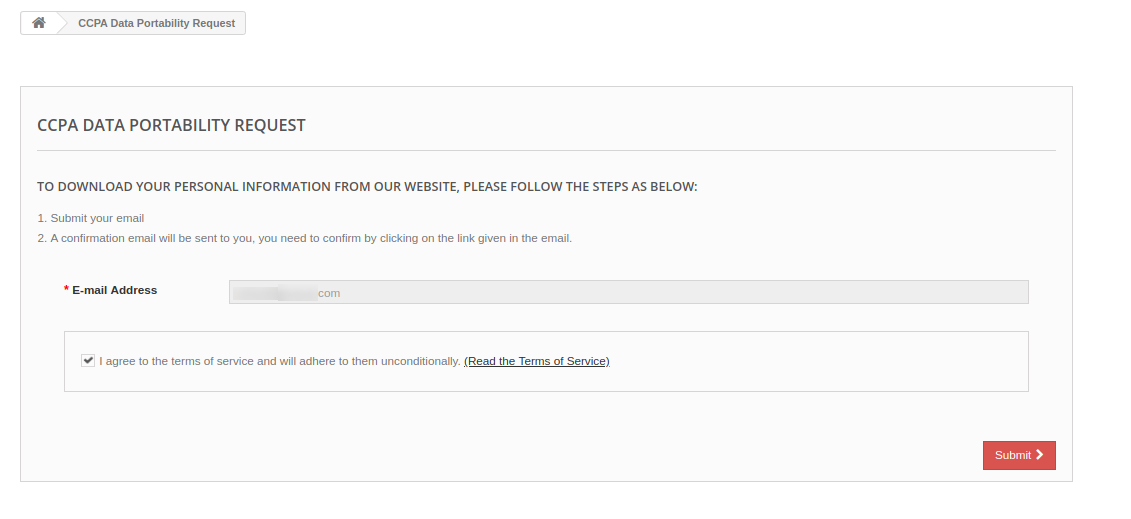
2. Right to Data Portability: Customers can request for data portability for downloading personal information, address and orders.
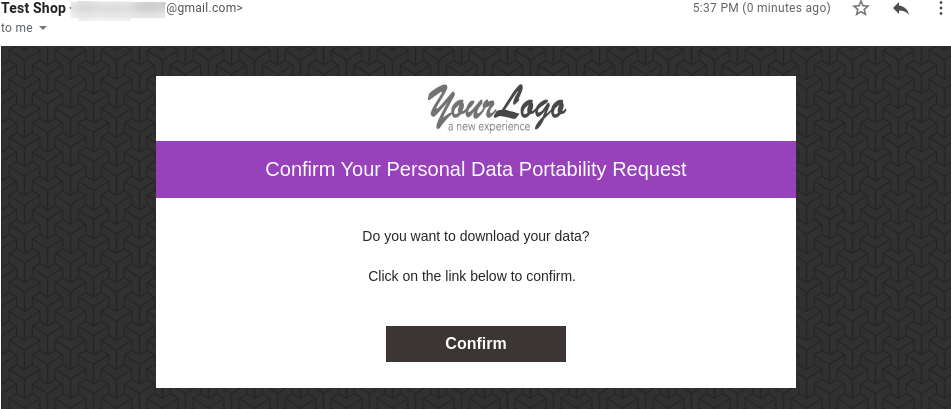
After clicking on the submit button, users will get a confirmation email as shown below:
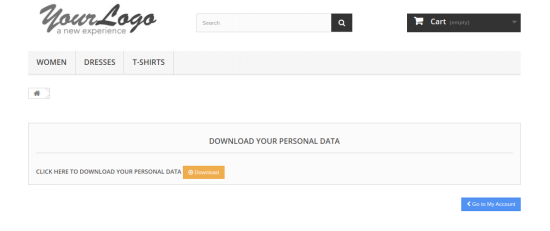
After clicking on “confirm”, customers can download the personal data as shown below:
The online users can get a CSV file along with personal information.
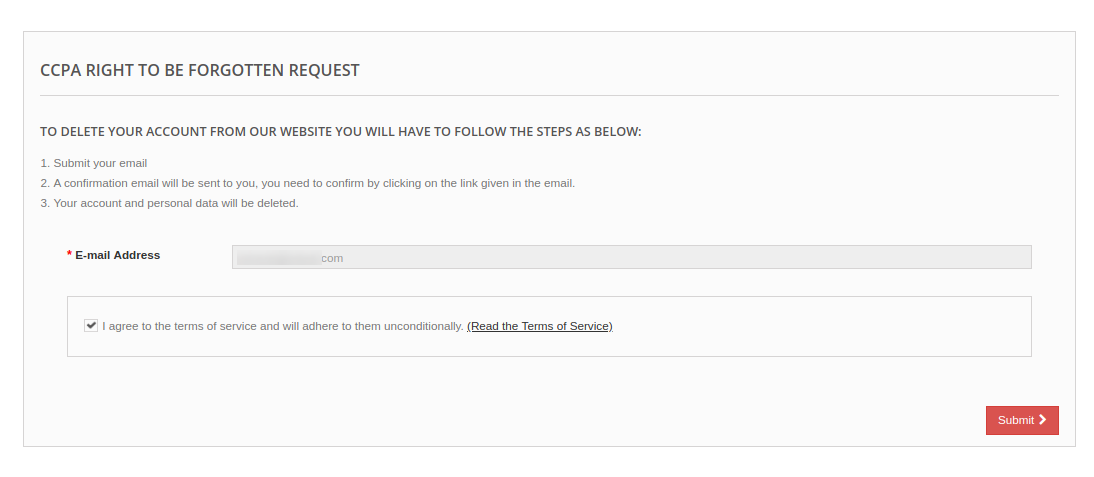
3. Right to be Forgotten: The online users can send a request for using their right to be forgotten. In this option, they need to click on the “Personal Data Request Forgotten” link and provide email details.
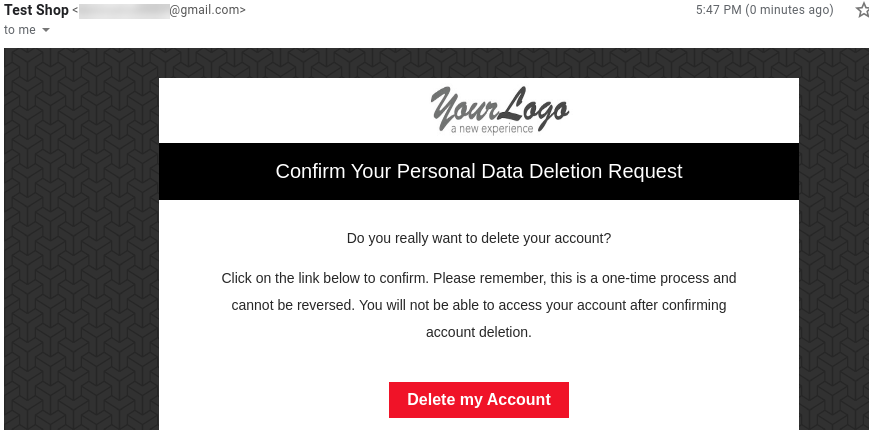
After submitting the email details, the users will get a confirmation email on their registered email id. The users can delete their account by clicking on the provided link.
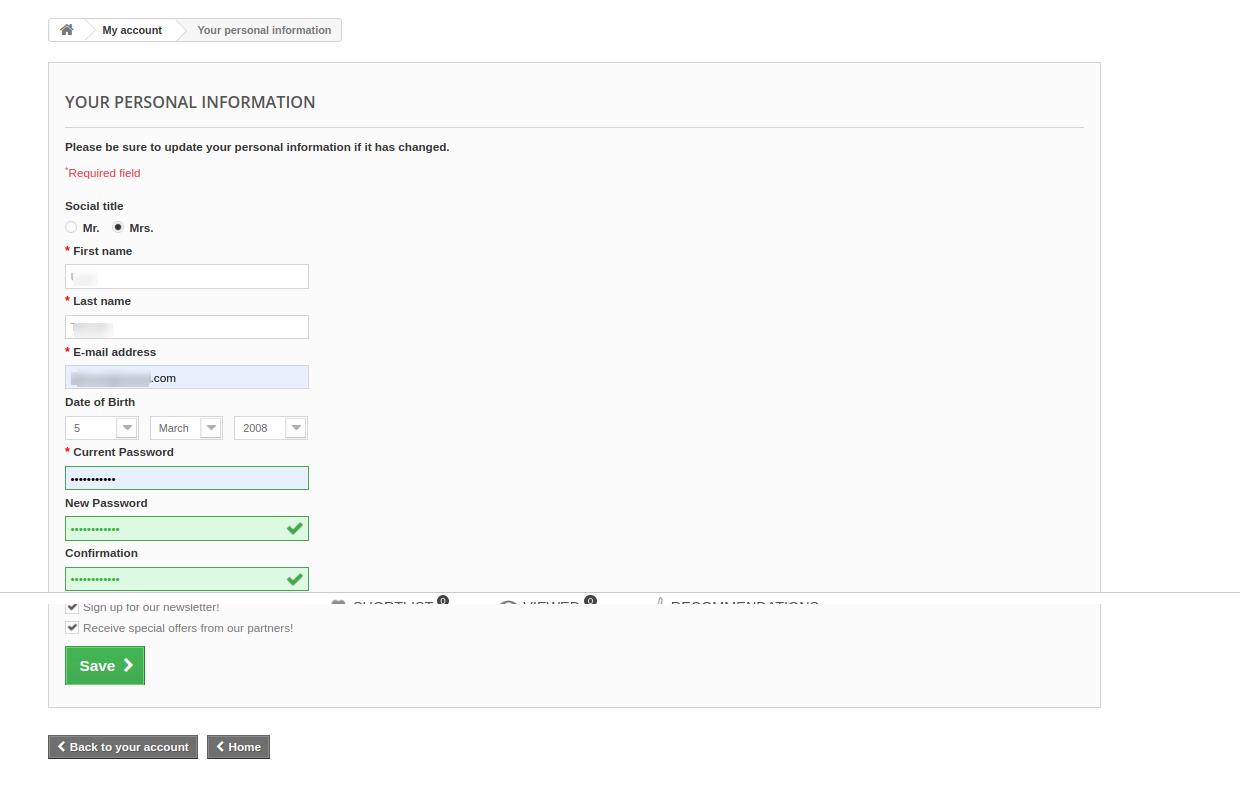
4. Right to Data Rectification: The online consumers can click on provided “Data Rectification” link and update their data, Address and password:
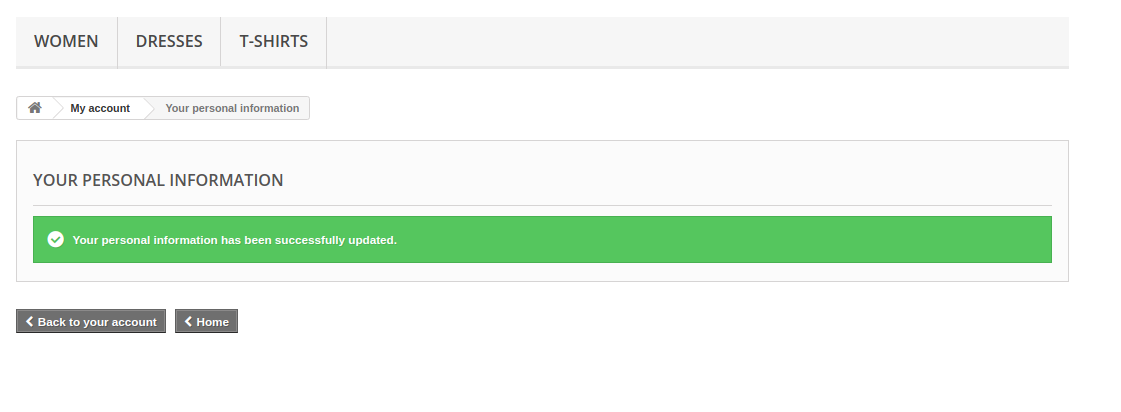
After updating the information, online users need to click on save button. They can view the confirmation page after saving the details successfully.
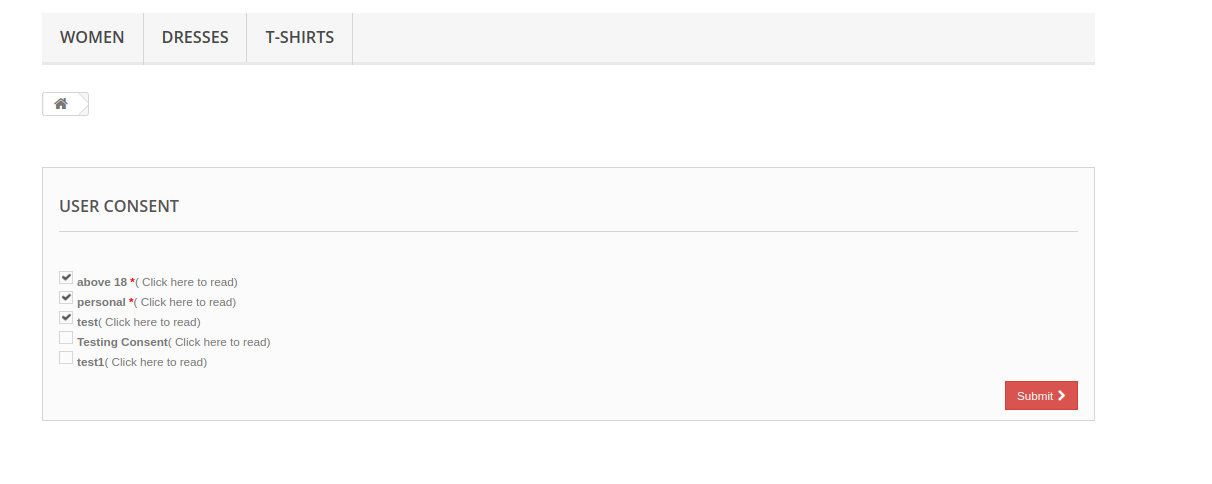
5. Right to User Consent: The online users can also update user consent data by clicking on “Edit Consent data” link:
Online users can edit user consent and save settings. After saving these settings, the PrestaShop CCPA Addon will show a confirmation page.
This way the online store merchant can use PrestaShop California Consumer Privacy Act Module and implement CCPA compliance easily.
To learn how to select modified files to deploy on the server using GitAhead.
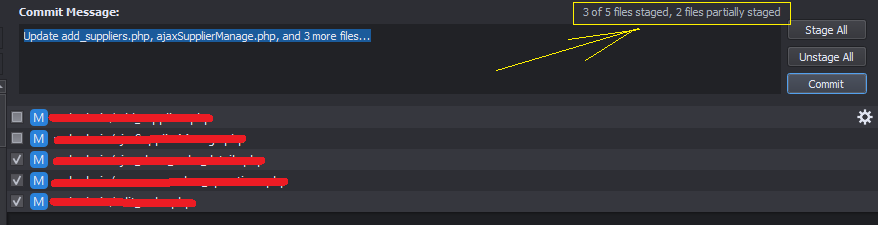
Generally, by clicking on the “Select All” button all the modified files selected and the “Select All” button disabled automatically.
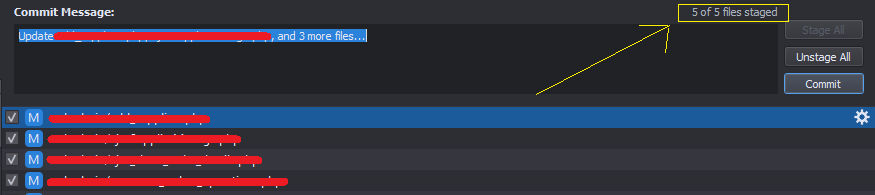
But for some file, it will not select and if you try to do it manually it will not let you do. And it will also show those files as “partially staged”. You can see in the below screenshot:
To fix this issue you need to follow below steps:
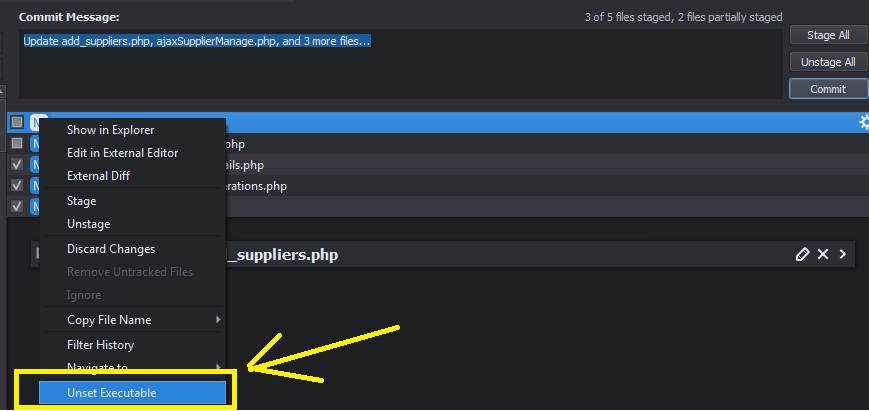
Step 1: Right-click on all that file and click on “Unset Executable” as shown in below screenshot:
Step 2: Now click on the “Stage All” button, and now it will stage all the files. Now you will able to commit on server successfully.