Obiettivo del blog
Dopo aver letto questo blog, sarai in grado di capire come viene configurato SQS e come viene sottoscritta MWS per qualsiasi notifica.
Creiamo un Amazon SQS e abilitarlo per l'abbonamento a MWS
L'amazzone
Crea Amazon Simple Queue Service (Amazon
1. Accessohttps://console.aws.amazon.com/sqs/home?region=us-west-2#?URL?and credentials. Page will look like below image.
 2. Clicca suCrea nuovo Coda
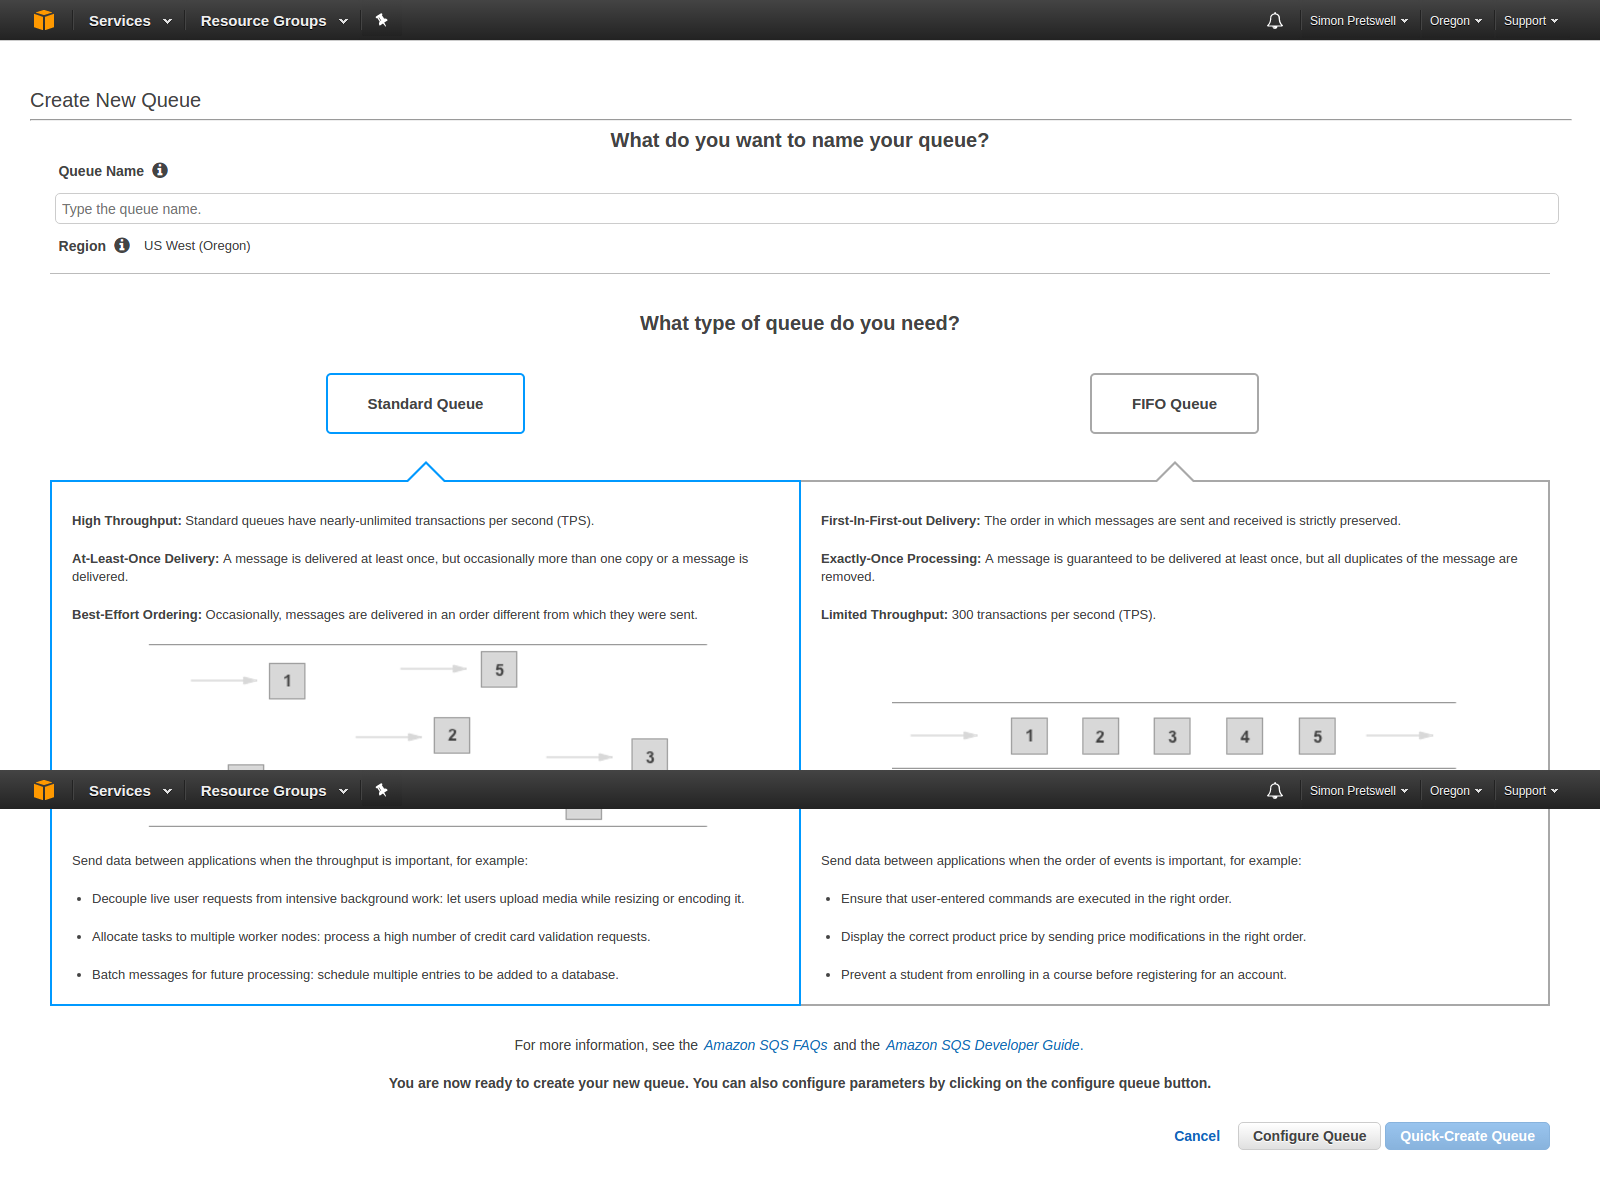 Qui, entraNome della coda?which you want. Select queue type. By default,?Coda standard?will be selected. Now click on?Configura coda?and after click on this, you will get the options to configure queue like below image.
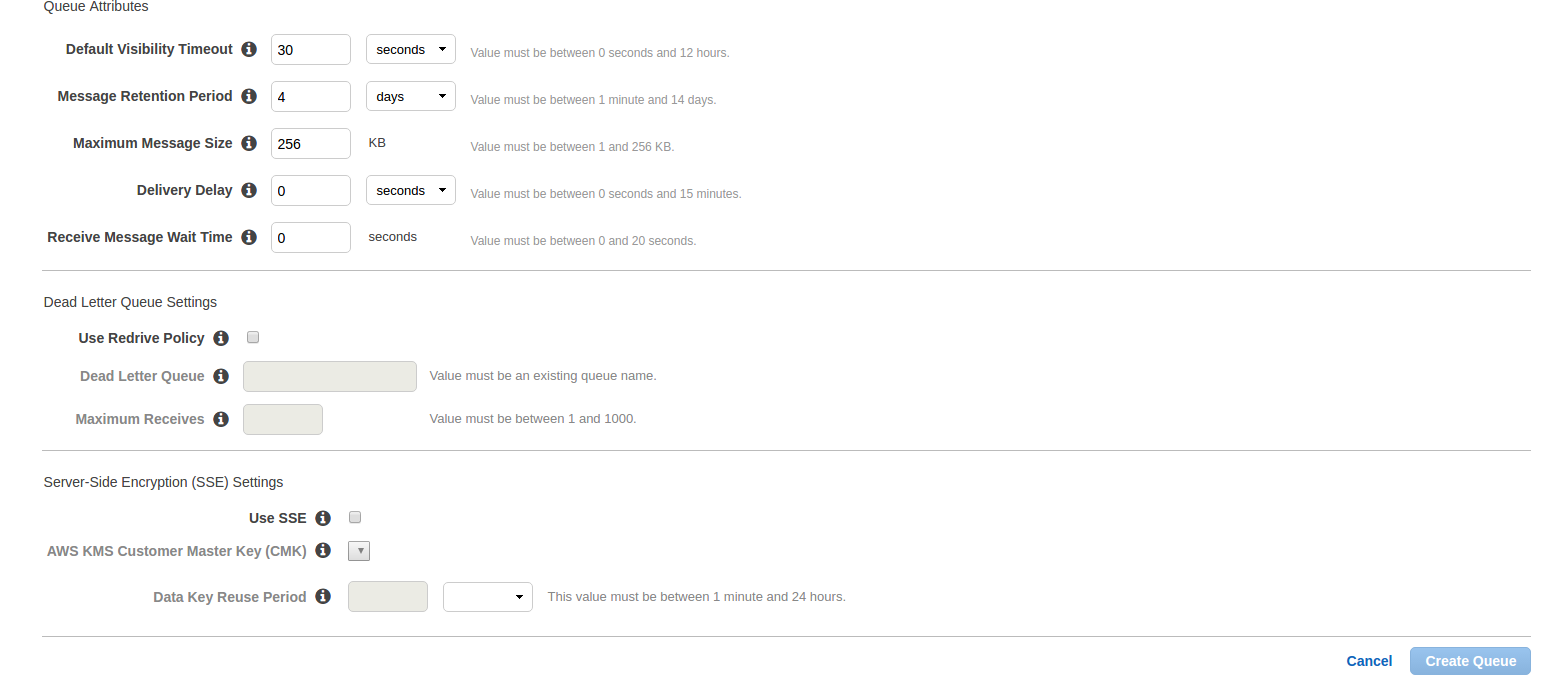
- Timeout predefinito della visibilità:Questo è il tempo per il quale un messaggio ricevuto dalla coda non sarà disponibile per ricevere nuovamente.
- Periodo di conservazione dei messaggi: Questo è il momento in cui qualsiasi messaggio risiederà nella coda se quel messaggio non viene eliminato forzatamente. Dopo il tempo immesso, quel messaggio verrà automaticamente eliminato dalla coda. Questi sono due campi più importanti. Altri campi sono:
- Dimensione massima del messaggio:
- Ritardo nella consegna:La quantità di tempo per ritardare la prima consegna di tutti i messaggi aggiunti a questa coda.
- Ricevi il tempo di attesa del messaggio:La quantità massima di tempo che una chiamata di ricezione con polling prolungato attenderà che un messaggio sia disponibile prima di restituire una risposta vuota.
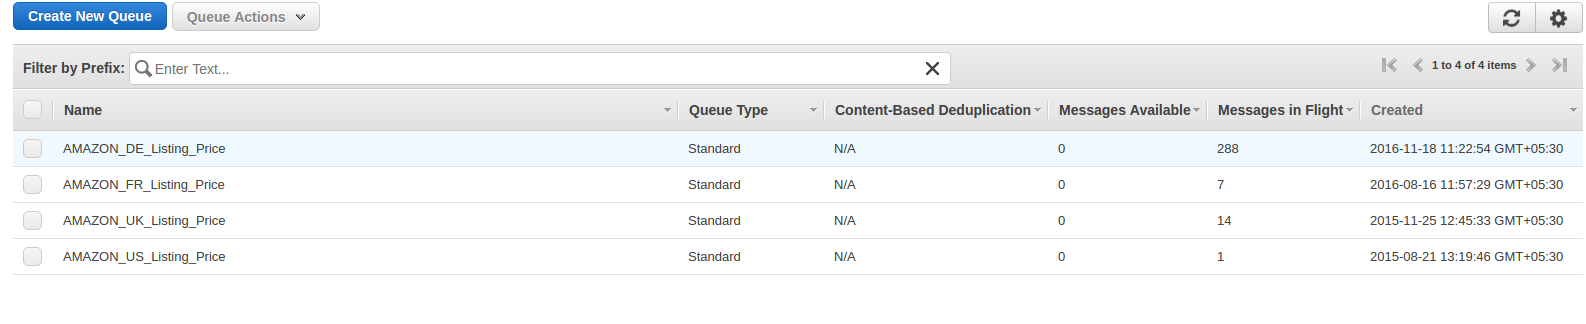
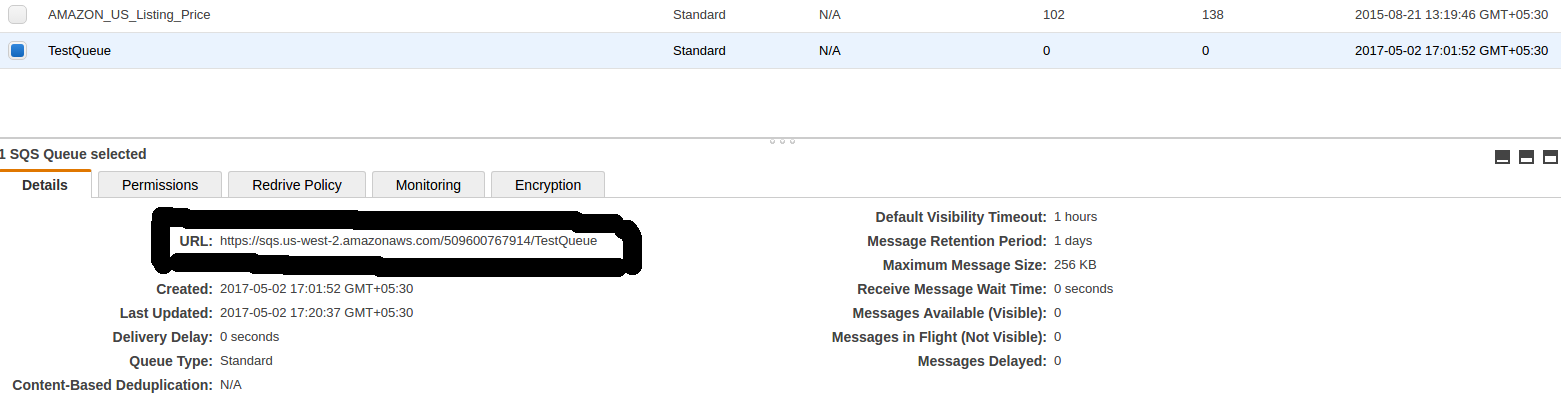
Dopo aver inserito i dettagli, fare clic suCrea coda?button and you will be redirected on queue list page and your new queue will also be shown as shown in below image and basic detail of queue will also be displayed.
In basic detail, there is?URL?which is the most important attribute and this will be used to register and subscribe for notification.
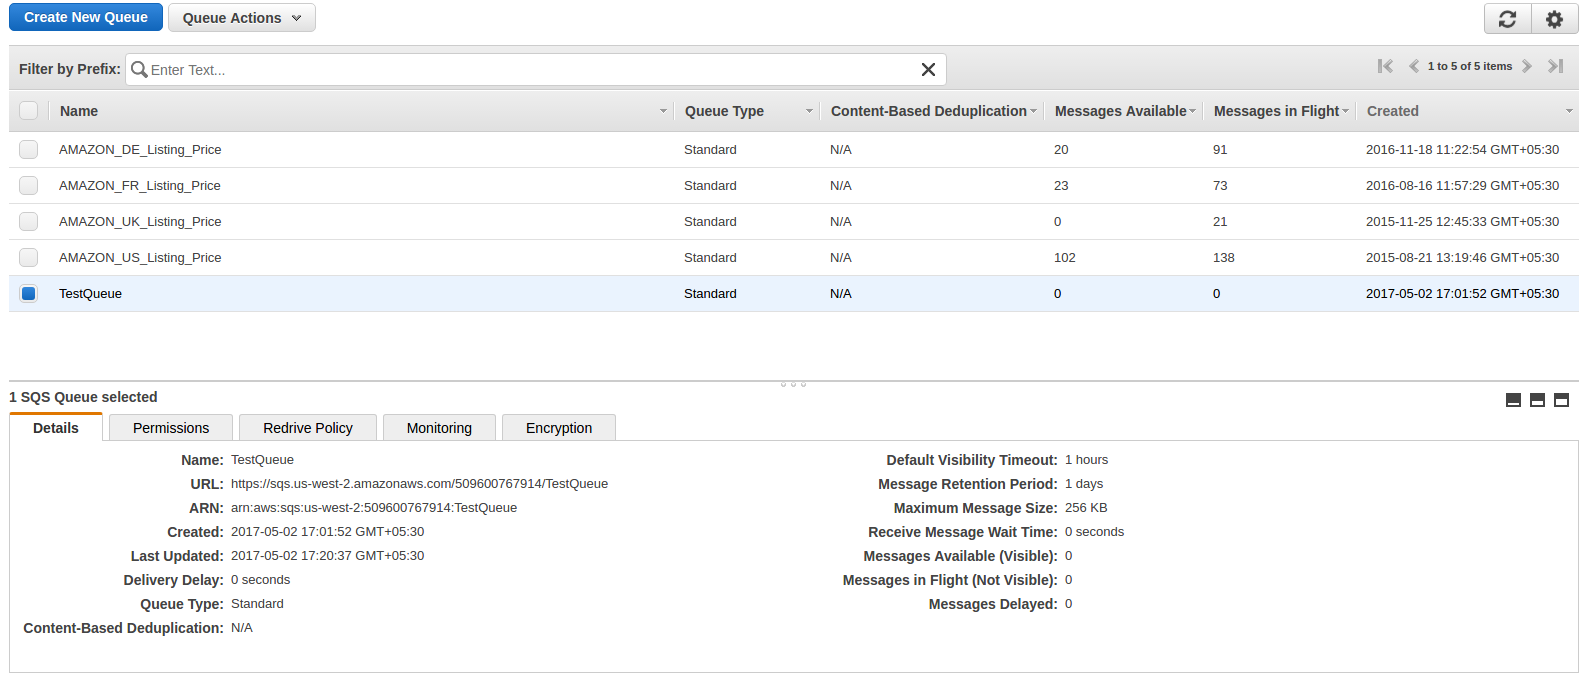
Ora fai clic suAggiungi un'autorizzazione?button. A popup will be opened like below image. Enter your?AWS?account number and in action, check?Tutti?Azioni?checkbox and click on Add permissions.
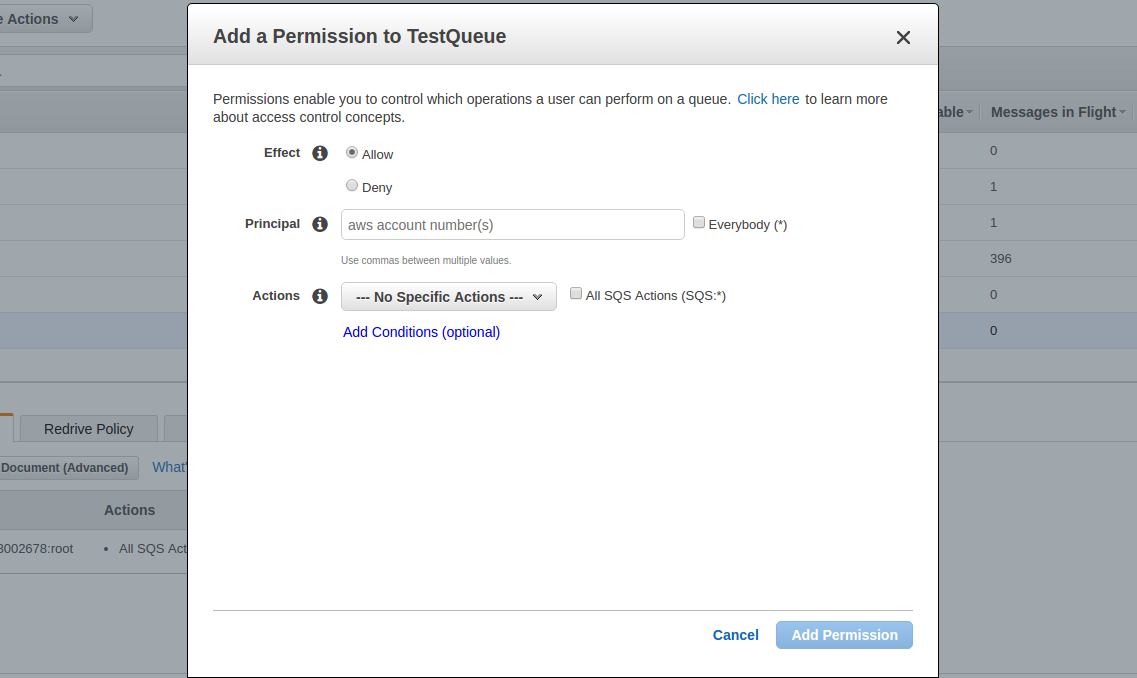
Puoi aggiungere più permessi come vuoi.
Registra una destinazione (coda creata)
Ora la coda è stata creata ed è necessario registrare questa coda per le notifiche. Per questo, è necessario utilizzare l'operazione RegisterDestination suhttps://mws.amazonservices.co.uk/scratchpad/index.html?or?https://mws.amazonservices.com/scratchpad/index.html?depending on the marketplace. Select?subscriptions?from?API?Section and?RegisterDestination?from operation as below image.
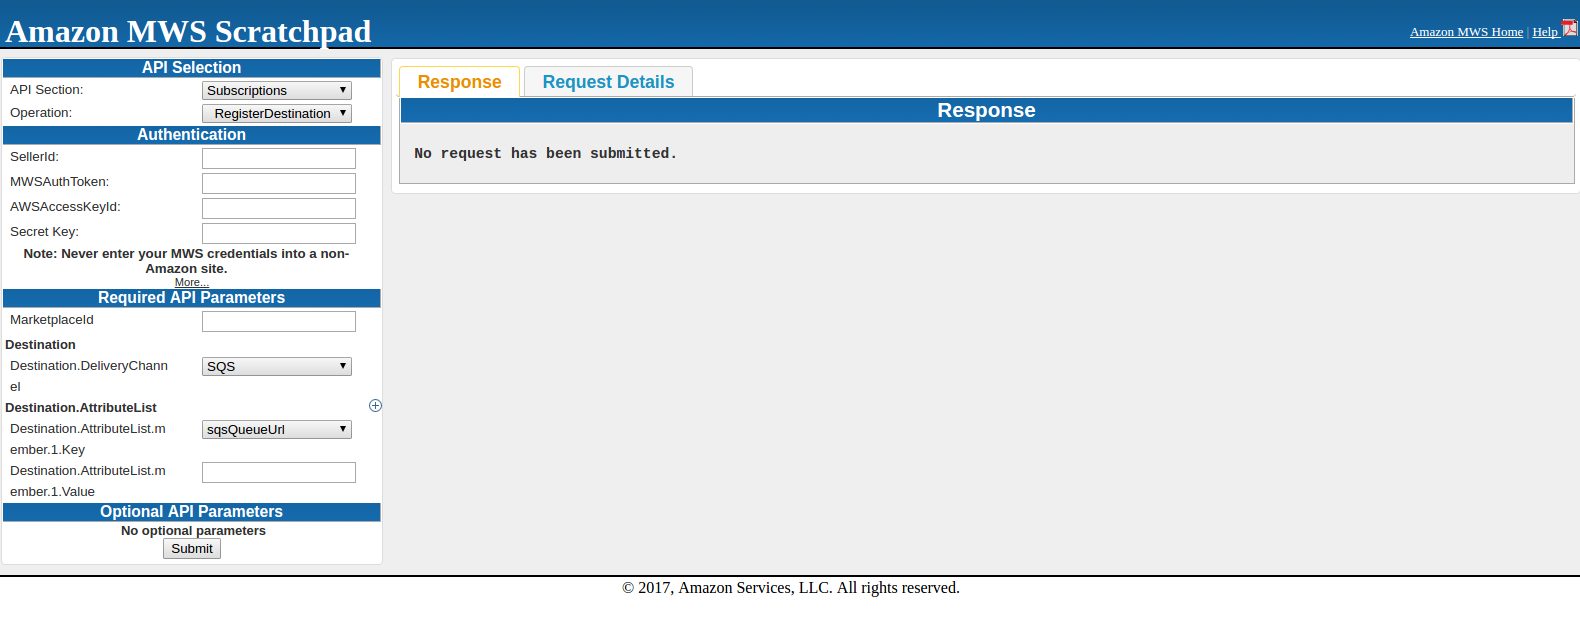
Qui inserisci SellerId, AWSAccessKeyId, Secret Key e MarketplaceI. In Destinazione,sqsQueueUrl?and in Destination.AttributeList.member.1.Value, you need to enter?SQS?URL che era sotto i dettagli in
Quando si invia la richiesta, è possibile ottenere una risposta positiva o una risposta all'errore. Se ottieni una risposta inferiore, significa registrato con successo.
<? xml version = "1.0"?> <RequestReportResponse xmlns = "https://mws.amazonservices.com/doc/2009-01-01/"> <RequestReportResult> <ReportRequestInfo> <ReportRequestId> 2291326454 </ ReportRequestId> < ReportType> _GET_MERCHANT_LISTINGS_DATA _ </ ReportType> <StartDate> 2009-01-21T02: 10: 39 + 00: 00 </ StartDate> <EndDate> 2009-02-13T02: 10: 39 + 00: 00 </ EndDate> <Scheduled> false </ Scheduled> <SubmittedDate> 2009-02-20T02: 10: 39 + 00: 00 </ SubmittedDate> <ReportProcessingStatus> _SUBMITTED _ </ ReportProcessingStatus> </ ReportRequestInfo> </ RequestReportResult> <ResponseMetadata> <RequestID> 88faca76-b600 -46d2-b53c-0c8c4533e43a </ RequestId> </ ResponseMetadata> </ RequestReportResponse>
Se una richiesta non riesce, l'elemento di risposta principale sarà ErrorResponse, indipendentemente dall'azione richiesta e anche i dettagli dell'errore saranno in risposta.
<ErrorResponse xmlns = "https://mws.amazonservices.com/doc/2009-01-01/"> <Errore> <Tipo> Mittente </ Tipo> <Codice> InvalidClientTokenId </ Code> <Message> L'accesso AWS L'ID chiave che hai fornito non esiste nei nostri archivi. </ Message> <Detail> com.amazonservices.mws.model.Error$Detail@17b6643 </ Detail> </ Error> <RequestID> b7afc6c3-6f75-4707-bcf4-0475ad23162c </ RequestID> </ ErrorResponse>
Dopo aver registrato la destinazione, provare l'operazione SendTestNotificationToDestination per verificare che le notifiche siano ricevute o meno. Questa operazione invia una notifica di prova alla destinazione specificata.
Iscriviti per la notifica
Per fare ciò, è necessario utilizzare l'operazione CreateSubscription e questa operazione crea una nuova sottoscrizione per il tipo di notifica e la destinazione specificati. Selezionare
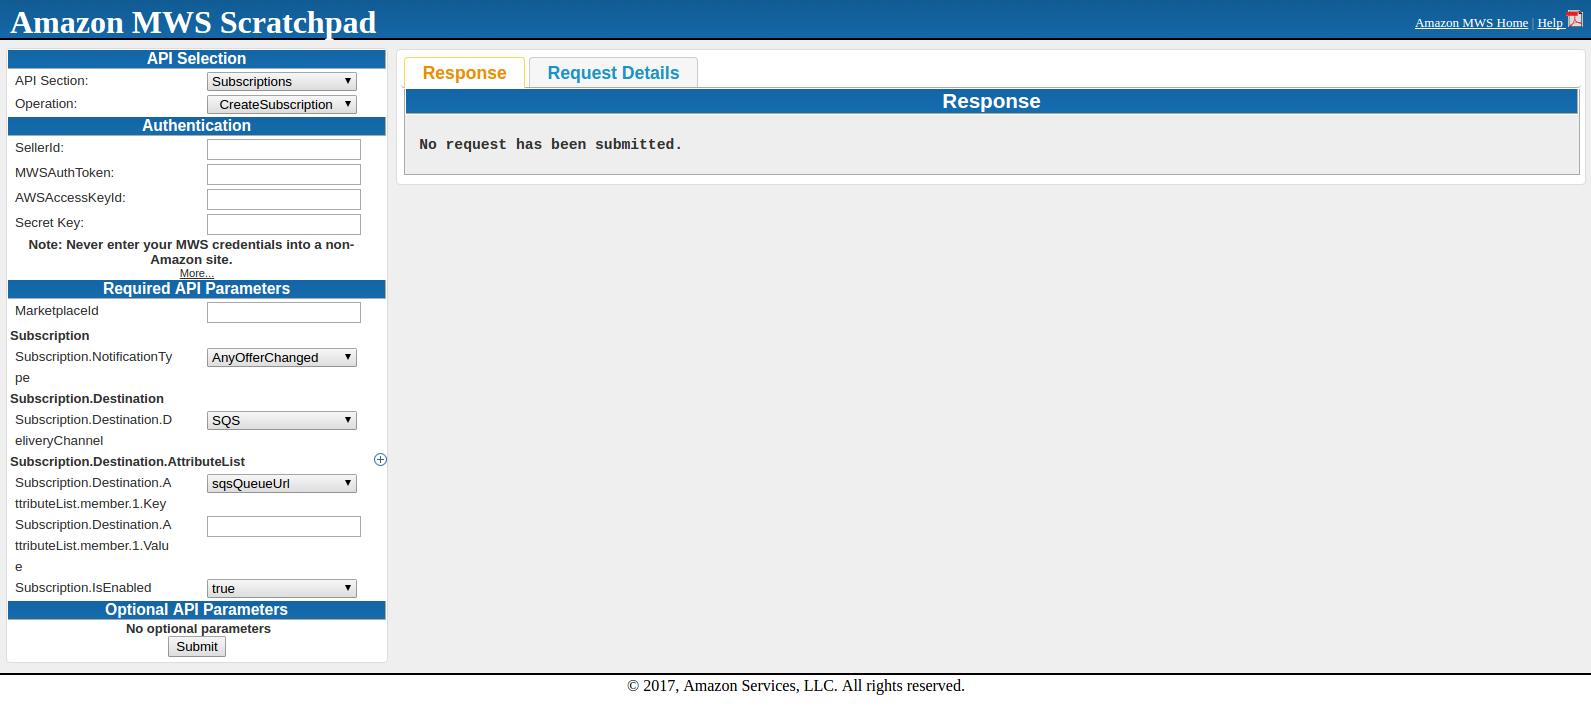
Qui inserisci SellerId, AWSAccessKeyId, Secret Key e MarketplaceId. Subscription.NotificationType dovrebbe esseresqsQueueUrl?and in Subscription.Destination.AttributeList.member.1.Value, you need to enter?SQS?URL which was under details in?SQS?Queue. Subscription.IsEnabled will be true.
When submitting the request, either you will get success or error in response. Once you get success in response, all is done to get notifications.
After this, you can fetch notification from SQS using CURL request.