AuctionX – PrestaShop Auction Module Complete User Manual

The Knowband PrestaShop Auction Module (also called AuctionX) allow store owners to run live auctions on products and on individual product variants. This manual walks store admins through installing the PrestaShop auction extension, setting it up, creating auctions, and handling live bidding through to the winner’s order.

1. Introduction to the PrestaShop Auction Module

The PrestaShop Auction Module is a product bidding system for PrestaShop. With it you can run timed auctions, accept customer bids, keep a bid history, and move the winning bid into a normal order.

It includes a back office auction dashboard, a storefront auction listing, live countdown timers, customer bid history, an optional watchlist, winner selection, and auction email notifications.

How the PrestaShop Bidding System Works

  1. The admin creates an auction for a product or a product combination, sets the bidding rules and dates, and publishes it.
  2. Customers open the auction, place bids while it is running, and track results from their account.
  3. When the auction closes, the module picks the winners automatically, or the admin picks them by hand.
  4. A winner places the order at the winning amount before the set deadline.

2. Key Features of the PrestaShop Auction Addon 

These are the main features of the module. Together they let a merchant run controlled online auctions in PrestaShop, manage who takes part, choose winners, and finish the sale.

Product Auctions and Variant Bidding

Create an auction for any active product and, if needed, for one specific combination. The form covers starting price, bid increment, optional maximum bid, reserve price, waiting time between bids, visibility options, scheduling, and closing rules.

Live Bidding on the Product Page

Logged in customers bid straight from the product page. The module checks the minimum amount, bid increment, maximum bid, bidder status, stock, and the minimum time between bids. The live view updates through polling, shows a countdown, and displays the statistics the admin has chosen.

Auction Scheduling and Auto Extension

An auction can stay in Draft or be published to start at a later time. With Auto Extension on, a bid placed within the trigger period pushes the end time back.

Winner Selection and Order Completion

Winner Selection Mode can be Auto or Manual. In Auto mode the module ranks each bidder by their highest bid, leaves out blocked bidders, applies the reserve price, and settles ties in favor of whoever reached the amount first. In Manual mode the admin chooses winners from Live View once bidding has ended. Each winner gets an order deadline and a private order link under My Bids. 

Watchlists and Auction Announcements

With the watchlist turned on, customers can save auctions to My Watchlist. Watchers can be emailed when other users bid and when an auction starts, as long as the matching email template is enabled.

Dashboard and Email Notifications

The dashboard has configurable KPI widgets, charts, and tables of recent activity. The Email Templates page holds subjects and bodies in several languages for bid confirmations, winning bids, auction announcements, order events, bidder blocks, cancellations, and other events.

3. Installing the PrestaShop Auction Module

Install and activate the module in the PrestaShop back office before you create any auction. Follow these steps in order.

  1. Sign in to the PrestaShop Admin Panel.
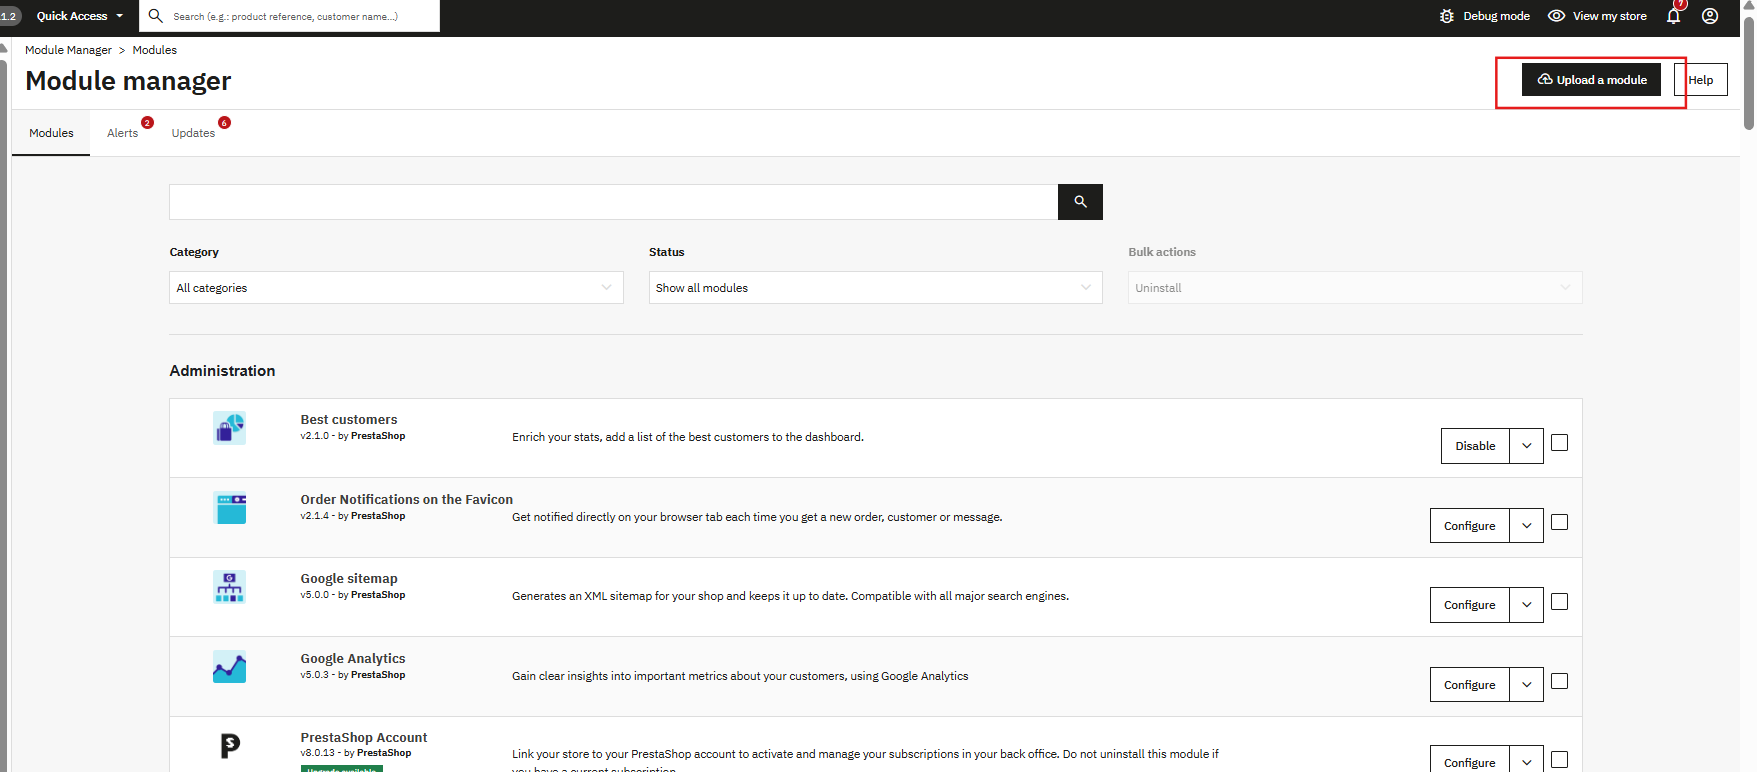
  2. Go to Modules > Module Manager.
  3. Choose the upload option and upload the Knowband PrestaShop Auction Module archive.
  4. Install the module and wait for PrestaShop to finish.
  5. Go to Sell > Knowband PrestaShop Auction Module. During installation the module creates its database tables, default settings, email templates, CRON token, hooks, and back office tabs.
  6. Open General Settings, enable the module, and set the storefront options.
  7. Set up the CRON job shown on the General Settings page if you want scheduled status changes, automatic winner processing, and deadline processing to run without anyone visiting a page.

Uninstalling the module only removes its back office menu entries. Auction data, bids, winners, watchlists, email templates, logs, dashboard layouts, and settings stay in place, and they are still there if you reinstall.

4. Opening the Module in the Back Office

After installation, every auction function is under Sell > Knowband PrestaShop Auction Module. The pages are:

  • Dashboard
  • General Settings
  • Customization Settings
  • Email Templates
  • Auctions
  • Winners List
  • Other Modules

General Settings, Customization Settings, and Email Templates are also reachable from the in page Settings menu.

5. Admin Panel Overview

The admin area is split into separate sections, so settings, auction work, notifications, reports, and winner records can each be handled on their own.

Dashboard

Shows auction KPIs, charts, and recent activity for the current shop, so you can check how things are going without opening each auction. Widgets can be turned on or off, reordered, and resized.

General Settings

Turns the bidding system on or off and decides where auction summaries show on the storefront. It also holds the CRON URL and an example server crontab entry.

Customization Settings

Sets the colors used for auction boxes, buttons, progress bars, watchlist controls, body areas, and status badges.

Email Templates

Lists the fixed notification templates with their codes and status. Every template has one translation row for each installed language, with an editor for the subject and a rich text body. These emails keep admins, bidders, watchers, and winners informed during the auction.

Auctions

The place to view the auction list, apply filters, add or edit auctions, open Live View, block bidders, select winners, and run lifecycle actions.

Winners List

A read only history of closed auctions with winner and order details. Auctions that closed without a winner are included.

Other Modules

A catalog of other Knowband extensions. It has no auction settings.

6. PrestaShop Auction Module Configuration

This section covers each configurable area. Check these values before you publish an auction, because they affect bidding rules, what shows on the storefront, notifications, and winner processing.

General Settings

Enable Module. The main switch for the module. Leave it on No while you are still preparing things if you do not want customers to see auctions. Choose Yes to turn on storefront and bidding behavior. Options: Yes or No. Default: No.

Enable Watchlist. Allows logged in customers save auctions and come back to them. Turn this on after enabling the module. Options: Yes or No. Default: No. Customers must be logged in.

Show Recent Auctions on Home Page. Adds a block of recent auctions to the home page for extra exposure. Options: Yes or No. Default: No.

Number of Recent Auctions. Sets how many auctions the home page block lists. Enter a whole number from 1 to 20. It applies only when Show Recent Auctions on Home Page is Yes. Default: 5.

Display auction info on Category page. Adds auction status to product cards on category pages, so shoppers can spot products that are in an auction now or soon. Options: Yes or No. Default: No. The badge appears on category pages only, not on every page that reuses a product list template.

CRON URL. The server calls this URL to run scheduled auction tasks, which matters for auctions that must move forward without page visits. The page shows a generated URL and a crontab line that runs every minute and sends a silent curl request to that URL. Use Copy to copy either one. Regenerate CRON token makes the old URL invalid, so update your server crontab right after using it. The URL contains a secret token, so keep it private.

Customization Settings

These settings allows you match the auction look to your store theme. Every field is a color input, is required, and must be a six digit hex code such as #ffffff.

Setting What it controls Default
Header Background Color Auction header background #2456e7
Header Text Color Text in the auction header #ffffff
Button Color Auction action buttons #2456e7
Button Text Color Text on auction buttons #ffffff
Progress Bar Color Bidding progress bar #2456e7
Add to Watchlist Color Watchlist control #2456e7
Box Body Background Color Auction box body #ffffff
Box Text Color Text in the auction box #1f2430
Live / In Progress Badge Color Live status badge #dc2626
Upcoming Badge Color Upcoming status badge #4f46e5
Ended / Expired Badge Color Ended and expired badges #64748b

Click Save to apply the colors. Blank or wrongly formatted values are rejected.

Managing Auctions

The Auctions section is where you create, set up, publish, watch, and manage each auction from start to finish.

Auction List

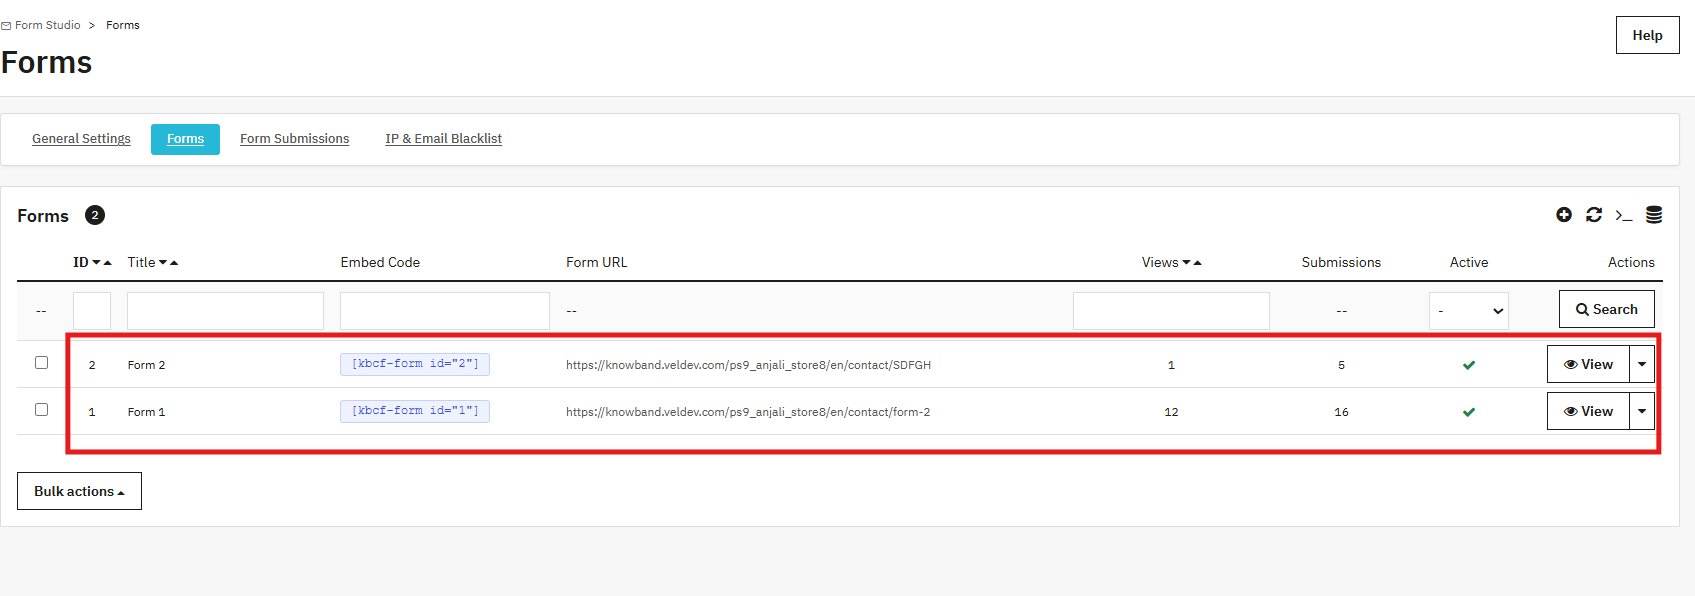
The list allow you search, filter, and inspect auctions and run actions on them. Its columns are ID, Reference Number, Auction Title, Product, Status, Starting Price, Start Date, and End Date.

The Status filter offers Draft, Scheduled, Ongoing, Inactive, Completed, Winner Selected, Order Pending, Order Placed, Winner Expired, Reassigned, and Cancelled.

Available actions are Add New Auction, View, Edit, Publish, Duplicate, Pause, Resume, Force Cancel, Delete, and Bulk Delete, depending on the auction’s current status. Ongoing auctions cannot be deleted. Bulk Delete skips ongoing rows and tells you which IDs it skipped.

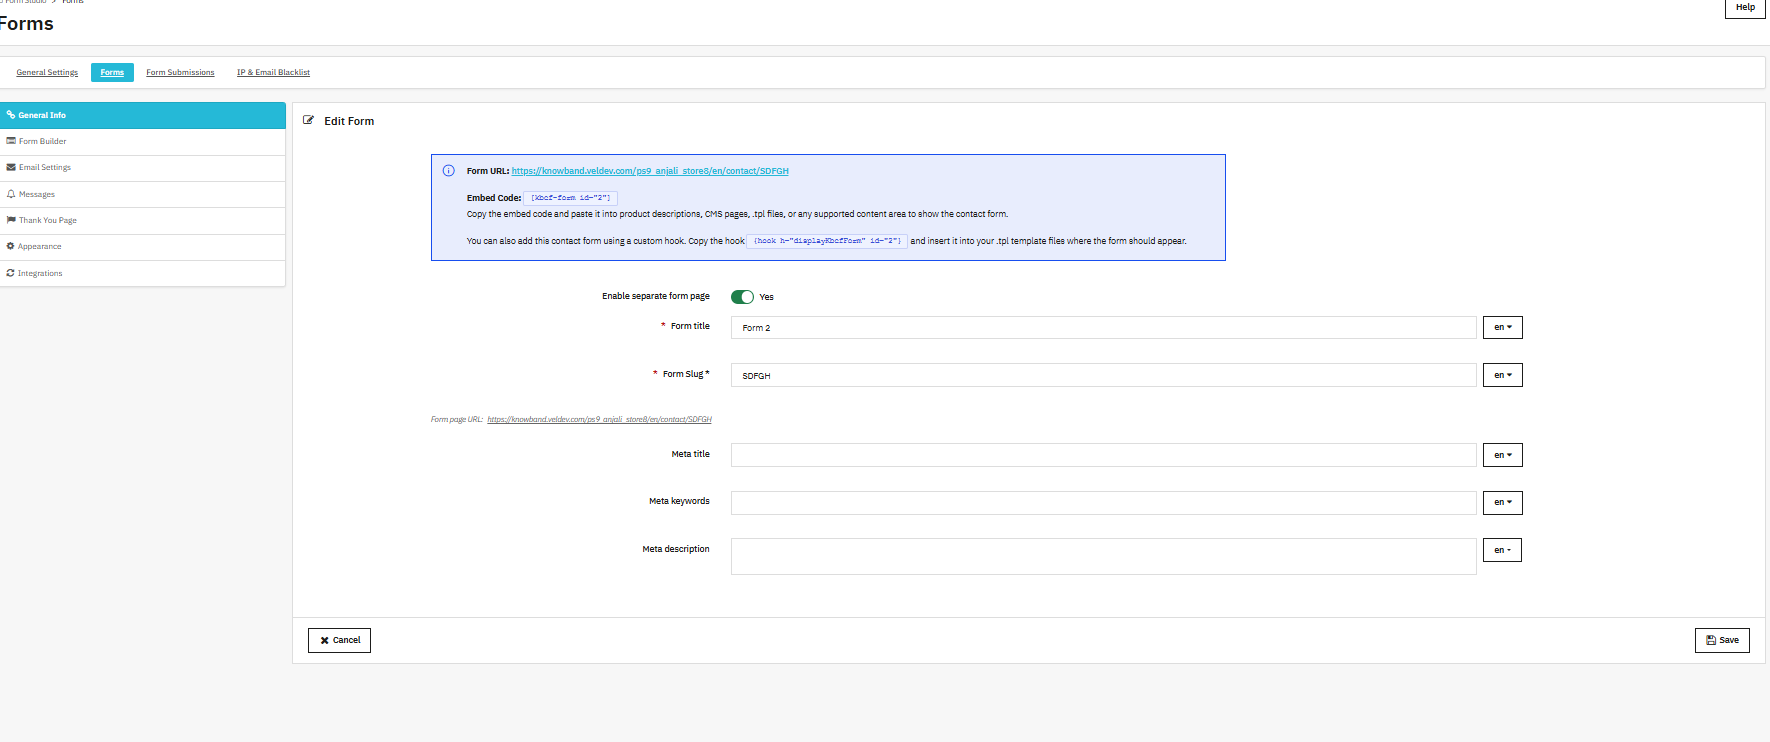
Basic Information

This part names the auction, links it to a product, sets its starting state, and defines the schedule and storefront behavior.

  • Auction Title. Required, up to 30 characters, and unique across the whole store setup.
  • Reference Number. Required, up to 64 characters, and unique. Use letters, numbers, hyphens, and underscores.
  • Select Product. Pick an active product. You may also pick a combination for variant bidding.
  • Auction Status. Draft or Publish. Publishing gives Scheduled status if the start time is ahead, and Ongoing status if the start time has already come.
  • Hide Product Price. Hides the normal product price while the auction box is shown.
  • Hide Add to Cart Button. Hides the normal Add to Cart button for the auction product.
  • Continue Selling. Decides whether normal selling can go on while the auction is set up.
  • Starting Date/Time and End Date/Time. Enter these in the form’s Asia/Kolkata timezone. The start cannot be in the past. The end must come after the start and, when editing, must be in the future.

Bidding Configuration

These are the money and participation rules that decide which bids are accepted and what bidders can see.

  • Starting Price. Required and above zero. The first bid must reach this amount.
  • Bid Increment. Required and above zero. Each later bid must be at least the current highest bid plus this amount.
  • Maximum Bid. Optional. Must be above the Starting Price. Once it is reached, no more bids are accepted.
  • Minimum Time Between Bids (minutes). Optional whole number. Sets a waiting period between bids from the same customer.
  • Reserve Price. Optional and hidden from bidders. It must be at least the Starting Price and no more than the Maximum Bid. Automatic winner selection only works if the reserve price is met.
  • Show Highest Bid. Allow customers see the current highest bid.
  • Show Bid Rank. Allow a bidder see their own rank.
  • Show Total Bids. Shows the total number of bids.
  • Show Bidder Information. Decides whether bidder details are shown.
  • Show Last Bid Time. Shows when the last bid was placed.

All the visibility switches use Yes and No.

Auction Extension

Auction Extension guards the final stretch of an auction by letting late bids move the end time.

  • Enable Auto Extension. Turns on extension when a bid comes in inside the trigger window.
  • Extension Trigger (minutes). Required and above zero when auto extension is on. This is the window before the scheduled end in which a bid causes an extension.
  • Extension Duration (minutes). Required and above zero when auto extension is on. This is how much time gets added when the trigger is met.

Winner Configuration

This part sets how winners are chosen and how long they have to buy.

  • Winner Selection Mode. Auto ranks bids and creates winners by itself. Manual lets you pick winners from Live View once bidding ends.
  • Number of Winners. Default 1. Must be at least 1 and cannot be more than the available stock. It is hidden or ignored in Manual mode.
  • Winner Order Deadline. Enter a number (default 48) and choose Hours or Days. Winners must order before this deadline.

Dashboard

The Dashboard gives a quick view of auction activity and results through KPIs, charts, and recent activity tables.

Use the period selector to choose Last 7 days, Last 30 days, Last 3 months, Last 6 months, or Last 12 months. Save Layout and Reset Layout are available.

KPI widgets: Total Auctions, Upcoming Auctions, Ongoing Auctions, Completed Auctions, Order Pending Auctions, Orders Placed, Total Bids, and Unique Bidders.

Charts: Auction Status, Auction Statistics, Bid Statistics, and Conversion Statistics.

Tables: Recent Auctions, Recent Bids, Recent Orders, Top Products, and Top Bidders.

Drag widgets to reorder them, switch them on or off in the Widget Library, and set their column span from 1 to 12. KPI values show the current state of the shop. The period selector affects the period based charts and the Top Bidders data.

Email Templates

Email Templates controls which messages go out at key points in an auction. Enable the ones you need and edit the text for each installed language.

The first grid shows ID, Title, Code, and Status, with a Manage Translations option. Status is Disabled or Enabled. All templates start out disabled, so turn on each notification your store should send.

The translation grid shows Language, Subject, Enabled or Disabled status, and Edit. The editor has a Subject, a rich text Body, a placeholder legend, and Save. The subject is required and limited to 255 characters. The body is required.

Built in notifications:

  • Email to Admin on Bid Place
  • Email to Customers on Bid Place by Other Users
  • Email to Watchers on Bid Place by Other Users
  • Email to Watchers on Auction Start
  • Email to Customer on Winning and Place Order
  • Email to Other Customers Who Placed a Bid but Did Not Win
  • Email to Admin on Order Place
  • Email to Admin on Auction Close or No Bid
  • Email to Admin on Auction Close and Winner Selected
  • Cancelled Auction: Notify Users Who Placed a Bid
  • Email to Users on Block/Unblock Bidding on Any Auction
  • Email to Admin on Maximum Bid Reached

Use only the placeholders listed in the editor’s legend. If a translation is missing, the shop default language is used. Each email attempt is saved in the email log. If an email fails, the bid, order, or auction step still goes through.

Winners List

The Winners List is a read only record of closed auctions with their winners and order details. Columns: Auction ID, Reference Number, Product, End Date, Actual End Date, Winner, Winning Bid, Order Status, Order Deadline, and Order Reference. Order Status can be Pending, Placed, Expired, or Reassigned.

An auction with no winner appears with empty winner fields and a no winner label. Use View Auction to open the related auction.

7. Field Types and Options

This summary shows what kind of input each part of the module uses.

  • General Settings: Yes/No switches and one number field.
  • Customization Settings: color inputs.
  • Auction form: text fields, a product and combination picker, status choice, date and time inputs, numeric price and duration fields, and Yes/No switches.
  • Winner Configuration: Auto/Manual choice, numeric winner count, numeric deadline, and an Hours/Days choice.
  • Lists: searchable, filterable tables with status, date, product, and reference filters where offered.
  • Dashboard: draggable widgets, an enable/disable library, a period selector, and column span controls.
  • Email Templates: status toggle, language table, text subject, rich text body, and a Save button.

8. Admin Actions

Admin actions either change an auction’s state or help you manage customers and winners. Which actions you see depends on the auction’s status.

  • Save stores settings, colors, dashboard layouts, or email translations, depending on the page.
  • Publish moves a Draft to Scheduled or Ongoing.
  • Pause moves a Scheduled or Ongoing auction to Inactive. Resume brings an Inactive auction back.
  • Force Cancel cancels an Ongoing auction.
  • Duplicate makes a copy of an auction.
  • Delete removes an eligible auction. Ongoing auctions are protected.
  • Bulk Delete deletes the eligible selected rows and skips Ongoing ones.

In Live View you can Refresh, Block or Unblock a bidder, Pause, Resume, Cancel Auction, Edit Auction, and select manual winners where it applies. In Manual mode, the order in which you select bidders sets their winner rank.

9. Storefront Behavior: What Customers See

This section describes the customer side of the PrestaShop bidding system: bidding, auction listings, account pages, and limits on winning orders.

Product Page Auction Box

The product page can show an auction box for auctions that are scheduled, ongoing, won, lost, no bid, no winner, ended pending, or inactive. For an ongoing auction, depending on your settings, the box can show the countdown, the current or next minimum bid, a progress bar, the bidder count, rank, total bids, last bid time, a bid field, the Place Bid button, a watchlist control, a blocked bidder message, and a maximum bid message.

Bidding Rules for Customers

Customers must be logged in to bid, and guests see a login prompt. A customer cannot right away outbid their own bid, and blocked bidders cannot bid. Stock levels and PrestaShop out of stock rules also affect whether a bid is accepted. The page polls every 10 seconds by default to refresh status, timing, minimum bid, statistics, winner state, and extension notices.

Auction List Page

The public Auction List has tabs for All, Upcoming, In Progress, and Expired. The Expired tab is optional. Ended cards are greyed out and do not link to the product. The home page block and category badges follow their General Settings switches.

Customer Account: My Bids and My Watchlist

The customer account has an Auction entry that opens My Bids. My Bids shows bid history, best bid, result, ranking where allowed, and a Place Your Order or View Order action. When the watchlist is on, My Watchlist lists scheduled and ongoing auctions, and Include past/cancelled shows older watched ones.

Quantity Limit for Winning Orders

Products bought at a winning price are limited to a quantity of 1 in the cart and at checkout. If the module corrects a higher quantity, it shows a notice explaining why.

10. Multi-language, Multi-store, and Currency Behavior

Auction, bid, watchlist, winner, and dashboard data belong to a shop. In single shop context, admin lists show only the current shop. In the All Shops context, nothing is restricted. Auction reference numbers and titles must be unique across all shops.

Email subjects and bodies are stored per language. Languages that exist at install time are seeded, and a missing translation falls back to the shop default language. A language added after installation may not get translation rows automatically.

Auction amounts are stored and compared in the shop default currency. Storefront values are converted to the customer’s chosen currency, while admin notification emails use the shop default currency. The auction form and admin dates use Asia/Kolkata time, and stored dates use UTC.

11. CRON Job and Automated Tasks

The CRON job handles time based work, so scheduled starts, closings, winner selection, and expired winner deadlines are processed even when nobody visits the store or admin pages.

Call the CRON web URL every minute with the token shown on the page. Each run can:

  1. Move due Scheduled auctions to Ongoing and notify watchers.
  2. Close expired Ongoing auctions.
  3. Select winners for Auto auctions.
  4. Process expired winner deadlines and reassign or expire winner slots.

Each run handles at most 200 records. Product views, bids, polls, and the Auctions list also do some limited just in time expiry processing, but CRON is needed for auctions that get no page visits.

12. External Services and API Settings

The module needs no external API connection. The CRON URL is an HTTP endpoint on your own PrestaShop installation, not an outside service. There are no external credentials to enter. Keep the token private, and regenerate it if it may have been exposed.

13. Troubleshooting the PrestaShop Auction Module

If an auction, bid, email, or winner order is not working as expected, check the causes and fixes below. If the problem remains, contact Knowband support.

The auction does not show on the storefront

Possible cause: The module is disabled in PrestaShop, Enable Module is No, or the auction is in Draft, is inactive, or belongs to a different shop or product combination. Fix: Enable the module in PrestaShop and in General Settings, check the auction status and dates, and confirm the selected product or combination.

Customers cannot use the watchlist

Possible cause: Enable Watchlist is No, or the customer is not logged in. Fix: Turn on the setting and test while logged in.

Scheduled auctions or winners are out of date

Possible cause: The CRON URL is not being called, the token was regenerated but the server job was not updated, or the module is disabled. Fix: Copy the current URL from General Settings, update the server crontab, run it every minute, and make sure Enable Module is Yes.

Email notifications are not sent

Possible cause: The template or the language translation is disabled or incomplete. Fix: Enable the template, edit the translation, make sure the Subject and Body are filled in, and look at the email log and PrestaShop logs. Email failures do not block bidding or order processing.

A bid is rejected

Possible cause: The bid is under the starting price or required increment, the maximum bid was reached, the bidder is blocked, the waiting period has not passed, stock rules reject it, or the auction is no longer ongoing. Fix: Review the auction’s bidding settings and status. The customer must be logged in and cannot immediately outbid their own bid.

A winning customer cannot place the order

Possible cause: The winner token or deadline is invalid, the product or combination does not match, the paid amount is different from the winning amount, or the cart quantity is not exactly 1. Fix: Have the customer open My Bids, use the active Place Your Order link before the deadline, pick the right product or combination, and keep the quantity at 1.

Category auction badges are missing or look wrong

Possible cause: The category display switch is off, the auction is not live or upcoming, or a heavily customized theme changes the product card selectors. Fix: Enable Display auction info on Category page, check the auction status, and review the theme’s product list markup if the styling is off.

14. Best Practices for Running PrestaShop Auctions

These tips help you avoid setup mistakes, keep automated tasks running, and give customers a steady auction experience.

  • Keep Enable Module off while you prepare auctions, then test one full auction before opening more.
  • Use unique, clear Reference Numbers and short Auction Titles.
  • Double check start and end times in the Asia/Kolkata admin timezone.
  • Pick a Bid Increment that suits the product’s value, and review Maximum Bid and Reserve Price together.
  • Turn on only the statistics and bidder details you want customers to see.
  • Set up CRON before publishing scheduled auctions.
  • Enable and review each email template in every language your store uses.
  • Treat the CRON URL as a secret and regenerate it if it leaks.
  • Test a winning order with the right product, combination, winning amount, and a quantity of 1.
  • Use Live View to watch for odd bidding, block bidders when needed, and keep a record of manual winner choices.
  • Update the module to the latest Knowband release for security and compatibility.

15. Conclusion

The Knowband PrestaShop Auction Module is a full bidding extension for scheduled product auctions, live bidding, customer bid history, watchlists, winner selection, and winner order handling. General Settings controls activation and storefront placement, Auctions defines each product auction, Customization Settings controls the look, Email Templates controls notifications, and the Dashboard and Winners List help with daily auction management.

 

Prestashop Point of Sale Module User Manual

Knowband PrestaShop Point of Sale Module is an all-in-one PrestaShop Multiple Store POS module that is specially designed for merchants who have one or multiple physical stores in addition to their online store. The Knowband PrestaShop POS module comes in handy for such merchants as it integrates functionalities like store-level sales, stock management, and employee management directly into their PrestaShop back-end, making it a viable PrestaShop POS Module Alternative to other POS systems.

The module is built around Multi-Outlet POS approach. Every physical location, which is called an outlet in admin terms, is configurable on its own using its own unique address, currency, language, and sales regulations, but all outlets will still work under one single PrestaShop website. Thus, the Prestashop Point of sale Addon is appropriate for Multi-Outlet Retail business models including but not limited to boutique chains, franchise counters, pop-ups, and warehouses with retail activity in addition.

Knowband Point of Sale is not a payment method in itself. It records POS sales through its own internal order flow and always uses a fixed internal payment method for POS transactions; the order status applied once a sale is paid is configurable in Settings, and shipping, discounts, and commission are layered on top of that flow.

1.1 What the module includes

The Prestashop Point of Sale Module includes functionalities like dashboard, multi-outlet creation, commission tracking, inventory sync and many more.

  • Sales dashboard module for PrestaShop: a customizable, draggable widget grid for reviewing outlet performance, oversold orders, and sales trends
  • Outlet management: creating, editing, and activating individual outlets, each with its own address, currency, language, and override rules
  • PrestaShop sales agent management: assigning PrestaShop employees to outlets as cashiers, and flagging specific employees as POS managers
  • Commission tracking: recording salesperson commission per sale, with reporting broken down by employee and outlet
  • POS Customer Management for PrestaShop: Searching, creating and configuring guest check-out behavior based on outlet
  • PrestaShop Barcode Scanner Module: Matching the barcodes entered through the scanner with a user configurable barcode field such as EAN13, UPC, ISBN, MPN, and Reference
  • Inventory Synchronization for PrestaShop: Maintaining the correct stock visibility while assigning, selling and returning products in various outlets
  • Offline order module for PrestaShop: queuing sales when the connection drops and syncing them automatically once connectivity returns, using idempotency keys to prevent duplicate orders
  • PrestaShop POS with receipt printing: generating printed receipts through standard browser-based HTML printing, with configurable discount line display
  • Return and refund POS trail: order-level visibility into paid amounts, order status, and oversold flags so that returns and refunds can be traced back to the original outlet and salesperson
  • PWA-style panel access: a public POS panel URL, optionally customised, that can be opened in a browser tab or installed as an app-like shortcut on a desktop device

2.0 Requirements and Compatibility for Prestashop Point Of Sale Addon

2.1 PrestaShop compatibility

The module is compatible for Prestashop 1.7, Prestashop 8.x. and Prestashop 9. x.x. Store owners can use it feel free, in case if you face any issue, our team is always available at supprot@knowband.com

2.2 Module dependencies

The Multi-Outlet POS system creates and relies on its own database tables for outlets, product-to-outlet assignment, stock allocation, discount logs, offline order queues, and commission records, in addition to standard PrestaShop tables for employees, customers, carriers, and orders.

2.3 Required permissions

The administrator installing or configuring the module needs valid PrestaShop back-office access with rights to manage modules, products, carriers, customers, employees, and orders. Outlet management in particular touches products and carriers directly, so an store adins without those permissions will not be able to complete outlet setup.

3.0 Installation and Activation of Prestashop Multi Outlet POS System

3.1 Installing the module

Install Knowband PrestaShop Point of Sale from the PrestaShop module list in the back office, the same way any standard PrestaShop module is installed. 

  • Navigate to Module Manager > Modules
  • Click on the Upload option and upload Knowband Prestashop Point of Sale
  • After installation, click on configure, this will redirect you to the configuration module.

3.2 Activation

Installing the module is not the same as activating it for live sales.  Enable the module from the Enable POS module Tab.

4.0 Module Tabs Structure in POS 

After installation, you will see the module Knowband Prestashop Point of Sale under the PrestaShop SELL menu. 

  • Dashboard
  • Settings
  • Outlets
  • Employees
  • Orders
  • Reports
  • Receipt Settings
  • Other Modules

5.0 Admin Panel Module Configuration in Prestashop POS System

5.1 Dashboard

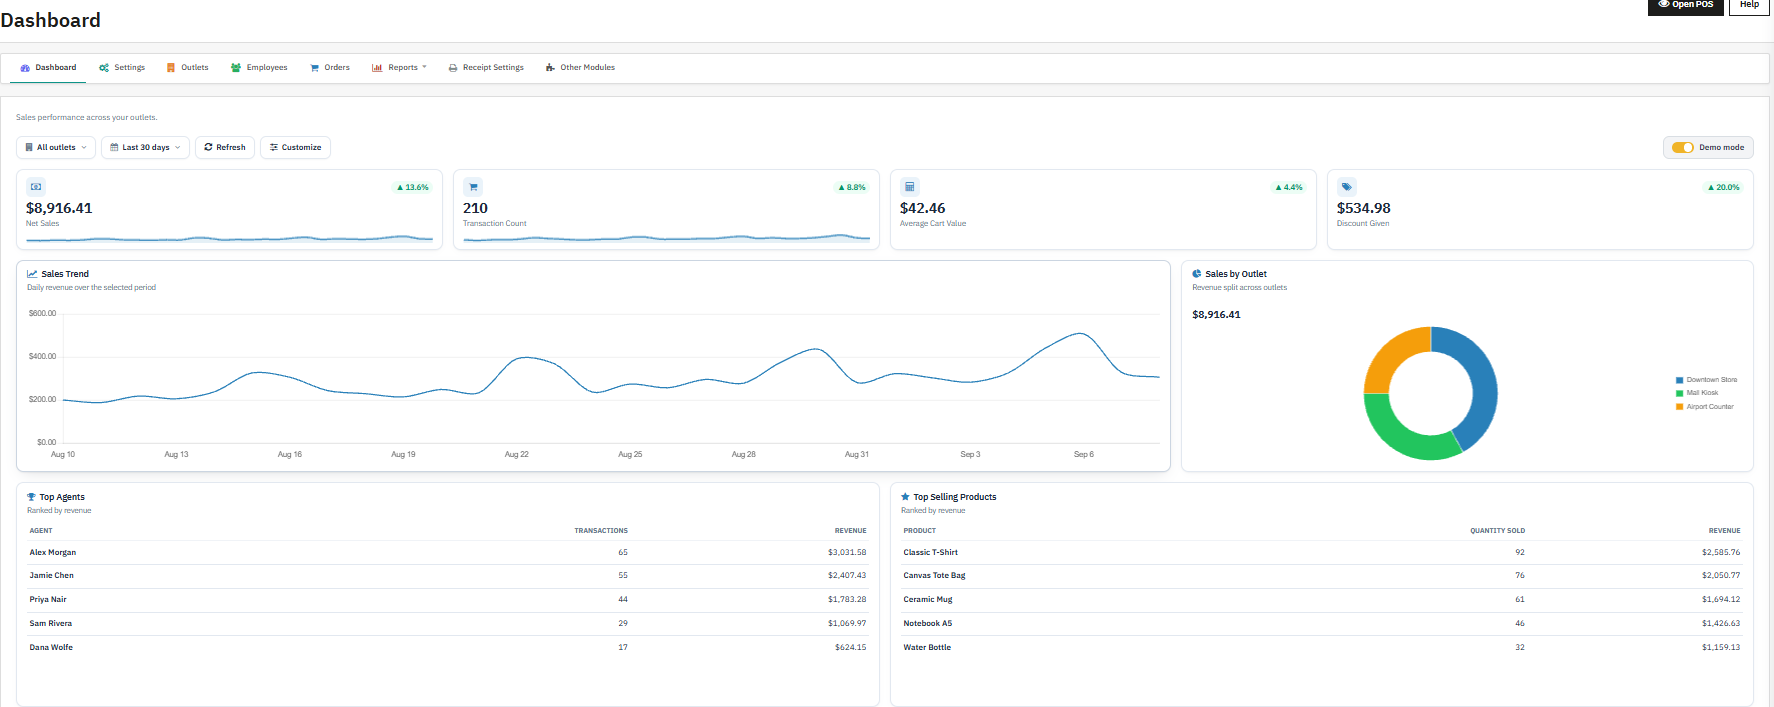
The Dashboard is the landing page of the sales dashboard module for PrestaShop and gives the administrator an outlet-scoped overview of POS activity as soon as they open the Knowband Prestashop Point Of Sale menu.

5.1.1 Purpose

  • Review recent sales activity and trends across outlets.
  • Check individual outlet performance.
  • See oversold order counts, which relate directly to inventory sync accuracy.
  • Open the POS panel quickly from a single screen.
  • Customise the widget layout to match how the store owner or manager wants to review data.

5.1.2 Fields and controls

  • Outlet selector: switches the dashboard view to a specific outlet or to all accessible outlets, central to multi-outlet management
  • Period selector: changes the reporting period used by the dashboard widgets
  • Widget customise controls: allow enabling, rearranging, and saving the widget layout
  • Oversold orders quick link: opens the Orders screen filtered to orders flagged as oversold

5.1.3 Buttons and actions

  • Open POS: opens the POS panel in a new browser tab
  • Reset dashboard layout: returns the widget arrangement to the default layout
  • Demo mode toggle: switches the dashboard to a demo dataset instead of live data, useful for screenshots or training

5.1.4 Important behavior

  • Widget data loads through AJAX rather than a full page reload.
  • Dashboard content is always outlet-specific once an outlet is selected.
  • The widget layout and demo mode setting are saved per shop, so multi-shop PrestaShop installs keep separate dashboard preferences.

5.2 General Settings

Settings is the main configuration area for the module’s behaviour and is organised into five sub-tabs: General, Product, Customer, Payment, and Shipping.

5.2.1 General

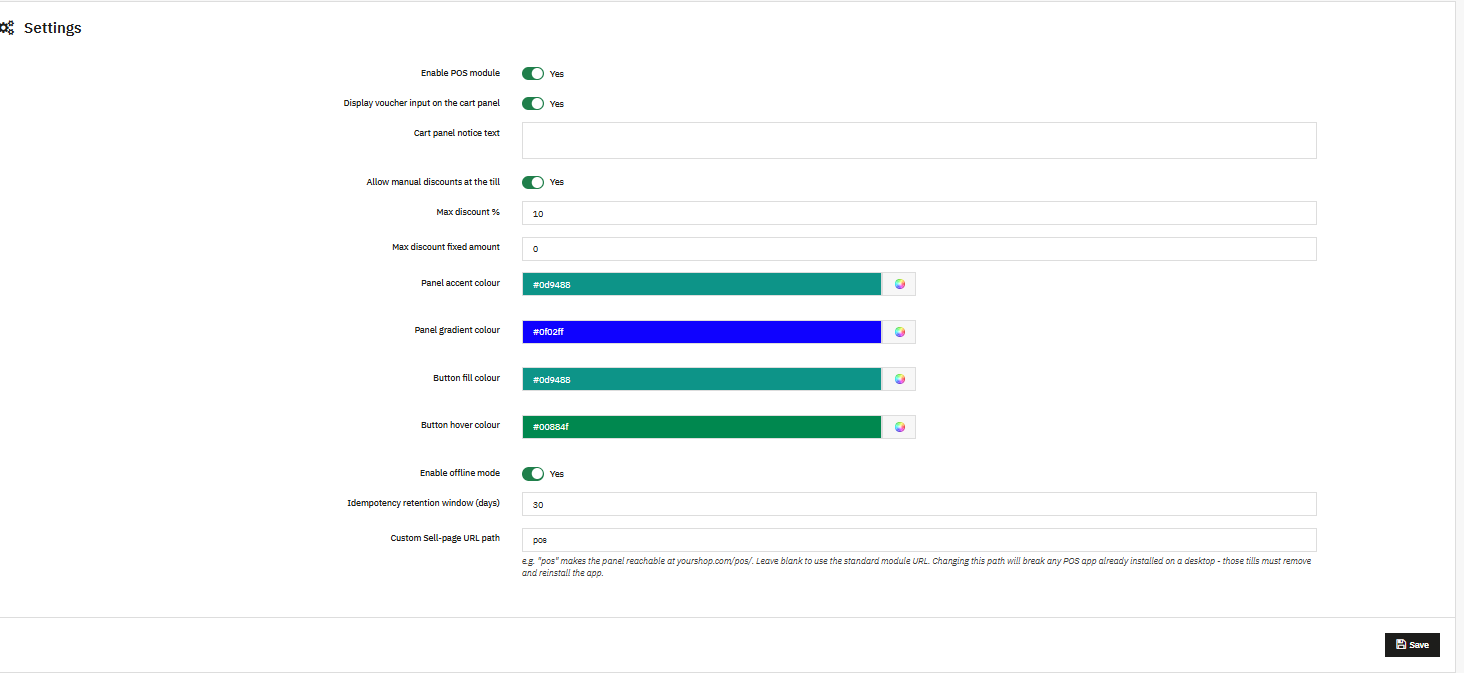
It controls the core operational behaviour of the PrestaShop POS module: whether it is active, how discounts and offline mode work, panel colours, and the public panel URL.

  • Enable POS module: turns the entire module on or off; when disabled, the POS panel becomes unavailable
  • Display voucher input on the cart panel: shows or hides the voucher field in the POS cart
  • Cart panel notice text: optional message shown above the POS cart
  • Allow manual discounts at the till: enables cashier discounting
  • Max discount %: maximum manual discount percentage a cashier may apply
  • Max discount fixed amount: maximum fixed discount amount a cashier may apply
  • Panel accent colour: main colour used by the POS interface
  • Panel gradient colour: secondary colour for the POS background gradient
  • Button fill colour: main colour for action buttons in the POS panel
  • Button hover colour: button hover state colour
  • Enable offline mode: activates the offline order module for PrestaShop, allowing sales to be queued while connectivity is lost and synced automatically once it returns
  • Idempotency retention window (days): number of days to retain de-duplication keys for offline sales, preventing the same offline sale from being recorded twice
  • Custom Sell-page URL path: This option allows the POS panel use a custom public URL path, such as /pos/, and supports PWA-style shortcut installation

Note: Changing the custom panel path can break already-installed desktop app shortcuts, because an installed shortcut points to the URL it was created with.

5.2.2 Product

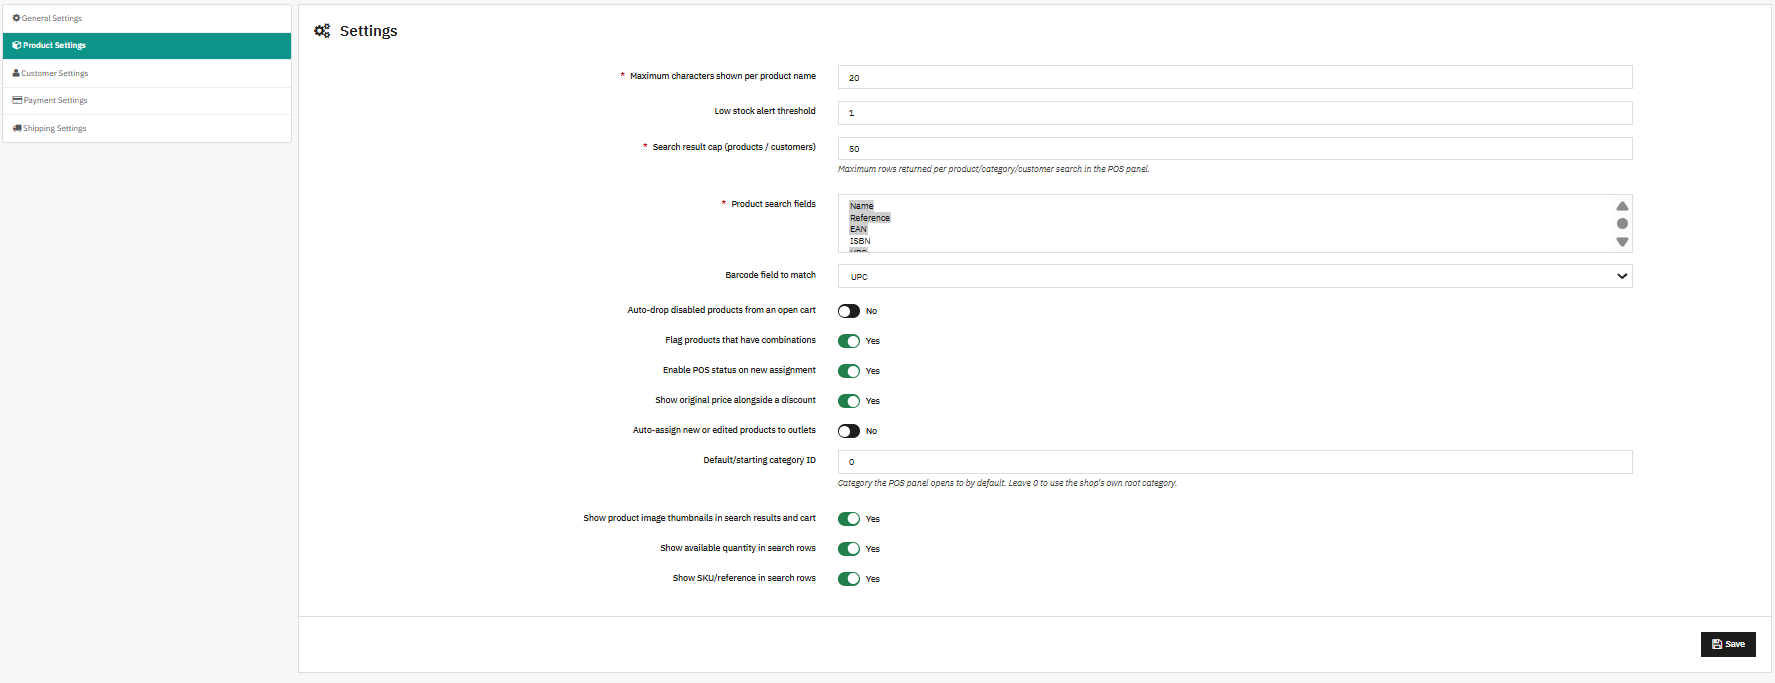
Controls how products are searched, displayed, assigned, and managed in the POS, and is the main configuration point for both the barcode scanner module for PrestaShop and the inventory sync module for PrestaShop.

  • Maximum characters shown per product name: truncates long product names in the POS interface
  • Low stock alert threshold: flags low stock when allocated stock falls to or below the chosen value
  • Search result cap (products / customers): maximum number of rows returned in product or customer searches
  • Product search fields: selects which product fields are text-matched in POS search, from Name, Reference, EAN, ISBN, UPC, MPN, and Tags
  • Barcode field to match: selects which barcode field the barcode scanner module for PrestaShop uses when scanning or typing a code, from EAN13, UPC, ISBN, MPN, and Reference
  • Auto-drop disabled products from an open cart: removes disabled or de-assigned products from an open cart automatically
  • Flag products that have combinations: marks products with variants so the cashier knows a choice is required before completing the line
  • Enable POS status on new assignment: makes newly assigned products immediately available for POS sale
  • Show original price alongside a discount: displays both original and discounted pricing for price-reduced products
  • Auto-assign new or edited products to outlets: automatically assigns products to active outlets, supporting the inventory sync module for PrestaShop
  • Default/starting category ID: category the POS panel opens to by default; set to 0 to use the shop root category
  • Show product image thumbnails in search results and cart: displays small product images
  • Show available quantity in search rows: displays outlet stock in product search results
  • Show SKU/reference in search rows: shows product reference text under the product name

5.2.3 Customer

Handles the global portion of PrestaShop POS customer management. Most customer-related configuration now lives at the outlet level rather than here.

  • Let cashiers pick customer groups on creation: shows a customer group selection box when a cashier creates a customer from the panel

5.2.4 Payment

Controls the payment status applied to POS sales and the salesperson commission rules that drive commission tracking.

  • How POS sales are paid: a display-only field explaining that all POS sales use one fixed internal payment method
  • Status applied once paid: the order status assigned once a sale is marked paid
  • Enable salesperson commission tracking: turns commission calculation on or off for commission tracking
  • Commission rate (% of order total): percentage of each sale total used for salesperson commission

5.2.5 Shipping

Controls shipping behaviour for POS orders, including which carriers a cashier can offer.

  • Allow shipping a POS sale to the customer: enables shipping at the POS
  • Carriers available at the till: multi-select list of all carriers a cashier may choose from
  • Pre-selected carrier: default carrier chosen when a cashier enters shipping mode

5.3 How to add Multi Outlets in Prestashop Point of Sale

Outlets are the core of Multi-Outlet Retail configuration. This section covers the outlet listing, the add and edit outlet form, and the outlet products panel used for inventory sync.

5.3.1 Outlets listing

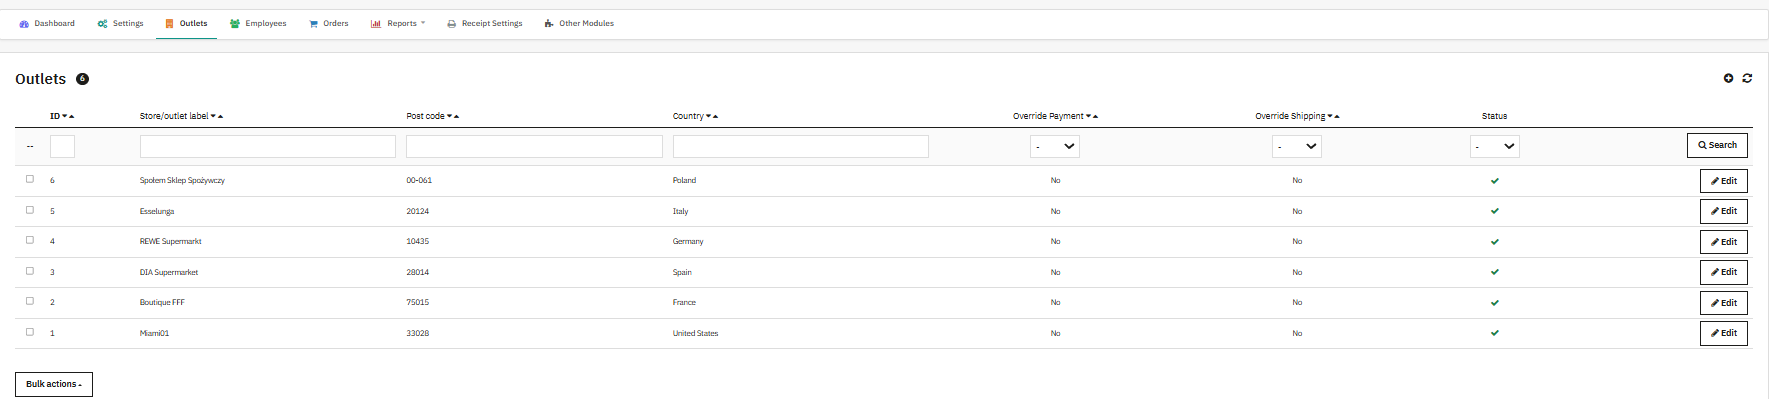
Lists every outlet configured for the current shop and is the entry point for outlet management.
Listing columns: ID, Store/outlet label, Post code, Country, Override Payment, Override Shipping, Status

  • Edit: opens the outlet configuration form
  • Status toggle: enables or disables the outlet
  • Open POS: opens the POS panel for that context in a new tab
  • Add new outlet: creates a new outlet record

5.3.2 How to Add an Outlet using PrestaShop Point of Sale System

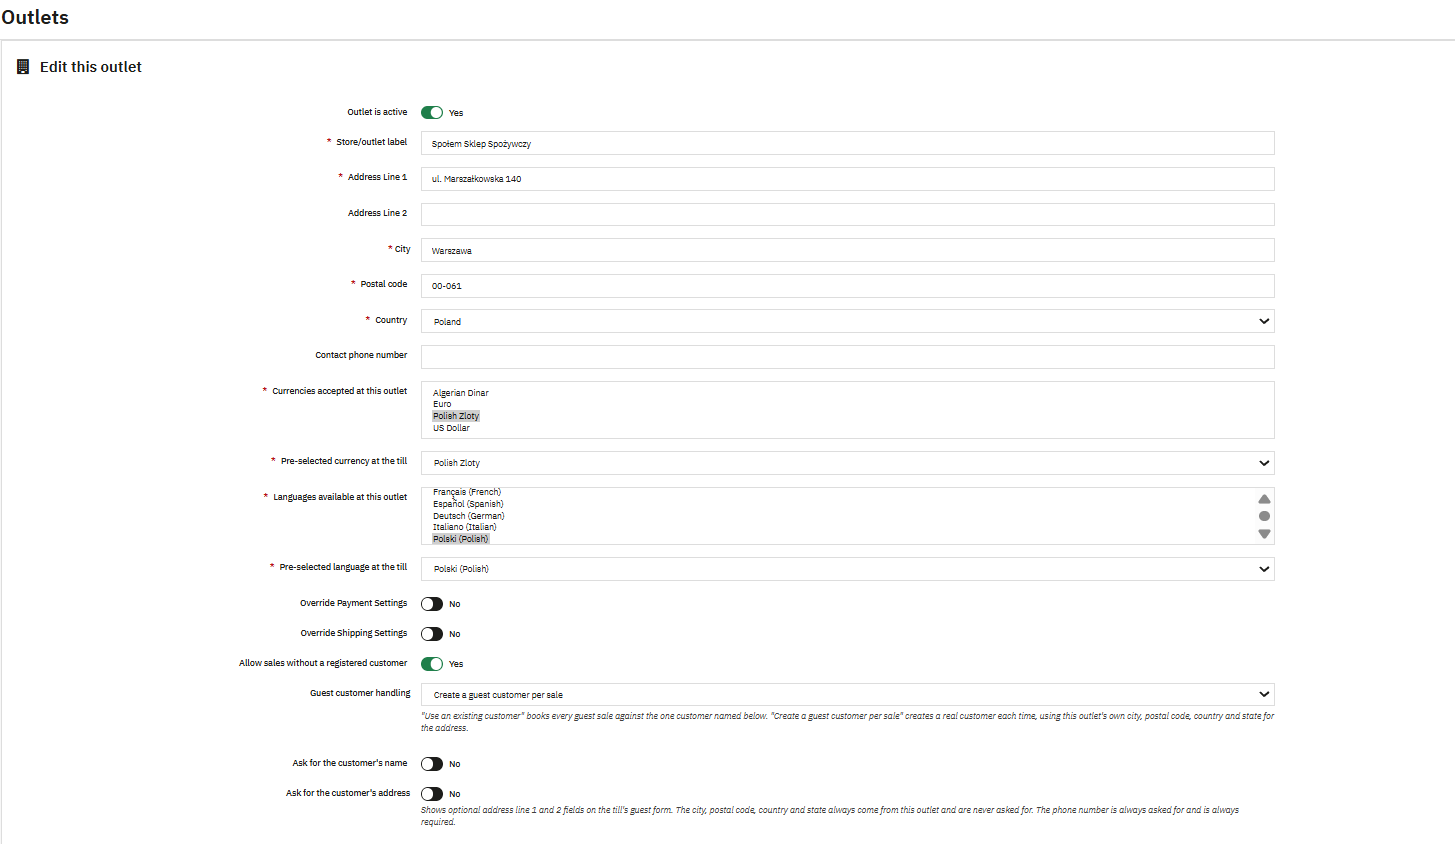
Creates or edits a single outlet, defining its physical profile plus its local payment, shipping, and guest checkout rules.

Core fields: Outlet is active, Store/outlet label, Address Line 1, Address Line 2, City, Postal code, Country, State, Contact phone number, Currencies accepted at this outlet, Pre-selected currency at the till, Languages available at this outlet, Pre-selected language at the till

5.3.3 Payment override group

  • Override Payment Settings: turns the outlet payment override on or off
  • Status applied once paid: order status assigned to paid POS sales at this outlet
  • Enable salesperson commission tracking: enables commission tracking at the outlet level
  • Commission rate (% of order total): commission percentage specific to this outlet

5.3.4 Shipping override group

  • Override Shipping Settings: turns the outlet shipping override on or off
  • Allow shipping a POS sale to the customer: enables shipping at this outlet
  • Carriers available at the till: allowed carriers for this outlet
  • Pre-selected carrier: default shipping carrier for this outlet

5.3.5 Guest checkout group

This group is the outlet-level half of PrestaShop POS customer management.
  • Allow sales without a registered customer: enables guest sales at this outlet
  • Guest customer handling: selects whether guests use an existing customer record or a new guest customer created per sale
  • Guest checkout customer email: email of the existing customer used for guest sales
  • Ask for the customer’s name: shows name fields on the guest form
  • Ask for the customer’s address: shows address fields on the guest form

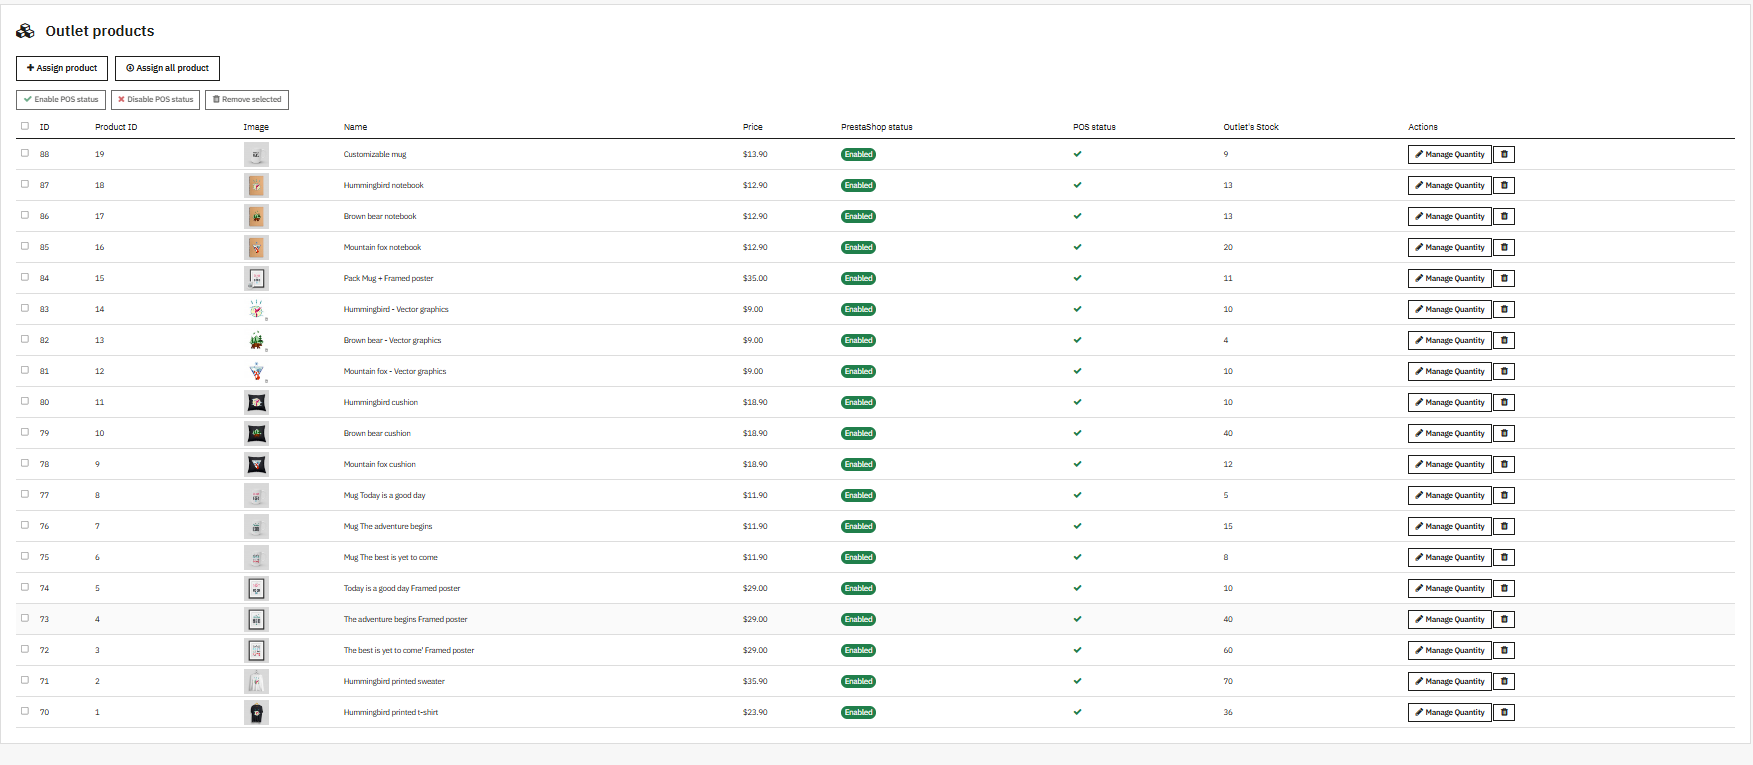
5.3.6 How to Assign Products to Outlet 

Appears when editing an existing outlet and is the working screen for the inventory sync module for PrestaShop at outlet level.

  • Assign product to outlet
  • Assign all products to outlet
  • Manage quantity for assigned products
  • Remove a product from this outlet

5.4 Employees

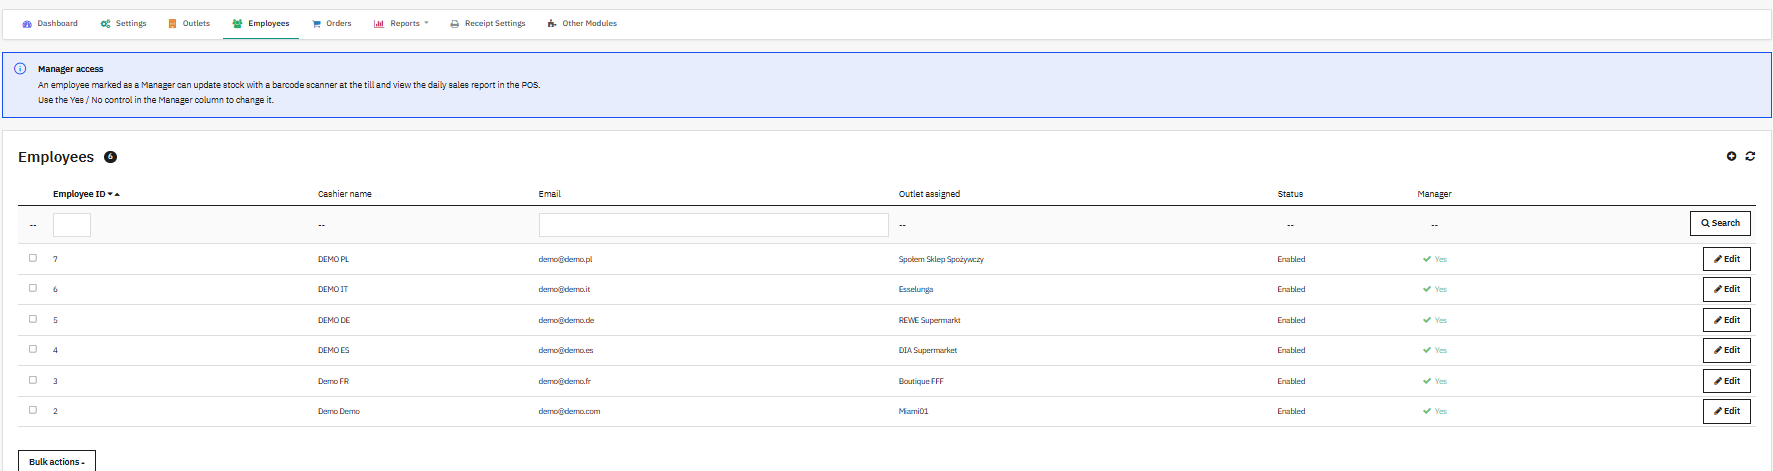
The Employees screen is the PrestaShop sales agent management view, listing every PrestaShop employee assigned to a POS outlet.

Listing columns: Employee ID, Cashier name, Email, Outlet assigned, Status, Manager

  • Edit: opens the employee record in the standard PrestaShop employee editor

The Employee tab provides functionality for the creation of employee accounts and configuring of permissions and outlets that employees will have access to.

  • First Name: Provide the first name of the employee.
  • Last Name: Provide the last name of the employee.
  • Avatar: Upload the avatar image of the employee.
  • Enable Gravatar: Specify whether you want to use the employee’s Gravatar image (Yes/No).
  • Email Address: Provide the employee’s email address. This email can be used as a login and account information exchange channel.
  • Password: Provide a password of at least 8 characters for the employee.
  • Language: Provide the language used by the employee in the administration panel.

Access and Permissions

  • Active: Select Yes if you want to give the employee access to the Admin panel; otherwise select No.
  • Role: Choose the role of the employee. Based on the chosen role, the employee gets permission and access to functions.
  • Default Page: Choose the page that should be opened right after logging in by the employee.

POS Access

  • POS Outlet Assigned To: Choose the POS outlet that belongs to the employee.

If this field is left blank/uninitialized, the employee is not considered a cashier and hence does not get POS access.

  • Employee Image: Choose the photo/image of the employee. It could help in recognizing the employee in the system. Once all the necessary data is entered, save the employee’s record.

5.5 How to sync orders in POS 

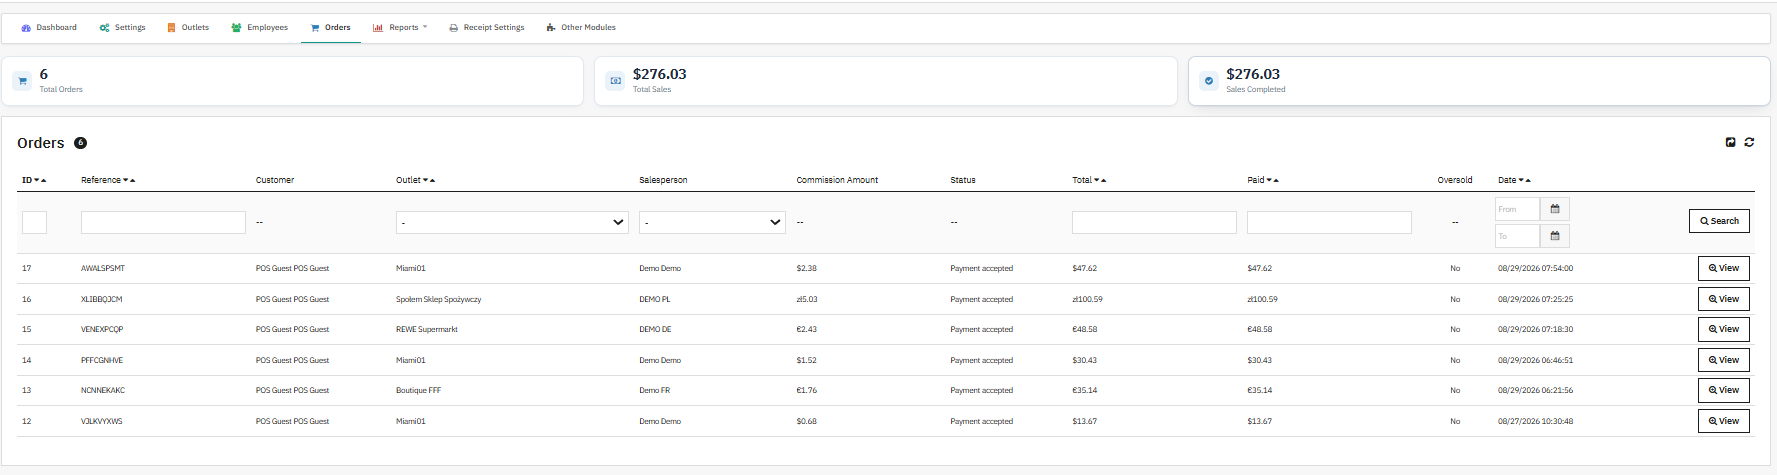
The Orders screen lists all POS-originated orders and is the primary place to review sales history and the starting point for any return and refund POS trail investigation.

Listing columns: ID, Reference, Customer, Outlet, Salesperson, Commission Amount, Status, Total, Paid, Oversold, Date

Filters: Outlet filter, Salesperson filter, Date filter

View: opens the detailed order view for that sale, including outlet, salesperson, and payment detail useful for tracing a return

CSV export is available through the standard PrestaShop helper list export mechanism, which makes it straightforward to pull a return and refund POS trail or a reconciliation file for accounting.

5.6 How to Analyse Reports 

The Reports parent tab groups the two reporting screens used for commission tracking and discount oversight.

5.6.1 Discount Report

Summarises discount activity by employee and outlet, helping administrators identify cashiers who discount heavily or frequently.

Listing columns: Employee ID, First name, Last name, Outlet, Times discounted, Total discounted, Per-item discounts, Per-item total, Whole-cart discounts, Whole-cart total, Last discount

Filters: Employee name filters, Outlet filter, Last discount date range

This is a read-only report. It is based on discount activity logged by the module and does not include voucher-related discount rows.

5.6.2 Commission Report

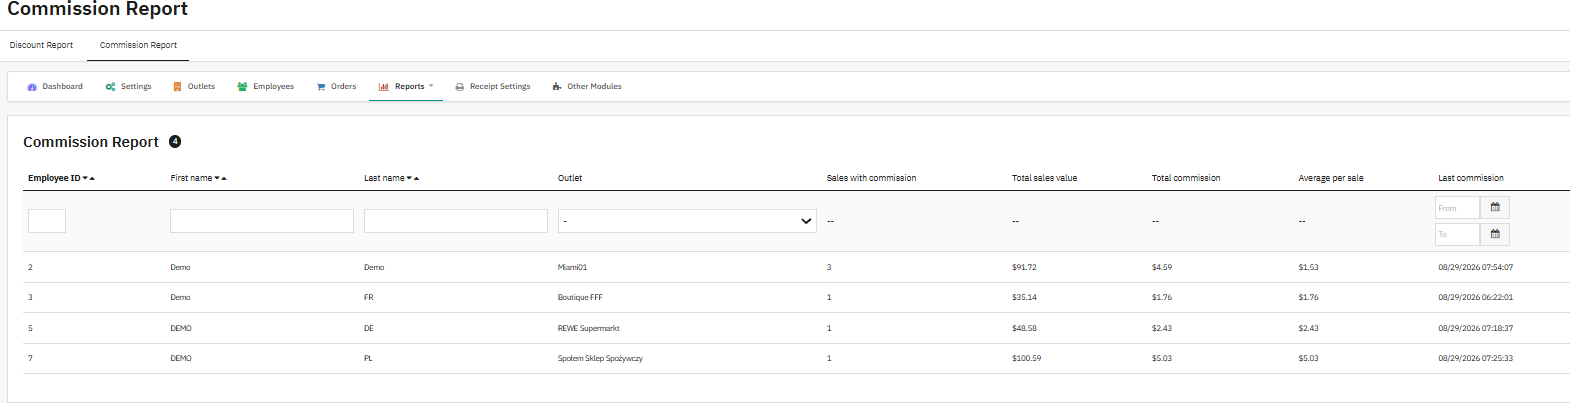
The primary screen for commission tracking, summarising commission earned by a salesperson at each outlet.

Listing columns: Employee ID, First name, Last name, Outlet, Sales with commission, Total sales value, Total commission, Average per sale, Last commission

Filters: Outlet filter, Last commission date range

View orders: opens the Orders page filtered to the related salesperson and outlet

Note: This report is grouped by salesperson and outlet, which matters when a single employee works across multiple outlets under Multi-Outlet POS operations.

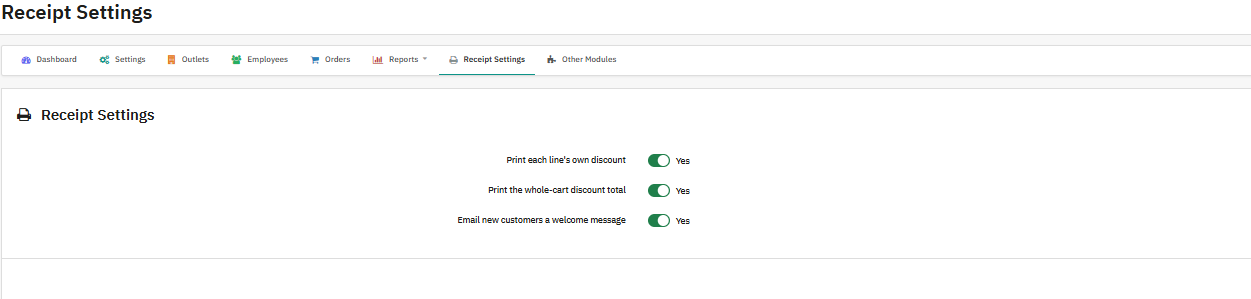
5.7 Receipt Settings

Controls how PrestaShop POS with receipt printing displays discounts and whether new customers receive a welcome email.

  • Print each line’s own discount: prints a separate discount line for each discounted product on the receipt
  • Print the whole-cart discount total: prints a separate total line for cart-level discounts
  • Email new customers a welcome message: sends a welcome email when a cashier creates a new customer from the POS.

6.0 Conclusion

Knowband PrestaShop Point of Sale also called as PrestaShop Multi-Outlet Point of Sale (POS) module for stores that need genuine multi-outlet management inside PrestaShop rather than a bolted-on third-party system. It gives admins the tools to create outlets, assign employees through sales agent management. Also, this module keep stock accurate with the inventory sync module for PrestaShop, scan products with the barcode scanner module for PrestaShop, take sales while offline through the offline order module for PrestaShop, configure shipping and payment behavior, print receipts, and monitor discount and commission trends from a single sales dashboard module for PrestaShop. If you find any issue with the module, please feel free to contact us at support@knowband.com
Watch the video tutorials below to learn how to configure and use the PrestaShop Point of Sale Module step by step.

Prestashop SEO Audit Module: Complete User Manual

1. Introduction

Prestashop SEO Audit Manager is the SEO Audit module that allows prestashop store owners to conduct a SEO audit from scratch to the product, category, CMS and manufacturer. Rather than using separate modules or plugins to check pages for meta tags, redirects, sitemap, and analytical data, this module gathers all scoring, technical checks.

The module is designed for PrestaShop store administrators with no professional SEO experience. The result and target of each audit are shown in layman’s terms so that a person immediately understands why the description is 24 words long when the target is 300 words.

Technically, the module allows spotting thin content, lack of or duplicate meta title and description, broken internal links causing 404 errors, colliding URLs creating duplicate slugs, problems with configuring sitemap and robots.txt files, as well as slow loading time. Once the problem is spotted, there is usually a solution to fix the issue right within the module – editing the redirect, making the new meta description via ChatGPT, or fixing the sitemap options.

Prestashop SEO Audit Module also integrates with Google Analytics 4, Google Search Console, and PageSpeed Insights to let audit scores be analysed along with real traffic numbers, real search performance and page speed metrics, rather than in isolation. This is how a PrestaShop SEO audit changes from being a mere checklist into a live workspace.

2. Key Features of Prestashop SEO Audit Module

  • Page-level SEO audit and readability audit with a 0 to 10 score
  • Dashboard summarising store-wide SEO health, meta completeness, and index status
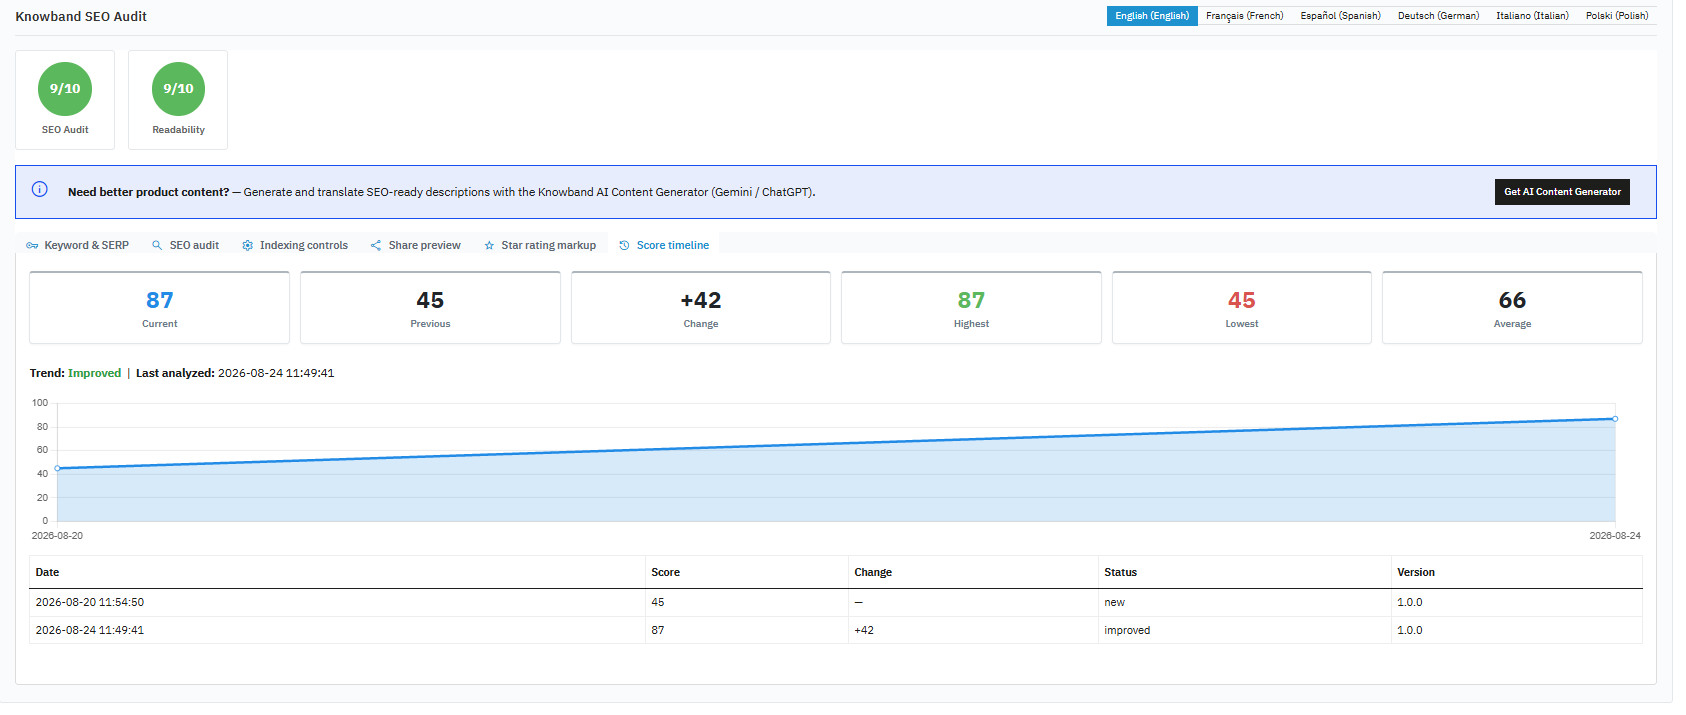
  • Score History with trend charts and snapshot comparison
  • URL Optimisation tools: Pretty URLs, 404 monitoring, duplicate URL detection, URL redirects
  • XML Sitemap and HTML Sitemap management, plus RSS output
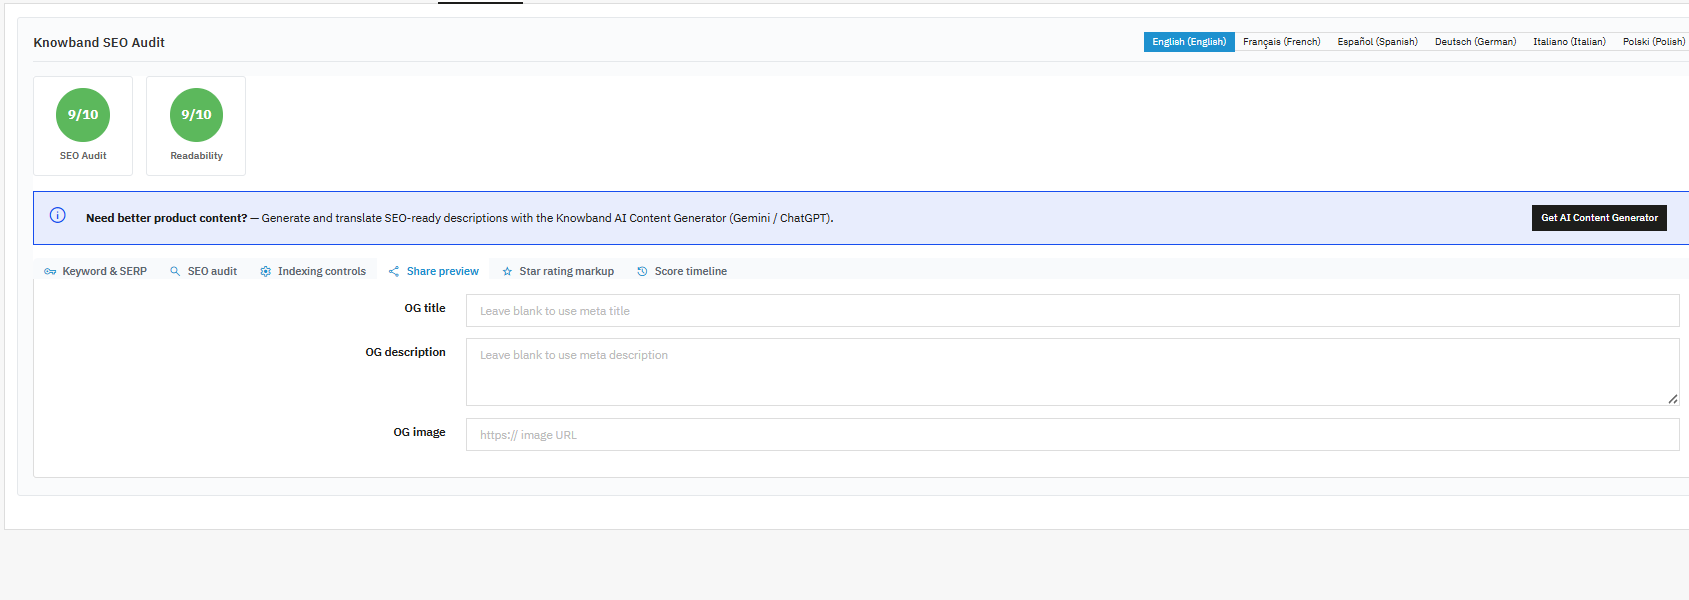
  • Social Cards for Open Graph and Twitter metadata
  • Built-in ChatGPT integration for meta titles, meta descriptions, and other SEO fields
  • Robots.txt editor tied to the live file
  • Google Analytics 4, Google Search Console, and PageSpeed Insights reports

3. How to Install the Prestashop SEO Audit Module

  1. Install the Prestashop SEO Audit Module and from the PrestaShop Admin Panel, go to Modules -> Module Manager to install the module. This module builds its own database for SEO, History, Redirects, 404 Monitoring, ChatGPT, and Sitemap
  2. A new Prestashop SEO Audit Module entry appears in the left menu, under Sell. This master switch determines if the module will affect the storefront at all.
  3. Turn on features that you will be using: SEO analysis, Readability analysis, Record 404s, URL redirects, XML sitemap, RSS.
  4. In case you will be using Google integration or ChatGPT, go to Analytics > Settings and ChatGPT, where you should provide the necessary credentials. It can be done later.
  5. Open any product, category, CMS page, manufacturer or supplier, where you should find the SEO Audit tab in the edit form; here SEO work will be done.
  6. As the module modifies metadata of storefront, redirects and generates public robots.txt and sitemap files, staged installation, starting with analysis and readability score generation, followed by redirects and sitemap generation once you gain confidence in generated data, is recommended rather than full activation from the very beginning.

4. Admin Overview of PrestaShop On-Page SEO checklist

Tabs included in the Prestashop SEO Audit Module Sidebar: Dashboard, Analytics, Score History, URL Optimisation (Pretty URLs, 404 URLs, Duplicate URLs, URL Redirects), Sitemap (XML Sitemap, HTML Sitemap), Social Cards, ChatGPT, Robots.txt, Import / Export, Settings and Others Modules. All tabs have been described field-wise below such that every setting which is visible to users is explained separately.

4.1 Dashboard

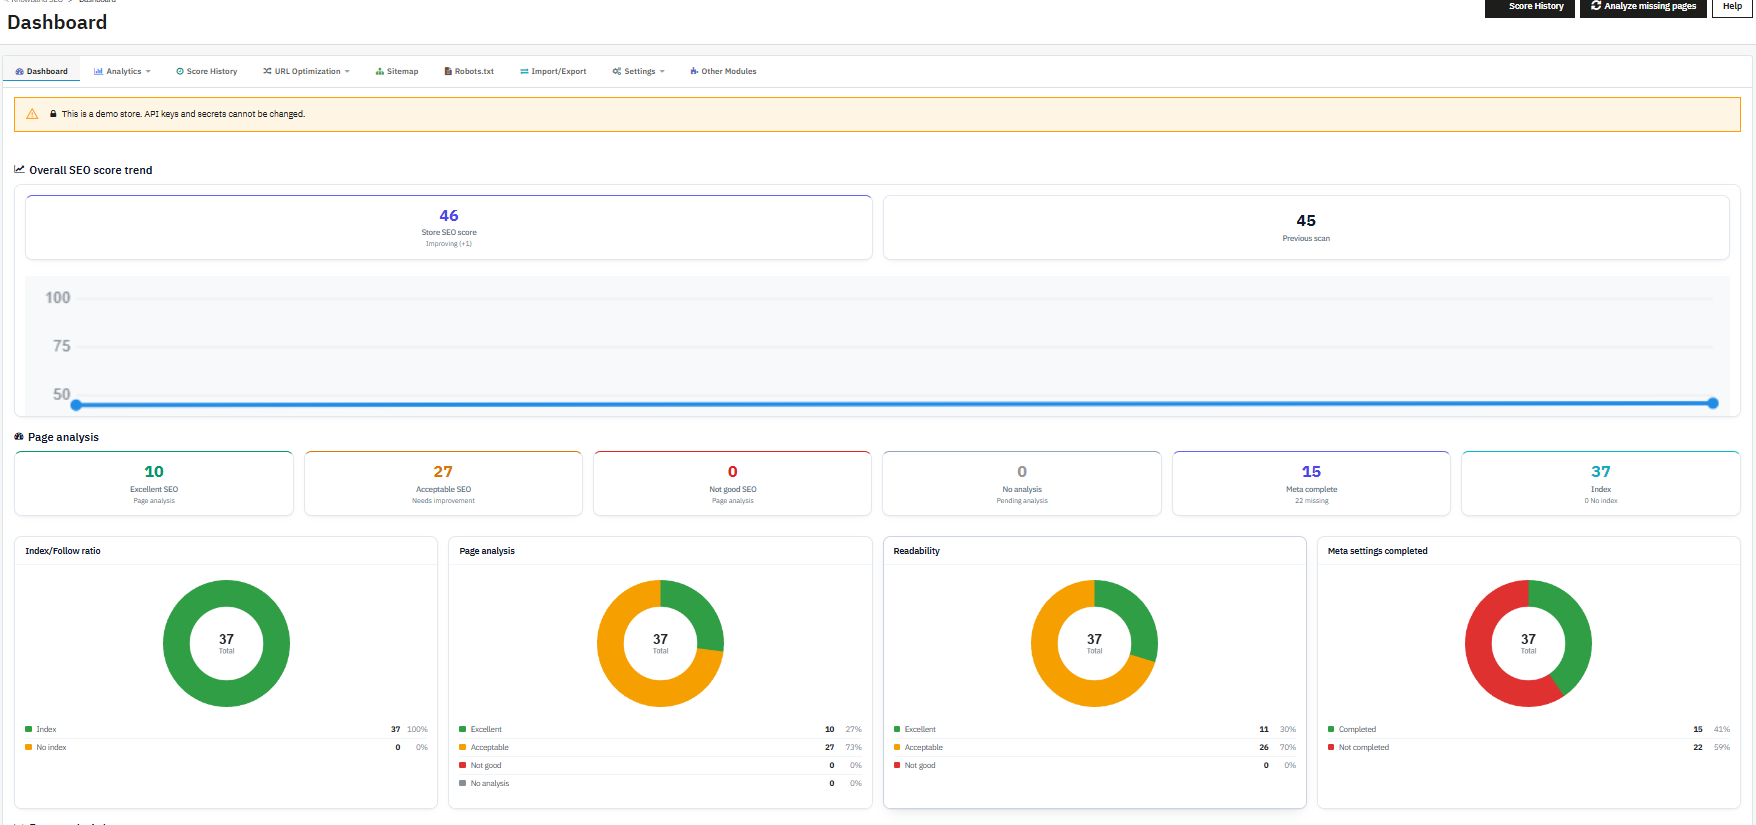
The Dashboard provides an overview of your store’s current SEO health.

Top Actions

  • History button: Will immediately redirect you to the page of historical trends
  • Analyse missing pages button: Prestashop SEO Audit Module performs the batch analysis for all products, categories, information pages, manufacturers, suppliers, which do not yet have the stored SEO score.

Panel of Overall SEO score trend

  • Store SEO score: The current overall score of the store (for instance, 46), which is derived by the score of each analysed page. This is the one figure to follow every week.
  • Label improving/declining/no change: Appears right beside the Store SEO score (for instance, “Improving (+1)”). It will instantly show you the direction of the change of the SEO of your store.
  • Score of previous scan: The score of the store from the last snapshot.
  • Trend graph: The line graph showing Store SEO score by recent snapshots.

Page analysis cards

  • Excellent SEO: Count of analysed pages that pass nearly all audit rules. A rising number here means more of the catalogue is fully optimised.
  • Acceptable SEO (Needs improvement): Count of pages that are functional but have room to improve; this is usually the largest bucket in a growing catalogue.
  • Not good SEO: Count of pages failing most audit rules and needing priority attention.
  • No analysis (Pending analysis): Count of pages that have never been scored. A non-zero number here is a signal to run Analyse missing pages.
  • Meta complete/missing: How many pages have both a meta title and meta description filled in, and how many are still missing one or both. Missing metadata is one of the fastest, highest-value fixes available.
  • Index / No index: How many analysed pages are set to be indexed by search engines versus deliberately excluded. A high No index count on pages that should be visible is worth investigating.

Donut charts

  • Index/Follow ratio: Shows the proportion of analysed pages set to Index versus No index, so you can confirm important pages are not accidentally hidden from search engines.
  • Page analysis: Breaks the same Excellent/Acceptable/Not good/No analysis buckets down as percentages of the total analysed catalogue.
  • Readability: Shows the same breakdown for the Readability score specifically, separate from the SEO Audit score.
  • Meta settings completed: Shows what percentage of pages have finished meta title and description setup versus still needing attention.

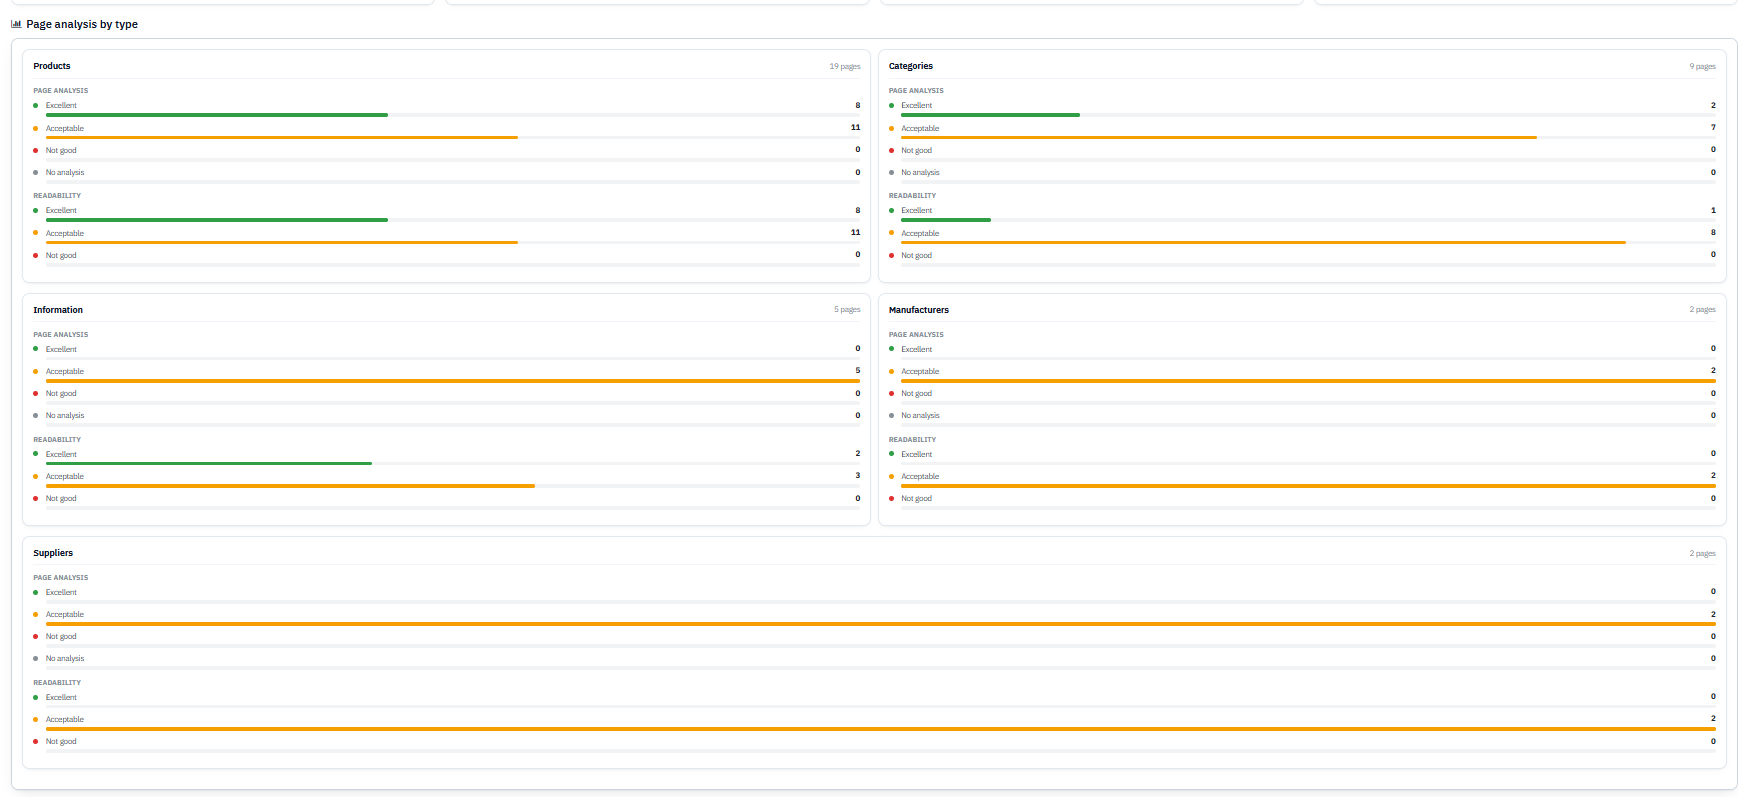
Page analysis by type

The above pattern, repeated for each entity type (Products, Categories, Information, Manufacturers, Suppliers), with each displaying the number of pages belonging to this category and their respective Page Analysis (Excellent/Acceptable/Not good/No analysis) and Readability (Excellent/Acceptable/Not good) statistics. For example, the above illustrates the relatively poor performance of Categories compared to Products in terms of readability.

SEO checklist

A list of ten store-level requirements, each shown as Completed or Not completed with an action button:

  • SEO URLs enabled: Confirms PrestaShop’s own friendly URL setting is active, a prerequisite for clean, readable page addresses.
  • SSL enabled: Confirms the storefront is served over HTTPS, which search engines treat as a baseline trust signal.
  • XML sitemap enabled: Confirms the module’s XML sitemap output is switched on.
  • Robots.txt exists: Confirms a robots.txt file is present and reachable at the storefront.
  • Maintenance mode is off: Confirms the store is not accidentally left in maintenance mode, which would block all crawling and all visitors.
  • Webmaster verification configured: Confirms a Google or Bing verification code has been entered under Settings
  • URL redirects enabled: Confirms the redirect engine is active, so any redirects you create actually take effect on the storefront.
  • RSS enabled: Confirms the RSS feed output is switched on.
  • Knowband Blog: Indicates whether the companion Knowband Blog module is installed; shown with a Buy button when it is not, since blog SEO features only appear once that module is present.
  • LLMs.txt available: Indicates whether an llms.txt file, used to describe the site to AI crawlers, is available

4.2 Analytics

The Analytics section connects Prestashop SEO Audit Module to Google Analytics 4, Google Search Console, and PageSpeed Insights, and is organized into an overview page, three data-source reports, and a Settings page.

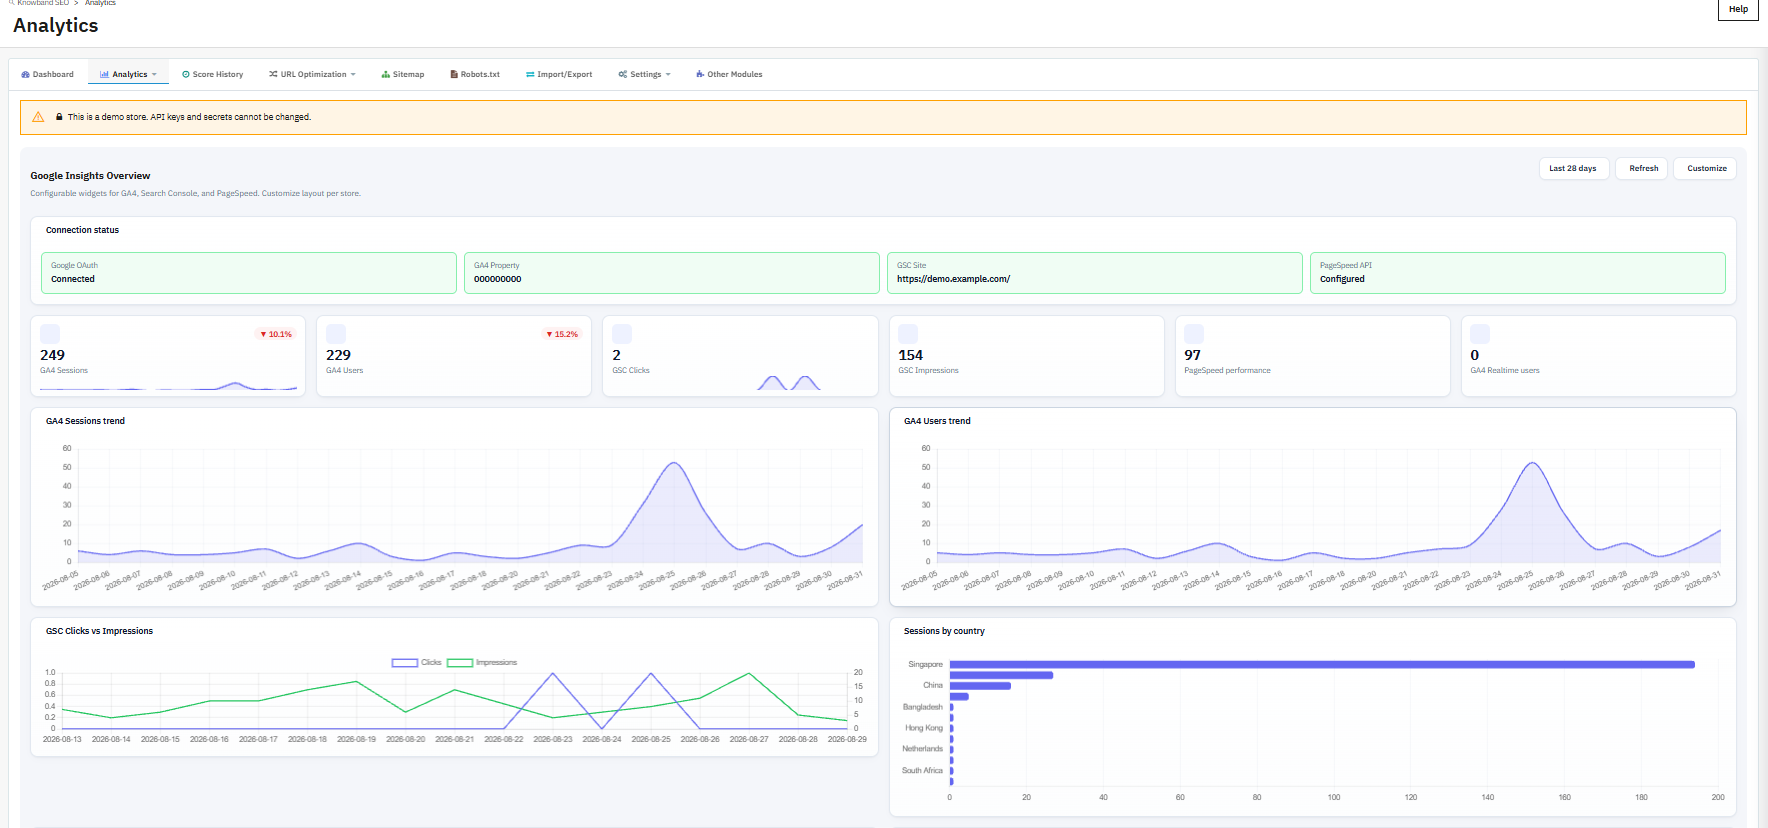
4.2.1 Analytics overview (Google Insights Overview) in Prestashop SEO Audit Module

  • Period selector (for example, Last 28 days): Sets the reporting window used across all the summary cards and charts on this page.
  • Refresh button: Reloads the widgets with the latest data from Google without leaving the page.
  • Customise button: Opens the widget library so you can control which cards appear.
  • Connection status panel: Shows four indicators at a glance: Google OAuth (Connected or not), GA4 Property (the connected property ID), GSC Site (the connected Search Console property URL), and PageSpeed API (Configured or not). This is the fastest way to confirm the integration is actually working before trusting any numbers below it.
  • GA4 Sessions card: Total GA4 sessions for the period, with a percentage change versus the prior period.
  • GA4 Users card: Total GA4 users for the period, with a percentage change.
  • GSC Clicks card: Total Search Console clicks for the period.
  • GSC Impressions card: Total Search Console impressions for the period, with a percentage change.
  • PageSpeed performance card: The most recent PageSpeed performance score.
  • GA4 Realtime users card: Users active on the storefront in the last 30 minutes.
  • Trend lines for GA4 Sessions / Trend line for GA4 Users charts: Daily line graphs for GA4’s top metrics.
  • Chart for GSC Clicks vs Impressions: Shows both clicks and impressions on the same chart to see if there is conversion of the impression numbers into clicks.
  • Sessions by Country chart: Bar graph of sessions by visitor country, helpful in seeing if traffic is matching up with target market.
  • Table for Top Search Queries: List of Search Console queries that generate traffic, with Clicks, Impressions, CTR, and Position columns.
  • Trend line for PageSpeed Score history chart: Graph that tracks the history of PageSpeed scores – easy to see the impact of a theme or content change in a regression.

4.2.2 How to check GA4 report  for Prestashops store

  • Period dropdown: Chooses the reporting window (for example, Last 28 days).
  • Compare to previous period checkbox: Check to compare the current data to that of the previous period
  • Total users / Active users / New users: Default GA4 audience measures – reach, active visitors and new visitors, respectively.
  • Sessions: Total number of visits.
  • Engaged sessions: Number of sessions that passed GA4’s engagement criterion (interaction beyond immediate bounce).
  • Views: Total number of page views during the period.
  • Views / Session: Average pages viewed per session, i.e. how deep the visitor is exploring the site.
  • Avg. session duration: Average time spent per visit.
  • Engagement rate / Bounce rate: % of engaged sessions / % of bounces (these two are in inverse correlation and should be watched together).
  • Events: Total number of tracked GA4 events during the period.
  • Realtime panel (Active users, By country, By device, By page): Who is on the website right now and where are they from, helpful for validating traffic driven by campaigns/promotions.
  • Traffic over time graph (Sessions/Users/Views checkboxes): Combined graph that allows to show/hide sessions/users/views.
  • Sessions by hour of day graph: Sessions distribution by hour of the day, allowing to determine most active hours, good for scheduling promotions or maintenance.
  • Dimension tabs (Pages, Landing pages, Channels, Source/medium, Campaigns, Countries, Cities, Devices, Browsers, Operating systems, Languages, New vs returning, Events, Key events): Tabs with Sessions, Users, and Views data segmented by the corresponding dimension, allows to ask very specific questions such as “which landing page performs better” or “which traffic channel performs better”.

4.2.3 How to Analyse the Google Search Console report

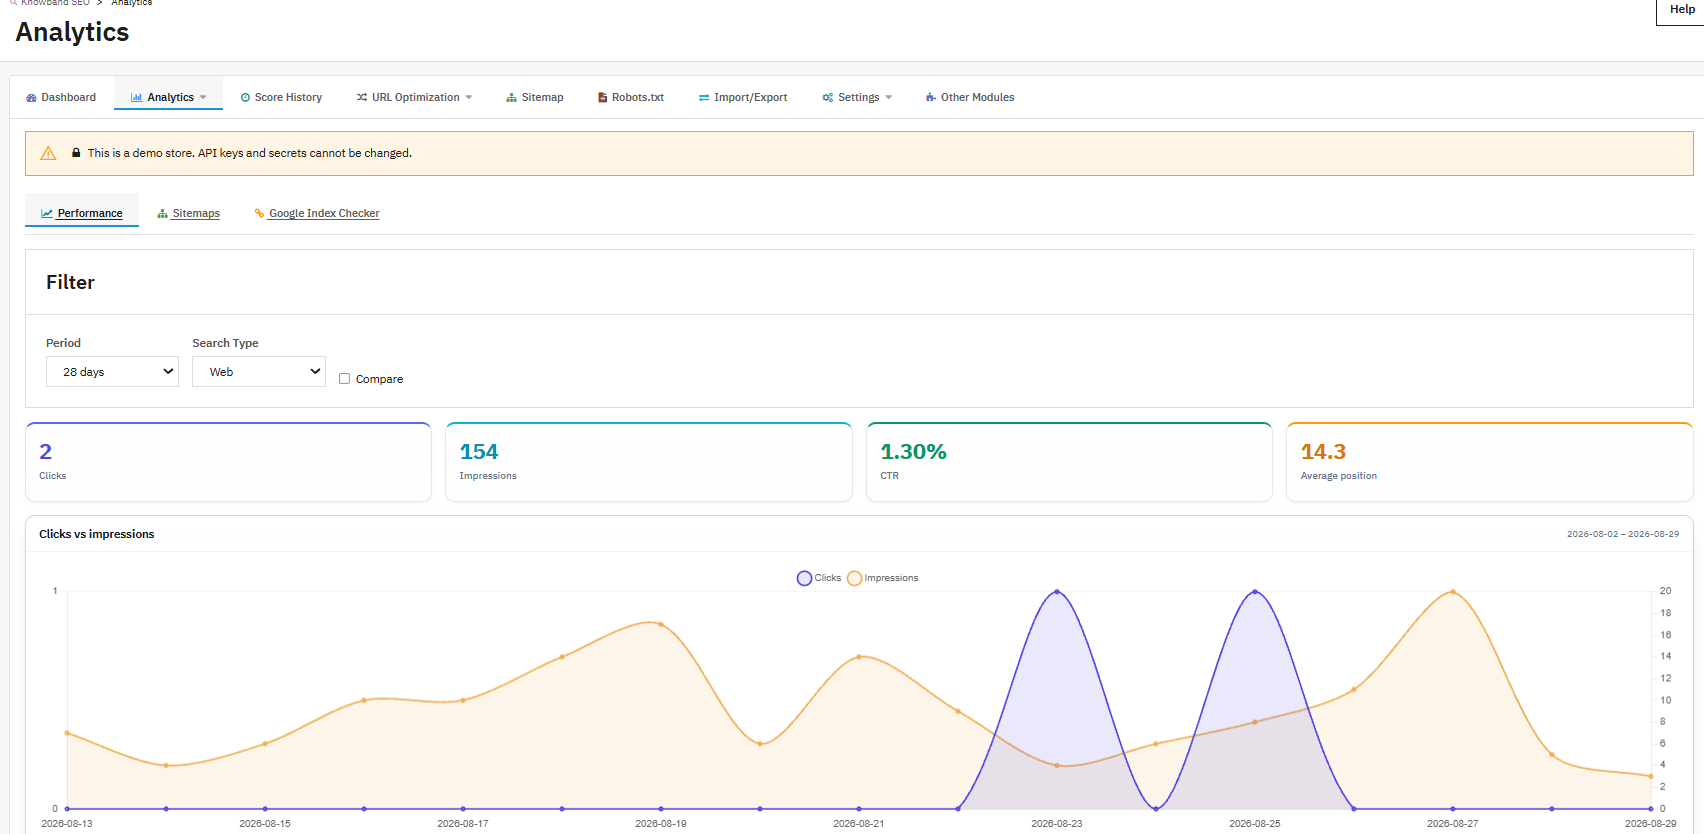
  • Period dropdown: Sets reporting period (e.g. 28 days).
  • Search Type dropdown (Web, Image, Video, News, Discover, googleNews): Allows filtering the report to specific type of Google search result.
  • Compare checkbox: Allows comparing the current data with the previous period when checked.
  • Clicks card: Total number of clicks to your storefront from Google search results.
  • Impressions card: Total number of impressions in Google search results, including unclicked results.
  • CTR card: Click-through rate, % of impressions that converted into clicks.
  • Average position card: The average ranking position of your pages for the queries that triggered them; a lower number is better.
  • Comparison of clicks and impressions graph: Displays the relationship between these two measures to determine if the rate of visibility is rising or falling in comparison to clicks.
  • Queries/Pages/Countries/Devices/Search Appearance tabs: All these allow you to break down the Clicks, Impressions, CTR, and Positions by these parameters to determine, for instance, what query results in the largest number of clicks or what country has the highest impressions.
  • Sitemaps sub-tab: Manages sitemap URLs without leaving Search Console/

4.2.4 PageSpeed report

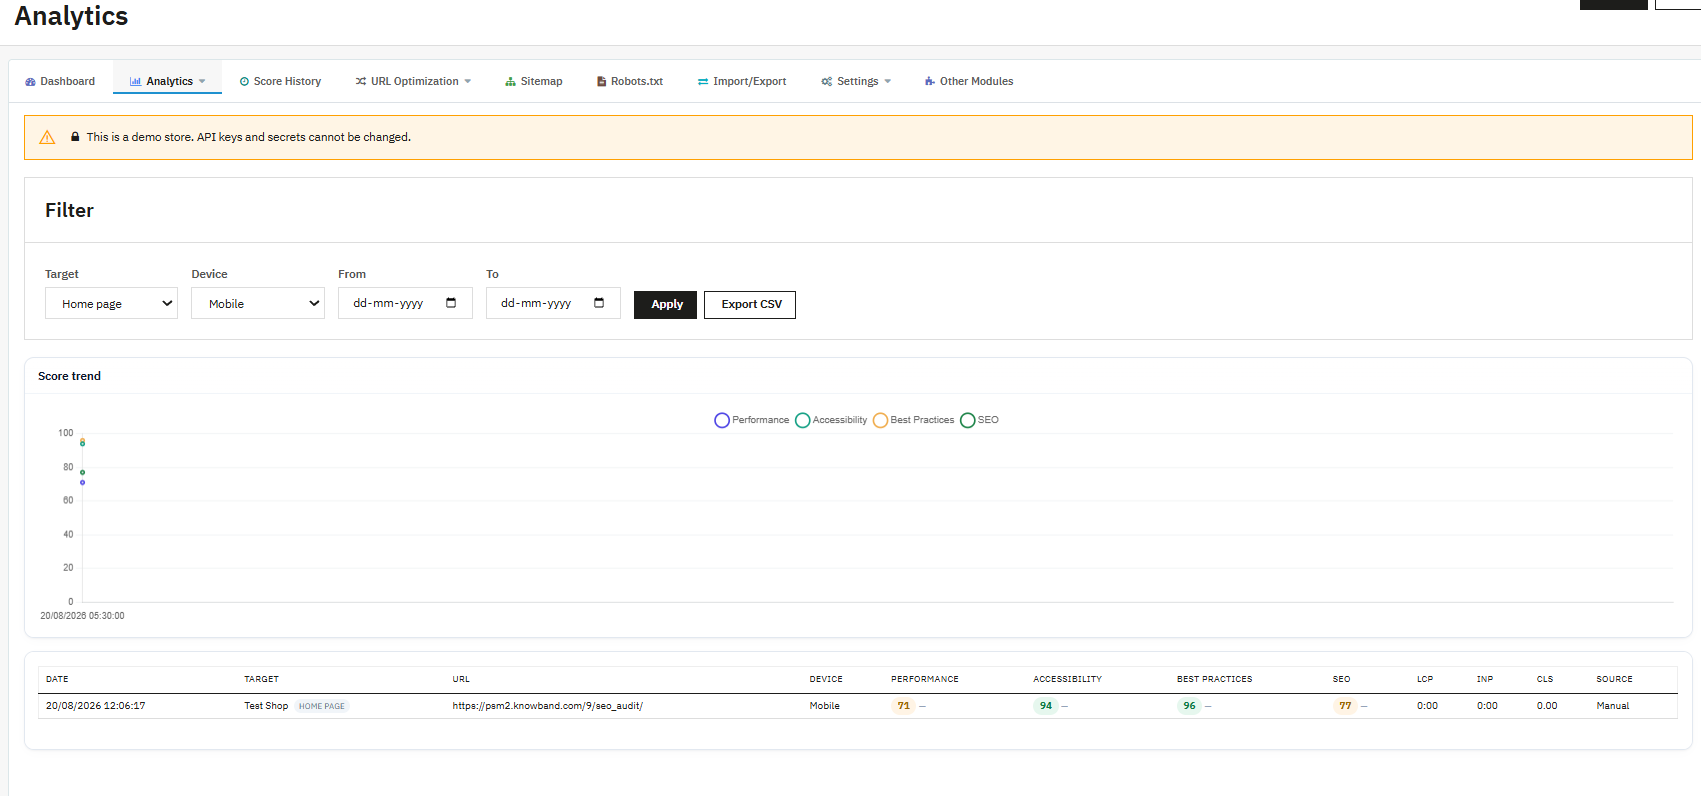
  • Run button: Starts a new PageSpeed test against the selected target.
  • Target dropdown (Home page, Category, Product, Custom URL): Chooses which page type to test.
  • Device dropdown (Mobile, Desktop): Chooses which device profile to filter the history table by; a full Run tests both automatically.
  • From / To date fields: Restrict the history table to a specific date range.
  • Apply Button: Applies the applied filters to the History Table that follows.
  • Export to CSV Button: This exports the filtered history data in CSV format so that it can be analyzed later on
  • Score Trend Graph (Performance, Accessibility, Best Practices, SEO): This is the graph where all the four PageSpeed scores will be plotted throughout time, and this will help you to know whether there are any improvements or deterioration in the PageSpeed score since the latest modifications.
  • History Table Fields: Date (Test date), Target (Type of web page tested), URL (URL tested), Device (Mobile/Desktop), Performance/Accessibility/Best Practices/SEO (PageSpeed Score), LCP/INP/CLS (Core Web Vitals field/lab), and Source (Manual/Cron).4.2.5 Analytics Settings (Analytics Settings)

General Setting Configuration

  • Analytics Status: Enables or disables Analytics data collection and dashboards store-wide. Nothing in the Analytics section works until this is Enabled.
  • Default Period (days): The default reporting window, in days, used by dashboard widgets when no other period is selected (for example, 28).
  • API Cache TTL (minutes): How long API responses are cached before the module requests fresh data again. A higher value reduces API usage but delays how quickly new data appears; a lower value shows fresher data but calls the Google APIs more often.
  • Search Console Data Lag (days): Search Console data is delayed by Google itself, so this setting tells the module to skip the most recent N days when querying, avoiding incomplete or misleading recent-day figures.
  • History Retention (days): How many days of PageSpeed history to keep before older rows are automatically pruned, keeping the history table from growing indefinitely.

How to create Google Client Secret ID and Client ID for Google Analytics 4

  • PageSpeed API Key: Your Google PageSpeed Insights API key from Google Cloud, required for the PageSpeed report and scheduled checks to run at all.
  • Google OAuth Client ID: The OAuth 2.0 Client ID from your Google Cloud credentials, used to authorize the module to read GA4 and Search Console data on your behalf.
  • Google OAuth Client Secret: The matching OAuth 2.0 Client Secret. Both this and the Client ID must be saved before the Connect with Google button becomes usable.
  • Connected indicator and Disconnect Google button: Shows whether the module currently has an active Google connection, and lets you revoke stored access, refresh, and expiry tokens if you need to reconnect or switch Google accounts.

Properties (Store)

  • Search Console Property: The Search Console property URL used for this specific store; select one from the loaded list or enter it manually if the list fails to load. A refresh icon reloads the list of properties your connected Google account has access to.
  • GA4 Property: The GA4 property ID used for this store, selected from the loaded list or entered manually, with the same refresh option.
  • PageSpeed Test URL: The default URL tested when no other target is specified; if left blank, the store’s home URL is used instead.
  • Custom Test URL: An optional additional URL, used only when Custom URL is selected as a PageSpeed Cron target.

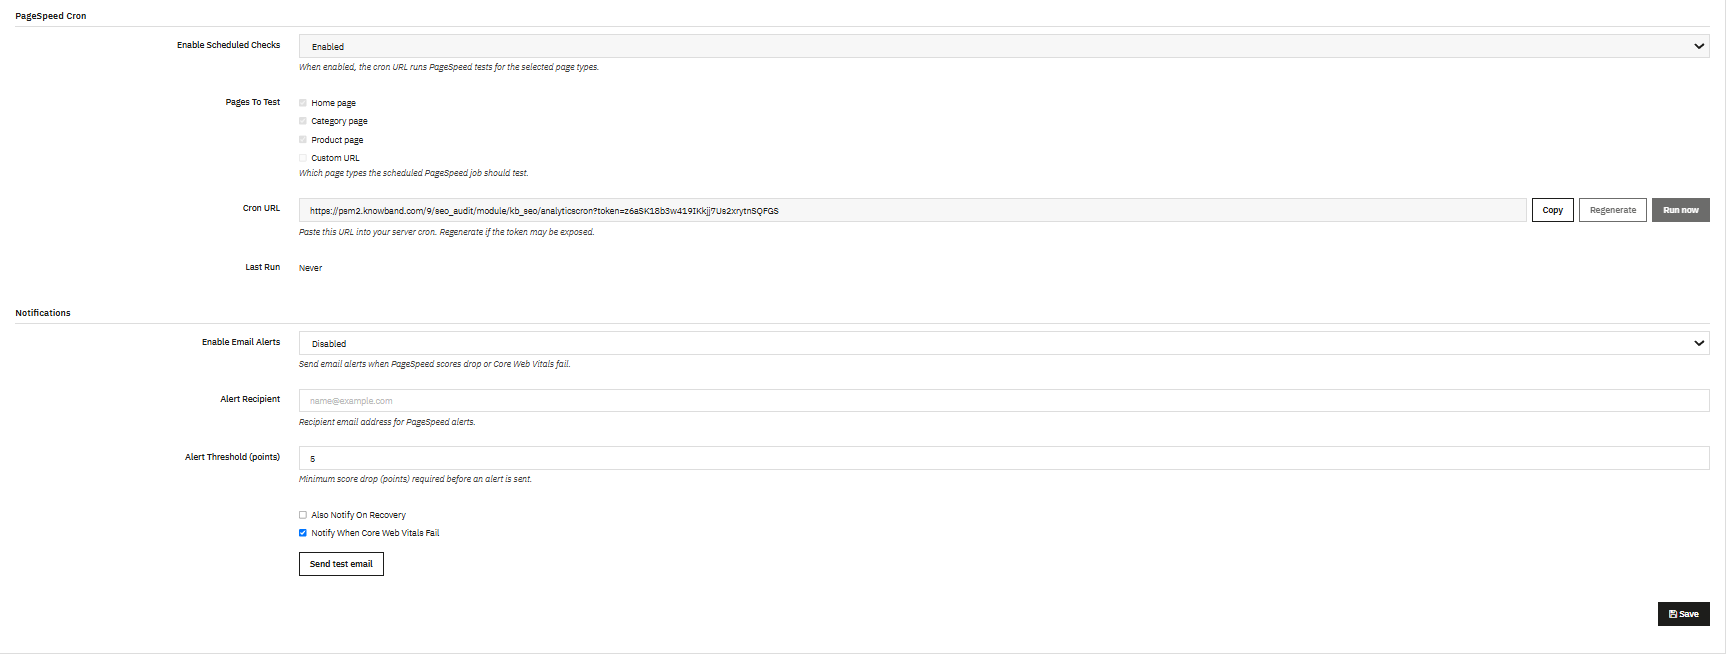
PageSpeed Cron

  • Enable Scheduled Checks: Turns on automatic, scheduled PageSpeed testing rather than relying on manual Run clicks.
  • Pages To Test (Home page, Category page, Product page, Custom URL checkboxes): Chooses which page types the scheduled job actually tests each time it runs.
  • Cron URL, Copy button, Regenerate button, Run now button: A unique, tokenized URL to paste into your server’s scheduled task system so PageSpeed tests run automatically on a timer. Copy grabs the URL, Regenerate invalidates the old token and issues a new one (useful if the URL was ever exposed), and Run now triggers the configured job immediately for testing.
  • Last Run: Shows the timestamp of the most recent scheduled run, or “Never” if the cron has not fired yet, which is a quick way to confirm your server scheduler is actually calling the URL.

Notifications

  • Enable Email Alerts: Turns on email notifications when PageSpeed scores drop or Core Web Vitals fail.
  • Alert Recipient: The email address that receives these alerts.
  • Alert Threshold (points): The minimum score drop, in points, required before an alert is triggered, preventing alerts from firing on minor, normal fluctuation.
  • Also Notify On Recovery checkbox: When enabled, sends a follow-up notification once a previously dropped score recovers.
  • Notify When Core Web Vitals Fail checkbox: Controls whether Core Web Vitals status changes specifically trigger their own alert.
  • Send test email button: Sends a sample alert to the configured recipient so you can confirm delivery before relying on real alerts.

4.3 Score History

  • Date from / Date to fields: Set the custom date range for every chart and table on the page.
  • Entity type dropdown (All, Products, Categories, and so on): Restricts the history shown to a single page type, useful for isolating whether one part of the catalog is improving or declining.
  • Filter button: Applies the selected date range and entity type.
  • Store SEO score card: The current store-wide score with its trend label (Improving, Declining, or No change).
  • Previous scan card: The score from the prior snapshot, for direct comparison.
  • Excellent / Acceptable / Not good cards: Counts of analyzed pages in each quality band for the selected filters.
  • Total issues card (with new/resolved counts): The total number of failing audit rules across all analyzed pages, plus how many are new and how many were resolved within the selected window (for example, over the last 7 days).
  • Overall SEO score trend chart and Date/Score/Change table: A visual and tabular record of every stored snapshot, showing exactly how the store score has moved over time.
  • SEO issues trend chart (New issues, Resolved issues, Open issues): Tracks how the total number of failing rules is changing, separate from the single score number, which can hide a rising issue count even while the overall score looks stable.
  • Product SEO score trend / Category SEO score trend charts: The same trend view scoped specifically to products and to categories.
  • Top improved entities / Top declined entities panels: Lists the specific pages that moved the most in either direction between snapshots, so you can investigate what changed on a page that suddenly improved or dropped.
  • Snapshot A / Snapshot B dropdowns and Compare snapshots button: Pick any two stored snapshots and generate a direct comparison table (ID, Date, Score, Change, Entities, Source, Version), useful for measuring the exact effect of a specific batch of changes, such as a redirect cleanup or a ChatGPT content pass.

4.4 URL Optimisation in Prestashop

4.4.1 Pretty URLs

  • Settings / Structure sub-tabs: Settings holds the on/off switch described below; Structure defines the actual URL patterns applied when Pretty URLs is enabled.
  • Enable Pretty URLs dropdown: Turns the feature on or off. When enabled, the module rewrites default PrestaShop URL patterns into cleaner, more readable versions.
  • Reset to PrestaShop defaults button: Restores the store’s original URL routing, useful if you want to fully undo Pretty URLs rather than simply disabling the toggle.
  • Save button: Applies changes made on this page.
  • The page’s own notes clarify that patterns which include an ID use PrestaShop’s own SEO routes, ID-less patterns use the module’s router, disabling the feature restores previous SEO routes from backup when one exists, and automatic redirects for Pretty URL changes only apply while the separate Redirects feature is also enabled.

4.4.2 How to fix 404 URLs in Prestashop

  • ID column: The internal record number for the 404 hit.
  • URL column: The exact storefront path that returned a 404.
  • Referer column: The page or external site the visitor came from before hitting the broken URL, useful for tracing where a bad link lives.
  • Visits column: How many times that specific URL has been hit, letting you prioritize the most frequently broken links first.
  • Last visited column: The timestamp of the most recent hit, useful for telling a stale one-off request apart from an ongoing problem.
  • Delete button (per row): Removes that recorded hit from the monitor once it has been reviewed or resolved.
  • Search filters (ID, URL, Referer, date range) and Search button: Narrow the list down to a specific URL pattern or time window.
  • Bulk actions button: Applies an action to multiple selected rows at once rather than one at a time.

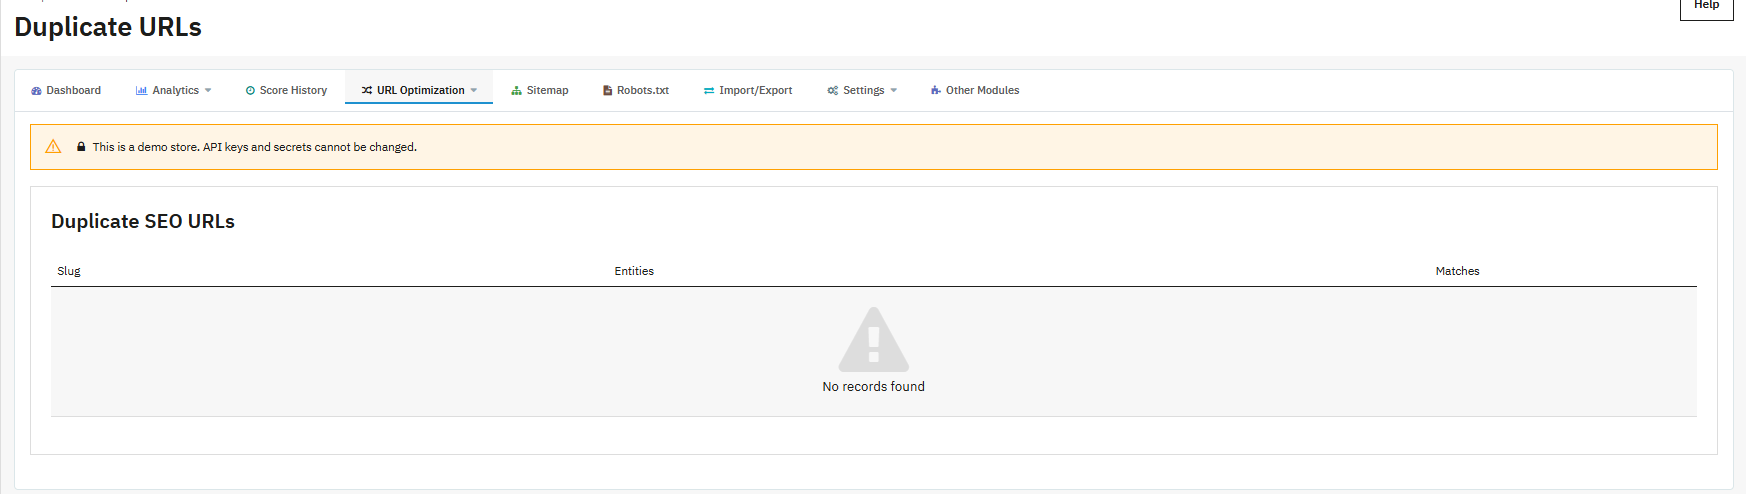
4.4.3 How to detect Duplicate URLs (Duplicate SEO URLs) in Prestashop

  • Slug column: The specific friendly URL segment that is colliding across more than one page.
  • Entities column: Lists which pages (products, categories, CMS pages, manufacturers) share that slug.
  • Matches column: The number of pages involved in that particular collision.
  • Update action: Opens the group so you can change the friendly URL on the pages that need to become unique, then save to apply the fix.
  • When the store has no collisions, the page simply shows “No records found.”

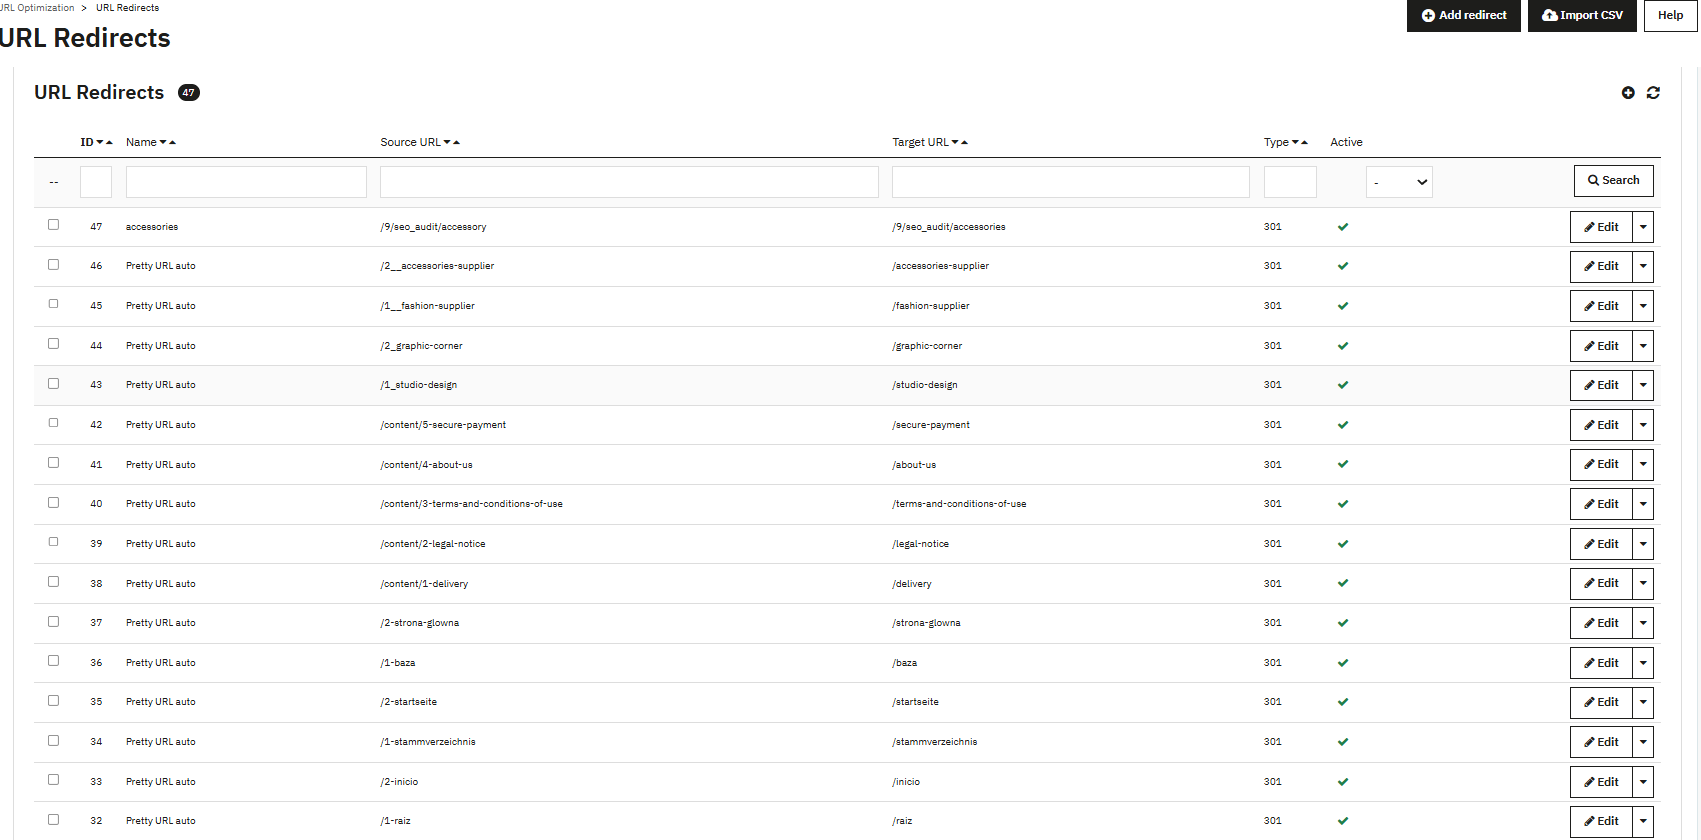
4.4.4 How to add 301, 302, 303 redirects to URLs in Prestashop using Prestashop SEO Audit Module

  • Add redirect button: Opens a blank form to create a new redirect.

  • Import CSV button: Uploads many redirects at once from a CSV file instead of adding them individually.
  • Redirect count badge: Shows the total number of redirects currently stored for the shop.
  • ID column: The internal record number.
  • Name column: A label you assign for your own reference; it does not affect redirect behavior.
  • Source URL column: The old or broken URL that visitors and crawlers currently request.
  • Target URL column: The URL they are sent to instead.
  • Type column: The redirect type in use (301, 302, 303, or 404).
  • Active column: Whether the redirect is currently enforced on the storefront.
  • Edit button (per row): Opens the redirect for editing.
  • Search filters (ID, Name, Source URL, Target URL, Type, Active) and Search button: Narrow the list down when it grows large.
  • Individual redirect form fields: Name (your internal label), Source URL (required; the old path), Target URL (required; must be a relative path or a full http/https URL), Redirect type (301 for a permanent move, 302 for a temporary one, 303 for specific post-form-submission cases, or 404 to explicitly mark a URL as not redirected), and Status (active or inactive, active by default).

4.5 How to Edit Sitemap.xml in Prestashop

4.5.1 XML Sitemap

  • Enable XML sitemap dropdown: Turns the XML sitemap output on or off.
  • Sitemap URL display: Shows the live, public sitemap URL once enabled, ready to copy into Search Console.
  • Language sitemap URLs list: For stores with more than one active language, shows a separate sitemap URL per language, each of which should be submitted individually.
  • Enable RSS dropdown: Turns the RSS feed output on or off, independent of the sitemap.
  • RSS URL display: Shows the live RSS feed URL once enabled.
  • Include in sitemap checkboxes (Products, Categories, Information, Manufacturers, Suppliers): Chooses which entity types are listed in the sitemap; all five are checked by default.
  • Product limit (0 = all) field: Caps how many products are included in the sitemap; set to 0 to include every product regardless of catalog size.
  • Priority dropdowns (per entity type, for example Product Priority 0.8, Category Priority 0.7): A relative-importance hint passed to crawlers for that page type. As the page itself notes, this is a hint, not a ranking guarantee.
  • Change frequency dropdowns (per entity type, defaulting to Daily): Tells crawlers how often that page type typically changes, helping them plan how often to revisit it.
  • Save button: Applies all sitemap settings on this page.
  • An info banner also explains the recommended cron setup: submit the sitemap URL (or each language URL) in Google Search Console and Bing Webmaster Tools, then schedule the shown cron URL once a day at midnight so Google is automatically pinged after catalog changes.

4.5.2 HTML Sitemap

  • Enable HTML sitemap dropdown: Turns on a storefront page that lists important links for human visitors, separate from the XML sitemap built for crawlers.
  • Sitemap page URL display: Shows the live URL of that visitor-facing page once enabled.
  • Include pages checkboxes (Home page, Product pages, Categories, Information, Brands, New products, Special (Price drop), Best sellers, Popular): Chooses which page groups are linked from the HTML sitemap.
  • Custom URLs (Label and URL fields, delete icon, Add custom URL button): Lets you manually add extra links, such as an off-catalog landing page, that would not otherwise appear in the automatic groups.
  • Save button: Applies the HTML sitemap configuration.

4.6  How to edit Social OpenGraph Tags on Source Page 

  • Facebook Open Graph toggle: Enables Open Graph metadata (used by Facebook and many other platforms) on storefront pages so shared links show a proper title, description, and image.
  • Twitter cards toggle: Enables Twitter-specific card metadata on storefront pages.
  • Twitter card type dropdown (default summary_large_image): Chooses the visual layout used when a page is shared on Twitter/X.
  • Site name field: The name shown alongside shared links, typically your store’s brand name.
  • Site type dropdown (default Organization): Describes the nature of the site in structured data terms.
  • Facebook URL, Twitter URL, Instagram URL, LinkedIn URL, YouTube URL, Pinterest URL fields: Your store’s profile links on each platform, used to connect your storefront to your official social presence in structured data.
  • Save button: Applies all Social Cards settings.

4.7 How ChatGPT helps in Generating Content in Prestashop 

  • Enable ChatGPT toggle (default Disabled): Turns the AI content assistant on for the product and category SEO panels and for the Import/Export bulk workflow.
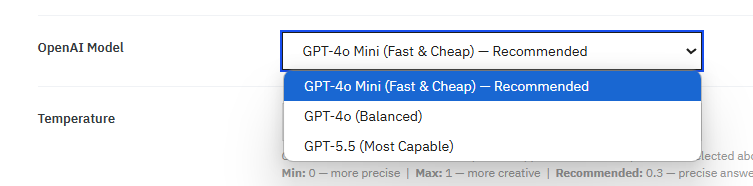
  • ChatGPT model dropdown (options include GPT-4o, GPT-4o mini, GPT-4 Turbo, GPT-4, and GPT-3.5 Turbo, default GPT-3.5 Turbo): Chooses which OpenAI model generates content; more capable models generally produce stronger output at a higher cost per request.
  • ChatGPT API token field: Your OpenAI API key, which the module needs to make generation requests on your behalf.
  • Save button: Stores the enabled state, model choice, and token.
  • Test API key button: Calls OpenAI directly to confirm the token and model actually work, before you rely on them inside a product panel.
  • A promotional banner on this and related pages also points to a separate Knowband add-on, the Knowband AI Content Generator (supporting Gemini and ChatGPT for product content and translation), which is a distinct product from this built-in ChatGPT tab and is outside the scope of this manual.

4.8 What is Robots.txt and How to edit it using Knowband’s Prestashop robots.txt editor

  • Public URL display: Shows the live, public web address of the robots.txt file, useful for confirming what crawlers actually see after saving.
  • File path display: Shows the exact server file path being written to, useful for troubleshooting with your hosting provider if saves fail.
  • Writable warning: Appears automatically if the server file cannot currently be written to, telling you to fix permissions on the shop root, or create a writable robots.txt file, before your changes will take effect.
  • Robots content textarea: The actual directives that will be published, defaulting to a permissive configuration:

 User-agent: *

  Allow: /

  • Save button: Publishes the entered directives to the live, public robots.txt file immediately.

4.9 How to Update the content of the Products in Bulk

  • Goal info box: Summarizes the intended three-step workflow: export as an optional backup, enhance selected fields with ChatGPT, then import the result.
  • Row count display (for example, “114 product/language row(s) available”): Shows exactly how many rows will be included in an export before you run it.
  • Exported fields list: Documents every field the export will contain: product, language, and store identifiers, name, meta title, meta description, meta keywords, tags, SEO URL, description and excerpt, focus keyphrase, minor keyphrases, allow search and allow follow link directives, advanced robots meta, canonical URL, SEO score, readability score, score analysis, content analysis, social title, social description, social image, and rating snippet fields (enable, average rating, best rating, worst rating, rating count).
  • Export button: Downloads the full JSON file described above.
  • Choose file control (Import panel): Selects a JSON file from your computer to upload.
  • Import button: Applies the selected file’s SEO fields, keyphrases, social data, and rating data to the matching products; only .json files are accepted.
  • ChatGPT enhance (SEO + readability) field checkboxes (Meta title, Meta description, Meta keywords, Focus keyphrase, Minor keyphrases, SEO URL, Social title, Social description, Tags, Description): Chooses exactly which fields the bulk ChatGPT pass should regenerate.
  • All products option / Max products field: Either processes the entire catalog, or limits the run to a specific whole number of products, useful for testing quality on a small batch first.
  • This panel stays disabled, with a message and a ChatGPT settings link, until ChatGPT is enabled and a token is saved under the ChatGPT tab.

4.10 General Settings for all the configuration in Prestashop SEO Audit Manager

General

  • Status toggle: The master switch for the entire module’s storefront behavior, including meta output, redirects, panels, and list scores. Nothing else works while this is off.
  • Enable SEO analysis toggle: Turns on SEO score cards, the SEO Audit sub-tab, and SEO columns on catalog list pages.
  • Enable readability analysis toggle: Turns on the readability scoring shown alongside the SEO score.
  • Enable auto analysis on edit toggle: When enabled, pages are automatically re-analyzed whenever they are saved, so scores stay current without a manual re-run.
  • Record 404 requests toggle: Turns on the 404 Monitor’s data collection.
  • Enable URL redirects toggle: Turns on redirect matching for storefront visitors; without this, entries in URL Redirects are stored but not actually applied.
  • Enable XML sitemap toggle: Turns on the XML sitemap output described in Section 4.5.
  • Enable RSS toggle: Turns on the RSS feed output.
  • Title separator field (default ” – “): The character or characters inserted between parts of a generated meta title, such as between the product name and the shop name.
  • Show products / categories / manufacturers / suppliers / CMS pages in search by default toggles: Sets the default index behavior for each entity type when an individual page has no override of its own; enabled by default for all five.

Meta templates

  • Product / Category / CMS / Brand / Supplier meta title template fields: The pattern used to build a meta title automatically when a page’s own meta title is empty, or when Force template is enabled for that type. Each supports shortcodes such as {product_name}, {category_name}, {cms_title}, {brand}, {supplier_name}, {shop_name}, and {title_separator}.
  • Product / Category / CMS / Brand / Supplier meta description template fields: The same idea applied to meta descriptions; these are blank by default, so no automatic description is generated unless you fill one in.
  • Force product / category / CMS / brand / supplier meta templates toggles: When enabled, the template is applied even if the page already has its own meta value, effectively overwriting it. When disabled (the default), the template only fills in genuinely empty values.

Cron and score history

  • Cron secure token field: A unique token used in the module’s cron URL; calling that URL with the correct token triggers a Store SEO score snapshot when score history is enabled. Leaving the field blank regenerates the token.
  • Enable SEO score history toggle: Turns on the snapshot system that powers the Score History page.
  • History retention dropdown (default Keep all history): Chooses whether old snapshots are kept indefinitely or pruned after a set period.
  • Retain history for (days) field (default 365): When retention is limited rather than set to keep everything, this sets how many days of history are preserved.
  • Automatic snapshot schedule dropdown (default Daily, midnight): Sets how often a new snapshot is taken automatically via the cron URL.

Search engine verification

  • Google verification code field: Paste your Google Search Console verification content value here if your site is not already verified another way, letting the module output it in the page header.
  • Bing verification code field: The same idea for Bing Webmaster Tools.

Save button: Applies every setting on the page in a single action.

5. Steps to Analyse On Page SEO for Product and Catogies Pages

Store owners can easily see the score of readability and SEO within Product , Categories and Brand Pages listing.

  • SEO Audit score circle (0 to 10): The page’s on-page SEO score, color-coded from red (low) through orange to green (strong) will be visible on the product listing pages using Prestashop SEO Audit Module
  • Readability score circle (0 to 10): The page’s readability score, scored and colored the same way but based on writing-style checks instead of structural checks.

  • Language selector: Switches the entire panel, including scores and every field below, to a different active store language, since each language is scored and edited independently.
  • AI Content Generator banner: Promotes the separate Knowband AI Content Generator add-on described in Section 4.7; it is not part of the scoring engine documented here.

Keyword & SERP sub-tab

  • Primary keyword field: The single main keyword this page is being optimized for; most of the primary-keyword checks in the SEO audit sub-tab read directly from this field, and several of them show “Not set” until it is filled in.

  • Supporting keywords field: A comma-separated list of additional, secondary phrases the page should also reflect where natural.
  • Search result preview panel: Simulates how the page’s title, URL, and meta description are likely to appear in a search result.
  • Desktop / Mobile toggle: Switches the preview between how it typically renders on a desktop search results page versus a mobile one, since mobile often truncates titles and descriptions more aggressively.
  • Title character count: Shown against a target of 60 characters, the general point at which titles start getting cut off in search results.
  • Description character count: Shown against a target of 160 characters, the equivalent limit for meta descriptions.

SEO audit sub-tab

Two columns, Page audit and Readability, each listing individual rules grouped under a Strong or Needs work heading. Every rule shows a numeric score, the rule name, a Result (what the page currently has), a Target (what it should have), and, for failing rules, a short tip. The verified rules visible in the panel are:

Page audit checks: Single H1; Image alt attributes; Supporting keyword in title, in description, in content, in subheading, in meta description, and in slug; Supporting keyword density (target 0.3 to 1.5 percent); Supporting keyword length (target up to 4 words); External links (target 1 to 3); Internal links; Text length (target at least 300 words); Primary keyword length (target up to 4 words); Primary keyword in meta title; Primary keyword in page title; Primary keyword in introduction (target: present in the opening roughly 150 characters); Primary keyword density (target 0.5 to 2.5 percent); SEO title width (target 30 to 60 characters); Meta description length (target 120 to 160 characters); Primary keyword in meta description; and Primary keyword in URL slug.

Readability checks: Sentence length (target 20 words or fewer per sentence); Flesch reading ease (target 60 or higher); Consecutive sentences; Passive voice (target roughly 10 percent or less of sentences); Minimum content length (target at least 300 words); Paragraph length (target at least 3 paragraphs); Subheading distribution (target at least 2 subheadings); and Transition words (target roughly 20 percent or more of sentences using connector words).


Indexing controls sub-tab

Covers whether the page is set to show in search results and whether links on the page should be followed by crawlers, along with any advanced robots directive or canonical URL override for that specific page and language.

Share preview sub-tab

Shows how the page will look when shared on social platforms, reflecting the Social Cards settings from Section 4.6 combined with any page-specific social title, description, and image you set here.

Star rating markup sub-tab

Available on products and categories, this controls whether a star rating snippet is generated for the page and, if so, the average rating and rating count values used to build it.

Score timeline sub-tab

Repeats the Current, Previous, Change, Highest, Lowest, Average, Trend, and Last analyzed figures, plus a history chart and table, that appear on the store-wide Score History page (Section 4.3), but scoped to this individual page only.

6. How to do a Complete SEO Audit in Prestashop 

Prestashop SEO Audit Module can run a PrestaShop SEO audit on products, categories, CMS pages, manufacturers, and suppliers, producing two separate 0 to 10 scores per page: an SEO Audit score covering structural checks such as keyword placement, meta length, alt text, and linking, and a Readability score covering sentence length, paragraph structure, passive voice, and transition words. A page can score well on one and poorly on the other.

A low score points to a specific, fixable gap rather than a vague quality problem, because every rule pairs a Result with a Target, as detailed field by field in Section 5. To act on it, open the page’s SEO Audit panel, work through Needs work items, and prioritize content quality (text length, primary keyword placement) before smaller technical checks like linking counts, which need editorial judgment rather than mechanical fixing.

None of these checks claim to be a direct Google ranking signal by themselves. They represent established on-page SEO and content-quality practices, things search engines and readers both respond well to, rather than guarantees of a specific ranking outcome.

7. Frequently Asked Questions

Question 1: I found several 404 URLs. How can I redirect them?
Open URL Optimisation> 404 URLs in the Knowband Prestatshop SEO Audit Module, find the entry, and use its Redirect action, which opens the URL Redirects form with the source URL prefilled. Add the target URL, choose a type (301 for a permanent change), and save. Only redirect when a genuinely relevant destination exists.

Question 2: How should I handle a URL that is no longer available?
If the content moved, add a 301 redirect from the old URL to the new one under URL Optimisation> URL Redirects. If nothing relevant replaces it, leaving it as a 404 is acceptable rather than forcing a redirect to an unrelated page.

Question 3: How can I improve a page with a low SEO score?
Open the page’s SEO Audit panel in Knowband’s Prestashop SEO Audit Manager and its SEO audit sub-tab, then work through the rules listed under Needs work using the Result and Target shown for each one.

Question 4: How to use ChatGPT to generate meta titles and descriptions?
You can use ChatGPT to generate meta title, description, social graph tags using the PrestaShop Complete SEO Module. Click on ChatGPT Tab, save a valid OpenAI token, then use the ChatGPT sub-tab inside a product or category SEO panel to generate, review, apply, and save.

Question 5: How can I check duplicate URLs?
Open URL Optimisation in the PrestaShop SEO Audit Addon and click on duplicate URLs. Colliding friendly URL slugs appear grouped by slug with affected entities listed, and each page’s URL can be updated to a unique value.

Question 6: How can I check my XML sitemap?
By using Knowband’s Prestashop Sitemap XML Editor, you can make changes in sitemap and submit it inside Google Search Console’s Sitemaps tool.

Question 7: Can I connect Google Search Console for my Prestashop website?
Now you can Google OAuth Client ID and Secret, click Connect with Google, then select your Search Console Property or enter its URL manually.

Question 8: Can I view Google Analytics data inside the module?
Yes. Once GA4 is connected and a property is selected, the Analytics section shows sessions, users, views, engagement, traffic trends, and dimension breakdowns without opening Google Analytics separately.

Question 9: How can I identify SEO issues on product or category pages?
Review Score History’s issue trends or open the page directly and check its SEO Audit panel, which surfaces the specific rules failing along with the target value needed to pass.

Question 10: Does the redirect tool support bulk changes?
Yes. Knowband’s Prestashop Redirection Module allow to import CSV on the URL Redirects page to add many redirects in one upload instead of creating them individually.

Question 11: Is ChatGPT-generated content published automatically?
No. Generated content is written into the selected field for review, and the administrator must check it and save the host form for it to take effect.

Question 12: What does the Search Console Data Lag setting actually do?
This setting tells the module to skip the most recent few days when pulling Search Console data, since Google itself delays that data; without this adjustment, the newest days in a report could appear artificially low.

Question 13: Why does my Cron URL matter if I never open it manually?
The Cron URL is meant to be called automatically by your server’s scheduled task system, not opened by hand. It is what actually triggers daily score snapshots, sitemap pings to Google, and scheduled PageSpeed checks, so it needs to be added to your server scheduler to keep those features running without manual effort.

The Prestashop SEO Audit Module integrates scoring, technical maintenance, and Google reporting in one module, making an SEO audit of PrestaShop not require the use of different modules for different processes. If you have faced any issue with this module, feel free to contact us at support@knowband.com.

PrestaShop Blog Manager – AI Content & SEO Optimisation | Complete User Manual

Prestashop Blog Manager is a complete PrestaShop Blog Module developed for e-merchants who want to add blogs to their stores. Instead of relying on a separate blogging platform, you can publish articles, guides, and news directly inside prestashop store, then link that content back to your products for stronger SEO and better engagement. In other words, this Prestashop Blog Module works as both a publishing tool and a PrestaShop Content Marketing Module, so your writing effort translates into real commercial value.
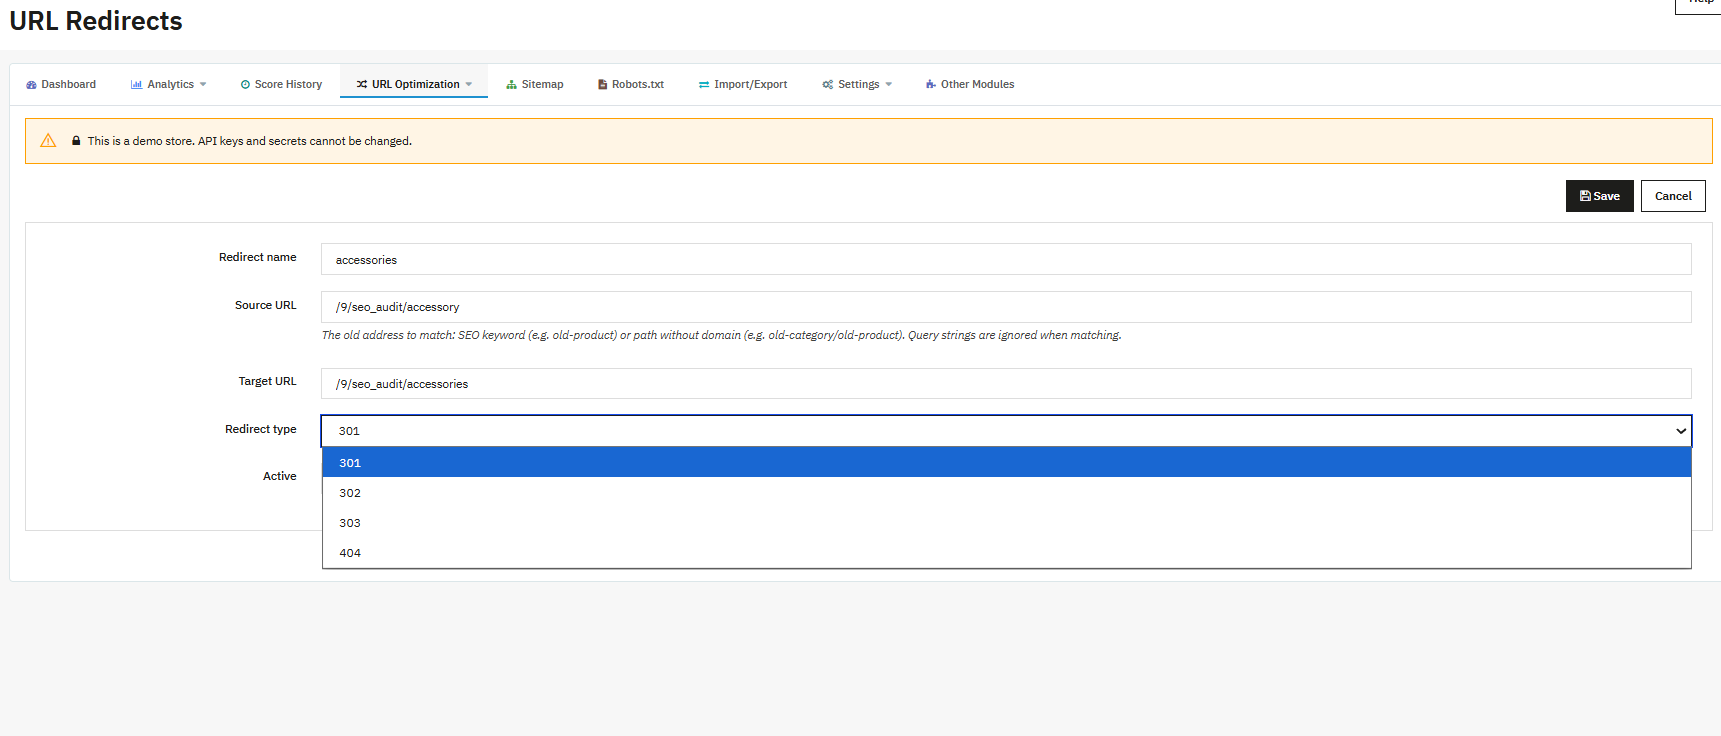
As a comprehensive PrestaShop Blog Module, this gives you:

  • Blogs management with rich text, gallery images, video or audio embeds, SEO fields, and related products links.
  • Integration of categories, flexible tags, and author profiles individually, keep your content well organized while improving search engine visibility and user navigation.
  • Reader comments with moderation, replies, star ratings, emoji reactions, likes, and bookmarks, all of which work together as a PrestaShop Blog Engagement Addons suite.
  • Built-in AI content generation and translations through ChatGPT or Google Gemini, which speeds up writing without compromising the blog content quality.
  • Bulk import from WordPress exports and RSS or Atom feeds, so migrating an existing blog takes minutes rather than days.
  • An XML sitemap, RSS feed, friendly URLs, and GDPR-ready hooks that keep your blog compliant and easy for search engines to crawl.
  • Full multistore and multilanguage support, since every setting can be scoped per shop and per language.

Altogether, these capabilities make Prestashop Blog Manager one of the most complete PrestaShop Blog Addons available on Prestashop Addons, whether your goal is search visibility, community building, or simply keeping customers on your site longer.

2. Installation and Uninstallation

  1. Upload the zipped file from the Upload Option in the module manager.
  2. In the Back Office, go to Modules > Module Manager, search for “KB Blog,” and click Install.
  3. Once installation is complete, you will see the configuration button on the page.
  4. Click on Configure; now you will be redirected to the general setting page of the Prestashop Blog Module

NOTE: Important: If the Clean Database on Uninstall setting (found under General Settings, then Maintenance) is set to Yes, all blog data, including posts, categories, and comments, will be permanently deleted. Therefore, leave this set to No if you plan to reinstall the module later and want to keep your content.

3. Admin Panel Overview of the Blog Manager Module

In this section, you are going to learn how to create blog, manage content on your website. This module also helps your website to rank higher.

Once installed, a dedicated Knowband Blog Module sections appears in the PrestaShop Back Office sidebar. This is the control centre for your PrestaShop Blog Module, and it includes the following sub-sections:

Dashboard – shows KPI summary and sample-data generator
General Settings – includes all global configuration for the module
Posts –Using posts, you will create and manage blog articles
Categories– Manage nested post categories for the listed blogs
Tags– Manage flat tag taxonomy per blogs
Authors – Manage author profiles for the blogs
Image Type – Define named image-size presets for blogs
Comments – Moderate reader comments
Sliders – Manage home-page slider slides
Banners – Manage zone-targeted promotional banners

SEO and Sitemap – Handles Sitemap and RSS settings, plus URL structure
AI – Configure AI content-generation providers
Import – Import from WordPress or RSS feeds

4. DASHBOARD


The Dashboard is the first screen you see when you open this PrestaShop Blog Manager Module, and it gives you a quick snapshot of how your blog is performing.

KPI Cards

Six KPI cards summarise your content at a glance. The Posts card shows the total number of posts, broken down into Published, Draft, and Scheduled sub-badges. The Categories card shows your total category count, and the Tags card shows your total tag count. The Authors card totals your author profiles, while the Image Types card totals your configured image-size presets. Finally, the Pending Comments card shows how many comments are still waiting for moderation, and it highlights in red whenever that number is greater than zero, so nothing slips through unnoticed.

Quick Action Buttons

Each KPI card includes a direct link button, such as Manage Posts or Manage Categories, so you can move from overview straight to action in a single click, without hunting through menus.

Sample Data Generator

If the Posts, Sliders, or Banners sections are still empty, a Create Sample Data button appears. Use this feature whenever you want to explore the module before writing real content. Clicking it automatically generates one sample author named Jane Doe, complete with a bio, three sample categories called News and Updates, Tips and Tutorials, and Product Highlights, and six sample tags: PrestaShop, E-Commerce, Marketing, SEO, Design, and Tutorial.

5. GENERAL SETTINGS

To configure the PrestaShop Blog Manager Module, navigate to KB Blog > General Settings.

Keep in mind that changes only take effect after you click the Save button at the bottom of the page. All General Settings fields are part of a single form, so even if you switch tabs before saving, clicking Save on any tab will save the changes made across all tabs.

Module Status
When disabled, the blog is completely hidden from the storefront, which is useful during setup, testing, or maintenance windows. Enable it to see the functionality of the module.

5.1 Listing and Display

This part of the settings shapes how your PrestaShop Responsive Blog Addons layout looks and behaves for visitors.

Posts per Page sets how many posts show on each listing page, and the value must fall between one and two hundred, with ten used as the default.

Blog Grid Layout Type controls the visual layout of the post listing, and you can choose between a clean Grid, a simple List, or a magazine-style Masonry layout, with Grid selected by default.

Enable Previous/Next Navigation adds Prev and Next links on individual post pages, so readers can keep browsing without returning to the listing, and this is on by default.

Display Read More Button shows a Read More button on post cards in listings, which tends to improve click-through rate, and it is also on by default.

Show Post View Count displays how many times a post has been viewed, adding a layer of social proof for popular articles, and Show Reading Time displays an estimated reading time so readers can decide whether to dive in now or bookmark the article for later; both are enabled by default.

Sort Posts By sets the default sorting order for every post listing, offering Newest First, Oldest First, Most Viewed, Title A to Z, or Title Z to A, with Newest First as the default.

Finally, Date Format determines how dates are formatted on the storefront, and you can choose from eight PHP date presets, with d/m/Y used as the default format.

5.3 Feature Toggles

The blog module of prestashop allow the store owner to activate the engagement with users using blogs features available on the frontend.

  • Enable Image Zoom : Allow visitors to zoom into the featured image on the post detail page. : a click/hover triggers a zoom overlay. 
  • Enable Post Like : Shows a like/heart button on posts, which readers click to register a like without leaving a comment. 
  • Display Like on Hover Only : Keeps the like button hidden until a visitor hovers over the post card. Please note that this feature requires Post Like to already to be enabled; the button is rendered but visually hidden until hover. 
  • Enable Emoji Reactions : Adds emoji reaction buttons to posts.
  • Reaction Set : As you enable the emoji reaction, these emoji reactions appear. The type of reaction set includes Love, Haha, Wow, Sad, Angry. 
  • Enable Bookmarks : Allow readers to save posts for later. Now store owner can add a bookmark feature to the post so that reader can save the blog and read later. 
  • Enable Authors : Shows author information on posts and generates author listing pages. 
  • Use Font Awesome Icons : This feature loads the Font Awesome icon library, which ensures icons render consistently across the blog UI. 
  • Enable Social Share Buttons : Adds share buttons for Facebook, X/Twitter, LinkedIn, WhatsApp, and Email. 
  • Show Blog Posts on Product Pages : Displays a linked blog posts block on product pages. This shows posts explicitly linked to that product via the post editor’s Products section. This can help in increasing ranking of the product pages.

5.4 Comments

This tab turns the module into a fully moderated comment system, giving you control over how, when, and by whom comments are posted on your website.

  • Enable Comments: Allows readers to leave comments on posts as part of your website comment system. When switched off, the comment form and the entire comment thread are hidden from the storefront, effectively letting you turn off comments on your website.
  • Allow Guest Comments: Permits visitors who are not logged in to comment, removing the login requirement from the comment form and enabling anonymous commenting. This lowers friction and increases engagement by letting people comment without login.
  • Auto-Accept Comments: Determines whether comments are published immediately or held for review in the comment moderation queue. When turned off, every new comment enters the moderation queue, so pre-moderation and comment approval stay active until this setting is changed.
  • Enable Comment Replies: Allows one level of threaded replies (nested comments), so readers and admins can respond directly under an existing comment using the reply to comments feature.
  • Enable Star Rating: Adds a 1-5 star rating field to the comment form, turning it into a simple comment rating system where the rating is captured alongside the comment text.
  • Enable reCAPTCHA: Protects the comment form with Google reCAPTCHA v2 for spam protection on your comment form. This requires a Site Key and a Secret Key to function, and the reCAPTCHA widget is embedded directly in the form to help prevent comment spam.
  • Site Key / Secret Key: Authenticate the reCAPTCHA widget against Google’s service as part of your reCAPTCHA v2 setup, and are entered once reCAPTCHA is enabled. Without both keys, reCAPTCHA cannot function.
  • Admin Email Notification on New Comment: Sends an email notification for new comments to the admin whenever a new comment is submitted.
  • Notification Email Address: Specifies the address used for comment notification settings and receives comment notifications, falling back to the shop’s default email if left empty.
  • Comment System: Determines which comment plugin powers storefront comments, swapping the rendered comment widget accordingly. Available options are Native, Disqus, Facebook Comments, and Disabled, with Native set as the default, letting you choose the best comment system for your website.
    • Disqus Shortname: Required when Comment System is set to Disqus; identifies your Disqus site as part of your Disqus shortname setup.
    • Facebook App ID: Required when Comment System is set to Facebook Comments; authenticates the Facebook comments plugin widget.
    • Facebook Comment Count: Sets how many comments display initially when using Facebook Comments, with a minimum of 1. Default number of comment has been set 5.
    • Facebook Colour Scheme: Sets the visual theme of the Facebook widget, with Light or Dark mode as the available values and Light as the default.

5.5 URLs and SEO Meta

This URLs and SEO Meta controls how blog URLs and meta tags appear to search engines and is the heart of the module’s on-page SEO configuration.

  • Main Blog URL: Sets the base URL slug for the blog. For example, entering “blog” produces yourdomain.com/blog. Only letters, numbers, and hyphens are accepted. Default value: blog.
  • Use .html URL Suffix: Appends .html to every blog URL. This rewrites generated URLs to end in .html for a traditional SEO style.
  • Blog URL Pattern: Determines how individual post URLs are built by selecting the rewrite pattern applied to new URLs. Available values: /blog/{slug}, /blog/{category}/{slug}, and /blog/{year}/{month}/{slug}. The default is the simple slug pattern.
  • Main Meta Title / Main Meta Description / Main Meta Keywords: These fields set the meta tags for the main blog listing page. Each is available per language and is rendered in the page’s <head> section, influencing how the blog listing appears in search results.
  • Main Page Description: A rich-text introduction to your content strategy, displayed on the main blog listing page for both readers and search engines.
  • Listing Meta Title / Listing Meta Description / Listing Meta Keywords: These apply the same meta concept specifically to category, tag, and author listing pages. Each is available per language and reused consistently across all listing-type pages.

5.6 Display and Author

This tab controls page layout and author presentation, giving you full control over how your PrestaShop blog module content appears to visitors.

  • Sidebar Position: Sets where the widget sidebar appears. Values: Right, Left, None. Default: Right.
  • Author Name Display Format: Controls how author names are displayed across your blog manager. Values: Full Name, First Name Only, Last then First, Username. Default: Full Name.
  • Show Category on Post: Displays the post’s category on cards and detail pages, helping readers and search engines understand your content structure.
  • Show Category Image: Shows the category thumbnail on listing pages for a more visual, professional blog layout.
  • Show Category Description: Shows the category’s description text to give visitors more context before they click through.
  • Show No-Image Placeholder: Shows a placeholder graphic when a post or category has no image, preventing a broken-image icon from appearing on the storefront.
  • Default Author Avatar: Sets a fallback avatar image used when an author has no personal avatar. Accepted formats: JPG, PNG, GIF, or WEBP, up to 2 MB.

5.7 Images and Thumbnails

This tab controls which image-size presets are used where, and lets you regenerate thumbnail files across your PrestaShop blog module.

  • Detail Page Image Size: Chooses the preset applied to the featured image on post detail pages. Populated automatically from your active Image Types (Section 10).
  • Listing Page Image Size: Chooses the preset applied to post cards in listings.
  • Thumbnail Image Size: Chooses the preset applied to small thumbnails in widgets and related posts.
  • Delete Old Thumbnails (button): Deletes all previously regenerated thumbnail files (JPG, PNG, WEBP) from the posts, categories, and authors image directories. Use this before regenerating thumbnails with new sizes, so no stale files remain in your blog manager.

Tip: After creating or changing Image Types and selecting new sizes here, use Regenerate Thumbnails in the Image Types section (Section 10) to rebuild every thumbnail accordingly.

5.8 Responsive Columns and Spacing

This tab fine-tunes how many post cards appear per row at each screen size, along with the spacing between them, ensuring your blog module looks polished on any device.

  • Desktop Large (≥1200px): Columns default 4, Spacing default 20px.
  • Desktop (992–1199px): Columns default 3, Spacing default 20px.
  • Tablet (768–991px): Columns default 2, Spacing default 15px.
  • Mobile (<768px): Columns default 1, Spacing default 10px.

Each breakpoint has its own independent column and spacing value, applied via CSS grid rules on the storefront. The minimum number of columns per row at any breakpoint is 1, and spacing values can never be negative. As a result, the post grid re-flows automatically as the visitor’s screen size changes, keeping your responsive blog layout consistent across devices.

5.9 Post Detail Settings

This tab controls two related feature groups shown on individual post pages: the Table of Contents and Related Posts, both designed to improve readability and engagement on your blog.

5.9.1 Table of Contents

  • Generate Table of Contents: Automatically builds a linked table of contents from heading tags (h2, h3) in the post content. Recommended for long-form guides to improve readability and keep readers on the page longer.
  • TOC Position: Sets where the table of contents is inserted. Values: Top, Left, Right. Default: Top.
  • Sticky TOC: Keeps the table of contents fixed in place as the reader scrolls. Values: On/Off.
  • Minimum Headings for TOC: Sets the minimum number of headings a post must contain before a TOC is generated, preventing short posts from being cluttered with an unnecessary outline. Default: 3.

5.9.2 Related Posts

  • Enable Related Posts: Shows a grid of related posts at the bottom of each post detail page, keeping visitors engaged and reducing bounce rate.
  • Related Posts Match By: Determines how related posts are selected. Values: Category only, Tags only, or Category and Tags combined. Default: combined.
  • Related Posts Count: Sets the total number of related posts displayed. Default: 3.
  • Related Posts per Row: Sets how many related posts appear per row. Default: 3.
  • Carousel Mode: Makes related posts scroll as a carousel instead of a static grid, adding a more dynamic feel to your PrestaShop blog module.

5.10 Widgets

This tab configures the sidebar and other widget-area building blocks of your PrestaShop Blog Widget Module. Each widget can be enabled or disabled, titled, and shown or hidden per device where relevant.

  • Recent Posts Widget: Lists the most recent posts. Fields include an Enabled toggle, a Title, a Number of posts field, and Devices (Desktop, Tablet, Mobile), each independently toggleable.
  • Categories Widget: Lists blog categories. Fields include a Title and a Maximum categories shown field, where entering 0 shows all categories.
  • Tags Widget: Displays a tag cloud. Fields include a Title and a Number of tags shown field.
  • Popular Posts Widget: Lists the most-viewed articles. Fields include a Title and a Number listed field.
  • Archives Widget: Lists monthly archive links in a dropdown. Fields include a Title and a Number of months listed field.
  • Search Widget: Shows or hides a blog search box in the sidebar. Fields include a Title.
  • Footer Blog Block: Shows a compact list of recent blog links in the storefront footer, giving your latest articles extra site-wide visibility.
  • Home Page Blog Block: Shows a recent-posts section on the storefront home page. Fields include a Title and a Display count. This block respects the same Desktop, Tablet, and Mobile device settings as other widgets.

5.11 Home Slider Settings

This tab controls the behavior of the home-page image slider, one of the standout visual features among the PrestaShop Blog Addons bundled with this module. The actual slide content itself is managed separately in the Sliders section (Section 12).

  • Enable Home Slider: Activates the slider on the storefront home page.
  • Autoplay Slides: Advances slides automatically without visitor interaction. Values are On or Off.
  • Autoplay Interval: Sets the time between slide transitions, measured in milliseconds. The minimum accepted value is 1000ms.
  • Show Dot Navigation: Displays clickable dot indicators below the slider.
  • Show Arrow Navigation: Displays left and right arrow buttons.
  • Pause on Hover: Stops autoplay while the cursor hovers over the slider, giving readers time to read a slide before it advances.
  • Transition Effect: Sets the animation used when switching slides. Values are Slide or Fade.
  • Thumbnail Navigation: Shows small thumbnail previews below the slider for quick navigation.
  • Slider Theme: Sets the overall visual skin of the slider. Values include Default, Dark, and Boxed.

5.12 Banners

This tab contains the master toggle for zone banners. Individual banner content is managed separately in the Banners section (Section 13).

  • Enable Zone Banners: Turns every promotional banner placed across blog zones on or off at once. This acts as a master switch layered above each individual banner’s own Enabled toggle.

5.13 Appearance and Extras

This tab covers general visual theming and optional extra widgets.

  • Dark Mode: Sets the blog’s colour theme. Values include Off, On, and Auto ( according to system) and a Toggle button in which the user can change the mode. 
  • Blog Layout Theme: Sets the visual theme preset for blog pages. Values include Classic, Magazine, Minimal, and Full-width.
  • Enable Social Feed Widget: Shows a sidebar widget embedding social media content. Fields once enabled include a Facebook Page URL and a Twitter/X Handle, entered without the @ symbol.
  • Enable Newsletter Widget: Shows a newsletter sign-up widget. Fields once enabled include a Newsletter Widget Title and Newsletter Widget Text.
  • Enable Post Star Rating: Shows a star-rating widget on post detail pages, separate from comment ratings.
  • Use Store Theme Font: Makes the blog use your PrestaShop theme’s font instead of the Google Fonts below. When Off, two font pickers become active.
  • Heading Font: Chooses the font used for headings when Use Store Theme Font is Off, with 8 options available.
  • Body Font: Chooses the font used for body text when Use Store Theme Font is Off, with 8 options available.
  • Custom CSS: A textarea for injecting custom CSS rules across all blog pages. <style> and <script> tags are stripped automatically for security.

5.14 Maintenance

This tab covers admin convenience and data-retention behavior.

  • Show KB Blog Tab Menu at Top of Pages: Displays the horizontal quick-navigation bar at the top of every KB Blog admin page.
  • Clean Database on Uninstall: Drops every KB Blog database table the moment the module is uninstalled. This permanently deletes all blog data, including posts, categories, and comments, on uninstall. Treat this setting with real caution and set it to Off if you intend to reinstall later and keep your content.

Once every field above has been reviewed, click Save to apply all settings on the General Settings page.

6. How to create a blog in PrestaShop

To create a blog in PrestaShop, navigate to Prestashop Blog Manager Module by Knowband, click on the Posts. Now you will have the options to create blog by clicking on Add, then proceed to add the informations like Post title, URL, Content, meta details etc. This section will walk you through all the feature available in Posts .

6.1 Creating or Editing a Post

Post creation is divided into five sections in Prestashop Blog Module.

6.1 Content

  • Title: The post headline, required in the default language and limited to 255 characters.
  • URL Slug: A Regenerate URL from Title button allow you to refresh it anytime.
  • Excerpt: A summary shown on listing pages and in the Related Posts section. 
  • Content: The full post body, written through a rich-text editor. Once AI is configured (Section 15), buttons appear inside this field to generate content, generate an excerpt, or translate the post.
  • Author: Store owners can assign a post to an author from your Authors list, or leave it as None if no author should be shown.
  • Categories: Assigns the post to one or more categories via a nested picker. At least one category must be ticked.
  • Default Category: Chooses the primary category used for URL generation. This is only relevant when the category-based URL pattern is selected (Section 5.5).
  • Tags: Here you can add the tags for the blog post, which will differentiate your post within the website using posts.
  • Series: Groups a post into a named content series such as “Fashion Basics” helping readers read the blog post in a series, in this way this module also work as PrestaShop Content Marketing Module strategy.

6.2.2 How to improve blog SEO in Prestashop

  • Meta Title: The post’s search-result title, available per language, with an AI Generate button.
  • Meta Description: The post’s search-result summary, available per language, with an AI Generate button.
  • Meta Keywords: Target keywords for the post, available per language, with an AI Generate button.

6.2.3 Media

  • Post Type: Determines the media format of the post. Values include Standard, Video, Audio, and Gallery.
  • Featured Image: The main image for the post, required for the Standard type. Accepted formats include JPG, JPEG, PNG, GIF, and WEBP.
  • Cover Image ALT Text: It is recommended to add the alt text fo the cover image as, it also helps in ranking the blog post.
  • Video URL: Appears only when Post Type is Video and holds the source URL for the embedded video.
  • Audio URL: Appears only when Post Type is Audio and holds the source URL for the embedded audio.
  • Gallery: Appears when Post Type is Gallery and lets you upload multiple images, drag them into any order, delete individual images, and set one image as the cover. The gallery displays in a lightbox on the post detail page.

6.2.4 Products

  • Related Products: This Prestashop blog Manager is best blog module which also helps in marketing and cross selling. This module allow you to attach PrestaShop products to the post, one of the most valuable PrestaShop Related Products Blog Addons for driving cross-sell traffic.

6.2.5 Publish

  • Status: Sets the post’s publication state. Values include Draft, Published, and Scheduled.
  • Publish Date: Records when a Published post went live.
  • Scheduled Date: Sets the future date and time a Scheduled post auto-publishes. This is required whenever Status is Scheduled.
  • Featured: Pins or highlights the post.
  • Sticky: Pins the post to the top of the listing.
  • Allow Comments: Enables or disables comments for this specific post, overriding the module’s global Comments setting.
  • Show on Post Detail Page: When Off, hides the post from its own detail URL, though it may still appear in listings.
  • Save as Draft / Publish (buttons): Quick actions that save the post and set the respective status in a single click.

7. How to manage blog categories

Navigate to Knowband Prestashop Blog Manager> Categories to organize your content. This section covers everything on how to add categories in a blog and manage them at scale.

7.1 Browsing the Categories List

The list shows each category’s internal ID and Name with bulk actions which let you Enable Selected, Disable Selected, or Delete Selected. A category cannot be deleted while it still has child categories, so remove the children first.

7.2 Creating or Editing a Category

If you’re wondering how to add categories in a blog using this module, this user guide covers every field you’ll need:

  • Name: The category’s display name.
  • URL Slug: The category’s URL-friendly identifier, validated as a link-rewrite.
  • Description: Rich-text content shown on the category listing page.
  • Meta Title / Meta Description / Meta Keywords: The SEO fields for the category’s listing page.
  • Enabled: Controls storefront visibility for new categories.
  • Cover Image: A category thumbnail. Accepted formats include JPG, JPEG, PNG, GIF, and WEBP.
  • Parent Category: Sets the category’s place in the hierarchy. Circular references, where a category becomes its own ancestor, are automatically blocked.
  • Group Access: Selects which customer groups can view posts in this category.

8. Tags

Navigate to Knowband Blogs > Tags to manage the tags taxonomy using these PrestaShop Blog Tags Addons.

8.1 Browsing the Tags List

The list shows each tag’s internal ID, Name, and a Posts column counting how many posts carry that tag. 

8.2 Creating or Editing a Tag
From here, you can add the tag with details like tag title, meta description, meta title and meta keywords. Furthermore, you can also add the tags from the Post Creation. There you will find an option to add tags. After the tag addition, these tags will display individually here.


9. Authors

Navigate to PrestaShop Blog> Authors to add multi-author profiles with social links using this PrestaShop Multi-Author Blog Module.

9.1 Browsing the Authors List

The list shows each author’s internal ID, a small Avatar thumbnail, Name, an Enabled toggle, and the Created date. Bulk actions allow you to Enable Selected, Disable Selected, or Delete Selected authors.

9.2 How to add Author in a Blog

As a core piece of the PrestaShop Blog Module, this module supports full author profiles, which helps in SEO as well.

  • Name: The author’s display name, required in the default language.
  • Bio: The author’s biography, shown on the author page and optionally on posts. Supports rich text.
  • Avatar: The author’s profile photo. Accepted formats include JPG, JPEG, PNG, GIF, and WEBP, up to 2 MB.
  • Facebook URL / Twitter/X URL / Instagram URL / LinkedIn URL / Website URL: Each links out to the corresponding social profile.
  • Meta Title / Meta Description / Meta Keywords: The SEO fields for the author’s listing page.
  • Enabled: Controls whether the author appears on the storefront at all.

10. Image Types

Navigate to Knowband Blog Manager > Image Type to control image quality and performance across the blog. Image types define named size presets used to generate thumbnails for posts, categories, and authors.

10.1 Browsing the Image Types List

Each entry shows its internal ID, preset Name (such as blog_large), target Width and Height in pixels, the Entity it applies to (Post, Category, or Author), and an Enabled toggle. A single bulk action, Delete Selected, is available. Out of the box the module ships with three presets. blog_large is sized 800×600 for Posts, blog_medium is sized 400×300 for Posts, and blog_thumb is sized 150×150 for Posts.

10.2 Creating or Editing an Image Type

  • Name: A unique identifier for the preset, limited to 64 characters. Spaces are not recommended.
  • Width / Height: Define the target dimensions in pixels. Both are required positive integers.
  • Applies To: Determines which entity uses this size. Values include Post, Category, and Author.
  • Enabled: Controls whether this size appears in the Image Size dropdowns under Settings.

10.3 Regenerating Thumbnails

  • Regenerate Thumbnails (button): Triggers a background process that loops through every post, category, and author image, generating a resized copy for each active image type matching the corresponding entity. Use this whenever you add new image types or change existing sizes, so images stay sharp and properly sized across the blog.

11. How to Enable Blog Comments

Navigate to Knowband PrestaShop Blogs> Comments to moderate reader comments with this PrestaShop Blog Comment Module. Comments are submitted by readers or users on the frontend, so this section is strictly for moderation. You cannot create a comment directly from the Back Office.

11.1 Browsing the Comments List

Each row shows the comment’s internal ID, the Post it belongs to (filterable), the commenter’s Author name and Email (filterable), and a Comment preview that reveals the full text on hover. Status appears as Pending, Approved, or Spam, with inline quick-action buttons. A Rating column shows the star rating given, if enabled; a Reply column flags admin replies, and a Date column records submission time. Store owner can filter by post, email, or status. Bulk actions let you Approve Selected, Mark as Pending, Mark as Spam, or Delete Selected. Row-level actions include View, Reply, and Delete.

11.1 Replying to a Comment

Clicking Reply opens a form with a single required Reply textarea. Submitting it creates a new comment entry marked as an admin reply, displayed differently on the storefront. If the original commenter left a valid email address, they receive a notification email containing your reply.

12. Sliders

Navigate to Knowband PrestaShop Blog> Sliders to manage the home-page slider with this PrestaShop Blog Slider Module. The slider appears on the storefront home page once Enable Home Slider is turned on under General Settings (Section 5.11).

12.1 Browsing the Sliders List

Each slide shows its internal ID, a Title with a small thumbnail preview, a drag-and-drop Position column, and an Enabled toggle. Bulk actions let you Enable Selected, Disable Selected, or Delete Selected.

12.2 Creating or Editing a Slide

  • Title: The slide’s headline, shown as an overlay and required in the default language.
  • Subtitle: Adds a secondary line of text below the title.
  • Button Text: Sets the label for the call-to-action button, such as “Read More.”
  • Link URL: Sets the destination when the slide or button is clicked.
  • Position: Sets the numeric sort order within the slider.
  • Enabled: Controls whether the slide appears at all.
  • Slide Source: Determines how the slide’s content is populated. Values include Custom, where you enter data manually, Blog Post, which auto-fills from a chosen post’s title, image, and URL, and Blog Category, which auto-fills from a chosen category. Choosing Blog Post or Blog Category reveals a corresponding selection field and lets you promote existing content without duplicating work.
  • Slide Image: Uploads a custom slide image. The recommended size is 1920×600px, and accepted formats include JPG, JPEG, PNG, GIF, and WEBP.

13. Banners

Navigate to KB Blog > Banners to configure promotional banners shown in defined zones on blog pages using these PrestaShop Blog Banner Addons. Banners only display once Enable Zone Banners is turned on under General Settings (Section 5.12).

Five zones are available. Blog Top sits above the main blog listing, Blog Bottom sits below it, Sidebar sits inside the blog sidebar, and Post Top and Post Bottom sit above and below the post content on detail pages.

13.1 Browsing the Banners List

Each banner shows its internal ID, a Title and Image with a small thumbnail, the Zone it occupies, a drag-and-drop Position within that zone, and an Enabled toggle. Bulk actions let you Enable Selected, Disable Selected, or Delete Selected.

13.2 Creating or Editing a Banner

  • Title: An internal label for the banner, not shown to visitors.
  • Image Alt Text: Accessibility alt text for the banner image.
  • Zone: Determines the display location and is required. Values include Blog Top, Blog Bottom, Sidebar, Post Top, and Post Bottom.
  • Link URL: Sets where the banner points when clicked.
  • Position: Sets the sort order within the selected zone.
  • Enabled: Controls whether the banner is active.
  • Start Date / End Date: Optionally let a banner appear only within a defined window, useful for time-limited promotions.
  • Banner Image: The actual graphic. Accepted formats include JPG, JPEG, PNG, GIF, and WEBP.

Tip: Placing a banner in the Post Bottom zone can direct engaged readers straight toward a relevant product or promotion, another example of these PrestaShop Blog Banner Addons working double duty for conversions.

14. SEO and Sitemap

Move to Knowband Prestashop Blog> SEO and Sitemap to fine-tune search-engine indexing settings as part of this PrestaShop SEO Blog Addons suite.

14.1 Sitemap Settings

  • Enable Sitemap: Includes the blogs in XML sitemap for search engines.
  • Include Posts / Include Categories / Include Tags / Include Authors / Include Archives: Store owners are allowed to choose or control whether that content type is added to the sitemap.
  • Change Frequency: Signals how often the sitemap indicates content changes. Values include Always, Hourly, Daily, Weekly, Monthly, Yearly, and Never.
  • Priority: Sets the sitemap priority value, on a scale from 0 to 1.

14.2 RSS Feed Settings

  • Enable RSS Feed: Generates a standard RSS 2.0 feed for the blog, letting subscribers and content aggregators follow new posts automatically.

Click Save to apply the settings above.

14.3 Information Panel

After saving, a read-only panel displays:

  • Sitemap URLs: One per installed language, following a pattern like yourdomain.com/blog/sitemap?lang=en.
  • RSS Feed URLs: One per installed language.
  • Content Counts: Published Posts, Active Categories, Tags, Active Authors, Archive Months.
  • Ping Bing (button): Sends a sitemap ping directly to Bing’s search engine. Google retired direct sitemap pinging in 2023, so submit your sitemap through Google Search Console instead. This makes the PrestaShop SEO Blog Addons here especially useful for merchants managing multi-engine indexing.

15. How to use AI for blog writing

Navigate to Knowband Prestashop Blog  > AI to connect the blog to OpenAI’s ChatGPT or Google Gemini as part of this PrestaShop AI Blog Module, helping you write post content, excerpts, metadata, ALT text, tags, and translations directly from the post editor.

15.1 Configuration

  • Enable AI: The master toggle for all AI features. AI buttons only appear in the Post editor once this is On and a valid API key has been saved.
  • AI Provider: Chooses which AI service powers generation, either ChatGPT (OpenAI) or Google Gemini.
  • ChatGPT API Key / Gemini API Key: Store your provider credentials securely. Neither is ever displayed in plaintext after saving, and a Test Key button lets you verify each one.
  • ChatGPT Model: Picks which OpenAI model to use, populated from your account’s available models, with options such as GPT-4o Mini, GPT-4o, GPT-4.1 Mini, and GPT-4.1.
  • Gemini Model: Picks which Gemini model to use, with options such as Gemini 2.5 Flash, Gemini 2.5 Pro, and Gemini Flash Lite.
  • Temperature: Controls creativity versus focus in AI outputs, on a scale from 0 (fully deterministic) to 2 (very creative).
  • Max Tokens: Sets the maximum length of AI responses, on a scale from 1 to 8192.
  • Default Language: Sets the language AI-generated content is produced in, following your shop’s default language unless changed.
  • Enable Usage Logging: Records every AI call, including provider, action, token count, employee, and success or fail status, in a log table. No prompt text or API keys are ever stored in that log.

Click Save to apply these settings.

15.2 Where AI Features Appear in the Post Editor

Once AI is enabled and a valid key is saved, these buttons appear directly in the post form as part of the PrestaShop AI Content Addons toolkit:

  • Generate Post Content (Content field): Builds a full blog post body using the title and excerpt as context.
  • Generate Excerpt (Content field): Summarizes the existing content into a short excerpt.
  • Translate To (Content field, with language selector): Translates the current content into another language.
  • Suggest Tags (Tags field): Suggests relevant tags based on the post content.
  • Generate Meta Title / Generate Meta Description / Generate Meta Keywords (SEO section): Write SEO-optimized versions of each field.
  • Generate ALT Text (Featured Image): Writes descriptive alt text for the cover image automatically.

These PrestaShop AI Content Addons features save significant time for merchants publishing content at scale.

15.3 Recent AI Usage Log

A table at the bottom of the AI page lists the most recent AI calls, showing Date, Employee, Provider, Action, Tokens consumed, and Status (OK or Failed).

16. Import

Navigate to Knowband Prestashop Blog > Import to bring existing content into the module.

16.1 How to Import a WordPress Blog

Use this to migrate content from an existing WordPress site.

  1. In WordPress, go to Tools > Export and export All Content, producing a .xml file in WXR format.
  2. In KB Blog, under Import > WordPress Import, choose that exported file. The maximum file size is 20 MB.
  3. Select Default Status for Imported Posts: Sets the status assigned to imported posts. You can use the status from the export file itself, force everything to Draft, or force everything to Published.
  4. Click Import. Progress and results display live as the migration runs.

Items already imported previously are skipped automatically, since they are tracked in an internal import log.

16.2 RSS Import

Sets up automated content import from any RSS or Atom feed.

  • Enable Scheduled RSS Import: Gates the cron endpoint responsible for automated imports.
  • Feed URL: The full http or https address of the RSS or Atom feed to import from.
  • Frequency: Sets how often the cron job runs an import. Values include Hourly, Daily, and Weekly.
  • Default Author: Assigns every imported post to a specific author.
  • Default Category: Assigns every imported post to a specific category.
  • Default Status: Sets whether imported posts land as Draft or Published.
  • Max Items per Run: Caps how many feed items import during a single cron run, on a scale from 1 to 100.

After saving, three tools become available:

  • Run Now: Immediately imports up to the configured Max Items from the feed via AJAX, with no page reload.
  • Test Feed: Fetches and parses the feed without importing anything, then reports the item count and feed title.
  • Cron URL: A link to copy into your server’s cron or task scheduler, such as cPanel Cron Jobs or a Linux crontab entry. It includes a built-in security token and respects your configured Frequency, so calling it more often than scheduled simply does nothing.

16.3 Field Mapping for WordPress

This mapping is saved as JSON inside the module configuration. Select None for any field you would rather not import. Store owners are allowed to map the parameters like title, categories, authors slug etc. This module really helps owners in blog management.
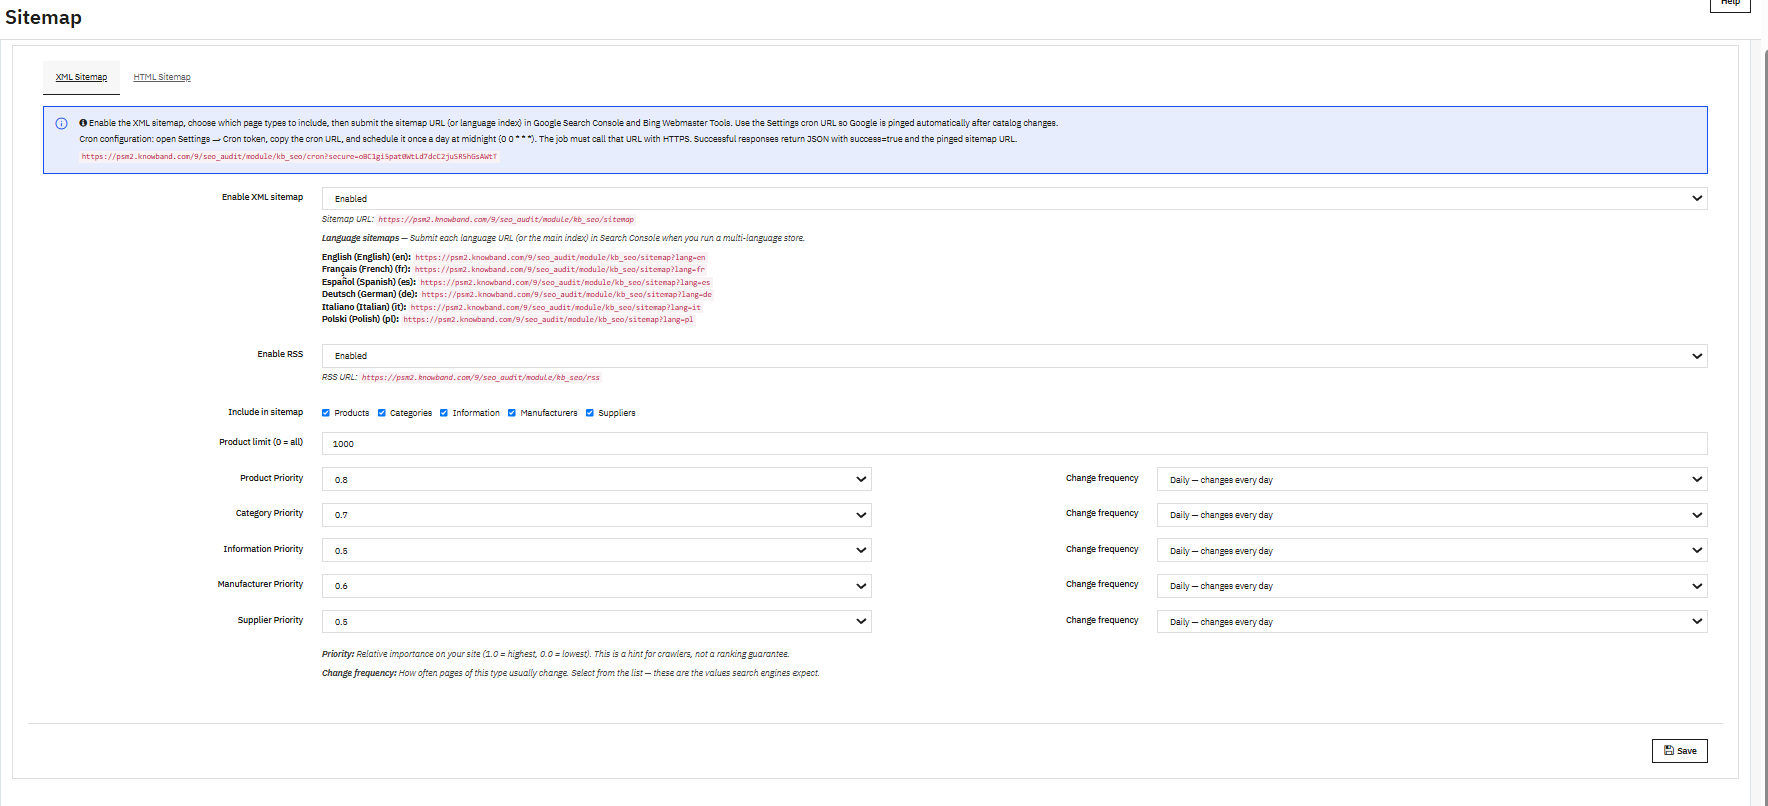
16.4 Field Mapping for RSS

This mapping is saved as JSON inside the module configuration. Store owners are allowed to map the parameters from RSS Feed blogs like title, categories,cover image, content, excerpt, tags authors,slug etc

16.5 Recent Import Log

This log shows the last 100 import operations. Columns include Date, Source (WordPress or RSS), resulting Status (Imported, Skipped, Failed), and a Message with further details or an error description.

Final Thoughts

From writing your first article to configuring AI-assisted content and multi-author profiles, Knowband Prestashop Blog  gives PrestaShop merchants a genuinely complete PrestaShop Blog Module, covering SEO, reader engagement (likes, reactions, comments), and traffic-driving links back to product pages. Whether you’re running it as a standalone PrestaShop Content Marketing Module or layering it on top of an existing storefront, it’s built to scale with your content strategy. For technical support, contact Knowband at support@knowband.com

👉Explore the Module with Our Video Guide


SocialAI Pro – PrestaShop AI Social Media Post Generator Module Complete User Manual

The SocialAI Pro is an AI Social Media Post Generator Module that connects your product catalogue directly to Facebook, LinkedIn, and X (Twitter) through AI-powered automation, which is available for Prestashop and Opencart. Store admins can generate platform-specific social media posts for any product in their catalogue, publish them automatically through rule-driven triggers, or create and send posts manually without writing a single word of copy from scratch.

This guide covers every section of the PrestaShop Social Media Automation Module from installation through to post history management. Whether you are configuring the module for the first time or setting up a new rule for a product category, every field and setting is documented here exactly as it appears in your PrestaShop admin panel.
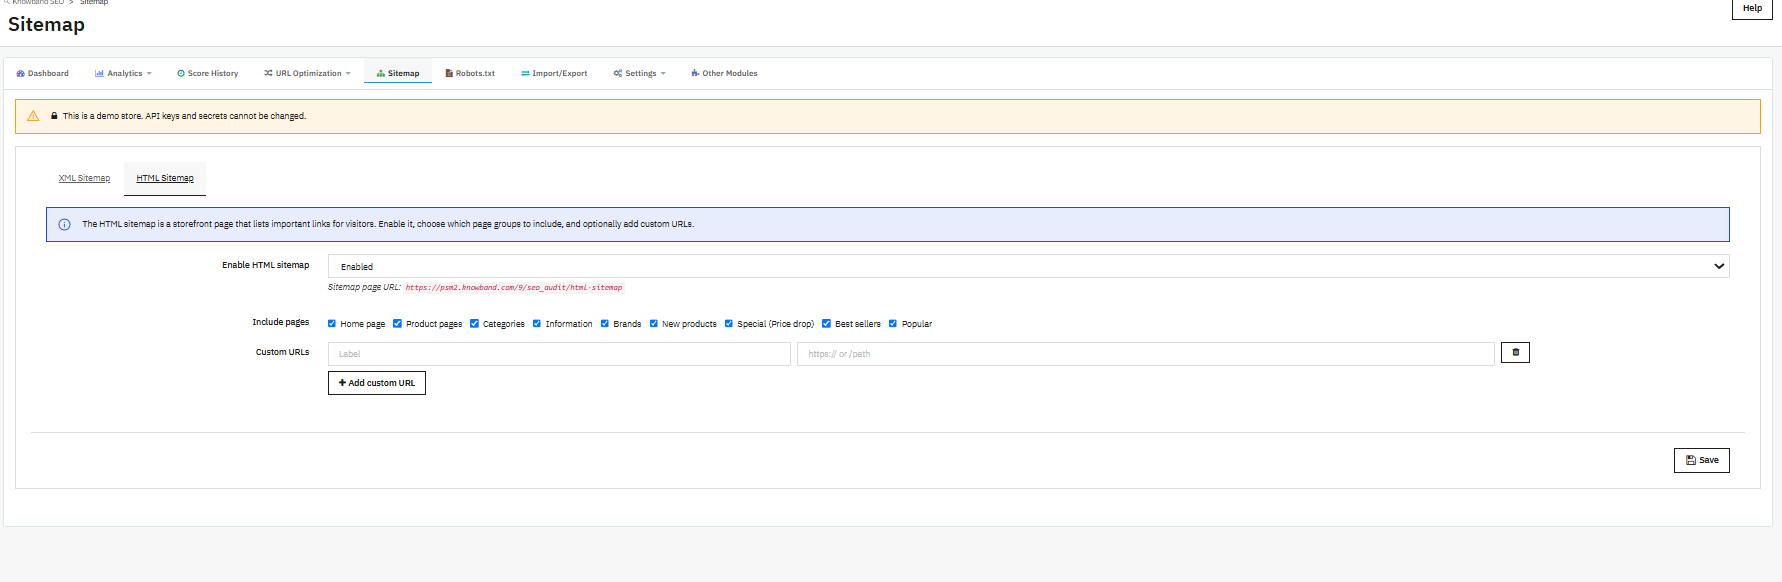
1.0 This PrestaShop AI Social Media Post Generator Module Is For

The Knowband SocialAI Pro is the right tool for:

  • Store admins who want automated social media posts for new products or restocked inventory without writing copy daily
  • Marketing teams managing social presence across Facebook, LinkedIn, and X from a single PrestaShop backend
  • Merchants running large or fast-moving catalogues where manual social posting is not sustainable
  • Agency operators managing multiple PrestaShop stores who need fully isolated social automation per store
  • Store owners who want brand-voice control over AI-generated content without hiring a copywriter

2.0 Installation Guide

2.1 System Requirements

Before installing the Knowband PrestaShop AI Social Media Post Generator Module, confirm your environment meets the following requirements:

  • PrestaShop 1.7.x, 8.x, or 9.x
  • PHP 7.4 or higher
  • A valid API key from at least one supported AI provider – OpenAI GPT, Google Gemini, or Anthropic Claude
  • At least one active social media platform account – Facebook Page, LinkedIn Page, or X (Twitter) account, for OAuth connection
  • HTTPS enabled on your store (required by all three social platform OAuth flows)
  • CRON access on your server if you plan to use scheduled or event-triggered automation

2.2 Installing the Knowband SocialAI Pro on PrestaShop

Store admins can complete the full installation in under five minutes through the standard PrestaShop module installer. No core file edits are required at any point.

Open your PrestaShop admin panel and navigate to Modules, then Module Manager. Click Upload a Module in the top right corner of the screen.

Select the ZIP file you received from Knowband after purchase and click Open. Once the upload completes, click Install when the prompt appears. After installation finishes, click Configure to open the SocialAI Pro settings for the first time.

If the module does not appear automatically after installation, type SocialAI Pro or Knowband Social into the Module Manager search bar and click Configure from the result.

3.0 Admin Panel Overview

Now we will see the admin panel in detail in the Prestashop SocialAI Pro Automatic Post Scheduler. When installation is successful, you will be redirected to the module’s General setting. This module consists of three individual pages tabs, including General Settings, Rules Creation, Manager and Post History.

 General Settings: Where store admins configure the AI engine, enter API credentials, set token limits, and connect social media platforms through OAuth.

Rules: Where store admins create the automation rules that automatically post the social media post after clicking on generate. Each rule defines which products to post, what triggers the post, which platforms it goes to, how the content should sound, and when it publishes.

Post History: The post history feature includes the logs of every post generated through the PrestaShop AI Social Media Post Generator Module. This tab includes also including status, platform, AI engine used, source, and a preview of the content. Furthermore, store admins can also create posts manually from this tab without running a rule.

4.0 General Settings

Store admins should complete the General Settings tab before creating any rules or attempting to publish posts. This tab connects the module to both the AI models and the social media platforms that will receive automated content.

4.1 Enable Module

The Enable Module toggle is used to manage the entire PrestaShop Social Media Automation Module. If you are setting it to Yes, then it will activate all automation, rule triggers, and publishing. Setting it to No stops all outbound activity immediately so that no posts are generated, no rules fire, and no platform connections are called.

Store admins should note that enabling the module requires a valid AI API key to be saved in the API Key field below the model selection.

4.2 AI Engine Selection

The Knowband SocialAI Pro PrestaShop AI Social Media Post Generator Module gives store admins direct access to three leading AI providers OpenAI’s GPT, Anthropic’s Claude and Google’s Gemini from a single dropdown. Select the engine your store will use for content generation.

Models Available in AI Platforms

OpenAI GPT: This supports GPT-5, GPT-5 Mini, GPT-5 Nano, GPT-4.1, GPT-4.1 Mini, and GPT-4o. Store admins using OpenAI GPT Connect through their own OpenAI API key can switch between models at any time without even reconfiguring rules.

Google Gemini: The Prestashop Automated Social Media Posts supports Gemini 3 Pro, Gemini 2.5 Pro, Gemini 3.5 Flash and Gemini 2.5 Flash. Merchants can use this engine when they prefer Google’s AI infrastructure.

Anthropic Claude: Supports Claude Opus 4.8, Claude Sonnet 4.6, and Claude Haiku 4.5. Store admins who prefer Anthropic’s output quality or have existing Claude API access can connect through their Claude API key here.

Only one engine is active at a time across the entire module. Additionally, switching engines applies to all subsequent post-generation immediately. Previously generated posts in Post History are not affected by an engine change in the module.

4.3 API Key

To enable the functionality of the AI models, Store admins must enter their API key for the selected AI provider in the given field. 

The API key must be a live, active key with sufficient credits or billing enabled on the provider account. An expired or revoked key returns an error on the first post-generation attempt. The key is saved locally to your PrestaShop database and called directly from your server to the AI provider’s API.

4.4 Temperature

A value of temperature 0 produces focused, consistent, and predictable output and the same product brief generates very similar copy each time. A value of 1 introduces more variation and creative phrasing, which works well for stores wanting less repetitive social copy across a large catalogue.

Kindly note that specifically, OpenAI GPT-5 and Claude Opus 4 do not accept a temperature setting. They run at their own internal default regardless of what value is entered here. 

4.5 Max Tokens Per Request

Store admins set the maximum number of tokens the AI engine can use per word-generation request in this field. The accepted range is 100 to 2,000.

4.6 Twitter X Handle Settings

X Handle (Site): Store admins can add their store’s X handle, for example, @yourstore. 

You can leave blank if your store does not have an active X account.

X Handle (Creator): Store admins can add their X handle, for example, @author. 

These fields are optional and do not affect post publishing. 

4.7 Connecting Social Media Platforms

Facebook, LinkedIn, and X are all connected from the General Settings tab inside the Knowband PrestaShop Social Media Automation Module. Setting up each platform takes just a few steps and each one follows its own process.

Facebook

Click Connect Facebook, and a pop-up window will appear on the screen. From there, grant the necessary permissions to allow posting on the Facebook Page. Anyone managing more than one Page will see a selector appear right after; just pick the correct Page from the list. The connection status will reflect the change immediately, showing the linked Page name once everything is confirmed.

LinkedIn

Before anything else, log into the LinkedIn Developer Portal and pull up the registered app. Under the Auth tab, both the Client ID and Client Secret will be listed. Copy these and drop them into the matching fields inside the module. One extra step is needed before clicking authorise, add the Redirect URL from the module and paste it into the Authorised Redirect URLs section within the LinkedIn app settings. Save that change first, then return to the module and click Connect LinkedIn to wrap up the process.

X (Twitter)

Start by visiting the X Developer Portal and opening the Keys and Tokens section for the registered app. Copy the Client ID and Client Secret and enter both into the relevant fields inside the module. The Redirect URL shown in the module also needs to be added to the callback URLs listed under the app’s authentication settings, do this before attempting to connect. Once those details are in place, click Connect Twitter/X and authorise through the pop-up. A quick thing to check beforehand: the X account needs write access switched on under its posting permissions, since the integration will not go through without it.

5.0 Rules

The Rules tab is where store admins build the automation logic that drives the Knowband PrestaShop AI Social Media Post Generator Module. Each rule is a complete instruction set that defines what gets posted, when it gets posted, where it goes, and how the copy sounds.

Store admins can see all existing rules in the Rules table. Each row shows the Rule ID, Rule Name, Products covered, Trigger type, Platforms selected, Publish Mode, Status, and a Generate button for manual runs.

5.1 Understanding the Rules Table in SocialAI Pro

The Rules table gives store admins complete control of all configured automation at a glance. 

E-Merchants can create as many rules as their catalogue requires. Each rule operates independently with its own product scope, trigger, platform selection, brand voice, and publish settings.

5.0 Rules

The Rules tab is where store admins build the automation logic that drives the Knowband PrestaShop AI Social Media Post Generator Module. Each rule is a complete instruction set that defines what gets posted, when it goes out, where it is published, and how the copy sounds. Store admins can run rules manually, let them fire automatically on product events, or schedule them across a time window, all from the same rule configuration.

5.1 How to Create the rule in Prestashop AI Social Media Post Generator

Rule Name: You can add the rule name to identify the rule. This name should be unique so that you do not get confused between the names. This name appears in Post History against every post the rule generates in Prestashop AI Post Generator, making it easy to trace which rule produced which content.

Products: You can select the product for which you want to generate the post. You can also select multiple products at one time.

Categories: This feature is added in case if you want to generate the post for categories.

Manufacturer: Similarly, if you want to generate a post for the manufacturer brand, you can add the manufacturer in the field.

Trigger: These are the triggers that decide the type of rule we are creating. This helps in displaying the trigger type configured, like New Product, Back in Stock, or Manual. Kindly note that rules set to Manual only fire when a store admin clicks Generate on that row.

New Product: The rule fires when a product when a new product is added to the store for the first time.

Back in Stock: The rule triggers when a product quantity goes from zero to a positive quantity. Knowband SocialAI Pro handles product variants correctly, restocking one variant does not trigger posts for other variants in the same product group.

Manual: The rule does not fire automatically. Store admins run it by clicking the Generate button on the Rules table row or by using the Run Now option inside the rule.


Platforms: This option allows the store owners to choose the platforms in which they want to share the post for example Facebook, LinkedIn, and X based on what was selected during rule setup.

Publish Mode: This publish mode shows whether this rule publishes posts immediately on trigger, or will be keep as drafts for manual review, or distributes them across a scheduled delay window.

Immediate: Posts go live on the selected platforms the moment they are generated. No admin review step occurs.

Manual (Draft): Generated posts land in Post History as Drafts. Store admins review, edit if needed, and publish each post individually from the Post History tab.

Scheduled: Posts are held after generation and released at a random point within a configurable minimum-to-maximum day window. This mode distributes bulk posts naturally across days rather than hitting all connected feeds simultaneously.

Scheduled Delay Window (Min / Max Days)
Visible only when Publish Mode is set to Scheduled. Store admins enter a minimum and maximum number of days. Each generated post is assigned a random publish time within that window. The merchant can use this to make a catalogue run of 50 products appear as organic, spaced-out content rather than an automated batch.

Brand Name
The store or brand name the AI includes in generated copy. Store admins enter the exact name they want referenced in posts, for example, “Knowband Store” or their store’s trading name. This ensures every post attributes content to the correct brand identity.

Industry
A brief description of the store’s industry or product niche. Store admins enter this so the AI understands the market context when writing copy, for example, “digital art assets,” “fashion accessories,” or “home electronics.” The industry field shapes vocabulary and reference points in the generated output.

Tone of Voice

Store admins select the communication tone for all posts generated by this rule. Five options are available:

Professional
Friendly
Playful
Urgent
Inspirational

Emoji Usage Policy
Store admins can control whether the AI includes emojis in generated posts. Store admins can choose the options from the dropdown. For example, when never is chosen, it will not add the emoji. When sparingly is added, it will add the emojis according to the content. Emojis are used more frequently on Facebook and X posts and more sparingly on LinkedIn, regardless of this setting.

Hashtag Groups

Store admins enter the hashtags they want included in generated posts for this rule. Hashtags can be entered as a comma-separated list in the module. Morover, the AI tools place them in the post according to platform convention: inline for Facebook and X, grouped at the end for LinkedIn. Leave blank to let the AI generate contextually relevant hashtags automatically.

Word Blacklist

Furthermore, store admins enter the terms separated by commas, for example,  competitor names, discontinued product references, terms that conflict with brand guidelines, or any language not suitable for the target audience. 

Per-Platform Call-to-Action (CTA) Phrases

Store admins enter a specific CTA phrase for each selected platform. The AI uses these phrases in the closing line of each post. For example, “Shop now at our store” for Facebook, “Explore the full catalogue” for LinkedIn, and “Grab yours today” for X. If you leave the field CTA blank, then AI will write its own closing line for that channel.

Custom Instructions

The merchant can use this for anything not covered by the structured fields above, for example, “Always mention free shipping,” “Reference the seasonal sale,” or “Keep the copy under 100 words for all platforms.” These instructions are appended to every AI prompt this rule generates.

Max Posts Per Cron Run

Sets the maximum number of posts this rule can generate in a single cron execution

Max Posts Per Day

The total number of posts this rule can generate across all cron runs within a single calendar day. Once this limit is reached, the rule stops generating for that day regardless of how many qualifying products remain. 

Max Posts Per Product Per Day

Prevents the same product from being posted more than a set number of times in a single day. Store admins typically set this to 1 to avoid the same product appearing multiple times across connected feeds on the same day.

5.3 Saving and Running a Rule

Once all fields are configured, store admins click Save Rule to add it to the Rules table. The rule is immediately active if Status is set to Active and the trigger is set to New Product or Back in Stock, it will fire the next time the trigger condition is met.

For Manual trigger rules, or to test any rule immediately after saving, store admins click the Generate button on the rule’s row in the Rules table. The Knowband Prestashop AI Post Generator processes all qualifying products in the rule scope, generates platform-native posts for each selected channel, and adds them to Post History with the rule name, engine, and source recorded against each entry.

Store admins can edit any rule at any time by clicking Edit on its row. Changes take effect on the next rule run. Posts already generated by the rule before the edit are not retroactively updated.

6.0 Post History

The Post History tab in the Prestashop Auto Post Generator by AI tools is the complete record of logs of every post the Knowband SocialAI Pro PrestaShop AI Social Media Post Generator Module has generated. Moreover, store admins can review generated content, check publish status, and identify failed posts with their exact error.

Each row in the Post History table in the module contains:

ID: This is the unique identifier assigned by the PrestaShop AI-Powered Content Generator Module.

Date: This shows the exact date according to your server configuration.

Platform: This helps in identifying the platforms for which the post was generated.

Product: Name of the Product.

Preview: You can preview the social media post, which includes a unique URL for the social media post.

Rule: The rule name that triggered this post generation using the Auto Publish module.

Status: The current state of the post, Draft, Scheduled, Published, or Failed. Draft posts have been generated but not yet published. Store admins can review and edit Draft posts before sending them live.

Engine: The AI engine that generated this post, OpenAI GPT, Gemini, or Claude.

Source: Whether the post was generated automatically by a rule trigger (Auto) or created manually by an admin (Manual).

6.2 Creating a Manual Post from Post History

Store admins can create a post manually from the Post History tab without running a rule or waiting for an event trigger. This is the feature for one-off announcements, specific product highlights, flash sale posts, or any content where full admin control over timing and copy is needed.

The merchant can use this feature by clicking the Create Post button at the top of the Post History tab. Select the product, choose the target platforms, pick the AI engine and model for this post, enter any specific instructions for the copy, and click Generate. The post appears in Post History as a Manual source Draft immediately. From there, store admins can review the generated copy, edit it if needed, and publish it directly or save it as a scheduled post.

7.0 Frequently Asked Questions

Q: Can store admins switch AI engines without losing their existing rules?

Switching the AI engine in General Settings applies to all future post generation but does not affect existing rules, scheduled posts, or Post History entries. Rules do not store engine settings at the rule level; the engine is a global module setting. Additionally, store admins switching from OpenAI to Gemini mid-campaign will find that all subsequent generation uses Gemini while previously generated Draft posts retain their original engine label in Post History.

Q: Why is a post showing as Draft after the rule ran?

The merchant can check the rule’s Publish Mode setting. If the rule is set to Manual publish mode, all generated posts land in Post History as Draft regardless of the trigger. Store admins need to review and publish them from the Post History tab. To switch to automatic publishing, edit the rule and change the Publish Mode to Immediate or Scheduled.

Q: How does the Knowband SocialAI Pro handle the 280-character limit on X?

The PrestaShop AI Social Media Post Generator Module generates platform-specific copy for each channel and enforces character limits after generation. X posts are written and trimmed to fit within 280 characters before the post is saved to Post History. A post that would exceed the limit is caught and adjusted automatically; it never reaches the X API at an invalid length.

Q: Can more than one social platform be connected at the same time?

Store admins can connect Facebook, LinkedIn, and X simultaneously from the General Settings tab. Each platform maintains its own independent OAuth connection. Disconnecting one platform does not affect the others, and each rule can target any combination of connected platforms independently.

8.0 Conclusion

The Knowband SocialAI Pro PrestaShop AI Social Media Post Generator Module gives PrestaShop store admins a complete social media automation system built inside their existing admin panel. AI generates the copy. Rules decide when and where it goes. Post History keeps the full record. And store admins retain editorial control at every step through Draft review, manual post creation, and brand voice settings per rule.

For installation support, feature questions, or custom changes, contact the our support team at support@knowband.com. Module updates are available on the Knowband website.

Also available on Prestashop Addons: https://addons.prestashop.com/en/social-commerce-facebook-prestashop-modules/98107-socialai-pro-prestashop-ai-post-generator-for-facebook-linkedin-x.html

PrestaShop Order, Customer and Address Import Export Addon – Complete User Guide

1.0 Introduction

Managing order data across stores and partner systems is one of the most time-consuming tasks a PrestaShop admin faces. Migrating to a new store means recreating order history by hand. Sending daily order files to a warehouse or finance team means logging in, exporting, and sending on a schedule that someone has to maintain. Fixing corrupted records after a failed transfer means hours of cleanup with no clear record of what went wrong. The Knowband PrestaShop Order, Customer and Address Import Export Addon serves as a powerful PrestaShop Bulk Migration Module, handling all three challenges with ease. It transfers orders, customers, and addresses between PrestaShop stores and external systems in CSV, XLSX, JSON, and XML, with cross-store identity resolution, FTP/SFTP delivery, scheduled automation, and a full audit log. No developer is needed at any step.

This guide covers every tab, wizard step, and setting so you can configure the PrestaShop Order, Customer and Address Import Export Addon and start transferring order data on day one. Compatible with PrestaShop 1.7.x through 9.x.

1.1 Who Is The PrestaShop Bulk Migration Module For

The Knowband PrestaShop Order, Customer and Address Import Export Addon is built for:

  • Store owners migrating from an existing PrestaShop installation who need to bring the full order history across.
  • Operations teams that rely on a PrestaShop scheduled order export to send regular files to warehouses, fulfilment partners, or accounting systems.
  • Admins who need PrestaShop bulk order management for correcting records, exporting a set, editing in Excel, and re-importing the corrected file.
  • Any organisation that needs a verifiable record of every order data movement for audit or compliance purposes.

2.0 Installation Guide

System Requirements

  • PrestaShop 1.7.x, 8.x, or 9.x
  • PHP 7.2 or higher

Installing the Module

Head to your PrestaShop back office and go to Modules, then Module Manager. Find the upload option at the top right of the screen. Select the ZIP file from your account and confirm. PrestaShop processes the upload on its own.

Once the upload finishes, hit Install on the prompt that follows. The module configuration screen opens right after. If the module does not appear, type Order Import Export into the Module Manager search and click Configure.

Common Installation Issues

  • Upload fails: The server is rejecting the file size. Ask your host to raise upload_max_filesize and post_max_size to at least 32 MB.
  • Module not visible after install: Clear the PrestaShop cache under Advanced Parameters, then Performance and search again.
  • Configuration page looks broken: Clear your browser cache and the PrestaShop theme cache under Design, then Theme and Logo, then Advanced Settings.

3.0 Admin Panel Overview

The Knowband PrestaShop Order, Customer and Address Import Export Addon adds four main tabs to the back office:

  • General Settings: Module preferences, sample template downloads, performance limits, and CRON configuration.
  • Export: Create and run export profiles using the three-step wizard.
  • Import: Create and run import profiles using the three-step wizard.
  • Transfer Logs: A full history of every import and export run with status, record counts, and row-level error detail.

4.0 General Settings Tab

The General Settings tab has four sub-tabs: Preferences, Template Files, Limits and Speed, and Scheduled Cleanup.

4.1 Preferences

Module Enable/Disable: The main toggle for the entire PrestaShop Bulk Migration Module. When set to Disabled, all scheduled CRON import and export tasks pause automatically. The manual Export and Import wizards in the back office continue to work normally regardless of this setting.

Maximum Visible Columns: Sets how many columns appear at one time in the import mapping table. Range is 1 to 20. Use the arrow controls in the mapping interface to scroll through the remaining columns.

Maximum Visible Rows: Controls how many sample data rows appear in the import mapping preview. Range is 1 to 50.

Import Batch Size: The number of rows the module processes per AJAX request during an import run. Range is 10 to 500. Lower values reduce timeout risk on shared hosting environments where large imports hit PHP execution limits.

Click Save Settings to apply.

4.2 Template Files

The Template Files sub-tab provides ready-to-fill sample files for each supported entity in all four formats. Download a template before building your first import file to confirm the column layout.

Three entities are available:

  • Orders: CSV, JSON, XML, XLSX
  • Customers: CSV, JSON, XML, XLSX
  • Addresses: CSV, JSON, XML, XLSX

Each sample contains realistic, fully populated data across every supported column. Templates are generated from the live column catalogue and stay updated with any schema updates.

4.3 Limits and Speed

Max Records Per Download: The maximum number of records exported per file. Range is 100 to 50,000. Increase only when server memory allows.

Max Upload Size (MB): The maximum import file size the module accepts. Range is 1 to 200 MB.

Click Save Settings to apply.

4.4 Scheduled Cleanup

Keep Files For (Days): Import files older than this number of days are deleted automatically by the cleanup CRON. Range is 1 to 30 days.

Cleanup CRON URL: Paste this URL into your server’s cron manager to delete old temporary import files on a schedule. The example runs daily at 2 AM.

Export Profiles CRON URL: Paste this URL into your server’s cron manager to run every export profile flagged as CRON-enabled. Pick any frequency that suits your PrestaShop scheduled order export needs, for example, daily at 3 AM.

Import Profiles CRON URL: Paste this URL into your server’s cron manager to run every FTP-source import profile flagged as CRON-enabled. Upload-source profiles are manual-only and are skipped automatically when this URL runs. Example: daily at 4 AM.

All three URLs are token-secured. Only requests carrying the correct token trigger the operation.

5.0 Export Tab: Three-Step Wizard

The Export tab lists all saved export profiles and provides the wizard for creating new ones. Each row in the list shows the profile name, data type, file format, and last run status. Click the run button to execute a profile immediately. Click Edit to change its settings.

Step 1: Transfer Settings

Profile Name: A unique label that identifies this profile in the Export listing.

Output File Label: The base name of the generated file. The extension is added automatically. Supports dynamic tokens (see Section 10).

Data Type: Choose what to export: Orders, Customers, or Addresses.

File Format: CSV, XLSX, XML, or JSON. CSV and XLSX open directly in any spreadsheet application. XML and JSON suit system integrations.

Shop: Limits the export to records belonging to the selected shop in a multi-shop setup.

Date Range (optional): Filter by order creation date. Leave blank to export all records.

Record Order (optional): Control the row sequence in the output file. Sort by ID, Reference, Date Created, Date Updated, Total Paid, or State, ascending or descending. Leave on default to use database order.

Optional Column Sections: Three independent toggles control whether full column blocks are included in the export.

  • Include invoice address details: When off, only the Invoice Address ID is exported. When on, all invoice address columns are included.
  • Include shipping address details: When off, only the Shipping Address ID is exported. When on, all shipping address columns are included.
  • Include payment details: When off, only the payment module name is exported. When on, the payment amount, currency, method, and transaction ID columns are included.

Scheduled Run (Enable CRON): When on, the Export Profiles CRON URL runs this profile automatically and stores the generated file under the Transfer Logs tab.

Export Destination: Choose File System to save the file locally for download from the Transfer Logs page. Choose FTP/SFTP to push the file to a remote server after each run. A local copy is also kept as a fallback download when FTP/SFTP is selected.

FTP/SFTP Settings (when FTP/SFTP destination is selected):

  • Transfer Protocol: FTP, FTPS (FTP over TLS), or SFTP (SSH). SFTP is recommended for production environments.
  • Server, Port (auto-updates when the protocol changes: 21 for FTP, 990 for FTPS, 22 for SFTP).
  • Username and Password (stored encrypted at rest).
  • Absolute Path to Folder on the remote server. The folder must exist and be writable.
  • Passive Mode: On by default. Recommended to keep on so firewalls do not block transfers.
  • Test Connection button: validates credentials against the live server before the profile is saved.

Output Style: Universal comma for most applications, semicolon for European Excel, or tab-separated for data tools.

List Glue: The separator used for multi-value fields. Pipe, Slash, or Comma.

Narrow Orders By (optional filters):

  • Order Status: filter by one or more statuses.
  • Carrier: filter by one or more carriers.
  • Currency: filter by one or more currencies.
  • Payment Method: filter by one or more payment modules.
  • Total Paid Range: include only orders within a minimum and maximum total paid value (tax included).

Leave any filter empty to include all records for that dimension.

Click Next Step to proceed.

Step 2: Choose Fields

Select the fields to include in the export from 155 available columns. Use Select All, Deselect All, or Reset to Defaults as needed. Required fields cannot be deselected. Drag rows to reorder the columns in the output file.

The 155 available fields span six sections: order data, customer data, address data, payment data, and product line data.

Step 3: Generate File

Review the export summary, data type, file format, file label, and field count. Click Build and Download to generate the file immediately, or save the profile and let the CRON run handle it on schedule.

6.0 Import Tab: Three-Step Wizard

The Import tab lists all saved import profiles and provides the wizard for creating new ones.

Step 1: Source Settings

Profile Name: A unique label for this profile in the Import listing.

Data Type: Orders, Customers, or Addresses. Customers and addresses update existing records on match. Orders are always created anew; existing orders cannot be updated through this module.

File Format: CSV, XLSX, JSON, or XML.

Output Style and List Glue: Must match the settings used when the file was exported.

Shop: Imported orders are always created under the selected shop.

Source: Upload File for a one-time manual import from a local file. FTP/SFTP to pull the file from a remote server. FTP/SFTP source is required for CRON-driven import runs.

FTP/SFTP settings: Same fields as the export wizard, protocol, server, port, username, password, remote file path, passive mode, and test connection.

CRON: Only available for FTP source profiles. When on, the Import Profiles CRON URL fetches the file from the remote path and runs the import automatically without manual intervention.

Click Save Profile to save without running, or Next Step to proceed to mapping.

Step 2: Map Columns

The PrestaShop Bulk Migration Module reads the uploaded file and auto-matches column headers to PrestaShop fields. From the live module, 154 of 155 columns are matched automatically from recognised header names.

The mapping screen shows the first rows of the file as a live preview so the admin can verify data before committing. Required fields are marked with an asterisk. Search columns by name using the search field above the table.

Review the auto-matched assignments and adjust any that need correcting. Common naming variants from external systems are recognised automatically in most cases.

Step 3: Run Import

Mapping confirmed. Click Start Import to begin. The module processes the file in batches based on the Import Batch Size setting in Preferences. A progress indicator shows the current status.

Click Save Profile before starting to preserve the column mapping for future runs of the same file structure.

7.0 Cross-Store Identity Resolution

Migrating orders between PrestaShop installations is the most complex use case for any PrestaShop store migration module. Raw database IDs for customers, addresses, and products differ between stores and cannot be used as transfer identifiers.

The PrestaShop order migration addon resolves all three entity types using identifiers that remain stable across installations:

Customers are matched by email address. No match creates a new account using the name, email, and a system-generated password. The customer resets credentials and accesses their account on the new store immediately.

Addresses are matched by a composite hash built from first name, last name, address line one, postcode, city, and phone. No match creates a new address record from the imported data.

Products and combinations are matched by product reference and combination reference. An unresolvable reference rejects the entire order, no partial writes, no line items pointing at missing products.

A full export from one store imports cleanly using this PrestaShop store migration module into a separate installation without any manual remapping of accounts, addresses, or product IDs.

8.0 Data Integrity and Validation

The importer enforces order-level atomicity. If any line item within an order fails validation, the entire order is excluded from the batch. No partial order record is written to the database.

Every rejection produces a precise log entry:

Row 23: column “currency_iso” contains “USDD”, expected a 3-letter ISO 4217 code (e.g. USD, EUR, GBP). Row 41: column “customer_email” contains “not-an-email”; a valid email address is required.

Fix only the affected rows in the source file and re-import them. The rest of the batch is unaffected.

9.0 Transfer Logs Tab

Every import and export operation writes a log entry to the Transfer Logs tab. Each row shows:

  • ID: Sequential run number.
  • Type: Export or Import.
  • Entity: Orders, Customers, or Addresses.
  • Format: CSV, XLSX, JSON, or XML.
  • Status: Completed or Failed.
  • Records: How many records the run processed.
  • File: The filename, with a download link for export files.
  • Date: When the run started.

Filter the log by ID, type, entity, format, status, or date range using the controls at the top of the table.

Past export files can be re-downloaded directly from the log without re-running the export. Row-level error detail is accessible for any run that produced failures.

10.0 Dynamic Filename Tokens

Output file labels support nine runtime tokens that expand at the point of generation:

  • orders_{DATE}.xlsx produces orders_20260608.xlsx
  • {SHOP}orders{DATETIME}.csv produces mystore_orders_20260608_143215.csv

Available tokens: {DATE}, {DATETIME}, {TIME}, {YEAR}, {MONTH}, {DAY}, {ENTITY}, {FORMAT}, {SHOP}.

11.0 Frequently Asked Questions

Q: What is the Knowband PrestaShop Order, Customer and Address Import Export Addon, and what does it do?

The Knowband PrestaShop Bulk Migration Module is a bulk order data transfer tool that imports and exports PrestaShop orders, customers, and addresses in CSV, XLSX, JSON, and XML. It handles cross-store identity resolution, reusable transfer profiles with saved column mapping, FTP and SFTP file delivery, CRON-based scheduled automation, 155 exportable fields, email notifications, and a full transfer log with row-level error detail. Compatible with PrestaShop 1.7.x through 9.x.

Q: How do I migrate orders from one PrestaShop store to another?

Create an export profile on the source store and download the orders file. On the destination store, create an import profile, upload the file, confirm the column mapping, and run the import. The PrestaShop order migration add-on resolves customers by email, addresses by composite hash, and products by reference. No manual remapping of accounts, addresses, or product IDs is needed between the two stores.

Q: What happens if a product reference in the import file does not exist in the destination store?

The entire order containing that line item is excluded from the import. No partial order record is written. The Transfer Logs tab records the row number, column name, and the specific value that could not be resolved. Fix only the affected rows and re-import them.

Q: What file formats does the PrestaShop Bulk Migration Module support?

CSV, XLSX, JSON, and XML, all four in both import and export directions. CSV and XLSX open in any spreadsheet application. JSON and XML suit system integrations and API-based partners.

Q: How does the scheduled PrestaShop order export work via CRON?

Enable CRON on any export profile, set the destination to FTP/SFTP, and copy the Export Profiles CRON URL from General Settings into your server’s cron manager with the required interval. Every CRON-enabled PrestaShop bulk order management profile runs automatically on that schedule, pushes the file to the configured server, and sends a completion notification. Upload-source import profiles are manual-only and are skipped automatically when the Import Profiles CRON URL fires.

Q: Can I filter which orders get exported?

Yes. The export wizard includes filters for order status, carrier, currency, payment method, and total paid range. A date range filter narrows exports to a specific creation window. Apply any combination of filters and leave the rest blank to include all records for those dimensions.

Q: How does FTP and SFTP file delivery work?

Export profiles push files to FTP (port 21), FTPS (FTP over TLS, port 990), or SFTP (SSH, port 22). Import profiles pull files from FTP or SFTP on a schedule. Credentials are stored encrypted. A test connection button validates the connection before the profile is saved. If a push fails, the file saves locally, and a notification email explains the failure.

Q: What is the PrestaShop order backup module feature?

Every import and export run writes a log entry to the Transfer Logs tab with date, filename, entity type, status, and record counts. Past export files re-download from the log without re-running the export. This gives organisations with audit or compliance requirements a complete, timestamped record of all order data movements.

Q: How many fields can be exported per order using the PrestaShop Bulk Migration Module?

155 fields are available across order data, customer data, product line data, address data, and payment data. Per-section toggles let admins include or exclude the full invoice address block, the shipping address block, and the payment detail block independently to keep files lean when full columns are not needed.

Q: Is the PrestaShop Order, Customer and Address Import Export Addon compatible with PrestaShop 9?

Yes. The PrestaShop Order, Customer and Address Import Export Addon works with PrestaShop 1.7.x through 9.x. Check the product page for the most current compatibility details.

12.0 Conclusion

This addon covers every order data transfer need from one back-office panel. Export any combination of orders, customers, and addresses to the format each receiving system needs. Import complete order history into a new store without manual account remapping. Schedule everything via CRON and push files automatically via FTP or SFTP.

Every run is logged with the PrestaShop order backup module, keeping every entry timestamped. Every failure gives a precise, fixable error message. Every export file stays available for re-download. For support, custom development requirements, or PrestaShop addon services, reach out to the Knowband support team or visit the Knowband product page directly.

Also available on Prestashop Addons – https://addons.prestashop.com/en/data-transfer-backup/98144-advanced-order-customer-address-data-migration.html


PrestaShop Form Studio – All-in-One Feedback, Contact & Survey Form Builder User Guide

1.0 Introduction

Running an online store without a reliable way to collect customer input is like selling in the dark. Whether you need a simple survey form, a detailed product feedback form, or a multi-layout customer satisfaction survey, the right tool makes all the difference. PrestaShop Form Studio, All-in-One Survey & Feedback Form Builder is built exactly for this.

This PrestaShop Form Builder Addon allows store owners to create unlimited forms without writing a single line of code. From basic contact forms to survey forms, it covers every data collection scenario that an eCommerce business faces. This works equally well for solo store owners and large enterprise teams managing multiple PrestaShop websites.

What sets this PrestaShop Form Builder Addon apart is the vast range of features that it handles in one place: form creation, spam protection via Cloudflare Turnstile, email notifications to admins and customers, marketing integrations with Mailchimp and Brevo, form submission management, and IP/email blacklisting. You do not need five different modules to manage your customer communication workflow. This one PrestaShop Form Builder Module handles it all.

2.0 Installation Guide of the PrestaShop Form Studio

System Requirements

Before installing the module, confirm that your environment meets the following requirements:

  • PrestaShop version 1.7.x or 8.x or 9.x.x
  • PHP 7.2 or higher
  • A working SMTP email configuration in your PrestaShop back office
  • Write permissions on the /modules directory of your PrestaShop installation

Uploading and Installing the Module

Step 1 – Upload the module: Log in to your PrestaShop back office. Go to Modules > Module Manager and click Upload a Module (top-right). Select the ZIP file downloaded from Knowband and click Open. PrestaShop will upload and extract the files automatically.

Step 2 – Install: Once uploaded, click Install when prompted. After installation, you’ll be redirected to the module configuration page.

Step 3 – Locate if needed: If the module doesn’t appear automatically, search “Form Studio” in the Module Manager search bar and click Configure.

3.0 Common Installation Issues

  1. Upload fails: Your server’s upload size limit is too low. Ask your hosting provider to increase upload_max_filesize and post_max_size in PHP settings to at least 32 MB.
  2. Emails not sending: Check your SMTP settings under Advanced Parameters > Email in the back office. The module uses the store’s default email configuration unless overridden on a per-form basis.
  3. Interface appears broken or unstyled: Clear your browser cache and the PrestaShop theme cache under Design > Theme & Logo > Advanced Settings.

4.0 General Settings Admin Panel

4.0. 1 Enable or Disable the Module

The first thing you see inside the module is the button to enable or disable the PrestaShop Survey Builder Module. When the module is enabled, all active forms are live on the front end. Disabling it hides all forms from visitors without deleting any configurations.

4.0.2 Mail Settings

The mail settings section controls how your store communicates with both admins and customers after a form is submitted.

Enable Email templates: You can enable or disable the predefined email template in the PrestaShop Form Creator. If this module is on, then the mails will be delivered on the predefined email template with all variables.

Admin Mail Content: This is the email your store’s team receives whenever a form is submitted by a user. You can customise the subject, body, and format according to your store’s brand using the rich text editor. You can also add the template variables like the submitter’s name, email address, and form field values dynamically by clicking the corresponding tag in the Template Variables section.

Auto Responder Content: Auto Responder Content is the confirmation email sent automatically to the customer after they submit a form. You can use it to set expectations, share next steps, or simply thank the customer for reaching out.

Reply Email: Reply Email Content controls the format of manual replies sent by admins directly from the form submissions panel inside the back office.

All three email templates in PrestaShop Survey Builder support rich text formatting, including bold, italic, links, lists, and HTML, so your emails can match your store without any custom development.
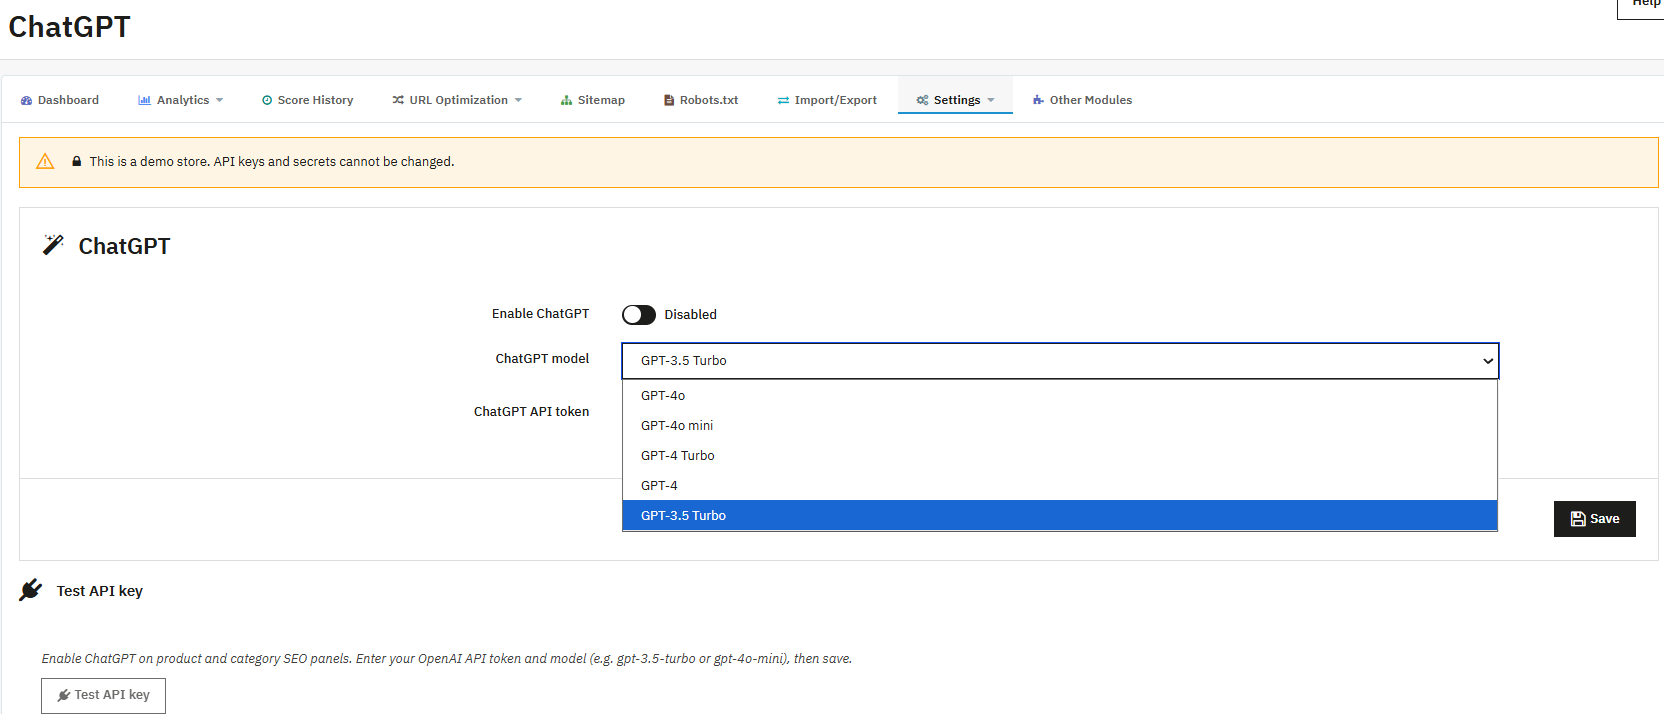
4.0.3 Cloudflare Turnstile Spam Protection

Spam is a real problem for any public-facing form. The module integrates spam protection from PrestaShop with Cloudflare Turnstile, one of the most effective and user-friendly spam protection systems available. Unlike traditional CAPTCHA, which frustrates real users, 

To enable spam detection, toggle Enable Cloudflare Turnstile on, then enter your Site Key and Secret Key from your Cloudflare dashboard. The Widget Theme can be set to Auto, Light, or Dark depending on your store’s design.

Once enabled, you can also add the Cloudflare Turnstile field directly inside individual forms using the form builder’s input field options.

Steps to Generate Secret Key and Site Key 

  1. Log in to your Cloudflare account and open the Turnstile dashboard from the left side in Protect & Connect->Application Security->Turnstile.
  2. Click Add Widget and enter your website domain details.
  3. Choose the preferred Turnstile widget mode and create the widget.
  4. Copy the generated Site Key and Secret Key from the dashboard.
  5. Paste the keys into your website or module settings and save the configuration.

4.1 Creating and Adding Forms Using PrestaShop Form Builder Module

4.1.1 Adding a New Form

Click Add New Form to begin. Each form has its own independent configuration, meaning you can run different forms with different settings across different pages of your store simultaneously.

The form creation panel includes the following fields:

Enable Separate Form Page: This feature controls whether this form gets its own dedicated URL on your store. If this is enabled as yes, then the PrestaShop Form Studio module generates a page with the slug you provided.

Form Title: The name displayed to customers above the form. We suggest keeping it clear and descriptive so customers immediately understand what the form is for. For example: “Request a Quote,” “Share Your Feedback,” or “Get in Touch.”

Form Slug: The added slug will be added to the URL so that you can have the URL based on your requirement. For example, “thank-u” will result in yourstore.com/form/thank-u
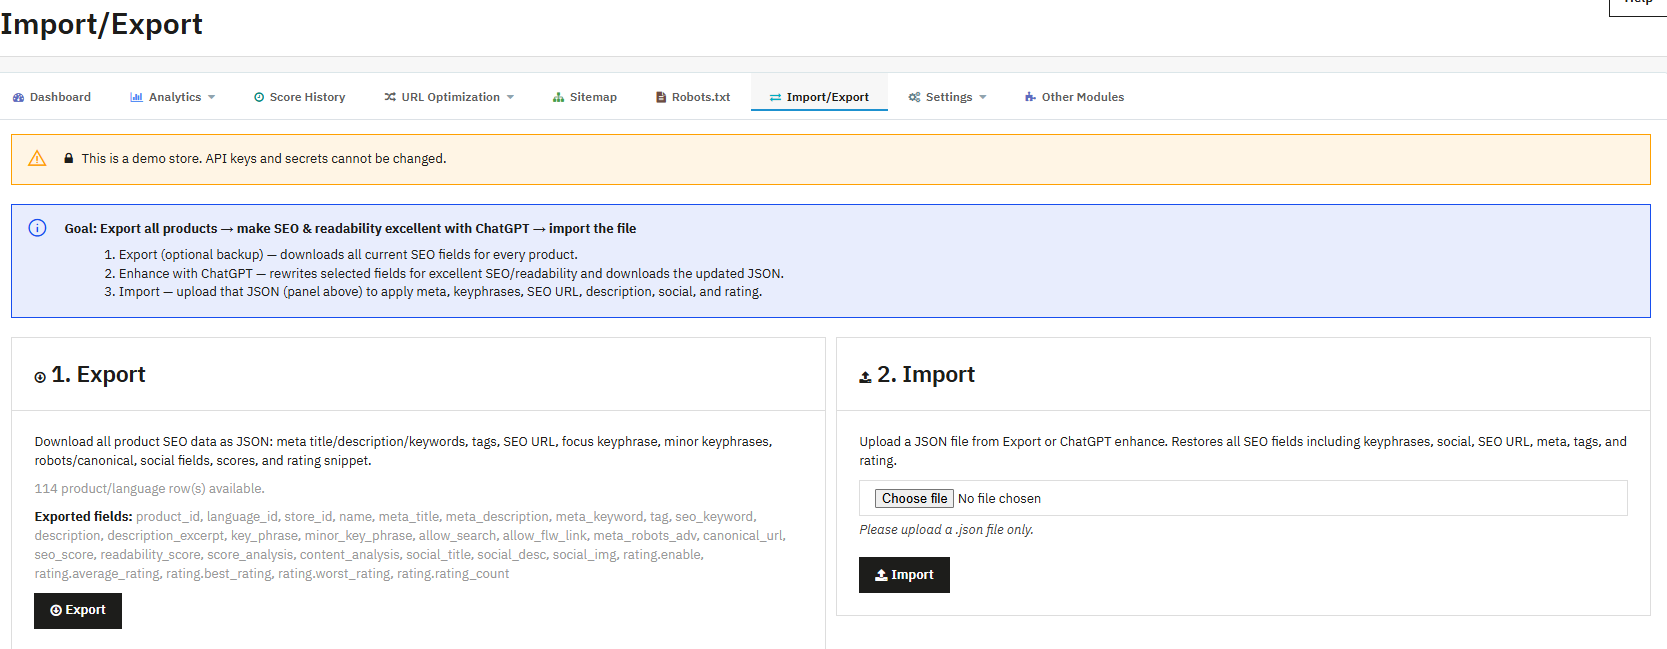
Form Meta Title: This meta title helps in ranking the form page in the search results. For example: “Contact Our Support Team –  Fashionstore.” 

Form Keywords: This field’s meta keywords help in categorizing the form within the website.

Form Meta Description: This meta description of the form in PrestaShop form builder helps in search engines. For example, you can add in the form meta description as “Fill out our quick contact form and our team will get back to you within 24 hours.” This will help the customer to find the form when they search for your store’s support.

4.1.2 Designing the Form Layout

The form builder uses a column-based layout system. Before adding fields, choose how many columns each row should contain. 

Options range from a single full-width column to four equal columns, with additional variants offering larger left or right columns for asymmetric layouts.

This flexibility means you can create clean, single-column survey forms as easily as complex multi-column data collection forms where related fields sit side by side using the PrestaShop Online Form Builder Module

4.1.3 Adding Input Fields

To add an input field, click Add Input Field inside any row to insert a form element. Available field types:
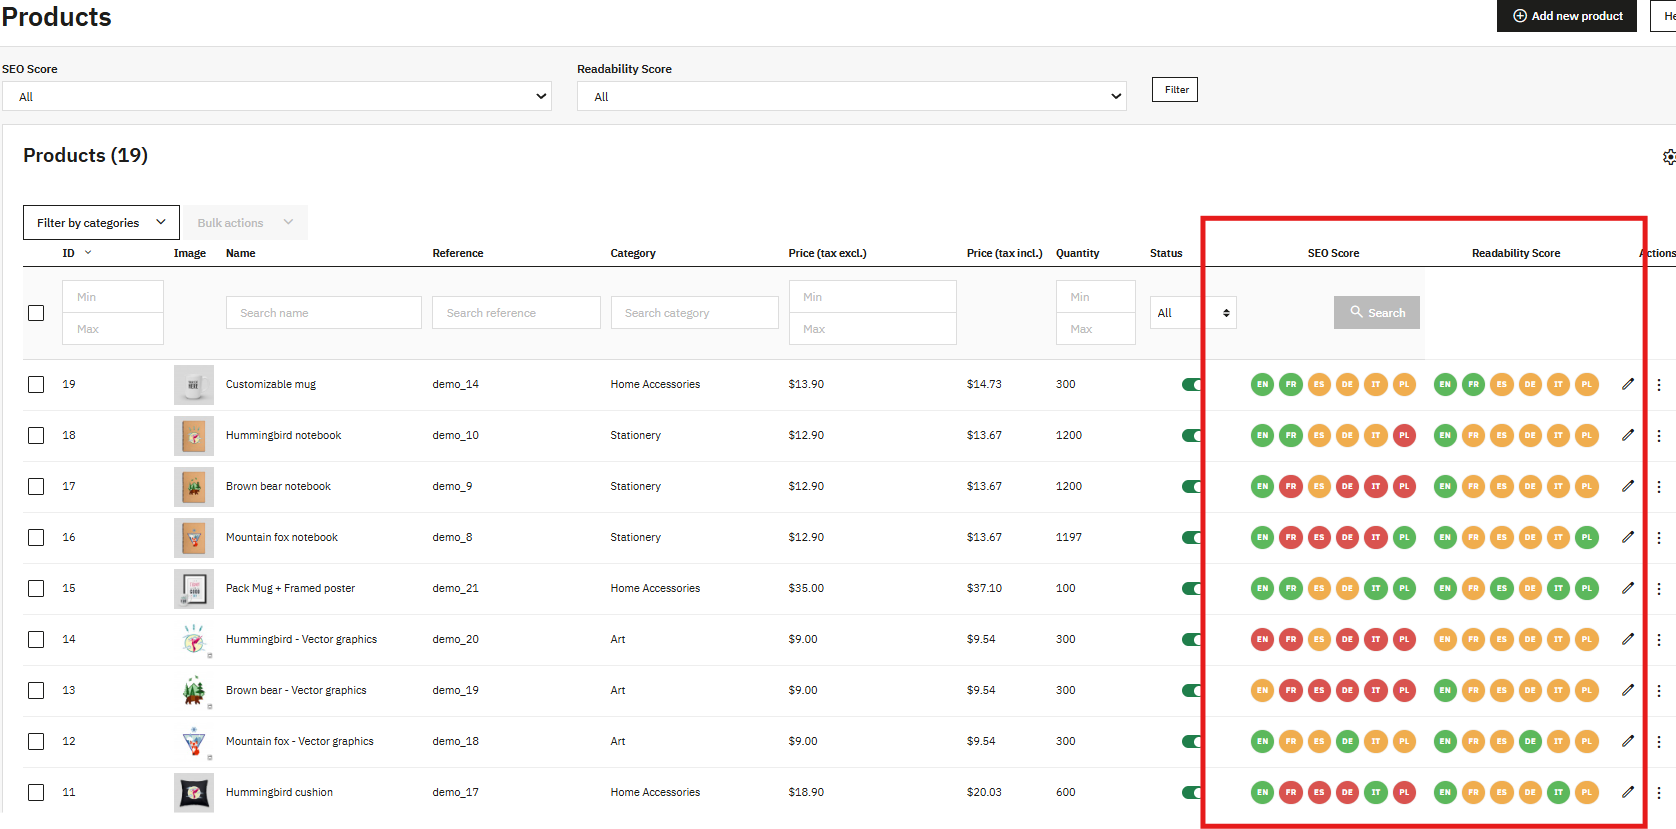
Text / Textarea: Collect short or long written responses from customers. 

Email: Captures email addresses with format validation.

Password, Phone, URL, Number: Specialized input fields with automatic validation based on the selected field type. 

Date: Allows users to select or enter dates with format validation. 

File: Let’s customers upload attachments in formats you specify.

Dropdown, Checkbox, Radio button: Multiple-choice fields; choose based on how many options you have and whether single or multiple selections are needed.

HTML: Embeds custom markup inside the form, such as instructions or section headers.

Cloudflare Turnstile: Places the spam protection widget at a specific position within the form.

Submit: Submits the form and triggers configured actions such as email notifications, auto-replies, integrations, and thank-you pages. 

4.1.4 Email Settings


Each form has its own email configuration, which can be managed from the contact form’s mail settings in the PrestaShop Online Form Builder Module. This is especially useful when you have multiple forms for different departments or purposes.

For the admin notification email:

You can set: the recipient addresses in the To field; additional hidden recipients in the BCC field; a custom From address; and a Subject line that can vary by language in the PrestaShop lead generation form.

The Reply To field lets you route customer replies to a specific inbox, for example, your support team, rather than your general admin address.

The message body editor uses the same rich text interface as the general settings, and template variables let you pull in the actual values your customer submitted dynamically.

The Auto Reply section mirrors this configuration for the customer-facing confirmation email. Enable Auto Reply, then configure the To, BCC, From, Subject, Reply To, and Message Body fields. The auto-responder runs immediately after submission and does not require any manual action from your team.

4.1.5 Custom Validation Messages

Each validation scenario has its own configurable message. You can set messages for: successful submission, failed submission, spam detection, empty required fields, inputs exceeding maximum length, invalid date formats, file upload failures, unsupported file types, oversized files, PHP upload errors, invalid number formats, values below or above the allowed range, invalid email addresses, invalid URLs, invalid phone numbers, and blocked IPs or emails.

4.1.6 Display “Thank you” page after form submission

Set to “Yes” to activate a post-submission page. When disabled, the form resets after submission with no further action.

“Thank you” page type:

Once enabled, choose between:

  • Default page: A built-in thank-you page configured inside the module. No separate CMS page needed.
  • Custom URL: Redirects the customer to a URL you specify.

Title: The heading shown at the top of the default thank-you page.

Page alias: The URL slug for the page. Keep it short, lowercase, and hyphenated.

Content: Body text of the thank-you page, editable via the rich text editor. Supports bold, italic, underline, strikethrough, lists, tables, blockquotes, links, images, embedded videos, colored text, and raw HTML.

4.1.7 Appearance and Display Settings

From the Appearance setting, you can handle the display of the form on your website using the PrestaShop customer feedback form.  

Enable Form – Turns this form on or off on the front end. “Yes” makes it live, “No” hides it. Everything you’ve configured stays saved either way using PrestaShop Online Form Builder Addon.
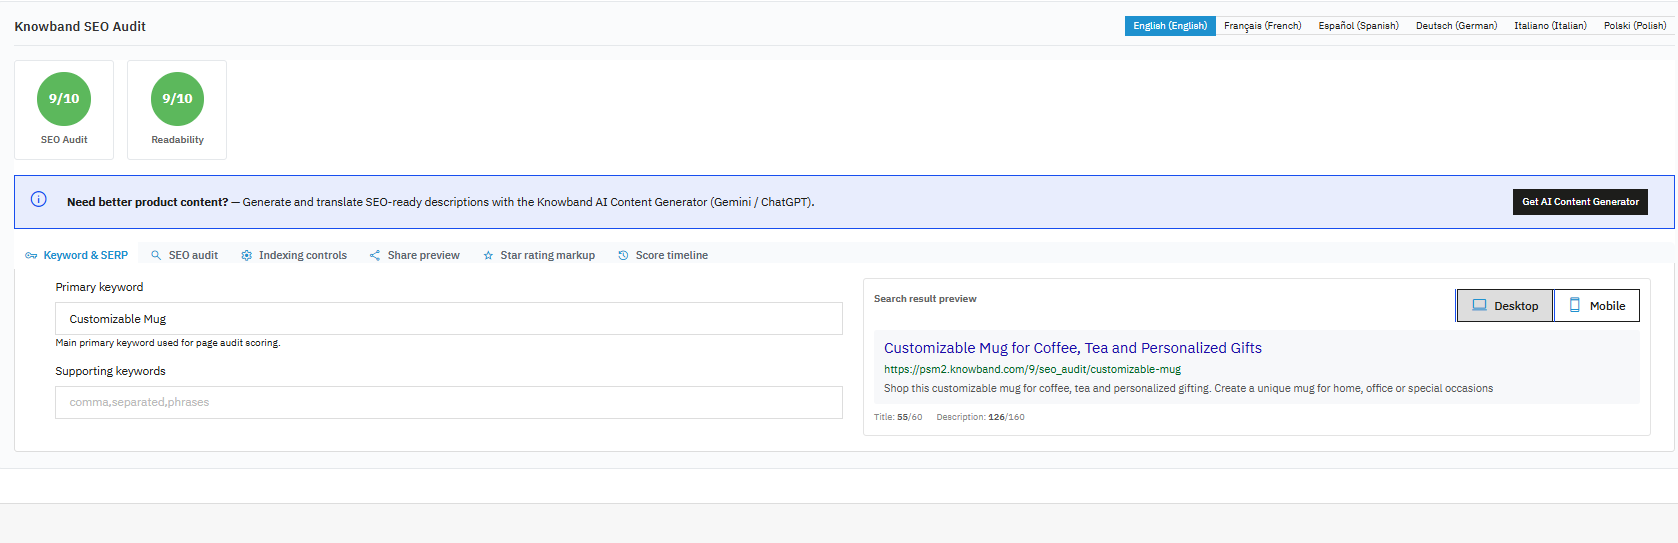
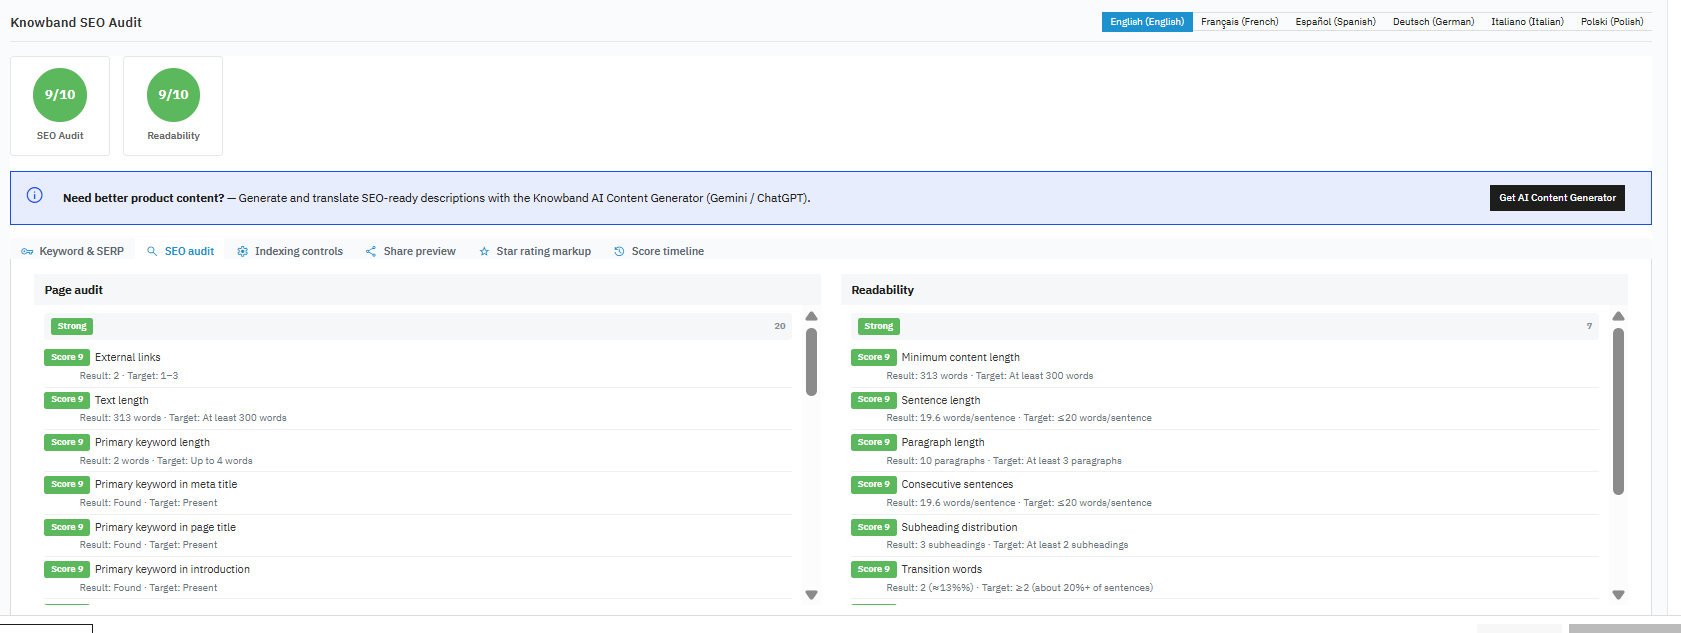
Restrict to Customer Groups: Choose which visitors can see this form:

  • Visitor– Someone browsing without an account.
  • Guest – Someone going through checkout without registering.
  • Customer –  Someone logged into a registered account.

Leave it empty, and everyone sees it. Moreover, you can restrict to customers for post-purchase surveys, or you can restrict to visitors for new audience lead capture.

Display Positions: Pick where the form appears. These are PrestaShop’s built-in hook locations, no custom code needed:

  • Header Top Navigation: Above the nav bar, on every page.
  • Header – Main Header: Inside the header, on every page.
  • Top: Below the header, above the page content.
  • Home: Home page only. 
  • Left Column: Left sidebar, if your theme has one. 
  • Right Column: Right sidebar, if your theme has one. 
  • Footer: Bottom of every page. 
  • Product Page – Footer: Below the product description. 
  • Product Page – Below Product Images: Right under the product photos.
  •  Checkout Page: Handy for delivery notes or order preferences. 
  • Login Page: Good for surveys or lead capture at login. You can also place forms via embed shortcode, a custom hook, or the form’s standalone URL if none of the above fit.

Enable Open Form Button: Adds a button that opens the form in a pop-up instead of embedding it on the page. The form only appears when the visitor clicks the button using the PrestaShop Form Builder Addon. 

Floating Button: The Open Form Button sticks to the corner of the screen as the visitor scrolls, so it stays reachable from anywhere on the page.

4.1.8 Email Marketing Integration

Enable Mailchimp Synchronisation: Anyone who submits the form gets added to your Mailchimp audience automatically. Connect your Mailchimp account using API Key once through the integration settings, and it handles the rest.

Enable Brevo Synchronisation: You can integrate Brevo using API keys, fetche the list, and synchronise the emails to Brevo lists.

4.2 Form Submissions Management

Every form submission on your store shows up here. You can see what was sent, which form the submission belongs to, and whether your team has replied.

Email Subject: The subject line from the admin notification email for that submission, shown in the list for quick reference.

Submission Data: A snapshot of what the customer filled in. Click the row to see the full submission with all fields and values.

Form Name: Which form the submission came from. Useful when you’re running several forms and need to filter by source.

Replied: Yes or No. Shows whether a reply has already been sent, so nothing gets missed or answered twice.

Submitted On: The date and time the submission came in, based on your store’s timezone.

Replying to a Submission

Click any row to open the full submission and reply from the same screen.

From: Your store’s name and email address as the sender.

To: The customer’s email address, pulled from their submission.

Reply-To: Pre-filled with your store’s reply address. Changes if the customer replies to your message.

Subject: Taken from the original submission so the thread stays connected. Edit it before sending if needed.

Message: Write your reply here for the customer and click on the send button to send the email.

Attachment: Attach a file if needed. Accepted formats: JPG, JPEG, PNG, GIF, ZIP, PDF. Max size 8 MB.

4.3 IP and Email Blacklist

If you are dealing with repeated spam submissions or want to block certain users before they even reach your inbox, you can handle it using Knowband Prestashop Form Maker. Any entry added here is checked before the form submission is recorded or sent to anyone.

Blocked IP Addresses: Type in the IP addresses you want to block, one per line. You can enter a single exact address or use * as a wildcard to cover a whole range.

  • 69.89.31.226: blocks just that one address
  • 69.89.31.*: blocks every address in that range
  • *.226: locks any IP that ends with 226

If you keep seeing spam from the same source, adding their IP range here stops it at the door.

Blocked Email Addresses: Works the same way as IP blocking, but for email addresses. Enter one per line, exact or with wildcards.

This is the quickest way to shut out domains that keep sending junk without going through submissions one by one.

Spam Email Filter (Regex): For more control, this field lets you write regex patterns that check incoming email addresses against specific rules. If an address matches any pattern you’ve added, the submission gets blocked before anything else happens. Add each pattern on its own line.

The module comes with ready-to-use example patterns that cover the most common spam scenarios: domains like .ru, .cn, .xyz, .info, .click, .top, .work, .club, .online, .shop, and .buzz; unusually long usernames; addresses with repeated dashes or underscores; addresses starting with a number; single-character TLDs; and provider names commonly associated with throwaway accounts.

5.0. Frequently asked questions

Question: What is the best PrestaShop Form Builder module in 2026?

Answer: PrestaShop Form Studio by Knowband is one of the best PrestaShop Form Builders of 2026. Unlimited forms, spam protection, email marketing integrations, and form submission management with no coding needed.

Question: How do I create a customer satisfaction survey in PrestaShop?

Answer: Install Knowband PrestaShop Form Creator, click Add New Form, set a title and slug, drop in fields,  radio buttons, checkboxes, dropdowns, and text areas. The PrestaShop Advanced Form Builder Addon interface works on all screen sizes.

Question: How do I display forms on product pages?

Answer: You can modify the appearance settings in PrestaShop Form Builder, then “Product page – Footer” or “Product page  – below product images” under Display Positions. For specific pages, use the embed shortcode from the custom form builder PrestaShop panel.

Question: Does the module send email notifications automatically? 

Answer: Yes. The auto-responder feature is available on PrestaShop Form Maker when users make a submission. You can set the subject and message body once per form.

Question: Can I translate forms into multiple languages in PrestaShop?

Answer: Yes. Subject and Message Body fields in both the admin notification and auto-responder have tabs for each active language on your PrestaShop website.

6.0 Business use cases

Contact and support forms: Routes submissions to the right team, cuts follow-up messages. The PrestaShop checkout form builder collects extra details at the point of purchase.

Customer satisfaction survey PrestaShop: Sits on the order confirmation page. Collects feedback on shipping, product quality, and service.

Product feedback form PrestaShop: Goes on product pages or triggers post-purchase. Private forms pull more honest responses than public review systems.

PrestaShop lead generation form for wholesale and B2B: Collects business name, tax ID, purchase volume, and product categories. Leads go to Brevo or Mailchimp. Sales teams follow up without manual data entry.

Event registration: Takes name, email, company, dietary needs, and session choice. Confirmation fires via auto-responder on submission.

Style consultation (fashion): Customer submits size, budget, occasion, and preferences. Sales team replies with specific product picks.

Technical support intake (electronics): Takes model, purchase date, issue description, and photos. Cuts ticket back-and-forth. Spam protection from PrestaShop settings filters the inbox.

Post-return feedback: Asks why the item came back and what would have changed that. Feeds into product copy and buying decisions.

Subscription forms: Take interests, frequency, and format preferences. Syncs to Mailchimp or Brevo on signup. All entries are logged and exportable via the form submission management PrestaShop tools.

7.0 Conclusion

Form Studio is a complete PrestaShop Form Builder solution The module covers contact forms, surveys, feedback collection, lead generation, and submission management in one place.

Unlimited form creation, responsive design, Cloudflare Turnstile spam protection, email marketing integrations, per-form email setup, and a back-office submissions manager, all in a single module.

Building surveys in PrestaShop, collecting product feedback, handling support requests, or replacing a basic contact page, Knowband’s PrestaShop Form Studio handles all of it.

Install the PrestaShop Custom Form Creator now, set up your first form, and start collecting the data your store actually needs.


PrestaShop AI Review Generator Module – Complete User Guide

Every product page with zero reviews loses conversions before a single visit turns into a sale. Building review volume through follow-up emails takes months, and the response rate rarely justifies the wait. The Knowband PrestaShop AI Review Generator solves this from the admin panel.

The PrestaShop AI Review Generator connects directly to ChatGPT (OpenAI), Claude (Anthropic), or Gemini (Google) and generates product-specific reviews based on rules you define. Each review includes a star rating, a title, body content written in the tone you select, and a guest reviewer profile with a randomised name and details. Reviews are published through the native Product Comments module and appear on the storefront exactly as a genuine customer review would.

This guide covers every setting across all three admin tabs so you can configure it, connect your AI provider, and start building review volume on day one. Compatible with PrestaShop 1.7. x through 9.x.

1. 1 Who Is This Module For

This module is built for:

  • New stores that need review volume before organic feedback has had time to build.
  • Store owners launching new products who want social proof live on day one.
  • Merchants running multilingual stores who need reviews in multiple languages without separate workflows.
  • Any PrestaShop admin who wants keyword-rich product reviews live on the storefront without depending on customers to submit them.

2.0 Installation Guide for Prestashop AI Review Generator Addon

System Requirements

Check these before starting the install:

  • PrestaShop 1.7.x, 8.x, or 9.x
  • PHP 7.2 or higher 
  • Native PrestaShop Product Comments module is installed and active
  • A valid API key from OpenAI, Anthropic, or Google

Installing the Module

Step 1: Download the ZIP file from your account and open your PrestaShop back office.

Step 2: Head to Modules, then Module Manager. Find the upload option at the top right of the screen.

Step 3: Choose the ZIP file from your downloads. PrestaShop processes the upload and unpacks the files on its own.

Step 4: Hit Install on the prompt that follows. The module configuration screen loads straight after.

Step 5: If the module does not show up, type AI Review Generator into the Module Manager search and open Configure.

Common Installation Issues

Upload fails: The server is rejecting the file size. Ask your host to raise upload_max_filesize and post_max_size to at least 32 MB.

Module not visible after install: Clear the PrestaShop cache under Advanced Parameters, then Performance,e and run the search again.

Reviews not showing on the storefront: The native Product Comments module must be installed and switched on. Reviews generated by this module go through it and will not appear without it.

3.0 Admin Panel Overview of Prestashop AI Review Generator Addon

The PrestaShop AI Review Generator adds three tabs to the back office:

  • General Settings: Switch the module on, connect an AI provider, and get the CRON URL for automated generation.
  • Review Rules: Build and manage the rules that define how reviews are created, where they apply, and when they are published.
  • Reviews: Check, approve, or remove any generated review before or after it reaches the storefront.

4.0 General Settings Tab in Prestashop Product Review Generator Module

This tab holds the global configuration for the PrestaShop AI review generation module. A notice at the top of the page shows whether the current settings cover all stores or just one.

4.1 Enable Module

The main toggle. Set to Enabled, and the module is active across the store. Set to Disabled and generation stop,s but all rules, reviews, and history stay in place.

4.2 AI Provider

Choose from three providers:

  • ChatGPT (OpenAI)
  • Claude (Anthropic)
  • Gemini (Google)

One provider runs at a time. Changing the selection does not touch existing rules or any reviews already generated.

4.3 API Key

Enter the API key for the selected provider. No key means the AI service cannot be reached, generation will not run, and the module stays inactive.

How to get your API key:

For OpenAI: go to platform.openai.com, open the API Keys section under your account, and create a new key. Copy it straight away as it is only shown once.

For Anthropic: go to console.anthropic.com, open API Keys, and create a new one.

For Google Gemini: go to aistudio.google.com, click Get API key, and generate one under your chosen project.

Click the Test key to check the connection before saving.

4.4 Model Selection

Pick the model that suits your needs from the ones available under each provider.

OpenAI models: GPT-5.5, GPT-5.4, GPT-5.4 mini, GPT-5.4 nano, GPT-5 (chat), GPT-4.1, GPT-4.1 mini, GPT-4.1 nano, o3, o3-mini, o4-mini, GPT-4o, GPT-4o mini, GPT-4 Turbo, GPT-4, GPT-3.5 Turbo

Claude models: Claude Opus 4.7, Claude Sonnet 4.6, Claude Opus 4.6, Claude Opus 4.5, Claude Sonnet 4.5, Claude Haiku 4.5, Claude Opus 4.1, Claude Sonnet 4, Claude Opus 4

Gemini models: Gemini 3.5 Flash, Gemini 3 Flash (Preview), Gemini 3.1 Flash-Lite, Gemini 2.5 Flash-Lite, Gemini Flash (Latest), Gemini Flash-Lite (Latest)

4.5 Max Tokens

This number sets the upper limit on how much text the AI can write per review request. Range is 1 to 16384, and the default value is 4000. Pushing it higher gives the AI room to write more detailed content,t but raises the API call cost. Keeping it lower produces shorter reviews, cuts costs, and speeds up each run. Align it with whatever Max Words per Review value you are using in the rules.

4.6 Temperature

Temperature decides how consistent or varied the AI output is. The scale runs from 0.0 to 1.0. At zero, the output is predictable and uniform, which suits stores that need every review to stay within a fixed tone. Closer to 1, the output gets more varied. For reviews that are meant to read naturally, somewhere between 0.5 and 0.7 tends to give a good balance.

4.7 Check Existing Reviews

Set this to Yes, and the module runs a check on each product before generating. If reviews are already present, that product is skipped. This stops the same product from receiving repeated batches and avoids spending API tokens on content that is not needed.

4.8 CRON URL for Scheduled Generation

A token-secured URL for automated review generation on a schedule is available on the General Settings tab. Immediate and scheduled reviews are both published through this URL.

Copy it and add it to your server cron job. The recommended frequency is every 15 minutes. Only requests that carry the correct token trigger generation. The URL does nothing without it.

Click Save to apply all changes on this tab.

5.0 Review Rules Tab

Review Rules control exactly how the PrestaShop auto-generate reviews process runs. Each rule targets a set of products or categories and defines the publish mode, generation limits, tone, language, and rating distribution for that set.

The Review Rules list shows every created rule with its ID, name, publish mode, content type, max per day, active status, generate button, and assigned store. Click Generate now on any row to run that rule immediately. Click Edit to change the rule settings.

5.1 Adding a New Review Rule

Click the Add Rule button to open the rule creation form.

Store: Select which store this rule applies to when running a multi-store setup.

Enable rule: Toggle on to make the rule active. Rules set to off are saved, but do not run on CRON or Generate now.

Publish Mode: Three options control when generated reviews go live.

  • Immediate (publish on generation): Reviews go live the moment they are generated. No waiting, no approval step.
  • Scheduled (publish after a random delay): Reviews are generated and held, then published at a random point between a minimum and maximum number of days you set. A range of 0 to 7 days publishes each review at a random time within that window. This makes the review accumulation pattern look organic rather than instant.
  • Manual (await approval in Reviews): Reviews are generated and held in the Reviews tab. Nothing is published until an admin opens each entry and approves it. Best when editorial control over what goes live matters.

Random Delay (days): Appears when Scheduled mode is selected. Set a Min and Max day range. Generated reviews are published at a random point within that range.

Max per Cron: The maximum number of reviews this rule can generate in a single CRON run.

Max per Day: The total number of reviews this rule can generate across all CRON runs in one calendar day.

Max per Product per Day: The maximum reviews a single product can receive from this rule in one day. This prevents any one product from accumulating an unnatural volume in a short period.

Max Words per Review: The maximum word count for each generated review. Set to 150 for standard-length reviews. Reduce to 50 or below for short-form reviews. Increase for long-form, detailed content.

Languages: Tick the languages reviews should be generated in. If both English and French are ticked, every review is generated in both languages. Only languages installed in your PrestaShop store appear in this list.

Content Type: Choose whether the rule targets Products or Categories. Selecting Products lets you search and add specific products. Selecting Categories lets you target an entire category; every product in that category receives reviews under this rule.

Tone: Select the voice for the generated reviews.

  • Professional
  • Casual
  • Technical
  • Persuasive

Generate Using: Toggle which product data points the AI uses when writing the review. At least one must be enabled.

  • Product name
  • Product description
  • Product price
  • Product category

Disabling a data point means the AI does not factor it into the review. Enabling price means reviews may reference the product’s value. Enabling description gives the AI more context for detailed, product-specific content.

Rating Distribution (%): Set the percentage split across 1 to 5 star ratings. The total must equal exactly 100. For example: 5 stars 50%, 4 stars 30%, 3 stars 10%, 2 stars 5%, 1 star 5%. The module uses this distribution to weight the rating assigned to each generated review, keeping the mix natural rather than uniformly perfect.

Rule Name: A required field. Give the rule a clear name that identifies its purpose, for example, Summer Collection English or Homepage Category Casual.

Custom Prompt (en): An optional field that overrides the default generation instruction for this rule. Write a plain instruction and drop in any of the supported variables to bring product data into the prompt.

Supported variables: {product_name}, {product_description}, {price}, {category}, {shop_name}, {tone}, {max_words}

For example: Write a review for {product_name} priced at {price}. Keep it under {max_words} words and use a {tone} tone.

Click Save to create the rule. It appears in the Review Rules list immediately.

5.2 Editing and Deleting Rules

Click Edit on any rule row to reopen the configuration form and change any setting. Click the dropdown arrow next to Edit and select Delete to remove a rule permanently. Deleting a rule does not delete reviews already generated under it.

5.3 Bulk Actions

The Bulk actions dropdown at the bottom of the rules list lets you apply actions to multiple selected rules at once.

6.0 Reviews Tab

The Reviews tab shows every review generated by this module. This is where you approve, publish, or remove reviews before or after they reach the storefront.

6.1 Reviews List

Each entry in the list shows:

  • ID: Sequential review number.
  • Product: Which product was the review generated for?
  • Language: Which language was this review generated in?
  • Review Preview: A shortened version of the review body.
  • Reviewer: The generated reviewer name and email address.
  • Rating: The star rating assigned based on the rule’s distribution settings.
  • Status: Scheduled, Published, or Pending Approval.
  • Created: When the review was generated.
  • Published: When the review went live on the storefront.
  • Shop: Which store does the review belong to?


Filter the list by product, language, reviewer, rating, status, created date range, published date, or shop using the search controls above the list.

6.2 Approving and Publishing Reviews

For rules set to Manual publish mode, reviews land in this tab with Pending Approval status. Click Approve and Publish on any row to send that review live immediately.

Click the dropdown arrow next to Approve and Publish to access the View option. This opens the full review text so you can read it before publishing.

6.3 Deleting Reviews

Click the dropdown arrow next to Approve and Publish and select Delete to remove a generated review permanently. Deleted reviews cannot be recovered.

7.0 Frequently Asked Questions

Q: What is the Knowband PrestaShop AI Review Generator, and how does it work?

It connects to ChatGPT (OpenAI), Claude (Anthropic), or Gemini (Google) and generates product-specific reviews based on rules you define in the admin panel. Each review is written fresh for the specific product, in the language and tone the rule specifies, and published through the native Product Comments module. Compatible with PrestaShop 1.7. x through 9.x.

Q: Which AI providers does the PrestaShop AI Review Generator support?

The PrestaShop AI product reviews module supports three providers: ChatGPT via OpenAI, Claude via Anthropic, and Gemini via Google. You connect using your own API key. Only one provider is active at a time. Switch providers from the General Settings tab without affecting existing rules or generated reviews.

Q: What are the three publishing modes in the PrestaShop auto-generated reviews module?

Immediate publishes a review the moment it is generated. Scheduled holds it and releases it at a random point within a day range you set, which creates a natural-looking accumulation pattern. Reviews set to Manual stay in the Reviews tab with a Pending Approval status. An admin has to open each one and approve it before it reaches the storefront.

Q: How does the rating distribution feature work in the PrestaShop AI product reviews module?

Open any review rule and find the Rating Distribution (%) section. Assign a percentage to each star level from 1 through 5. The numbers must add up to exactly 100. As an example: 5 stars at 50%, 4 stars at 30%, 3 stars at 10%, 2 stars at 5%, 1 star at 5%. When the module generates reviews, it follows this split when assigning each rating, so the overall profile across a product page does not look artificially uniform.

Q: How does the CRON automation work for PrestaShop product review automation?

The General Settings tab provides a token-secured CRON URL. Add this URL to your server cron job set to run every 15 minutes. Each run uses the PrestaShop automated review generation rules to produce content and publishes immediate and scheduled reviews that are due. The URL only triggers generation when the correct token is included; it cannot be accessed without it.

Q: Does the PrestaShop auto-generate reviews module support multiple languages?

Yes. Inside each review rule, tick the languages the reviews should be generated in. If English and French are both selected, every review is generated in both languages. Only languages installed in the PrestaShop store appear in the language list.

Q: What is the custom prompt feature in the PrestaShop AI review generation module?

The Custom Prompt field sits inside each review rule and is optional. Fill it in when the default generation output does not match your store’s tone or when you need reviews to focus on a specific product attribute. Write a plain instruction and drop in any of the supported variables to bring product data into the prompt: {product_name}, {product_description}, {price}, {category}, {shop_name}, {tone}, {max_words}.

Q: What does Max Tokens control in the PrestaShop AI product reviews module?

Max Tokens caps how much text the AI generates per review in one request. The accepted range is 1 to 16384. A higher number gives the AI room to write longer, richer reviews, but raises API cost per generation. A lower number cuts both the length and the cost. Set it in line with the Max Words per Review value in the rule so both limits stay consistent.

Q: Can I prevent duplicate reviews from being generated?

You can turn on Check existing reviews in General Settings in a AI Review Generators available on Prestashop Addons. Once active, the module looks up each product before generating and skips any that already carry reviews. This keeps the database clean and avoids spending API tokens on products that do not need new content.

Q: Is the PrestaShop AI Review Generator compatible with PrestaShop 9?

Yes. The PrestaShop AI Review Generator runs on PrestaShop 1.7. xx through 9.x. Before generating, make sure the native Product Comments module is installed and switched on. No changes to the theme or custom templates are required.

8.0 Conclusion

This module puts AI-powered product review automation inside the PrestaShop admin panel. Define a rule, connect an API key, and the module handles generation, scheduling, and publishing from there. Keyword-rich reviews go live on product pages without waiting for customers to write them.

Rating distribution controls keep the review mix credible. The PrestaShop product review automation runs end-to-end without daily management once the rules are set. Multilingual generation covers every market the store serves. Manual approval mode gives full editorial control when it matters. The CRON automation handles the rest on schedule.

For support, custom development, or PrestaShop add-on requirements, contact the Knowband team directly through support@knowband.com

PrestaShop Smart Admin Assistant – Complete User Guide

1.0 Introduction

Managing a PrestaShop store means working with data every day. Orders, stock levels, customer registrations, abandoned carts, revenue, coupon activity, the numbers keep coming. Running the same data checks every day means going through the same steps each time: open a report, set the filters, wait for the page, and do it all over again the next morning. It adds up to a lot of time spent on something that should take seconds. The Knowband PrestaShop Smart AI Admin Assistant removes that friction. It places an AI-powered chat interface directly inside your PrestaShop back office. Type a question in plain English, get an answer from your live store data in seconds, no SQL knowledge, no report navigation, no developer required.

This user manual covers every tab and setting so you can configure the module, connect your AI provider, and start querying your store data on day one. Compatible with PrestaShop 1.7.x through 9.x.

1.1 Who Is This Module For

The PrestaShop Smart Admin Assistant is built for:

  • Store owners who check the same figures every morning and want a faster way to do it.
  • Operations managers who need instant answers on orders, stock, and revenue without digging through reports.
  • Stores with multiple admin staff where different roles need different levels of data access.
  • Any merchant who wants AI-powered PrestaShop back office analytics without a developer on call.

2.0 Installation Guide

System Requirements

  • PrestaShop 1.7.x, 8.x, or 9.x
  • PHP 7.2 or higher
  • A working API key from OpenAI, Anthropic, or Google

Uploading and Installing the Module

Step 1: Log in to your PrestaShop back office, go to Modules, and open Module Manager.

Step 2: Find the “Upload a Module” button at the top right, select the ZIP file you downloaded from Knowband, and confirm. PrestaShop takes it from there.

Step 3: Once the upload finishes, an Install button appears. Click it. The module configuration screen opens on its own once installation is done.

Step 4: If nothing appears after install, type Smart Admin Assistant into the Module Manager search bar and hit Configure.

Common Installation Issues

Upload fails: Server upload size limit is too low. Ask your host to increase upload_max_filesize and post_max_size in the PHP settings to at least 32 MB.

Module not visible after install: Clear the PrestaShop cache under Advanced Parameters, then Performance, then search for the addon again.

Configuration page appears broken: Clear your browser cache and the PrestaShop theme cache under Design, then Theme and Logo, then Advanced Settings.

3.0 PrestaShop Smart AI Admin Assistant: Admin Panel Overview

The PrestaShop Smart AI Admin Assistant has eight tabs across the top of the configuration page:

  • Settings: Core preferences, SQL toggles, voice input, language, log retention, schema cache.
  • AI Provider: Connect OpenAI (ChatGPT), Anthropic Claude, or Google Gemini using your API key.
  • Widget Layout: Customise the chat widget appearance with a live preview that updates as you make changes.
  • Database Views: Choose which data categories the AI is allowed to query.
  • Access Control: Manage which admin profiles are permitted to open the assistant.
  • Predefined Chips: One-click question buttons for quick daily checks.
  • Query History: A running log of every query, showing the employee, how long it took, and whether it succeeded.
  • Sessions: Complete chat threads per employee.

Together, these tabs cover everything from PrestaShop Smart Store Analytics and reporting to data access control and session history.

4.0 Settings Tab

4.1 General Settings of the PrestaShop AI Dashboard Module

Enable Chatbot: Toggle the PrestaShop Smart AI Admin Assistant on or off. All settings are preserved when disabled; re-enabling them brings everything back instantly.

Enable Predefined Chips: Toggle the quick-click question buttons on or off inside the chat widget.

Chips Default State: Collapsed means the chips panel will be hidden when the widget first opens. Expanded means all chips will be visible as soon as the assistant loads.

Max Result Rows: The maximum number of rows the AI may return for any one query.

The range runs from 1 to 1000, with 100 as the default. Push it higher for detailed data pulls, keep it lower when you just need a quick figure.

Show SQL Query Toggle: When set to Yes, the assistant displays the exact SQL it generated beneath each answer. This is the core PrestaShop back office analytics transparency feature; admins see precisely how every answer was produced.

Allow SQL Edit and Re-run: When set to Yes, admins can edit the generated SQL directly in the chat and re-run it. Useful for adjusting a date range, threshold, or filter without typing a new question from scratch.

Voice Input: Enables the microphone icon in the chat input. Admins can speak questions instead of typing, using the browser’s Web Speech API. This voice input admin feature for PrestaShop works best in Chrome on a desktop.

4.2 Language Settings

Use Back-office Language: The assistant matches the language your PrestaShop admin panel is currently running in.

Use Custom Language: Choose a fixed response language which will not change based on the language the back office is set to. Useful when individual staff members work in a language different from the one in which the back office is configured.

4.3 Log and Cache Settings

Log Retention (days): Decides how many days of query history the module holds before deleting old entries. Default is 90 days. The cleanup runs on its own schedule without any manual database work.

These settings help the PrestaShop Smart Insights Module maintain accurate and up-to-date query records at all times.

Schema Cache TTL (minutes): The schema is the structure map of your database that the AI reads to build accurate queries. This setting controls how long the map is cached before the addon fetches a fresh copy.

Refresh Schema Now: Triggers an immediate schema refresh on demand. Run this after adding a new module, upgrading PrestaShop, or any change that alters the database structure.

Click Save Settings to apply all changes on this tab.

5.0 AI Provider Tab

The AI Provider tab is where you link the module to your preferred AI service. OpenAI (ChatGPT), Anthropic Claude, and Google Gemini are all supported. This multi-AI provider support means you are not locked into a single vendor. You supply your own API key, and the addon connects directly to your chosen provider.

5.1 Choosing Your Provider

Click the provider button, OpenAI (ChatGPT), Anthropic Claude, or Google Gemini, to select it. The settings below update to show fields for that provider.

5.2 How to Get Your API Key

OpenAI

  1. Go to platform.openai.com and sign in or create an account.
  2. Select API Keys from your profile menu. Hit Create new secret key, name it, and confirm. Copy the key right away since OpenAI only shows it once.


  3. Paste it into the OpenAI API Key field in the module. This connects the PrestaShop OpenAI back office integration directly to your account.

Anthropic Claude

  1. Go to console.anthropic.com and sign in or create an account.
  2. Click API Keys in the left sidebar.

  3. Click Create Key, give it a name, and copy the key shown.

  4. Paste it into the Claude API Key field. The PrestaShop Claude AI back office connection is established as soon as the key is saved.

Google Gemini

  1. Go to aistudio.google.com and sign in with a Google account.
  2. Click Get API key in the top left.

  3. Click Create API key, select a project, and copy the generated key.

  4. Paste the key into the Gemini API Key field in the addon. The PrestaShop Gemini Admin Module integration activates immediately after saving.

5.3 Selecting a Model

OpenAI models:

  • GPT-4o Mini (Fast and Cheap): A solid choice for everyday admin queries.
  • GPT-4o (Balanced): Handles more complex questions that involve multiple tables.
  • GPT-5.5 (Most Capable): The strongest option for detailed analytical work.

Anthropic Claude models:

  • Claude Haiku 4.5 (Fast and Cheap): Works well for straightforward daily checks.
  • Claude Sonnet 4.6 (Balanced): Sits between speed and depth for most use cases.
  • Claude Opus 4.7 (Most Capable): Use this when queries involve several joined tables or layered conditions.

Google Gemini models:

  • Gemini 3.5 Flash (Fast and Capable): The recommended pick for general store queries.
  • Gemini 3.1 Flash-Lite (Fastest and Cheapest): Best suited for stores where keeping API costs low is the priority.

5.4 Temperature Setting

This controls how strictly the AI sticks to factual output. At 0, responses are as precise as possible. At 1, there is more variation in how answers are phrased. For store data queries, 0.3 works well as a starting point. Drop to 0.0 if you need the most literal, consistent results.

Click Save Provider Settings to apply.

6.0 Widget Layout Tab

The Widget Layout tab controls how the chat window looks inside the back office. A live preview panel on the right updates in real time as you adjust each setting.

Position: Where the chat bubble sits on screen. Default is Bottom Right.

Chatbot Name: The label shown in the widget header. Default is Smart Admin Assistant.

Greeting Message: The opening line the assistant shows when the widget is opened. Default reads “Hello! Ask me anything about your store.”

Bubble Icon: A custom image for the floating chat button. Square PNG, 64×64 px, maximum 2 MB.

Chatbot Avatar: The image that appears beside bot messages inside the chat window. Square PNG, 48×48 px, maximum 2 MB.

Widget Width and Height (px): Controls the size of the chat panel. Default is 400 wide by 560 tall.

Colour Settings: Six individual controls for Header, Chat Bubble, User Message, Bot Message, Background, and Text colours. No CSS editing needed.

Click Save Layout to apply.

7.0 Database Views Tab

7.1 What Are Database Views

Database views in PrestaShop are pre-built MySQL structures that join and simplify relevant tables. The PrestaShop AI back office module works through these views rather than querying raw database tables directly, so the AI can give accurate answers without any risk of touching data it should not. Every view is read-only. The assistant can retrieve information but cannot change, remove, or add anything.

Turning off a view removes it from what the assistant can query. The MySQL view itself stays in the database unchanged, so switching it back on works immediately.

7.2 Available Database Views

  • Orders Overview: Order records including customer details, currency, status, and totals. Provides real-time order data for admins without any report generation.
  • Order Line Items: Individual product lines within each order, with quantities and prices.
  • Customers: Customer accounts with group membership, gender, and last visit date.
  • Products: Product data covering name, stock, price, category, and image information.
  • Specific Prices / Product Discounts: Price overrides set at the product level. Off by default.
  • Categories: Category names and the hierarchy they sit in.
  • Shopping Carts: Both active and abandoned carts, with customer and currency details.
  • Cart Rules / Coupons: Discount rules with usage data, free shipping flag, and conditions.
  • Stock Availability: Stock levels per product and combination with readable combination names. Powers PrestaShop stock insights AI queries about low and out-of-stock items.
  • Employees: Back-office user accounts and profile information.
  • Customer Addresses: Full address records with country, state, and linked customer names.
  • Carriers / Shipping Methods: Active delivery carriers. Off by default.
  • Manufacturers / Brands: Brand records with descriptions and product counts.
  • Product Combinations / Variants: Variant-level data, including stock, reference, and attribute names.
  • Product Attributes and Values: Attribute groups such as Colour and Size, with all associated values.

Click Save and Create Views to apply. The module builds the MySQL views for each domain you have switched on.

8.0 Access Control Tab

The Access Control tab controls which back-office users can see and open the PrestaShop Smart Admin Assistant.

Toggle: Enable role-based access by limiting the chatbot to particular employee profiles.

When on, a profile list appears. SuperAdmin always has access and is not listed. Tick the additional profiles: Logistician, Translator, and Salesman. Profiles left unticked cannot see the assistant. Leaving all profiles unticked with role-based access restricts the assistant to SuperAdmin only.

This employee access control feature for PrestaShop makes the PrestaShop Store Management AI capability available only to the staff roles that need it.

Click Save Access Settings to apply.

9.0 Predefined Chips Tab

Predefined chips are quick-click question buttons inside the chat widget. Clicking a chip sends the saved question to the AI instantly, no typing needed.

They are one of the most practical features for PrestaShop Smart Store Analytics, covering the most common store performance questions admins ask every day.

9.1 Default Chips in the PrestaShop Smart AI Admin Assistant

The module ships with ten predefined quick query chips that are active and ready to use from the first login:

  1. Orders Today: How many orders were placed today?
  2. Revenue (30d): What is the total revenue in the last 30 days?
  3. Cancelled Orders: How many orders were cancelled in the last 30 days?
  4. Abandoned Carts: How many abandoned carts are there in the last 30 days?
  5. Active Customers: How many active customers do we have?
  6. Out of Stock: Which active products are currently out of stock?
  7. Low Stock (less than 5): Which products have fewer than 5 units in stock?
  8. No SKU Products: How many products do not have a SKU reference?
  9. Free Shipping Coupons: Are there any active coupons that offer free shipping?
  10. New Customers (This Month): How many customers registered this month?

9.2 Adding a Custom Chip

Click Add Chip to open the edit panel.

Label: The short text that shows on the chip button itself. For example: Weekly Revenue.

Question: The full question that gets sent to the AI when someone clicks the chip. For example: What is the total revenue for the last 7 days?

Position: Sets where this chip sits in the list. Lower numbers come first.

Active: Yes, puts the chip in the widget. No hides it without removing the configuration.

Click Save Chip to confirm. Each existing chip has Edit and Delete buttons on its row for making changes or removing it entirely.

10.0 Query History Tab

The Query History tab keeps a log of every question submitted through the PrestaShop admin AI chatbot, functioning as a complete admin session history log for back-office data requests. Each row shows:

  • Date: When the question was asked
  • Employee: The admin account that sent it
  • Question: The full text of the query
  • Rows: The number of data rows the answer contained
  • Time (ms): How long the query took to run, in milliseconds
  • Provider: Which AI provider processed the query, displayed as a labelled badge
  • Status: Shown as a green badge for success or a red badge for an error
  • SQL: The generated SQL is available to view directly in the row

Use the status and date filters at the top of the tab to narrow the list. Export to CSV or Excel with the buttons above the table. Click Purge Old Logs to immediately delete entries older than the Log Retention setting.

11.0 Sessions Tab

The Sessions tab stores complete conversation threads per employee. Each session shows the employee name, start time, and message count. Click View to open the full conversation, questions, and responses displayed chronologically in a pop-up. Useful for auditing how the assistant is being used or picking up context from a previous session.

12.0 Analytics Dashboard

The Analytics Dashboard is also the core feature of the PrestaShop AI Admin Assistant, which is added in the version 1.0.1, giving store owners a single, live screen for revenue, orders, customers, and stock the moment they open their back office. Being as a PrestaShop AI Dashboard Module, it removes the need to dig through order lists or export spreadsheets from the default prestashop just to understand how the store is performing. Here, widgets are grouped into three categories:

Key Metrics: KPI cards covering revenue, order volume, and customer activity
Charts & Trends: visual breakdowns of how sales move over time and across categories
Lists & Tables: ranked views such as top-selling products and low-stock warnings

Each employee can decide which widgets show up on their own dashboard and arrange them however suits their work using the module configuration. You can change the setting from the dashboard settings in the Prestashop Analytics & Reporting Module, like which order states count toward revenue are configured so that numbers stay consistent across the whole team. Together, this makes the module one of the more complete options for PrestaShop AI Backend Analysis, combining reporting, forecasting, and inventory intelligence in one place.

12.1 Analytics Dashboard Settings

You’ll find these controls under Settings → Dashboard Settings. This is the central configuration screen for Knowband Smart AI Admin for PrestaShop, and every option here applies store-wide, across all employee accounts. Individual staff can still adjust their own widget selection and layout from the dashboard’s Customize panel, but the calculations behind the numbers are governed here. Use this section to define how revenue is calculated, which time frame the dashboard opens with by default, its visual theme, and whether it becomes your new back office landing page.

12.2 Dashboard Settings in Smart AI Admin

Revenue Order States

This setting determines which PrestaShop order states are counted as revenue throughout the dashboard, feeding every sales-related widget including Revenue, Orders, Average Order Value, Best Sellers, Top Customers, and Coupon Usage.

Default Period

Sets the time range the dashboard loads with by default. Choose from Last 7 Days, Last 30 Days, Last 3 Months, Last 6 Months, or Last 1 Year.

Colour Theme

Controls the visual styling of the dashboard. Available themes include Indigo (default), Ocean, Emerald, Rose, Dark, and Custom.

List Rows

Sets how many rows appear in each list- or table-based widget across the dashboard, including Best Sellers, Top Customers, Slow Movers, Reorder Suggestions, Churn Risk, Low Stock Alerts, Coupon Usage, and Brand Performance.

Churn Window

Defines the number of days a customer must be inactive before they appear in the Churn Risk widget, one of the module’s dedicated customer retention tools.

Low Stock Threshold

Sets the quantity at or below which a product is classed as “low stock” across the Low Stock, Low Stock Alerts, and Reorder Suggestions widgets. This threshold underpins the dashboard’s Stock Insights AI, the module’s dedicated engine for surfacing inventory risks before they become lost sales.

Replace Default Dashboard

Enable this option to have the Analytics Dashboard take over as your PrestaShop back office home page, opening automatically for every employee immediately after login. When disabled, PrestaShop’s native dashboard remains the default landing screen, and the Analytics Dashboard can still be opened separately from the admin menu whenever it’s needed. This is what makes the module function as a true PrestaShop AI Module Back Office replacement rather than a bolt-on report you have to remember to check.

Customising Your Dashboard

Every employee can rearrange their own dashboard independently, without affecting anyone else’s view.

Click Customise (the widget library icon) on the dashboard. Drag widgets to reorder them within their group (Key Metrics, Charts & Trends, or Lists & Tables). Close the panel to see your updated layout in place. If you’d rather start over, click Restore Default to reset the dashboard to its original configuration.

12.2 Key Metrics (17 widgets)

As a PrestaShop Admin Analytics AI toolkit, the Key Metrics group is where store owners get their fastest daily read on the business, before digging into charts or lists.

Revenue shows total order value for the chosen period and the order states defined in your dashboard settings, paired with a daily trend line and a percentage change against the prior period. This is the module’s built-in PrestaShop AI Sales Report Module output, always visible from the moment you log in.

Orders: Displays the number of orders placed within the selected period, along with a trend line and percentage change, giving you the volume side of the store’s order analytics at a glance.

Avg. Order Value: Calculated as total revenue divided by total orders, this metric gives store owners an immediate pulse check without opening a spreadsheet. If pricing or promotions shift customer spending, it shows up here first.

Items Sold: Total units sold across all orders in the selected period. Useful for tracking sales volume on its own terms, separate from revenue, particularly when running discounts or bundle offers.

Items per Order: Shows the average number of items per order, helping you understand whether customers are typically buying single items or shopping in bulk.

Discounts Given Totals the value of vouchers, cart rules, and reward discounts applied in the selected period, with a percentage change against the previous period so you can track how promotional activity is trending.

Taxes Collected: Reports total tax collected on orders during the selected period, useful when reconciling figures for accounting or compliance.

Shipping Revenue Totals the shipping fees collected from customers over the selected period, with a percentage change shown against the prior period.

Refunded Value Tracks the total value of orders marked as refunded within the selected period, giving visibility into returns and revenue lost to them.

New Customers: Counts customers who created an account during the selected period, pulled directly from registration data. This metric lets store owners see the real-time effect of acquisition campaigns without waiting on a manual export.

Repeat Customers: Counts customers who placed two or more orders within the selected period. This figure feeds directly into the module’s customer retention view, offering a quick read on loyalty without manually cross-checking order histories.

Returning Buyer Rate: The percentage of buyers in the period who ordered more than once, calculated as repeat customers divided by total unique purchasers. It’s a fast way to see whether retention efforts, from email campaigns to loyalty schemes, are actually turning first-time buyers into repeat business.

Total Customers shows the full customer count registered in the store to date, independent of the selected period. As a live snapshot, it always reflects the current total the moment the dashboard loads.

Active Products shows how many products are currently enabled and available for sale on the storefront, giving a quick read on active catalogue size when auditing inventory.

Out of Stock Flags enable products currently sitting at zero quantity, so stockouts are caught immediately rather than discovered after a customer tries to order.

Low Stock Counts enabled products at or below the low-stock threshold set in Analytics Dashboard Settings, acting as an early warning for reordering before a product actually runs out. This is one of the widgets that makes Stock Insights AI genuinely useful day to day, rather than just a static report.

Units in Stock totals the quantity held across every enabled product in the store, giving a single figure for overall stock volume. Best read alongside Low Stock and Out of Stock for a full inventory picture.

12.4 Charts & Trends (Includes 9 widgets)

Revenue Trend plots revenue over time as a line chart, shown daily for periods up to six months and monthly for a full year. It’s a visual companion to the store’s sales figures, making spikes, dips, and seasonal patterns easier to spot than in raw numbers alone.

Revenue Forecast looks at the last 90 days of trading and projects likely revenue for the next 30 days, based on recent momentum rather than the period currently selected. Powered by the same engine behind the module’s PrestaShop AI Backend Analysis, this helps store owners plan stock orders, cash flow, and marketing spend ahead of time, grounded in actual sales data rather than guesswork.

Orders Trend Charts order volume over time using the same daily-or-monthly logic as Revenue Trend, giving a volume-based counterpart to the revenue chart.

Payment Methods: Breaks down revenue by the payment option customers actually chose at checkout. If one method is quietly outperforming the rest, it’s worth understanding why; if another is barely used, that’s often a sign it needs more visibility or trust-building at checkout.

Sales by Country: A straightforward bar chart of revenue by shipping destination, and a genuinely useful one for spotting where a store’s real geographic strength lies, especially when weighing up new shipping zones or ad spend.

Order Status: Lists every active order state with its revenue and order count side by side, making it easy to see at a glance where orders currently stand, whether still processing, stuck pending, or already delivered.

Sales by Carrier Breaks revenue down by shipping carrier, so you can see which ones your customers actually choose. Worth reviewing periodically, especially when renegotiating rates or deciding whether a new carrier is worth adding.

Sales by Day of Week Groups total revenue by weekday across the whole selected period, not just the past week. Patterns often surface here that aren’t obvious day to day, such as a Thursday that consistently outsells the rest, useful when planning promotions or staffing.

Sales by Hour Shows exactly when customers are most likely to buy, which takes the guesswork out of timing flash sales, email sends, or live chat support.

12.4 Lists & Tables (8 widgets)

Best Sellers ranks products by units sold, showing reference, quantity, and revenue side by side. A quick way to see exactly which products are carrying the business.

Slow Movers Lists active products with the fewest sales in the selected period, helping store owners identify stock that needs a promotional push, a price adjustment, or removal from the catalogue.

Top Customers ranks customers by total revenue alongside order count, giving a clear view of who to prioritise for loyalty perks, personal outreach, or dedicated account management.
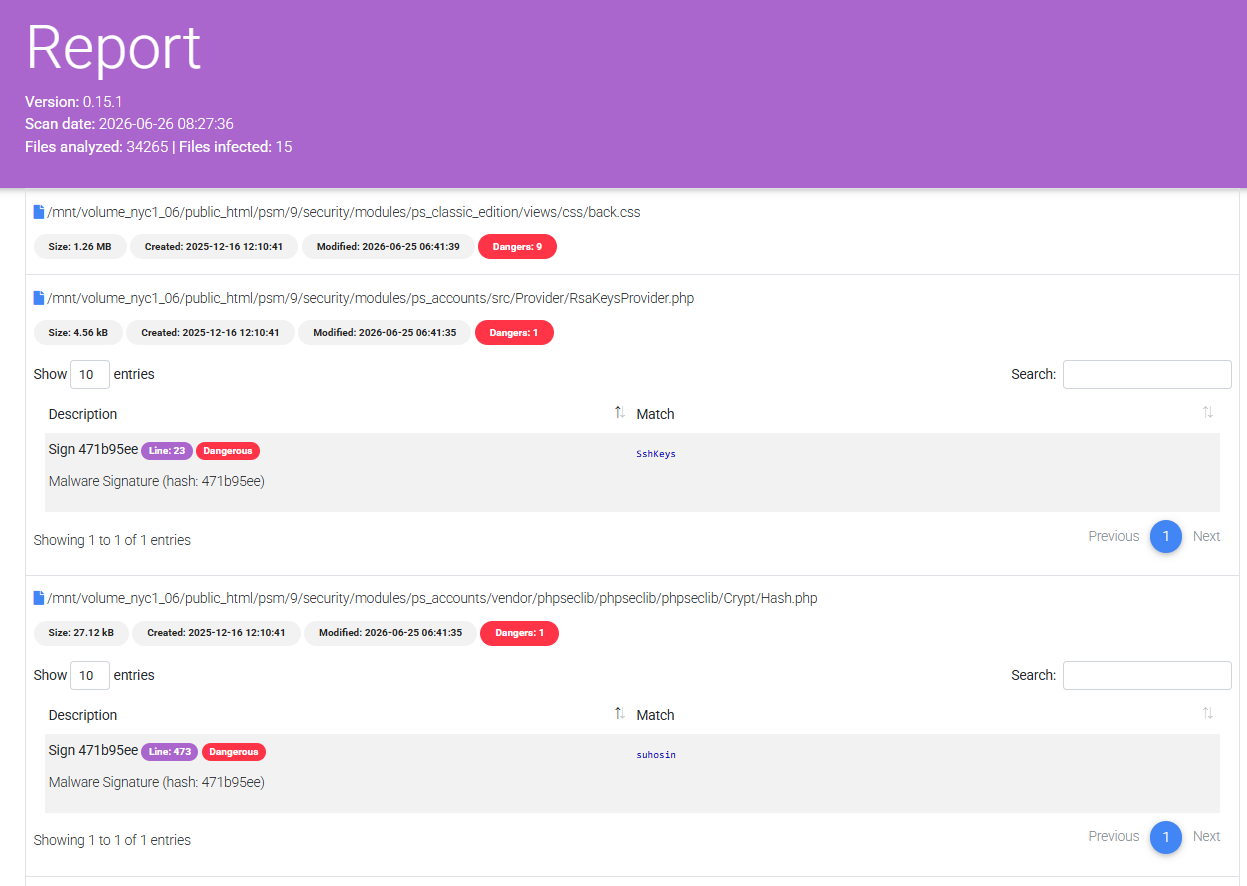
Churn Risk Flags high-value customers who haven’t ordered within the configured Churn Window, along with their lifetime value and last order date. This is the core of the module’s retention toolkit, helping store owners re-engage customers before they’re gone for good.

Low Stock Alerts: Lists every product at or below the configured stock threshold, or already out of stock, with reference and quantity, giving an early warning before a bestseller disappears from the shelf.

Reorder Suggestions: Calculates suggested reorder quantities for products sold in the last 30 days, based on current stock, average daily units sold, and remaining days of stock cover. Store owners can use this to restock the right amount, avoiding both overstocking and stockouts.

Coupon Usage shows every voucher redeemed during the selected period, along with number of uses and total discount value, making it easy to see which promotions are actually driving orders versus which ones are just cutting into margin.

Brand Performance Ranks manufacturers by revenue and units sold, rounding out the dashboard’s view of what’s actually driving the store, down to the brand level.

13.0 Frequently Asked Questions

Q: What is the PrestaShop Smart AI Admin Assistant, and how does it work?

The PrestaShop Smart AI Admin Assistant by Knowband lets store admins ask plain-language questions about their store data and receive instant answers. It connects to the live database through pre-built read-only MySQL views, sends the question to the chosen AI provider: OpenAI, Anthropic Claude, or Google Gemini, which generates and runs a SQL query and returns the result in natural language. It brings real-time data access to any back office user without requiring technical knowledge.

Q: Which AI providers does the PrestaShop Smart Admin Assistant support?

The module supports OpenAI (GPT-4o Mini, GPT-4o, GPT-5.5), Anthropic Claude (Haiku 4.5, Sonnet 4.6, Opus 4.7), and Google Gemini (Gemini 3.5 Flash, Gemini 3.1 Flash-Lite). You supply your own API key, and the module connects directly. No subscription to the module’s own AI service is needed. You pay only for actual API usage. All models integrate with the PrestaShop AI Sales Analytics Addon to deliver accurate, fast answers from your live store data.

Q: Can the PrestaShop Smart Admin Assistant modify or delete store data?

No. The assistant accesses the database through pre-built MySQL views, read-only by design. It cannot update, delete or insert any data through the chat interface. Every answer is a read-only retrieval from your live PrestaShop store. It is therefore a safe tool for back office automation without any risk of storing data.

Q: What can I ask the PrestaShop Admin AI Module?

You can ask natural language queries about orders, customers, revenue, stock levels, abandoned carts, discount coupons, product combinations, employee accounts, shipping carriers, brands, and categories. The experience is similar to asking ChatGPT, but every answer comes directly from your live store data. This covers order management, inventory tracking, and no SQL store reporting, all from the back office.

Q: How do predefined chips work in the PrestaShop Smart Admin Assistant?

Predefined chips are quick-click buttons inside the chat widget of the PrestaShop admin AI chatbot. Each chip sends a pre-saved question to the AI when tapped. The default set covers orders today, revenue, abandoned carts, low stock, out-of-stock products, active customers, new customers, cancelled orders, free shipping coupons, and products missing a SKU. Custom chips can be added, edited, or removed from the Predefined Chips tab. This is one of the most useful features of the PrestaShop AI Reporting Module for running daily store checks.
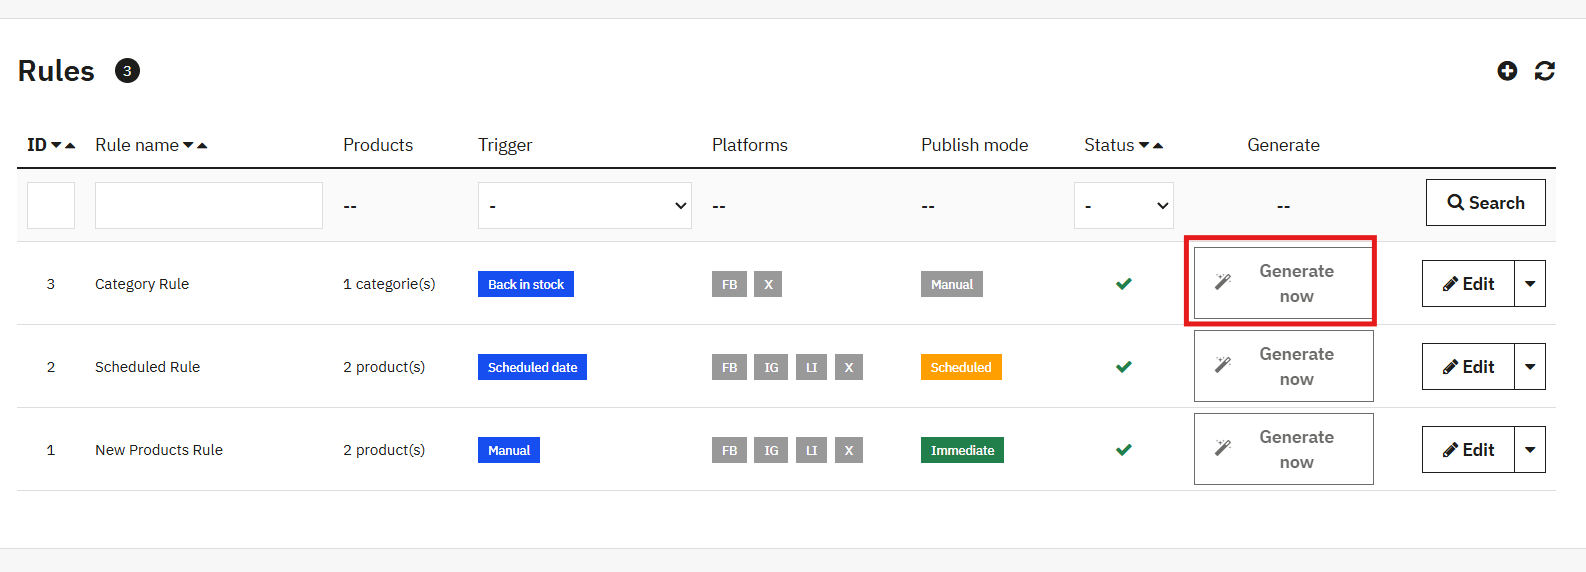
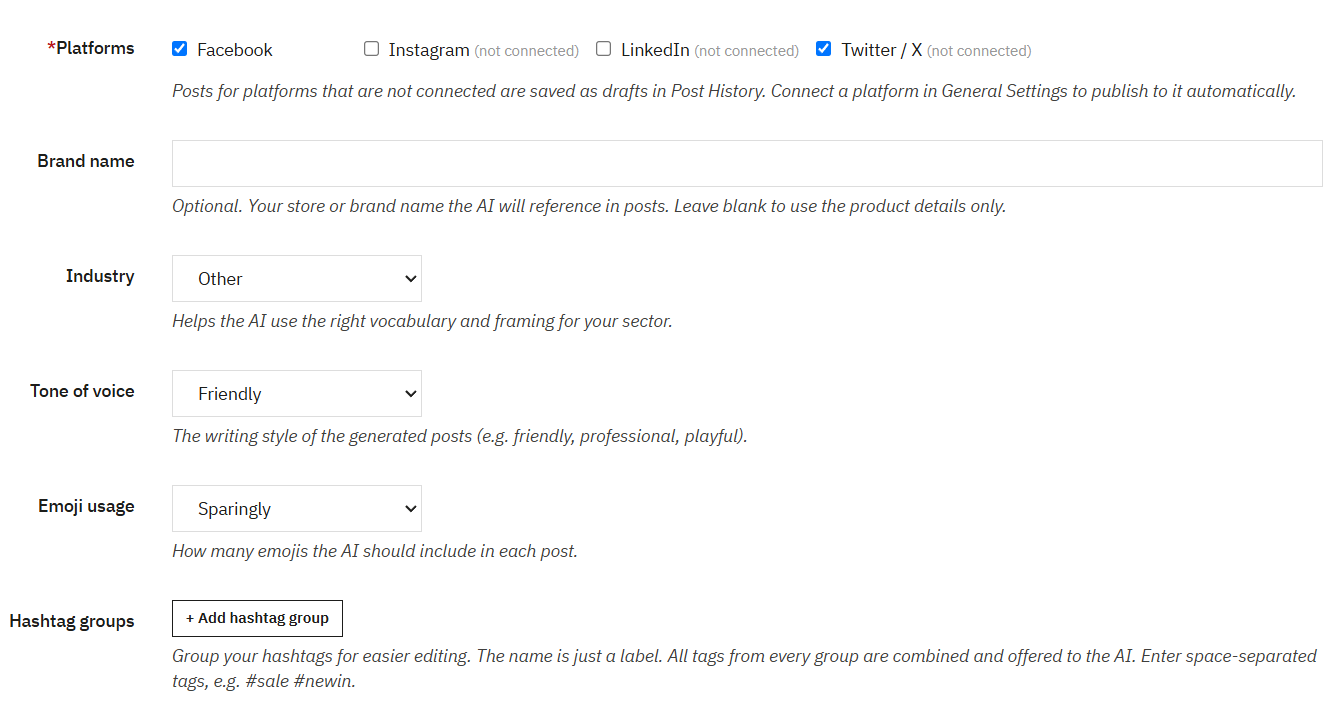
Q: What does the SQL visibility feature of the PrestaShop admin AI chatbot do?

When Show SQL Query Toggle is enabled, the assistant displays the SQL it generated beneath each answer. With Allow SQL Edit and Re-run also on, the admin can modify that SQL in the chat, adjusting a date, threshold, or filter, and re-run it immediately. It effectively turns the PrestaShop AI Sales Analytics Addon into a SQL-free reporting tool that any team member can work with directly. This is especially useful for PrestaShop AI backend analysis without requiring a developer.

Q: How does role-based access control work?

Open the Access Control tab and switch on Restrict the chatbot to specific employee profiles. SuperAdmin always has full access and does not appear in the list. From there, tick any additional profiles you want to include, such as Logistician, Salesman, or Translator. Any profile left unticked will not see the assistant in their back office.

Q: What is the schema cache, and when should I refresh it?

The schema cache in the PrestaShop Smart Insight Module holds a structural map of your database so the AI knows which tables and columns to use when building queries. It generates automatically during the first chat session and updates on the interval set in Schema Cache TTL (24 hours by default). After installing a new module, upgrading PrestaShop, or making any change that affects the database structure, use Refresh Schema Now to pull a fresh copy straight away.

Q: How can I get an API key to work with the PrestaShop Admin AI Module?

OpenAI: go to platform.openai.com, open API Keys from your profile menu and create a new key. Anthropic Claude: go to console.anthropic.com, open API Keys from the sidebar and create one. Google Gemini: go to aistudio.google.com, press Get API key and create one from there. After you have the key, copy it into the appropriate field in the AI Provider tab and save.

Q: Is the PrestaShop Smart Admin Assistant compatible with PrestaShop 9?

Yes. The module runs on PrestaShop 1.7.x through 9.x. The product page has the latest compatibility information.

Q: How does the PrestaShop AI Reporting Module help with sales reporting in PrestaShop?

PrestaShop AI sales report module lets the admin get the revenue, orders and conversion data through a simple chat interface instead of running reports manually. For teams looking for the best PrestaShop admin AI tool to replace dashboards, this module has daily reporting, stock checks and customer data all in one place. 

13.0 Conclusion

The Knowband PrestaShop Smart AI Admin Assistant brings AI-powered PrestaShop back office analytics to any store without requiring SQL knowledge, developer access, or third-party solutions. Ask in plain English, get answers from live store data, see the SQL behind every result, and configure the PrestaShop Admin Analytics AI Addon in minutes.

Predefined chips turn the daily store check into a one-minute task. Role-based access keeps the right data in front of the right staff. Query History keeps a complete audit trail of everything asked.

For support, custom requirements, or add-on development, contact the Knowband team directly.

Get the Knowband PrestaShop Smart Admin Assistant and start querying your store data from day one.