Prestashop Advance Product Attribute/Field by Knowband – User Manual

1.0 Introduction

Prestashop Advance Product Attribute/Field Addon by Knowband is an effortless way to include additional information fields in the product page of the website. The store owner can now gather the required information for the product from the prospective customers with the help of this Prestashop Additional Product Field module. The Prestashop Advance Product Attribute module allows the e-merchants to add supplementary information field in the product pages of the website. This attribute of the Prestashop Advance Product Attribute/Field addon can be included in a particular product page or all the product pages of the website. In addition, the admin gets an option to choose the categories in which he wants to include the fields.

The Prestashop Advance Product Attribute module enables the e-merchants to add N number of different field type. The best thing is that all this can be done in a few simple steps. Even the required field validation in this Prestashop Advance Product Field module can be included in the fields at a button click. The created fields can be edited, deleted as required from the back end of the Prestashop Product Attribute/Field module.

1.1 Project Objectives

Here are some of the objectives of the Prestashop Product Page Field addon that can be achieved with the .
1. The Prestashop Additional field module on product page create new custom fields or attributes in the product page of the eCommerce website.
2. Edit/delete the exiting field from the admin interface of the Prestashop Additional Product Field module.
3. To include the attribute is a single product page.
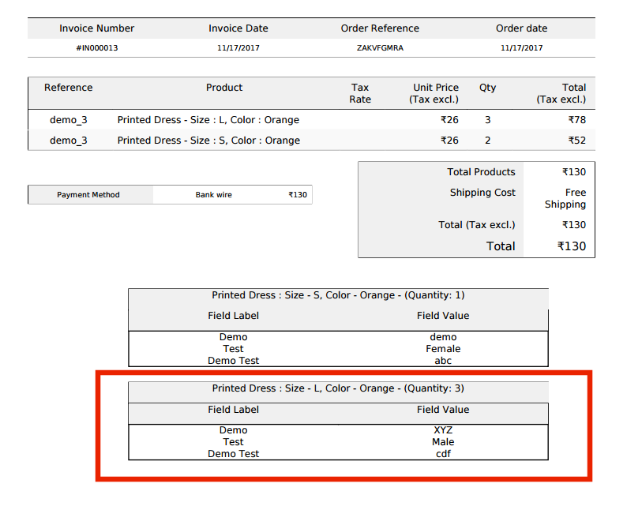
4. The Prestashop Advance Product Attribute/Field module shows the additional information in the invoice.

2.0 Installation

In order to install the Prestashop module follow the below-mentioned steps:

1. Purchase the Prestashop Advance Product Attribute module from the store. You’ll be provided with the following files:
a) Zipped file including the source code of the Prestashop module
b) User Manual
2. Unzip the zipped file. It would contain a number of files and folders as shown below –
3. Copy all the files and folders from the unzipped folder and paste them into your store “Modules” directory on the path – Root Directory/modules/.
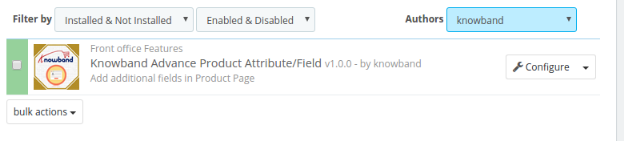
4. The Prestashop Advance Product Field module can be installed in the store and you can find that in Store Admin -> Modules and Services.

Searching the Prestashop module with following details –

Keyword – Advance Product Attribute
Category – Front Office
Filter By – Installed & Not Installed / Enabled & Disabled

5. Click on “Install” button to install the Prestashop module by Knowband. It would, then, ask for your conformation. Click on Proceed with the installation option.

6. This step will install the Prestashop Product Attribute/Field module and show notification – “Module(s) installed successfully”.

7. Once the installation is complete, the Prestashop Product Page Field addon can be configured as shown below:
 

PS Advance Product Attribute

3.0 Admin Interface

This Prestashop Additional field module on product page is easy-to-understand and use. All the customization and changes on the product pages can be done without any code changes. The Prestashop plugin by Knowband allows you to enter additional information fields in the product page of the website from the back-end of the admin interface.

The admin panel includes Prestashop Additional Product Field module configuration as well as product custom field creation tabs.
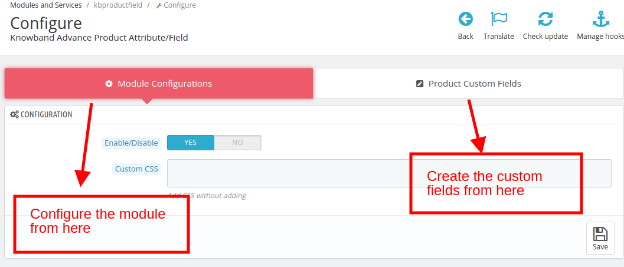
 

Follow the below-mentioned steps in order to configure the Prestashop Advance Product Attribute/Field plugin.

3.1 How to configure the Prestashop module ?

The admin can enable or disable the Prestashop Advance Product Attribute module as required. The “Module Configuration” tab offers easy configuration and optimization.
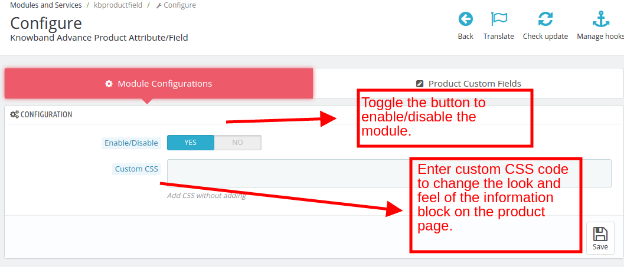
Toggle the button shown below to enable or disable the Prestashop Advance Product Field module.

The admin can customize the appearance of the Prestashop Product Attribute/Field module by entering the Custom CSS code.

3.2 How to create the custom product attribute or field?

The admin can add a number of custom information fields in the product page of the website with this Prestashop Product Page Field addon. In order to create new fields, go to the “Product Custom Field” Tab and click on the “Add New Field” or “+” sign in the top right side as shown below.
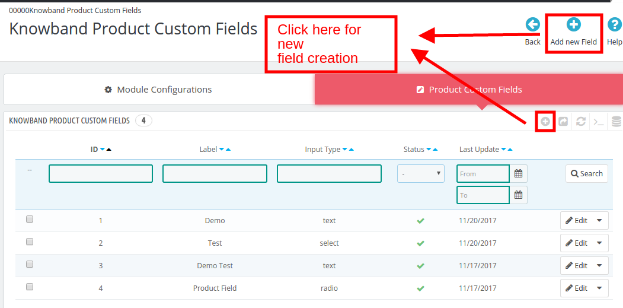
Once this is done, the admin will be redirected to field creation page. The Prestashop Additional field module on product page allows you to create various type of the field. The various type of fields are provided in the dropdown list. The admin can select any one as desired.
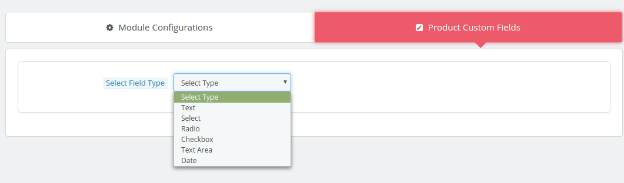
The various options offered in this section of the Prestashop Additional Product Field module is mentioned below.

  • Text
  • Select
  • Radio
  • Checkbox
  • Text Area
  • Date
  • File

Let us discuss the various field type one by one.

3.2.1 Text Field

With the text fields in the Prestashop Advance Product Attribute/Field module, the customers can enter their information in a textbox. This field is in general used for Name, Last Name, Address and other such information.

For the field creation, the admin is asked to fill up the form as shown in the image below.
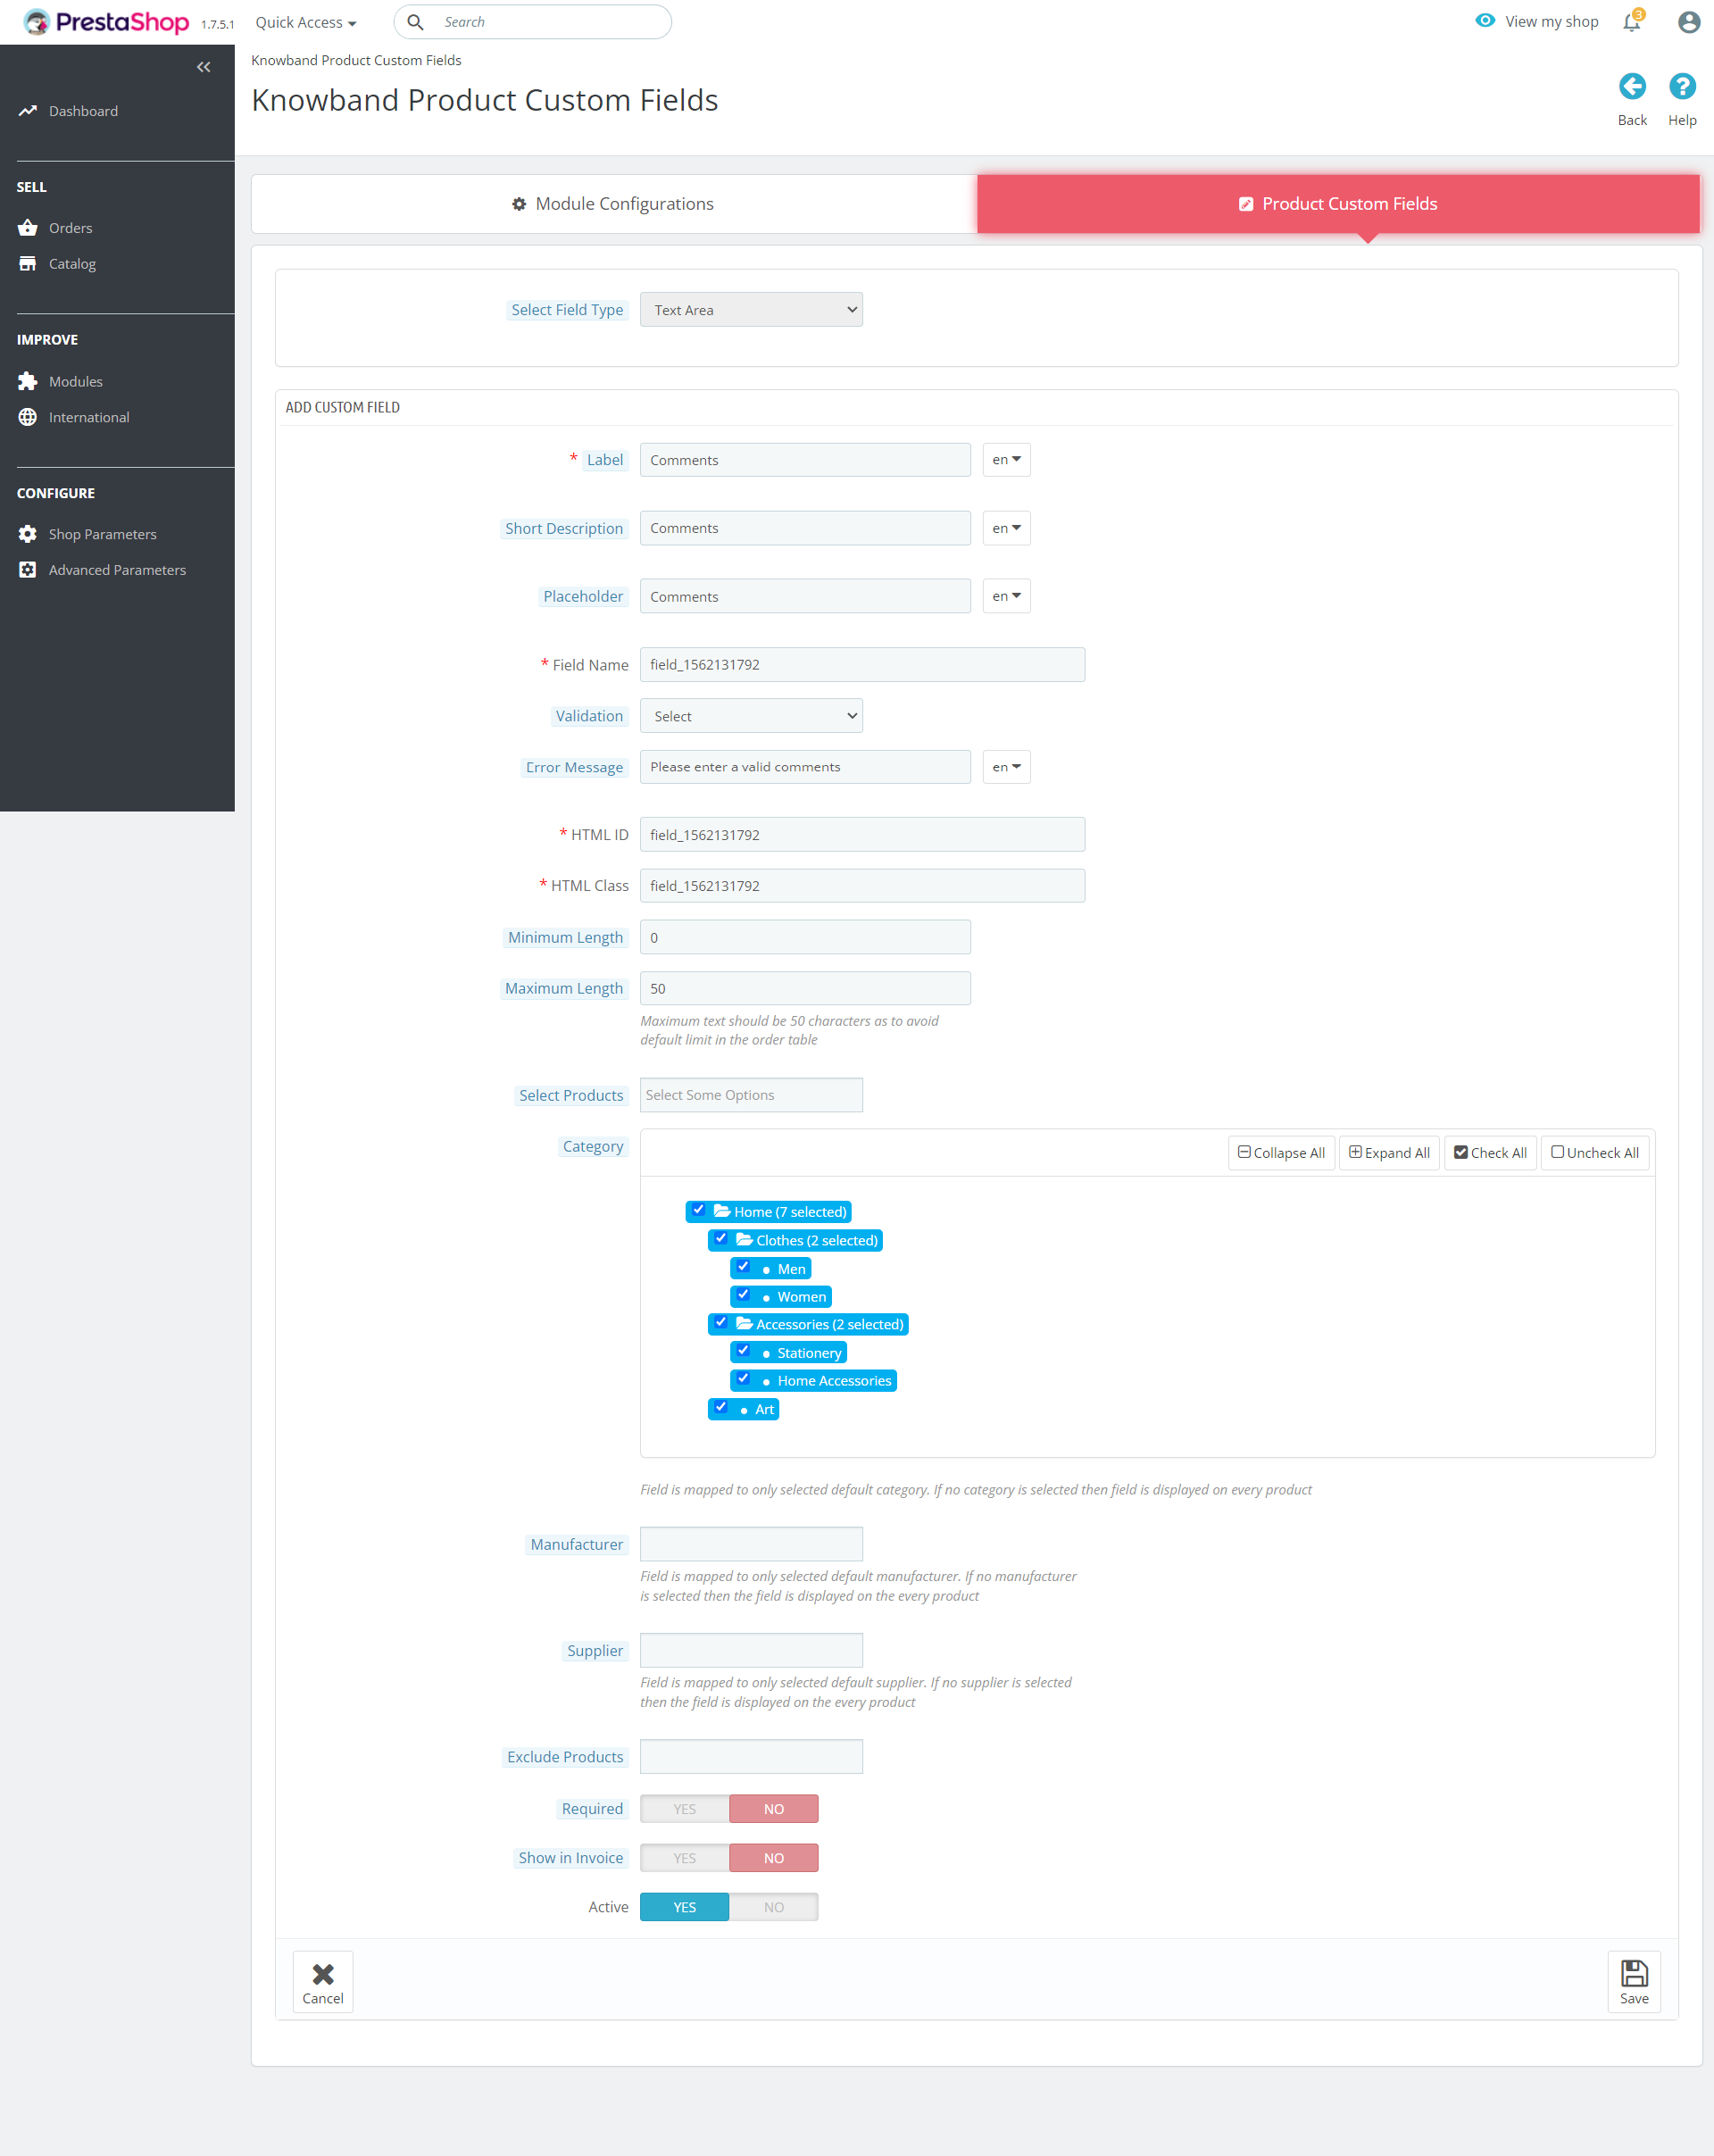
Label: Label specifies the name of the field that will be displayed on the front-end of the website.

Short Description: The short description in the Prestashop Advance Product Attribute module includes the specification of exactly what the field is intended for.

Placeholder: The admin can enter the Placeholder in this section of the Prestashop Advance Product Field module. All these inputs can be entered in multiple languages.

Field Name, HTML ID, HTML Class: This section of the Prestashop Product Attribute/Field addon will provide a unique identity to the fields. It will be same for all the three sections.

Error Message: The error message is shown if the customer enters a wrong information. This message can be entered in this section of the Prestashop Product Page Field addon as per the requirement. This can be done is multiple languages.

Maximum and Minimum Length: The word limit for the fields of the Prestashop Additional field module on product page can be fixed by entering the maximum and minimum length in the sections below. In case, no value is entered, then, the text box will be able to intake as many characters and words.

Select products: The additional attribute can be included in the specific products by entering the respective product’s names.

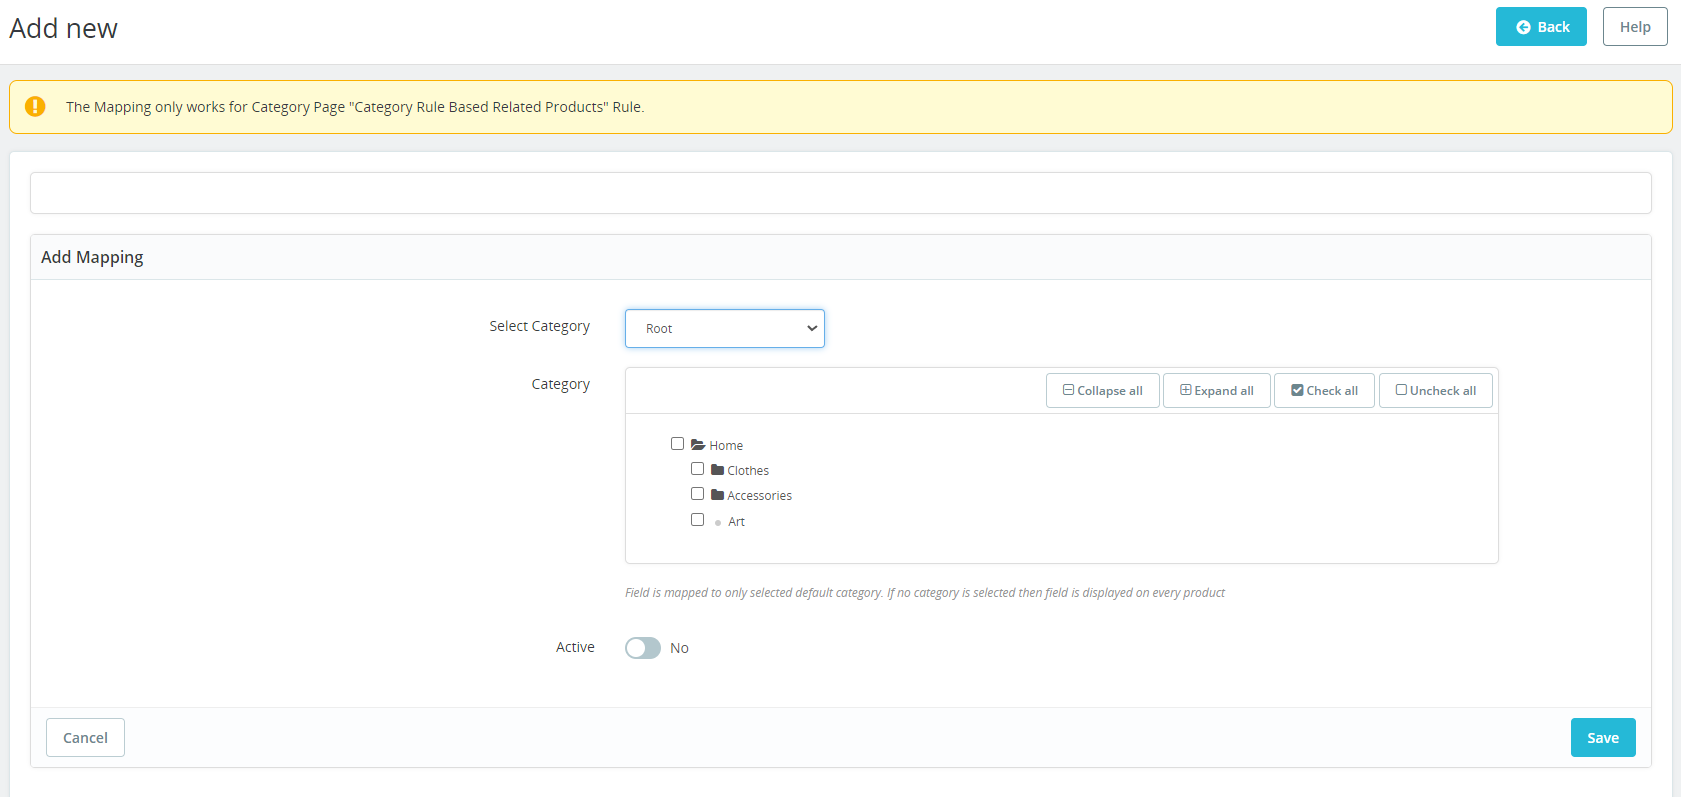
Category: The additional attribute can be included in the desired default category of the products. The admin can check or uncheck all the categories in one go for the same in this Prestashop Additional Product Field module.
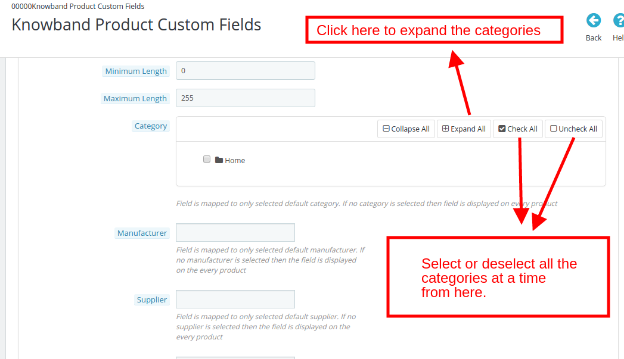
 

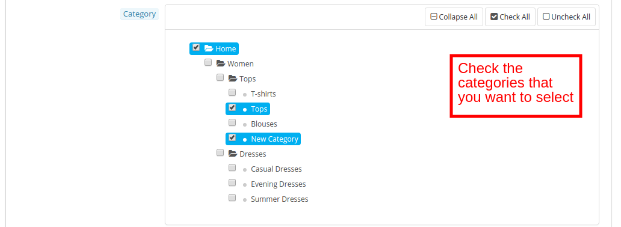
You can even select a particular category in this Prestashop Advance Product Attribute/Field addon by expanding the category as shown above. The categories to be selected can then checked accordingly.
Manufacturer and Supplier Name: The attribute or custom fields can be added for a particular manufacturer and supplier. The admin can select the same from the drop-down list in this section of the Prestashop Advance Product Attribute addon. The fields are mapped for the selected default manufacturer and default supplier of the product. In case no option is selected, then, the fields will be displayed on every product.

Exclude Product: The attribute can be excluded from a particular product if required. The admin can enter the name of the product in this section of the  Prestashop Advance Product Field addon and the additional field will not be mapped in that particular product page.

Required Field Validator: This field of the Prestashop Product Attribute/Field module can be enabled in the mandatory fields. In case the visitors leaves it empty, the Prestashop module by Knowband will throw an exception.

Show in Invoice: The information entered by the customers will be shown on the invoice if this field is enabled.

Active Button: Enable/disable the field by toggling this button of the Prestashop Product Page Field addon.
Note:- The Label, Short Description, Placeholder, Field Name, Error Message, HTML ID, Class, Category, Manufacturer, Supplier, Required Field Validator, Exclude Product and Show in Invoice sections will remain the same for all the field types.

3.2.2 Select Field

This field of the Prestashop Additional field module on product page allows the customers to select the option from the multiple choices available. This field of the Prestashop addon by Knowband is usually used for Gender field with the option of “Male” and “Female”.

Multiple Select: The store visitors can be offered an option to select more than one choices by enabling this button of the Prestashop Additional Product Field module. In case the button is disabled, they will be able to select only one option at a time.

Options: The varied options can be entered here in this field of Prestashop Advance Product Attribute/Field module. The multi-lingual support allows you to enter the choices in multiple languages.

Default Value: This is an optional field of the Prestashop Advance Product Attribute module. The store admin can set the default value for the Radio, Select or Checkbox options.
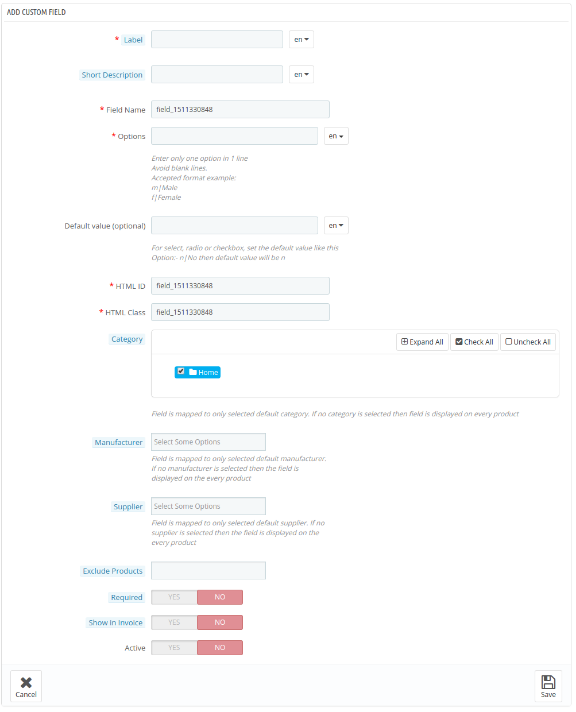
 

3.2.3 Radio Field

The Select field of the Prestashop Advance Product Field addon allows the customers to even choose more than one option. However, the radio buttons will only allow the visitors to choose one option at a time.

The radio button type field creation is same as that of the “Select” field. Only the “Multiple Select” option is missing here.
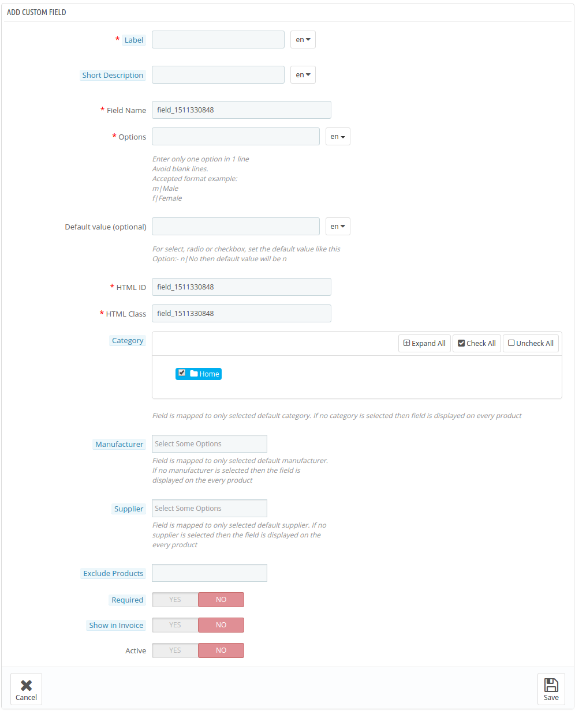
3.2.4 Check Box Field

The check boxes is very similar as the radio buttons and select field of the Prestashop Product Attribute/Field module. The only difference is that the customers can select the desired options by checking the boxes.
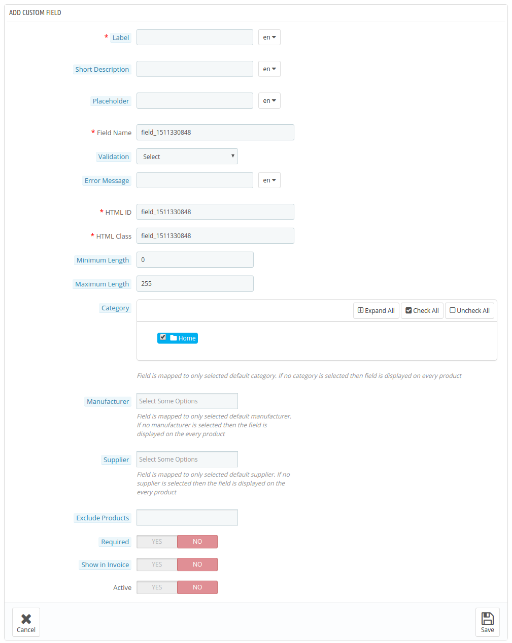
3.2.5 Text Area Field

The text area and text field are very similar to each other. While the latter offers just a single line in order to enter their information, the former provides multiple line. The maximum and minimum length of the characters can be entered by the store admin from the back end of the Prestashop Product Page Field addon.
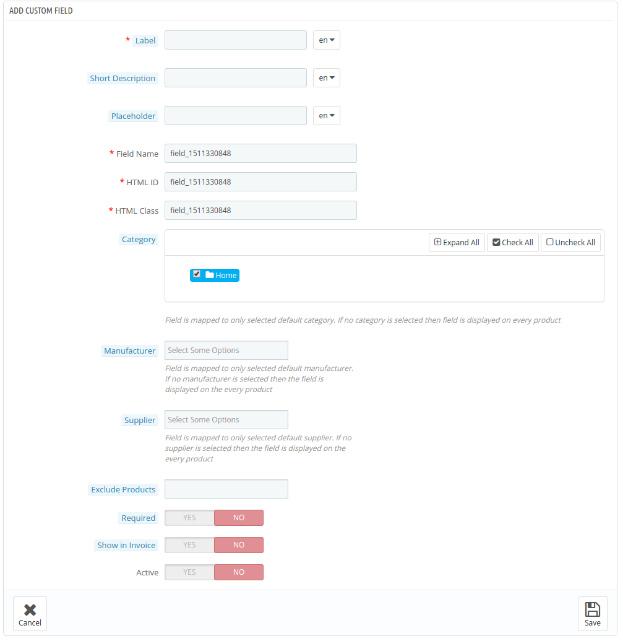
3.2.6 Date

This field of the Prestashop Additional field module on product page allows the customers to enter the date. In case the date is entered in the wrong format, an error message will be flashed on the front end.

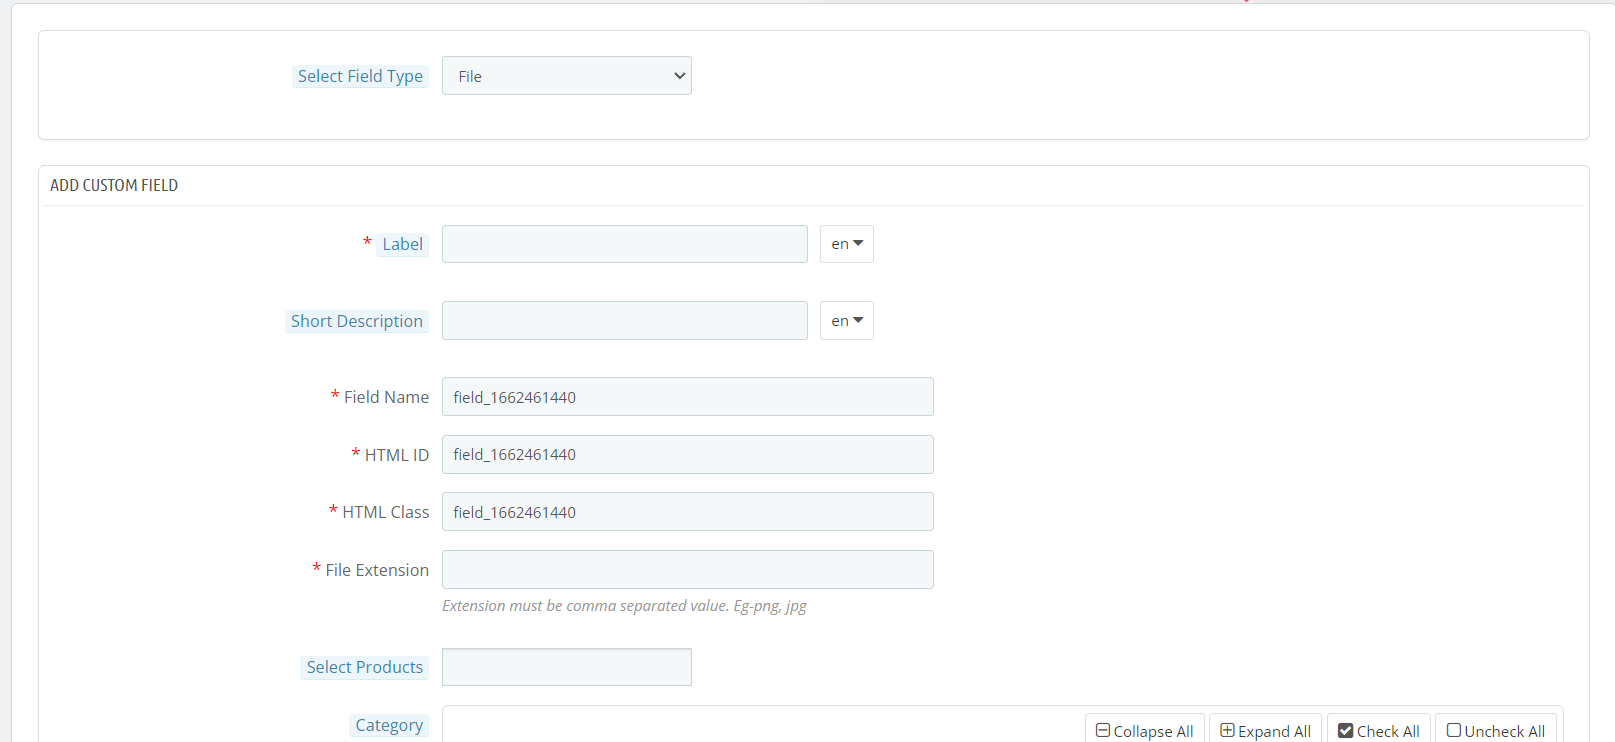
3.2.7 File

This field of the Prestashop Additional field module on the product page allows the customers to upload the file. In case the file extension is not the same as specified by the admin then, an error message will be flashed on the front end.
 

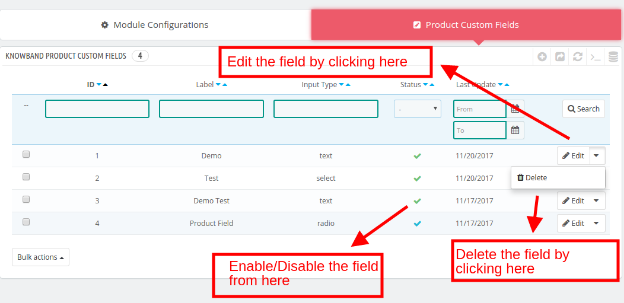
3.3 How to Edit or Delete the Custom Product Attribute or Field?

The list of the custom product fields created can be viewed in the admin panel of the Prestashop Additional Product Field module. The admin can edit, delete, enable/disable the field at a single button clicks from here.
3.3.1 Show in Invoice Option

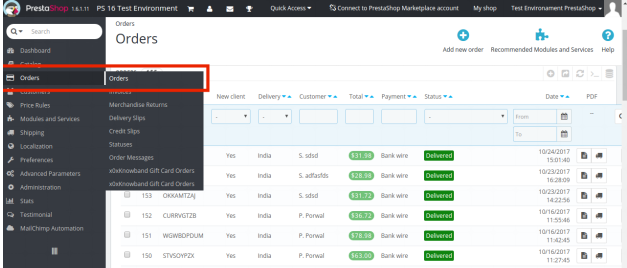
The fields of the Prestashop Advance Product Attribute/Field addon in which this option is enabled can be viewed in the order invoice copy. In order to check the same, go to the “Order” tab of the main menu of the admin interface.
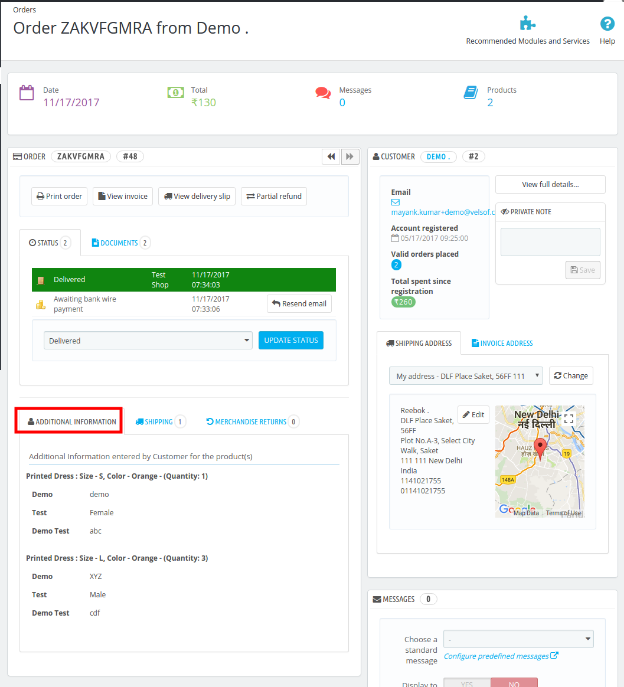
Select any one of the order profile. It includes a section of “Additional Information“. The custom attributes can be viewed here as shown below.
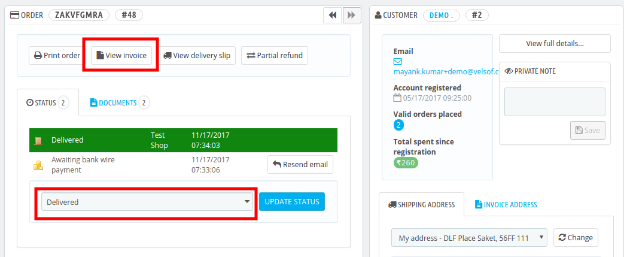
In case, the product status is Delivered, then, the same information will be shown in the invoice as well. Click on View Invoice.
The additional attributes can seen in the PDF of the invoice as well.
3.3.2 How to Add the Attribute in a single Product Page?

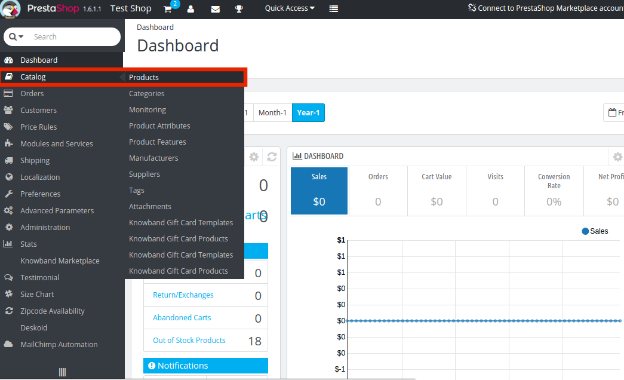
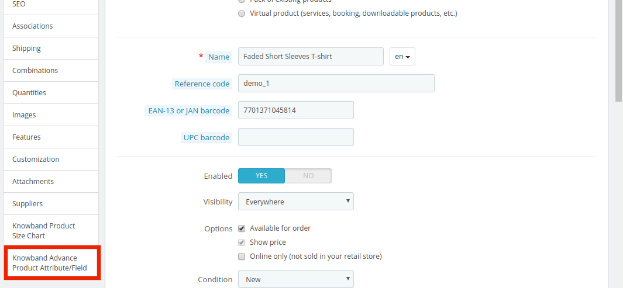
The custom fields can even be added in a particular product page instead of adding them on every product page with the help of this Prestashop Advance Product Attribute module. In order to do so, go to the Catalog -> Product option of the main menu.
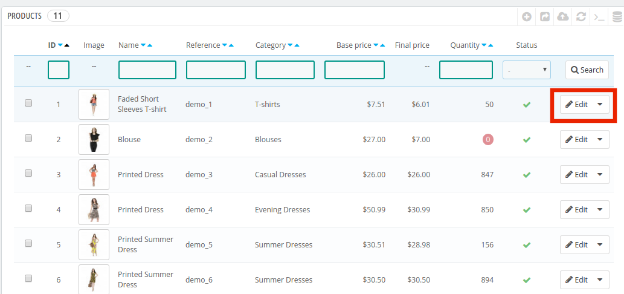
Select any one of the product in which you want to add the custom field and click on “Edit“.
The product profile include the option of Advance Product Attribute/Field as shown below.
The attribute can be added by clicking on “Add Field“
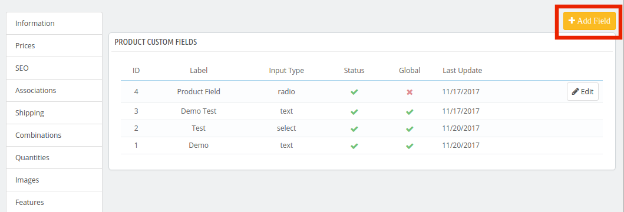
The fields of the Prestashop Advance Product Field addon can then be created with the same process.

4.0 Product Page UI

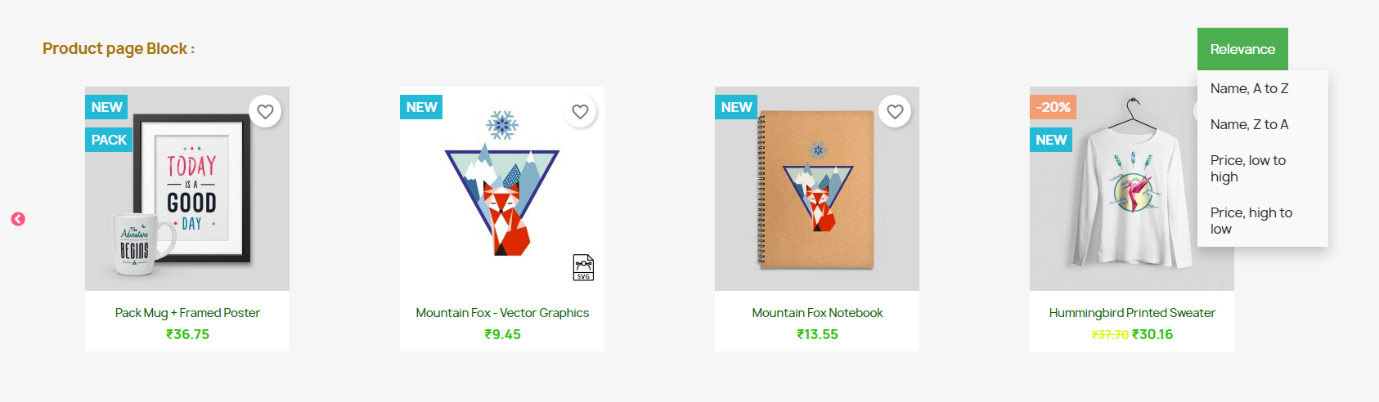
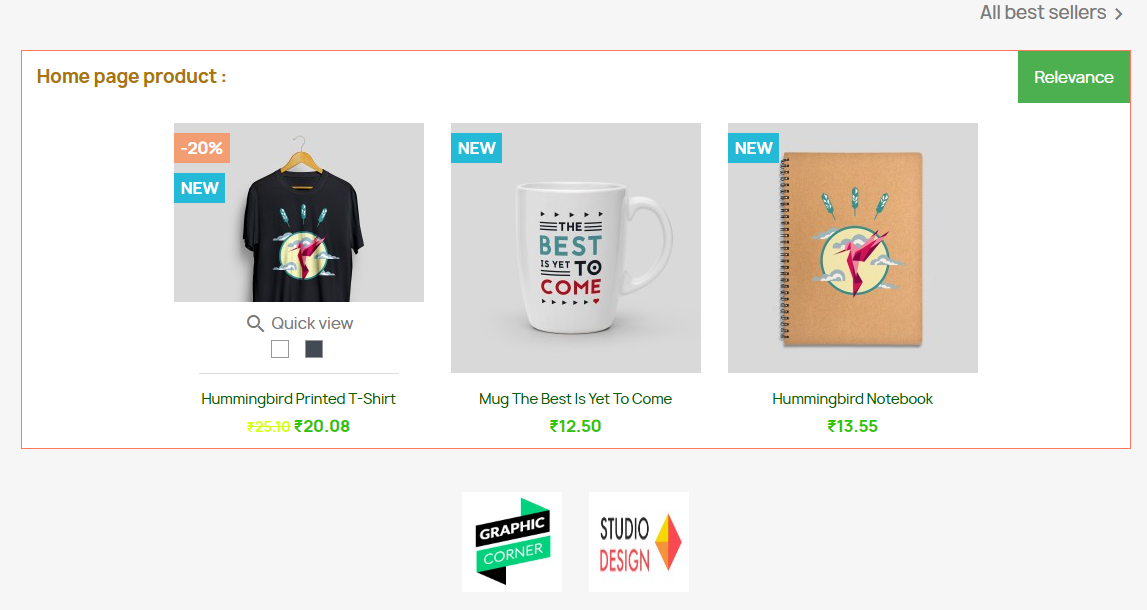
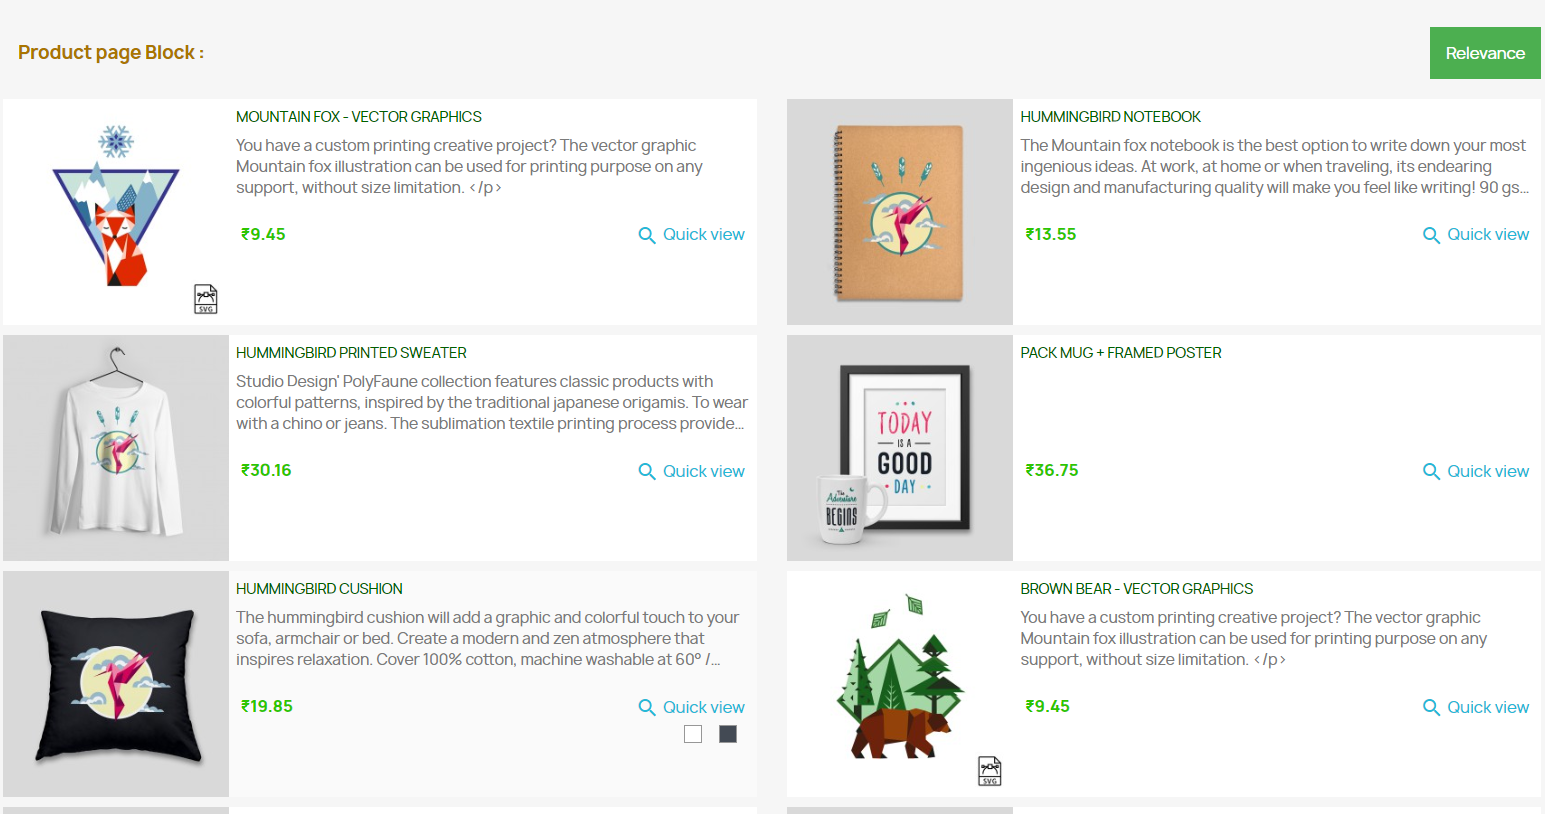
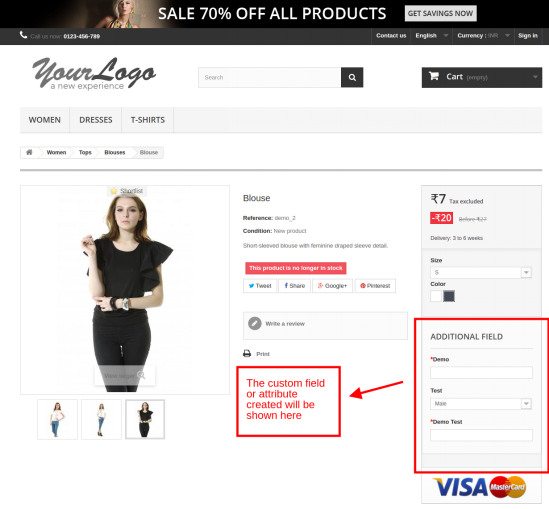
Once the various custom fields is created with the help of this Prestashop Product Attribute/Field module, the attributes will be shown on the product pages of the website. The additional field will be shown as image below:
Your customers play the best critics for your store products. They are key people that help you in taking your eCommerce store to next level. They criticise your product so that you can make it better for them.  So, focus on grabbing more information from the user side about your store products. You can simply buy this module from the addon store

Prestashop Advance Promotion Manager Addon- User Manual

1.0 Introduction

Every eCommerce store owner goal getting a higher sales and conversion. Promotion and sales can help you to get sales and traffic but it takes a bit of work to put together an effective eCommerce promotion. Prestashop Advance Promotion Manager Addon by Knowband one of the smoothest means to manage the various promotion rules of the Prestashop store. The promotional rules and discounts is an inevitable part of the customer retention and acquisition. However, managing the multiple promotional rules of the site becomes difficult for the store admin at times. This is when the Prestashop Promotion manager module can help the merchants manage the same with minimum hassle.

The Prestashop promotion rule manager addon offers a fully customizable interface. The admin can create desired promotional rules. The created rules can be edited and their priorities can be set from the back-end of the Prestashop addon.

How can Promotion manager help the admin to boost revenue?

Did I say that promotions can increase the revenue? That’s right, I did. Well strategic eCommerce promotions, when implemented correctly, It can great boost to your eCommerce business. Let us discuss some points:

  • Promotion is the ideal way to engage people.
  • Free shipping is one of the biggest factors in eCommerce business. Online store admin always looks for free shipping. As per the research, 73% of online shoppers stated that free shipping is the #1 criterion for making a purchase.
  • Abandoned Cart: Promotion and sales help the eCommerce store owners to get rid of the abandoned cart. 56% of consumers abandon carts when presented with unexpected costs.
  • 40% of shoppers prefer receiving discounts over loyalty program points.  We live in a world where instant gratification is expected. Meeting shopper’s needs immediately results in more sales.
  • Promotion and sales help the eCommerce seller retaining leads. As per the research, the old customers spend on average 67% more than first-time customers. If the admin offers the old customer some coupons and deals. They always excited to participate deals and you can retain the leads easily.
  • Cross-selling is another opportunity to increase your store revenue.
  • Buy Something, Get Something Else For Free is one of the best promotion to attracting the customers. Online shoppers always looking for free gifts, vouchers and coupon etc.
  • First Time Visitors You can make the deals when the customer visits the first time to get some additional discount. This helps you build the brand loyalty.
  • Holiday / Seasonal Promotions (Black Friday, Christmas New Year’s resolutions and other) Holiday promotion is great to help the admin to boost sales. The eCommerce seller can make the deal the Holiday seasons.

1.1 Merchant Benefits

Listed below are some of the benefits offered to the admin by the Prestashop advance promotion manager module:

  • This Prestashop Advance Promotion manager extension allows the e-merchant to create unlimited promotion rules and edit/delete the same just at a button click.
  • The front-end display pattern can be set as per the wish of the store admin.
  • The Prestashop promotions rules manager module by Knowband allows the store admin gets an option to set the computation rules for each deal.
  • Even the cart rules can be fixed from the back-end of the Prestashop extension.
  • The Prestashop deal manager addon enables the e-merchant to offer a fixed discount, percentage discount or a free gift to the store visitors.
  • This Prestashop advance promotion manager addon is one of the ways to increase the average cart value of the customers and motivate them to complete their transaction without abandoning their cart.
  • The validity duration of the deal can be fixed at a button click.
  • The e-merchant can select the category in which he wants to include the rules of the promotion.
  • The sore admin even get an option to choose the products that he want to exclude from the offers.

1.2 Project Objectives

Prestashop Advance Promotions Manager module offers a number of optimization options. The project objective are listed below:

1. The process of including the general information of promotion rules.

2. The ways to set the rules for each promotion deals.

3. The computation ways of the promotions.

4. The cart rule action computation.

2.0 Installation

After purchasing Prestashop deal manager module, you will get following files as listed below:

1. Zipped file containing the source code of the Prestashop promotion manager addon.

2. User Manual

Follow the following steps to install the Prestashop addon:

1. Unzip the zipped file. It would contain files and folders as shown below –

2. Copy all the files and folders of unzipped folder and paste them in the “Modules” directory of your store on the path – Root Directory/modules/.

3. Now module is ready to be installed on your store and you can find that in Store Admin -> Modules and Services. It would shown as below –

In case, you are not able to find module in admin modules list, please try searching module with following details –

Keyword – Advance Promotions Manager

Category – Pricing and Promotion

Filter By – Installed & Not Installed / Enabled & Disabled

4. Click on “Install” button to install the module. It would show a pop-up for your confirmation. Click on “Proceed with the installation” option. This step will install the module and show notification – “Module(s) installed successfully”.

3.0 Admin Interface

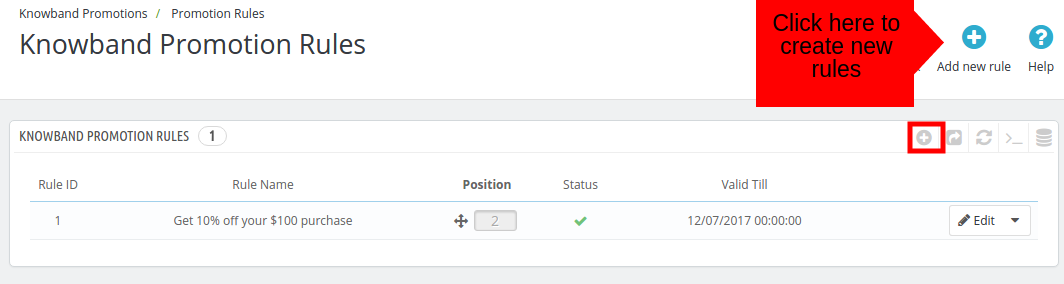
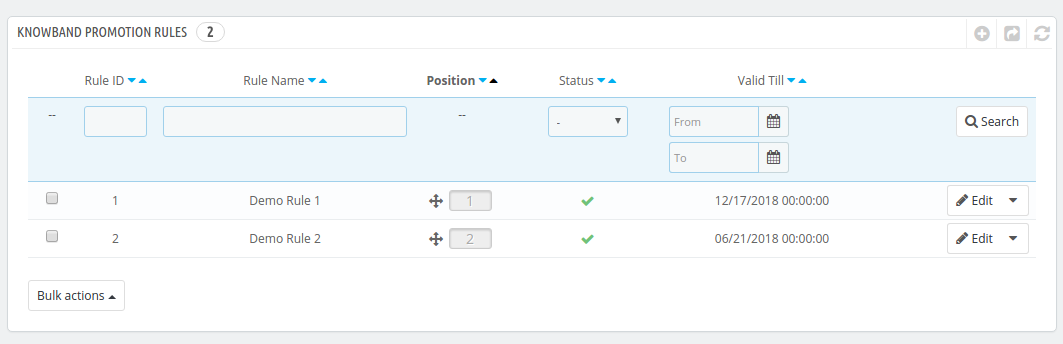
Prestashop promotions manager module offers an easy-to-use interface for effortless promotion management. The entire promotional deals created by the admin is listed in the back-end of the Prestashop plugin as shown in the image below:

The store admin can drag and drop the promotion rules to change their position as well as priority.

Let us discuss the various configuration options are discussed below:

3.1 How to create the Promotion Rules?

The already created promotional offers can be viewed in the admin interface. In order to create a new rule, click on ‘Add New Rule’ or the ‘+’ sign in the top right side as shown below:

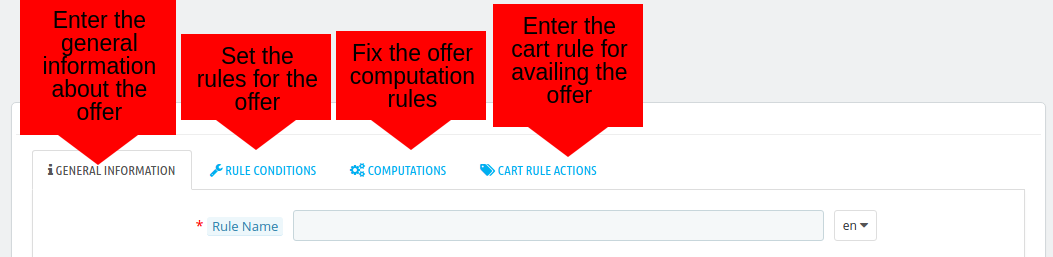
You’ll be redirected to the Rule creation page. The promotional rules will be listed in the page. The e-merchant can set the position of the promotion rule just by dragging and dropping them.

Few examples of the Promotion rule:

A. Buy X Get Y Free (Buy 1 Get 1 Free)

1. You will go to General settings tab enter the deal name, description, status and select the store in which you want to offer the feature.

2. In the Rule Condition tab, you will enter the promotion rule validation date & time, applicability, minimum cart amount, cart amount currency, cart amount tax, cart amount shipping. They can also select the customer whom he/she want to offer the discount.

3. The computation rules for the promotions can be set from the back-end of the Prestashop promotion manager addon.

  • Computation Type:  For applying Buy 1 Get 1 offer, you need to select Product option. After selecting Product. You need to fill following options:
  • Computation Method: The offer rules will be computed based on the number of products added in the cart or the cart value. The admin can select the desired option here.
  • Number of Product: For applying Buy 1 Get 1 offer, You need to enter the 1 no of products required to be present in the cart for the offer computation.
  • Consider Products with Reduction: Switch the button ‘On’ if the rule computation will consider the product with reduction.
  • Allowed Category: Select the categories in which you want to apply the offer rule. By default it will be applicable in all the categories.
  • Product to Exclude: Enter the name of the product that you want to exclude from the offer rules.
  • Minimum Cart Items Required: For applying Buy 1 Get 1 offer, You need to enter the 1 no of items required in the cart of the customers for availing the offers.

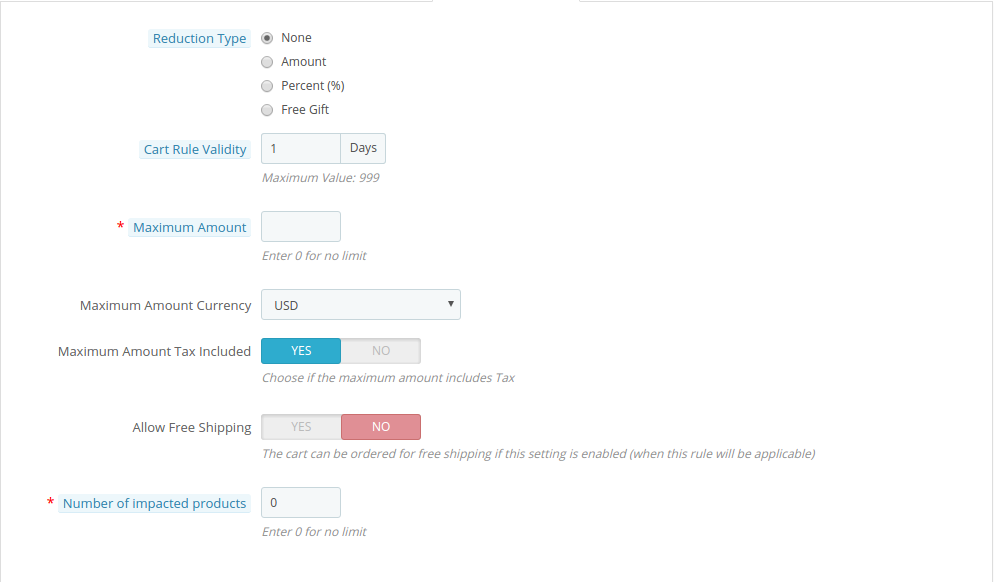
4. In the Cart rule action tab, the Prestashop store admin can set the cart rules for the offer in this section.

  • Reduction Type: In this tab, you can select Free Gift.
  • Select Gift Card Product: In this tab, select the name of the product that will be automatically shown on the checkout page of the customers.
  • Cart Rule Validity: Enter the validity period (in days) of the rule.
  • Allow Free Shipping: Enable to allow free shipping to the customers.
  • The number of impacted products: In this tab, you can enter the no of product that can be impacted by this promo rule.

B. Buy X Items & Get Free Shipping (Buy 1 Get Free Shipping)

1. You will go to General settings tab enter the deal name, description, status and select the store in which you want to offer the feature.

2. In the Rule Condition tab, you will enter the promotion rule validation date & time, applicability, minimum cart amount, cart amount currency, cart amount tax, cart amount shipping. They can also select the customer whom he/she want to offer the discount.

3. The computation rules for the promotions can be set from the back-end of the Prestashop promotion manager addon.

  • Computation Type: You can select either ‘Product’ or ‘Category’. You can select the Product. You want to enter this information.
  • Computation Method: The offer rules will be computed based on the number of products added in the cart or the cart value. The admin can select the desired option here.
  • Number of Product: Enter the 1 no of products required to be present in the cart for the offer computation.
  • Consider Products with Reduction: Switch the button ‘On’ if the rule computation will consider the product with reduction.
  • Allowed Category: Select the categories in which you want to apply the offer rule. By default, it will be applicable in all the categories.
  • Product to Exclude: Enter the name of the product that you want to exclude from the offer rules.
  • Minimum Cart Items Required: You can enter the 1 no of items required in the cart of the customers for availing the offers.

4. In the Cart rule action tab, The Prestashop store admin can set the cart rules for the offer in this section.

  • Reduction Type: The e-merchant can give a discount of Fixed Amount, Percentage or a Free Gift. Select any one option here.
  • Select Gift Card Product:  In this tab, select the name of the product that will be automatically shown on the checkout page of the customers.
  • Cart Rule Validity: Enter the validity period (in days) of the rule.
  • Allow Free Shipping: Enable to allow free shipping to the customers.
  • Number of impacted products: In this tab, you can enter the no of product that can be impacted by this promo rule.

C. Buy X Items of a Product & Get Y% Discount(Buy 2 Items of a Product & Get 30% Discount)”

1. You will go to General settings tab enter the deal name, description, status and select the store in which you want to offer the feature.

2. In the Rule Condition tab, you will enter the promotion rule validation date & time, applicability, minimum cart amount, cart amount currency, cart amount tax, cart amount shipping. They can also select the customer whom he/she want to offer the discount.

3. The computation rules for the promotions can be set from the back-end of the Prestashop promotion manager addon.

  • Computation Type: You can select either ‘Product’ or ‘Category’. You can select the Product.  You want to enter the these information.
  • Computation Method: The offer rules will be computed based on the number of products added in the cart or the cart value. The admin can select the desired option here.
  • Number of Product: Enter the 2 no of products required to be present in the cart for the offer computation.
  • Consider Products with Reduction: Switch the button ‘On’ if the rule computation will consider the product with reduction.
  • Allowed Category: Select the categories in which you want to apply the offer rule. By default it will be applicable in all the categories.
  • Product to Exclude: Enter the name of the product that you want to exclude from the offer rules.
  • Minimum Cart Items Required: You can enter the 2 no of items required in the cart of the customers for availing the offers.

4. In the Cart rule action tab, The Prestashop store admin can set the cart rules for the offer in this section.

  • Reduction Type: The e-merchant can select the Percentage. When Percentage is selected, enter the percentage value that you want to offer as discount as shown below.

For example: If you enter the 30% discount on the product. Set percentage apply on the front end.

  • Cart Rule Validity: Enter the validity period (in days) of the rule.
  • Maximum Amount Currency: Choose the currency in which the maximum amount fixed above is to be considered. For example, you can select the USD.
  • Maximum Amount Tax Included: Enable if you want to include the tax in the maximum amount fixed above.
  • Allow Free Shipping: Enable/Disable the free shipping to the customers.
  • Number of impacted products: In this tab, you can enter the no of product that can be impacted by this promo rule.

D. “Buy X Items of a Product & Get Y Discount(Buy 3 or more items for full price and get $50 discount)

1. You will go to General settings tab enter the deal name, description, status and select the store in which you want to offer the feature.

2. In the Rule Condition tab, you will enter the promotion rule validation date & time, applicability, minimum cart amount, cart amount currency, cart amount tax, cart amount shipping. They can also select the customer whom he/she want to offer the discount.

3. The computation rules for the promotions can be set from the back-end of the Prestashop promotion manager addon.

Computation Type: You can select either ‘Product’ or ‘Category’. You can select the Product.  You want to enter the these information.

Computation Method: The offer rules will be computed based on the number of products added in the cart or the cart value. The admin can select the desired option here.

Number of Product: Enter the 3 no of products required to be present in the cart for the offer computation.

  • Consider Products with Reduction: Switch the button ‘On’ if the rule computation will consider the product with reduction.
  • Allowed Category: Select the categories in which you want to apply the offer rule. By default, it will be applicable in all the categories.
  • Product to Exclude: Enter the name of the product that you want to exclude from the offer rules.
  • Minimum Cart Items Required: You want to enter the 3 no of items required in the cart of the customers for availing the offers.

4. In the Cart rule action tab, The Prestashop store admin can set the cart rules for the offer in this section.

  • Reduction Type: The e-merchant can select the Percentage. When the Fixed amount is selected, then, the admin will be asked to fill this information.
  • Reduction Amount: This is the discount amount that will be offered to the customers. If  You enter the $50. The $50 discount fixed on the front end.
  • Reduction Amount Currency: Select the currency in which the discount is to be offered.
  • Reduction Amount Tax Included: If enabled the tax will be included in the reduction amount.
  • Cart Rule Validity: Enter the validity period (in days) of the rule.
  • Allow Free Shipping: Enable/Disable the free shipping to the customers.
  • Number of impacted products: In this tab, you can enter the no of impacted products

E. Get X% Discount on Y Cart Total” For example (Get 20% Discount on $100 Cart Total)

1. You will go to General settings tab enter the deal name, description, status and select the store in which you want to offer the feature.

2. In the Rule Condition tab, you will enter the promotion rule validation date & time, applicability, minimum cart amount, cart amount currency, cart amount tax, cart amount shipping. They can also select the customer whom he/she want to offer the discount.

3. The computation rules for the promotions can be set from the back-end of the Prestashop promotion manager addon.

  • Computation Type: You can select either ‘Product’ or ‘Category’. You can select the Product.  You want to enter the these information.
  • Computation Method: The offer rules will be computed based on the number of products added in the cart or the cart value. The admin can select the desired option here.
  • When the Cart Amount is selected, the admin will be asked to fill following options.
  • Cart Amount: If You want to fix $100 cart amount. The fixed Cart amount will be applicable on the Front end.
  • Cart Amount Currency: Choose the currency in which you want to consider the order amount.
  • Cart Amount Tax Included: Enable this feature to include the tax amount while considering the cart value.
  • Consider Products with Reduction: Switch the button ‘On’ if the rule computation will consider the product with reduction.
  • Allowed Category: Select the categories in which you want to apply the offer rule. By default, it will be applicable in all the categories.
  • Product to Exclude: Enter the name of the product that you want to exclude from the offer rules.
  • Minimum Cart Items Required: You can enter the 2 no of items required in the cart of the customers for availing the offers.

4. In the Cart rule action tab, The Prestashop store admin can set the cart rules for the offer in this section.

  • Reduction Type: The e-merchant can select the Percentage. When Percentage is selected, enter the percentage value that you want to offer as discount as shown below.

For example: If you want to enter the 20% discount on the product. Set percentage apply on the front end.

  • Cart Rule Validity: Enter the validity period (in days) of the rule.
  • Maximum Amount Currency: Choose the currency in which the maximum amount fixed above is to be considered. For example, you can select the USD.
  • Maximum Amount Tax Included: Enable if you want to include the tax in the maximum amount fixed above.
  • Allow Free Shipping: Enable/Disable the free shipping to the customers.
  • Number of impacted products: In this tab, you can enter the no of product that can be impacted by this promo rule.

F. Get X Discount on Y Cart Total “For example “Get $20 Discount on $200 Cart Total.

1. You will go to General settings tab enter the deal name, description, status and select the store in which you want to offer the feature.

2. In the Rule Condition tab, you will enter the promotion rule validation date & time, applicability, minimum cart amount, cart amount currency, cart amount tax, cart amount shipping. They can also select the customer whom he/she want to offer the discount.

3. The computation rules for the promotions can be set from the back-end of the Prestashop promotion manager addon.

  • Computation Type: You can select either ‘Product’ or ‘Category’. You can select the Product.  You want to enter the these information.
  • Computation Method: The offer rules will be computed based on the number of products added in the cart or the cart value. The admin can select the desired option here.
  • When the Cart Amount is selected, the admin will be asked to fill following options.
  • Cart Amount:  If you want to enter the $20 discount on the product. Set fixed discount to apply on the front end.
  • Cart Amount Currency: Choose the currency in which you want to consider the order amount.
  • Cart Amount Tax Included: Enable this feature to include the tax amount while considering the cart value.
  • Consider Products with Reduction: Switch the button ‘On’ if the rule computation will consider the product with reduction.
  • Allowed Category: Select the categories in which you want to apply the offer rule. By default, it will be applicable in all the categories.
  • Product to Exclude: Enter the name of the product that you want to exclude from the offer rules.
  • Minimum Cart Items Required: You can enter the 1 no of items required in the cart of the customers for availing the offers.

4. In the Cart rule action tab, The Prestashop store admin can set the cart rules for the offer in this section.

  • Reduction Type: The e-merchant can select the Percentage. When the Fixed amount is selected, then, the admin will be asked to fill this information.
  • Reduction Amount: This is the discount amount that will be offered to the customers. If You want to enter the $200. The $200 discount fixed on the front end.
  • Reduction Amount Currency: Select the currency in which the discount is to be offered.
  • Reduction Amount Tax Included: If enabled the tax will be included in the reduction amount.
  • Cart Rule Validity: Enter the validity period (in days) of the rule.
  • Allow Free Shipping: Enable/Disable the free shipping to the customers.
  • Number of impacted products: In this tab, you can enter the no of product that can be impacted by this promo rule.

3.1.1 General Information

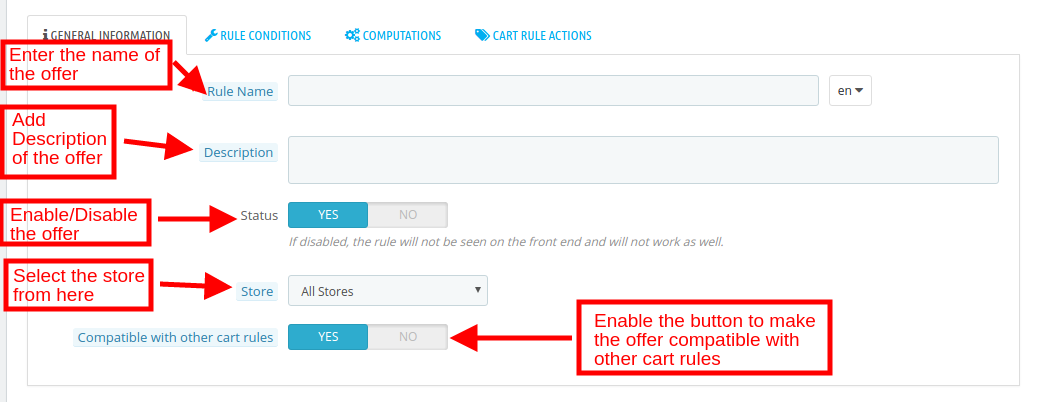
Enter the basic information of the offers here. The various options in this tab are discussed below:

Rule Name: It specifies the name of the offer that will be displayed in the front-end of the website.

Description: enter the description of the offer in this section.

Status: You can enable/disable the promotion offer from here. If disabled, the offer will not be shown in the front-end.

Store: The Prestashop advance Promotion manager module offers multi-store compatibility. You can select the store in which you want to include the promotion offer rule.

Compatible with other Cart Rules: If this functionality is enabled, then, the offer will be compatible with other cart rules as well.

3.1.2 Rule Condition

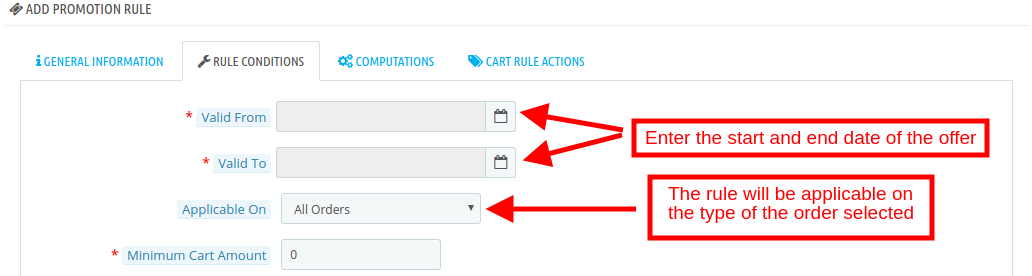
The ‘Rule Condition’ tab allows you to set the rule for the offers.

Valid From and To: Enter the start and end date of the offer. The offer rules will be only applicable in this duration.

Applicable On: The rules will either be applicable on all the orders or the first order of the customer. The admin can select any one of the order type from this field.

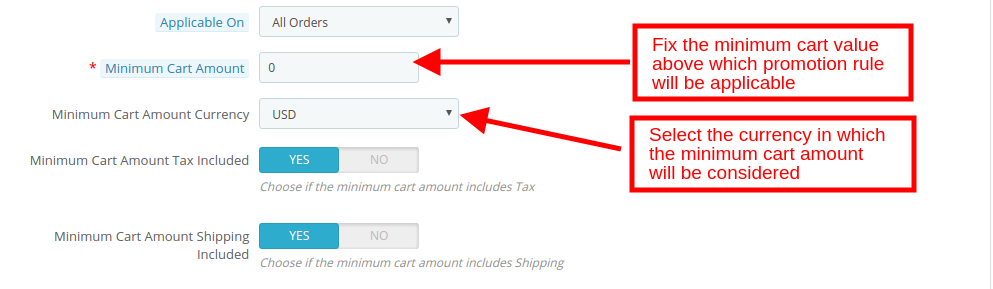
Minimum Cart Amount: Enter the minimum cart amount for making offer rule applicable.

Minimum Cart Amount Currency: Select the currency in which the minimum cart amount is to be considered.

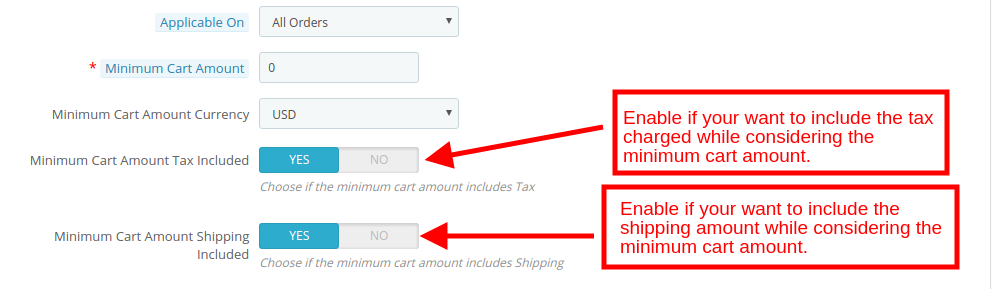
Minimum Cart Amount Tax Included: If enabled, the minimum cart amount will be considered including the tax.

Minimum Cart Amount Shipping Included: If enabled, the minimum cart amount will be considered including the shipping charges.

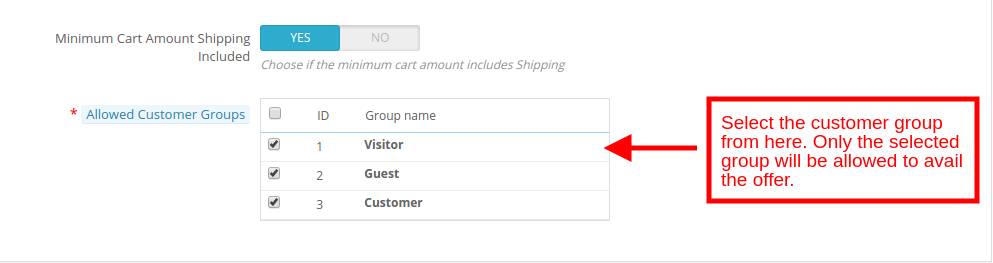
Allowed Customer Group: The admin can make the offer accessible to a selected customer group. You can choose from Visitors, Guest or Registered Customers.

3.1.3 Computations

The computation rules for the promotions can be set from the back-end of the Prestashop promotion manager addon.

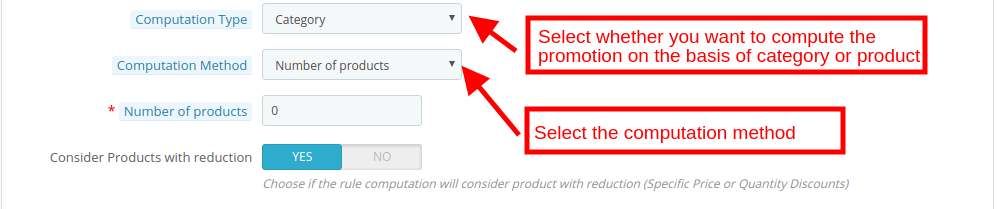
1. Computation Type: The admin can select either ‘Product’ or ‘Category’. The computation will be done according to the type selected.

2. Computation Method: The offer rules will be computed based on the number of products added in the cart or the cart value. The admin can select the desired option here.

2.1 In case you choose the Number of Product option, then, you need to enter the minimum number of products required to be added in the cart in order to avail the offer.

On selecting this option, you’ll be required to fill following options.

Number of Product: Enter the minimum number of products required to be present in the cart for the offer computation.

2.2 When the Cart Amount is selected, the admin will be asked to fill following options.

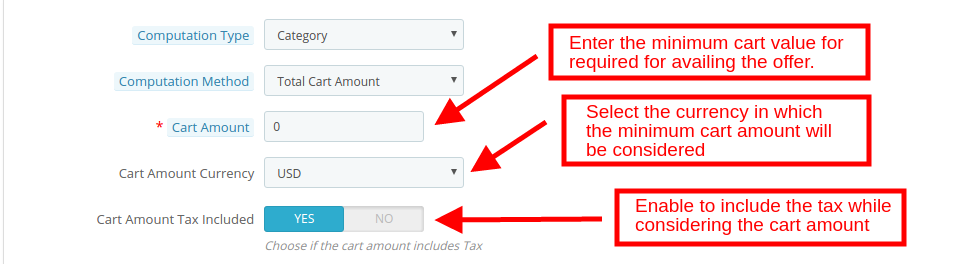
Cart Amount: Enter the minimum cart value of the customers required for availing the promotional offer.

Cart Amount Currency: Choose the currency in which you want to consider the order amount.

Cart Amount Tax Included: Enable this feature to include the tax amount while considering the cart value.

3. Consider Products with Reduction:Switch the button ‘On’ if the rule computation will consider the product with reduction.

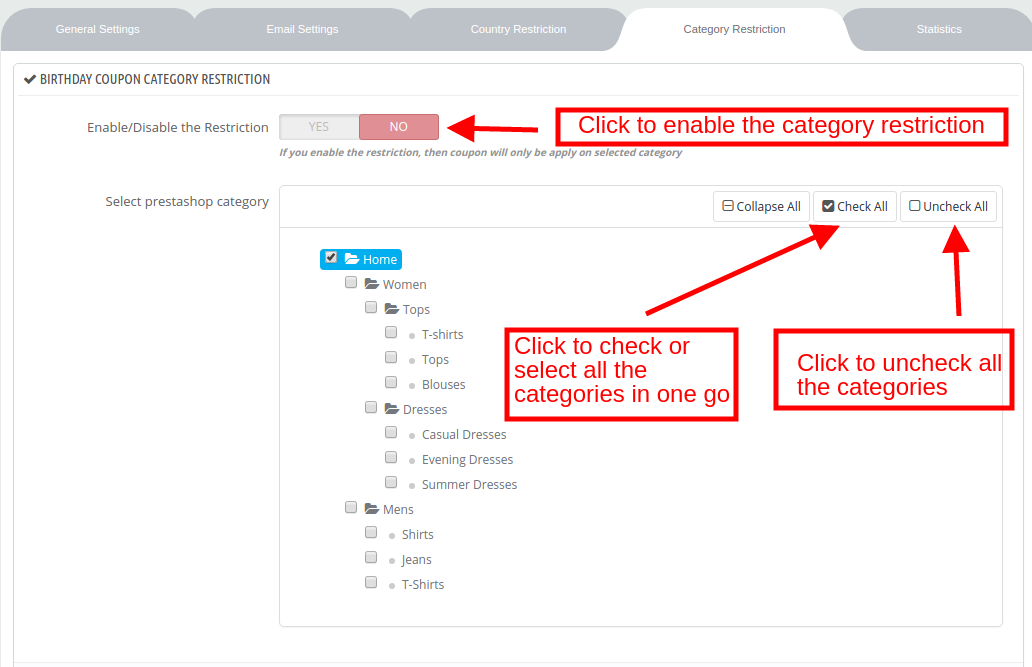
4. Allowed Category: Select the categories in which you want to apply the offer rule. By default it will be applicable in all the categories.

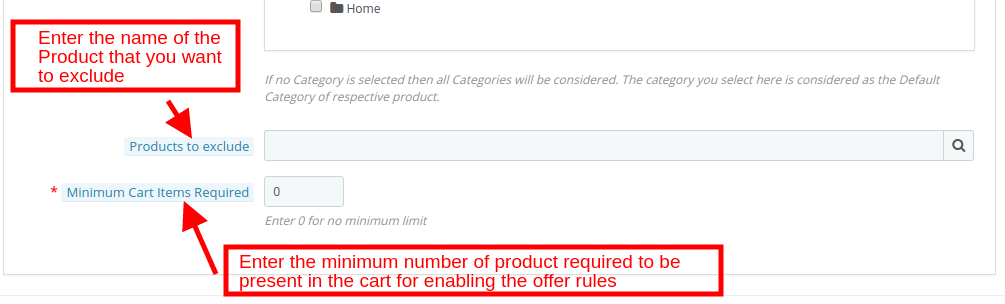
5. Product to Exclude: Enter the name of the product that you want to exclude from the offer rules.

6. Minimum Cart Items Required: Enter the minimum number of items required in the cart of the customers for availing the offers.

3.1.4 Cart Rule Actions

The Prestashop store admin can set the cart rules for the offer in this section:

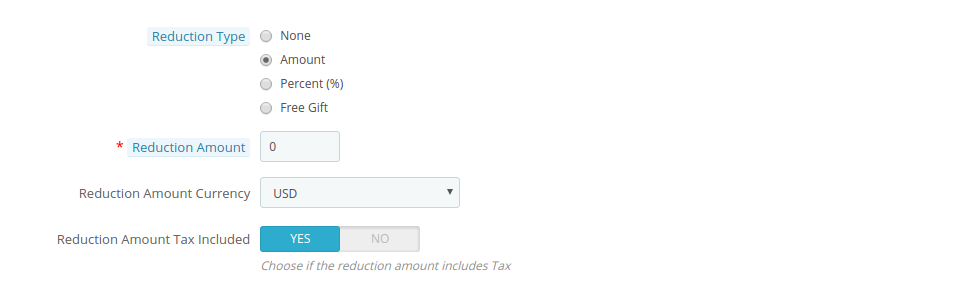
1. Reduction Type: The e-merchant can give a discount of Fixed Amount, Percentage or a Free Gift. Select any one option here.

1.1 When Fixed amount is selected, then, the admin will be asked to fill these information.

Reduction Amount: This is the discount amount that will be offered to the customers.

Reduction Amount Currency: Select the currency in which the discount is to be offered.

Reduction Amount Tax Included: If enabled the tax will be included in the reduction amount.

1.2 When Percentage is selected, enter the percentage value that you want to offer as discount as shown below.

1.3 In case of Free Gift, enter the name of the product and hit the search button. The same product will be automatically shown in the checkout page of the customers.

2. Cart Rule Validity: Enter the validity period (in days) of the rule.

Maximum Amount: Enter the maximum amount of discount allowed.

3. Maximum Amount Currency: Choose the currency in which the maximum amount fixed above is to be considered.

4. Maximum Amount Tax Included: Enable if you want to include the tax in the maximum amount fixed above.

5. Allow Free Shipping: Enable to allow free shipping to the customers.

6. Number of impacted products:

4.0 Website UI

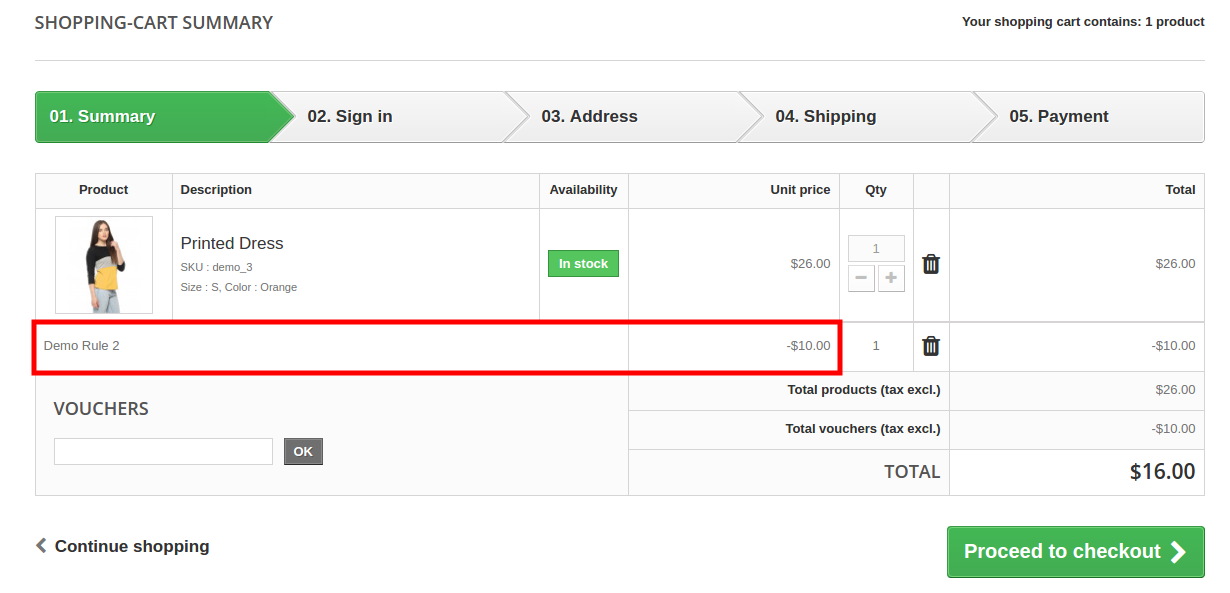
The promotion rule created in the back-end of the Prestashop promotion rule manager extension will be displayed on the checkout page of the website as shown in the image below. The discount offered will be automatically deducted from the cart value.

Now you can try Prestashop Advance Promotion manager addon for on your Prestashop website. KnowBand Prestashop deal manager extension helps you engage more customer to your store & increase the customer base.

Module Link: https://www.knowband.com/prestashop-advance-promotion-manager

Watch Video: https://www.youtube.com/watch?v=BrJ6hqNhKiQ&feature=youtu.be

Admin Demo Link: https://psm.knowband.com/promotions/16/admin1/index.php?controller=AdminLogin&token=ffa17b0c72ff8c0ab7cf3e344c5ae4fc&redirect=AdminModules

Front Demo Link: https://psm.knowband.com/promotions/16/en/

Addon Store Link: https://addons.prestashop.com/en/promotions-gifts/30307-knowband-advance-promotion-manager.html

Opencart Walmart Integration – User Manual

1.0 Introduction

Today, marketplaces are playing an important role in the growth of e-commerce. Amazon, eBay are some of the well-known platforms, but in recent years several new marketplaces have entered the completion and these marketplaces have a good potential to drive the competition. Walmart is one of the most popular marketplaces and allows people from around the globe to buy and sell from walmart.com.

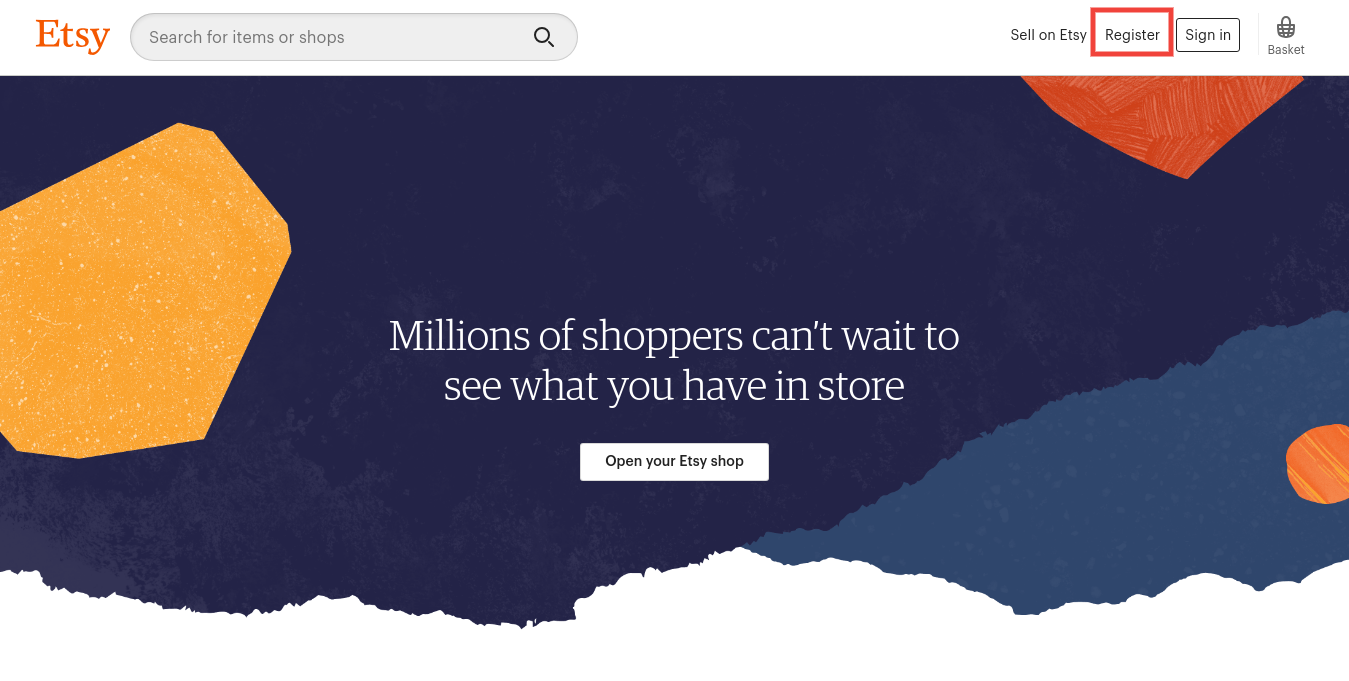
To start selling on Walmart.com, sellers need to register at Walmart. Please click on the link below to know more about the registration process.

https://marketplace.walmart.com/

2.0 Installation

After purchasing the module, you will get the following files as listed below:

1. zip (contains source code of the module)

2. User Manual

Follow the following steps to install the extension:

  1. Unzip the zip file. It would contain files and folders as shown below –

2. Copy all the files and folders of the unzipped folder into your Root Directory of the website.

3. Now module is ready to be installed in your store and you can find that in Admin -> Modules. It would be shown as below –

3.0 System Setup

Before proceeding ahead, it is important to understand the flow of actions to complete the setup. Store admin needs to take care of some specific instructions to complete the module setup.

  • Seller account setup: This section will help you to set up the shop on the Walmart marketplace and in the next steps you will learn about the Walmart API key. Walmart Consumer ID, Private Key, and Consumer Channel Type are required to integrate the OpenCart and Walmart marketplace. Please refer to the below screenshot:

  • Admin Interface: This section will help you to understand the complete working of the OpenCart to Walmart Integration module.

3.1 How to configure Walmart Opencart Integration extension?

To configure the Walmart Marketplace Integrator, store admin needs to get the Client ID and Client Secret. In order to obtain Walmart Client ID, and Client Secret, follow the process given below:

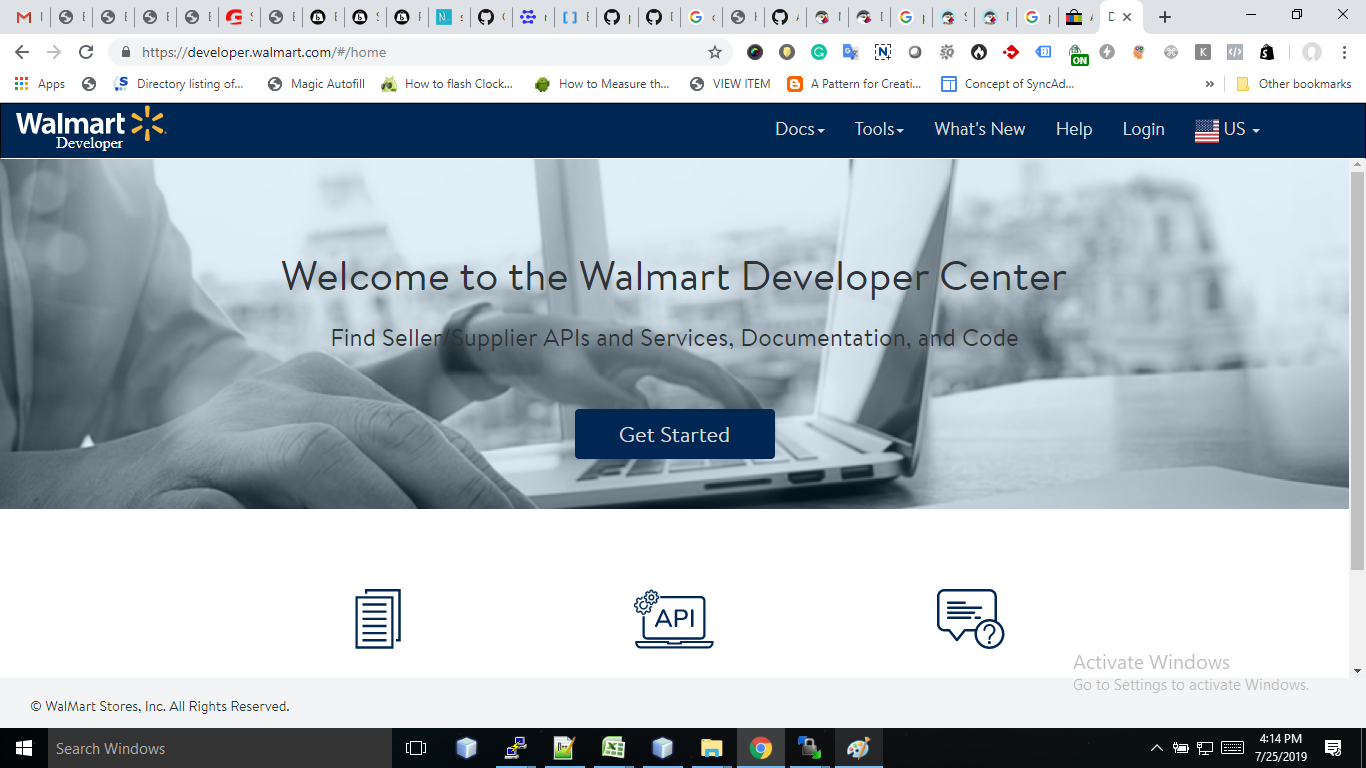
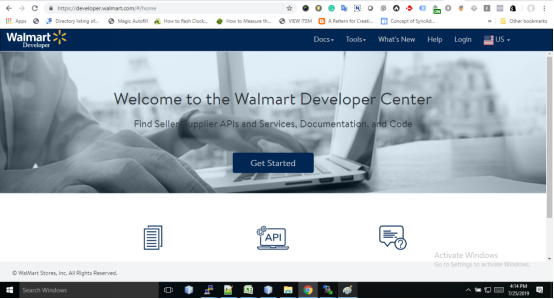
1. Go to https://developer.walmart.com/

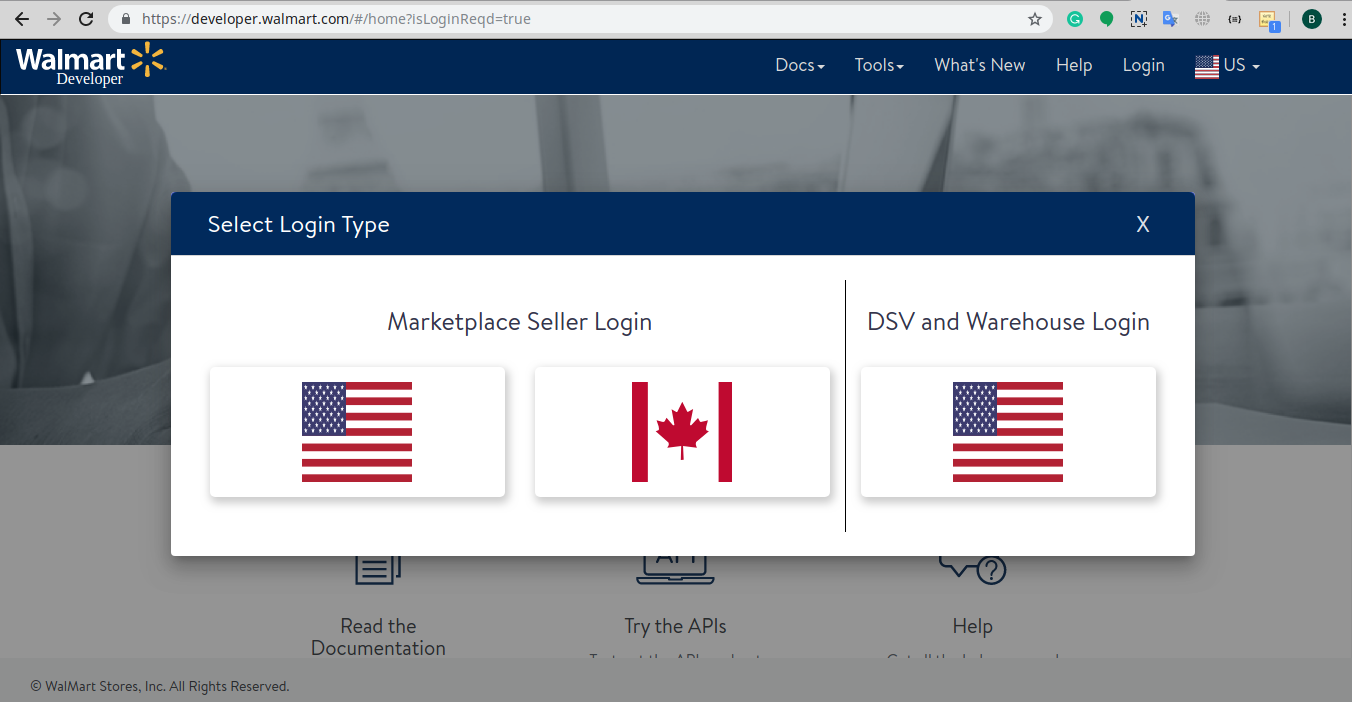
2. Select the Login type.

3. Log in using your Credentials.

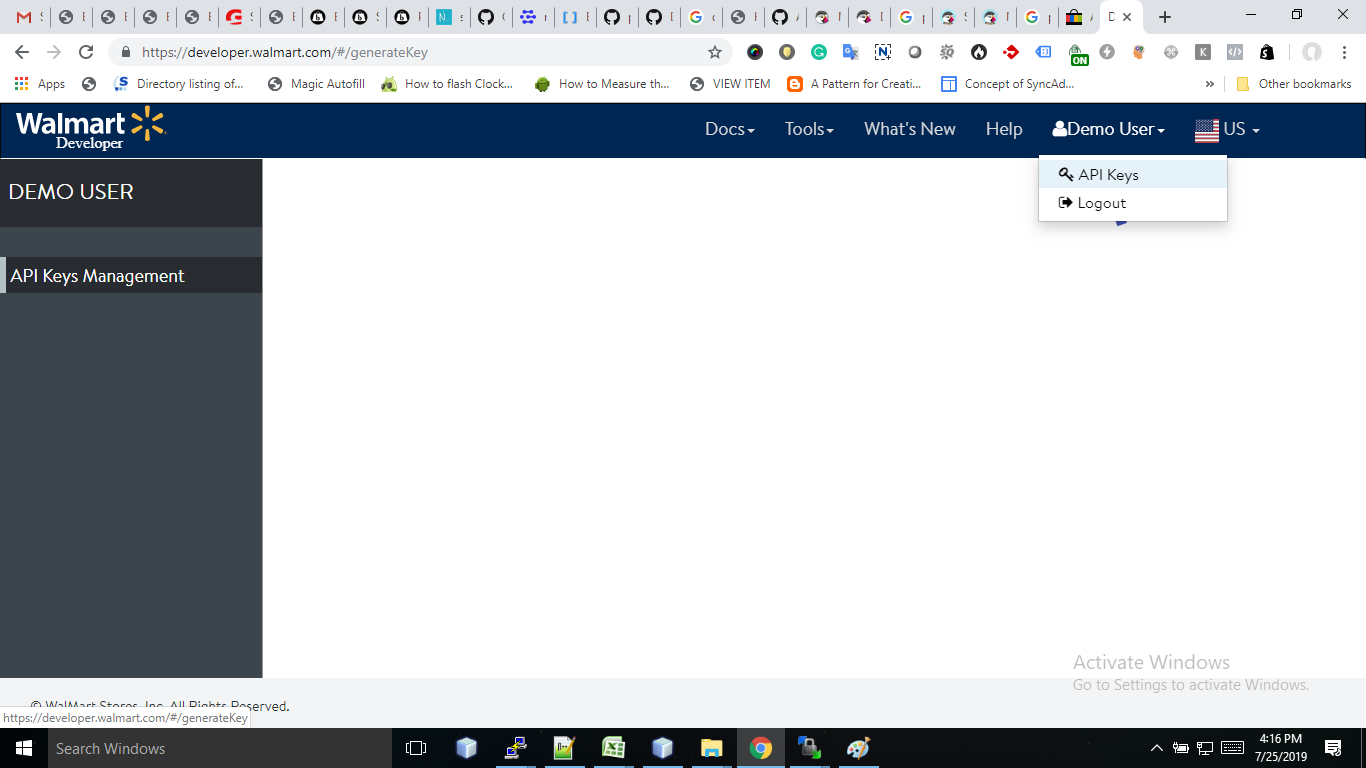
4. Click on your account and select “API Keys“.

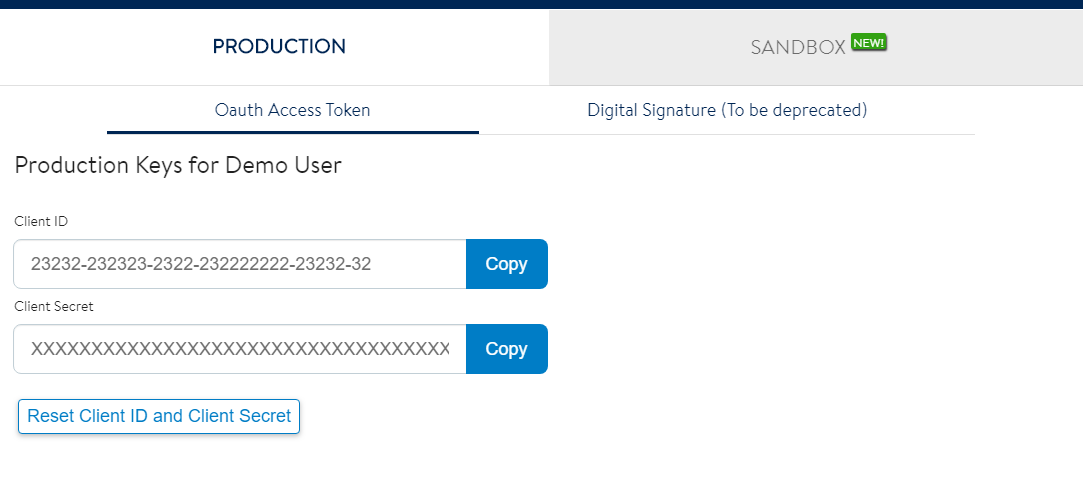
5. Now you can get the New “Client ID” and “Client Secret” from here.

4.0 Admin Interface

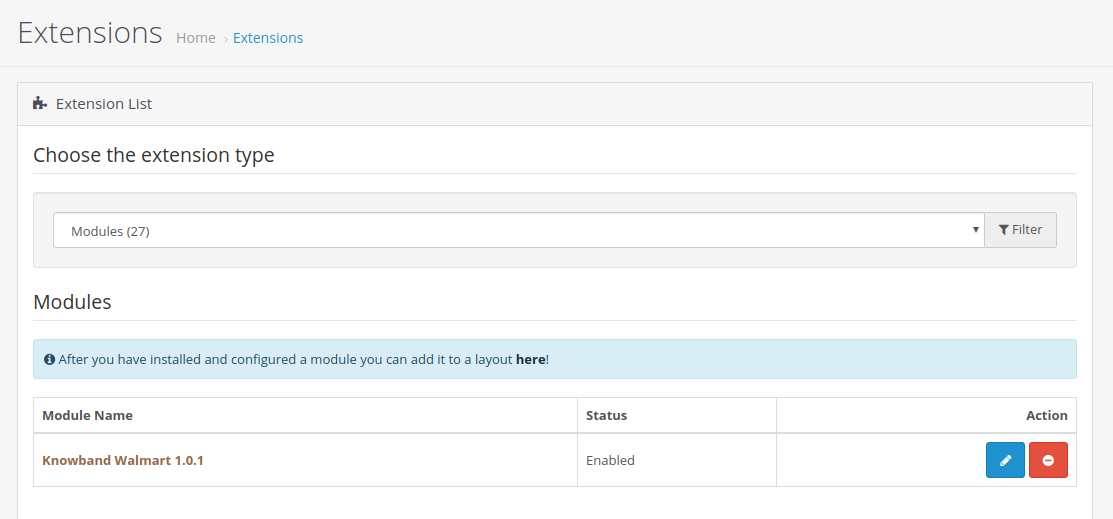
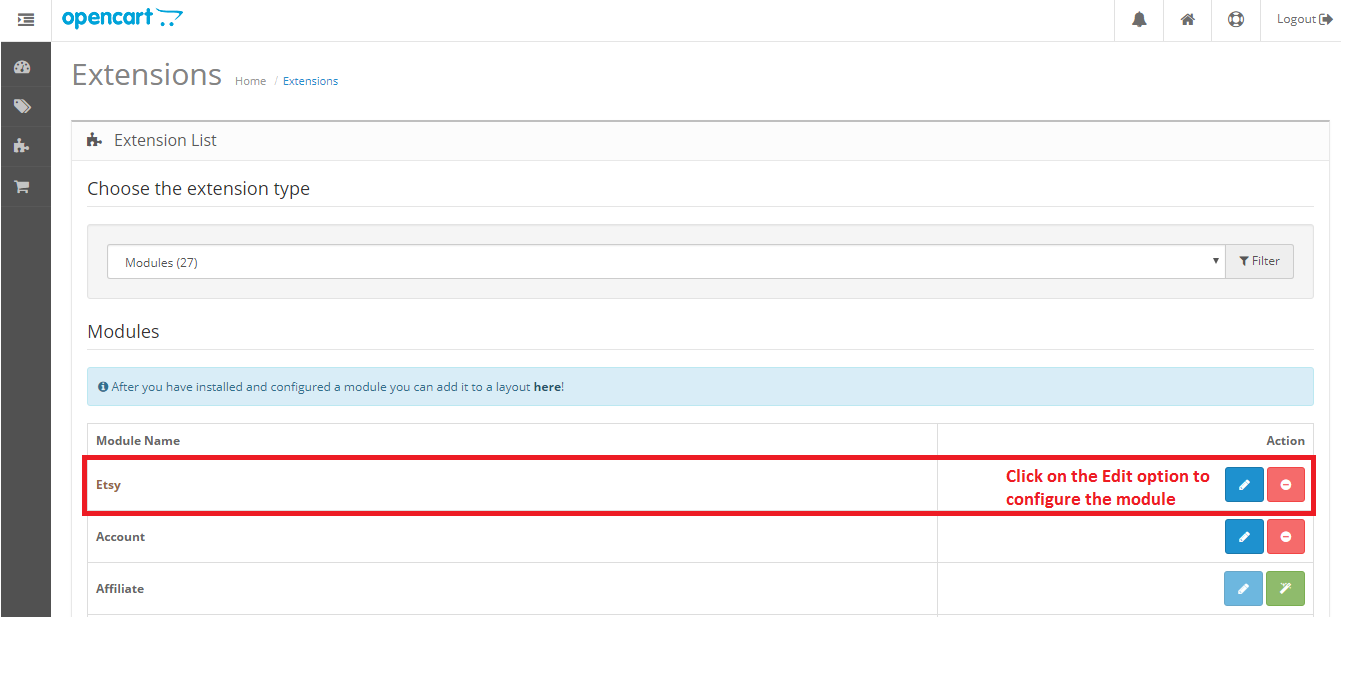
OpenCart Walmart Integration plugin has a user-friendly interface. The configuration settings can be managed via the admin interface. After installation, store admin can find the “Walmart Integration module” in the Extension List under the “Extensions” tab.

The Walmart integration extension will be displayed as shown below:

On clicking the Edit button next to the Walmart Integration module, it will redirect the admin to the admin interface. Here admin can see all the options to configure the OpenCart to Walmart Integration extension:

Walmart API Integration module offers the following options –

  1. General Settings
  2. Attribute Mapping
  3. Profiles
  4. Products
  5. Orders
  6. Feed Status
  7. Synchronization
  8. Support

Each tab is explained below.

4.1 General Settings

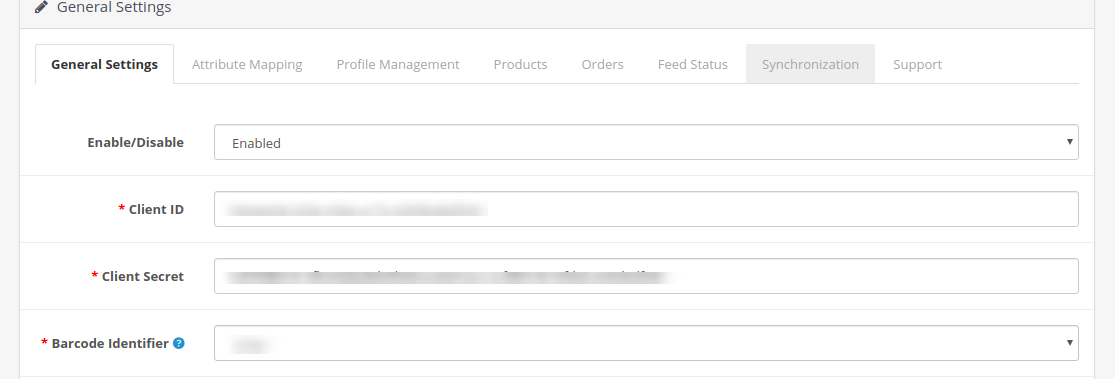
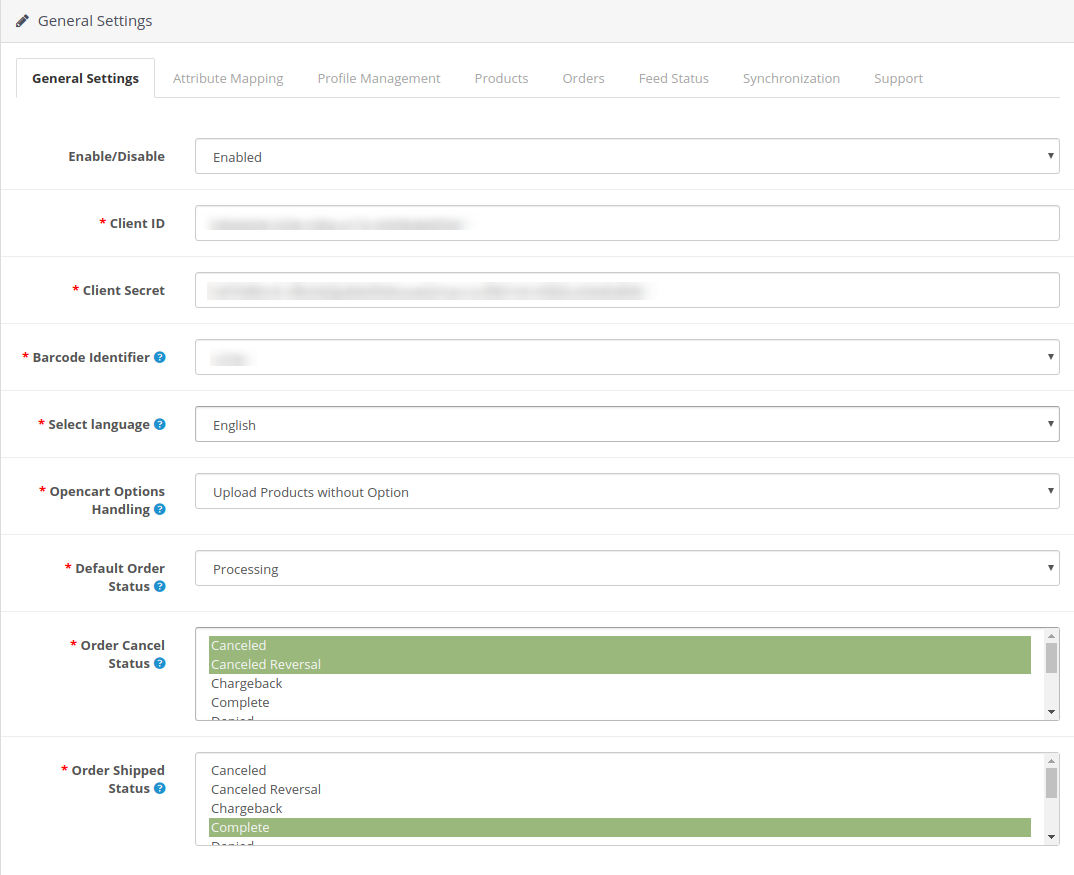
You can find the screenshot of “General Settings” page below –

General Settings tab is there for capturing details of Walmart API’s like Consumer Id, Private Key, and Consumer Channel Type, etc. This helps the admin to connect the OpenCart store with the Walmart marketplace. Please find the description of each input field below –

1. Enable/Disable

Admin can Enable/Disable the OpenCart Walmart integration module by using this option. If enabled, then only this module and all its settings will be working otherwise there will be no impact of this module on the store.

2. Client ID:

Enter Client Id in this field; it will authenticate the connection between the OpenCart store and Walmart Marketplace.

3. Client Secret:

Admin needs to enter Client Secret in this field.

3.Consumer Channel Type:

Enter the Consumer channel type API header in this field. This value can be copied from the Walmart API page.

4. Barcode Identifier:

Select the preferred Barcode Identifier from the drop-down list. The Walmart API Integration supports the UPC, GTIN, ISBN, and EAN.

5. Select Language:

Select the default language for the store.

6. Opencart Options Handling:

Enter Opencart Options Handling procedure.

7. Default Order Status:

Select the Default Order Status.

8. Order Cancel Status:

Select the Order Cancel Status option.

9. Order Shipped Status:

Select the Order Shipped Status.

After providing these details, click on the “Save” button. The Walmart API integration module verifies the API details and if the details are correct it will show the success message.

Now your OpenCart store has been connected with the Walmart marketplace.

4.2 Attribute Mapping

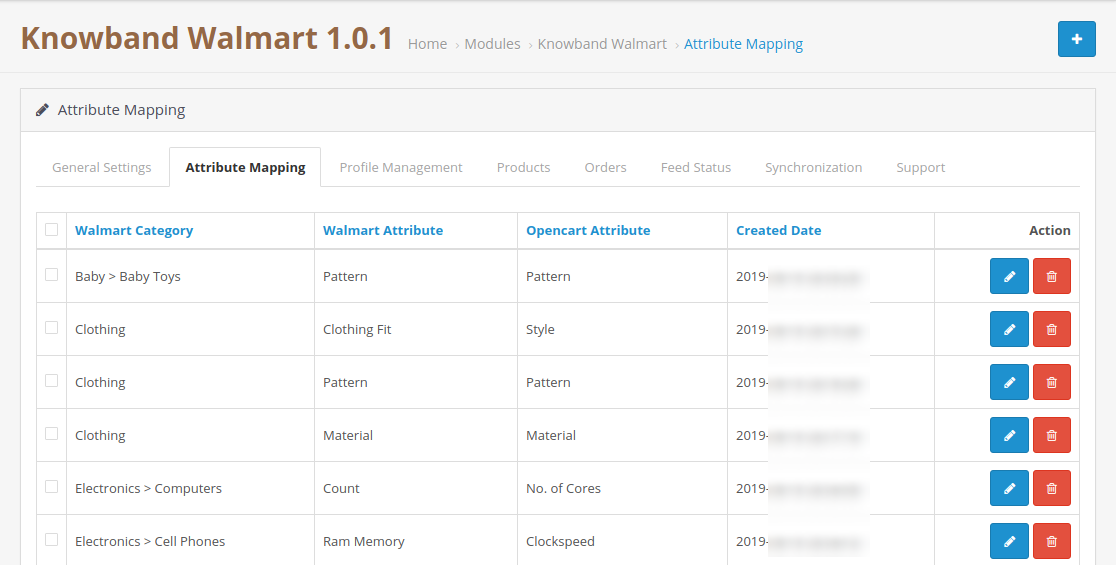
The attribute mapping tab of the OpenCart Walmart integration module allows admin to map the OpenCart store product attributes with the Walmart marketplace. Mapping of the OpenCart store attributes with the Walmart attributes so that these attributes can be mapped to the products during the profile creation. Please refer to the below screenshot-

4.2.1 How to Map Attributes

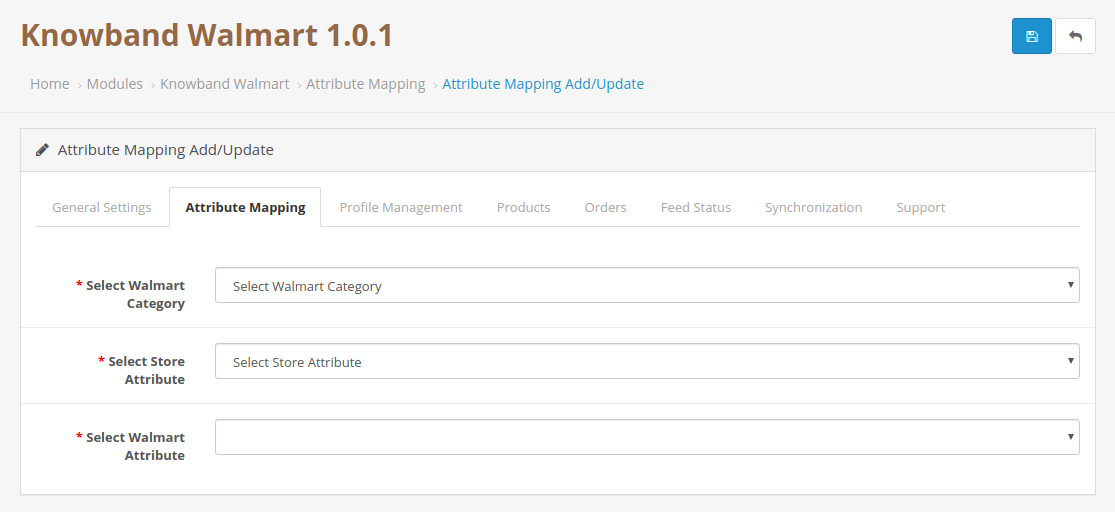
Click on the Attribute Mapping tab of the Walmart OpenCart Integration method, it will redirect to a new page as shown above in the screenshot. Now click on the (+) sign on the top of the page. It will open a new page with the option to select the Walmart category and as per the selected Walmart category Walmart attributes will appear in the drop-down list of the Walmart Attributes field. Admin can map the store attributes with the Walmart attributes by using this interface. Admin can add store attributes as per requirement from the OpenCart store admin panel. Please refer to the below screenshot-

4.3 Profile Management

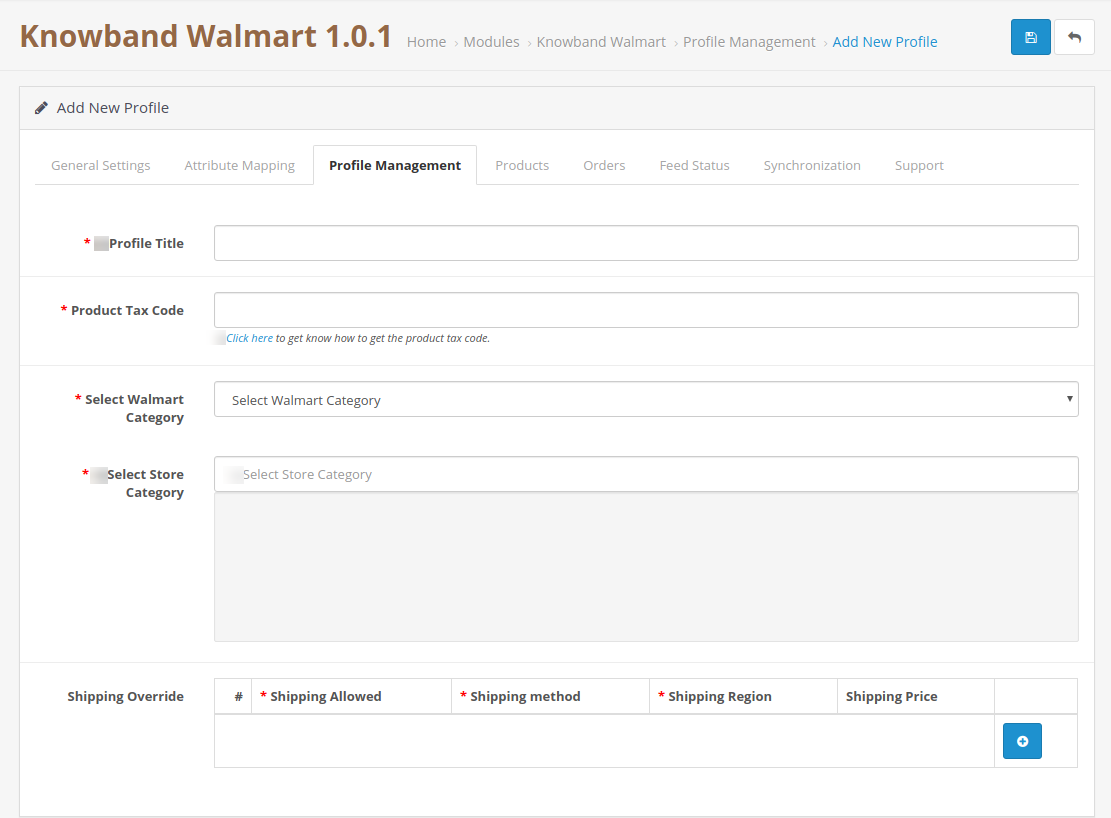
The profile Management tab provides options to list the product on the Walmart marketplace. In this section, the admin will be able to map OpenCart store product attributes and categories to Walmart store under the Walmart store product attributes and category. OpenCart Walmart integration extension allows the store admin to select multiple store categories to sync with the one Walmart category. It is mandatory to enter all the required details as per the instructions are given in the below screenshot. After entering all the details click on the Save button at the top of the form.

After creating a profile admin need to run the Product Sync by visiting the Synchronization >> Product Synchronization tab of the OpenCart Walmart Integration extension.

4.3.1 How to add New Profiles?

Following are the steps to add new profiles-

  1. Go to the Walmart API Integration extension -> Profile Management (Menu Option)
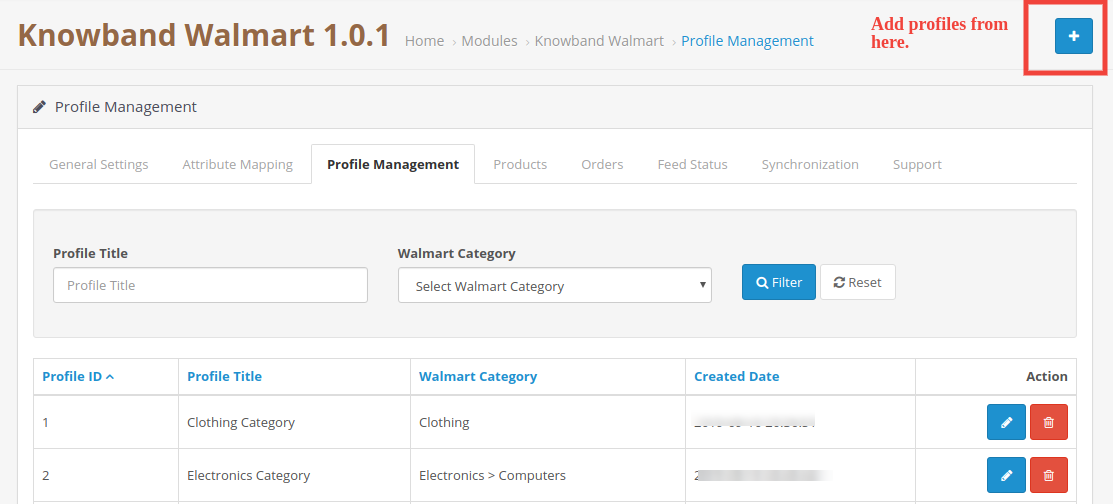
  2. It would redirect admin to a page where already added profiles will be listed (If any). Click on the “+” (plus icon as shown in the screenshot below) and it would redirect admin to a new page where a form with some input fields will be shown.

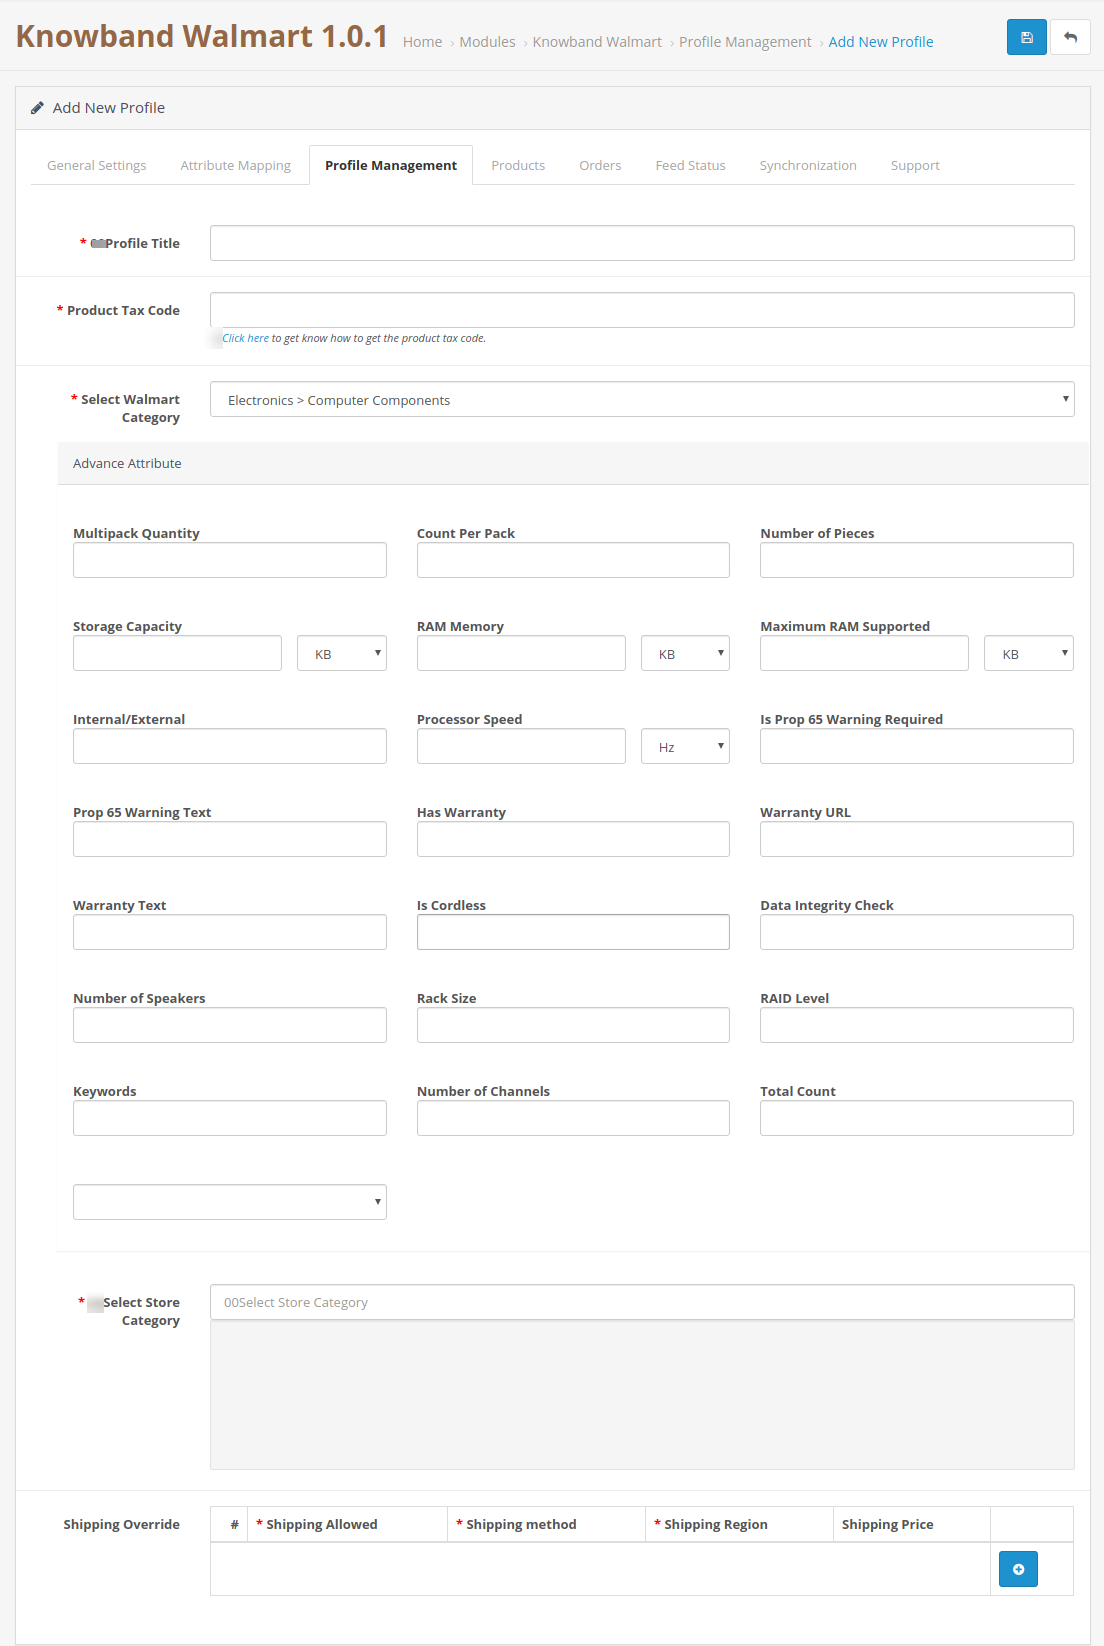
  1. Fill up the following input fields –
  2. Profile Title: Enter the Profile Title as per your choice.
  3. Product Tax Code: Enter the Tax code for the product. Tax code spreadsheet can be downloaded from the Walmart seller account, under Partner Profile select Taxes, Scroll down to the Download section and click on the US Tax Codes 2017 button.
  4. Select Walmart Category: Select the correct Walmart Category for the products from the drop-down list. On selecting the Walmart category the Advance attribute options for the products will appear on the page. Please refer to the below screenshot. For example, we have selected the Walmart category as Baby > Baby clothing –


6. Select Store Category: Select the store category of the product.

2. Shipping Override: Admin can select the preferred shipping method from here; admin can add multiple shipping methods by using the Shipping Override option.

Admin can select the shipping method and the Shipping region to define the shipping methods for the Walmart store. As per choice admin can add multiple shipping options for the shipping.

4.3.2 How to Edit/Delete Profile?

Admin can easily update the profile entries; OpenCart Walmart Integration module allows admin to sync the changes to the Walmart marketplace in simple steps. Following are the steps to edit/delete profile from the system –

  1. Go to the Walmart Integration Module -> Profile Management (Menu Option)
  2. It would redirect admin to a page where already added profiles will be listed (If any, shown in the screenshot below).

  1. Click on the “Edit” button given just next to the Profile detail.
  2. If admin clicks on the “Edit” option, then, it would redirect the admin to a new page where a form with some already filled input fields will be shown. Admin can simply update values and save the details by clicking on the “Save” button.
  3. To “Delete” a profile admin needs to select the “Profile” (select the profile by clicking the checkbox) and click on the Delete button available at the top of the page.

4.4 Products

After creating a Profile admin need to run the sync operation (Synchronization >> Product Synchronization) to list the products selected under the newly created profile on the Walmart marketplace. As soon as the synchronization process will get completed it will display the “Success” message on the top of the page. Admin can check the status of listed products under the Product Listing tab of the Walmart OpenCart integration module. This tab shows the status of all the listed products and in case of any issue with the listing then admin can check the reason for listing error. Please refer to the below screenshot-

As shown in the above screenshot Product listing page shows the following fields:

  1. Image
  2. SKU
  3. Barcode
  4. Options
  5. Profile Title
  6. Listing ID
  7. Listing Status
  8. Action

Admin can use the Name and Listing Status filters to check the listing status. Listing status filter shows the option to check the status of the products with Listed, Pending, Deleted, Inactive, Expired and Error.

4.4.1 How to check the listing error

In case of any missing information or wrong details of the product, the Walmart OpenCart integration module also displays the error message for the listing process. At the product listing page under the Listing Status admin can find the products with the Error status. To know the reason for the error admin needs to click on the second button given under the action field. It will open a popup with the details of the error. Please refer to the below screenshot:


4.4.2 How to delete the product from Walmart

To delete a product from Walmart click on the Delete button next to the product under the Action field and then sync the products to the Walmart, this operation will retire the product from

Walmart without removing the product from the OpenCart store. Please refer to the below screenshot-


4.5 Order Listing

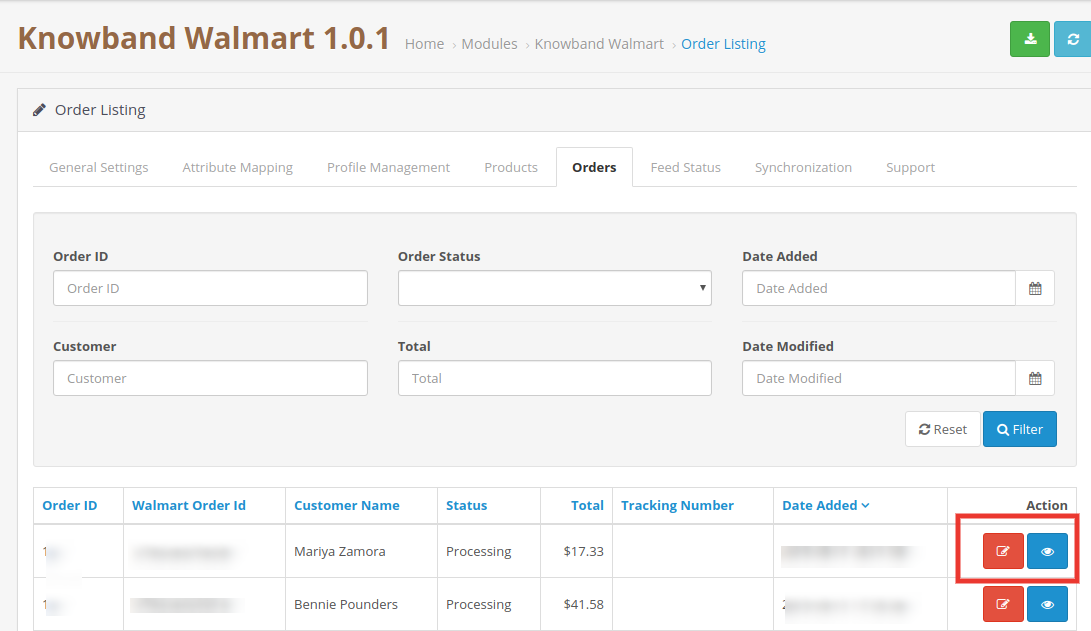
The order listing tab of the Walmart OpenCart connector module helps the store admin to synchronize the Walmart store orders to the OpenCart Store. To sync the orders to the OpenCart store admin need to run the Synchronization >> Order Download, after that, all the orders will be downloaded to the OpenCart store and admin can check the order details under the Order Listing tab. Please refer to the below screenshot-

Admin needs to run the Synchronization >> Acknowledgeorder cron to notify Walmart that the orders have been downloaded to the OpenCart store. After running this cron next time only the newly placed orders will be downloaded. Admin can also set up the cron job to automate the process.

4.5.1 Update Shipping information for the orders

Admin can update the shipping information like shipping carrier, tracking id and the date of shipping for the Walmart orders and the order details can also be checked by using the “Edit” button under the Action field. Please refer to the below screenshot-

Update Tracking:

After downloading the orders from the Walmart store to the OpenCart store, store admin can update the shipping information for the Walmart orders and sync it to Walmart. To complete the synchronization admin need to run the Synchronization >> Update Shipment cron. This will update the order status of the Walmart store.

Edit:

Admin can update the status of the Walmart store order from the OpenCart store by clicking the Edit option.

4.6 Feed Status

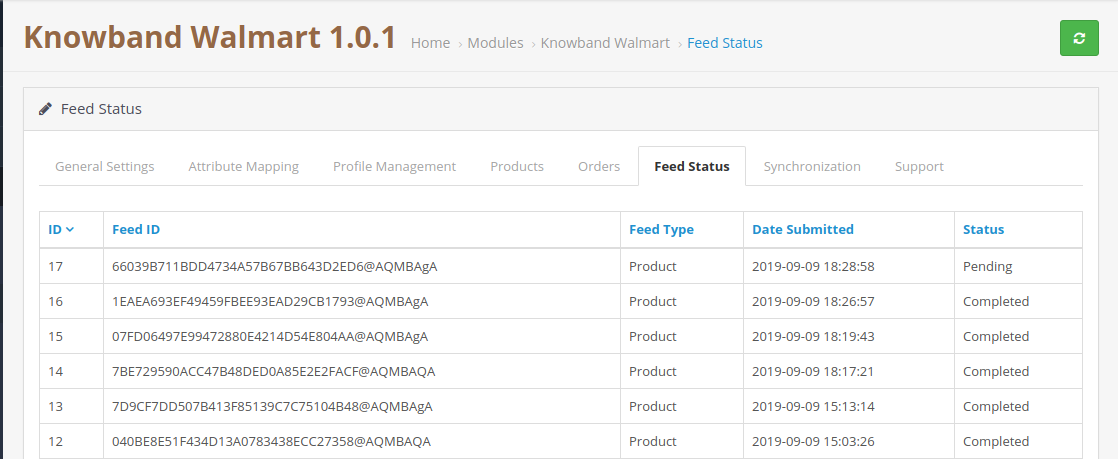
The status will be updated by the cron jobs if it is set. Otherwise, the user will have to click on the “Feed status” button on the synchronization page.

4.7 Synchronization

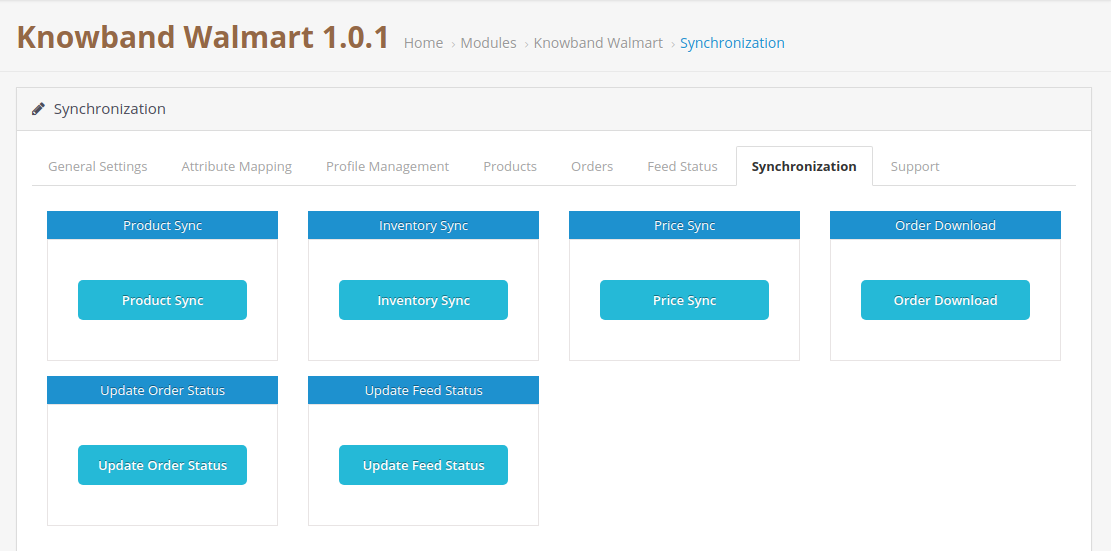
The Synchronization tab of the Walmart OpenCart Integration module synchronizes all the settings and changes done in the different tabs of the OpenCart Walmart Marketplace Integration Module. The synchronization between the OpenCart Store and Walmart Marketplace and vice-versa can be done from the ‘Synchronize‘ tab.

Product Sync:

After creating a new profile OpenCart store admin need to run the Product Sync. This operation lists all the products under the newly created profile on the Walmart marketplace. Admin can check the status of listed products under the “Product Listing Tab”.

Product Sync would perform following actions –

  • Update the products list in the Walmart marketplace.
  • It will add products to the Walmart Marketplace with the respective product details (e.g. Price, Quantity, Image, etc.).
  • It will update the expired products on Walmart Marketplace for the items in which ‘Renewal’ is enabled.
  • It will remove the products from Walmart Marketplace which are marked deleted on Store.

Inventory Sync:

The quantity of the products can be updated on the Walmart Marketplace by clicking the ‘Inventory Sync’. It updates the quantity status of each product listed on Walmart Marketplace.

Price Sync:

The price of the products can be synced to the marketplace by clicking the ‘Price Sync’.

  • This synchronization will update the price of the products on Walmart Marketplace.
  • It will update the changes in the price of the products.

Order Download:

Order download Synchronization will download all the orders from the Walmart marketplace to the OpenCart store.

Update Order Status:

After downloading the orders to the OpenCart store, the store admin needs to click on the Update order status button, so that the orders will be updated on the OpenCart store. Admin can also set up the cron job to automate the process.


Update Feed Status:

Update Feed Status will update the feed status of Walmart and will also update the product add/update/delete status on OpenCart.

4.8 Support

In case of any issue, raise a ticket OR email us at support@knowband.com.

Product Page Details: https://www.knowband.com/opencart-walmart-integration

Prestashop Walmart Integration – User Manual

1.0 Introduction

Prestashop Walmart Integrator by Knowband gives you a handy mechanism to list the product on Walmart and manage the order in a few simple steps directly from the Prestashop store.

Walmart is one of the largest retail companies and has made a prominent presence in the eCommerce industry over the years. The marketplace is famous for Electronic goods and even deals with other products including home and furniture, home improvement, clothing, footwear, jewelry, toys, health and beauty, grocery, etc. The Prestashop store owners can now sync their store and sell the products on Walmart.com.

Walmart Prestashop Integration module by Knowband allows the store owners to integrate the store with Walmart.com. The Prestashop Walmart API Integrator automates the entire process of store synchronization, product and inventory management as well as order processing.

1.1 Features offered by Prestashop Walmart Integrator are listed below:

  • The Prestashop Walmart Integration Module connects the Prestashop store with Walmart.com in a few button clicks.
  • Real-time product listing from the back-end of the Prestashop Walmart integration plugin makes it easier for the sellers to display their products to the customers of the marketplace.
  • The easy inventory management and product synchronization of the Prestashop Walmart Integration extension allows the vendors to manage the products with minimal hassle.
  • The profile-based listing of the Prestashop Walmart Integration Module allows the admin to upload the products in bulk. The admin can update the prices and inventory by executing the cron from the admin interface of the Prestashop Walmart integrator.
  • The admin can even change the price of the product on the marketplace without changing their cost at their site.
  • Prestashop Walmart Integration addon offers easy order management that makes it easier for the store admin to keep a track of the orders received from the marketplace and manage the same from a single interface.
  • With easy shipping and product management from the back-end of the Prestashop Walmart Marketplace integration plugin, the store owners can effortlessly boost the overall revenue of their company.
  • The Prestashop Walmart API integration addon allows the admin to manage the shipping carrier and shipping methods with ease.
  • The admin gets an option to get the buy box report just by executing cron in the back-end of the Prestashop Walmart integration addon.
  • Based on the performance of the products, the admin can reprice the products and sync the same with the marketplace at a button click with the help of Walmart Prestashop integration addon.
  • Walmart Prestashop connector makes it easier for the admin to provide the tax code of Walmart Categories.
  • Admin can view the overall sales report along with the sales report of individual products from the admin interface of the Prestashop Walmart integrator.
  • The sellers can easily manage the lag time of the products from the back-end of the Walmart Prestashop connector.

1.2 Merchant Benefits of the Prestashop Walmart integration addon:

  • Walmart Prestashop Integration plugin automates the entire process of store integration.
  • With the help of Walmart Prestashop API integrator, the store admin can list the products and the corresponding details in the marketplace and manage the inventory without any manual synchronization.
  • Not just the inventory, even the orders received can be synced in the store by executing cron in the back-end of the Walmart integration module.
  • The orders can, then, be processed from the store and the status of the orders can be updated to Walmart.com at a button click.
  • The store admin can map the category of their store with that of the category of the marketplace with the help of the Prestashop Walmart integration extension.
  • Even the attributes of the products can be mapped with the attribute of the marketplace with the help of this Prestashop Walmart Marketplace Integration extension.
  • The Walmart Prestashop integration module is easy is to understand and use.
  • The Walmart Prestashop integration extension comes with free support of 3 months.
  • Along with version compatibility, the Prestashop Walmart Integration plugin doesn’t conflict with other modules of the store.

1.3 Project Objectives

Listed below are the project objectives of Walmart Prestashop Connector:

  1. The installation process of the Prestashop Walmart integrator.
  2. The process of seller account set-up in Walmart.com
  3. Profile creation and synchronization in the marketplace.
  4. Product listing and status update of the products on Walmart.
  5. Order synchronization from Walmart and status updates.

2.0 Installation

Once the Prestashop Walmart Integration module is purchased from the store, you will get the zipped file (containing the source code of the Prestashop Walmart marketplace integration addon) along with the user manual. Please follow the below steps to install it:

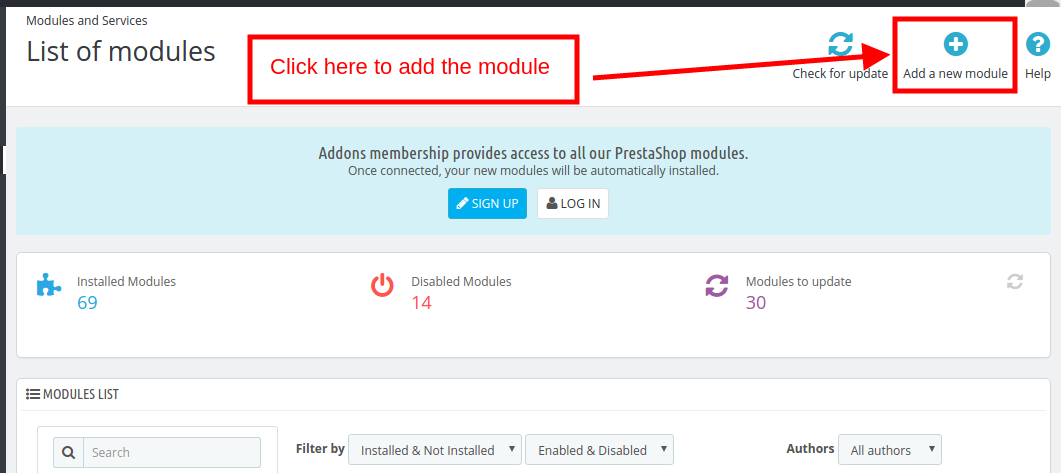
Step 1: Go to Module listing page and “Add New Module” button.

Step 2: Upload the downloaded zipped file.

Step 3: Once this is done, the Prestashop Walmart Marketplace Integration extension will be listed on the module listing page as shown in below screen:

Step 4: Click on the install button. The module will be installed in your Prestashop store.

Note: Please set the read/to write permission on the module folder before installing the module into the system.

3.0 How to configure Walmart Magento Integrator Extension?

To configure the Walmart Marketplace Integrator, store admin needs to get the Client ID and Client Secret. In order to obtain Walmart Client ID, and Client Secret, follow the process given below:

1. Go to https://developer.walmart.com/

2. Select the Login type.

3. Log in using your Credentials.

4. Click on your account and select “API Keys“.

5. Now you can get the New “Client ID” and “Client Secret” from here.


4.0 Admin Interface

Once the seller account setup is complete, the merchant can configure his shop on Walmart.com

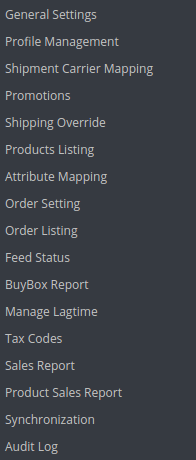
The Prestashop Walmart Marketplace Integration extension offers 17 configuration tabs in the main menu of the admin interface. These options include the following:

  • General Settings
  • Profile Management
  • Shopping Carrier Mapping
  • Promotions
  • Shipping Override
  • Product Listing
  • Attribute Mapping
  • Order Setting
  • Order Listing
  • Feed Status
  • BuyBox Report
  • Manage Lagtime
  • Tax Report
  • Sales Report
  • Product Sales Report
  • Synchronization
  • Audit Log

Each option is discussed in detail below.

4.1. General Setting

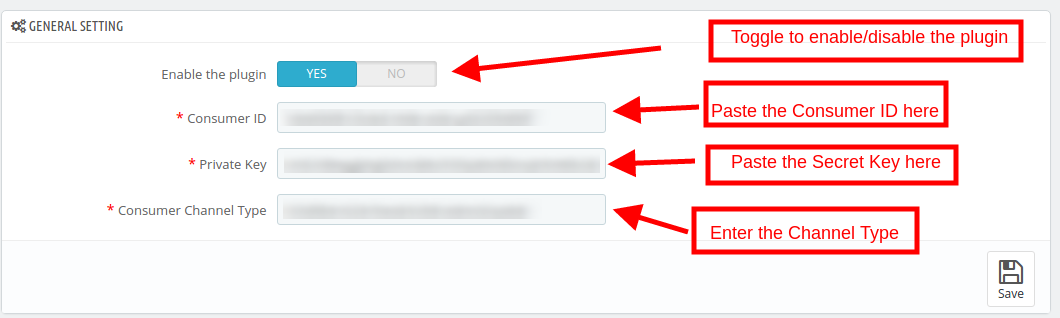
To authenticate the Prestashop to Walmart integration, the Prestashop store admin needs to fill-up the following field:

1. Enabled the Plugin

Toggle the button to enable/disable the Prestashop Walmart Marketplace Integration addon from the store.

2. Consumer ID

Enter the Walmart Consumer ID that was copied while setting up the connection.

3. Private Key

Enter Walmart API Secret Key here that was copied from the seller’s account. It is mandatory for authenticating the integration between the store and Walmart Marketplace.

4. Consumer Channel Type

The value for the Channel Type header is used to send information to the API.

4.2. Profile Management

The Prestashop store admin can create, edit or delete N number of profiles from the back-end.

4.2.1 How to Create a New Profile?

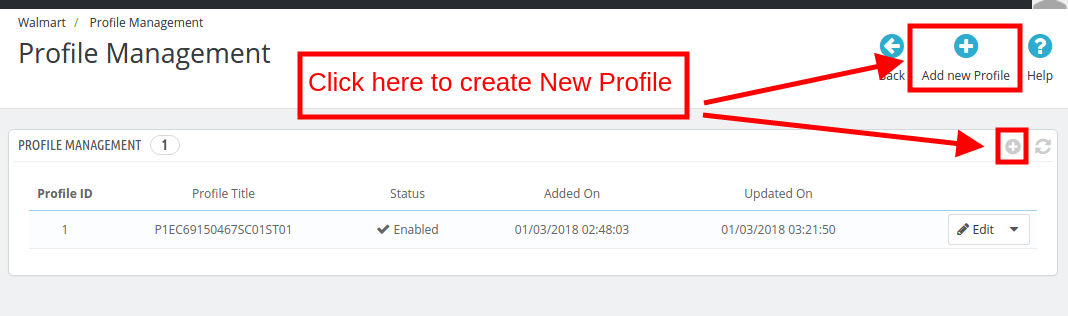
Click on the ‘Add New Profile’ or ‘+’ sign to create a new profile.

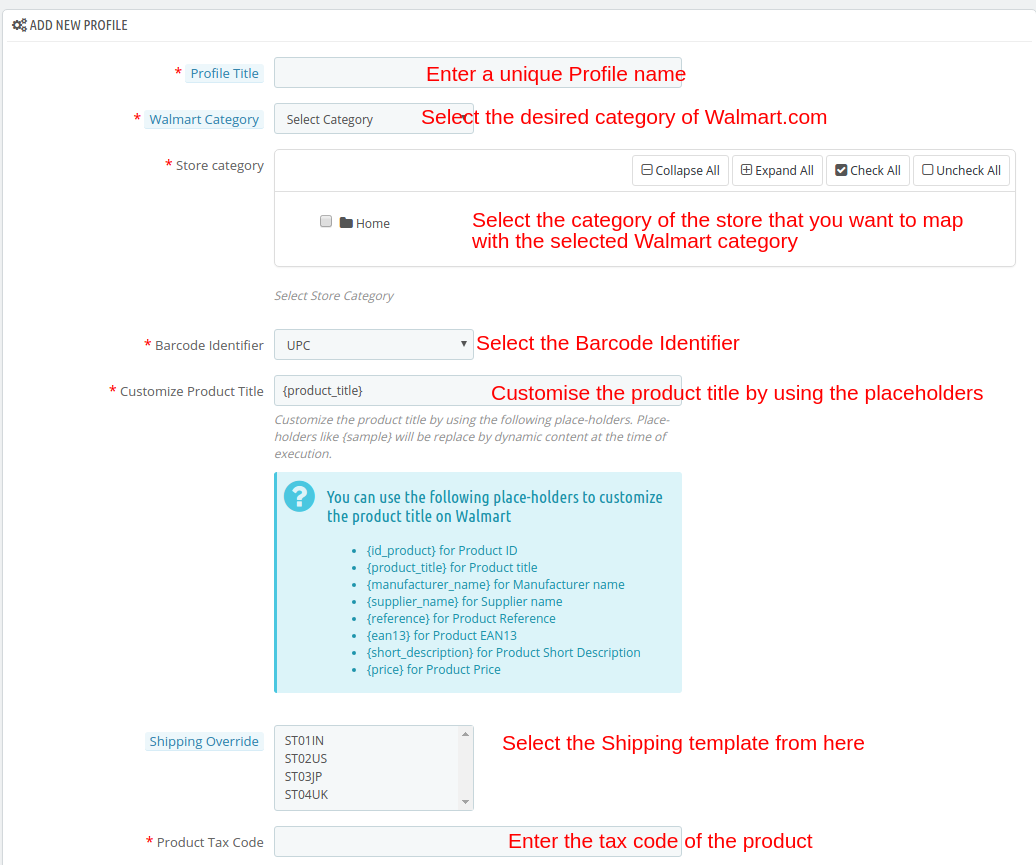
Once the button is clicked, the admin will be redirected to the profile creation page. Here are the fields that you need to fill.

Profile Title: Enter a unique name for the profile.

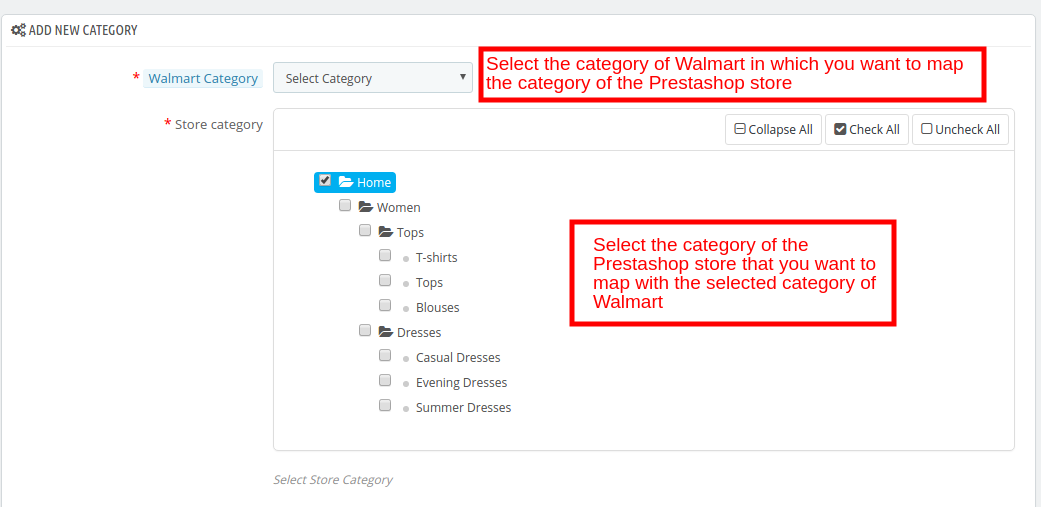
Walmart Category: Select the category of the Walmart where you want to map the category of the store.

Store Category: Expand the category and select the category of the Prestashop that you want to map in the category of Walmart.com.

Barcode Identifier: This is the unique field of the product. Select anyone from the dropdown list, so that, the Prestashop extension can identify the product according to the mapped attribute. The various options to choose from include: UPC, EAN13.

The various place-holders are listed below.

  • {id_product} for Product ID
  • {product_title} for Product title
  • {manufacturer_name} for Manufacturer name
  • {supplier_name} for Supplier name
  • {reference} for Product Reference
  • {ean13} for Product EAN13
  • {short_description} for Product Short Description
  • {price} for Product Price

Enable Custom Pricing: Enable this option to change the price of the product without changing the price of the product on the Prestashop site.


The admin can enter the custom price change in this section.

Select whether you want to change the price by a fixed amount or a percentage amount.

Select whether you want to increase or decrease the price of the products by that particular value.

For instance, the admin chooses ‘Fixed’ and ‘Increase’ and enters the custom price of $5, then, the price of all the products of that particular profile will increase by $5.

Shipping Override: This is an optional field. Select the shipping options from the list provided. This section includes all the shipping templates added in the Shipping Override tab.

Product Tax Code: Enter the product tax code in this section.

Also, the store admin can add relevant attributes of the products.

4.2.2 How to Edit the Existing Profiles?

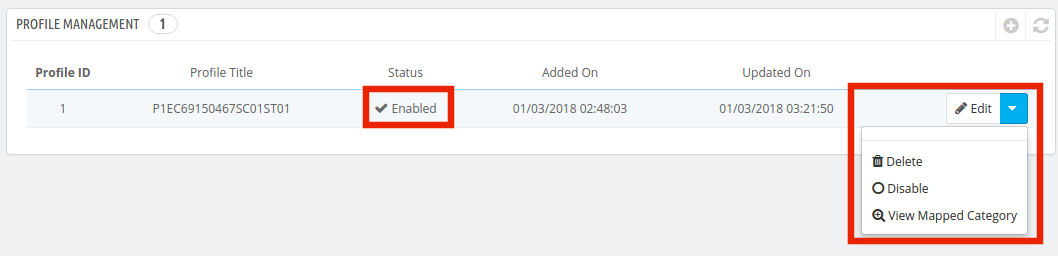
You can find the list of the created profile in the Profile Management tab of the admin interface.

To edit the profile, click on the ‘Edit’ button corresponding to the profile.

The Prestashop store admin can enable/disable by changing the status as shown in the image below.

The category mapped can even be viewed by clicking the ‘View Mapped Category’ button shown in the above image.

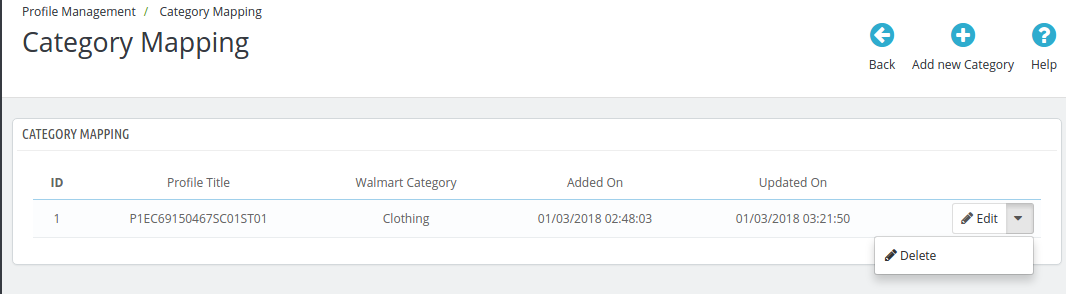
The mapped categories will be shown as the image below:

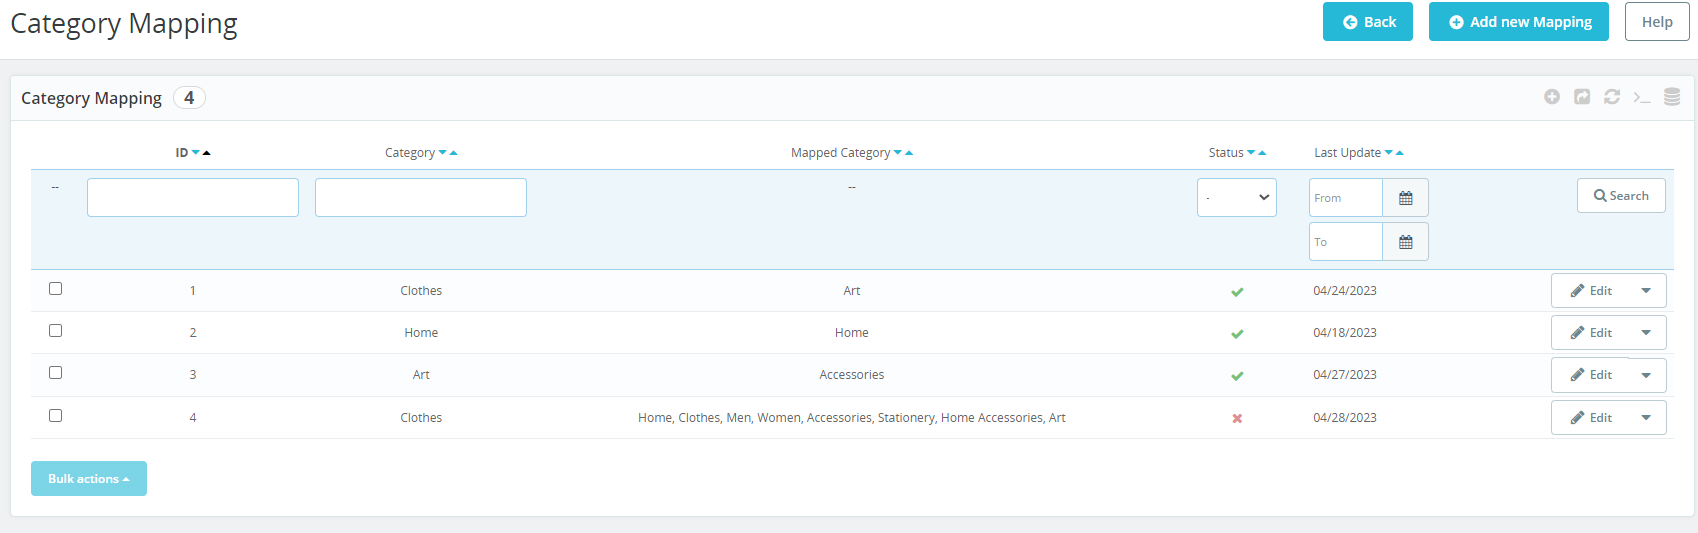
The store admin can even add new categories for mapping.

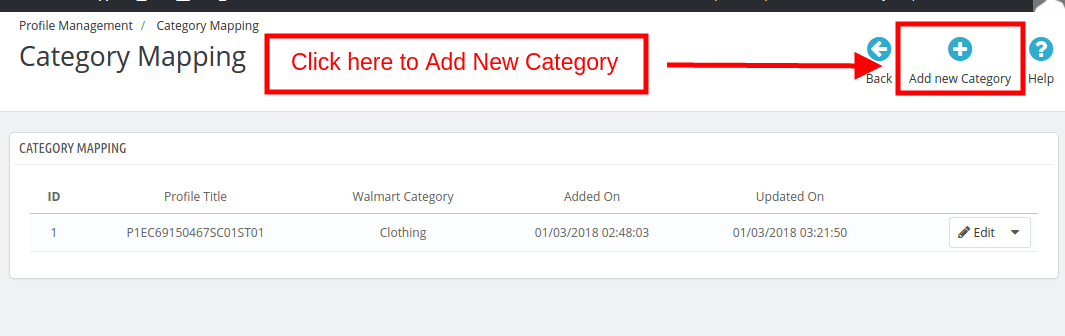
4.2.3 How to Add New Category?

To add a new category click on the ‘Add New Category’ on the top right side of the admin interface.

You’ll be redirected to the category creation page as shown below.

Walmart Category: Select the category of Walmart in which you want to map the category of the Prestashop store.

Store Category: Select the category of the Prestashop store that you want to map with the selected category of Walmart.

4.2.4 How to Edit/Delete the Categories?

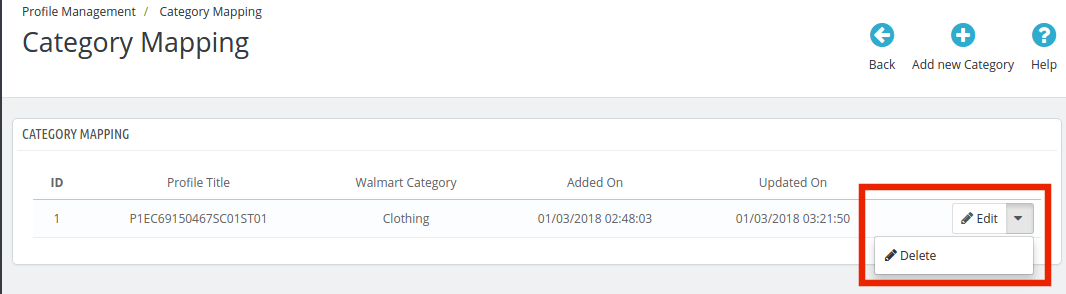
There is an Edit and Delete button corresponding to every category as shown below. Click on the respective buttons to Edit and Delete the categories.

4.3. Shipment Carrier Mapping

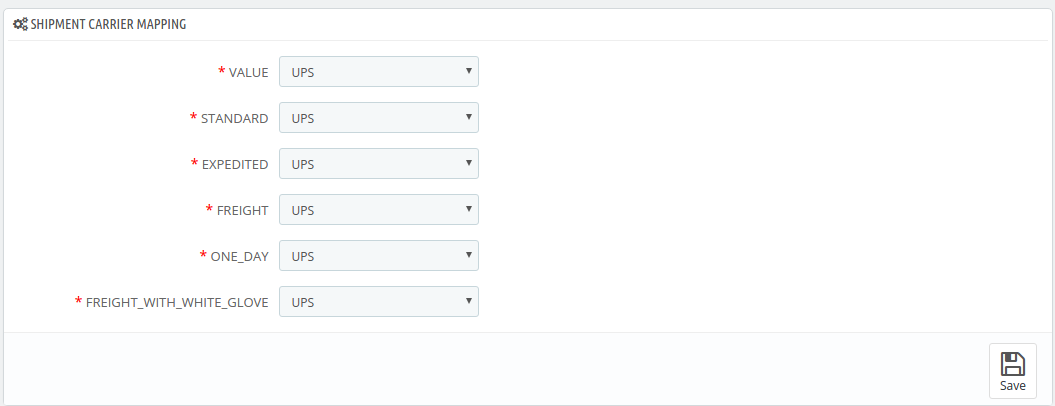
The Prestashop Walmart Integration addon allows the admin to map the shipping carrier with ease.

Just the options from the drop-down menu for the various shipment carrier methods.

4.4. Promotions

The admin gets an option to add promotional deals for the marketplace customers with the help of the Prestashop Walmart Integration addon.

4.4.1 How to add Promotions on the Walmart marketplace?

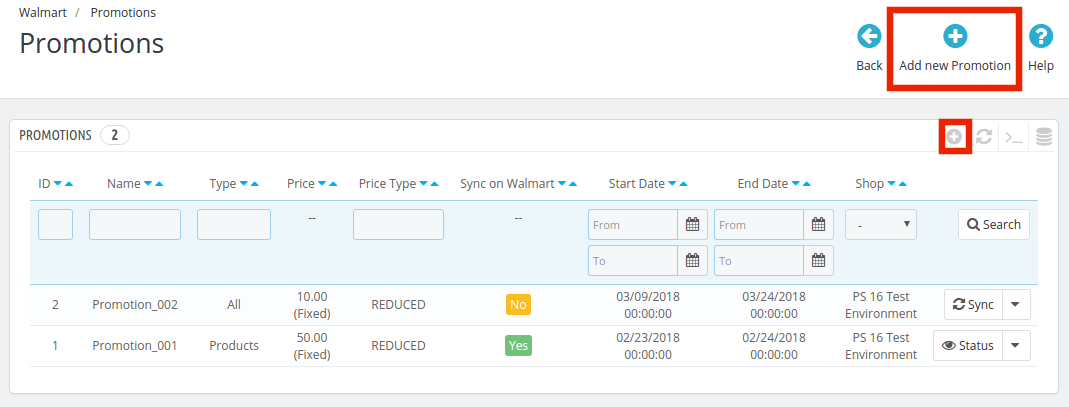
To add promotional deals, click on the ‘+’ sign or ‘Add New Promotion’ on the top right side of the Walmart Prestashop Integration module.

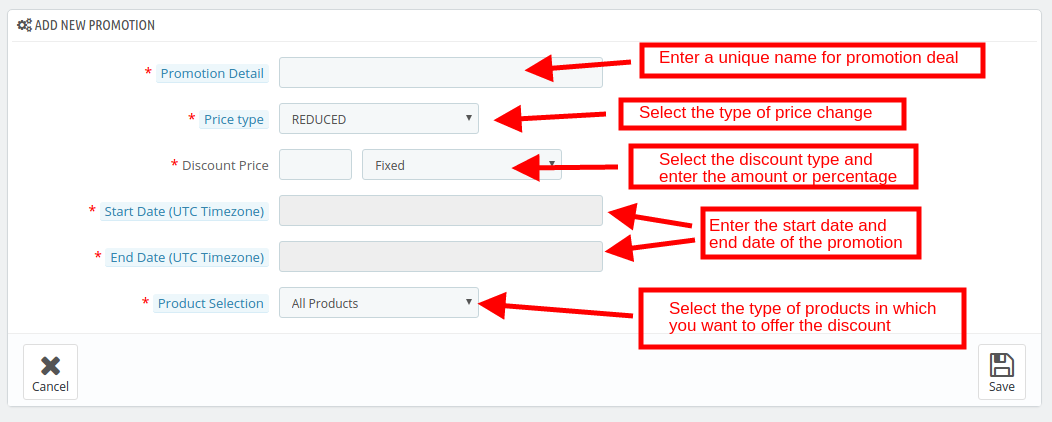
You’ll be redirected to the promotion creation page. Fill in the required details that are discussed below:

Promotion Detail: Enter the detail of the promotion in this section.
Price Type: Select the price change type. It can be Reduced or Clearance.
Discount Price: Select the discount type, Fixed or Percentage. Enter the fixed amount or the percentage amount.
Start Date: Enter the start date of the deal.
End Date: Enter the date when the deal will end.
Product Selection: Select the product group in which you want to offer the discount. It has 3 options:

  • All Products: This will apply for the promotion of all the products listed in the marketplace.
  • Products of Selected Profile: This will apply the deal on all the products of the selected profile. Once this option is selected, all the profiles will be listed in the Select Profile section.

  • Selected Products: This will allow the admin to offer discounts on the selected products. The products can be selected in the Select Product section.

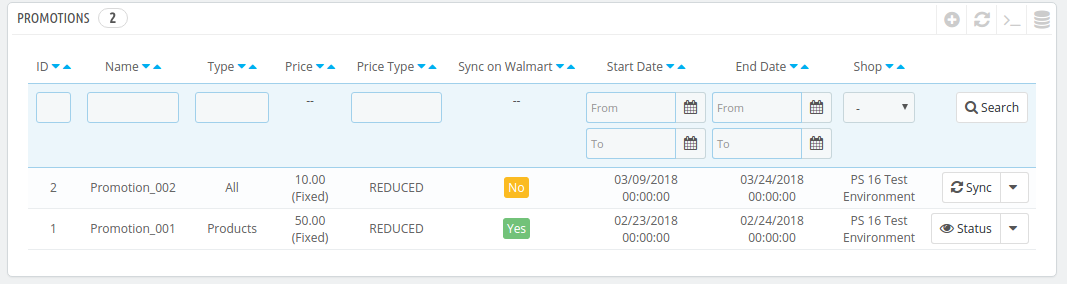
4.4.1 How to Sync and Edit/Delete the Promotions?

The promotion deals will be listed in this tab of the Prestashop Walmart API integration extension as shown in the image below:

The promotions can be synced with the Walmart marketplace by hitting on the ‘Sync’ button corresponding to each promotion rules.
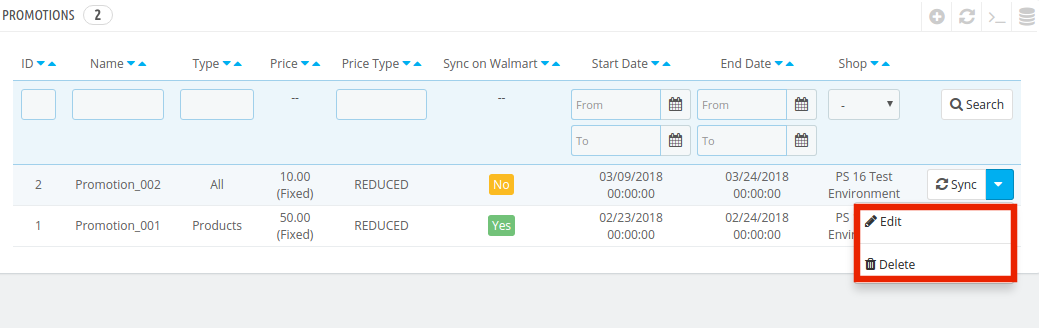
To edit or delete the promotion rules, click on the ‘Edit’ or ‘Delete’ button corresponding to each rule as shown below:

4.5 Shipping Override

The Prestashop Walmart Integration extension allows the store admin to add shipping methods for the Walmart consumers.

4.5.1 How to Create New Shipping Override?

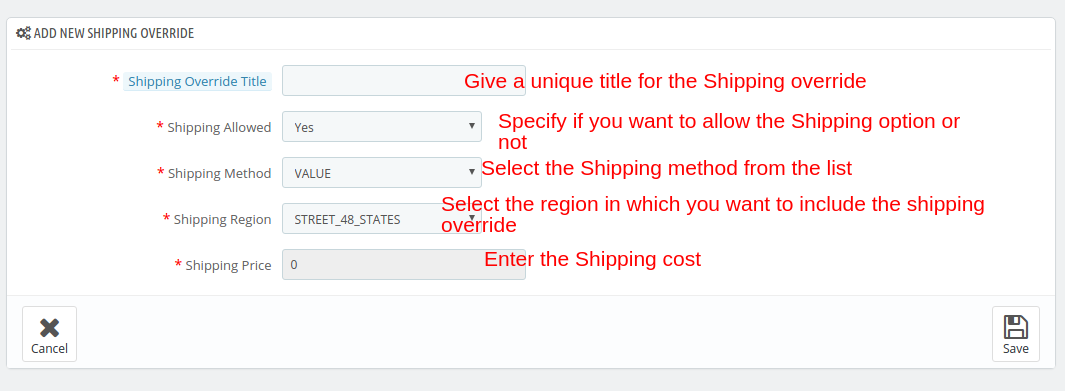
The various information fields in this tab of the Prestashop Walmart Integration extension are listed below:

Shipping Override Title: Enter a unique title for the Shipping override.

Shipping Allowed: The dropdown menu includes the option of Yes and No. Select Yes, if you want to allow this shipping override.

Shipping Method: Select the shipping method that you want to include in this Shipping override.

Shipping Region: Select the region in which you want to incorporate the shipping override.

Shipping Price: Enter the shipping cost here.

Note: All the Shipping Override options created here will be listed in the Profile Management section.

4.5.2 How to Edit/Delete Shipping Override?

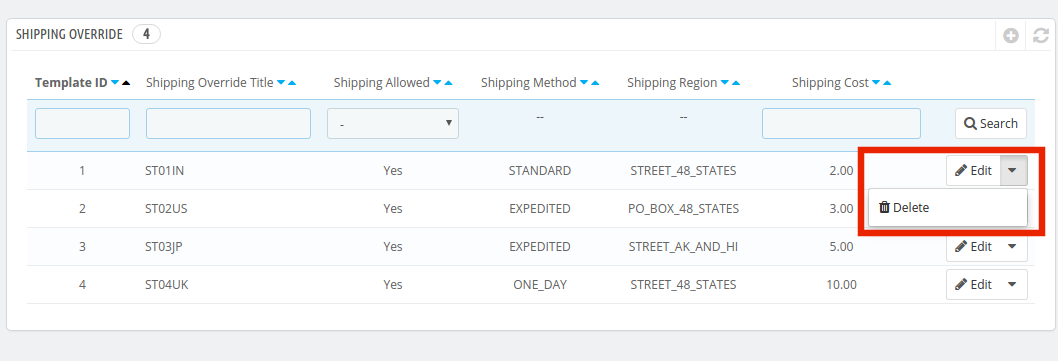
All the Shipping Override options can be viewed in this tab of the Prestashop Walmart Marketplace Integration plugin. To edit or delete the shipping override option, click on the Edit or Delete button corresponding to each option as shown in the image below.

4.6. Product Listing

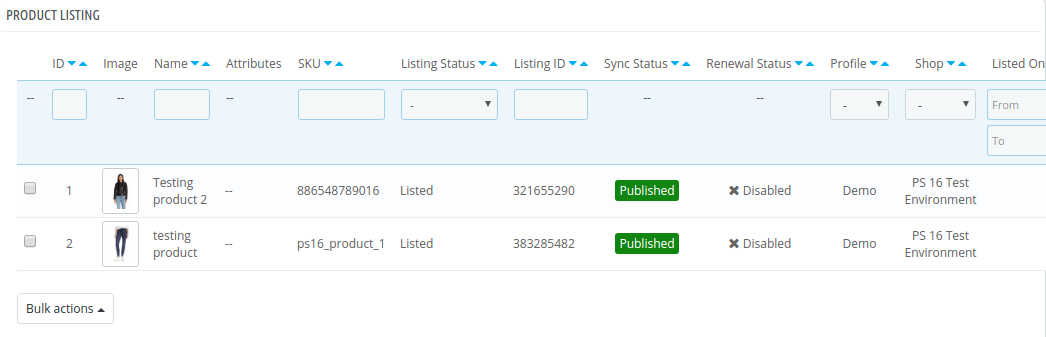
The listed products can be viewed from the back-end of the Prestashop Walmart integration module as shown in the image below. The Prestashop Walmart Integration addon allows the admin to renew, delete or remove the product from the marketplace. These actions can be performed for individual products as well as in bulk.

This section shows the list of all the products listed on Walmart Marketplace with their statuses.

To list the products on Walmart, run the Sync Inventory to Walmart cron. The products will get listed on the Walmart marketplace. (See Section 4.16)

Once the inventory is synced, the corresponding product details will be synchronized accordingly. To sync the price of the products, run the ‘Sync Price of the Product’ cron in the Synchronization tab.

Here are some of the options offered in this section:

Product Listing Renewal

The Prestashop store admin can renew the product, in case the listing has expired from the Walmart Marketplace or the product is updated, by clicking on the “Renew” action corresponding to each product.

After the renewal of the products, action “Renew” will be changed to “Halt” action. This action is used to stop product renewal in case needed.

Product Listing Deletion

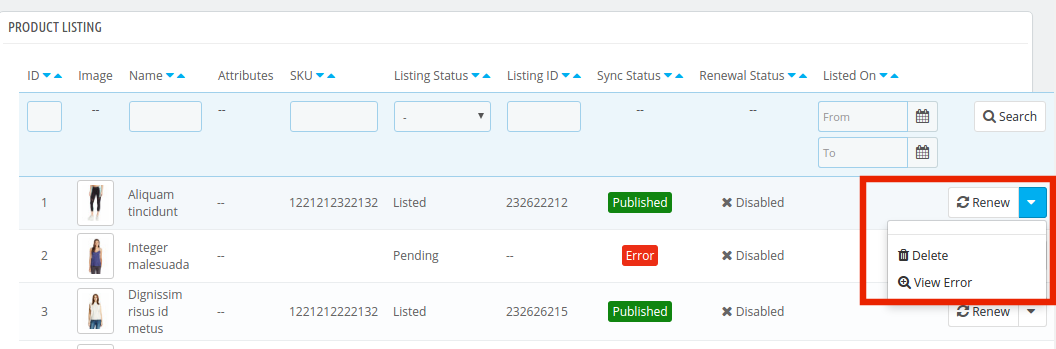
The store admin can disable the product from the marketplace by clicking on the “Delete” button corresponding to each product listing. To revert the action, click on the “Relist” button. The delete action will then be replaced with Relist action. Execute the Sync Products on Walmart cron to remove the products or mark them as inactive in the product listing page.

View Error

The admin can view the error occurred in listing the product by click on ‘View Error’ action.

Bulk Update of Products

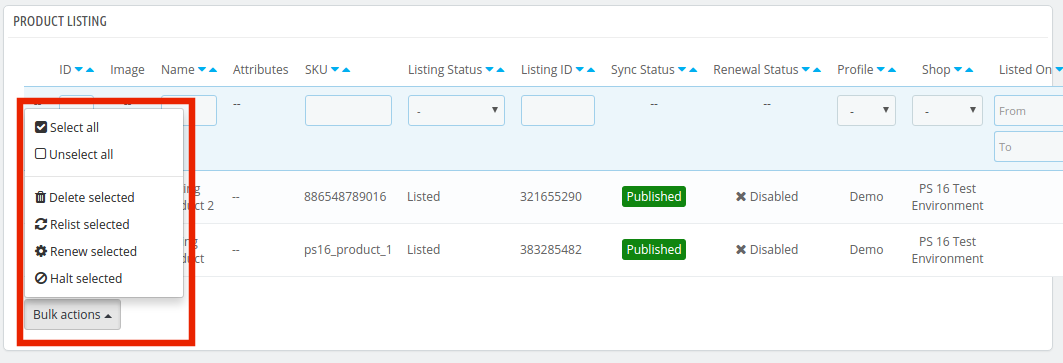
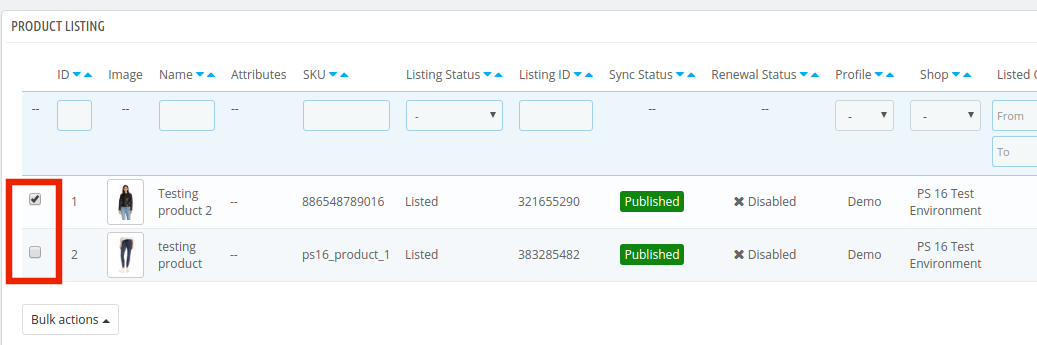
The Walmart Prestashop integration addon allows the admin to update the products in bulk. The bulk action offers the following options:

  • Delete Selected
  • Relist Selected
  • Renew Selected
  • Halt Selected

Select the products in which you want to perform any of the above-mentioned action as shown in the image below:

Once the products are selected, click on the action that you want to perform. The same action will be performed on all the selected products.

Mapping of Existing Products on Walmart

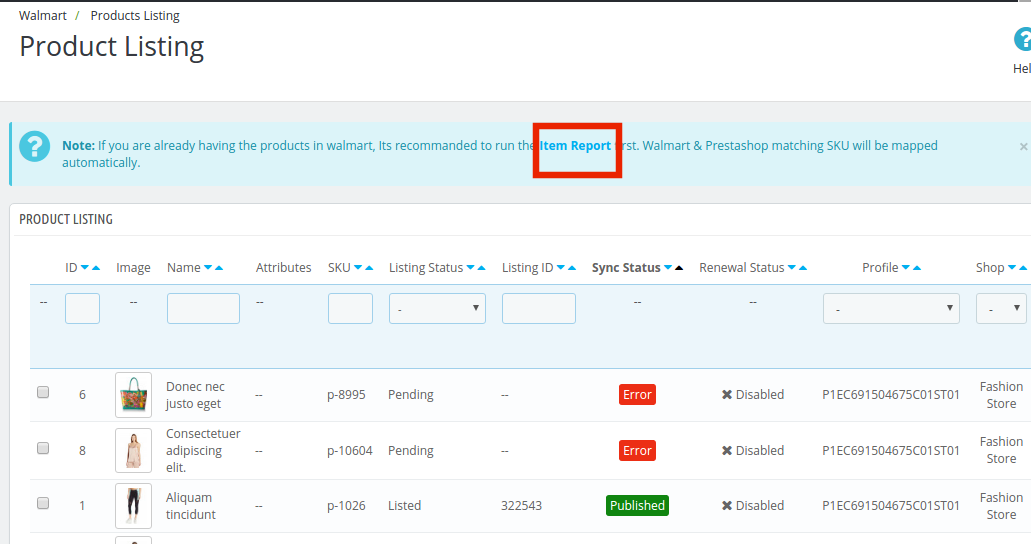
If you already have the products in Walmart, execute the Item Report cron first. Once this cron is executed, Walmart & Prestashop matching SKU will be mapped automatically. They can match the SKU, create the Listing ID and change the status as ‘Published’.


4.7. Attribute Mapping

The Prestashop Walmart Integration extension offers easy means to map the attribute of the Prestashop store with the Walmart marketplace. The store admin can map the attribute of Walmart.com with the attribute of the Prestashop eCommerce store in this tab.

4.7.1. How to create New Attribute Mapping?

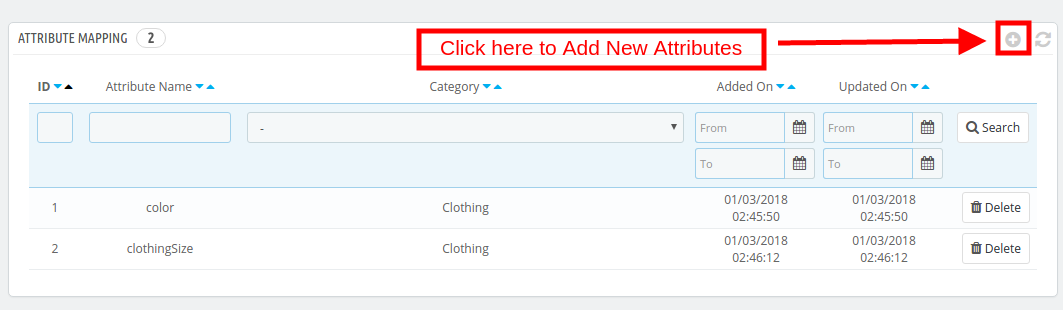
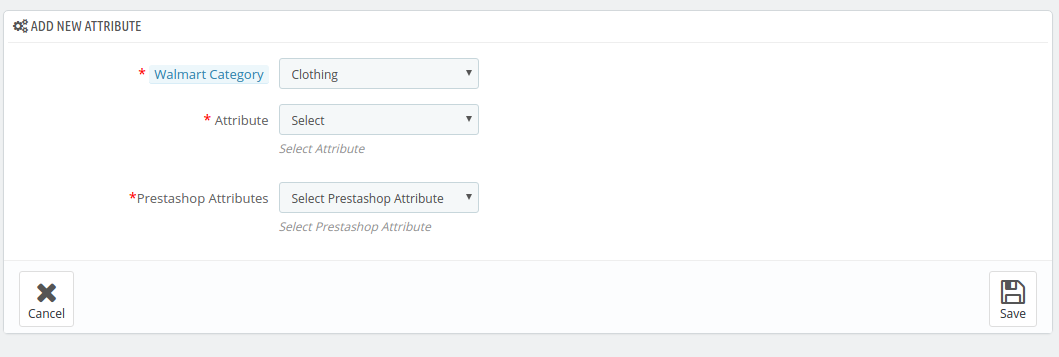
To create new attributes, click on the ‘+’ sign on the top right side of the admin interface. You’ll be redirected to the Attribute creation page. Follow the steps below for the Attribute mapping.

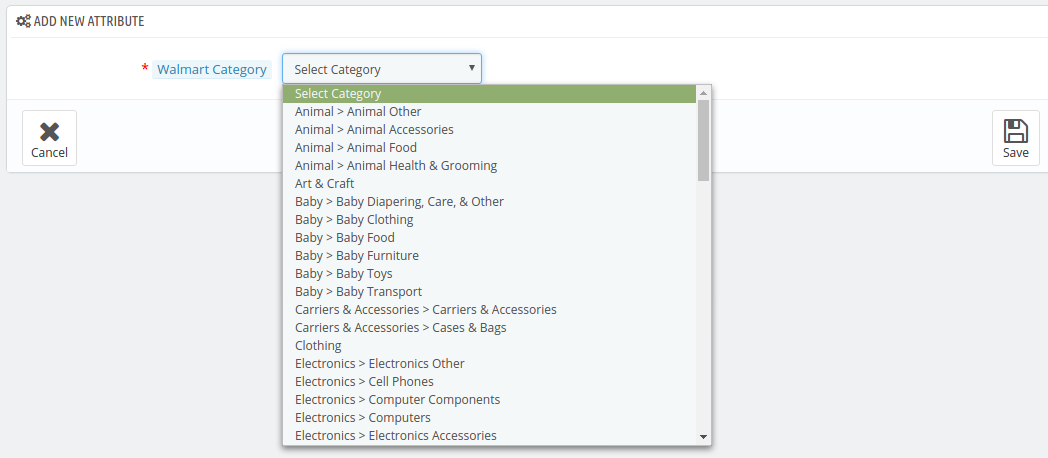
Select the Walmart Category in which you want to map the attribute as shown in the image below:

Attribute: Select the attribute of Walmart in which you want to map the attribute of the Prestashop.

Prestashop Attribute: Select the attribute of the Prestashop store that you want to map with the attribute of the marketplace.

4.8. Order Setting

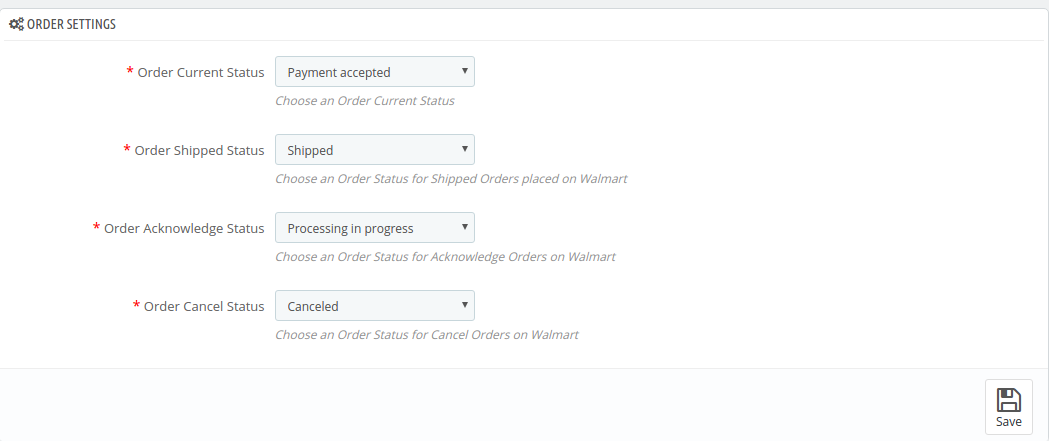
The store admin can set the status of orders placed on Walmart that are mapped in the Prestashop store from the Order Setting tab of the Prestashop Walmart Integration plugin. This section consists of four different order statuses. They are:

Order Current Status, Order Shipped Status, Order Acknowledgment Status, and Order Cancel Status.

Once the status of the order is changed in the Prestashop store, run the ‘Update Order Status to Walmart’ cron. This will sync all the changes to the marketplace. (See Section 4.16)

4.9. Order Listing

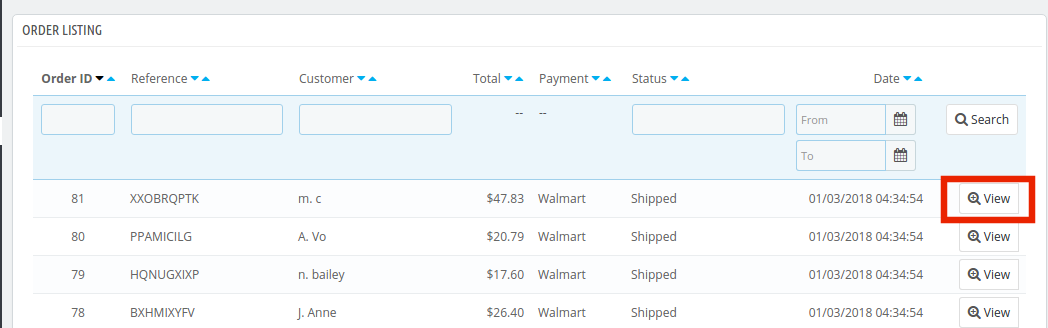
The orders received from the Walmart.com is listed in the admin interface of the Prestashop Walmart API Integration. For this, the store owner needs to run the ‘Sync Order Listing from Walmart’ cron. (See Section 4.16)

Once the cron is executed, the entire orders will be synced in the Prestashop store. These orders can then be processed by clicking on the ‘View’ button as shown below.

4.10. Feed Status

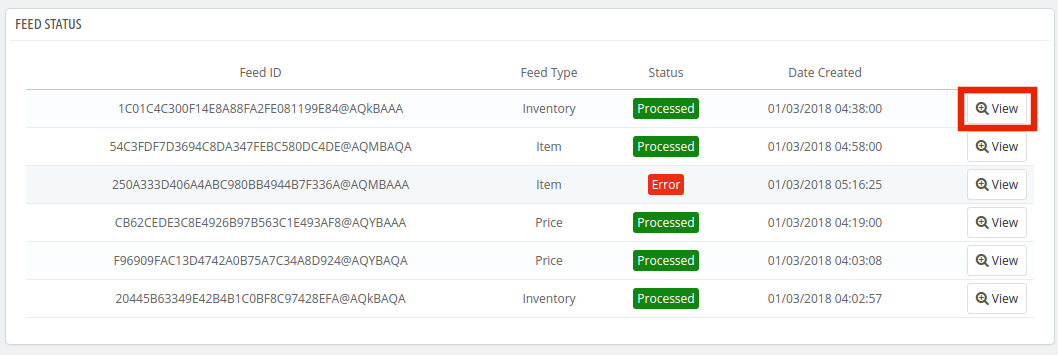
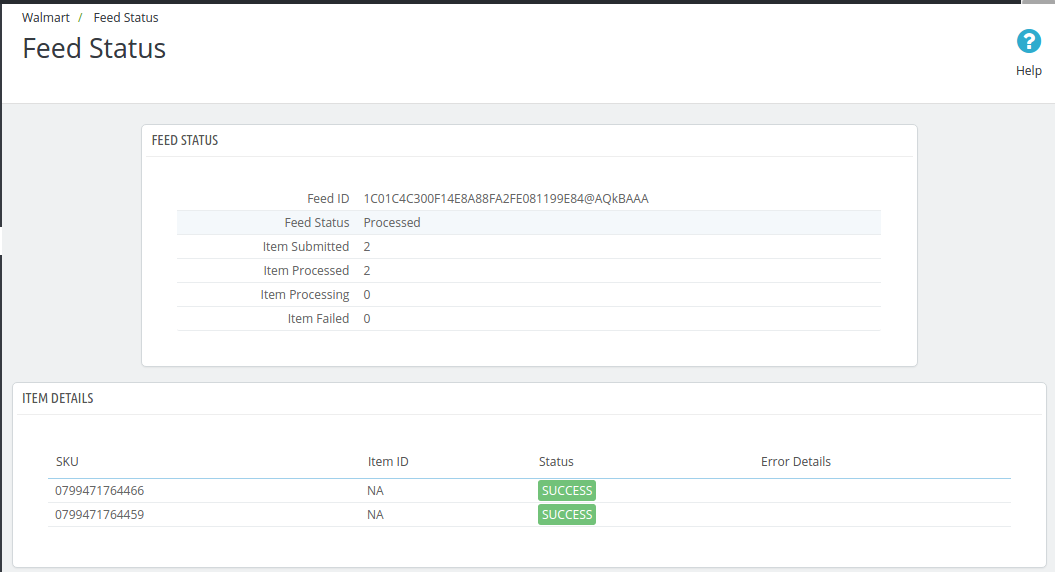
Every time a cron is executed, a Feed will be created in this tab as shown here. The status of the feeds can be seen by clicking on the ‘View’ button.

On clicking the button, you’ll be redirected to the feed status detail page.

4.11. BuyBox Report

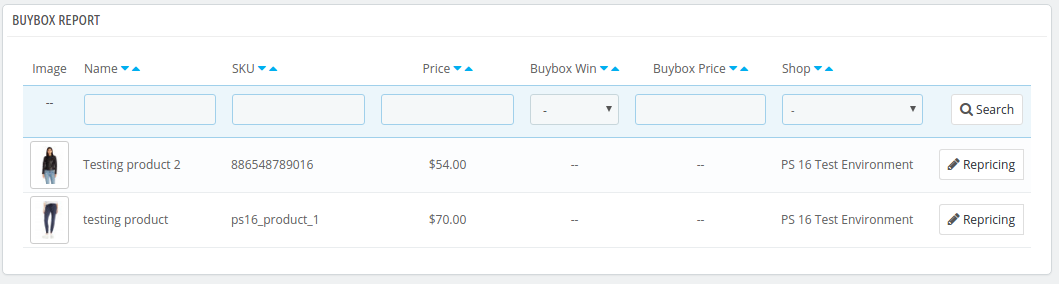
In case more than one seller is selling the same product, walmart.com displays them on a single page. This page displays the products and their pricing to the customer. Out of these products, one item wins the Buy Box. The customers are drawn to the very first option that they see. Hence, winning the buy box is essential for the vendors.

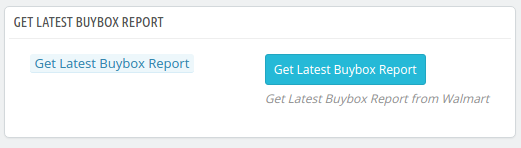
The sellers can see the products listed on the Buy Box with their status in the ‘Buy Box’ tab of the Prestashop Walmart Integration extension. To sync the latest buy box report, execute a cron job in the Synchronization tab of the Walmart Prestashop API integration addon. (See Section 4.16)

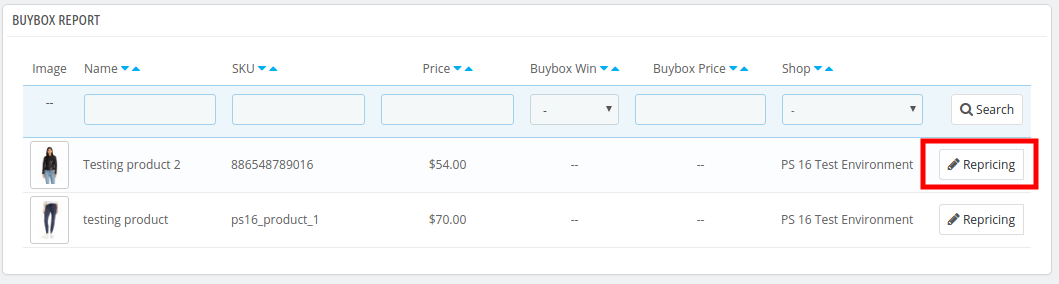
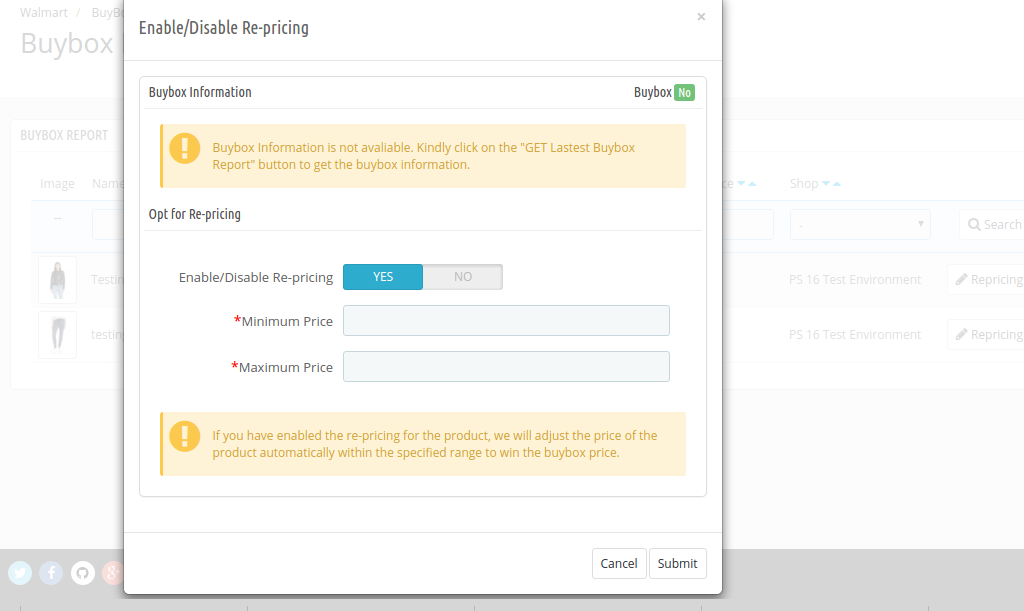
Also, Prestashop Walmart Integrator offers an easy means to reprice the products to win the buy box. The sellers can reduce the cost to boost their product visibility.

To reprice the products, click on the ‘Repricing’ option corresponding to each product.

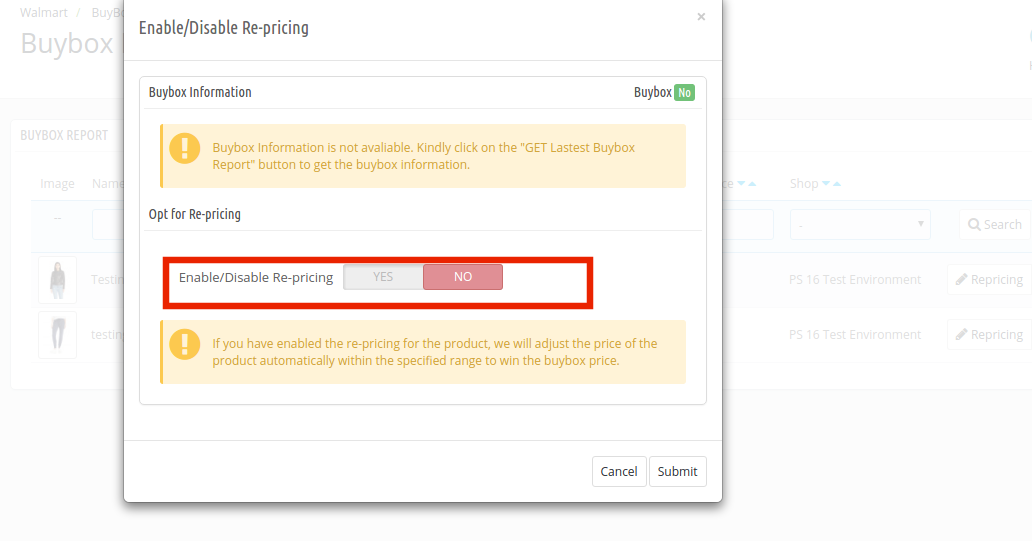
Once you click here, you’ll get a popup. Toggle the Enable/Disable Re-pricing option for the same.

Once you enable this functionality, you’ll be asked to enter the Minimum and Maximum Price.

Enter the minimum and maximum price and click on the ‘Submit’ button. Sync the reprice with the marketplace by executing cron in the Synchronization tab of the Prestashop Walmart API integration addon. (See Section 4.16)

4.12. Lag Time

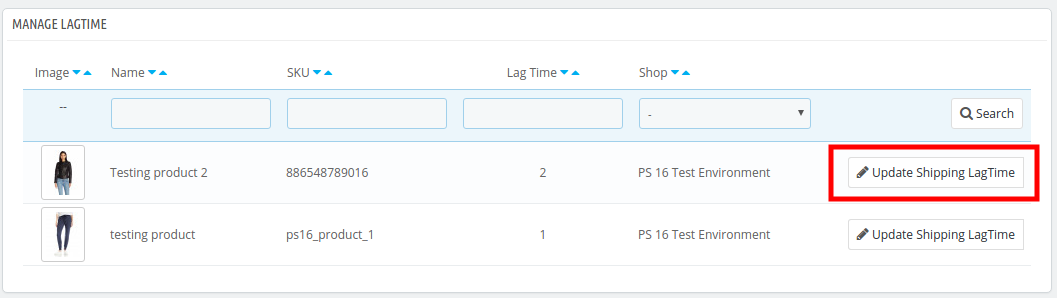
Lag Time refers to the minimum number of days when the shipment of the order is initiated. The lag time is the interval between the day when the order is placed and when it is shipped.

To update the shipping lag time, the admin is required to click on the ‘Update Lag Time’ button as shown below.

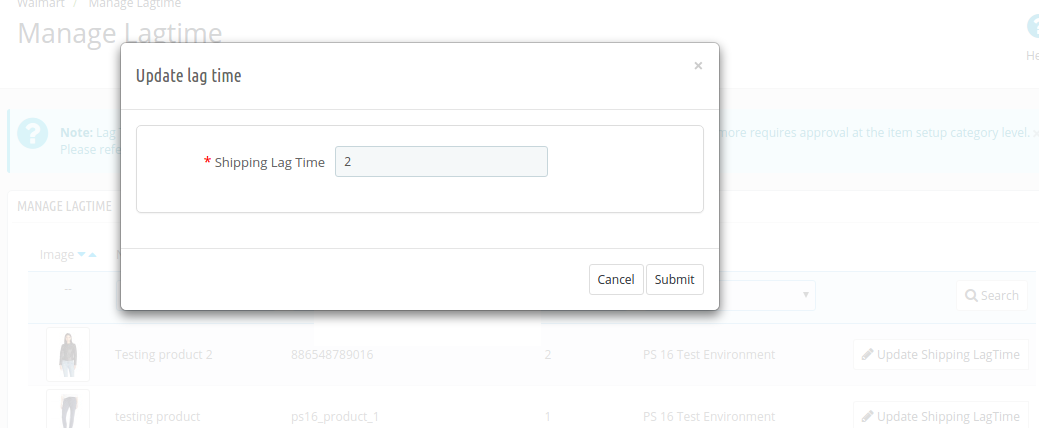
On clicking, a popup will appear as shown below:

Enter the lag time for each product. Once this is done, the admin can sync the lag time in bulk by executing cron in the synchronization tab of the Prestashop Walmart connector.

Refer to Section 4.15 for the cron job details.

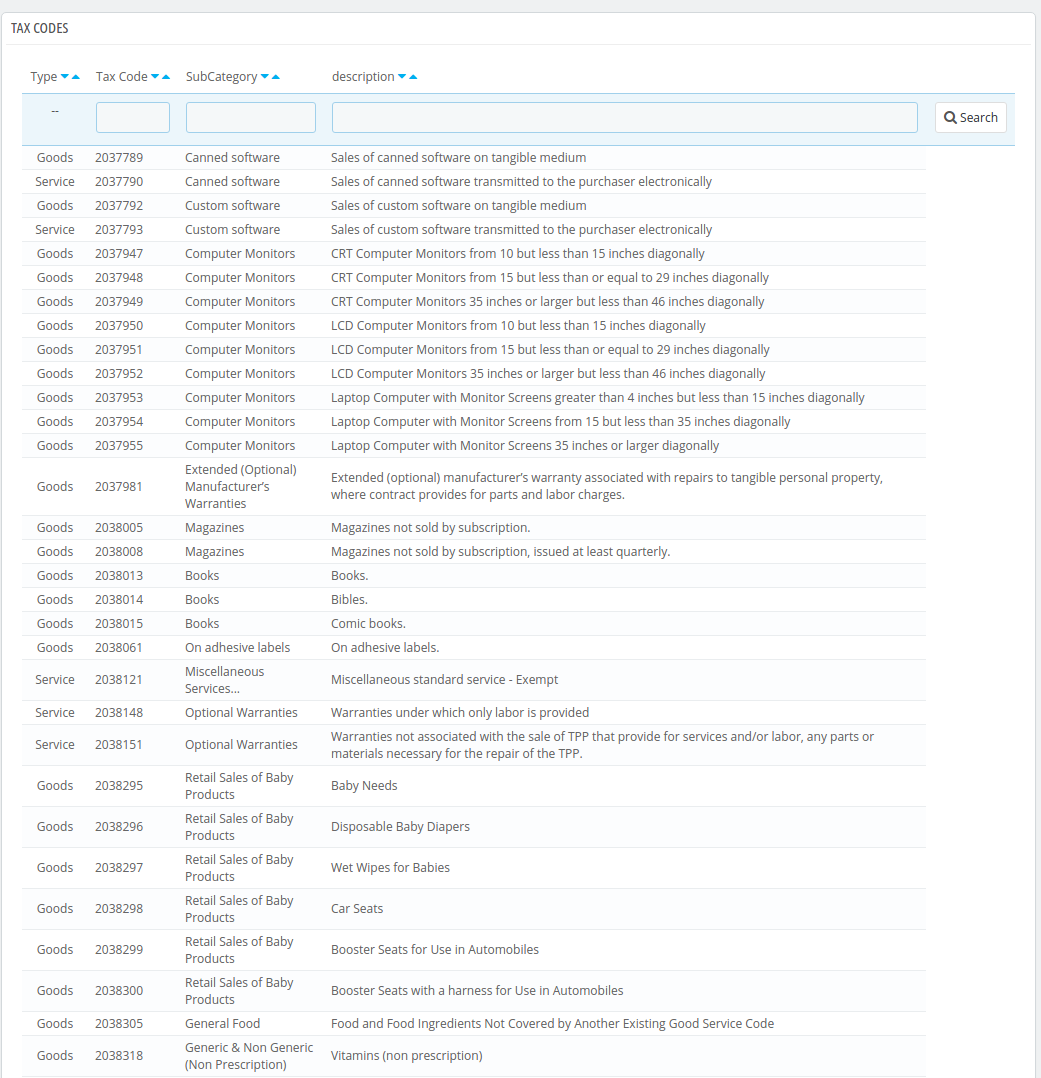
4.13. Tax Code

Walmart makes it mandatory for the sellers to provide the Tax Code for the products at the time of product listing. The store admin can check tax codes in this tab of the Prestashop Walmart marketplace integration module.

4.14. Sales Report

The seller gets a complete report of the marketplace sales from the Sales Report tab of the Walmart Prestashop connector. The sales report will appear in both graphical and tabular format.

Apply filter by selecting the Start and End date. The seller can even group the report by days, months and years.

4.15. Product Sales Report

The seller can even view the sales report of a particular product in the Product Sales Report tab of Walmart Prestashop Integrator.

Enter the SKU, Start Date, End Date and apply the filter to view the sales report of that particular product.

4.16. Synchronization

This tab of the Prestashop Walmart Integration module synchronizes all the settings and changes done in the other tabs of the Prestashop Walmart Marketplace Integration Module. The synchronization between Prestashop Store and Walmart Marketplace and vice-versa can be done from the ‘Synchronize‘ tab.

The various cron jobs to synchronize the settings between Store and Walmart Marketplace are shown below –

4.16.1 How to sync the status of the Feed?

Every time a cron is executed, a feed is created in the Feed Management tab. The initial status of the feed is submitted. To change the status of submitted or processing feed, click on Sync Feed Status.

It would perform following actions –

  • A feed will be created every time a cron is executed in the admin interface.
  • This particular cron updates the status of the Feeds.

4.16.2 How to sync Products to Walmart Marketplace?

The product listed in the Prestashop Walmart Marketplace Integration addon will be synced to Walmart.com by clicking on ‘Sync Products to Walmart’.

It would perform following actions –

  • The cron will update the products list in the Walmart marketplace.
  • It will add products on the Walmart Marketplace with the respective product details (e.g. Price, Quantity, Image, etc.).
  • It will update the products on the Walmart marketplace which are already listed.
  • It will update the expired products on Walmart Marketplace for the items in which ‘Renewal’ is enabled.
  • It will remove the products from Walmart Marketplace which are marked deleted on Store.

4.16.3 How to sync Inventory to Walmart Marketplace?

The quantity of the products can be updated on the Walmart Marketplace by executing the ‘Sync Inventory to Walmart’ cron from the Prestashop Walmart Integration module.

It would perform following actions –

  • It updates the quantity status of each product listed on Walmart Marketplace.

4.16.4 How to sync the price of the products to Walmart Marketplace?

The price of the products can be synced to the marketplace by executing ‘Sync Price to Walmart’ cron

It would perform following actions –

  • The cron execution will display the updated price of the products on Walmart Marketplace.
  • It will update the changes in the price of the products.

4.16.5 How to sync Order Listing from Walmart Marketplace?

The orders received from the Walmart Marketplace can be synced in the store by executing ‘Sync Order Listing from Walmart’ cron.

It would perform following actions –

  • The cron will sync the Orders and Transaction details from Walmart Marketplace.
  • It creates Orders into the Store as per the order received from Walmart Marketplace.

4.16.6 How to sync Lag time with the marketplace?

The lag time of the products fixed in the Lag time tab of the Prestashop Walmart Integration addon can be synced with the marketplace by executing ‘Sync Lag time on Walmart’ cron.

It would perform following actions –

  • The cron will sync the lagtime with the marketplace.
  • Any change in the lag time can be updated just by executing cron.

 4.16.7 How to sync Repricing Buy Box on the marketplace?

The admin can sync the Buy Box repricing by executing ‘Sync Repricing Buy Box on Walmart’.


It would perform following actions –

The cron will sync the change in the price of the Buy Box products.

4.16.8 How to get the latest Buy Box report from the marketplace?

The sellers can get the latest buy box report from the marketplace by executing the ‘Sync Latest Buy Box Report’ cron.

It would perform following actions –

The cron syncs the latest buy box report from the marketplace to the Prestashop Walmart API integrator.

Note:

On successful completion of synchronization, a message will be display – “Success”. Otherwise “Failed” will be displayed.

4.15. Audit Log

The admin can view all the jobs running occurred in the Audit Log tab of the Prestashop Walmart Integration extension. The status of the jobs can be viewed in this tab.

You can get Prestashop Walmart Integration at budget-friendly prices from the Knowband store.

Prestashop Walmart Integration Module Link: https://www.knowband.com/prestashop-walmart-integration

Prestashop Walmart Integration Admin Demo Link: https://psm.knowband.com/walmart/16/admin1/index.php?controller=AdminLogin&token=ffa17b0c72ff8c0ab7cf3e344c5ae4fc

Watch Video: https://www.youtube.com/watch?v=Dvhlpl8KTUk

Buy the Walmart Prestashop Integrator from the Addon store: https://addons.prestashop.com/en/third-party-data-integrations-crm-erp/30194-knowband-prestashop-walmart-integration.html

Contact us at support@knowband.com for any query or custom change request as per your business requirement.

Knowband Prestashop Category Product Display Order Addon : User Manual

Introduction

Prestashop Category Product Display Order addon by Knowband allows the eCommerce store owners to sort their products in bulk and display it on the website as per their wish. The display order sorting can be done by Product ID, name of the manufacturer as well as the date the product upload and updation. The admin even gets to sort the products as per their wish. The order display can either be ascending or descending as per the requirement of the admin.

With ‘N’ number of products available in the product listing, it sometimes becomes difficult for the customers to end up finding the item of their choice. By showcasing the products in the desired order, the e-merchants can magnetize the store visitors to pick up a product that they find interesting easily. Reducing the purchase decision time of the store visitors, Prestashop product sorting module boosts the chances of conversion.

Features:

  • The Prestashop Product Sorting Module can be enabled or disabled as per Prestashop admin requirement.
  • The Prestashop eCommerce store admin can select the particular brand or manufacturer for adding the sorting feature.
  • The sorting can be done on the basis of specific product name. All the Prestashop store admin needs to do is to enter the name in the web admin panel.
  • The Prestashop Product Sorting Module increases the chances of conversions as customer don’t wast time for the required product.
  • The store admin can change the sorting of the product display by Price, Product ID, Date when it was added or updated, Manufacturer or by Position.
  • With the help of this Prestashop plugin the products can be either sorted in ascending or descending order.
  • Prestashop Product Sorting addon is compatible with the latest version of Prestashop. That’s why it can work flawlessly on any of the eCommerce website.
  • The Prestashop extension does not conflict with any other module operating on the web store.
  • Along with this, the Prestashop addon is SSL compatible.
  • This Plugin is multi-lingual compatible.
  • No technical knowledge is required for implementation.

Merchant Benefits:

  • You can analyze the behavior of store visitors and make changes in default display setting of the category pages.
  • The Prestashop Category Product Sorting modules sort the inventory of the web store as per the requirement of the customers.
  • This Prestashop module offers multiple sorting options to select from. The admin can improve the user experience by reducing their time consumed in searching.
  • The Prestashop admin can select the particular web pages where he wants to sort the products. This can be either done on the entire website or on a particular product. Moreover, different sorting can be done on the different categories of product.
  • The sorting options are easy to understand and implement. Thus, the store merchants can use the module without any technical knowledge.
  • By sorting the products admin can reduce the time consumed in making the purchase decision by customer.

Customers Benefits:

  • The Prestashop product order display module makes shopping very easy for the customers.
  • This Prestashop extension reduces the time and effort invested in searching the products, thus, making shopping flawless.
  • With the help of this module purchase decision becomes easy and quick by customer.

Project Objectives

The Prestashop module is a must-have for the eCommerce websites in order to achieve better user experience. Here are some of the objectives that are served by the Prestashop addon:

  1. The Prestashop Category Product Order plugin is the easiest and quickest ways to sort the products of the website’s catalogue in one go. The module is designed for the eCommerce store and helps the admin to customize the display of the products as per their need.
  2. By displaying the products in an ordered way, it makes website browsing easier for the store visitors. The price-conscious customers can now find the products sorted by price.
  3. The Prestashop admin can choose from the varied sorting options in the web admin panel. The sorting can be done in ascending or descending order as per the requirement.

Installation

On purchasing the Prestashop module from Knowband store, you’ll get following files and folders as listed below:

  1. productsorting.zip (contains source code of the module)
  2. User Manual

Follow the following steps to install the module in your Prestashop store:

  • Unzip the productsorting.zip file. The zipped file contain files and folders.
  • Copy all entire the files and folders of unzipped folder into the “Modules” folder of the Root Directory of your store. The address path for the same is mentioned below:
    Root Directory/modules/
  • The module is ready to be installed on the web store. You can find it in the Store Admin -> Modules and Services. It would be shown as below –

In case, you are not able to find module in admin modules list, you can search it with the following details –
Keyword – category Product Display
Author – Knowband
Category – Front office
Filter By – Installed & Not Installed / Enabled & Disabled

  • Click on “Install” button to install the module. It would show a pop-up for your confirmation. Click on “Proceed with the installation” option. This step will install the module and show notification – “Module(s) installed successfully”.

Admin Interface

Prestashop product sorting module allows easy customization and implementations. Let us discuss the various customization processes one-by-one.

How to start configuration process?

The web admin panel of the module offers below mentioned configuration options.

  • Enable/Disable
  • Select Categories
  • Product Name
  • Select Manufacturer
  • Order By
  • Order Way

The various customization options are mentioned below:

  • Enable/Disable option: Once the addon is successfully installed on the web store, the admin can enable it by toggling the button in the admin panel.

  • Select Category: The store admin can select the product category in which he wants to sort the products. By default the module selects the Home Page. This will enable the sorting option in all the categories. However, if the admin wants to specifically add this in a particular category page, then, he can select the same from the back end. This even allows different sorting option to be enabled in the different category pages as per the requirement of the store owners. The product of the selected category can be previewed in the admin panel. The store owner can then do the customization from the back end.

  • Product Name: Prestashop Category product display order module helps the admin to sort the product by name as well. On entering the name, only the products with that name will be displayed in the preview. The admin can set the position of the accordingly.
  • Select Manufacturer: The admin can select the manufacturer in which he is looking to include the sorting option. The merchant can select from the list of the manufacturers that is being offered on the web store.

  • Sort Product Order By: The Prestashop addon allows the e-merchants to sort the categories of products by following custom orders:
  • Product ID
  • Date when the products were uploaded
  • Date when the products were updated
  • Product name
  • Manufacturer of the product
  • Position

That is, the store admin can either sort the products by product ID, the date when it was added or updated on the web store. The items on the website can be even sorted by their product or manufacturer name. At the same time, the admin can specify the position where he wants to display a particular product on the website. However, only one order can be applied to a particular category or sub-category. It is not possible to apply multiple orders in a single category.

Change the Order Way

The display order can either be set in the descending or ascending order. The admin can select the sorting option from the Prestashop Category Product Display Order extension.

Website UI

The entire display order method set by the admin in the back end of the Prestashop Category Product Display Order plugin will be reflected on the front end. For instance, if the products are sorted in the ascending order, then, the products will be displayed on the website accordingly as shown in the image below.

In case, the sorting is done in the descending order, then, the product order will be displayed accordingly.

Admin Demo Link:

https://ps.knowband.com/sortorder/16/admin1/index.php?controller=AdminLogin&token=ffa17b0c72ff8c0ab7cf3e344c5ae4fc&redirect=AdminModules

Front Demo Link: 

https://ps.knowband.com/sortorder/16/en/

Module Link: 

https://www.knowband.com/prestashop-category-product-display-order

Watch video:

https://www.youtube.com/watch

Please contact us at support@knowband.com for any query or custom change request as per your business requirement.

Opencart Etsy Marketplace Integration – User Manual

Introduction

Marketplaces have played a vital role in the growth of e-commerce. Amazon and eBay are some of the well-known platforms, but in recent years a number of new marketplaces have marked their presence in the eCommerce ecosystem. Etsy is one of the most popular marketplaces for handmade goods and vintage items. Etsy allows people from around the globe to buy and sell unique goods. This platform invites the sellers to showcase their creativity to the new audience, thus, helping them to reach out to potential customers globally. Etsy is a great place to extend the reach of your business. The process of starting a business in the Etsy marketplace is quite easy. Please click on the link below to know more about the rules and regulations of trading: https://www.etsy.com/in-en/sell. Opencart Etsy Marketplace Integration can help you reach your business goals effectively.

KnowBand, an eCommerce plugin, and marketplace integration development company offers the OpenCart Etsy integration module. The Opencart Etsy Marketplace Integrator allows the seller to synchronize their OpenCart store with the Etsy marketplace in a few simple steps. We do understand that being ready to start selling on the Etsy marketplace, it is also important for the store owner to analyze their business method and process so that they can be able to keep up with the new challenges. After starting to sell on multi-channel sellers have to keep proper track of their inventory status, product listings, shipping methods, delivery time, and customer support. To overcome all the major challenges of selling on a marketplace, KnowBand has developed the Opencart Etsy Marketplace Connector.

With the help of the Etsy OpenCart Integration extension, OpenCart store owners can effectively manage the inventory, orders, and shipping for the Etsy shop orders from the OpenCart store admin. OpenCart Etsy marketplace integration module offers the following advantages to the sellers:

  • Easy installation and user-friendly interface: The user-friendly interface of the OpenCart Etsy Marketplace Integration offers an effortless interface to list the products to the Etsy marketplace.
  • Bulk uploading of the products: OpenCart Etsy Marketplace Integrator Module allows the sellers to upload products in bulk. Sellers can create a profile to upload the entire category of the OpenCartstore to the Etsy marketplace.
  • Category and product attribute mapping: Sellers can easily map the product attributes and category of the OpenCartstore products with the Etsy store attributes and category via the OpenCart Etsy Marketplace Connector Extension.
  • Shipping templates: Create shipping templates from the OpenCartstore admin panel and sync these templates to the Etsy shop via OpenCart Etsy Marketplace Integration Plugin.
  • Order Management: Manage and keep track of Etsy shop orders from the OpenCartstore admin panel.
  • Order status: Admin can update the order status of the Etsy marketplace orders from the OpenCart store admin panel through a cron job.
  • Inventory management: Manage inventory for the Etsy store products from the OpenCart admin panel. After making any changes in the product inventory or attributes in the OpenCart store, the admin can easily synchronize the changes to the Etsy marketplace.
  • Secondary language: Admin can select a secondary language for the store and easily synchronize it with the Etsy marketplace shop through a cron job.

What’s New in the Recent Enhancements of Opencart Etsy Extension v2.0.4?

[New]Aligned with Etsy OpenAPI Standard

The OpenCart Etsy Extension has been enhanced to support OpenAPI authorisation headers, ensuring secure authentication and full compliance with Etsy’s current API standards. Furthermore, this update helps maintain uninterrupted connectivity between OpenCart and Etsy while aligning the extension with Etsy’s evolving security and policy requirements.

[New]Return Policy Synchronisation

In addition to the authentication header format update, Knowband’s Etsy Marketplace extension now includes Return Policy Synchronization, allowing merchants to seamlessly sync their return policies between their opencart store and Etsy. This ensures consistency across both platforms, reduces manual effort, and helps provide a clear and unified return experience for customers.

Profile Level Product Synchronization:

The enhanced Knowband’s Opencart Etsy marketplace connector extension now features profile-level product synchronization. This allows admins to list products from specific categories, offering a more targeted and efficient listing process compared to bulk product listing. This feature enhances inventory management and improves the accuracy of product listings on Etsy.

Product Listing with Custom Details:

The updated extension also includes a feature for product listing with custom details. Admins can now list products with unique titles and descriptions, differentiating their products and enhancing visibility on Etsy. This flexibility allows for better product presentation and marketing, tailored to attract specific customer segments.

You can watch our video on “New Features in Knowband’s Opencart Etsy Connector v1.0.9”:

2.0 Installation

After purchasing the module, you will get the following files as below:

1. zip (contains the source code of the module)

2. User Manual

Follow the following steps to install the extension:

  1. Unzip the zip file. It would contain files and folders as shown below –

2. Copy all the files and folders of the unzipped folder into the root folder of the website.

3. Now module is ready to be installed on your store and you can find that in Store Admin -> Modules and Services. It would be shown as below –

Etsy OpenCart Integration Extension

Knowband’s OpenCart Etsy Marketplace Integration plugin facilitates seamless integration between your OpenCart store and Etsy marketplace, streamlining product listings and order management.

SHOP NOW

3.0 System Setup

Before proceeding ahead, it is important to know the correct flow of actions to set up this system as several things are dependent on other things. If we do not take care of them then it would become difficult to process smoothly or it may be error-prone.

  • Seller account setup: This section will help you to set up the shop on the Etsy marketplace and in the next steps you will learn about the Etsy API key. Etsy API key and API Secret are required to integrate the Opencart and Etsy marketplace.
  • Admin Interface: This section will help you to understand the complete working of the Etsy Opencart Integration plugin.

4.0 Etsy Marketplace – Seller Account Setup

To start selling on Etsy Marketplace you need to have a seller account on Etsy. In this section, we are listing all the steps to create a seller account on Etsy. Please find them below –

  • Go to the link – https://www.etsy.com
  • Click on the “Sell on Etsy” button present at the top right corner.
  • Click on the “Register” button on the page you are visiting now. Refer to the screenshot given below.

  • Fill up the registration form and click on the “Register” button. It would create your seller account and send a verification email to the provided email address.

  • Now, it would also redirect you to another page as shown below.

5. Now, it is asking to set up your shop preferences. Complete all the highlighted sections – Shop Preferences and Name your shop, Stock your shop, how you will get paid, and Set up Billing.

5.0 Etsy Marketplace – Setup an App

To start communication between OpenCartStore and Etsy Seller Account, you need to create an App on Etsy Marketplace. Following are the steps to create an App on Etsy –

  • Fill up the form and click on “Read Terms and Create App”. Please make sure that you left the “Inventory Management Compatibility” checkbox is checked.
  • It would ask to accept “terms and conditions”. Accept and click on the “Create App” button.
  • It would register your App on Etsy Marketplace and provide API details as shown below.

Note: “The term ‘Etsy’ is a trademark of Etsy, Inc. This application uses the Etsy API but is not endorsed or certified by Etsy, Inc.”

6.0 Admin Interface

Opencart Etsy Marketplace connector is easy to configure. The configuration settings can be managed via the admin interface. After installation, the store admin can find the “Etsy” module in the Extension List under the “Extensions” tab.

The Etsy integration extension will display as shown below:

On clicking the Edit button next to the Etsy module, it will redirect to the admin interface. Here admin can see all the options to configure the Etsy module:

Etsy Marketplace extension offers the following options –

  1. General Settings
  2. Profiles
  3. Attribute Mapping
  4. Shop Section
  5. Shipping Templates
  6. Products
  7. Orders
  8. Synchronization
  9. Audit Log

Each tab is explained below.

6.1 General Settings

You can find the screenshot of the “General Settings” page below –

General Settings tab is there for capturing details of Etsy Marketplace API like API Key, Host, etc. This helps the admin to connect the OpenCart store with the Etsy marketplace. Please find the description of each input field below –

1. Enable/Disable

Admin can Enable/Disable Opencart Etsy Marketplace Integration by using this option. If enabled, then only this module and all its settings will be working otherwise there will be no impact of this module on the store.

2. Etsy API Key

Enter Etsy API Key which will authenticate the connection being established between OpenCartstore and Etsy Marketplace.

3. Etsy API Secret

Admin needs to enter Etsy API Secret mandatory for authentication between OpenCartstore and Etsy Marketplace.

4. Etsy Currency

Admin can select the Etsy currency from the menu.

5. Select your Etsy default language:

Admin can select the Etsy default language from the menu.

6. Select additional languages to sync:

Admin can select additional languages to sync with the Marketplace.

6.1.1 Etsy Order Settings:


After providing these details, click on the “Save” button in the top right corner. It would redirect the admin to the Etsy Marketplace to allow the App Access for the store. Click on the “Allow Access” button as shown below and it will establish the connection between the store and Etsy Marketplace.

It would also redirect the admin back to the same page of “General Settings” and show the “Disconnect” button as the connection has now been set up with Etsy Marketplace.

6.2 Profiles

The profile Management tab provides options to create the profile for product listing. In this section, the admin will be able to map OpenCart store product attributes and categories to Etsy Marketplace. Opencart Etsy Marketplace Connector allows the seller to select multiple store categories to sync with the one Etsy category.

Admin needs to enter all the mandatory details as per the instructions are given in the below screenshot. After entering all the details click on the Save button at the top of the form.

6.2.1 How to Add New Profiles?

Following are the steps to add new profiles-

  1. Go to the Etsy Marketplace module-> Profiles(Menu Option)
  2. It would redirect the admin to a page where already added profiles will be listed (If any). Click on the “+” (plus icon as shown in the screenshot below) and it will redirect the admin to a new page where a form with some input fields will be shown.
  3. Fill up the following input fields –
  4. Profile Title: Enter the Profile Title as per your choice.
  5. Etsy Category (List of Etsy Marketplace categories): Select the correct category from the drop-down list.
  6. Store Category (Lists of Store Categories): Select the OpenCart store category for the products. The selected category will be mapped with the Etsy category (as selected in the Etsy Category) field.
  7. Select Shop Section: Select the shop section from the drop-down list.
  8. Shipping Template (List of Shipping Templates): Select the shipping template from the drop-down list.
  9. Is Customizable?: Select from the drop-down list.
  10. Who Made: Select from the drop-down list.
  11. When Made: Select from the drop-down list.
  12. What is it?: Select from the drop-down list.
  13. Recipient: Select from the drop-down list.
  14. Occasion: Select from the drop-down list.
  15. Price Type: Select from the drop-down list.
  16. Price Management: Select from the drop-down list.

6.2.2 How to Edit/Delete Profile?

Admin can easily update the profile entries; the Opencart Etsy Marketplace Connector allows the admin to sync the changes to the Etsy shop in simple steps. Following are the steps to edit/delete a profile from the system –

1. Go to the Etsy Module -> Profiles (Menu Option)

2. Click on the “Edit/Delete” button corresponding to each profile as shown in the above screenshot.

3. If an admin has clicked on the “Edit” option, then, it will redirect the admin to a new page where a form with some already filled input fields will be shown. Admin can simply update values and save the details by clicking on the “Save” button.

4. The admin can click on the “Delete” option to delete the selected Profile from the system.

6.3 Attribute Mapping

This option helps to upload the Variation products. Select the correct attribute and save it.

6.4 Shop Section

Under this tab, the admin can view the shop sections and their titles. You can edit, and delete the existing profile while you can add the new shop section too from the top right corner. You will be directed to the window below. The same window will open for editing the shop section with filled details.

6.5 Shipping Templates

The shipping Templates tab is there to manage shipping options. In this section, the admin can create Shipping Templates along with other options for the existing shipping template like Add Shipping entry, View shipping entry, Edit Shipping Template, and Delete. Admin can create multiple shipping templates by using the EtsyOpenCart Integration module. Please refer to the next screenshot:

Admin can easily modify the existing shipping template or add new shipping templates. After creating new shipping templates, the store admin must sync the shipping templates to the Etsy shop by clicking the “Shipping Template Synchronization” option under the “Synchronization” tab.

6.5.1 How to add Shipping Templates?

Following are the steps to add a Shipping Template into the system –

  1. Go to the Etsy Marketplace -> Shipping Templates (Menu Option)
  2. It would display the page where already added Shipping Templates will list (If any). Click on the “+” (Plus Icon – as shown in the above screenshot).
  3. It would redirect the admin to the new page where a form with some input field will be shown (Screenshot is shown below).
  4. Fill up the following input fields of form –
  5. Shipping Template Title: Enter the shipping template title as per your choice.
  6. Origin Country: Select the origin country from the drop-down list.
  7. Primary Cost: Enter the primary shipping cost for the shipment.
  8. Additional Item Cost: Enter the additional item cost for shipment. It is the additional cost if the customer adds a second product to the package.
  9. Min. Processing Days: Enter the minimum processing days. This field accepts only numeric values.
  10. Max. Processing Days: Enter the minimum processing days. This field accepts only numeric values.

Click on the “Save” button to add the new shipping template.

You can find the screenshot of the “Add New Shipping Template” form below –

6.5.2 How to Edit/Delete Shipping Template?

Following are the steps to edit/delete Shipping Template from the system –

1. Go to the Etsy Marketplace -> Shipping Templates (Menu Option)

2. It would display the page where already added Shipping Templates will list (If any). Click on the “Edit/Delete” buttons corresponding to each Shipping Template.

3. Admin can update the values as per the requirement and save the details by clicking on the “Save” button.

4. If an admin has chosen the “Delete” option then it would delete the Shipping Template and all its Shipping Template Entries from the system.

Admin can modify the shipping template details by using the Edit option. After making the changes in the shipping template details, the admin needs to save the changes and synchronize the shipping templates with the Etsy marketplace.

6.5.3 How to Edit/Delete Shipping Location of a Shipping Template?

The shipping Entry tab of the Etsy OpenCart module allows the admin to define the destination country and the standard shipping cost for the selected destination. Admin can create only one shipping entry for a particular destination (country/region). Following are the steps to view the Shipping Template location into the system –

1. Go to the Etsy Marketplace Connector module -> Shipping Templates (Menu Option)

2. It would display the page where already added Shipping Templates will list (If any). Click on the “+” button given corresponding to each Shipping Template listed.

3. It would display the page as the screenshot given below:

  • Shipping Template Title: Enter the shipping template title.
  • Origin Country: Select the country of origin.
  • Destination Type: Select the country of destination for the shipping template.
  • Destination Country: Select the destination country.
  • Primary Cost: Enter the Primary Cost.
  • Additional Item Cost: Enter the additional item cost.

6.6 Products

In the Etsy OpenCart integration extension after creating the profile, the admin needs to sync the products which are selected in the profile to the Etsy marketplace. Admin can also check the status of the listed products from the OpenCart store admin panel. The product listing tab of the Etsy Marketplace Integration shows a list of all the products that are to list on Etsy Marketplace with their status and values as shown in the screenshot below –

Please note that after creating a profile the admin must click on the “Product Synchronization” option under the “Synchronization” tab of the Etsy module to list the selected products to the Etsy marketplace. Admin can click on the Revise/Relist button to activate it on the Etsy Marketplace. Admin can also delete the product listing by clicking on the “-” button.

6.7 Order Settings

The order Settings tab is there for mapping store order status with Etsy Marketplace order status which will be used during capturing orders from Etsy Marketplace. The screenshot below will show you the order listings and the admin can also create a filter to search for a particular order.

6.5.1 How to view Order Details and Status?

Following are the steps to map order status –

  1. Go to the Etsy Marketplace Integration module -> Orders (Menu Option)
  2. It would display a page the same as shown in the above screenshot.
  3. Click on the View Button given below the “Action” tab.
  4. It would display the page with all the Order details as shown below.

6.8 Synchronization

All tabs defined above are basically for saving the settings and options into the system which are used during synchronization between OpenCart Store and Etsy Marketplace. There are the following jobs to synchronize content between OpenCart Store and Etsy Marketplace which you can find below –

6.8.1 How to sync products locally?

Following are the steps to synchronize sync products locally on Etsy Marketplace –

1. Go to the Etsy Marketplace ->Synchronization (Menu Option)

2. It would redirect admin to a new page where all synchronization actions list as shown in the above screenshot.

3. Click on the “Sync Now” button shown below.

This action will sync the products from the OC to the module (Without syncing the products on Etsy). If you want to disable any products (don’t want to sync on Etsy), click on the ‘Sync Now’ & disable the products in the Product Listing Tab. Disabled products will not be synced on Etsy.

6.8.2 How to Sync New Products on Etsy Marketplace?

Following are the steps to get Countries and Regions from Etsy Marketplace –

1. Go to the Etsy Marketplace Integration module->Synchronization (Menu Option)

2. It would redirect admin to a new page where all synchronization actions list as shown in the above screenshot.

3. Click on the “Sync Now” button shown below.

This action will sync the new products into Etsy. Click on the ‘Sync Now’ to sync the products manually. Set this CRON in your hosting CRONTAB to run every hour to sync the products automatically

6.8.3 How to sync Updated Products on Etsy Marketplace?

Following are the steps to synchronize Products Listing on Etsy Marketplace –

1. Goto the Etsy Marketplace Integrator module -> Synchronization (Menu Option)

2. It would redirect admin to a new page where all synchronization actions list as shown in the above screenshot.

3. Click on the “Sync Now” button shown below.

If any listed product info has been updated in the Opencart then Run this CRON to update the product info on Etsy. Click on the ‘Sync Now’ to sync the products manually. Set this CRON in your hosting CRONTAB to run every 2hour to sync the products automatically.

6.8.4 How to sync Products Status on Etsy Marketplace?

Following are the steps to synchronize Products Variations Listing on Etsy Marketplace –

1. Goto the Etsy Marketplace Integration module -> Synchronization (Menu Option)

2. It would redirect admin to a new page where all synchronization actions list as shown in the above screenshot.

3. Click on the “Sync Now” button shown below.

This action will sync the status of the products from Etsy on Opencart. For example, if any products have been expired in Etsy then this CRON will set the status of the products as expired in the module as well. Set this CRON in your hosting CRONTAB to run every day to sync the status automatically.

6.8.5 How to Synchronize orders from Etsy Marketplace?

Following are the steps to synchronize Products Variations Listing on Etsy Marketplace –

  1. Goto the Etsy Marketplace Integration module -> Synchronization (Menu Option)
  2. It would redirect the admin to a new page where all synchronization actions are listed as shown in the above screenshot.
  3. Click on the “Sync Now” button shown below.

 This action will sync the orders from Etsy to Opencart. Click on the ‘Sync Now’ to import the orders from Etsy to Opencart. Set this CRON in your hosting CRONTAB to run every hour to sync the orders from Etsy to Opencart automatically.

6.8.6 How to update Orders Status on Etsy Marketplace?

Following are the steps to update the status of orders on Etsy Marketplace –

1. Goto the Etsy Marketplace Integrator module -> Synchronization (Menu Option)

2. It would redirect admin to a new page where all synchronization actions are listed as shown in the above screenshot.

3. Click on the “Sync Now” button shown below.

This action will sync the mark the status of order as Shipped in Etsy if the order is marked as Shipped in the Opencart. Click on the ‘Sync Now’ to sync the status of the imported order from OpenCart to Etsy. Set this CRON in your hosting CRONTAB to run every hour to sync the status of the order from OpenCart to Etsy automatically.

6.8.7. How to Synchronize a Particular Profile on the Etsy Marketplace?

All the crons available in the “Synchronization” tab of the Opencart Etsy Connector plugin provide support for all the categories in bulk. However, if you want to list/update a particular profile only, you can handle this task from the “Profile Management” tab itself.

In this section, we have provided the “Local Sync”, “Sync Products”, and “Sync Product Status” crons to provide the Opencart admin with the flexibility of managing the category-level synchronization between Opencart and Etsy.

6.8.8 How to List the Products with Custom Details on Etsy Marketplace.

Knowband’s Opencart Etsy Marketplace Integration Extension comes with a custom product details listing option. This feature allows the Opencart store admin to list the products on the Etsy marketplace with different names and product descriptions.

If you want to list the product as it is, you can keep the custom status disabled. However, if you want to list the products with different details as in the screenshot above, save the same.

These details will be updated in the next product synchronization.

6.9 Audit Log

The audit log helps the admin to keep track of all the tasks performed. Please refer to the attached screenshot below.

6.10 [New] Return Policy Synchronisation

The OpenCart Etsy Module allows the admin to efficiently manage and synchronize return policies between their Opencart store and Etsy. Admins can create, edit, or delete multiple return policies within the module and assign them to specific profiles. Once a return policy is mapped to a profile, all categories associated with that profile are automatically updated on Etsy with the selected return policy, ensuring uniform policy application across listings.

Add New Return Policy

Admins can create new return policies or modify existing ones directly from the OpenCart Etsy Marketplace Module. Moreover, this provides flexibility to manage different return rules based on business requirements without needing to log in to Etsy separately.

Sync Return Policies

Using the Return Policy Sync cron, admins can fetch all available return policies from Etsy into the OpenCart store. Moreover, the synchronization process includes important details such as return and exchange acceptance, the number of allowed returns or exchanges, and return deadline dates, ensuring accurate and up-to-date policy data.

Profile Mapping

Within the profile mapping section, admins can select and assign a return policy to products under a specific category. This makes it easy to manage return rules in bulk rather than applying them individually to each product.

Automatic Updates

When a category is added or updated within a mapped profile, the assigned return policy is automatically applied to the product of the categories mapped on Etsy. This ensures consistency between the OpenCart store and Etsy listings, reduces manual work, and helps maintain compliance with Etsy’s policies.

Watch the Tutorial of the Etsy Marketplace Integration Extension

This OpenCart Etsy Marketplace Integration tutorial provides a complete step-by-step guide on installing and configuring the Etsy integration module, connecting your OpenCart store with your Etsy seller account, synchronizing products, categories, prices, and inventory in real time, managing Etsy orders directly from the OpenCart admin panel, enabling automated product listing with customizable template controls, mapping store attributes with Etsy product requirements for accurate listings, organizing products into Etsy Shop Sections for better storefront management, and handling active, drafted, or expired Etsy listings seamlessly from your OpenCart store.

Module link of Opencart Etsy Connector Plugin

Admin Demo link of the OpenCart Etsy Integration Module.

You can also find this OpenCart Etsy Integration Module directly on the OpenCart Store.

PrestaShop Automatic Related Products Module – User Manual

1.0 Introduction

The online store merchant can now grab customer’s focus and improve website sales by using PrestaShop product cross-selling module. Knowband offers PrestaShop Automatic Related Product addon which allows the online sellers to display related products on various website pages. This advance related product extension provides an option to set specific conditions for showing appropriate similar products on each page.

The store admin can set the methods and filters for displaying the products as similar products. The PrestaShop Automatic Related Product addon allows the admin to show the related product column on the left, right or page bottom. Online customers can view similar products and get the right product of their choice. Thus, the admin can improve sales and conversion rate also just by using this Prestashop Automatic Related Product addon.

What’s New in V2.0.1.

  1. Random product display: Now you can showcase your products in a more dynamic way by displaying them in random orders with Prestashop Related Product Addon.
  2. Related products on super-checkout: We have added related products on the super-checkout page to increase cross-selling opportunities.
  3. Sorting functionality for related products: You can now sort related products by various criteria, such as price or popularity, name, etc.
  4. Brand slider on the home page: Now, the Presta admins can also add brand sliders on the home page to highlight your brand and products.
  5. Multiple tabs on the home page: You can now organize your products better by displaying them on multiple tabs, such as top products, new products, best products, and user history products.
  6. Customization options for slider: Prestashop sellers can customize the slider’s background color, height, width, and other settings to match your website’s design.
  7. Related products on add to cart popup: We have added related products on the add-to-cart popup to increase upselling opportunities.
  8. Additional methods on product and category pages: You can now display discounted products, products with the same brand, and rule-based related products on the product page, and child categories, same category feature products, subcategories new products, and rule-based related products on the category page.
  9. Flexible display options for related products: You can choose to display related products either in a slider view or a 2-column list view.
  10. Prestashop-related product module is now compatible with Prestashop v8.0.x.

1.1 Benefits for Merchants

  1. This Prestashop product cross-selling module helps the admin to increase the customer’s average cart value by showing similar products.
  2. There are higher chances of conversions if a store visitor finds the desired product in a similar product block.
  3. The store admin can display perfect similar products in order to increase sales and offer a better store experience to the customers.
  4. PrestaShop Similar products module allows setting the related product block position according to their preference.
  5. There are multiple conditions available for showing similar products in an advanced way.
  6. This PrestaShop alike product module provides an option to hide the out-of-stock products and show only available products as similar products.
  7. With the help of this PrestaShop-related products plugin, the admin can reduce the bounce rate by engaging the customers.
  8. Prestashop related products module allows the eCommerce store admin to show new arrivals as similar products in order to promote new products.
  9. The e-merchant can show those products on which he wants to grab the customer’s attention. The Prestashop Automatic Related Product module allows the eCommerce store admin to display the related products on different website pages.
  10. Compatible with Prestashop v8.0.x.

1.2 Features of the PrestaShop Automatic Related Product Addon

  1. Admin can show related products on various website pages like homepage, product pages, category pages, cart page, manufacturer pages and order confirmation page with the help of this Prestashop product cross-selling addon.
  2. The admin has the option to show available products as related products. The out of stock products won’t be displayed as related products. The Prestashop similar products addon provides an option to show only in-stock products in the related products list.
  3. The online seller can enter a related product block title. The PrestaShop related products module allows the admin to set block titles in various languages.
  4. The PrestaShop advance related product extension provides various methods for showing the related products. The store merchant can display top-visited products, bestsellers, and new products or use user history for showing the related products.
  5. The maximum number of the related product to display on different pages can be fixed from the admin interface of this Prestashop similar products addon.
  6. The PrestaShop related products addon allows the admin to set the method priority and different filters for showing related products.
  7. The PrestaShop related products addon is fully mobile responsive.
  8. Related products extension is multi-store compatible and offers multi-lingual support.

2.0 Installation Steps

The admin will get the below-mentioned files after purchasing the Automatic Related Product addon:

1. The zipped file that consists of the source code of this Automatic Related Product addon.

2. User Manual

Follow these steps to install the Prestashop Automatic Related Product addon:

  • The admin needs to unzip the zipped file. This file includes some files and folders.
  • After that, admin can copy the overall content of the folder and paste them into the “Modules” folder of the store’s directory. The admin can follow the path – Root Directory/modules/.

3. Now, the store owner can install the Automatic Related Product addon. As an eCommerce store owner, you can find that in Store Admin -> Modules and Services. It would be shown as below:

Now you just need to click on “Install” button to install this Prestashop Automatic Related Product addon easily. A confirmation pop-up will be shown. Click on “Proceed with the installation” option. This step will install the Automatic Related Product addon and show notification – “Module(s) installed successfully”.

3.0 Admin Interface

There are various customization options. The store admin can apply the settings and show the similar products on various website pages. These are the customization options:

  1. Basic Settings
  2. Home Page Settings
  3. Product Page Settings
  4. Category Page Settings
  5. Cart Page Settings
  6. Manufacturer Page Settings
  7. Order Confirmation Settings

3.1 Basic Settings

1. Enable/Disable: The store admin can activate or deactivate the functionality just by toggling the button. The Prestashop similar products addon can be activated or deactivated easily from the admin interface.

2. Display Related Products on the Super checkout Page: With the help of this option, the admins can show/hide related products on the One Page checkout page. Not only it will help the customers to get a better UI but also will help in cross-sales.

3. Show only those products which are currently available in stock: The e-Commerce store admin can enable the menu option if he wants to show only in-stock products as related products. Prestashop Automatic Related Product addon provides an option to show all the products or in-stock products as related products.

4. Enter Slider Previous/Next Button Color: You can choose the button color of the previous/next button (for the product slider only).

5. Enter Heading Color: With the following option, the admins can change the related product text heading color.

6. Enter Slider Background color: The following option will manage the slider’s background color.

7. Enter the Product’s Actual Price Color: From here, you can easily manage the color of the actual prices of related products.

8. Enter product’s Old Price color: The following option can be used for changing the color of the old price of related products.

9. Enter Product Title Color: You can manage the product title’s color from the following option.

10. Enter Slider Border Color: The following option will manage the Related Products slider’s border color.

11. Custom CSS: Now, Prestashop Related product module allows the Prestashop admins to add customized CSS for making their related product blog sound. While adding custom CSS, the admins cannot include the style tag in the same.

12. Custom JS: In case you want to add custom JavaScript, you can add the same in the following text field. Also, the Prestashop admins cannot include JS tags in the following text field.

3.2 Home Page Settings

1. Display Related Product in List View (with 2 Columns): If you enable the following option then instead of slider view, the related products will appear in the list view.

2. Enable/Disable Brand Slider on Home Page: You can show/hide the brand slider on the home page (only if enabled).

3. Enable/Disable Homepage settings: The eCommerce store admin can activate or deactivate the homepage settings by clicking on this option from the admin interface Prestashop-related products module.

4. Enable/Disable Multitab for Home Page: If Enabled then a Multitab with Top Visited products, New products, Best seller Products, and User History Products are displayed instead of the Home Page Slider.

5. Select Methods: In the following option, the admins can add the methods based on which they want to show top sellers, new, or most visited products.

6. Disabled Priority Settings: The admins can enable/disable the priority settings with the help of the following button.

7. Display Products in Random order: If you will enable the following button, the related products will appear in a random order every time.

8. Display Sorting for Products: If the following option is enabled, the customers will get the sorting options on the related product slider.

9. Block Title: You can enter the name of the title that will appear on the front end (home page) above related products.

10. Show Home Block Title on Front: The admins can show/hide the home block title on the front end with the following button.

11. Select Display Column: Select the column in which the related products need to be displayed. Here, you can choose if you want to show the products on the page bottom, left column, or right column.

12. Select Methods: In the following option, the admins can add the methods based on which they want to show top sellers, new, or most visited products.

13. Choose Specific Products: Here you can map all the products that you want to add as related products on the front end. Once you will start typing the name, you can find all the suggestions related to the entered text.

14. Max Products to be Displayed: The Prestashop retailers can enter the maximum number of related products they want to show on the front end.

The store admin can also set the priority of the methods. The related product of higher priority will be selected first.

3.3 Product Page Settings

1. Enable/disable Product Page Settings: The store owner can activate or deactivate the product page settings just by a button toggle.

2. Disabled Priority Setting: The admins can enable/disable priority settings from here.

3. Enable/Disable Related products Block for Add to Cart Pop up: If the following option is enabled, the related product blog will appear on the pop-up while adding the product to the cart.

4. Display products in random order: Knowband Prestashop Related products module allows the admins to display/hide products in random order. The admins can simply manage the same from this particular button.

5. Display Sorting for Products: If the following option is enabled, the customers will get the sorting options on the related product slider on the product page.

6. Block Title: From this option, the admin can manage the block title for the related products on the product page.

7. Show Product Block Title on Front: This option will show/hide the Home Block title on the front for the product page only.

8. Select Display Column: Select the column in which the related products need to be displayed. Here, you can choose if you want to show the products on the page bottom, left column, or right column.

9. Select Methods: In the following option, the admins can add the methods based on which they want to show top sellers, new, or most visited products.

10. Select Filter: Select the filter based on which the products on the front will be displayed.

11. Choose Specific Order: Here you can map all the products that you want to add as related products on the front end. Once you will start typing the name, you can find all the suggestions related to the entered text.

12. Max products to be displayed: Admin can select the maximum number of products to display as related products.

The store admin can set the priority of the methods. if there is no product on the higher priority method, then the Prestashop product cross-selling module will show the product from the lower priority.

3.4 Category Page Settings

1. Enable/Disable Related Products Block for Add to Cart Popup: If the following option is enabled, the related product blog will appear on the pop-up while adding the product to the cart.

2. Enable/Disable Category Page Settings: The store admin can enable or disable the category page settings from the admin interface.

3. Disabled Priority Setting: The admins can enable/disable priority settings for the category page from this particular option.

4. Display Products in Random Order: In case you want to show random related products every time, you can keep this option enabled.

5. Display Sorting for Products: If the following option is enabled, the customers will get the sorting options on the related product slider.

6. Block Title: With the help of this particular text field, the admins can manage the block title for the related products on the category page.

7. Show Category Block Title on the Front: Show/hide the home block title on the front for category pages with this option.

8. Select Display Column: You can manage the display column from this option. Further, you can select the options such as bottom, column left, and column right for showing the related products title.

9. Select Methods: The Prestashop admins can manage the methods based on what they want to show the related products. For example, the admin can select methods for most visited products, top-selling products, new products, or products from categories or subcategories, etc.

10. Choose Specific Products: Here you can map all the products that you want to add as related products on the front end. Once you will start typing the name, you can find all the suggestions related to the entered text.

11. Max Products to be Displayed: You can enter the maximum number of the related products you want to display on the category page.

3.5 Cart Page Settings

1. Enable/Disable Related Products block for add to cart popup: If the following setting is enabled, the related products will appear on the add-to-cart pop-up.

2. Enable/Disable Cart Page Setting: This button will enable/disable the related products on the cart page.

3. Disabled Priority Setting: Like cart page settings, this option can be used for making the priority setting work.

4. Display Products in Random Order: In case you want to show off the related products in random order, you can use this particular option.

5. Display Sorting for Products: If you enable this option, the users can sort the products on the slider.

6. Block Title: The admin can manage the related products block title for the cart page from this particular text field.

7. Show Cart Block Title on Front: From here, the admin can show/hide the cart block title on the front end.

8. Select Display Column: You can choose and manage the location of the related product blog from this option.

9. Select Display Column: You can manage the display column from this option. Further, you can select the options such as bottom, column left, and column right for showing the related products title.

10. Select Methods: The Prestashop admins can manage the methods based on what they want to show the related products. For example, the admin can select methods for most visited products, top-selling products, new products, or products from categories or subcategories, etc.

11. Choose Specific Products: Here you can map all the products that you want to add as related products on the front end. Once you will start typing the name, you can find all the suggestions related to the entered text.

12. Max products to be displayed: the admin can fix the maximum products count for displaying on the category page.

The store admin can also set the priority of every method easily from the admin interface. the Prestashop related products module picks the product from the lower method if no product will be available on the higher method.

3.6 Manufacturer Page Settings

1. Enable/Disable Related Products Block for add to cart pop-up: If the following setting is enabled, the related products will appear on the add-to-cart pop-up on the manufacturer page.

2. Enable/Disable manufacturer Page Settings: The store admin can enable or disable the manufacturer page settings from the admin interface of this Prestashop alike product addon.

3. Disabled Priority Setting: This option can be used for making the priority setting enabled or disabled.

4. Display Products in Random Order: In case you want to show off the related products in random order to your visitors, you can use this particular option. If this option is enabled, all the related products will appear in random form every time.

5. Display Sorting for Products: If you enable this option, the users can sort the products on the related product slider.

6. Block Title: The PrestaShop related products plugin allows the admin to set the related products block title in multiple languages.

7. Show Manufacturer Block Title on front: This feature lets the admin to enable or disable the module tab heading and also the heading text can be customized.

8. Select Display Column: The PrestaShop related products plugin allows the admin to show the related products in various positions like the left column, the right column of product or page bottom.

9. Select Methods: There are various methods to select from. The admin can show the related products as per Bestsellers, Top visited products, New Products, Use user history, Top viewed by this manufacturer, Bestseller in this manufacturer.

10. Choose Specific Products: For this option, you can add specific products just by entering the name and the related products will appear based on the same.

11. Max products to be displayed: The Prestashop related products addon allows the store admin to fix the maximum products count for displaying on the category page.

The store admin can also set the priority of every method easily from the admin interface. the Prestashop product cross-selling module picks the product from the lower method if no product will be available on the higher method.

3.7 Order Confirmation Settings

1. Enable/Disable Related Products Block for Add to Cart Pop-Up: If you have enabled the following setting, the related products will appear on the add-to-cart pop-up on the Order Confirmation page.

2. Enable/Disable Order Confirmation Page Settings: The store admin can enable or disable the Order Confirmation Page settings from the admin interface.

3. Disabled Priority Setting: The admin can enable/disable priority settings from here.

4. Display Products in Random Order: Using this option, the admins can show related products in random order to the visitors. If this option is enabled, all the related products will appear in random form every time.

5. Display Sorting for Products: If you enable this option, the users can sort the products on the related product slider.

6. Block Title: The Prestashop related products plugin allows the admin to set the related products block title in multiple languages.

7. Show Order Block Title on front: This feature lets the admin to enable or disable the module tab heading and also the heading text can be customized.

8. Select Display Column: The Prestashop related products addon allows the admin to show the related products in various positions like the left column, the right column of product or page bottom.

9. Select Methods: There are various methods to select from. The admin can show the related products as per Top visited products, Best Sellers, New Products, Use user history, Products ordered with the products of order and Products of the same category as the products of the order.

10. Select filter: The store admin can select the filters like no filter, keyword, attribute.

11. Choose Specific Products: For this option, you can add specific products just by entering the name and the related products will appear based on the same.

12. Max products to be displayed: The admin can fix the maximum products count for displaying on the category page. The store admin can also set the priority of every method easily from the admin interface. The Prestashop Automatic Related Product addon picks the product from the lower method if no product will be available on the higher method.

Category Mapping:

Store Admin can Create, Edit and Delete new Category rules under the Category Mapping tab.

After clicking on the Add new Mapping button, a new mapping form will be open with following fields :

The admin has the ability to create rules for category pages by mapping multiple categories to a specific category. This means that on the designated category page, all products from the mapped categories will be displayed. This provides greater control and flexibility to the admin in curating product displays and enhancing the user experience on the website.

4.0 Front-end Interface

The customers can view the related products as shown in the below-mentioned images.

At the home page the related products will be displayed like the below image:

The customers can also view the related products on the product page:

Similar products will display on add to cart pop up too:

This way, the online store admin can showcase related products on different website pages like homepage, product pages, category pages, cart page, manufacturer page and order confirmation pages also. This way, the e-merchant can grab the customers attention on those products which he wants them to purchase. The Prestashop Automatic Related Product module allows the eCommerce store admin to implement this functionality to showcase related products on the website pages without any code changes. The eCommerce store admin can configure this Prestashop similar products addon according to their requirements and showcase the related products on the website pages easily. The customers can also view the related products and select the best one for themselves. The Prestashop similar products addon shows related products which increase the cart value of the customers.

For more PrestaShop Addons please visit Knowband.

For more details please visit:

PrestaShop Automatic Related Product Module Product page link.

Prestashop similar products addon admin demo link.

Prestashop Automatic Related Product module Front-demo link.

PrestaShop related products Addon User manual link.

Prestashop product cross-selling module addon store link.
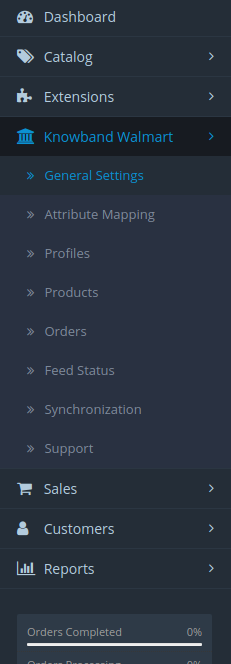
Please contact us at support@knowband.com for any query or custom change request as per your business requirement.

Prestashop Review Reminder and Incentive Addon- User Manual

1.0 Introduction

Product reviews are the best way to build the much-needed trust amongst the online shoppers. The eCommerce store owners can now provide compelling reasons to their customers to provide their reviews and rating. With the help of Prestashop Review Reminder and Incentive module, the e-merchants can now send their customer email reminders asking to share their feedback on the recent purchases. The customer gets lucrative discounts in return for the reviews. Thus, it provides a win-win situation for both the customers as well as the e-merchants.

The handy module allows the admin to keep a check on the reminder triggers as well as the incentives offered. The admin can set the timing when they want to send the reminder and fix the incentive criteria from the back-end. Even the email to be sent can be personalized in a matter of moment from the admin interface. Moreover, the PrestaShop review reminder and incentive addon offers an easy medium to approve/disapprove the reviews and ratings received from the end users. The users can even like/dislike the reviews that are posted on the website.

Note: The eCommerce store visitors and the customer can provide N number of reviews on any of the product. The restriction of the module is only on the review reminders and the incentive criteria. The customer will get only one incentive in return of the review on a particular product.
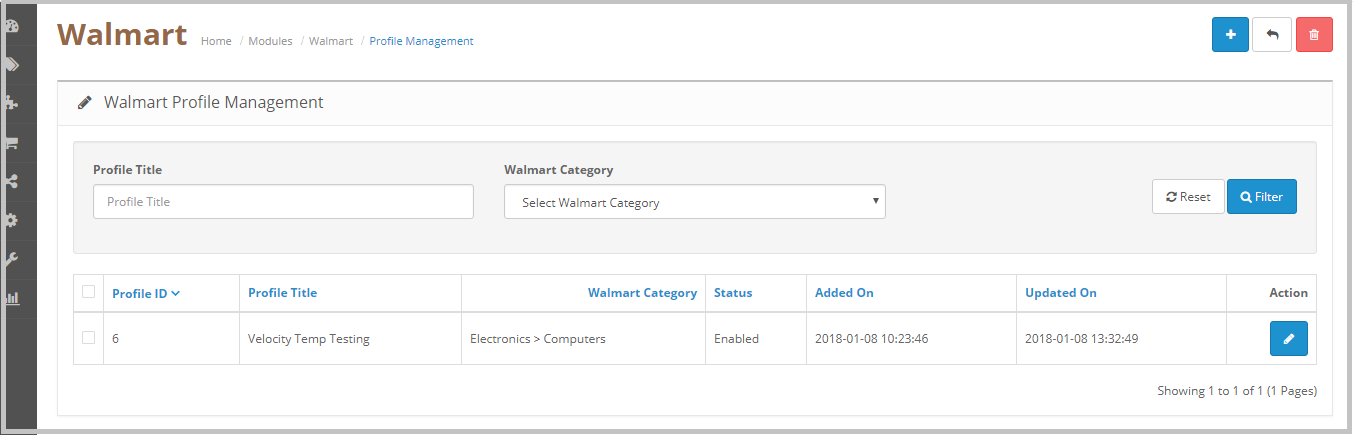
1.1 Project Objectives

The project objectives of PrestaShop review reminder module are listed below:

1. Configure the Smart review reminder module and set the incentive criteria. Personalize the email triggers from the backend.

2. Manage the reminder triggers and emails.

3. Exclude the product or category from the reminder and incentive criteria.

4. Moderate the status of the reviews before they are posted on the website.

5. Track the reviews and the incentives for the various products and categories.

2.0 Prestashop Review Reminder and Incentive Module Installation

Order the module from the our store. You will receive following files as listed below:

1. Zipped file with the source code of the module

2. User Manual

Follow the following steps to install this PrestaShop star rating extension:

  1. Unzip the zipped file. You’ll find a number of files and folders as shown below –
  2. Copy all the files and folders from unzipped folder and paste them into your store “Modules” directory on the path – Root Directory/modules/.
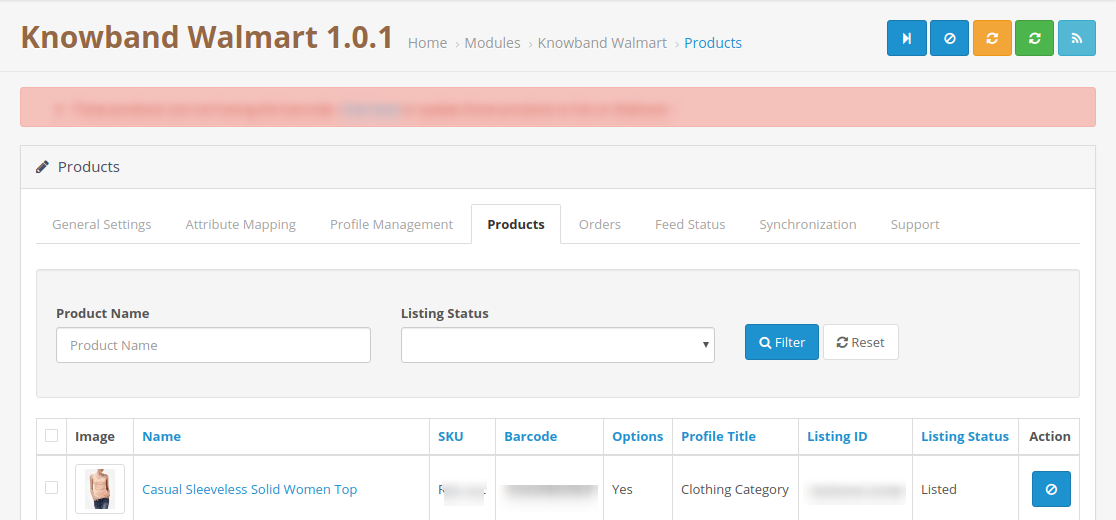
  3. You can find the Prestashop product review reminder module in Store Admin -> Modules and Services. You may even search the module with following details –
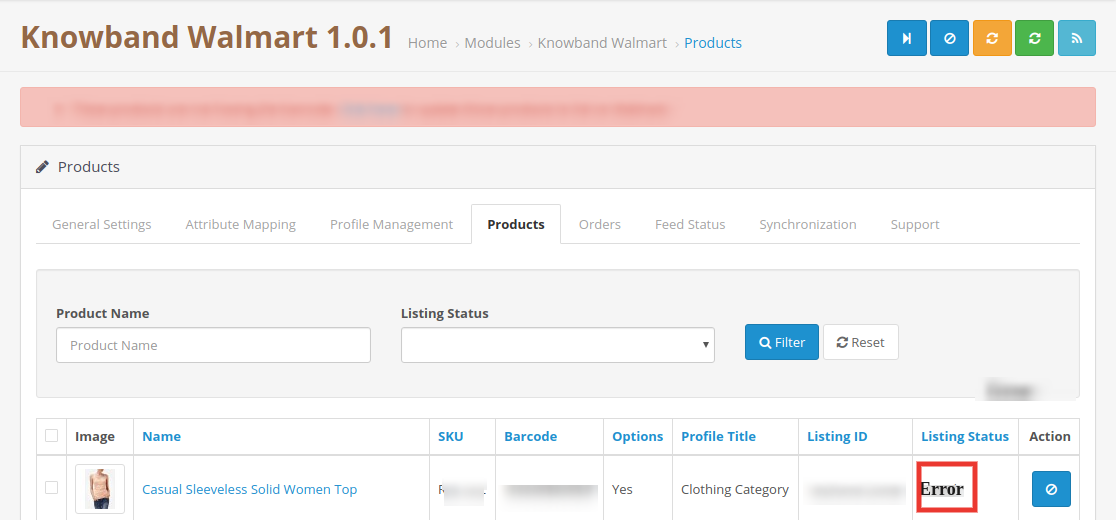
Keyword – Review Reminder and Incentive

Category – Front office Feature
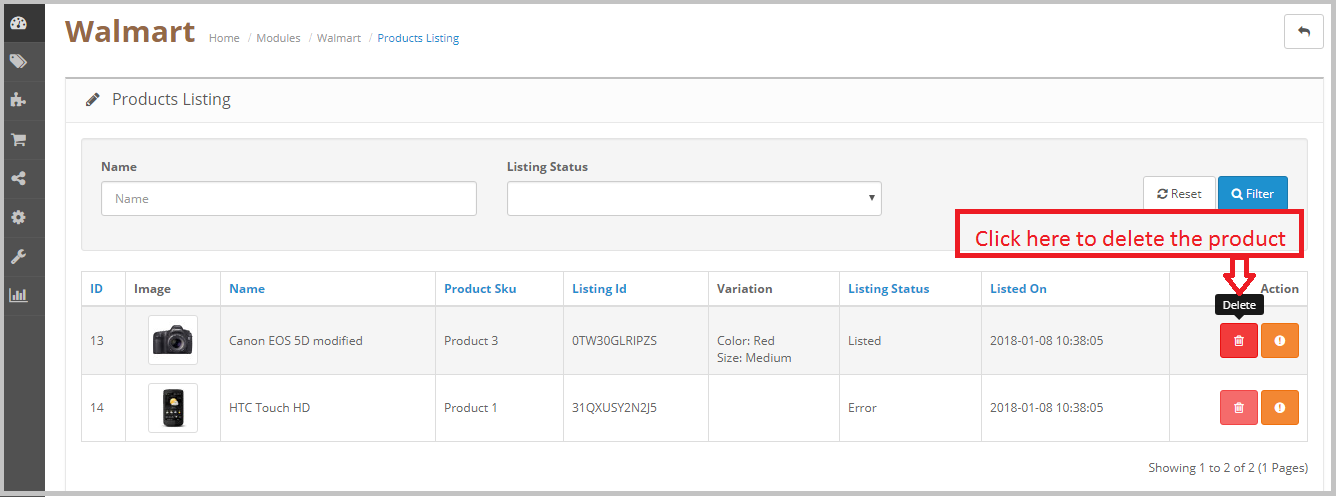
Filter By – Installed & Not Installed / Enabled & Disabled

  1. Click on “Install” button to install the module. It would show a pop-up for your confirmation. Click on “Proceed with the installation” option. This step will install the module and show notification – “Module(s) installed successfully”.
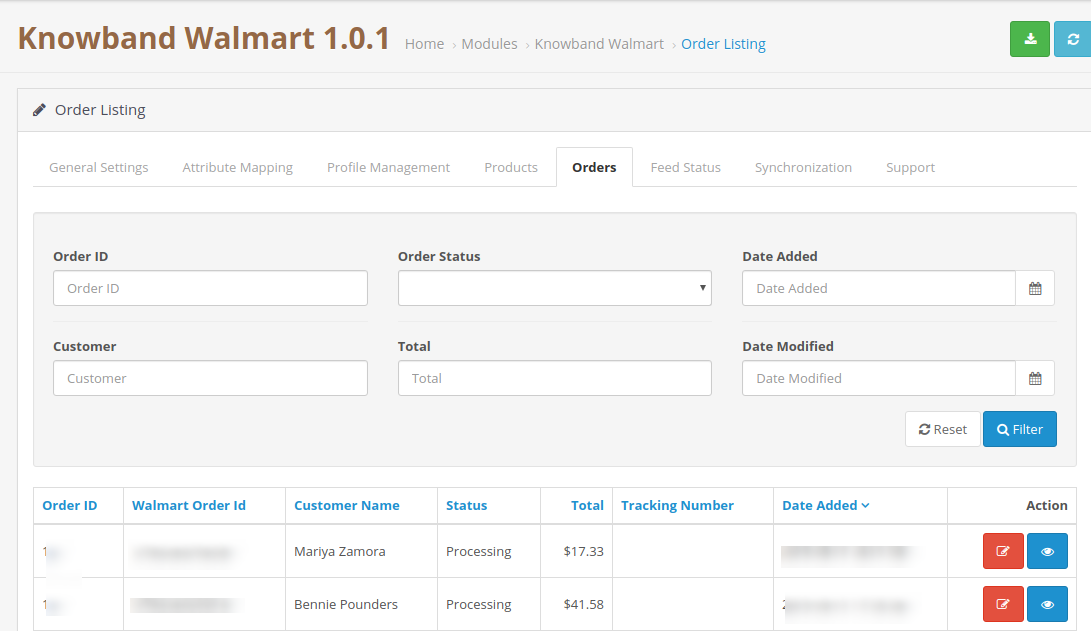
  2. Once the installation is complete, you can proceed to configure the Prestashop product review reminder module as shown below:

3.0 Admin Interface

The store admin can now motivate their customers to give their reviews and ratings on the products purchased by them in few simple steps. Once the installation of PrestaShop review reminder and incentive addon is complete, the module can be easily configured from the back-end of the admin interface. The e-merchants gets following configuration options:
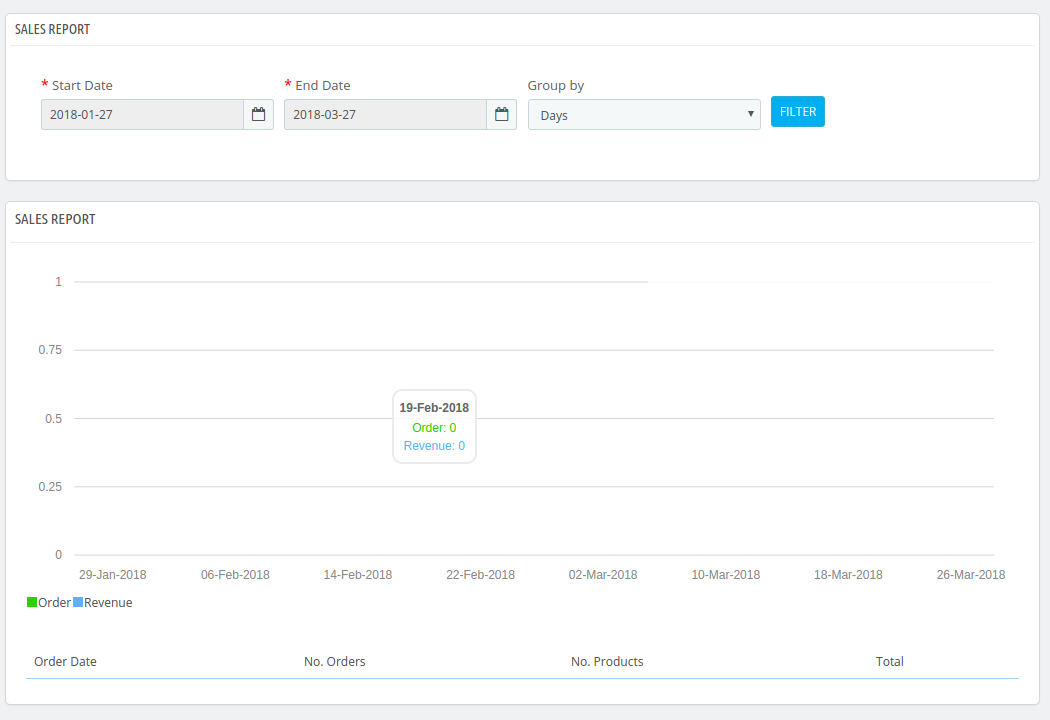
  • General Settings
  • Reminder Settings
  • Exclude Settings
  • Product Reviews
  • Reports

3.1 How to configure the module?

The very first step of the Prestashop product review reminder module configuration involves enabling/disabling it. This can be done from the back-end at a button click. In addition, the admin can even enable/disable the incentive being offered in return of the ratings as shown in the image below.

Once the incentive criteria is enabled, the admin can enter the desired amount for the same.

The incentive can be offered either to any of the store visitors or to the buyers of the site in particular. In case a buyer is selected, then, he/she should be the buyer of that particular product in order to get the incentive. The admin can choose any one from the drop-down list.
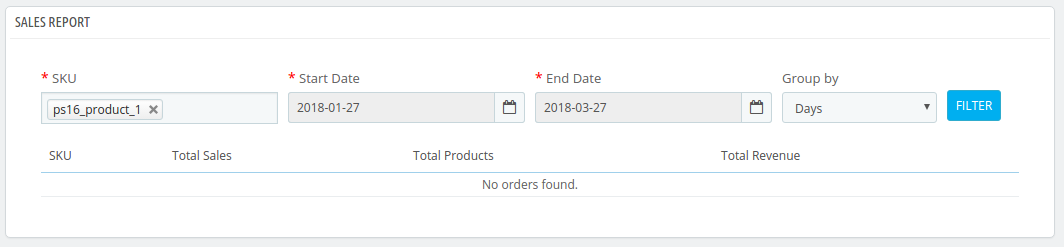
In addition, the admin can even approve or disapprove the review before they are posted on the website. For this, the Manual moderation rule is to be selected. If the moderation rule is automatic, then, the reviews of the customers will be automatically approved.

The admin interface of PrestaShop product review reminder and incentive module offers default email templates to the e-merchants. There are two types of email that can be sent to the customer.

  • When the review is approved, but they don’t get any incentive in return
  • When the review is posted on the website.
  • An apology mail to notify that the review was disapproved
  • The email with the notification that the review has been posted and the customer can view it by clicking on the link.

In each case, the admin can change the subject line of the email and personalize the template as required. The PrestaShop product review reminder and incentive module offers multi-lingual support. Thus, these changes can be done in multiple languages by selecting the desired one as shown in the image below:

3.2 How to Configure the Review Reminders?

In order to send reminders to the customers for sending their reviews, the admin needs to enable this functionality from the back-end.

The admin can even send the reminder automatically after a certain duration from the day of order creation. The number of days after which the reminder is to be sent can be entered as shown in the image.

The admin can even select the order status after which he wants to send the reminder. For this, the above-mentioned functionality must be disabled. The admin can then select the order status. The number of days after which the mail is to be sent is entered. The module will check the order status and will send the mail after the prescribed duration.

The email or the reminder trigger can be personalized from the back-end. The subject line as well as the content of the email can be changed and modified in multiple languages.

3.3 How to Exclude a Product or category from this functionality?

The reminder and incentive criteria can be included all the products and categories of the store. However, if the admin wants to exclude any of the product or category from the same, this can be done from the ‘Exclude Setting’ tab.

3.3.1 Exclude a Product

Go to the ‘Product’ tab and then click on the ‘+’ in order to add the product name that you want to exclude.

The products can be excluded easily by entering the name manually.

The selected item can seen in the list as shown below. The admin can even edit or delete the selected item.

3.3.2 Exclude a Category

Similarly, for the selecting the category, go to ‘+’ in the top right corner. Just expand the categories and check the ones that you want to exclude.

3.3 How to Approve or Disapprove a Review?

The customers can enter their reviews in the front-end of the website by entering their Name and Email IDs. In case the Moderation setting is Automatic, then, the review will be automatically posted on the website. However, if it’s Manual, then, it will be posted after the approval of the admin.

The admin can view the entire reviews in the back end.

These reviews can be edited or deleted at a button click.

The status of the Pending Reviews can be changed by clicking on the ‘Edit’ button. The status of the review can be selected as shown below.

In addition, the admin can even post the review with a bit of modification if they wish. He can change the Helpful Votes for the review along with the review incentive.

The PrestaShop review reminder and incentive addon even allows the store admin to differentiate between the fake reviewers and genuine customer reviews. The option of ‘Certified Buyer’ can be enabled for the genuine customers who posted their reviews on the product page.
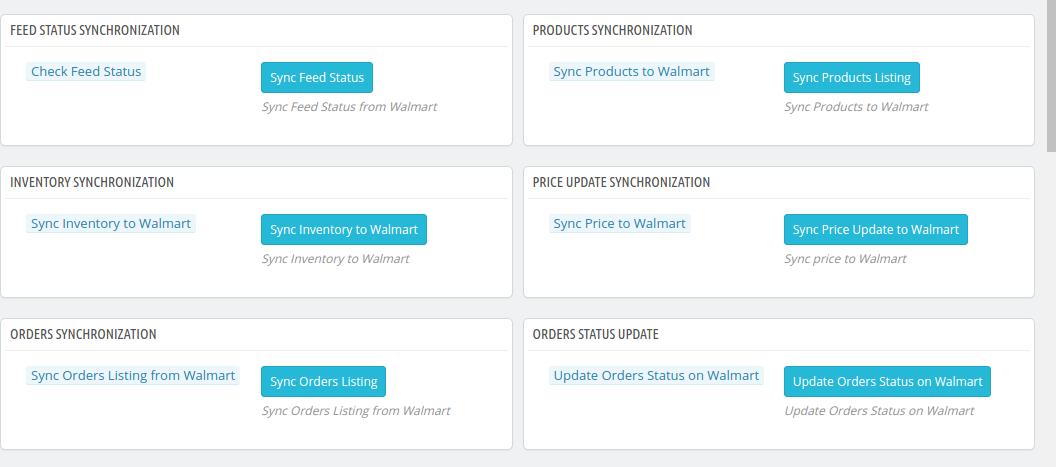
3.4 How to Track the Reviews and Incentive?

The reviews and the incentives can be easily tracked from the admin interface.

The store owners can either track the reports of individual products, an entire category or the products of a particular manufacturer or supplier.
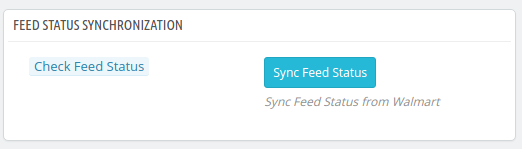
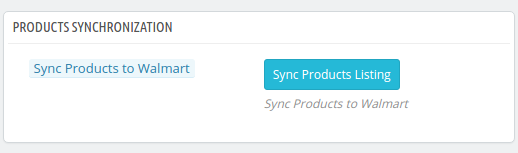
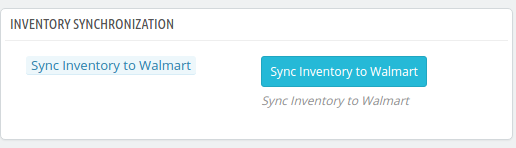
Select any one option and you can view the reviews received and the incentives offered.

3.5 How does the Audit Log works?

The Audit log of the admin interface keeps a track on all the email send to the customers and the status of the same. Click on the ‘Audit Log’ section as shown below and you can view the entire list of the email trigger send.

The email that was send to the customers along with the descriptions of it’s purpose and it’s status can be viewed as shown below.

4.0 Website UI

The link to enter the review will be sent to the customers in the mail. The customers can then enter their review and rating.

The review will then be posted on the product page after the approval of the admin and the prescribed incentive will be provided to the customer.

The review chart in the product page as shown in the below image allows the new customers to get an overview of the reviews of the product without actually reading each one of them. PrestaShop product review reminder and incentive module provides an insight to the store visitors of how many reviews were received and the overall rating of the same.

Magento Etsy Integration Extension – User Manual

1.0 Introduction

Etsy Magento API Integration by KnowBand offers a smart solution to the e-merchants to start selling on the Etsy Marketplace. The store admin can effortlessly sync products to Etsy for the selected categories with the help of this Magento Etsy Integration plugin.

Etsy provides a marketplace specifically for the crafters. The Etsy Magento Integration extension is easy to understand and use. So, the merchants can now find a larger niche audience base with minimal effort by selling their product in the Marketplace.

1.1 Merchant Benefits offered by Magento Etsy integrator by Knowband:

  • The Etsy Magento API integrator offers real-time synchronization between the Magento store and the Etsy marketplace.
  • The connection between the two stores can be set-up in a few simple steps with the automated approach of the Magento Etsy integration module.
  • The Magento store admin can list the products in bulk by creating profiles in the back-end of Etsy Magento API Integration.
  • The store admin can easily manage the inventory by making changes in the profiles created in Etsy Magento integrator. The merchants can remove, relist or revise products by simply executing cron jobs in the back-end of Etsy Magento API integrator.
  • With the help of Magento Etsy integration extension, the store admin can even add shipping methods for the marketplace customers.
  • The Magento Etsy Connector makes it easier for the online merchants to keep track of the product listing.
  • The admin can sync the orders received from the marketplace with the orders of the Magento store just at a button click with Etsy Magento integration plugin.
  • These orders can be processed from the Magento store itself by raising the invoice. The change in the order status is synced with the marketplace via the automated approach of the Magento Etsy API integration module.
  • The Etsy Magento integrator makes it easier for the store admin to track the errors that occurred while product listing.
  • Etsy Magento API Integration makes it easier for the store admin to tap a larger audience base and manage the online transaction from a single interface.
  • Magento to Etsy synchronization is the easiest way to expand your online business with minimal hassle.

2.0 Installation of Magento Etsy Integration Extension

Follow the following steps for installing Magento Etsy API Integration:

  1. Download the extension package of Magento Etsy integration plugin from Knowband.
  2. Unzip the package in your root folder of Magento setup via FTP manager (like Filezilla or WinSCP – download here: https://filezilla-project.org/).
  3. In Admin Panel go to Etsy Marketplace in the main menu.

4. The Magento Etsy integrator is now ready for use.

This User Manual will guide the users through the Magento Etsy synchronization extension configuration and settings.

2.2 Etsy Marketplace Integration- Seller Account Setup

To start selling on Etsy Marketplace you need to have a seller account on Etsy. In this section, we are listing all the steps to create a seller account on Etsy. Please find them below –

  • Go to the link – https://www.etsy.com
  • Click on the “Sell on Etsy” button present at the top right corner.
  • Click on the “Register” button on the page you are visiting now. Refer to the screenshot given below.

  • Fill up the registration form and click on the “Register” button. It would create your seller account and send a verification email to the provided email address.

  • Now, it would also redirect you to another page as shown below.

  • Now, it is asking to set up your shop preferences. Complete all the highlighted sections – Shop Preferences and Name your shop, Stock your shop, How you will get paid and Set up Billing.

That is it.

2.2.1 Etsy Marketplace Integration- Setup an App

To start communication between Magento Store and Etsy Seller Account, you need to create an App on Etsy Marketplace. Following are the steps to create an App on Etsy –


  • Fill up the form and click on “Read Terms and Create App”. Please make sure that you left the “Inventory Management Compatibility” checkbox is checked.
  • It would ask to accept “terms and conditions”. Accept and click on the “Create App” button.
  • It would register your App on Etsy Marketplace and provide API details as shown below.

Note: “The term ‘Etsy’ is a trademark of Etsy, Inc. This application uses the Etsy API but is not endorsed or certified by Etsy, Inc.”

3.0 Admin Interface

Admin Panel Settings of Etsy Magento synchronization extension contains the 8 tabs for settings.

  1. General Settings
  2. Shipping
  3. Order Settings
  4. Profile Management
  5. Product Listing
  6. Existing Products Mapping
  7. Order Listing
  8. Synchronization
  9. Audit Log

3.1 General Settings

Magento Etsy API integrator allows the store admin to integrate their store in a few simple steps. General Settings tab includes the details of Etsy Marketplace API like API Key, Host, etc. Etsy API helps to connect the Magento store with the Etsy marketplace. The description of each input field is mentioned below:

1. Enabled

Admin gets the option to Enable/Disable the module by toggling the button. If enabled, the module and all its settings will be working on the store.

2. Etsy API Key

Enter the Etsy API Key which will authenticate the connection being established between the Magento store and Etsy Marketplace.

3. Etsy API Secret

Enter Etsy API Secret Key here. It is mandatory for authenticating the integration between the store and Etsy Marketplace.

4. Etsy Default Language

Select the default language to be used.

5. Languages to Sync

Magento Etsy connector offers multi-lingual support. Choose the language used for synchronizing the product. The selected language should be anything other than the default language.

6.Register Etsy Customers
Magento Etsy Integration Module allows the admin to register the list of customers who have placed their orders on the Etsy store.

7. Send Email to Etsy Customers
Enable this feature to send emails to the registered customers.

8.Email Subject( When Customer is registered on the store)
The subject of the emails sent to the registered customer can be customized from the backend of Magento Etsy Connector.

9.Email Template (When Customer is registered on the store)
Magento Etsy Integration Module offers admin the choice to customize the email templates as per his choice.

Click on the ‘Save Configuration’. ‘Connect’ button will appear when the changes are saved. Click on the “Connect” button to connect with the Etsy Marketplace. It would redirect admin to Etsy Marketplace to allow the App Access to the store. Click on the “Allow Access” button as shown below. The connection between the store and Etsy Marketplace will be established.

It would also redirect admin back to the same page of “General Settings” and show the “Disconnect” button instead of “Connect” as the connection has now been set up with Etsy Marketplace.

Note: Once the connection is set-up, you need to execute the Country/Region cron to sync the country list in the database. (See section 3.7.)

3.2 Shipping

The admin can manage the shipping options in the Shipping tab of the Etsy Magento integration plugin. In this section, the admin can create Shipping Templates that contain the various shipping details as per the need of the system.

3.2.1 How to add Shipping Templates?

Follow the steps mentioned below to add Shipping Template:

To create new templates, click on ‘Add New’ as shown below:

You’ll be redirected to the template creation page. Fill up the following input fields of form –

Shipping Template Title: Enter the Shipping Template Title here.

Origin Country: Choose a country from the list as an origin country of Shipment.

Primary Cost: Provide the primary cost of the shipment. You can set it only once.

Secondary Cost: Provide the shipping cost for each additional item. You can set it only once.

Minimum Processing Days: Provide the minimum number of days for processing the shipment.

Maximum Processing Days: Enter the maximum processing days for processing the shipment.

3.2.2 How to Edit/Delete the existing Shipping Templates?

The Shipping templates (if any) will be listed in the Shipping Template tab of the Etsy Magento integrator. Click on the “Edit or Delete” button as shown in the image:

3.2.3 How to add Shipping Template Entries Template?

Each Shipping Template can have multiple shipping entries to define shipping destinations and their respective costs according to the destinations. Etsy Magento integration extension allows you to set up only one shipping template entry for each destination country.

The shipping entries can be viewed by clicking on ‘View Shipping Entries’.

This will redirect you to the shipping entries page of the Magento Etsy integration plugin. The admin can view the entries here.

Click on the Add New Entries button to create new entries.

This will redirect you to the entry creation page.

While the Origin and Shipping Template Title will remain the same, the Destination type, Destination country, primary cost, and secondary shipping cost can be entered here.

The existing list can be viewed with the help of Magento Etsy integrator as shown below. To Edit/Delete the existing entries, click on ‘Edit’ and ‘Delete’ action respectively.

Note: Execute the Shipping Template cron from the back-end of the Magento Etsy API Integration to sync the entire shipping templates in the Etsy Marketplace. (See Section 3.7.)

3.3 Order Settings

Order Settings tab of Magento Etsy integration module helps to map store order statuses with Etsy Marketplace order statuses. This will be used for capturing order details from Etsy Marketplace. For mapping the orders from the Etsy Marketplace to the Magento store, you need to execute the Order cron in the Synchronization tab of Magento Etsy integrator. (See section 3.7.)

The various fields are discussed below:

Order Default State: Choose an order default status.

Order Paid State: Choose an ordered state for the paid orders placed on the Etsy marketplace.

Order Shipped Status: Choose an ordered state for the shipped orders on the Etsy marketplace.

Note –

The default status is the first status of the order when it is placed on the store.

Paid status means that payment for the order has been made and accepted.

Shipped status means that ordered items have been shipped.

3.4 Profile Management

The profile-based listing of Magento Etsy integration plugin makes it easier for the online merchants to manage the inventory. Profile Management tab of the Etsy Magento Integration module provides options to create N number of profiles for product listing. In this section, the admin can map attributes of Magento store products with the attributes of Etsy Marketplace. The admin can even map the categories of the Magento store with the categories of Etsy Marketplace. Magento Etsy integration extension offers many-to-one category mapping.

Once you click on ‘Add New’, you’ll be redirected to the profile creation page of Etsy Magento integrator. The various fields are discussed below:

Profile Title: Enter the profile name here.

Etsy Category: Choose an Etsy Marketplace Category to list the attributes.

Attribute Mapping: Map the selected Etsy Marketplace attributes to the store’s attributes. Select the ‘Size’, ‘Primary color’. This will help the list the products with variations.

Store Categories: Select the category of the store that you want to map with the selected category of the Etsy Marketplace. At a time multiple store categories can be selected.

Shipping Template: Choose a Shipping Template from the drop-down list. The customer can avail of the selected shipping options.

In case, if Shipping Templates are not being displayed, Run Synchronization -> Sync Shipping Templates

Etsy Currency: This currency should be the same as the currency of your Etsy Admin panel, you can check the Etsy currency in Finances -> Payment Settings -> Currency.

Customized Product Title: Customize the product title by using the following place-holders. Place-holders like {sample} will be replaced by dynamic content at the time of execution.

  • {id_product} for Product ID
  • {product_title} for Product title
  • {country_of_manufacture} for Country of Manufacturer
  • {sku} for Product SKU
  • {weight} for Product Weight
  • {short_description} for Product Short Description
  • {price} for Product Price

Tags: The Etsy search shows results if the word or phrase is available in the product title or tags. The store admin can add the tags for the entire category at the time of creating the profile. The Etsy Magento Integrator module allows the store admin to add the maximum 13 tags.

Materials: The Etsy Magento Integration module allows the store admin to sync the Materials used in the product. For example Ingredients, components, etc.

Price Type: The Etsy Magento Integration Module allows the store admin to list the product on Etsy Marketplace at a different price than the Magento store price. Admin can select the option to sync the Actual or Special rice from the Magento store. Admin also has the option to increase or decrease the product price based on the Fixed or Percentage basis.

Change price: The store admin has access to change the price of goods at the Etsy store. Enable the Change price feature to increase or decrease the price of products listed at Etsy in comparison to their actual price.

Type: Select whether you want to increase or decrease the product price.

Amount: Enter the amount value in this field.

Sync Property: Select the properties to sync with the Etsy Marketplace. This will work while updating the product and its variations

Enable to enter minimum quantity: If enabled, the quantity of the items will be restricted to the minimum amount filled the following text box.

Enable to enter maximum quantity: If enabled, the quantity of the items will be restricted to the maximum amount filled the following text box.

Is the product customizable?: Enable if the product is customizable.

Who Made: Specify who made the specific product. Select an option from the drop-down list.

When Made: Specify when this product was made.

Is Supply?: Specify if the product is the product is supply product or not.

Recipient: Select the Recipient of the product

Occasion: Specify the Occasion (if any) for which the product is intended.

3.5 Product Listing

This section of the Magento Etsy integration plugin shows the list of all the products listed on Etsy Marketplace with their statuses. To sync the product in the Etsy Marketplace, execute the Product Cron in the Synchronization tab of the Etsy Magento Integration module. (See section 3.7.)


One the product is listed and synchronized, the status of the product variations will appear pending. To list them, the admin will be required to execute the ‘Product Variation’ cron in the Synchronization tab of the Etsy Magento integration plugin. Once this is done, even those products will get listed.

Product Listing Renewal

This option offered by Magento Etsy integrator allows admin to renew product in case listing has expired on Etsy Marketplace. To renew the product, the admin can click on the “Renew” action corresponding to each product.

After setting up a product for renewal, action “Renew” will be replaced with “Halt” action. This action is used to stop product renewal in case needed.

Auto Renew

Admin can also set products at the “Auto Renew” option. This option will automatically renew a particular product.

Product Listing Deletion

This option of Etsy Magento integrator allows admin to delete product listing from Etsy Marketplace. Click on “Delete” action given corresponding to each product listing. After setting up a product for deletion, the action “Delete” will be replaced with “Relist” action.

View Error

The admin can view the error that occurred in listing the product. For this, click on ‘View Error’ action.

3.6 Existing Products Mapping

Under this tab, the admin would be able to view the list of existing mapped products on Etsy Marketplace. Admin can search a particular product by setting filters accordingly.

3.7 Order Listing

This tab of Magento Etsy connector shows the list of orders placed on Etsy Marketplace for the products of your eCommerce store listed on Etsy as shown in the screenshot below –

To sync the orders received from the Etsy Marketplace into your Magento store, you need to execute the Order Syncing cron in the Synchronization tab of Magento Etsy connector. (See section 3.7)

To check the order, click on ‘View’.

The admin gets to see the following details of each order.

It offers basic information like order date, status, billing and shipping address, payment information, gift options, item ordered, comments history.

The default order view page is shown below:

  1. Invoice: The admin can generate the invoice for the orders received from here. This will initiate the processing of the order. Execute the Update Order Status on Etsy cron and the status of that order will be updated in the Etsy Marketplace.
  2. Credit Memos: Change the status of the credit here.
  3. Shipments: The admin can update the shipment details, that is, the name of the shipment, date and the quantity of shipment.

3.8 Synchronization

The Magento Etsy integration module offers several synchronization options. This tab of the Etsy Magento integration extension synchronizes all the settings and options defined in the other tabs. The synchronization between Magento Store and Etsy Marketplace can be done by clicking the ‘Synchronize’ button.

The various crons offered by Magento Etsy Integration extension to synchronize content between Store and Etsy Marketplace are shown below –

3.8.1 How to sync Countries/Region on Etsy Marketplace?

Following are the steps to synchronize Countries/Region on Etsy Marketplace –

  • Go to the Etsy Marketplace ->Synchronization tab (Main Menu)
  • Click on the “Sync Countries/Region” button shown below.

It would perform following actions –

  • The cron will get all the countries with their country ID and ISO code and save it into the database.
  • Once the cron is executed, the countries and regions in the database will be visible in the Shipping Template tab as well.

3.8.2  How to sync Shipping Template on Etsy Marketplace?

Following are the steps to synchronize Shipping Templates on Etsy Marketplace –

  • Goto the Etsy Marketplace ->Synchronization tab (Main Menu)
  • Click on the “Sync Shipping Template” button shown below.

It would perform following actions –

  • It will add new shipping templates along with their Entries on Etsy.
  • It will update the modifications made in the Shipping Templates and their entries on Etsy
  • It will delete the shipping templates and their entries that were deleted from the store on Etsy.

3.8.3  How to sync Products on Etsy Marketplace?

Following are the steps to synchronize Products on Etsy Marketplace –

  • Goto the Etsy Marketplace ->Synchronization tab (Main Menu)
  • Click on the “Sync Products” button shown below.

It would perform following actions –

  • The cron will update the product list based on the profiles created into the system.
  • It will add products on the Etsy Marketplace with the respective product details (e.g. Price, Quantity, Image, etc.).
  • It will update the products on Etsy marketplace which are already listed
  • It will renew the expired products on Etsy Marketplace for the items in which ‘Renewal’ is enabled.
  • It will remove the products from Etsy Marketplace which are marked deleted on Store.
  • It updates the Listing Status of each product listed on Etsy Marketplace.

3.8.4  How to sync Products Variation on Etsy Marketplace?

Following are the steps to synchronize Products Variation on Etsy Marketplace –

  • Goto the Etsy Marketplace ->Synchronization tab (Main Menu)
  • Click on the “Sync Products Variation” button shown below.

It would perform following actions –

The cron execution will add Products Variations on Etsy Marketplace

It will update Products Variations which are already listed on Etsy Marketplace

It will remove the Products Variations on Etsy Marketplace that are marked as deleted on the Store.

3.8.5 How to sync  Etsy Non-mapped products?

Following are the steps to synchronize Etsy Non-Mapped products with your store–

  • Go to the Etsy Marketplace ->Synchronization tab (Main Menu)
  • Click on the “Sync Etsy Not-Mapped products” button shown below.

It would perform the following actions:

  • In case, if any product is not mapped with the store then, the same will be synchronized in the Etsy marketplace.

3.8.6  How to sync Order Listing from Etsy Marketplace?

Following are the steps to synchronize Orders from Etsy Marketplace –

  • Goto the Etsy Marketplace ->Synchronization tab (Main Menu)
  • Click on the “Sync Orders” button shown below.

It would perform following actions –

Once this cron is executed, it will get the Orders and Transaction details from the Etsy Marketplace.

It creates Shipping Carrier options into the store as per the details of the order coming from Etsy Marketplace

It creates Orders into the Magento store as per the details coming from the Etsy Marketplace and sets the order status as per the configuration settings updated in the “Order Settings” tab of this Magento Etsy Marketplace module.

3.8.7  How to sync Order Status on Etsy Marketplace?

Following are the steps to synchronize Orders Statusto Etsy Marketplace:

  • Goto the Etsy Marketplace ->Synchronization tab (Main Menu)
  • Click on the “Sync Order Status” button shown below.

It would perform following actions –

  • The cron checks if there is any status update recorded by the module for any Etsy Order. The updates are then synchronized accordingly.
  • It updates the Status of Orders as per the configuration settings modification in the “Order Settings” tab of the admin interface.

3.8.8  How to sync Language on Etsy Marketplace?

Following are the steps to synchronize Language to Etsy Marketplace:

  • Goto the Etsy Marketplace ->Synchronization tab (Main Menu)
  • Click on the “Sync Language” button shown below.

It would perform the following actions:

In case there are any product or category details in different languages, then, the same will be synchronized in the Etsy marketplace.

3.8.9 How to sync  Products Inventory/Price?

  • Goto the Etsy Marketplace ->Synchronization tab (Main Menu)
  • Click on the “Products Inventory/Price Synchronization” button shown below.

It would perform the following actions:

In case of any change in the inventory/price of the Magento store product then the admin needs to sync the updated price/inventory of the product to the Etsy marketplace. To make the entire process hassle-free the Products Inventory/Price Synchronization cron update the product price at the Etsy marketplace.

3.8.10 How to sync  Product  Images?

  • Goto the Etsy Marketplace ->Synchronization tab (Main Menu)
  • Click on the “Sync Product Images” button shown below.

It would perform the following actions:

  • Instead of updating the Products images individually on Etsy Marketplace, admin can update the same by running the Sync Product Images.

3.8.11 Full Magento Update Synchronization

  • Goto the Etsy Marketplace ->Synchronization tab (Main Menu)
  • Click on the “Products Inventory/Price Synchronization” button shown below.

It would perform the following actions:

Instead of running multiple crons to update the Products/Price/Inventory/Translation/Variation on Etsy admin can update the same by running the Full Magento Update on Etsy cron.

Note:

Once the synchronization is completed successfully, then, a message will be display – “Synchronization completed” else “Synchronization failed” will be flashed.

3.9 Audit Log

The Audit Log section of Magento Etsy integration plugin contains the entire list of the job that is running. The status of the same can be viewed here. The errors (if any) occurred while executing the jobs can be checked here.

Click Here to get Etsy Magento Integration Plugin

Click Here to view Admin Demo of Magento Etsy Integrator

Watch Plugin Video of Magento Etsy integration extension

iOS Mobile App Builder – Configuration

Introduction

We at Knowband are exceptionally skilled and proficient in converting your PrestaShop site into a wonderful feature packed mobile app for your targeted customers. You just have to specify your business requirements and expectations to our PrestaShop developers, rest will be assured by them. With our talent pool of programmers, designers, and other involved professionals, we can deliver a mobile app that closely matches your personal expectations and business requirements. If you are not sure about the utility of this mobile app for your PrestaShop store, let us throw some light on this amazing PrestaShop mobile app.

This is definitely one such mobile app that can take your eCommerce business to far off places. With the support of this PrestaShop mobile app, you can seamlessly target your multi-platform customers for your PrestaShop store for grabbing maximum sales and customer engagement. It can make your eCommerce business accessible to mobile based consumers in order to improve your chances of business growth and expansion. This mobile app lets PrestaShop store owners get their customized mobile app as per their business requirements and needs.

Working Process

In order to utilize the services of this mobile app, store owners have to implement the following steps:

Step 1. Once you purchase this module, download, install and enable the module on your store. This module enables communication between your mobile app and store.

Step 2. Contact us and share below requested details so that we can give generate your iOS app (IPA file) and can share it with you.

a. Splash image (1280×1920 png)

b. App icon (512×512 png)

c. Theme color (Blue, Orange, Green, Black)

d. Website URL

e. Website Name

f. Desired social login option name out of Facebook and Google.

g. GoogleInfo.plist file

h. Code snippet from Facebook developer console (Facebook App Id, Facebook App Name)

i. Provisioning Profiles (.mobileprovision files)

STEP 3. After receiving above requested information we will share an IPA file with you, which you can post on your “App Store” account so that your customers can download your app.

Read the document properly to know the process to get the required files.

Creating Facebook App

Prerequisites for creating Facebook App for iOS (Will be provided by Knowband)

  • App Package Name (com.example.xxxx)

Creating Facebook App

  • Go to https://developers.facebook.com/. If you have not registered yourself as a developer yet then Facebook will ask you to register as a developer. Simply register as a developer.
  • From the top navigation menu hover over My Apps.
  • Then click Add a New App.
  • Enter a display name for the app. This name will be displayed to the user when he/she use Facebook login.
  • Click on Create App ID. After verification, you will be redirected to the new page.
  • On that page select the Facebook login and click on Set Up option.

  • Then choose iOS and click on Next button until you reach on “Add your Bundle Identifier”step.
  • Enter the bundle identifier (Application Package Name) for the iOS app. Bundle identifier will be provided by Knowband). Click on “Save” and then click on “Continue” button.
  • Keep clicking on “Next” until you reach on “Configure Your info.plist” step.
  • On “Configure Your info.plist” step, click on “Copy Code” button and paste the text into a text file.

  • Click next till last step.

Making the App public

  • Now to make this App accessible to all, you need to make it public.
  • Now from the left menu, click on App Review.
  • Turn the switch next to ‘Do you want to make this app and all its live features available to the general public?’ to Yes.

  • Choose the category and click Confirm.

  • Now your App will be publicly available.
  • Please share the text you saved in text file (on “Configure Your info.plist” step) with Knowband. Make sure the text contains the following details –

<key>FacebookAppID</key>

<string>some_key</string>

<key>FacebookDisplayName</key>

<string>name_of_facebook_app_you_created</string>

Creating App IDs in Apple Developer Account

Prerequisites for creating App Id in Apple Developer Account (Will be provided by Knowband)

  • App Package Name (com.example.xxxx)
  • Package Name for Push Notification Service (com.example.xxxx.NauticaPrestashopNotificationServiceExtension)

Creating App Id in Apple developer account

  • Sign in to developer.apple.com/account, and click Certificates, IDs & Profiles.
  • Under Identifiers, select App IDs.
  • Click the Add button (+) in the upper-right corner.
  • Enter a name or description for the App ID in the Description field.

  • To create an explicit App ID, select Explicit App ID and enter the app’s bundle ID in the Bundle ID field.
  • Enter the bundle Id provided by Knowband (Enter App Package Name not the Package Name for Push Notification Service).

  • Select the corresponding checkboxes to enable the app services you want to use. Check the Push Notifications options as well.

  • Click Continue.
  • Review the registration information, and click Register.
  • Click Done.
  • Repeat all the steps for Package Name for Push Notification Service as well.
  • Now there will be two App IDs added in your account. One for App Package Name and Another one for Package Name for Push Notification Service.

Setting up Push Notification in Apple developer account

Prerequisites for creating App Id in Apple Developer Account (Will be provided by Knowband)

  • App Package Name (com.example.xxxx)

Setting up the App Id for Push notifications

  1. On “iOS App IDs” page. Look for the App ID you just created (The same as provided by Knowband). Press on it and you should see a drop down of Application Services.
  2. Scroll down until you reach the end of the drop down and you should see an “Edit” button. Press that.
  3. The “iOS App ID Settings” page will show up. Now, it is the time to generate the CSR (Certificate Signing Request) that will be used to generate SSL certificate. The CSR file can only be generated from MacBook. However, default CSR will be provided by Knowband butif you wish to generate your own CSR file, then read How to Generate CSR (Certificate Signing Request) using MacBook.
  4. Now that we have our CSR generated, it is ready to go back to the “Add iOS Certificate” page.
  5. Scroll down. Press continue, and then click “Choose file…” Select the CSR file you just saved on your hard drive.
  6. Next, click “continue”again. Then the web page should say “Your certificate is ready.”. Download the certificate by clicking on the blue download button.

  1. Again follow all the steps from the point 1 to 7 shown above for Production certificates instead of Development certificates.
  2. Now you will have two certificates (.cer) files one for development and another one for production.
  3. Now this is the time to generate the private key p.12 file. Again, this can be generated by Knowband after sharing the certificates files with usby you or you can also generate it at own end. Read How to generate private key file (.p12) using MacBook.
  4. Now you will have the private key file (.p12) for development and production environment.
  5. Save these files for now. You need to upload these files on Firebase developer console.

Exporting the provisioning profile for Code signing

Prerequisites for creating App Id in Apple Developer Account (Will be provided by Knowband)

  • App Package Name (com.example.xxxx)
  • Package Name for Push Notification Service (com.example.xxxx.NauticaPrestashopNotificationServiceExtension)

Exporting the Provisioning Profile

  • Click the Add button (+) in the upper-right corner.

  • Select App Store and click Continue.

  • Select the App ID from the drop down created in Creating App IDs in Apple Developer Account step. You can identify the App ID by name or description you set in Creating App IDs in Apple Developer Account step. (Select the App Package Name not the Package Name for Push Notification Service)

  • Click on Continue at the bottom of the page.
  • Select the certificate

  • Click Continue
  • Give a Profile Name and click Continue.

  • The you will see a success message saying “Your provisioning profile is ready”.
  • Click on the Download button to download the Provisioning profile in your System.

  • Repeat all the steps for Package Name for Push Notification Service as well.
  • Now you will have two Provisioning Profiles. One for App Package Name and Another one for Package Name for Push Notification Service.
  • You will have to share those two files (having extension as .mobileprovision) also with Knowband.

Creating a Project at Google Developers Console

Prerequisites for creating Google App for iOS (Will be provided by Knowband)

  • App Package Name (com.example.xxxx)

Creating Google Project

  • First, head over to https://firebase.google.com/. Sign in with your Google account to enter the console. If you don’t know how to switch to the console, there is a button at the very top right that says “Go to console.” Go ahead and click on that.

  • Once you are at the console, click on the “CREATE A NEW PROJECT” button. Give a name to your project and click the “CREATE A NEW PROJECT” button to proceed.

  • After that, you are redirected to the project overview page. Now click the “Add Firebase to your iOS” button. Enter the bundle ID provided by Knowband. Then click the “ADD APP” button.

  • Follow the on-screen instruction to download the GoogleInfo.plist file. We are going to need this file later.

  • Now lick “Continue” to proceed and click “Finish” to complete the configuration. You should then see your iOS app in the Firebase overview page.

  • Look for the setting icon at the top right. Click the settings icon > Project settings.

  • Select the Cloud Messaging tab.

  • Scroll down, and click the “Upload Certificate” button.

  • Then a pop should appear to ask you for your Development APNS certificate.
  • Click browse and choose your APNs certificate (i.e. .p12 file for development) that you prepared in “Setting up Push Notification in Apple developer account” section (we got two .p12 files in that step one for development and another one for production). Then click on Upload button. Similarly on Production APNs certificate section, upload the certificate for production (i.e. .p12 production file).
  • On same page, you can download the GoogleInfo.plist file (if not downloaded already). You will have to share the GoogleInfo.plist file to Knowband.

How to Generate CSR (Certificate Signing Request) using MacBook

  • It is time for us to create a “Client SSL Certificate.” This will allow our notification server (Firebase) to connect to the Apple Push Notification Service. Under Development SSL Certificate, press on the “Create Certificate…” button.
  • To generate a certificate, we would need a Certificate Signing Request (CSR) file from the Mac. We will get back to this page later, but now we need the CSR file.
  • To generate the CSR file see the steps shown below.
  • To generate a CSR file, press cmd + space and do a spotlight search for “Keychain Access.” Open Keychain Access, and go up to the menu to select Keychain Access > Certificate Assistant > Request a Certificate From a Certificate Authority…

  • A “Certificate Assistant” pop up should appear.

  • Fill in your email address and name. Choose “Saved to disk” and press Continue. Then save your CSR somewhere on your hard drive.

How to generate private key file (.p12) using MacBook.

  1. Double click on certificate (.cer) file and it will be automatically added in your keychain access certificates.
  2. Open up Keychain Access. Under the “My Certificates” category, you should see the certificate you just added. It should be called: Apple Development IOS Push Services: <your.bundle.id>
  3. Click the expand arrow to the left of the certificate’s name to reveal the private key option. Right click on the private key and press export.
  4. Once clicking Export, a pop up will prompt you to save your private key as a .p12 file. Go ahead and click save. Give some prefix as dev in the name to make sure that the file is for Development.
  5. Then leave the fields empty and click OK to confirm and a .p12 file will be saved on your device.


Enable Facebook login on the Firebase console

  • We need to enable the facebook login from the firebase account as well in order to make the functionality work.
  • First, go to the Facebook console then select the app you have created in “Creating Facebook App” step.
  • You will be redirected to the Dashboard.

  • There you will find App ID and App Secret
  • Then go to the Firebase console and select the Authentication tab from the left menu.
  • Go to “Sign-In Method” tab and enable the facebook from there.

  • You will have to enter the app secret and facebook id and then click on save button.


/***************************** End of document *******************************/