How to create Prestashop Module Web Service API?

This blog is all about how to create and use the Prestashop Webservices API. Prestashop has default Web Services tool available which allows accessing the store from remote applications.

Prerequisites

  1. You Prestashop store should have “module rewrite” enabled for apache.
  2. It is preferable to use SSL (https:) for web service calls, as it avoids the “man in the middle” type security issues.
  3. Check that the five methods GET, POST, PUT, DELETE and HEAD are supported on the server.

To ensure the security and efficiency of your Prestashop Web Services, it’s essential to use SSL (HTTPS) for all web service calls. This prevents “man in the middle” attacks, safeguarding your data during transmission. Additionally, verifying that your server supports the HTTP methods GET, POST, PUT, DELETE, and HEAD is crucial for seamless operation. By configuring these settings, you optimize your store’s performance and security, ensuring reliable access and management of your Prestashop resources through the API.

How to configure Web Services in the Prestashop?

1. Login into the Prestashop Back-office.

2. Navigate to Advance Parameters -> Web Services menu options to open the Web Services page.
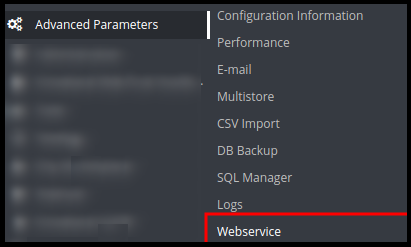
 

3. It will redirect to the Web Services page having the listing of available Web Services and the configuration form to configure the service.

4. The Configuration form has the following fields:
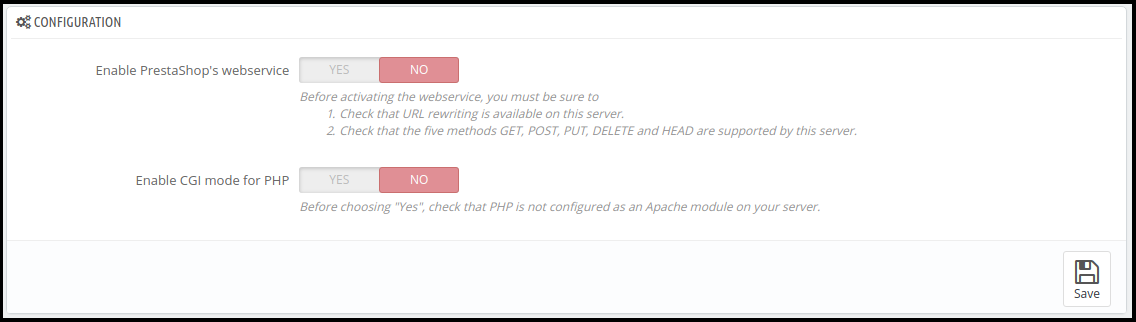
a) Enable Prestashop’s web service: Enable the setting to use web service in the Prestashop Store.

b) Enable CGI mode for PHP: Enable the setting to use PHP as CGI script instead of Apache module.

5. Click on the Save button to save the configuration. Now, you can use the Web Services in your Prestashop Store.

How to add/Update Web Services in the Prestashop?

1. Login into the Prestashop Back-office

2. Navigate to Advance Parameters -> Web Services menu options to open the Web Services page.

3. It will redirect to the Web Services page having a listing of available Web Services.
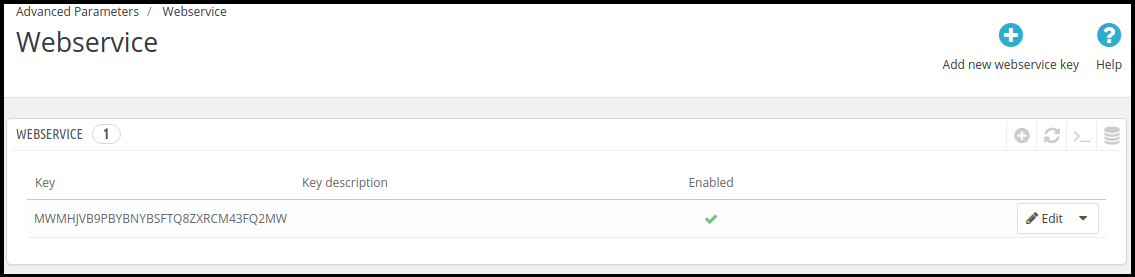
4. Click on the “Add new web service key” button to add new web service key to access only to the certain resources of the Prestashop store.
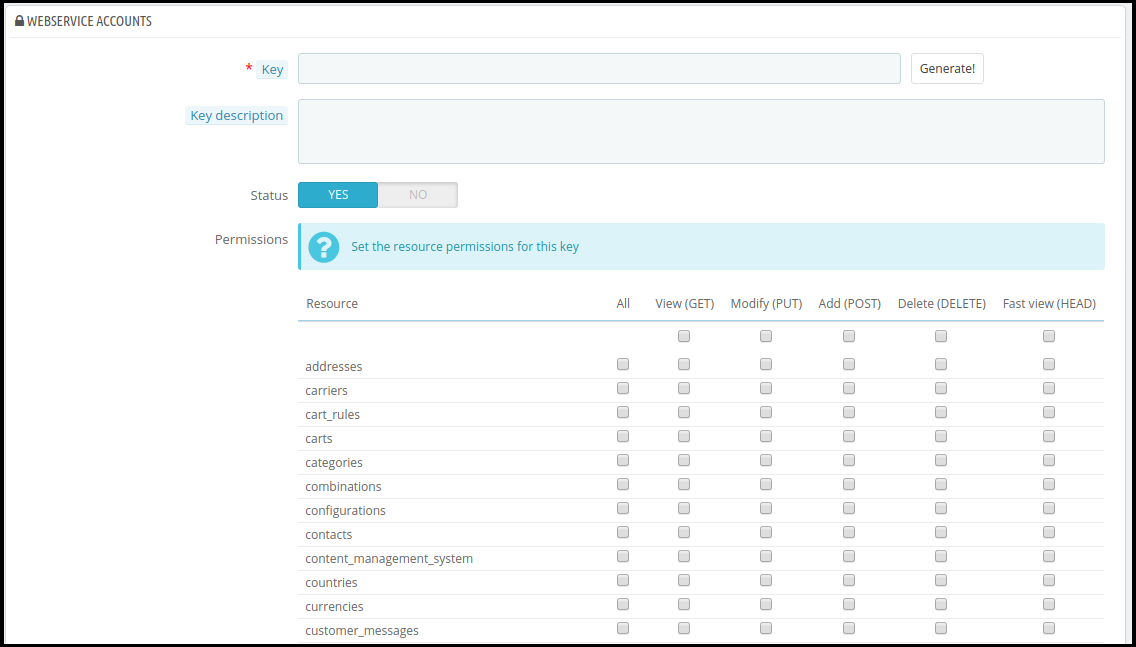
a) Key: This is a unique key. You can enter it manually or click on the Generate button to generate a random key for the Prestashop web service.

b) Key Description: You can provide the description regarding the key for better understanding.

c) Status: Enable the key to provide a grant to access the data using the key.

d) Permission: Provide the permission to access the data using the certain key. You can check the specific permission to grant access of the data like Add, Edit, delete or view. Here, we have checked the permission to Countries and Currency.

5. Click on the Save button to add the key to the web services.

How to the access the Web Service?

Once you have created the key for the web service and properly configured, you need to hit the following URL in your browser:

https://{store root path}/api/

It will prompt you for username and password to access the resource.
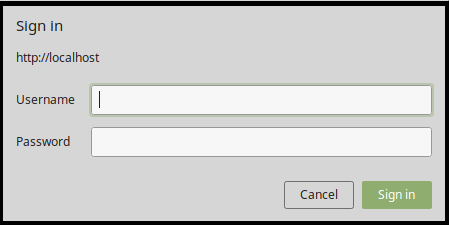
a) Username: Enter the key of the web service which is generated in the above step. For Example MWMHJVB9PBYBNYBSFTQ8ZXRCM43FQ2MW

b) Password: It should be blank as no password required.

After sign in, you will access the list of the resources and all permitted CRUD options that you have configured in your Prestashop Store.
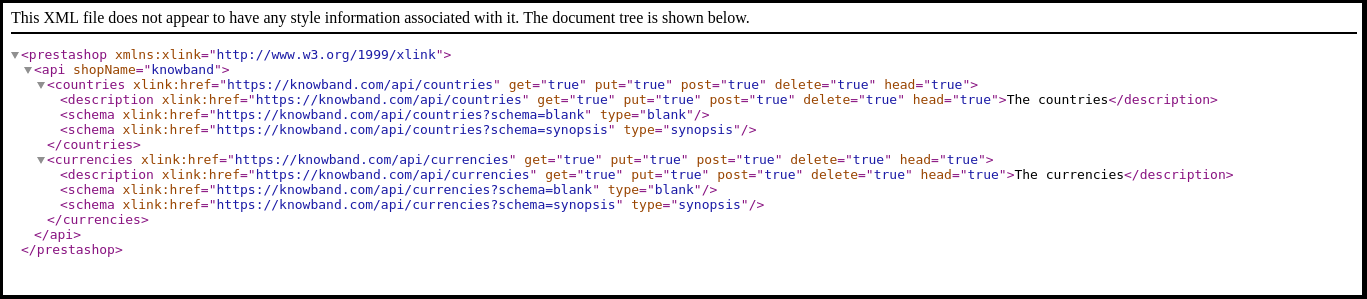
You are now successfully connected to the Prestashop web service.

a) To GET the list of entities for a particular resource:

https://shop_root_url/api/resouce

Example: https://www.knowband.com/api/customers to get a list of all customers.

b) To GET a specific customer by ID:

https://shop_root_url/api/customers/1

For Example: To get the detail of customer having ID 10

https://www.knowband.com/api/customers/10

Recommend Watch: 

How to create Prestashop Module Webservice API for Prestashop 1.7?

We will show you how to create a module to fetch customers. For this, we will register a hook addWebserviceResources of ServiceRequest for the resources instead of overriding getResources() function of ServiceRequest Class in Prestashop 1.7.

Creating custom web service APIs in Prestashop 1.7 involves using the WebserviceSpecificManagement class. This allows you to define specific functionalities and manage data processing. For instance, implementing the WebserviceSpecificManagementKbCustomer class lets you handle customer data efficiently. Therefore, this approach provides a flexible and robust solution for extending Prestashop’s capabilities, enabling tailored interactions with your store’s data. By leveraging these advanced customization options, you can create more dynamic and responsive eCommerce solutions that meet unique business needs.

1. Register addWebserviceResources hook in the module.

public function install() {

parent::install();

$this->registerHook('addWebserviceResources');

return true;

}

2. Add a hook listener to define the class and description. Set specific_management to true if you want to use WebserviceSpecificManagement instead of ObjectModel file.

public function hookAddWebserviceResources()

{

return array(

'kbcustomer' => array(

'description' => 'Knowband Custom Customer',

'specific_management' => true,

),

'kbaddress' => array(

'description' => 'Knowband Custom Address',

'class' => 'kbaddress'

)

);

}

3. Create WebserviceSpecificManagement class file as WebserviceSpecificManagementCLASSNAME which implements WebserviceSpecificManagementInterface

For Example – WebserviceSpecificManagementKbCustomer which is similar to /classes/webservice/WebserviceSpecificManagementImages.php.

You must have to include the functions which are defined in WebserviceSpecificManagementImages.php class. These are:

  • setObjectOutput
  • setWsObject
  • getWsObject
  • getObjectOutput
  • setUrlSegment
  • getUrlSegment
  • getContent
  • manage (where data is processed)

1. Now add the key having resource kbcustomer in the web service in the back-office.

2. Now, visit the https://{youstore.com}/api/kbcustomer to see the response in XML. In the below example, we display the listing of all customer available in the store.

Add include_once(_PS_MODULE_DIR_.’YOURMODULENAME/classes/WebserviceSpecificManagementKbCustomer.php’);

in your module file.

class WebserviceSpecificManagementKbcustomer implements WebserviceSpecificManagementInterface

{

/** @var WebserviceOutputBuilder */

protected $objOutput;

protected $output;


/** @var WebserviceRequest */

protected $wsObject;


public function setUrlSegment($segments)

{

$this->urlSegment = $segments;

return $this;

}


public function getUrlSegment()

{

return $this->urlSegment;

}

public function getWsObject()

{

return $this->wsObject;

}


public function getObjectOutput()

{

return $this->objOutput;

}


/**

* This must be return a string with specific values as WebserviceRequest expects.

*

* @return string

*/

public function getContent()

{

return $this->objOutput->getObjectRender()->overrideContent($this->output);

}


public function setWsObject(WebserviceRequestCore $obj)

{

$this->wsObject = $obj;

return $this;

}


/**

* @param WebserviceOutputBuilderCore $obj

* @return WebserviceSpecificManagementInterface

*/

public function setObjectOutput(WebserviceOutputBuilderCore $obj)

{

$this->objOutput = $obj;

return $this;

}


public function manage()

{

$objects_products = array();

$objects_products['empty'] = new Customer();

$customer_list = Customer::getCustomers();

foreach ($customer_list as $list) {

$objects_products[] = new Customer($list['id_customer']);

}

$this->_resourceConfiguration = $objects_products['empty']->getWebserviceParameters();

$this->output .= $this->objOutput->getContent($objects_products, null, $this->wsObject->fieldsToDisplay, $this->wsObject->depth, WebserviceOutputBuilder::VIEW_LIST, false);

}

}

The below screenshot provide you the visual of the output:
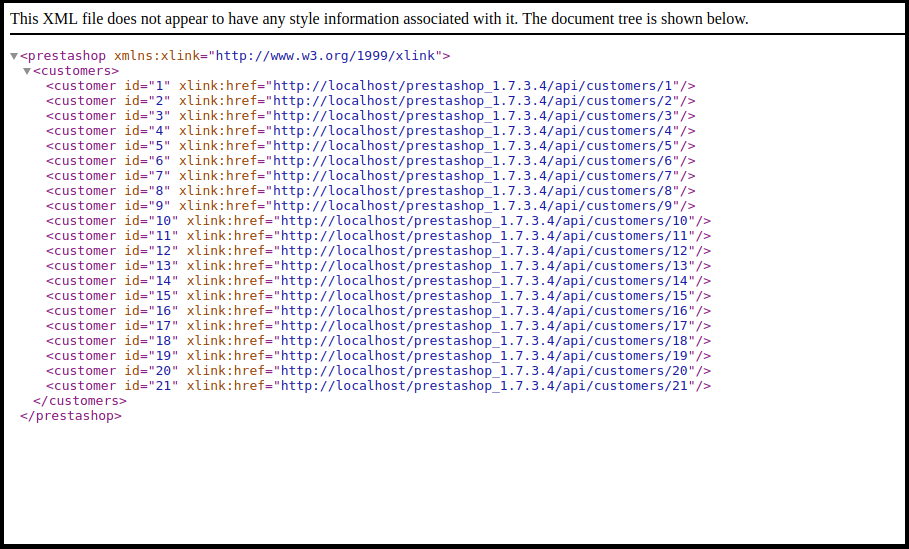
If you want the output in JSON format then append &output_format=JSON at the end of the URL. For example: https://{yourstore.com}/api/kbcustomer&output_format=JSON

Output: {“customers”:[{“id”:1},{“id”:2},{“id”:3},{“id”:4},{“id”:5},{“id”:6},{“id”:7},{“id”:8},{“id”:9},{“id”:10},{“id”:11},{“id”:12},{“id”:13},{“id”:14},{“id”:15},{“id”:16},{“id”:17},{“id”:18},{“id”:19},{“id”:20},{“id”:21}]}

In the END!

With over 13 years of technical expertise, Knowband offers comprehensive app and web development services using the latest technologies, including various PHP frameworks and React. We provide more than 100 ready-to-use extensions for popular eCommerce platforms like Prestashop, Opencart, WooCommerce, and Magento 2.

For any queries, please feel free to reach us at support@knowband.com. Knowband is also a Premium Prestashop Partner and a Superher Seller providing more than 100 Prestashop modules to suit all your eCommerce needs.

Check our most popular One page Supercheckout module for Prestashop here.

 

Prestashop One Page Supercheckout Addon

The Prestashop One Page Supercheckout addon by Knowband makes checkout faster and easier by putting everything on one page, helping to reduce cart abandonment.


SHOP NOW

PrestaShop 1.7 is stable now- Things you need to know before upgrading

It’s been more than one and half year since the PrestaShop came up with PrestaShop version 1.6.1.0, the last major update. The stable version of PrestaShop is finally out for all. Before that, PrestaShop has been testing the Beta versions for a long time. The development versions were already available on the official site for testing. The new version excited me too, so I did some testing. Surprisingly, I was struggling to even install it on my local host.

After going through the release notes, I discovered that PrestaShop has been through a complete makeover. On your local host you need to do some additional setups to make it compatible with the new frameworks and structures. This time, I read the release notes and instructions very carefully as I did not wanted to repeat my mistakes again and taunt the PrestaShop developers. While going through the documentations I picked up some interesting points (that I tested on my localhost too before writing) .

Major highlights of the new PrestaShop 1.7 update include:


1. Introduction of Symfony2 framework-

Based on Symphony framework, PrestaShop 1.7 is a completely new architecture. However, it’s confirmed that as of now, only Back-Office will have the new architecture. The two pages on back-office will be in radar of the new the architecture- the product page and the Module page. With the introduction of Symfony2 in the these two pages, PrestaShop 1.7 has received a complete makeover that I will be discussing in the later part. For now, until a complete transition happens, the two architectures- Symfony and twig templating engine will coexist.

With the new framework in these two pages, it is also clear that the custom modules which target the pages other then these two pages (the product page and the Module page) will not need adaptation. They will work as fine as they were working on the previous version, but the PrestaShop also recommends the developers to adapt their modules ASAP. Soon enough the new architecture would expand to the whole system.

2. A Brand new default theme along with a starter theme-

When you install any PrestaShop on your system, it welcomes you with a pre-configured theme and a set of products- The Default Theme. In PrestaShop 1.7, the new theme has a different name – “Classic”. The new Classic theme is competent to meet all the basic Web and eCommerce requirements, and off-course it is fully responsive.

Along with the “Classic” a new interesting feature called as “Starter Theme” will also be there. Basically, with Starter Theme anybody with a skill set for HTML and CSS can design a completely new PrestaShop theme from the scratch. Earlier, designing a new PrestaShop theme from the scratch was a very tricky task; it was required to have skill set for HTML and CSS, and addition, it was also required to have a comprehensive knowledge of inner PrestaShop structures. With the new Starter Theme, one can design the new PrestaShop themes in no time, and can easily replace the old default-bootstrap theme. The Starter Theme will not consist any bootstrap. It is expected that only a knowledge of CSS and markup is enough to generate the implementation.


3. The reworked Product creation page-

PrestaShop has always been popular for providing easiest user interface to the non coders. It is a non-coder who mostly do the uploading and managing of a product. The Product upload and management interface in PrestaShop 1.7 claims to provide the non-coders a hassle free interface for uploading and managing the products. The newly added Symfony framework ensures the best UX for the PrestaShop website owners until now. Not only the product upload, but the creation of product combinations have become somewhat more simpler. You have to just enter the attributes and their values, PrestaShop will generate the combinations automatically. Say, you want to create a combination for all the available colors and sizes. Just input the color:all, size:all, and its done.


New shortcuts:

Duplicate (CTRL + D): Used to save the current product and duplicate it.

Go to catalog (CTRL + Q): Used to save the current product and lead to the catalogue page.

Add new product (CTRL + P): Used to save the current product and creates a new, empty product page.

Save (CTRL + S): It will save the product and stay on the current product.

4. A new module listing – or a new App Store?-

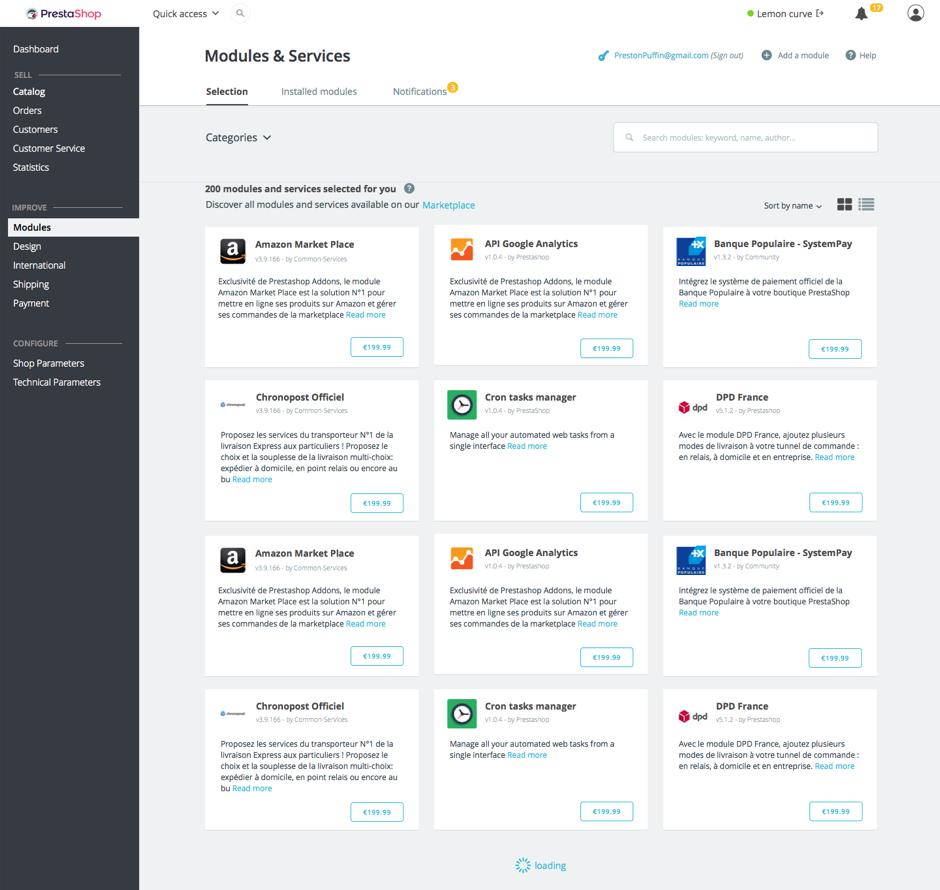
You can see a major change in the Module page. With the inclusion of Symfony2 Framework, the new module page has changed a lot. A lot means, a lot like the new interface is now more like an App store. The new modules  display is a card design view. The categories of the module have a perfect sync with the categories of the modules on the official PrestaShop store. They have also changed the filter for Installed and recommended modules. There are now two new tabs – “Selection” and “Installed modules”.

The selection tab consist of the recommended modules from the official module store. The installed module tab is used to displayed all the modules that are currently installed on the site. It is expected that with the new look of the module listing, the Module page will soon transform itself into a App Store. However, It has already been transformed up to a major extent. The new features added to the module page are:
Configuration key to check the configuration of the module.

Change log to see the new features or update whenever a new update is released by the developer of a module.

Segregation of Installed, to be installed, and needs update module in separate sub-tabs

The new architecture of modules page seems like more of an app store.

Conclusion

The new PrestaShop 1.7 update seems to be a promising one. Lets see, how far we can go with the Symfony2 and it’s architecture. As of now, we can PrestaShop 1.7 have focused largely on improving the UX for both the admin and customer point of view. The new structure claims to impact the SEO of the site in a more positive way. However, it would be interesting to see if it can compel the already established businesses to upgrade their PrestaShop store to a completely changed interface.

This Would Also Interest You

How to add an SEO friendly URL for any controller in PrestaShop?

With the introduction of the friendly URL and customized URL, PrestaShop revolutionized the control of URLs in its update PrestaShop v1.5. Later in the PrestaShop v1.7, it added the feature of URL dispatcher to enhance the URL rewriting in PrestaShop. With this update, PrestaShop made the URL rewriting or URL customization for modules very easy.

An SEO URL structure is a special customized URL which simplifies the complex structure of the URL to a very simple and easy to understand structure.

For example :

Say you have new module called “yourmodule”. Let say it has two main functions.

1. Page list of commands for any user

2. Using “yourmodule” to see the order details.

Now if the friendly URL is Disabled, you will see your page list URL something like this:

https://www.yourrstore.com/index.php?fc=module&module=monmodule&controller=orders&module_action=listing

If Friendly URL is enabled you will see the same page list with this URL:

https://www.yourrstore.com/module/monmodule/orders?module_action=listing

As we can see that the second case presents the more simplified and understandable URL structure and this is because of the Friendly URL being active on your site.

Friendly URLs are nice to have on your site. A clean, SEO friendly URL is more understandable and easily readable by the search engines. Adopting a friendly URL is one of the pre-development SEO approaches.

How to get the Friendly URL for your front controller pages?

Follow these simple steps to get an SEO Friendly URL for your module controller:

Step 1: Login to your Back office.

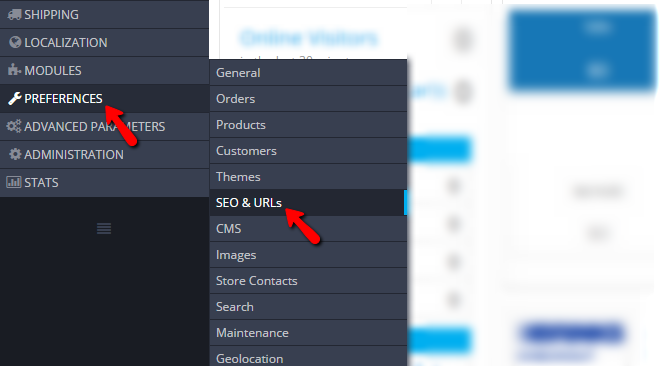
Step 2: Navigate to Preferences>>SEO & URLs

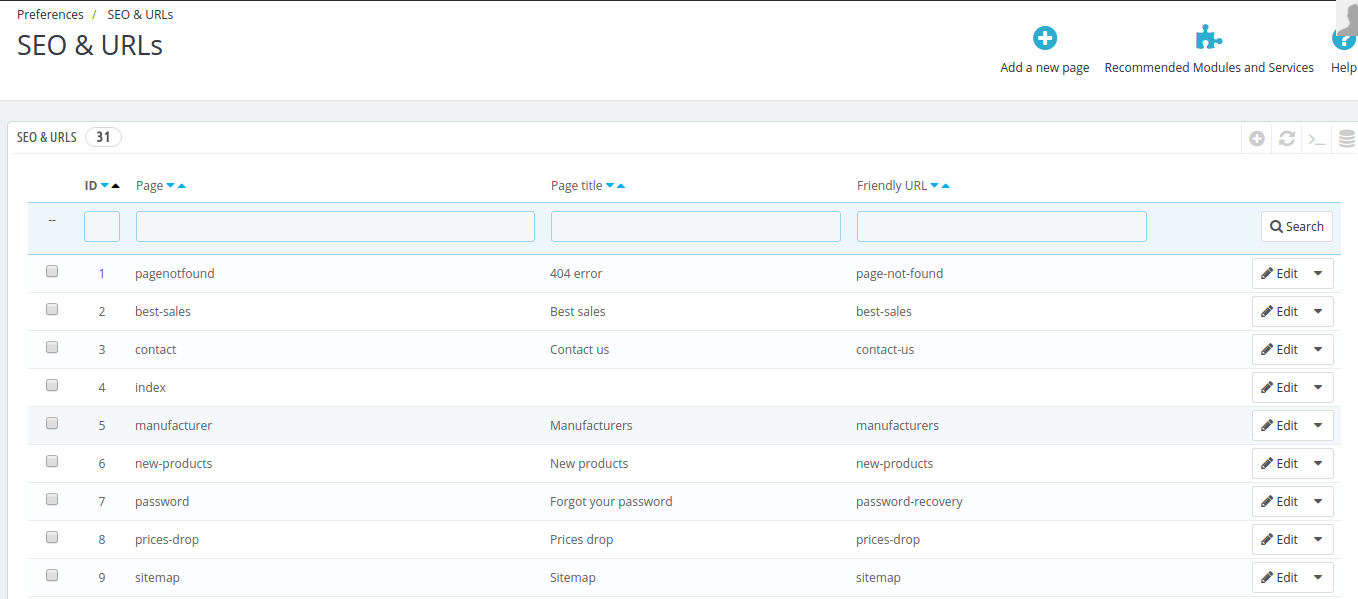
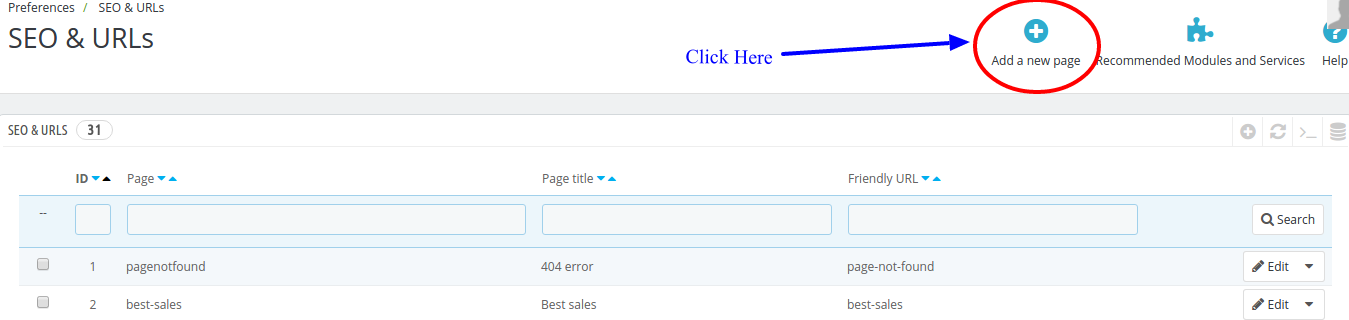
Step 3: You will see the configuration page “SEO & URLs”.You will see the list of front pages, Page Title, and their URL.

Something like the below screenshot:

Step 4: Now, click on “Add new Page” as shown in the screenshot below:

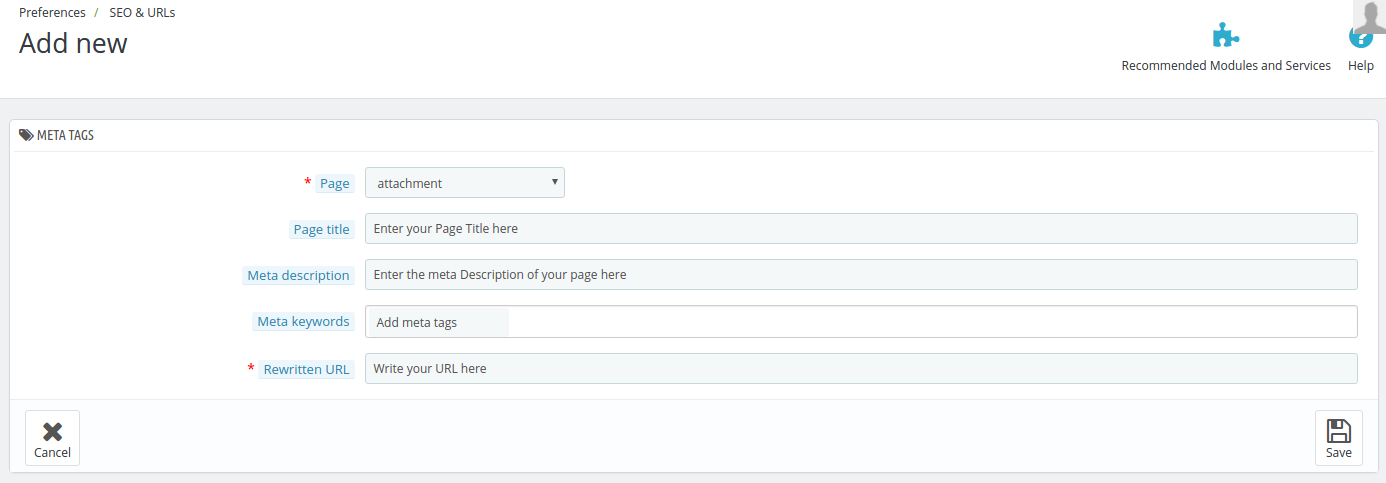
You will be redirected to a page which looks something like below:

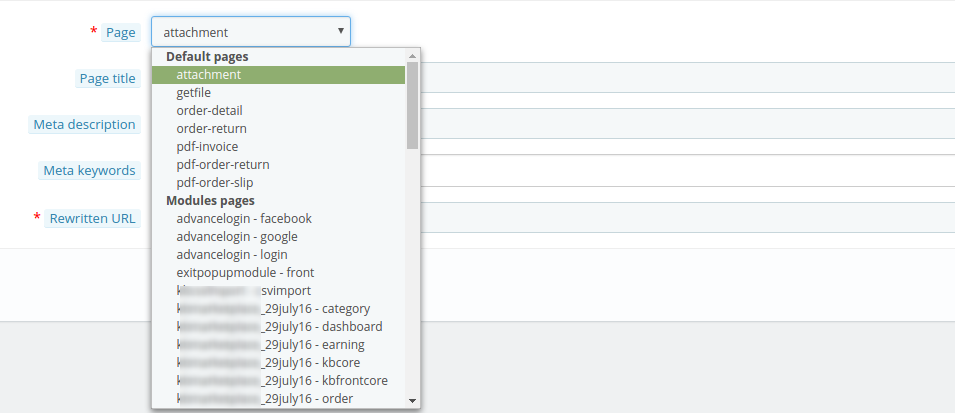
Step 5: When you click on the tab “Page”, it will open a drop down list of all the pages that are created on your website. Select the page from the list for which you want to rewrite the URL.

Step 6: Enter the details asked in the form above and also mention your custom URL in the “Rewritten URL” tab. Click “Save” to store your settings.

You have done the the task of rewriting the URL after you saved the form. But in some cases you will need to perform the following additional operations.

1. Clear the cache: Sometimes cache won’t let the new URL show on the front end. To avoid this you need to go to Advance Parameter>>Performance  and clear the cache from there.

2. Make sure in Preferences >> SEO & URLs >> SET UP URLS, the “Friendly URL is turned on”. You can also disable the “Accented URL”; it’s optional.

An alternate way of implementing SEO-friendly URL

Knowband offers an alternative and easier method of making the URLs of your store user-friendly. PrestaShop SEO Optimizer – Clean URLs & 301/302/303 redirection Module offered by Knowband IDs from all the URLs of the stores in one go. By removing the product and category ID, the links of the landing pages becomes SEO optimized. Additionally, you can even remove the default ISO and .html from the links without making any manual changes. Not just this, you can retrieve the list of the URLs redirected to a new link or the links that are redirecting to 404 error by using PrestaShop 301/302/303 Redirect.

What are the features offered by Knowband’s Prestashop URL cleaner addon?

Some of the admin features offered by this Prestashop SEO optimizer extension are mentioned below:

  • With PrestaShop SEO URL Addon, you can optimize the URLs of your site from SEO point-of-view and improve the website ranking in the Google SERP results.
  • No manual changes are required to be done with PrestaShop SEO Friendly URL module.
  • The Prestashop addon lists out the URLs that have 301/302/303 redirection as well as the links that redirects to 404 error.
  • You can remove .html and default ISO from the URLs if required with Prestashop SEO Friendly URL extension.

Why you should have SEO-friendly URLs?

Having discussed the various ways of implementing SEO-optimized URL, the question of why you need to have one in the first place might come to your mind. So, listed below are some of the reasons for the same.

URLs with a structured hierarchy are preferred by GoogleBot. Such URLs make it easier for the crawler to crawl pages throughout the site.

If you links with structured hierarchy, then, the webpages will get indexed easily. Not just this, such pages are displayed in search results faster.

Even in case of indexed links, the recrawling becomes easier.

With a SEO friendly URL structure, it becomes easier to promote your site.

Moreover, it is a preferred option from the end-users’ point-of-view. It is easier for the user to remember the links of the landing pages.

So, here we learned that how we can rewrite the URL of any front page on our PrestaShop site. The support for Friendly URLs is really a nice feature in PrestaShop which also acts used as a competitive advantage against other CMS systems.