In Opencart there is functionality to automate sending order email to admin which we send to the customer after placing an order.
For Opencart 2.2
Follow the following steps to automate sending order emails to the admin:
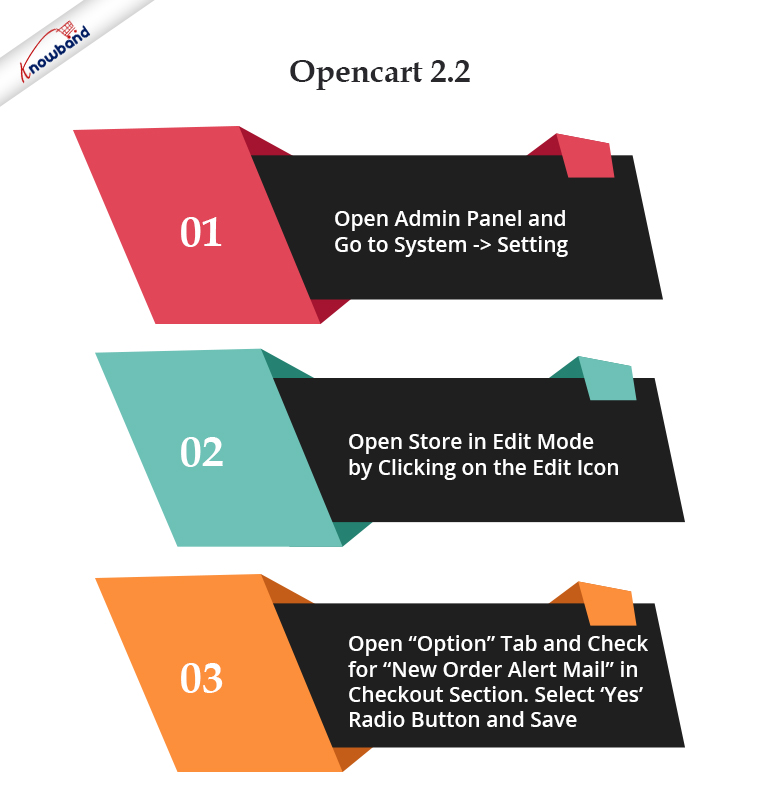
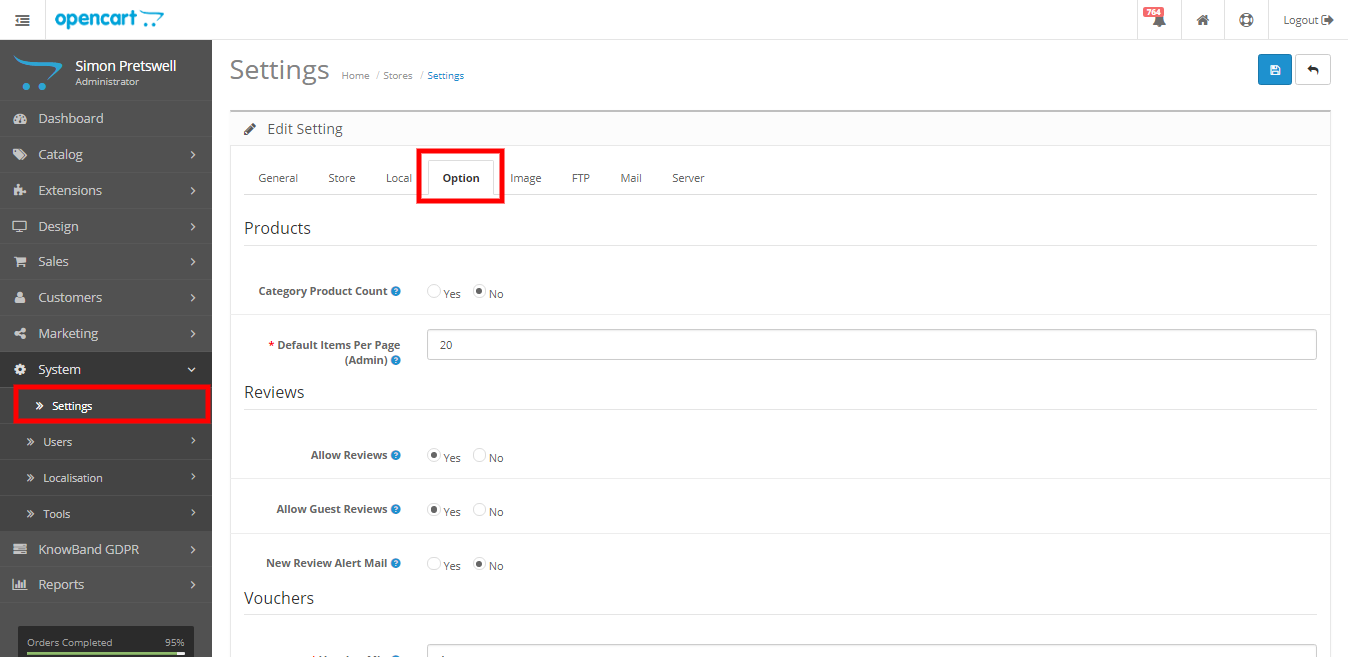
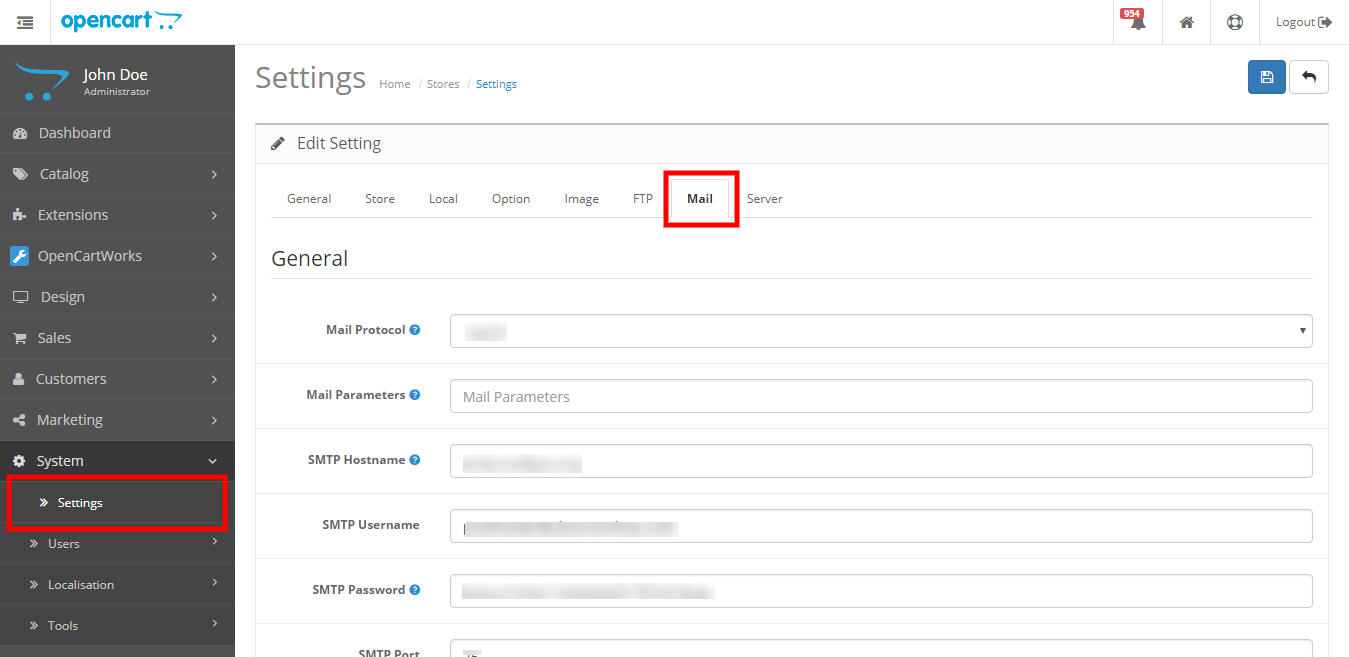
Open the admin panel and go to System -> Setting. On this page, you will see a store listing.
Open a store in edit mode by clicking on the edit icon.
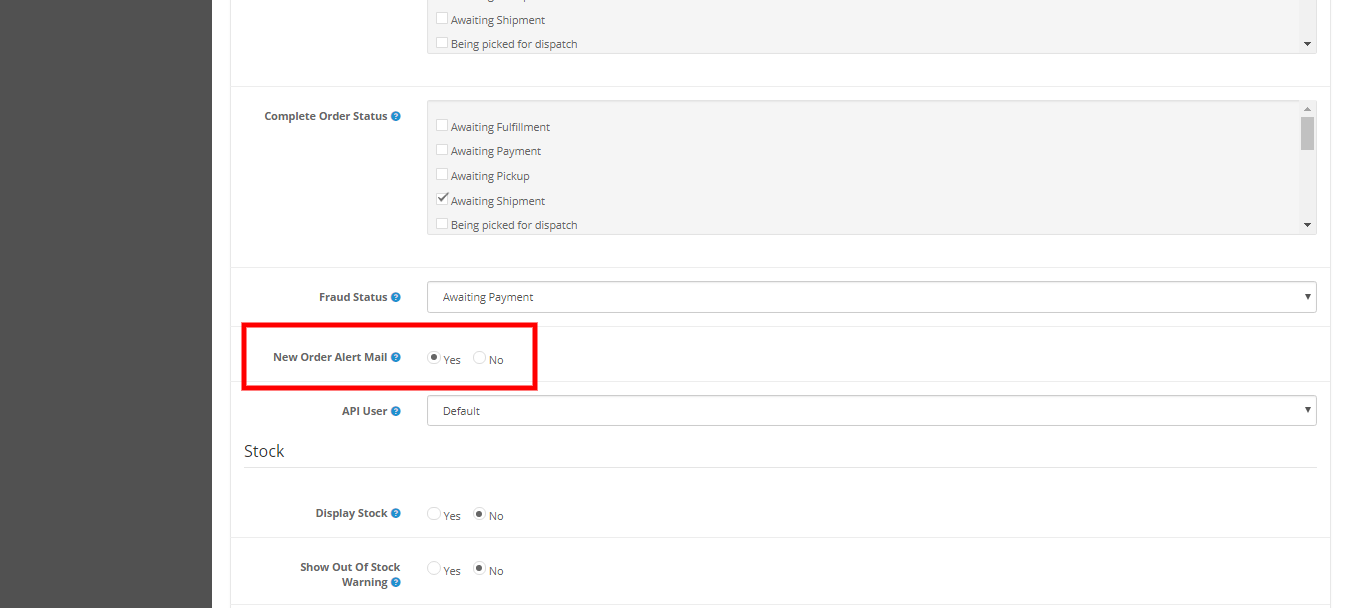
Open the “Option” tab and check for “New Order Alert Mail” in the checkout section. Select the ‘Yes’ radio button and save.
Refer below screenshots
Note: Function add order history() in catalog/model/checkout/order.php file is used to send mail to mail to admin in. If you want to make any changes to the email then can make this function.
Search for ‘if ($this->config->get(‘config_order_mail’)) {‘ to find code to send mail to admin.
For Opencart 2.3
Follow the following steps to automate sending order emails to the admin:
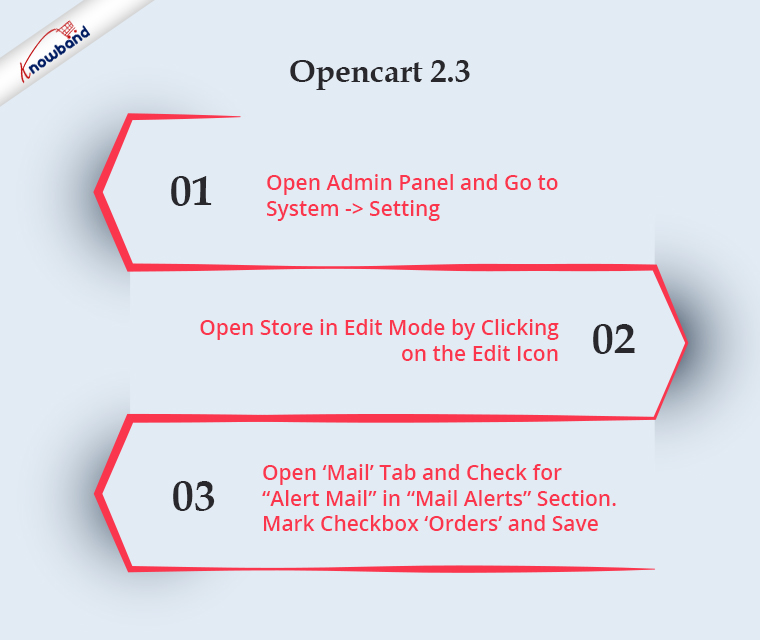
Open the admin panel and go to System -> Setting. On this page, you will see a store listing.
Open a store in edit mode by clicking on the edit icon.
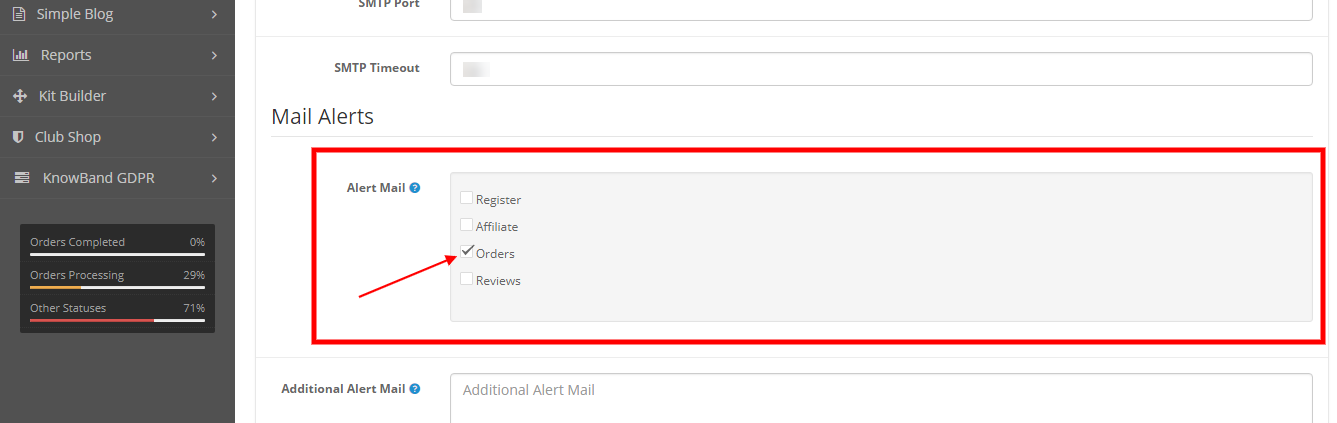
Open the ‘mail’ tab and check for “Alert Mail” in the “Mail Alerts” section. Mark checkbox ‘orders’ and save.
Refer below screenshots
Note: Function addOrderHistory() in catalog/model/checkout/order.php file is used to send mail to mail to admin in. If you want to make any changes to the email then can make this function.
Search for ‘if (in_array(‘order’, (array)$this->config->get(‘config_mail_alert’))) {‘ to find code to send mail to admin.
In the End:
In order to enhance the functionality of your OpenCart store, Knowband offers a large selection of both free and paid OpenCart extensions. With a large variety of features available in these modules, the store admin can easily launch, develop, and grow their business. To know further about OpenCart Modules’ functionality and features, feel free to reach us at support@Knowband.com.
After reading this blog you will be able to display all products when the search is blank.
Problem Statement
Currently in Opencart, when user search for any string using search functionality, then no products are returned if no search product found in database. We want to make it return all the products when search is empty.
Code Implementation
To achieve this, we will have to make some changes in the model function which we are using to fetch products from database on the basis of entered search keyword.
Here we are making changes in getProducts() function of model catalog/model/catalog/product.php as we are using this function to display results on the basis of search keyword.
Note: you can make same changes in the model function which you are using to fetch products.
Here is the code which we have added in the model:
/*Checked if the result empty (affected rows 0) of query which is running to fetch data on the basis of search keyword.
* If yes then added new query to fetch new added products and executed same.
* By doing this we will display our new products on the search page instead of showing blank page.
*/
if($query->num_rows == 0){
   $sql = "SELECT DISTINCT p.product_id
           FROM " . DB_PREFIX . "product p
           LEFT JOIN " . DB_PREFIX . "product_description pd ON (p.product_id = pd.product_id)
           LEFT JOIN " . DB_PREFIX . "product_to_store p2s ON (p.product_id = p2s.product_id)
           WHERE p.status = '1' AND p.date_available <= NOW() AND p2s.store_id = '" . (int)$this->config->get('config_store_id') . "'
           GROUP BY p.product_id ORDER BY p.product_id DESC LIMIT 20";
   $query = $this->db->query($sql);
}
Add this code just after executing main query or just after line ($query = $this->db->query($sql)).
In this code first we have checked the number of affected row by the main query (used to fetch data on the basis of search keyword). If the affected row is 0 ($query->num_rows == 0) then added our query to fetch new added products.
By doing this we will display our new products on the search page instead of showing blank page.
Note: here we have written query to fetch new added products from the database if search is empty. You can also add query to fetch special or best seller products according to your requirement.
Summary
After making the following changes in the model file, new added products will be shown when the search is empty.
After reading this blog you will be able to fetch products from Opencart database on the basis of parameter which is passed from URL.
Requirement
We have to display latest products on the basis of passed parameter in the URL. Using this parameter we have to decide that whether we have to display special products or not.
Code Implementation
To implement this we need to make change in our controller and model. In controller we added condition to pass parameter and in model we will make changes in the query according to the passed parameter.
To handle condition we are using show_special parameter in the code.
Below is the code which we have to add in controller (catalog/controller/extension/module/latest.php):
/*Checking for show_special key in get parameter
* This key ($show_special) will be used to conditionally fetch data from the database.
* i.e. if $show_special = 1 then display products which special
*         $show_special = 0 then display products which are not having special
*      else
*         display all products irrespective of special
*/
if (isset($this->request->get['show_special'])) {
     //passing the value in variable if set in URL
     $show_special = $this->request->get['show_special'];
} else {
    //Otherwise empty string will be passed
    $show_special = '';
}

//Creating a variable to be passed into model
$filter_data = array(
'start' => ($page - 1) * $limit,
'limit' => $limit,
     'show_special' => $show_special
);

//Calling model function to fetch data from database according to the data passed in the filter_data array.
$results = $this->model_catalog_product->getProductLatest($filter_data);
In this code first we have checked that if ‘show_special’ parameter is set in the URL or not. If yes then set value of parameter in a variable $show_special and if no then set variable as blank.
Then we have created an array ($default_data) with the values on behalf of which we have to fetch products from database.
Then we have called model function getProductLatest() to fetch latest products according to the variable passed ($filter_data) in the function.
Here is the function which we have to add in model (catalog/model/catalog/product):
public function getProductLatest($data = array()) {
   //Setting $join and $condition parameters to fetch data of special products
   if($data['show_special'] == '1'){
        $join = "LEFT JOIN " . DB_PREFIX . "product_special ps  ON (ps.product_id = p.product_id) ";
        $condition = "AND ps.customer_group_id = '" . (int)$this->config->get('config_customer_group_id') . "'
                             AND ((ps.date_start = '0000-00-00' OR ps.date_start < NOW()) AND (ps.date_end = '0000-00-00' OR ps.date_end > NOW() OR ps.date_end = '0001-01-01')) ";
   }
   //Setting $join and $condition parameters to fetch data of products which are not specil
   elseif($data['show_special'] == '0'){
       $join = "LEFT JOIN " . DB_PREFIX . "product_special ps  ON (ps.product_id = p.product_id) ";
       $condition = "AND ps.product_id IS NULL";
   }else{
   //Setting $join and $condition parameters to fetch data of all products irrespective of special
       $join= '';
       $condition = '';
   }

   //Query to fetch data of products from database. Added $join and $condition parameter in the query to fetch data accordingly
   $sql = "SELECT DISTINCT p.product_id
           FROM " . DB_PREFIX . "product p
           LEFT JOIN " . DB_PREFIX . "product_description pd ON (p.product_id = pd.product_id)
           LEFT JOIN " . DB_PREFIX . "product_to_store p2s ON (p.product_id = p2s.product_id)
           $join
           WHERE p.status = '1' AND p.date_available <= NOW() AND p2s.store_id = '" . (int)$this->config->get('config_store_id') . "'
           $condition
           GROUP BY p.product_id ORDER BY p.product_id DESC";

   //Setting limit in query if passed LIMIT from controller.
   if (isset($data['start']) || isset($data['limit'])) {
          if ($data['start'] < 0) {
                $data['start'] = 0;
          }

          if ($data['limit'] < 1) {
                $data['limit'] = 20;
          }

          $sql .= " LIMIT " . (int)$data['start'] . "," . (int)$data['limit'];
   }

   $product_data = array();
   //Execute query
   $query = $this->db->query($sql);

   //Loop to set fetched data in the variable to pass in controller.
   foreach ($query->rows as $result) {
        $product_data[$result['product_id']] = $this->getProduct($result['product_id']);
   }
   //Return products data to controller.
   return $product_data;
}
In model we have set variables $join and $condition on the basis of following three conditions:
If show_special is 1: In this case we have displayed only products those are special. As in opencart the data of special products is stored in oc_product_special table so we have added join of oc_product table with the oc_product_secial table to fetch data of special products only.
If show_special is 0: In this case we have displayed products which are not set as special. So to find products which are not special we have to fetch products which are in special table but on in oc_product_special table. For this we have added LEFT join of oc_product table with oc_product_secial table and added condition “ps.product_id IS NULL”.
If show_special is other than 0 and 1: In this case we have to fetch all products whether they are special or not. So for this we have directly fetched data from oc_product table.
After adding all three possible condition we have written query and executed it. Then we have set all fetched data in $product_data array and return the same to controller.
Note: here to fetch latest products we have just used ‘Order by product_id DESC’ in query. If you want to fetch data of products which were added in last few days then you can add one more condition in the WHERE clause i.e. date_added > ‘any date’.
Summary
After following the above procedure, you will be able to fetch latest special products on the basis of passed parameter for special products in the URL.
This document will give an idea about how to create SEO Friendly URLs in Opencart (version 2.x). Also will explain how to customize the Opencart function to create SEO URLs other than default pages (product page, category page etc.).
This document will also explain how to 301 redirect URLs from old URL to new URL and URLs deleted.
The main purpose of this document is to learn about creating SEO Friendly URLs in Opencart (version 2.x) and URL redirections to maintain our SEO ranking on Google.
SEO Friendly URLs are well-crafted URLs which provide both humans and search engines with an easy-to-understand indication of what the destination page will be about.
Default Step in Opencart to Enable SEO URL
In Opencart there are setting which we have to manage from the admin panel to activate SEO Friendly URLs.
Following are the steps to enable:
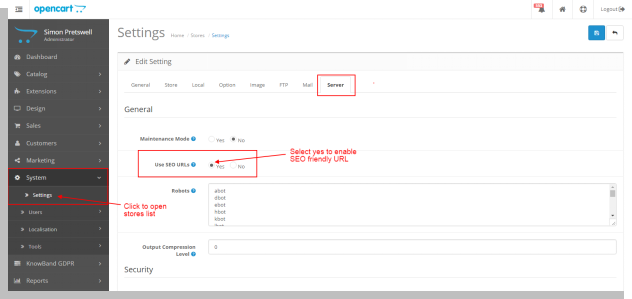
Open admin panel. Go to System > Setting. Then click on the edit button corresponding to the store from the store listing page.
In the edit system setting page open the ‘Server’ tab.
In the server, the tab selects the ‘Yes’ radio button corresponding to ‘Use SEO URL’ and then clicks on the save button.
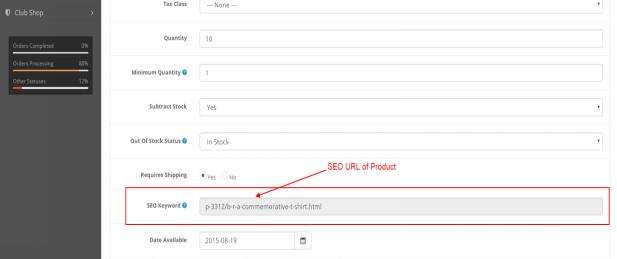
To save the SEO URL of any product page go to Catalog > Products in the admin panel. Click on the edit button corresponding to the product name.
In the edit product page click on the ‘Data’ tab. In the Data tab, there is an option for ‘SEO Keyword’. Enter the SEO URL of the product and then save. Refer below screen:
Category Page
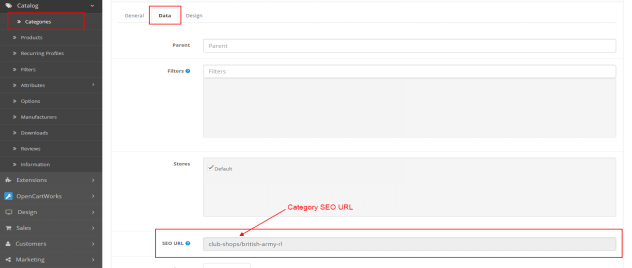
To save the SEO URL of any category page go to Catalog > Categories in the admin panel. Click on the edit button corresponding to the category.
In the edit category page click on the ‘Data’ tab. In the Data tab, there is an option for ‘SEO URL”. Enter SEO URL of category and then save. Refer below screen:
Manufacturer Page
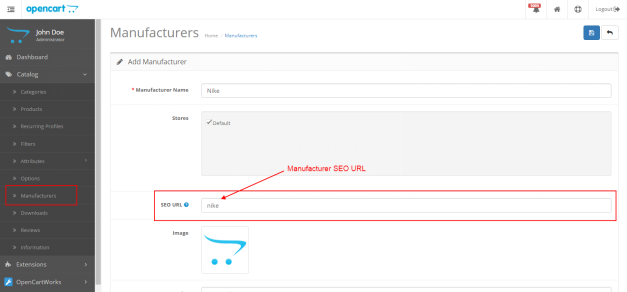
To save the SEO URL of any manufacturer page go to Catalog > Manufacturers in the admin panel. Click on the edit button corresponding to the manufacturer.
On the edit manufacturer page, there is an option for ‘SEO URL”. Enter the SEO URL of the manufacturer and then save.
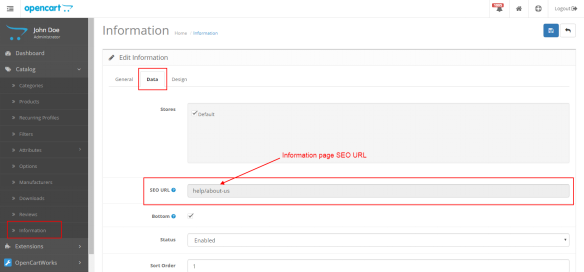
To save the SEO URL of any information page go to Catalog > Information in the admin panel. Click on the edit button corresponding to the information page.
On the edit, the information page clicks on the ‘Data’ tab. In the Data tab, there is an option for ‘SEO URL”. Enter the SEO URL of the information page and then save.
Refer below screen:
Note: Admin can also save SEO URL while adding a new product, category, manufacturer and information page.
If the admin wants to create an SEO URL for any custom pages then he/she has to make changes accordingly (explained below in the same document).
Technical Flow for URLs
In Opencart (version 2.x) when the user hit any URL (SEO or non-SEO) it calls the controller file seo_url.php located at catalogue/controller/startup. This file is called to find the SEO URL.
Note: The SEO URL of each page is stored in the ‘url_alias’ table in the database.
If the customer hit any non-SEO URL then it calls the seo_url.php file. In this file, there is code which searches the SEO URL of the Non-SEO URL in the ‘keyword’ column of the url_alias table corresponding to the ‘query’ column
url_alias Table in the Database
url_alias table is used to save SEO URLs of all pages. There are the following 3 columns in the table by default:
url_alias_id: Primary key of the table.
Query: contains the id of different pages like product_id, category_id, and other pages.
Keyword: contains SEO URL keyword of the corresponding page
SEO URL creation for other than default pages
If the admin has created landing pages and wants to serve an SEO URL for the page. For this first have to make an entry of the page in the url_alias table.
Example 1:
If the admin has created the ‘Sports’ landing page then he has to make an entry in the url_alias table as:
In query column: sport_id=1
In keyword column: sports
Admin also has to make changes in controller file seo_url.php for sport_id. Admin has to add a condition for sport_id same as product_id and category_id.
Now if admin enter URL “host/index.php?route=product/landing_page&sport_id=1” then code will search seo keyword in url_alias table corresponding to sport_id=1 and then serve URL ‘host/sports’.
Example 2:
In this example, we will create an SEO URL for the blog page.
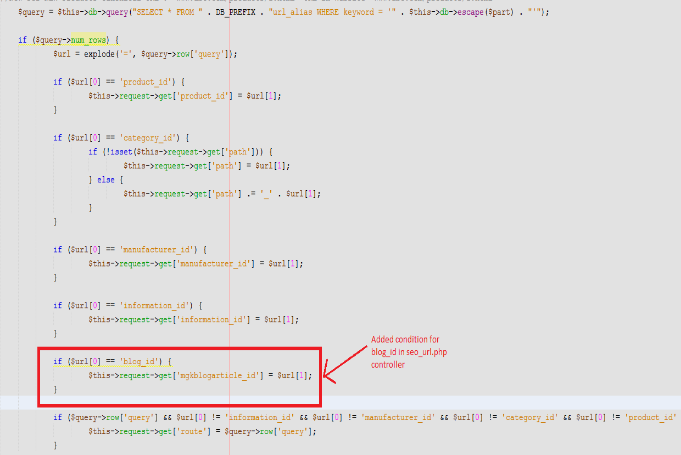
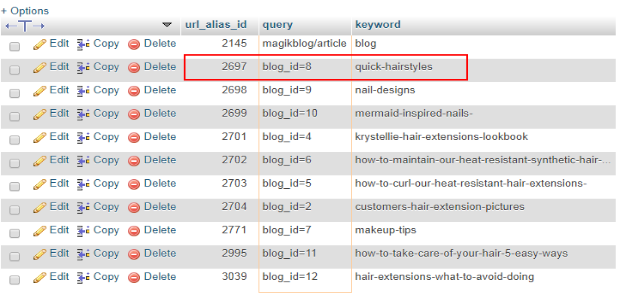
For this we have to add a condition in the controller file and make an entry in the url_alias table corresponding to blog_id:
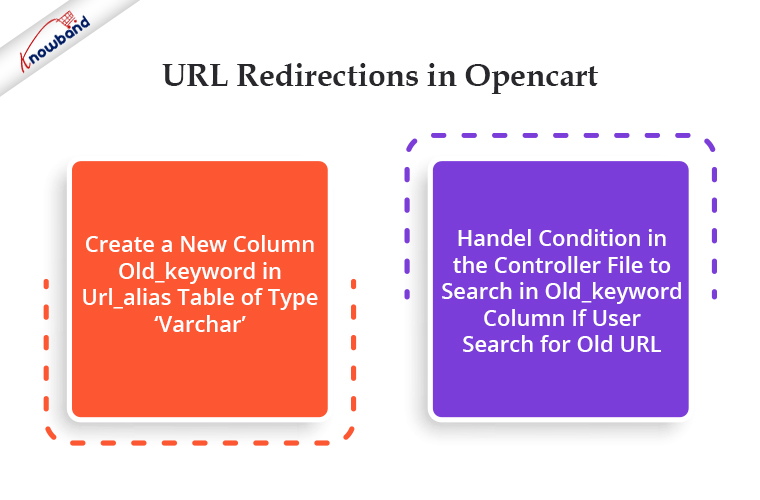
In Opencart if the admin wants to create new SEO URLs and wants 301 (permanent redirection) or 302 (temporary redirection) redirect on a new URL then the admin has to make the following changes in the controller file and url_alias table.
Create a new column old_keyword in url_alias table of type ‘varchar’.
Handel condition in the controller file to search in old_keyword column if user search for old URL.
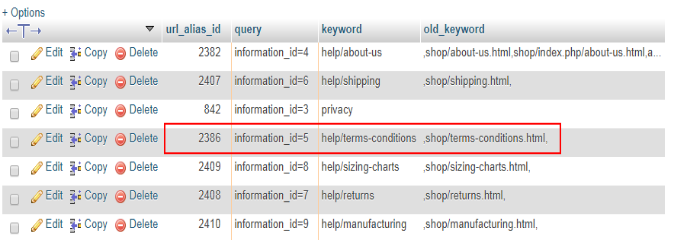
Example: To redirect from the old URL of the ‘termes and conditions’ page to the new URL.
If the admin wants to redirect any information page from the old URL to the new then he has to make an entry in the url_alias table. Refer to the below screenshot:
Here
the old keyword is: shop/terms-conditions.html
new keyword: help/terms-conditions
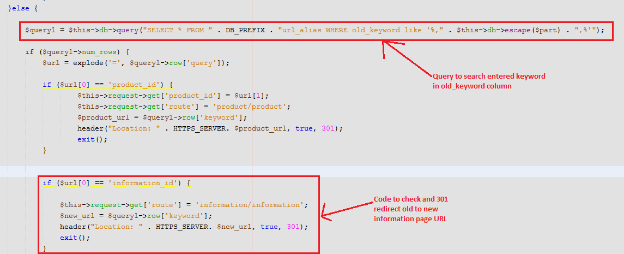
Controller file changes: In seo_url.php controller admin has to handle conditions if enter URL did not found in the keyword column.
The first system will search entered URL in the keyword column. If not found then will search in the old_keyword column. If found then will redirect to the corresponding new URL.
Please refer to the below screenshot:
URL Redirections in Opencart for Deleted Pages
If the admin wants to redirect the URL of deleted categories, products or any other pages on the home page then he can make changes in the controller file accordingly.
Example: Here we will 301 redirect URLs of deleted categories
Steps to redirect URL of deleted categories:
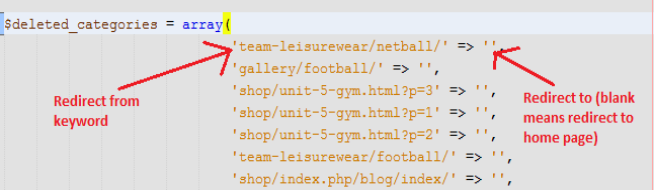
Create a file and define an array with the key as deleted category URL and value as URL to which admin wants to redirect. Refer to the below screenshot for creating an array of deleted categories.
Note: Here we have defined blank value because we want to redirect deleted categories URLs to the home page
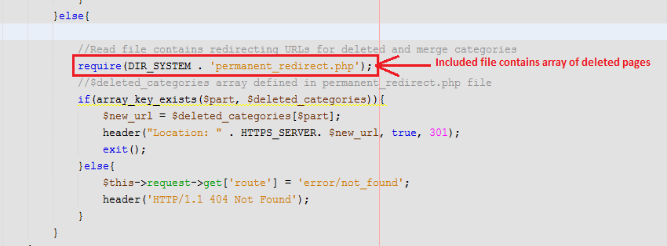
Add a condition in the seo_url.php controller to redirect from deleted category URL to the new URL.
In this code first, we have included a file containing URLs of deleted categories and then checked if the entered URL is in the defined array or not. If yes then redirected to a new URL else redirected to the not found page.
In the End:
A variety of OpenCart modules and extensions, both free and paid, are available from Knowband to boost your store’s operation. To know in detail about the OpenCart platforms, modules available or any functionality related to the platform feel free to drop us an email at support@Knowband.com.
Reactions are more expressive as compared to the simple like and dislike buttons. Using reactions the user can easily express their thought because emoticons are basically a way to show the emotions. On the other hand if we use like and dislike button then the user can not show the exact emotion. Using emoticons we can make our site more expressive for the user.
Objectives of the blog
In this blog, you will find an easy and quick way to implement the Reactions functionality. After going through the blog, you will be able to create a reaction system for your website same as Facebook’s Like button.
Working
There will be one Like button and rest of the Reaction buttons. On focus the Like button, the Reaction buttons will be displayed. JQuery will be used to handle the taps on the reaction buttons. On tapping reaction button, an Ajax request is sent on like.php page. The logic to save/update data on database can be written on the handler page.
On tapping the reaction text again, the reaction is undone and this time we are sending Ajax on undo_like.php page.
All the functionality to show/hide the reaction buttons and animation is added through JavaScript and CSS.
Creating the HTML Structure
Before working on the logic, we will have to create the layout. HTML for the layout is following –
<!DOCTYPE html>
<html>
<head>
<title>Facebook Reactions</title>
<meta name="description" content="Facebook Like Reaction System" />
<!-- bootstrap css -->
<link rel="stylesheet" href="https://maxcdn.bootstrapcdn.com/font-awesome/4.3.0/css/font-awesome.min.css">
<link rel="stylesheet" type="text/css" href="css/style.css" />
<!-- Css for reaction system -->
<link rel="stylesheet" type="text/css" href="css/reaction.css" />

<script type="text/javascript" src="js/jquery.min.js"></script>
<!-- jQuery for Reaction system -->
<script type="text/javascript" src="js/reaction.js"></script>
</head>
<body>
<div class="container">
<div class="header">
<h1>Facebook Reactions</h1>
</div>
<div class="main">
<!-- Reaction system start -->
<div class="reaction-container"><!-- container div for reaction system -->
<span class="reaction-btn"> <!-- Default like button -->
<span class="reaction-btn-emo like-btn-default"></span> <!-- Default like button emotion-->
<span class="reaction-btn-text">Like</span> <!-- Default like button text,(Like, wow, sad..) default:Like  -->
<ul class="emojies-box"> <!-- Reaction buttons container-->
<li class="emoji emo-like" data-reaction="Like"></li>
<li class="emoji emo-love" data-reaction="Love"></li>
<li class="emoji emo-haha" data-reaction="HaHa"></li>
<li class="emoji emo-wow" data-reaction="Wow"></li>
<li class="emoji emo-sad" data-reaction="Sad"></li>
<li class="emoji emo-angry" data-reaction="Angry"></li>
</ul>
</span>
<div class="like-stat"> <!-- Like statistic container-->
<span class="like-emo"> <!-- like emotions container -->
<span class="like-btn-like"></span> <!-- given emotions like, wow, sad (default:Like) -->
</span>
<span class="like-details">Knowband and 10k others</span>
</div>
</div>
<!-- Reaction system end -->
</div>
</div>
</body>
</html>
Adding Style
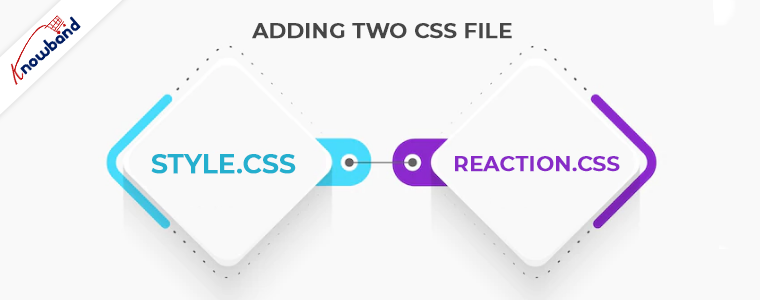
We are using two CSS files (style.css and reaction.css) to add styling in the page.
Note: You can find the CSS files in the complete project build.
Adding Functionality
Once our layout is ready, we can work on the functionalities.
First we will be handling the taps on the Like and Reaction buttons. For that, we will be using jQuery and we will be adding the click events. The code to add the click events is given below –
// Adding the click event as soon as the document is ready
$(document).ready(function () {
// Adding the click event on reaction button by using the class name
$(".emoji").on("click", function () {   // like click
// Here we will be writing the code, which will run on tapping the reaction button
});
});
On focus of the reaction button, we will be sending the Ajax request on php page. The Ajax request is given below –
// Sending Ajax request in handler page (like.php) to perform the database operations
$.ajax({
type: "POST",
url: "php/like.php",
data: "",
success: function (response) {
// This code runs after the Ajax is successful
}
})
Then we will have to create a handler page. This can be a simple php file.
Note: User can perform database changes in the handler file according to the requirement.
Whatever is returned/printed in that file is returned to the Ajax request and we can update layout accordingly. Here we have added the code to update the layout to show the currently saved reaction. The full code of the reaction.js file is following –
$(document).ready(function () {
$(".emoji").on("click", function () {
// Here we are getting the reaction which is tapped by using the data-reaction attribute defined in main page
var data_reaction = $(this).attr("data-reaction");
// Sending Ajax request in handler page to perform the database operations
$.ajax({
type: "POST",
url: "php/like.php",
data: "data_reaction=" + data_reaction,
success: function (response) {
// This code will run after the Ajax is successful
$(".like-details").html("You, Knowband and 10k others");
$(".reaction-btn-emo").removeClass().addClass('reaction-btn-emo').addClass('like-btn-' + data_reaction.toLowerCase());
$(".reaction-btn-text").text(data_reaction).removeClass().addClass('reaction-btn-text').addClass('reaction-btn-text-' + data_reaction.toLowerCase()).addClass("active");

if (data_reaction == "Like")
$(".like-emo").html('<span class="like-btn-like"></span>');
else
$(".like-emo").html('<span class="like-btn-like"></span><span class="like-btn-' + data_reaction.toLowerCase() + '"></span>');
}
})
});

$(".reaction-btn-text").on("click", function () { // undo like click
if ($(this).hasClass("active")) {
// Sending Ajax request in handler page to perform the database operations
$.ajax({
type: "POST",
url: "php/undo_like.php",
data: "",
success: function (response) {
// Handle when the Ajax is successful
$(".reaction-btn-text").text("Like").removeClass().addClass('reaction-btn-text');
$(".reaction-btn-emo").removeClass().addClass('reaction-btn-emo').addClass("like-btn-default");
$(".like-emo").html('<span class="like-btn-like"></span>');
$(".like-details").html("Knowband and 1k others");
}
})
}
})
});
Summary
You can download the full project from the following location –
In this tutorial we have not covered the database connection and operations as the database logic can be different as per your needs. With the help of this project, you can easily implement the reactions functionality same as Facebook in your webpage.
If you face any issues, drop us an email at support@knowband.com. We also provide plugins for Prestashop, Opencart, Magento and Magento 2. All sorts of customization is also done by us on your store.
Take a look at one of our top selling modules:
Prestashop One page Supercheckout by Knowband is a must have tool for any eCommerce store as it helps you streamline the checkout process, increase your conversion rate and reduce the abandoned carts. Know more here: