
Every growing OpenCart store reaches a point where data management becomes its own full-time job. Order records pile up across multiple systems. Customer accounts live in one place while fulfilment teams need them somewhere else. A warehouse partner expects a structured file every morning, and right now someone on your team is logging in manually to make that happen.
The Knowband OpenCart Order, Customer & Address Import Export Extension , the most capable OpenCart import export extension for orders, customers, and addresses , is the opencart import export extension for order and customer data , is developed to remove that manual overhead entirely. It gives store administrators of this proven OpenCart import export extension a single, centralised control panel to move order records, registered customer profiles, and delivery address data in and out of OpenCart, in any direction, on any schedule, to any destination. No custom development. No third-party middleware. No spreadsheet gymnastics every time a partner changes their preferred file format.
What sets this OpenCart data migration module apart from generic data tools is its native understanding of OpenCart’s data structure. It does not simply read and write flat files. It resolves entity relationships across stores, validates every record before touching the database, and keeps a timestamped log of every operation so your team always knows exactly what moved, when, and whether it succeeded.
This user guide documents every feature of the Knowband OpenCart import/export extension in full detail. Admins can follow it from start to finish for initial setup, or jump to the relevant section whenever you need to configure a specific workflow.
1.0 Installation Steps
Log into your OpenCart administration panel. From the top navigation, go to Extensions and then select Extension Installer. On the installer page, click the Upload button and select the kborderimportexport.ocmod file. The installer processes the file without requiring any additional steps from you.
Log in through FTP, copy all the folders under the upload folder, and move them to the store root.
When the upload finishes, navigate to Extensions, select Extensions from the submenu, and choose Modules from the category dropdown. Find the Order, Customer & Address Import Export entry in the list and click Install. Once installation completes, click the Edit button to open the main configuration panel.
If the module does not appear in the list after installation, go to Extensions and click Modifications, then hit the Refresh button in the top right corner. Return to the modules list and search again.
2.0 Admin Panel Configuration 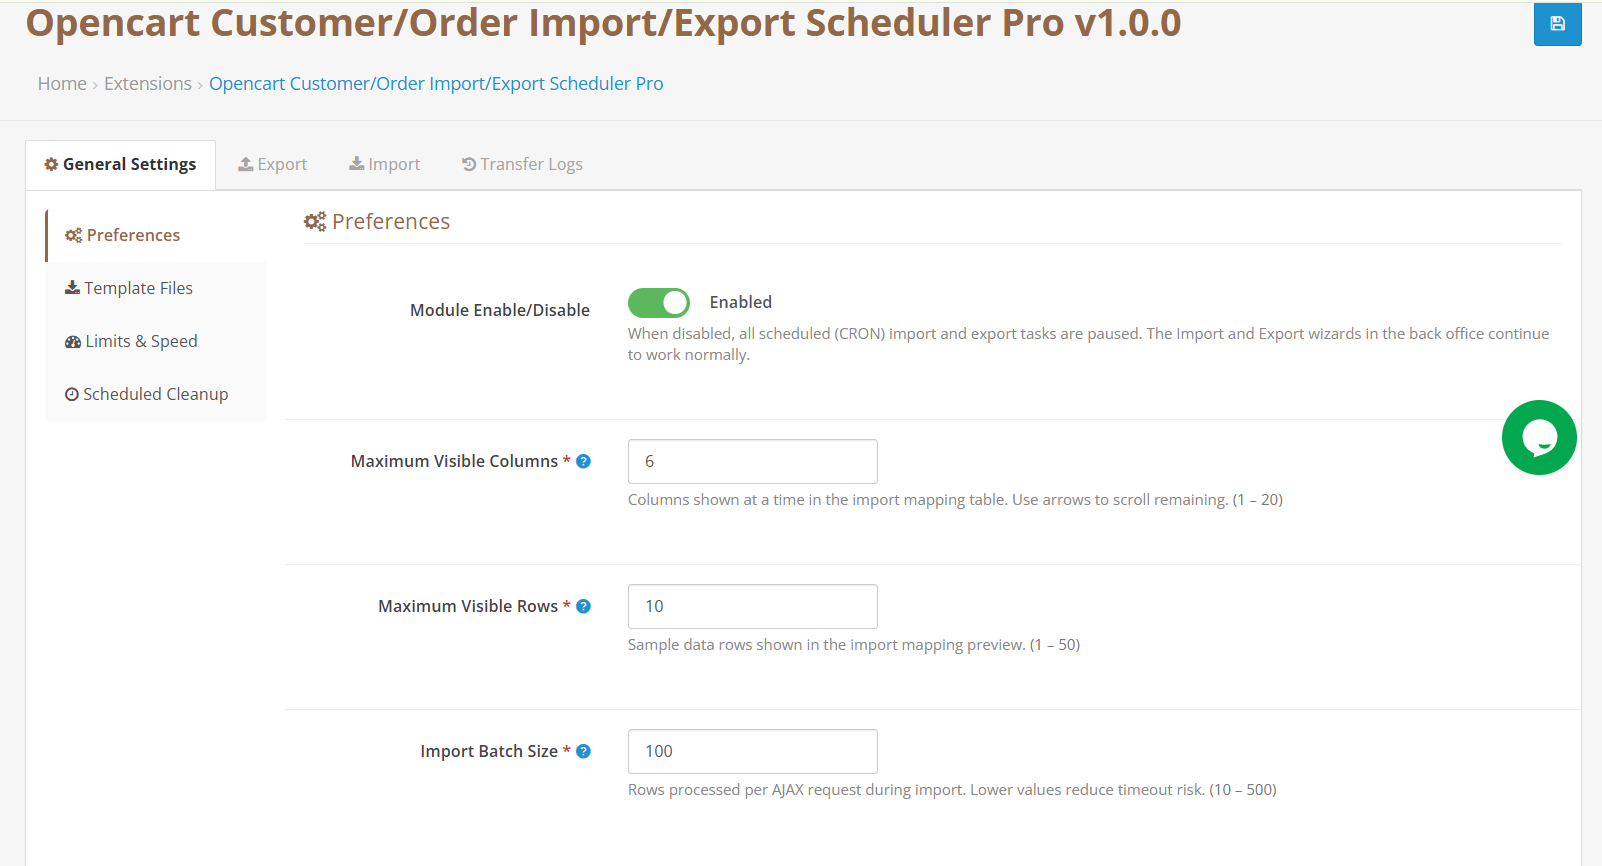
After installation, the OpenCart order import/export extension introduces four distinct areas to your OpenCart back office. Each handles a separate part of the data transfer workflow.
Settings Panel: The global configuration hub. This is where you set performance preferences, download starter template files, manage size limits, and retrieve the scheduled automation URLs needed for task-scheduler setup.
Export Profile: Build, manage, and run export profiles. A guided setup process walks you through every configuration choice, from which fields to include to where the finished file should be delivered. This is the core of OpenCart’s bulk import/export capability.
Import Profile: Build, manage, and run import profiles. Handles one-time manual imports from local files and recurring automated imports from remote servers, making it a complete OpenCart CSV import customers, orders, and OpenCart customer migration solution.
Activity Log : A permanent record of every import and export operation the extension has performed. Includes run status, record counts, file references, and detailed error information for any operation that did not complete cleanly
3.1 General Settings
The Settings Panel is divided into four sub-sections. Work through each one during initial setup before creating your first import or export profile.
Enable/Disable Extension: Disabling the extension immediately pauses all scheduled automation. Any import or export profiles with scheduling enabled stop firing until the extension is re-enabled. Manual operations initiated directly from the Export Center or Import Center are unaffected by this switch.
Column Display Limit: Define how many mapping columns are shown simultaneously on the import mapping screen. The range is 1 to 20 columns. Files with more columns than this limit are still fully supported; the mapping interface provides navigation controls to move through all available columns in pages.
Preview Row Limit: Set how many data rows from your import file appear in the live preview section of the mapping screen. Increase this number when you want a broader sample of your data visible before committing to the import. The range is 1 to 50 rows.
Batch Processing Size: Determine how many records are processed in each cycle during an import run. The range spans 10 to 500 records per batch. If you are on a shared hosting environment where PHP execution times are tightly capped, set this to 50 or below to avoid timeout errors during large OpenCart bulk import export operations. Dedicated server environments can use higher values to complete imports faster.
Save your changes before moving to the next sub-section.
3.2 Template File Library
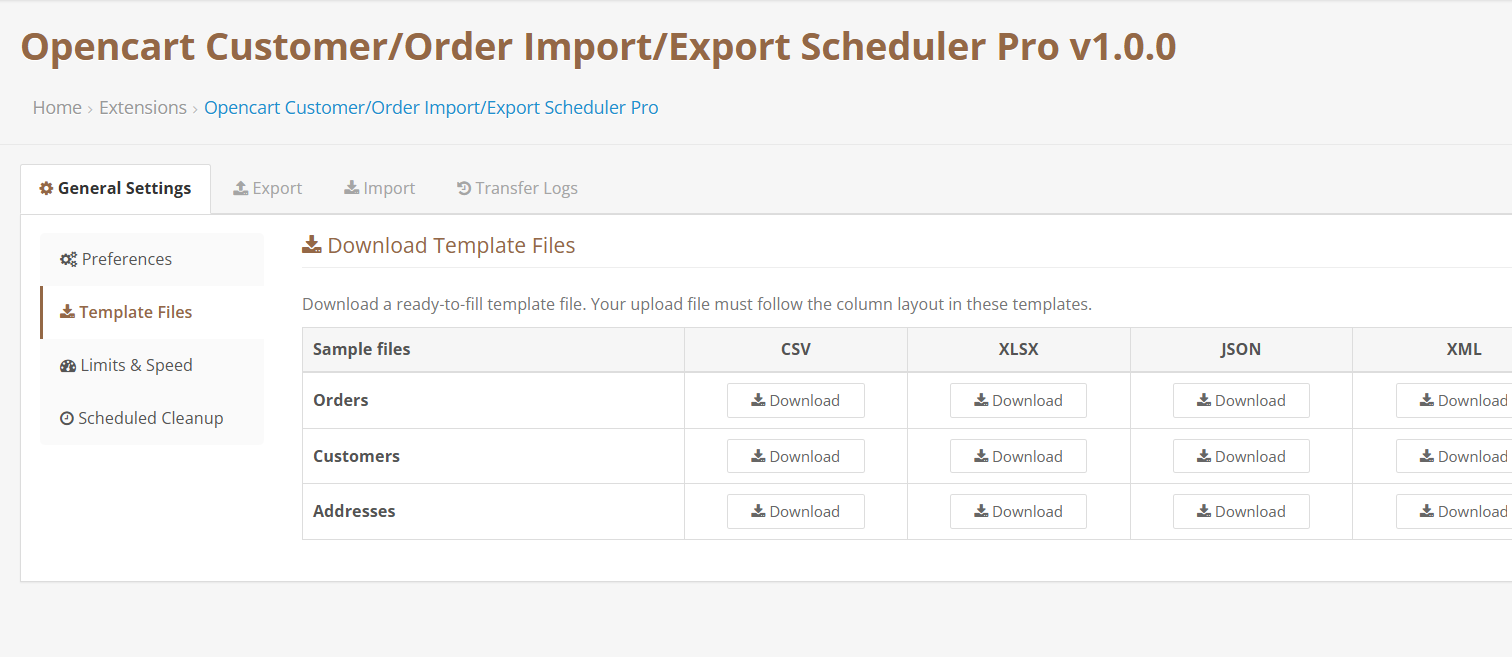
Before preparing your first import file, download the relevant sample template from this sub-section. Templates are available for all three data entities and all four supported formats , making this the most versatile OpenCart import/export CSV XLSX JSON XML toolkit available:
- Order templates: CSV, XLSX, JSON, XML
- Customer templates: CSV, XLSX, JSON, XML
- Address templates: CSV, XLSX, JSON, XML
Use the XLSX template if you plan to export OpenCart orders to Excel format for review and editing before importing. Use CSV templates when integrating with third-party logistics platforms, ERPs, or automated data pipelines that expect OpenCart export orders in CSV format. The OpenCart export orders to CSV capability supports comma, semicolon, and pipe delimiters.
3.3 File Size and Volume Limits
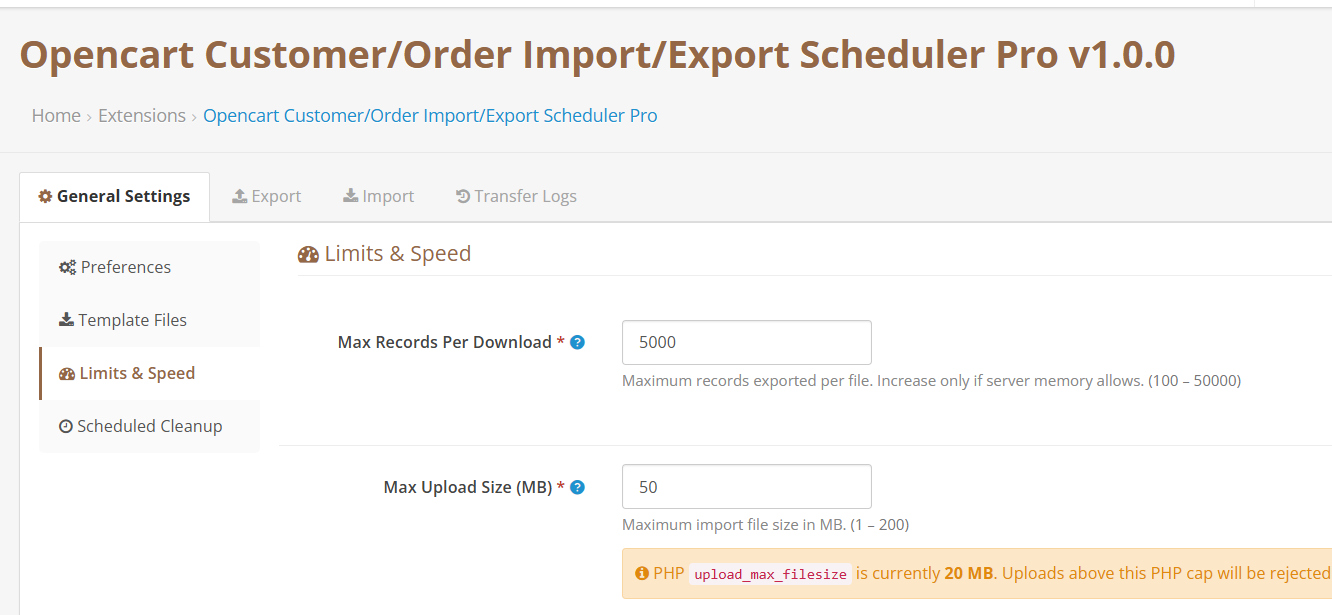
Records Per Export File controls how many records the OpenCart order export module includes in a single generated file. Adjust this based on your server’s available memory. The range is 100 to 50,000 records. For very large datasets, use the date range filter in your export configuration to split output across multiple files rather than raising this limit to its maximum.
Maximum Import File Size controls the largest file the import engine will accept. The range is 1 MB to 200 MB. Set this in line with what your server’s PHP configuration allows, or slightly below it.
Save your changes before continuing.
3.4 Automation and Scheduled Tasks in Opencart Customer Migration Extension
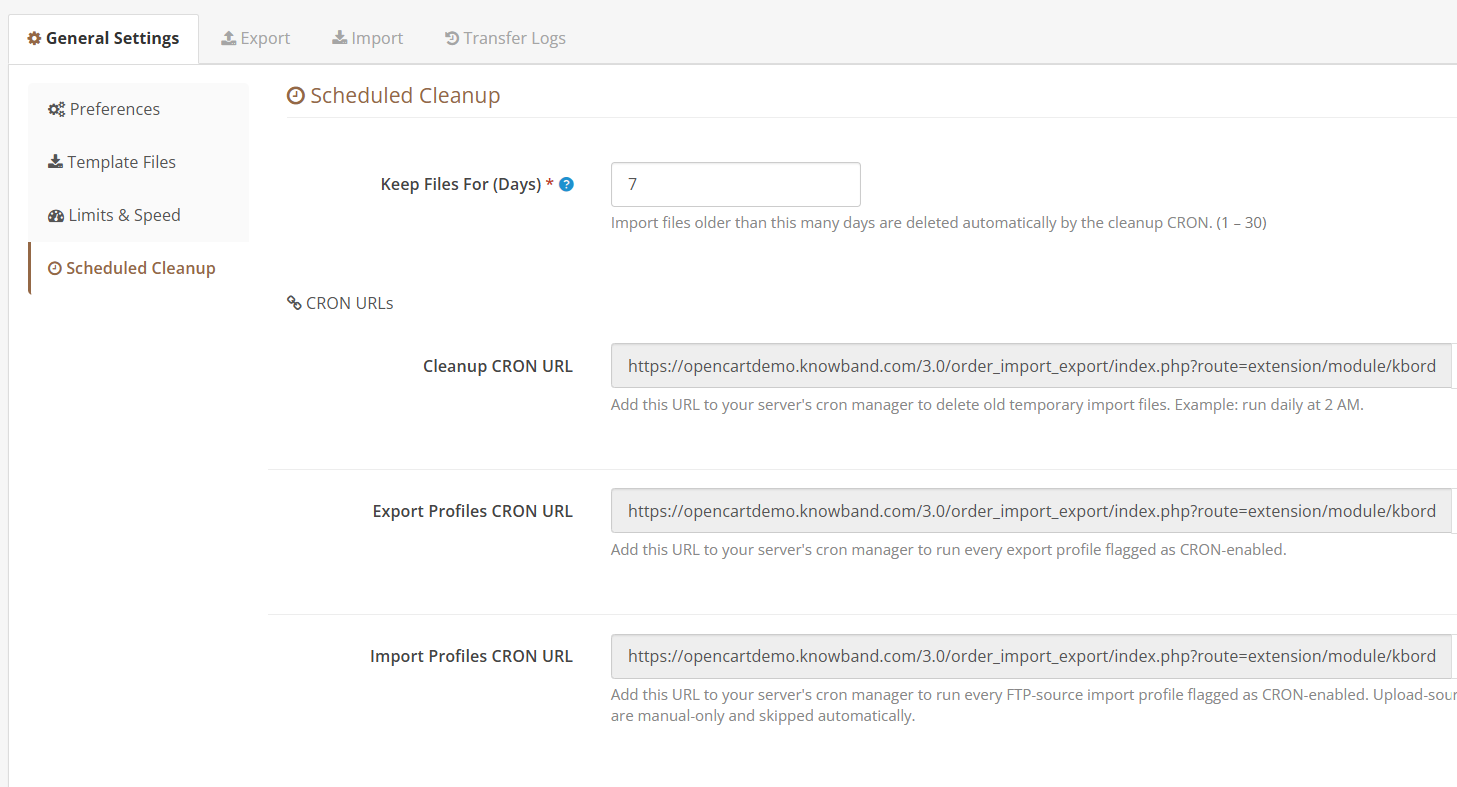
This sub-section is where you find the three scheduler-ready URLs that power the extension’s OpenCart automated data export and import capabilities. Each URL is unique to your installation and includes an authentication token. Copy them into your server’s task scheduler to activate automated operations.
Temporary File Cleanup URL: Runs a housekeeping routine that deletes old import files from the server. Use the adjacent setting to specify how many days to keep files before they are eligible for deletion (range: 1 to 30 days). A daily schedule at an off-peak hour like 2:00 AM is typical.
Export Automation URL: Triggers every export profile that has been configured with scheduling enabled. This is how you set up OpenCart scheduled export operations , call this URL as frequently as your business requires: every hour, every six hours, daily, or weekly. All enabled export profiles run in sequence each time the URL fires.
Import Automation URL: Triggers every import profile that uses a remote FTP or SFTP source and has scheduling enabled. Profiles configured to use a manually uploaded file are ignored when this URL runs. A daily early-morning schedule works well for most overnight data feed scenarios.
All three URLs reject any request that does not carry the correct authentication token, so they are safe to expose to a task scheduler without additional access controls.
4.0 Export Feature, Full Setup Guide
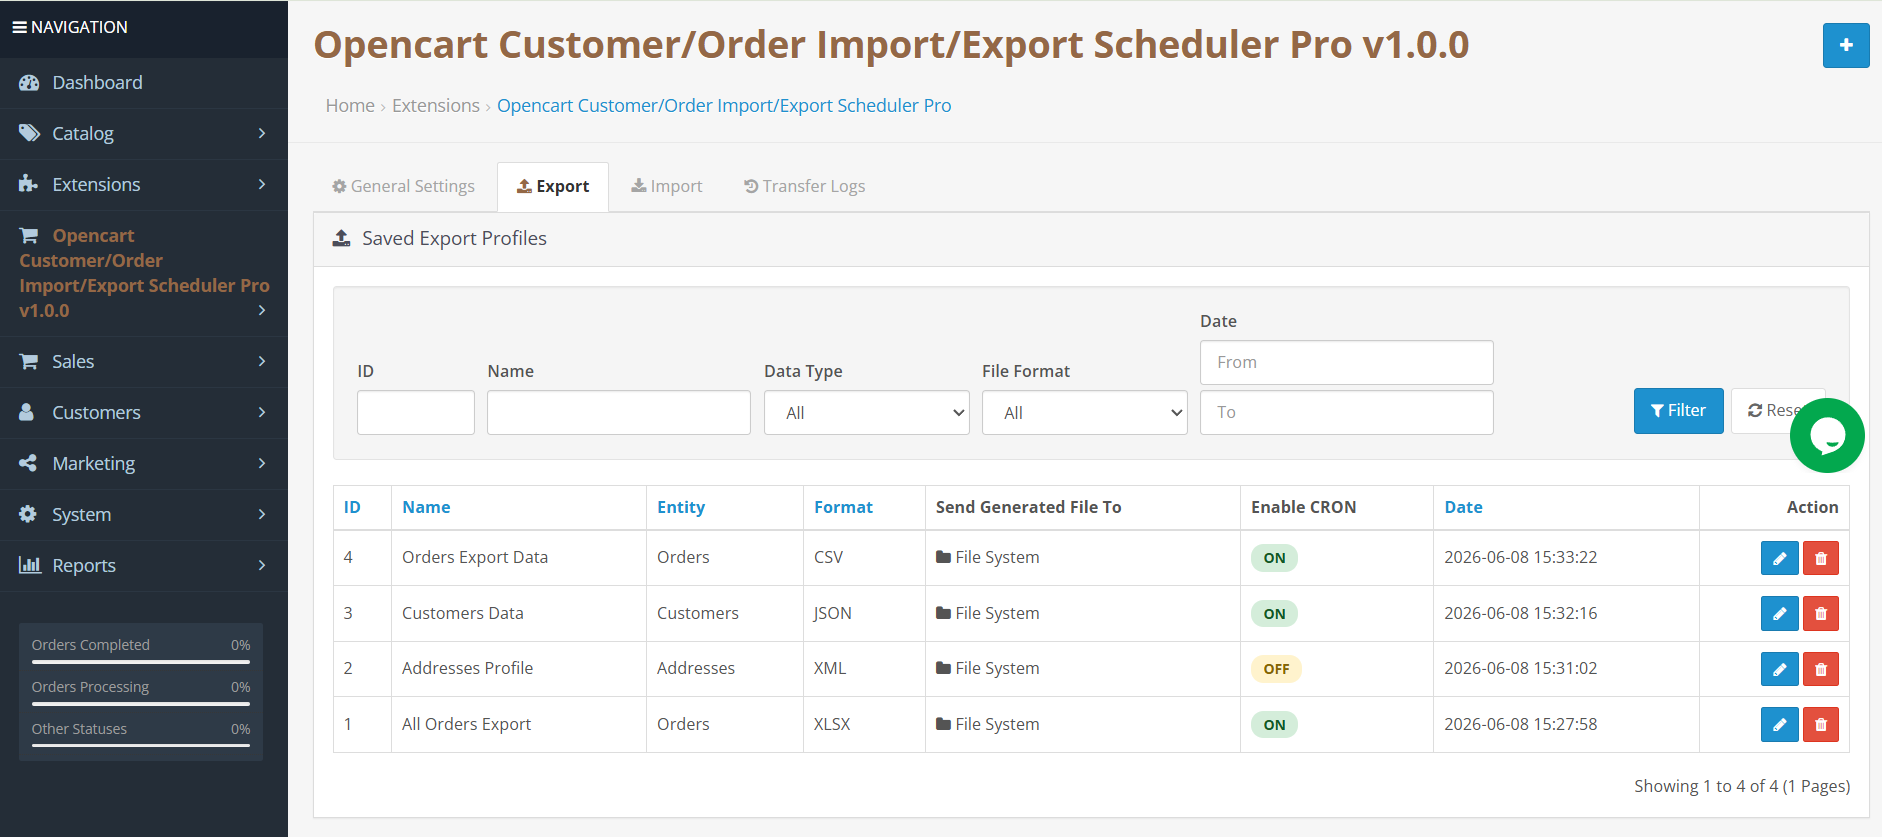
The Export Feature in Opencart Customer Migration Extension displays a table of all saved export profiles. Each row shows the profile name, the entity type, the file format, and the outcome of the most recent run. From this view, you can launch an immediate export on any profile, open an existing profile for editing, or create a new one using the setup wizard.
4.1 Step One: Basic Configuration and Delivery Options
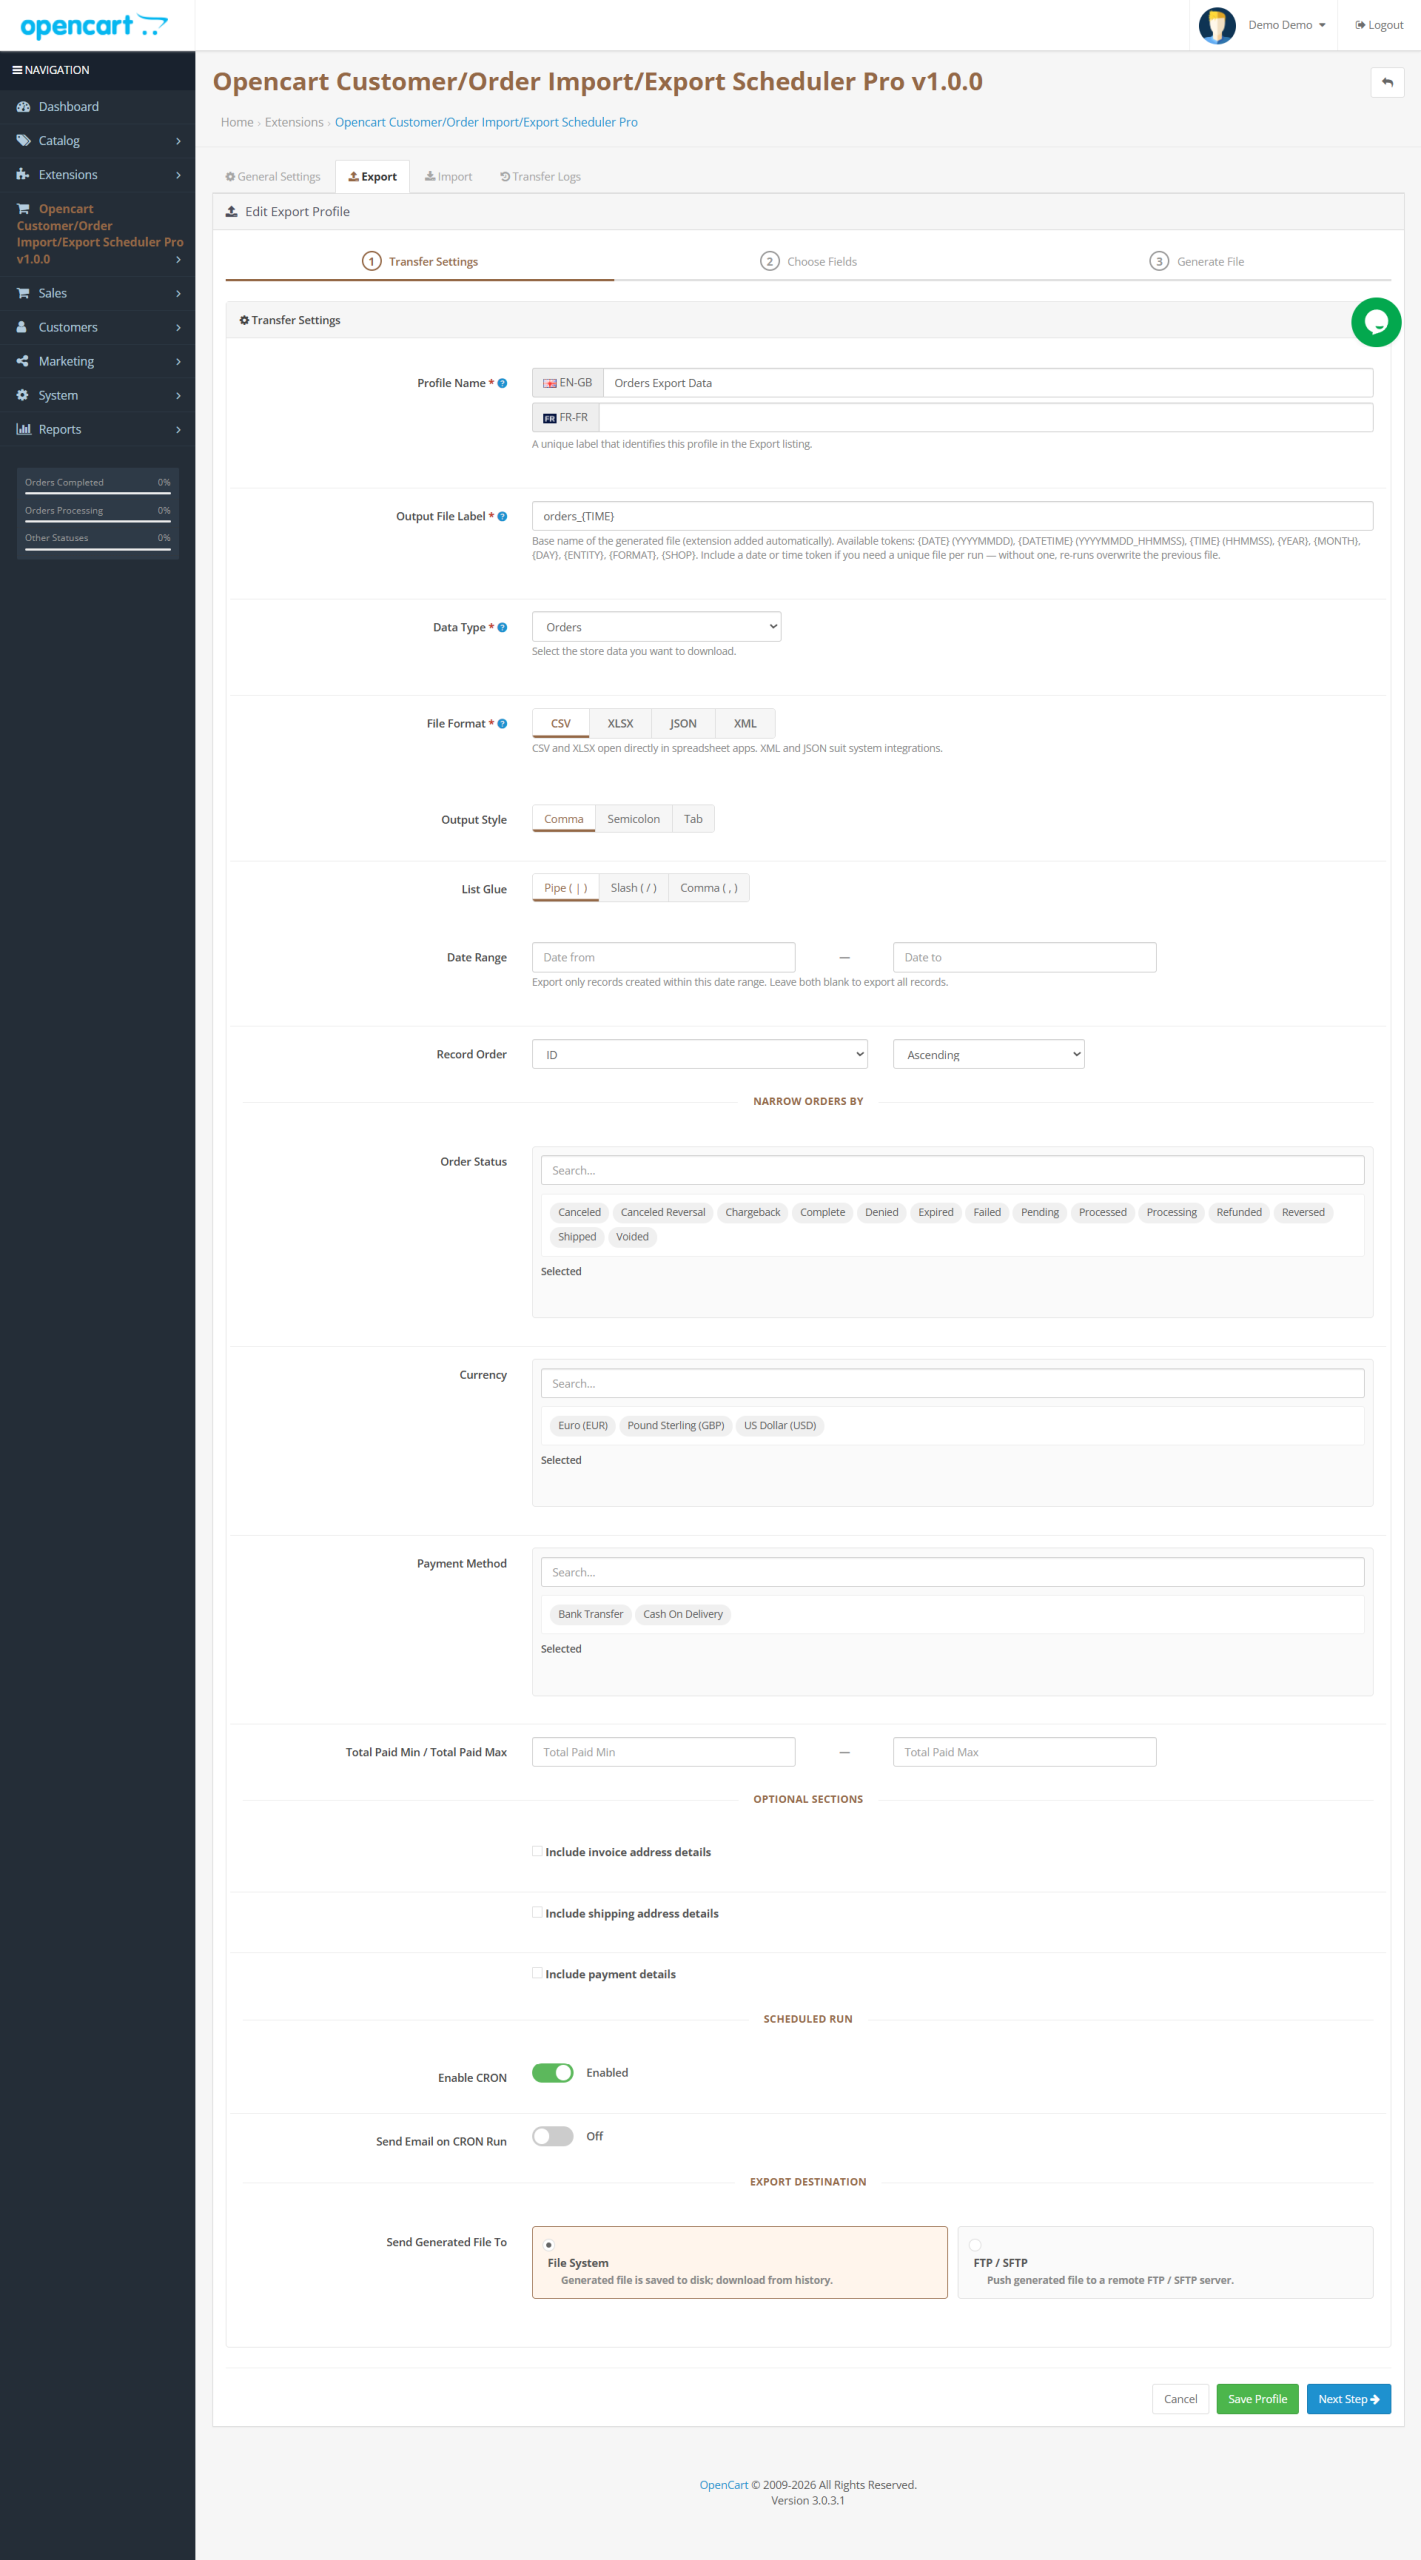
Profile Name: Give this profile a name that will make sense to you and your team six months from now. Something like “Daily Fulfilled Orders to WMS” or “Weekly Customer Backup XLSX” communicates the purpose at a glance.
Output Filename: The base name used for the generated file. File extension is added automatically. You can include dynamic tokens in this field to make filenames descriptive and date-stamped.
Entity Type: Choose which category of data this profile exports: Orders, Customers, or Addresses. The OpenCart address import export system handles all three entity types through this single unified interface.
File Format: Four options are available. CSV and XLSX work directly with Excel, Google Sheets, and most data tools with no conversion needed. JSON and XML are better suited to API integrations, ERPs, and software systems that consume structured data feeds.
Store Scope: In multi-store OpenCart setups, use this field to restrict the export to a single storefront. Leave it on the all-stores default to pull records from every store in your installation.
Date Window: Optionally limit the export to records created within a specific date range. This is particularly useful for daily or weekly OpenCart scheduled export workflows where you only want records from the most recent period. Leave it blank when you need the full historical dataset.
Sort Preference: Controls the row order in your output file. Available sort keys include order ID, reference number, creation date, modification date, total order value, and order status. Choose an ascending or descending direction for each.
Column Block Controls: Three independent toggles let you expand or collapse entire sections of the output:
The invoice address toggle adds all billing address fields when enabled.
The delivery address toggle adds all shipping address fields when enabled.
The payment detail toggle adds payment amount, currency, method name, and transaction reference columns when enabled. When disabled, only the payment method name is exported.
Use these toggles to strip out data that the receiving system does not need, reducing file size and avoiding unnecessary transmission of financial data.
Scheduled Automation – Enable this toggle to include this profile in the automated OpenCart export orders run triggered by the Export Automation URL. When active, every time the URL fires, this profile generates its output file and either saves it locally or pushes it to the configured remote destination.
File Destination: Local storage saves the file to the server and makes it available for download from the Activity Log. Remote delivery via OpenCart FTP export orders or SFTP pushes the file to an external server after each run. When remote delivery is selected, a local backup copy is also retained.
Remote Server Configuration (visible when remote delivery is selected):
Select the transfer protocol based on your partner’s server requirements. OpenCart SFTP export using SSH key exchange is the most secure option and the recommended default for any production environment handling customer or payment data. FTPS provides encryption over the standard FTP protocol. Standard FTP should only be used in internal network scenarios where security is controlled at the network level.
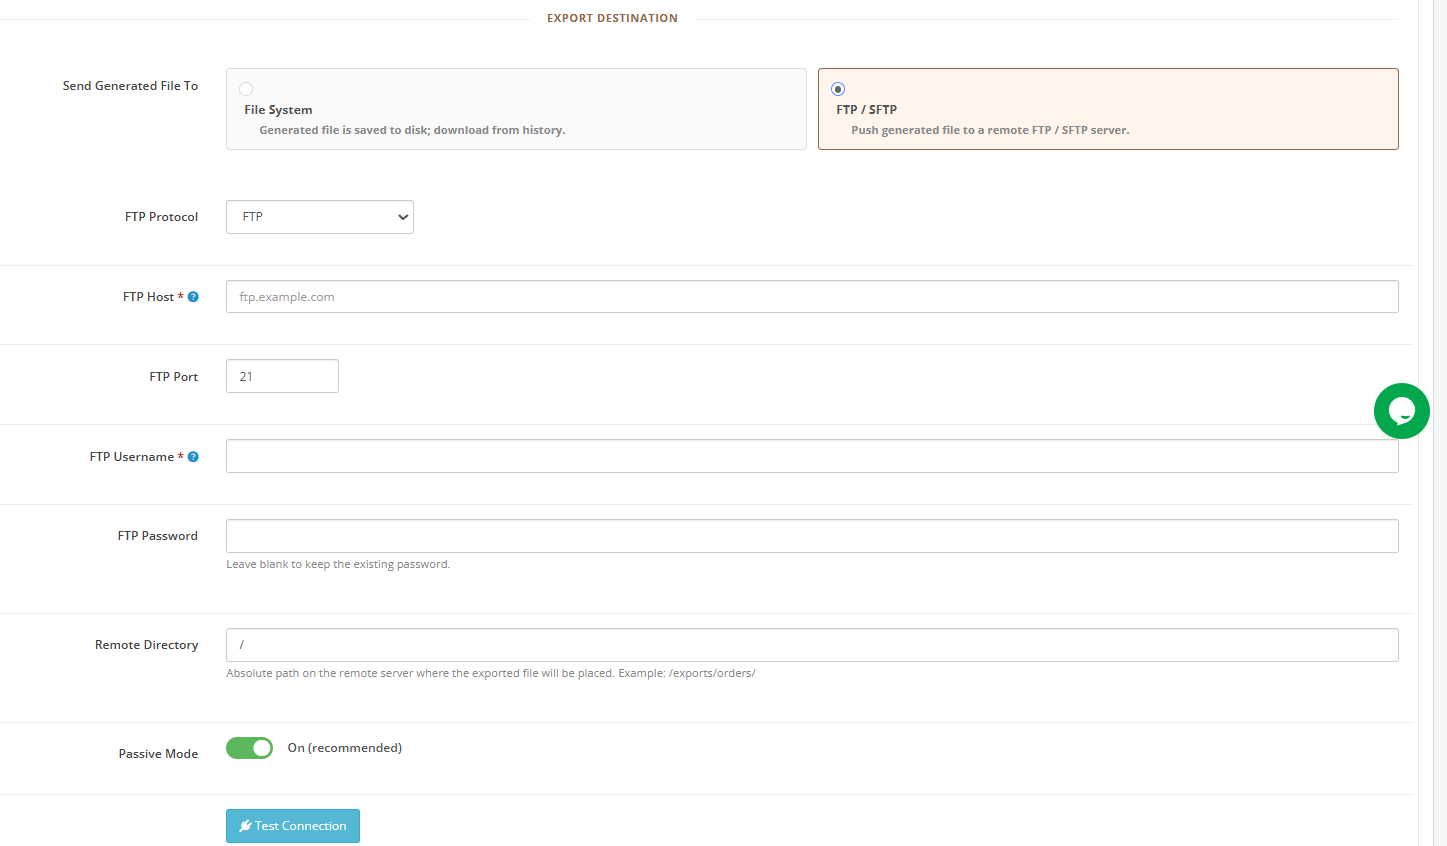
The port field updates automatically when you change the protocol selection: 21 for FTP, 990 for FTPS, and 22 for SFTP.
Enter the server hostname or IP address, username, and password. Credentials are stored in encrypted form. Provide the full absolute path to the destination directory on the remote server.
Passive mode is enabled by default. Use the Test Connection button before saving the profile to confirm the directory is accessible.
Field Delimiter: For CSV output, select the character that separates field values. Comma is the standard for most English-locale applications. Semicolon is the correct choice for European Excel locales.
Multi-Value Separator: Some order fields contain multiple values in a single cell, such as product options or applied discount codes. Pipe is the most unambiguous choice.
Order Filtering Options: The export wizard provides five narrowing filters:
- Order Status: Narrows the export to orders currently in one or more selected status states, ideal for teams that need to export OpenCart orders to Excel for reporting only completed or pending records.
- Shipping Method: Filters by carrier name, enabling logistics-specific exports for individual fulfilment partners.
- Currency: Filters by transaction currency code, useful for finance teams working with region-specific revenue data.
- Payment Method: Filters by the payment module used at checkout.
- Order Value Range: Sets a minimum and maximum on the total paid amount, allowing you to isolate high-value orders.
Click Next to move to field selection.
4.2 Step Two: Choosing Which Fields to Export
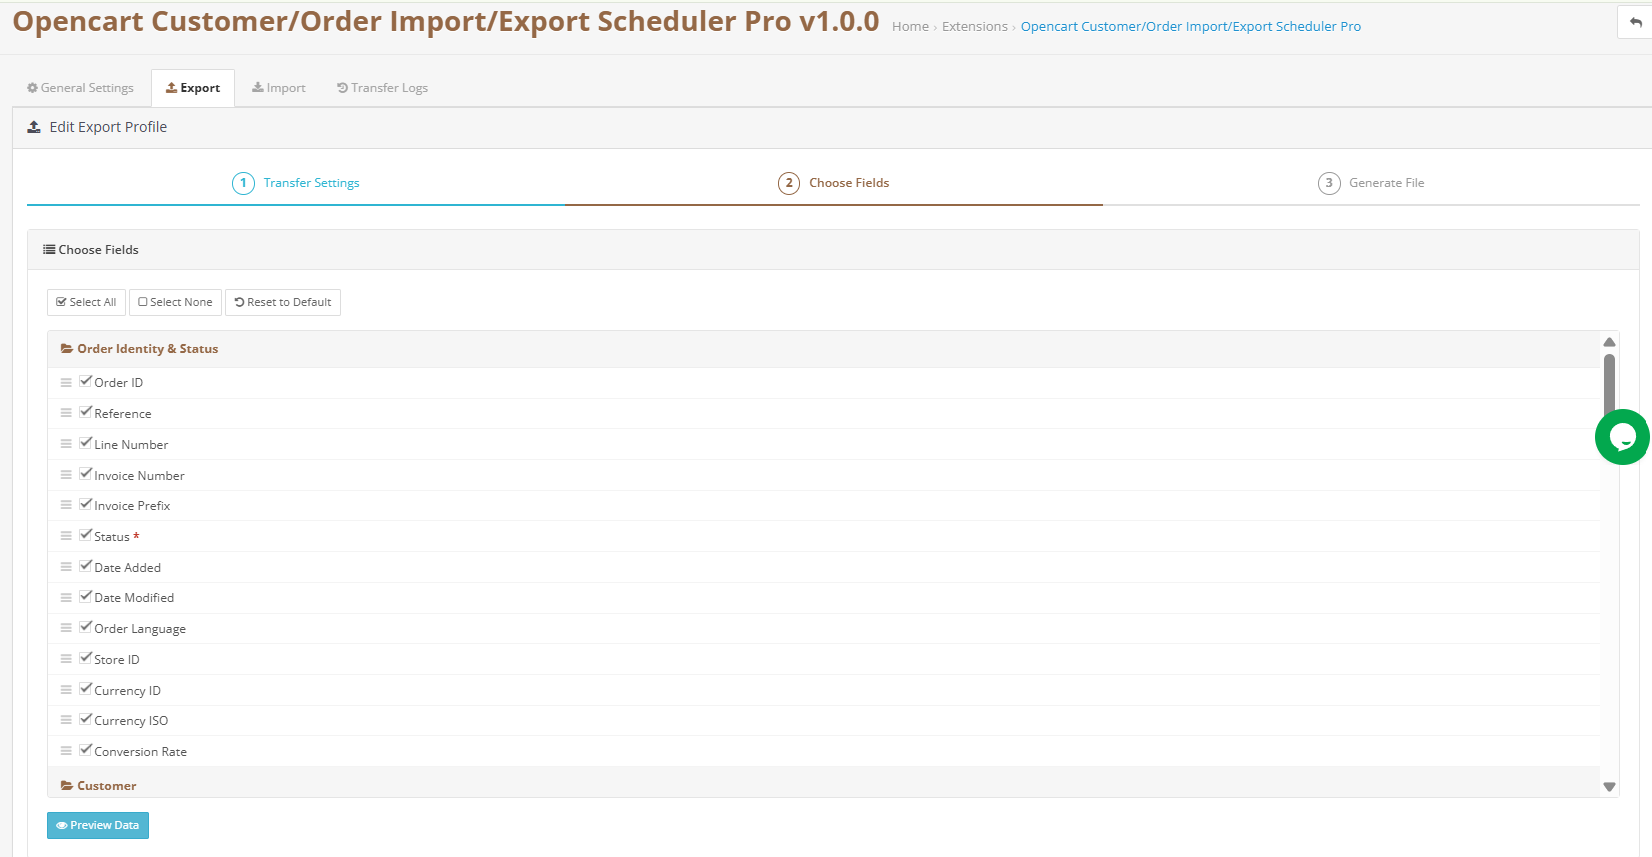
The field selection screen lists every available export column organised by data category. More than 155 individual fields are available, spanning order header information, full customer profile data, invoice and delivery address details, payment records, and product line item data , making this the most complete OpenCart bulk order management and export toolkit available.
Use the Select All control to include everything, Deselect All to start fresh, or Reset to Defaults to return to the standard recommended selection. A small number of identifier fields are mandatory and cannot be removed.
Drag any row to change the column sequence in the output file. An export file that contains only what the receiving system actually needs is faster to generate, smaller to transfer, and less likely to cause issues at the destination.
4.3 Step Three: Review and Generate
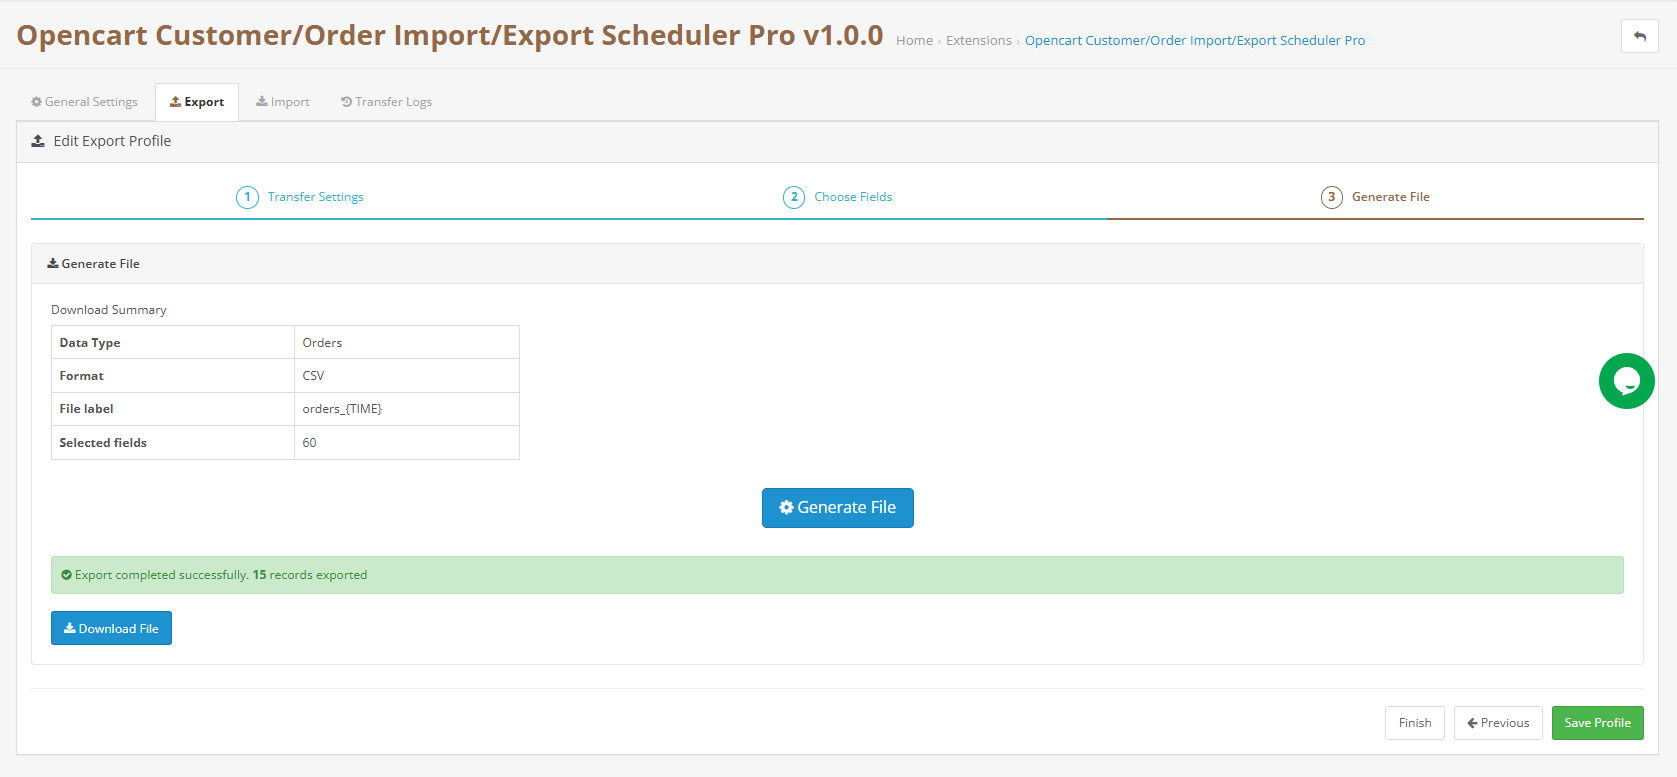
The final screen shows a complete summary of the profile configuration, including entity type, format, filename pattern, active filters, and the total number of fields selected for output.
Click Generate and Download to produce the file immediately. The OpenCart order export module creates the output and either initiates a browser download for local storage profiles or pushes the file to the configured remote server for FTP and SFTP profiles. The operation is recorded in the Activity Log.
Alternatively, save the profile without running it and let the next scheduled cycle trigger the first automated run.
5.0 Import Process, Full Setup Guide
The Import Feature lists all saved import profiles with their configuration summary and last run status. The three-step wizard guides you through source configuration, field mapping, and execution. This is where OpenCart customer import, export and ecommerce order data transfer workflows are configured for both one-time and recurring use.
5.1 Step One: Source and Format Settings
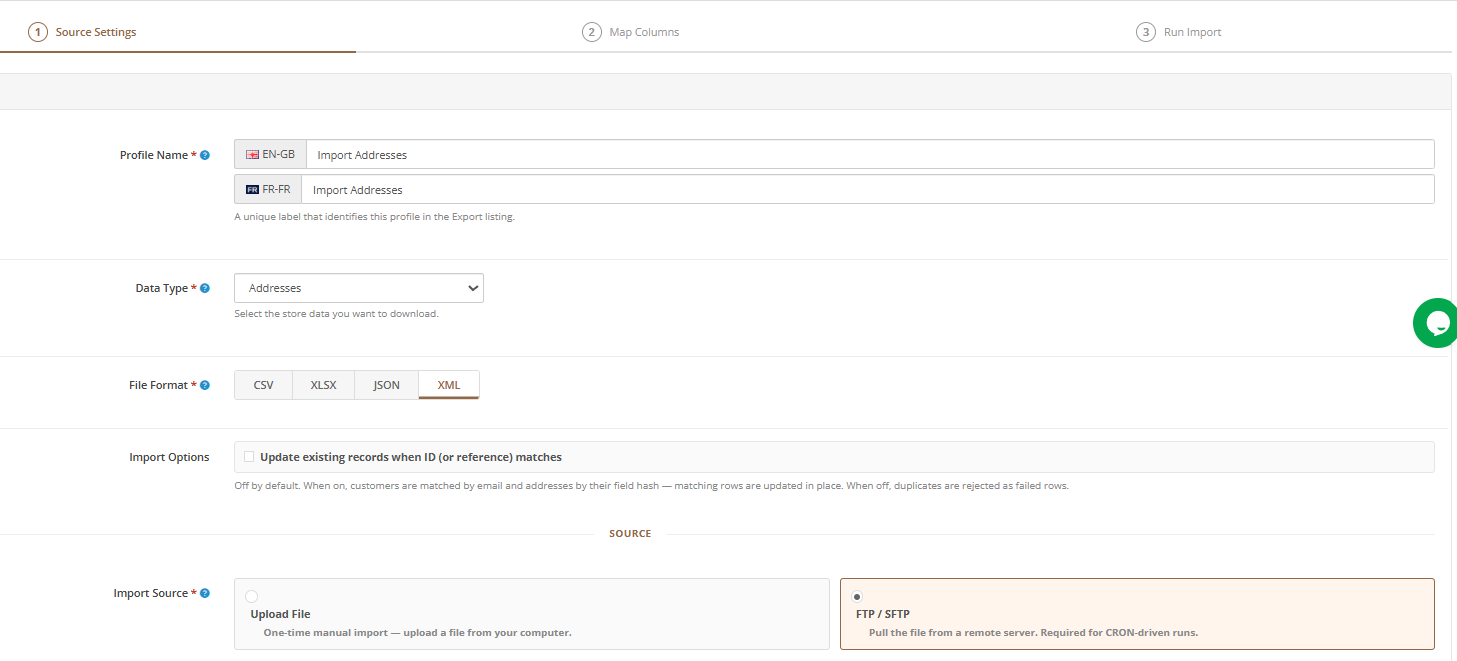
Profile Name: A clear, descriptive label. Include the data entity and source system in the name for easy identification when multiple profiles accumulate over time.
Entity Type: Select Orders, Customers, or Addresses. The behaviour differs by entity type in an important way. Customer and address records are matched against existing data during import. A match updates the existing record, while no match creates a new one. Order records always result in new entries; the extension does not support updating existing order records through import, by design, to preserve the integrity of the historical order log.
File Format: Must match the format of the file you intend to import. The OpenCart CSV import customers details workflow requires CSV format selected here; XLSX for spreadsheet-based imports; JSON or XML for system-generated feeds.
Delimiter and Separator Settings: These must exactly match the settings used when the source file was created. A mismatch here is the most common cause of field boundary errors during OpenCart customer import and export operations.
Store Assignment: Imported records are created under the store selected here. Double-check this before saving in multi-store environments.
File Source: Manual upload accepts a file from your local machine and is suitable for one-time imports. Remote source connects to an FTP or SFTP server for the OpenCart FTP export orders and import automation workflows, required for any profile that runs on a schedule.
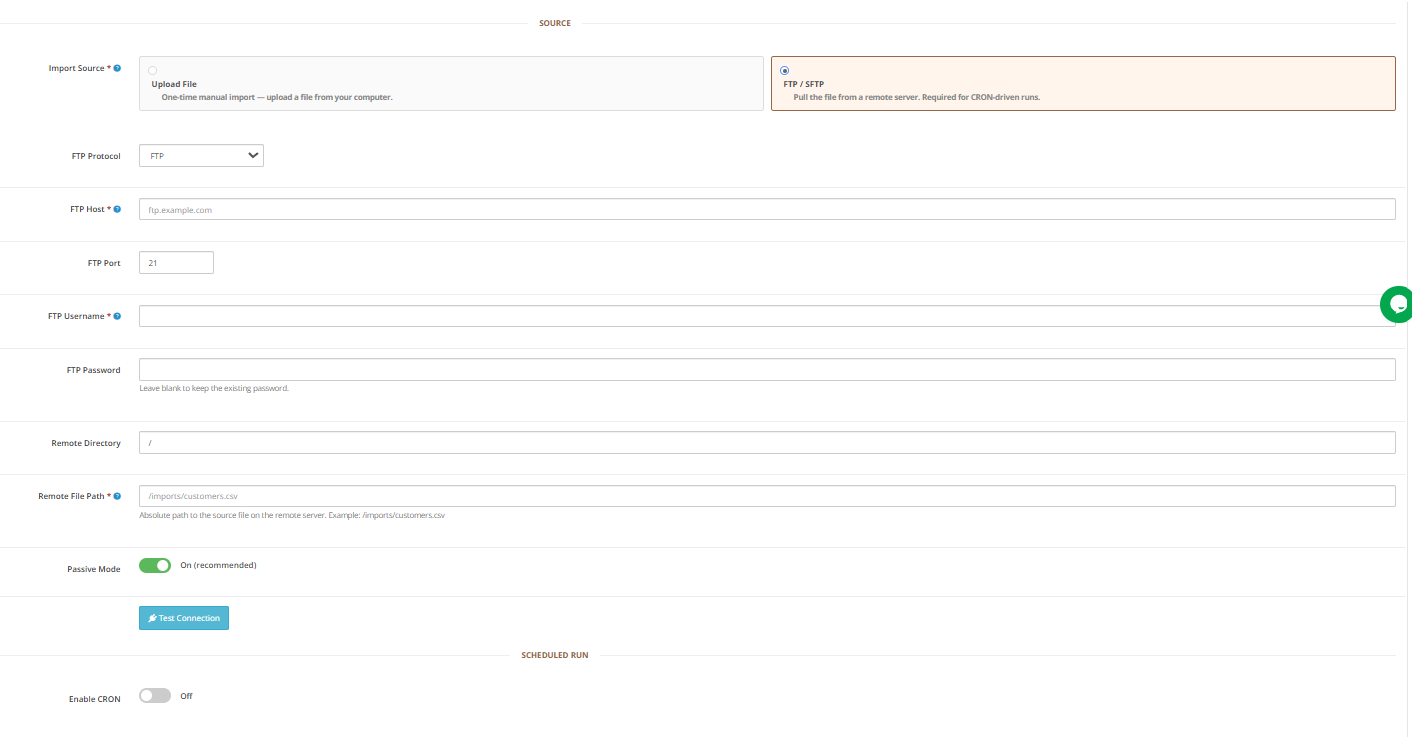
Remote Server Settings: Protocol, host, port, credentials, remote file path, passive mode, and test connection. Configure and test these before saving.
Schedule: When enabled, this profile runs each time the Import Automation URL fires. The extension connects to the remote server, retrieves the file from the specified path, and processes the OpenCart data migration without any manual action.
Click Save Profile to store the configuration, or proceed to the next step to continue directly to field mapping.
5.2 Step Two: Field Mapping
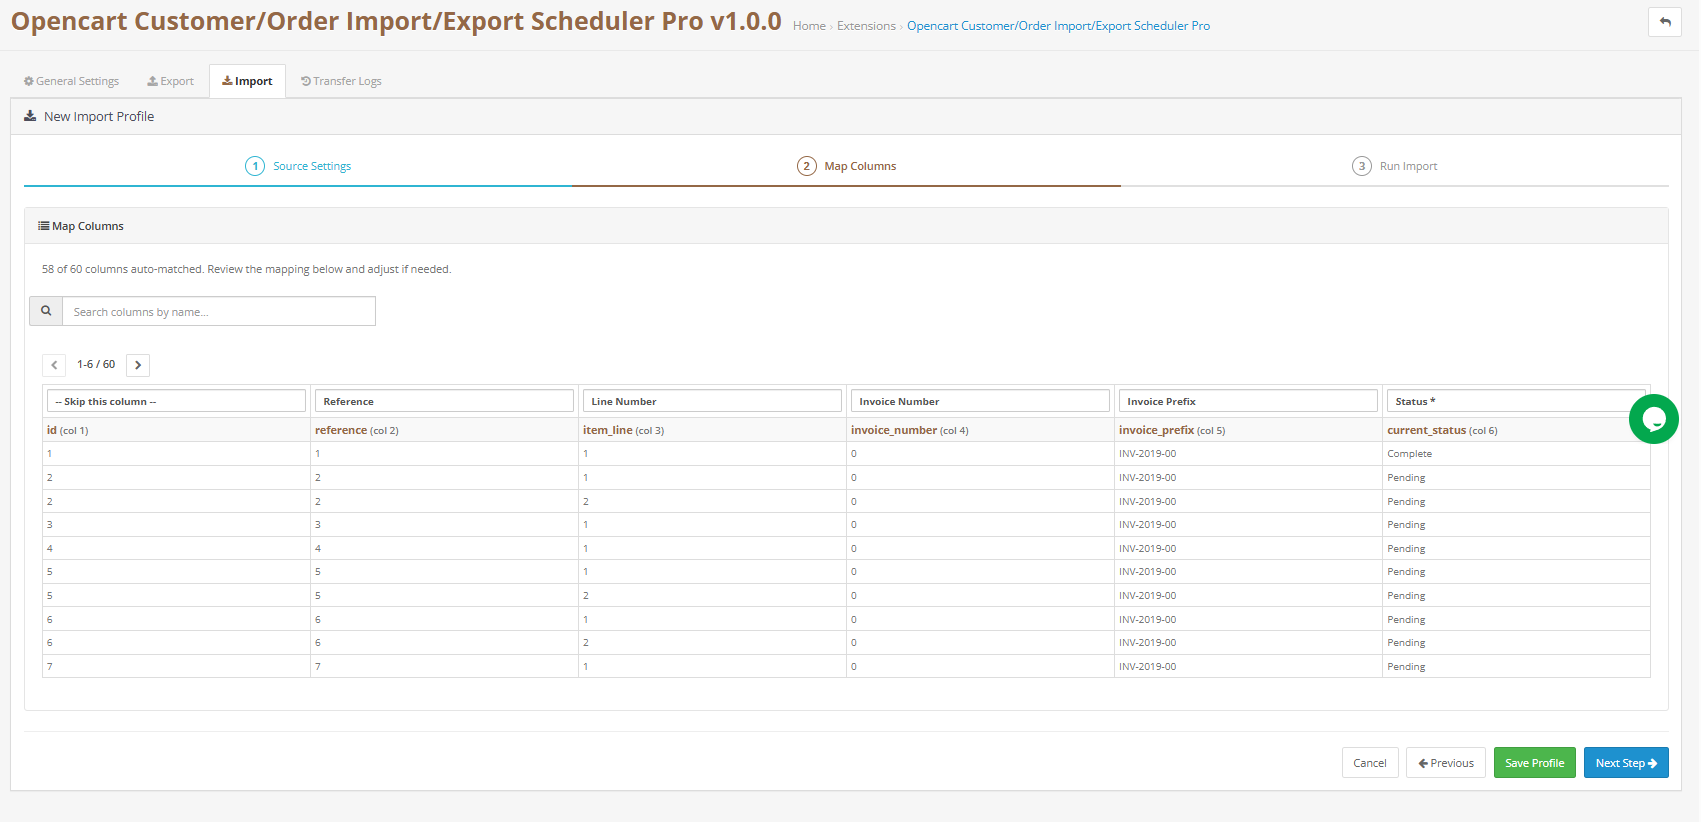
The mapping screen is where the extension reads your file and connects its columns to the corresponding OpenCart data fields. The process is largely automatic; the extension recognises standard column header names and common naming conventions used by popular eCommerce platforms and ERP systems.
A live data preview shows the first rows of your file alongside the field mapping assignments, so you can visually confirm that the data appearing under each field label is what you expect. Required fields are indicated clearly. If any required field has not been auto-matched, you must assign it manually before proceeding.
The search box above the mapping table makes it easy to find specific fields in files with a large number of columns. Review every auto-matched assignment carefully, particularly for date, currency, numeric, and address fields. These are the categories most likely to have naming variations that the auto-matcher may have interpreted differently.
The assignment you set manually is saved with the profile, so it only needs to be done once per file structure.
5.3 Step Three: Import the File
With mapping confirmed, click Start Import to begin processing. The extension works through the file in sequential batches, with each batch size determined by the Batch Processing Size value set in the Settings Panel.
A live progress display updates after each batch completes, showing how many records have been processed and how many are remaining. This is especially useful for large OpenCart bulk import/export operations on servers with limited memory.
Before clicking Start Import, click Save Profile if you want the field mapping preserved for future runs. Saving the profile means the next time you run an import with the same file structure, all field assignments are already in place.
6.0 Activity Log, Understanding Your Transfer History
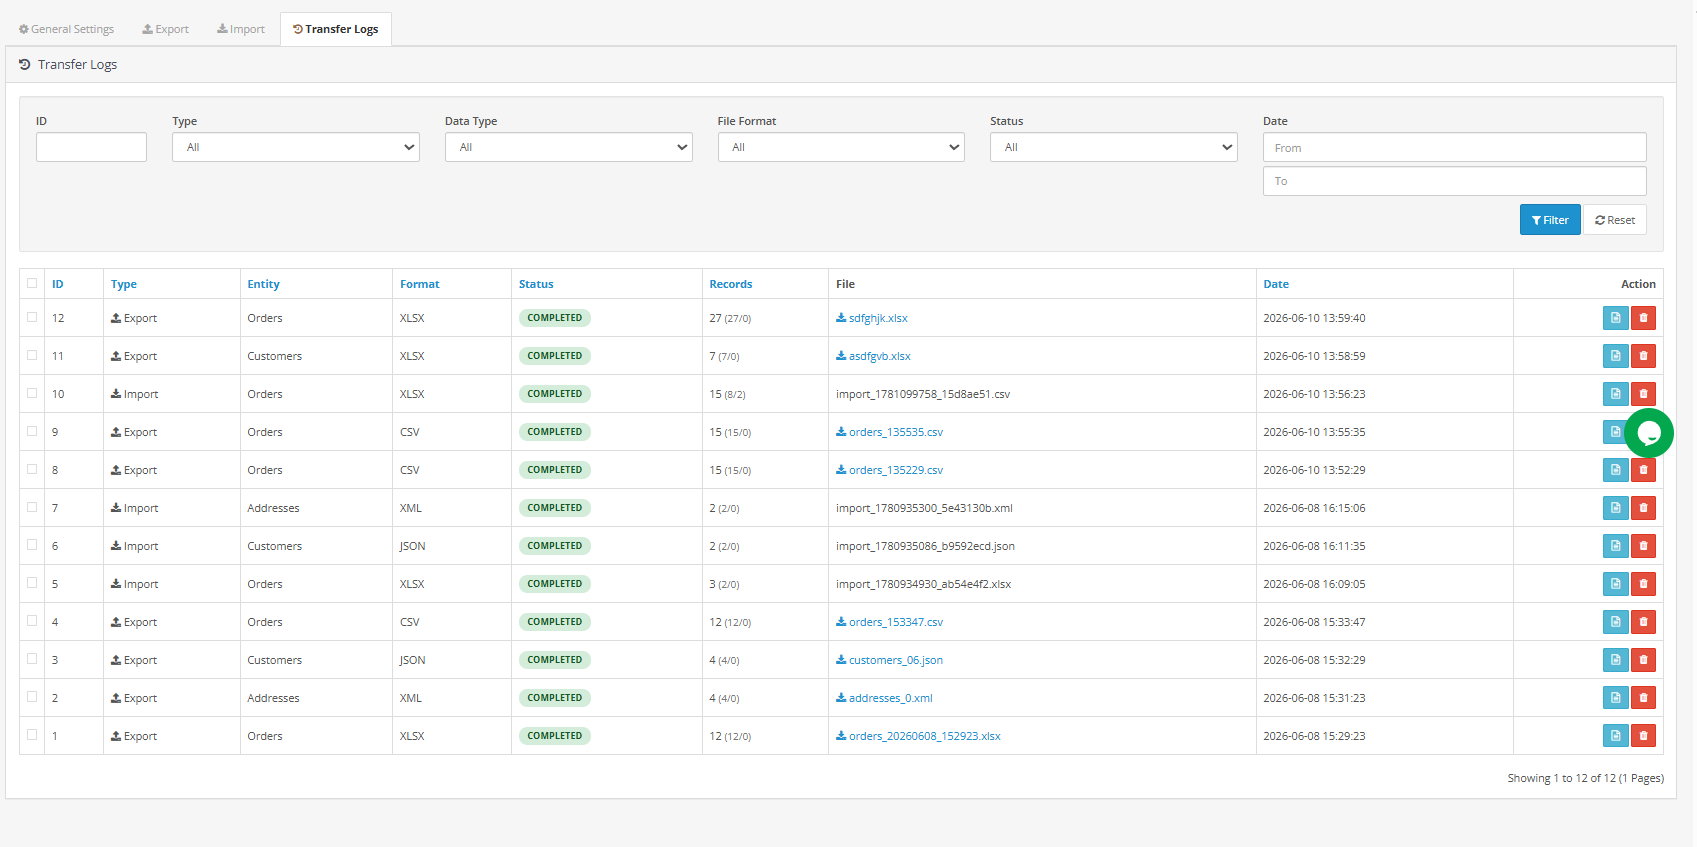
The Activity Log maintains a permanent record of every import and export the extension has performed. It is searchable and filterable, making it a practical audit tool for compliance reviews, dispute resolution, and operational troubleshooting.
Each log entry displays the following:
- Run Number- a sequential identifier assigned to each operation.
- Operation Type- whether the run was an import or an export.
- Entity- which data type was involved (Orders- Customers- or Addresses).
- Format – the file type used (CSV- XLSX- JSON- or XML).
- Status – whether the run completed cleanly or encountered errors.
- Record Count – how many records the run processed.
- Filename – the output file name- with a download link for export runs.
- Timestamp – when the run started.Use the filter controls at the top of the log to narrow the view by any combination of these fields, including a custom date range. Export files remain downloadable from the log indefinitely. For runs that produced errors, expanding the log entry reveals the complete row-level error detail from that operation.
7.0 Full OpenCart Store Migration Workflow
This section covers end-to-end OpenCart store migration using Knowband as the sole migration tool.
Install the Knowband extension on both the source and destination OpenCart stores. On the source store, create three separate export profiles: one for Orders, one for Customers, and one for Addresses. For each, select all available fields, apply no filters, choose XLSX (easiest for pre-import review), and generate the files.
This approach makes the extension the most efficient OpenCart store migration plugin for preserving complete order history, ideal for OpenCart customer data migration scenarios, including customer accounts and delivery address data across environments, without requiring custom scripts or third-party migration services.
On the destination store, create a corresponding import profile for each entity type. Upload the exported file for each entity: orders, customers, and addresses. Confirm the field mapping and run the imports in this sequence: Customers first, then Addresses, then Orders. Running in this order means customer and address records exist before the order import attempts to link to them, which reduces the number of records the cross-store resolution engine needs to create from scratch.
This complete e-commerce order data transfer approach makes the Knowband extension the most efficient single-tool solution for OpenCart data migration.
8.0 Frequently Asked Questions
Q1: Can I export orders from multiple Opencart in the same operation?
Each export profile targets one store at a time using the Store Scope setting using Opencart Order Migrations Extension by Knowband. To combine data from multiple storefronts, run a separate export for each and merge the resulting files in your spreadsheet application before delivering them onward.
Q2: My import file has custom column names that do not match OpenCart’s field names. Will the mapping fail?
The auto-matcher recognises a wide range of common naming variants. For any column it cannot resolve automatically, the mapping screen lets you make the assignment manually by selecting the correct OpenCart field from a dropdown. The assignment is saved with the profile, so it only needs to be done once.
Q3: Does importing customer records create duplicate accounts?
No. Customer records are matched by email address. If the email already exists in your OpenCart database, the existing account is updated. New accounts are only created when the email does not match any existing record. This is the same de-duplication logic used by leading OpenCart customer import/export extensions.
Q4: Is it safe to re-run an export profile that already delivered a file to a remote server?
Yes. Each run generates a new file and each run is logged separately. Re-running a profile does not delete or replace files from previous runs when filenames include date or datetime tokens. If you are using a static filename without tokens, the file on the remote server will be overwritten on each run.
Q5: What should I do if a scheduled import or export did not run?
Check the Activity Log first to confirm whether the run was attempted. If no entry exists for the expected time, the issue is with the automation URL not being called by your task scheduler. Verify the URL is correctly saved in your task scheduler and that the scheduled automation toggle is enabled on the relevant profile.
This user guide covers the complete feature set of the Knowband OpenCart Order, Customer & Address Import Export Extension, the leading OpenCart import export extension for orders, customers, and address data. For technical support, contact the support team directly via the extension’s support channel.


