How to Send the Webservice Key of PrestaShop in the Authorization Header Instead of the URL

PrestaShop provides a comprehensive webservice API that enables developers to programmatically manage critical aspects of an eCommerce store, including products, orders, customers, and more.

Traditionally, accessing the PrestaShop API involves appending the webservice key as a query parameter in the URL. While this method is functional, it poses significant security concerns due to the potential exposure of sensitive information.

A more secure and professional approach is to transmit the webservice key through the Authorization header. In this blog, we delve into the reasons for adopting this approach, its technical advantages, and a step-by-step guide to implementing it in your PrestaShop integration.

Why Use the Authorization Header?

Transmitting sensitive information like the webservice key via the Authorization header offers several technical benefits over embedding it in the URL:

Mitigation of Security Risks:

Sensitive information included in URLs is often logged in browser history, server logs, and monitoring tools.
This increases the risk of unauthorized access and data exposure. It compromises the overall security of sensitive information.. By using the Authorization header, you ensure that the key remains hidden from such logs.

Adherence to Security Standards:

Modern security guidelines and compliance frameworks discourage placing sensitive data in query strings.
Employing the Authorization header aligns with these standards and enhances the overall security posture of your API integrations.

Improved URL Readability:

Embedding the webservice key in the URL results in cluttered and hard-to-read query strings.
By using the Authorization header, you maintain clean and professional URLs, simplifying troubleshooting and debugging.

Scalability and Interoperability:

The Authorization header is widely adopted across APIs and platforms, ensuring compatibility and future-proofing your implementation. 

Build Android and iOS App for Your Prestashop Store

No Coding Skills Required

SHOP NOW

Steps to Send the Webservice Key in the Authorization Header

Implementing the Authorization header for your PrestaShop webservice requests involves a series of technical configurations. Below are the detailed steps:

Step 1: Enable the PrestaShop Webservice

To begin, ensure that the webservice functionality is enabled in your PrestaShop store:

  1. Log in to your PrestaShop store Back Office.
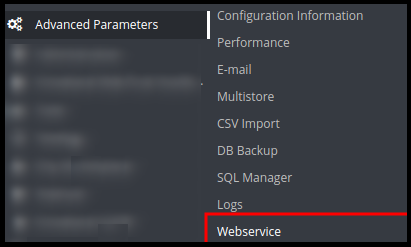
  2. Navigate to Advanced Parameters > Webservice.
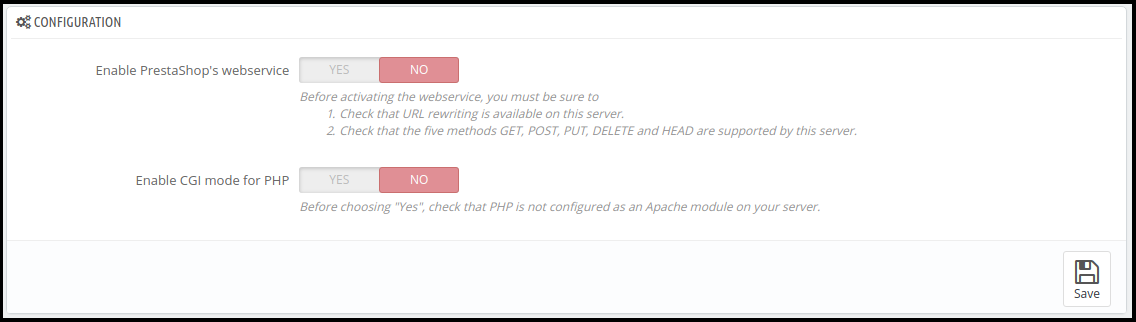
  3. Toggle the switch to enable the webservice functionality.

This step ensures that your store can handle API requests.

Step 2: Generate a Webservice Key

Next, create a unique webservice key with the required permissions:

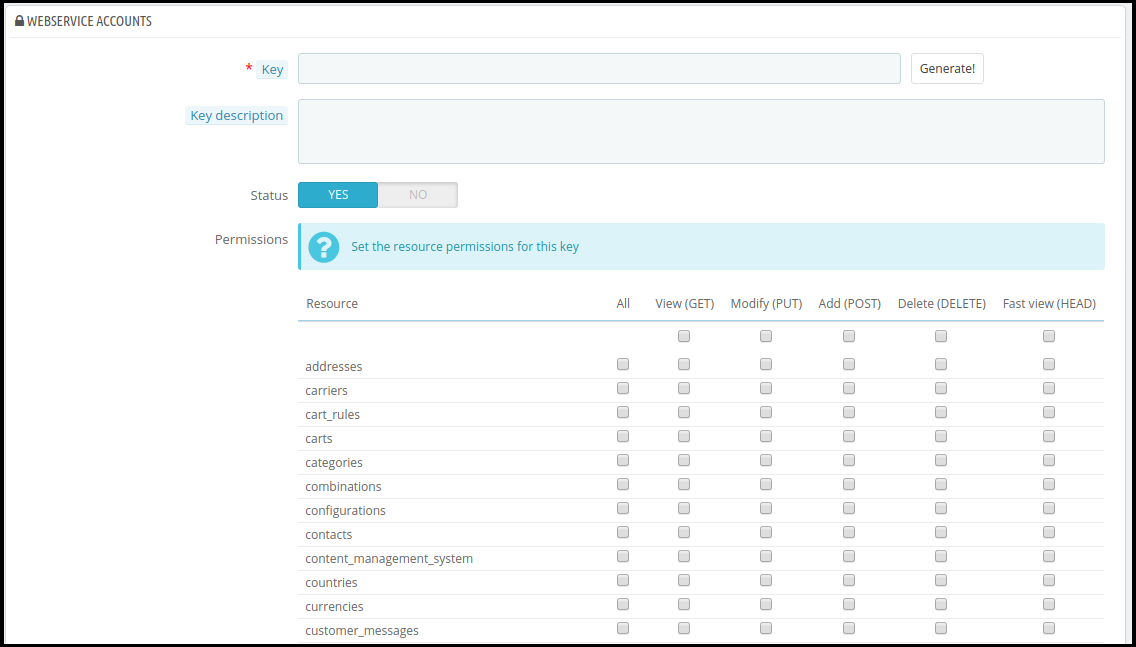
  1. In the Webservice section, click Add New Key.
  2. Define the key permissions, such as GET, POST, PUT, and DELETE, based on your integration requirements.
  3. Save the key and securely store it, as it will be required for authorization.

Step 3: Update Your Code to Use the Authorization Header

Modify your API integration code to include the webservice key in the Authorization header instead of the URL.

Step 4: Test Your Implementation

After integrating the Authorization header, verify its functionality by testing API requests. Key points to validate include:

  1. The server accepts the Authorization header.
  2. The response contains the expected data.
  3. Error handling works as intended for invalid or missing keys.

Testing ensures seamless integration and reliability in production environments.

Step 5: Update Server Configurations (Optional)

In some instances, your PrestaShop server may explicitly check for the webservice key in the URL. To enable the use of the Authorization header, adjust the server configurations as follows:

  1. Modify the .htaccess file to bypass checks for keys in query strings.
  2. Adjust the API controller settings in PrestaShop to prioritize Authorization headers.

These configurations ensure backward compatibility and prevent disruptions.

Advanced Considerations

For developers handling large-scale integrations, consider the following enhancements:

  • Token-Based Authentication: Replace static webservice keys with dynamically generated tokens for improved security and control.
  • Rate Limiting: Implement request throttling to prevent abuse and ensure optimal API performance.
  • HTTPS Enforcement: Always use HTTPS to encrypt API communication, safeguarding sensitive data during transmission.
  • Error Logging: Maintain comprehensive logs for API requests and responses to facilitate debugging and auditing.

These measures fortify your API ecosystem and prepare it for future scalability.

Add Clean URLs & 301/302/303 redirection on Your Prestashop Store

SHOP NOW

Conclusion

Sending the webservice key in the Authorization header is a significant upgrade to your PrestaShop API integration. By adopting this approach, you mitigate security risks, adhere to best practices, and future-proof your eCommerce store’s infrastructure.

To implement this enhancement, follow the outlined steps meticulously, test rigorously, and update configurations as needed. Complement this practice with additional security measures, such as HTTPS enforcement and token-based authentication, for a robust API integration.

If you have any questions or insights then feel free to share them in the comments section. Together, we can build secure and efficient eCommerce solutions.

Happy coding!

How to create Prestashop Module Web Service API?

This blog is all about how to create and use the Prestashop Webservices API. Prestashop has default Web Services tool available which allows accessing the store from remote applications.

Prerequisites

  1. You Prestashop store should have “module rewrite” enabled for apache.
  2. It is preferable to use SSL (https:) for web service calls, as it avoids the “man in the middle” type security issues.
  3. Check that the five methods GET, POST, PUT, DELETE and HEAD are supported on the server.

To ensure the security and efficiency of your Prestashop Web Services, it’s essential to use SSL (HTTPS) for all web service calls. This prevents “man in the middle” attacks, safeguarding your data during transmission. Additionally, verifying that your server supports the HTTP methods GET, POST, PUT, DELETE, and HEAD is crucial for seamless operation. By configuring these settings, you optimize your store’s performance and security, ensuring reliable access and management of your Prestashop resources through the API.

How to configure Web Services in the Prestashop?

1. Login into the Prestashop Back-office.

2. Navigate to Advance Parameters -> Web Services menu options to open the Web Services page.


3. It will redirect to the Web Services page having the listing of available Web Services and the configuration form to configure the service.

4. The Configuration form has the following fields:

a) Enable Prestashop’s web service: Enable the setting to use web service in the Prestashop Store.

b) Enable CGI mode for PHP: Enable the setting to use PHP as CGI script instead of Apache module.

5. Click on the Save button to save the configuration. Now, you can use the Web Services in your Prestashop Store.

How to add/Update Web Services in the Prestashop?

1. Login into the Prestashop Back-office

2. Navigate to Advance Parameters -> Web Services menu options to open the Web Services page.

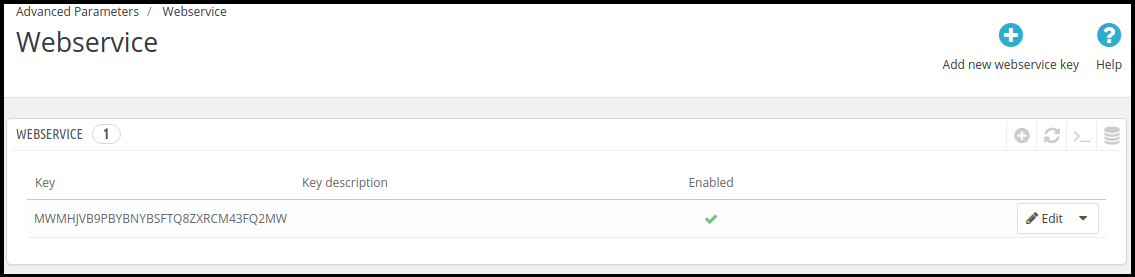
3. It will redirect to the Web Services page having a listing of available Web Services.

4. Click on the “Add new web service key” button to add new web service key to access only to the certain resources of the Prestashop store.

a) Key: This is a unique key. You can enter it manually or click on the Generate button to generate a random key for the Prestashop web service.

b) Key Description: You can provide the description regarding the key for better understanding.

c) Status: Enable the key to provide a grant to access the data using the key.

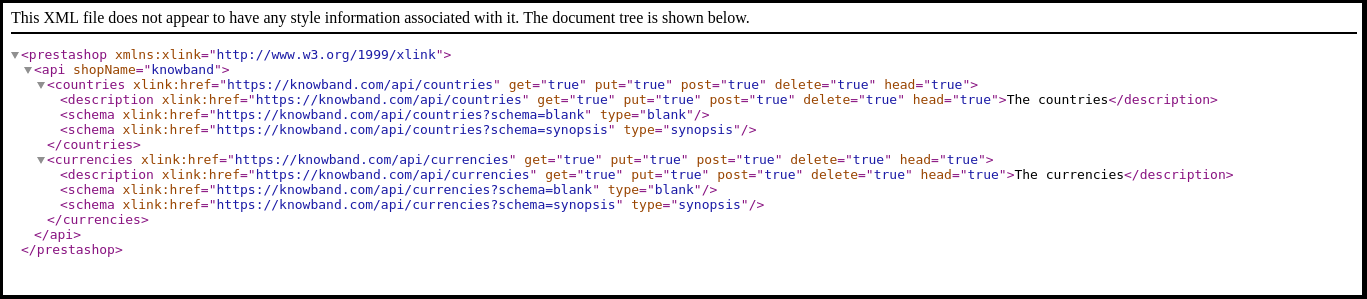
d) Permission: Provide the permission to access the data using the certain key. You can check the specific permission to grant access of the data like Add, Edit, delete or view. Here, we have checked the permission to Countries and Currency.

5. Click on the Save button to add the key to the web services.

How to the access the Web Service?

Once you have created the key for the web service and properly configured, you need to hit the following URL in your browser:

https://{store root path}/api/

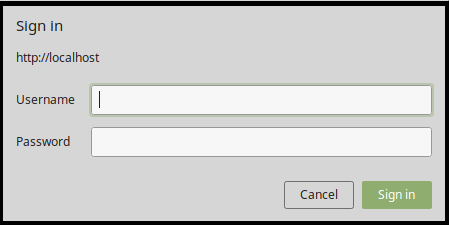
It will prompt you for username and password to access the resource.

a) Username: Enter the key of the web service which is generated in the above step. For Example MWMHJVB9PBYBNYBSFTQ8ZXRCM43FQ2MW

b) Password: It should be blank as no password required.

After sign in, you will access the list of the resources and all permitted CRUD options that you have configured in your Prestashop Store.

You are now successfully connected to the Prestashop web service.

a) To GET the list of entities for a particular resource:

https://shop_root_url/api/resouce

Example: https://www.knowband.com/api/customers to get a list of all customers.

b) To GET a specific customer by ID:

https://shop_root_url/api/customers/1

For Example: To get the detail of customer having ID 10

https://www.knowband.com/api/customers/10

Recommend Watch: 

How to create Prestashop Module Webservice API for Prestashop 1.7?

We will show you how to create a module to fetch customers. For this, we will register a hook addWebserviceResources of ServiceRequest for the resources instead of overriding getResources() function of ServiceRequest Class in Prestashop 1.7.

Creating custom web service APIs in Prestashop 1.7 involves using the WebserviceSpecificManagement class. This allows you to define specific functionalities and manage data processing. For instance, implementing the WebserviceSpecificManagementKbCustomer class lets you handle customer data efficiently. Therefore, this approach provides a flexible and robust solution for extending Prestashop’s capabilities, enabling tailored interactions with your store’s data. By leveraging these advanced customization options, you can create more dynamic and responsive eCommerce solutions that meet unique business needs.

1. Register addWebserviceResources hook in the module.

public function install() {

parent::install();

$this->registerHook('addWebserviceResources');

return true;

}

2. Add a hook listener to define the class and description. Set specific_management to true if you want to use WebserviceSpecificManagement instead of ObjectModel file.

public function hookAddWebserviceResources()

{

return array(

'kbcustomer' => array(

'description' => 'Knowband Custom Customer',

'specific_management' => true,

),

'kbaddress' => array(

'description' => 'Knowband Custom Address',

'class' => 'kbaddress'

)

);

}

3. Create WebserviceSpecificManagement class file as WebserviceSpecificManagementCLASSNAME which implements WebserviceSpecificManagementInterface

For Example – WebserviceSpecificManagementKbCustomer which is similar to /classes/webservice/WebserviceSpecificManagementImages.php.

You must have to include the functions which are defined in WebserviceSpecificManagementImages.php class. These are:

  • setObjectOutput
  • setWsObject
  • getWsObject
  • getObjectOutput
  • setUrlSegment
  • getUrlSegment
  • getContent
  • manage (where data is processed)

1. Now add the key having resource kbcustomer in the web service in the back-office.

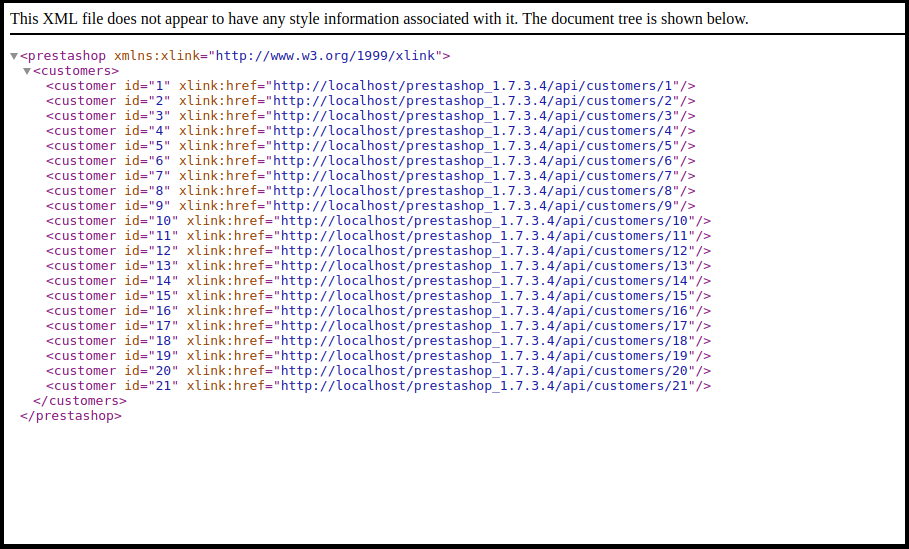
2. Now, visit the https://{youstore.com}/api/kbcustomer to see the response in XML. In the below example, we display the listing of all customer available in the store.

Add include_once(_PS_MODULE_DIR_.’YOURMODULENAME/classes/WebserviceSpecificManagementKbCustomer.php’);

in your module file.

class WebserviceSpecificManagementKbcustomer implements WebserviceSpecificManagementInterface

{

/** @var WebserviceOutputBuilder */

protected $objOutput;

protected $output;


/** @var WebserviceRequest */

protected $wsObject;


public function setUrlSegment($segments)

{

$this->urlSegment = $segments;

return $this;

}


public function getUrlSegment()

{

return $this->urlSegment;

}

public function getWsObject()

{

return $this->wsObject;

}


public function getObjectOutput()

{

return $this->objOutput;

}


/**

* This must be return a string with specific values as WebserviceRequest expects.

*

* @return string

*/

public function getContent()

{

return $this->objOutput->getObjectRender()->overrideContent($this->output);

}


public function setWsObject(WebserviceRequestCore $obj)

{

$this->wsObject = $obj;

return $this;

}


/**

* @param WebserviceOutputBuilderCore $obj

* @return WebserviceSpecificManagementInterface

*/

public function setObjectOutput(WebserviceOutputBuilderCore $obj)

{

$this->objOutput = $obj;

return $this;

}


public function manage()

{

$objects_products = array();

$objects_products['empty'] = new Customer();

$customer_list = Customer::getCustomers();

foreach ($customer_list as $list) {

$objects_products[] = new Customer($list['id_customer']);

}

$this->_resourceConfiguration = $objects_products['empty']->getWebserviceParameters();

$this->output .= $this->objOutput->getContent($objects_products, null, $this->wsObject->fieldsToDisplay, $this->wsObject->depth, WebserviceOutputBuilder::VIEW_LIST, false);

}

}

The below screenshot provide you the visual of the output:

If you want the output in JSON format then append &output_format=JSON at the end of the URL. For example: https://{yourstore.com}/api/kbcustomer&output_format=JSON

Output: {“customers”:[{“id”:1},{“id”:2},{“id”:3},{“id”:4},{“id”:5},{“id”:6},{“id”:7},{“id”:8},{“id”:9},{“id”:10},{“id”:11},{“id”:12},{“id”:13},{“id”:14},{“id”:15},{“id”:16},{“id”:17},{“id”:18},{“id”:19},{“id”:20},{“id”:21}]}

In the END!

With over 13 years of technical expertise, Knowband offers comprehensive app and web development services using the latest technologies, including various PHP frameworks and React. We provide more than 100 ready-to-use extensions for popular eCommerce platforms like Prestashop, Opencart, WooCommerce, and Magento 2.

For any queries, please feel free to reach us at support@knowband.com. Knowband is also a Premium Prestashop Partner and a Superher Seller providing more than 100 Prestashop modules to suit all your eCommerce needs.

Check our most popular One page Supercheckout module for Prestashop here.


Prestashop One Page Supercheckout Addon

The Prestashop One Page Supercheckout addon by Knowband makes checkout faster and easier by putting everything on one page, helping to reduce cart abandonment.

SHOP NOW