In the fast-paced world of eCommerce, staying ahead of the competition means being efficient and customer-focused. Whether you’re running a small online shop or managing a large-scale operation, automation is key to ensuring smooth operations and scaling your business. Knowband offers a variety of OpenCart extensions that can help you automate and simplify various aspects of your eCommerce store, allowing you to focus more on growth and customer satisfaction.
In this article, we will explore how Knowband’s OpenCart extensions can help you optimize your online store, streamline workflows, and ultimately improve your business operations.
Streamline Order Management with OpenCart One Page Checkout:
Order management can often be a complex and time-consuming task. Therefore, Knowband’s One Page Checkout extension for OpenCart simplifies this process by combining all necessary checkout steps into a single page. It not only enhances the user experience but also speeds up the checkout process, leading to a reduction in cart abandonment rates.
Key Features:
One-click checkout process for customers.
Mobile-responsive design for a seamless experience.
Integration with multiple payment gateways.
Benefits:
By simplifying the checkout experience, you reduce friction for customers, resulting in higher conversion rates and less time spent on troubleshooting checkout-related issues.
Automate Shipping with OpenCart Shipping Timer Extension:
Managing shipping processes manually can be overwhelming, especially during peak times. With Knowband’s Shipping Timer extension, you can automate shipping operations by setting deadlines for same-day dispatch or next-day shipping, encouraging customers to complete their purchases faster.
Key Features:
Set countdown timers on product pages.
Customizable timer settings based on store preferences.
Helps boost customer urgency to place orders quickly.
Benefits:
This automation increases efficiency by organizing shipping times and ensuring smoother order processing. Furthermore, it leads to better customer satisfaction and on-time deliveries for the customers.
Improve Customer Engagement with OpenCart Email Subscription Popup:
Customer engagement is a critical part of growing your eCommerce store. Knowband’s Email Subscription Popup extension allows you to capture leads by offering subscription popups that encourage visitors to sign up for newsletters or special offers.
Key Features:
Customizable popup designs and messaging.
Integration with major email marketing tools.
Ability to offer discounts or coupons for sign-ups.
Benefits:
By automating email subscriptions, you ensure consistent customer engagement without manual intervention. This helps in growing your email list, which is an essential asset for marketing campaigns.
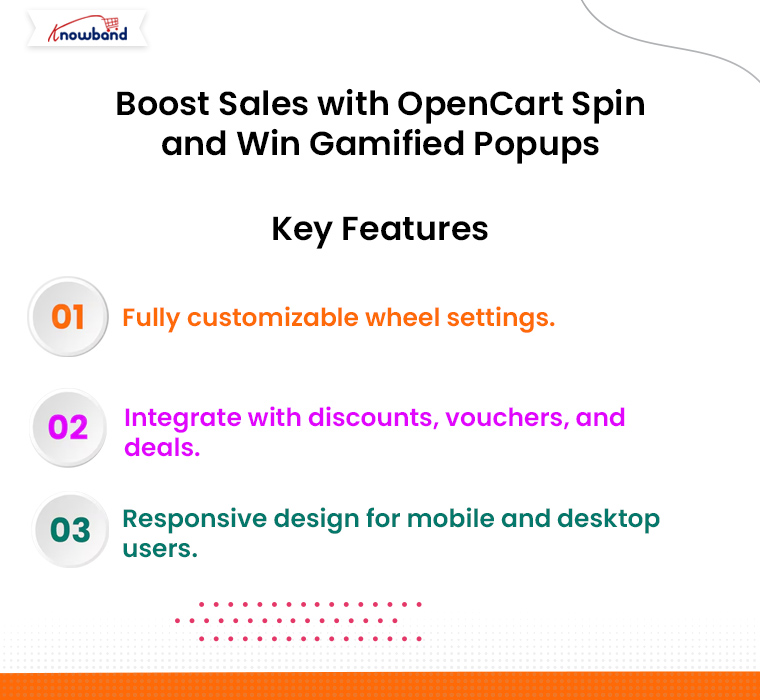
Boost Sales with OpenCart Spin and Win Gamified Popups:
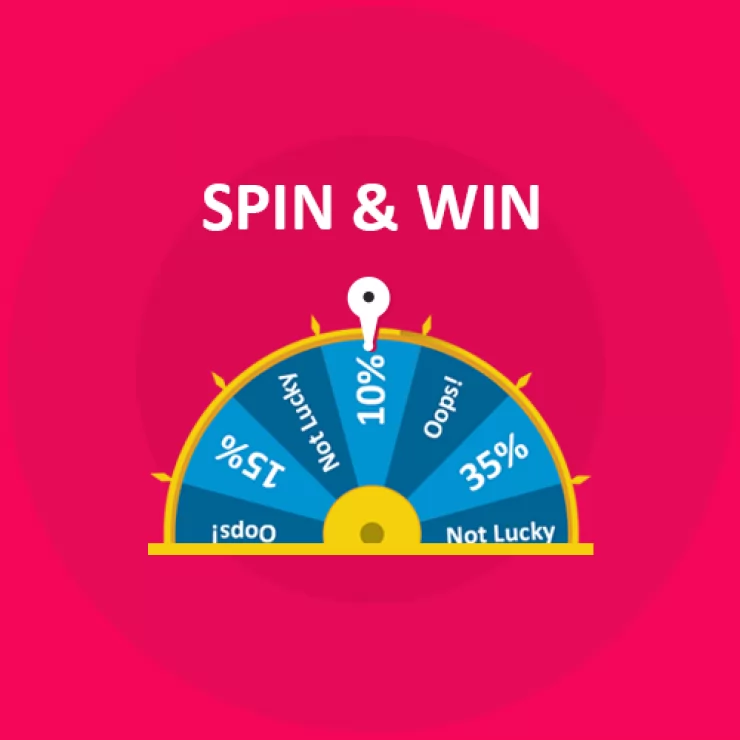
Want to make the shopping experience more interactive? The Spin and Win extension from Knowband gamifies the shopping experience by offering visitors a chance to spin a virtual wheel for discounts or special offers. Furthermore, this interactive feature enhances customer engagement and encourages more purchases.
Key Features:
Fully customizable wheel settings.
Integrate with discounts, vouchers, and deals.
Responsive design for mobile and desktop users.
Benefits:
Automating this interactive marketing tool keeps customers engaged, increases time spent on your site, and motivates them to make a purchase, all without requiring additional manual work.
Showcase Gamified Pop-ups on Store-front
Promote Your Discounts in a Gamified Way by Showing Spin Win Wheel.
Simplify Marketplace Integration with OpenCart eBay Marketplace Integration:
If you’re selling products on multiple platforms, managing all those sales channels can be time-consuming. Knowband’s eBay Marketplace Integration extension for OpenCart automates this process by synchronizing your OpenCart store with eBay, allowing for efficient inventory management and order processing.
Key Features:
Automatic product listing synchronization.
Real-time inventory updates.
Automated order import from eBay to OpenCart.
Benefits:
This extension simplifies multi-channel selling, reduces manual tasks, and ensures your inventory is always up-to-date, resulting in a better experience for you and your customers.
Logging in to an account can be a barrier for many customers. Therefore, with Knowband’s Social Login extension, you can allow users to sign in using their existing social media accounts, such as Facebook, Google, or Twitter.
Key Features:
Quick and easy integration with major social media platforms.
Supports multiple social login options.
Mobile-friendly design.
Benefits:
Automating the login process leads to better user retention and quicker checkouts, improving the overall shopping experience on your site.
Conclusion!
Running a successful eCommerce business is all about efficiency and offering a seamless shopping experience for your customers. Knowband’s OpenCart extensions provide the automation tools you need to simplify your daily operations, improve customer engagement, and boost your sales.
Whether you’re looking to streamline your checkout process, automate shipping, or integrate with marketplaces like eBay, Knowband’s extensions have you covered. With these tools in place, you’ll spend less time on manual tasks and more time growing your business.
OpenCart Social Login Extension offers your customers an easy and fast way of login through 8 most trusted social networks including Facebook, Twitter, Instagram, LinkedIn, etc. Opencart Social Media Login extension increases the customer registrations on your website and improves the user experience of your online store by allowing them instant access to your website. Social Login Opencart module helps to retain the customers and increases the number of visits on your website.
Allowing your customers to access your website through social accounts without creating a new account on the website improves their experience and encourages them to revisit your website. Opencart Social Login is one of the best extension for those who don’t want to spend time in providing their personal information to register on a website through a new account. Social Login for Opencart has a user-friendly interface and the extension is completely customizable.
1.1 Basic Features of this OpenCart Social Login extension
Social Login Opencart module offers website login through 8 most trusted social media networks including Facebook, Twitter, Instagram, LinkedIn, etc. rather than creating a new account on the particular website.
Opencart Social Login extension can be easily customizable including activating/deactivating the extension in a single click, activating/deactivating social media networks, size, and placement of social media icons on the website.
Opencart Google Login module is designed to match the needs and requirement of every OpenCart website and has a user-friendly interface.
The OpenCart Social Login plugin has a mobile responsive layout and it is desktop responsive also.
The store admin can easily activate or deactivate any social media network from the back office of Opencart Twitter Login extension according to one’s preferences and needs.
Opencart Google Login module is super easy to install and configure without having any coding or technical knowledge.
The online merchant can set the look and feel of social login buttons by configuring button color, hover settings and icon type.
Admin can set a different layout for various website pages.
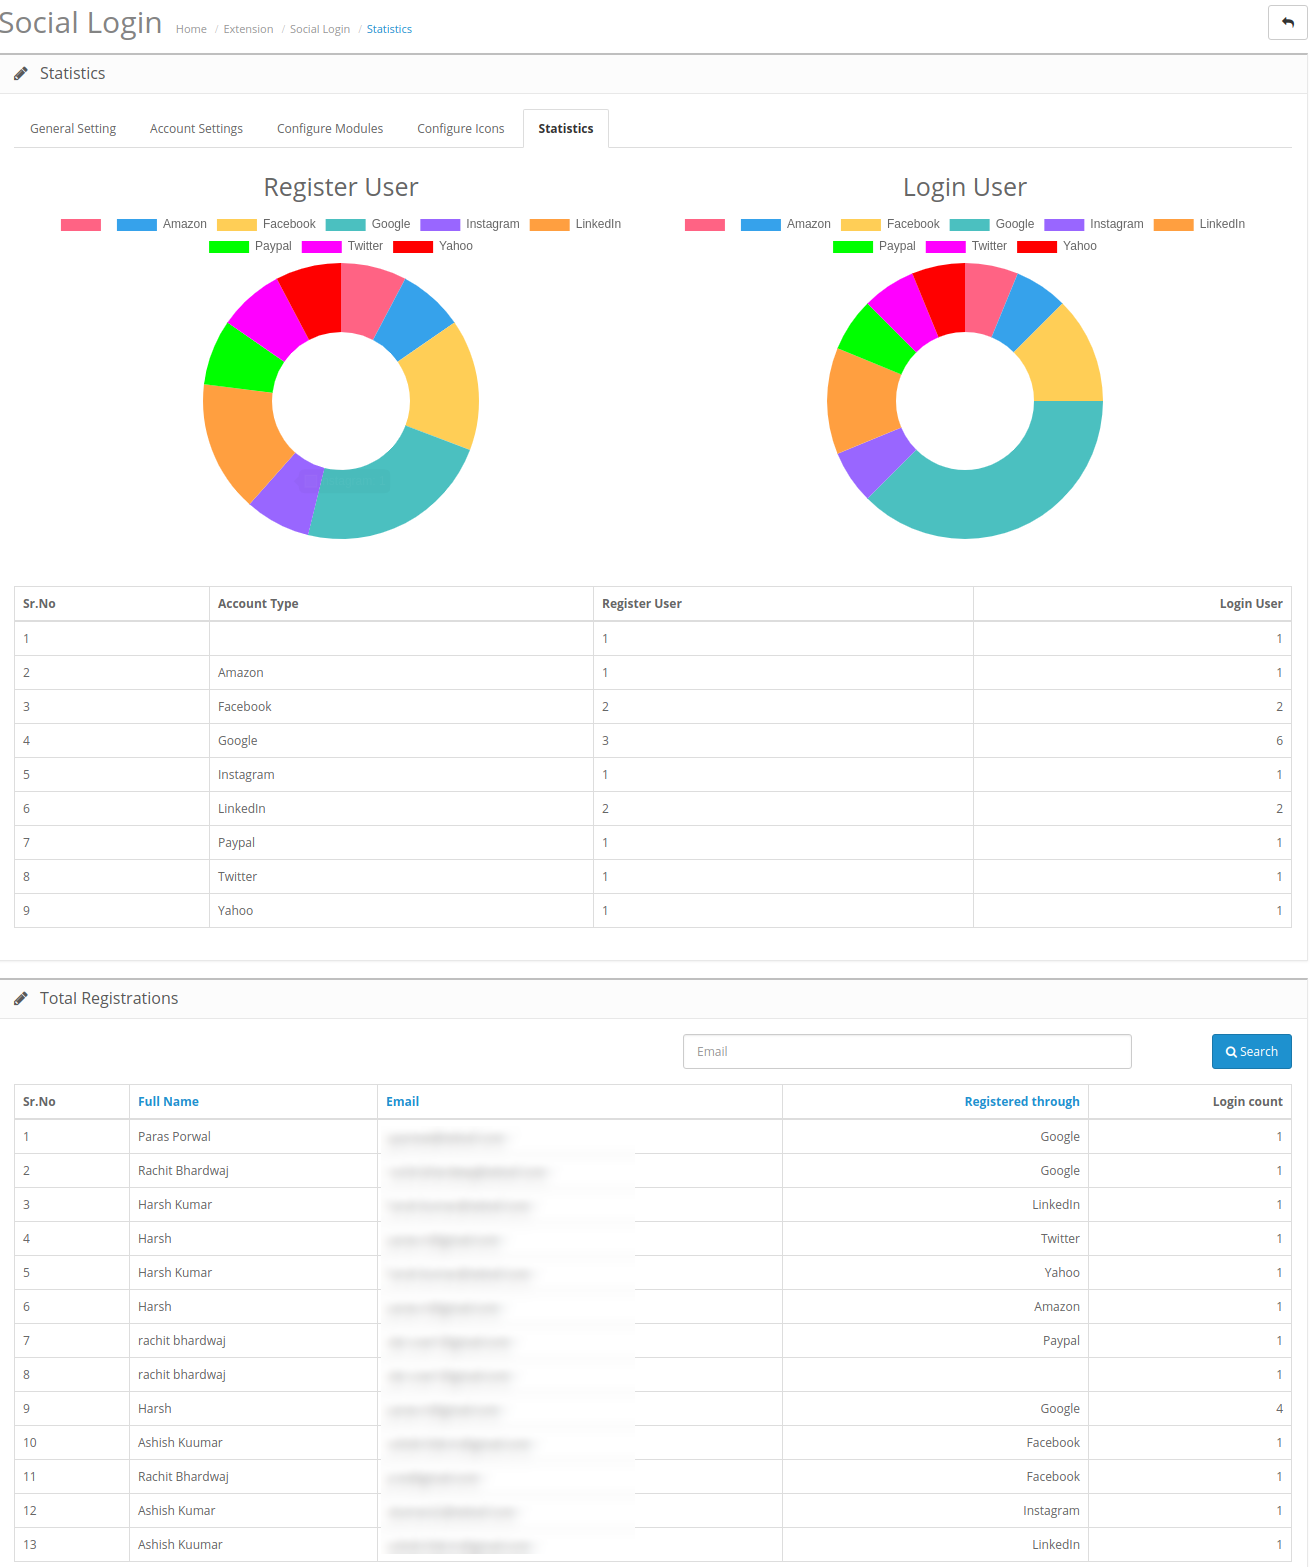
The OpenCart Social Media Login extension provides statistics for analyzing the impact of social login options and registrations/login details.
2.0 Installation Steps for OpenCart Social Login extension
Purchase OpenCart Social Login extension from the Knowband website. You will receive these files after purchasing the OpenCart extension:
First, you will get a source code file of the OpenCart Social Login module in zipped file format.
User Manual of this Social Login OpenCart module.
Follow below-mentioned steps in order to install OpenCart Social Login module:
1. Unzip the received zip file. You will get the folders as shown in the following image:
2. Copy all the folders of the zip file in the Root Directory of OpenCart setup via FTP manager.
So, OpenCart Twitter Login extension is now successfully installed and ready to use at your store.
Now go to the admin menu and click on the extensions and thereby click on configure button next to OpenCart Twitter Login extension.
3.0 Admin Interface
The online store admin can configure the OpenCart Social Media Login extension after installing successfully. There will be multiple configuration options as mentioned below:
General Settings
Account Settings
Configure modules
Configure Icons
Statistics
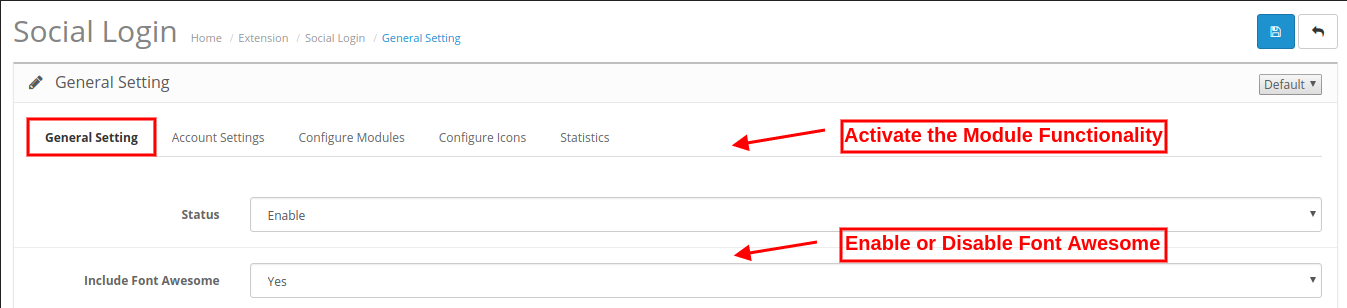
3.1 General Setting
The online merchant can apply the basic settings from here. These are the available configuration options:
Status: The e-merchant can activate or deactivate the OpenCart Social Login extension functionality by enabling or disabling it.
Include Font Awesome: Font Awesome is a font and icon toolkit which is based on CSS and LESS. The online store owner can include it by selecting the “yes” option from the drop-down list.
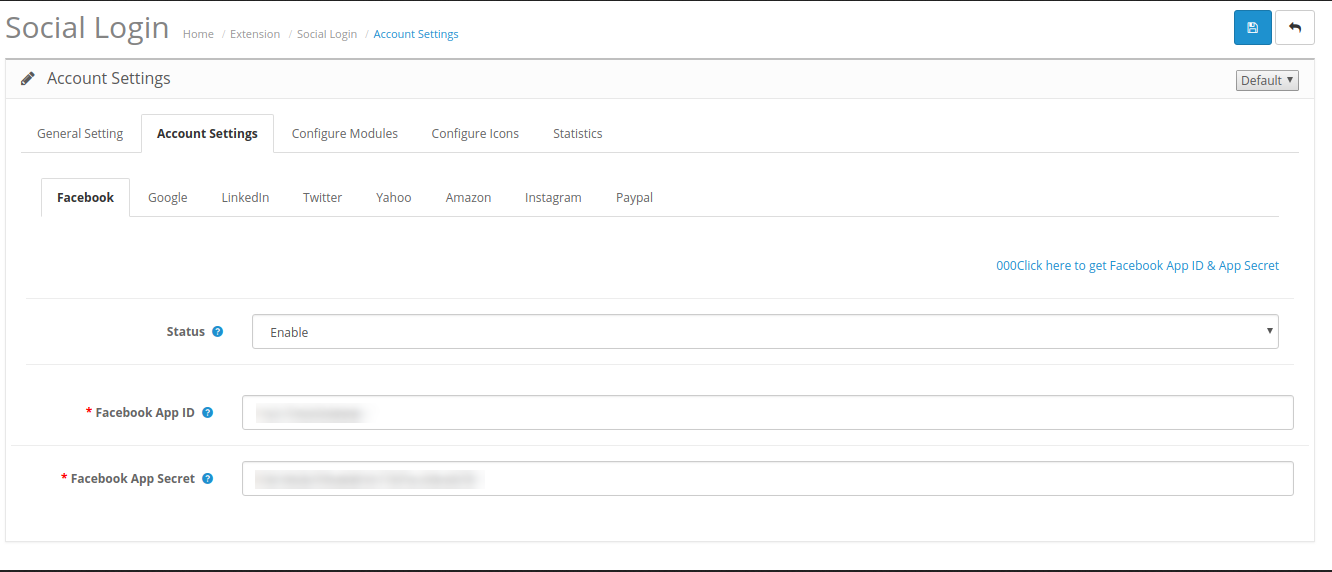
3.2 Account Settings
From here, the online merchant can set up the social login options. Admin can activate and set eight social login options from here.
3.2.1 Facebook
Status: The store merchant can show or hide Facebook login by enabling or disabling the settings from the OpenCart Social Login module admin interface.
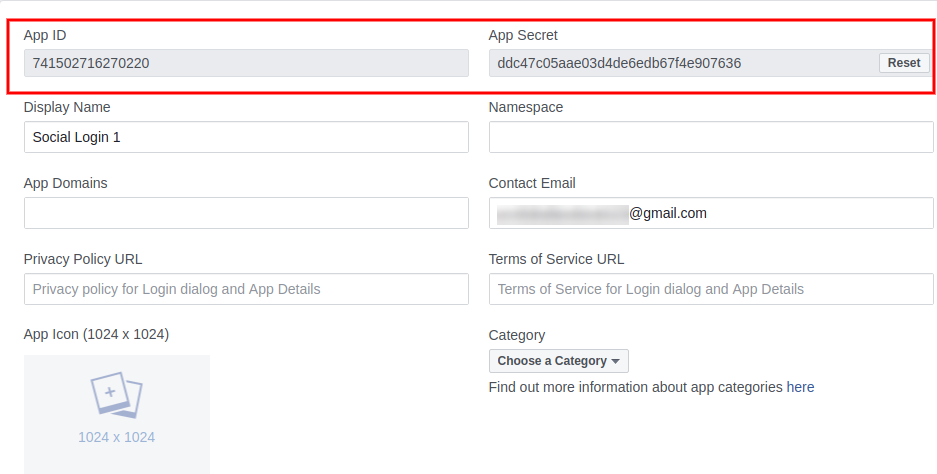
Facebook App ID: Admin needs to enter the Facebook app ID and page ID in order to incorporate the Facebook login option.
Facebook App Secret: Here, the admin needs to enter Facebook App-Secret.
In Section 1, admin can view the steps to generate a Facebook app id and app secret.
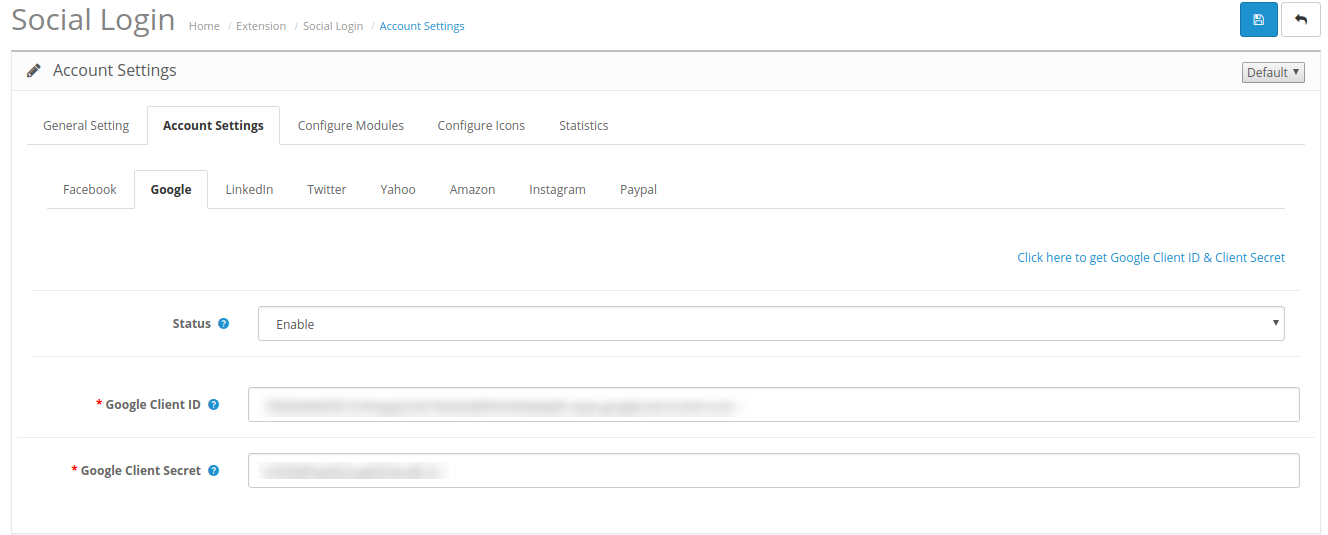
3.2.2 Google
Status: Admin can enable or disable the Google login option from the admin interface of Social Login OpenCart module.
Google Client ID: The e-merchant needs to enter Google Client-ID here.
Google Client Secret: Here, the admin needs to enter Google Client-Secret.
In Section 2, admin can view the method of generating Google client ID and client secret.
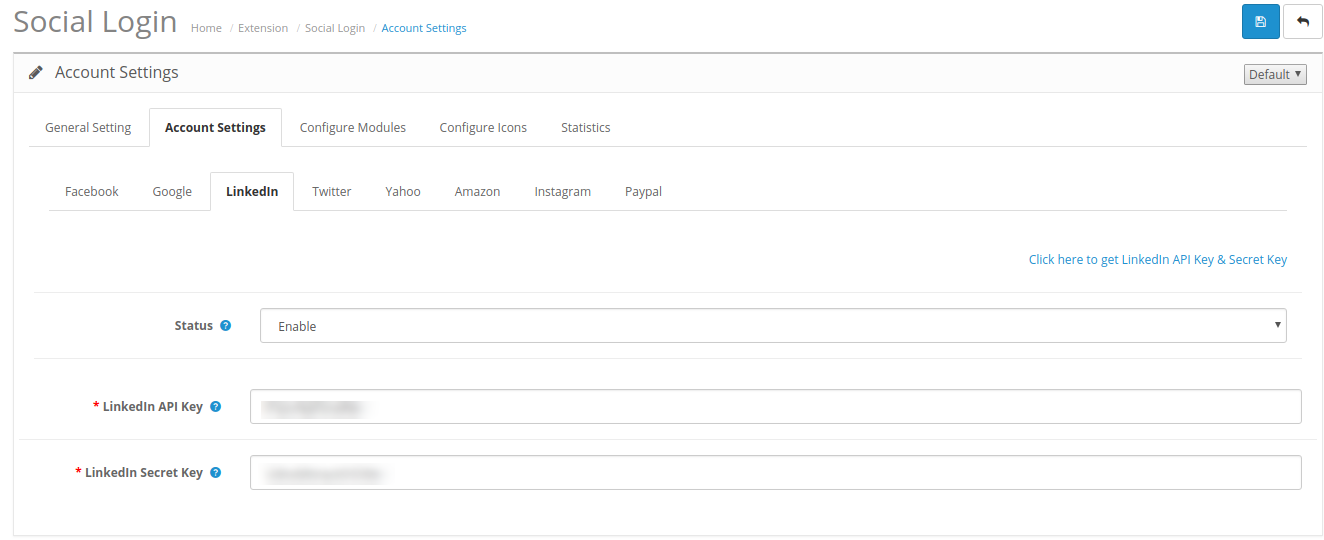
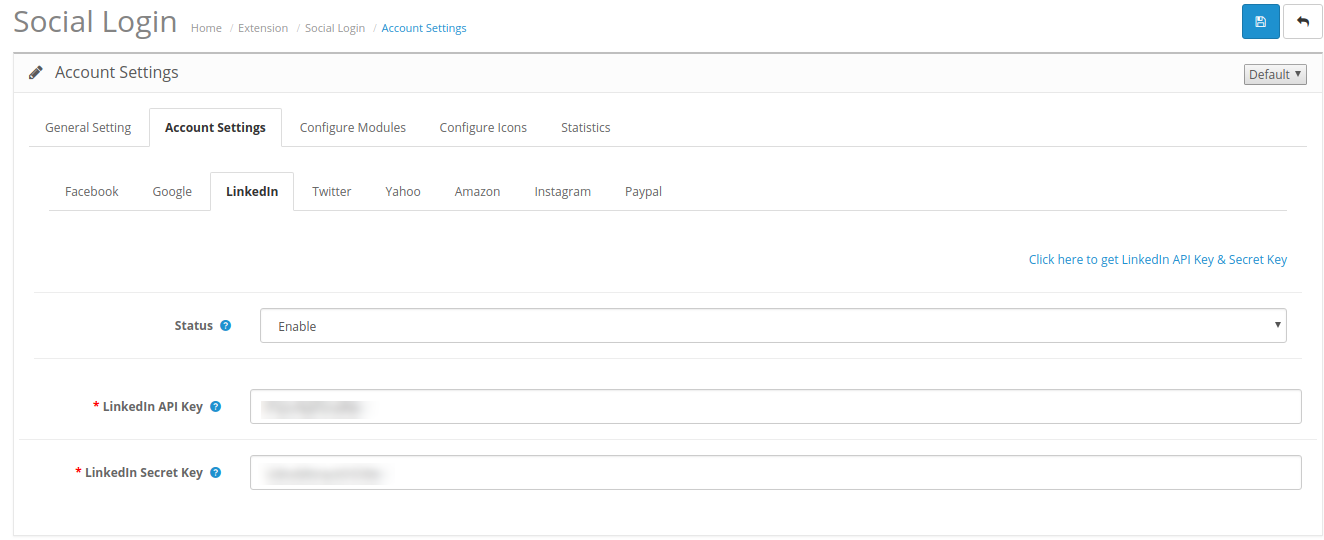
3.2.3 LinkedIn
Status: The store merchant can enable or disable the LinkedIn Login option from here.
LinkedIn API key: The admin needs to set up the LinkedIn API key.
LinkedIn Secret Key: Here, the admin needs to enter the LinkedIn Secret Key.
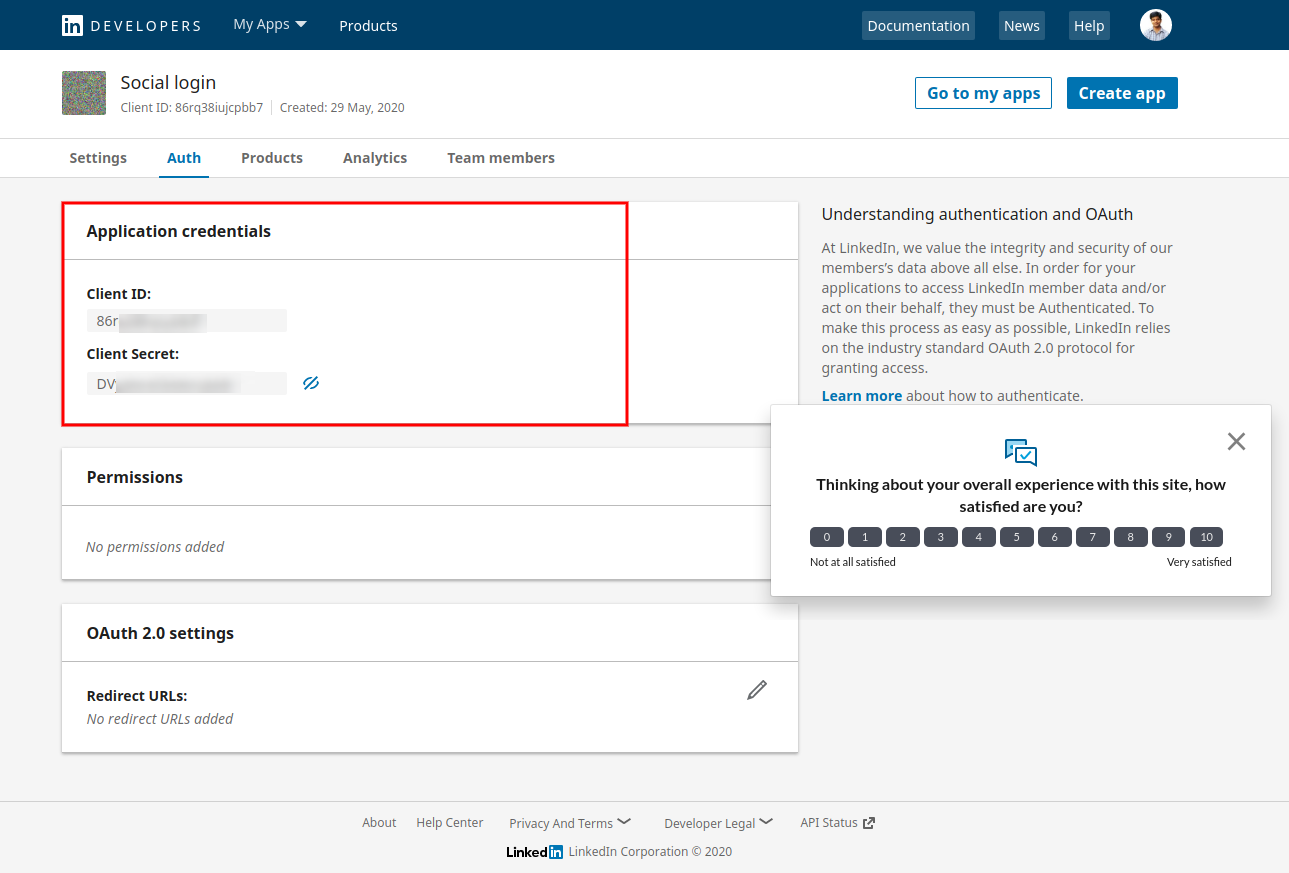
In Section 3, the admin can view the method of generating LinkedIn API key and secret key.
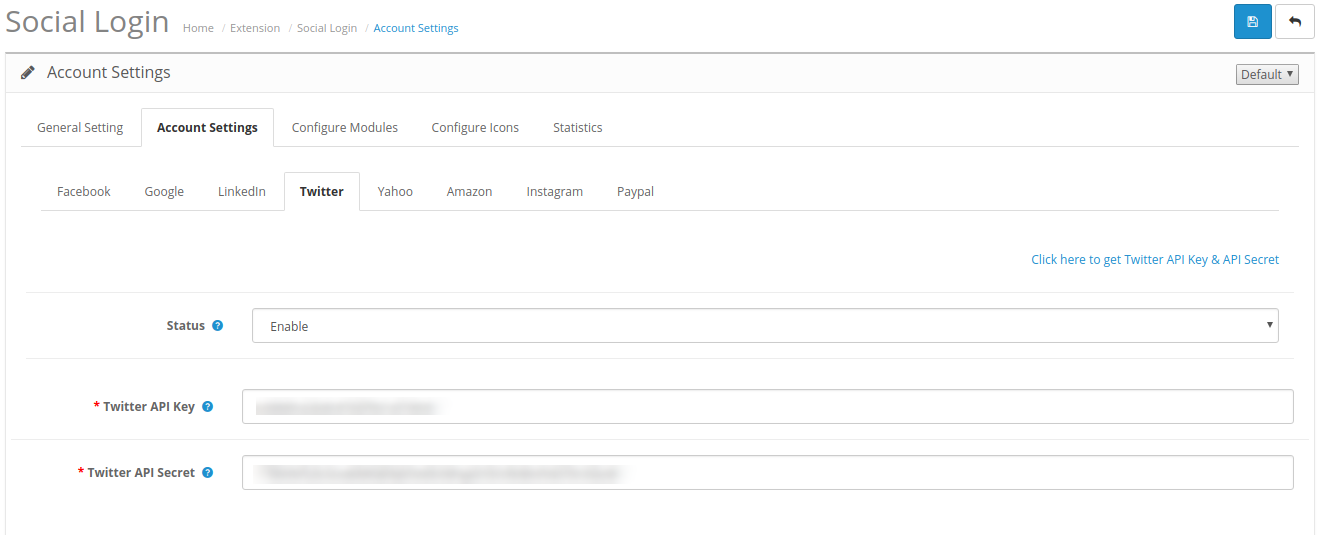
3.2.4 Twitter
Status: Admin can Enable or Disable the Twitter login option.
Twitter API Key: The admin needs to set the Twitter API Key.
Twitter API Secret: Here, the admin needs to set an API secret.
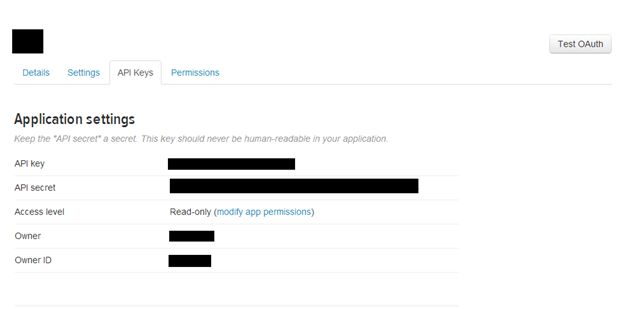
In Section 4, the admin can view the method of generating Twitter API key and API secret.
3.2.5 Yahoo
Status: The store merchant can Enable or Disable the Yahoo Login option.
Yahoo Consumer Key: Here, admin can enter Yahoo Consumer key.
Yahoo Consumer Secret: The admin needs to set Yahoo Consumer Secret.
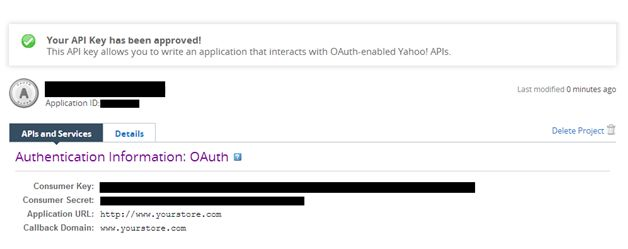
In Section 5, the admin can view the steps for generating Yahoo consumer key and consumer secret.
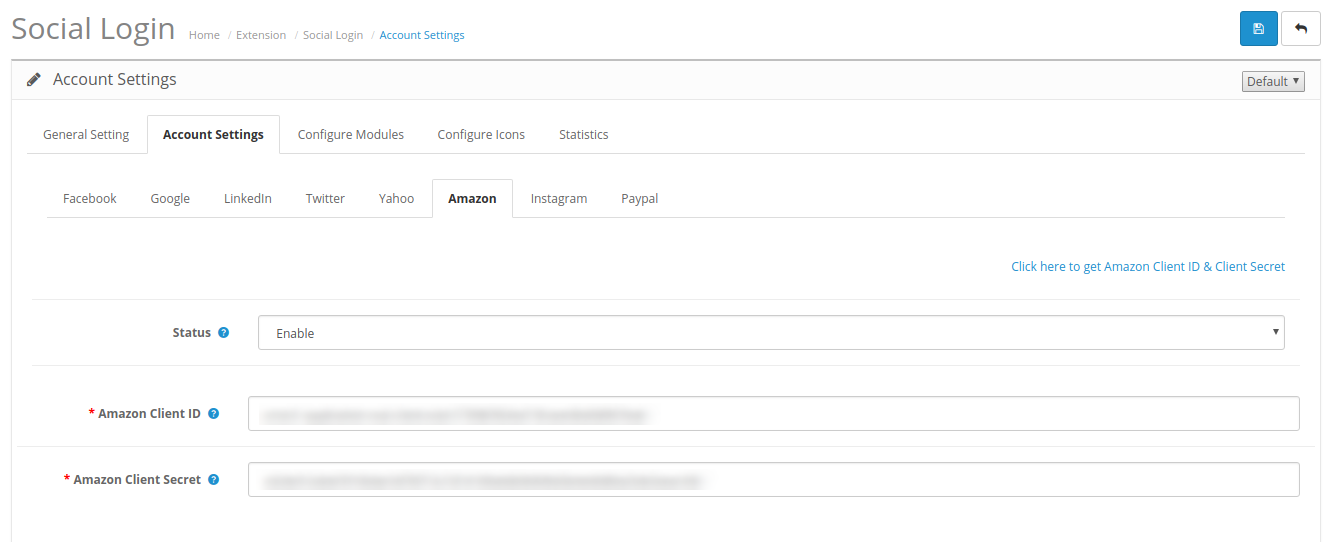
3.2.6 Amazon
Status: To Enable or Disable the Amazon Login.
Amazon Client ID: The admin needs to enter Amazon Client-ID.
Amazon Client Secret: Here, admin can enter Amazon Client-Secret.
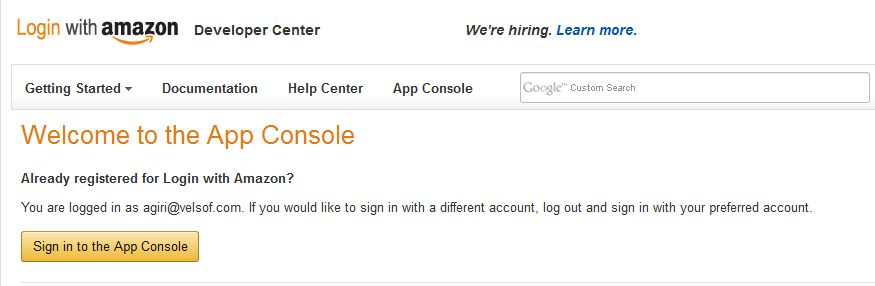
In Section 6, the admin can view the method of generating Amazon client ID and client secret.
3.2.7 Instagram
Status: Admin can Enable or Disable the Instagram Login from the admin interface of this OpenCart Social Media Login extension.
Instagram Client ID: The admin can enter Instagram Client-ID here.
Instagram Client Secret: Here, the admin needs to enter Instagram Client-Secret.
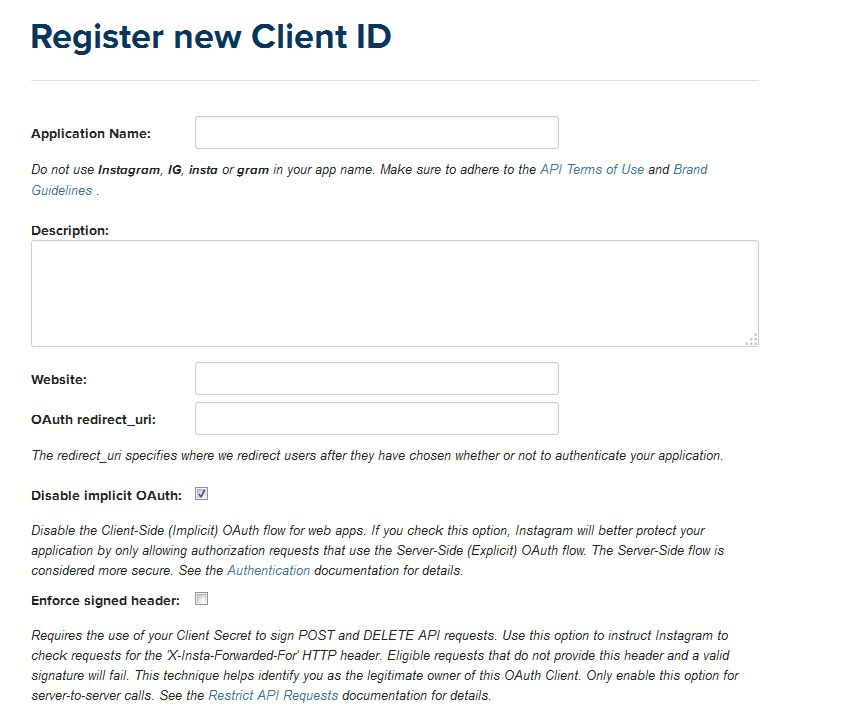
In Section 7, the admin can view the method of generating an Instagram client ID and client secret.
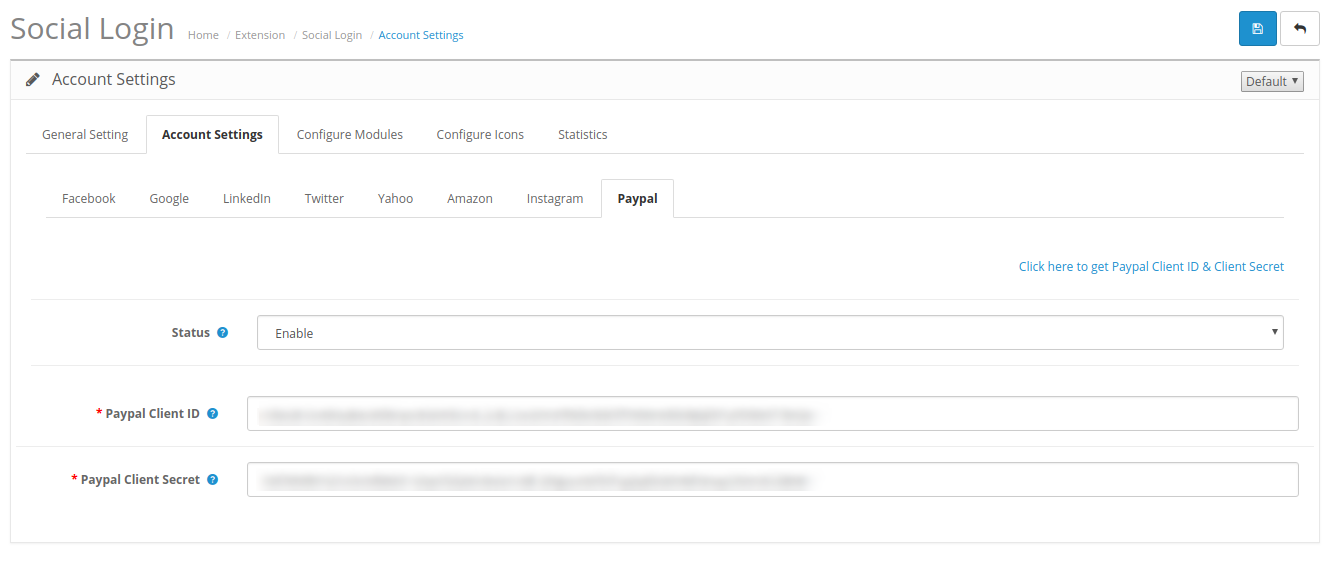
3.2.8 Paypal
Enable/Disable: The online merchant can Enable or Disable the PayPal Login from the OpenCart Facebook Login extension admin interface.
Paypal Client ID: The admin needs to enter Paypal Client-ID.
Paypal Client Secret: Here, the admin needs to enter Paypal Client-Secret.
In Section 8, the admin can view the method of generating Paypal client ID and client secret.
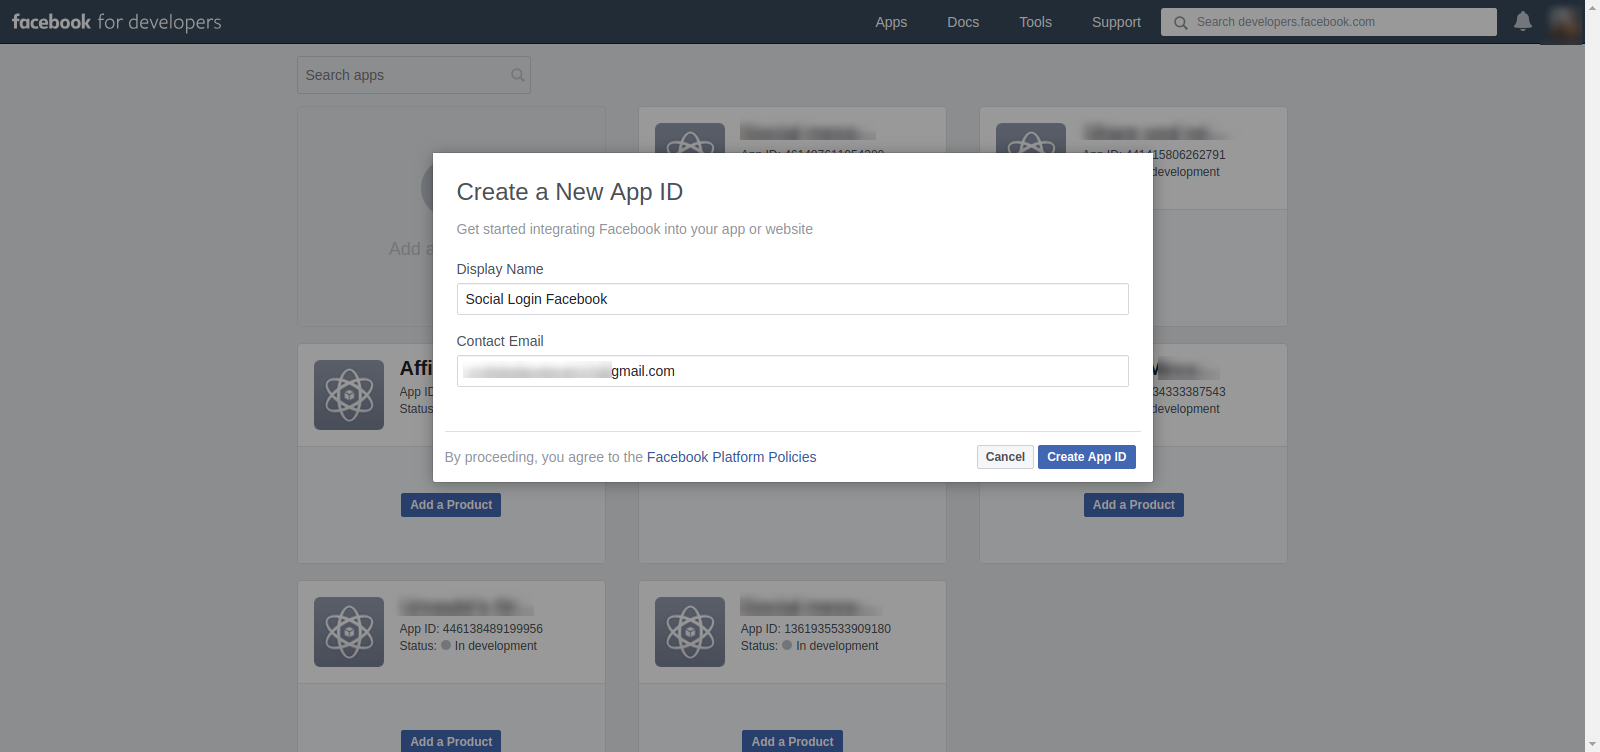
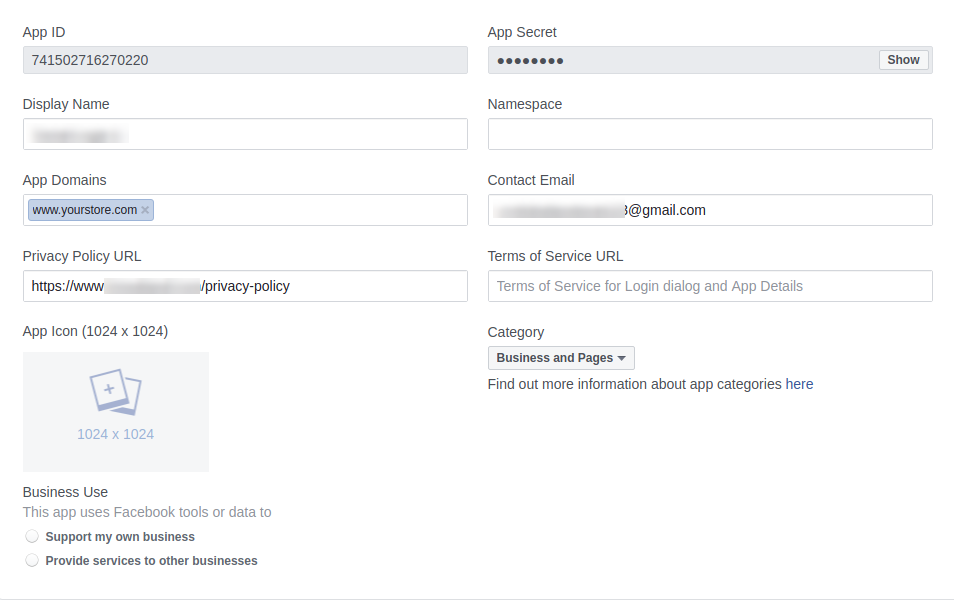
1. Steps to Generate Facebook App details:
Go to the link https://developers.facebook.com/apps/ or you can directly click on the message available at Facebook configuration page which is “Click here to get Facebook App ID & App Secret”.
Click on Add a new App.
Enter the required Details.
After security check, go to settings>basic. Here you will get the App ID and App Secret.
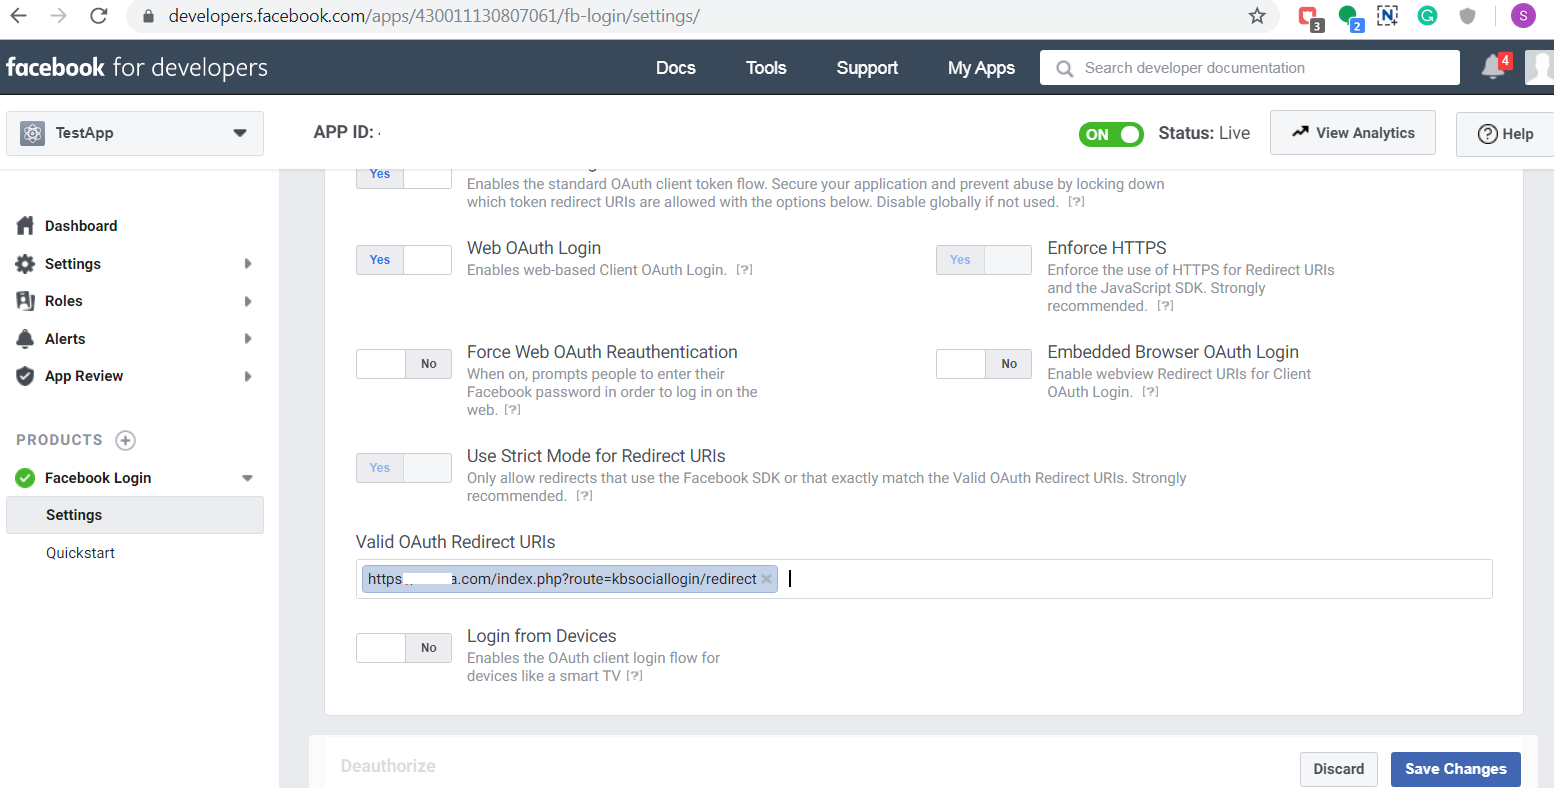
Now enter the App Domain, privacy policy URL and save changes.
Now, go to the Status & Review tab from the left menu and make the Application Live.
2. Steps to get Google App details:
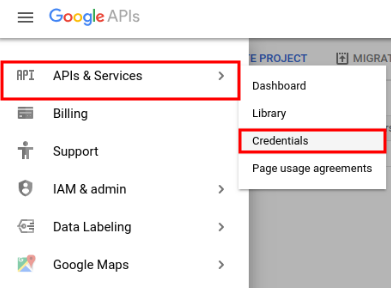
Go to Google Developers Console: https://console.developers.google.com/project
Now click API and Services-> Credentials from left menu.
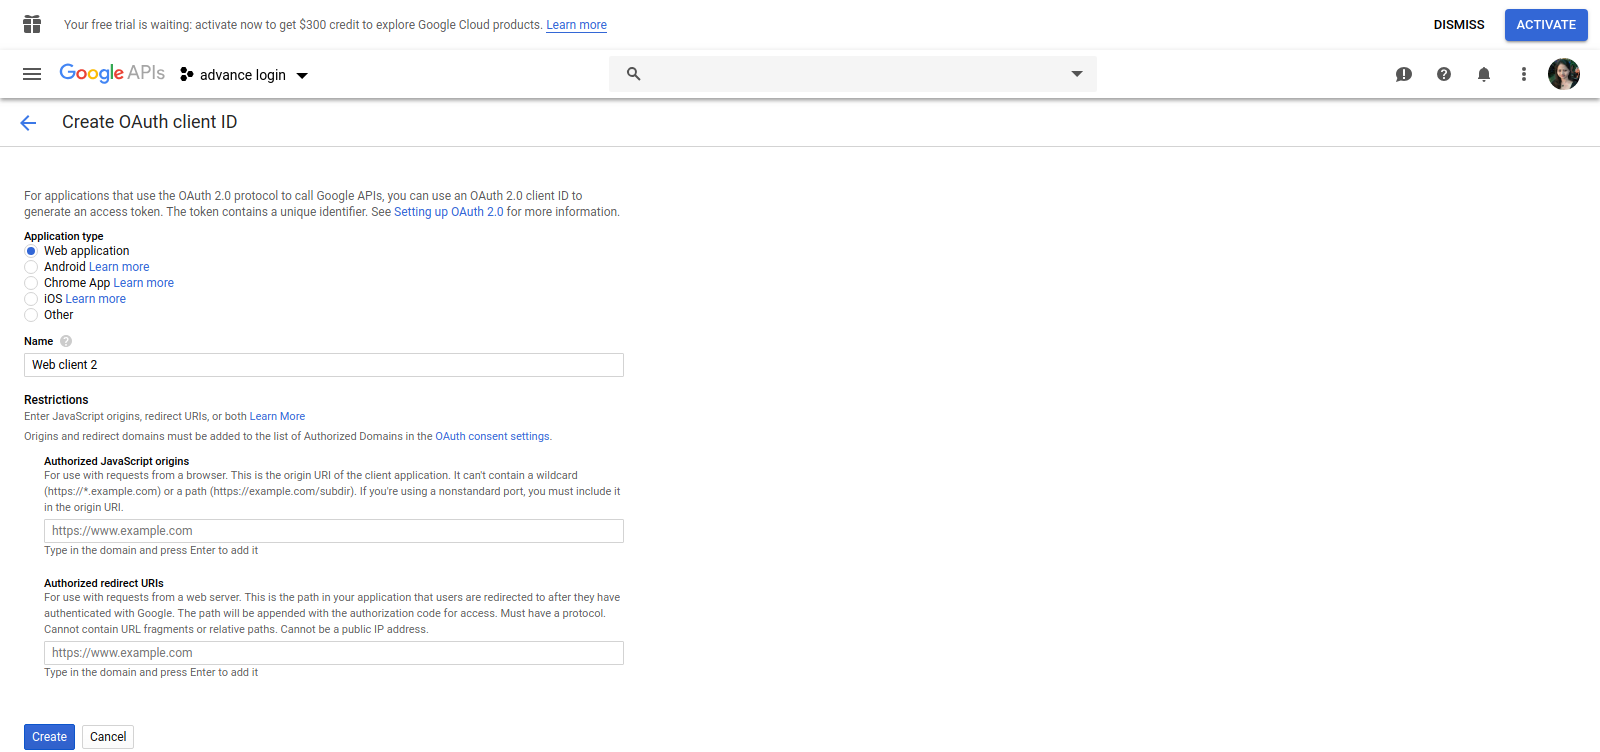
Click Create New Client ID button from the right panel of the screen.
Fill the pop-up form with below details:
Application Type: Web Application.
Authorized JavaScriptorigins: Your store domain name. (https://www.example.com)
Authorized redirect URI: URI of SNSLogin redirect page.
(https:// www.example.com/index.php?route=kbsociallogin/redirect).
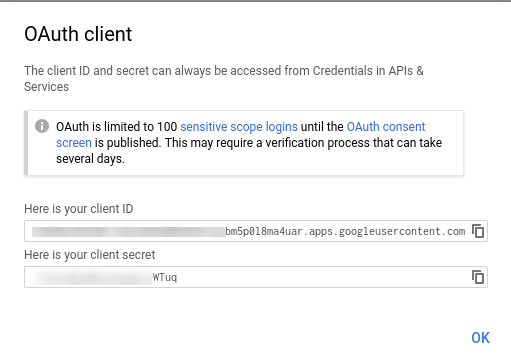
Now click Create Client ID button to get your Client ID and Client Secret Key for OpenCart Social Login.
3. Steps to get LinkedIn App details:
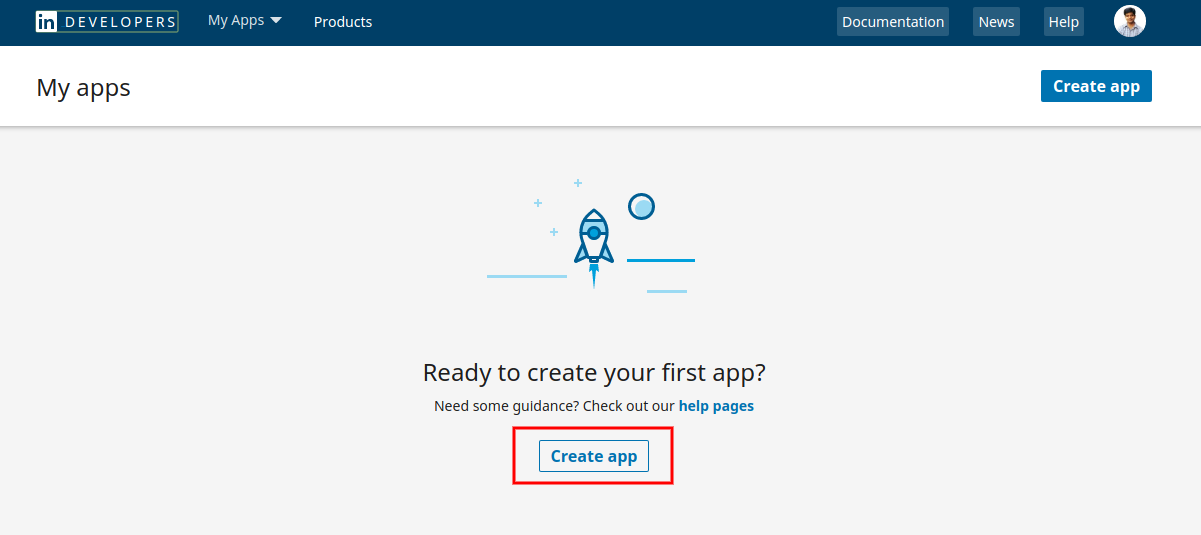
Go to https://www.linkedin.com/developers/apps
Click on Create App.
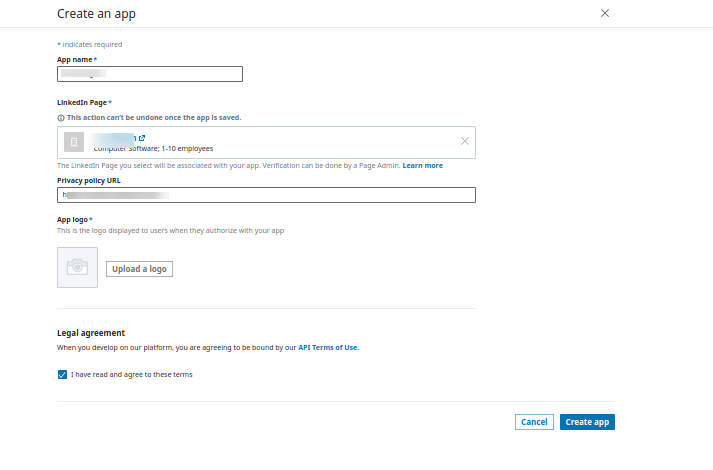
Fill the form to register a new application. The website URL must be your Store URL like https://www.example.com.
Click on the create app button.
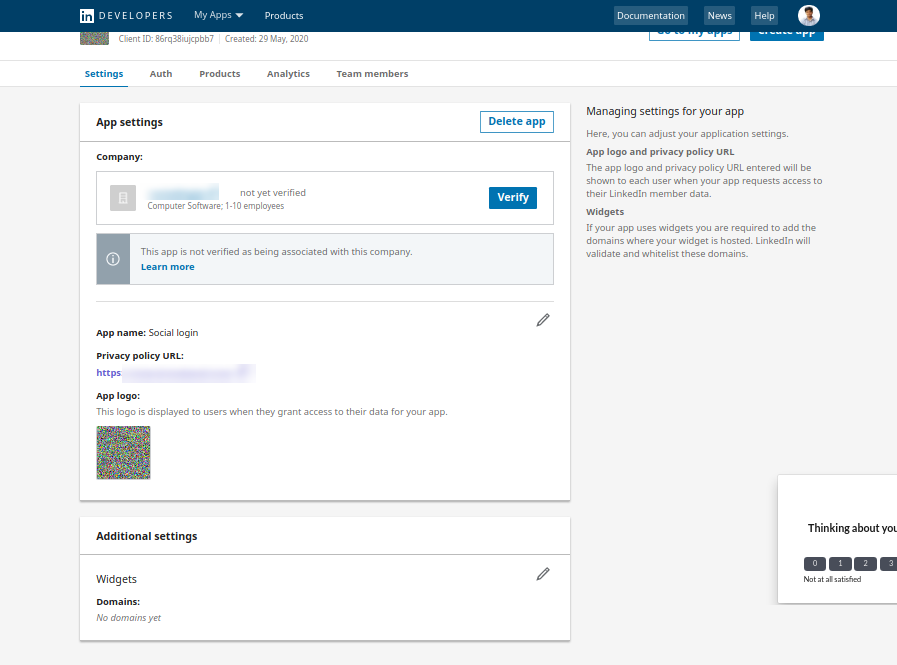
In the auth section, the online merchant can view the app Id and secret as shown below:
4. Steps to get Twitter App details:
Go to https://dev.twitter.com/apps
Click Create New App button.
Enter the Application Details as follows:
1. Application Name: Name of your Application.
2. Description: 10 to 200 characters description of your application.
3. Website: Your store URL.
4. Callback URL: SNSLoginresirect page URL of your store.
(https:// www.example.com/index.php?route=kbsociallogin/redirect).
Now, Click Yes, I agree and then click Create your Twitter application.
Now, select the API Keys from the menu below your Application Name and copy your API Key and API Secret for OpenCart Social Login.
5. Steps to get Yahoo App details:
Go to Yahoo Developer Network (https://developer.apps.yahoo.com/projects).
Click Create a Project.
Fill the required details as per instructions. Home URL will be your Store URL.
Click Create Project button.
Copy your Consumer Key and Consumer Secret for OpenCart Social Login extension.
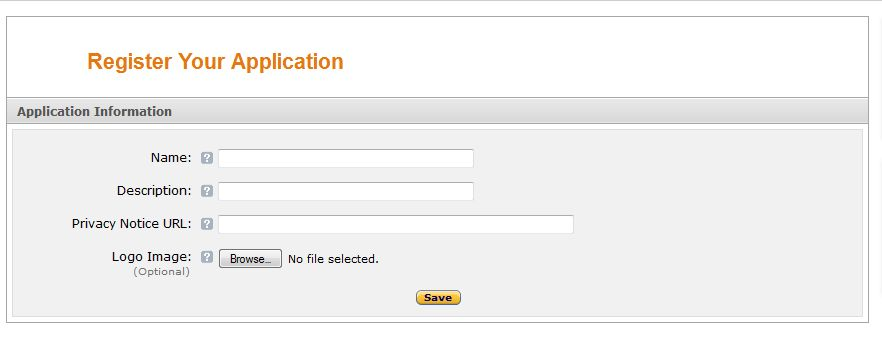
Go to Amazon Developer Network (https://login.amazon.com/manageApps).
Click on Sign in to App Console button.
After successful login to App Console click on Register new application button in the top right of the page and you will be redirected to the following page.
Enter the Application Details as follows:
Name: Name of your Application.
Description: Description of your application.
Privacy Notice URL: Url of privacy policy page of your store.
Logo Image: Select optional logo image of your store.
Click the Save button.
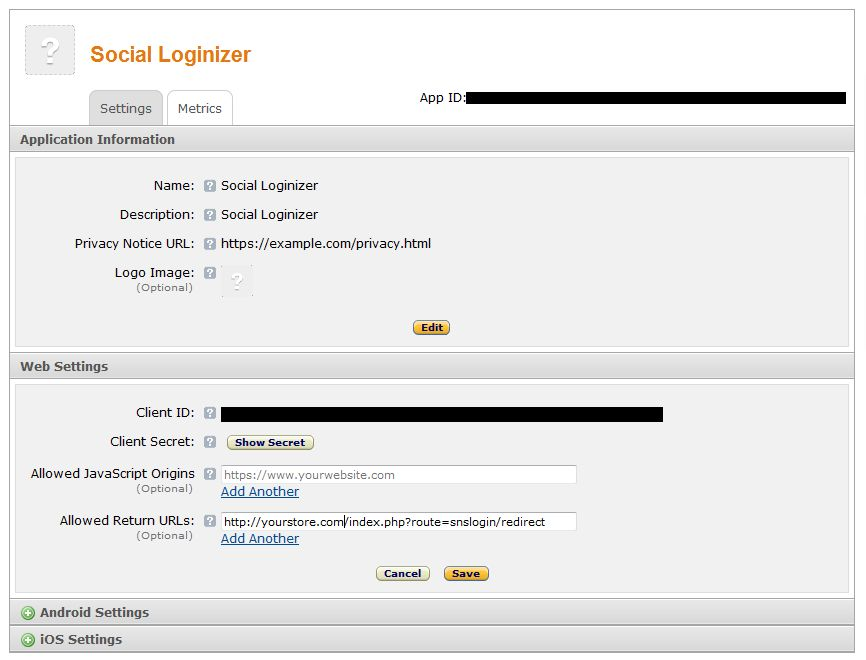
Now click on Web Settings to get your client id and secret for Social Login OpenCart module.
Allowed Return URL: SNSLogin redirects page URL of your store.
(https:// www.example.com/index.php?route=kbsociallogin/redirect)
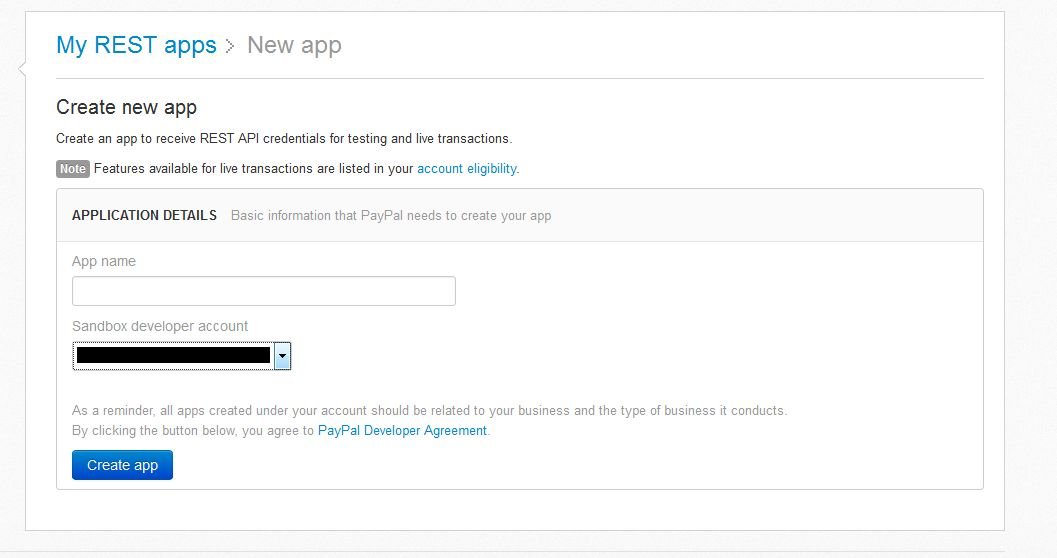
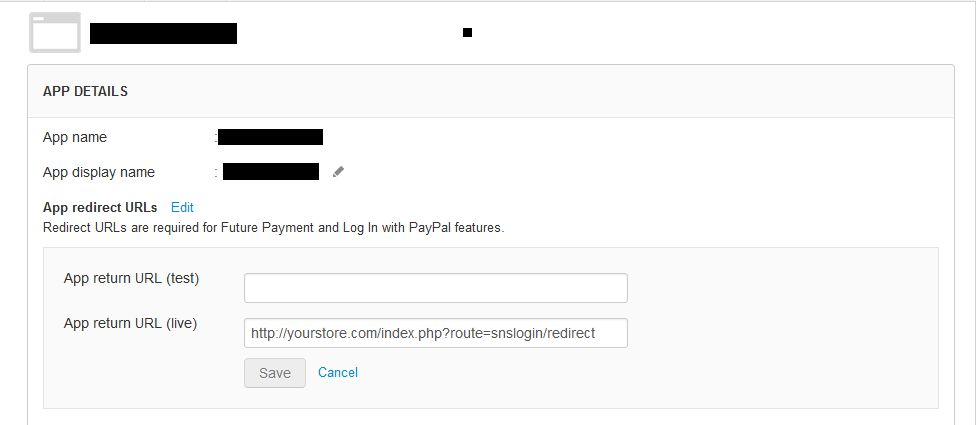
Go to Paypal Developer Network (https://developer.paypal.com/webapps/developer/applications/myapps).
Click on Create App button.
Now enter the name of your Application and click Create App Button.
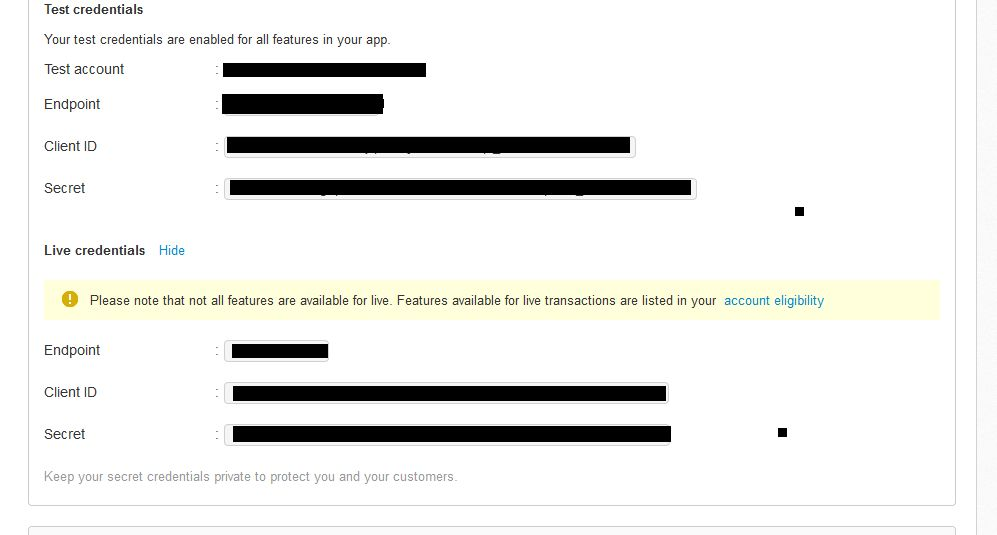
Set App return URL (live) as SNSLogin redirect page URL of your store.
(https:// www.example.com/index.php?route=kbsociallogin/redirect).
Copy and paste live credentials to admin panel of OpenCart Social Login extension.
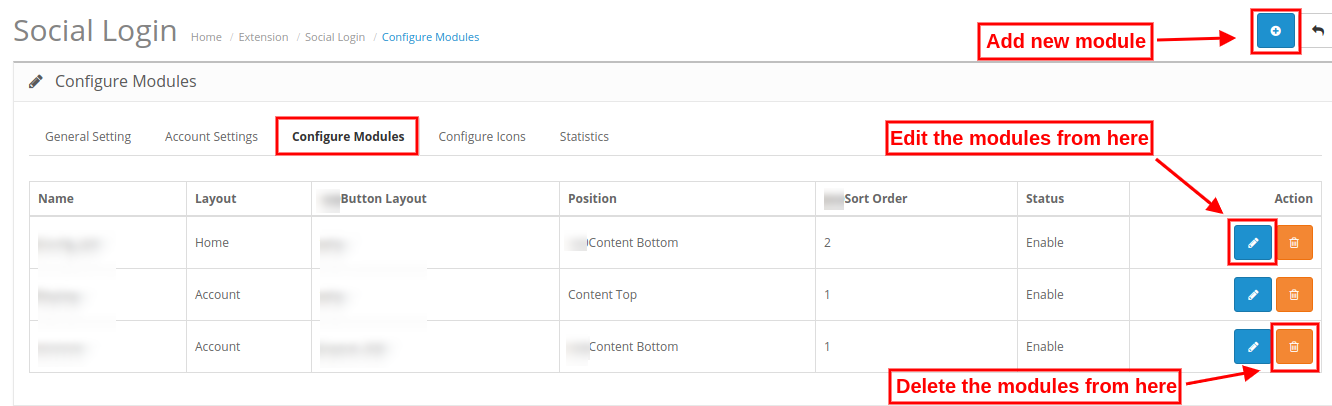
3.3 Configure Modules
Here, the online merchant can set the social login icons on different pages and apply other related settings. Admin can add, delete and update different social login modules. The customization options are described below:
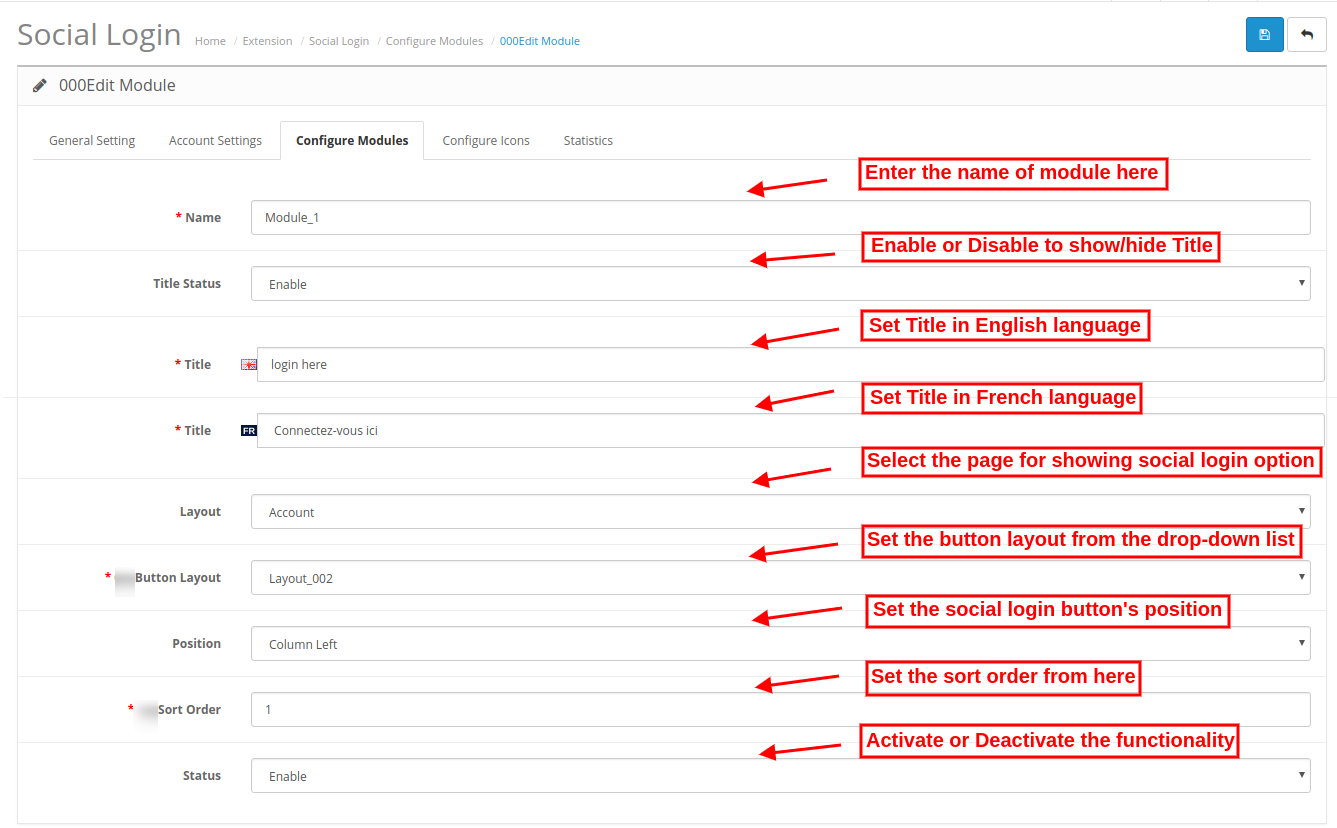
Steps to add a new module:
Module name: Admin can set the name of the social login module.
Title Status: The e-merchant can activate or deactivate this option to show or hide the module title.
Title: Admin can set the module title in different languages.
Layout: The e-merchant can select the layout from the drop-down list available at the admin interface of this OpenCart Facebook Login extension.
Button Layout: The e-merchant can select the button layout from the available options in the drop-down list.
Position: The online seller can select the position for showing social login options. The Social Login Options for OpenCart allows showing login options in the content top, content-bottom, content left and content right.
Sort Order: Admin can set the sort order for the social icons.
Status: The store merchant can activate or deactivate this module from the admin interface.
3.4 Configure Icons
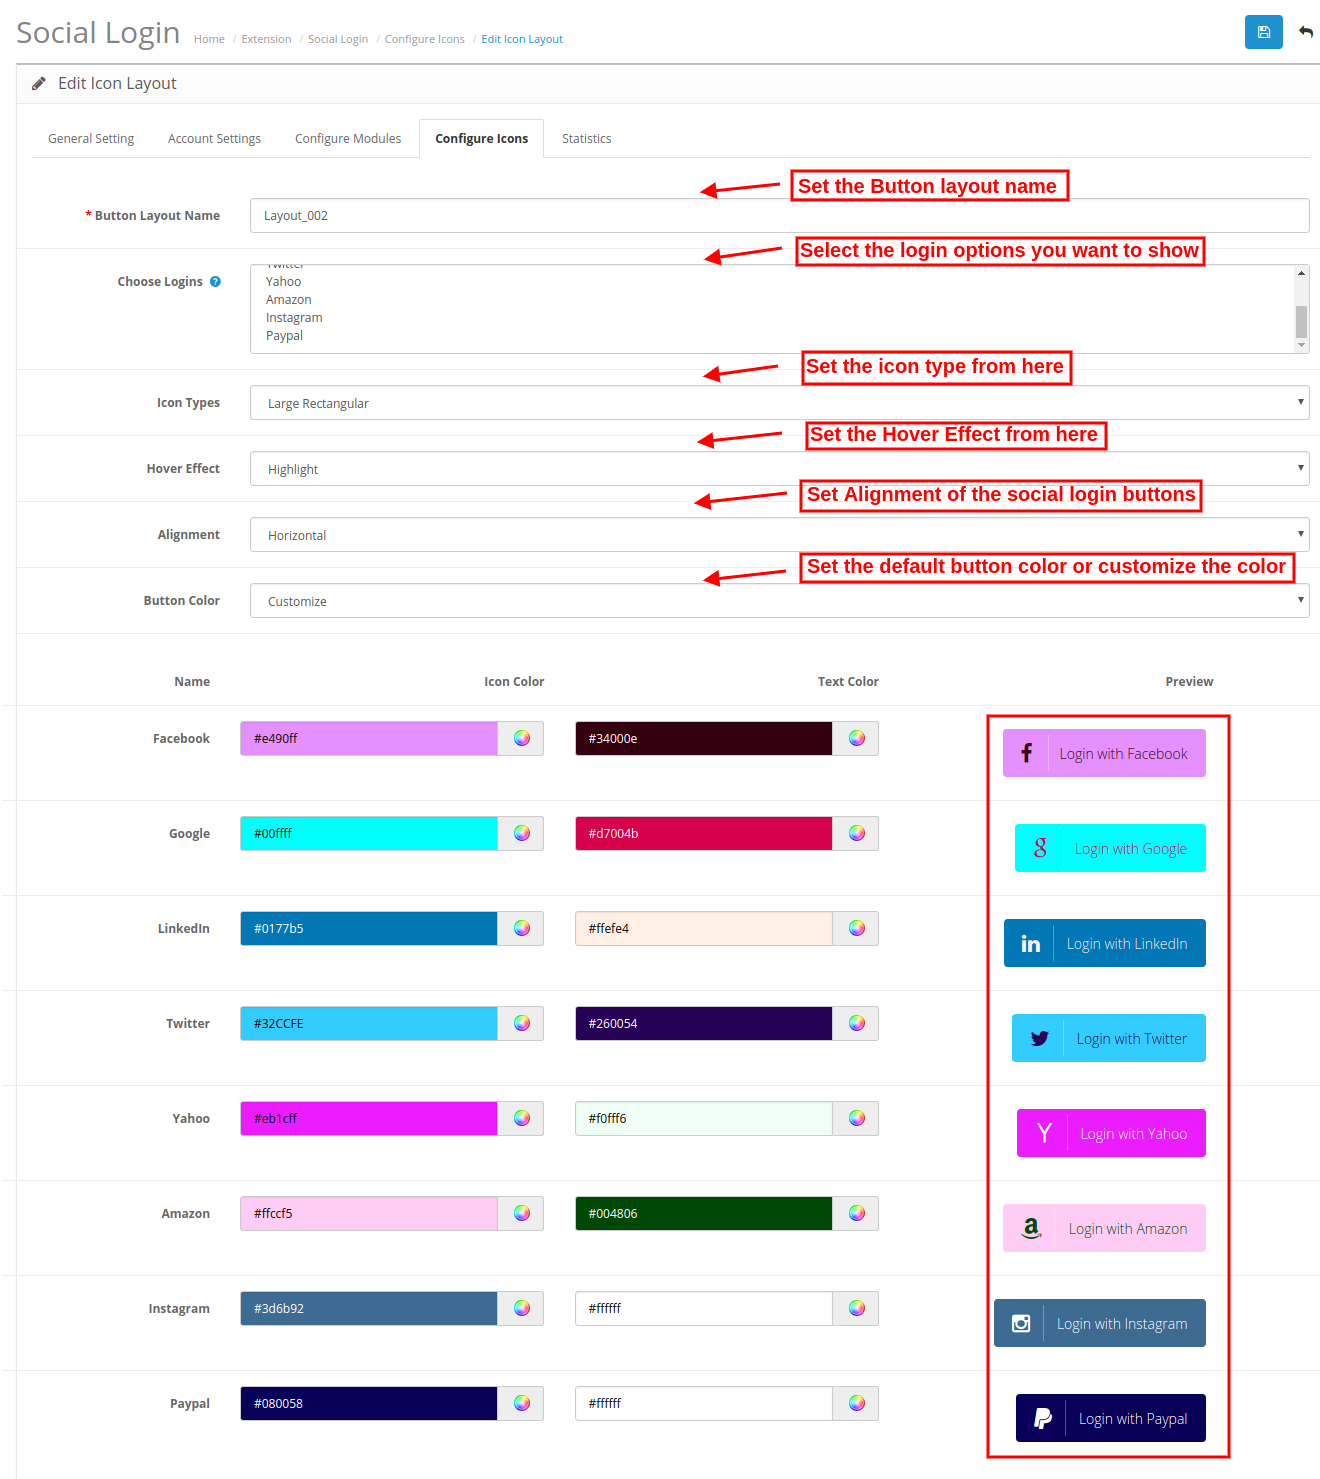
The online store merchant can create layouts for social login icons. The OpenCart Twitter Login extension allows the store merchant to add, delete and edit the layout from the admin interface.
Button Layout name: Admin can set the button layout name from here.
Choose Logins: The store admin can select from the 8 social options which he wants to display in this layout.
Icon Types: Admin can set the icon type from here. The icon can be Small Circular, Small rectangular, small rounded, large rounded and large rectangular.
Hover Effect: Admin can set the hover effect from here. The Social Login OpenCart module can zoom, highlight and rotate the social login icons.
Alignment: The store merchant can set the alignment as horizontal or vertical.
Button Color: Admin can select the default button color or customize the button color for each icon from the Social Login OpenCart module admin interface.
3.5 Statistics
In this section, the online merchant can view the statistics of user registration and login. The admin can view the list for getting the details that how many customers login/registered from every social login option. The OpenCart Twitter Login extension also shows the total registration in the website using any social media options along with the name and email id details.
4.0 Front-End Interface
The online users can view the multiple social login options on the website pages. The admin can show different social login options on all the website pages if he wishes to do so.
The customers can log in/signup from any of the social login option available on the website page.
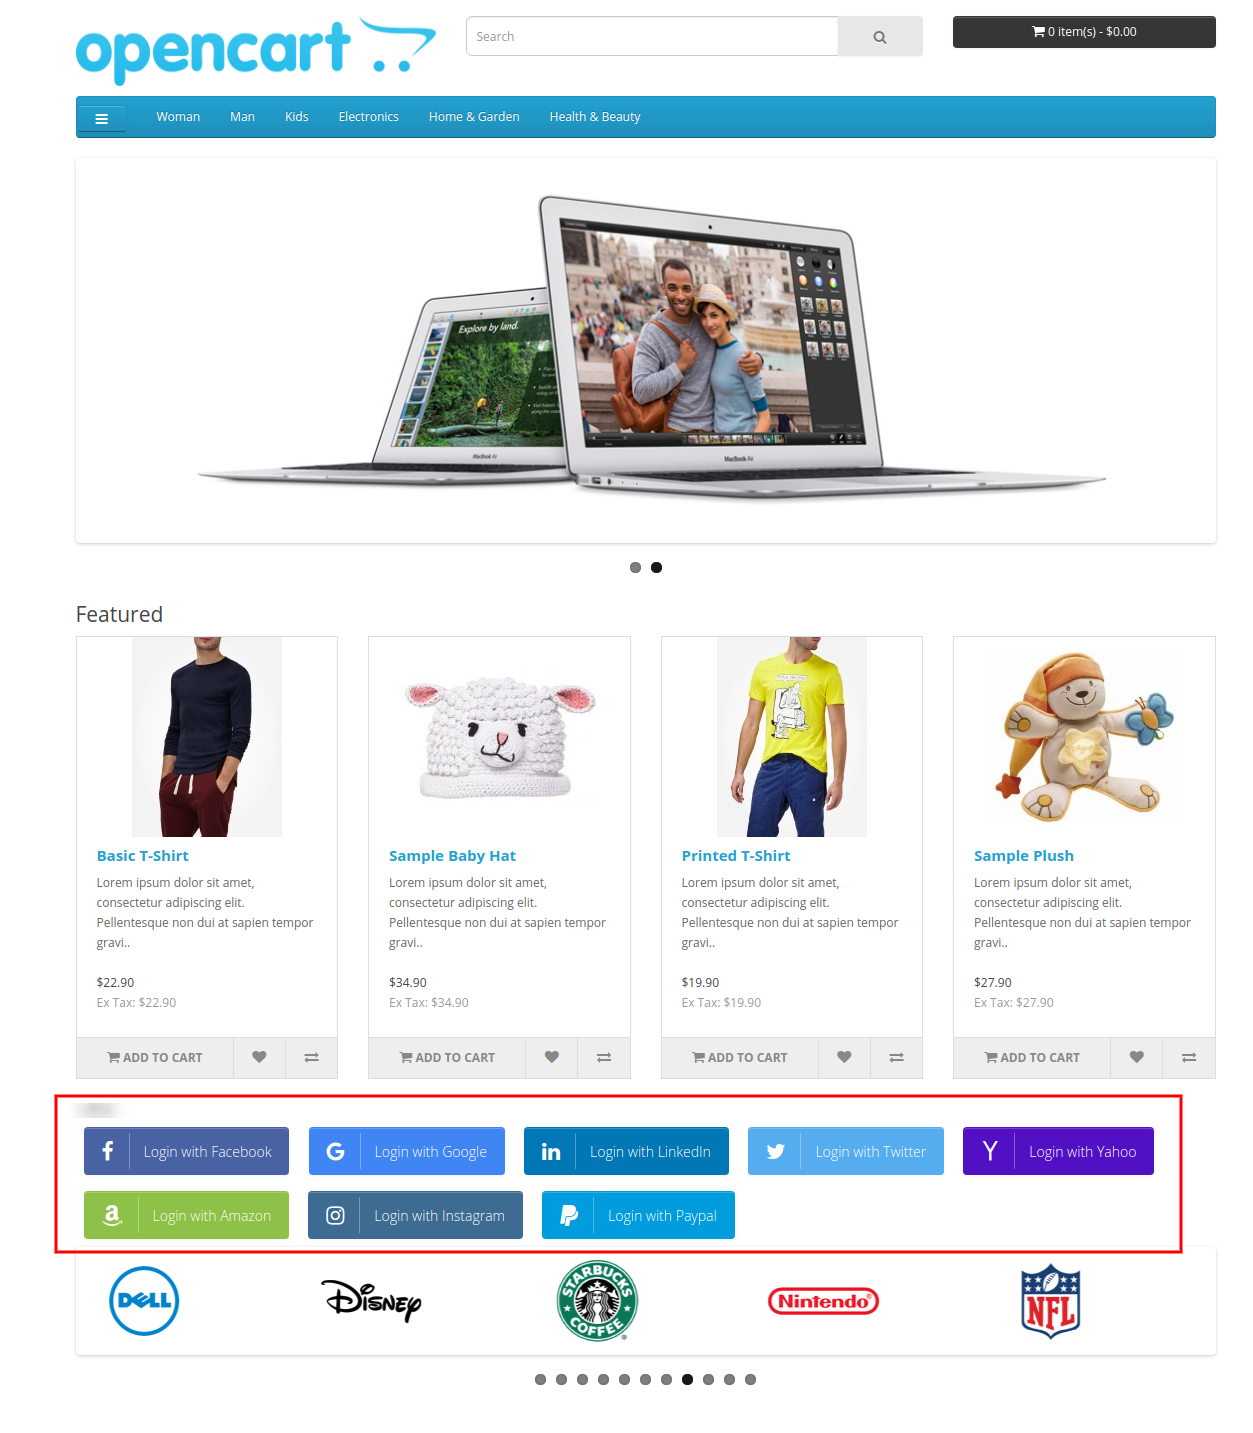
Home Page will display as below mentioned image while using large rectangular icon with zoom effect.
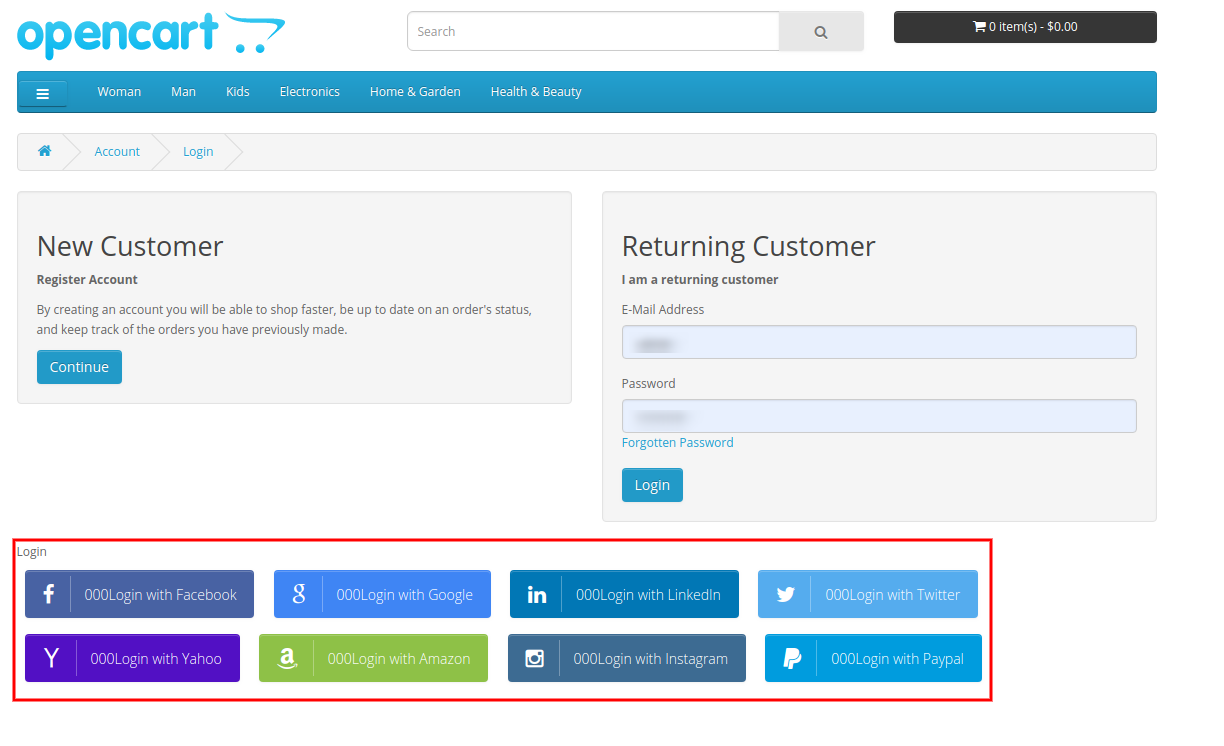
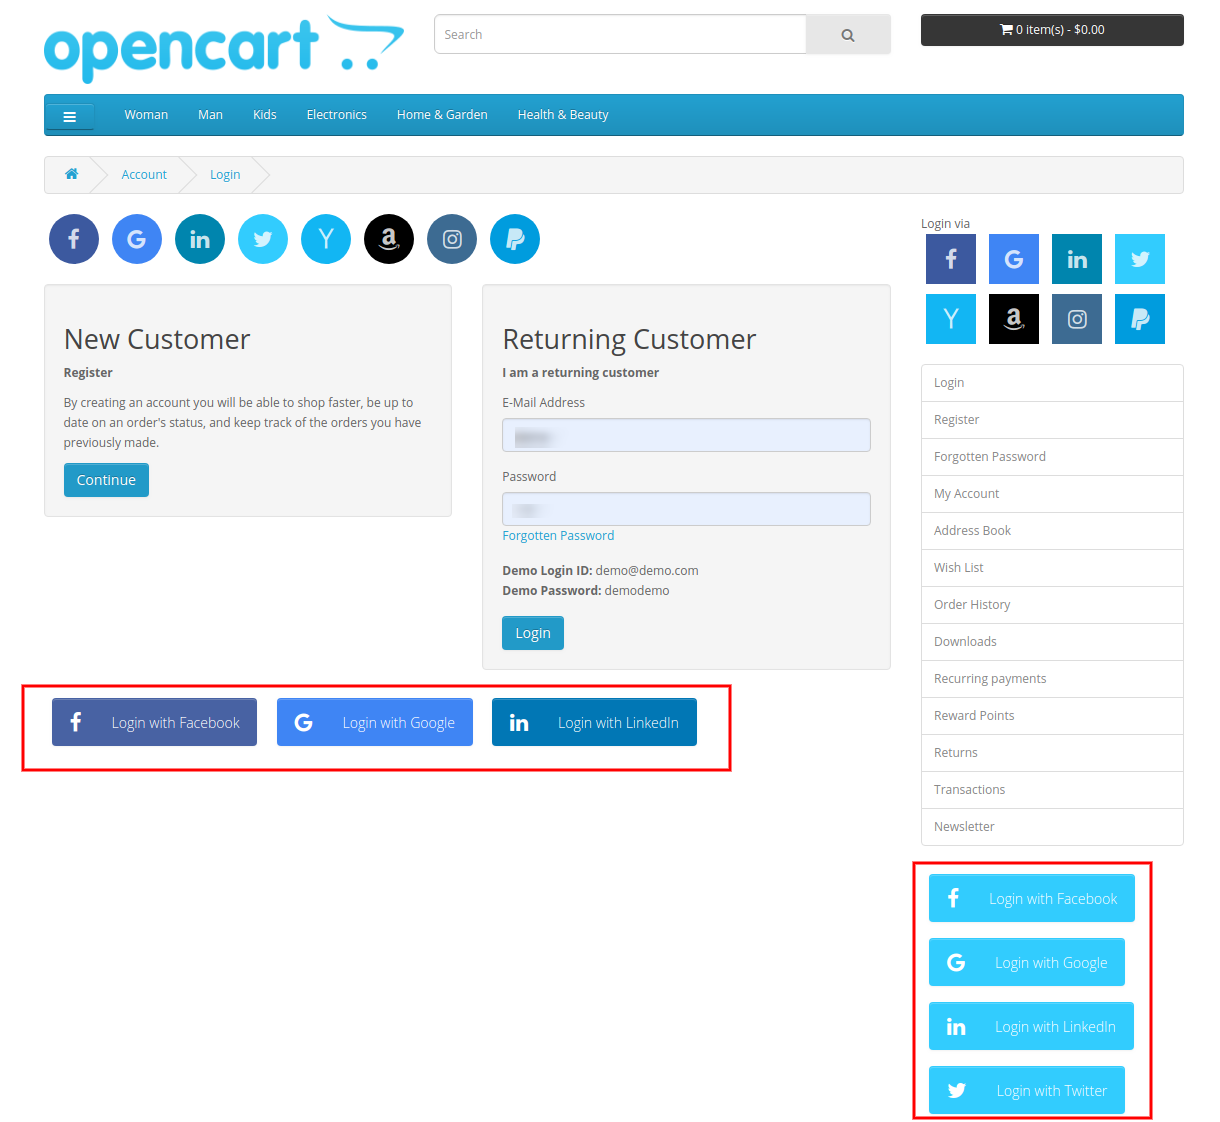
Large Rectangular Icon with Highlight Effect and Large Rectangular Icon with Highlight Effect, customized button color will look as below mentioned image.
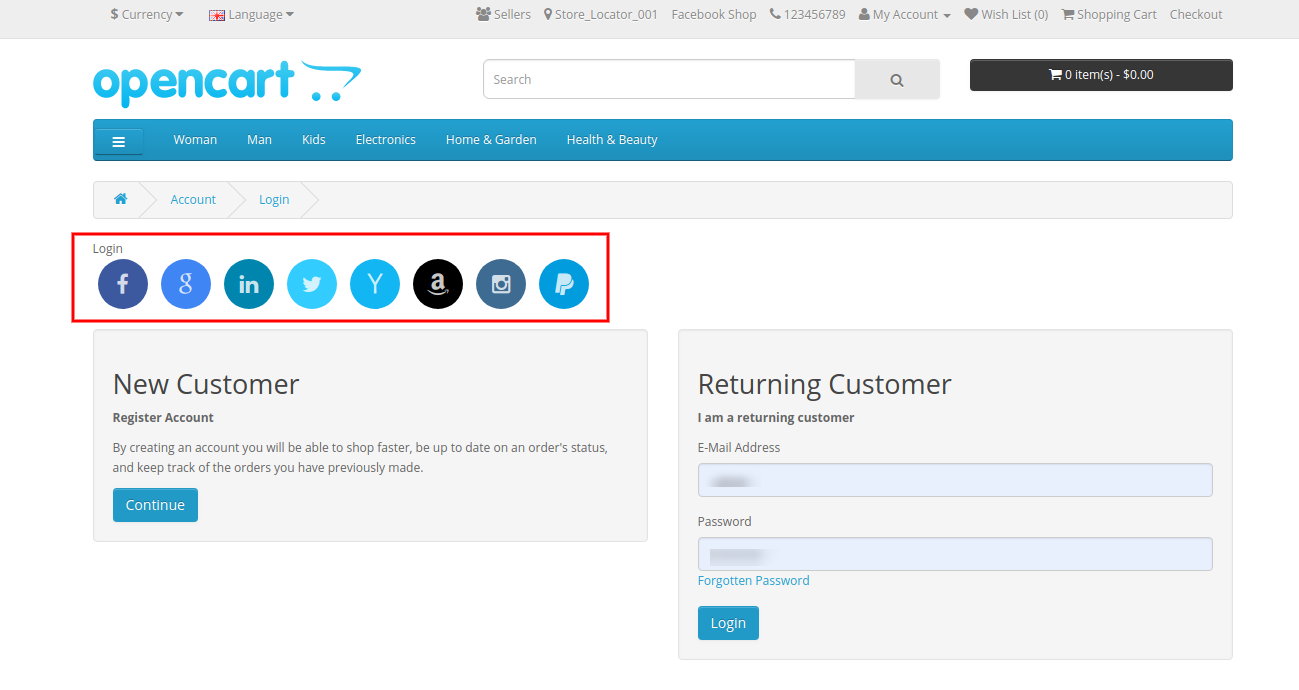
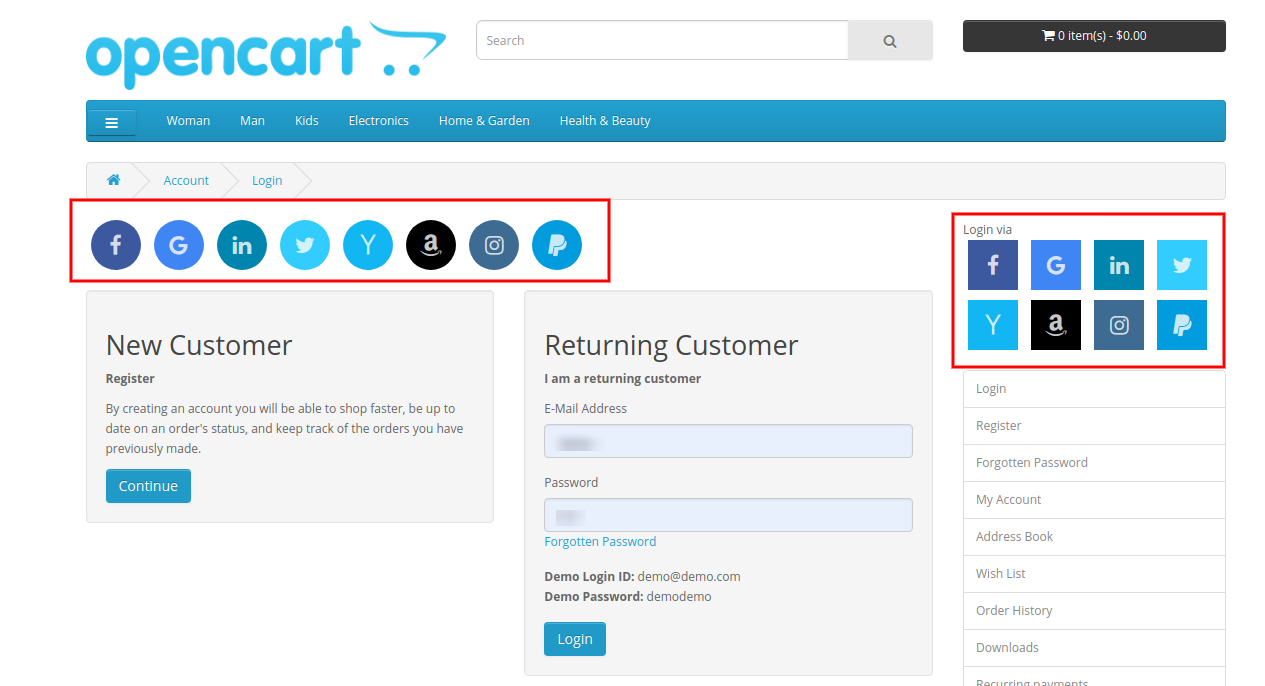
Small circular icon with a rotating effect and small rectangular icon with highlight effect will be displayed as below mentioned image:
This way, the customers don’t need to login/register via a lengthy process. They just need to click on social login buttons and easily login/register.
For more details about this OpenCart Social Login extension, visit here: