OpenCart Shipping Timer Extension – User Manual

1.0 Introduction

OpenCart Shipping Timer extension by Knowband offers a configurable shipping timer which you can display on product pages at your store. This shipping timer is a countdown that compels the visitors at your store for grabbing benefits of same day shipping or one day shipping. This OpenCart Shipping module basically adds a single day or multiple day timer to your store for selected products, categories and manufactures. You can attain your customer’s attention with this shipping timer and show custom banners to them.
If the customer orders a product before the countdown time ends, their product will be delivered on the same day or one day of ordering.

1.1 Striking Features of Product Shipment Timer for OpenCart

OpenCart Shipping Timer extension comes with customizable features which can be modified as per business requirements. No coding is required and you can display a same day shipping timer or one day delivery timer at your store without any coding efforts. Let us explore them one by one.

  • Shows a shipping timer on every product page of your store compelling users to buy product before same day or one day delivery offer ends.
  • OpenCart Shipping module is easy to install and configure.
  • You can enable or disable OpenCart Shipping Timer extension on a single click.
  • OpenCart Countdown Timer offers multi-lingual and multi-lingual compatibility.
  • With OpenCart Shipment Timer extension, you can create a single day timer or multiple day timer for your store.
  • OpenCart Shipping module provides you multiple choices for selection that is categories, products and manufacturers.
  • You can set the starting and ending date for the shipping timer.
  • You can choose the days for which you want to show the countdown timer.
  • OpenCart Shipping Timer extension also gives you option to set the vacation dates to restrict the functionality.
  • In order to give an appealing look and feel, you can add desired banners along with countdown.
  • You can easily view and manage the total orders by customers using this OpenCart Countdown Timer.
  • OpenCart Shipment Timer extension is useful in increasing conversion levels as the shipping countdown compels the customer in making their decision quick.

2.0 Installation Guide of OpenCart Shipment Timer Extension

Before starting the installation process, you have to buy the OpenCart Shipping module from the Knowband store. Once purchased, you will receive the following files on your registered email.

  1. Source code of Shipping Timer extension in zipped file format
  2. User Manual of OpenCart Shipping Timer extension

Now in order to install this Shipping Timer on your website, follow the given steps:

1. Unzip the zip file. You will get the folders as shown in the image below


2. Copy all the folders of the zip file in the Root Directory of OpenCart setup via FTP manager.

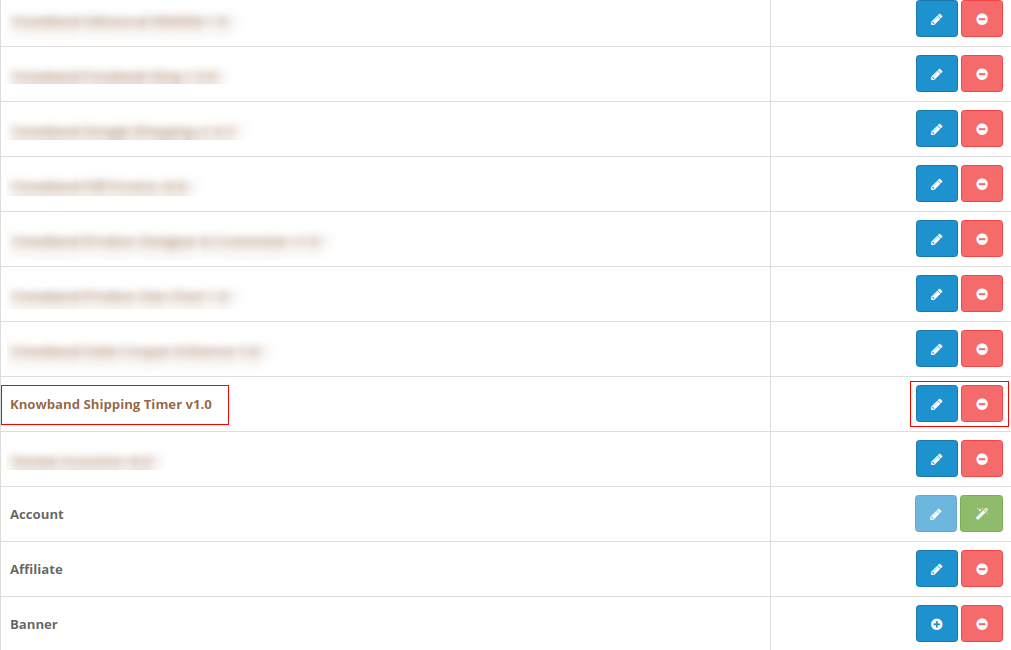
So, OpenCart Shipping Timer extension is now successfully installed and is ready to use at your store. Go to the admin menu and click on the extensions. Then, click on Modules and thereby click on configure button next to Knowband Shipping Timer.

3.0 Admin Interface of OpenCart Shipping module

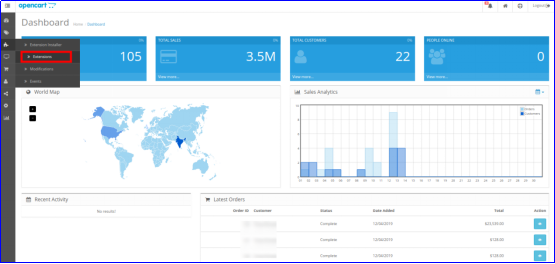
Just after successful installation of Shipping module for OpenCart website, you can create and configure the countdown timers as per your business requirements. Navigate the settings in the given order: Admin Panel > Extensions > Modules > Knowband Shipping Timer.
picture2

The simple to understand admin interface of OpenCart Shipping Timer extension is divided into six broad sections as:

1. General Settings
2. Manufacturers
3. Categories
4. Products
5. Orders
6. Support

These sections are discussed in detail below. While the “General Settings” section is also divided into three sections as:
1. Enable Settings
2. Countdown Settings
3. Banner Settings

3.1 General Settings

The complete General Settings are categorized under these following three sections:

3.1.1 Enable Settings
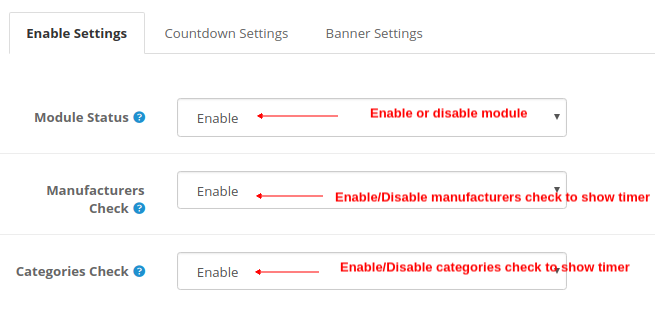
  • Module Status: This setting simply enables or disables the shipping module functionality.
  • Manufacturers Check: By enabling this option, the timer will be shown for the selected Manufactures list. To add new manufacturer into the list, go to section 3.2.
  • Categories Check: By enabling this option, the timer will be shown for the selected Categories list. To add new categories into the list, go to section 3.3.

3.1.2 Countdown Settings

You can setup two kinds of countdown timer here:

A) Single Day
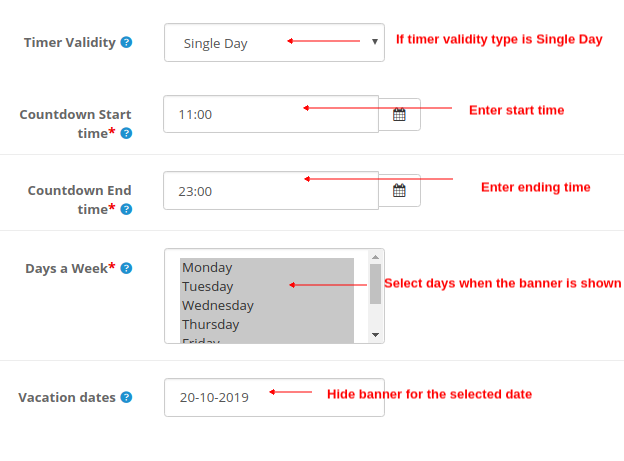
  • Timer Validity: This option can be set to single day or multiple day. Considering that it is set to Single Day.
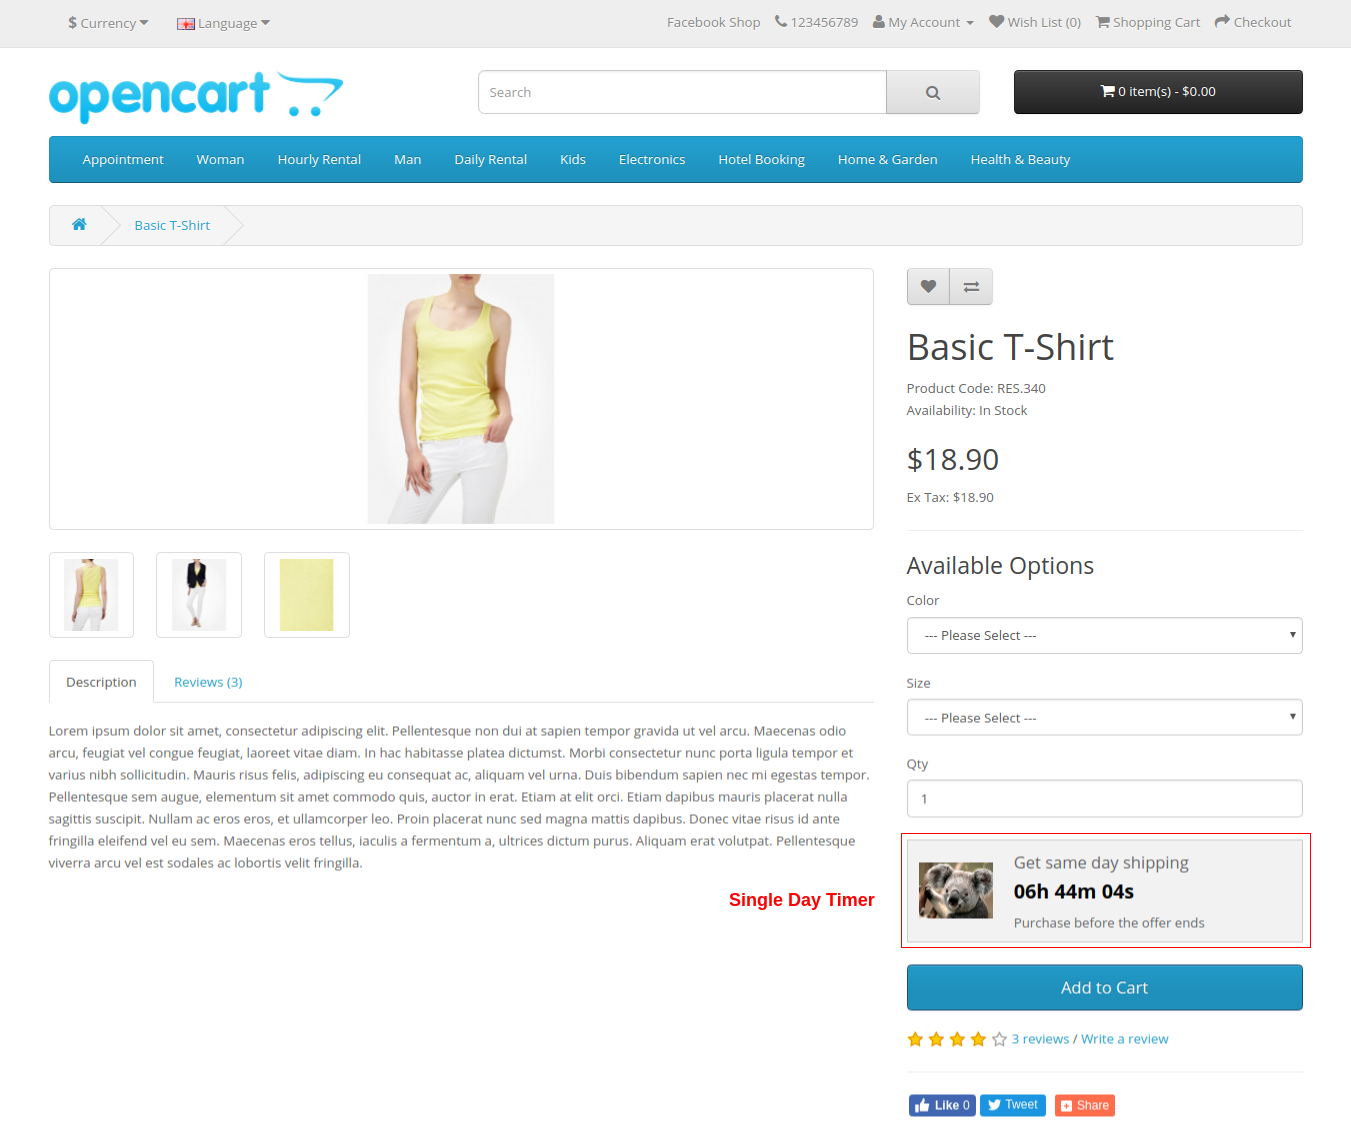
  • Countdown Start Time: This option allows you to set the start time for the countdown timer.
  • Countdown End Time: This option allows you to set the end time for the countdown timer.
  • Days a Week: With this option, you can pick up or select the days when the banner will be shown.
  • Vacation Dates: Using this option, you can exclude the particular date when you want to hide the banner. You can select multiple dates separated by (,)

B) Multiple Day
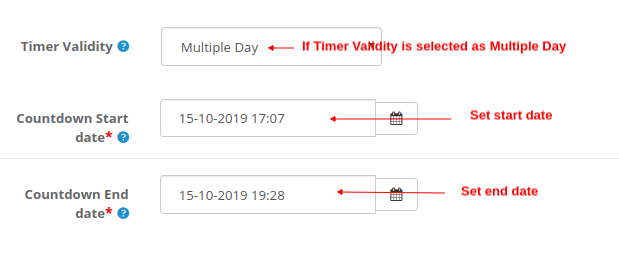
  • Timer Validity: This option can be set to single day or multiple day. Considering that it is set to Multiple Day.
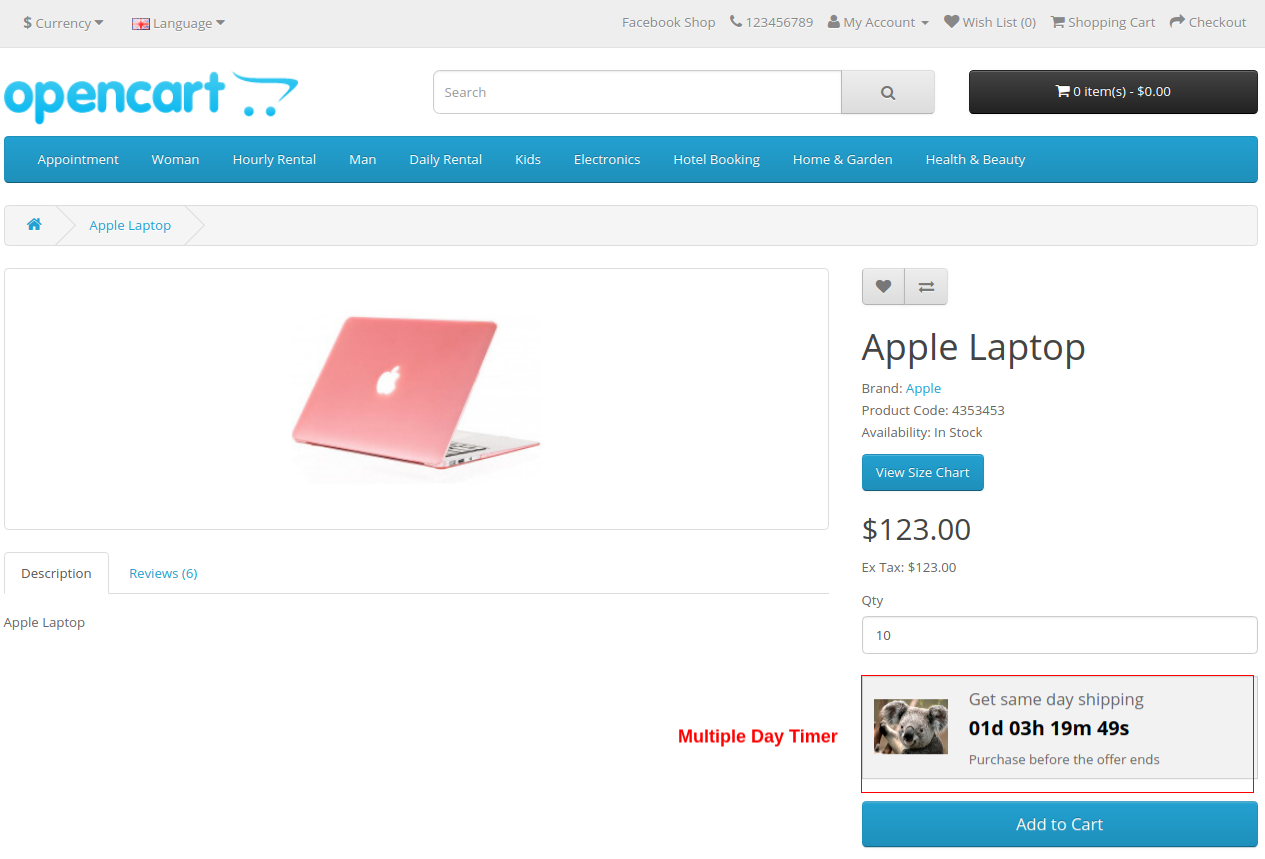
  • Countdown Start Date: This option allows you to set the start date and time for the countdown timer.
  • Countdown End Date: This option allows you to set the ending date and time for the countdown timer.

3.1.3 Banner Settings
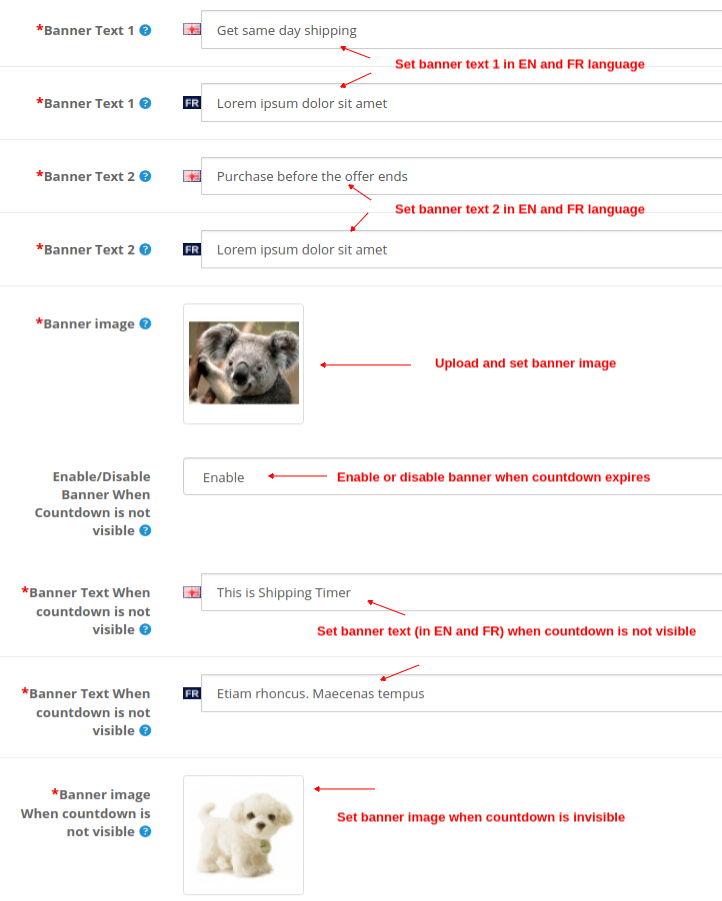
  • Banner Text 1: Set a desired text (in english and french) which is displayed above the timer.
  • Banner Text 2: Set a desired text (in english and french) which is displayed below the timer.
  • Banner Image: With this option, you can set the banner image you want to show along with countdown timer.
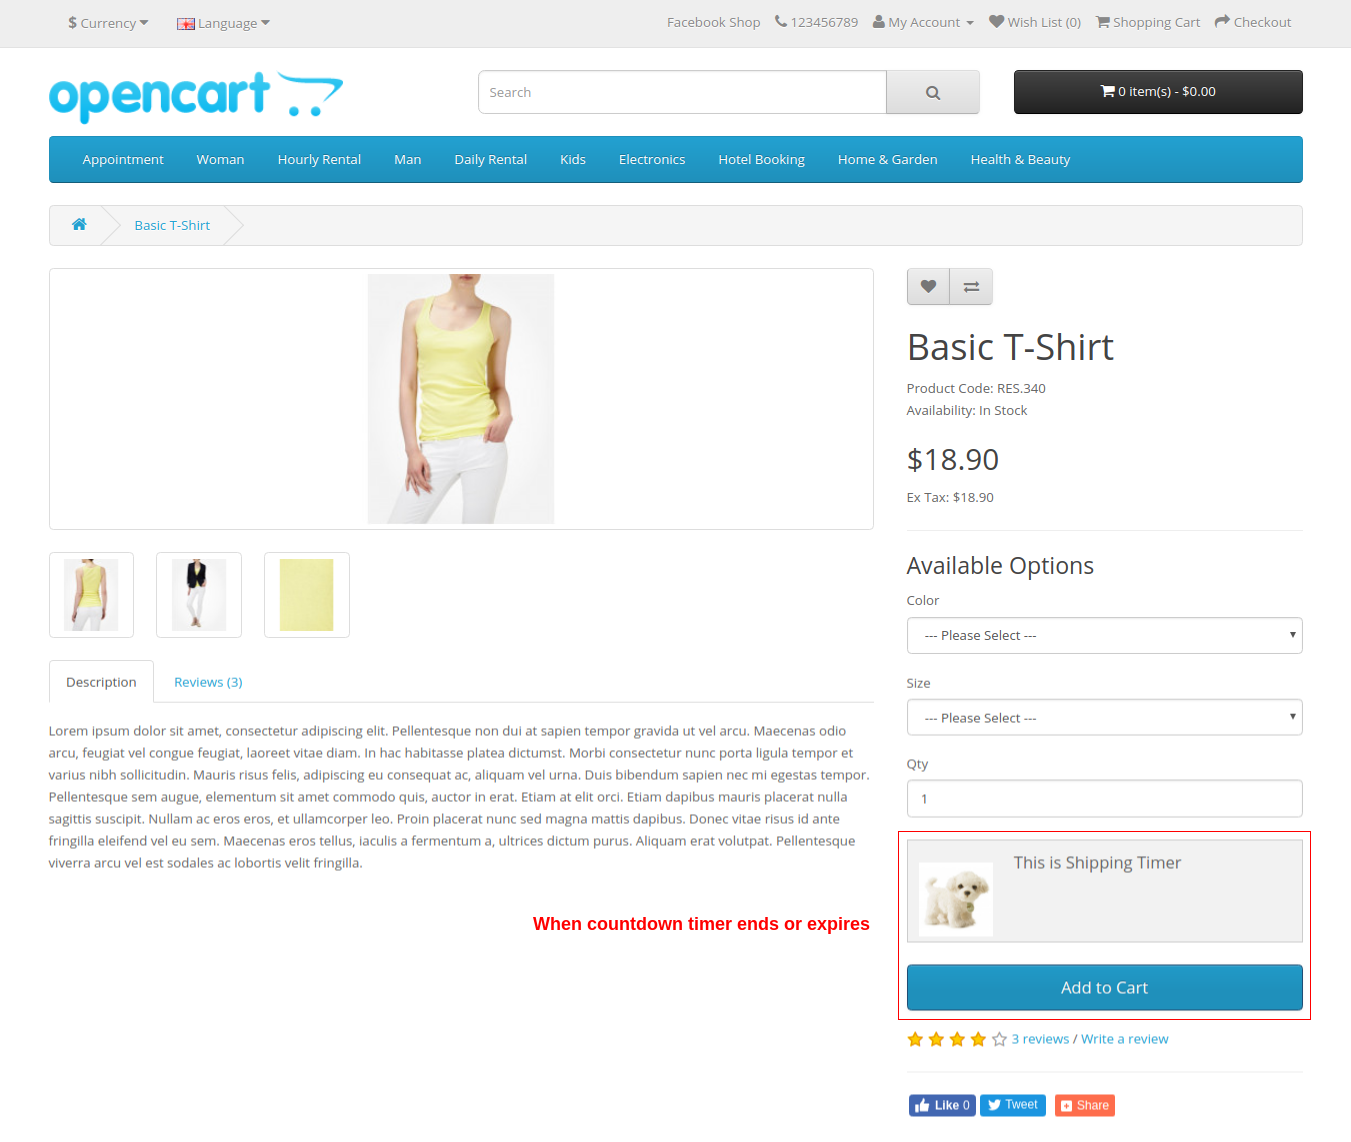
  • Enable/Disable Banner when countdown is not visible: You can enable or disable the banner when countdown is not visible or it expires.
  • Banner Text when countdown is not visible: You can set a desired banner text (in english and french) which is shown when countdown is not visible.
  • Banner Image when countdown is not visible: You can set a desired banner image which is shown when countdown is not visible.

3.2 Manufacturers
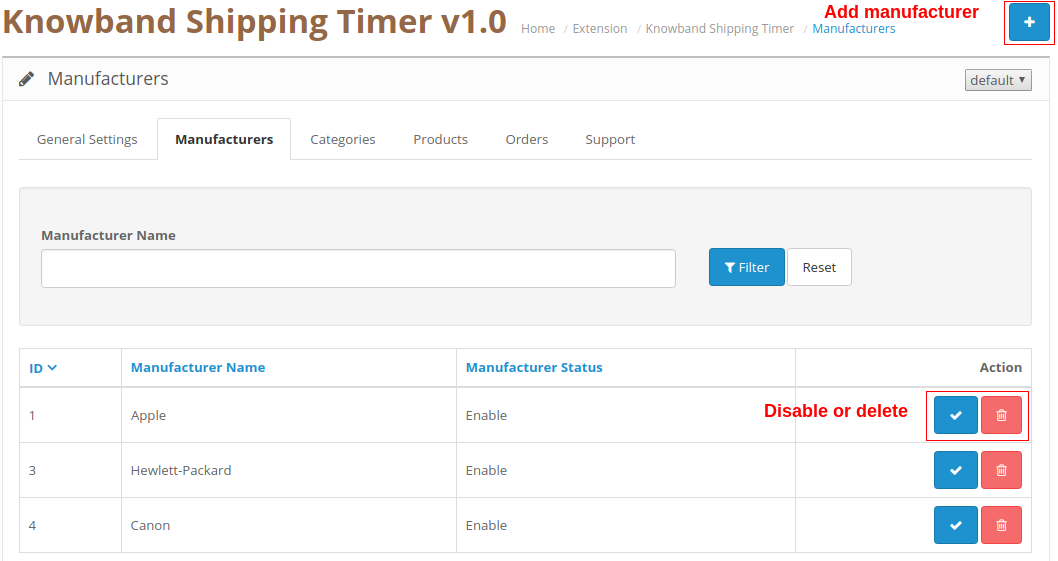
From this section of OpenCart Shipping module, you can add manufacturers by clicking on the “+” button. To disable or delete the existing manufacturer, you can click on corresponding “Disable” or “Delete” button.
The shipping timer is displayed for the products which are offered by these manufacturers.

3.3 Categories
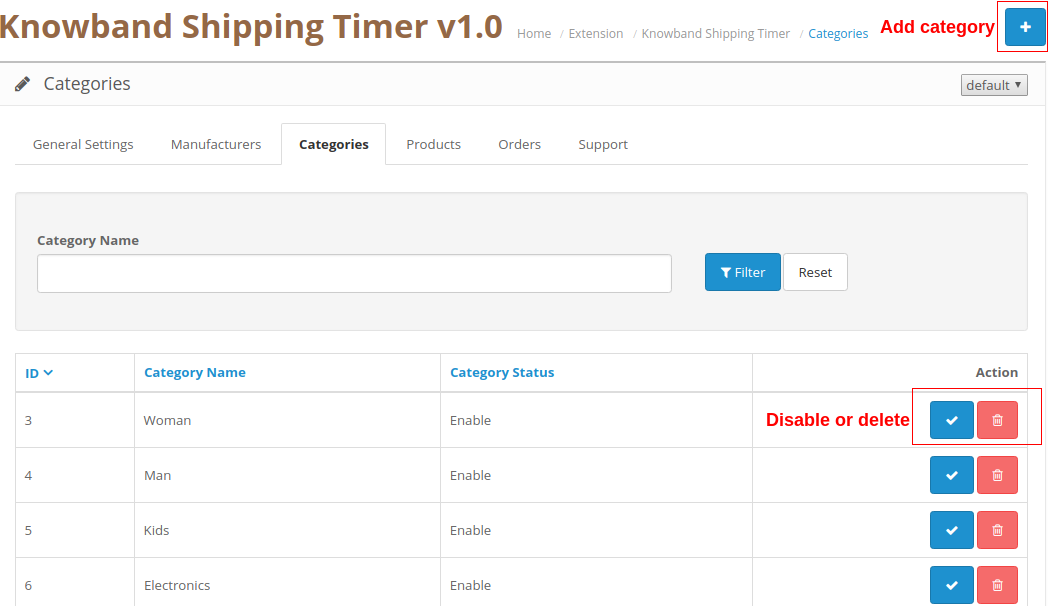
From this section of OpenCart Shipping module, you can add categories by clicking on the “+” button. To disable or delete the existing category, you can click on corresponding “Disable” or “Delete” button.
The shipping timer is displayed for the all the products belonging to these categories.

3.4 Products
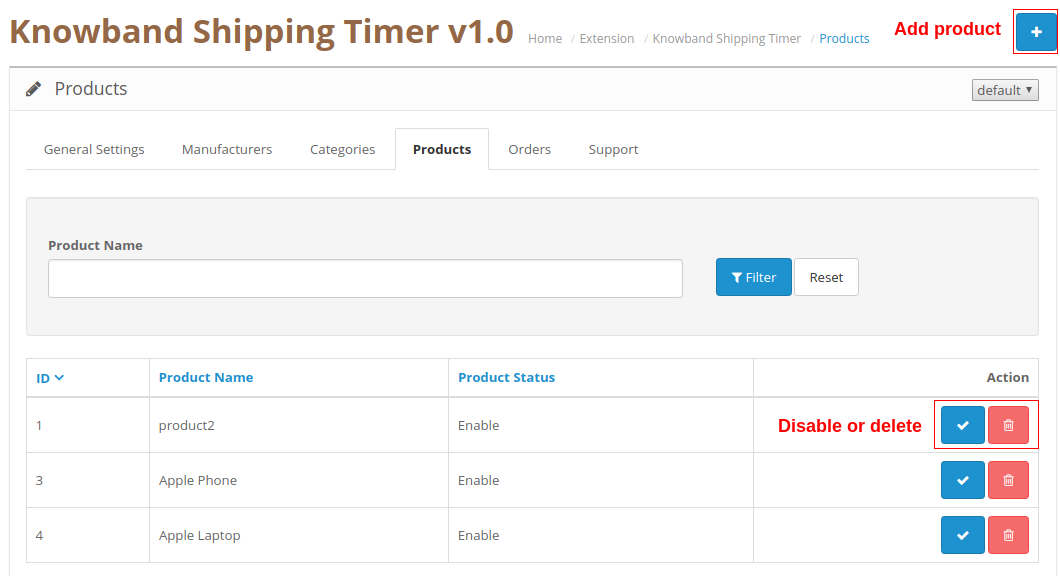
From this section of OpenCart Shipping module, you can add products by clicking on the “+” button. To disable or delete the existing product, you can click on corresponding “Disable” or “Delete” button.
The shipping timer is displayed for all these products.

3.5 Orders
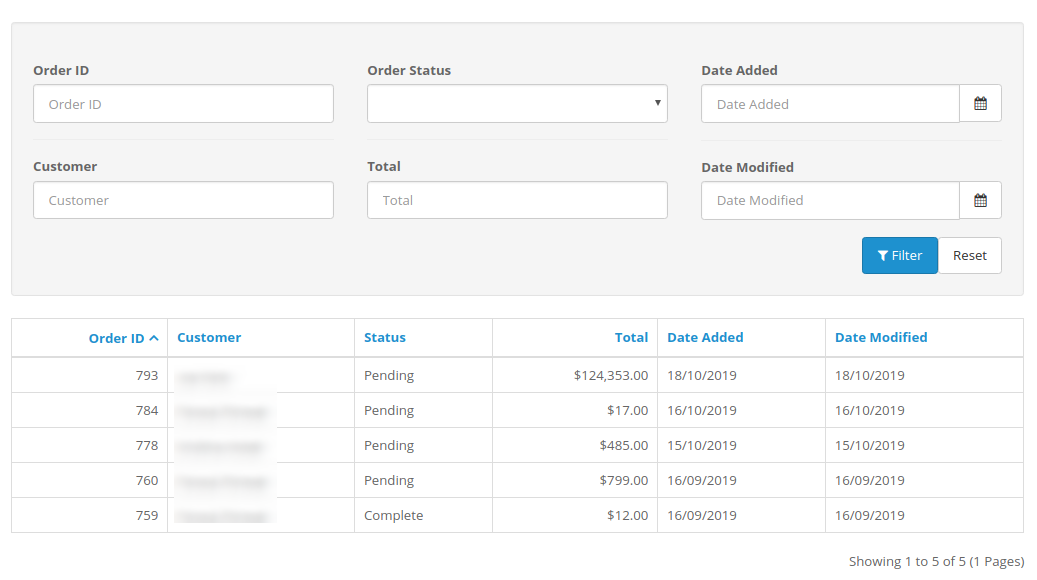
OpenCart Shipping Timer extension allows you to view and track the complete details of the orders received. The purchase orders of the products with the one-day or same day shipping features can be easily viewed in this ‘Order’ tab of the admin interface.
You can even apply various filters to fetch the entire list of the orders received along with details of any particular customer as per the need.

3.6 Support

For any issues or concerns, you can simply raise a ticket from this Support section.

4.0 Front Interface of OpenCart Shipping Timer Extension

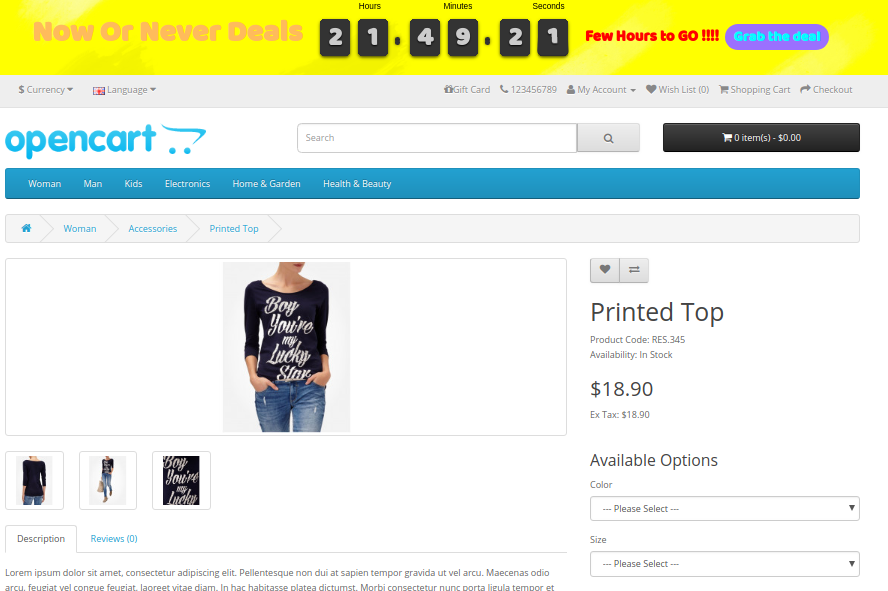
A) Multiple Days Timer

B) Single Day Timer

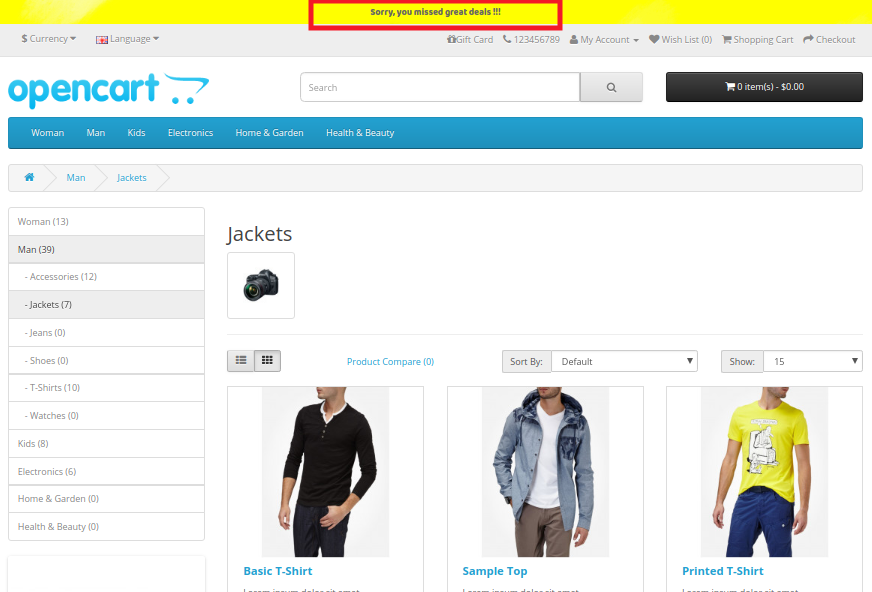
C) Banner and Text shown when the countdown timer is not visible
D) Text message when a product in your cart is not eligible for one day or same day delivery.
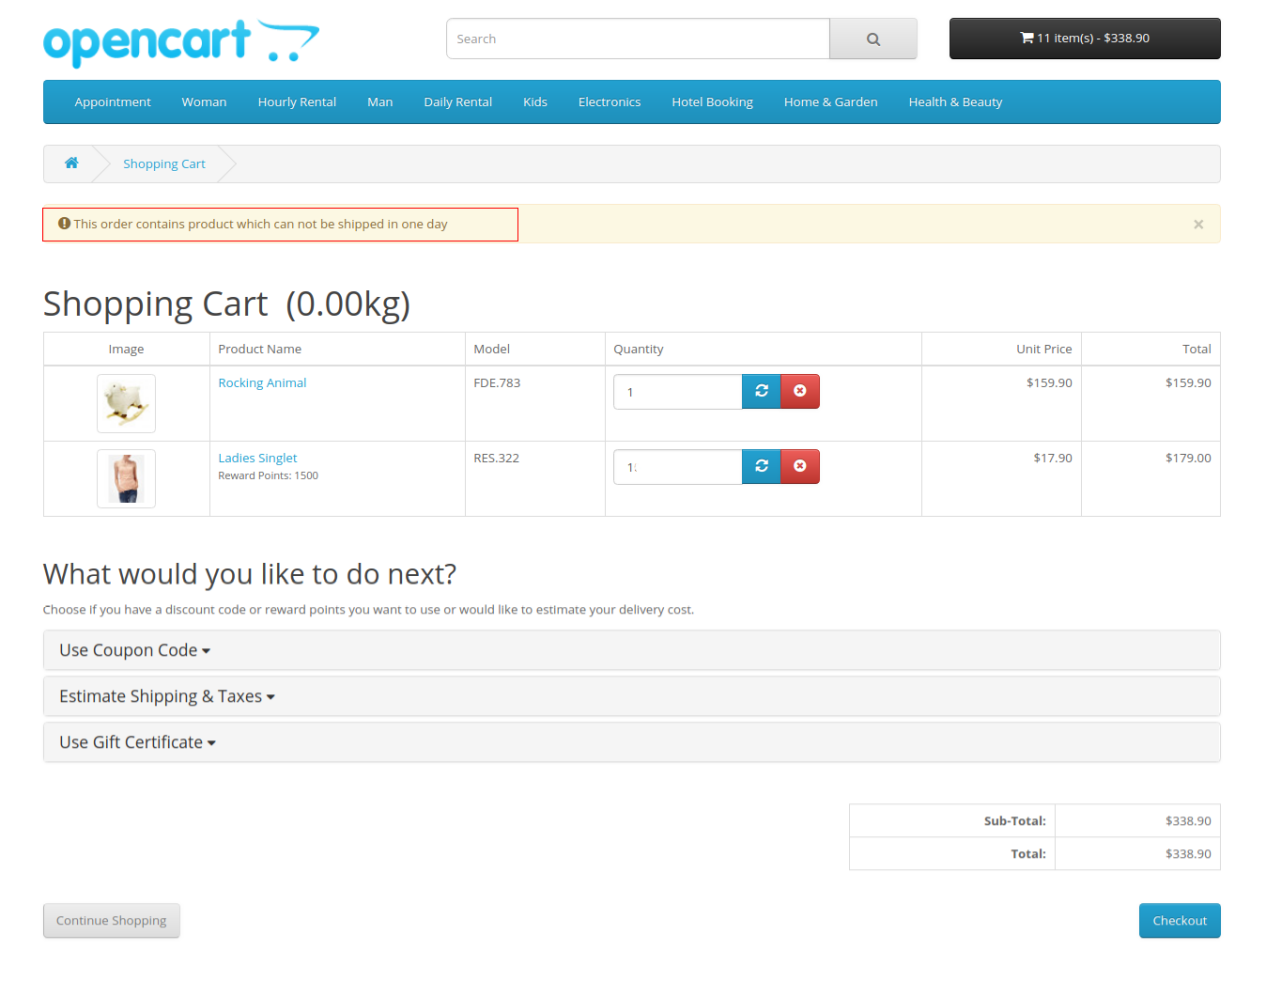
Note: If cart contains more than one product and none of them are selected by admin for one day delivery,  then there is no message on cart page for the user.

OpenCart Countdown Sales Timer Extension – User Manual

1.0 Introduction

Putting a countdown timer bar at the top of the website is the best way to remind your shoppers that they have a limited amount of time to grab the product deals at the lowest rates. A sense of urgency is created using sales countdown timer which triggers their instant purchase decision. OpenCart Countdown Sales Timer extension compels shoppers to make an immediate decision by showing limited stocks and half prices. Showing sale price and free shipping on selective products are an effective tactic to provoke bulk sales on the eCommerce store. Knowband’s Sales Countdown Timer Bar for OpenCart allows admin to add a custom timer bar to their online shop promoting special events, promotions and new product launches.

Countdown timer campaigns module offers a real-time countdown timer creating awareness among customers regarding limited edition products, new arrivals, free shipping products and many more. This results in increasing conversion rates which ultimately helps e-merchants to run more effective sale campaigns/promotions. With OpenCart sale countdown module, admin can create multiple countdown timers for the homepage, product pages and category pages within the website scheduled at different dates and times.

1.1 Striking Features of Countdown Timer extension for OpenCart

OpenCart sale countdown module offers many customizable features which can be set as per business requirements. No coding is required and the store owner can set a sales timer bar for their store in seconds. Let us explore them one by one.

1. OpenCart sale countdown module displays a countdown timer bar for the entire website or selective pages to create a special feel and urgency among the visitors.

2. Using Sales Countdown Timer Bar for OpenCart, admin can show the desired text message beside a countdown timer running.

3. With the countdown timer campaigns module, Admin can easily fix the start and end time for multiple countdown timers.

4. Admin can create multiple Sales Countdown Timer Bar for OpenCart site based on different occasions and events.

5. OpenCart Countdown Sales Timer extension allows admin to choose appealing color coding for the sales countdown bar on the website.

6. The Sales Countdown Timer Bar for OpenCart can be shown at the top or bottom of the store.

7. An option to change the font style of text shown on countdown timer bar is also provided by this OpenCart Countdown Timer module.

8. To avoid confusions in different timers, admin can set a unique name corresponding to each of the sales countdown timer bars.

9. With OpenCart sale countdown module, admin can assign a unique priority or sort order for each of the set timers for the shop.

10. The button text and button link is shown over the countdown timer bar can be changed using this OpenCart extension.

11. An option to add custom CSS code is also offered by this OpenCart Countdown Sales Timer module.

12. Countdown timer campaigns module provides flexibility to display the countdown timers in selected locations or countries.

13. The OpenCart Countdown Timer module gives an option to set time after which the countdown sales timer is shown at the front.

14. OpenCart admin can show a text message after the sale timer ends or expires. If no expiry message is shown then the timer will automatically end and disappear without giving any message to the visitors.

15. OpenCart sale countdown module works flawlessly in multiple languages and with multiple stores.

16. OpenCart Countdown Timer is completely mobile responsive.

17. OpenCart Countdown Sales Timer extension can be enabled or disabled on a single button click from the backend. Moreover, each of the timers can be separately enabled or disabled as per requirements.

2.0 Installation Guide of OpenCart Countdown Sales Timer extension

Before starting the installation process, you have to buy the OpenCart sale countdown module from the Knowband store. Once purchased, you will receive the following files on your registered email.

  • The source code of OpenCart Countdown Sales Timer extension in zipped file format.
  • User Manual of OpenCart Countdown Sales Timer extension

Now in order to install this OpenCart Countdown Timer Bar on your online shop, follow the given steps:

1. Unzip the zip file. You will get the folders as shown in the image below:

2. Copy all the folders of the zip file in the Root Directory of OpenCart setup via FTP manager.

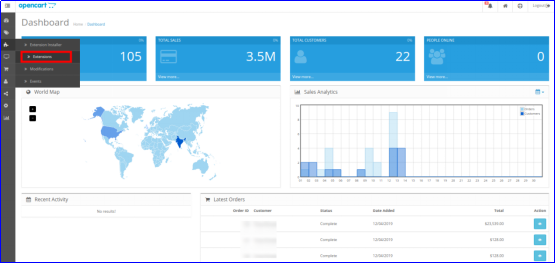
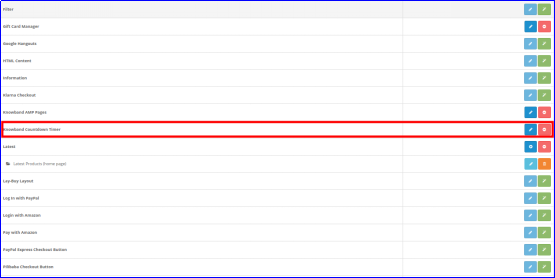
So, OpenCart Countdown Sales Timer is now successfully installed and is ready to use at your store. Go to the admin menu and click on the extensions and thereby click on configure button next to Knowband Countdown Timer.

3.0 Admin Interface of OpenCart Countdown Sales Timer Extension

Just after successful installation of Sales Countdown Timer Bar for OpenCart website, you can create and configure the countdown sales timers as per your requirements. Navigate the settings in the given order: Admin Panel > Extensions > Modules > Knowband Countdown Timer

The simple to understand admin interface of OpenCart Countdown Timer Module is divided into two broad sections namely:

1. General Settings
2. Timers

Each of these sections have been discussed in detail below. Further, the “Timer” section is sub-divided into:

1. General Settings
2. Display Settings
3. Look and Feel Settings

3.1 General Settings

The general settings of the Countdown Timer extension for OpenCart have been listed one by one.

  • Status: Enable or disable the complete functionality of countdown timer campaigns module on the store.
  • Fonts: Select the desired font style for the text information shown on the sales countdown timer bar.

3.2 Timers

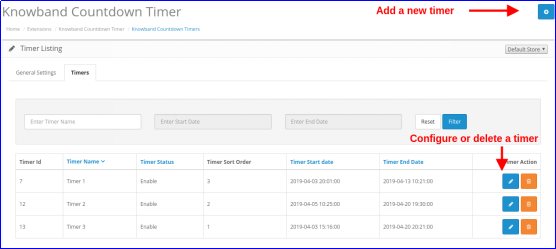
OpenCart sale countdown module provides a detailed view of the existing countdown timers. An option to edit or delete the existing timers is provided corresponding to each of the timers. Admin can easily make changes to the existing sale timers. To add a new countdown timer to the store, click on the “+” button shown at the top right corner of the admin interface. As you click on the “Add” button, you will see the following settings for the countdown timer.

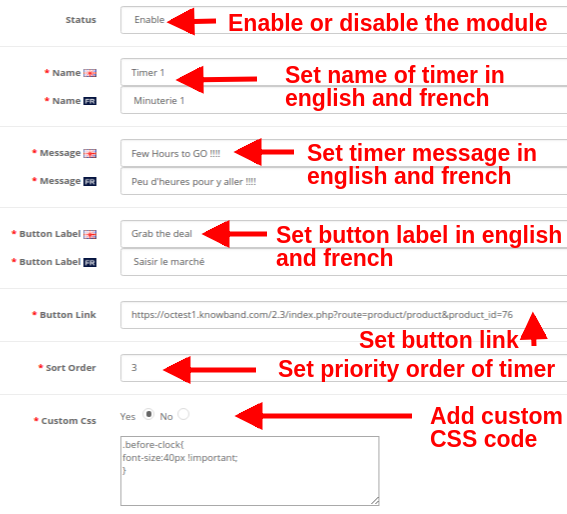
3.2.1 General Settings

Initially, the above fields are set to their default values.

  • Status: This option enables or disables the countdown timer.
  • Name: This option allows you set a name for the sales timer so that you are not confused while configuring the settings for multiple timers on the store. The name can be specified in English, French and other languages.
  • Message: This option sets a message or text information shown on the countdown sales timer bar. This text describes the deal or discount offer which is active on the store.
  • Button Label: To redirect the visitor on the deal or offer page, a button is provided on the timer bar. This option allows you to set the desired label for this timer button.
  • Button Link: This option lets you set the URL for the timer bar button. When the user clicks the button, they are redirected to this specific link.
  • Sort Order: This option allows you to set the sort order or priority value for each of the timers created for the OpenCart store. Remember, this priority value should be unique.
  • Custom CSS: This option includes custom CSS to improve frontend functionality of the website.

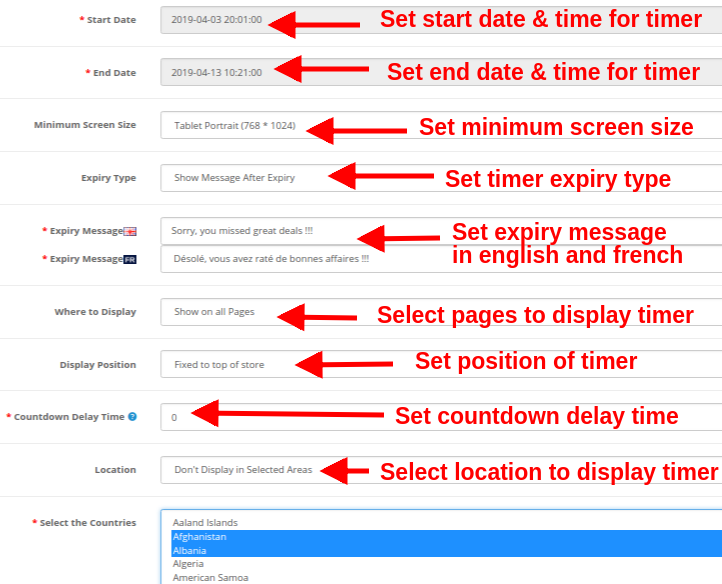
3.2.2 Display Settings

The display settings of this OpenCart Countdown Sales Timer extension control where and how the Countdown Timer block will be displayed to the visitors. The various configuration options under this section include:

  • Start Date: This is a mandatory field that sets the start date and time for the countdown timer.
  • End Date: This is a mandatory field that sets the end date and time for the countdown timer.
  • Minimum Screen Size: This option sets the minimum screen size(display configuration) where this countdown timer block can be seen through different devices.
  • Expiry Type: This option allows you to set the countdown timer expiration type. You can either set it to “Auto” or you can “show a custom message after timer expiry”.
  • Where to Display: This option allows you to choose the site pages where you want to display the countdown timer block on the website. You can show on your complete site or only selected pages of your site.
  • Display Position: You can fix the display position for the countdown timer block over the website. The three display options include:

1. Top of the store

2. Fixed to top of window

3. Bottom of the store

  • Countdown Delay Time: You can specify the delay time (in seconds)after which the timer block is displayed on the frontend. Set 0 if you want to display it immediately to the visitors.
  • Location: You can set a location where you want to show the sales countdown timer. You can set the location as global or to selected areas only.

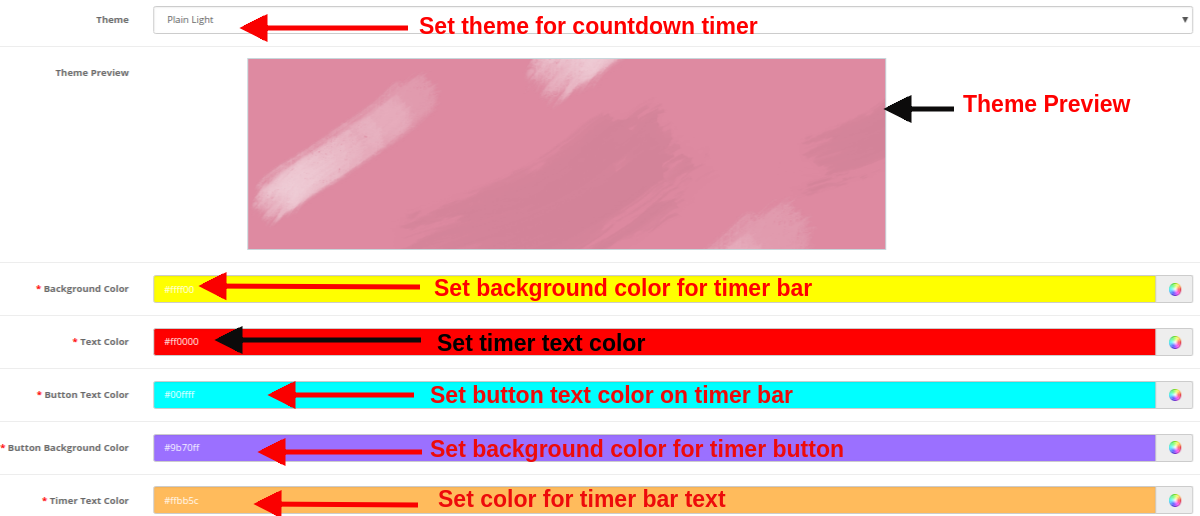
3.2.3 Look and Feel Settings

The look and feel settings of OpenCart Countdown Timer module control the frontend appearance of the countdown timer block. The various configuration options offered are:

  • Theme: This option allows you to set a theme for the sales countdown timer block.
  • Theme Preview: Using this option, you can preview the selected theme before applying the final changes to the website.
  • Background Color: Using this option admin can set the background color for the sales countdown timer block.
  • Text Color: The font color of the text shown on countdown timer block can be set using this option.
  • Button Text Color: Admin can change the text color on the timer button.
  • Button Background Color: Admin can set a desired background color for the timer button.
  • Timer Text Color: Select text color for the timer text shown in sales countdown block.

After this, click on the “Save” button shown at the top right corner of admin panel to save the module settings.

4.0 Front Interface of Countdown Timer Campaigns Module

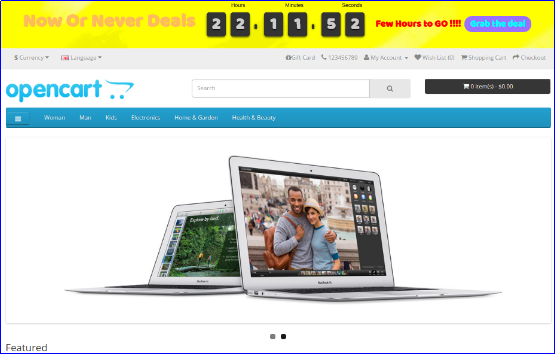
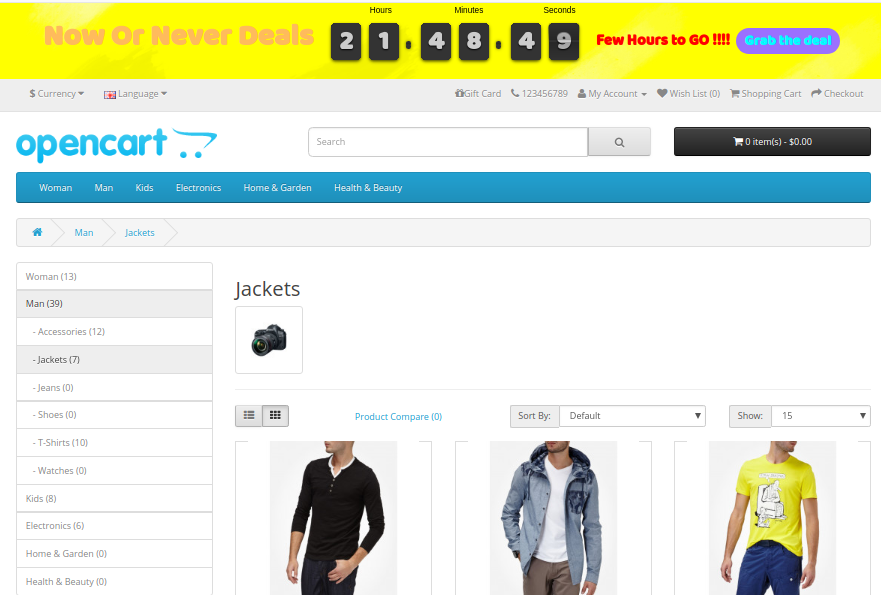
After you have successfully configured the settings of OpenCart sale countdown module, you can see Sales Countdown Timer Bar for your OpenCart store in accordance with the selected priority values and time schedule.

A) Sales Countdown Timer on Category Page


B) Sales Countdown Timer on Product Page


C) Sales Countdown Timer on Home Page

D) Expiration Message after the Sale Ends