Magento is one of the most flexible and widely used e-commerce platforms nowadays. Many times during our development we need to create customers via our code. For example, if we are developing a Magento plugin to connect our Magento store to marketplaces like Walmart, Etsy etc then we create an order for the customer via our code. But to create an order we need to create customer if that customer does not exist on our Magento store. We can create customer in Magento simply by using the following code.
But this customer only has very basic information like first name, last name, email etc. It does not have shipping or billing address. We can save complete address information of the customer via the following code.
Magento is one of the best e-commerce based open-source platform which is written in PHP. Magento provides three different platforms:
Magento Community Edition
Magento Enterprise Edition
Magento Enterprise Cloud Edition
Here we will be learning how to install Magento using the command line(CLI). Command line installation of Magento is one of the most efficient ways of installing if we are installing it on servers.
Download Magento Community Edition 1.X
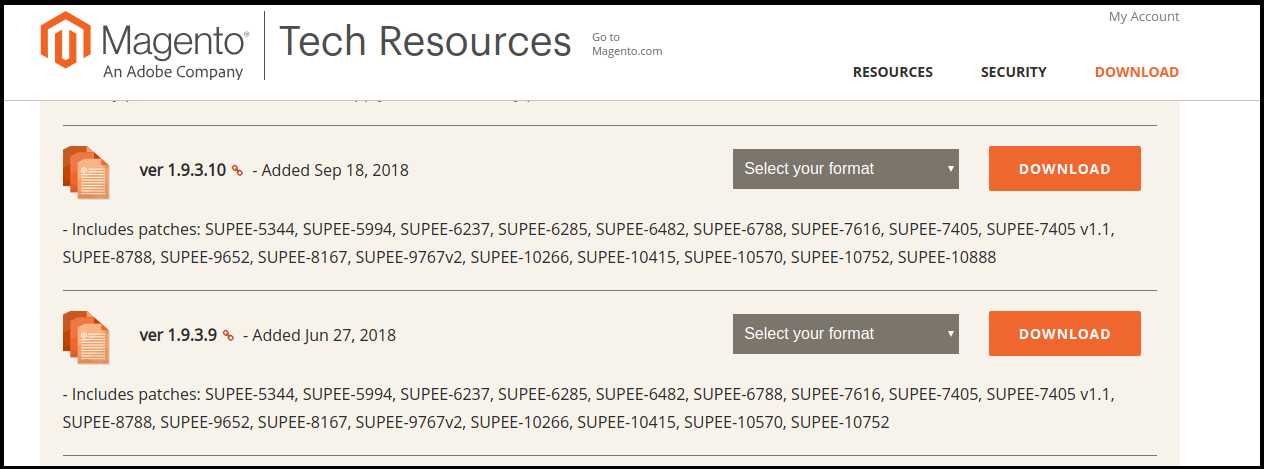
One can download the required version of the Magento from the official website of the magneto. Use below link to download your package.
It will ask to login. If you do not have an account then create an account and proceed further.
Uncompressing the downloaded file
Move the file to a directory where you want to install it and uncompress it.
a) If it is a zip file then using following way:
Syntax:- unzip file_name
e.g –
unzip magento-1.9.3.10-2018-09-18-03-21-10.zip
b) If it is a tar file then use the following way:
Syntax:- tar xf file_name
e.g –
tar xf magento-1.9.3.10-2018-09-18-03-21-10.tar.bz2
Prerequisite for Magento installation:
For the installation of the Magento, you will need to meet the standard system requirements. As per the documentation of Magento you need to meet the following requirement for the installation of the Magento.
a) Environment:
LAMP (Linux, Apache, MySQL, and PHP) or LNMP stack
b) Operating System:
Linux x 86, x86-64
c) Web Server:
Apache 2.x
Nginx 1.7.x
d) Server Hosting:
Ability to run scheduled jobs (crontab) with PHP 5.
Ability to override options in .htaccess files.
e) PHP:
PHP 5.6
PHP 5.5
PHP 5.4
f) Required extensions:
PDO_MySQL
Simplexml
Mcrypt
Hash
GD
DOM
Iconv
Curl
SOAP (for Webservices API)
g) Additional configuration:
safe_mode off
memory_limit no less than 256 MB (512 MB recommended)
Sometimes we need to programmatically create orders in Magento. Suppose you are creating a Magento plugin for your store to connect it to the marketplace like Walmart or Etsy. In these cases, we need to create order on our Magneto store whenever a customer places an order on the marketplace. To do so we fetch the details of the item ordered and the customer details like shipping and billing details and create order on our Magento store programmatically.
So in today’s article, we will be learning how we can programmatically create an order for a customer for any particular item. We will follow the following steps for creating an order on the Magento store.
Steps involved in creating order:
We will define customer data like first name, last name, email.
Define Shipping and Billing address of the customer.
Define Shipping and Payment method of the customer.
Define product and the quantity which needs to be ordered on our Magento store.
Create a customer if the customer does not exist our Magento store. It’s an optional step.
Add product to the quote of the customer.
Add Shipping and Billing address to the quote of the customer.
Prepare and save quote of the customer.
The order is created on your Magento store.
Use the below code to create order in Magneto 1.x –
         $_store = Mage::app()->getStore();
         $_website = Mage::app()->getWebsite();
         $_firstName = John';
         $_lastName = 'doe;
         $_email = 'demo@demo.com';
        /*
         * Custom billing address
         */
        $billingAddress = array(
            'customer_address_id' => '',
                         'prefix' => '',
            'firstname' => $_firstName,
            'middlename' => '',
             'lastname' => $_lastName,
            'suffix' => '',
            'company' => '',
            'street' => array(
                 '0' => 'Sector 63', // Required
                '1' => 'Noida, UP'
            ),
             'city' => 'Noida',
            'country_id' => 'IN', // Country code
            'region' => 'UP',
            'region_id' => '',
            'postcode' => '201301',
            'telephone' => '888-888-8888',
            'fax' => '',
            'save_in_address_book' => 1
        );

        /*
         * Custom shipping address
         */
        $shippingAddress = array(
            'customer_address_id' => '',
            'prefix' => '',
            'firstname' => $_firstName,
            'middlename' => '',
            'lastname' => $_lastName,
            'suffix' => '',
            'company' => '',
            'street' => array(
                '0' => 'Sector 63', // Required
                '1' => 'Noida, UP'
            ),
            'city' => 'Noida',
            'country_id' => 'IN', // Country code
            'region' => 'UP',
            'region_id' => '',
            'postcode' => '201301',
            'telephone' => '888-888-8888',
            'fax' => '',
            'save_in_address_book' => 1
        );

        /**
         * Enter the shipping method you want to use. Some of the other shipping
         * methods are tablerate_tablerate, freeshipping_freeshipping etc.
         * Here we are using flatrate_flatrate
         */
        $_shippingMethod = 'flatrate_flatrate';

        /**
         * Enter the payment method you want to use. Some of the order payment
   	*methods are checkmo, free, banktransfer, ccsave, purchaseorder etc.
         */
        $_paymentMethod = 'cashondelivery';

        /**
         * Provide array of product and their qty.
         * $array = array(product_id => qty)
         */
        $productIds = array(905 => 1);
        $quote = Mage::getModel('sales/quote')
                ->setStoreId($_store->getId());

        $quote->setCurrency(Mage::app()->getStore()->getBaseCurrencyCode());

        $customer = Mage::getModel('customer/customer')
                ->setWebsiteId($_website->getId())
                ->loadByEmail($_email);

        /**
         * Preparing customer for the quote
         * if the customer is not registered then we will create a new customer. This is  	*an optional process.
         */
        if (!$customer->getId()) {
            $customer = Mage::getModel('customer/customer');

            $customer->setWebsiteId($_website->getId())
                    ->setStore($_store)
                    ->setFirstname($_firstName)
                    ->setLastname($_lastName)
                    ->setEmail($_email);

            /**
             * Creating new customer
             * Skip try-catch if you don't want to create a new customer.
             */
            try {
                // Generating password for customer. You can also use any custom  // password for it.
                $password = $customer->generatePassword();
                $customer->setPassword($password);
                $customer->setForceConfirmed(true);
                $customer->save();

                $customer->setConfirmation(null);
                $customer->save();
                $customerId = $customer->getId();
                $customAddress = Mage::getModel('customer/address');
                $customAddress->setData($billingAddress)
                        ->setCustomerId($customerId)
                        ->setIsDefaultBilling('1')
                        ->setIsDefaultShipping('1')
                        ->setSaveInAddressBook('1');
                $customAddress->save();

            } catch (Mage_Core_Exception $e) {
                Mage::getSingleton('customer/session')->addException($e, $this- >__('Error in creating customer'));
                Mage::logException($e);
            } catch (Exception $e) {
                Mage::getSingleton('customer/session')->addException($e, $this- >__('Error in creating customer'));
                Mage::logException($e);
            }
        }

        // Assign customer to quote
        $quote->assignCustomer($customer);

        // Add products to quote
        foreach ($productIds as $productId => $qty) {
            $product = Mage::getModel('catalog/product')->load($productId);
            $quote->addProduct($product, $qty);
        }

        // Add billing address to quote
        $_billingAddressData = $quote->getBillingAddress()- >addData($billingAddress);

        // Add shipping address to quote
        $_shippingAddressData = $quote->getShippingAddress()- >addData($shippingAddress);

        /**
         * If the customer is a registered customer then you can fetch their billing or  *shipping address as below
         *
         * $_customerBillingAddress = $customer->getPrimaryBillingAddress();
         * $_customerShippingAddress = $customer->getPrimaryShippingAddress();
         *
         * $_billingAddressData = $quote->getBillingAddress()- >addData($_customerBillingAddress);
         * $_shippingAddressData = $quote->getShippingAddress()- >addData($_customerShippingAddress);
         */

        // Collect shipping rates on quote shipping address data
        $_shippingAddressData->setCollectShippingRates(true)
                ->collectShippingRates();

        // Set shipping and payment method on quote shipping address data
        $_shippingAddressData->setShippingMethod($_shippingMethod)
                ->setPaymentMethod($_paymentMethod);

        // Set payment method for the quote
        $quote->getPayment()->importData(array('method' => $_paymentMethod));

        try {
            $quote->collectTotals();
            $quote->save();

            // Preparing Order From Quote
            $service = Mage::getModel('sales/service_quote', $quote);
            $service->submitAll();

            // $incrementId is the increment id of the order created.
            $incrementId = $service->getOrder()->getRealOrderId();

            Mage::getSingleton('checkout/session')
                    ->setLastQuoteId($quote->getId())
                    ->setLastSuccessQuoteId($quote->getId())
                    ->clearHelperData();

           /*
           * $response is the Array of the response with the status of the order  creation.
           */
            $response['success'] = true;
            $response['error'] = false;
        $response['messages'] = 'Order number '.$incrementId.' created  successfully.';
        } catch (Mage_Core_Exception $e) {
            $response['success'] = false;
            $response['error'] = true;
            $response['messages'] = $e->getMessage();
            Mage::logException($e);
        } catch (Exception $e) {
            $response['success'] = false;
            $response['error'] = true;
            $response['messages'] = $this->__('Error in processing order. Please try  again later.');

            Mage::logException($e);
        }

        Mage::app()->getResponse()->setBody(Mage::helper('core')- >jsonEncode($response));
Please go through the above-mentioned code to create order on your store. In the above example, we have placed an order of one simple item with quantity 1. We have used “cash on delivery” as the payment method and “flatrate_flatrate” as the shipping method. You can make any combination as per your requirement and your Magento store configuration. Hope this will help you in understanding the mechanism of creating order.
Today we will learn how to run direct SQL queries in the Magento 1.x. By default Magento usages data model to access and modify the database. The data model provides good abstraction which hides the tricky queries but they also make the operation slow. Direct SQL queries come very handily whenever we need to update/insert a large number of data. For example, you have to update the price of all the products of a manufacturer and there are 15k products in that manufacturer. Doing this via loading product model in Magento will take a lot of time.
We can also use Magento resource to directly run our SQL queries without loading the whole collection.
Get the core resource model –
$resource = Mage::getSingleton('core/resource');
After this we need to create read or write connection as per our need.
/**

* Retrieve the read connection

*/

$readConnection = $resource->getConnection('core_read');

/**

* Retrieve the write connection

*/

$writeConnection = $resource->getConnection('core_write');
Fetching the correct Table name –
In case you are unaware of the prefix of the table then you can use below code to fetch the correct table name.
If the prefix is mage_ then the table name it will return will be mage_catalog_product_entity
Reading Data –
To read data from the table use the following code
$query = “select * from {$_tableName}”;

$query_result = $readConnection->fetchAll($query);
Here, $query_result will return the result of select query. In our case it will return the array of all the product. In case you need data of only product then use following command.
$query = “select * from {$_tableName} where entity_id={$_productId}”;

$query_result = $readConnection->fetchAll($query);
Here $_productId is the id of the product whose data we need.
Writing Data –
For inserting data into the table use the following code.
$insert_query = “INSERT INTO {$_tableName} (‘COL_NAME1’,’COL_NAME2’) VALUES                                                                 (‘COL_VALUE1’,’COL_VALUE2’)”;

$writeConnection->query($insert_query);
Updated Data –
If we have to update the type_id of a product to “configurable” then we can use following code. Here $_productId is the product id.
$update_query = “UPDATE {$_tableName} SET type_id=”configurable” WHERE 						entity_id={$_productId}”;
$writeConnection->query($update_query);

But Magento has provided the concept of the model for database connection as they provide abstraction and they are more secure that the direct SQL queries.
1.0 Introduction of Magento Auto Switch Language and Currency Extension:
Knowband Magento Auto Switch Language and Currency Module automatically change the language and currency of the eCommerce site according to the visitor’s country or region. The admin in Magento auto switch currency can offer a better store experience to the store visitors by providing them the relevant information in their preferred language. This is one of the must-have extensions to improve the user experience and the customer base globally.
1.1 Features of the Magento Auto change language and currency:
1. Magento language and currency autoswitcher automatically convert the language of the online store based on the location of users by detecting their IP address.
2. Magento Language and Currency switch Extension can be easily implemented on the store.
3. Knowband’s Magento Automatic language and currency converter tracks the IP address of the user and finds out their country or region of the user.
4. Magento Auto Switch Language and Currency Module convert the default language and currency according to the customer’s geolocation.
5. This Magento Auto Change Language Module is supported in multiple languages.
6. The Magento auto switch currency are SSL compatible also.
7. The Magento language and currency auto switcher by Knowband is multi-store compatible.
8. With the help of this Knowband Magento Automatic Switch Language and Currency Extension, the store admin can offer a better user experience to the customers by showing the content in their preferred language and currency.
9. The Magento auto switch currency back-end interface is extremely easy to use.
2.0 Installation
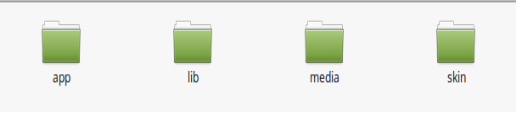
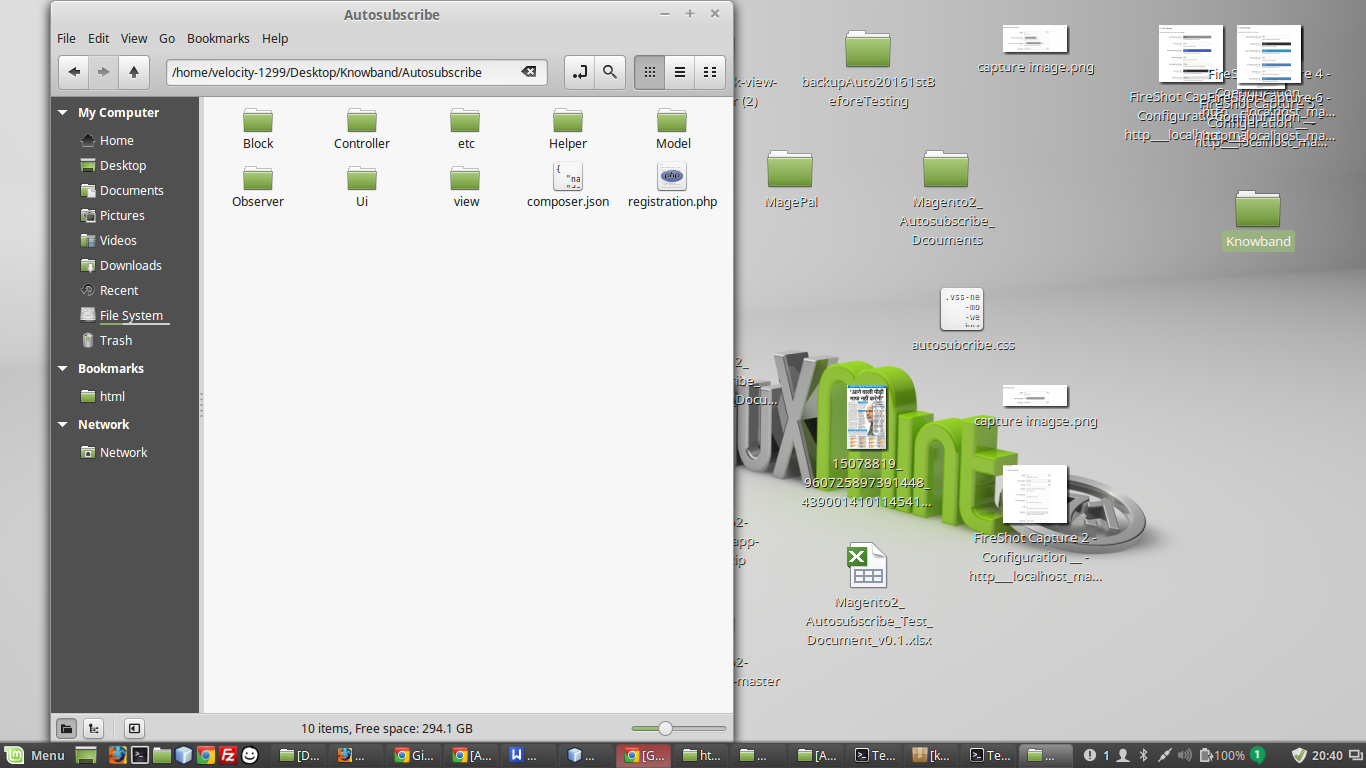
1. The folder structure of the Auto Switch Language and Currency folder.
2. Copy all the folders into Magento root directory and clear the cache (if enabled).
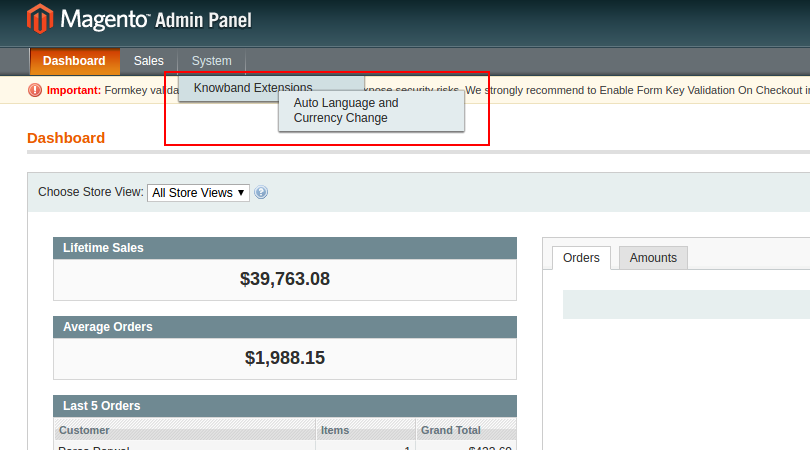
3. You will be able to find the “Auto Switch Language and Currency” option inside the “System > Knowband Extensions > Auto Switch Language and Currency”.
4. You can now configure the Magento language and currency autoswitcher as per your requirements and check its working in the front end at following URL:
3.0 Admin Panel
After installing Magento Language and Currency Switcher Module in the Magento store. The admin interface of the Magento language and currency switcher offers two tabs. They are mentioned below:
1. General Settings
2. Country List
Let us discuss the various customization options of Magento Automatic language and currency converter:
3.1 General Settings
The various fields of the tab of Magento Auto Change Language and Currency Extension are listed below:
1.Language Switching
2.Currency Switching
1. Language Switching: In this section of Magento Auto Switch Language Module, the admin can enable/disable the auto switch language option. After enabling this feature, it will automatically change the website language whenever customers will visit the website.
2. Currency Switching: This Knowband Magento Auto Switch Currency Extension allows the admin to enable the auto switch currency option. If this button is enabled, then, the Magento Auto Currency Switch plugin will automatically change the currency being used in the front-end.
3.2 Country List
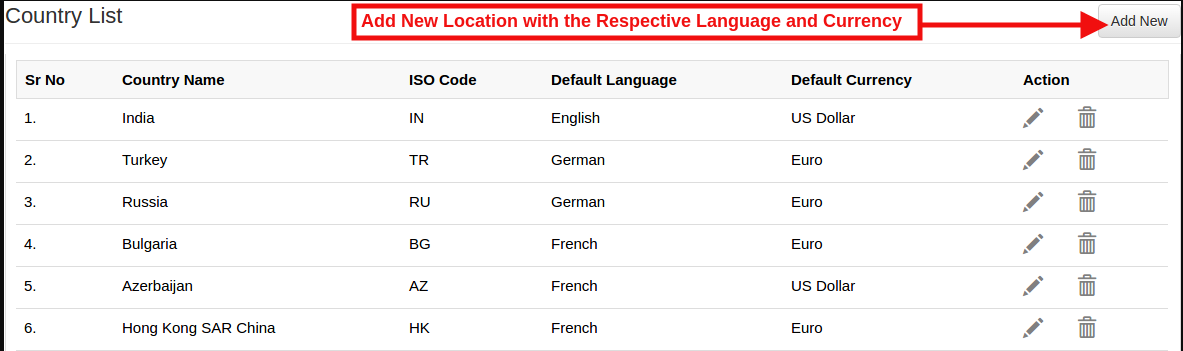
The Automatic Language and Currency Converter for Magento offers an option to the online retailer to add the Countries with preferred language and currency. For all the countries listed here with default language and currency will be different for the language.(As per the option selected by the admin)
3.2.1 How to Add New location/Country with the respective language and currency?
As per the requirement of the store the admin can add the countries here.
For adding the country the Store admin needs to Click on the ‘Add New’ button.
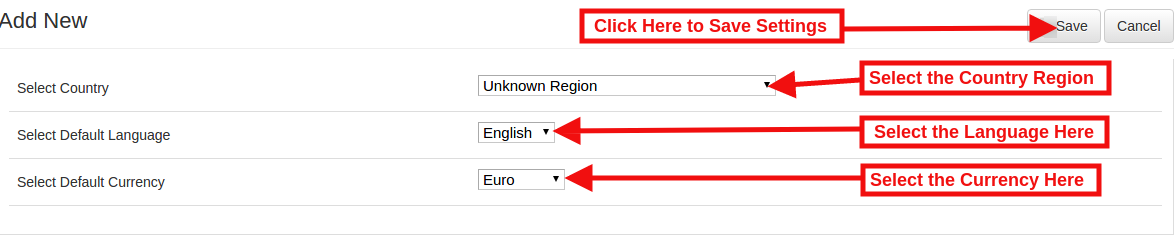
By clicking on the Add New button, the store admin will be redirected to the below-mentioned page:
Select Country: In this field of Magento Auto change currency and language, the online merchant can select the country from the drop-down list.
Select Default Language: This contains the list of languages. The admin in Magento Auto Switch Currency Module can select the language used in that particular country.
Select Default Currency: By Select default currency option of the Magento Auto change currency the Magento store admin can select the currency for the selected country.
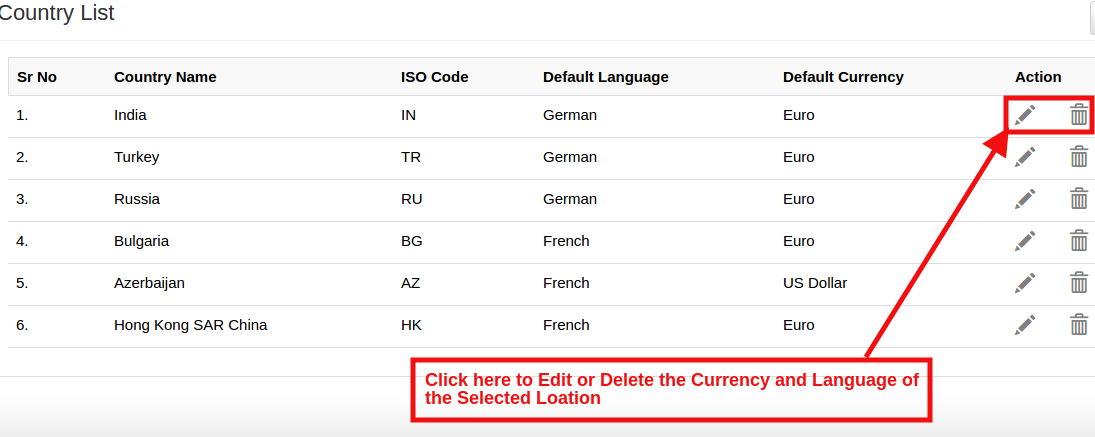
In case of admin need to update the Currency and Language for any particular Country then the admin can update the information by click on the ‘Edit’ button in Magento language and currency switcher.
Please refer the below screenshot for edit the details:
They can delete the specific country by clicking on the Delete button.
4.0 Front End
In the Front End, the Language and Currency will automatically switch according to admin configuration in Back-Office of
Magento language and currency switcher.
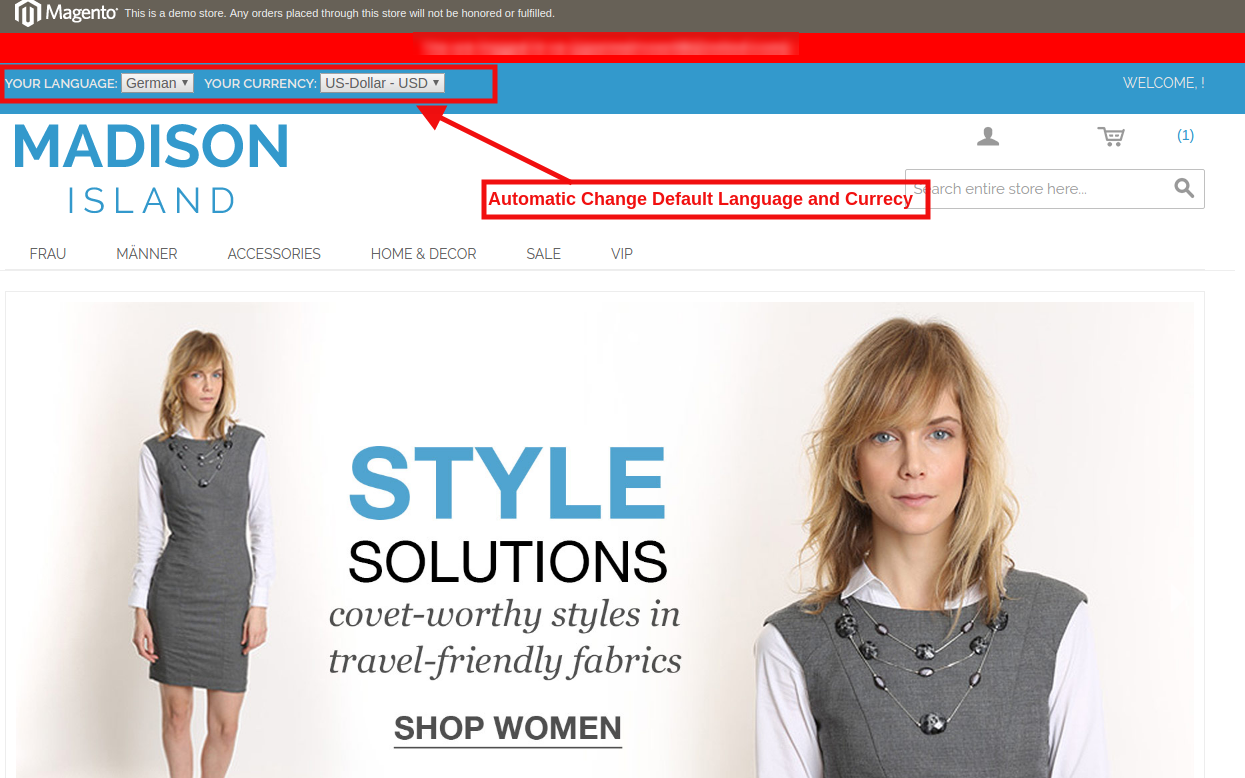
With Magento Auto change currency and language, the IP of the user will be detected and the default language and currency is changed automatically as shown in the image above. The changes will be based on the configuration of done in the back-end of the Magento Auto Switch Language and Currency Extension.
Installation Steps of Magento Advanced Wish List Extension
1.0 Introduction
Most of the time eCommerce store visitors have to plan their shopping in advance – they may need certain products regularly (e.g. consumer goods or food, clothes); for special occasions, to make sure they will have all they need, etc. For this purpose making the easy, they save the favorite product to their wishlist. The Magento Advanced wishlist extension makes this process much more comfortable – with it customers can save the favorite products, they are planning to buy in the future, etc.
This Magento advanced order list extension motivates the customer to come back to your website as well as attract the new shoppers and they place more orders. This Magento extension shows the popup of the wishlist product at the bottom of the webpage with the help of this, they can transform wishlist products into checkout with just a click of a button.
1.1 Benefits of the merchant:
The Magento advanced wishlist extension allows the customer to maintain the private wishlist of the product that can help for future reference.
The Magento extension provides an option to the store admin can view the complete list of products saved by the customer on their wishlist.
The Magento Advance order list extension allows the e-merchant to change the look and feel of the wishlist and add to cart button and they can also allow the default. color settings as per requirement.
The Magento advance purchase list has an option to include the jQuery file if required.
The online retailers can set the expiry of the saved product in days.
With the help of this Magento advanced wishlist extension, the store admin can view the which product is most popular and high demanded.
The store admin can analysis the sales report.
The Admin can Re-Price the products to increase sale.
This Magento saves for later extension compatible with all themes.
Mobile responsive.
Easy installation and use.
2.0 Installation Guide
1. Folder structure of the Magento Return Manager module.
2. Copy all the above folders into Magento root directory and clear the cache (if enabled).
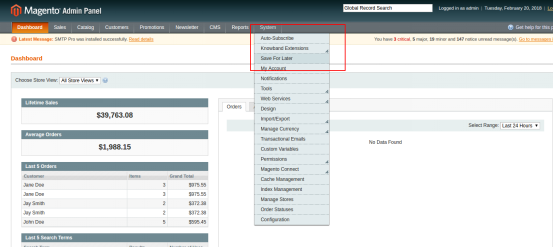
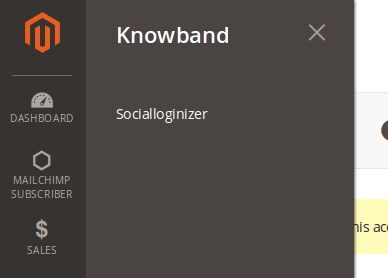
3. Now, login to the admin panel of your Magento store. You will be able find the “Save for Later” option inside the “System > Knowband Extensions > Save for Later” menu.
2. On clicking menu Save For Later the module for plugin will open. It contains navigational bar at the top, Tab menu at the left and in main content the first general setting tab will display.
4. You can now configure the Magento Save for Later Extension as per your requirements and check its working in the front end at following URL:
https://pstest2.knowband.com/mage1932
3.0 Admin Module
After installing the Magento advanced wishlist plugin into magento store, the module will provide following options inside “Save For Later” menu:
Above 4 points are actually one section comes under “Settings” but described here as separate entity for more clarity.
Each interface is in form of a tab and each tab contains some specific settings/functionalities that can be changed according to the need. Each tab is explained below.
3.1 General Settings
1. Active: Initially, this will be “OFF”. The e-merchant can enable the module, select enable present under the label Activate.
2. Remove Wishlist : Check this option to remove the default wishlist from the website.
3. Use Default Color Setting: This option will allow the store admin to reset your color setting to default. The default color values will display by default. Remember if you wish to change the color setting then this option must be disabled.
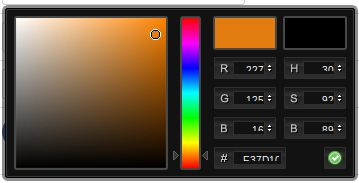
4. View All Button Color: To Select a color for the view all button color in the saved product list. See below image:
5. View All Button Text Color: Select the color value for text over the view all button color.
6. Add To Cart Button Color: Select the color for add to cart button visible on the page open on the click of view all button.
7. Add To Cart Button Text Color: Select the color for the text over the add to cart button.
8. Days to Store guest Product: For guest users the product will be saved in the cookies. Using this option you can set the expiry days for cookies.By Default cookies will stored for 10 days.
9. Jquery File: jQuery i.e. a javascript framework is required for this plugin to work. Sometimes themes used in magento already includes it but sometime they do not. If jquery is already included in your theme select no else select yes to include it.
3.2 Category Analysis
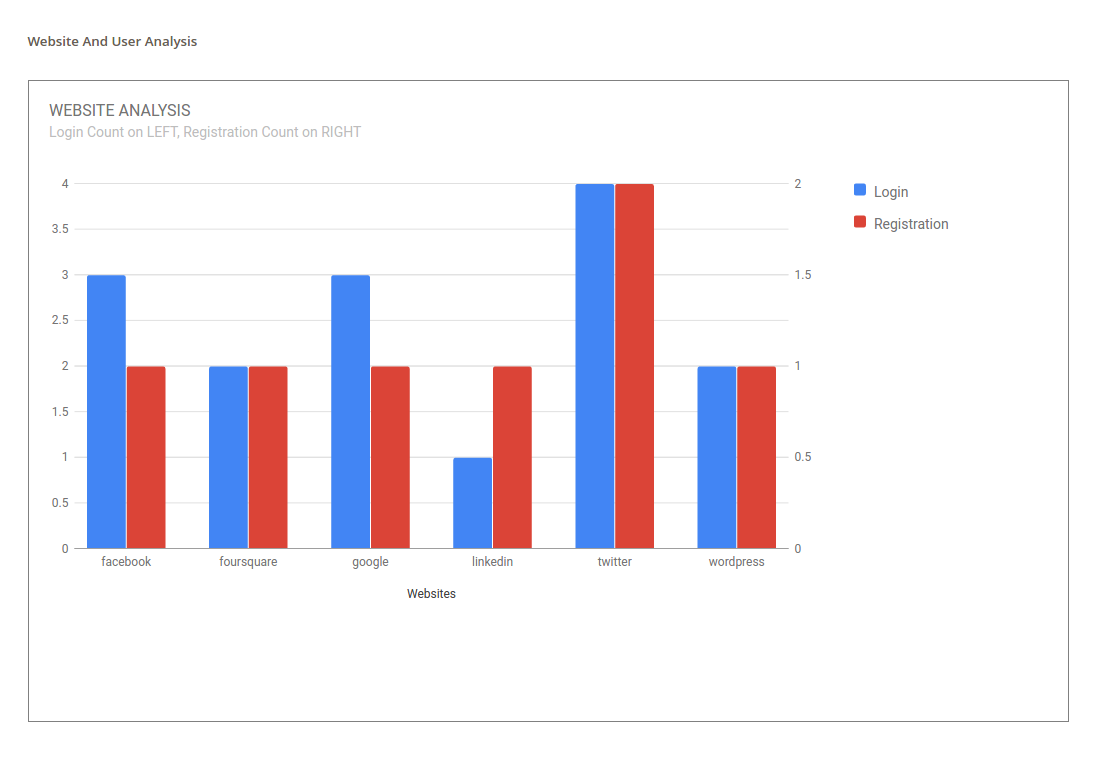
This Magento advanced wishlist extension allows the admin to make an analysis on the Categories. Here the store merchant can view the graph for the categories using the dropdown menu and date filters. When the admin opens the tab, by default last week report will display. If there is no product saved in last week then no record found message will display instead of the graph.
Below the graph a grid is provided. This grid will display the categories of the product saved.
On the top of the grid there is an export button , that will export the grid data into csv file. You can find particular record for category by using its id and search button available on top left of the grid.
In the Grid you can see an action column, on click of it a new grid will open in another browser tab displaying the products saved under that category.
NOTE: The No. of Product will be display according to configuration scope.
3.3 Product Analysis
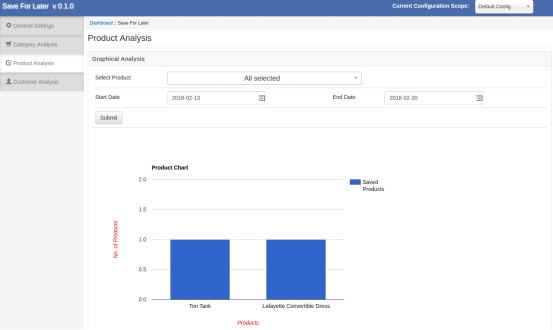
This Magento advance purchase list allows the admin to make an analysis on the Products. The Product analysis tab the online retailers can view the graph for the product using the dropdown menu and date filters. When the admin opens the tab, by default last week report will display. If there is no product saved in last week then no record found message will display instead of the graph. Below the graph a grid is provided. This grid will display the categories of the product saved.
On the top of the grid there is an export button , that will export the grid data into CSV file. You can find particular record for category by using its id and search button available on top left of the grid.
NOTE: The No. of Product will be display according to configuration scope,
3.4 Customer Analysis
This Magento advance order list allows the Magento store owners to make an analysis on the the online customer. The Online store owner can view the use count of the SAVE FOR LATER option for each user in the grid.
Also, there is a column view saved products, on click a new grid will open in new tab displaying the products saved by that customer.
NOTE: The no. of use count and no of product can be different. When you click on view saved product , only those product will be displayed which are saved in customers list that time.
Hope that we have covered all the concerned regarding the installation of Magento Extension. If you are new on Magento then you can also check our blog of Top Magento themes of 2015.
4.0 Front End Module
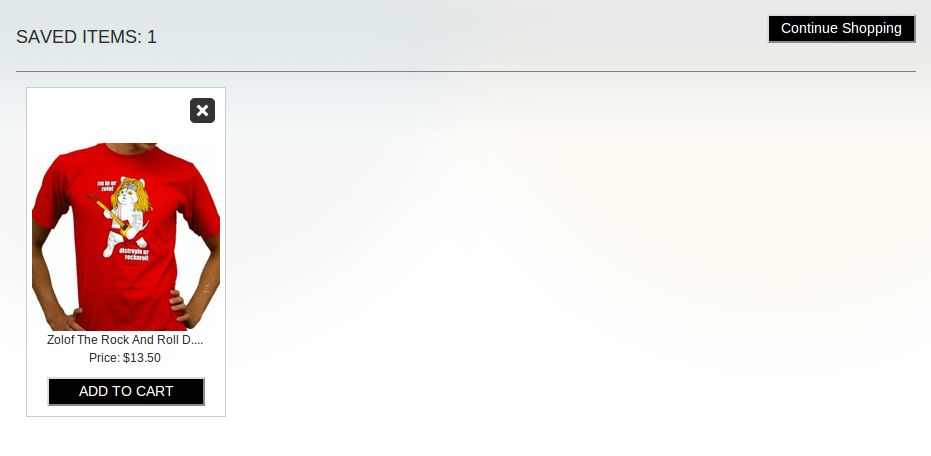
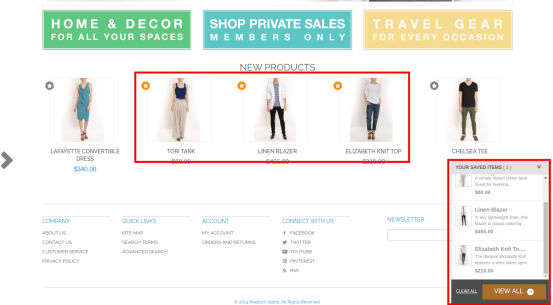
After enabling the Magento save for later module, customers will be able to see a bottom bar on every page of the store containing the “Your Saved Item block” enabled through configuration panel of the magnto extension.
The bottom bar at the front-end appears as shown below:
The highlighted “Shortlist” button will allow customers to shortlist corresponding products into a separate bucket. This bucket is displayed at the bottom of the page as highlighted in above screen.
When the customer clicks on “Shortlist” button, a product gets added to bucket and button text will get changed from “Shortlist” to “Added”.
You can try Knowband’s Magento Advanced Wishlist extension for on your Magento store. Magento advance order module helps you increase customer engagement to your store & you can
Provide the option to the online shoppers to save the favorite product to their wishlist.