OpenCart Booking and Rental System Extension- User Manual

1.0 Introduction

The online store merchant can now allow the online users to rent products, fix appointments and book hotels from the website. Knowband offers OpenCart Booking and Rental System Extension which is highly customizable and allows the online merchant to show hourly rental products, daily rental products, hotels for booking and appointment options. The online merchant can create a dynamic booking system easily without any hassle. This OpenCart Reservation And Booking Module allow the online merchant to set pricing, time slots, date availability, number of maximum available appointments/bookings/quantity from the admin interface.

The online users can fix appointments, book hotels, book hourly rental based products, book daily rental based products easily as per their requirements. The online merchant can also apply price rules for offering a reduced price on specific dates. The Online Booking module for OpenCart shows location using Google Map on the product pages for helping the users. The Hotel booking module for OpenCart is multi-lingual compatible and offers smooth functioning.

1.1 Features of this OpenCart Booking Calendar Extension

  1. The online merchant allows the online users to fix appointments, book hotel rooms and rent any product daily or hourly basis.
  2. The OpenCart Booking and Rental System Extension allows showing Locations using Google maps on the booking/rental product pages.
  3. Admin can create price rules for offering a discount on specific days. Admin can show/hide price rules on the booking/rental product pages.
  4. The OpenCart Reservation And Booking Module allows selecting appointment(Date/Date-time), daily rental(Date/Date-time), hotel booking and hourly rental type products from the admin interface.
  5. The Hotel booking module for OpenCart allows selecting service type ie. branch and home service for Appointment type products. In-home service, the users can get doorstep service and in-branch service type the users need to visit the service provider.
  6. Admin can select the initial price of service, show Google map location, image and availability date/time. Admin can also select the days on which he doesn’t want to offer a particular service.
  7. In hotel booking settings, admin can set the minimum-maximum days of booking, set the hotel rating, Facilities and add rooms of different types.
  8. For a specific room, admin can set the additional price of that room, the number of available rooms, check in-checkout time. Admin can also upload a room image and its facilities.
  9. Admin can create unlimited room categories and activate or deactivate it anytime.
  10. The Booking System Extension for OpenCart allows admin to create multiple room types(ie Deluxe, super-deluxe, semi-deluxe) and set the maximum allowed child/adult count. The store merchant can enable or disable the room types easily as per the requirement.
  11. The Online Booking module for OpenCart allows adding booking facilities and maps it with the product. Admin can add facilities like wifi availability, bathtub, free lunch and map it with hotel rooms. Admin can add images or font awesome for showing booking facilities.
  12. The online merchant can create and apply price rules from the admin interface for offering a discount on particular dates/duration.
  13. Admin can select the product, date type(specific/date range), reduction type(fixed/percentage-based) and reduction amount for applying price rule.
  14. Admin can view a list of all the ordered based on booking and rental. The OpenCart Event Booking plugin allows admin to view and edit the orders from the admin interface.
  15. The Online Booking module for OpenCart is multi-lingual compatible.

2.0 Installation Steps for Booking and Rental System

Purchase OpenCart Booking and Rental System Extension from our store. You will receive these files after purchasing the OpenCart Booking and Rental System Extension:

  • First, you will get a source code file of the OpenCart Booking and Rental System Extension in a zipped file format.
  • User Manual of this OpenCart Booking and Rental System module.

Follow below-mentioned steps to install OpenCart Booking and Rental System Extension:

1.Unzip the received zip file. You will get the folders.

2. Copy all the folders of the zip file in the Root Directory of OpenCart setup via FTP manager.

3. There will be a file named kbbooking_system.ocmod.xml (In case of Openvar v3.0.x file name would be kbbooking_system.ocmod.zip). Upload the same file from the page “Admin -> Extension -> Extension Installer -> upload”.

So, OpenCart Booking and Rental System Extension is now successfully installed and ready to use at your store.

Now go to the admin menu and click on the extensions and thereby click on the configure button next to Booking and Rental System.

3.0 Admin Settings

After installation, the online merchant can apply the settings to implement booking and rental functionality on the website.

There are seven configuration sections as shown below:

  1. General Settings
  2. Products
  3. Room Categories
  4. Room Type
  5. Booking Facilities
  6. Price Rules
  7. Orders

3.1 General Settings

In general settings, the online merchant can apply basic settings related to the rental system.
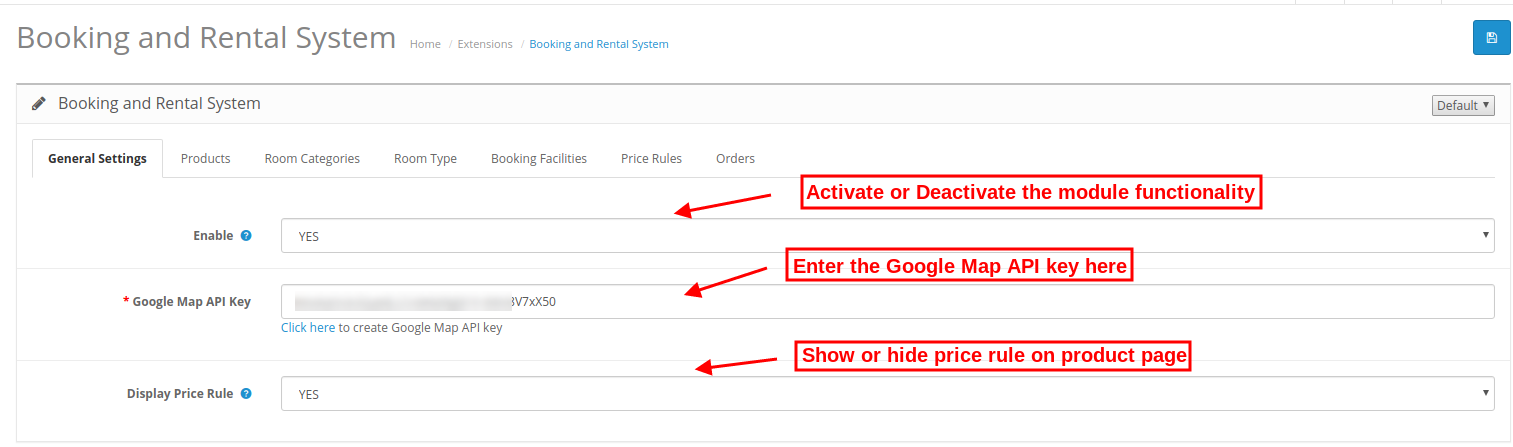
OpenCart Booking and Rental System Extension General settings

  • Enable: Enable or disable the functionality by selecting yes or no option.
  • Google Map API Key: Enter the Google map API key for Google map integration. The store admin can also get the steps to generate a Google map API key.
  • Display Price Rule: Enable this option to show price rule on the product page.

3.1.1 How to generate the Google Map API key

For generating Google map API key, admin can follow these steps:

  • Click on the “Get Started” button: First of all click on this button to get Google map API key.
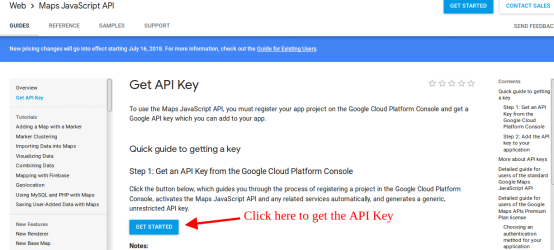
  • Pickup the products: On clicking the “Get Started” button, an admin will view this pop-up.
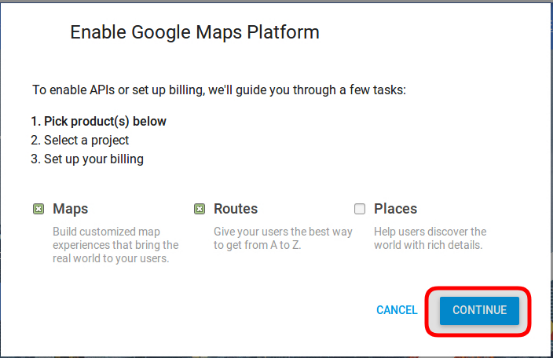
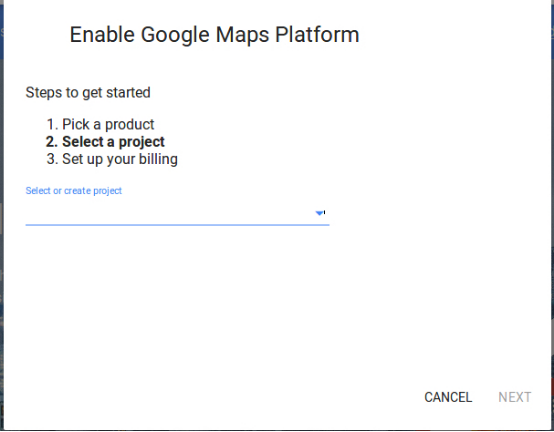
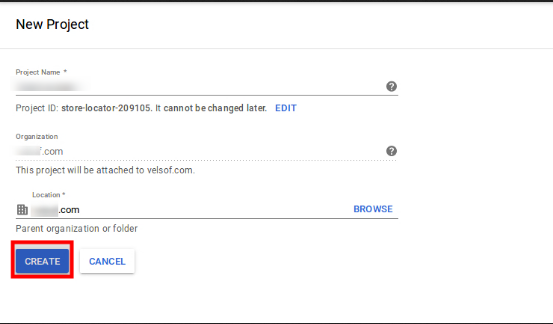
  • Project selection: Now, admin can create or select any project.

1. Select a project:
2. Create a new project:
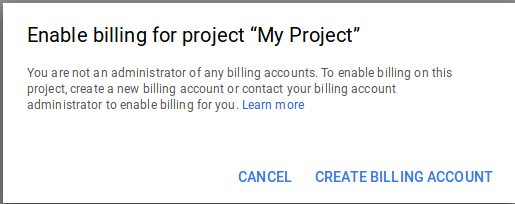
  • Setup the billing: After creating a new project set up the billing.
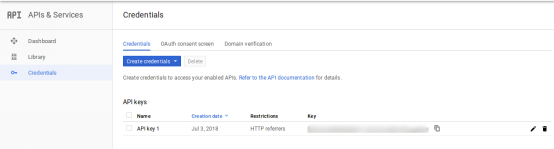
  • After billing the online merchant can get the Google map API key.  On the Credentials page, get an API key:
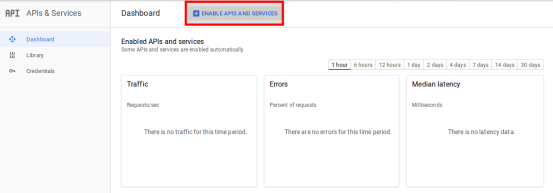
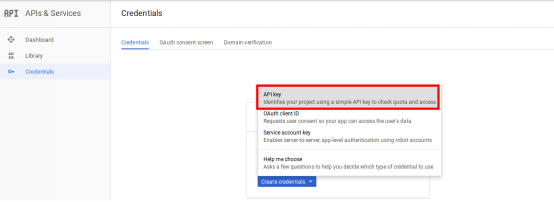
  • The store admin can select the API key option:
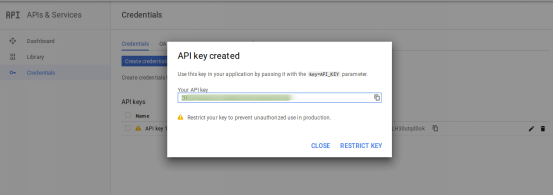
The admin can select the restrict key option from the dialog box to set a browser restriction on the API key.
In the Key restriction section, the store admin can select HTTP referrers (web sites), then follow the on-screen instructions to set referrers.
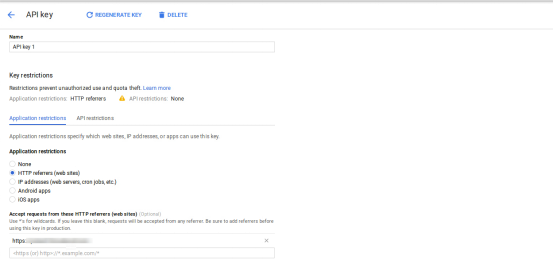
This way the admin can set the Google map API key.
3.2 Product

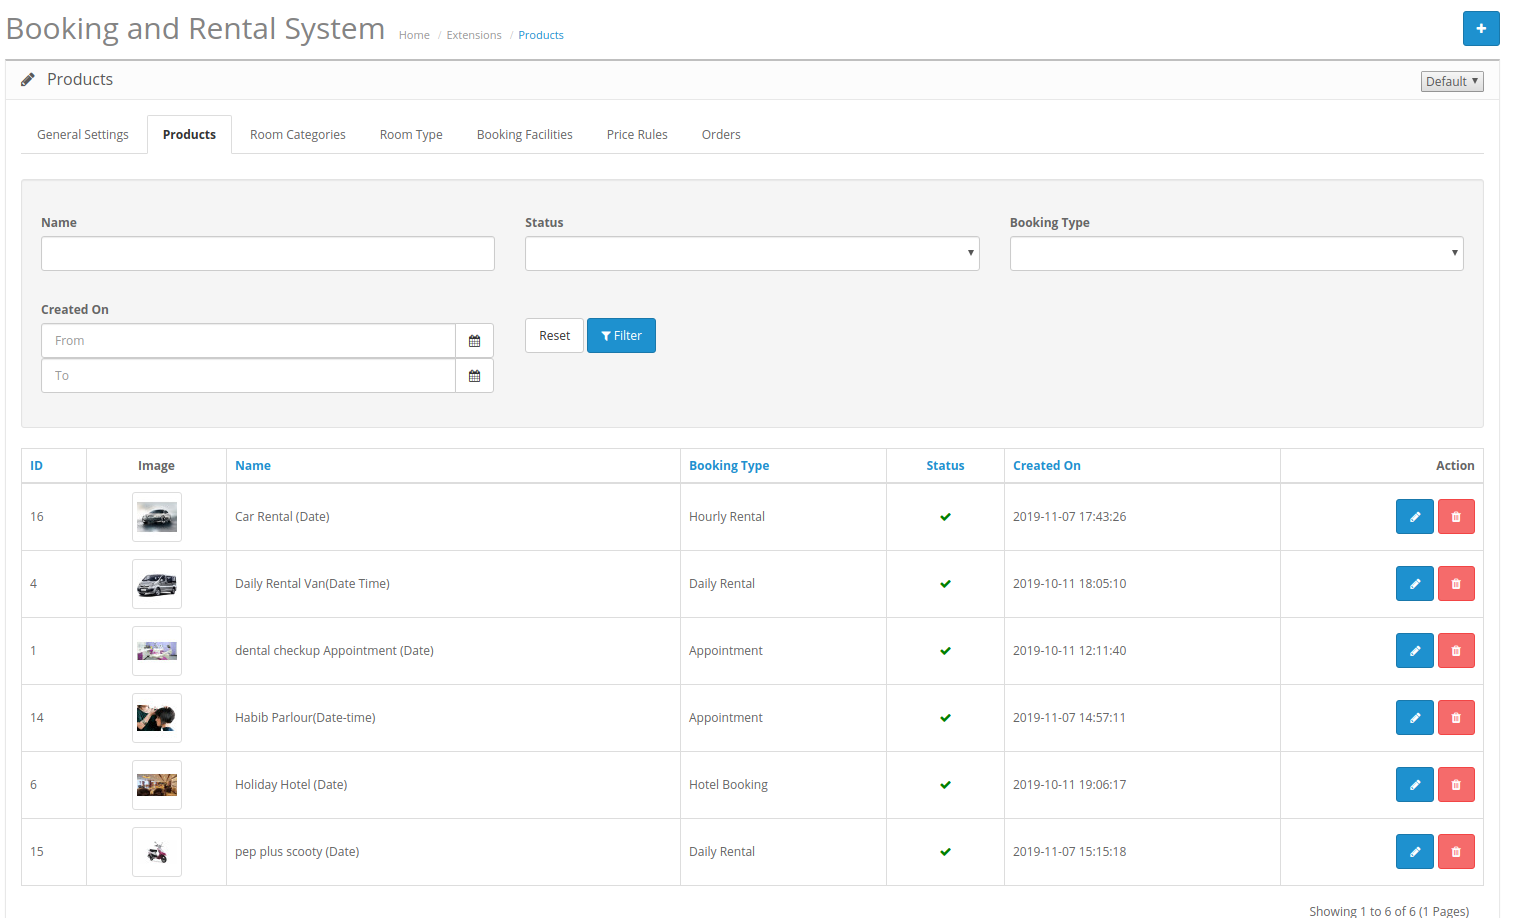
In the products tab, online users can view the list of added products. The store merchant can add, edit and delete any product easily without any hassle.

3.2.1 Add new Product

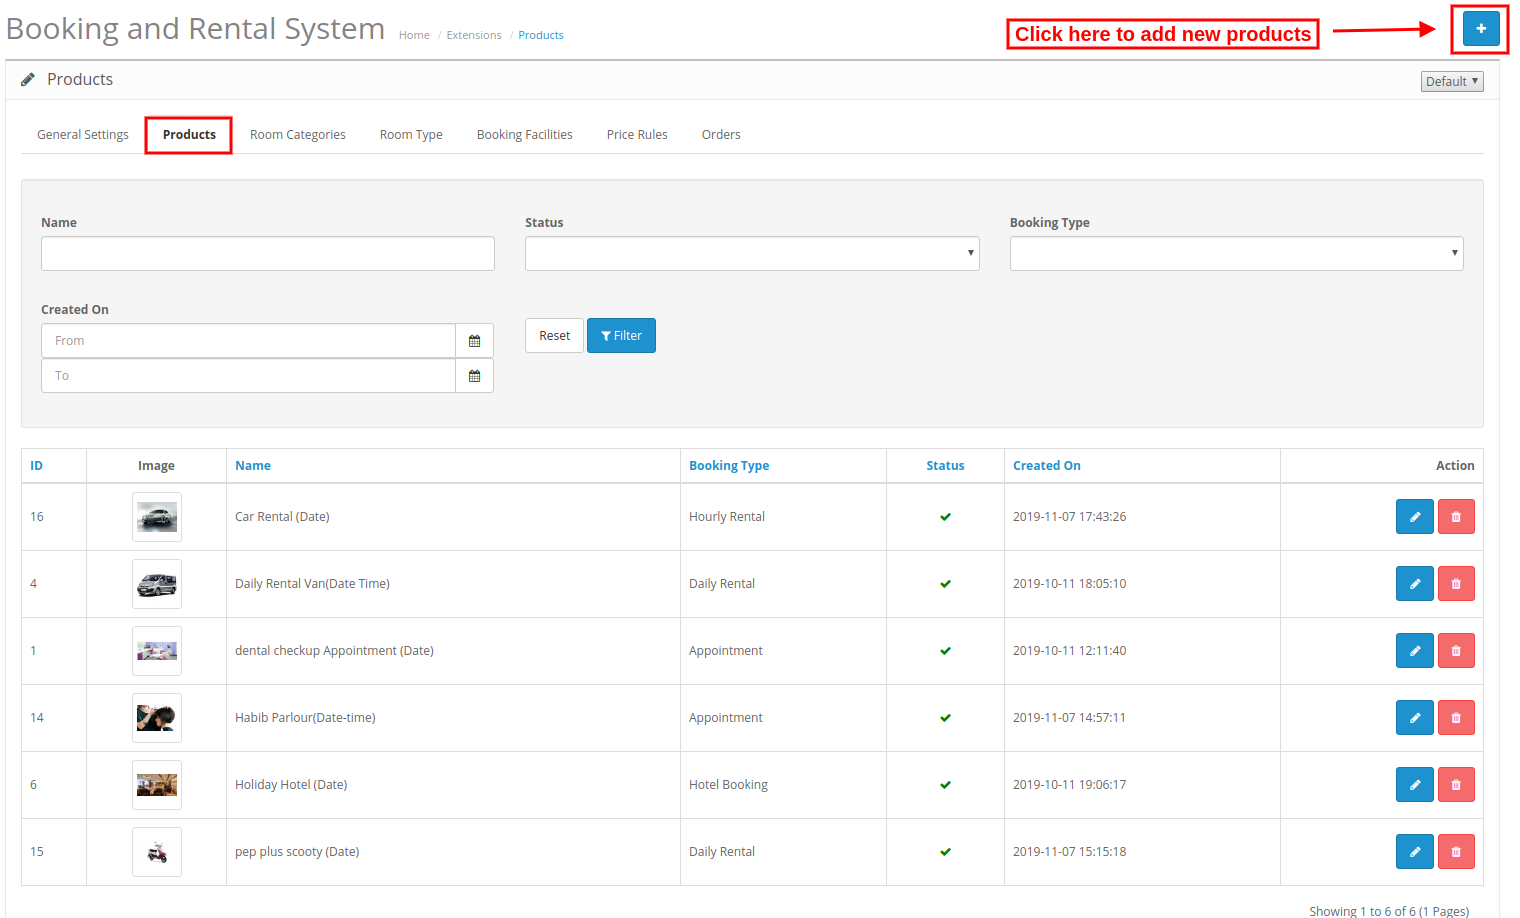
For adding a new product, the admin needs to click on the “+” button first.

After clicking on the “+” button, an admin will get several options as shown below:
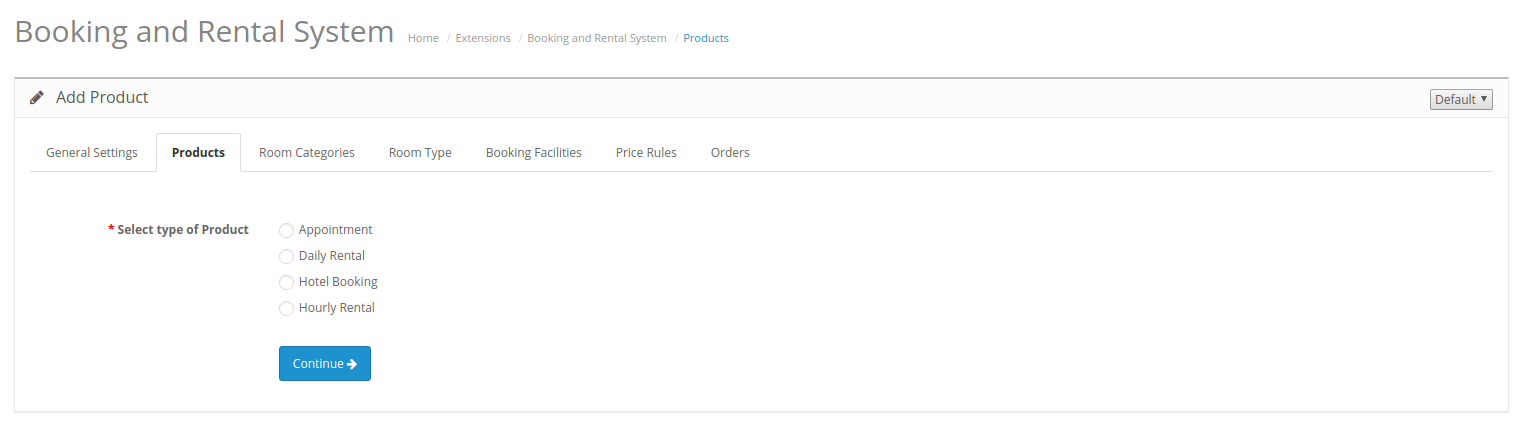
Select Type of Product: Admin needs to select the type of product which he wants to add.

Admin can select from these product types:

  • Appointment
  • Daily Rental
  • Hotel Booking
  • Hourly Rental

There are a total of 6 cases:

Admin can add Appointment(Date and Date-type), Daily Rental(Date and Date-type), Hotel Booking(Date) and Hourly Rental(Date) type of products.

3.2.1.1 Appointment Type

1. General:

The store merchant can apply basic settings for products.
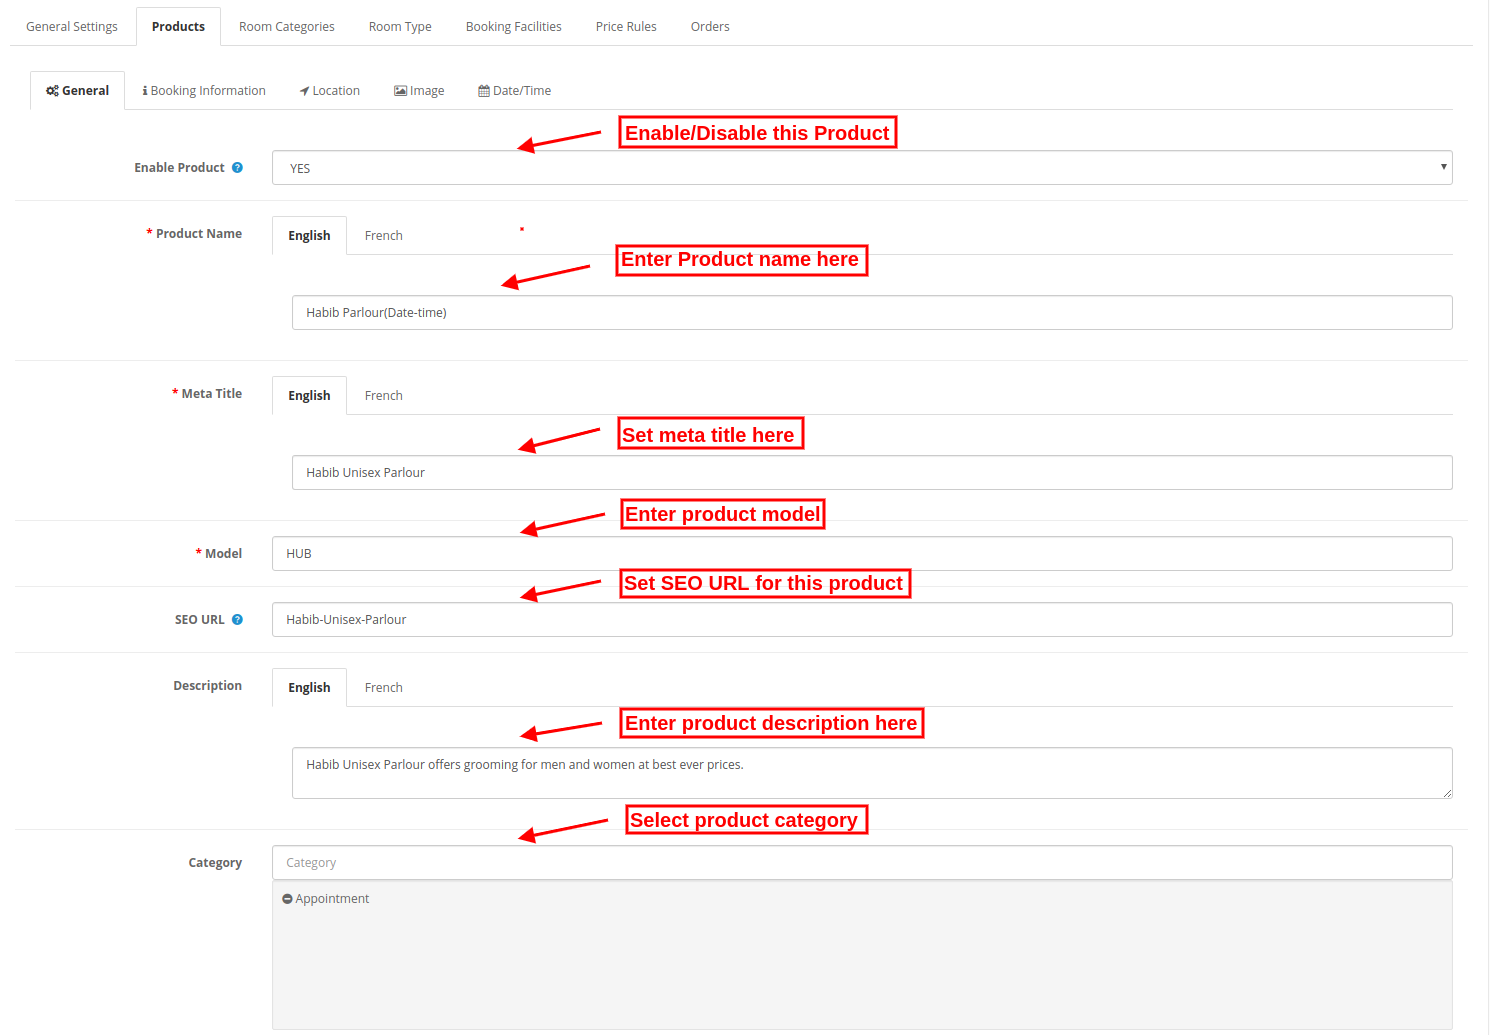
  • Enable Product: Select Yes or No to activate or deactivate the product.
  • Product Name: Enter the name of the product in multiple languages.
  • Meta Title: Set the meta title in multiple languages.
  • Model: Enter the model details here
  • SEO URL: Set SEO URL for this product. Do not use any space in the SEO URL.
  • Description: Enter the product description in various languages.
  • Category: Select the category for the product.

2. Booking Information:

In booking information tab, admin can set the booking related settings as shown below:
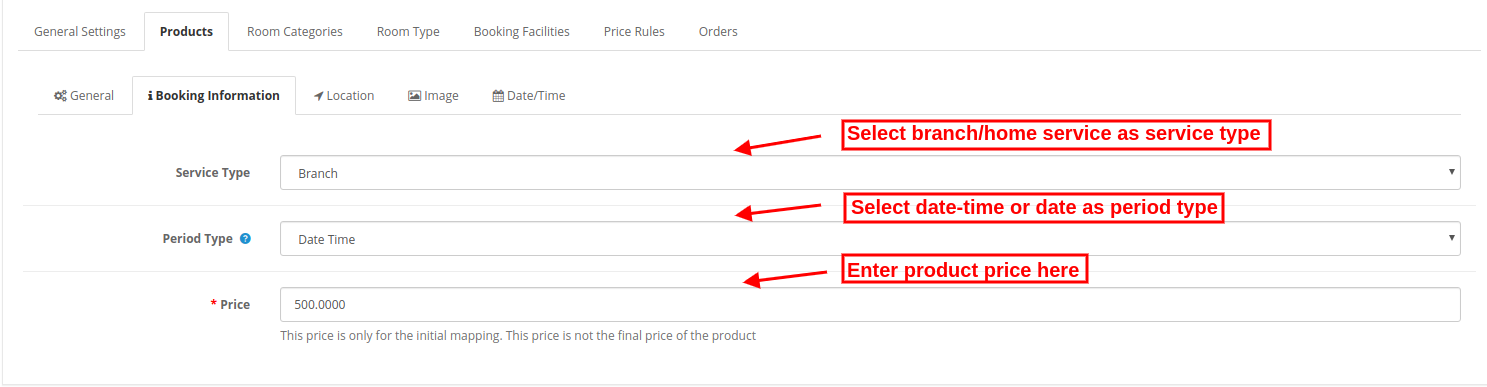
  • Service Type: Select the Service type as Branch if you want the user to visit at your place. Select service type as Home service if you want to offer the home facility.
  • Period Type: There are two-period types one is date and the other is date-time. Admin can select any of the period types as per the requirements. According to the selected option, the fields will change in the Date/Time tab.
  • Price: Set the price of the product for initial mapping. It will not be considered as a final price.

3. Location:

The online merchant can also show the service location at Google map by applying these location settings:
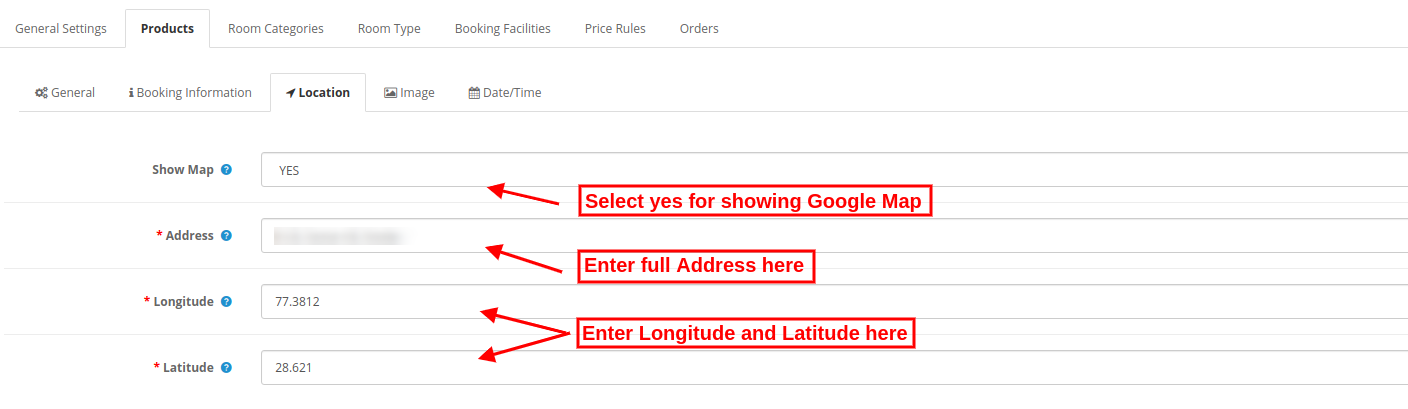
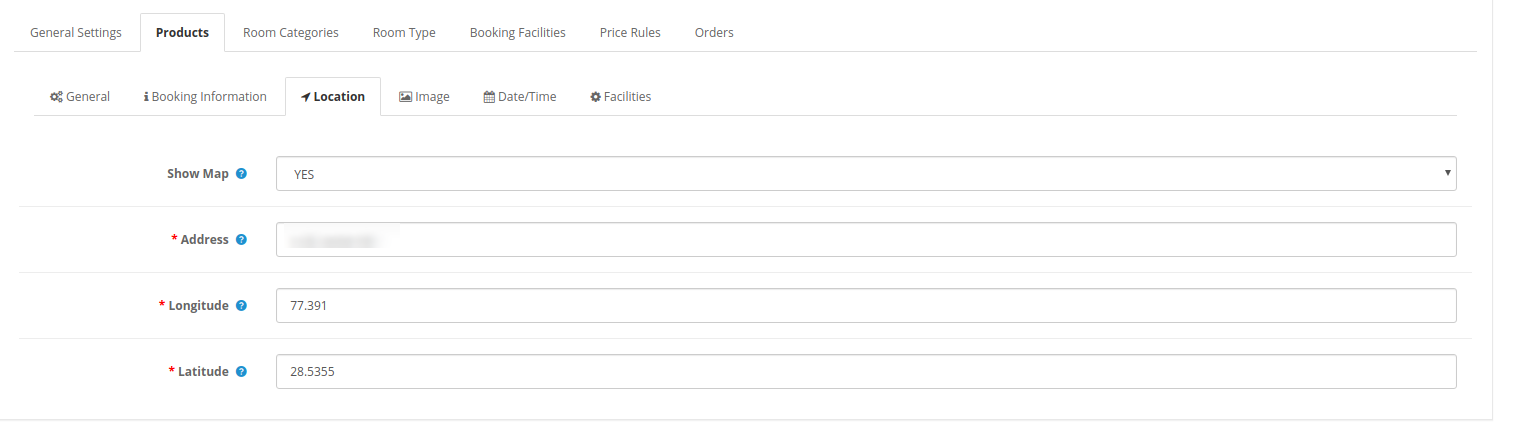
  • Show Map: Select yes for including a map and no if you don’t want to show map.
  • Address: Enter the full address here.
  • Longitude: Set the Longitude.
  • Latitude: Set the Latitude.

4. Image: Select the product image. Admin can select multiple images and set the sort order for setting the position.
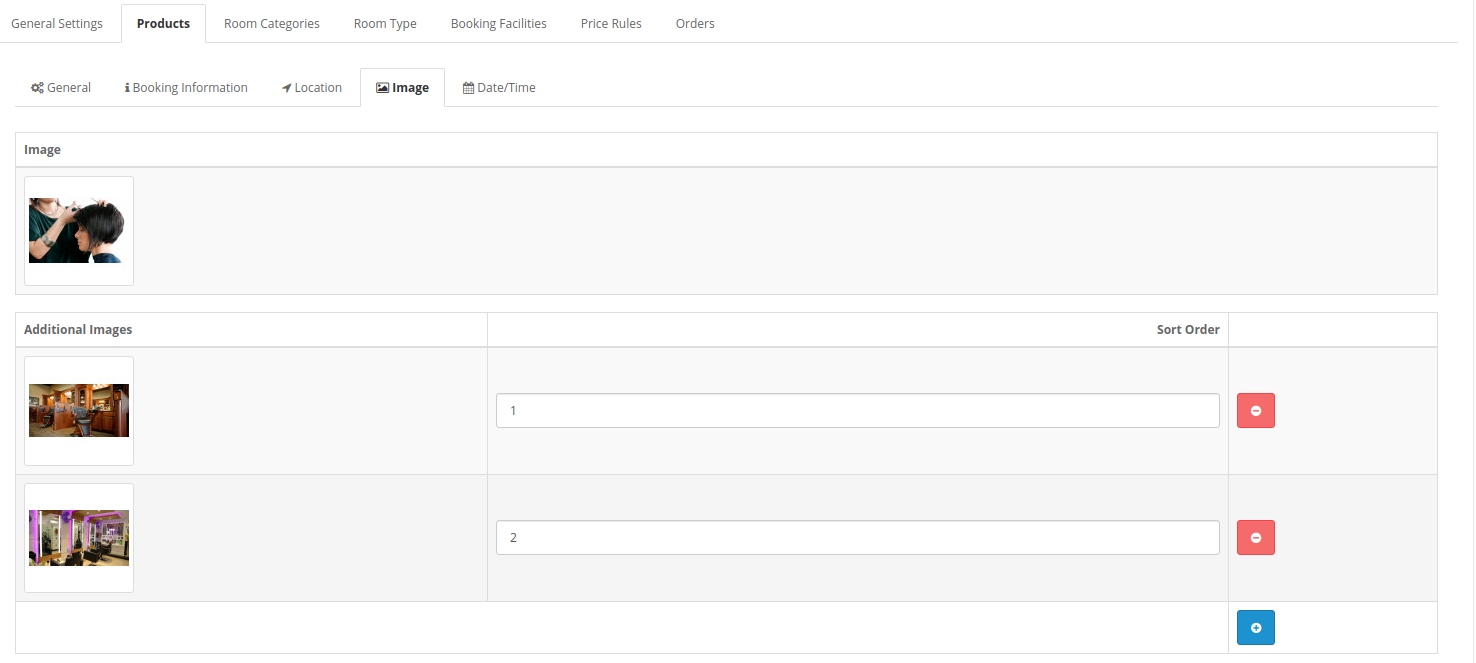
 5. Date/Time:

The online merchant can set date and time setting as shown below:

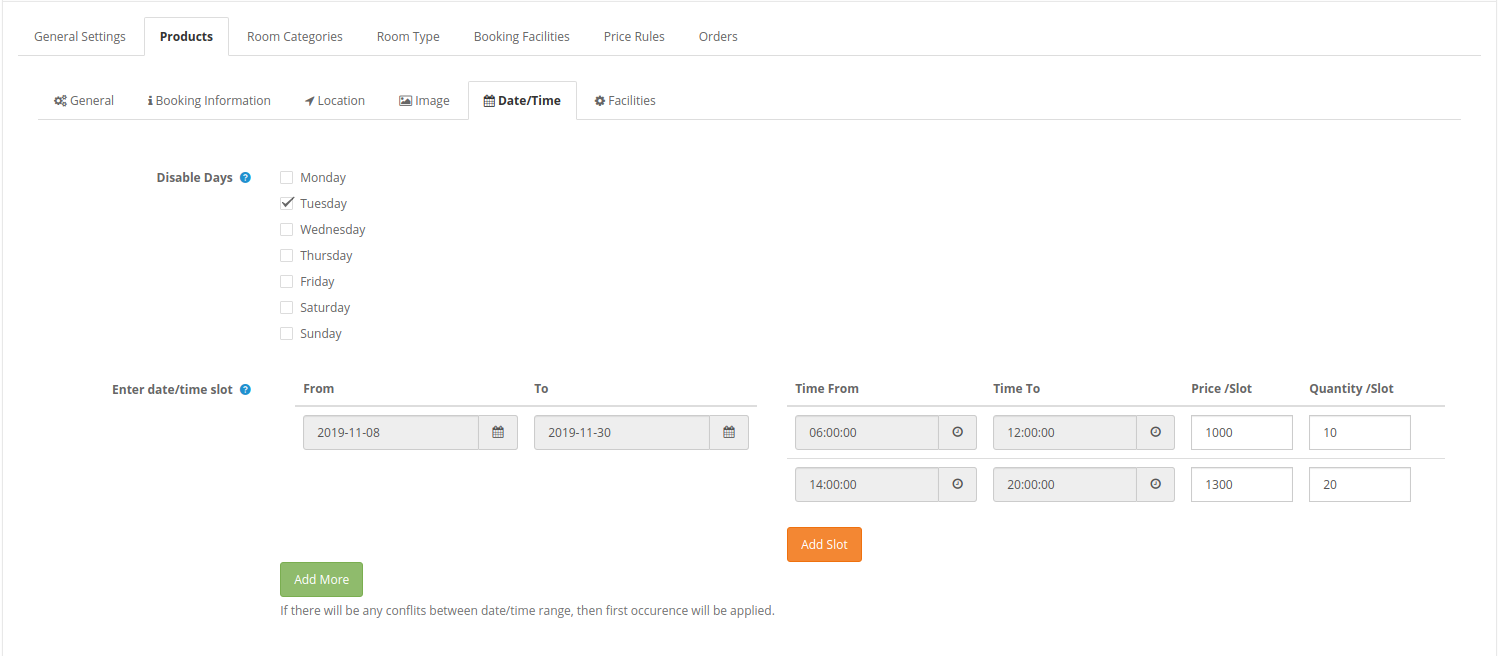
Date-time slots settings will display as below-mentioned image:
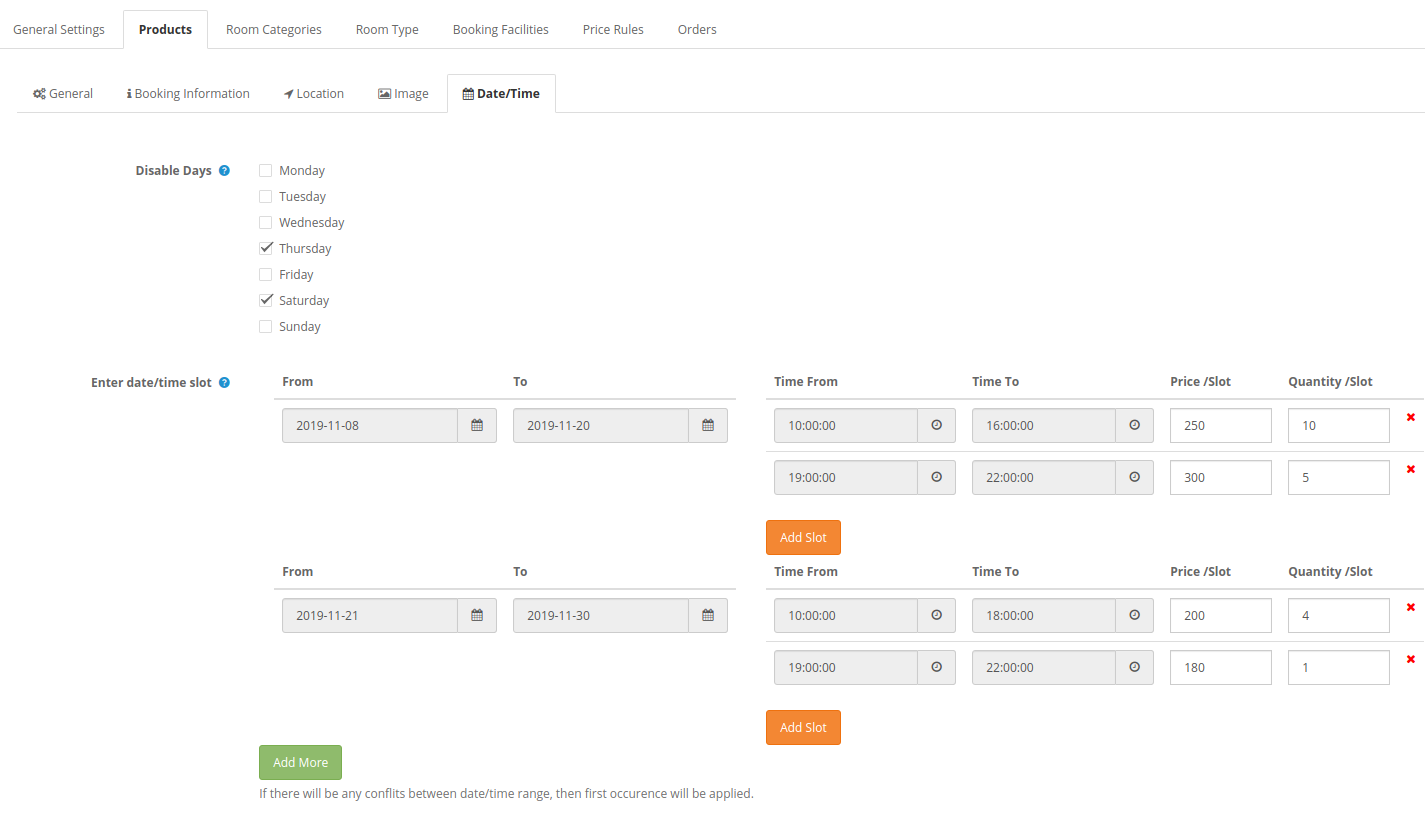
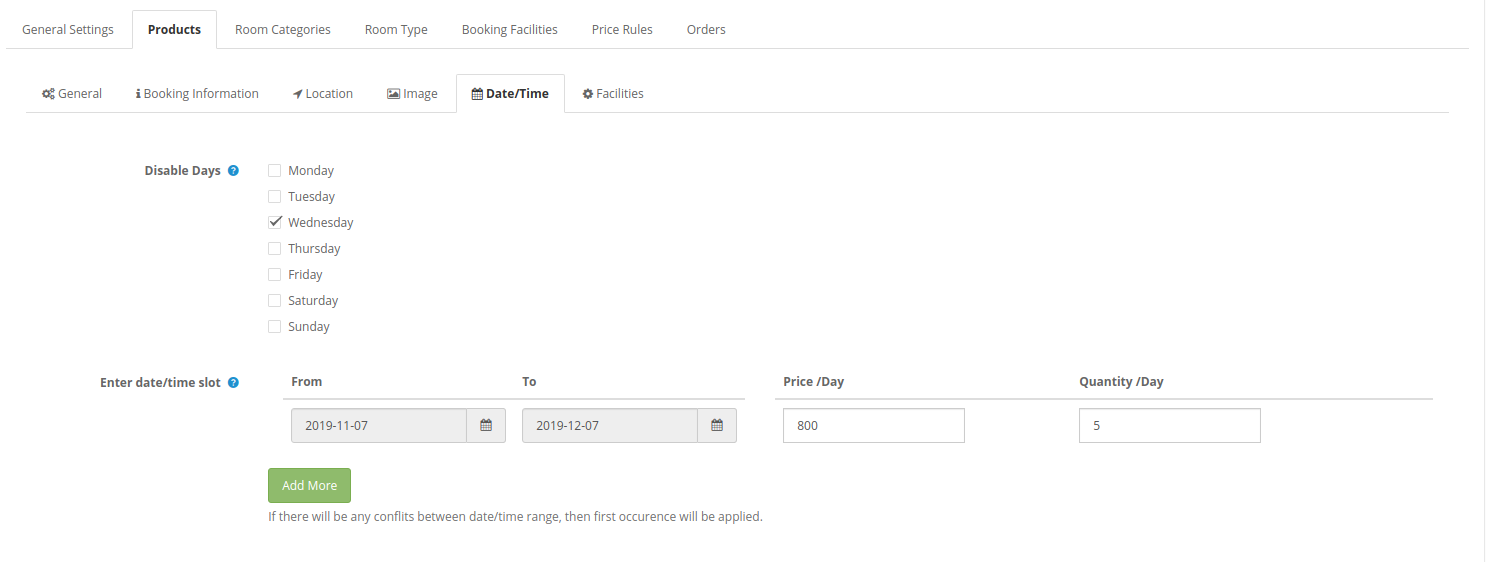
  • Disable days: A checkbox is available for every day, admin can click on the day which he wants to disable. There will be no service/product available on disable days.
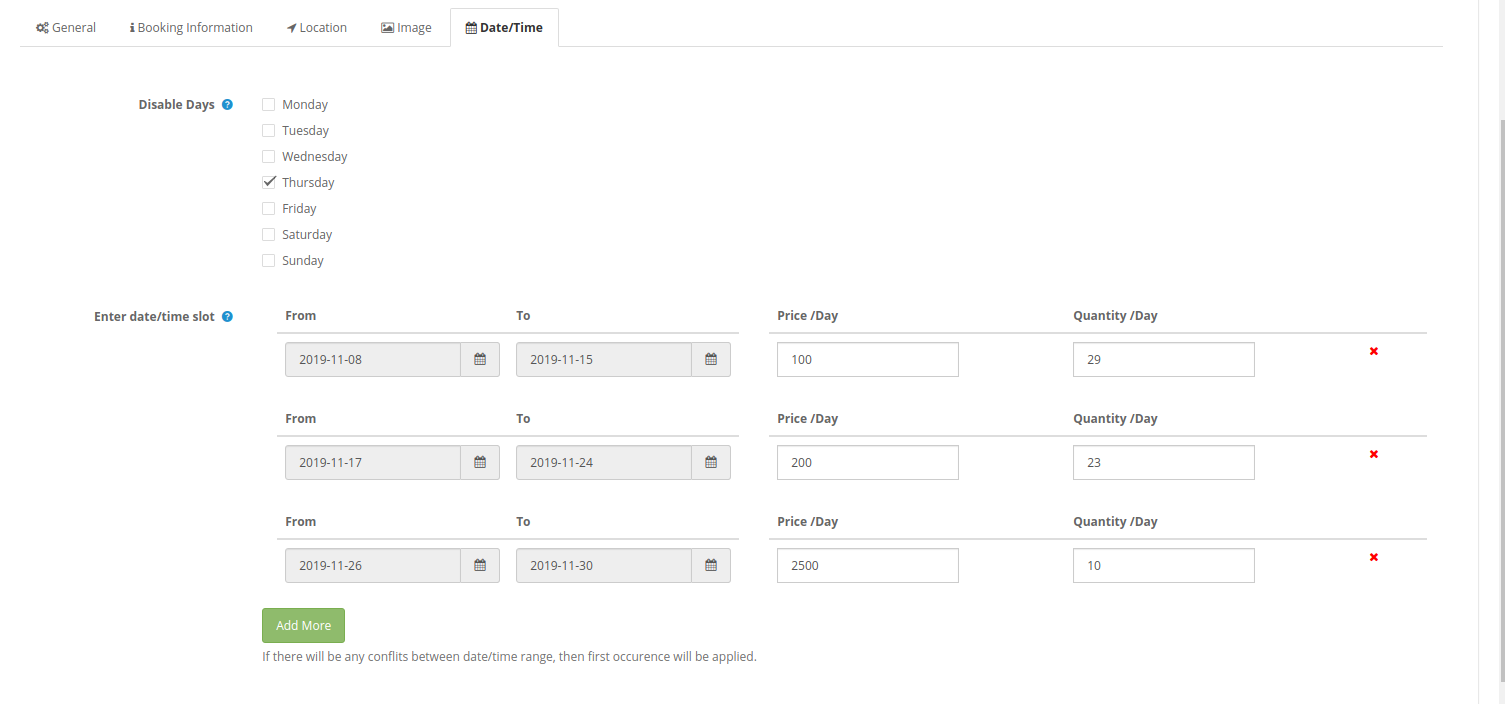
  • Enter date/time slot: Admin can create multiple days/time slots by setting the dates/time duration, the price per slot and quantity per slot. The OpenCart Reservation And Booking Module shows an error if the admin overlaps any date/time.

Date Slot settings will show as below-mentioned image:
3.2.1.2 Daily Rental

Admin can select the product type as Daily rental and add products in this category.
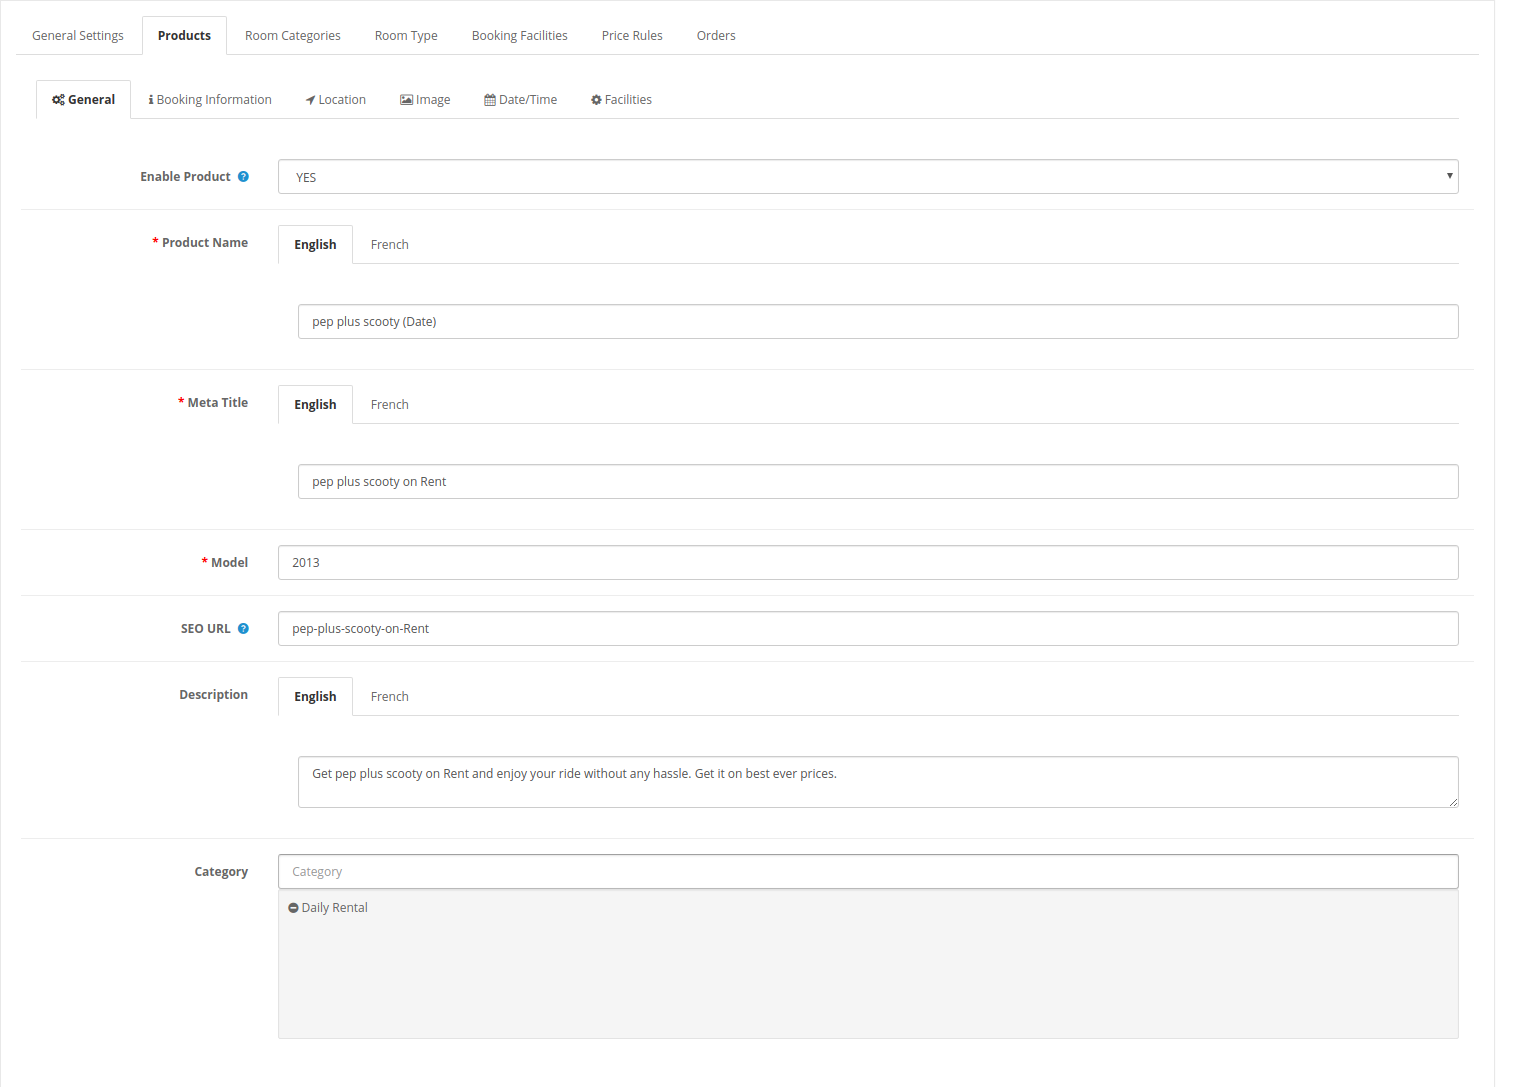

1. General: General Settings will be the same as “Appointment” product type settings. Admin can enable/disable the settings, enter product name, meta title, model, description, SEO URL and also select the product category.

2. Booking Information: 

  • Period Type: Admin can select the booking period type as date and date-time. While selecting period type as date, there will be two more settings for minimum and maximum days. According to the selected option the fields will change in the Date/Time tab.
  • Price: Set the product price for initial mapping.
  • Min Days: Set Minimum booking days.
  • Max Days: Set Maximum booking days.

3. Location:

Location Settings will be the same as “Appointment” location settings. Admin can show/hide the map, set address and enter longitude-latitude.


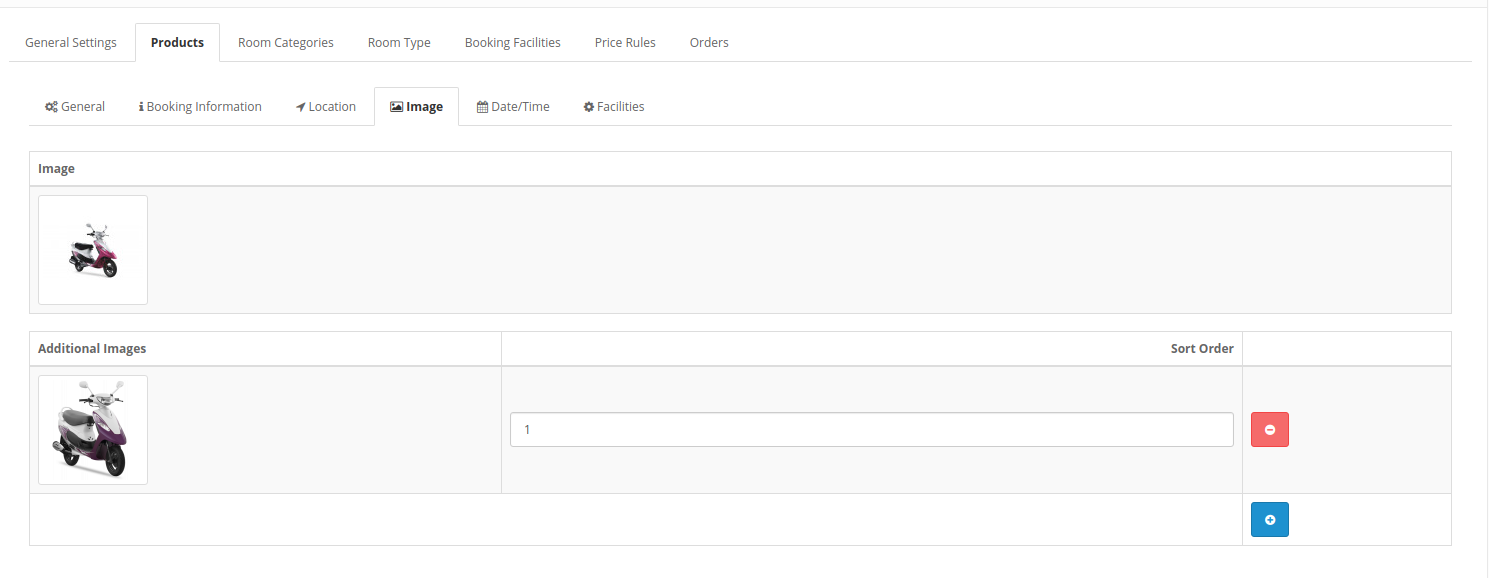
4. Image:

Select the product image. Admin can select multiple images and set the sort order for setting the position.
5. Date/Time:

Date/time Settings will be the same as “Appointment” Date/time settings. Admin can click on the checkbox for disabling days and enter date/time slots also.

Date slots:

Date-time Slots:
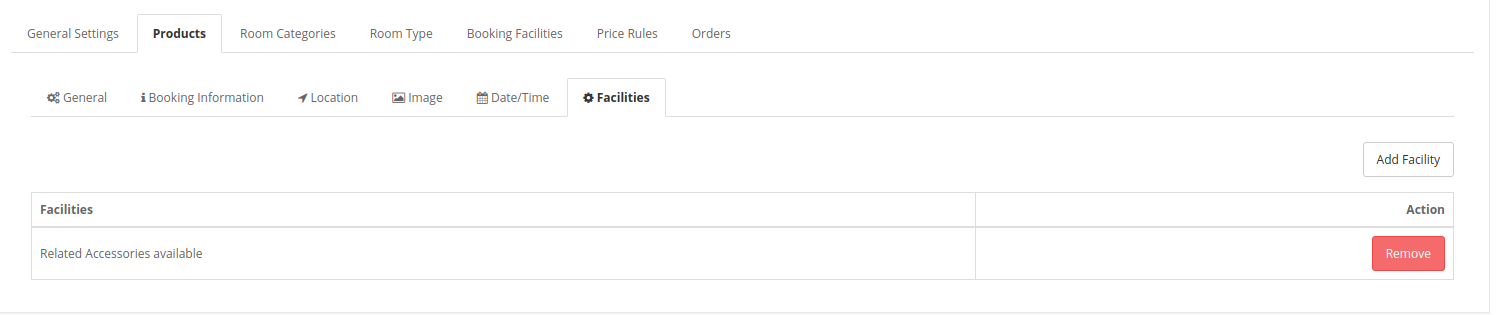
6. Facilities:

Admin can add facilities once he saves this settings. Only the “Rent” type of facilities will be listed here to add them.
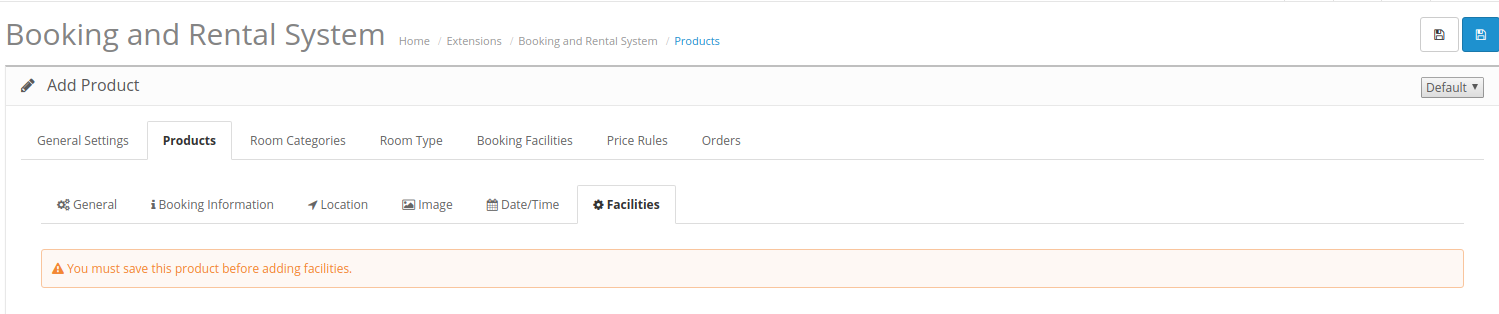
After saving the products and applying booking facility settings, admin can add facilities easily by clicking on the add facility button.
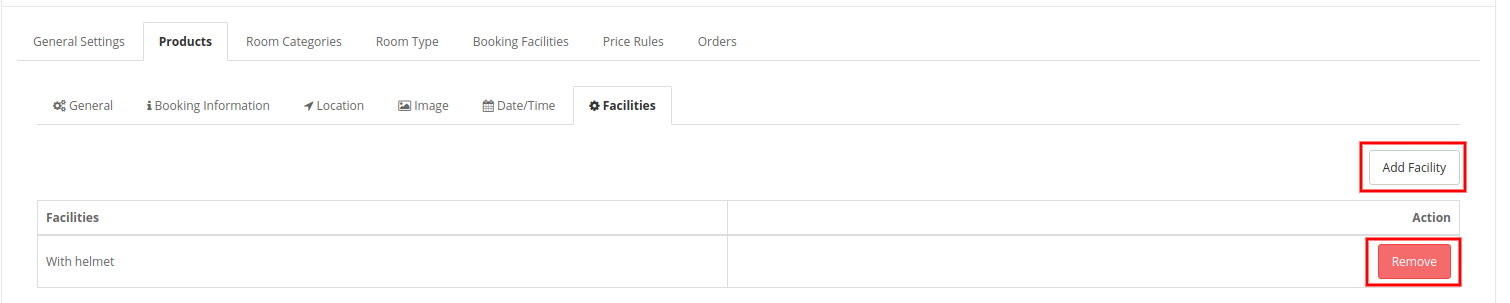
Admin can also remove any facility by clicking on the remove button.

3.2.1.3 Hotel Booking

Admin can select hotel booking product types and add multiple hotels easily.

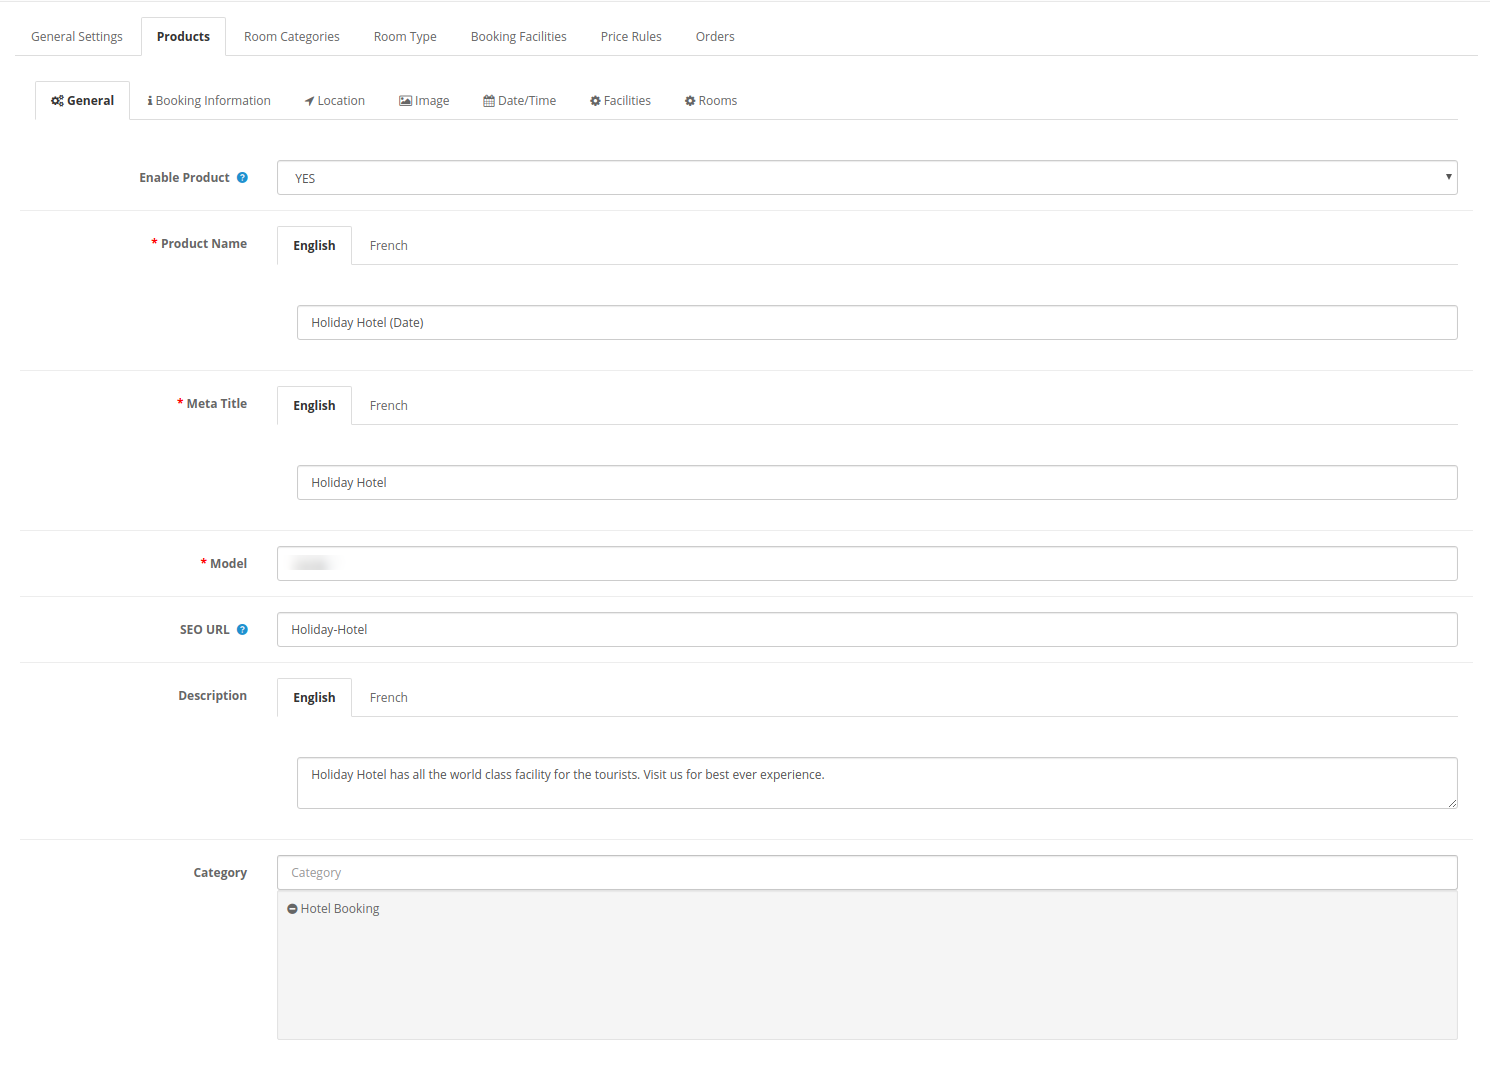
1. General:

General Settings will be similar to previous settings.
2. Booking Information:
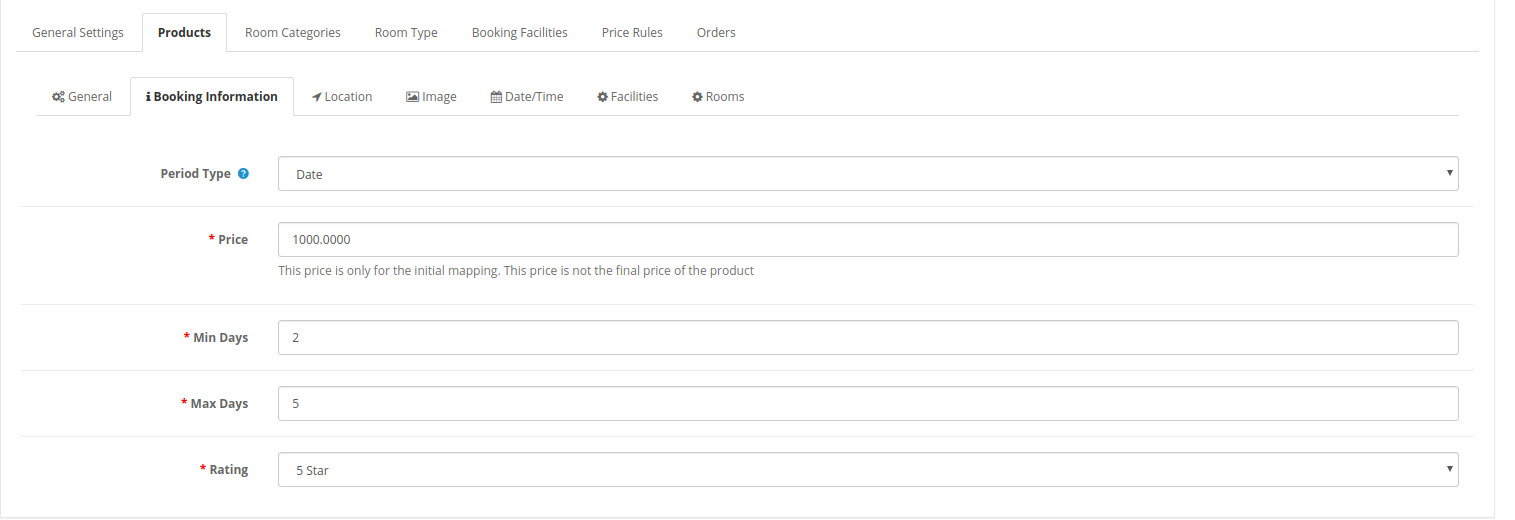
  • Period Type: Period type will be as date.
  • Price: Set the product price for initial mapping.
  • Min Days: Set minimum booking days for this hotel.
  • Max Days: Set maximum booking days for this hotel.
  • Rating: Set hotel Rating. The maximum rating will be 5 stars.  

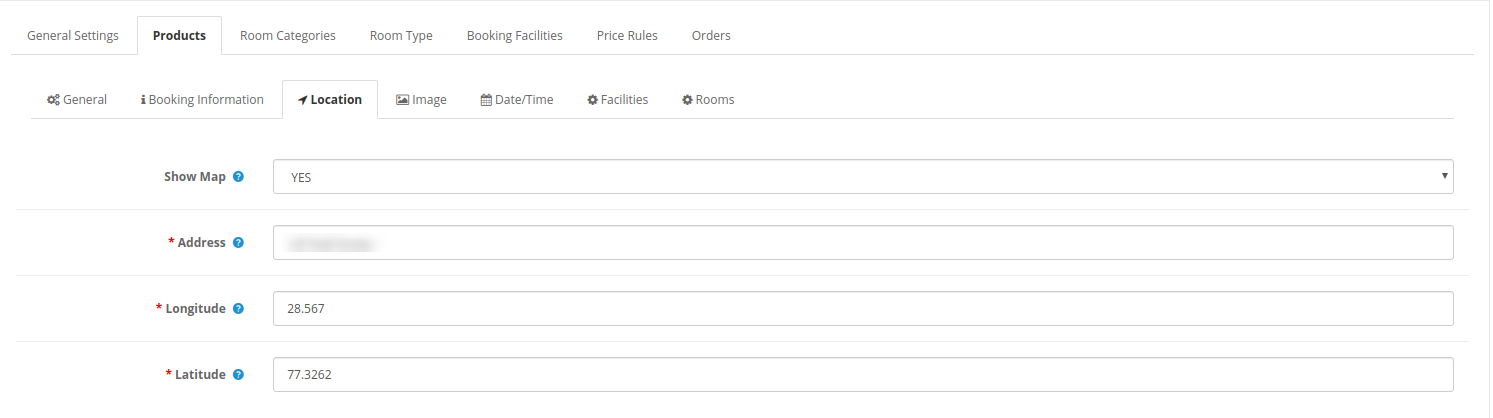
3. Location 

Location settings will be the same as in previous settings.
4. Image:

Select the product image. Admin can select multiple images and set the sort order for setting the position.

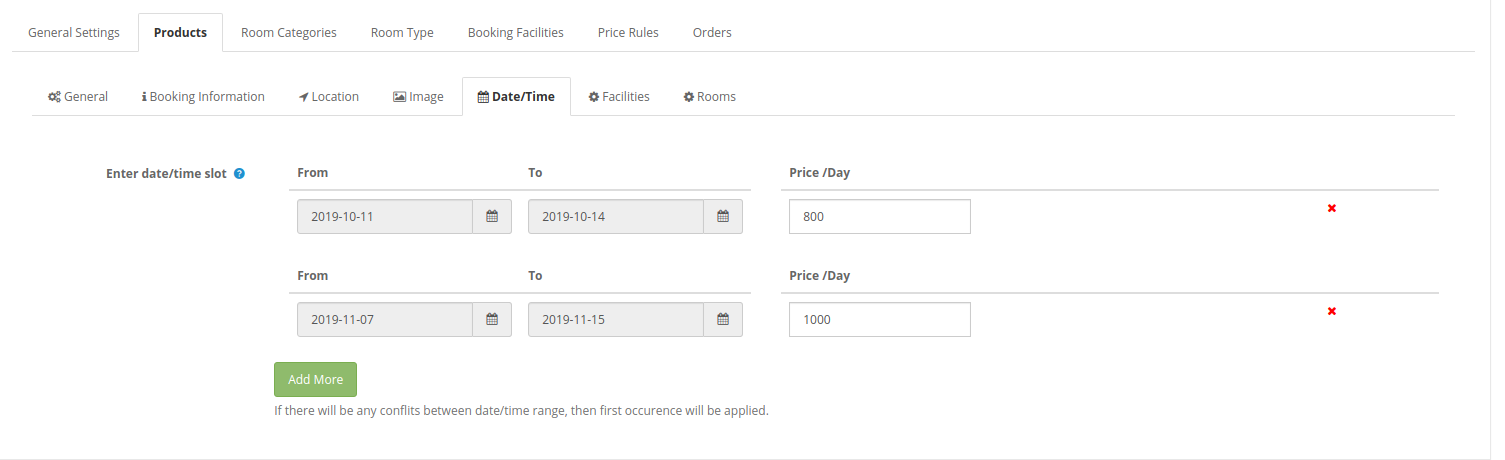
5. Date/Time Set:

  • Enter Date/time Slot: Admin can create date slots and set hotel prices per day.
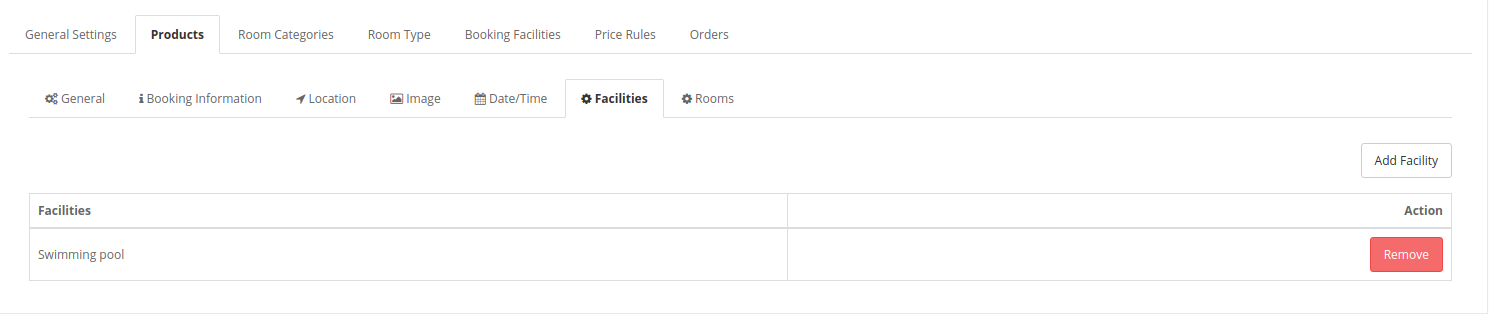
6. Facilities:

Admin can add facilities once he saves these settings. Admin just needs to click on “Add Facility” for adding facilities. Only hotel type of facilities will be listed to add them.
7. Rooms: 

Admin can first save the settings and then add the details of the room. Rooms can be added only after applying room category settings, room type settings and booking functionality settings.
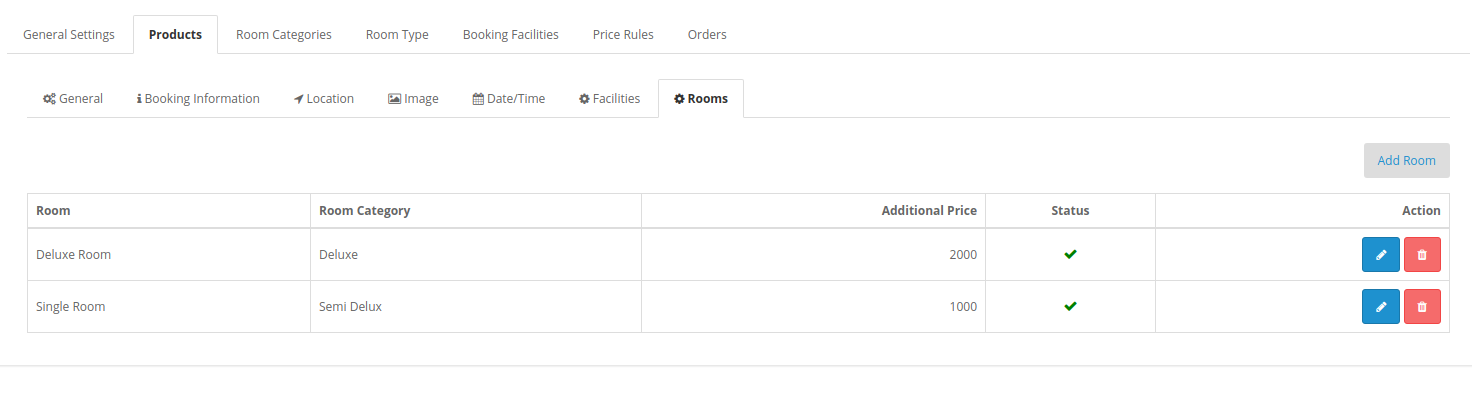
For adding any new room, follow these steps:

For adding a new room, admin just needs to click on “Add new” and apply these settings:
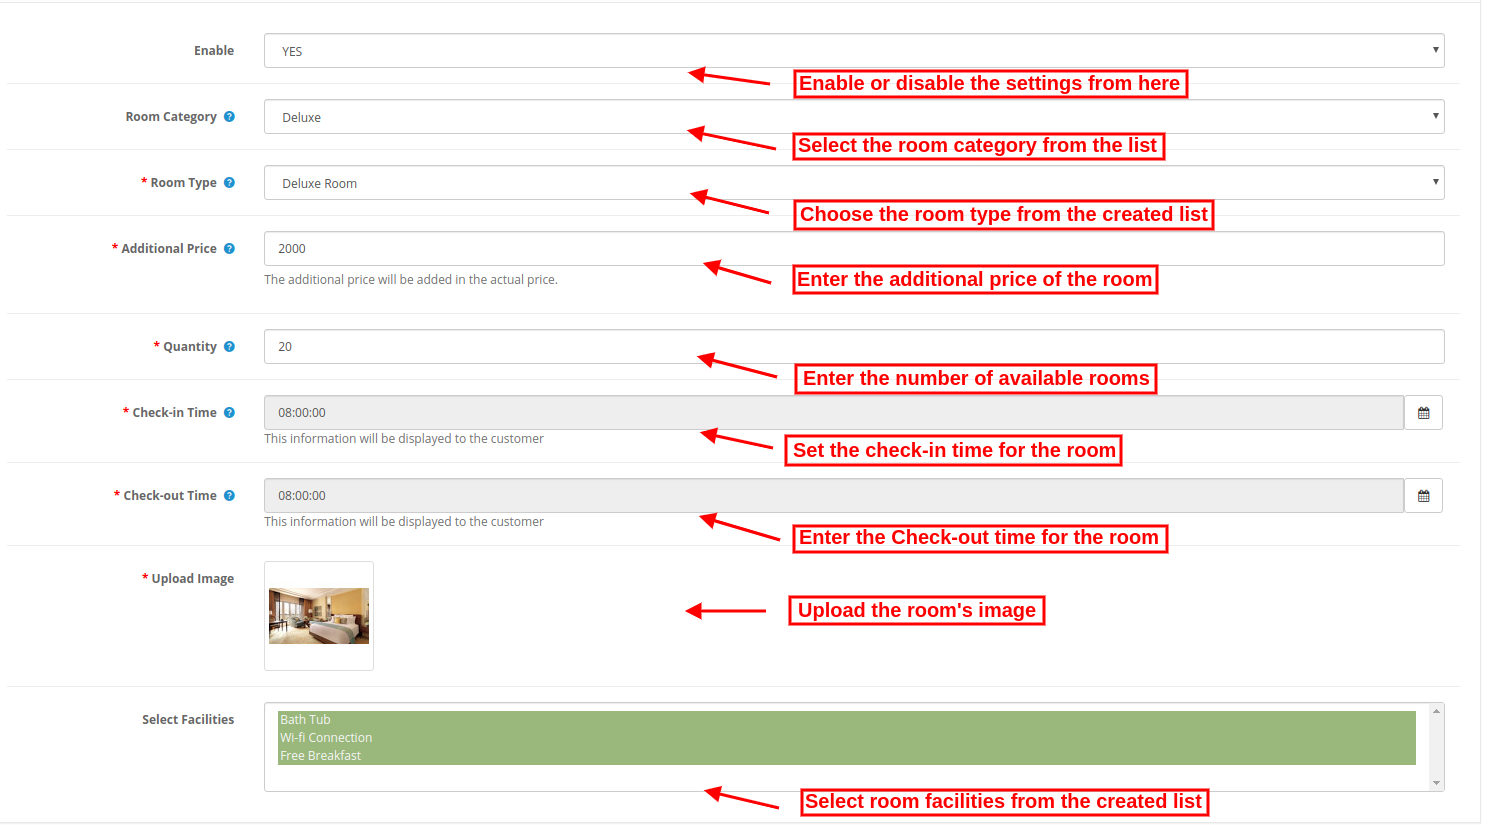
  • Enable: Select yes if you want to show this room at the front-end interface.
  • Room Category: Select from available room categories.
  • Room Type: Select the room type from the available room types.
  • Additional price: Set the room price which will be added in the hotel’s mapped amount.
  • Quantity: Enter the number of available rooms of similar type.
  • Check-in-time: Enter Check-in time in available format.
  • Checkout time: Enter Check-out time in available format.
  • Upload Image: Select the room image and upload it.
  • Select Facilities: Select facilities of room ie wifi, bathtub. Only the “Room” type of facilities will be listed here to select.

Admin can delete and edit room details from the rooms list page. He just needs to click on delete and edit icons.

3.2.1.4 hourly rental

Admin can select the hourly rental product types and add multiple products on the bases of hourly rent.

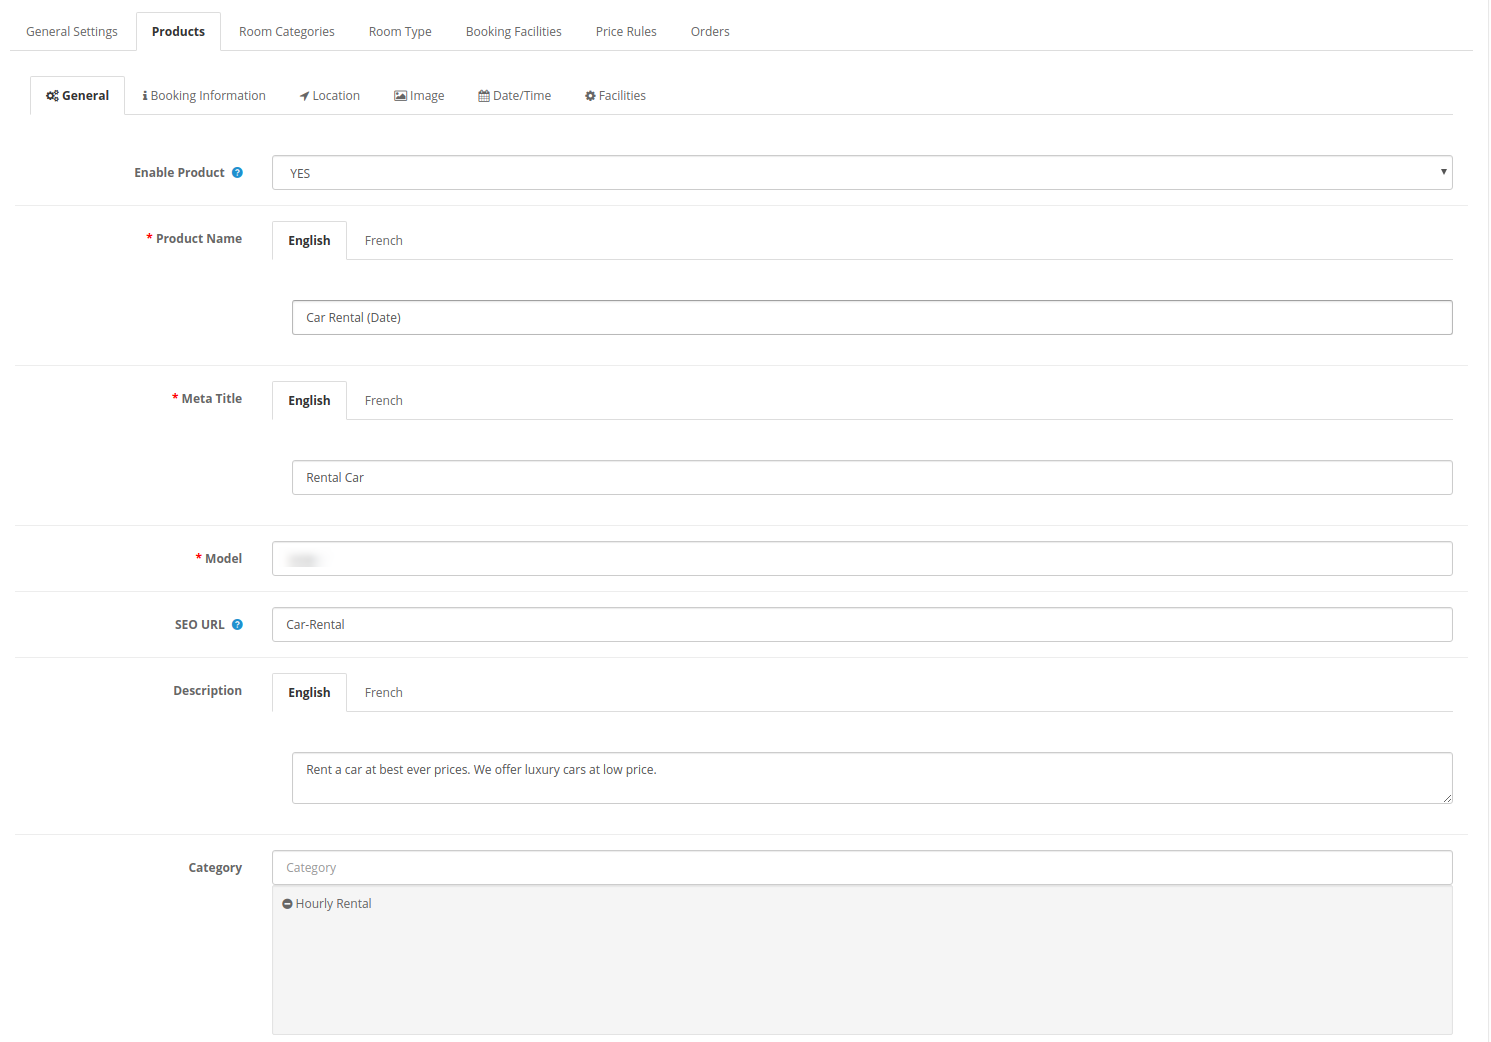
1. General:

General Settings are same as previous settings.
2. Booking Information: 

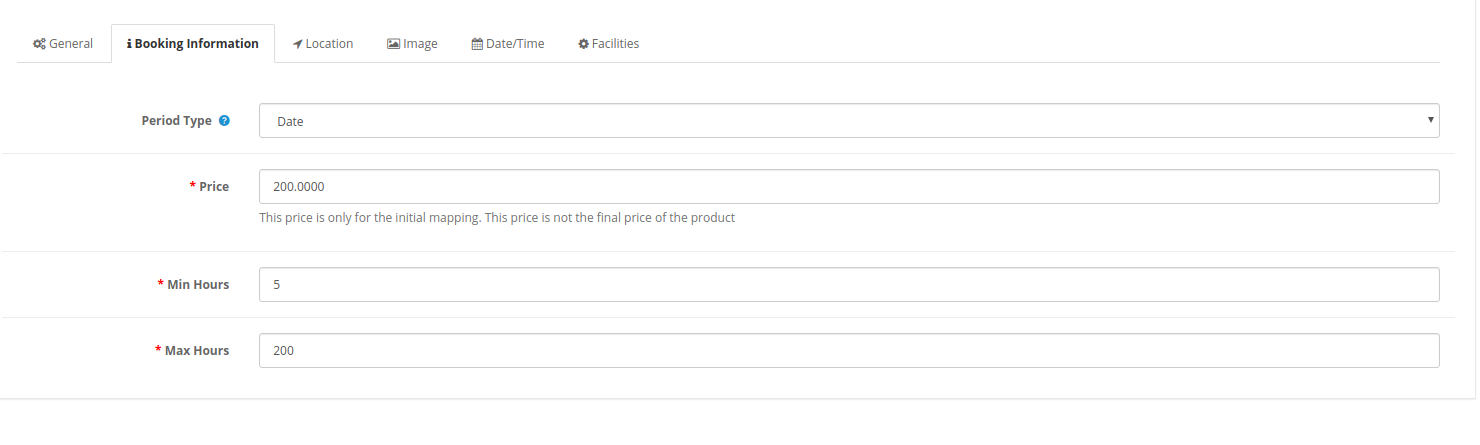
Booking Information is the same as in previous settings. Admin can set date as period type, set initial mapping price, min-max hours.
3. Location 

Location settings will be the same as in previous settings.
4. Image:

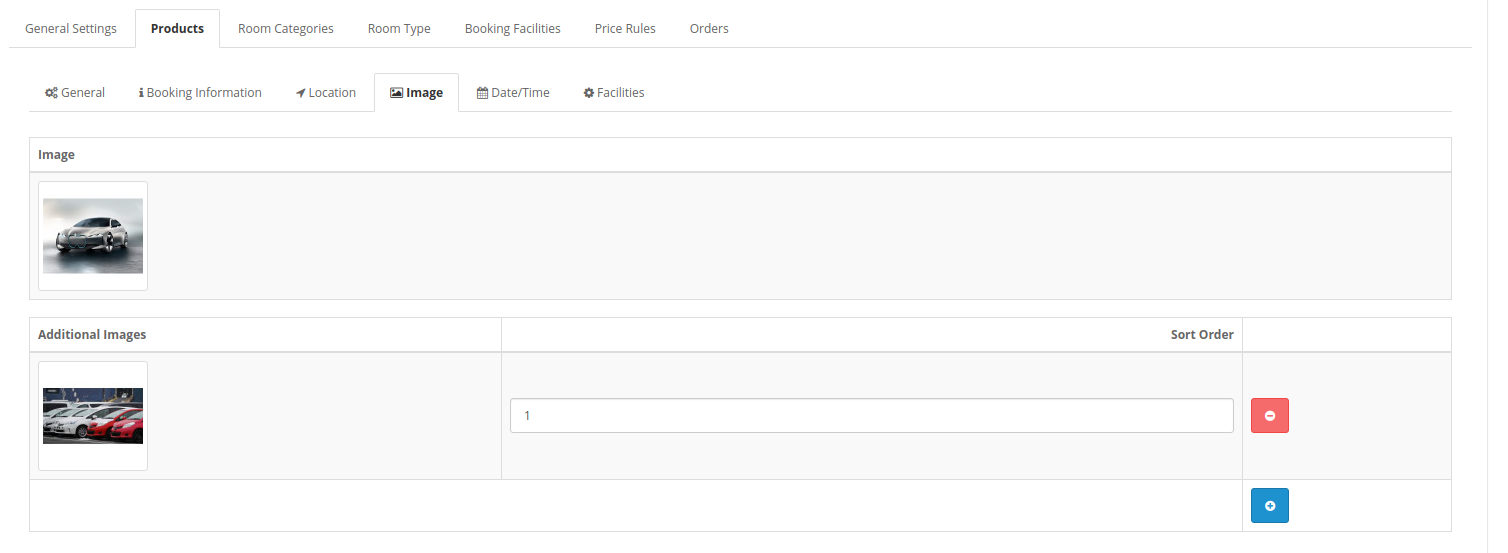
Select the product image. Admin can select multiple images and set the sort order for setting the position.
5. Date/Time Set:

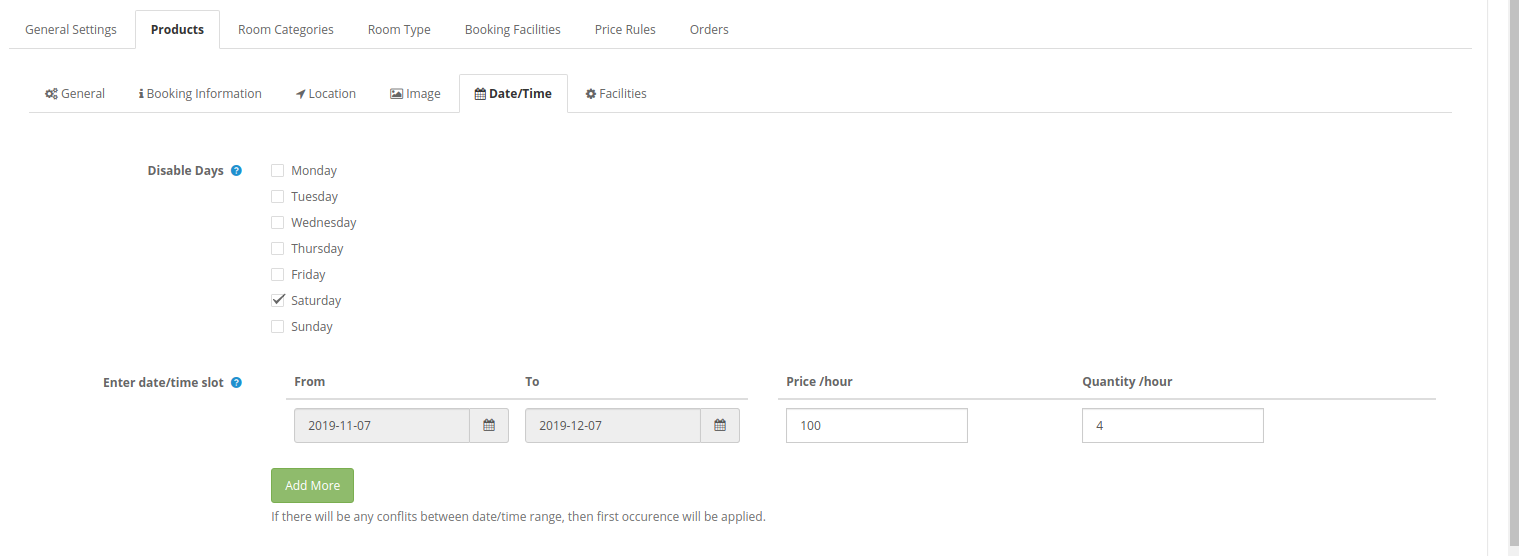
  • Disable Days: Admin can click on check-box for disabling days and enter date/time slots also.
  • Enter Date/time Slot: Admin can create date slots and set hourly rental prices per hour and quantity per hour.
6. Facilities:

Admin can add facilities once he saves this setting. Only the “Rent” type of facilities will be listed here to add them.
3.2.2 Delete Products

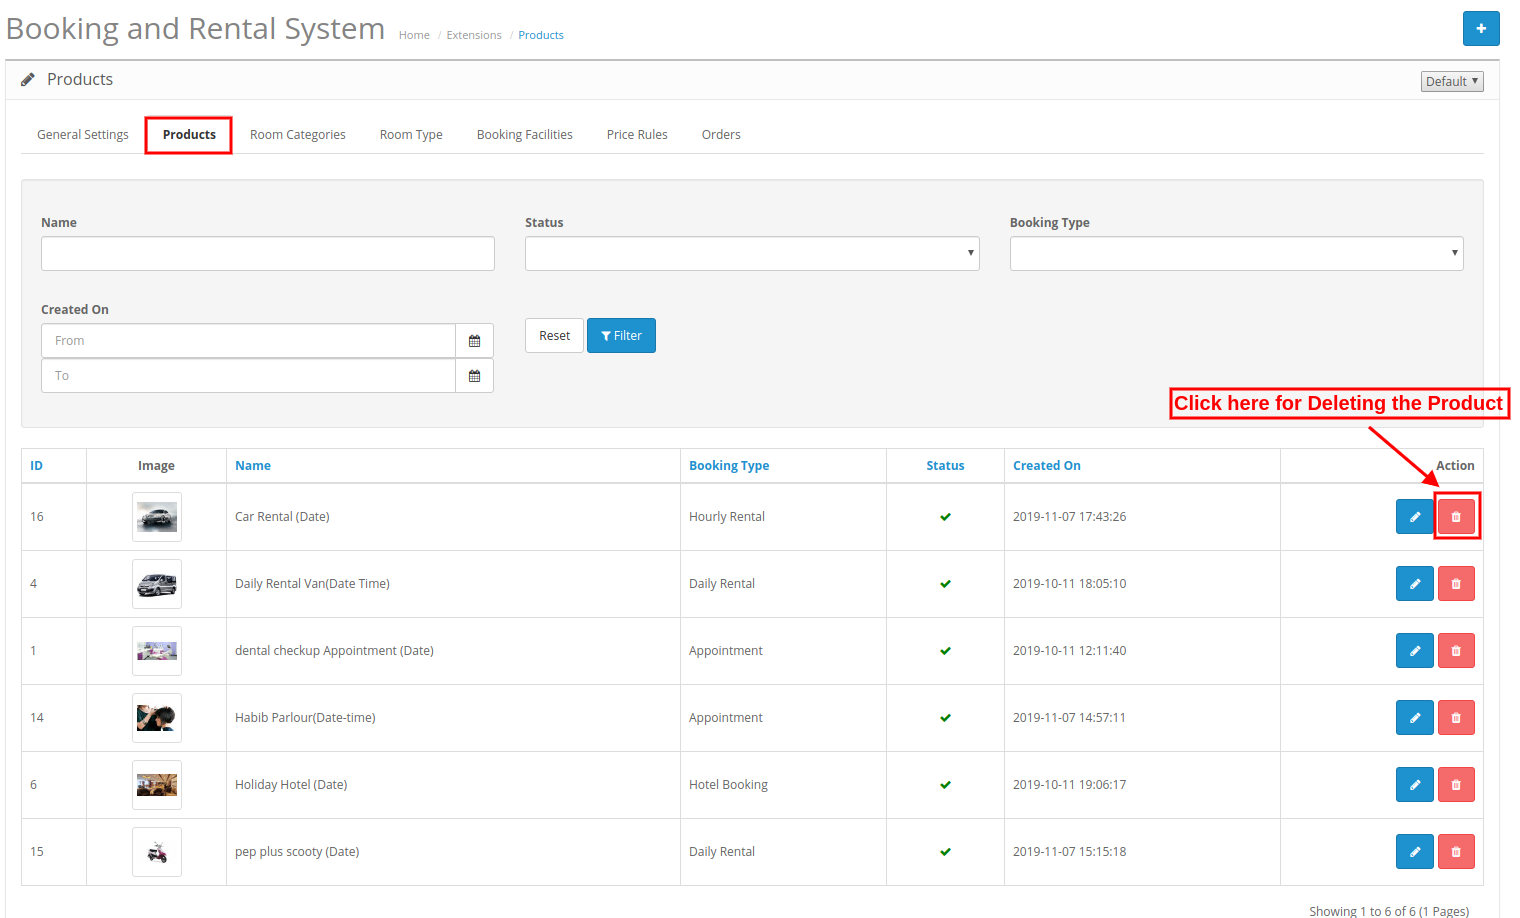
Admin can click on the delete button for deleting the products.
3.2.3 Edit Products

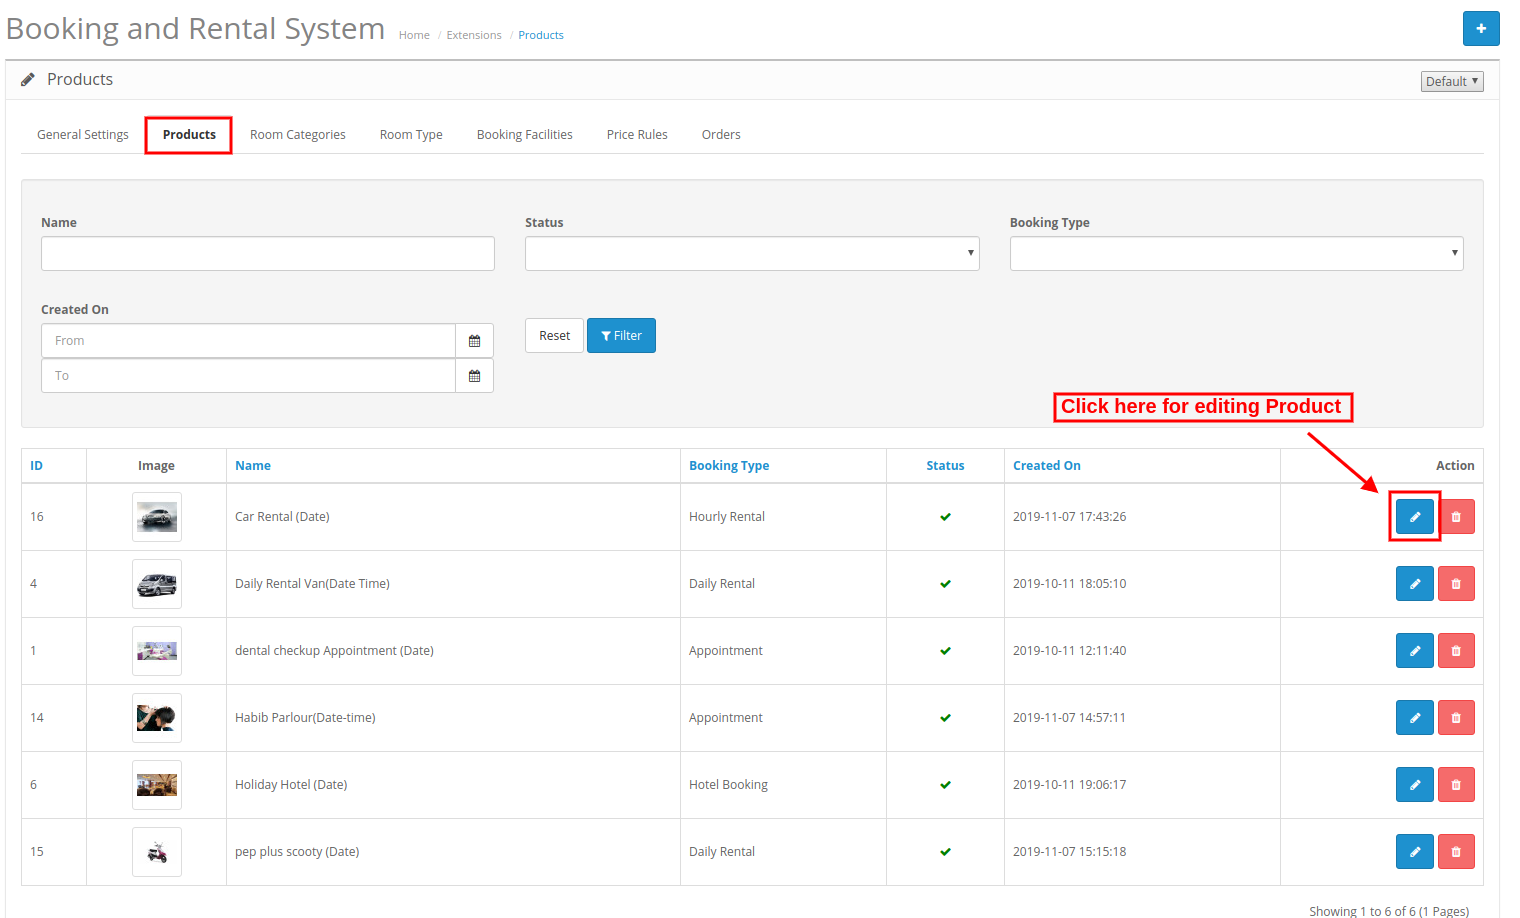
The online store merchant can also modify the product details easily from the admin interface of this Hotel booking module for OpenCart.

Admin just needs to click on the edit button and save after applying the changes.
3.3 Room Categories

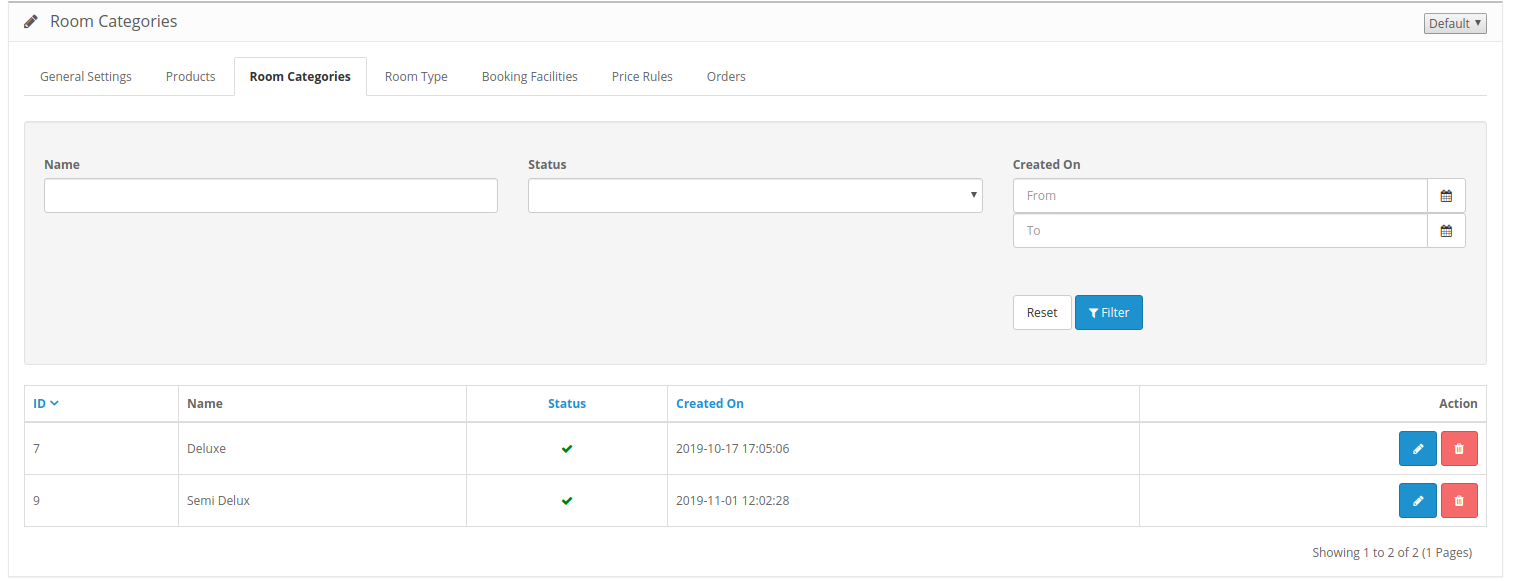
Here, in this tab, the online store admin can add various kinds of rooms and they can also delete and modify the room details. The store merchant can apply filters.
3.3.1 How to Add a room Category

For adding any new room category, click on the “+” button and apply these settings:
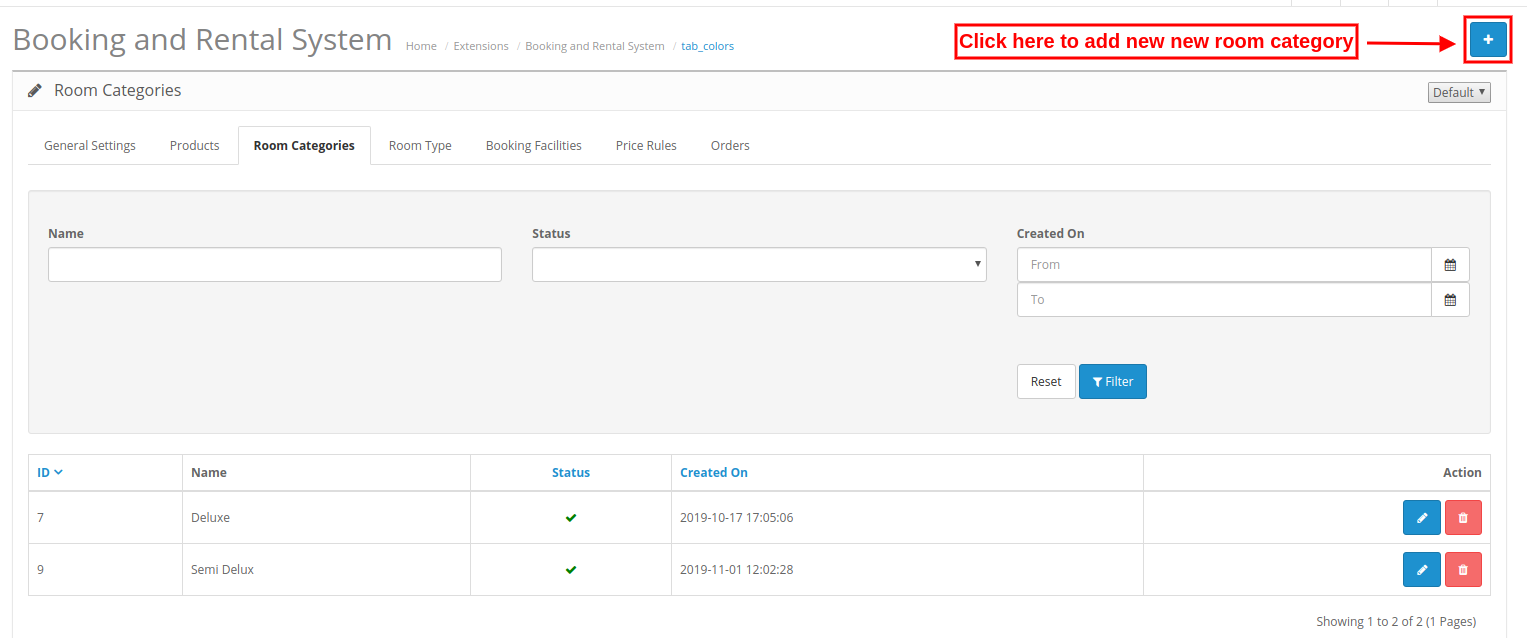
After clicking on the add button, the admin needs to apply these settings:
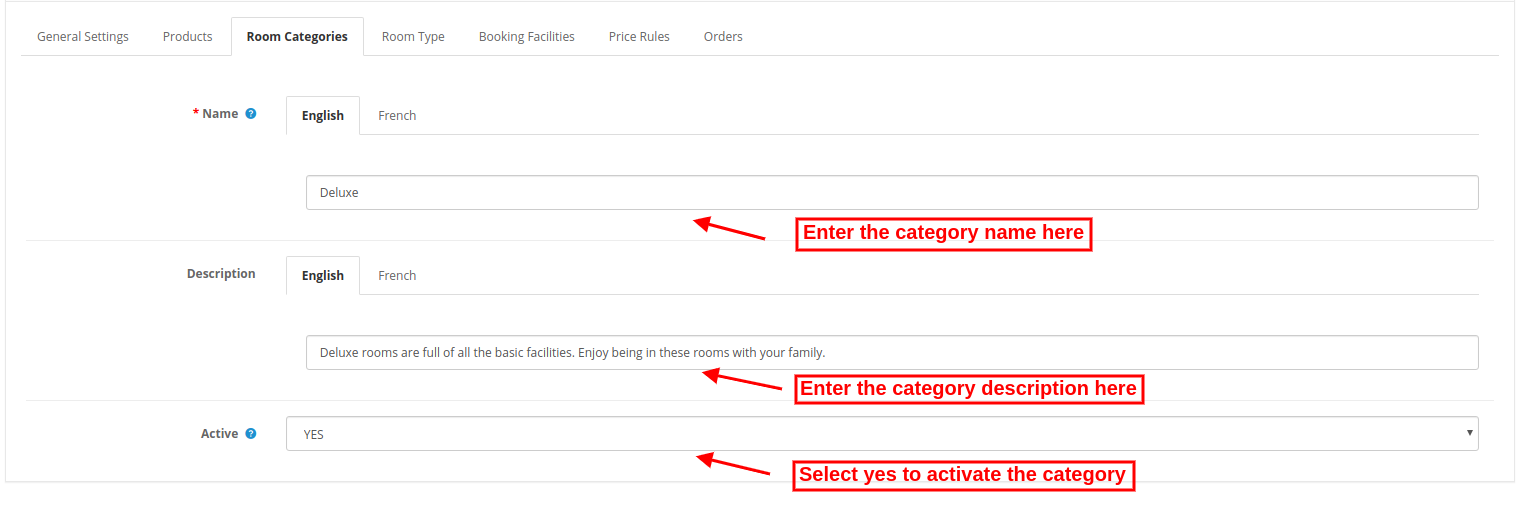
  • Name: Enter the Room category name in various languages.
  • Description: Enter the description of this room category in various languages.
  • Active: Select yes or no for activating/deactivating this room category.

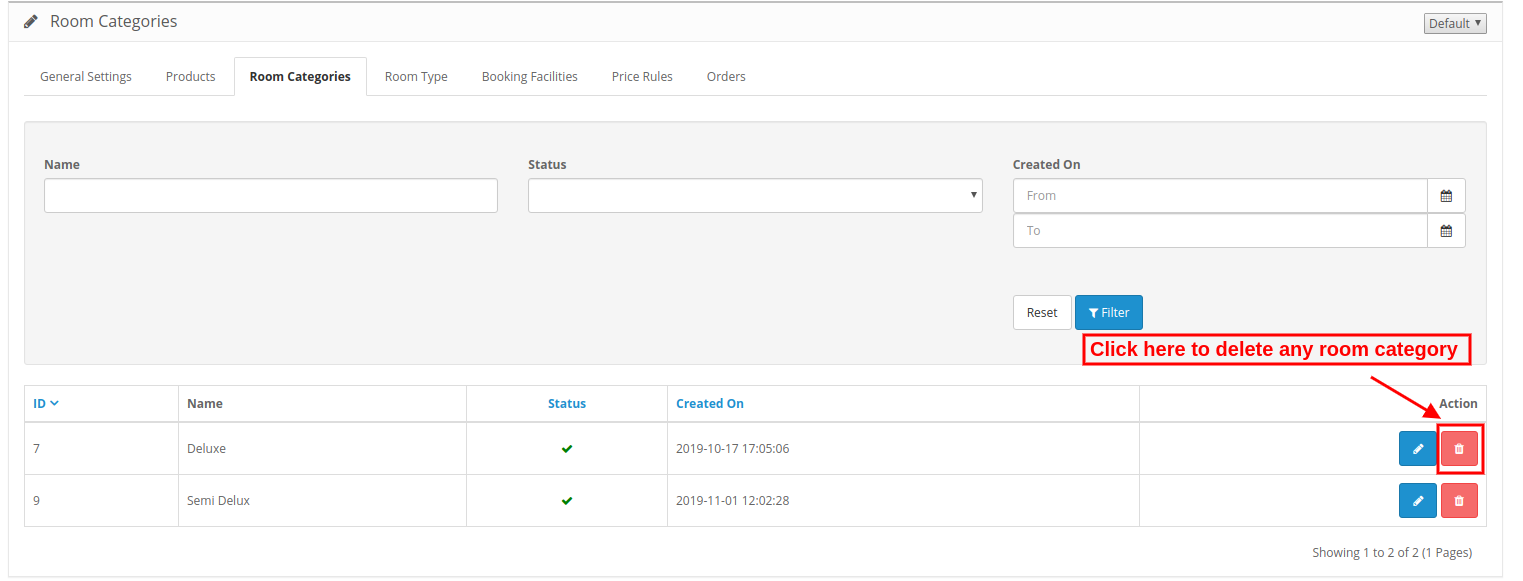
3.3.2 How to delete any room category

Click on the delete icon and delete any room category easily. You cannot delete or disable any such category which is mapped with any product.
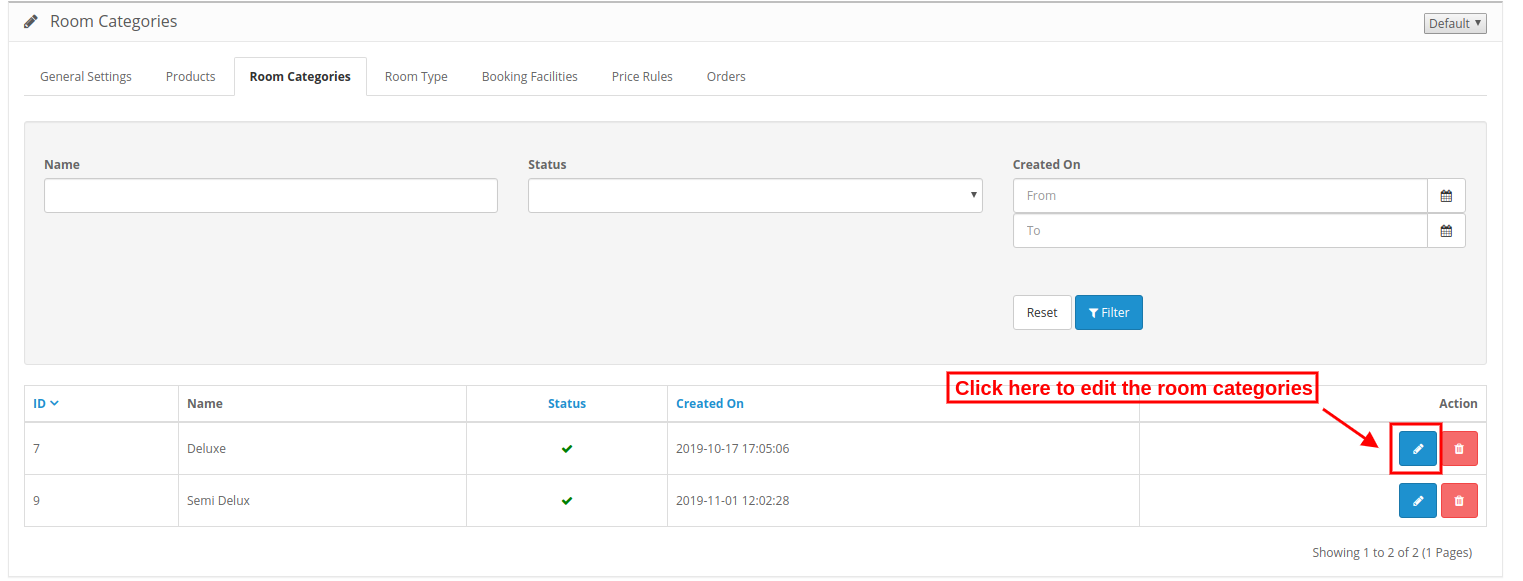
3.3.3 How to Edit any room category

Click on the edit icon for applying any changes in room categories.
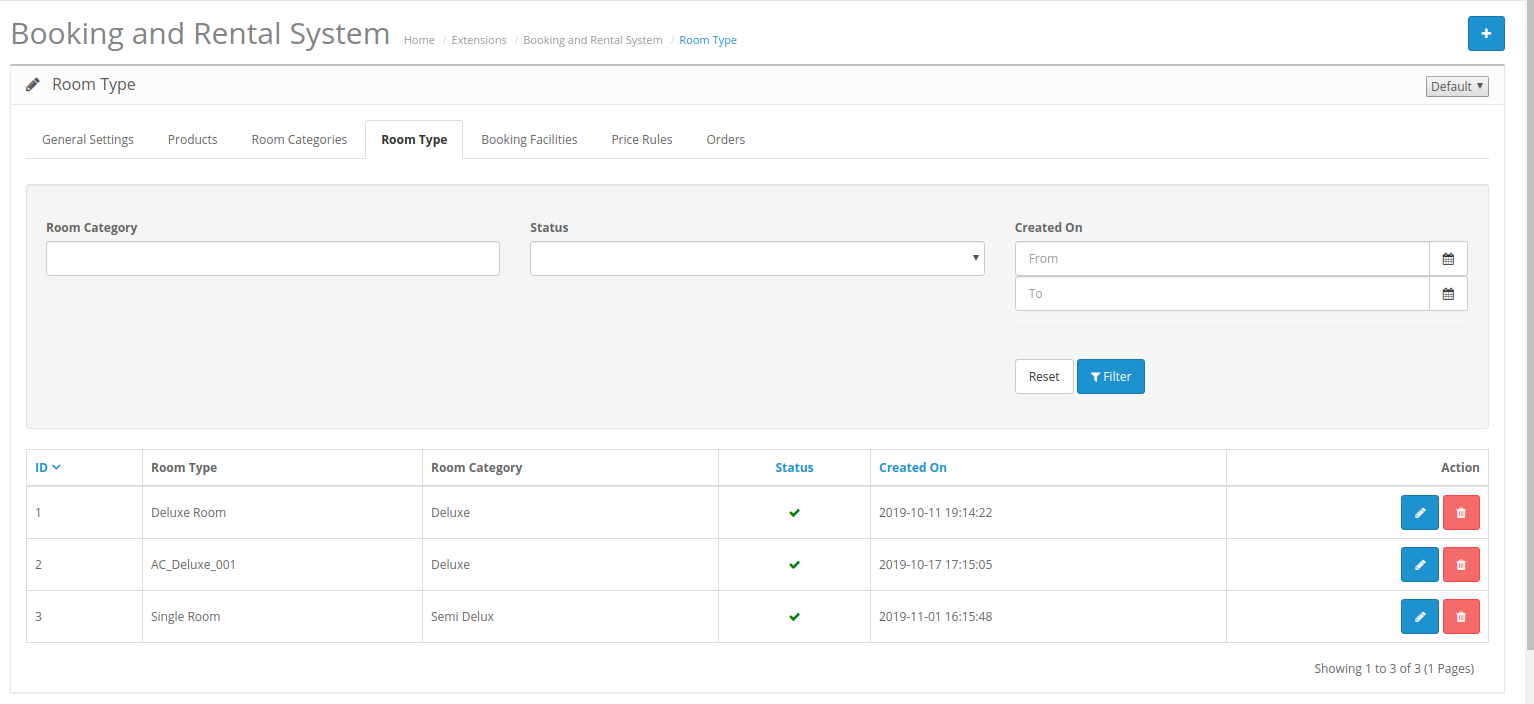
3.4 Room type

In this tab, the online merchant can set the room type from here. The admin is allowed to add, delete and edit the room type from the admin interface of this Online Booking module for OpenCart.
3.4.1 How to Add a new Room Type

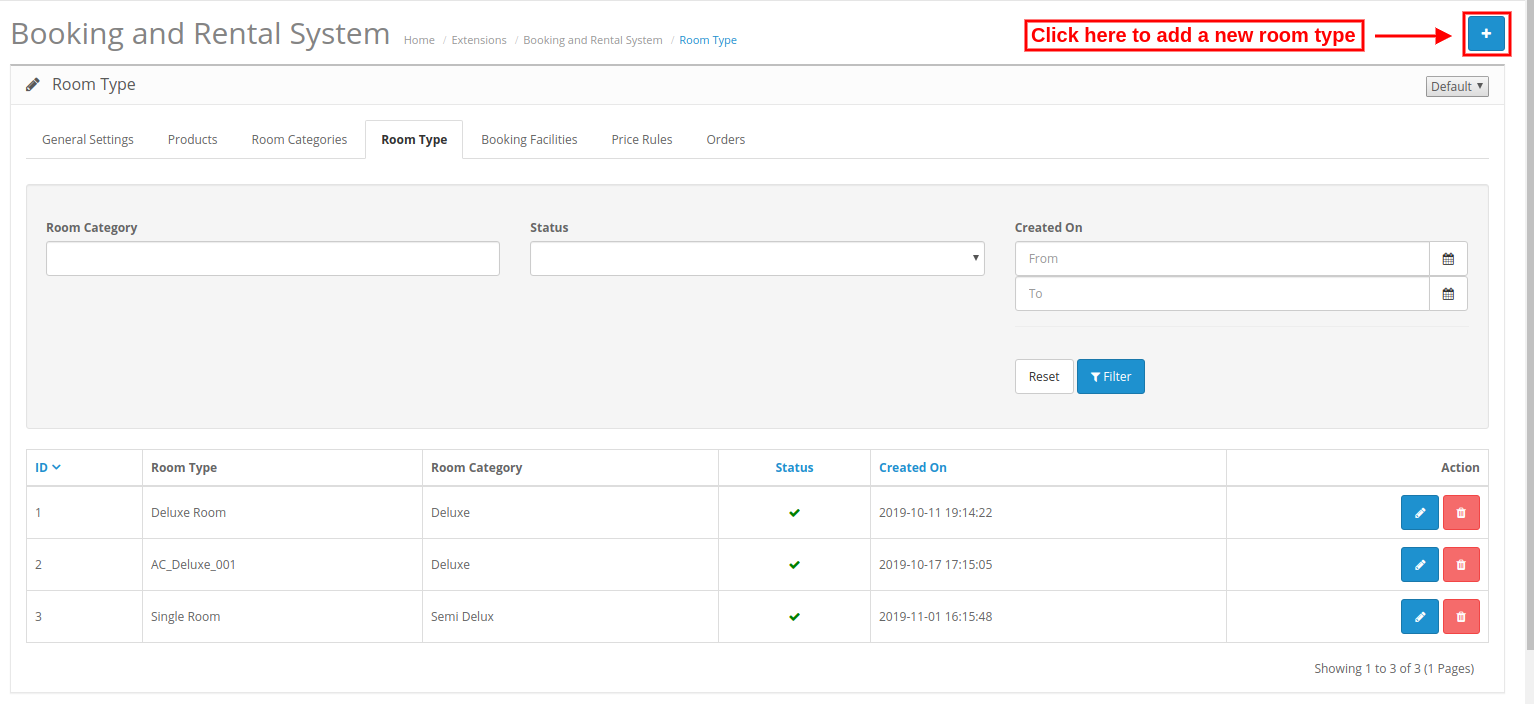
For adding a new room type, click on the “+” sign and enter these details:

After clicking on the “Add” button, the admin needs to apply these settings:
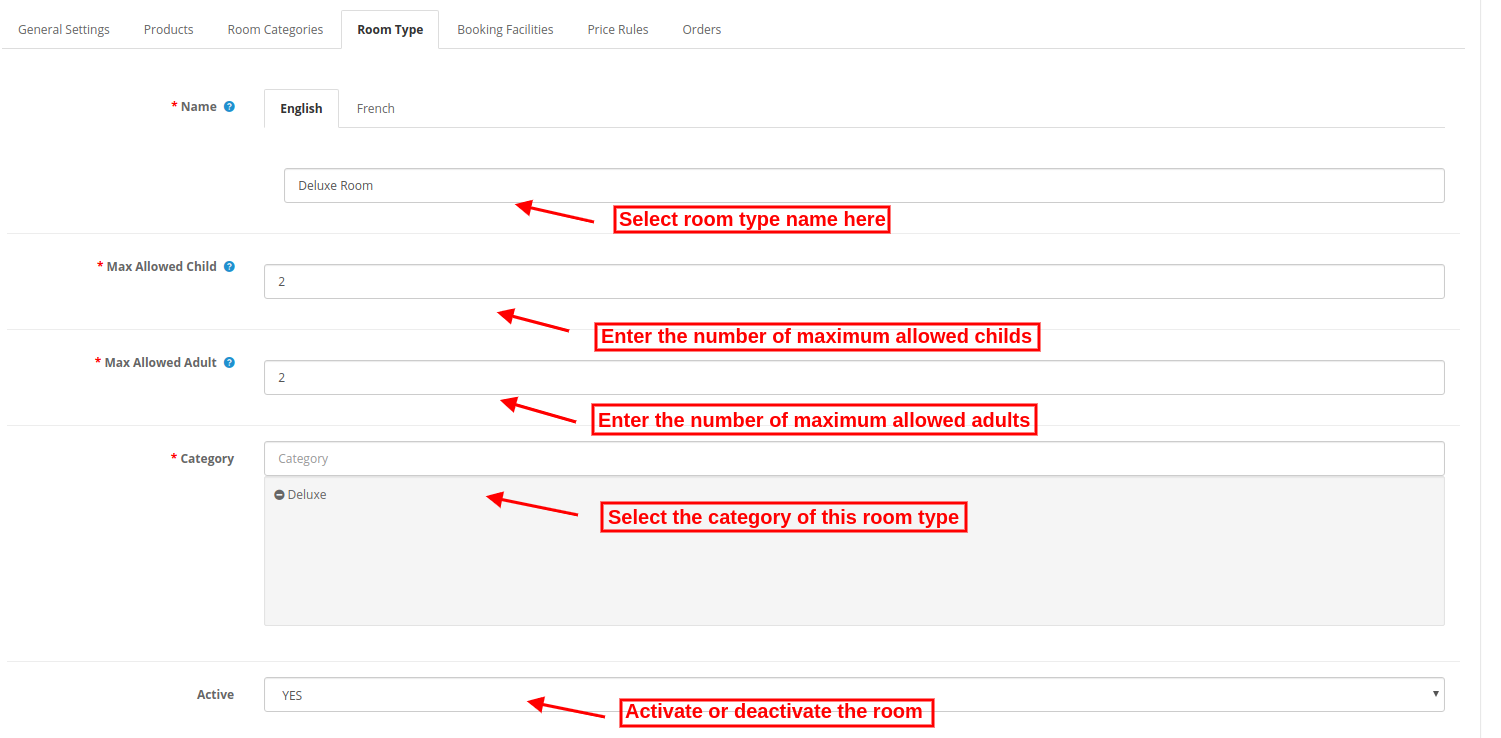
  •  Name: Enter the room type name in multiple languages.
  • Max Allowed Child: Enter the number of children who are allowed.
  • Max Allowed Adult: Enter the number of adults who are allowed.
  • Category: Select the room category from here.
  • Active: Select yes or no for activating/deactivating this room type.

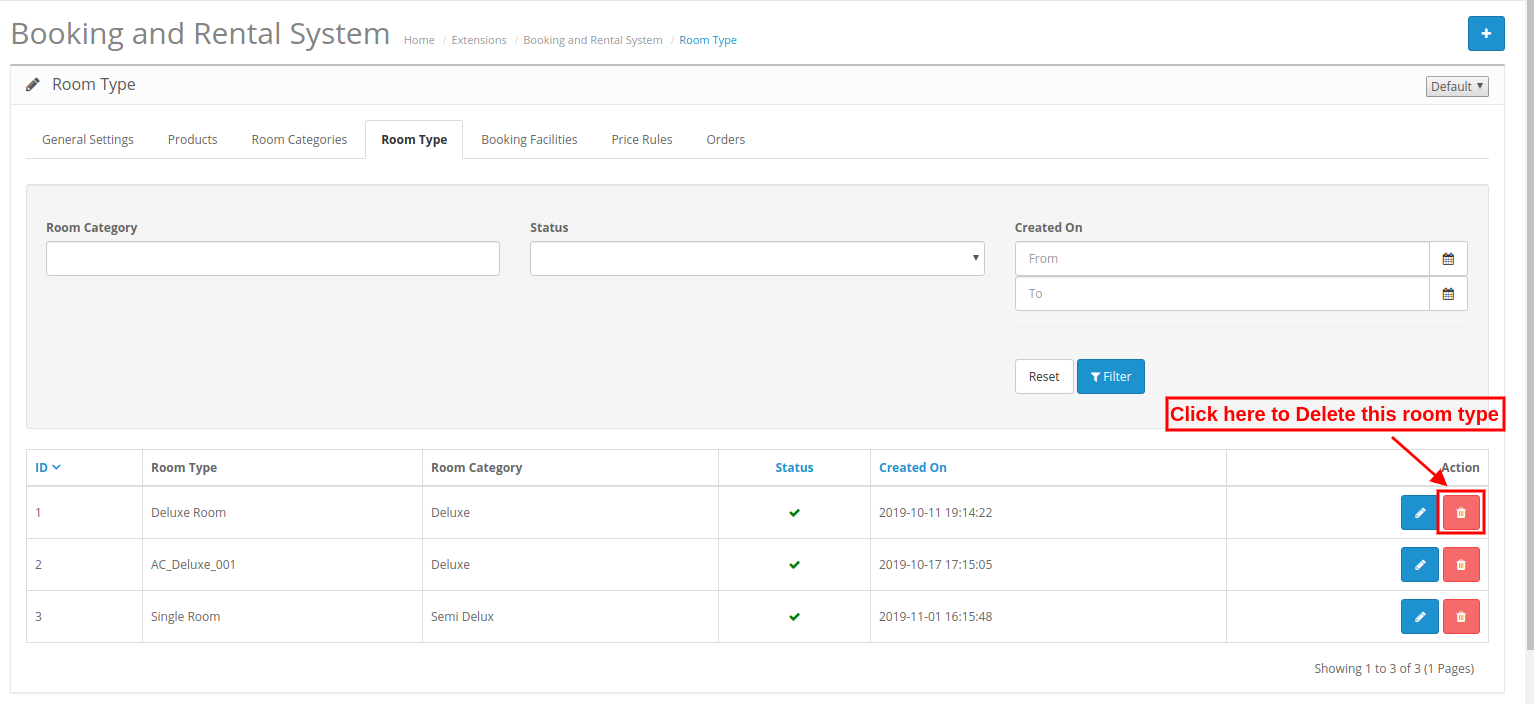
3.4.2 How to Delete a Room Type

Admin just needs to click on the delete icon for deleting any room type.
3.4.3 How to Edit a Room Type

Admin just needs to click on the edit icon for editing any room type.

3.5 Booking Facility

The store merchant can add, delete and update the booking facilities from this tab.
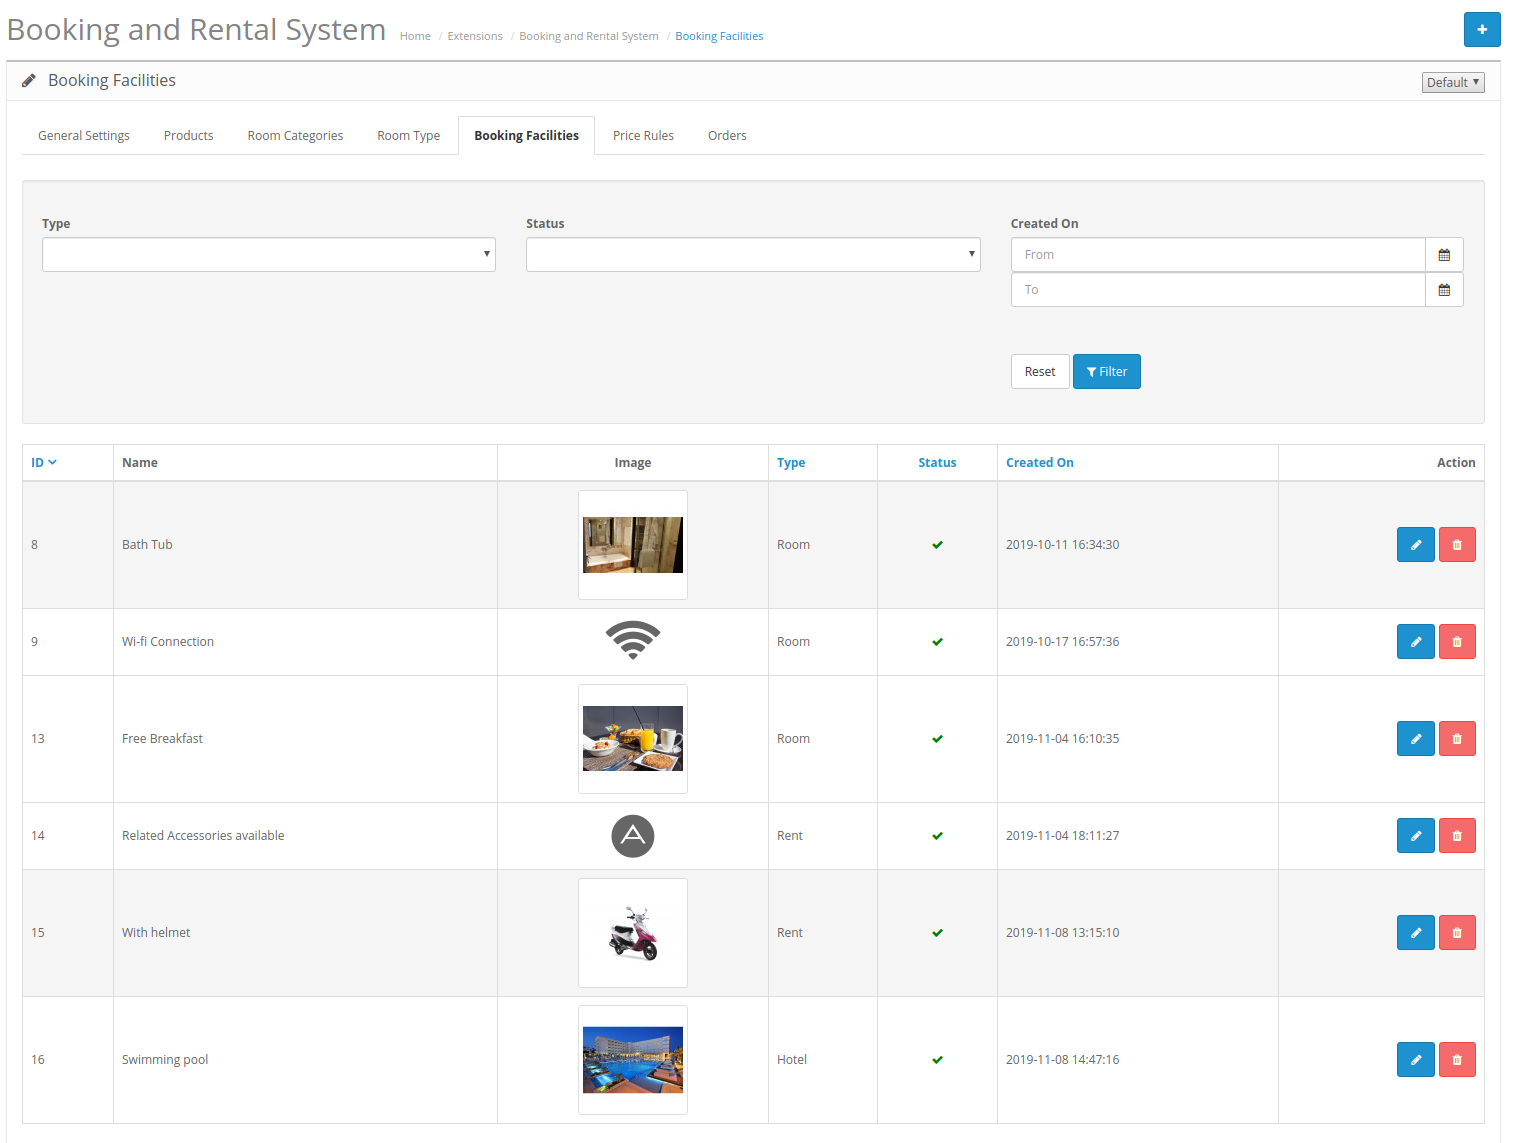
3.5.1 How to Add new booking facility
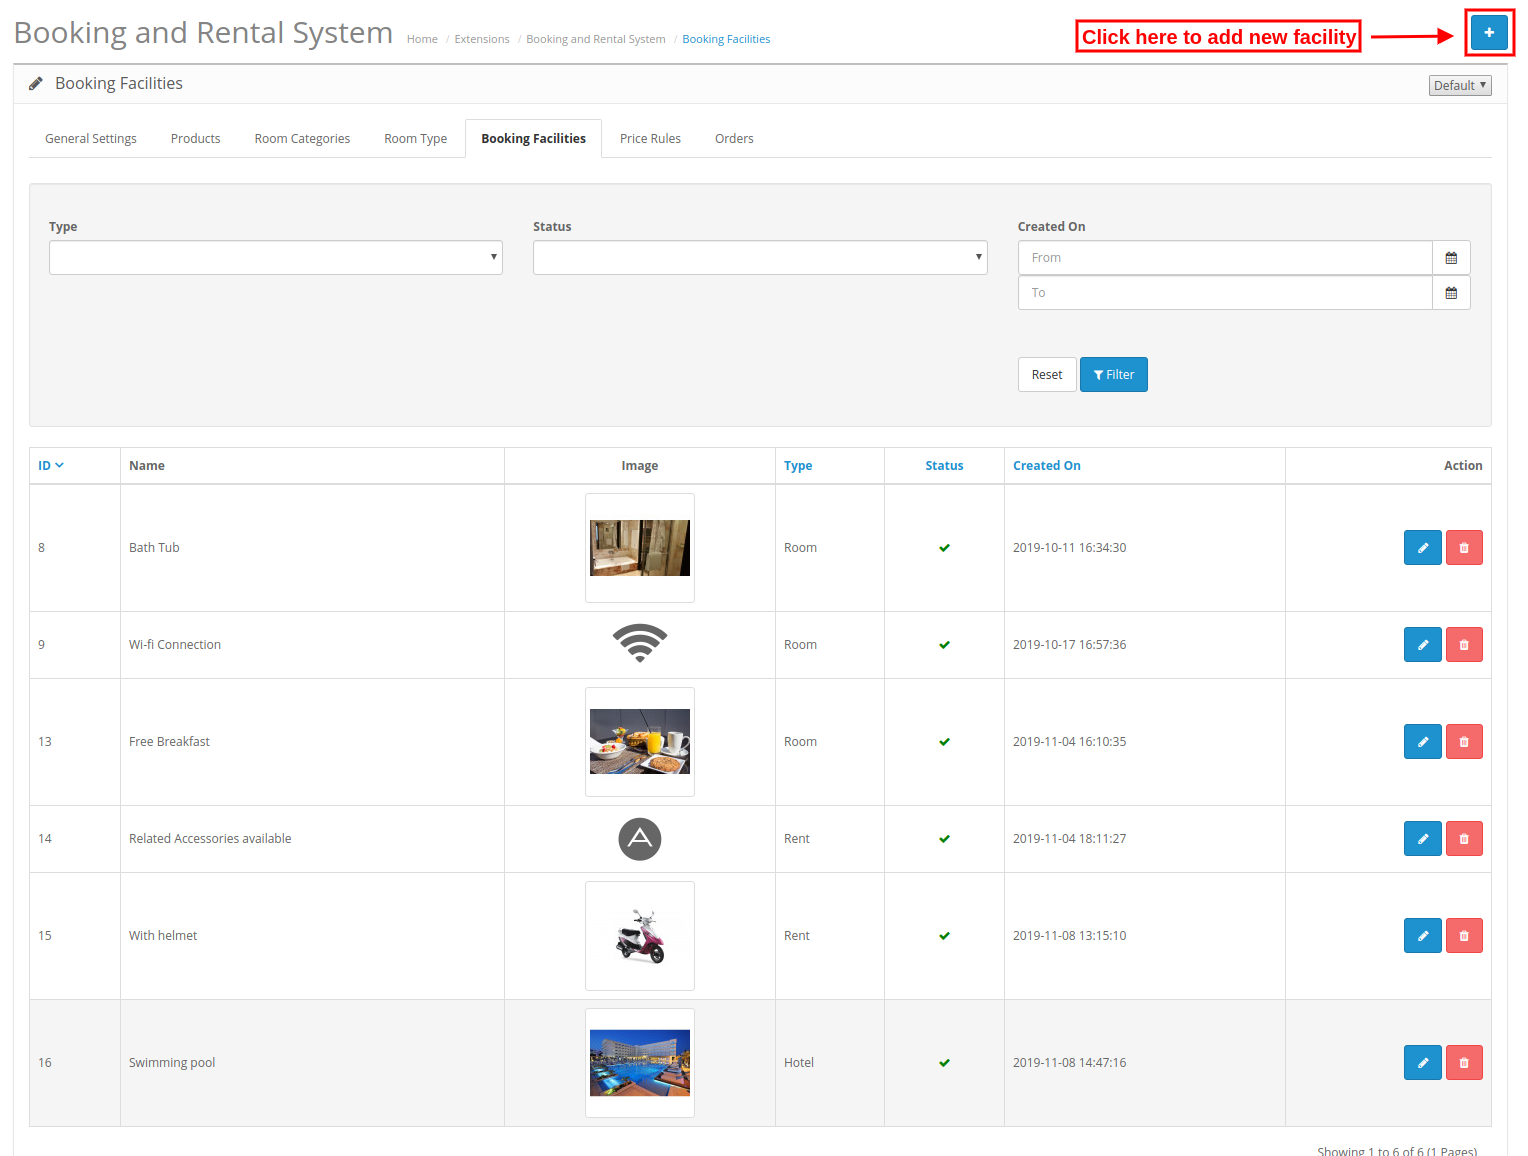
For adding a new booking facility, click on the “+” button as shown below:
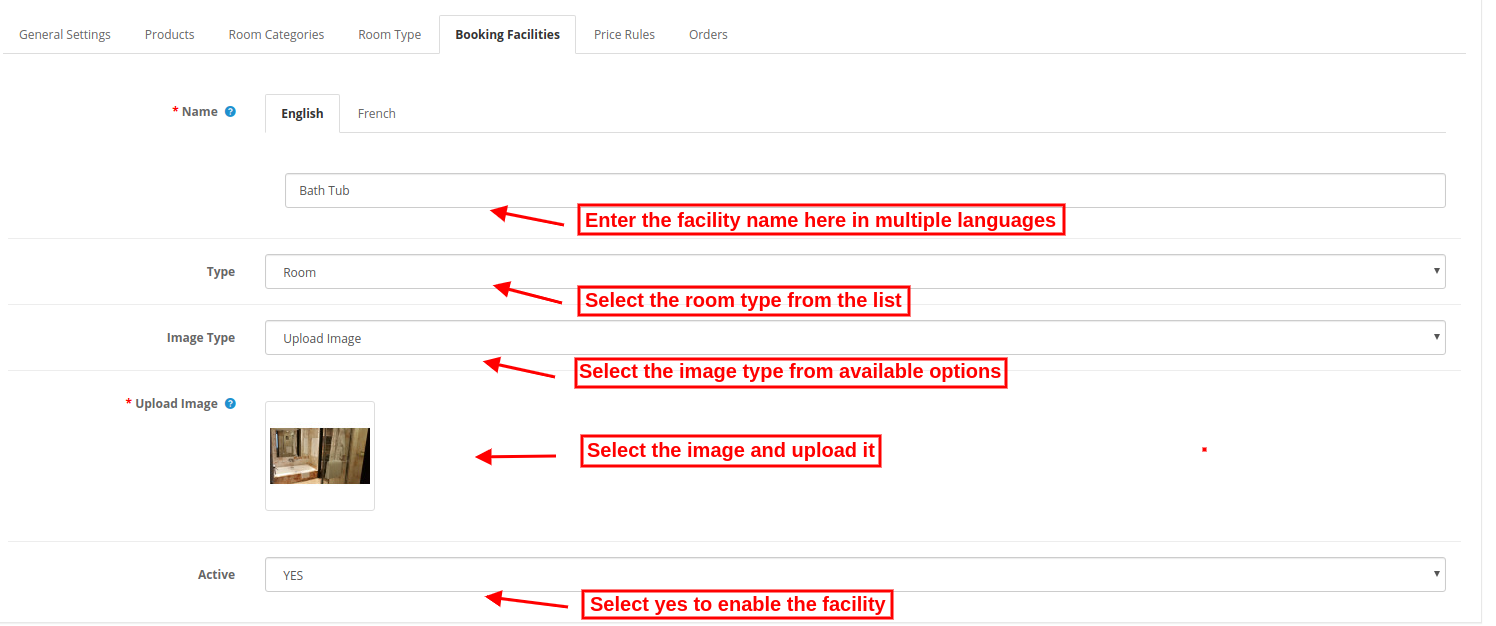
After clicking this button admin needs to apply the following settings:

  • Name: Enter the facility name in various languages.
  • Type: Select from the available types ie room, rent or hotel. The facilities would be available to map with the product according to there type i.e. A hotel type of category can be mapped with only hotel type of products.
  • Image Type: Select the image type ie upload image or a font awesome.

1. Upload Image: Select the image which you want to upload

2. Font Awesome: Enter the font awesome icon.

  • Active: Select yes or no for activating or deactivating this booking facility.

3.5.2 How to Delete booking facility

The online merchant just needs to click on the delete icon for deleting any booking facility.
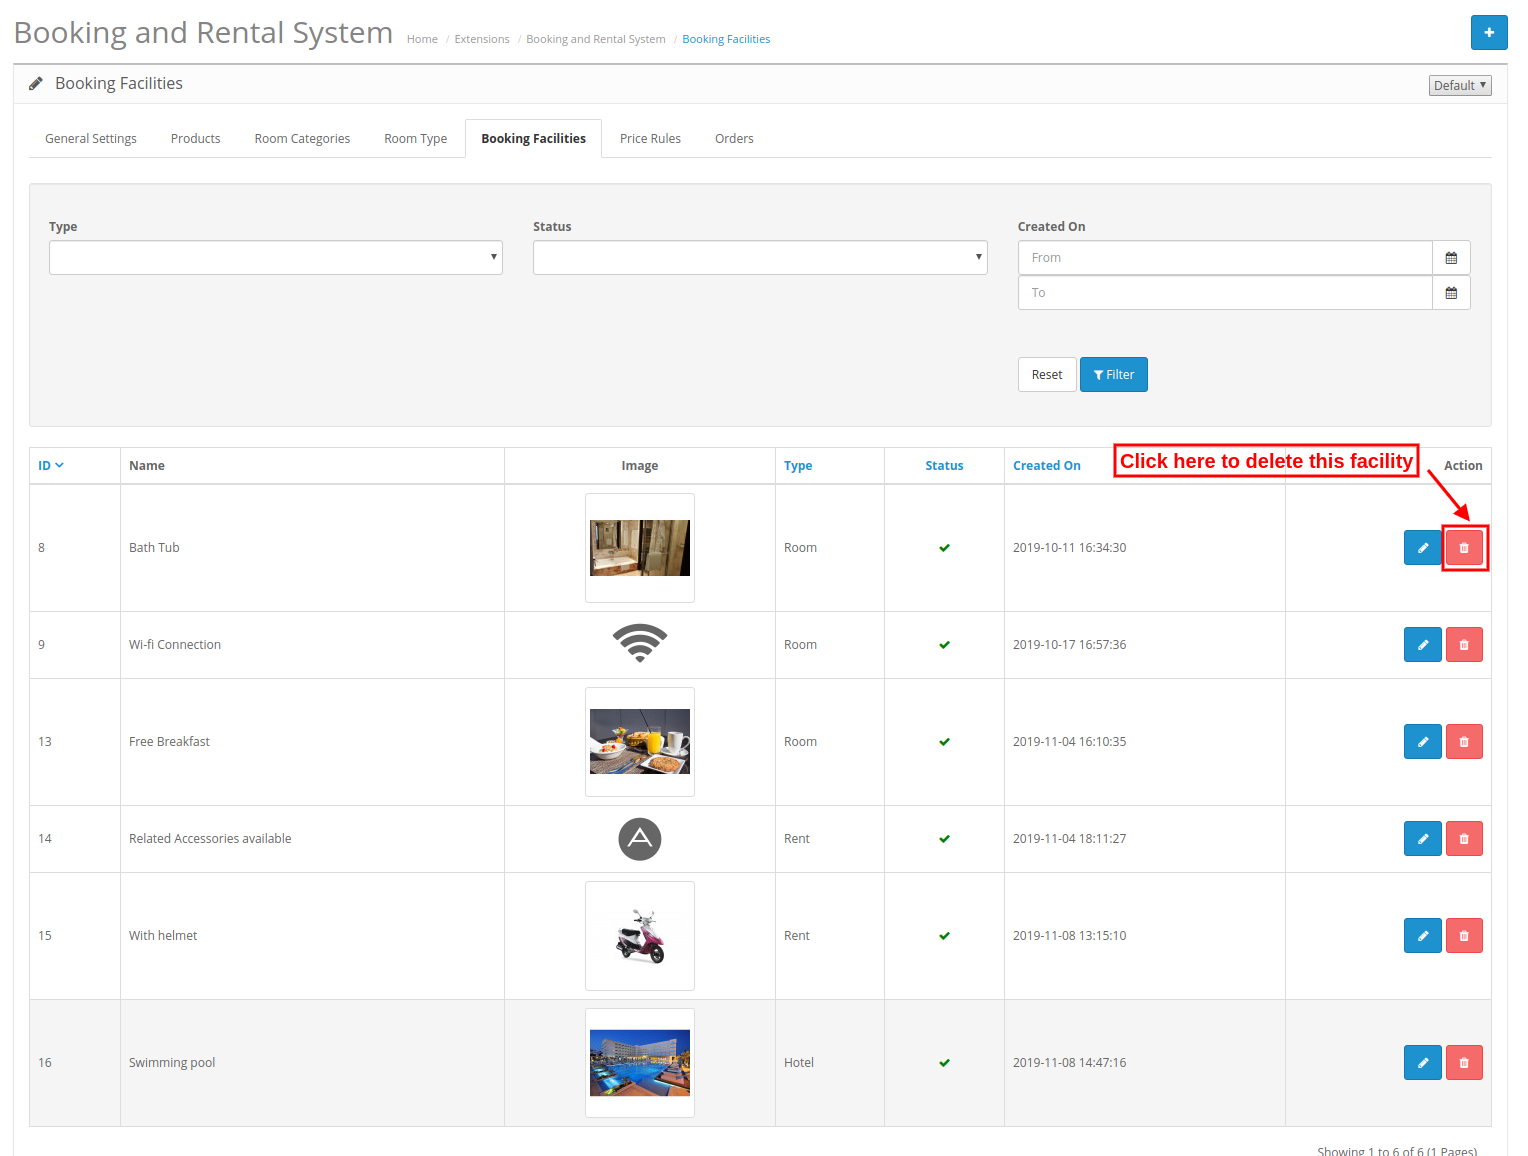
3.5.3 How to Edit booking facility
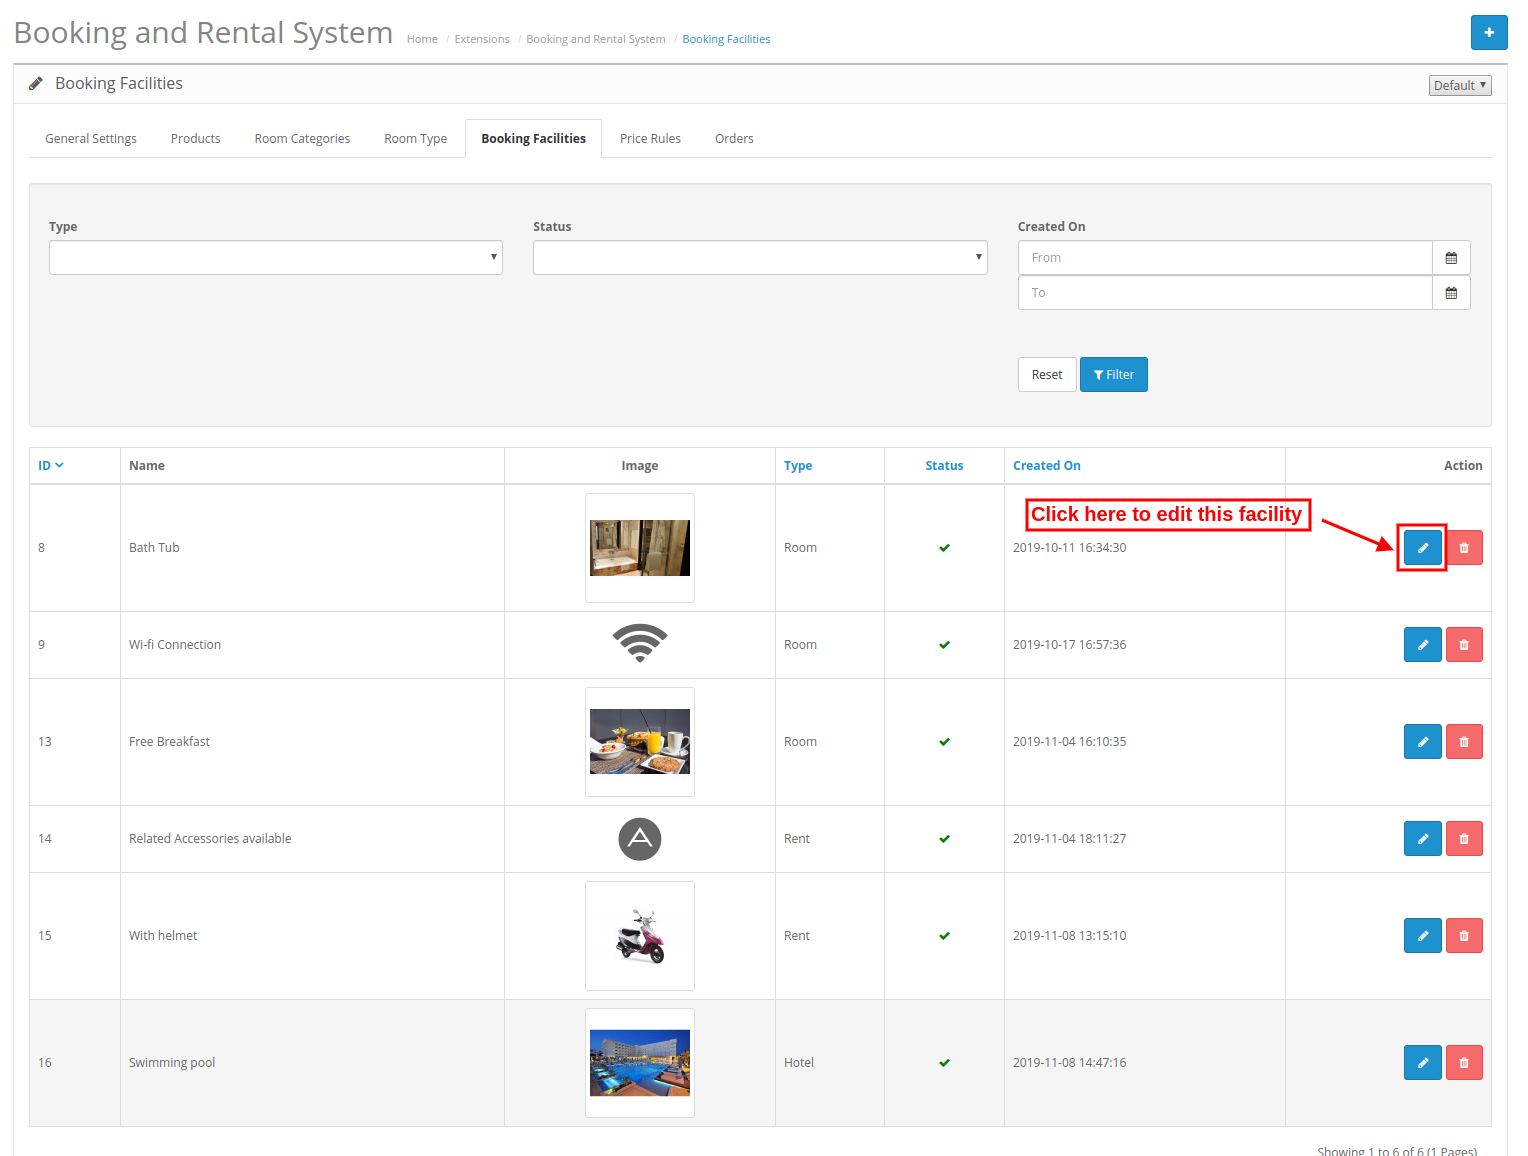
The online merchant just needs to click on the edit icon for editing any booking facility.

3.6 Price Rule

Here, admin can create, delete and update price rules easily by following the described steps.
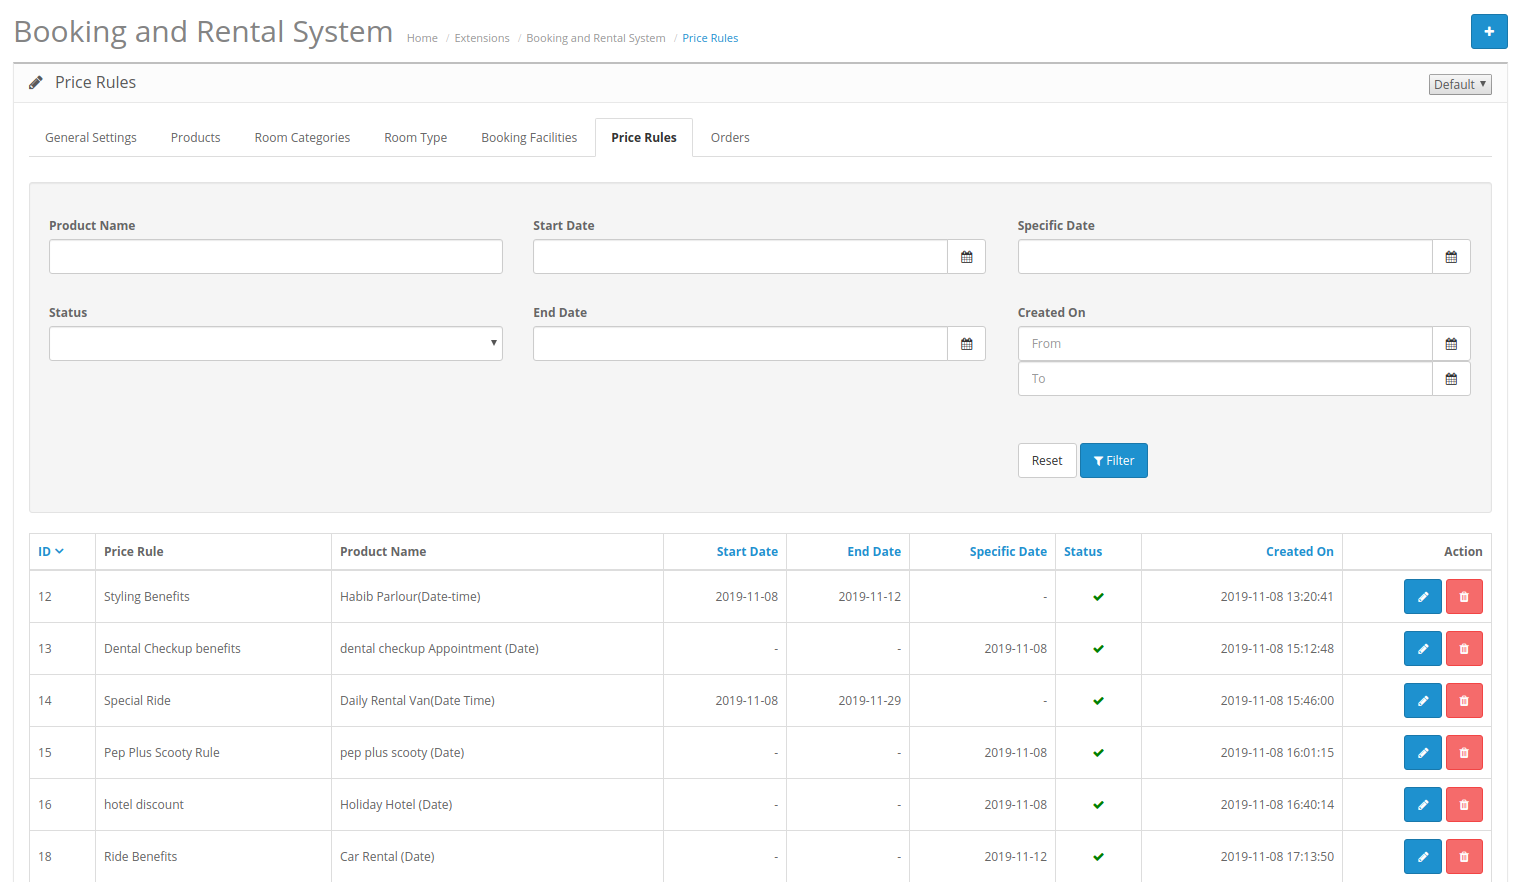
3.6.1 How to Add new Price Rule
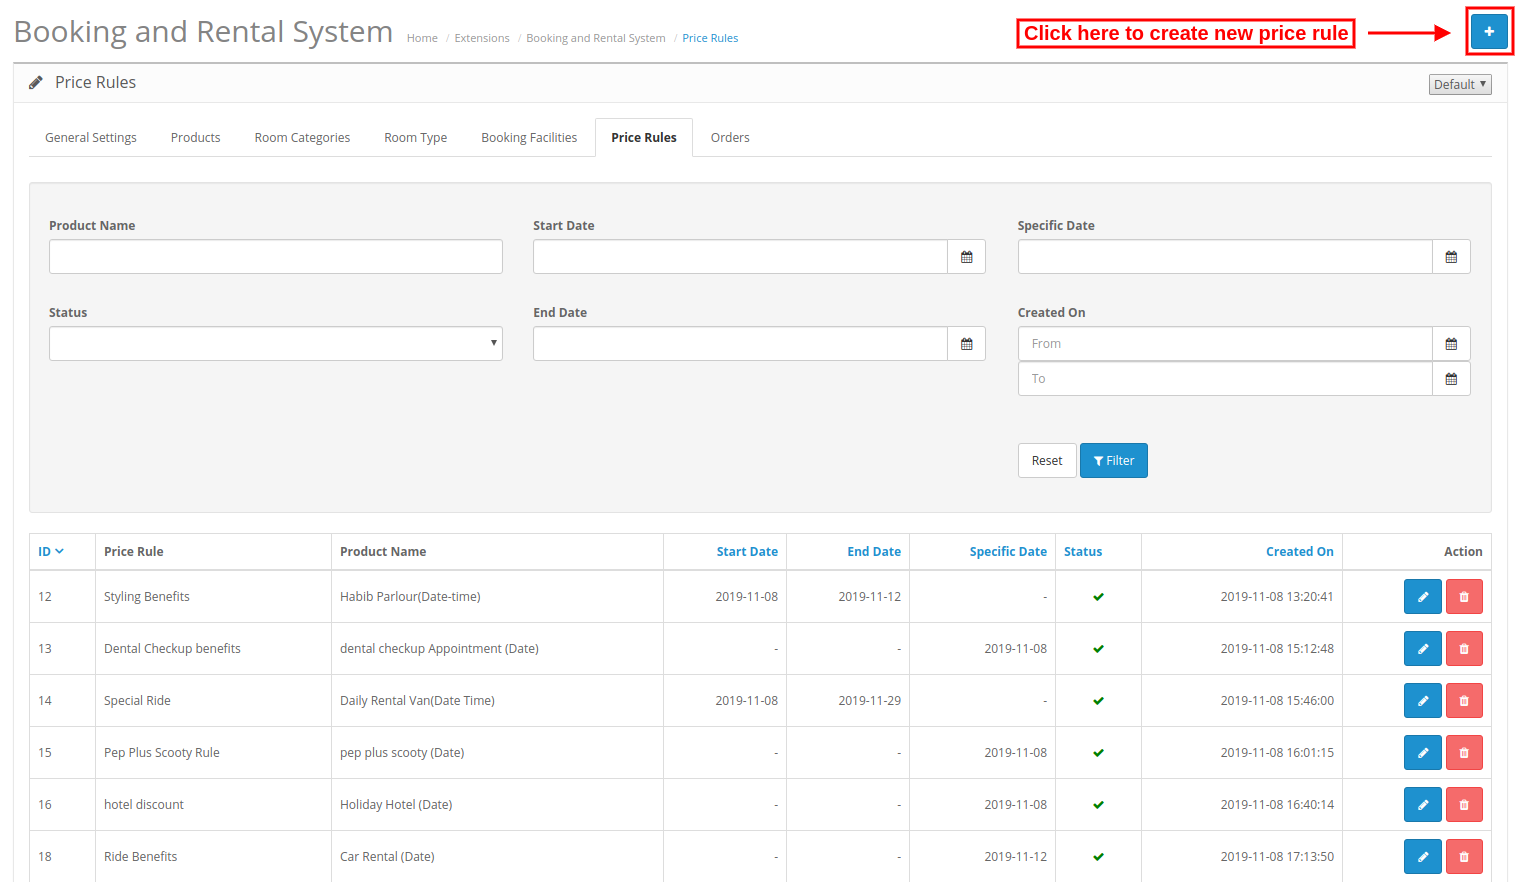
After clicking on Add new button, the admin needs to apply these settings:
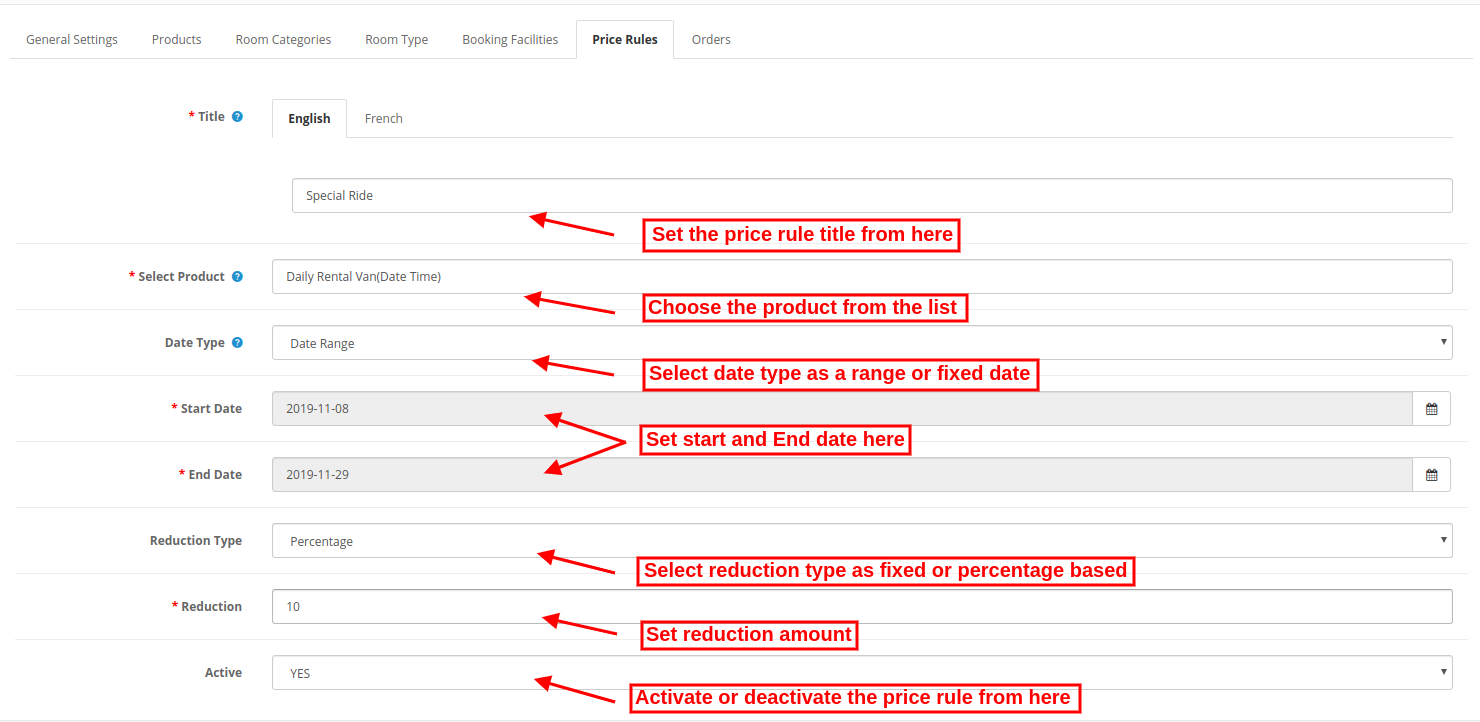
  • Title: Enter the Price Rule Title in various languages.
  • Select Product: Select the product for mapping this price rule.
  • Data Type: Select the date type as a date range or a specific date.

While selecting date type as date range, you will get these customization options:

1. Start Date: Enter the starting date here.

2. End date: Enter the ending date.

While selecting a specific date, the admin needs to enter a specific date only.

  • Reduction Type: Select a fixed or percentage-based reduction type.

  • Reduction: enter the fixed/percentage based amount which you want to reduce.
  • Active: Select Yes or no for activating/deactivating this price rule.

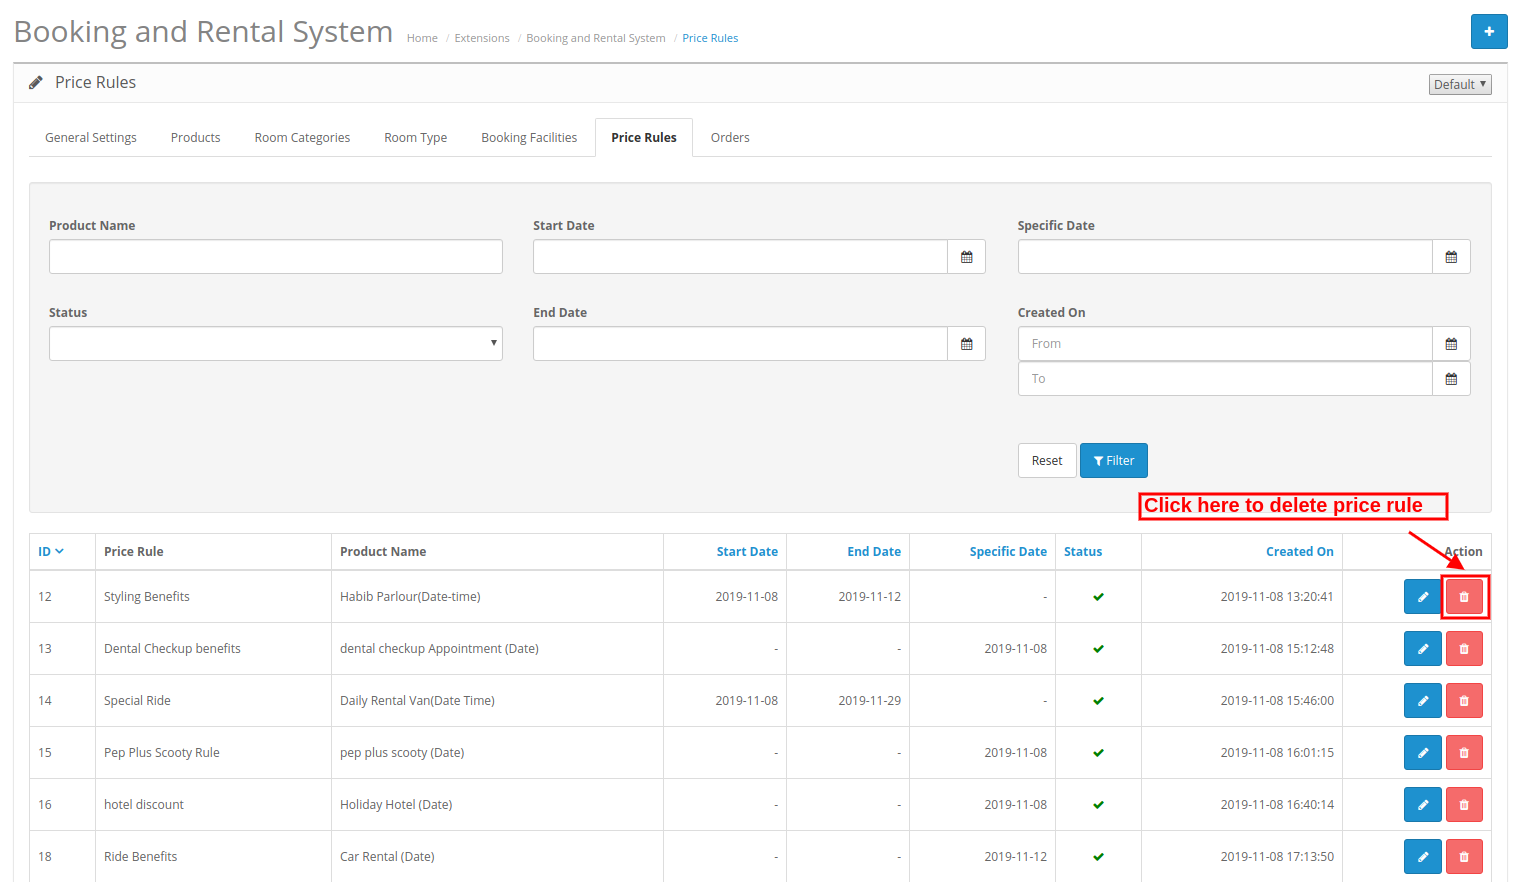
3.6.2 How to Delete Price Rule

The online merchant just needs to click on the delete icon for deleting any Price Rule.
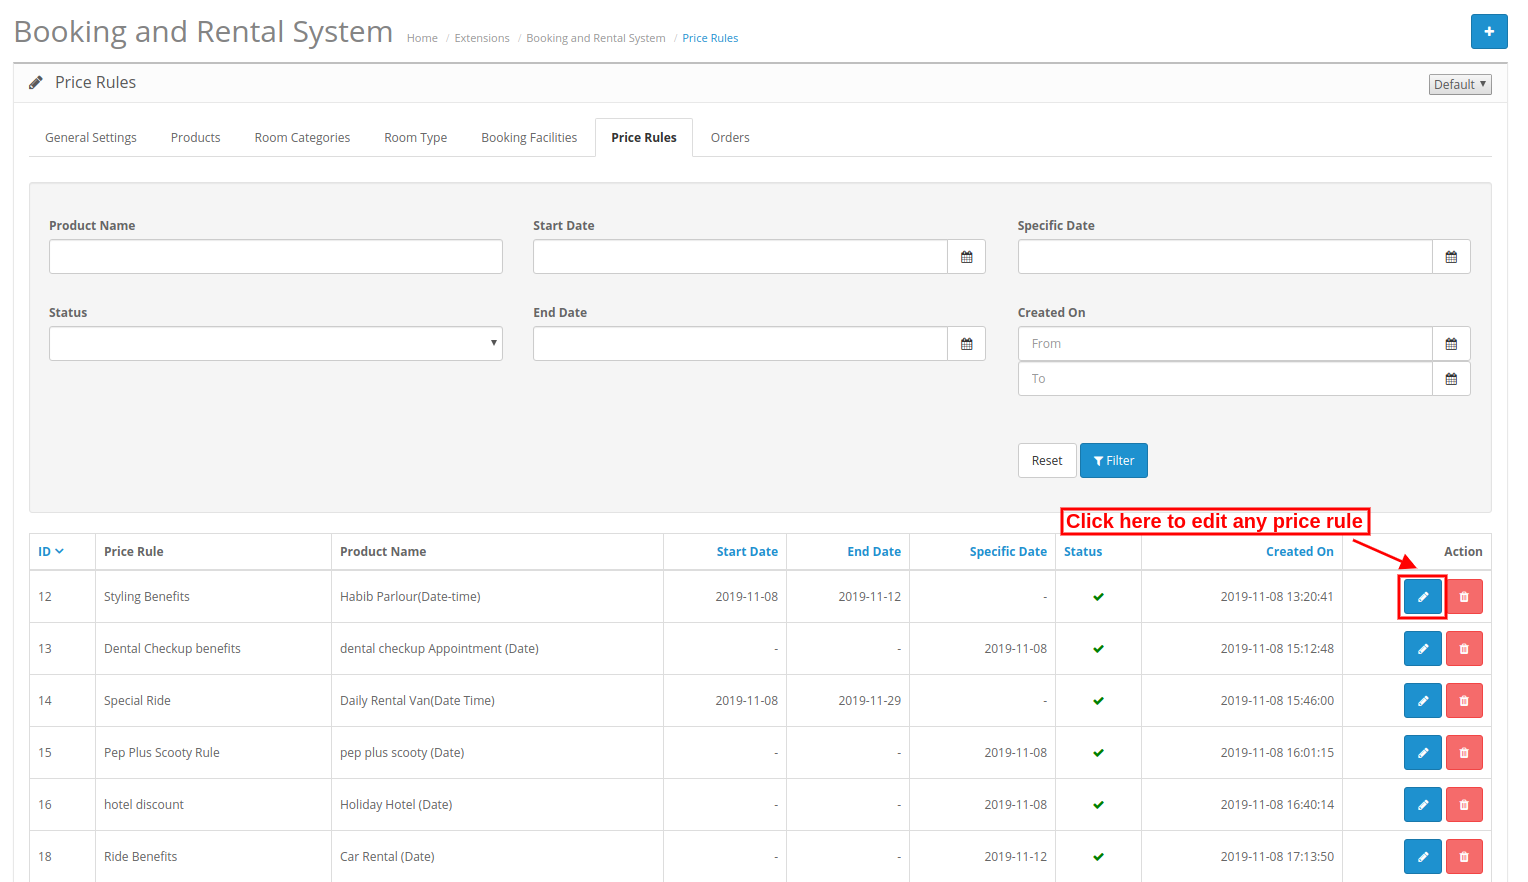
3.6.3 How to Edit Price Rule

The online merchant just needs to click on the edit icon for editing any Price Rule.
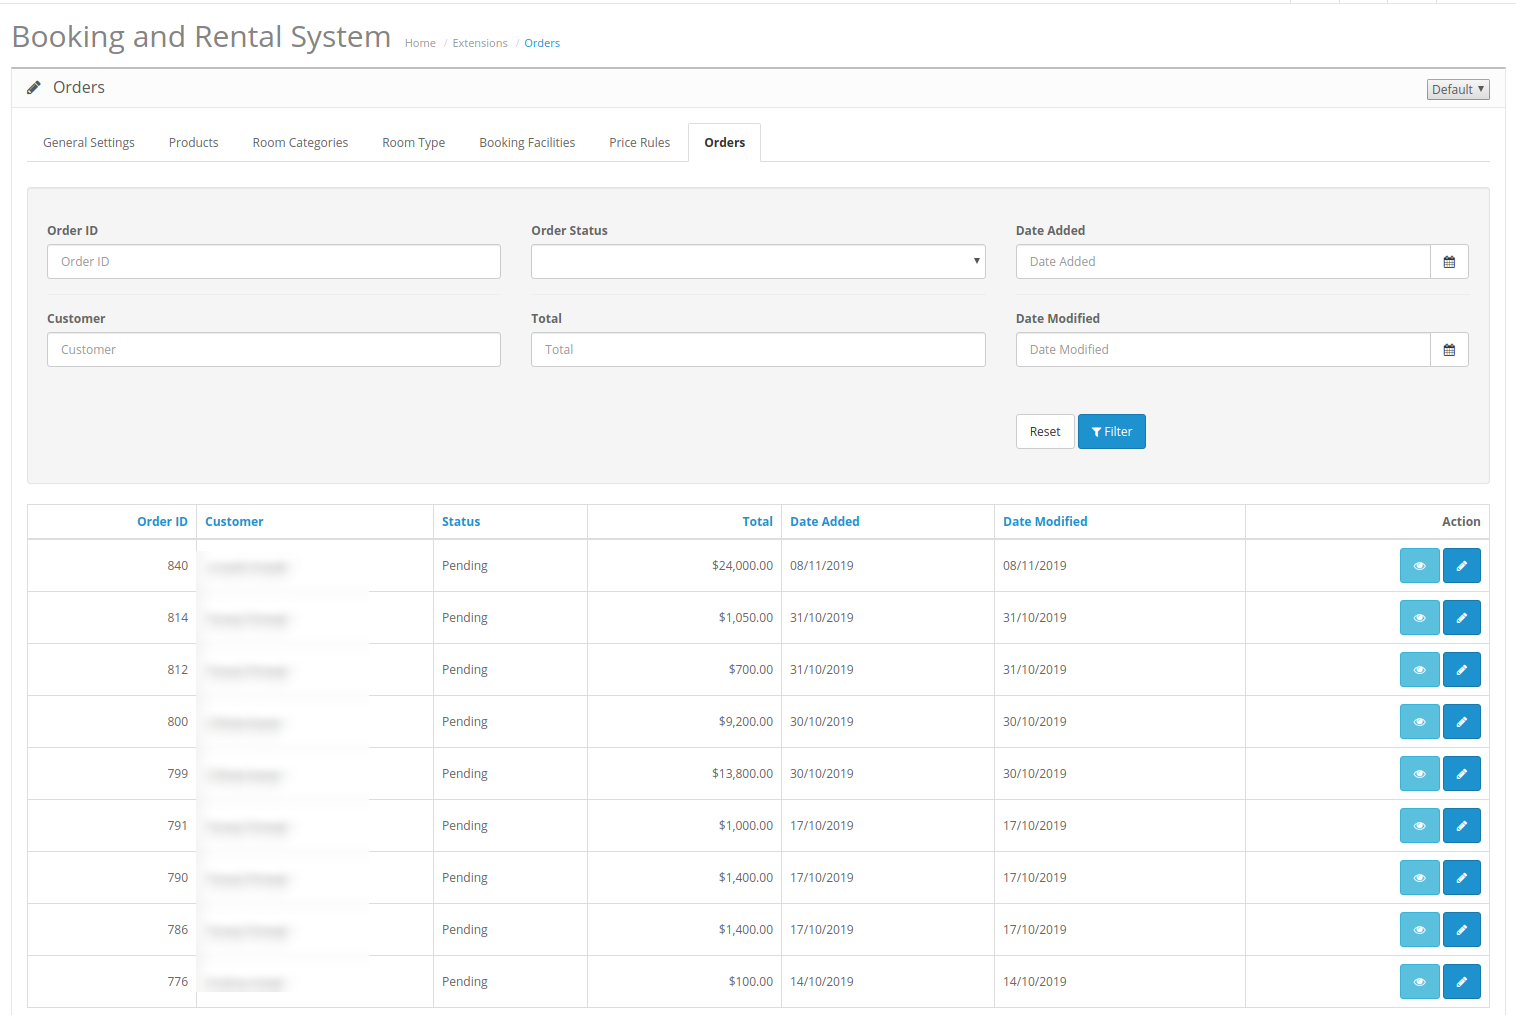
3.7 Orders

Admin can view all the booking and rental system based orders. Admin can view and edit order details.
4.0 Front-end Interface

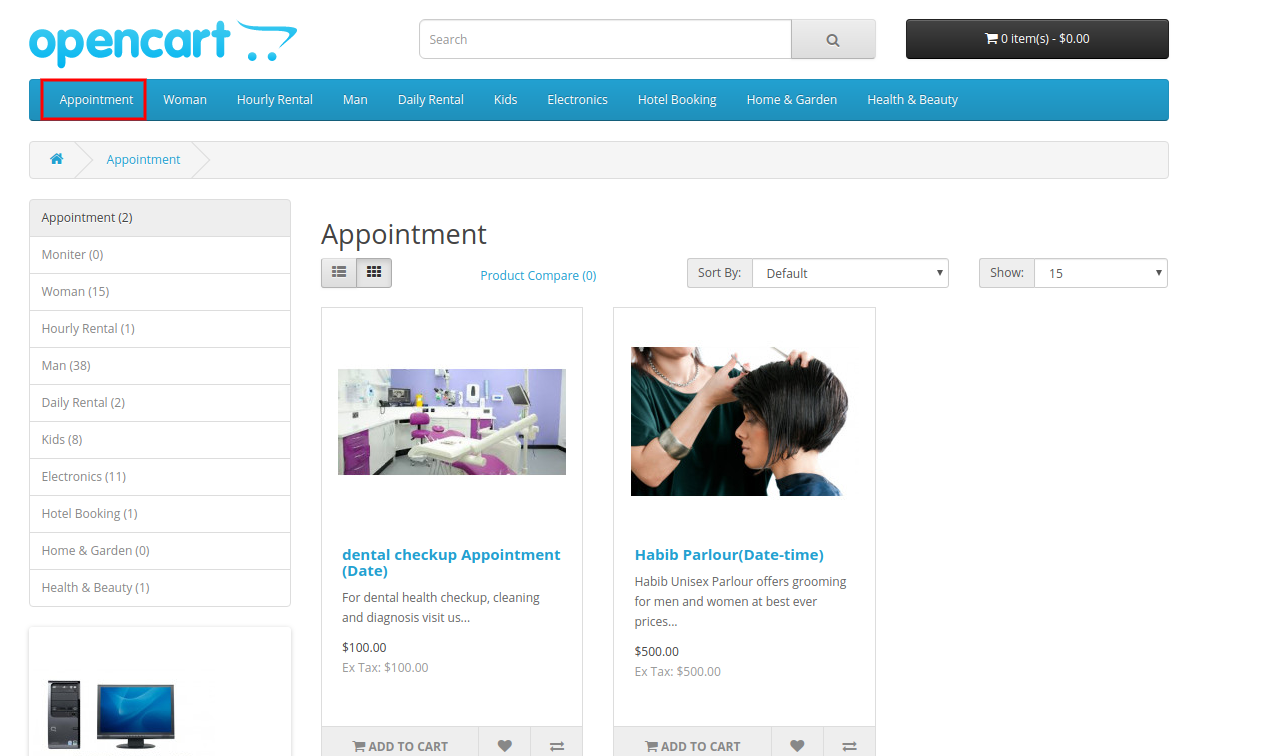
1. Appointment:

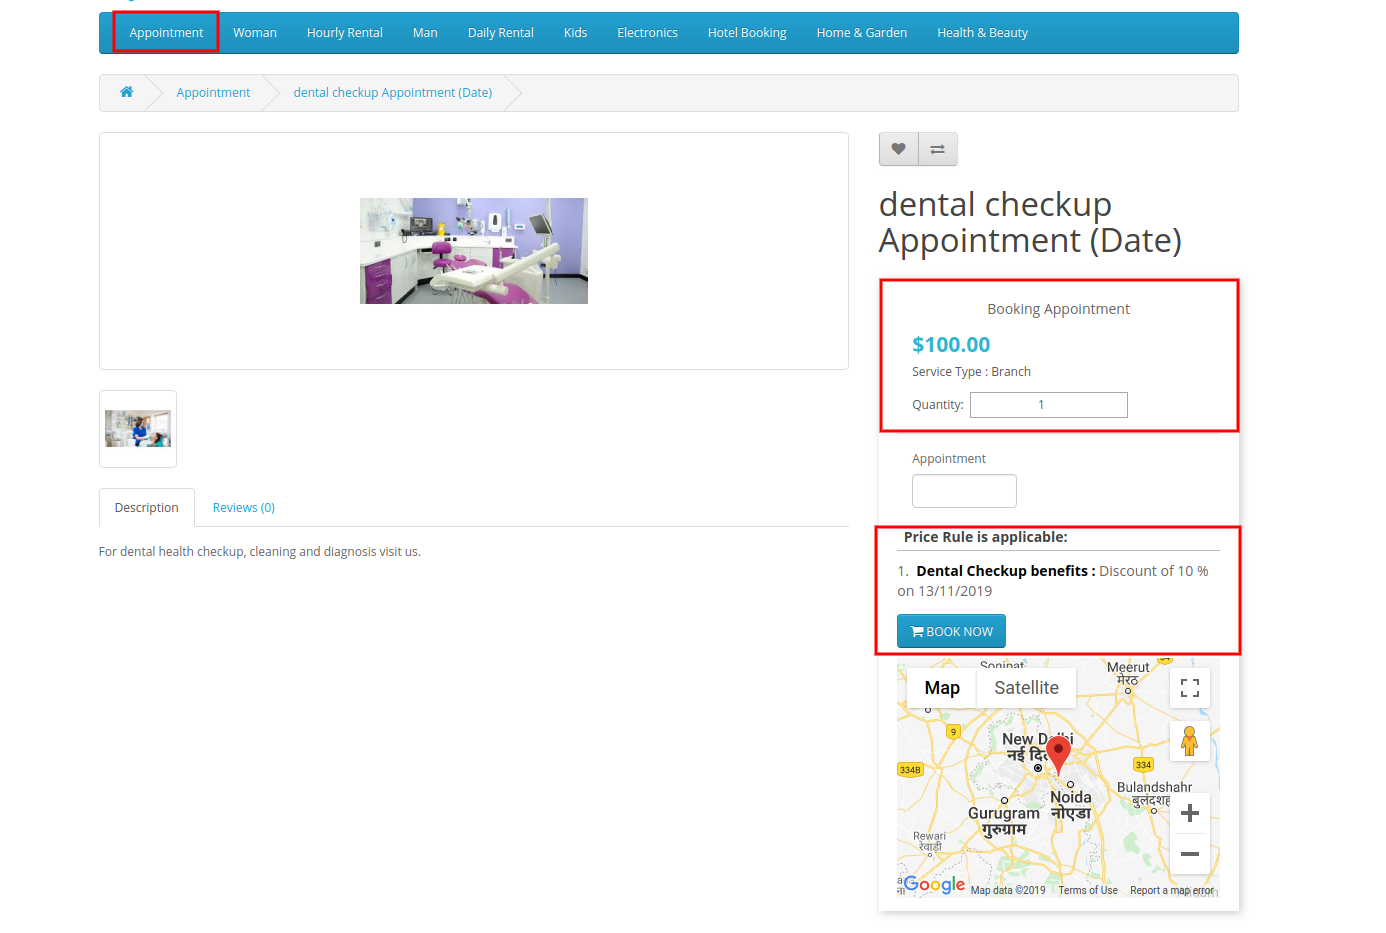
In the appointment category, the online users can view appointment type products as shown below:
Appointment Date Type:

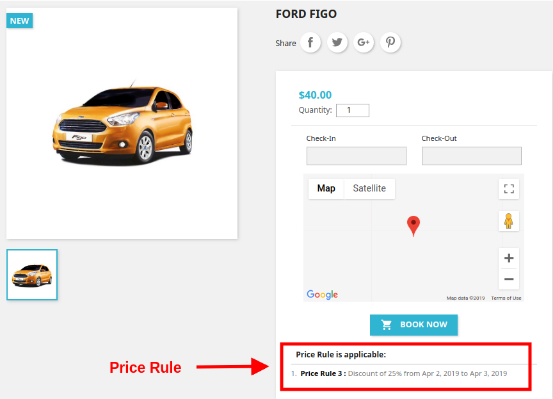
The online users can view the initial price of the appointment and view the price rule. The online users can also view the location on the map as shown below:
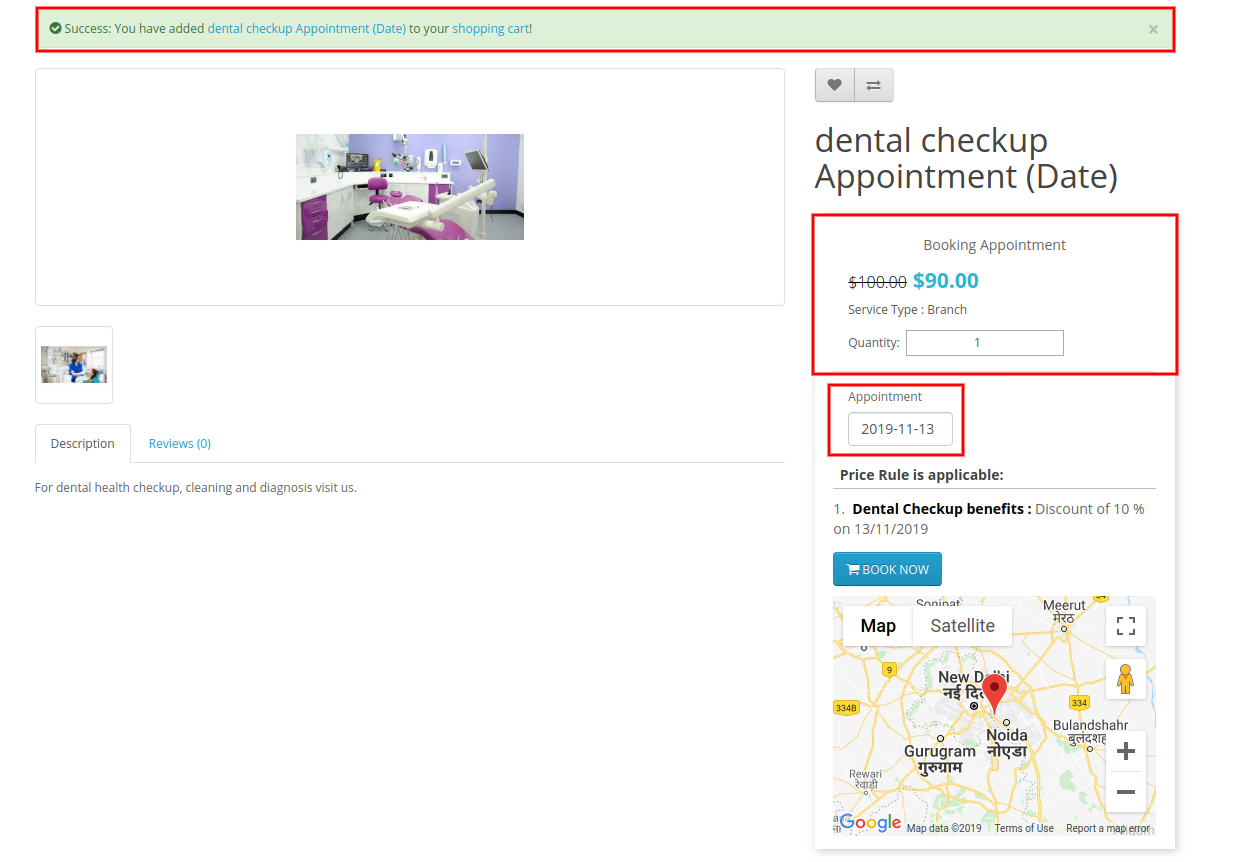
After selecting the appointment date, online users can view the location from the Google map. The online users can view the discounted amount at the same time when they select the appointment date.
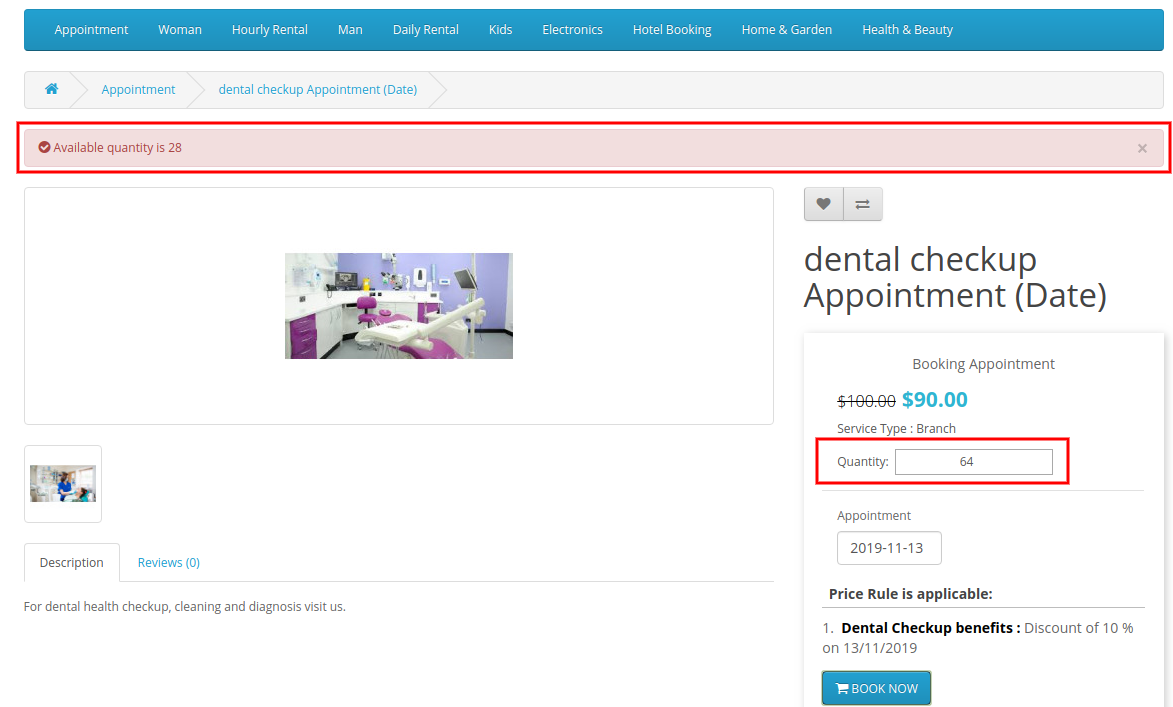
There will be an error if customers select more quantity than the available number of appointments.
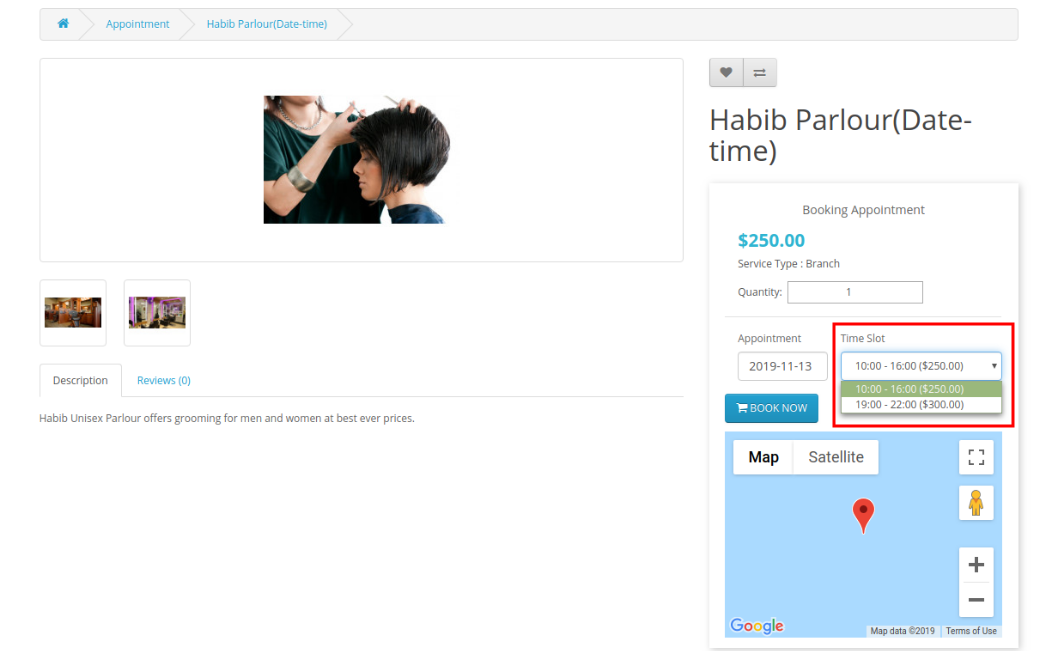
Appointment Date-time Type:

In Date-time based appointments, customers need to select time along with the date. They can view the charges of different time slots.
2. Daily Rental:

In the Daily rental category, online users can view all the activated daily rental products.
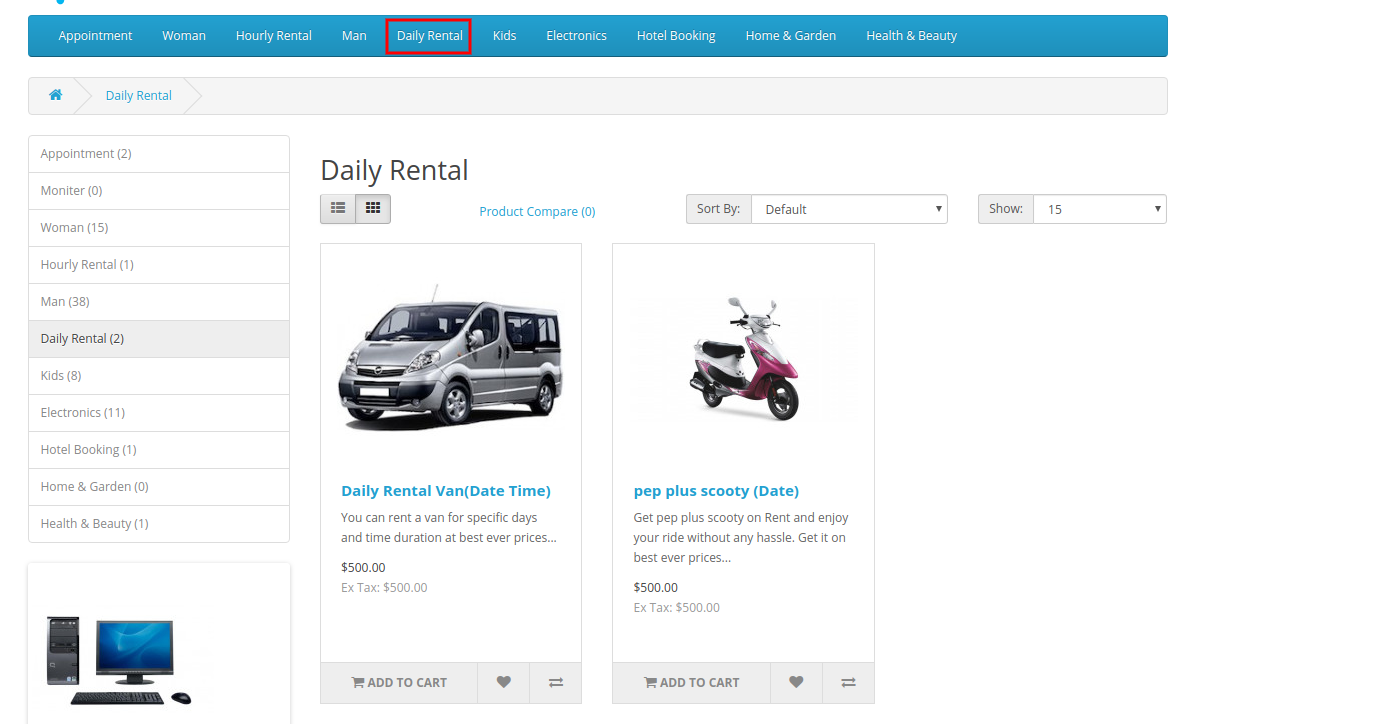
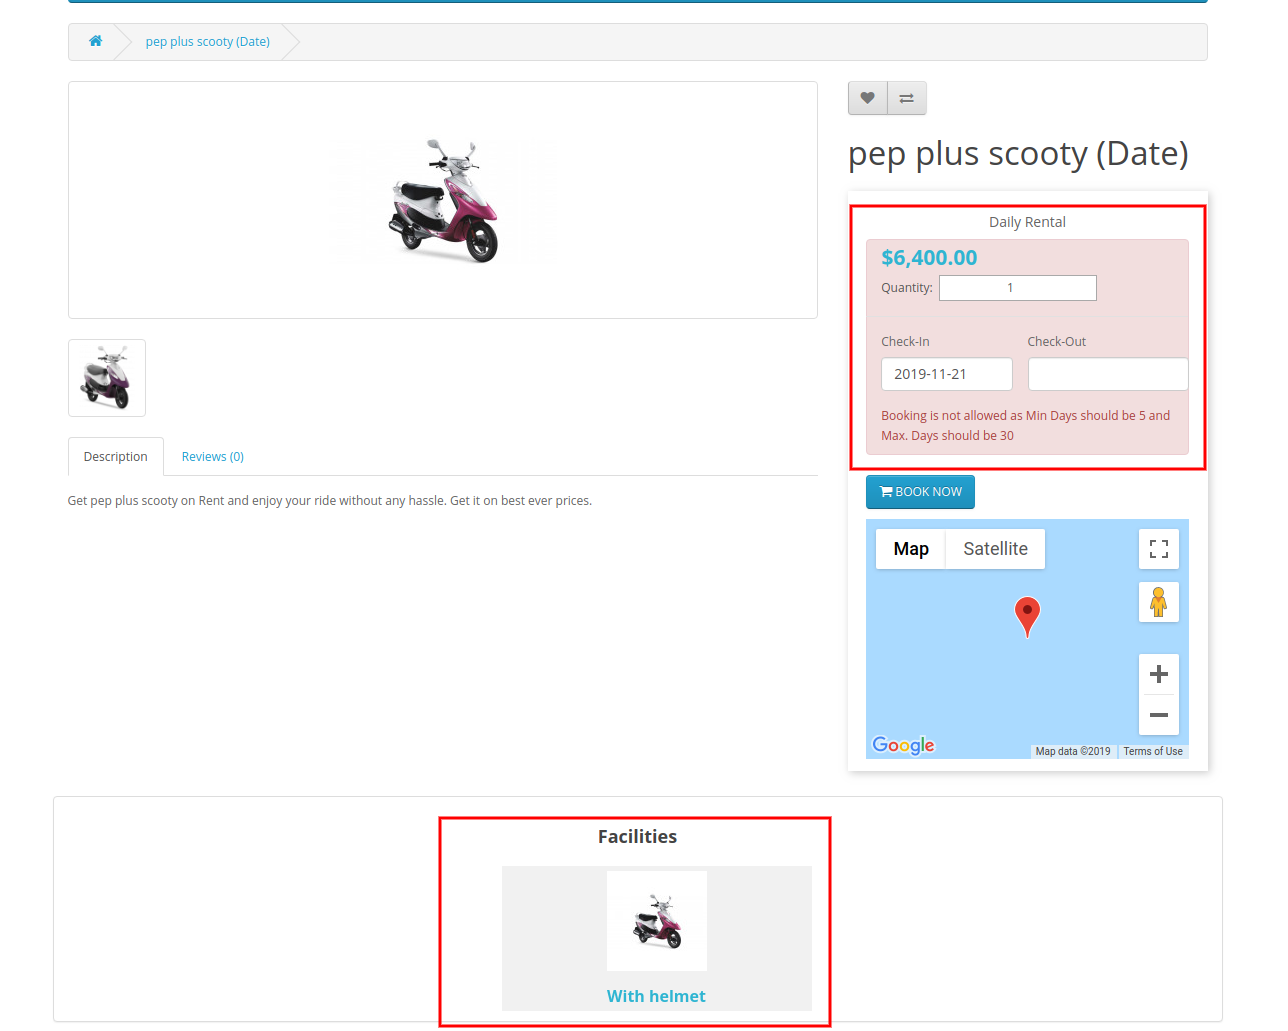
Daily Rental Date Type:

The online users can view the booking instructions and facilities on the product page.
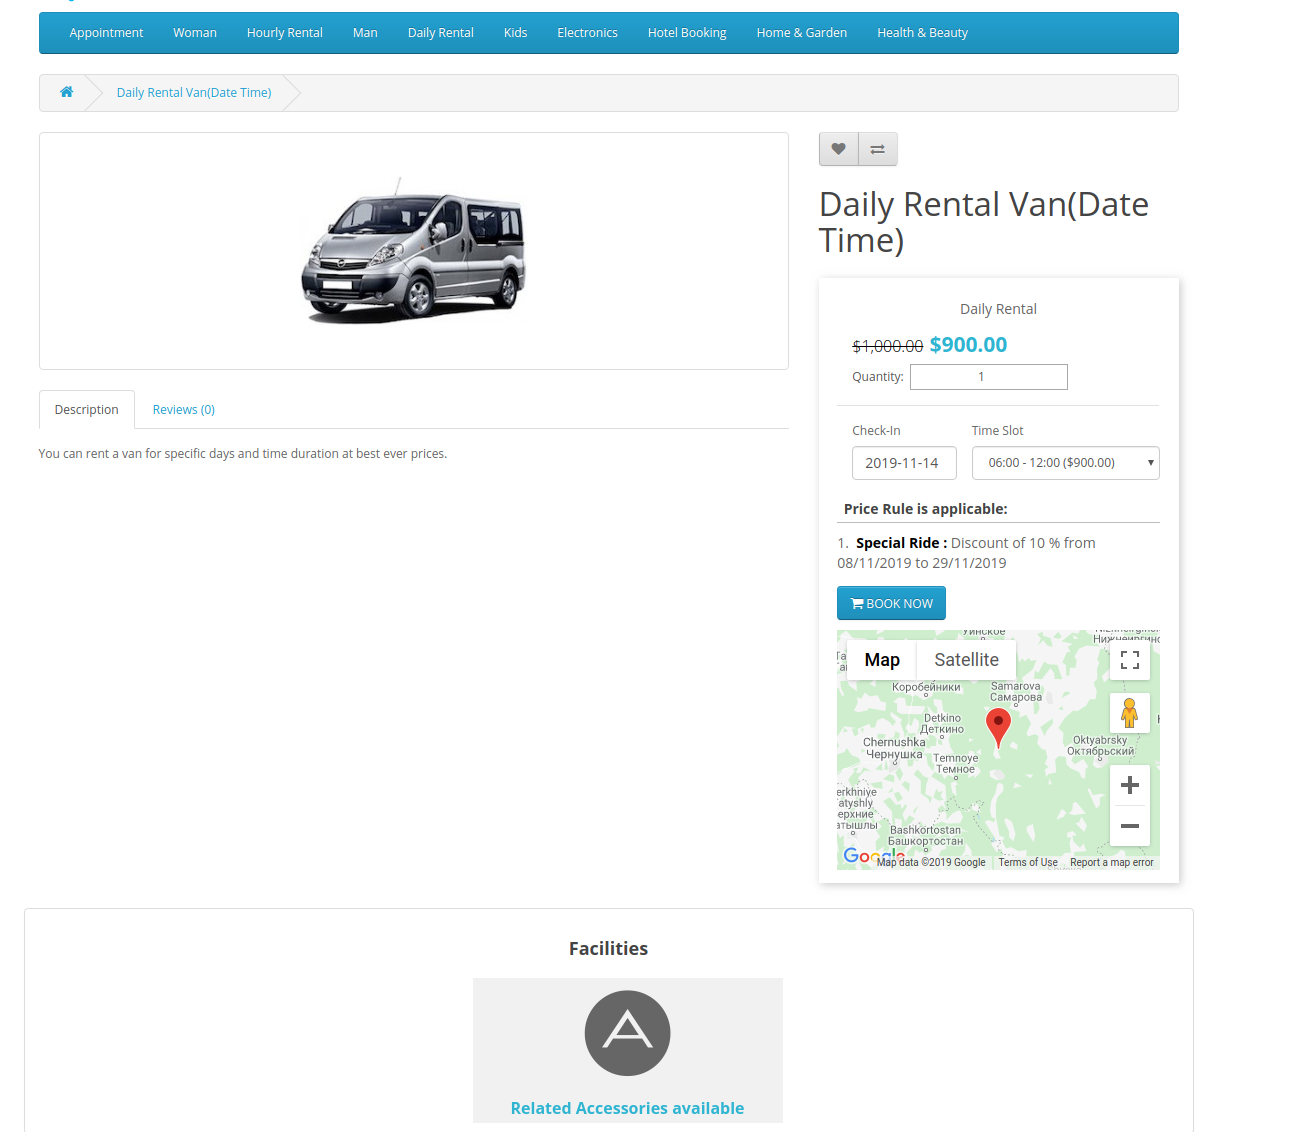
Daily Rental Date-time type:

The online users can select the date and time slots. After that users can book daily rental based bookings.
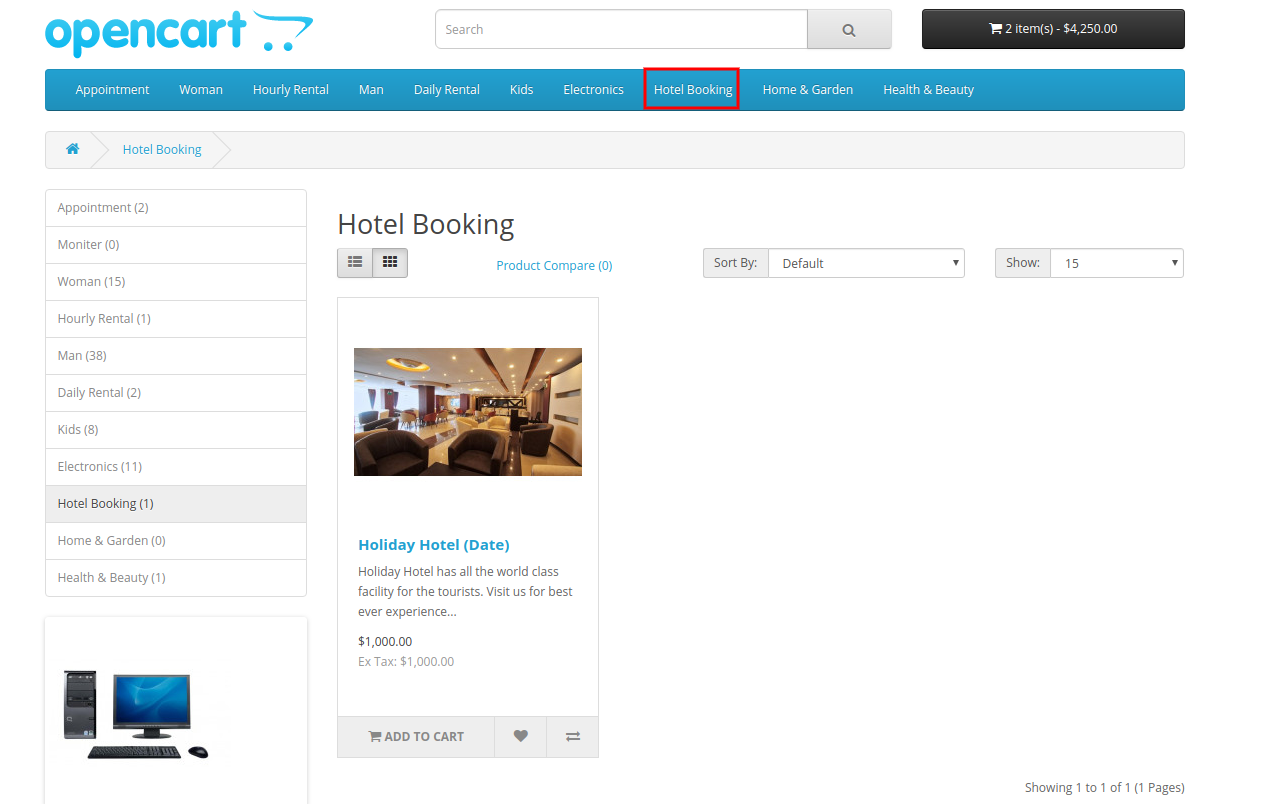
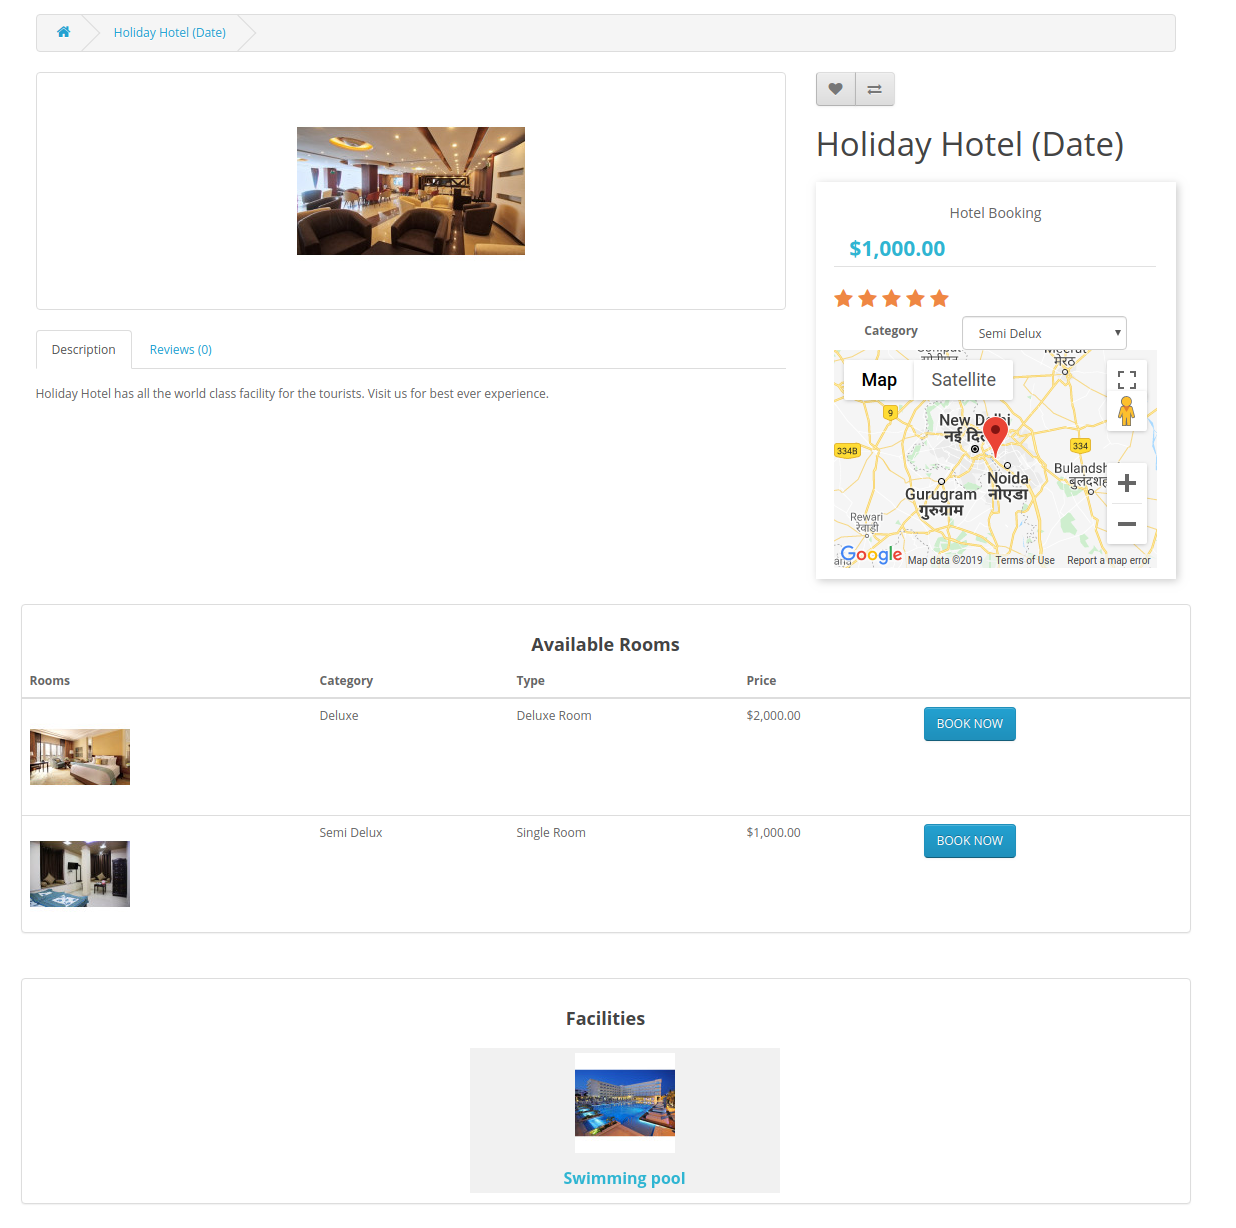
3. Hotel Booking:

The online users can view all the available hotels in hotel booking category as shown below:
Initially, admin can view all room types and facilities as shown below:
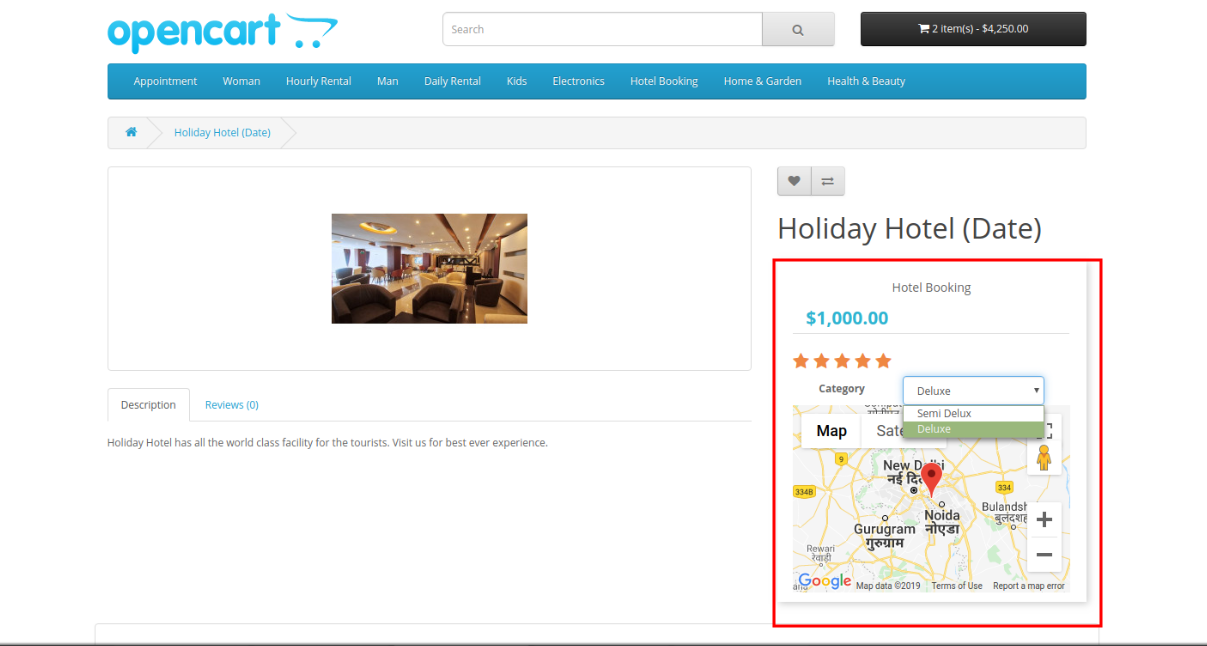
Admin can select from available room categories.
Online users can book the deluxe room as shown below:
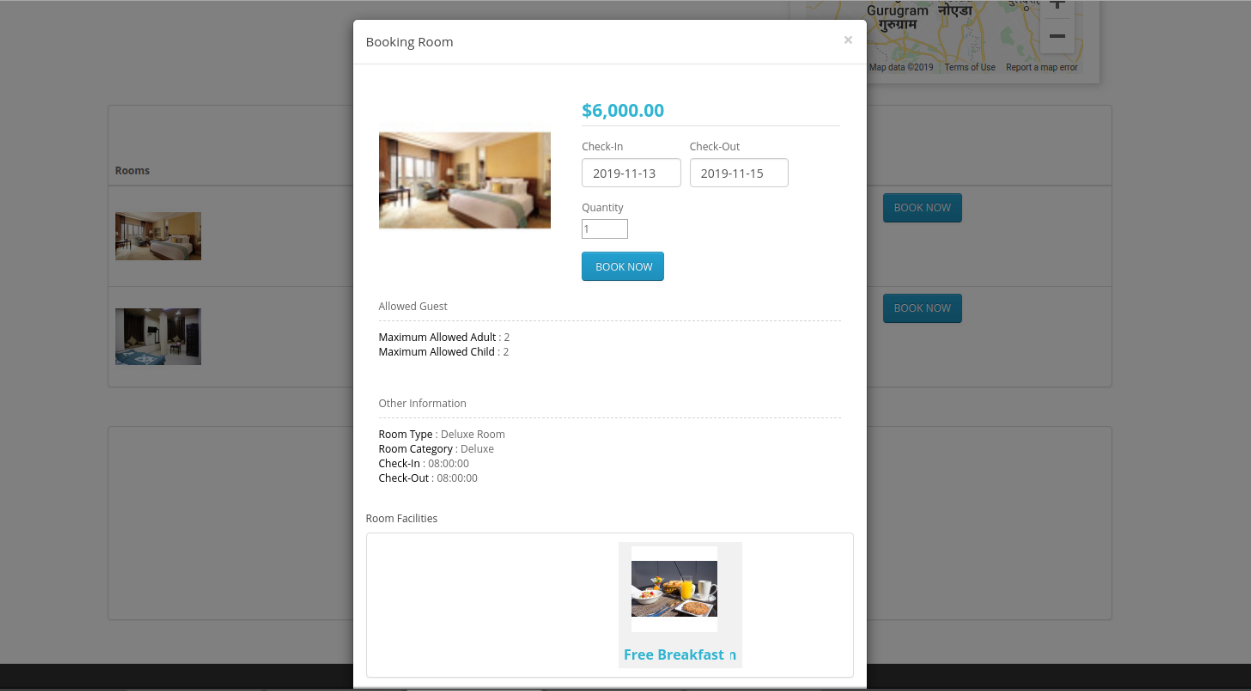
Online users can also check conditions and facilities before booking any room.
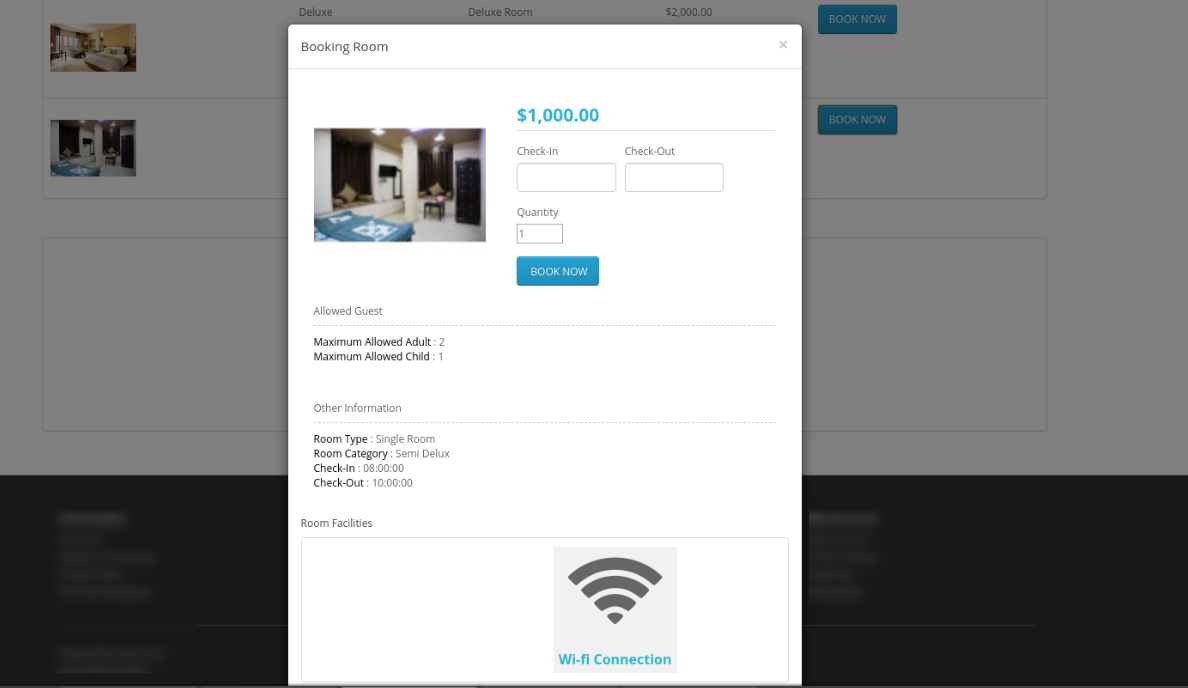
4. Hourly Rental:

In the hourly rental category, online users can use products based on hourly rent.
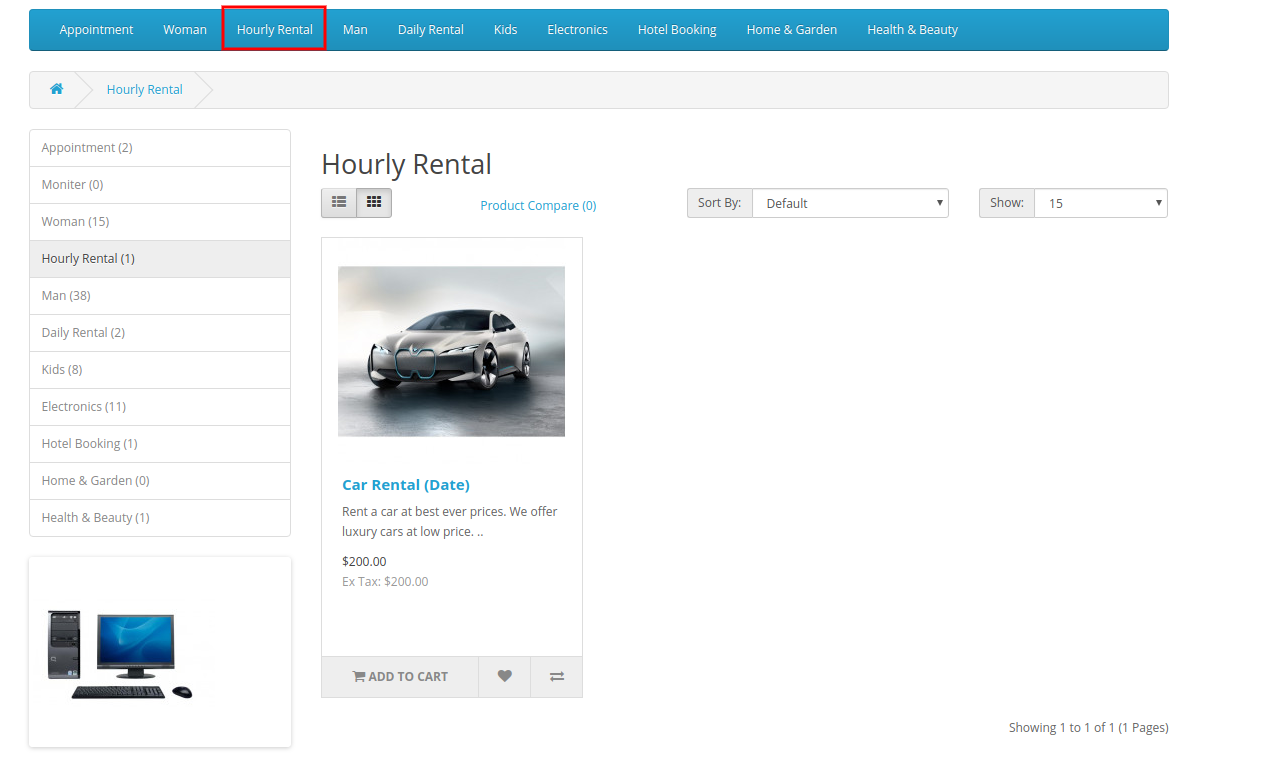
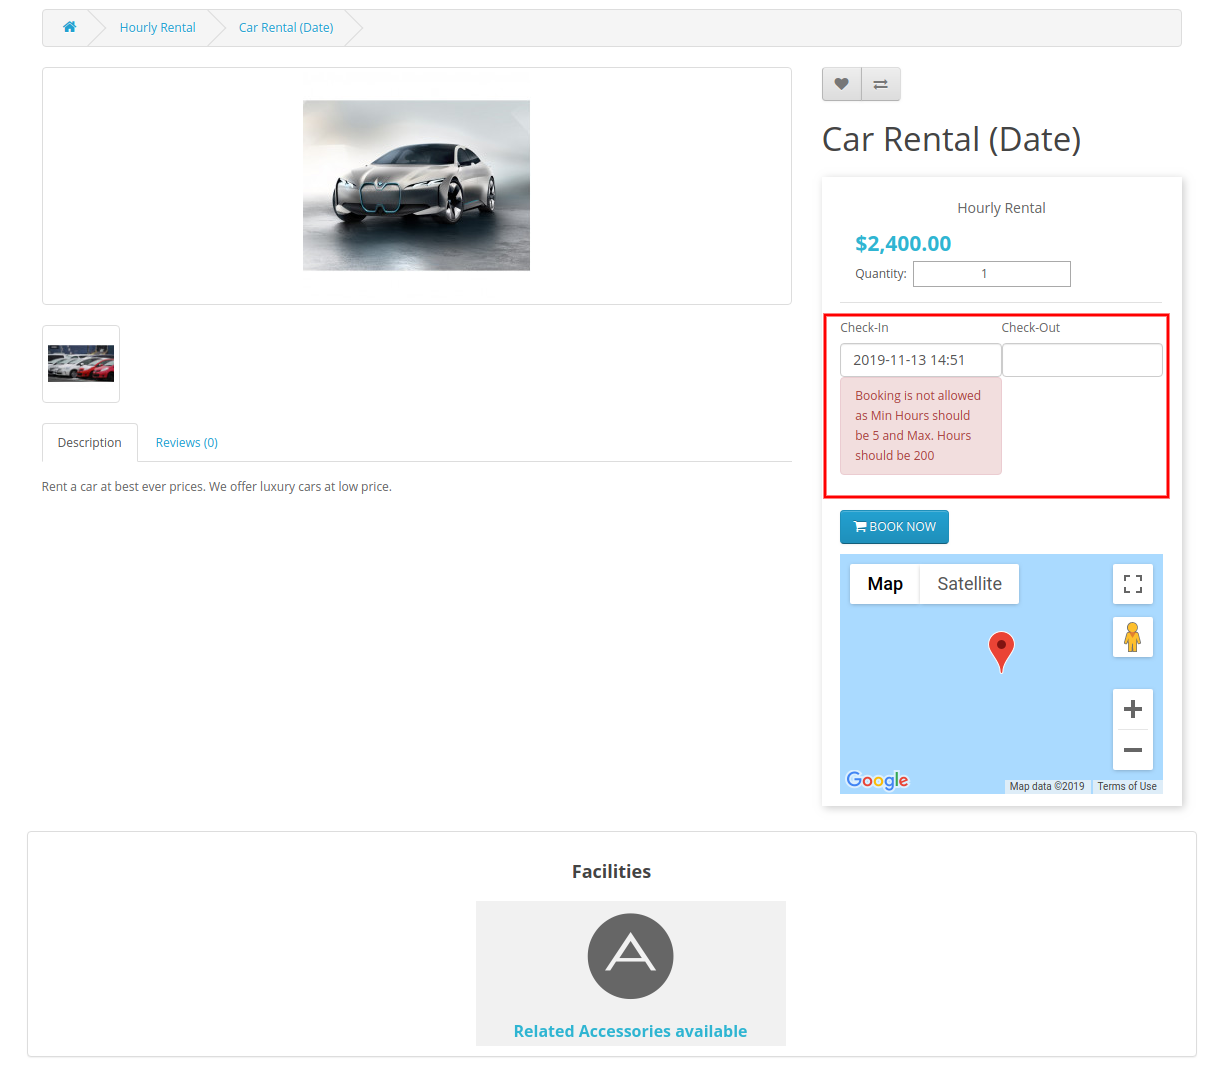
The online users can view the hourly rental conditions after selecting the check-in date as shown below:
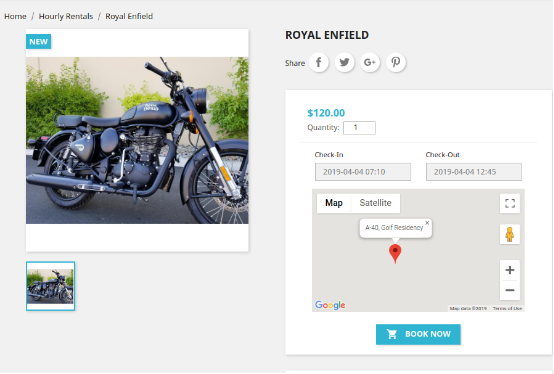
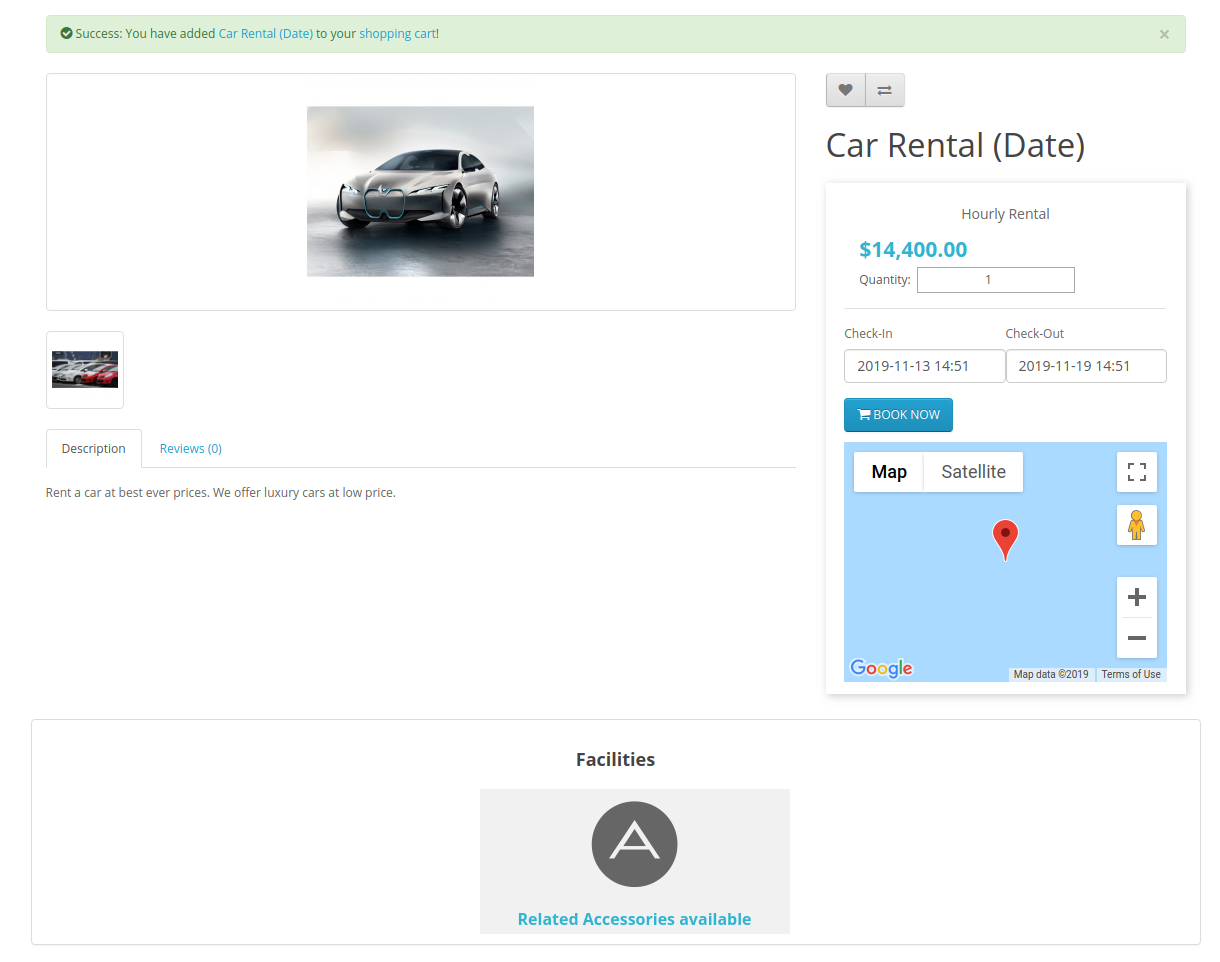
Online users can select the quantity and duration for booking any hourly rental based product.
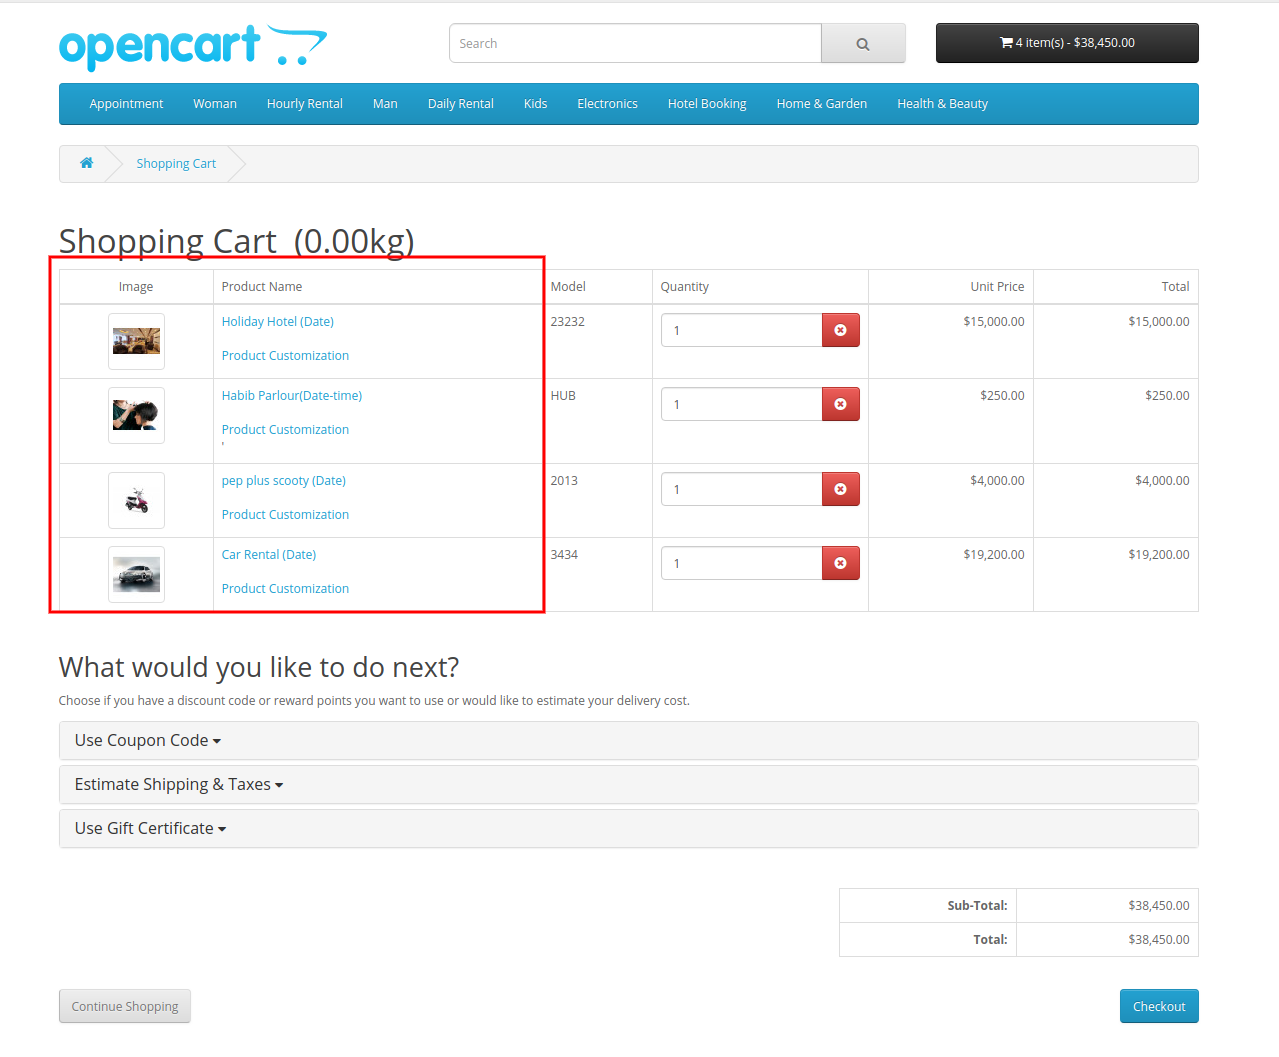
This way, the online store merchant can implement the functionality of booking and reservation with this Booking System Extension for OpenCart.

Prestashop Booking and Rental System Addon – User Manual

1.0 Introduction

Buying and renting services has now become a common scenario of online markets. People commonly prefer rental products and therefore shop owners have found their way in the rental business. So, which module to try for offering 24*7 booking and rental services to your customers. Prestashop Booking and Rental System addon by Knowband helps e-merchants in adding a wonder functionality to their online shop which is referred to as booking system. Yes, Prestashop Booking System is one great module to create a dynamic booking system for your online shop giving an option to set your pricing, maintain a calendar, appointment orders very effectively from the back-office. Using eCommerce booking system, online users can easily make time-date based bookings and appointments for various products.

Prestashop Reservation And Booking Module help you to add rental products and services to your Prestashop site. Prestashop Booking Calendar addon integrates flexible booking options and a user-friendly interface to the site. Customers can check real-time availability and relatively opt for rental or booking services from the online shop. So if you are planning to offer a rental, appointment or bookable services, this is the right one for you.

1.1 Striking Features of Prestashop Booking and Rental System Addon

To provide rental services that fit your customers need, Prestashop Reservation system module has offered multiple configuration settings so that you can effectively make your online business booking ready for the customers. The simple to use backend of Prestashop Booking Calendar addon is extremely easy to use without any technical operations or coding hassles.

The various key features provided by Prestashop Rental Booking System has been listed below.

1. Prestashop Booking and Rental System addon help store owners to convert their store into an online reservation and booking store that provides many kinds of rental, appointments and room booking services to the online users.

2. Creating and listing an appointment, daily rental product, booking room, hourly rental services is a time-saving approach with the help of Prestashop Booking Calendar addon.

3. Prestashop Booking System gives an intuitive interface to add the details for bookable product/services or appointment.
4. Admin can add suitable date ranges and time slots on the product page of booking product or appointments when their business services are available to the online users.
5. The total bookable orders with their status and associated customer details can be viewed from the back-office of this Prestashop Event Booking addon.

6. Prestashop admin can provide exciting deals and discount to their customers by flashing special price rules on the product pages. This will engage and add more traffic to the site which will impact the sales system as well.

7. Prestashop Booking Calendar addon builds a rental service schedule or appointment based on the features selected by the customers.

8. Admin can show the location with every bookable product/service using the Google Place Integration feature of Prestashop Reservation system module.

9. Prestashop Service Booking module offers flexibility to add, edit and delete unlimited bookable products to their eCommerce shop.

10. Prestashop Booking and Rental System addon allow you to add two kinds of bookable services for the users which include branch and home service.

11. Prestashop Booking System flawlessly supports multi-lingual and multi-store compatibility.

12. With Prestashop Reservation And Booking Module, admin can set the initial price for the rental services or appointments at their store.

13. They can disable booking and appointments for selective days or timing using this Prestashop Booking and Rental System addon.

14. The Prestashop admin can show multiple dates and time slots available for each bookable product or service.

15. Prestashop Booking Calendar addon provides an option to show custom rental service charges corresponding to the date-time slot selected by the customer.

16. Prestashop Event Booking addon allows admin to specify the different type, category and offered facilities with the rental room or hotel services.

1.2 Technology for Development

Language: PHP
Frame Work: Prestashop

2.0 Installation Guide for Prestashop Booking Calendar Addon

The store admin can follow these simple steps for installing the Prestashop Booking and Rental System addon on their eCommerce store:

1. First of all download the addon package from the Knowband store.

2. You will get a zipped file containing the source code and user manual. Unzip the complete package in the root directory of your Prestashop store through FTP manager (like Filezilla or WinSCP – download here: https://filezilla-project.org/). You’ll find the files and folders as shown in the image below:

The Prestashop Booking System is now installed and ready for use. Now the admin can configure the various configuration settings in accordance with their Prestashop site.

3.0 Admin Interface of Prestashop Rental Booking System

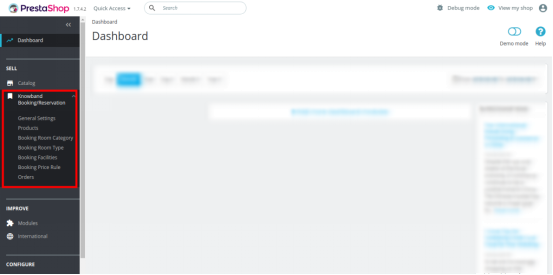
Just after successful installation of Prestashop Booking and Rental System addon at your website, you can configure the booking service setting as per your needs. In the admin panel or dashboard, you will find the Knowband Booking/Reservation module along with its sub-sections listed below.

This Knowband Booking/Reservation System comprises of seven sections which have been discussed further.

1.General Settings
2.Products
3.Booking Room Category
4.Booking Room Type
5.Booking Facilities
6.Booking Price Rules
7.Orders

Each Tab of the Prestashop Booking System has been discussed below:

3.1 General Settings

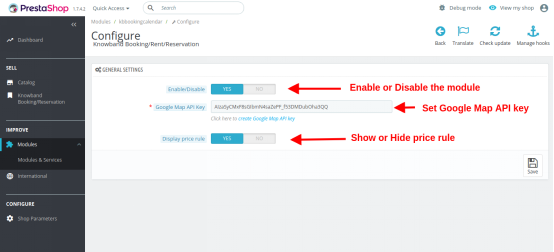
The General Settings of Prestashop Rental Booking System includes the basic configuration settings as:

1.Enable/Disable: This option enables or disables the complete functionality of the Prestashop Booking and Rental System at your store.

2.Google Map API Key: This option helps you to set the Google Map API Key. Once this unique API key is set from the backend, you can mark and display the location corresponding to every bookable product or service.

3.Display Price Rule: This option lets you show or hide the custom price rules over the product page of bookable product and rental service. To create a new price rule for different bookable products or edit the existing price rule, jump to the “Booking Price Rule” section of the dashboard.

3.1.1 How to generate the Google Map API key

The eCommerce store admin can generate the Google API key by following these steps:

  • Click on the “Get Started” button: The admin can click on this button to get Google map API key.

  • Pickup the products: When the admin will click the “Get Started” button this pop-up will be displayed.

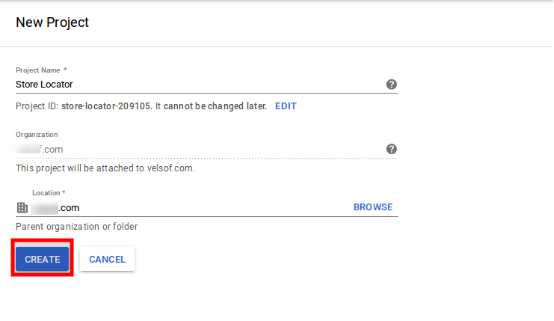
  • Project selection: The eCommerce store admin can select or create a project.

1. Select a project:

2. Create a new project:

  • Setup the billing: The eCommerce store admin can now set up the billing.

  • After billing the store admin can get their Google map API key.
    On the Credentials page, get an API key:

  • The store admin can select the API key option:

  • The admin can select the restrict key option from the dialog box to set a browser restriction on the API key.

  • In the Key restriction section, the store admin can select HTTP referrers (web sites), then follow the on-screen instructions to set referrers.

  • This way the admin can set the Google map API key.

3.2 Products

Here, you can view the complete list of daily/hourly rental products, appointments and hotel booking services added at your eCommerce store. To edit the existing details for any type of booking product/service, click on the edit option corresponding to a product listing. If you want to delete a particular listing, click on Delete option shown in the drop-down option corresponding to the product. If you don’t want to delete, simply enable or disable the product manually.

To add a new rental product or booking room service or appointments at your store, click on the Add new Booking Product option at the top right corner of the admin panel of this Prestashop Booking and Rental System addon.

1. Click on the “+” button at the top right side of the admin interface.
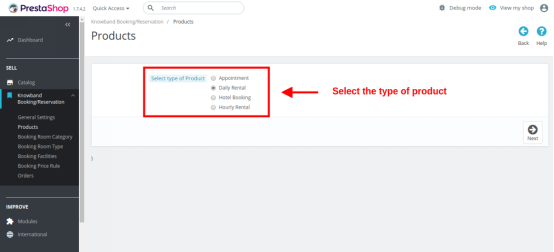
2. Now select the type of product you want to add to your site. The four offered options include:

  • Appointment
  • Daily Rental
  • Hotel Booking
  • Hourly Rental

3.2.1 Add an Appointment Type Product

The Appointment type product contains the following information. In Appointment type of product, admin can show date/time slots. Admin has to set the appointment price on per day basis.

3.2.1.1 General Information

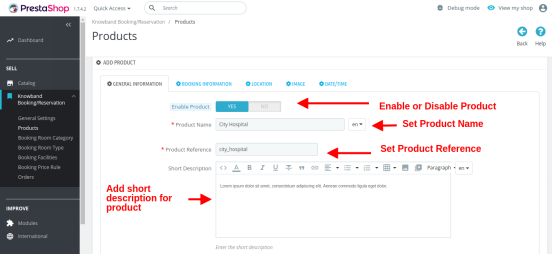
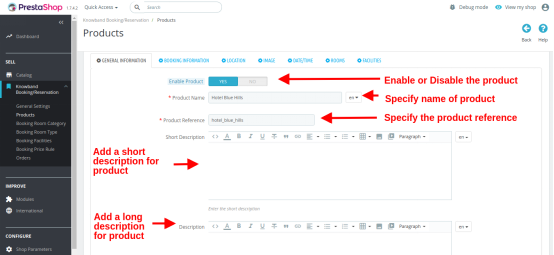
  • Enable or Disable Product: This option helps to enable or disable the current product.
  • Product Name: You can set the desired name for the product which is a mandatory field.
  • Product Reference: Set a unique reference code for the product which is a mandatory field.
  • Short Description: You can add a short one-line description for your product which displays under the product name.
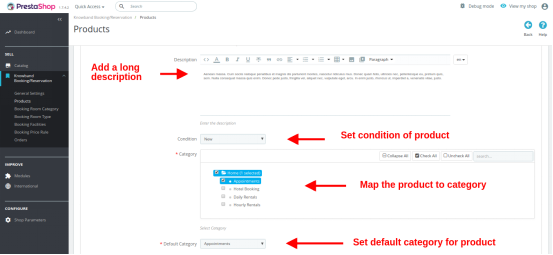
  • Description: Give detailed information about the product in this field box.

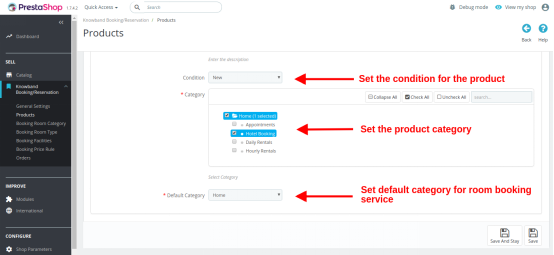
  • Condition: Set the condition of the product stating whether it is new, refurbished or used.
  • Category: Select a particular category where you want to add and show this appointment service.
  • Default Category: You can choose a default category for the product using this field.
3.2.1.2 Booking Information

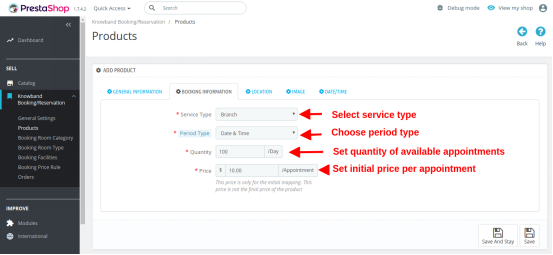
  • Service Type: This option lets you select the service type as a branch or home service.
  • Period Type: This option sets the period or schedule type that you want to display on the product page for the users. If the date is selected, then date schedules will be shown only. If the date/time option is selected then both date and time slots are shown to the customers.
  • Quantity: You can set the available quantity of bookable product or service for a day.
  • Price: You can set an initial price of the product per appointment that is shown to the user before they have done any service customization. After they have selected their product preferences, mainly date, and time schedules, the initial price is changed to the final custom price that they have to actually pay for getting service benefits.
3.2.1.3 Location

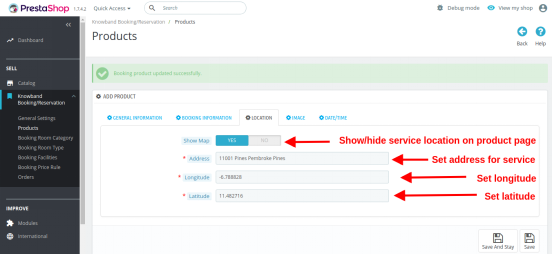
  • Show Map: You can turn Google Map ON or OFF visible at the frontend over the product page.
  • Address: This field specifies the exact location or address of that particular bookable product.
  • Longitude: This field sets the longitude coordinate of the specific location.
  • Latitude: This field sets the latitude coordinate of the specific location.
3.2.1.4 Image

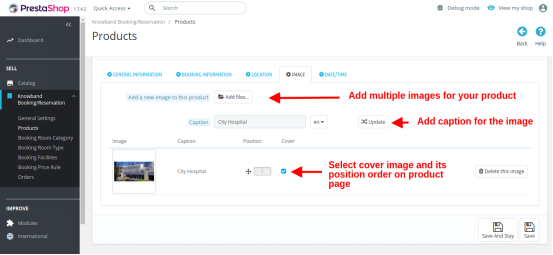
  • Add new image to this product: You can add multiple images to describe your product. You can set the display order of these images. Also, you can set any of these images as a cover image for the rental service or booking service.
  • Caption: You can give a desired caption for the product images.
3.2.1.5 Date/Time

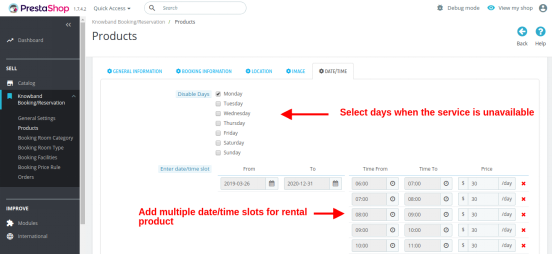
  • Disable Days: You can select all the days when the services are unavailable by the respective businesses.
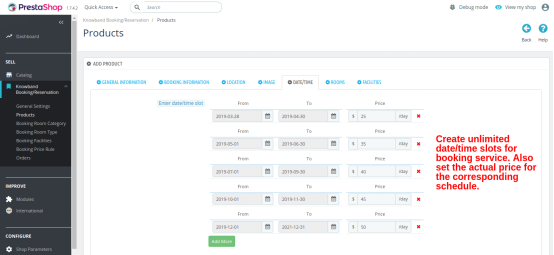
  • Enter Date/Time Slot: You can create and display multiple dates and time slots on the product page. If the period type is selected as Date, then only date schedules will be shown at the backend. If the date/time is selected as period type, then you can add multiple time slots corresponding to every date range. This way you can map multiple time slots to a single date slot.
  • Final Price: You have to specify the final price corresponding to each date/time schedule added for the appointment. This final price is calculated during checkout based on customization done by the customer.
    Finally, save your created product.

3.2.2 Add a Daily Rental Product

The complete configuration settings for a rental product are the same as appointment type product.
Admin can show date/time slots for a daily rental product and can also fix a price corresponding to that schedule on per day basis.
The only difference occurs in the following listed settings:

  • Price: The initial price for the rental product is on a daily basis. Remember this is not the final price of the rental product.
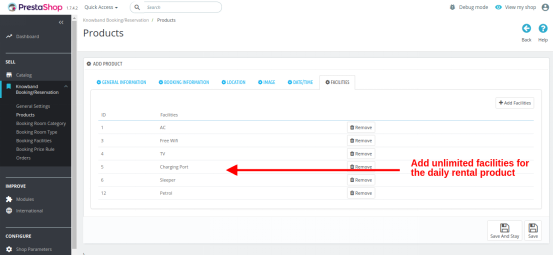
  • Facilities: This option allows you to add multiple facilities that you are offering with the daily rental product. These rent type facilities have to be first created from the “Booking Facilities” section of the admin panel. Once created, you can map them here for the particular daily rental service.

3.2.3 Add a Hotel Booking Service

The Hotel Booking service or Room Booking service contains the following information. In this room booking service, the customer has to select the check-in and check-out dates so that the room availability can be checked.

3.2.3.1 General Information

  • Enable or Disable Product: This option helps to enable or disable the Hotel room booking service.
  • Product Name: You can set the desired name for the booking service which is a mandatory field.
  • Product Reference: Set a unique reference code for the booking service which is a mandatory field.
  • Short Description: You can add a short one-line description for your room booking service which displays under the product name.
  • Description: Give detailed information about the hotel service in this field box.

  • Condition: Set the condition of service stating whether it is new, refurbished or used.
  • Category: Select a particular category where you want to add and show this booking service.
  • Default Category: You can choose a default category for the booking service using this field.
3.2.3.2 Booking Information

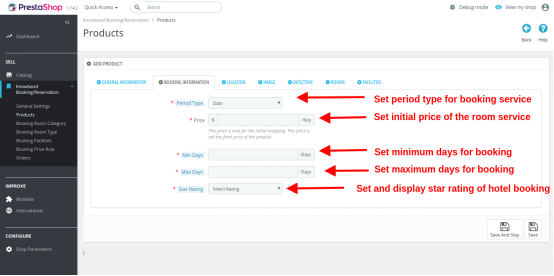
  • Period Type: This option sets the period type as Date allowing you to add multiple date slots for your hotel service.
  • Price: You can set an initial price of the booking service on a daily basis that is shown to the user before they have done any service customization. After they have selected their product preferences, mainly date slot, this initial price is added with the final custom price that they have to actually pay for getting service benefits.
  • Min days: Set the minimum days for hotel booking service.
  • Max Days: Set the maximum days for hotel booking service.
  • Star Rating: Select and display the star rating of hotel room service.
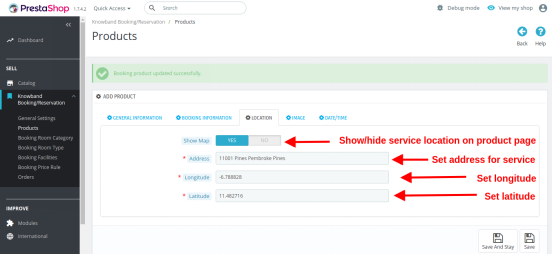
3.2.3.3 Location

  • Show Map: You can turn Google Map ON or OFF visible at the frontend over the product page.
  • Address: This field specifies the exact location or address of that particular Hotel service.
  • Longitude: This field sets the longitude coordinate of the specific location.
  • Latitude: This field sets the latitude coordinate of the specific location.
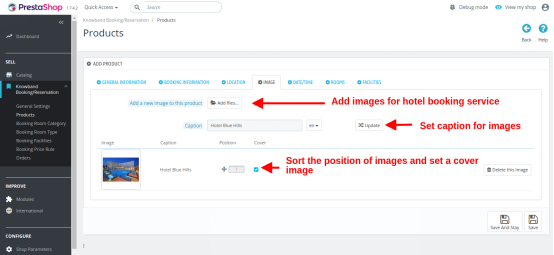
3.2.3.4 Image

  • Add a new image to this product: You can add multiple images to describe your Hotel booking service. You can set the display order of these images. Also, you can set any of these images as a cover image for the room booking service.
    Caption: You can give a desired caption for the product images.
3.2.3.5 Date/Time

  • Enter Date/Time Slot: You can create and display multiple date schedules on the product page when your hotel services are available for the users. If there will be any conflict between the date/time range, the first occurrence will be applied.
  • Final Price: You have to specify the final price corresponding to each date slot schedule. This price is on a nightly basis. This final price is calculated during checkout based on the check-in and check-out time selected by the customer.
3.2.3.6 Rooms

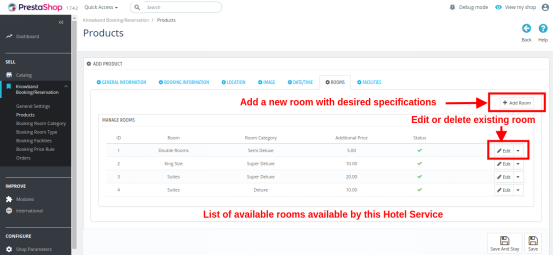
This interface will list you all the existing rooms within the particular hotel booking service. You can edit the details/specifications for any available room or you can delete them if required.
You can create a new room under this hotel service with different room type, category, and offered facilities. For this, you have to simply click on the Add Room option present at the top right corner of the interface.

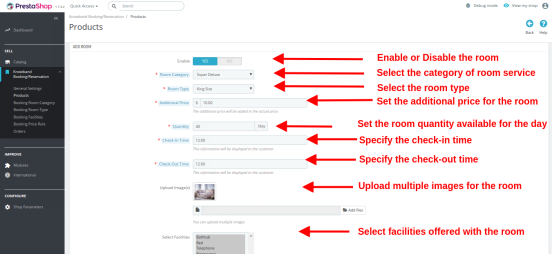
  • Enable: Enable or disable the room service.
  • Room Category: Select a particular category for room service. For this, you have to first create various categories from the “Booking Room Category” section of the admin interface. Then you have to map this room under the desired room category.
  • Room Type: Select a particular type for the room service. For this, you have to first create various room types from the “Booking Room Type” section of the admin interface. Then you have to map this room under the desired room type.
  • Additional Price: Set the additional price which is added to the initial price.
  • Quantity: Set the available quantity of rooms per day.
  • Check-in Time: Specify the check-in time for this room.
  • Check-out Time: Specify the check-out time for this room.
  • Upload Images: You can add multiple images describing the hotel room.
  • Select Facilities: Select multiple facilities that are offered with the room service. These facilities have to be first created from the “Booking Facilities” section of the admin interface. Then, you can easily map various facilities for this selected room.
3.2.3.7 Facilities

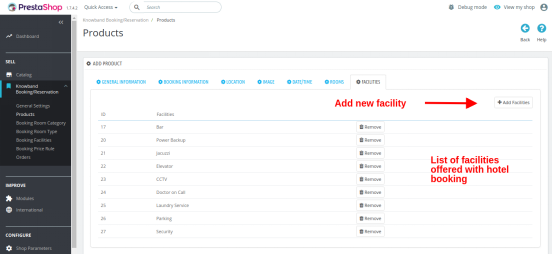
Under this section, you can map all the facilities that are being provided for the particular hotel service. These hotel facilities are also created from the “Booking Facilities” section of the admin interface.
Finally, save your created hotel/room service.

3.2.4 Add an Hourly Rental Product

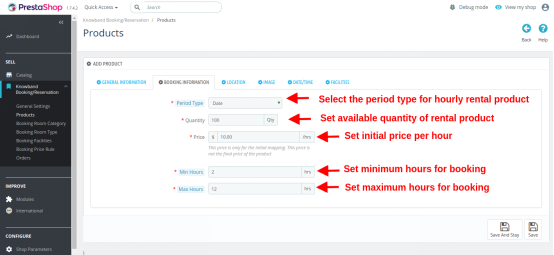
The complete configuration settings for an hourly rental product are same as of daily rental type product. The customer has to pick a check-in and check-out date-time which specifies the duration for which they want the product.
The only difference occurs in the following listed settings:

  • Period Type: This option sets the period type as Date Type for the hourly rental product.
  • Quantity: You can specify the total quantity of that hourly rental product.
  • Price: This option sets the price of the product on per hour basis.
  • Min Hours: Set minimum hours for booking.
  • Max Hours: Set maximum hours for booking.

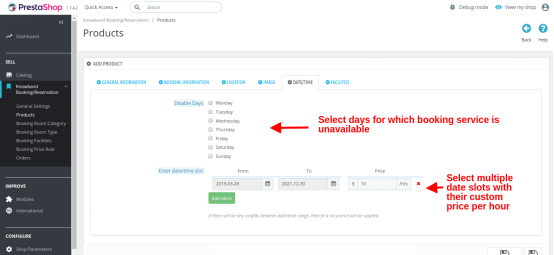
  • Disable days: Check the days on which the hourly rental product is unavailable for customer use.
  • Enter Date/Time slot: Create multiple date slots along with their final custom price on per hour basis.
  • Facilities: This option allows you to add multiple facilities that you are offering with the hourly rental product. These rent type facilities have to be first created from the “Booking Facilities” section of the admin panel. Once created, you can map them here for the particular hourly rental service.

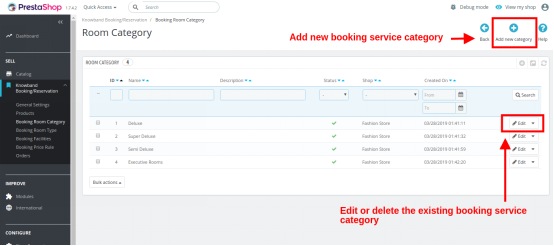
3.3 Booking Room Category

You can view and manage the list of booking room category through this interface. You can even edit or delete an existing category. For adding a new booking room category, click on the “+” button at the top right place of the admin panel.

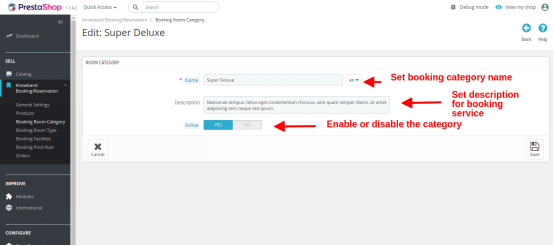
Fill the following details while creating a new booking room category:

  • Name: Set name of booking room category.
  • Description: Set a short description for the booking room category.
  • Active: Enable or disable the room category.

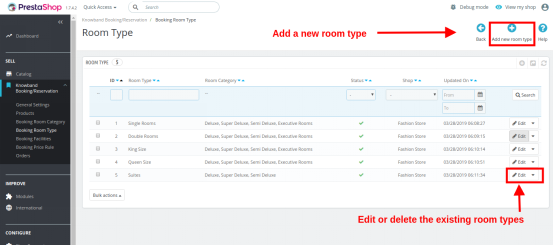
3.4 Booking Room Type

You can view and manage the list of booking room type through this interface. You can even edit or delete an existing room type. For adding a new booking room type, click on the “+” button at the top right place of the admin panel.

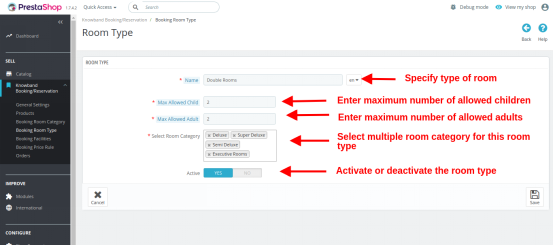
  • Name: Enter the name of room type.
  • Maximum Allowed Child: Set the maximum limit of allowed children.
  • Maximum Allowed Adults: Set the maximum limit of allowed adults.
  • Select Room Category: Select multiple room categories for this room type.
  • Active: Enable or disable the booking room type.

3.5 Booking Facilities

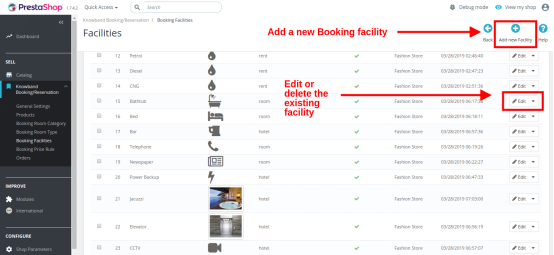
There are three kinds of booking facilities that can be created using this Prestashop Booking and Rental System addon.

1. Room: These facilities are mapped for particular room service.
2. Rent: These facilities are mapped for daily rental and hourly rental services.
3. Hotel: These facilities are mapped for a particular hotel booking service.

You can configure or delete the existing booking facilities from this interface. To add a new facility, click on the “+” button at the top right corner of the admin panel.

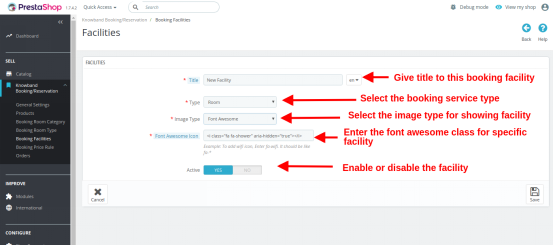
  • Title: Set a catchy title for the booking service.
  • Type: Set the booking service type for the offered facility. The three types include Room, Rent and Hotel.
  • Image Type: Specify the image type you want to use for depicting the booking facility. The two image type include Upload Image and Font Awesome.
  • Font Awesome Icon Class/Upload Image: If you have selected “Upload Image” type, then you have to browse a desired image from the local system. Else if you have selected the “Font Awesome Icon” type, then insert the font awesome class for that particular icon. For example, to depict the “Charging Port” facility, the font awesome class is “fa-plug”.
  • Activate: Enable or disable the booking facility.

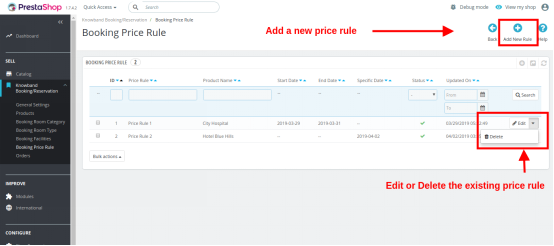
3.6 Booking Price Rules

Price rules are basically created for specific products. This is a kind of offer or discount deal that you can use to entice the online users for grabbing that particular rental or booking service from the store.
The various price rules can be viewed and managed from a single interface under the Booking Price Rule Section. You can edit or delete the existing price rule. Additionally, you can create a new price rule for another bookable product on the store. To add a new booking price rule, click on the “+” button at the top right corner of the interface.

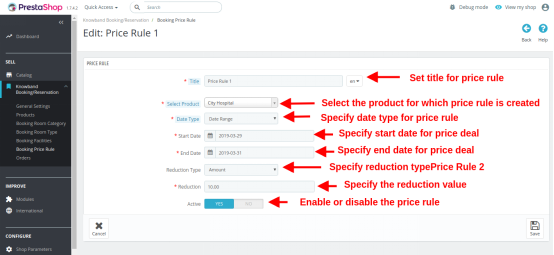
Specify the following field information while creating a new price rule.

  • Title: Set a desired catchy name for the price rule.
  • Select Product: Select the product over which you want to apply this booking price rule.
  • Date Type: Specify the date type from two options: Date Range and Specific Date.
    Start Date, End Date / Fix date: Enter the start date and end date if you have selected Date Range as Date Type. If you have selected the Specific Date option as Date Type then enter the fixed date to display the price rule.
  • Reduction Type: Set the reduction type as amount or percentage.
  • Reduction Value: If you have selected Amount as Reduction type then set the discount value you are offering to your customers. If you have chosen the Percentage type option, then set the discount percentage for the booking service.
  • Active: Enable or Disable the price rule.

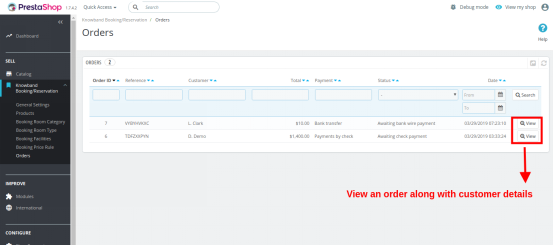
3.7 Orders

Here, the admin can view the complete list of orders placed by the customers whether it is an appointment, room booking service, daily rental product or hourly rental product. The date and time of order, customer detail, payment type, payment value and order status is also visible in this backend report of Prestashop Booking and Rental System.

4.0 Front Interface of Prestashop Reservation And Booking Module

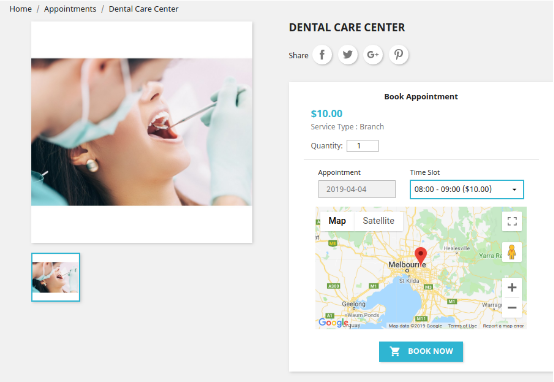
A) Appointment Type Product

B) Hotel Booking Type Service

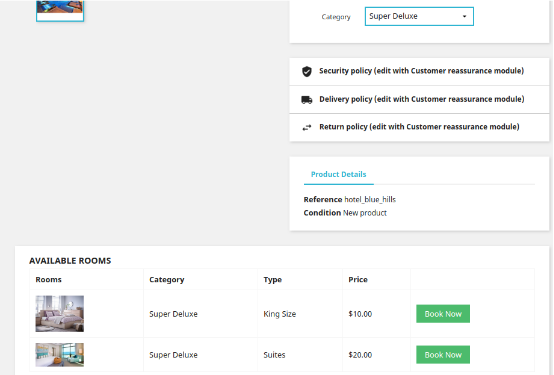
Available Rooms in Super Deluxe Category

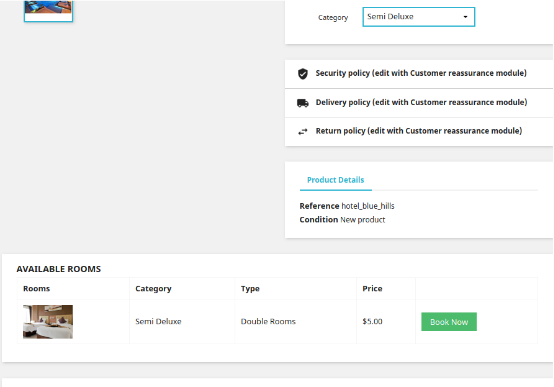
Available Rooms in Semi Deluxe Category

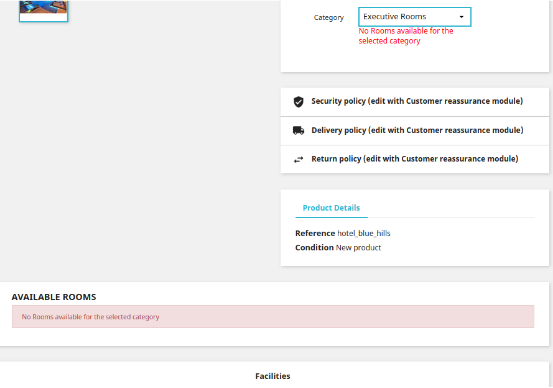
Available Rooms in Executive Rooms Category

Here you can see that there are no rooms in this category. This information is given to the frontend user in the form of an error message.

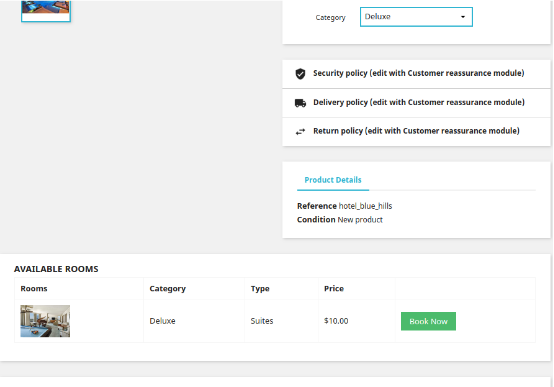
Available Rooms in Deluxe Category

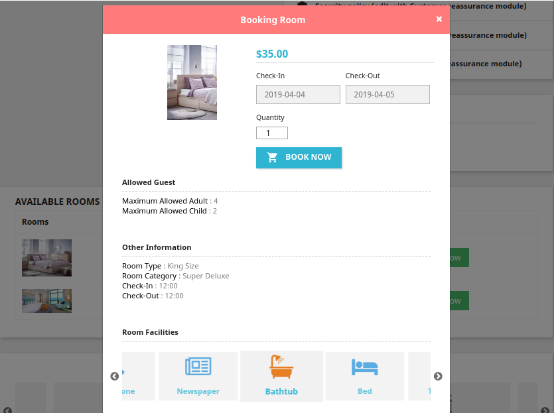
Now as the customer will select the desired room from the list of available rooms, then they will be shown a new popup as given below.

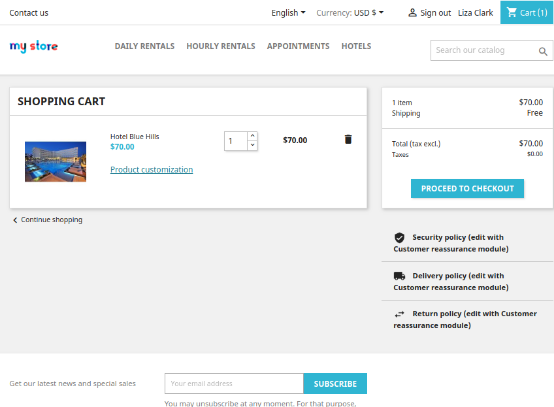
This popup gives complete details about the room selected by the customer in accordance with their needs. Now as they click on the “Book Now” button the room booking service gets added to the cart which is shown below.

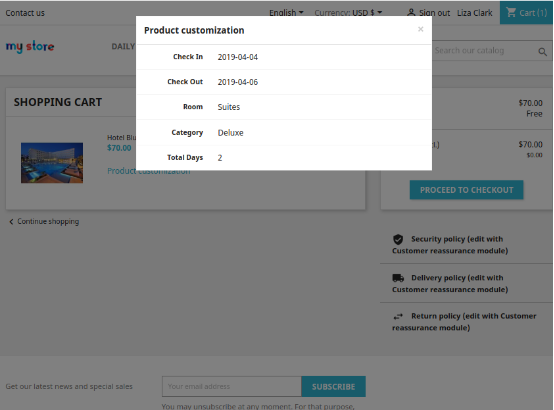
If the user wishes to check the booked room details again, they can simply click on the “Product Customization” link shown over the cart page.
This appears like the image below:

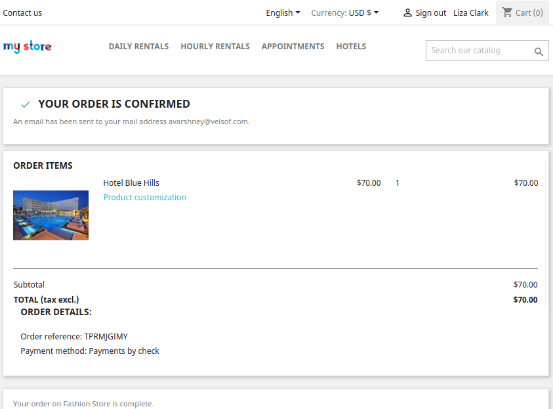
Order Confirmation Message on the frontend

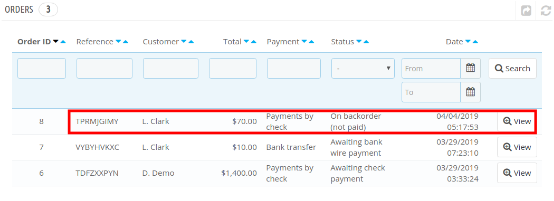
Admin can also check the order details from the admin. The backend interface showing list of store orders looks like:

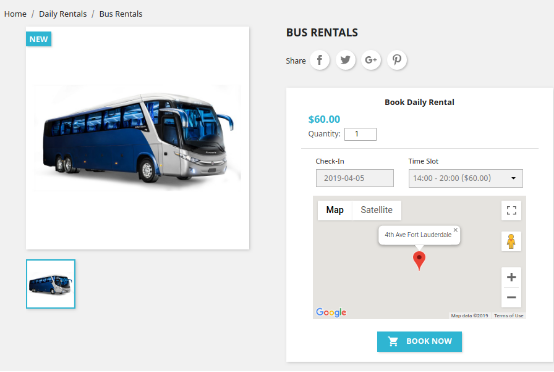
C) Daily Rental Type Product

D) Hourly Rental Product

E) Price Rule for Selective Products


For additional guidance, please refer to the tutorial video available below, which provides a step-by-step walkthrough of this module.