Magento 2 ® ChatGPT Content Generator/Translator Extension – User Manual

The Magento 2 ChatGPT Content Generator and Translator Plugin is a powerful tool designed to streamline content management for Magento 2 stores. With advanced AI technology, it simplifies content creation and translation, making it a must-have for modern eCommerce businesses. This plugin enables you to create engaging product and category descriptions, attractive titles, and SEO-friendly content to boost your store’s visibility and enhance customer experience.

Beyond generating content, the plugin integrates seamlessly with Magento 2 and includes a translation feature. The AI-powered Magento 2 ChatGPT Content Translator helps store owners expand into new markets with accurate and context-aware translations.

Whether you’re managing multilingual content or improving your content strategy, the Magento 2 ChatGPT Content Generator saves time and effort. By leveraging ChatGPT Engines 3.5 and 4.0, it delivers high-quality, multilingual content that takes your online store to the next level.

Key Features of Knowband’s Magento 2 ChatGPT Content Generator/Translator Plugin:

1. Effortless Content Creation

Easily generate high-quality product titles, detailed descriptions, and optimized meta tags, ensuring consistency across your store while saving time.

2. Advanced Dual AI Engine Support

Powered by ChatGPT models 3.5 and 4.0, the plugin delivers advanced content creation and precise translations, catering to bulk product needs.

3. SEO-Friendly Content

Create optimized content that enhances your store’s search engine rankings and attracts more visitors.

4. Seamless AI-Powered Translation

Translate store content into multiple languages effortlessly, paving the way for global business expansion.

5. User-Friendly Design

With an intuitive interface, the plugin is easy to use, even for store admins with no technical expertise.

6. Category and Meta Tag Management

Simplify the creation and translation of category names and meta descriptions for a professional and polished look.

7. Bulk Content Processing

Perfect for stores with large inventories, the plugin allows batch processing of items to save time and increase efficiency.

8. Streamlined Operations

Simplify content-related tasks for smoother product updates and better operational efficiency, regardless of business size.

9. Multi-Language Support

Compatible with all languages, including RTL scripts, the plugin ensures flexibility for businesses worldwide.

2.0 Setting Up the ChatGPT Key for Your Plugin

Follow these simple steps to configure the API key and activate ChatGPT functionalities in your Magento 2 plugin:

Step 1: Generate an API Key

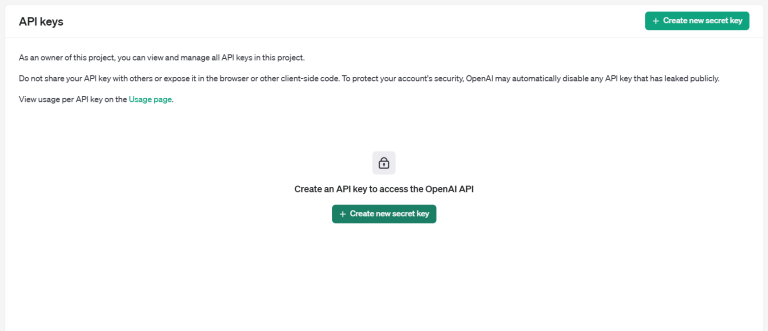
  1. Visit the OpenAI API Key Generation page.
  2. Log in to your OpenAI account or create one if you don’t have an account yet.

  1. Click on “Create new secret key” to generate a unique API key.
  2. Copy and securely save the key, as it will only be displayed once.

Important: Verify Billing Status

To ensure uninterrupted functionality, make sure your OpenAI account has an active billing setup:

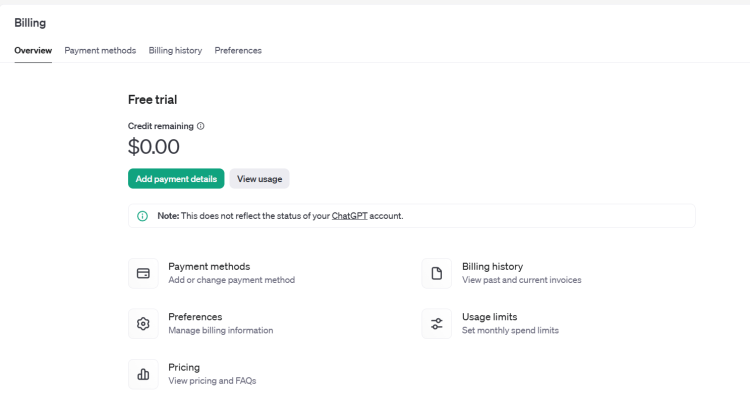
  1. Visit the OpenAI Billing Overview page.
  2. Check your account balance and add funds if necessary.
  3. Remember, insufficient credits can cause API requests to fail.

Once you’ve set up the API key and verified billing, your Magento 2 ChatGPT plugin will be fully configured and ready to generate and translate high-quality content for your store.

Also Available for Prestashop eCommerce Platform

SHOP NOW

Admin Panel Overview:

The Magento 2 AI Content Translator provides the store admin with an easy-to-manage and intuitive module dashboard. Let’s have a quick overview on all the different options provided in module backend.

Configurations:

Enable Disable the Extension: This button is used to enable/disable the module.

API Key: Insert the API key generated by following the steps in point 2.

ChatGPT Engine for Content Generation: The Content Generator and Translator Plugin for Magento 2 comes with 4 powerful ChatGPT Engines to take care of all your SEO rich content needs.

GPT-4: Highly capable model designed for complex tasks, offering superior accuracy and depth.

GPT-4o: Optimized for balancing cost and performance.

GPT-3.5-turbo: Cost-effective, suitable for general tasks.

GPT-4-turbo: Advanced model with improved accuracy and context handling.

Select the engine for content generation.

ChatGPT Engine for Translations: Choose the suitable engine for content translation from the dropdown list.

Temperature: Enter the value between 0.1 to 0.9. This value defines the creativity and uniqueness of the content. Where the lower number stands for more precise data, increasing the temperature could lead to more optimized and creative content generation.

Max Token: Enter the number of maximum tokens used in a single prompt execution.

Default Language for Translation/Content Generation: Select the default language for content generation on your store.

Languages to Translate Content: Choose the languages to translate the content.

ChatGPT Prompts:

Generate Product Description: Generate a detailed SEO-Friendly and engaging product description for the following product {product_name}. Make sure the description includes the main features, benefits, and use cases of the product. Please use HTML tags for formatting so the content is ready for a web page. The product is listed in the {category} category.

Generate Product Meta Title: Generate a concise and catchy meta title for a product named “{product_name}” in the “{category}” category. Keep the title under 60 characters. Avoid using double quotes. The title should include the main keyword and attract potential customers.

Generate Product Meta Description: Generate a compelling meta description for the product named {product_name} which lies in the category {category}. Limit the description to about 140 characters.

Translate Product Title: Translate the following product title and make sure to give translated content only.

Translate Product Description: Translate the following product description and preserve the HTML structure and tags, and only translate the visible text content and make sure to give translated content only.

Translate Product Meta Title: Translate the following product Meta Title and make sure to give translated content only.

Translate Product Meta Description: Translate the following product Meta Description and make sure to give translated content only.

Generate Category Meta Title: Generate a concise and catchy meta title for a “{category}” category. Keep the title under 60 characters. The title should include the main keyword, attract potential customers, and avoid using double quotes.

Generate Category Meta Description: Generate a compelling meta description for the category {category}. Limit the description to about 140 characters and avoid using double quotes.

Translate Category Title: Translate the following category title and make sure to give translated content only.

Translate Category Meta Title: Translate the following Category Meta Title and make sure to give translated content only.

Translate Category Meta Description: Translate the following category meta description and make sure to give translated content only.

3. ChatGPT Prompts Task Log:

The following tab displays a detailed record of completed tasks for the admin. It includes information such as the executed prompt type, product name, product category, language, previous content, and newly generated content.

Admins can also filter the task log using criteria such as Filter ID, Prompt Type, or Product Name, making it easier to locate specific data.

How to Use ChatGPT Prompts?

To use ChatGPT prompts, store admins can go to Catalog >> Products in the admin panel.

Executing Prompts with the Magento 2 AI Content Generator Plugin

  1. Select the products you want to update from the list.
  2. Open the Bulk Actions tab, as illustrated in the guide.
  3. Choose the desired prompt to perform the required action on the selected products.

This efficient workflow enables admins to generate or translate content for multiple products simultaneously, saving time and effort.

WooCommerce ChatGPT Content Generator Plugin – User Manual

The WooCommerce ChatGPT Content Generator Plugin is an advanced AI-based tool designed to simplify content management for your WooCommerce store. Powered by advanced OpenAI’s ChatGPT technology, this innovative plugin makes bulk content creation effortless, making it an essential resource for modern eCommerce businesses. With this tool, you can quickly craft engaging product and category descriptions, compelling titles, and SEO-optimized content to improve your store’s visibility and enhance customer satisfaction.

Designed to seamlessly integrate with WooCommerce, the plugin streamlines content generation, saving time and effort for merchants. Thus, utilizing the capabilities of ChatGPT Engines 3.5 and 4.0, helps you deliver high-quality content that not only helps you grow your online store’s performance but also saves time in manual content writing.

Key Features of Knowband’s WooCommerce ChatGPT Content Generator Plugin

Effortless Content Creation: Easily generate high-quality product titles, detailed descriptions, and optimized meta tags, ensuring consistent and professional content across your store while saving valuable time.

4 AI Engine Support: Powered by advanced ChatGPT models GPT-4.0, GPT-4-turbo, GPT-4, and GPT-3.5-turbo, the WooCommerce ChatGPT Plugin caters to diverse content generation needs, making it ideal for businesses of all sizes.

SEO-Optimized Output: Create SEO-friendly content effortlessly to enhance your store’s search engine rankings and drive more organic traffic.

User-Friendly Interface: Designed with simplicity in mind, the plugin offers an intuitive setup process, making it accessible for store admins without technical expertise.

Category and Meta Tags Management: Quickly generate category names and meta descriptions for a polished and organized presentation.

Bulk Content Generation: Streamline operations by processing multiple products at once, perfect for stores with extensive catalogs.

Enhanced Store Operations: Simplify content-related tasks to ensure smooth and efficient product updates, optimizing your store’s overall performance.

Global Flexibility: With support for various languages, including RTL scripts, the plugin accommodates businesses targeting diverse markets.

This streamlined tool empowers WooCommerce store owners to create and manage content effectively, enhancing productivity and boosting online presence.Top of Form

Setting Up the ChatGPT Key for Your Plugin

Follow these simple steps to enable ChatGPT functionalities in your WooCommerce plugin:

Step 1: Generate Your API Key

  1. Visit the OpenAI API Key Generation page.
  2. Log in to your OpenAI account or create one if you don’t have an account yet.
  3. Click on “Create new secret key” to generate a unique API key.

Copy and securely save the generated key, as it will be visible only once.

Important: Verify Billing Status

To ensure uninterrupted functionality, confirm that your OpenAI account has an active billing setup and sufficient credits:

  1. Visit the OpenAI Billing Overview page.
  2. Check your account balance.
  3. Add funds if necessary to prevent API request failures.

Once you’ve set up your API key and verified your billing, your WooCommerce ChatGPT plugin will be fully operational, ready to streamline content generation for your store.

Installation Guide

Follow these simple steps to install the WooCommerce AI Content Generator Module on your WooCommerce site:

Step 1: Purchase the Plugin

Buy the WooCommerce plugin from the Knowband store. Upon purchase, you’ll receive a zipped file containing the module’s source code.

Step 2: Access the WordPress Dashboard

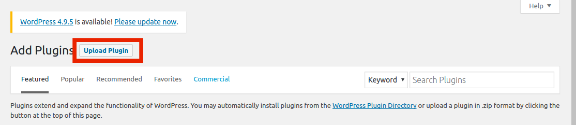
Navigate to your WordPress Dashboard and go to Plugins → Add New.

Step 3: Upload the Plugin

You’ll be directed to a new interface. Click on Upload Plugin.

Step 4: Upload the File

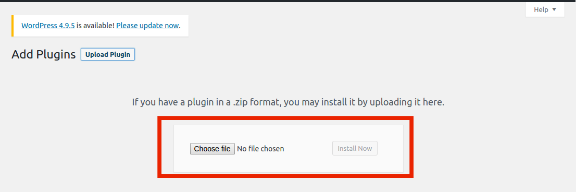
Click Choose File, select the zipped file you received, and upload it.

Once uploaded, activate the plugin, and it will be ready to enhance your WooCommerce site with AI-powered content generation capabilities.

Admin Panel Overview:

The WooCommerce AI Product Description Generator Plugin comes with an intuitive admin dashboard that allows the admin to handle all the content creation tasks efficiently.

1. Connection Setting:

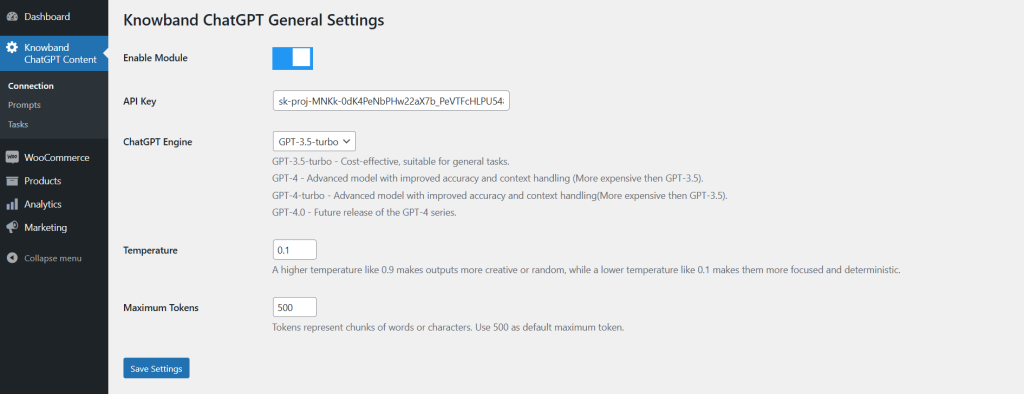
Enable Module: The store admin can activate/deactivate the extension using the following button.

API Key: Insert the obtained ChatGPT API key in this section. Please follow the steps mentioned above to get the ChatGPT API key for your module.

ChatGPT Engine: The plugin comes with 4 powerful ChatGPT engines to streamline the content management on your store.

  • GPT-3.5-turbo – Cost-effective, suitable for general tasks.
  • GPT-4 – Advanced model with improved accuracy and context handling (More expensive than GPT-3.5).
  • GPT-4-turbo – Advanced model with improved accuracy and context handling(More expensive than GPT-3.5).
  • GPT-4.0 – Future release of the GPT-4 series.

Select the one that suits your needs the best.

Temperature: The following text field accepts values between 0.1 and 0.9. Whereas, the lowest value 0.1 generates more focused and simple content. On the other hand, the highest value 0.9 generates more creative and refined content.

Maximum Tokens: Tokens represent chunks of words or characters. Use 500 as the default maximum token.

Also Available for Prestashop eCommerce Platform

SHOP NOW

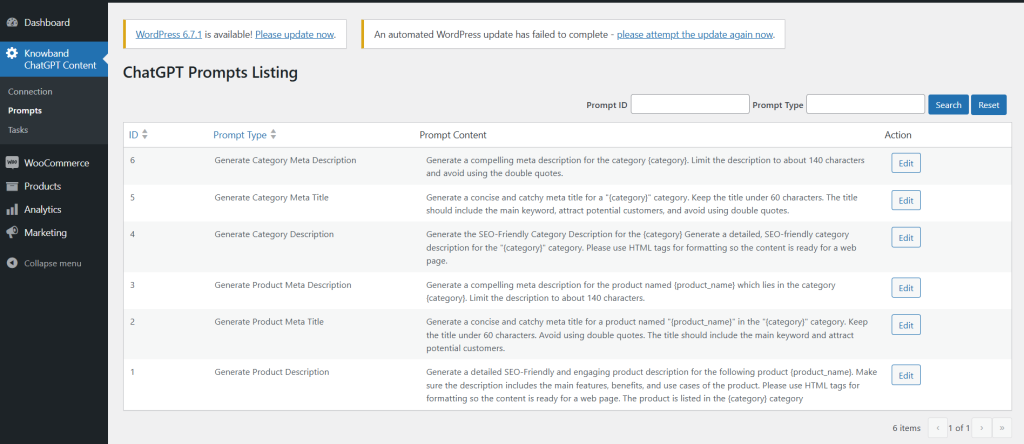
2. ChatGPT Prompts

Generate Category Meta Description: Generate a compelling meta description for the category {category}. Limit the description to about 140 characters and avoid using the double quotes.

Generate Category Meta Title: Generate a concise and catchy meta title for a “{category}” category. Keep the title under 60 characters. The title should include the main keyword, attract potential customers, and avoid using double quotes.

Generate Category Description: Generate the SEO-Friendly Category Description for the {category} Generate a detailed, SEO-friendly category description for the “{category}” category. Please use HTML tags for formatting so the content is ready for a web page.

Generate Product Meta Description: Generate a compelling meta description for the product named {product_name} which lies in the category {category}. Limit the description to about 140 characters.

Generate Product Meta Title: Generate a concise and catchy meta title for a product named “{product_name}” in the “{category}” category. Keep the title under 60 characters. Avoid using double quotes. The title should include the main keyword and attract potential customers.

Generate Product Description: Generate a detailed SEO-Friendly and engaging product description for the following product {product_name}. Make sure the description includes the main features, benefits, and use cases of the product. Please use HTML tags for formatting so the content is ready for a web page. The product is listed in the {category} category.

3. ChatGPT Logs Listing

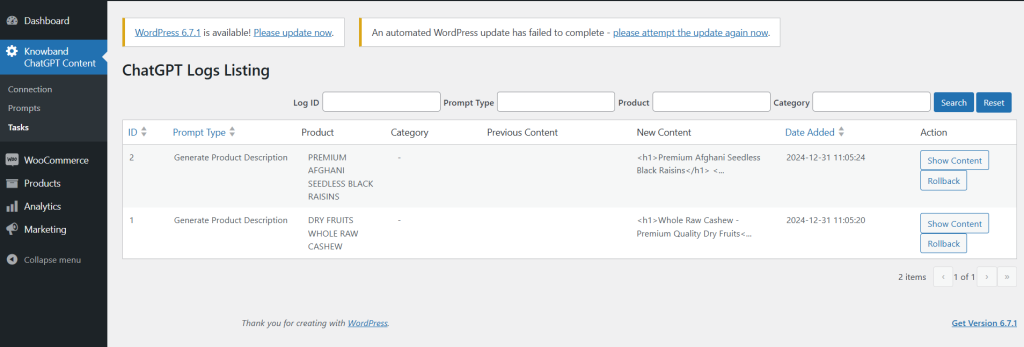
This tab provides the admin with a comprehensive overview of completed tasks. It displays details such as the executed prompt type, product name, product category, previous content, and the newly generated content.

Additionally, the store admin can filter the data using criteria like Filter ID, Prompt Type, and Product Name for easy navigation and organization.

How to Use ChatGPT Prompts

Store administrators can easily utilize ChatGPT prompts by following these steps:

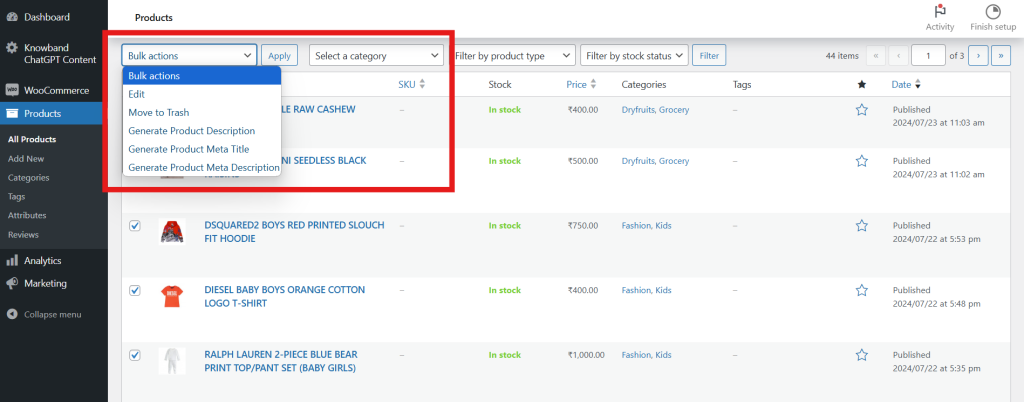
  1. Navigate to Catalog → Products in the admin panel.
  2. Select the desired products from the list.
  3. Access the Bulk Actions tab.
  4. Choose the appropriate prompts to perform actions on the selected products.

This streamlined process enables admins to efficiently generate content for multiple products at once, saving time and effort.
Opencart ChatGPT Content Generator | Opencart AI Translator Extension – User Manual

The Opencart ChatGPT Content Generator/Translator Plugin introduces a cutting-edge solution to simplify content management for your Opencart store. Utilizing advanced AI technology, this innovative plugin makes content creation and translation effortless, positioning itself as an essential tool for modern eCommerce businesses. Furthermore, with the Opencart ChatGPT Content Generator, you can craft captivating product and category descriptions, compelling product and category titles, and SEO-optimized content that enhances both your store’s visibility and customer satisfaction.

This AI-driven content generator goes beyond basic text generation by integrating seamlessly with Opencart, offering translation feature. The built-in Opencart ChatGPT Content Translator empowers store owners to enter new markets with contextually accurate, AI-powered translations.

Whether you’re managing multilingual content or aiming to enhance your overall content strategy, the Opencart ChatGPT Content Generator streamlines the process. Thus, combining ChatGPT Engines 3.5 and 4.0, this plugin helps merchants save time while delivering exceptional, multilingual content to elevate their online stores.

1.0 Key Features of Knowband’s Opencart ChatGPT Content Generator/Translator Plugin

  • Effortless Content Creation: Quickly generate high-quality product titles, detailed descriptions, and optimized meta tags with ease, all while ensuring consistency across your store while saving valuable time.
  • Dual AI Engine Support: Powered by ChatGPT models 3.5 and 4.0, the plugin provides advanced content generation and accurate translations tailored to diverse business requirements for products in bulk.
  • SEO-Optimized Output: Leverage AI to produce SEO-friendly content that boosts your store’s search engine rankings and drives increased traffic.
  • Simplified AI Translation: Effortlessly translate store content into multiple languages with this AI-powered translation tool, enabling global expansion with minimal effort.
  • User-Friendly Interface: Designed for store admins of no technical skills, the plugin features a straightforward setup process for seamless integration.
  • Category and Meta Tags Management: Efficiently generate and translate category names and meta descriptions for a polished, professional presentation.
  • Bulk Content Generation: Ideal for stores with large catalogs, the plugin allows batch processing of multiple items, significantly enhancing efficiency.
  • Enhanced Store Operations: Streamline content-related tasks for smoother product updates and improved operational performance, whether for small or large-scale businesses.
  • Multi-Language Compatibility: Supporting all languages, including RTL scripts, the plugin offers flexibility for global businesses.

2.0 Setting Up the ChatGPT Key for Your Plugin

To activate ChatGPT functionalities in your Opencart plugin, follow these steps to configure the API key:

Step 1: Generate an API Key

  1. Visit the OpenAI API Key Generation page.
  2. Log in to your OpenAI account or create one if you haven’t already.
  3. Click on “Create new secret key” to generate a unique API key.

Copy and securely save this key, as it will only be displayed once.

Important: Ensure Billing is Active

To avoid interruptions, confirm your OpenAI account has sufficient credits:

  1. Go to the OpenAI Billing Overview page.
  2. Check your balance and add funds if needed.
  3. Note that insufficient balance may cause API requests to fail.

With the API key in place and billing verified, your Opencart ChatGPT plugin will be ready to deliver exceptional content generation and translation capabilities for your store.

3.0 Installation Guide

Setting up the Opencart ChatGPT Plugin is straightforward. Follow the simple steps outlined below to complete the installation process with ease.

When you purchase the Knowband ChatGPT Content Generator/Translator Plugin, you will receive the following files:

  • A zipped file containing the source code for the Opencart ChatGPT Content Translator Extension.
  • A user manual for the extension to assist you further.

Steps to Install the Extension:

1. Unzip the Downloaded File:

Locate the zipped file in your account under My Account > Downloads and extract it. Once unzipped, you’ll see folders similar to those shown in the illustration below:

2. Transfer Files to the Root Directory

Use an FTP manager to copy all the files and folders from the unzipped folder to the root directory of your Opencart setup.

3. Complete the Installation

The module is now successfully installed and ready for configuration.

4. Access and Configure the Extension

Navigate to the Admin Panel > Main Menu > Extensions as displayed below:

Select the AI Content Generator Plugin by Knowband extension from the list of available extensions and click on the Edit button to begin customization.

4.0 Admin Panel Overview:

The module is equipped with an intuitive admin dashboard, enabling store administrators to manage it seamlessly, even without technical expertise.

1. General Settings Tab

Activate/Deactivate the Module: A simple toggle button lets the store admin enable or disable the module as needed.

API Key for ChatGPT Integration: Enter your ChatGPT API key to ensure the module functions smoothly. Refer to the steps above for generating the API key in just a few steps.

ChatGPT Engine for Content Creation:

The Opencart Content Generator/Translator Plugin Module supports two robust ChatGPT models:

GPT-3.5-turbo: A cost-effective and efficient choice for standard tasks.

GPT-4-turbo: A more advanced model, offering superior accuracy and enhanced contextual understanding.

Select the preferred engine from the dropdown menu.

ChatGPT Engine for Translations: Specify the ChatGPT model to be used for translating content into different languages.

Default Language for Translation/Content Generation: Select the default language for Content Generation and Translation.

Languages to Translate Content: Select the languages to translate the content.

Maximum Tokens: Enter the value of maximum tokens.

 2. ChatGPT Prompts:

1. Generate Product Description:
Create a detailed, SEO-friendly, and engaging description for the product {product_name} in the {category} Highlight key features, benefits, and use cases. Include HTML tags to make the content ready for web publishing.

2. Generate Product Meta Title:
Craft a concise, attention-grabbing meta title for the product {product_name} in the {category} Limit it to 60 characters, avoid double quotes, and incorporate the primary keyword to attract customers.

3. Generate Product Meta Description:
Write a compelling meta description for {product_name} in the {category} category, keeping it under 140 characters.

4. Translate Product Title:
Translate the provided product title, ensuring that only the translated content is returned.

5. Translate Product Description:
Translate the given product description while maintaining the HTML structure. Translate only the visible text and return the translated content.

6. Translate Product Meta Title:
Translate the provided product meta title, returning only the translated text.

7. Translate Product Meta Description:
Translate the specified product meta description, ensuring only the translated content is returned.

8. Generate Category Description:
Create an SEO-friendly description for the {category} The output should be detailed, formatted with HTML tags, and ready for a web page.

9. Generate Category Meta Title:
Develop a concise meta title for the {category} Limit it to 60 characters, include the main keyword, and make it appealing to potential customers while avoiding double quotes.

10. Generate Category Meta Description:
Write a compelling meta description for the {category} category, keeping it under 140 characters and avoiding double quotes.

11. Translate Category Title:
Translate the given category title, returning only the translated content.

12. Translate Category Description:
Translate the specified category description while preserving its HTML tags and structure. Only the visible text should be translated, and the translated content must be returned.

13. Translate Category Meta Title:
Translate the provided category meta title and return only the translated text.

14. Translate Category Meta Description:
Translate the given category meta description, ensuring that only the translated content is provided.

3.0 Task Log:

The following tab provide the admin with the data of performed tasks. You can find all the details including executed prompt type, product name, product category, language, previous content, and new content.

Also Available for Prestashop eCommerce Platform

SHOP NOW

The store admin also gets the option to filter out the data by filter ID, Prompt Type, and Product Name.  

5.0 How to Use ChatGPT Prompts?

To utilize the ChatGPT prompts, store administrators can navigate to Catalog >> Products within the admin panel.

Executing Prompts with the Opencart AI Content Generator

  1. Select the desired products from the list.
  2. Access the Bulk Actions tab, as shown in the image above.
  3. Choose the appropriate prompts to perform the required actions on the selected products.

This streamlined process allows admins to efficiently generate or translate content for multiple products in one go.

GA4 & GTM Events for WooCommerce: Unlock Advanced Tracking with Ease

In today’s competitive eCommerce landscape, data-driven decision-making is key to success. For WooCommerce store owners, understanding customer behavior is critical to optimizing sales and improving marketing strategies. With the right tools, tracking advanced eCommerce events can be a breeze. Introducing Knowband WooCommerce Google Tag Manager Module, a solution that simplifies the integration of GTM and GA4, allowing store owners to unlock the full potential of their analytics.

Why Use Google Tag Manager for WooCommerce?

Google Tag Manager for WooCommerce enables you to manage tags and track events without touching your website’s code. With the WooCommerce GTM Module, you can seamlessly implement and track events like page views, add-to-cart actions, purchases, and more.

Thus, integrating GA4 with your WooCommerce store through the WooCommerce GA4 Integration Module provides deeper insights into user behavior. This data allows you to make informed decisions, create targeted campaigns, and improve your store’s overall performance.

Key Benefits of Using the WooCommerce GTM Extension!

Streamlined Tag Management:

The WooCommerce Google Marketing Integration Plugin simplifies the implementation of tracking tags for your store. Moreover, you can easily manage all your tags from a single GTM interface, saving time and effort.

Advanced Event Tracking:

The Custom Event Tracking WooCommerce Plugin enables you to track specific customer interactions, such as product views, clicks, and purchases. This level of detail helps you understand the customer journey and optimize your sales funnel.

Enhanced Marketing Integrations:

With the WooCommerce Google Marketing Integration, you can connect your store with essential Google tools like GA4, gtag, and Ads. 

Accurate eCommerce Data:

The WooCommerce GA4 eCommerce Events feature allows you to collect accurate data about sales, revenue, and customer behavior. This data is invaluable for improving your store’s performance.

Ease of Use:

The WooCommerce Google Analytics Integration Plugin is designed with user-friendliness in mind. Thus, even if you’re not a tech expert, you can set up and manage the integration with minimal effort.

How the WooCommerce Google Tag Manager Module Works?

The WooCommerce Google Tag Manager Module acts as a bridge between your store and Google’s analytics tools. It allows you to:

  • Add and manage Google Tag Manager snippets to your WooCommerce store.
  • Configure GA4 tracking and events without coding.
  • Track key eCommerce actions such as purchases, cart updates, and product views.
  • Monitor custom events specific to your store’s requirements using the WooCommerce Google Event Tracker Plugin.

Once integrated, the WooCommerce GTM Extension ensures that all tracking data is sent to Google Analytics 4 in real-time. Furthermore, this seamless process eliminates the need for manual tracking setups and reduces errors.

Key Features of the WooCommerce GA4 Integration Addon!

The WooCommerce GA4 Integration Addon comes with several features designed to meet the unique needs of WooCommerce store owners:

Pre-configured Events: Automatically track essential events like product impressions, clicks, and transactions.

Customizable Tracking: Use the WooCommerce gtag Integration Plugin to create custom event tracking tailored to your business goals.

Real-time Analytics: Access real-time data for a comprehensive understanding of user behavior.

eCommerce Reporting: The WooCommerce eCommerce Measure Module provides detailed reports on sales performance, revenue, and conversions.

Multi-platform Integration: Works seamlessly with other Google tools, ensuring your marketing efforts are cohesive and effective.

Integrate Advanced Analytics to Your Store

SHOP NOW

Why Choose the WooCommerce GA4 Integration Plugin?

The WooCommerce GA4 Integration Plugin is a game-changer for eCommerce businesses. By leveraging the power of WooCommerce Google Analytics Integration, store owners can gain a deeper understanding of their customers.
Here’s why this plugin is a must-have:

  • It automates complex tracking processes.
  • It provides accurate insights into customer behavior.
  • It empowers you to create data-driven marketing strategies.
  • It helps you optimize your sales funnel based on real-time data.

Setting Up the WooCommerce gtag Integration Extension!

Getting started with the WooCommerce gtag Integrator is quick and easy:

Install the Plugin: Download and install the WooCommerce gtag Integration Extension from the plugin repository or your provider.

Connect to Google Tag Manager: Link your GTM account to the plugin.

Enable GA4 Tracking: Set up the WooCommerce GA4 Integration Module to track key events.

Customize Events: Use the plugin’s features to track custom events for your store.

Monitor Results: Access detailed analytics in GA4 to monitor performance and make data-driven decisions.

Conclusion!

The GA4 & GTM Events for WooCommerce integration is essential for any store owner looking to optimize their analytics and enhance their marketing efforts. Therefore, by using the WooCommerce Google Tag Manager Module, you can easily track advanced eCommerce events, gain valuable insights, and drive growth.

Whether you’re a small business owner or managing a large-scale eCommerce platform, the WooCommerce Google Analytics Integration Extension empowers you to unlock the full potential of your store’s data. Don’t let valuable insights go untapped—invest in the WooCommerce GTM Module today and take your analytics to the next level.

How to Setup SEO-Friendly URLs for your PrestaShop Store – A Comprehensive Guide

PrestaShop is a powerful eCommerce platform that enables businesses to create and manage online stores efficiently. One crucial aspect of running a successful online store is ensuring your website is optimized for search engines. A significant part of SEO (Search Engine Optimization) is creating clean, descriptive, and user-friendly URLs. In this guide, we’ll explore the steps to set up SEO-friendly URLs for your PrestaShop store.

Why Are SEO-Friendly URLs Important?

SEO-friendly URLs are crucial for improving visibility on search engines and enhancing user experience:

  • Improved Rankings: Search engines rely on URLs to interpret a page’s content. You can boost your search rankings by adding more descriptive URLs with relevant keywords

  • User Experience: Clean and readable URLs help users understand what to expect on a page.
  • Increased Click-Through Rates: Well-structured URLs encourage users to click on your links in search results.

Steps to Create SEO-Friendly URLs in PrestaShop

1. Enable Friendly URLs in PrestaShop

PrestaShop includes a built-in feature to generate friendly URLs. Follow these steps to enable it:
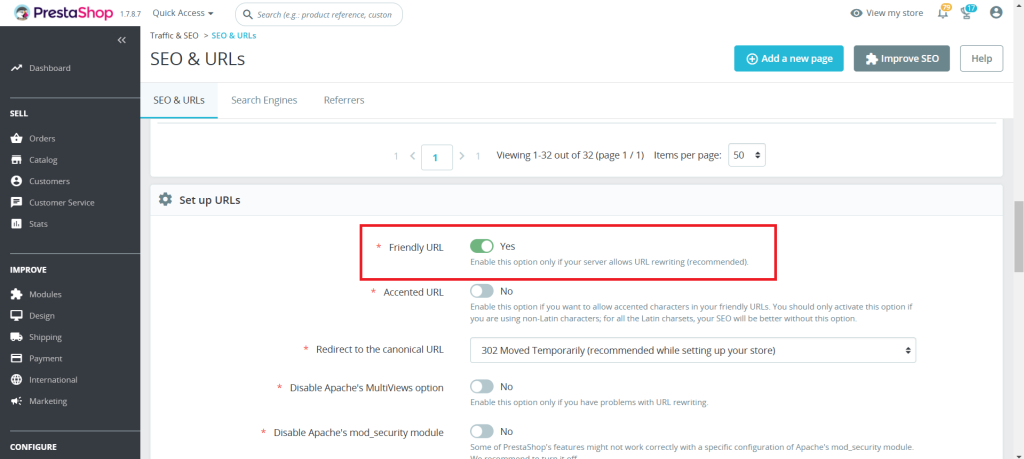
Log in to your PrestaShop Admin Panel.

Navigate to Shop Parameters > Traffic & SEO.

Scroll down to the Set Up URLs section.

Toggle the Friendly URL option to “Yes.”

Click Save.

2. Configure URL Settings

1. In the same Traffic & SEO page, you can configure:

  • Accented URL: Decide if your URLs should include special characters.
  • Redirect to the Canonical URL: Enable this to avoid duplicate content issues.

2. Customize the Base URLs for your store’s language preferences if you run a multilingual store.

3. Optimize Individual Product URLs

PrestaShop allows you to manually edit URLs for products, categories, CMS pages, and more. Below are the steps showing how to make the Product URLs SEO-Friendly:

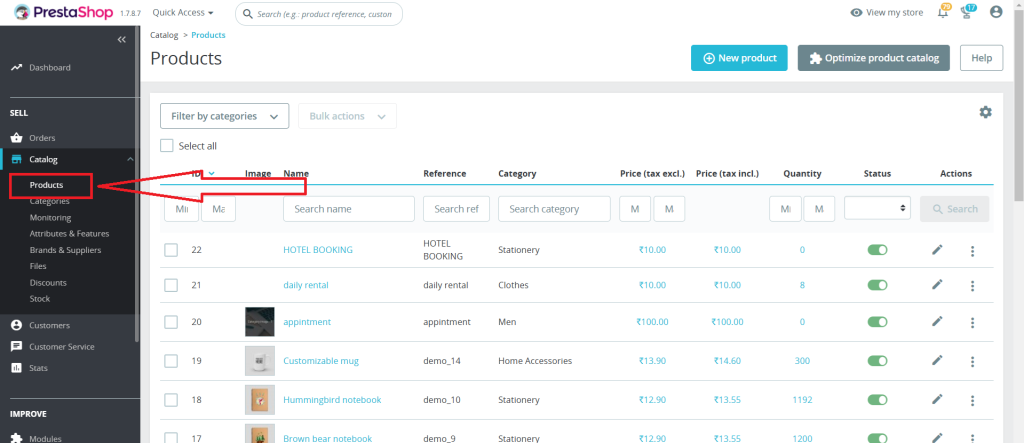
1. In the Admin panel, Open Catalog > Products:

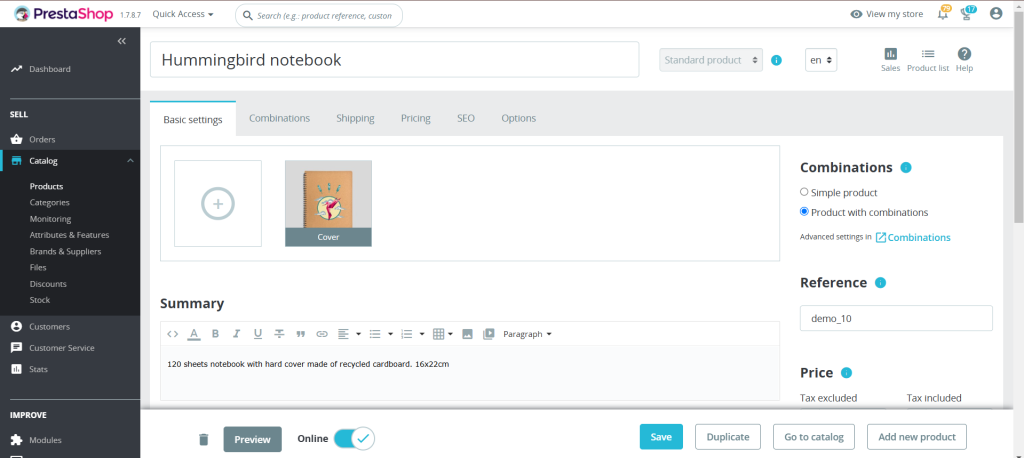
2. Select the product you want to edit.

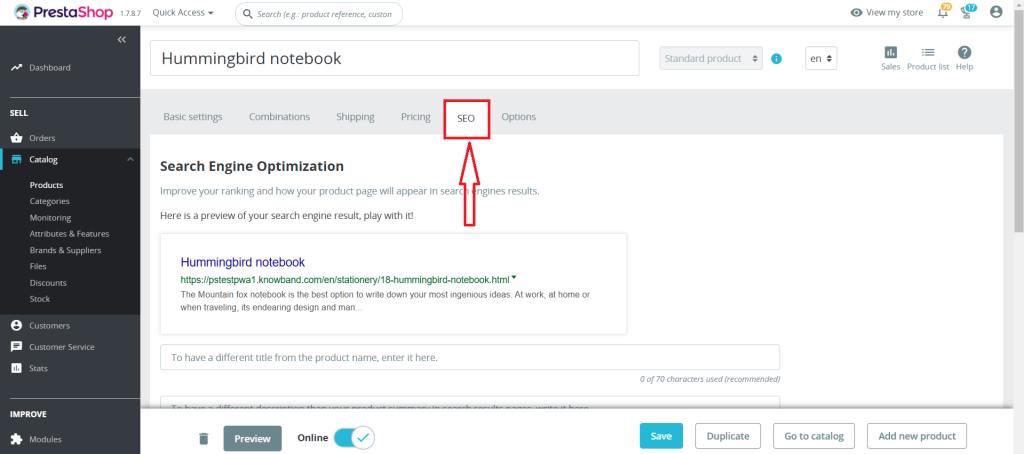
3. Navigate to the SEO tab.

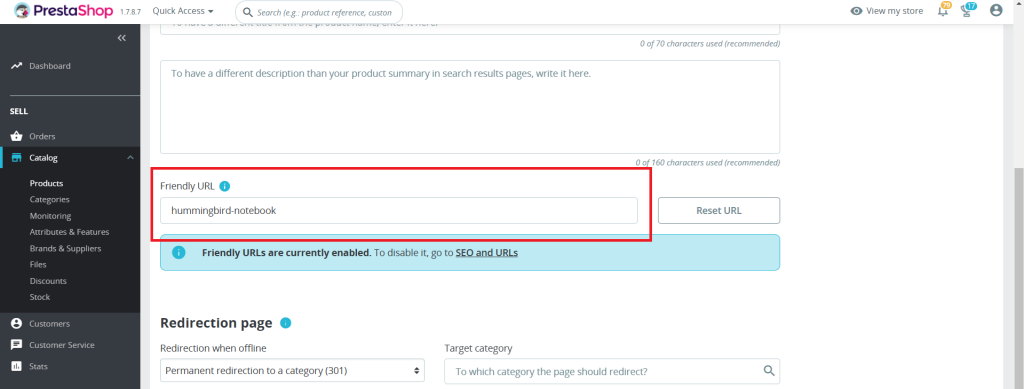
4. Optimize the Friendly URL field by using a concise, keyword-rich URL.

For example:
Instead of the product?id=123, use handmade-ceramic-mug.

5. Save your changes.

Add Clean URLs & 301/302/303 redirection

SHOP NOW

4. Use Keywords Strategically

When crafting your URLs:

  • Include primary keywords related to the page’s content.
  • Avoid stuffing URLs with unnecessary words or repetitive terms.
  • It is recommended to use hyphens (-) for separating the words instead of underscores (_).

5. Avoid URL Parameters

Dynamic URLs with parameters like ?id=123&ref=456 are harder for search engines and users to understand. Use PrestaShop’s friendly URL feature to replace these with clean, descriptive URLs.

6. Redirect Old URLs to New Ones

Implementing a 301 redirect from the old URL to the new one is an essential step that one should ensure while updating the SEO URLs. This helps maintain SEO rankings and prevents users from encountering 404 errors. Redirects can be managed through your server’s .htaccess file or an SEO module.

7. Test Your URLs

After configuring your URLs:

  • Verify they are working correctly.
  • Use online tools like Google’s URL Inspection Tool to check how search engines view your URLs.
  • Test for broken links and resolve them promptly.

Additional Tips for SEO-Friendly URLs

  • Use Lowercase Letters: URLs are case-sensitive. Stick to lowercase letters for consistency.
  • Avoid Stop Words: Words like “and,” “or,” “the” can be omitted unless necessary for clarity.
  • Limit URL Length: Keep URLs concise while still descriptive.
  • Update Sitemap: After making changes, update your sitemap and submit it to Google Search Console.

Recommended Modules for SEO in PrestaShop

To enhance your SEO efforts, consider using these modules:

Conclusion

SEO-friendly URLs are a cornerstone of an effective eCommerce SEO strategy. By following this guide, you can ensure your PrestaShop store’s URLs are optimized for search engines and user-friendly. Regularly review and update your URLs to maintain their effectiveness as your store grows.

Adopting these practices can significantly improve your website’s visibility on search engines, drive higher volumes of targeted traffic, and ultimately lead to an increase in conversions and overall engagement.
Happy optimizing!

Appendix: Common Issues and Troubleshooting

Friendly URLs Not Working

  • Ensure that your server supports URL rewriting (mod_rewrite for Apache).
  • Verify that the .htaccess file is correctly configured and writable.
  • Check permissions for the /var/www/html/ folder if hosted on a Linux server.

Broken Links after URL Changes

  • Whenever you modify URLs on your website, promptly update your sitemap to reflect these changes and resubmit it to Google Search Console. This ensures that search engines quickly discover, crawl, and index the updated URLs, preserving your site’s visibility and SEO performance.
  • Use a redirect manager module or .htaccess to map old URLs to new ones seamlessly.

3. Multilingual Store Challenges

  • Incorporate language-specific keywords in your URLs to enhance localization.
  • Make sure each language version of your store has a unique URL structure.

4. Duplicate Content Due to Canonical Issues

  • Enable “Redirect to Canonical URL” in Traffic & SEO settings.
  • Review all indexed pages using tools like Screaming Frog to detect duplicates.

ChatGPT-Powered Content Creation and Translation for Opencart Made Simple

Running an online store with Opencart can be a rewarding experience, but creating quality content and translating it into multiple languages is often time-consuming and challenging. Especially, when it comes to bulk store management.

That’s where Knowband’s new Opencart ChatGPT content generator comes in. This powerful extension simplifies content creation and translation, making it effortless to generate engaging product descriptions, category descriptions, product & category titles, and more—all while ensuring seamless translations for global audiences.

If you’re an Opencart store owner, this tool could be a game-changer. Let’s explore how the ChatGPT Extension for Opencart can revolutionize your store’s content strategy and improve your workflow.

Why Content Matters in eCommerce?

Content plays a crucial role in any eCommerce store. Furthermore, high-quality product descriptions and well-crafted meta tags can boost search engine rankings and engage customers. However, manually writing all this content can be tedious, especially when managing a large inventory.

Therefore, for the store owners targeting international markets, the challenge doubles. Translating content into multiple languages while maintaining accuracy and tone is a significant hurdle. Fortunately, with the AI-powered translation Extension for Opencart, you can overcome these obstacles easily and efficiently.

Introducing the Opencart ChatGPT Content Generator Extension:

Knowband’s Opencart ChatGPT content generator Extension is designed to make content creation and translation simple, fast, and effective. Furthermore, powered by OpenAI’s ChatGPT Engine v3.5 and v4, this extension can help you create high-quality, SEO-optimized content for your Opencart store in just a few clicks.

Whether you need detailed product descriptions, category descriptions, or optimized meta tags, the AI content generator Opencart is equipped to handle it all.
Moreover, with its user-friendly interface, even non-technical users can take advantage of its capabilities.

Key Features of the Opencart ChatGPT Content Generator Plugin:

AI-Driven Content Generation: Quickly generate SEO-friendly content for product pages, categories, and blogs.

Seamless Translation: Translate your store’s content into multiple languages with the Opencart ChatGPT content translator Extension.

Customizable Output: Tailor the tone and style of the generated content to suit your brand voice.

SEO Optimization: Ensure your content aligns with search engine best practices for better rankings.

Time-Saving Automation: Focus on growing your business while the plugin handles content creation and translation.

Why Choose ChatGPT Extension for Opencart?

If you’re wondering why this extension stands out, here are a few compelling reasons:

1. Improved Efficiency:

The Opencart ChatGPT content generator Plugin allows you to save hours of work by automating content creation. Instead of spending time brainstorming and writing, let the AI handle it for you.

2. Global Reach with Translations:

With the Opencart ChatGPT content translator Plugin, you can break language barriers effortlessly. Moreover, the AI ensures accurate and contextually appropriate translations, helping you cater to customers worldwide.

3. Boosted SEO Performance:

Search engines favor stores with fresh, relevant, and keyword-rich content. Thus, the Opencart ChatGPT SEO Content Generator helps you create such content, improving your chances of ranking higher in search results.

4. Cost-Effective Solution:

Hiring professional writers and translators can be expensive. The AI content generation Opencart extension offers a budget-friendly alternative without compromising on quality.

Practical Applications of the Opencart ChatGPT Content Generator Plugin!

1. Product Descriptions and Titles

Struggling to write compelling product descriptions and titles? The Opencart ChatGPT content generator can create detailed and persuasive descriptions and product titles that highlight the features and benefits of your products.

2. Meta Tags and SEO Content:

Improve your store’s visibility with optimized meta titles and descriptions for products and categories generated by the Opencart ChatGPT SEO Content Generator.

3. Multilingual Store Management:

Expand your reach with the Opencart ChatGPT content translator Extension. Translate your content into multiple languages, ensuring accuracy and cultural relevance.

The ChatGPT Content Generator is also Available for Prestashop

SHOP NOW

Benefits of Using the Opencart ChatGPT Content Translator Plugin

Faster Time-to-Market: Launch products and campaigns faster with automated content generation.

Enhanced Customer Experience: Provide clear and engaging information to your customers in their preferred language.

Scalable Solution: Manage content for hundreds or thousands of products effortlessly.

SEO-Friendly Content: Improve your store’s search engine rankings with AI-optimized content.

Final Thoughts!

The Opencart ChatGPT Content Generator/Translator Extension is more than just a plugin; it’s a powerful tool that can transform the way you manage content on your Opencart store. Whether you need help with creating engaging product descriptions or translating content for global customers, this extension has you covered.

Embrace the future of eCommerce with the ChatGPT Extension for Opencart and take your store to the next level. Simplify your workflow, save time, and deliver exceptional experiences to your customers with this innovative solution.

Ready to revolutionize your store’s content strategy? Install the Opencart ChatGPT content generator Plugin today and experience the difference AI-powered tools can make!

How to Create a Custom Tab in the Back Office Product Page in PrestaShop

PrestaShop, with its powerful and flexible framework, allows developers to customize various aspects of the platform to meet specific business requirements. One such customization is adding a custom tab in the back office product page. In this blog, we will walk through the step-by-step process to achieve this by creating a sample module called kbcustommodule.

We can create the custom Tab in the back office product page in two ways:

  1. Using Symfony components.
  2. Using displayAdminProductsExtra Hook

Method 1:

This tutorial is applicable for PrestaShop version 8.1 and above, utilizing Symfony components.

Step 1: Create Your Module

kbcustommodule/

|– composer.json

|– config/

|   |– services.yml

|– src/

|   |– Form/

|   |   |– Modifier/

|   |   |   |– ProductFormModifier.php

|   |   |– Type/

|   |   |   |– CustomTabType.php

|– kbcustommodule.php

Start by creating a folder named kbcustommodule under the modules directory of your PrestaShop installation. Inside this folder, create the kbcustommodule.php file, which will contain the main class for your module. The module class initializes the module and registers the required hooks.

Here’s an example of the kdcustommodule.php file:

Run the command composer dump-autoload in your module’s root directory to enable namespace autoloading.

Step 2: Define Services

Create a services.yml file under the config directory of your module (kbcustommodule/config/services.yml). This file defines the Symfony services required for form customization.

Step 3: Create the Custom Tab Form Type

Create a CustomTabType class in the src/Form/Type folder of your module. This class defines the fields that will appear in the custom tab.

Step 4: Create the ProductFormModifier Class

The ProductFormModifier class defines how the custom tab integrates with the existing product form.

Final Step: Install and Test

  1. Install the module via the back office or manually place it in the modules directory and enable it.
  2. Navigate to the back office product page. You should see a new tab labeled “Custom Tab” with a field labeled “Custom Field.”
  3. Test the functionality by adding data to the custom field and ensuring it saves correctly.

After successfully installation of the above module. You will get the result as follows.

Integrate Google Tag Manager with Prestashop

SHOP NOW

Method 2:

The displayAdminProductsExtra hook allows you to add custom content or tabs to the product edit page in the Back Office. This method avoids the complexity of defining Symfony services and is easier for developers not familiar with Symfony.

Step 1: Create the Module

Start by creating a basic module structure. For example:

Kbcustommodule/

|– config/

|– translations/

|– views/

|   |– templates/

|       |– admin/

|           |– products/

|               |– custom_tab.tpl

|– Kbcustommodule.php

Step 2: Define the Module Class

In the Kbcustommodule.php file, define your module and register the displayAdminProductsExtra hook.


Step 3: Create the Template File

In the views/templates/admin/products/custom_tab.tpl file, define the HTML and content for your custom tab.

Step 4: Save the Data

To save the custom data, use the actionAdminControllerSetMedia hook along with JavaScript or PHP. Alternatively, you can use the actionProductUpdate hook in PHP.

Example in Kbcustommodule.php:

Step 5: Add the Field to the Database

Modify the database to store your custom data. For example:

————————————————————————

ALTER TABLE ps_product ADD custom_field TEXT NULL;

————————————————————————

After successfully installation of the above module. You will get the result as follows


For further assistance, feel free to reach out or leave a comment below. Or you can also reach out to us on Knowband Helpdesk.

Simplify Your Marketing with Google Tag Manager for Opencart

Managing and analyzing marketing data is a vital part of running a successful online store. To help store owners streamline this process, we are excited to introduce the Google Tag Manager (GTM, gtag, GA4) – OpenCart Extension. This powerful tool integrates seamlessly with your Opencart store, enabling efficient data tracking, advanced analytics, and custom event tracking without the hassle of manual coding.

If you’ve been searching for a comprehensive solution to enhance your eCommerce analytics, the Opencart Google Tag Manager Module is the ultimate answer. Let’s dive deeper into how this module works and why it’s a must-have for your Opencart store.

Why Use Google Tag Manager for Opencart?

Google Tag Manager (GTM) is an essential tool for digital marketing. It simplifies the process of managing tags, tracking eCommerce events, and integrating analytics tools. With the Opencart GTM Module, you can effortlessly configure tags and scripts to capture valuable customer insights.

By using the Opencart Google Analytics Integration Extension, you gain access to detailed performance data, enabling you to make informed decisions about your marketing strategies. Additionally, this extension offers support for the latest GA4 Integration for Opencart, ensuring your analytics are future-proof.

Key Features of the GTM Opencart Extension!

The GTM Opencart Extension offers a wide range of features designed to simplify tracking and analytics for store owners. Here are some highlights:

Seamless Google Tag Manager Integration: Easily integrate GTM with your store to manage tags and scripts for Google Analytics, remarketing, and other marketing tools.

Support for GA4 eCommerce Events: Track advanced eCommerce events like product views, add-to-cart actions, and purchases using the Opencart GA4 Integration Module.

Custom Event Tracking: The Custom Event Tracking Opencart Plugin lets you define and monitor unique events that matter most to your business.

Comprehensive Analytics: With the Opencart Google Analytics Integration Plugin, you can access detailed insights into your store’s performance, customer behavior, and campaign results.

No Coding Required: The Opencart gtag Integration Plugin makes it easy to manage tags and tracking codes without any technical expertise.

How Does the Opencart Google Tag Manager Module Work?

Using the Opencart GTM Module is straightforward, thanks to its user-friendly interface. Here’s how you can get started:

Install the Module: Download and install the extension from the Opencart marketplace or your admin panel.

Configure GTM Settings: Add your GTM container ID to enable seamless integration.

Define Custom Events: Use the module’s interface to set up specific tracking events tailored to your store’s needs.

Activate GA4 Integration: Enable the latest Opencart GA4 Integration Addon for comprehensive analytics.

Monitor Performance: Use Google Analytics and GTM dashboards to track data and gain actionable insights.

Benefits of Using the Opencart Google Analytics Integration Plugin!

Enhanced Marketing Campaigns:

By integrating with Google Analytics and GTM, you can measure the effectiveness of your marketing campaigns. The Opencart eCommerce Measure Module provides detailed insights to help you optimize campaigns for better ROI.

Advanced eCommerce Tracking:

Track every step of the customer journey, from product impressions to conversions, with the Opencart GA4 eCommerce Events feature.

Improved Decision-Making:

The Opencart Google Marketing Integration Plugin gives you the data needed to make informed decisions about inventory, promotions, and user experience.

Save Time and Resources:

With the Opencart gtag Integrator, you can quickly implement and manage tracking codes without hiring developers or spending hours coding manually.

Stay Ahead with GA4:

As Google transitions to GA4, the Opencart GA4 Integration Module ensures you’re fully prepared to adapt to the latest analytics standards.

Integrate GTM with Prestashop Code-Free

SHOP NOW

Key Event Offered by the GTM Opencart Extension!

  •   Page View
  •   View Category
  •   View Product Detail Page
  •   Add to cart
  •   Remove from cart
  •   Checkout Begins
  •   Checkout Page
  •   Add/Select address on checkout
  •   Shipping Method Selected
  •   Order Confirmation
  •   Apply Discount Code
  •   Remove Discount Code
  •   View Cart
  •   Customer Login
  •   Customer Registration
  •   Add to Wishlist
  •   Remove From Wishlist
  •   Search Product
  •   Capture UTM Parameters

Why Choose the Opencart Google Marketing Integration Plugin?

If you’re still on the fence about adopting the GTM Opencart Extension, consider these advantages:

Comprehensive Features: From basic tag management to advanced event tracking, this module has everything you need.

Ease of Use: Its intuitive design makes it accessible for all users, regardless of technical expertise.

Cost-Effective Solution: Save time and money by managing analytics and marketing integrations in one place.

Future-Proof Analytics: With GA4 support, you’re prepared for the future of data tracking and measurement.

Conclusion!

Knowband’s Opencart GTM Plugin is a game-changing tool for store owners looking to enhance their analytics and marketing strategies. Whether you want to track custom events, analyze eCommerce performance, or integrate the latest GA4 features, this extension has you covered.

Take the hassle out of managing analytics and focus on growing your business. Install the Opencart Google Analytics Integration Plugin today and unlock the full potential of your store with advanced tracking and insights.

Boost Your eCommerce Tracking: Introducing the Prestashop Google Tag Manager Addon

As an eCommerce store owner, understanding your customers’ behavior is critical for driving sales, improving the customer experience, and optimizing your marketing efforts. But, you are just flying blind without proper data tracking. This is where Knowband’s newly introduced Prestashop Google Tag Manager Addon comes in. This powerful tool simplifies the integration of Google Tags into your store, helping you track key user actions effortlessly. Thus, we’ll explore how the Prestashop Google Tag Manager Module can transform your eCommerce tracking and enhance your overall store performance.

Knowband Prestashop Google Tag Manager Addon:

The Prestashop Google Tag Manager Addon is a robust tool designed for store owners who want to seamlessly integrate Google Tags with their Prestashop store. By integrating various available tags, the addon ensures you have complete control over your store’s tracking system.

Furthermore, with the Prestashop GTM Module, store owners can capture valuable customer data, track events, and optimize their marketing efforts—without the headache of manual implementation. The Prestashop Google Tag Manager Addon offers a streamlined, user-friendly interface, enabling easy management of all your tags in one place.

Key Features of the Prestashop Google Tag Manager Addon!

Seamless Integration with Google Tags:

The Prestashop Google Tag Manager Module enables effortless integration of essential Google Tags. Furthermore, these tags help track website traffic, conversions, user behavior, and more, making it easier to measure the effectiveness of your campaigns and optimize your store’s performance.

Custom Event Tracking PrestaShop:

The Prestashop Google Event Tracker Module empowers you to track specific user actions like product views, add-to-cart, and checkout. Thus, by integrating Custom Event Tracking in PrestaShop, you can measure interactions that matter most to your business, allowing you to fine-tune your strategy.

Google Analytics and GA4 Integration:

With the Prestashop Google Analytics Integration Module, store owners can directly integrate their Prestashop store with Google Analytics and GA4. Furthermore, the addon provides detailed insights into customer behavior, sales data, and other critical metrics.
The Prestashop GA4 Integration Addon specifically allows tracking of GTM eCommerce Events, which are essential for businesses looking to future-proof their tracking system.

Real-Time Tracking and Optimization:

With the Prestashop GTM Addon, you can track actions in real-time, including Add to Cart, Checkout, Order Confirmation, and more. This data allows you to optimize the customer journey by understanding where users drop off and where your store needs improvement.

How Does the Prestashop Google Tag Manager Addon Work?

Installing the Prestashop Google Tag Manager Module is simple. Once the addon is installed, it automatically integrates with your Prestashop store. You just need to follow a few quick steps to generate the GTM and GA 4 API keys. Moreover, you can also take the reference from the easy instructions provided in the module admin panel.

Therefore, you don’t need any coding knowledge to set up tags, as the module provides an intuitive interface for managing Google Tags directly from the Prestashop admin panel. This eliminates the need for a developer to handle the integration, saving you both time and money.

Once integrated, you can use the Prestashop Google Analytics Integration Addon to start tracking a variety of customer interactions. From page views to product searches, this addon helps you gather the data you need to make smarter business decisions. With Prestashop

GA4 Integration Module, you can also track eCommerce-specific events such as Add to Cart, Checkout Begins, and Order Confirmation, giving you a complete overview of your customer journey.

Benefits of Using the Prestashop Google Tag Manager Addon!

No Coding Required:

One of the biggest advantages of using the Prestashop GTM Addon is that you don’t need any coding knowledge. The module provides a simple, user-friendly interface that allows store owners to manage and integrate tags without relying on a developer.

Improved Tracking and Analytics:

The Prestashop Google Event Tracker Module ensures that you are capturing all the important data points, from Page Views to Search Product actions. Thus, this comprehensive tracking allows you to make data-driven decisions, optimize marketing efforts, and improve the customer experience.

Easier Marketing Campaign Optimization:

By integrating with tools like Google Ads and Google Analytics, the addon allows you to track the effectiveness of your campaigns. Moreover, you can measure conversions, monitor the success of discounts or promotions, and optimize your ads for better results.

Integrate Google Tag Manager with Prestashop

SHOP NOW

Streamlined eCommerce Tracking:

The Prestashop GA4 Integration Addon makes it easier to track essential eCommerce events, such as Add to Cart, Remove from Cart, Checkout, and Order Confirmation. This ensures that you’re capturing every key action along the buyer’s journey, giving you deep insights into customer behavior and conversion funnels.

Optimized Customer Experience:

With real-time tracking of user behavior, you can identify pain points in the customer journey and optimize your store to reduce cart abandonment and improve overall sales performance. Thus, by monitoring events like Add/Select Address on Checkout and Shipping Method Selected, you can further streamline the checkout process to increase conversions.

Conclusion!

The Prestashop Google Tag Manager Addon is more than just a tracking tool—it’s a game-changer for optimizing the eCommerce store. By integrating with Google’s powerful suite of marketing tools, this addon enables store owners to track key events, gather actionable insights, and ultimately drive better business outcomes. Start using the Prestashop Google Tag Manager Module today and see how easy it is to boost your eCommerce tracking.

Prestashop Google Tag Manager (gtag, GA4, GTM Events) Addon – User Manual

The Knowband Prestashop Google Tag Manager Addon is the ultimate solution for integrating Google Tag Manager (GTM) with your Prestashop store. This user-friendly module allows store owners to easily integrate and manage various Google tags without needing any technical skills. The add-on empowers you to track key events, such as Add to Cart, Product Views, Checkout Begins, Order Confirmation, and much more, providing deep insights into customer behavior.

With seamless integration, you can also capture UTM parameters, enabling you to track the effectiveness of your marketing campaigns. Furthermore, the Prestashop Google Marketing Integration Module helps you understand which campaigns are driving traffic and conversions, so you can optimize your ad spend and improve your ROI.

The Prestashop GTM Addon is perfect for those who want to enhance their tracking capabilities, optimize conversion rates, and improve the user experience. Whether you’re using Google Analytics, GA4, or other Google marketing tools, this addon streamlines the process, giving you more time to focus on growing your business.

1.0. Key Features Offered by Prestashop GTM Addon:

Seamless Google Tag Integration: Easily integrate Google tags like Google Analytics, Google Ads, and GA4 into your Prestashop store without the need for coding.

Real-Time Event Tracking: Track real-time user actions such as Add to Cart, Product Views, and Checkout Initiation to understand customer behavior instantly.

UTM Parameter Tracking: Capture UTM Parameters to track the effectiveness of your marketing campaigns and identify the best-performing channels.

Enhanced eCommerce Tracking: Track advanced eCommerce events such as Product Detail Views, Add to Cart, and Order Confirmations for in-depth sales performance analysis.

Easy Setup and Configuration: No technical expertise required! The module’s user-friendly interface allows quick and easy setup, making tag management hassle-free.

User-Friendly Dashboard: Manage and monitor all your tags and events directly from the Prestashop admin panel with an intuitive and easy-to-use dashboard.

Multi-Lingual Support: The Prestashop GTM addon comes with multi-lingual language support, allowing store admin to use the module for multiple different languages.

1.1. How to Get Your Google Tag Manager Container ID

Step 1: Go to your Google Tag Manager account.

Step 2: Create a new container or select an existing one.

Step 3: The Container ID will look like GTM-XXXXXX and is visible in the top-right corner of the Tag Manager interface.

Step 4: Copy the Container ID and paste it into the GTM Container ID field in this module’s configuration.

1.2. How to Get Your Google Analytics Measurement ID?

Step 1: Go to your Google Analytics account.

Step 2: Select the property for which you want to retrieve the Measurement ID.

Step 3: Navigate to Admin > Data Streams and choose your web data stream.

Step 4: The Measurement ID will look like G-XXXXXXXXXX.

Step 5: Copy the Measurement ID and paste it into the Google Analytics Measurement ID field in this module’s configuration.

1.3. How to Configure Events in Google Tag Manager?

Step 1: Download GTM Events: You can find a direct download link under module configurations>>Instructions tab.

Step 2: Go to your Google Tag Manager account.

Step 3: In Google Tag Manager, navigate to Admin > Import Container.

Step 4: Select the downloaded JSON file from your system.

Step 5: Choose the workspace where you want to import the events and select the “Merge” or “Overwrite” options as required.

Step 6: Click Confirm to complete the import process.

Step 7: Save and publish your container to activate the events in your Google Tag Manager.

By following the above steps, you can successfully configure the module. However, if you face any issues, please feel free to contact us at support@knowband.com.

2.0. Installation Guide for Prestashop GTM Addon:

Once you purchase the addon, follow the below steps:

  • Go to the Store Admin -> Modules and Services.

  • Click on “Upload a module”. You can drag or drop the file or can simply select the file from the system.

3.0. Admin Panel Overview:

The Google Tag Manager for Prestashop provides an easy and intuitive admin dashboard to Prestashop retailers. The store admin can configure and manage all the tags from the Prestashop admin dashboard itself. Here is a brief overview:

3.0.1. Configurations:

Enable/Disable: The store admin can enable/disable the module with this option.

GTM Container ID: Insert the GTM Container ID in this text field. The admin can get the container ID by following the steps mentioned in section 1.1.

Google Analytics Measurement ID: Enter the Google Analytics Measurement ID here.

Page View: Enable/Disable “Page View Google Event”.

View Category: Manage the “View Category” tag from here.

View Product Detail Page: Enable the “View Product Details Page” tag from here.

Remove from the cart: Enable/Disable the “Remove from Cart” Google tag.

Add to cart: Enable/Disable the “Add to Cart” Google Tag.

Checkout Begins: Enable the tag for checkout initiatiation tracking.

Checkout Page: Enable/Disable the event for “Checkout Page”.

Add/Select address on checkout: Enable/Disable the tag for the “Add/Select Address on Checkout” page.

Shipping Method Selected: Enable the tag for “Shipping Method Selection”.

Order Confirmation:Manage the “Order Confirmation” tag from here.

Apply Discount Code: Enable/Disable the “Apply Discount Code” tag.

Remove Discount Code: Enable/Disable the “Remove Discount Code” Google event.

View Cart: Manage the “View Cart” Google tag with this enable/disable switch.

Customer Login: Enable/Disable the “Customer Login” Google Tag from here.

Customer Registration: Enable/Disable the “Customer Registration” tag.

Add to Wishlist: Manage the “Add to Wishlist” tag from here.

Remove from Wishlist: Enable/Disable the “Remove from Wishlist” tag from here.

Search Product: Manage the tags for “Searched Products”.

Capture UTM Parameters: The store admin can enable capturing UTM parameters with the help of this switch button.

3.0.2. Configuration Instructions:

The Prestashop no-code Google tag manager integration comes with straightforward instructions that eliminate the need for any technical expertise for the module connections. The store admin can simply visit the Google consoles and get the required credentials by following the simple steps mentioned below:

These instructions are going to help the store admin in the module configurations, however, if you face any issue with any connect step or module, you can also drop us a mail at support@knowband.com or raise a ticket on knowband.com/helpdesk.