OpenCart LLMs TXT Generator Extension- Complete User Guide

The OpenCart LLMs TXT Generator Plugin is a powerful extension designed to generate an llms.txt file for your store. This file contains well-structured information about the store catalogue, including products, categories, and CMS pages, making it easier for AI platforms to understand and access your content.

Today, customers increasingly rely on AI-powered platforms such as ChatGPT, Gemini, DeepSeek, Perplexity, and Claude to search for products and get recommendations. As AI-driven searches continue to grow, having your products recommended by these platforms can significantly improve your store’s visibility and reach.

To address this, Knowband has developed the OpenCart LLMs TXT Generator Plugin, which enables AI platforms to discover, understand, and recommend your products more effectively.

The llms.txt file generated by the Knowband OpenCart LLMs TXT Generator allows AI crawlers and AI answer engines to access store content in an organised and structured format. By placing this file on your server, your store becomes compatible with modern AI search engines and AI product recommendation models such as ChatGPT, DeepSeek, Gemini, Perplexity, and Claude.

Using this AI product recommendation extension for OpenCart improves AI product discovery, supports accurate AI-generated answers, and ensures that your store content is correctly identified and referenced when users search for product- or store-related information on AI-driven platforms.

1.0.0 Key Features of OpenCart LLMs TXT Generator Extension

Support for Advanced AI Model Bots

This OpenCart extension supports access for multiple advanced AI crawler bots used by modern AI answer engines and generative AI search platforms, including:

  • DeepSeekBot
  • GPTBot
  • Anthropic AI
  • PerplexityBot
  • Google-Extended

Supporting these AI bots ensures compatibility with AI product discovery and ChatGPT product recommendations.

AI Crawler Access Control

The Knowband OpenCart LLMs TXT Generator Extension allows administrators to control which AI crawlers can access store content via the llms.txt file.

Customisation of llms.txt File

The OpenCart LLMs TXT Generator Add-on by Knowband allows store admins to add additional content to the llms.txt file.
Customisation options are available for:

  • Store descriptions
  • Product llms.txt entries
  • Category product llms.txt entries
  • CMS page llms.txt entries and more

Access Control for Content Pages

This feature allows admins to choose which content pages—such as product pages, category pages, and CMS pages—should be included in the llms.txt file.

This ensures AI engines generate accurate responses and access only the selected content.

Product Recommendation Compatibility

The OpenCart LLMs TXT Generator Add-on is built to support evolving AI search and AI product recommendation systems. By generating a structured llms.txt file with clear instructions, your store content remains aligned with next-generation AI answer engines like ChatGPT and other recommendation platforms.

Content Filtering

The Knowband OpenCart LLMs TXT File Generator allows store admins to filter and select specific products, categories, and CMS pages for inclusion in the llms.txt file.

This provides complete control over what data is made available for AI product discovery, AI crawler indexing, and generative AI search.

2.0.0 Installation Guide for Knowband Opencart LLMs TXT Generator Addon
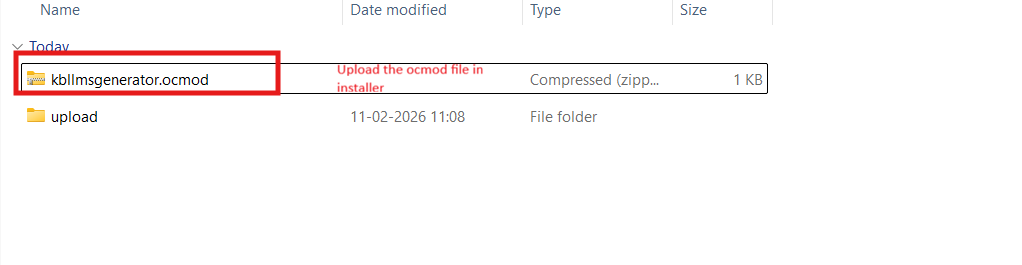
Step 1: Purchase and download the Knowband OpenCart LLMs TXT Generator Extension. After purchase, you will receive the file kbllmstxtgenerator.zip.

Step 2: Unzip the downloaded file. Inside, you will find the admin, catalog, and ocmod folders.

Step 3: Upload the admin and catalog folders to your OpenCart root directory via FTP or cPanel. Then upload the OCMOD file from the ocmod folder through Admin → Extensions → Installer, and refresh modifications.

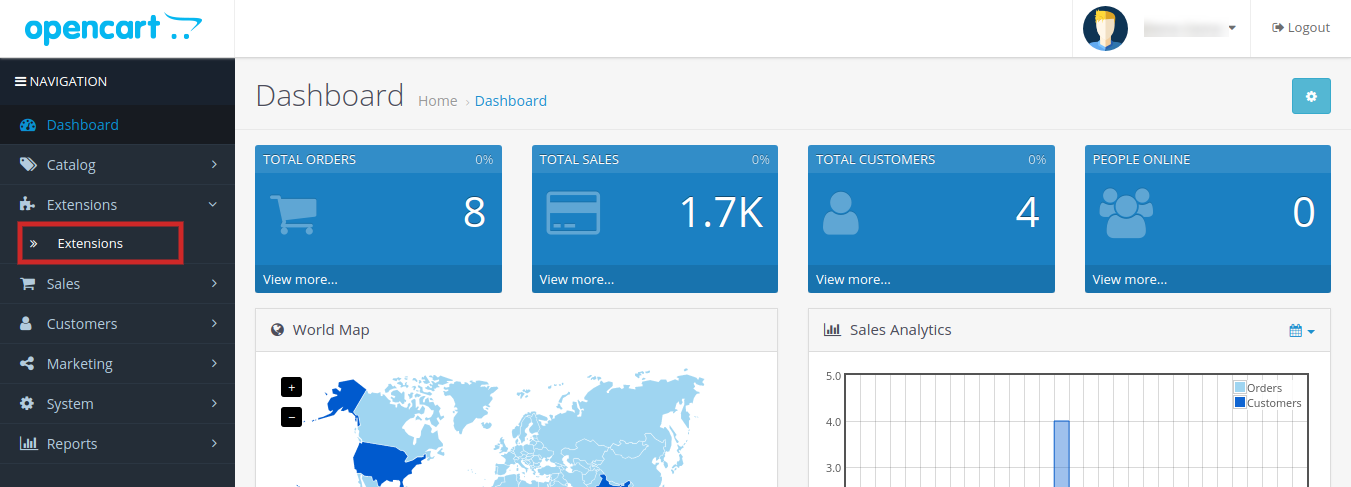
Step 4: Go to Extensions → Extensions, install the extension, click Edit/Configure, and complete the setup.

3.0.0 Backend/Admin Panel of Opencart Product Recommendation by ChatGPT Extension

3.1 General Settings

  1. Enable/Disable Extension:
    This option in the llms.txt file generator for AI is used to enable or disable the functionality of the Opencart LLMs.txt Generator Extension.
  2. Store Name:
    Store admins enter their store name in this field. This Opencart LLMs.TXT Generator Extension also supports the languages that are added in the store.
  3. Store Description:
    This field is used to add the store description to the llms.txt file generated by the Extension. Furthermore, it helps to describe the store and its catalogue based on the provided content.
  4. Product Batch Size:
    This field in the Opencart LLMs txt File Generator Addon allows you to define how many products are processed per batch during cron execution. By default, 30 products are processed in one batch.
  5. Category Batch Size:
    This field of category batch size allows the cron to process a specified number of categories per batch.
  6. CMS Batch Size:
    This field allows the cron to process CMS pages per batch. By default, 5 CMS pages are processed in one batch during cron execution in the Extension.
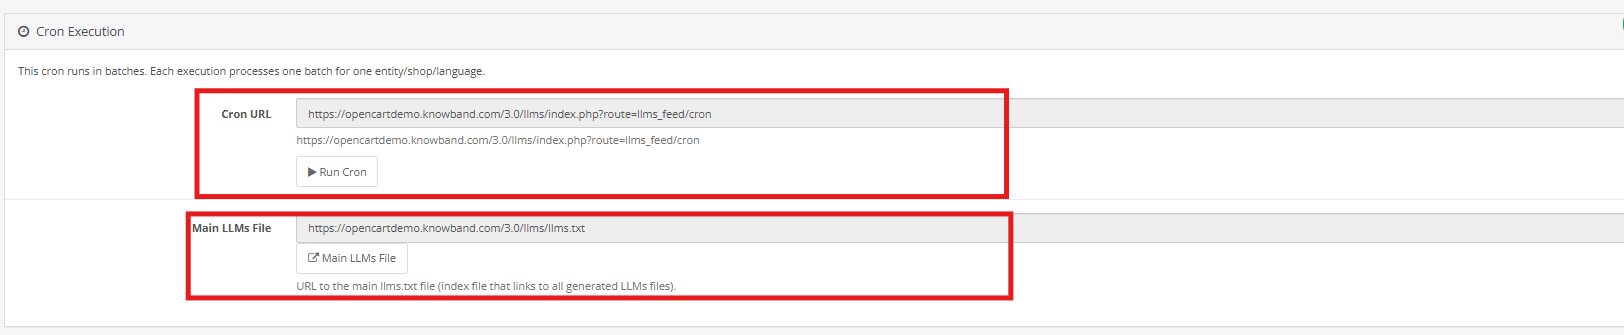
  7. Cron Execution (Batch Processing): This cron job in the Opencart LLMs TXT generator runs in batches. Each execution processes one batch only, for products, categories and CMS pages. After updating settings like general settings, content filtering and customisation of files, running the cron is necessary to reflect any changes.
3.2 Crawlers Setting

This crawler setting in Opencart LLMS TXT Generator allows the store owners to manage the AI model’s bots like GPTbot, Google Extended Gemini Bot, DeepSeek and many more
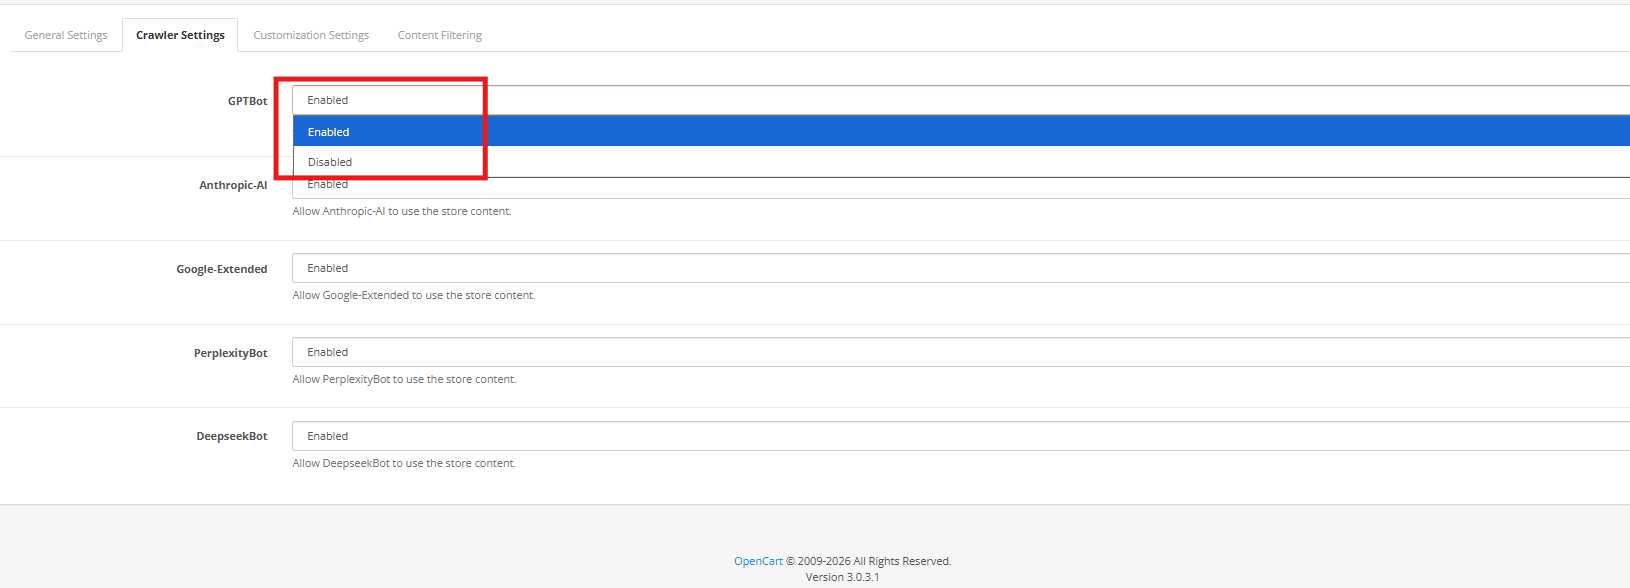
GPTBot: AI Crawler of OpenAI ChatGPT, collects the data to train the ChatGPT AI Models. You can allow or disallow this using the 

DeepseekBot: AI crawler bot of deepseek which gathers public web data of the store to train and refine DeepSeek’s large language models

Google-Extended: This Google’s AI-specific crawler (separate from Googlebot) allows the collection of content specifically for training Google’s AI models (like Gemini),

PerplexityBot: This web crawler of perplexity AI is used to fetch up-to-date web content to generate cited answers and summaries

Anthropic-AI: This web crawler of Anthropic is used to collect public web data to train and improve Claude AI models. You can enable or disallow all the AI Crawler bots. 

3.3 Content Filtering

The Content Filtering functionality enables store administrators to decide exactly which store data is included in the generated llms.txt file. This gives you full control over the information shared with AI crawlers and answer engines, ensuring that only meaningful and approved content is exposed while private or irrelevant data remains excluded.

1. Shop Context

The Shop Context setting is designed for OpenCart installations with multiple stores. It allows administrators to select a specific store and generate a dedicated llms.txt file for that shop. Each store can have its own configuration, ensuring accurate and store-specific content generation.


2. Product Details

The Product Details filter determines which products appear in the llms.txt file. Store owners may include all products or restrict the selection based on business needs. Options include adding only active products, featured items, or manually selected products, while excluding others from being shared.

3. Category Details

The Category Details filter helps manage category-level content. Administrators can choose which categories should be included, allowing inactive or unnecessary categories to be excluded. This keeps the file well-structured and focused on relevant store data.

4. CMS Pages

The CMS Pages filtering option allows you to control which CMS pages are included in the CMS llms.txt file. This is useful for preventing internal, draft, or temporary pages from being shared, while still making essential pages such as policies and informational content available to AI platforms.


3.4 Customization

The Customization features of the OpenCart LLMs.txt Generator allow store owners to add additional context to the generated llms.txt files. These options help enhance product, category, and CMS information with helpful notes, improving how AI crawlers interpret your store content.


1. File Boundaries Customisation

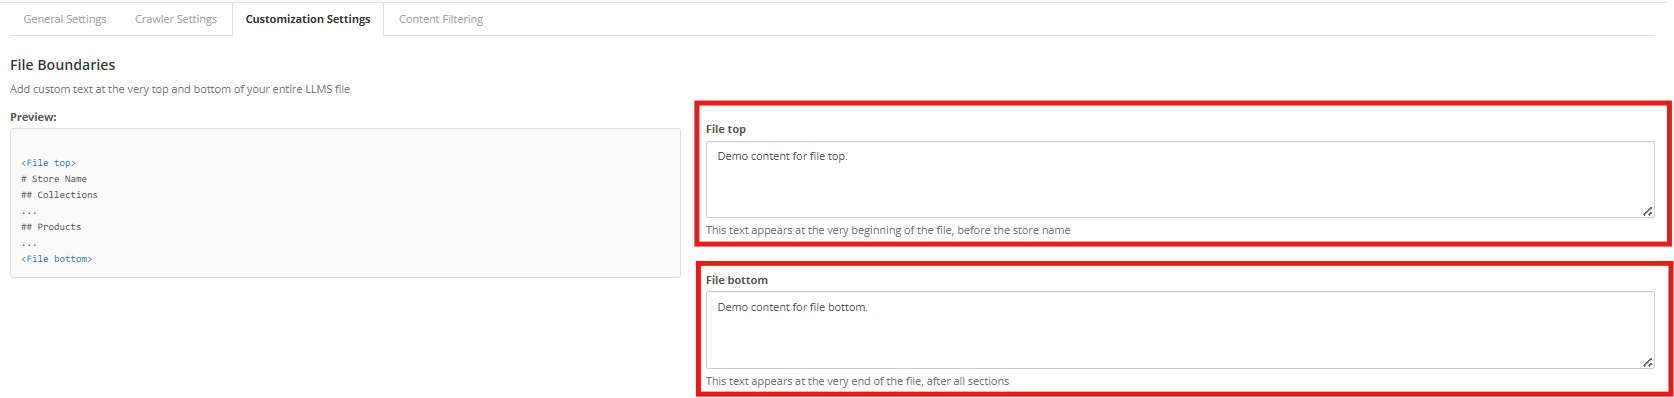
The File Boundaries option allows you to insert custom text at the beginning and end of the llms.txt file. This can be used to add general instructions, notes, or explanations without altering the core store data, helping crawlers understand the file structure more clearly.
2. Store Description

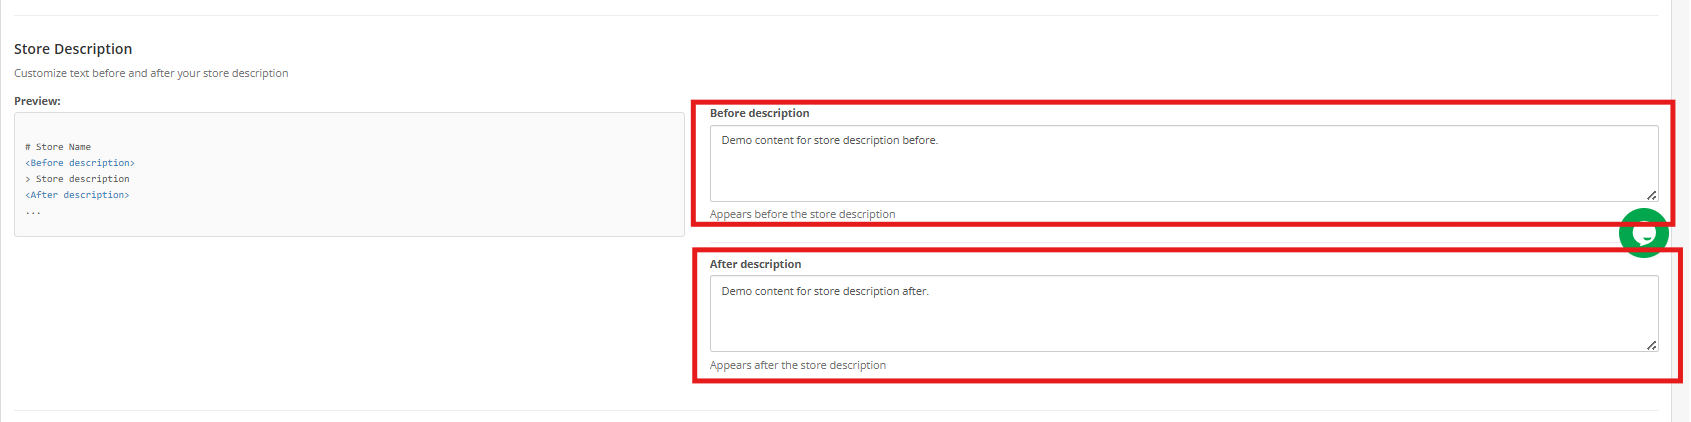
The Store Description customisation lets you add content before and after the store description section in the llms.txt file. This helps define your store’s purpose, key offerings, or any special instructions, making it easier for AI-driven platforms to generate accurate responses related to your business.
3. Category Section Customisation

With Category Section Customisation, store owners can add explanatory text before and after the categories section. This is useful for clarifying category organization, naming patterns, or relationships, allowing crawlers to interpret category data more accurately.

4. Product Section Customisation

The Product Section Customisation feature allows you to include additional notes before and after the product details section. These notes can provide general product-related guidelines or context without modifying the actual product information, improving AI understanding and recommendations.

 

5. CMS Pages Section Customisation

The CMS Pages Section Customisation option enables administrators to add contextual notes around the CMS pages section. Since CMS pages often contain key information such as policies, FAQs, and shipping details, this added context helps AI systems better interpret non-product content.

 

Pro Tip:
Maintain strong SEO practices across your product, category, and CMS pages to improve visibility on AI-powered search platforms. As AI technology advances, your store should evolve with it—use this extension to ensure AI models can accurately understand and recommend your business.



Opencart AI Chatbot Extension – Complete User Guide

1.0.0 Introduction

Introducing the OpenCart AI Chatbot Module by Knowband, which is designed to meet these expectations by providing a smart, professional, AI virtual chatbot for your opencart store.

By using advanced OpenAI technology, this ai chatbot gives natural, human-like responses in real time. Furthermore, it helps customers search for products, check prices and stock, understand store policies, and track orders, without human intervention.

With easy setup and powerful features, this AI assistant by Knowband improves customer satisfaction, reduces support workload, and boosts conversions. 

2.0.0 Key Features of OpenCart AI Chatbot Using ChatGPT

1. Real-Time Intelligent Responses Firstly, the AI Chatbot instantly answers customer queries related to product prices, stock availability, categories, and comparisons by fetching live store data.

2. Multi-Language & Multi-Currency Support The chatbot automatically detects the store’s languages and currencies and responds accordingly, making it perfect for international Opencart stores.

3. Powered by ChatGPT Technology Using the latest OpenAI GPT models, the opencart chat extension provides accurate, context-aware, and like-human responses.  Moreover, admins can choose different AI models like GPT 5, GPT 4o & GPT 4o mini based on performance needs.

4. Vector Search Integration Vector search integration with Qdrant allows the chat plugin for opencart to perform semantic searches based on keywords and their meaning. Moreover, this enables intelligent product recommendations, providing customers with results that match the true intent of their queries.

5. Smart Product Search Furthermore, customers can search products, browse categories, and compare items directly within the chatbot interface.

6. Automatic Order Information Retrieval Logged-in customers can retrieve order details such as order ID, products, prices, and order status directly using opencart live chatbot Extension.

7. Real-Time Order Status & Tracking Customers can easily track their orders and shipment status by entering their order ID in the live chatbot plugin for opencart.

8. Fully Customizable Chat Interface Interestingly, store owners can customise chatbot colours, chat window design, icons, buttons, and text styles to match their brand theme using Opencart Live chat Plugin.

3.0.0 Installation Guide for OpenCart AI Chatbot Extension

Step 1: After purchasing the extension, download the ZIP file from your Knowband account. Step2: Unzip the folder and copy the files to the upload folder and move the admin and catalog files.

  Step 3: Log in to the OpenCart Admin Panel and navigate to Extensions → Installer. Upload the downloaded ocmod file.

Step 4: Go to Extensions –> Modifications and click “Refresh”. Then navigate to Extensions -> Extensions -> Modules and install the opencart online chatbot Extension.

Step 5: Click on Edit to access the configuration page.

4. 0.0 Admin Interface Overview

The OpenCart Chatbot Using OpenAI is designed to be simple and user-friendly. The admin panel includes sections for General Settings, AI Configuration, and UI Customisation.

4.1.0 General Configuration of Opencart AI Chatbot Extension

Enable Chatbot: Store owners can enable or disable the module as per their need.

OpenAI API Key Enter your OpenAI API key to create a connection between the chatbot and OpenAI. This key is mandatory for the functioning of the Opencart AI Chatbot.

For security reasons, the API key should be kept confidential and must not be shared with anyone.

AI Model Selection Choose the AI model that will be used to generate opencart AI chatbot ChatGPT extension responses based on your store’s requirements:

  • GPT-4o: Suitable for handling complex queries, providing accurate responses, and maintaining better context during longer conversations.
  • GPT-4o Mini : Designed for faster response times and reduced API usage, ideal for basic customer interactions.
  • GPT-5: Offers enhanced processing capabilities and improved response quality for advanced use cases.

Temperature This setting controls the randomness of opencart chatbot software responses. Moreover, lower values generate more predictable and factual replies, while higher values allow more variation in responses. It is recommended to use a moderate value for customer support scenarios.

Max Results You can define the maximum number of product results displayed when customers asks product related queries. This feature on opencart live chatbot extension turns limiting results, helps maintain clarity and prevents overloading the chat interface.

Conversation History In this feature, Opencart modern chat assistant remembers the last conversation history and answers according to that.

Debug Mode: Enable this option to generate system logs that assist in diagnosing issues related to chatbot behavior, API connectivity, or data retrieval.

Enable Vector Search You can activate semantic search functionality, enabling the Opencart AI Chatbot Using OpenAI to better understand user intent and return more relevant responses beyond keyword-based matching. Qdrant URL Enter the endpoint URL of the Qdrant vector database server used to store and retrieve vector data for semantic search operations. We have covered the steps in section 7.0.0.

Qdrant API Key Provide the API key required to authenticate access to the Qdrant server. Furthermore, this ensures secure communication between the chatbot and the vector database.

4.2.0 Chatbot UI Customisation of  Knowband Opencart AI Chatbot Plugin

The module allows complete customisation of the chatbot interface, helping store owners match the chatbot’s appearance with their store’s branding and design. Chatbot Logo Upload First, this option allows you to upload a custom logo for the OpenCart ChatGPT AI Chatbot. The logo represents your brand inside the chat window and helps maintain visual consistency across your store. Supported file formats include JPG, PNG, GIF, and WEBP.

Chat Background Color Next, using this setting, you can define the background color of the chat area where conversations appear. This helps improve readability and ensures the chat interface aligns with your store’s overall design.

System Message Color Additionally, this option enables you to customize the background color of messages sent by the OpenCart Live AI ChatBot Extension. A distinct system message color helps customers easily differentiate between chatbot responses and their own messages.

User Message Color In addition, this setting in the OpenCart AI Chatbot Software Plugin allows you to change the background color of customer messages in the chat window. As a result, conversations become clearer and easier to follow.

Chat Popup Background Color Moreover, this option lets you customize the background color of the entire chat popup window. This ensures that the AI Chatbot for OpenCart blends smoothly with your store’s theme and layout.

Chat Button Color Furthermore, this setting controls the color of the OpenCart AI Chatbot Extension launch button and action buttons. A visually appealing and contrasting button color can improve visibility and encourage customers to start a conversation.

Chat Text Color Likewise, this option allows you to set the text color for both chatbot responses and user messages. Choosing a clear and readable text color enhances accessibility and user comfort.

In summary, these customisation options ensure that the Best AI Assistant for OpenCart integrates seamlessly with your store design while delivering a modern, visually appealing, and user-friendly chatbot experience.

Language Selection (English, French) This setting allows you to select the language in which the chatbot interface will be displayed. The chatbot can be configured separately for each available language, such as English and French, ensuring localized communication for different customer groups.   Chatbot Title Enter the title that will be displayed at the top of the OpenCart ChatGPT-powered Chatbot popup window. This title helps users identify the chatbot’s purpose, such as AI Product Assistant, and can be customized for each language.

Welcome Message Lastly, set the initial message shown to customers when the OpenCart Chatbot Using OpenAI (ChatGPT) LLM opens. This message is used to greet users and guide them on how to interact with the chatbot, such as asking about products, orders, or store policies.

5.0.0 Frontend View of Opencart AI Chatbot Extension

On the frontend, the chatbot appears as an interactive chat widget that assists customers in real time.

Frontend Capabilities of Opencart AI Chatbot Plugin Includes:

Product Search and Browsing Customers can search for products and browse categories directly through the chatbot. Additionally, this AI chatbot conversation retrieves relevant products based on customer input and displays matching results in real time, making product discovery faster and easier.

Keyword- and Meaning-Based Queries The ChatGPT AI chatbot supports both keyword-based and semantic (meaning-based) queries. Furthermore, with Qdrant integration enabled, the chatbot understands the intent behind customer questions and returns more accurate and relevant results, even when exact keywords are not used.

Product Details In addition, customers can request detailed product information such as price, stock availability, and product descriptions without navigating away from the current page, using AI chatbot assistance.

Order Details and Order History For logged-in users, the chatbot provides access to complete order information, including previous orders, purchased products, prices, and current order status, directly within the AI chatbot interface.

Shipment Tracking and Order Status Moreover, the ChatGPT chatbot allows customers to check shipment details and track the current status of their orders by simply providing the required order information.

General Store Queries Lastly, the Live AI ChatBot responds to common store-related questions such as store policies, delivery information, payment methods, and other general inquiries, ensuring continuous customer support.

6.0.0 How to Generate OpenAI API Key

To enable the functioning of the AI Chatbot Software by Knowband, you need an OpenAI API key. Follow these steps: Step 1: Log in to your OpenAI account Use your registered email and password to access the OpenAI platform.   Step 2: Navigate to Profile → View API Keys This section lists all your existing API keys. Step 3: Click “Create New Secret Key” Generate a new API key specifically for your chatbot integration. Step 4: Copy the API Key and store it securely The key provides access to your OpenAI account, so it should not be shared publicly.

Step 5: Paste the key into the module Now, in your OpenCart admin panel, open the AI chatbot module settings and enter the key in the API Key field under General Configuration → OpenAI API Key.

7.0.0 How to Generate Qdrant API Key and Endpoint URL for Opencart AI Chatbot

If you are using vector search with Qdrant for semantic queries in Knowband’s Opencart Best AI Assistant, follow these steps:

Step 1: Sign in to your Qdrant account Access your Qdrant cloud or self-hosted instance.

Step 2: Create a new API Key Navigate to the clusters, create a cluster, and generate keys for your chatbot integration.

Step 3: Copy the API Key and Endpoint URL The Endpoint URL points to your Qdrant server, and the API Key authorises access to the vector database. Step 4: Enter the details in the module In your OpenCart admin panel, go to General Configuration → Qdrant URL and paste the endpoint URL. Then enter the API Key in the Qdrant API Key field. Note: Moreover, using Qdrant vector search allows the chatbot to perform semantic searches, providing context-aware and accurate product recommendations based on customer queries.

9. 0.0 Summary

The OpenCart AI Chatbot Extension by OpenAI ChatGPT enhances customer support by offering instant, intelligent, and personalised assistance. Furthermore, it automates repetitive tasks, improves engagement, and helps store owners deliver faster and smarter customer experiences 24/7. Hence, this AI chatbot helps OpenCart merchants stay competitive while providing a modern, reliable, and efficient shopping experience.

Admin Demo Link: https://opencartdemo.knowband.com/3.0/aichatbot/admin

Frontend Demo Link: https://opencartdemo.knowband.com/3.0/aichatbot/

10.0.0 Tutorials

This section contains step-by-step tutorials to help you install, configure, and use the module features effectively.


VideoMate for OpenCart: User Manual & Setup Guide

Elevate your online store with the OpenCart Video Manager Extension, a powerful and flexible extension designed to integrate high-impact video content throughout your e-commerce site. Whether you’re aiming to improve product visibility, boost user engagement, or increase conversions, this all-in-one video plugin for OpenCart makes video integration seamless and efficient.

With support for various display options such as the carousel extension, floating video widget, and single video embeds—you can highlight featured products, promotions, or brand stories directly on your homepage, product pages, or category listings. The module includes flexible placement settings, making it simple to adapt to your layout and marketing goals.

Designed for simplicity, the OpenCart VideoMate extension includes a powerful video uploader built for smooth integration with OpenCart. Moreover, the video manager for opencart features browser-based (client-side) validation to ensure files meet format and size requirements before they’re uploaded, reducing errors and improving speed. A built-in video library makes it easy to manage and organize content right from your admin panel—no technical expertise is needed.

Moreover, you can easily update video status, manage uploads, and organize your media for quick access and consistent presentation. The extension also supports displaying downloaded Instagram and Twitter reels, along with social clips from other platforms—making it a comprehensive, all-in-one video manager extension for OpenCart.

Furthermore, whether you’re aiming to create an immersive shopping experience, build a captivating in-store video gallery, or leverage video content for promotions, tutorials, or customer reviews, this plugin is purpose-built to deliver results. With powerful features like OpenCart homepage video integration and category-level video embedding, you can strategically position engaging content where it captures the most attention and maximizes impact.

Ideal for modern merchants, this video marketing plugin for OpenCart is fully responsive, highly customizable, and designed for ease of use—no coding required. Boost conversions and strengthen customer engagement with this all-in-one e-commerce video extension built to elevate your store’s visual experience.

1.0 Key Features of OpenCart VideoMate Extension

Transform Your OpenCart Store with Engaging Video Content: First and foremost, bring your storefront to life with dynamic video integration. Whether you’re showcasing products, running promotions, or telling your brand story, this all-in-one OpenCart video plugin empowers you to create a visually engaging and conversion-driven shopping experience.

Easy Video Uploads with Built-In Library Management: Next, upload and manage clips, reels, or videos directly from your OpenCart admin panel using the intuitive and reliable video uploader. Organize your media effortlessly and access your complete video library from one centralized location—no coding required.

Targeted Video Placement Where It Matters Most: Moreover, with advanced video mapping, you can assign videos to specific products, categories, or custom pages. Whether using the OpenCart product video extension or the category video plugin, you’re fully in control of where your content appears—maximizing relevance and visibility.

Choose from Multiple Responsive Widget Types: In addition, display multiple videos in an interactive, scrollable layout using either the video carousel or floating video widget. This is ideal for showcasing featured products, tutorials, or promotional clips in a sleek, engaging format.

User-Controlled Video Players: Furthermore, the OpenCart Video Manager Extension is fully responsive, ensuring seamless adaptation across desktops, tablets, and mobile devices for a consistent user experience.

Customize Every Detail with Display Controls: Finally, fine-tune how your videos appear and perform. Set autoplay timers, define widget titles, control the maximum number of displayed videos, and adjust additional display settings—all with ease. These customizable features help align your video content with your store’s branding and customer experience strategy.

Boost First Impressions with Homepage Video Integration: Leverage the OpenCart homepage video extension to capture attention the moment visitors arrive. Significantly, the extension is ideal for showcasing promotions, introducing your brand, or delivering impactful storytelling right on your storefront’s front page.

Enhance Browsing with Category-Level Video Support: Upload videos directly on category landing pages using the OpenCart category video plugin. Showcase themed collections, seasonal content, or product highlights to encourage exploration and boost click-through rates.

Connect Your Store to Social Media
Seamlessly incorporate external content with built-in support for Instagram and Twitter video formats on the OpenCart plugin. Showcase real-time engagement, customer testimonials, or influencer partnerships—all without requiring visitors to leave your store.

Fully Responsive and Mobile-Optimized
No matter how your customers browse—on desktop, tablet, or smartphone—your video content will look and perform flawlessly. This Knowband’s VideoMate extension for Opencart ensures a smooth, responsive experience across all devices.

Simplified Management with Centralized Admin Control
Additionally, manage all video assets, widgets, and settings from a single, user-friendly dashboard. Whether you’re updating a single video or overhauling your entire video strategy, the streamlined admin interface makes everything quick and efficient.

The Complete Video Marketing Toolkit for OpenCart
Finally, from promotional clips to product tutorials and authentic social proof, this powerful e-commerce video extension provides everything you need to build a media-rich, high-converting OpenCart store. It’s customizable, responsive, and simple to manage—your all-in-one solution for modern video integration

2.0 Installation Guide for Knowband’s OpenCart VideoMate Extension

Step 1: Download the Extension

After purchasing, download the videomate.ocmod.zip file, which contains the complete video plugin for OpenCart.

1. Unzip the downloaded file – this will contain the videomate.ocmod.zip and necessary folders.
2. Go to the upload folder and locate the admin and catalog files.


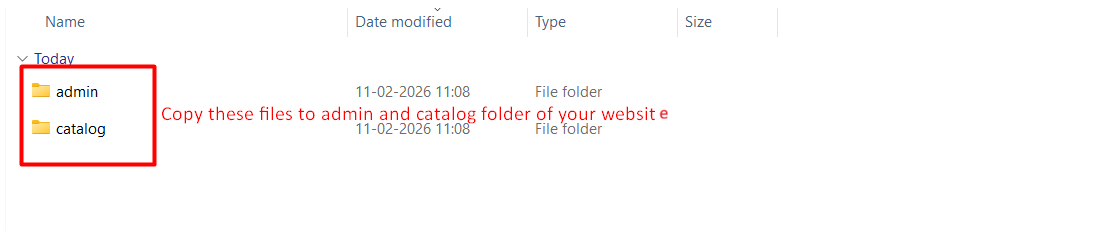
3. Copy these files into the root directory of your OpenCart store

Step 2: Upload via Extension Installer

  1. Go to Extensions > Extension Installer in your OpenCart admin panel.
  2. Upload the videomate.ocmod.zip file.
  3. Once installed, go to Extensions > Modifications, and click Refresh to apply changes.

Step 3: Assign User Permissions

Navigate to System > Users > User Groups, then edit your group and enable permissions for extension/module/videomate.

Step 4: Enable the Module

Navigate to Extensions > Extension Installer in your OpenCart admin dashboard.

3.0 Admin Panel Configuration of OpenCart Video Manager Extension

3.1 General Settings

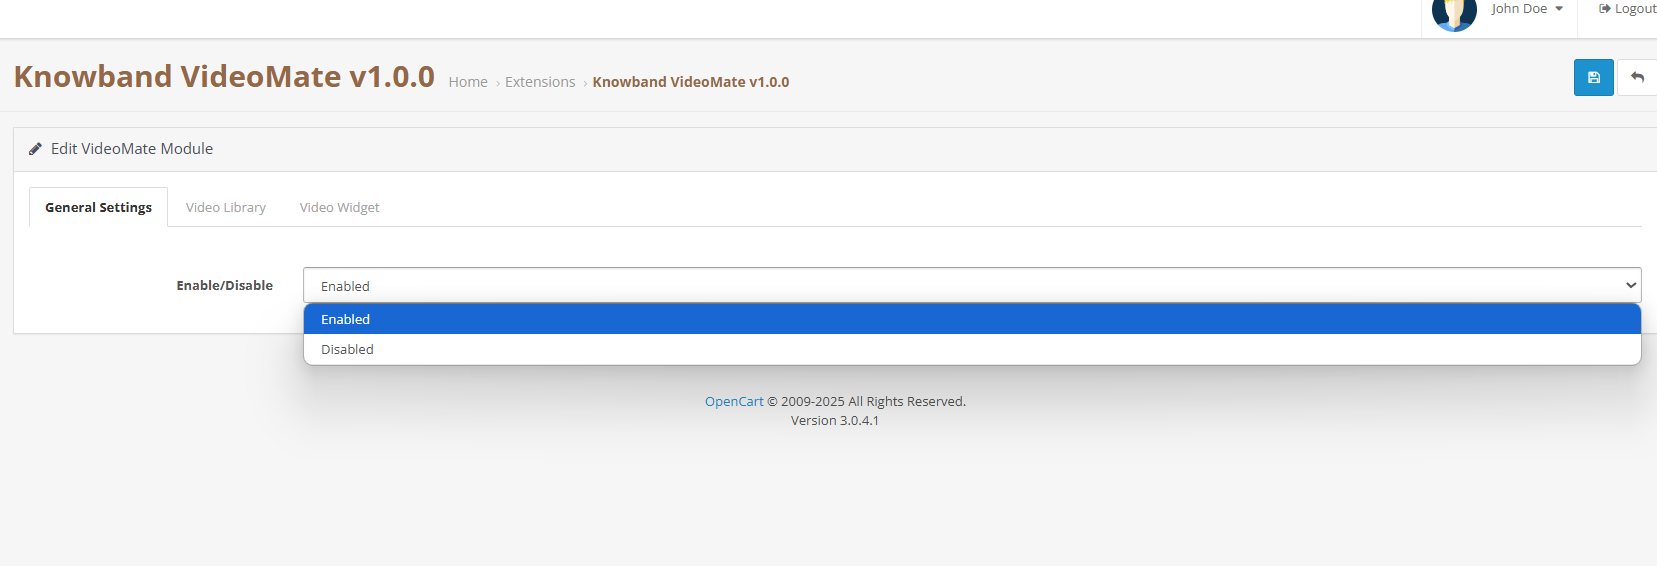
  • Enable/Disable Module: Easily turn the OpenCart video plugin on or off with a simple toggle as no complex setup is required.

3.2 Video Library Management

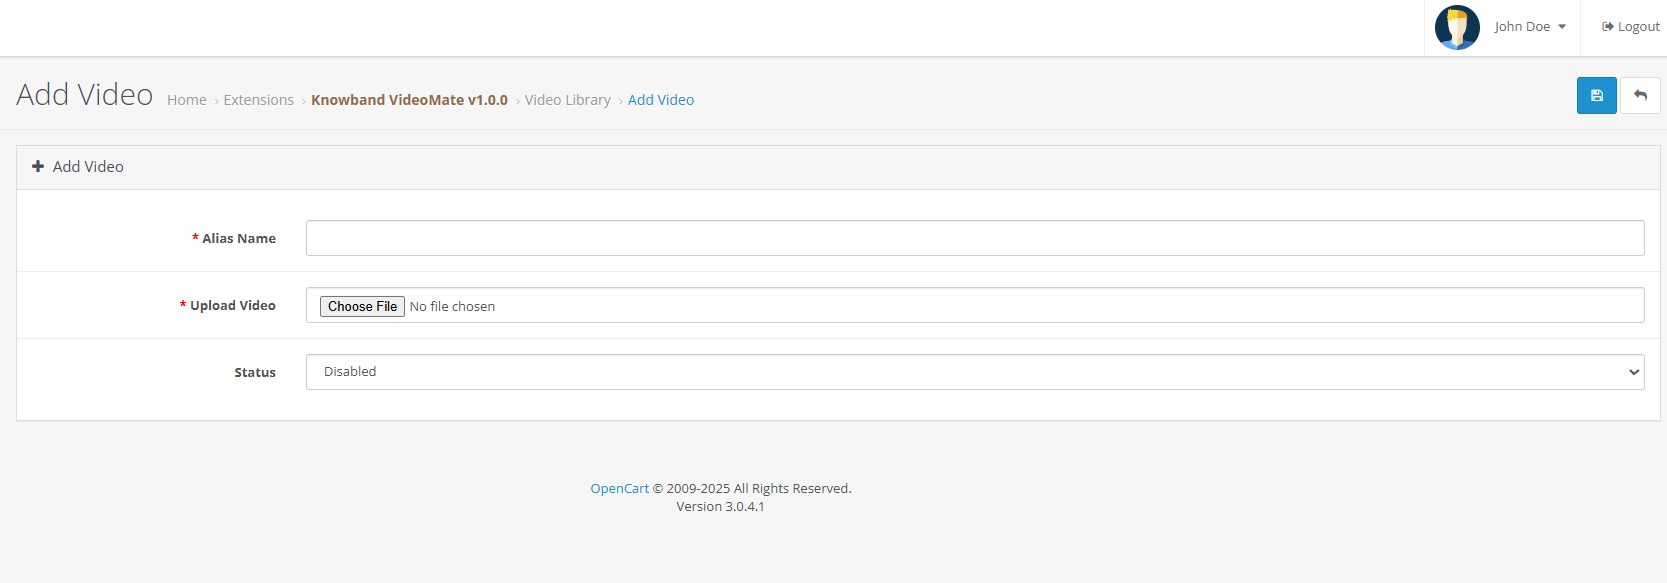
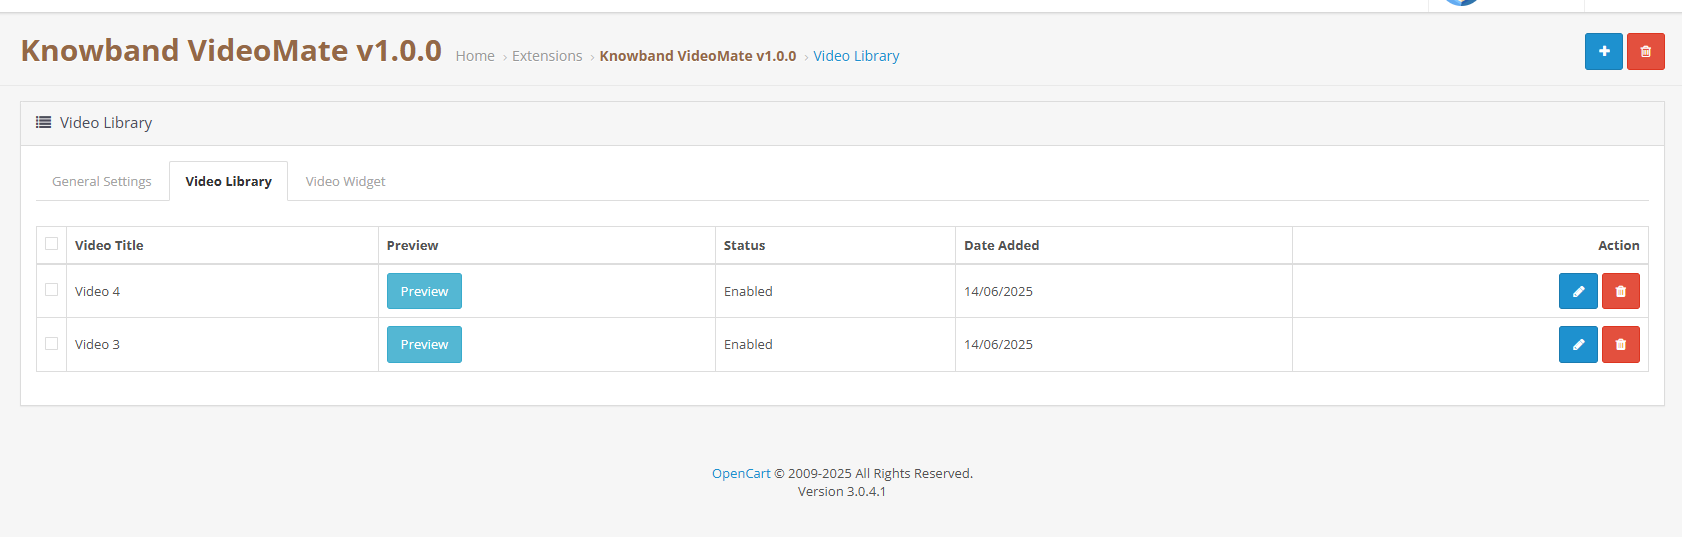
  • Add New Video: Upload files and assign alias names. Moreover, store owners can preview the videos before setting up the widget using Knowband’s Opencart Video Integration Extension. 
  • Status Toggle: Easily activate or deactivate any video, clips or reel from the Video Library by clicking on edit.
  • Social Media Videos or Clip Upload: Add downloaded reels, and clips from Instagram or Twitter to display via the social media video OpenCart plugin.
  • Delete: Remove any videos you no longer need with a single click—quick and hassle-free.
  • Preview: Preview the videos before mapping to the widgets.

3.3 Video Widget Configuration

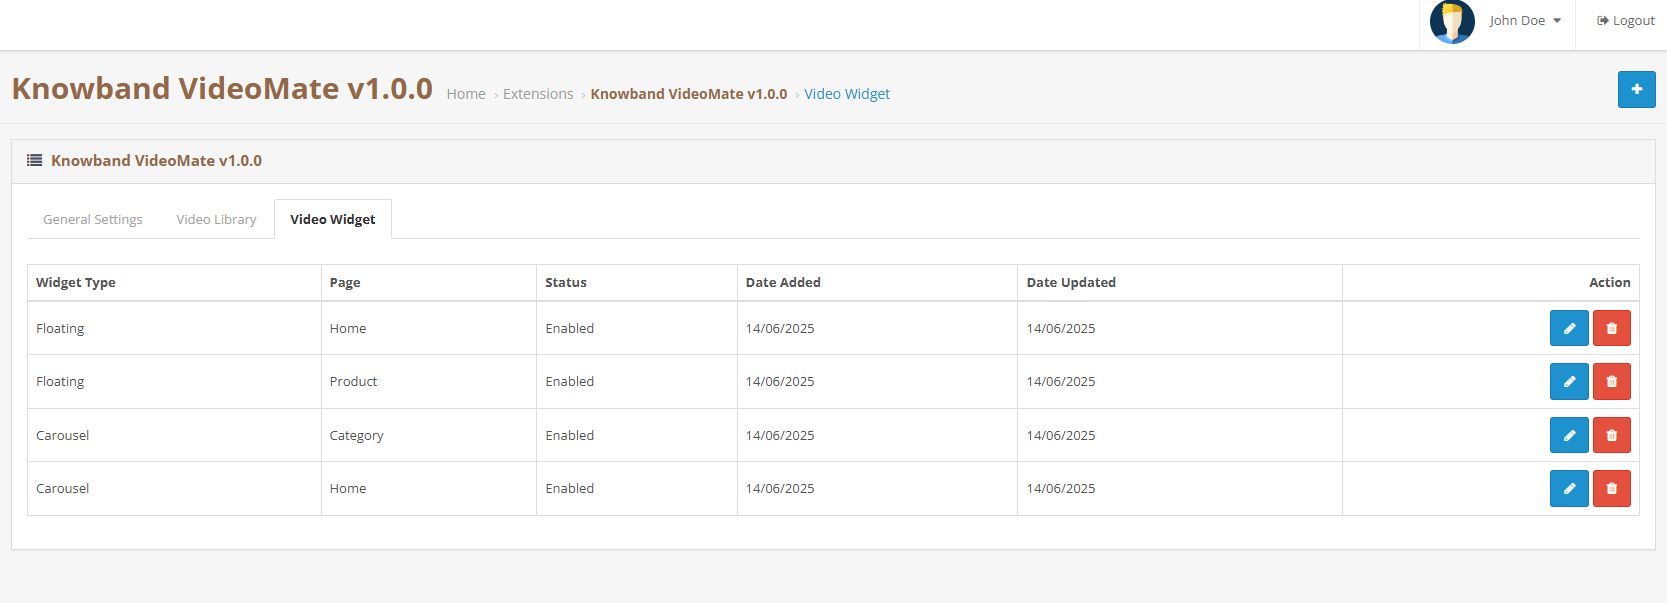
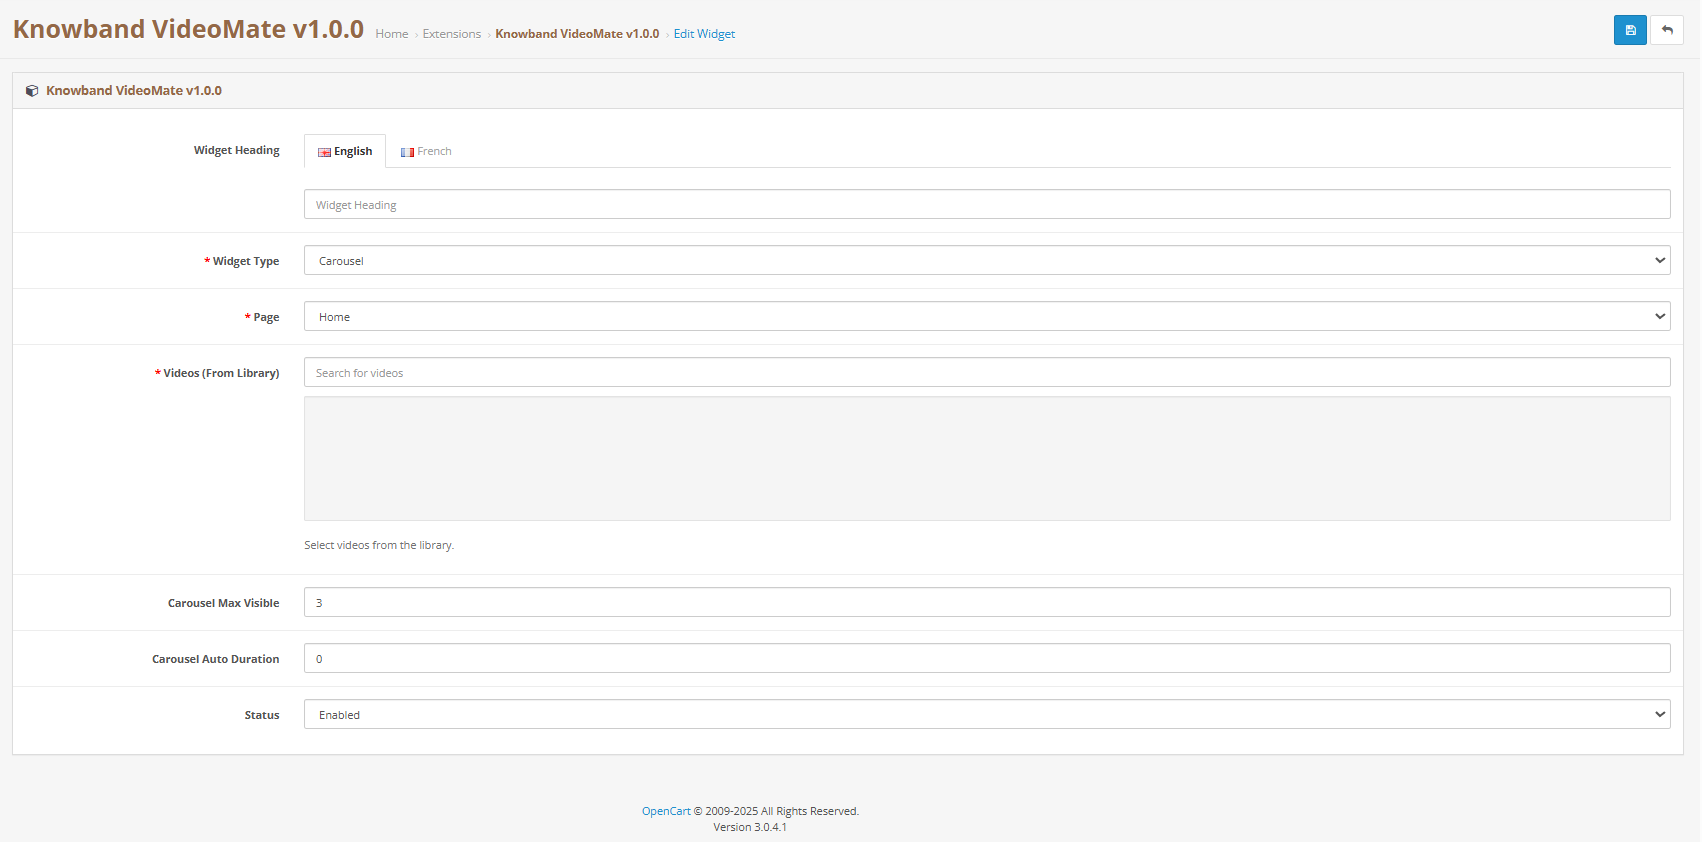
  • Widget Title: Assign custom titles to each video widget to match your branding or content strategy. For example, use titles like “Top Picks for You”, “Product Highlights”, or “How-To Videos” to guide your customers and create a more personalized experience.
  • Create a New Widget: Define a new widget for products, categories, home, or custom pages.
  • Page Type Selection: Choose display location (homepage, category, product, custom layout).
  • Entity Mapping: Select specific products or categories to which you want to add clips or videos.
  • Widget Type: Choose between a carousel or floating video widget based on your store’s layout, user behaviour, or current design trends. Each option offers a unique way to present engaging video content.
  • Carousel: Enables multi-video sliders via the OpenCart video carousel extension.
  • Showcase multiple videos in a sleek, scrollable slider using the OpenCart video carousel extension. Simply select and add the videos you want to be featured in the carousel—perfect for highlighting products, promotions, or brand content in one interactive view.
  • Floating: Choose Floating as video widgets for videos via the Knowband’s OpenCart floating video widget extension.
  • Autoplay Settings: Set a custom autoplay timer (in seconds) for each video widget. This feature ensures videos start automatically after a defined delay, helping to capture attention without user interaction.
  • Widget Positioning: Store owners can choose to place the video to be placed on the right or left. Control exactly where your floating video appears to align with your store’s layout and design
  • Max Videos: Set the maximum number of videos to display within the carousel to keep your layout clean, focused, and user-friendly.
  • Widget Status: Easily control the visibility of each widget with a simple enable/disable toggle. Show or hide video sections on demand—perfect for seasonal content, limited-time promotions, or testing different layouts.

4.0 Benefits of Using OpenCart VideoMate Extension

Increase Engagement & Time on the Site
First and foremost, using video through the OpenCart product video extension encourages customers to explore products longer and make informed purchase decisions.

Improve Conversion Rates
Secondly, VideoMate is ideal for in-store video marketing, which can significantly boost product page conversions by showcasing product value more effectively.

Versatile Video Placements
In addition, you can display content on the homepage, category pages, product pages, or custom layouts using various video formats and widget types to suit your store’s needs.

Instagram Video Integration
Moreover, enhance your storefront with real-time, dynamic content by uploading downloaded Instagram videos directly into the OpenCart VideoMate plugin—perfect for showcasing social proof, influencer clips, or behind-the-scenes moments.

Easy to Use
Lastly, with its intuitive UI and centralized controls, the OpenCart Video Manager Extension makes it simple to add videos to OpenCart plugin-based stores without any technical expertise.

5.0 Tutorial: Watch the Video Guide

To help you set up and use the Opencart Video Manager Plugin, we have created a comprehensive YouTube tutorial. This step-by-step video guide walks you through the installation process, configuration options, and how to effectively add and manage video content on your store.

6.0 Support & Assistance

If you encounter any issues during installation or usage, please contact our support team via:

We are happy to assist you with configuration, troubleshooting, or feature-related questions for your OpenCart video integration plugin.

OpenCart Google Tag Manager (gtag, GA4, GTM Events) Extension – User Manual

The Knowband OpenCart Google Tag Manager Extension is a powerful plugin designed to simplify the integration of Google Tag Manager (GTM) with your OpenCart store. With its intuitive interface, the Opencart Google Tag Manager Plugin enables store owners to add and manage various Google tags without requiring technical expertise. It allows you to monitor essential events such as product views, category, add-to-cart actions, remove-from-cart events, check-out events, payment events, shipping events, and order confirmations, giving you valuable insights into customer interactions.

Additionally, the OpenCart Google Tag Manager Plugin seamlessly captures UTM parameters, helping store owners to analyze the impact of their marketing campaigns. By leveraging the OpenCart Google Marketing Integration Plugin, e-merchants can identify which campaigns drive the most traffic and conversions, enabling smarter ad spend allocation and improved return on investment (ROI).

The Knowband’s OpenCart Google Tag Manager is Ideal for businesses looking to enhance tracking data or analytics about the stores and events, boost conversion rates, and improve the shopping experience. The Knowband OpenCart Google Tag Manager Extension supports Google Analytics, GA4, and other Google marketing tools, making data-driven decision-making easier and more efficient.

1.0 Key Features Offered by OpenCart Google Tag Manager Extension:

Seamless Google Tag Manager Integration: Easily connect Google Analytics, Google Ads, GA4, and other essential tracking tools to the OpenCart store without any coding skills required.

Live Event Tracking for Better Insights: The store owners can monitor key user actions in real time, such as Add to Cart, Product Views, Checkout events, applied coupons, as well as the payment& shipping methods, to gain instant insights into customer behavior.

Track Campaign Performance with UTM Parameters: Automatically capture UTM parameters to measure the success of your marketing campaigns and determine which channels drive the most traffic and conversions.

Advanced eCommerce Tracking for Data-Driven Decisions: Get in-depth analytics on product views, cart additions, and completed purchases to optimize your store’s sales performance.

Quick & Easy Setup – No Coding Required: With a user-friendly interface, the OpenCart GTM Extension makes tag management simple and stress-free, even for non-technical users.

Intuitive Admin Dashboard for Full Control: Manage and monitor all your tracking tags and events directly from your OpenCart admin panel with a clean, easy-to-use dashboard.

Multi-Language Support for Global Stores: The OpenCart GTM Extension supports multiple languages, allowing you to use it seamlessly in different regions and enhance the shopping experience for international customers.

2.0 Google Consoles IDs to Enable Functionality Knowband Opencart  Google Tag Manager Plugin

2.1 Steps to Get the Google Tag Manager ID

Step 1: Create the Google Tag Manager account.

Step 2: Create a new container or choose an existing container.

Step 3: The Container ID will look in this format GTM-XXXXXX and can be easily seen in the top-right corner of the interface of Google Tag Manager

 Step 4: Copy the Container ID and add it to the GTM container ID field in the configuration field.

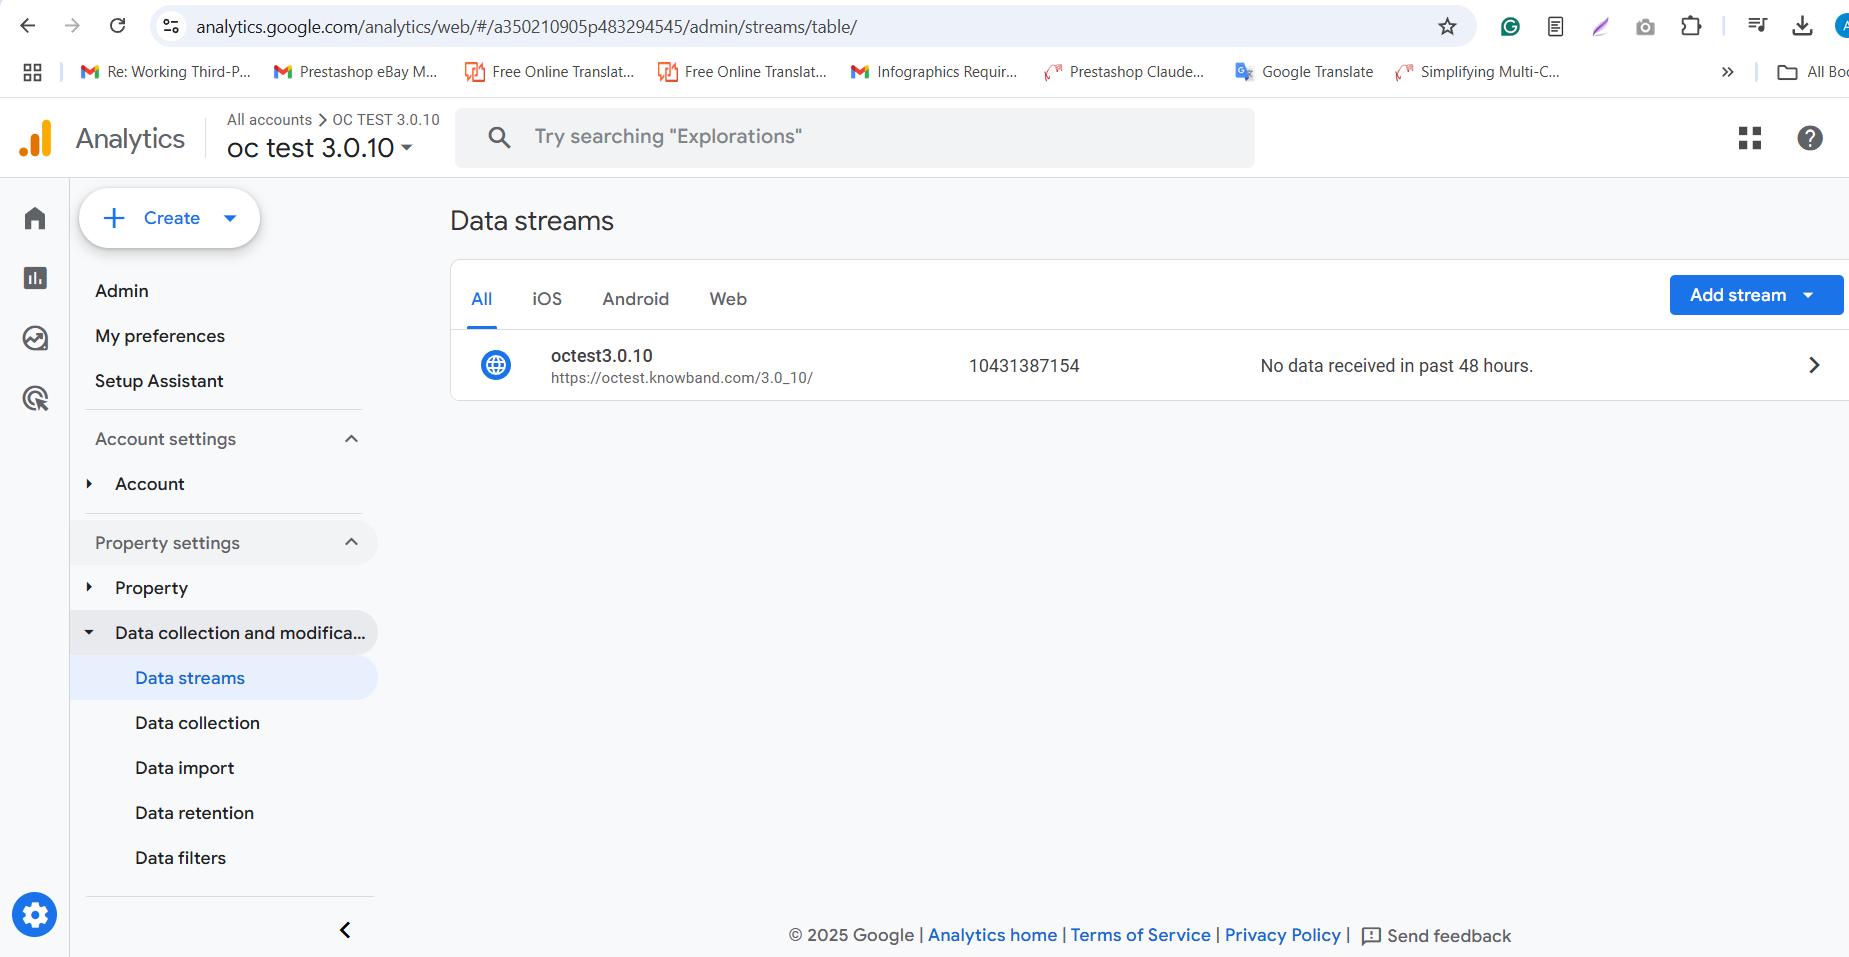
2.2 Follow these steps to get the Google Measurement ID 

Step 1: Visit the Google Analytics account.

Step 2: Select the property for which you want to get the Measurement ID.

Step 3: Navigate to Admin ->Data Streams and choose your web data stream.

Step 4: The Measurement ID will be in this format- G-XXXXXXXXXX.

Step 5: Copy the Measurement ID and add it to the Google Measurement ID field in the module’s configuration.


2.3 How to Configure Events in Google Tag Manager?

Step 1: Download GTM Events from the module configurations. You can find the direct download link under Configurations > Instructions tab.

Step 2: Log in to your Google Tag Manager account.

Step 3: In Google Tag Manager, go to Admin > Import Container.

Step 4: Select the downloaded GTM Event file from your system.

Step 5: Choose the workspace where you want to import the events and select the “Merge” or “Overwrite” options as required.

Step 6: Click Confirm to complete the import process.

Step 7: Save and publish your container to activate the events in your Google Tag Manager.

3.0 Steps to Set Up OpenCart Google Tag Manager in 3 Simple Steps

Once you’re ready to integrate Knowband’s Opencart Google Tag Manager with your OpenCart store, follow these three simple steps to get started with the OpenCart Google Tag Manager Extension:

Purchase the OpenCart Google Tag Manager Extension from the Knowband store. You’ll get the following file: a Zipped File containing the source code of the module.

Follow the steps mentioned below to install the OpenCart Google Tag Manager plugin in your store:

Step 1: Purchase the Extension, and then you will receive a ZIP file containing the module’s source code.

Step 1: Extract and Upload Files

  1. Unzip the downloaded file – this will contain the kbgtag. OCMod file and necessary folders.
  2. Go to the upload folder and locate the admin and catalog files.
  3. Copy these files into the root directory of your OpenCart store

Step 2: Install and Activate the Module

Go to Extensions > Installer in your OpenCart admin panel.

  1. Upload the kbgtag.ocmod file in the installer.
  2. Go to Extensions > Modifications and click Refresh to apply the changes.

Integrate your store with Prestashop Google Tag Manager

No Coding Skills Required

Buy Now

4.0. Admin Panel Overview:

The Google Tag Manager for OpenCart offers an easy-to-use admin dashboard for OpenCart store owners. The store admin can easily set up and manage all tags directly from the Opencart admin panel. 


Enable or Disable Extension: The store admin can easily turn the module on or off whenever needed.

GTM Container ID: Enter the GTM Container ID in the box. The admin can find this ID by following the steps in section 1.1.

Google Analytics ID: Enter your Google Analytics Measurement ID here to connect Google Analytics with GTM for tracking.

Track Page Views: You can turn on or off the “Page View” tag to track when customers visit different pages.

Category Views: Control the “View Category” tag to track when customers view product categories on your site.

Product Details Page: Turn on the “View Product Details” tag to track when a customer looks at a specific product page.

Cart Removal: Enable or disable the tag that tracks when items are removed from the shopping cart.

Add to Cart: Turn the “Add to Cart” tag on or off to track when items are added to the cart.

Checkout Start: Turn on the tag to track when a customer begins the checkout process.

Checkout Page: Enable or disable the tag that tracks activity on the checkout page.

Address Selection: Turn on the tag to track when customers add or select their shipping address during checkout.

Shipping Method Choice: Enable the tag to track when customers choose their shipping method during checkout.

Order Confirmation: Control the “Order Confirmation” tag to track when a customer completes an order.

Discount Code Use: Turn on or off the “Apply Discount Code” tag to track when customers use a discount code.

Discount Code Removal: Enable or disable the tag that tracks when customers remove a discount code.

Cart Views: Use the “View Cart” tag to track when customers look at their shopping cart.

Customer Login: Enable or disable the tag that tracks when a customer logs into their account.

Customer Registration: Turn on or off the tag to track when customers create an account on your site.

Add to Wishlist: Enable the “Add to Wishlist” tag to track when a customer adds an item to their wishlist.

Track Remove from Wishlist: Turn on or off the tag that tracks when a customer removes an item from their wishlist.

 Search Product Tracking: Manage the tags for products that customers search for on your store.

Capture UTM Parameters: The store admin can enable or disable the capture of UTM parameters using this toggle button.


5.0 Steps to Preview Events in Google Tag Manager Plugin

Steps to Preview an Event in OpenCart Google Tag Manager Extension

Step 1: Log in to your Google Tag Manager account.

Step 2: Select the container associated with your OpenCart store.

Step 3: Click on the Preview button in the top-right corner.

Step 4: Enter your OpenCart store URL in the Tag Assistant popup and click Connect.

Step 5: Perform the action you want to track (e.g., adding a product to the cart or completing checkout).

Step 6: Go back to the Tag Assistant window to check if the event is firing correctly.

Step 7: If the event appears in the Tag Assistant, it is working correctly. Otherwise, troubleshoot using the event details shown.


6.0 Configuration Instructions:

The OpenCart no-code Google Tag Manager integration offers simple instructions that require no technical expertise for module setup. The store admin can easily visit the Google Tag Manager and Google Analytics Consoles and follow the easy steps to obtain the necessary credentials.

These instructions will help the store admin with extension configuration. However, if you face any issues during the setup or with the extension, you can reach out to us by emailing support@knowband.com or by raising a ticket at knowband.com/helpdesk.

OpenCart Gemini/ Claude/ ChatGPT/DeepSeek Content Generator/Translator Extension – User Manual

The OpenCart AI Content Generator Extension is a powerful plugin designed to create and translate content for OpenCart store owners. By seamlessly integrating the advanced capabilities of Claude AI, ChatGPT API, DeepSeek API and Gemini API, the AI Content Generator and Translator for OpenCart enables store owners to generate high-quality, SEO-optimized product content. The OpenAI Content Translator Extension includes descriptions, titles, category content, meta titles, and meta descriptions, all while preserving authenticity.

Moreover, the OpenCart AI-powered Translator Plugin by Knowband provides seamless translation services across multiple languages, ensuring your OpenCart store can effectively reach global markets. As a result, store owners can generate professional content effortlessly, saving countless hours of manual writing and editing work. Additionally, the Extension enhances efficiency, as it streamlines both content creation and translation processes.

Furthermore, the OpenCart AI Bulk Content Generator Extension integrates smoothly with all three AI platforms (Claude, Gemini, DeepSeek, and ChatGPT). Whether you’re creating new content or translating existing product information, the extension ensures accuracy, consistency, and speed. Likewise, it minimizes errors, maintains brand voice, and improves content quality.

Meanwhile, the OpenCart SEO Content Generator Plugin ensures all content strictly follows SEO best practices. Consequently, this helps improve search rankings on Google and other search engines. In turn, better rankings lead to higher visibility, more traffic, and increased conversions. Thus OpenCart AI Content Extension is an essential plugin for OpenCart store owners who want to enhance productivity and maximize their reach.

1.0.0 Key Features Of the OpenCart AI Content Generator Extension

  • AI-Powered Content Generation- The OpenCart AI Content Generator and Translator Extension automatically creates high-quality product and category descriptions, meta titles, and meta descriptions by leveraging advanced AI technology, including DeepSeek, ChatGPT, Claude, and Gemini.
  • Seamless Multilingual Translation- Translate the content into multiple languages while maintaining accuracy and cultural relevance, allowing e-merchants to expand into international markets without hiring expensive translation services.
  • Enhanced SEO Performance- All generated and translated content is optimized for search engines, improving your store’s and product rankings and boosting store visibility through strategic keyword placement and best SEO practices.
  • Flexible AI Model Selection- The OpenCartAI Content Generator Extension provides a variety of AI models for both content creation and translation. Store owners can select from ChatGPT options like GPT-3.5 and GPT-4.0, Claude models such as Haiku 3, Haiku 3.5, Sonnet 3.5 (Old), and Sonnet 3.5 (New), along with Gemini variants, including Gemini 1.5 Pro, 1.5 Flash, 1.5 Flash-8b, 2.0 Flash, and 2.0 Flash – Lite Preview as well as DeepSeek Chat & Reasoner.
  • User-Friendly Interface- No technical expertise is required. The OpenCart AI Content Generator Extension provides an intuitive interface that makes content generation straightforward and informative, allowing even non-technical store owners to create professional content with just a few clicks.
  • Bulk Processing Capabilities- The perfect solution for stores with large product catalogues, enabling you to generate content for multiple products simultaneously and saving hours of manual work.
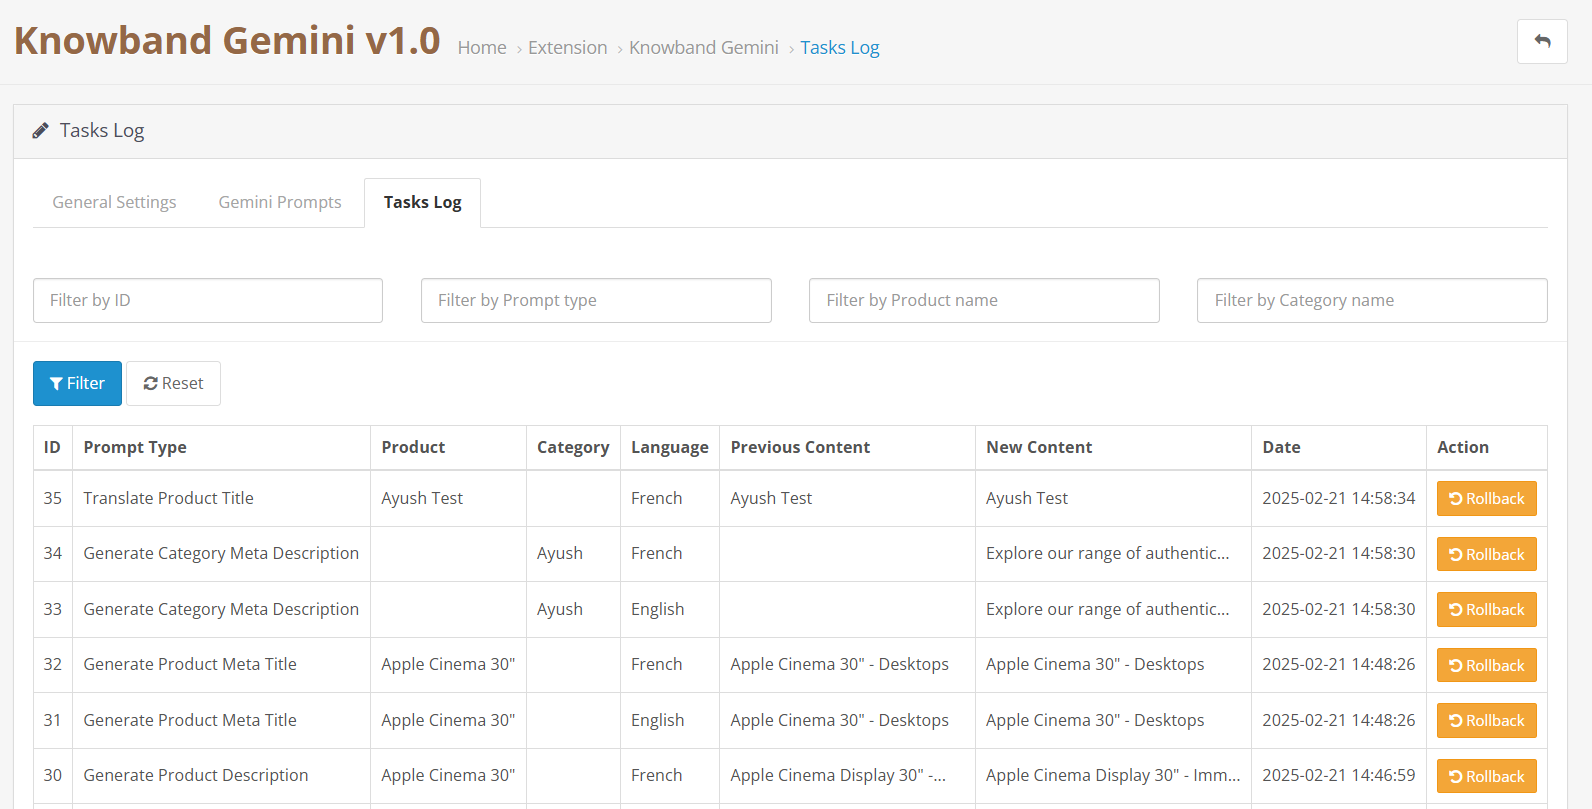
  • Comprehensive Activity Tracking- Records every action taken within the plugin, including timestamp and summary of changes, providing clear logs of all content generated and translated modifications.
  • Smart Product Categorization- Intelligently suggests appropriate product categories based on descriptions, helps in organizing your store more efficiently and ensures products appear in the most relevant sections.
  • Market-Specific Content Adaptation- Adjusts content for different target markets by considering local preferences, language, and cultural differences to make it more relevant and increase conversions.

2.0.0 Benefits of  Knowband’s OpenCart AI Content Generator Extension to E-Merchants

  • Time Savings- OpenCart Claude Content Translator Plugin quickly generate high-quality content in minutes, reducing manual effort. Focus on core business tasks instead of content creation.
  • SEO Improvements- AI-optimized content enhances search engine rankings and increases organic traffic. Ensure product descriptions and meta tags follow SEO best practices.
  • Global Reach- Translate your entire store into multiple languages effortlessly using OpenCart Content Translator & Generator Plugin. Expand into international markets and reach a wider audience.
  • Content Quality- OpenCart Content Translator & Generator Plugin allows the e-merchant to generate professional, engaging, and well-structured product descriptions. AI ensures accuracy while maintaining brand consistency.
  • Cost Efficiency- Save money on hiring copywriters and translators. AI Content Generator for OpenCart AI Content Translator reduces operational costs without compromising quality.
  • Competitive Advantage- Utilize advanced AI technology to stay ahead of competitors. Improve efficiency and offer better product information than rivals.
  • Enhanced User Experience- Detailed and engaging content helps customers make informed decisions. Improve conversions with clear and compelling product descriptions.
  • Performance Tracking- Monitor AI-generated content with a built-in task log. Keep track of past changes and refine content strategy over time

Automate the Content Generation and Translation on Your Prestashop Store

No Coding Skills Required

SHOP NOW

3.0.0 Installing the OpenCart AI Content Generator Plugin

Setting up the OpenCart AI Content Translator Plugin is simple. Follow the steps below to install and configure it easily.

What You Receive Upon Purchase:

  • A zipped file containing the OpenCart AI Content Translator extension.
  • A user manual to guide you through installation and setup.

Follow these steps for Installation

Step 1. Unzip the Downloaded File
Go to My Account > Downloads, locate the zipped file, and extract it. Once unzipped, you’ll see relevant folders.


Step 2. Transfer Files to the Root Directory

Use an FTP manager to copy the extracted files to your OpenCart root directory.

Step 3. Complete the Installation
The plugin is now installed and ready for configuration.

Step 4. Access and Configure the Extension
Go to Admin Panel > Main Menu > Extensions, select AI Content Generator Plugin by Knowband and click Edit to customize settings.


4.0 How to Generate the API Key for Knowband’s OpenCart AI Content Translator Plugin

Steps to Generate Claude API

  1. Visit Anthropic’s website, and click “Start Building”.
  2. Sign up for an account, go to your Dashboard, generate an API key, and store it securely.

Steps to Generate Gemini API

  1. Visit the Google AI Studio website.
  2. Click “Get API key,” accept the terms of service, create your key, and paste it into the configuration settings.

Steps to Generate ChatGPT API for OpenCart ChatGPT Plugin

  1. Go to OpenAI’s website and sign in.
  2. Click on View API Key and select Secret key.
  3. Make sure to copy the key immediately and store it safely.

Important- Billing Requirements

To generate a ChatGPT API key for the Knowband AI Content Translator Plugin, store owners need to set up billing in their OpenAI account. This means adding a payment method and ensuring you have enough credits or an active subscription to use the API. Without a billing setup, the API key won’t work.

Steps to Generate DeepSeek API for OpenCart DeepSeek AI Plugin

  1. Access the Deepseek platform via this URL https://platform.deepseek.com/api_keys to generate the API Key. Login or Signup to generate API Key
  2. Click on Create API Key after adding the key name.
  3. Copy or store the key to enable functioning of DeepSeek AI Content Generator Plugin

5.0.0 Admin Interface of OpenCart Gemini AI Content Generator Extension 

5.0.1 General Settings 

The OpenCart Gemini AI Content Generator Extension allows administrators to configure various AI settings and manage bulk content operations:

Configuration Options:

  • Enable/Disable- Turn the extension on or off as needed, allowing you to manage AI-generated content effortlessly.
  • API Key Configuration- Enter and store API keys for all AI engines, including Claude, ChatGPT, and Gemini, ensuring smooth functionality.
  • Enable/Disable the Claude- Easily activate or deactivate the Claude AI Engine with a single click.
  • API Key for Claude- Provide the required API key to unlock Claude AI’s content generation and translation features.
  • Select Claude Model for Generation- Choose from multiple Claude AI models, including Haiku 3, Haiku 3.5, Sonnet 3.5 (Old), and Sonnet 3.5 (New), for AI-powered content creation.
  • Select Claude Model for Translation- Pick the most suitable Claude AI model for translations, such as Haiku 3, Haiku 3.5, Sonnet 3.5 (Old), or Sonnet 3.5 (New).
  • API Key Configuration-Store and manage API keys for Claude, ChatGPT, and Gemini AI engines to enable seamless content generation and translation.
  • Enable/Disable the ChatGPT-Turn ChatGPT AI Engine on or off to control AI-generated content in your store.
  • API Key for ChatGPT- Enter the ChatGPT API key to activate content generation and translation capabilities.
  • Select ChatGPT Model for Generation- Choose between ChatGPT 3.5 and ChatGPT 4.0 for generating high-quality, SEO-friendly content.
  • Select ChatGPT Model for Translation- Select either ChatGPT 3.5 or ChatGPT 4.0 to translate content accurately while maintaining context.
  • Enable/Disable the Gemini AI- Activate or deactivate the Gemini AI Engine to manage content creation and translation efficiently.
  • API Key for Gemini- Provide the necessary API key to enable the Gemini AI Engine’s functionality.
  • Select Gemini Model for Generation- Select from various Gemini AI models like Gemini 1.5 Pro, 1.5 Flash, 1.5 Flash-8b, 2.0 Flash, or 2.0 Flash – Lite Preview for generating content.
  • Select Gemini Model for Translation- Pick a suitable Gemini model—1.5 Pro, 1.5 Flash, 1.5 Flash-8b, 2.0 Flash, or 2.0 Flash – Lite Preview to translate content seamlessly.
  • Enable/Disable the DeepSeek: Turn DeepSeek AI Engine on or off to use this  AI mode.l
  • API Key for DeepSeek- Enter the DeepSeek API key to activate content generation and translation.
  • Select DeepSeek Model for Generation- Choose between Deepseek Chat or DeepSeek Reasoner for generating the content for the products and categories.
  • Select DeepSeek Model for Translation- Select either Deepseek Chat or DeepSeek Reasoner to translate content accurately while maintaining context.
  • Model Selection– Easily select from available models across Claude, ChatGPT, DeepSeek and Gemini AI for content generation and translations.
  • Temperature Control- Adjust the AI creativity level using temperature settings (0.0 to 1.0). Higher values make content more creative, while lower values keep it consistent.
  • Token Limit- Set a maximum token limit for content generation across Claude, ChatGPT, DeepSeek and Gemini AI models
  • Primary Language- Define the main language for AI-generated content and translations to ensure consistency.
  • Target Languages- Select multiple languages for translations to reach a wider audience and enhance global accessibility.

5.0.2 Content Generation & Translation Prompts for OpenCart Gemini AI Content Generator Plugin

The OpenCart Gemini AI Content Generator plugin includes 14 pre-configured AI prompts designed specifically for e-commerce:

Product Content Generation & Translation Prompts of OpenCart AI Content Extension:

  • Generate Product Description – Creates SEO-friendly, structured product descriptions highlighting key features and benefits.
  • Generate Product Meta Title – Produces optimized titles under 60 characters with relevant keywords.
  • Generate Product Meta Description – Creates compelling descriptions within 140 characters.
  • Translate Product Title – Converts product titles into selected languages.
  • Translate Product Description – Translates descriptions while preserving HTML formatting.
  • Translate Product Meta Title – Converts meta titles to different languages.
  • Translate Product Meta Description – Translate meta descriptions while maintaining readability.

Category Content Generation & Translation Prompts:

  • Generate Category Description – Develop category content with proper HTML formatting.
  • Generate Category Meta Title – Creates keyword-rich category titles under 60 characters.
  • Generate Category Meta Description – Produces concise category descriptions within 140 characters.
  • Translate Category Title – Converts category titles to multiple languages.
  • Translate Category Description – Translates category descriptions with HTML formatting.
  • Translate Category Meta Title – Converts category meta titles to selected languages.
  • Translate Category Meta Description – Translates category meta descriptions across languages.

5.0.3 Task Log System of OpenCart AI Content Extension

The OpenCart AI Content Generator and Translator extension records all AI-generated and translated content, including prompt type, language, product/category, timestamp, status, previous content, and new content. This log helps track changes, review past updates, and monitor content evolution.

6.0 Bulk Content Generation by OpenCart AI Content Generator

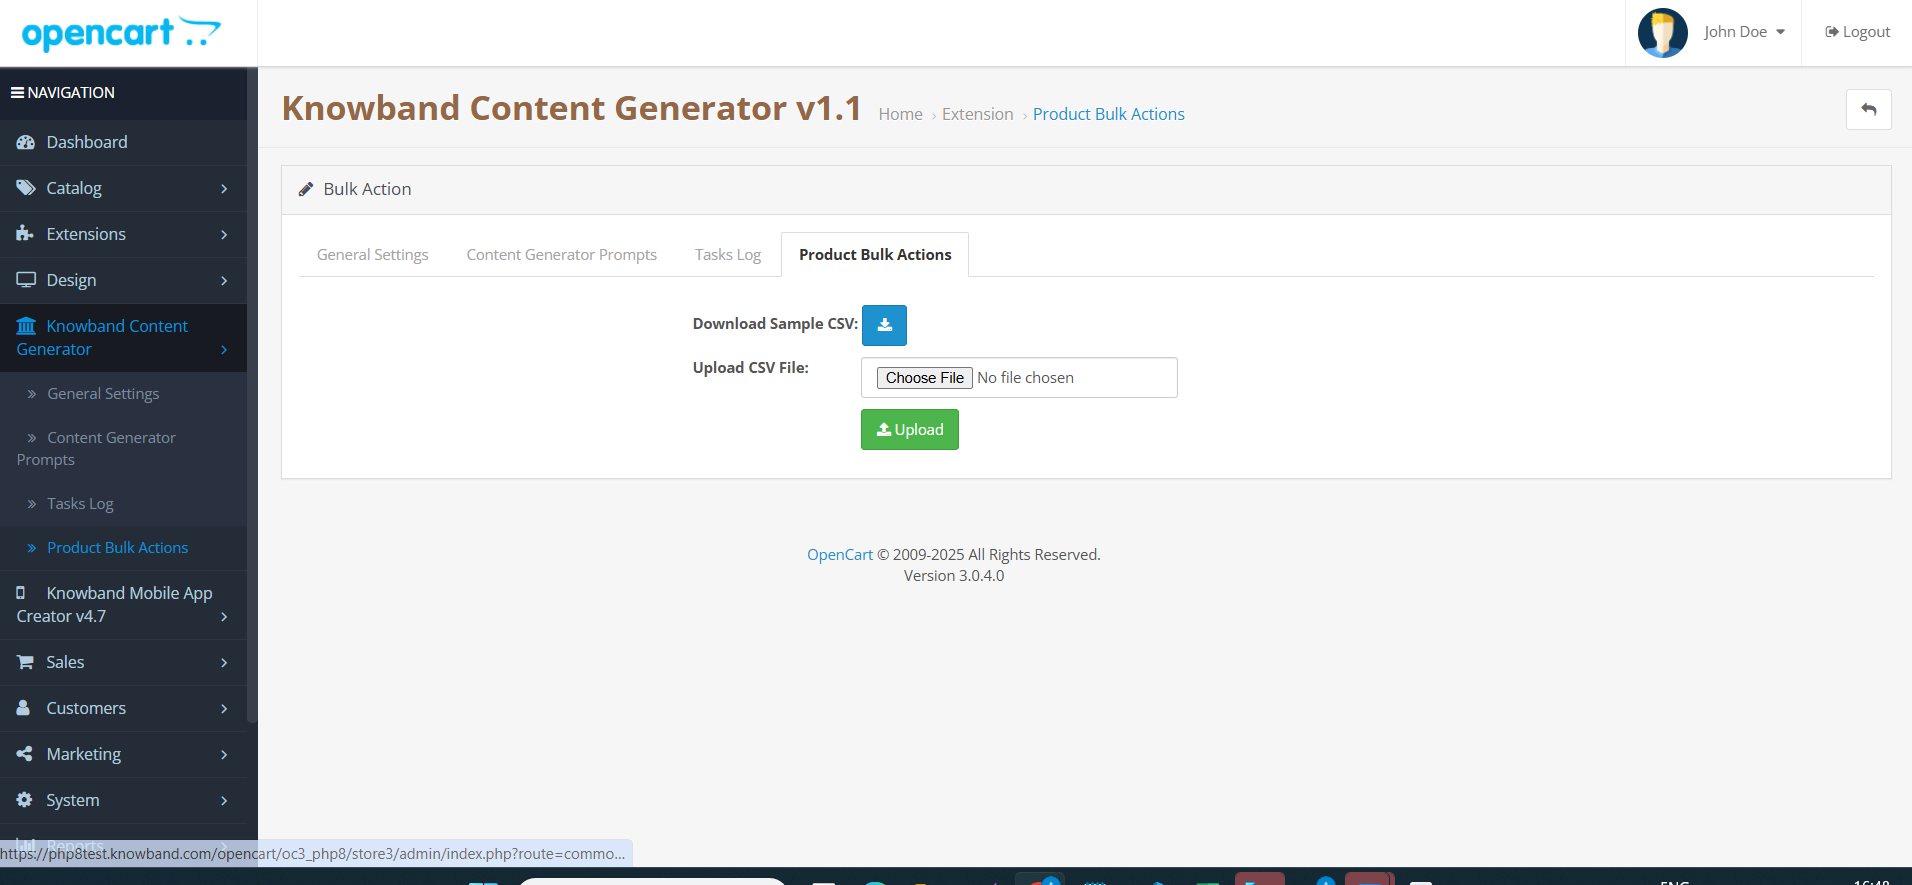
The AI Content Generator Extension for OpenCart allows the store admin to upload the CSV File which will contain the product id with with 67columns of Prompts like Generate Product description, Generate Product Meta description, Generate Product meta description, Translate Product  Description, Translate Product Titles, Translate Product Meta Description and Product meta title translation.

Moreover, the extension follows this algorithm if the generate product description will contain 1 in field then the content will be generated.

6.0 Steps to Execute OpenCart AI Content Prompt

To generate or translate content using OpenCart DeepSeek Content Translator Extension

  1. Navigate to Products or Categories in your admin panel.
  2. Select the items you want to work with.
  3. Click on the Bulk Actions menu.
  4. Choose the desired AI operation (Description, Meta Title, Translation, etc.).
  5.  Select which AI engine to use for the task.
  6. Click the prompt you want to execute.
  7. Review and approve the generated content.

7.0 Tutorial: Watch the Video Guide

To help you set up and use the Opencart AI Content Generator, we have created a comprehensive YouTube tutorial. This step-by-step video guide walks you through the installation process, configuration options, and how to effectively translate & generate the content on your store.

OpenCart Claude Content Generator/Translator Extension – User Manual

The Knowband OpenCart Claude AI Content Generator/Translator  Extension is a cutting-edge extension designed to simplify content creation and translation for OpenCart store owners. Leveraging the advanced capabilities of Claude AI, the module helps merchants craft high-quality product descriptions, product titles, category descriptions, meta titles, and meta descriptions while ensuring SEO-friendly content.

The AI-powered translation feature also allows seamless integration with Claude AI, enabling accurate translations to help businesses expand their reach globally.

With this powerful extension, OpenCart store owners can generate engaging and original content effortlessly. Thus, Knowband’s OpenCart AI Content Generator enhances creativity in product descriptions and ensures all generated content aligns with search engine optimization best practices.

Furthermore, the module integrates smoothly with Claude AI API, offering a hassle-free experience for both content generation and translation. The built-in SEO optimization features help improve search rankings while maintaining content integrity.

Whether managing a small boutique or a large e-commerce store, the Knowband OpenCart Claude AI Content Generator streamlines content workflows, ensuring consistency across product listings. The module’s user-friendly interface and robust AI capabilities make it a must-have extension for any OpenCart store looking to scale efficiently.

1.0 Key Features of OpenCart Claude AI Content Generator & Translator Plugin 

Create Content Instantly with AI- The OpenCart Claude SEO Content Generator plugin by Knowband allows store owners to craft SEO-optimised product & category descriptions, meta titles, and descriptions. Additionally, the Opencart Claude AI Generator plugin ensures that the content is informative, and optimized for SEO.

Powered by Advanced AI Technology –The extension uses Claude 3.5 Sonnet, Claude 3 Opus, and Claude 3 Haiku to create unique and high-quality content. 

Easily Translate Content for Global Reach- The store owners do not need to manually translate product descriptions anymore. Therefore, this AI-powered plugin ensures accurate and natural translations, making it simple to reach customers in different countries.

Improve SEO with Optimized Content- The OpenCart Claude AI Content Generator module ensures that all generated and translated content follows SEO improving rankings on Google. Thus, Integrating relevant keywords naturally helps boost sales and traffic.

Simple Installation & Easy to Use- Designed for a user-friendly setup, the OpenCart Claude AI Content Generator Plugin is easy to purchase and configure. Therefore, the setup is quick and simple, and the interface is designed to be user-friendly for all opencart store owners.

Generate Bulk Content in Seconds – This addon is perfect for stores with large product base catalogues, allowing e-merchants to generate and translate SEO Optimized content for multiple products simultaneously. Therefore, it helps in saving time and effort.

Supports Multiple Languages & RTL Scripts – Whether the customers speak English, Spanish, Arabic, or any other language, this addon supports them all. It also works with right-to-left (RTL) languages.

Customize Content to Fit Your Brand- Furthermore, store owners can customize content length, tone, and style to align with their brand voice, ensuring consistency across all product listings.

2.0 Installation Guide

Setting up the Opencart Claude Module is simple. The e-merchants must follow the simple steps to complete the installation process easily.

When you purchase the Knowband Claude Content Generator/Translator Extension, you will get the following files:

  • A zipped file containing the source code for the Opencart Claude content Translator Extension.
  • A user manual for the extension to assist you further.

Steps to Install the Extension:

  1. Unzip the Downloaded File:

Locate the zipped file in your account under My Account > Downloads and extract it. Once unzipped, you’ll see folders similar to those shown in the illustration below:

  1. Transfer Files to the Root Directory

Use an FTP manager to copy all the files and folders from the unzipped folder to the root directory of your Opencart setup.

  1. Complete the Installation

The module is now successfully installed and ready for configuration.

  1. Access and Configure the Extension

Navigate to the Admin Panel > Main Menu > Extensions.

3.0 How to Generate the Claude API Key for Module Configurations?

The store owners must get an API key to enable functionality in your opencart store.

Steps to generate the API Key for OpenCart Claude AI Content Generate Extension:–

Step 1: Obtain an API Key:

Step 2: Paste the API Key in the Opencart Store:

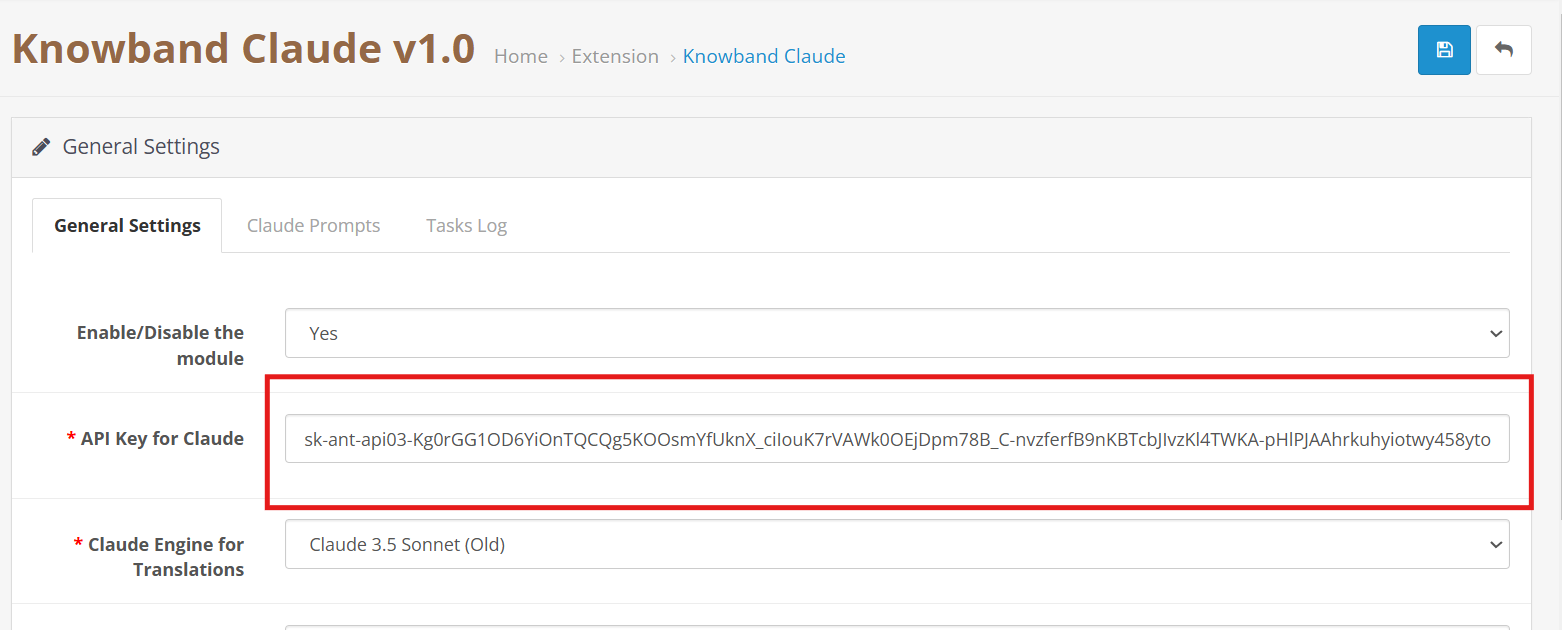
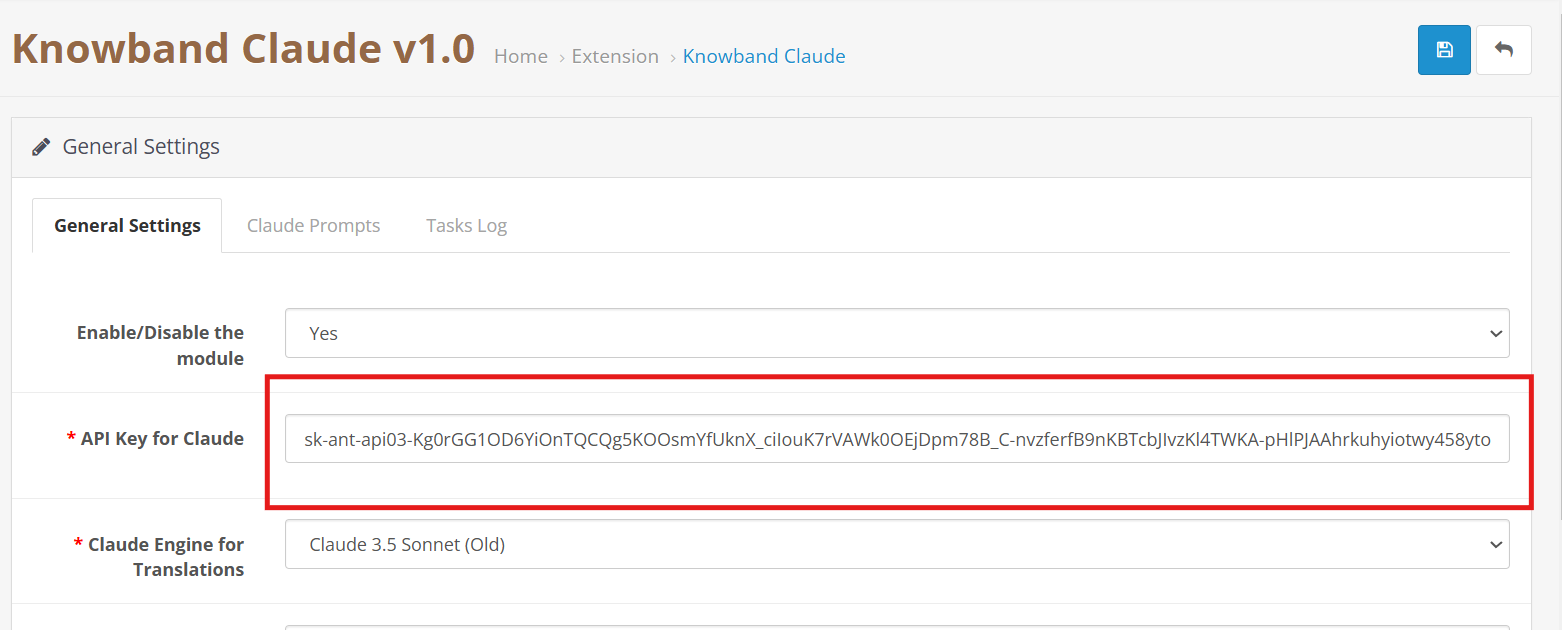
  • In your Opencart Store’s Backend, go to the Knowband Claude AI General Settings page.
  • Add the API Key into the given API Key for the Claude block.

Step 3: Save the Settings:

  • After inserting the API Key in General Settings, click Save to Module settings. The Claude AI module will now use this key to interact with the Claude API.

4.0 Admin Interface Overview:

4.0.1 General Setting:

The Opencart Claude Content Translator Plugin by Knowband allows the e-merchant to configure general settings and manage operations efficiently. Therefore, the Knowband provides an intuitive interface that allows the e-merchants to configure the module.

Here is a Brief Overview of the features of the Module

Enable/Disable:  E-merchants can enable or disable the OpenCart Claude AI Extension.

API Key for Claude: Add your Anthropic API Key in the required field.

Claude Model Selection: The module allows the e-merchant to select from Anthropic’s models, including Claude 3.5 Sonnet(new), Claude 3.5 Sonnet(old), Claude 3 Opus, and Claude 3 Haiku.

Temperature: Store owners can adjust the creativity level of the content which generally is between 0.0 to 1.0 – higher values represent more creative content, while lower values represent more consistent and focused results.

Maximum Tokens: Store owners can control how much text the AI generates. By default, it uses 2,000 tokens.

Select Claude Engine: E-Merchants can choose which Claude model to use specifically for translation tasks.

Primary Language Content Generator: Choose your primary language for automatic content generation and translation.

Target Languages: The store owners to select which languages they want content translated into.

4.0.2. OpenCart Claude Prompts:

The Extension contains 14 pre-configured prompts designed generator and translator.

Knowband’s OpenCart Claude AI Content Translator Extension– AI Prompts

Product Content Generation

Generate Product Descriptions – Creates SEO-friendly product descriptions with key features and benefits.

Generate Product Meta Titles – Writes optimized meta titles (under 60 characters) with keywords to boost search rankings.

Generate Product Meta Descriptions – Creates concise meta descriptions (within 140 characters) that highlight product details.

Product Content Translation

Translate Product Titles – Converts product titles into multiple languages as needed.

Translate Product Descriptions – Translates descriptions while keeping formatting intact.

Translate Product Meta Titles – Translate meta titles while maintaining the store’s tone and style.

Translate Product Meta Descriptions – Ensures accurate and well-structured translations of product meta descriptions.

Category Content Generation

Generate Category Descriptions – Creates category descriptions while keeping formatting intact.

Generate Category Meta Titles – Writes SEO-friendly meta titles (under 60 characters) with relevant keywords.

Generate Category Meta Descriptions – Generates short and optimized meta descriptions (within 140 characters) with focus keywords.

Category Content Translation

Translate Category Titles – Translates category titles into different languages based on store needs.

Translate Category Descriptions – Translates descriptions into multiple languages while preserving HTML structure.

Translate Category Meta Titles – Ensures SEO-friendly translations of category meta titles.

Translate Category Meta Descriptions – Translates category meta descriptions with accuracy and clarity.

4.0.3. Claude Prompts Task Log:

Knowband OpenCart Claude AI Content Translator Extension Module Task Log

The task logs keep a comprehensive record of all executed prompts with details like Prompt Type, Product, Category, Language, Previous Content, New Content, and time.

5.0 Steps to Execute Claude Prompts?

Knowband OpenCart Claude Prompt Execution Steps

Choose your desired products or multiple products access the Bulk Actions and select the prompt that you want to execute.

Generate Product Descriptions: Write or generate details for many products at once instead of one by one.

Generate Product Meta Titles: Make search-friendly titles for multiple products together to improve online visibility.

Generate Product Meta Descriptions: Create informative summaries for many products simultaneously that help shoppers understand what you offer.

Translate ProductTitles: Convert your product names into different languages to reach international customers.

Translate Product Descriptions: Transform your product information into various languages so more people can understand what you sell.

Translate Product Meta Titles: Turn your search titles into multiple languages for better global search visibility.

Translate Product Meta Descriptions: Use Knowband’s Claude AI to translate product summaries into different languages all at once.

OpenCart Gemini AI Content Generator/Translator Extension – User Manual

The Knowband’s Opencart Gemini AI Content Generator is a powerful extension that makes content creation easy for Opencart store owners. The OpenCart Gemini content generator uses AI, that allows store owners to generate high-quality and creative product descriptions, product titles, category descriptions, meta titles, meta descriptions, and SEO- optimized content.

The AI-powered translation Extension for the OpenCart seamlessly integrates with Google’s Gemini AI API, providing a smooth experience for content generation and translation. Therefore, with built-in SEO optimization features, the OpenCart Gemini content generator Extension ensures all generated content is original, engaging, and search engine friendly. Moreover, the translation capabilities of Knowband’s OpenCart Gemini content translator Extension allow merchants to expand their business to reach globally with perfect product information.

Whether you’re managing a small business or a large e-commerce marketplace, Knowband’s OpenCart Gemini content generator Extension streamlines your content workflow and ensures consistent quality across all product listings. Furthermore, the intuitive interface and powerful AI capabilities make it an essential Extension for any OpenCart store looking to scale content operations efficiently.

1.0. Key Features of  OpenCart Gemini AI Content Generator/Translator Extension

AI-Powered Content Generation

The OpenCart Gemini SEO Content Generator Extension leverages Google’s Gemini AI to create high-quality product descriptions, meta titles, and descriptions. Furthermore, it ensures content is engaging, informative, and optimized for search engines. 

Advanced AI Technology

The Gemini Extension for OpenCart utilizes Google’s latest Gemini AI models, including Gemini 2 Flash, Flash Light Preview, Gemini Flash 1.5, Gemini Flash 8B, and Gemini 1.5 Pro, which offers different generation modes for various content needs:

AI-Powered Translation

The  OpenCart Opencart translator Extension delivers accurate, context-aware translations for product content. Additionally, the OpenCart Gemini SEO Content Generator Supports multiple languages and preserves formatting and structure during translation.

User-Friendly Interface

The AI-powered translation Extension for OpenCart is simple to install and provides flexible and intuitive admin panel controls. Therefore, the store owners do not need to have coding experience or technical expertise.

Time Savings

The OpenCart Gemini content generator Extension automates time-taking tasks like writing product, and category descriptions and updating meta titles and descriptions. 

World-Wide Market Reach

The OpenCart Gemini content generator Extension’s feature allows the store to translate content into multiple languages to attract global customers.

2.0 How to Generate the Knowband OpenCart Gemini API Key for Extension Configuration

To enable Gemini AI functionality in your OpenCart Extension, follow these steps to obtain and configure your API key:

Step 1: Obtain an API Key

  1. Visit the Google AI Studio (https://aistudio.google.com/app/apikey)
  2. Click on “Create new secret key”. Copy this key for the next step.

Step 2: Enter the API Key in Your OpenCart Store:

  • In  Opencart Store’s BackOffice go to the “Knowband’s Gemini” General Settings page.
  • Paste the API Key into the provided “API Key for Gemini ” field.


Step 3: Save the Settings:

  • After pasting the API Key in General Settings, click “Save”. Now, you can use Knowband’s Gemini AI Extension.

Important:

Billing Requirement: Store owners must have a sufficient credit balance in their Google Gemini account for the API to function and run the Extension. If your credit balance is less, the API requests will not work in the Knowband’s Gemini AI Extension. Additionally, the store owners can check their balance and add credits by accessing the billing overview page at https://aistudio.google.com/app/apikey.

3.0 Admin Interface Overview:

3.0.1 General Setting:

The OpenCart Gemini AI Extension by Knowband allows the e-merchant to configure the Extension to perform operations within the store and manage bulk content operations efficiently.

Here is a Brief Overview of the features of the Extension

Enable/Disable: E-merchants can enable or disable the Opencart Gemini AI Content Generator depending on their needs.

API Key for Gemini AI: Enter your Generated API KEY from Google AI Studio in the required field.

Gemini AI Model Selection: Also, e-merchants can choose from Google’s latest Gemini AI models, including Gemini 2 Flash, Flash Light Preview, Gemini Flash 1.5, Gemini Flash 8B, and Gemini 1.5 Pro, which offers different generation modes for various content needs.

Temperature: The e-merchants can adjust the creativity level from 0.0 to 1.0 – higher values represent more creative content, while lower values represent more focused results.

Maximum Tokens: The Knowband’s Gemini Content Generator allows the admin to set a token limit (default: 500). The tokens represent text fragments.

Gemini AI Engine for Translations: Select which Gemini AI model to use for translation for the product and category details.

Primary Language: The admin can select the store’s default language for content generation and translation of the products

Target Languages: The Opencart Gemini Translator Extension provides the option to select which languages the store owners want their content to be translated.

3.0.2. Gemini AI Prompts:

The Extension features 14 pre-configured prompts designed for various e-commerce content needs:

Knowband’s Opencart Gemini AI Content Translator AI Prompts

Generate Product Description: The prompt creates SEO- optimized, well-structured, formatted product descriptions with key features, benefits, and many more.

Generate Product Meta Title: Creates SEO- optimized meta titles under 60 characters, including keywords and product categories to increase the search rank.

Generate Product Meta Description: The prompts generate meta descriptions of the product limited to 140 characters maintaining the information according to the product.

Translate Product Title: Translates the product titles to multiple different languages depending on the store’s need.

Translate Product Description: The prompt translates descriptions while preserving formatting and content.

Translate Product Meta Title: Translate meta titles to multiple different languages according to the store’s theme and tone.;

Translate Product Meta Description: The prompt translates meta descriptions to multiple different languages keeping the translated content focused and accurate according to the generated content.

Generate Category Description:  The prompt generated category descriptions while preserving formatting and content of the product.

Generate Category Meta Title: Also, translate category meta titles under 60 characters with related keywords keeping the title SEO Optimized.

Generate Category Meta Description: Creates category meta descriptions within 140 characters focusing on the meta keywords.

Translate Category Title: The prompt is to translate category titles into multiple different languages based on the needs of the store.

Translate Category Description: Translates category descriptions while maintaining HTML structure and generates category descriptions.

Translate Category Meta Title:  Translated category meta titles to multiple different languages depending on the store.

Translate Category Meta Description: Translates category meta descriptions to multiple different languages focused only on generated meta descriptions.

3.0.3. Gemini AI Task Log:

The task logs keep track of the changes and actions done within the store. Moreover, Knowband’s Gemini AI Extension maintains logs in the tasks log which helps the store owners to track, undo and revert changes in the task logs.


4.0. How to Execute Gemini AI Prompts?

The way to execute the prompt is to select the product for which you want to generate and translate content. Then select the prompt  and access bulk operations through Opencart Backend >> Products tab:

Knowband Opencart Gemini AI Prompt Execution Steps:

Select your desired products and access the Bulk Actions menu to choose from various content generation and translation options:

Generate Product Description: Generates the descriptions for multiple products at the same time.

Generate Product Meta Title: Generate the meta titles for the bulk of the product keeping the content SEO-optimized.

Generate Product Meta Description: Generate meta descriptions for multiple different products at the same time keeping the product informative to the customers and visitors. 

Translate Product Title: Convert product titles to multiple languages.

Translate Product Description: Translates the product’s description in selected multiple languages.

Translate Product Meta Title: Translated the selected meta titles to multiple languages for the products and categories.

Translate Product Meta Description: The Knowband’s Gemini AI Extension allows the admin to translate meta descriptions for bulk products at one time.

Opencart ChatGPT Content Generator | Opencart AI Translator Extension – User Manual

The Opencart ChatGPT Content Generator/Translator Plugin introduces a cutting-edge solution to simplify content management for your Opencart store. Utilizing advanced AI technology, this innovative plugin makes content creation and translation effortless, positioning itself as an essential tool for modern eCommerce businesses. Furthermore, with the Opencart ChatGPT Content Generator, you can craft captivating product and category descriptions, compelling product and category titles, and SEO-optimized content that enhances both your store’s visibility and customer satisfaction.

This AI-driven content generator goes beyond basic text generation by integrating seamlessly with Opencart, offering translation feature. The built-in Opencart ChatGPT Content Translator empowers store owners to enter new markets with contextually accurate, AI-powered translations.

Whether you’re managing multilingual content or aiming to enhance your overall content strategy, the Opencart ChatGPT Content Generator streamlines the process. Thus, combining ChatGPT Engines 3.5 and 4.0, this plugin helps merchants save time while delivering exceptional, multilingual content to elevate their online stores.

1.0 Key Features of Knowband’s Opencart ChatGPT Content Generator/Translator Plugin

  • Effortless Content Creation: Quickly generate high-quality product titles, detailed descriptions, and optimized meta tags with ease, all while ensuring consistency across your store while saving valuable time.
  • Dual AI Engine Support: Powered by ChatGPT models 3.5 and 4.0, the plugin provides advanced content generation and accurate translations tailored to diverse business requirements for products in bulk.
  • SEO-Optimized Output: Leverage AI to produce SEO-friendly content that boosts your store’s search engine rankings and drives increased traffic.
  • Simplified AI Translation: Effortlessly translate store content into multiple languages with this AI-powered translation tool, enabling global expansion with minimal effort.
  • User-Friendly Interface: Designed for store admins of no technical skills, the plugin features a straightforward setup process for seamless integration.
  • Category and Meta Tags Management: Efficiently generate and translate category names and meta descriptions for a polished, professional presentation.
  • Bulk Content Generation: Ideal for stores with large catalogs, the plugin allows batch processing of multiple items, significantly enhancing efficiency.
  • Enhanced Store Operations: Streamline content-related tasks for smoother product updates and improved operational performance, whether for small or large-scale businesses.
  • Multi-Language Compatibility: Supporting all languages, including RTL scripts, the plugin offers flexibility for global businesses.

2.0 Setting Up the ChatGPT Key for Your Plugin

To activate ChatGPT functionalities in your Opencart plugin, follow these steps to configure the API key:

Step 1: Generate an API Key

  1. Visit the OpenAI API Key Generation page.
  2. Log in to your OpenAI account or create one if you haven’t already.
  3. Click on “Create new secret key” to generate a unique API key.

Copy and securely save this key, as it will only be displayed once.

Important: Ensure Billing is Active

To avoid interruptions, confirm your OpenAI account has sufficient credits:

  1. Go to the OpenAI Billing Overview page.
  2. Check your balance and add funds if needed.
  3. Note that insufficient balance may cause API requests to fail.

With the API key in place and billing verified, your Opencart ChatGPT plugin will be ready to deliver exceptional content generation and translation capabilities for your store.

3.0 Installation Guide

Setting up the Opencart ChatGPT Plugin is straightforward. Follow the simple steps outlined below to complete the installation process with ease.

When you purchase the Knowband ChatGPT Content Generator/Translator Plugin, you will receive the following files:

  • A zipped file containing the source code for the Opencart ChatGPT Content Translator Extension.
  • A user manual for the extension to assist you further.

Steps to Install the Extension:

1. Unzip the Downloaded File:

Locate the zipped file in your account under My Account > Downloads and extract it. Once unzipped, you’ll see folders similar to those shown in the illustration below:

2. Transfer Files to the Root Directory

Use an FTP manager to copy all the files and folders from the unzipped folder to the root directory of your Opencart setup.

3. Complete the Installation

The module is now successfully installed and ready for configuration.

4. Access and Configure the Extension

Navigate to the Admin Panel > Main Menu > Extensions as displayed below:

Select the AI Content Generator Plugin by Knowband extension from the list of available extensions and click on the Edit button to begin customization.

4.0 Admin Panel Overview:

The module is equipped with an intuitive admin dashboard, enabling store administrators to manage it seamlessly, even without technical expertise.

1. General Settings Tab

Activate/Deactivate the Module: A simple toggle button lets the store admin enable or disable the module as needed.

API Key for ChatGPT Integration: Enter your ChatGPT API key to ensure the module functions smoothly. Refer to the steps above for generating the API key in just a few steps.

ChatGPT Engine for Content Creation:

The Opencart Content Generator/Translator Plugin Module supports two robust ChatGPT models:

GPT-3.5-turbo: A cost-effective and efficient choice for standard tasks.

GPT-4-turbo: A more advanced model, offering superior accuracy and enhanced contextual understanding.

Select the preferred engine from the dropdown menu.

ChatGPT Engine for Translations: Specify the ChatGPT model to be used for translating content into different languages.

Default Language for Translation/Content Generation: Select the default language for Content Generation and Translation.

Languages to Translate Content: Select the languages to translate the content.

Maximum Tokens: Enter the value of maximum tokens.

 2. ChatGPT Prompts:

1. Generate Product Description:
Create a detailed, SEO-friendly, and engaging description for the product {product_name} in the {category} Highlight key features, benefits, and use cases. Include HTML tags to make the content ready for web publishing.

2. Generate Product Meta Title:
Craft a concise, attention-grabbing meta title for the product {product_name} in the {category} Limit it to 60 characters, avoid double quotes, and incorporate the primary keyword to attract customers.

3. Generate Product Meta Description:
Write a compelling meta description for {product_name} in the {category} category, keeping it under 140 characters.

4. Translate Product Title:
Translate the provided product title, ensuring that only the translated content is returned.

5. Translate Product Description:
Translate the given product description while maintaining the HTML structure. Translate only the visible text and return the translated content.

6. Translate Product Meta Title:
Translate the provided product meta title, returning only the translated text.

7. Translate Product Meta Description:
Translate the specified product meta description, ensuring only the translated content is returned.

8. Generate Category Description:
Create an SEO-friendly description for the {category} The output should be detailed, formatted with HTML tags, and ready for a web page.

9. Generate Category Meta Title:
Develop a concise meta title for the {category} Limit it to 60 characters, include the main keyword, and make it appealing to potential customers while avoiding double quotes.

10. Generate Category Meta Description:
Write a compelling meta description for the {category} category, keeping it under 140 characters and avoiding double quotes.

11. Translate Category Title:
Translate the given category title, returning only the translated content.

12. Translate Category Description:
Translate the specified category description while preserving its HTML tags and structure. Only the visible text should be translated, and the translated content must be returned.

13. Translate Category Meta Title:
Translate the provided category meta title and return only the translated text.

14. Translate Category Meta Description:
Translate the given category meta description, ensuring that only the translated content is provided.

3.0 Task Log:

The following tab provide the admin with the data of performed tasks. You can find all the details including executed prompt type, product name, product category, language, previous content, and new content.

Also Available for Prestashop eCommerce Platform

SHOP NOW

The store admin also gets the option to filter out the data by filter ID, Prompt Type, and Product Name.  

5.0 How to Use ChatGPT Prompts?

To utilize the ChatGPT prompts, store administrators can navigate to Catalog >> Products within the admin panel.

Executing Prompts with the Opencart AI Content Generator

  1. Select the desired products from the list.
  2. Access the Bulk Actions tab, as shown in the image above.
  3. Choose the appropriate prompts to perform the required actions on the selected products.

This streamlined process allows admins to efficiently generate or translate content for multiple products in one go.

Opencart Product Preorder Plugin – User Manual

1.0. Introduction:

Are you an ambitious OpenCart store owner seeking a cutting-edge solution to boost your sales and customer satisfaction? Look no further! Presenting the Knowband Opencart product Pre-Order Extension, the ultimate tool to revolutionize the way you manage pre-orders, backorders, and advance bookings for your products.

The Opencart Product Backorder Extension is a powerful, feature-rich module designed exclusively for OpenCart merchants. It offers a seamless and hassle-free way to enable pre-order functionality on your store. Empowering your customers to book upcoming products in advance. Furthermore, the OpenCart product Advance Booking Plugin comes packed with robust features to cater to a variety of pre-order scenarios, making it the ultimate choice for any e-commerce business.

1.1. Key Features Offered by OpenCart Product Preorder Plugin:

Pre-Order Functionality:

With our extension, you can effortlessly offer pre-order options for upcoming or out-of-stock products. Ensuring your customers never miss the chance to secure their desired items in advance.

Advance Booking Made Easy:

Now, you can streamline the booking process for upcoming products. Customers can reserve their favorite products in advance and eagerly await their release, driving excitement and anticipation.

Real-time Status Updates:

Keep your customers informed at all times! The OpenCart Sell Out-of-Stock Products plugin provides real-time notifications on pre-order, backorder, and advance booking status, ensuring transparency and building trust.

Customizable Pre-Order Button:

Tailor the pre-order button to match your store’s theme, attracting attention and encouraging customers to reserve their products effortlessly.

Inventory Management:

Knowband’s OpenCart Preorder Module ensures efficient inventory management by allowing you to set pre-order limits and automatically disabling pre-orders when stock is available.

Seamless Integration:

Opencart Pre-Order Extension seamlessly integrates into your existing OpenCart store, requiring no complex coding or technical expertise.

Boost Sales & Revenue:

By offering pre-order options, you can drive product demand, increase sales, and maximize revenue potential like never before.

Pre-Order Pricing Options:

Offer flexible pricing for pre-order items. You can set special prices for pre-orders, giving your loyal customers exclusive discounts and incentives.

Partial Payments for Pre-Orders:

Allow customers to make partial payments for their pre-ordered products. Making it easier for them to secure their desired items without breaking the bank.

Pre-Order Stock Notifications:

With the help of the OpenCart Product Advance Booking Plugin, the store admin can enable the customers to receive email notifications when pre-ordered products are back in stock, ensuring they never miss the chance to complete their purchase.

SEO-Friendly:

The extension is designed with SEO best practices in mind. Furthermore, it ensures that pre-order products can be indexed by search engines, boosting your store’s visibility and driving organic traffic.

Cart Rules for Pre-Orders:

The Opencart store admin can set specific cart rules and restrictions for pre-ordered items. Such as minimum order quantities or eligibility for certain promotions, to optimize your pre-order management.

Guest Pre-Order:

Allow guest customers to place pre-orders without requiring them to create an account, reducing barriers to purchase and enhancing the overall shopping experience.

Multilingual and Multi-store Support:

Reach a global audience and cater to diverse markets with multilingual support, while managing pre-orders efficiently across multiple stores from a single admin panel.

1.3. Benefits to the Customers:

Knowband’s OpenCart Product Pre-Order Plugin offers several benefits to customers, enhancing their shopping experience and providing added convenience. Some of the key benefits for customers include:

Early Access to Desired Products:

Customers can pre-order products that are not yet available for regular purchase. This allows them to get early access to highly anticipated or newly launched items, ensuring they don’t miss out on popular products.

Guarantee Product Availability:

Pre-ordering with Knowband’s OpenCart backorder module ensures that customers secure their desired items before they run out of stock. This feature is especially useful for limited edition products or items with high demand.

No Missed Opportunities:

Customers won’t miss out on their favorite products even if they are out of stock at the moment. They can place an order in advance and receive the item as soon as it becomes available. The following functionality helps the Opencart Product Pre-order plugin stand out from the rest.

Convenience and Time-saving:

Pre-ordering eliminates the need for customers to constantly check the website for product availability. They can place their orders in advance and relax, knowing the product will be delivered once it is back in stock.

Flexibility in Payment:

The OpenCart Pre-order plugin allows the customers to make a partial payment or reserve the item without paying the full amount upfront. This flexibility is appreciated by customers who might not have the entire amount available at the time of pre-ordering.

Notification Alerts:

Customers can receive notifications when their pre-ordered products are back in stock or when the release date arrives. Furthermore, it helps the customers to keep them updated about the status of their orders.

Exclusive Offers:

Retailers can offer special discounts, promotions, or exclusive deals to customers who pre-order products with the OpenCart product advance booking plugin. Not only it incentivizes them to use the pre-order feature but also helps to build a healthy business-customer relationship.

Planned Purchases:

Pre-ordering allows customers to plan their purchases in advance, especially for upcoming events or special occasions. Ensuring they have the desired products in hand when needed.

Early Bird Access:

In cases where products are in limited supply or high demand, pre-ordering allows customers to be among the first to get their hands on the product, giving them a sense of exclusivity.

2.0 Installation Guide

To install the OpenCart Product Pre-Order Plugin, please follow the following steps:
Purchase the OpenCart Preorder Extension from the Knowband store. You’ll get the following files:

  • Zipped File containing the source code of the OpenCart backorder plugin.
  • User Manual of OpenCart Product advance booking plugin.

Follow the steps below to install the OpenCart Product Advance Booking Extension in the OpenCart store:

  1. Unzip the zipped. You’ll get the folders as shown in the image below:
  2. Copy all the files and folders of the zip file in the Root Directory of OpenCart setup via FTP manager.
  3. The OpenCart Pre-order is now installed and is ready to use. Go to Admin -> Main Menu -> Extensions as shown in the image below:
  4. Select Pre-Order from the list of modules and click on the Edit button as shown in the image below:


3.0. Admin Interface Overview: Opencart Pre-Order Plugin:

The OpenCart product pre-order plugin provides an easy to customizable admin panel for pre-order management. The store admin can find easy configuration options at their convenience.

3.1. General Setting:

The OpenCart store administrator can find module all the general configurations in the following tab.

Enable/Disable Button: The following button can be used for enabling/disabling the OpenCart Product Advance Booking Plugin.

Restrict Checkout with Other Products: If the following button is enabled, the customers will not be able to complete checkout of pre-order products with other products. Only one pre-order product in the cart will be allowed for checkout.

Show Total Price with Partial Price: The admin can show/hide the total price with partial price using the following button. The admin can choose whether they want to display both the prices or any one of them. This is applicable only on the product page.

Enable/Disable Pre-Order Label: The admin can show/hide pre-order labels from the products with this button. The pre-order label will only appear on the product listing pages such as the home page, category listing page, search result page, etc. This label can be modified also in the Design Tab.

Enable/Disable Category Restriction: The store retailers can enable/disable category restriction for Preorder products from here.

Exclude Products for Preorder: In case you want to exclude any specific products for advance booking, you can enter the same in the shown text field in the above image.

Show Preorder Content: The admin can show/hide pre-order content using the following button. This content is displayed only on the product description page.

Full Payment Content: The following content will appear in case the full payment option is selected for the preorder products.

Partial Payment Content: The content entered in the following text field will appear in case the partial payment option is selected.

Provide Preorder Discount: Enable the following option if you are willing to provide the preorder discount to your customers.

Discount Type: The store admin can choose the discount type as a fixed amount or percentage based on the order total from here.

Pre-Order Discount: The following text field is provided for entering the exact amount for the discount on the pre-order products.

3.2. Design:

The store admin can modify the look and feel of the preorder label and button that appears on the product images on product listing pages.

Preorder Label and Button Text: The text entered in the following text field will appear on top of the preorder product images. As this extension is multilingual, you can add the Label And Button text according to the languages enabled on your store.

Preorder Label Background Color: The store admin can choose the background color for the pre-order product label from here.

3.3. Product Configuration:

The product configuration tab allows the store admin to set all the product configurations for the pre-order products.

Quantity Per Order: The Opencart store admin can add the maximum quantity per order he wants to allow the customers to purchase.

Orders Per Customer: Here, the admin can enter the maximum number of pending Pre-orders he wants to allow the customer to make.

Product Status for Applying Pre-Order: Choose the default status of the product for applying pre-order using the following button.

Payment Type: The Opencart product pre-order plugin allows the store admin to allow the customers to complete product advance booking by just paying a partial or full amount.

The admin can enable/disable partial price using the following button.

Pre-Order Price: This particular text field is provided for selecting the percentage for the partial price that the customer is going to pay for product advance booking.

3.4. Pre-Order Products:

The Opencart Product Advance Booking Extension allows the store admin to set different rules for specific products. Here, Admin can create different price rules for different products. If the product is not listed here, then the price rules will be applied from the values set in Product Configuration.

Add New Preorder Product:

The store admin can add new price rules for specific preorder products just by clicking on the add new button shown in the above image. Furthermore, the admin just needs to select some basic details such as product name, product price, product discount, etc, and your new price rule for the selected pre-order product is all set to dive into your eCommerce store.

Search Pre-Order Product: The OpenCart Product Backorder extension allows the admin to search the pre-order products just by adding product ID, payment type, product name, etc.

3.5. Pre-Order Orders:

We have provided a separate tab for tracking all the booking orders. In the following tab, the store retailers can track all the pre-orders in a single place and further make the changes at their convenience.

4.0. Front End Preview: Opencart Pre-Order Extension:

Till now, we have discussed the various configuration options and their use in modifying the pre-order plugin as per your business needs. Furthermore, the Opencart product preorder plugin does take zero coding and technical skills to make your eCommerce shop preorder ready for various occasions.
Here are some of the front-end snapshots mentioned below for providing a better understanding of the pre-order flow for the customers.

Pre-Order History:

The customers can find the history of all the placed pre-orders in the following tab. Along with the pre-orders, the customers can also check the order balance (paid amount and remaining amount), order status, and order status.

Front End Snapshots:

Furthermore, in case you are having queries/suggestions regarding our Product Pre-Order Plugin, you can also reach out to our technical support staff at knowband.com/helpdesk.

Opencart Product Label | Product Sticker Extension – User Manual

1.0 Introduction

Modern customers have a very short attention span. In other words, if they are hovering over an eCommerce website, the admin has very less time to provide them with the information and offers at the same time. Even, many kinds of information help the customers to understand if the product is a perfect fit for their needs or not.

Following the same, we have designed the Opencart Product label extension for the Opencart eCommerce merchants. Using the extension, the admins can add responsive stickers on their shopfronts. Moreover, the admins can even upload the stickers and set the dimensions and sticker position at their convenience.

Likewise, if you are willing to make your customers aware of sales, offers, delivery time, and other pieces of information. We have got you covered with Knowband’s Product Label Extension for Opencart. On top of that, the extension comes with tons of richly loaded features to make sure your piece of mind. Let’s find out some of the most highlighted features offered by the Opencart product sticker plugin.

1.1 Major Highlighted Features Offered by Knowband’s Product Label Extension:

The Opencart product sticker plugin is empowered by tons of incredible features. Not only the plugin is configurable from the back end but also provides high-quality pre-loaded stickers.

We have tried to cover up some of the most sounding features of the Opencart product sticker module.

  • The admins can boost their revenue by showing the offer discounts on products.
  • The Opencart store admins can choose the pages where they want to show the product stickers.
  • For example, the store administrators can choose the options from the product page, product listing page, search page, home page, and much more.
  • The Opencart admins can include or exclude specific products for the sticker appearance.
  • With the help of the Opencart Product Sticker module, the store admins can include the Opencart store categories where they want to show the responsive stickers.
  • Along with pre-available stickers, the admins can also upload the stickers of their own will in the module and make them appear within no time on the shopfront.
  • The Opencart Product Label plugin provides the option to show the stickers based on the products’ available stock conditions.
  • Create as many labels as you want within clicks.
  • The Opencart store admins can manage the sticker positions on the product images right from the module backend.
  • Moreover, the admins can choose the start date and end date for particular stickers.
  • The admins get an option for choosing between all products, specific products, and special categories for the sticker appearance.

2.0 Installation Guide

The installation of the Opencart product label module is pretty easy. You can simply install the module by just following the below-mentioned steps.

After you will proceed with the order of Knowband OpenCart product label extension, you will get the following files at your end.:

  • Zipped File containing the source code of the OpenCart product label extension.
  • User Manual of OpenCart product label extension.

Follow the steps below to install the OpenCart Product Label Extension in the OpenCart store:

  1. For the first step, Unzip the zipped file (you will find the same in my account>>downloads). You’ll get the folders as shown in the image below:

  1. Copy all the files and folders of the zip file in the Root Directory of OpenCart setup via FTP manager.
  2. The Opencart product label module installation is done and the module is ready to configure now.

Go to Admin -> Main Menu -> Extensions as shown in the image below:

  1. Choose the product label by Knowband extension from the list of extensions and click on the Edit button.

3.0 Admin Interface of OpenCart Product Label/Sticker Extension:

The Opencart product sticker module comes with an easy-to-manage admin dashboard. The admins can manage every ounce of their extension within just a few clicks. The control panel for all the incredible features is managed in apple-pie order to deliver the piece of mind to the store admins.

Let’s discuss the admin panel configuration of Opencart Product Label Extension one by one.

3.1 General Setting:

Under the General setting tab, we have provided an option for enabling/disabling the module.

Enable/Disable:

The admins can enable/disable the extension with the help of the following button.

3.2 Sticker Setting:

In the following tab of the Opencart Product Label plugin, we have provided options for showing all the added stickers. The admins can perform basic operations for stickers under the sticker setting tab.

Search Sticker Button:

You can search the sticker by sticker ID, Sticker Name, or by enable/disable condition in the following section.

Delete Sticker:

By the following option, the admins can remove the sticker permanently.

Edit Label:

The following option is for managing the sticker configuration. By clicking the following option, the admins will be redirected to the sticker setting page.

3.2.1 Sticker Setting: General

In the following tab, we have covered all the general settings for the Opencart Product Label Extension.

Enable/Disable Sticker:

The admin can choose the sticker appearance status from this button by simply choosing to enable/disable the button.

Name:

In the following text field, the Opencart store retailers can assign the name to a sticker.

Select Where to Display:

This particular section is added to provide the options of choosing the sticker appearance place. The admins can simply check the boxes where they want to show the stickers from the general setting tab.

For example, if you have selected the option product page and home page from this section. The added sticker will only appear on the home page and the product pages on the website’s front end.

3.2.2 Edit Sticker: Configuration:

Opencart Product Label Extension’s edit sticker tab allows the store admins to configure the physical appearance of the product label.

Select Sticker:

We provide various pre-loaded stickers along with the Product sticker module plugin for Opencart. By hitting the following button you can simply choose from the already available stickers. Apart from it, the stickers you will add from the module will also appear in the following section.

Upload Sticker:

If you want to upload a new sticker from your system, you can simply choose the upload sticker button.

Select Sticker Size Type:

In the following button, we have provided 2 options. If you want to manage the size of the sticker based on fixed (px.) you can click on the radio button.

Moreover, if you want to configure the sticker size based on percentage, we also provide the option for percentage.

Height and Width of Sticker:

By the following button, you can manage the height and width of your product label. Moreover, you can also see a live preview of the sticker appearance along with the size change. Maximum height and width for sticker should be mentioned for both cases i.e. 300px for fixed size and 100% for percentage.

Change the Preview Image:

With the following button, the admins can choose a new preview image for checking the appearance of the product labels.

Opacity:

In the following option, you can choose the opacity of the sticker.

3.2.3 Edit Sticker: Condition:

The condition tab in the sticker configuration tab is for managing the condition of stickers to appear on the front end.

Select Products:

In the following button, the admins can choose the products where the sticker needs to appear.

Exclude Products:

If you do not want to exclude any product from the above-selected condition, you can go with the none option.

However, if you are planning to hide any specific product from the above-selected product group. You can simply choose the option to exclude products as shown in the image.

Select Excluded Products:

For excluding any product all you need to do is to enter the name of the product in the following text box field.

Select Inventory Status:

This particular section allows the admins to choose the sticker appearance based on the inventory status of the products.

All Products:

If you select this particular option, the sticker will appear for all the products.

In Stock:

If you select this option, the label will only appear for the in-stock products. Moreover, you can also add the minimum product quantity which needs to be considered for stickers.

Out of Stock:

By selecting the following option, the admins can show the product label for the out-of-stock products only.

Visibility Date:

Knowband’s Opencart Product Label Extension provides the following option for selecting the start and end date for the sticker.

You can simply pick any starting date and visibility end date for the sticker.

4.0 Front End of Opencart Product Label Plugin:

After making the changes as per convenience and saving the data from the module back-end. The Opencart store admins can check the preview of the made changes within no time. On top of that, the Opencart Product Sticker Extension allows the admins to show off high-quality stickers on their shopfronts. Below are some samples of the product sticker extension’s front end.