How To Minimize The Bounce Rate Of Our Website?

What is Bounce Rate?

First, we should know about the term “bounce rate”

In easy words we can say, bounce rate is the ratio between the number of visitors comes on our site and the number of visitors leaves our site from the landing page without navigating to another page.

When visitors or customers land on our website from any other external link for example advertisement, search result, shared link, etc but if they do not visit internal links of the site. This will increase the bounce rate as the server of Google Analytics will not be triggered due to no engagement.

So this will lower our ranking in Search Engine Results which is definitely a great loss for the growth of our website.

When the bounce rate matter

We should keep in mind that if the objective of our website is to share information then bounce does not matter for us. Let us take an example if our webpage gives any text-based information and if visitors came and read the articles and leave our sites. Here the job is done as the visitor got the information.

But the bounce rate really matters if we are looking forward to getting more and more active visitors engaged on our sites.

The major reason for the bounce rate

  • The website is taking more time to load.
  • Bad user interface and content management.
  • The UI of the landing page is complex which not easily understandable for every type of user.
  • Visitors didn’t get the information in the smart way which they looked for.
  • Internal links of our website are not clearly highlighted for the visitors.
  • Unwanted popup on the landing pages.

How to measure the bounce rate

Google provides many useful services for our website. To measure the bounce rate we can use Google Analytics which tracks and monitor the traffics coming on our websites. It calculates the total behavior on our website. So it is a great tool to measure the bounce rate of our website.

URL: https://analytics.google.com/

To use these tools we just need a Google account and link our website with Google Analytics. Note: If you need any help to use this tool please write the query in the comment box given at the bottom of the page.

According to Google

The bounce rate is a single-page session divided by all the sessions or the percentage of all sessions on your site in which users viewed only a single page and triggered only a single request to the Analytics server.

How To Minimize The Bounce Rate Of Our Website?

A Good Landing Page

A landing page is the first page where our visitors enter in our website by clicking on the links of search engine results.  The first impression is the last impressions so landing page must have a clear and user-friendly interface.

The landing page plays an important role in the good conversions rate.  A good landing page should an attractive offer and able to explain why it is valuable for money in concise terms. There should be an “About” section on the landing page and also navigation links should be clearly visible.

The landing page of Knowband is a good example of the landing page.

Reduce Page Load Time

As a user, we can know how irritating to browse the slow pages. Visitors simply press the back button if a page takes more than 5 seconds to load. Unwanted third party scripts on our website also increase the page load time. If we are showing an unoptimized image it also takes more time to load.

Tips: According to Google, a good score for page speed is 85 or above. We can know about the speed of our pages using the Google Analytics tool. 

Remove Unwanted Pop-Ups

Unwanted pop-ups and ads on the pages are also responsible to increase the bounce rate.

AB Testing

AB Testing is a useful experiment where two or more designs of the same page will show randomly to the visitors. By seeing the report of the AB Testing we can analyze which design had performed better and given more conversion.

CTA: Call To Action

CTA is just like a hidden trap or baits on our landing page.  Newsletter subscription, download button, internal links are some good examples of CTA. These things should be clearly visible on our pages.

Thanks for reading this blog. Hope all five mentioned tips will help you to reduce the bounce rate of your website. You can consider these points according to your business need.
How to see the code of ‘.ctp’ file as colorful as ‘.php’ file in NetBeans

NetBeans is one of the best and powerful IDE for any WebDevelopment specially best for PHP frameworks such as ZenCart, OpenCart, CakePhp etc.

CakePhp use their own custom file extension for its View files i.e. *.ctp. NetBeans doesn’t know about this file by default. So there are no color coding will be shown when these types of files are opened in the NetBeans. We have to manually enable these features.

Below are the steps to enable highlighting for CakePHP .ctpfiles.

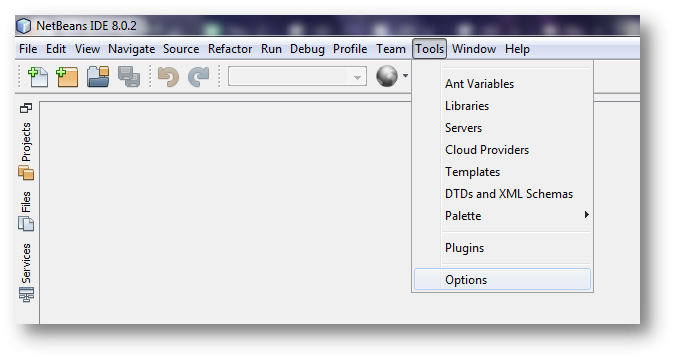
1.  Go to Tools => Options

Go to Tools => Options

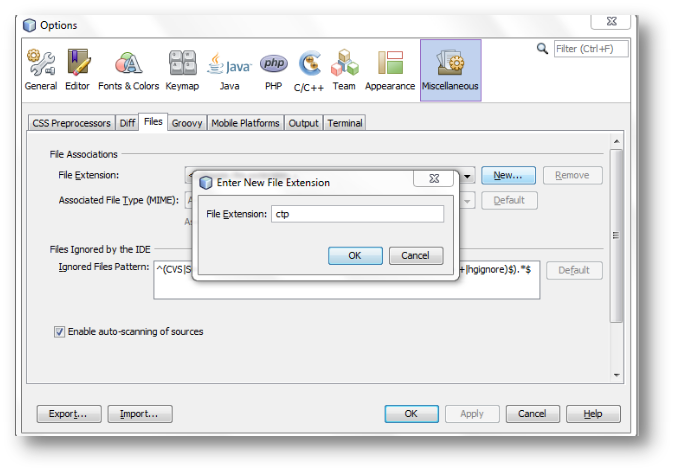
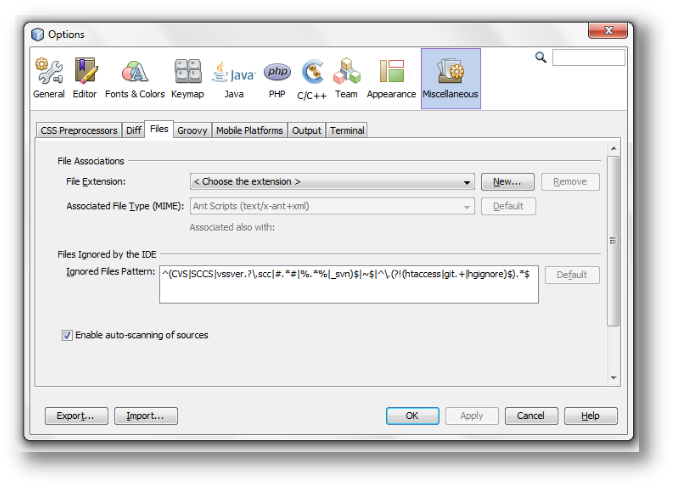
2.  Click on Miscellaneous => Files

3. Click on New button and type ctp. Then click on Ok.

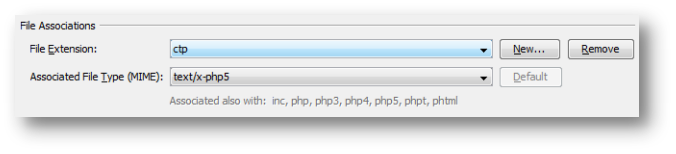
4. From Associated File Type (MIMI): Choose:  text/x-php5.

5. Click on OK.

Note: Restart the IDE if changes don’t reflected after doing the above steps.

Handle Large Data in Select2 Dropdown

Objectives of the blog

After the reading of this blog, you will able to know how you can handle the large set of data in the Select2 dropdown menu.

Description  

For a dropdown, if use the select2 library, it works really well for the small number of data but when the data become too large then you can face the issue of slowness. For example, suppose a dropdown of 20,000 options then the select2 library can take up to some seconds to minutes to open the dropdown. For such a large dropdown menu and to avoid this slowness issue, select2 provides an alternate solution.

In the normal select2 dropdown, we use <select> element. In the <select> element, select2 library binds all options in one go and this is causing the slowness for the large data. So instead of using the <select> element, you can use the textbox dropdown and select2 library helps to bind the textbox as the dropdown menu so it will give the fill of the dropdown menu to the users. The select2 library can smartly bind user-defined 20 or 30 options at a time and remaining data will binds either on search or on the scroll.

Running code is given below.

<!DOCTYPE html>
<html>
    <head>
        <link rel="stylesheet" href="//cdnjs.cloudflare.com/ajax/libs/twitter-bootstrap/3.3.7/css/bootstrap.min.css" />
        <link rel="stylesheet" href="//cdnjs.cloudflare.com/ajax/libs/select2/3.5.4/select2.min.css" />
        <link rel="stylesheet" href="//cdnjs.cloudflare.com/ajax/libs/select2-bootstrap-css/1.4.6/select2-bootstrap.min.css" />
        <style>
            .select2-container-multi .select2-choices .select2-search-choice {padding: 5px 5px 5px 18px;}
        </style>
    </head>
    <body>
        <div class="container">
            <div class="page-header">
                <h1>Select2 Dropdown menu with pagination</h1>
                <p>To improved performance of the dropdown with large data sets (20 000 items)</p>
            </div>
            <form method="post">  
                <input id="test" style="width:100%;" placeholder="type a number, scroll for more results" name="data" />
                <input type="submit" value="Submit" name="Submit" class="btn btn-info"/>
            </form>
        </div>
        <script type="text/javascript" src='//ajax.googleapis.com/ajax/libs/jquery/3.1.0/jquery.min.js'></script>
        <script src="//cdnjs.cloudflare.com/ajax/libs/lodash.js/4.15.0/lodash.min.js"></script>
        <script src="//cdnjs.cloudflare.com/ajax/libs/select2/3.5.4/select2.min.js"></script>
        <script>
            (function () {
                // initialize select2 dropdown
                $('#test').select2({
                    data: dropdownData(),
                    placeholder: 'search',
                    multiple: true,
                    // creating query with pagination functionality.
                    query: function (data) {
                        var pageSize,
                                dataset,
                                that = this;
                        pageSize = 20; // Number of the option loads at a time
                        results = [];
                        if (data.term && data.term !== '') {
                            // HEADS UP; for the _.filter function I use underscore (actually lo-dash) here
                            results = _.filter(that.data, function (e) {
                                return e.text.toUpperCase().indexOf(data.term.toUpperCase()) >= 0;
                            });
                        } else if (data.term === '') {
                            results = that.data;
                        }
                        data.callback({
                            results: results.slice((data.page - 1) * pageSize, data.page * pageSize),
                            more: results.length >= data.page * pageSize,
                        });
                    },
                });
            })();
            // Function to fetch the demo data for the dropdown menu
            function get_random_word(str) {
                return str
                        .split('').sort(function () {
                    return 0.5 - Math.random();
                }).join('');
            }
            // For the testing purpose we are making a huge array of demo data (20 000 items)
            function dropdownData() {
                return _.map(_.range(1, 20000), function (i) {
                    return {
                        id: i,
                        text: get_random_word('The quick brown fox jumps over a lazy dog') + ' ' + i,
                    };
                });
            }
        </script>
    </body>
</html>


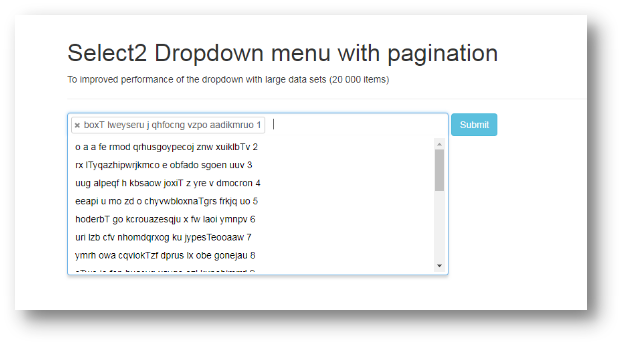
Output Screen


Summary

When user will submit this form, system will get the selected data in an array.

For any issues, please feel free to reach us at support@knowband.com. We also provide the top modules for Prestashop, Opencart, Magento and Magento 2. For more information, click here.

You can also take a look at our bestselling module One Page Supercheckout here:


Copy to clipboard in JavaScript

Objectives of the blog

After the reading of this blog, you will be able to know how data can be copy to clipboard with help of java script.

Benefit of copy to clipboard functionality

In the current web world, it’s all about the user experienced from your site. During our work on any site we copy content from one place and paste at another place. It will be really helpful to the user if a site give a functionality of click to copy. It saves the time and effort of the user to select and copy the content.

Implementation of copy to clipboard functionality

Let’s see how we can add this functionality:

Step 1:

Create a HTML with a paragraph having some content and button to click. You can use any relevant element instead of paragraph for example textbox, textarea, hidden fields etc.

<body>
    <p id="txt_knoband">KnowBand boasts of the best in the industry plugins for eCommerce systems and has years of experience working with eCommerce websites.</p>
    <button onclick="onClickCopy()">Copy Text</button>
</body>

Step 2:

You will need to create a function onClickCopy() which will copy the data of the paragraph. Function will simply run “document.execCommand(“copy”)” to copy the data to the clipboard.

function copyOnClick() {
    var tempInput = document.createElement("input");
    tempInput.value = document.getElementById("txt_knoband").innerHTML;
    document.body.appendChild(tempInput);
    tempInput.select();
    document.execCommand("copy");
    document.body.removeChild(tempInput);
    alert("value copied");
}

In the last line of the script, we have simply added an alert action to inform the user that the data has been copied.

So finally when you click on the button “Copy Text”, data will be copied to the clipboard and you can simply paste by using CRTL + V.

Related Article: How to set Cookie using JavaScript

JavaScript Desktop Notification

Objectives of the blog

After reading this blog, you will able to setup the desktop notification for your site. You will also be able to customize your notification by your own message, image, icon etc.

Benefit of Desktop Notification

Suppose you want to notify your customer outside the webpage then we can use the desktop notification as if you have enabled desktop notification for email, you don’t need to check emails regularly. In every email, you got a notification.

Code for Desktop Notification

Add the below function in the script tag in the head of the HTML.

function showNotification() {
    // Verify if the user's browser supports notifications or not
    if (!("Notification" in window)) {
        alert("Your browser does not support the desktop notification");
    }
    // Verify if notification's permissions have already been granted or not
    else if (Notification.permission === "granted") {
 
        // Create Notification
        var options = {
            body: 'Simple notification message line 1.\nSecond line of notification message.', // body of the notification
            dir: 'ltr', // direction of message ltr: left to right. rtl : right to left.
            image: 'https://www.knowband.com/blog/wp-content/uploads/2016/09/cropped-knowband_logo-v2.png', // Add image if required to show
            icon: 'https://www.knowband.com/blog/wp-content/uploads/2016/09/cropped-knowband_logo-v2.png', // Add icon if required to show
        }
 
        var title = "Knowband Blog";
        var notification = new Notification(title, options);
 
 
        //Add the notification click link
        notification.onclick = function (event) {
            event.preventDefault(); // prevent the browser from focusing the Notification's tab
            window.open('https://www.knowband.com/blog/', '_blank');
            notification.close();//Close the notification after click
        }
    }
 
    // If no permissions, ask the user for permission
    else if (Notification.permission !== "denied") {
        Notification.requestPermission().then(function (permission) {
            // If the user accepts, let's create a notification
            if (permission === "granted") {
                var notification = new Notification("Hi there!");
            }
        });
    }
}

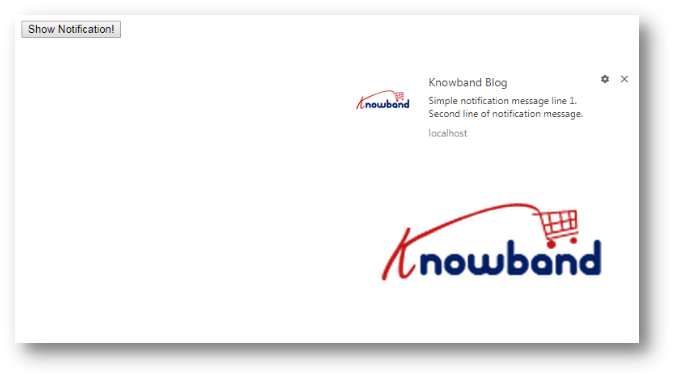
You can trigger this function through event as you wish. For testing purpose, you can check this by adding a button. Use below code for button in the body

<button onclick="showNotification()">Show Notification!</button>

Note: If you are running this code on the local system then use the local sever i.e. localhost.

Output Screen

Case-insensitive array sorting in the Php

Problem:

$data = array(“A”,”M”,”X”,”b”,”d”,”E”,”l”);

I need to sort the data base on value. When I use asort($data), got the following:

[0] => A
[5] => E
[1] => M
[2] => X
[3] => b
[4] => d
[6] => l

In the above example, “b”,”d” and “l” starts with a lower case but ends after “X” which has an upper case.

How can we sorts it where it ignores whether the words start with upper case or lower case?

I was expecting this

[0] => A
[3] => b
[4] => d
[5] => E
[6] => l
[1] => M
[2] => X

Solution:

Use natcasesort($data); and you will get the exact same result.

Notes:

We can use this function to sort our arrays using a case insensitive “natural array” algorithm. natcasesort() is a case insensitive version of the natsort().

Syntax:

bool natcasesort ( array &$array );

Returns

Returns true in case of success and false for failure.

To know more about natural array” algorithm or natcasesort() : https://www.w3schools.com/php/func_array_natcasesort.asp

How to Use Actions in Adobe Photoshop?

En tant que graphiste, il est très important de livrer notre produit avec une meilleure interface utilisateur. Nous devons également faire le travail de manière plus efficace et plus rapide. Mais chaque fois que nous devons faire la même tâche dans Adobe Photoshop à plusieurs reprises. En tant que nature humaine, nous perdons notre intérêt à faire la même tâche à plusieurs reprises. Nous essayons toujours de créer quelque chose de nouveau à chaque fois.

Adobe Photoshop peut nous soulager de ce travail répétitif continu. Pour ce faire, nous pouvons utiliser Actions dans Adobe Photoshop.

Apprenons-en plus sur l'action dans Photoshop

Action dans Photoshop est un travail prédéfini que nous avons enregistré auparavant.

Actions Photoshop?come in the.ATN file format. It allows us to record the actions for our repetitive tasks.

Supposons que nous ayons une photo 1000 et que sur celles-ci, nous souhaitons ajouter un filigrane, alors le meilleur moyen de le faire est de faire une action pour cela.

Processus enregistrer des actions

Étape 1 :

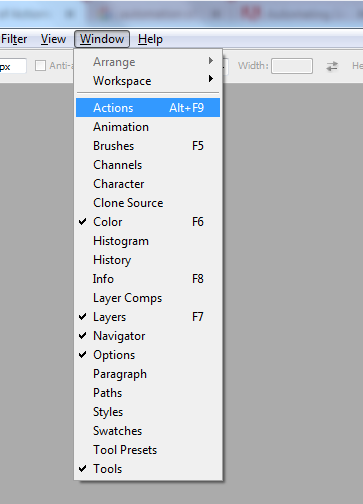
Ouvrez votre application Photoshop -> Allez à Windows -> Action

Ensuite, une fenêtre s'ouvrira:

Étape 2 :

Cliquez sur l'icône "Créer une nouvelle action" pour lancer l'enregistrement.

Étape 3 :

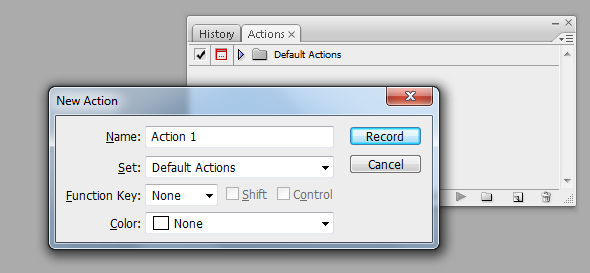
Nommez l'action de manière à pouvoir la reconnaître pour une utilisation future.

Après on clique dessus "Record"bouton vous remarquerez qu'un enregistrement commence.

Étape 4 :

Maintenant, faites votre travail dans Adobe Photoshop et il est enregistré.

Étape 5 :

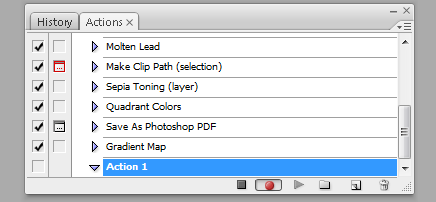
Maintenant, après avoir terminé le travail, nous empêchons l'action d'être enregistrée.

Processus pour mettre en œuvre l'action enregistrée

Pour mettre en œuvre l'action enregistrée pour les images en vrac, Photoshop a donné une excellente option pour cela et nous l'appelons en tant que "traitement par lots". Allons pas à pas pour mettre en œuvre l'action.

Étape 1

Cliquez sur le fichier => automatiser => batch

Quand on clique sur "Lot"option nous allons obtenir une fenêtre pop-up avec l'option de"Traitement par lots“.

À partir du menu contextuel, nous pouvons sélectionner notre action, le dossier source de l’image et le dossier de destination pour restituer l’image. Quand on clique sur "OK"Le bouton Photoshop fera l’opération en bloc et nos images seront sauvegardées dans le dossier de destination.

J'espère que vous comprendrez tous les points, si je me trompe à un moment donné, merci de me le faire savoir dans la section commentaires, je vais certainement y jeter un coup d'oeil.

How to Use Actions in Adobe Photoshop?

As a graphics designer, it is very much important to deliver our product with a better UI. We also to do the work in more efficiency and with more speed. But any time we have to do the same task in the repeatedly in Adobe Photoshop. As a human nature, we lose our interest to do the same task repeatedly. We always try to create something new every time.

Adobe Photoshop can give us relief from that continuous repetitive work. We can use Actions in Adobe Photoshop to do so.

Let’s learn about the Action in Photoshop

Action in Photoshop is some pre-defined work that we have recorded before.

Photoshop actions come in the.ATN file format. It allows us to record the actions for our repetitive tasks.

Suppose we have 1000 photo and on those, we want to add some watermark then the best way to do it is to make an action for it.

Process to record actions

Step 1:

Open your Photoshop application -> Go to Windows -> Action

Then a window will open:

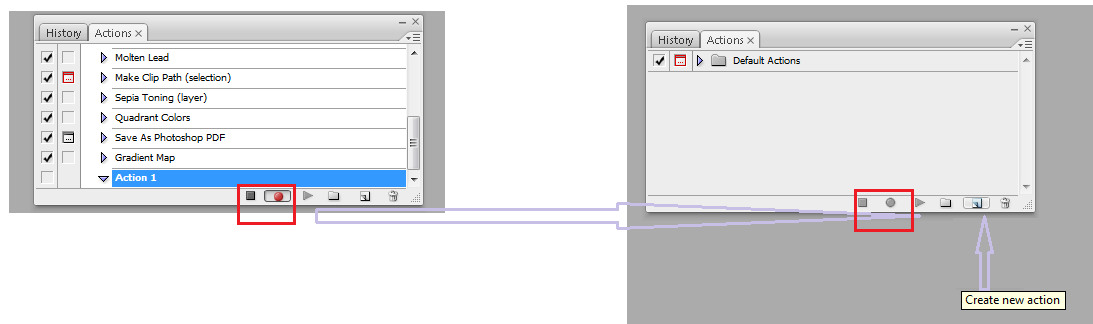
Step 2:

Click on the "Create New Action" icon to start the recording.

Step 3:

Name the action so, you can easily recognize it for future use..

After we click on that “Record” button you’ll notice that a recording gets started.

Step 4:

Now do your work in Adobe Photoshop and it gets recorded.

Step 5:

Now after getting work done we stop the action from getting recorded.

Process to implement the recorded action

To implement the recorded action for the bulk images Photoshop has given a wonderful option for that and we call is as “batch process”. Let’s go step by step to implement the action.

Step 1

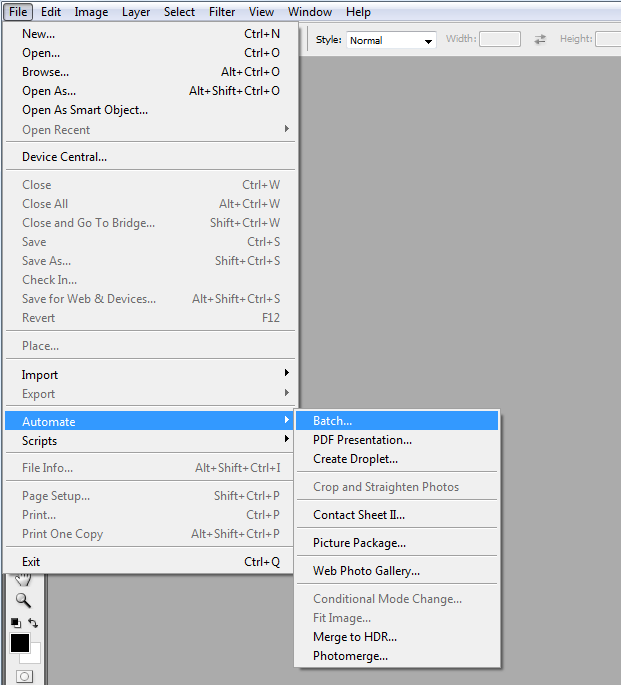
Click on the File => Automate => Batch

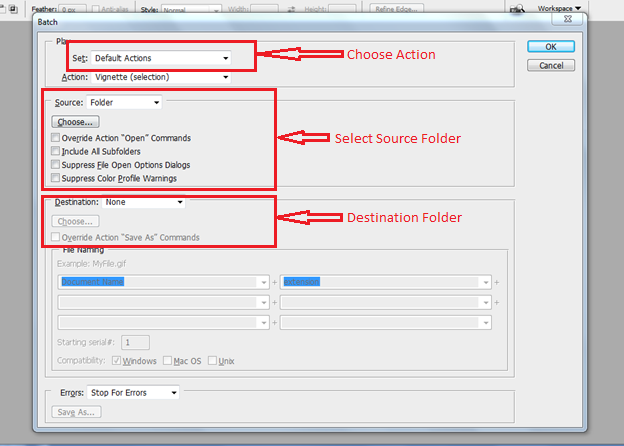
When we click on “Batch” option we will get a pop up window with the option of “Batch Process”.

From the Pop Up we can select our action, source folder of image and destination folder to render the image. When we click on “OK” button Photoshop will do the operation in bulk and our images will be saved in the destination folder.

I hope you get all my points, if I am wrong at some point, please let me know in the commenting section, I will for sure take a look at it.

How to use GraphQL in PHP?

Have you heard about GraphQL?

GraphQL is a modern query language for the API. In another word, we can say it is a modern application layer query language.

With the help of GraphQL, we can fetch data from the API calls and it works on the HTTP as REST. It provides the powerful option to the client so that they ask what they exactly need and it helps in the API growth or evaluation.

Benefits of GraphQL

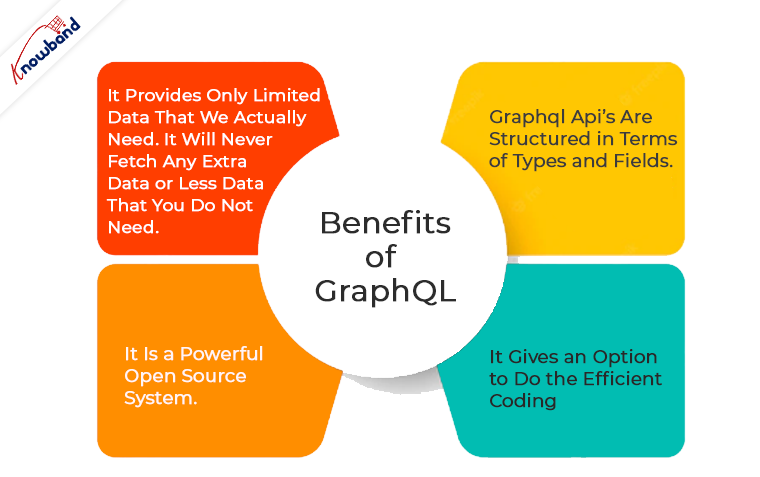
  • It provides only limited data that we actually need. It will never fetch any extra data or less data that you do not need.
  • It is a powerful open source system.
  • It gives an option to do the efficient coding. For example, suppose a table 40 column and sometimes we need the data of only 10 column or sometimes 20 etc. To solve this problem we have two option in normal API, either fetch all data in every API call and use any we want or we have to write the number of APIs for the same table so that we can call the efficient API as per requirement. But in GraphQL, we have to write only one API. So line code also gets reduced.
  • GraphQL API’s are structured in terms of Types and Fields.

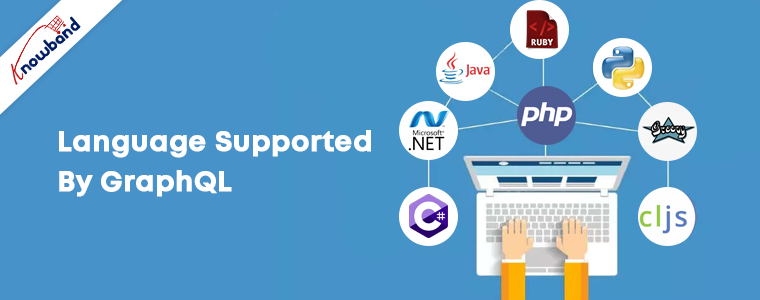
GraphQL has for supports various languages like

  • C#
  • .NET
  • Clojure
  • Elixir
  • Erlang
  • Go
  • Groovy
  • Java
  • JavaScript
  • PHP
  • Python
  • Scala
  • Ruby

In this blog, we will learn about the GraphQL in PHP.

Firstly we should know, in any language to use GraphQL we have to import their library.

In PHP, we can use this library file: webonyx/graphql-php.

Installation

Using composer, simply run:

composer require webonyx/graphql-php

How GraphQL Fetch Data with Queries?

In the REST, API returns data in a defined structure. While writing the API in REST we have to define the structure of data what it will return but GraphQL has no defined structure it will return. It can change their structure as per client need.

The client has to send some more information to the server in order to declare their requirements and this information is called the Query.

In the Query, we have to define the Root Fields in the other word we say the same as payload for the service.

Resolver

In the real world application like e-commerce application i.e. PrestaShop, OpenCart, Magneto etc. we need to fetch the customer data from the database by customerId and have to return the same. Our point is we don’t have to return the arrays, we have to return the values and graphql-php will pass it untouched to nested resolvers.

The resolver is basically a call back function for each field. There is always a default resolver for all fields. When we define our own resolve function for a field we simply override the default resolver.

How to define Schema for Query?

$schema_obj = new Schema {
          “query” => $queryType,
          “mutation” => $mutationType,
           “subscription” => $subscriptionType
}

Example

As this is a blog for the beginners or fresher let’s do a simple example.

Let’s create a type system that will be to process following simple query:

query {
  echo(message: "Hi Knowband, this is my first GraphQL program")
}

Note: We need an object type with field echo to do so.

<?php
use GraphQL\Type\Definition\ObjectType;
use GraphQL\Type\Definition\Type;
$queryType = new ObjectType([
    'name' => 'Query',
    'fields' => [
        'echo' => [
            'type' => Type::string(),
            'args' => [
                'message' => Type::nonNull(Type::string()),
            ],
            'resolve' => function ($root, $args) {
                return $root['prefix'] . $args['message'];
            }
        ],
    ],
]);

The resolve option is very important option of field definition. It is one which is responsible to for returning the value of our field. Values of the scalar fields will be directly get included in response while the values of the composite fields will be passed down to the nested field resolvers. Composite fields are interfaces, unions, objects etc.

Now after our type become ready, let’s write the GraphQL endpoint file for it graphql_program_1.php.

<?php
use GraphQL\GraphQL;
use GraphQL\Type\Schema;
try {
    $schema_obj = new Schema([
        'query' => $queryType
    ]);
    $Input = file_get_contents('php://input');
    $input_data = json_decode($Input, true);
    $query_data = $input_data['query'];
    $variable_values = isset($input_data['variables']) ? $input_data['variables'] : null;
    $value = ['prefix' => 'Output: '];
    $resultant = GraphQL::executeQuery($schema_obj, $query_data, $value, null, $variable_values);
    $output_value = $resultant->toArray();
} catch (\Exception $e) {
    $output_value = [
        'errors' => [
            [
                'message' => $e->getMessage()
            ]
        ]
    ];
}
header('Content-Type: application/json');
echo json_encode($output_value);
?>

How can we run the code?

We can run the code by:

php -S localhost:8080 graphql_program_1.php
curl https://localhost:8080 -d '{"query": "query { echo(message: \" Hi Knowband, this is my first GraphQL program \") }" }'

For any queries, please feel free to reach us at support@knowband.com. Knowband is providing the best in class modules for Prestashop, Opencart, Magento and Magento 2.

Take a look at one of our most popular for Prestashop called One page supercheckout:


How to create your own HTML template using jQuery?

This article is all about creating HTML template using jQuery.

Let’s know about the jQuery

jQuery is a fast, small, and feature-rich JavaScript library. It makes things like HTML document traversal and manipulation, event handling, animation, and Ajax much simpler with an easy-to-use API that works across a multitude of browsers. With a combination of versatility and extensibility, jQuery has changed the way that millions of people write JavaScript.

Let’s know about the jQuery Template

jQuery Template gives us an option or support to display and manipulation of the content on the browser. By using the jQuery Templating we can render JSON string to the HTML elements. Let us consider a simple example, we can use jQuery Template to display some set of records that we have got from an Ajax’s request.

A basic example of jQuery templates

Now we create a simple page using jQuery templates. We will only use the jQuery plugin. In this example, we will show you how to create a template and render the content from the JSON.

Requirement

Let’s us understand the requirement first.

Suppose we have to create a webpage like KnowBand website to sell the modules for the e-commerce platform like Opencart, Prestashop etc. We have some e-commerce modules or plugin that we want to list on KnowBand site. So, on the listing page, we will show the module’s name, image, and price.

We will use the below JSON string to list the data:

[
	{
		"name": "Product tabs- PrestashopAddons",
		"image_url": "https:\/\/www.knowband.com\/image\/data\/Plugin%20Logo\/Product-Tabs-logo-1000-x-1000.jpg",
		"module_url": "https:\/\/www.knowband.com\/prestashop-product-tabs",
		"price": "$25"
	},
	{
		"name": "Prestashop Mobile App builder",
		"image_url": "https:\/\/www.knowband.com\/image\/data\/Plugin%20Logo\/Mobile-app-prestashop-plugin-500-X-500.jpg",
		"module_url": "https:\/\/www.knowband.com\/prestashop-mobile-app-builder",
		"price": "$30"
	},
	{
		"name": "Return Manager - Magento Extensions",
		"image_url": "https:\/\/www.knowband.com\/image\/data\/Plugin%20Logo\/return-manager.png",
		"module_url": "https:\/\/www.knowband.com\/magento-return-manager",
		"price": "$50"
	},
	{
		"name": "Web Push Notification - PrestashopAddons",
		"image_url": "https:\/\/www.knowband.com\/image\/data\/Plugin%20Logo\/Web-Push-Notification-plugin.jpg",
		"module_url": "https:\/\/www.knowband.com\/prestashop-web-push-notifications",
		"price": "$43"
	}
]

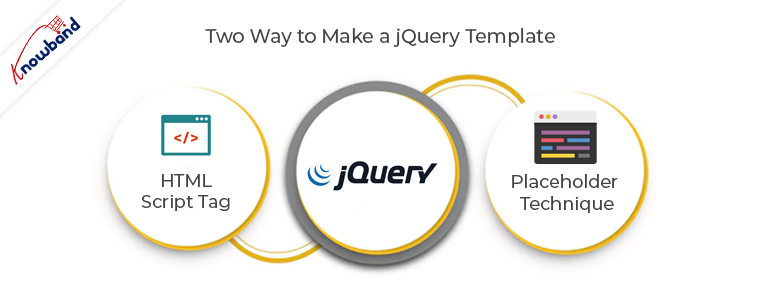
  1. By using the HTML Script Tag

    In this method, we will write HTML code in the script tag. The complete code is given below:

<html>
    <head>
            <link rel="stylesheet" href="https://maxcdn.bootstrapcdn.com/bootstrap/3.3.7/css/bootstrap.min.css&quot;>
            <script src="https://ajax.googleapis.com/ajax/libs/jquery/3.2.1/jquery.min.js&quot;&gt;&lt;/script>
        </head>
        <body>
            <div class="container">
                <script id="blog" type="template">
                    <div class="col-md-3">
                        <a href="{{module_url}}">
                            <div class="thumbnail">
                                <imgsrc="{{image_url}}" class="img-rounded img-responsive" width="100%"></img>
                                <div class="caption">
                                    <p class="lead">{{price}}</p>
                                    <p>{{name}}</p>
                                </div>
                            </div>
                        </a>
                    </div>
                </script>
            </div>
            <script>
            $(function () {
                varknoband_data = [
                        {
                            "name": "Product tabs- PrestashopAddons",
                            "image_url": "https:\/\/www.knowband.com\/image\/data\/Plugin%20Logo\/Product-Tabs-logo-1000-x-1000.jpg",
                            "module_url": "https:\/\/www.knowband.com\/prestashop-product-tabs",
                            "price": "$25"
                        },
                        {
                            "name": "Prestashop Mobile App builder",
                            "image_url": "https:\/\/www.knowband.com\/image\/data\/Plugin%20Logo\/Mobile-app-prestashop-plugin-500-X-500.jpg",
                            "module_url": "https:\/\/www.knowband.com\/prestashop-mobile-app-builder",
                            "price": "$30"
                        },
                        {
                            "name": "Return Manager - Magento Extensions",
                            "image_url": "https:\/\/www.knowband.com\/image\/data\/Plugin%20Logo\/return-manager.png",
                            "module_url": "https:\/\/www.knowband.com\/magento-return-manager",
                            "price": "$50"
                        },
                        {
                            "name": "Web Push Notification - PrestashopAddons",
                            "image_url": "https:\/\/www.knowband.com\/image\/data\/Plugin%20Logo\/Web-Push-Notification-plugin.jpg",
                            "module_url": "https:\/\/www.knowband.com\/prestashop-web-push-notifications",
                            "price": "$43"
                        }
                    ];
                var temp = $.trim($('#blog').html());
                $.each(knoband_data, function (index, obj) {
                    var x = temp.replace(/{{name}}/ig, obj.name);
                    x = x.replace(/{{image_url}}/ig, obj.image_url);
                    x = x.replace(/{{price}}/ig, obj.price);
                    x = x.replace(/{{module_url}}/ig, obj.module_url);
                    $('.container').append(x);
                });
            });
        </script>
        </body>
    </html>

We have created a thumbnail inside script tag i.e. #blog script tag and it was used as a template. In the above code, we have used {{ }} for wildcard variables.

Let’s understand actually what we have done in the above code:

var temp = $.trim($('#blog').html()); // It wil load all content of the #blog script tag in a temp variable.
var x = temp.replace(/{{name}}/ig, obj.name);       // Replaced the wildcard variable {{name}} with corresponding data from the JSON.
x = x.replace(/{{image_url}}/ig, obj.image_url);     // Replaced the wildcard variable {{image_url}} with corresponding data from the JSON.
x = x.replace(/{{price}}/ig, obj.price);                    // Replaced the wildcard variable {{price}} with corresponding data from the JSON.
x = x.replace(/{{module_url}}/ig, obj.module_url);  // Replaced the wildcard variable {{module_url}} with corresponding data from the JSON.
$('.container').append(x); // appended the content to the container div.
  1. By using the Placeholder technique

In this technique, we will append the content in the HTML after populating the data using the jQuery placeholder technique. The complete code is given below:

<html>
    <head>
        <link rel="stylesheet" href="https://maxcdn.bootstrapcdn.com/bootstrap/3.3.7/css/bootstrap.min.css&quot;>
        <script src="https://ajax.googleapis.com/ajax/libs/jquery/3.2.1/jquery.min.js&quot;&gt;&lt;/script>
    </head>
    <body>
        <div class="container"></div>
        <script>
         $(function() {
             varknoband_data = [
                        {
                            "name": "Product tabs- PrestashopAddons",
                            "image_url": "https:\/\/www.knowband.com\/image\/data\/Plugin%20Logo\/Product-Tabs-logo-1000-x-1000.jpg",
                            "module_url": "https:\/\/www.knowband.com\/prestashop-product-tabs",
                            "price": "$25"
                        },
                        {
                            "name": "Prestashop Mobile App builder",
                            "image_url": "https:\/\/www.knowband.com\/image\/data\/Plugin%20Logo\/Mobile-app-prestashop-plugin-500-X-500.jpg",
                            "module_url": "https:\/\/www.knowband.com\/prestashop-mobile-app-builder",
                            "price": "$30"
                        },
                        {
                            "name": "Return Manager - Magento Extensions",
                            "image_url": "https:\/\/www.knowband.com\/image\/data\/Plugin%20Logo\/return-manager.png",
                            "module_url": "https:\/\/www.knowband.com\/magento-return-manager",
                            "price": "$50"
                        },
                        {
                            "name": "Web Push Notification - PrestashopAddons",
                            "image_url": "https:\/\/www.knowband.com\/image\/data\/Plugin%20Logo\/Web-Push-Notification-plugin.jpg",
                            "module_url": "https:\/\/www.knowband.com\/prestashop-web-push-notifications",
                            "price": "$43"
                        }
                    ];
             $.each(knoband_data, function(index, obj) {
                $('.container').append(
                    `<div class="col-md-3">
                        <a href="${obj.module_url}">
                            <div class="thumbnail">
                                <imgsrc="${obj.image_url}" class="img-rounded img-responsive" width="100%"></img>
                                <div class="caption">
                                    <p class="lead">${obj.price}</p>
                                    <p>${obj.name}</p>
                                </div>
                            </div>
                        </a>
                    </div>`
                );
            });
         });
        </script>
    </body>
</html>

In the above example, we have used ` (back-tick) as template literal and ${ } as a placeholder. When we compare method 1 with method 2 we can easily say template literal and placeholder makes our task easier. In this example, we have written the template code in a loop and replaced our placeholders with its corresponding data.

Summary

To learn more about jQuery Templates, I recommend that you look at the documentation for jQuery Templates at the official jQuery website.

For any queries, please reach us at support@knowband.com. We also provide custom development of all sorts. You can also find the best eCommerce modules for Prestashop, Opencart, Magento and Magento 2 here.

We also recommend our most popular One page supercheckout module as a must-have module for all eCommerce stores. Know more: