Getting Started with Knowband’s VideoMate for WooCommerce: Complete User Manual

Elevate your online store with the WooCommerce VideoMate Plugin—a powerful, all-in-one solution designed to seamlessly integrate eye-catching video content throughout your e-commerce experience. Whether you want to enhance product pages, create immersive landing sections, or boost buyer engagement, this Video Manager for WooCommerce helps you tell your brand story in the most captivating way. From increasing dwell time to converting views into sales, it’s the ultimate plugin for visual-driven growth.

You can easily showcase promotional clips, product tutorials, reviews, or user-generated content. Add videos to any part of your site—homepages, product listings, or category pages—without compromising your theme or layout. The plugin’s intuitive interface gives you full control over video placement and presentation, helping you align visuals perfectly with your branding strategy.

Moreover, this WooCommerce Video Manager plugin supports popular formats like Instagram reels, YouTube shorts, and TikTok clips, making it simple to upload downloaded trending social media video content that resonates with today’s shoppers. With built-in upload validation, your files are checked for compatibility and size before processing, ensuring smoother performance and a hassle-free experience. Best of all, everything is managed directly from your WordPress dashboard—no coding is needed.

In short, whether you’re running product launches, educational campaigns, or testimonial-driven marketing, the WooCommerce product video Manager extension makes it easy to turn video content into a sales-driving force. Fully responsive and customizable, it’s the perfect tool to craft a visually rich shopping journey that not only grabs attention but keeps customers coming back. Let your videos do the talking and elevate your brand with one smart plugin.

1.0 Transform Your Store with Dynamic, Customizable Video Features

Transform Your WooCommerce Store with Dynamic Video Content: Start by energising your storefront with the WooCommerce VideoMate Plugin—a powerful video manager for integrating engaging, conversion-ready video content. Moreover, this all-in-one WooCommerce video plugin helps present products, share brand stories, and drive sales with ease.

Streamlined Video Uploads and Management: Upload and organize reels, clips, and video assets directly from your WordPress dashboard. The built-in video uploader WooCommerce Plugin offers simple, drag-and-drop management with no technical skills required.

Strategic Placement Across Store Pages: Map videos to specific product pages, categories or home pages. Whether using the WooCommerce product video Extension, you can tailor content placement for maximum visibility.

Responsive, Interactive Displays: After that, showcase content using the WooCommerce video carousel Extension or the sleek WooCommerce floating video widget Plugin. These responsive elements make it easy to highlight tutorials, promos, or featured products in an engaging layout.

Full Customisation and Mobile Optimisation: Moreover, customise autoplay, headers, video counts, and layout styles to match your store’s branding. The entire WooCommerce VideoMate Extension is mobile-optimised and built to deliver a smooth, consistent experience on all devices.

Make Your Homepage Work Harder: In addition, grab attention from the start with the WooCommerce homepage video Extension. Use it to introduce your brand, showcase promos, and product reviews or tell your story right on your storefront’s first impression.

Bring in Social Proof with Ease: Further, integrate trending formats like reels and shorts using the WooCommerce Instagram Video  Manager Plugin or embed content from platforms like TikTok and Twitter. Boost credibility with real-time customer engagement without redirecting visitors offsite.

Centralised Admin Control: Lastly, streamline your workflow with one unified dashboard. Whether you’re adjusting a single clip or managing a full library, the WooCommerce Video Manager Plugin simplifies your video strategy

2.0 Installation Guide for WooCommerce VideoMate Plugin

Step 1: Download the Plugin

After purchase completion, download the wcvideomate.zip file, which contains the complete video manager plugin for WooCommerce.

Step 2: Upload via WordPress Plugin Installer


Click on “Upload Plugin” and select the wcvideomate.zip file from your device.
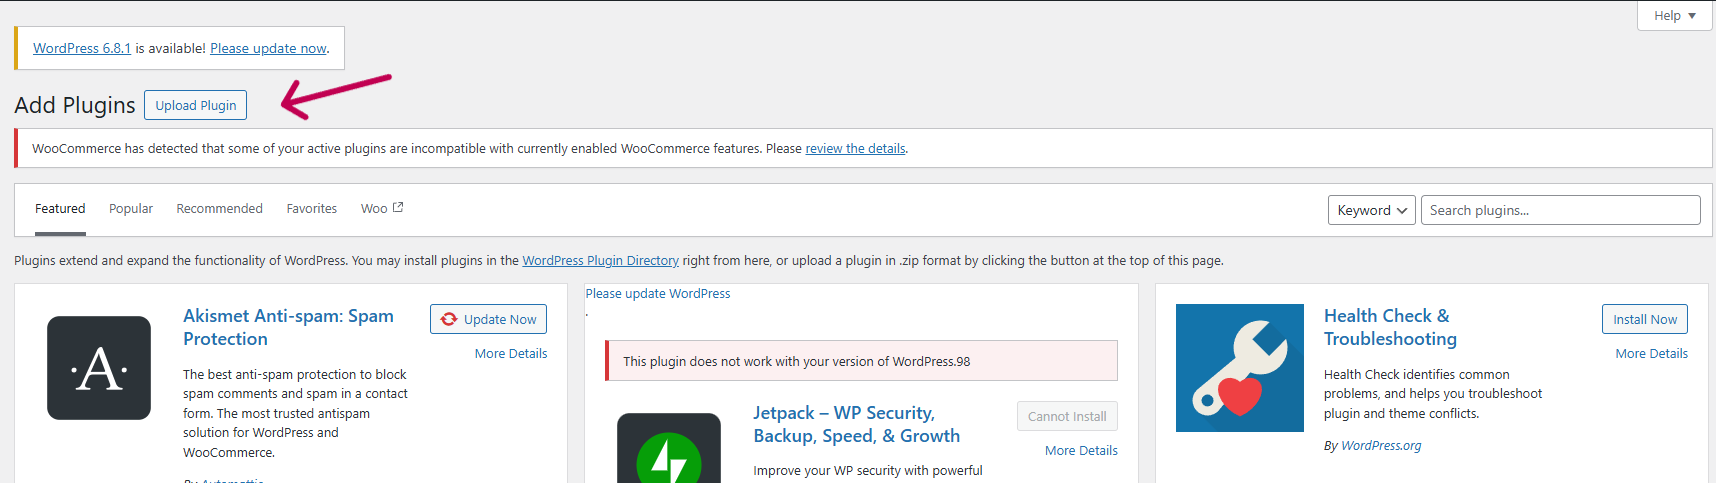
 

Upload the zipped file and click “Install Now” to begin the installation process.
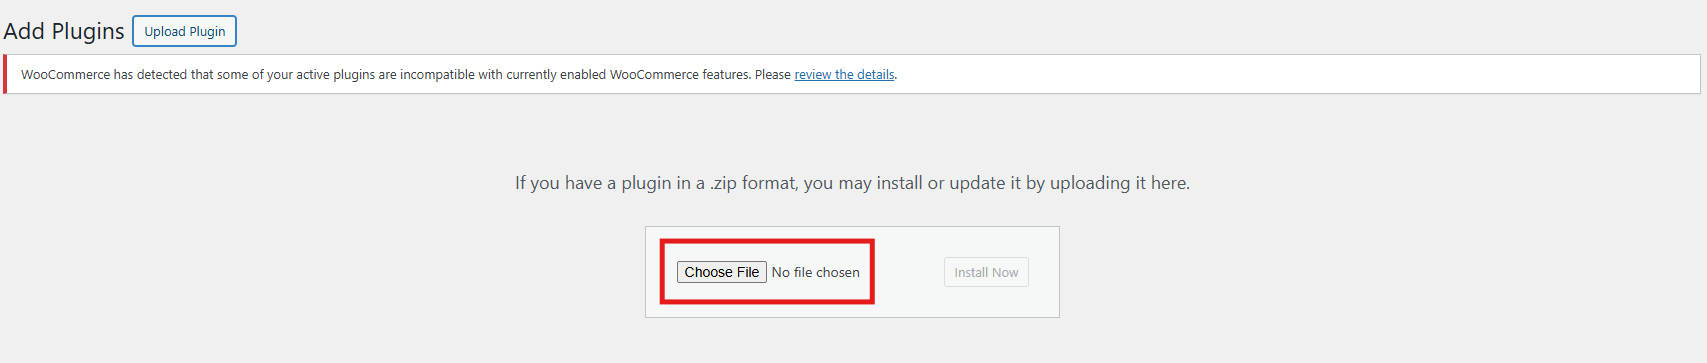
 

After the installation is complete, click “Activate Plugin” to start using it on your WooCommerce store.

Step 3: Access the Plugin

Navigate to WooCommerce > VideoMate in your WordPress admin dashboard to begin configuration.

3.0 Backend Setup Guide for WooCommerce Video Manager Plugin

3.1 General Settings
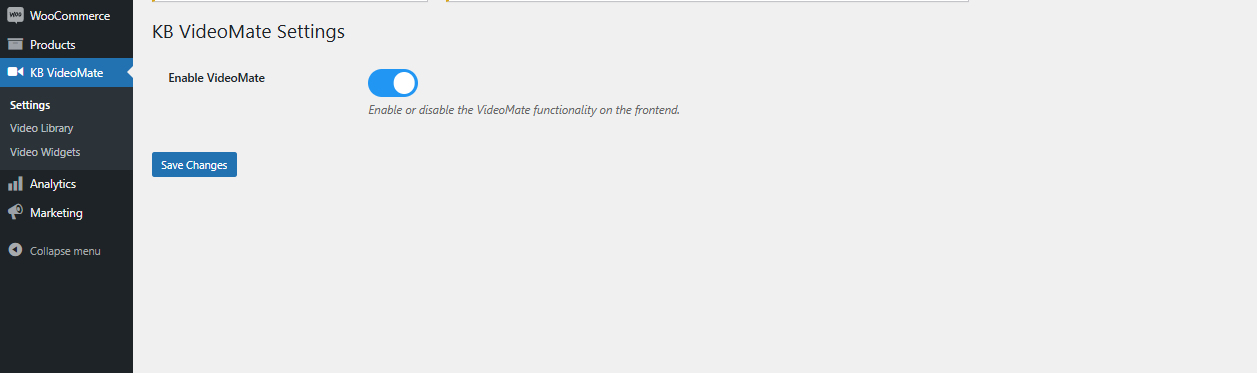
Enable/Disable Plugin: Easily turn the WooCommerce video plugin on or off with a single toggle—no complicated setup needed.

3.2 Video Library Management
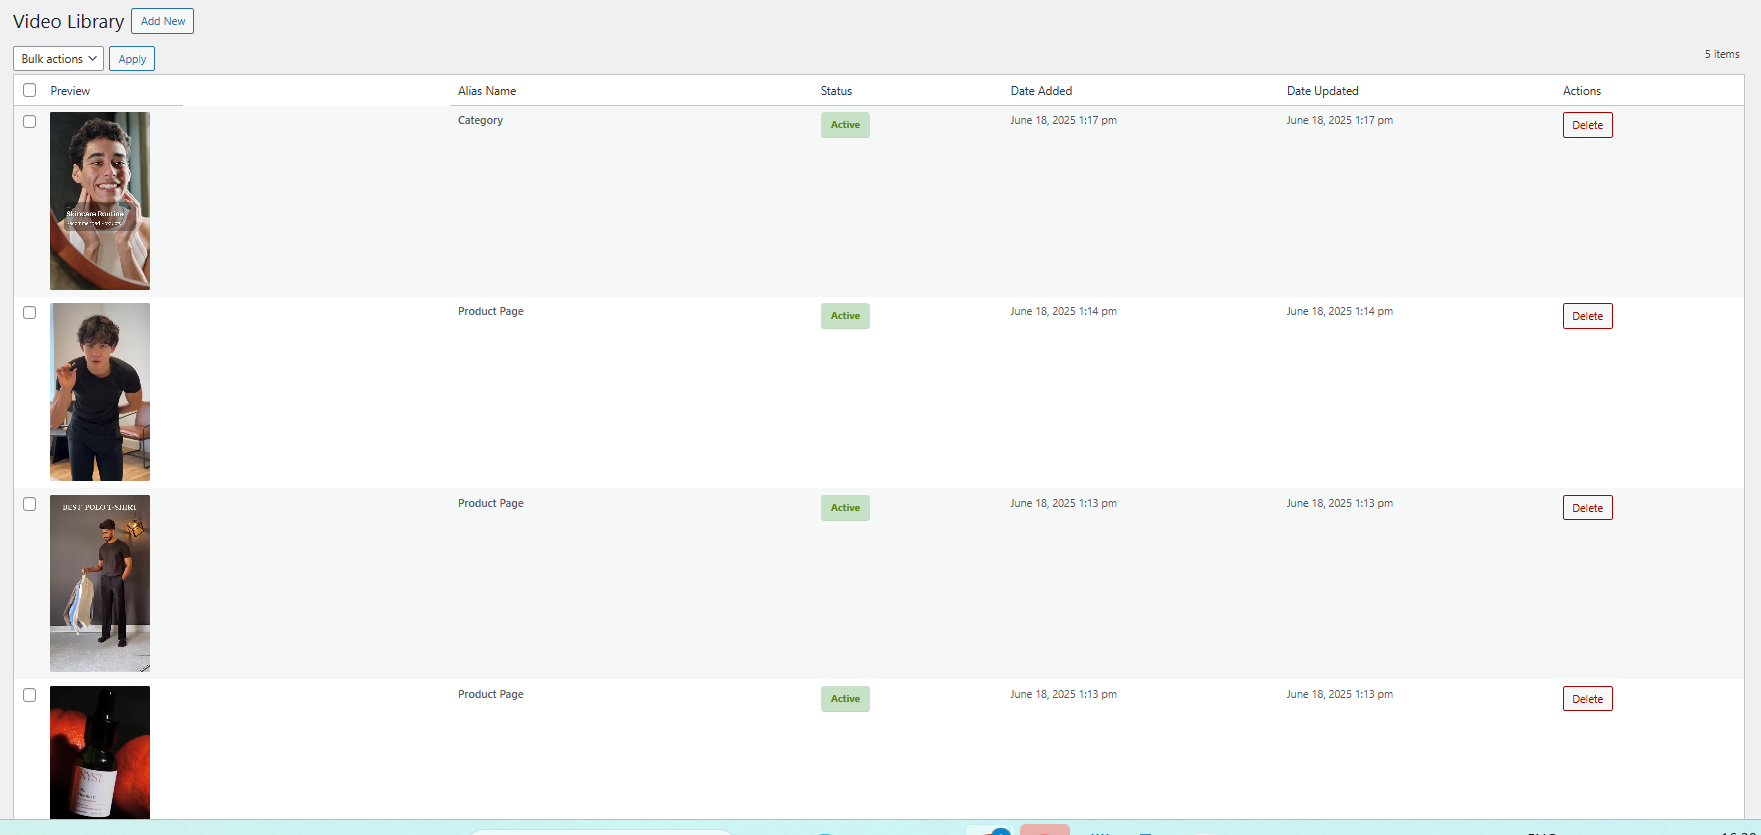
Add New Video: Upload files and assign descriptive names. Furthermore, store administrators can preview videos before configuring widgets using the WooCommerce Video Integration Plugin.

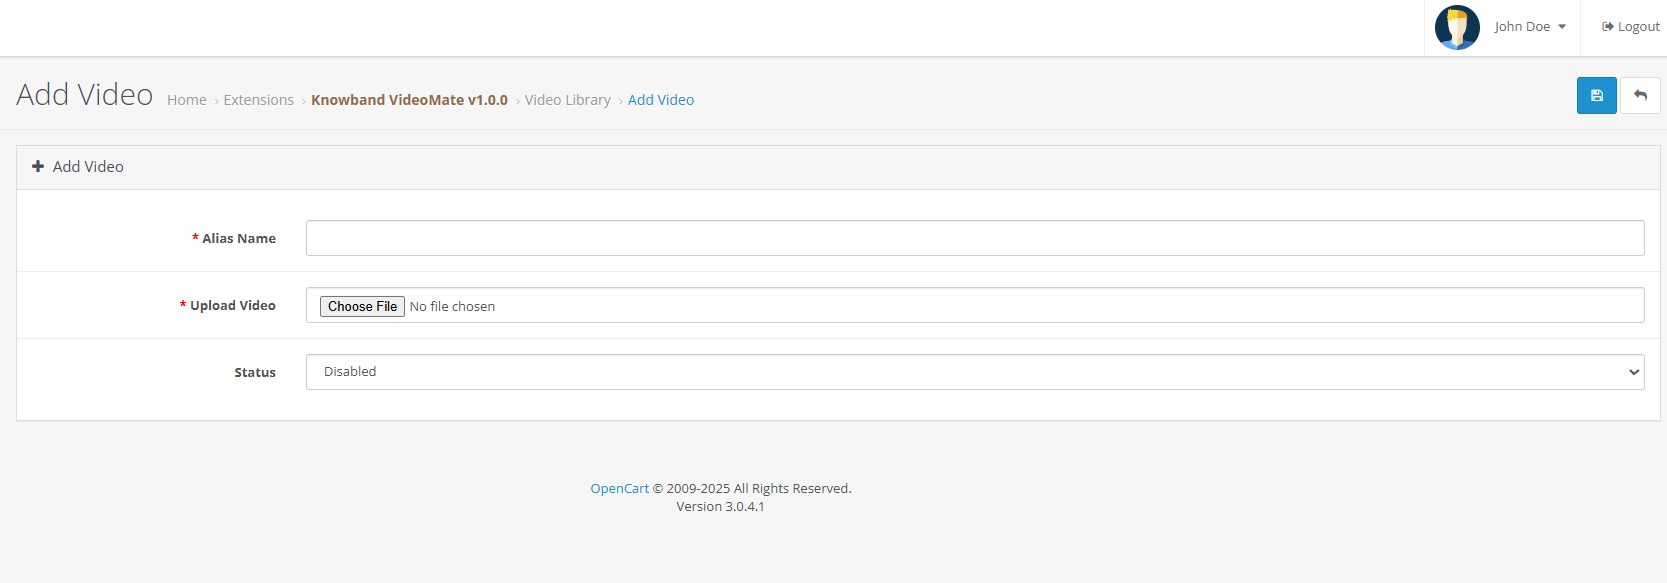
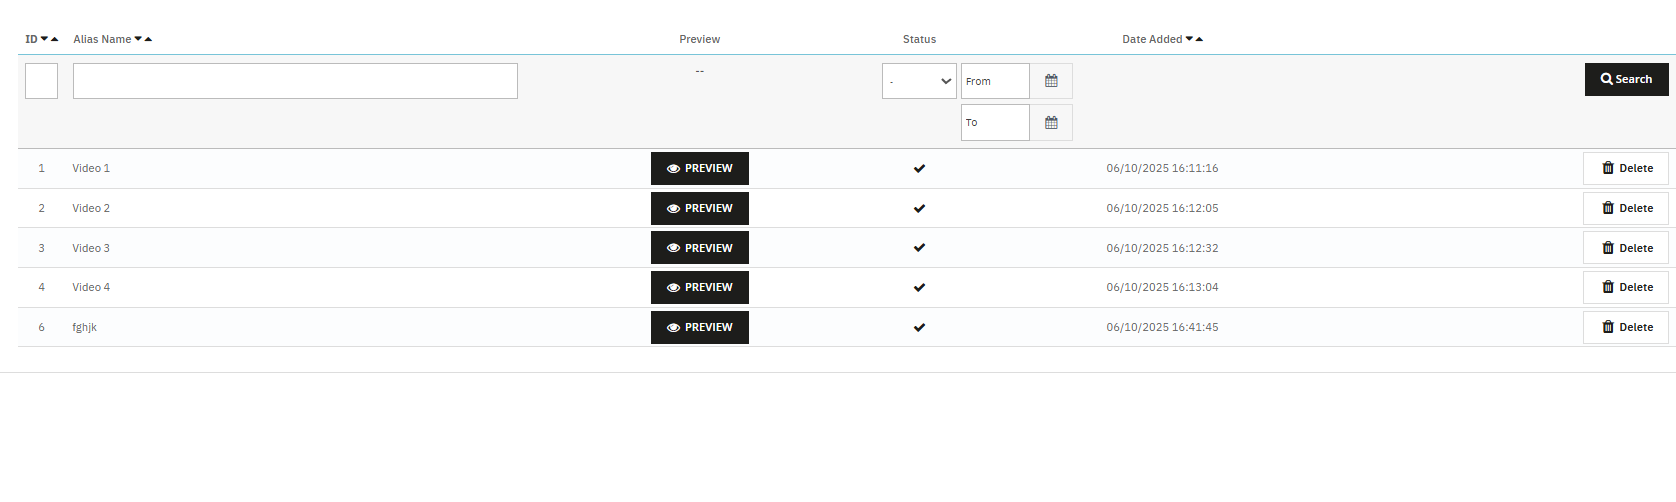
Alias Name: Add the alias name corresponding to the video for identification.

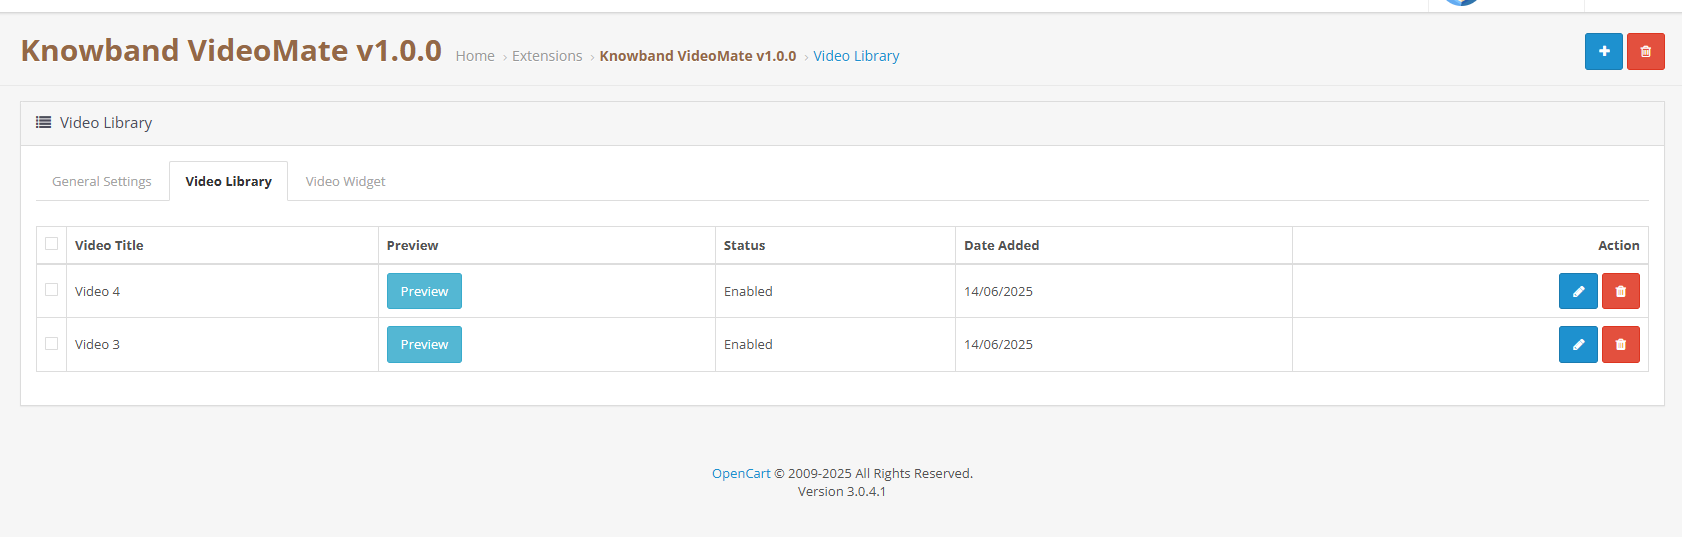
Status Management: Effortlessly enable or disable any video, reel, or clip within the Video Library using the edit option.

Upload: Seamlessly upload saved Instagram or TikTok reels and clips to showcase them on your store using the Social Media Video Plugin for WooCommerce.
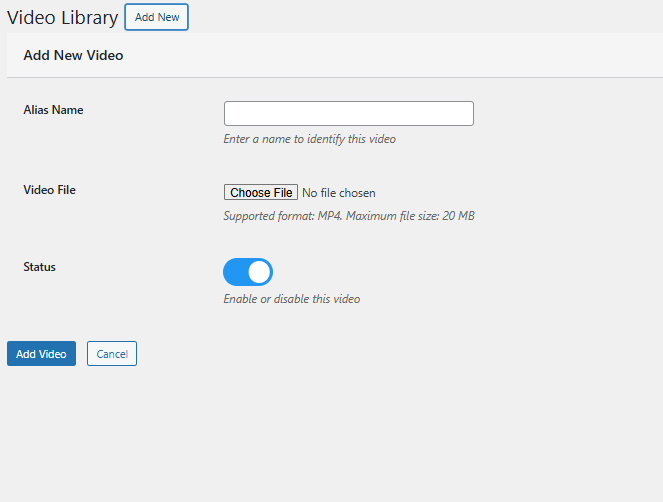
Content Removal: Delete any videos you no longer require with a single click—quick and efficient.

3.3 Video Widget Configuration

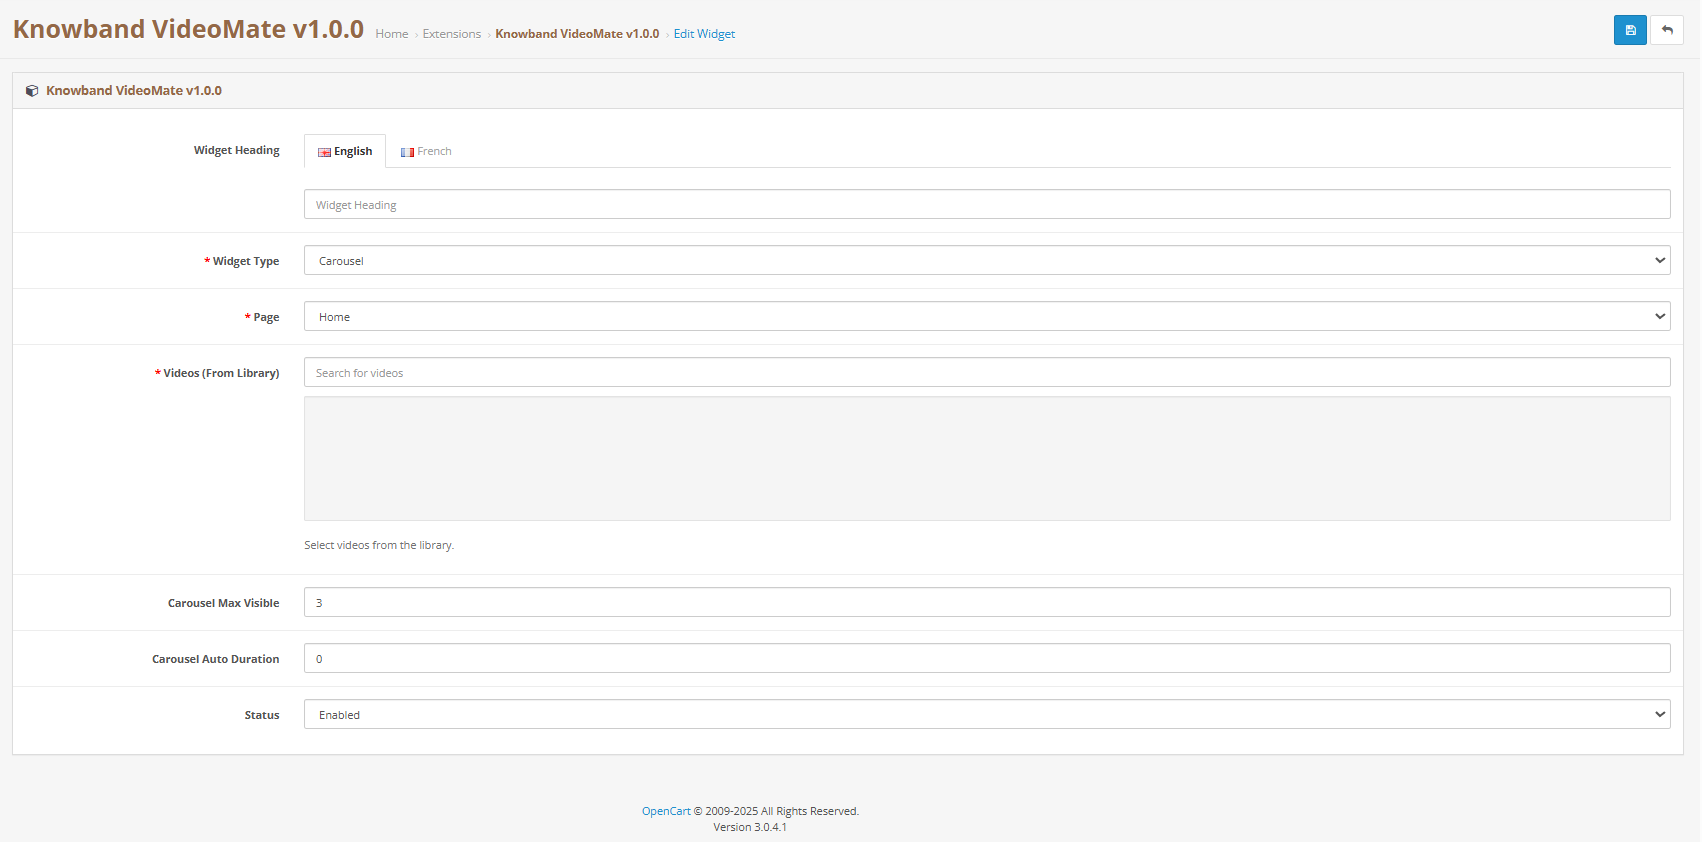
Widget Title: Set a custom title for your video widget to align with your store’s theme and engage your visitors effectively.

For example, use titles like “Customer Favourites”, “Product Showcases”, or “Tutorial Videos” to guide your customers and create a more personalised experience.

Create a New Widget:
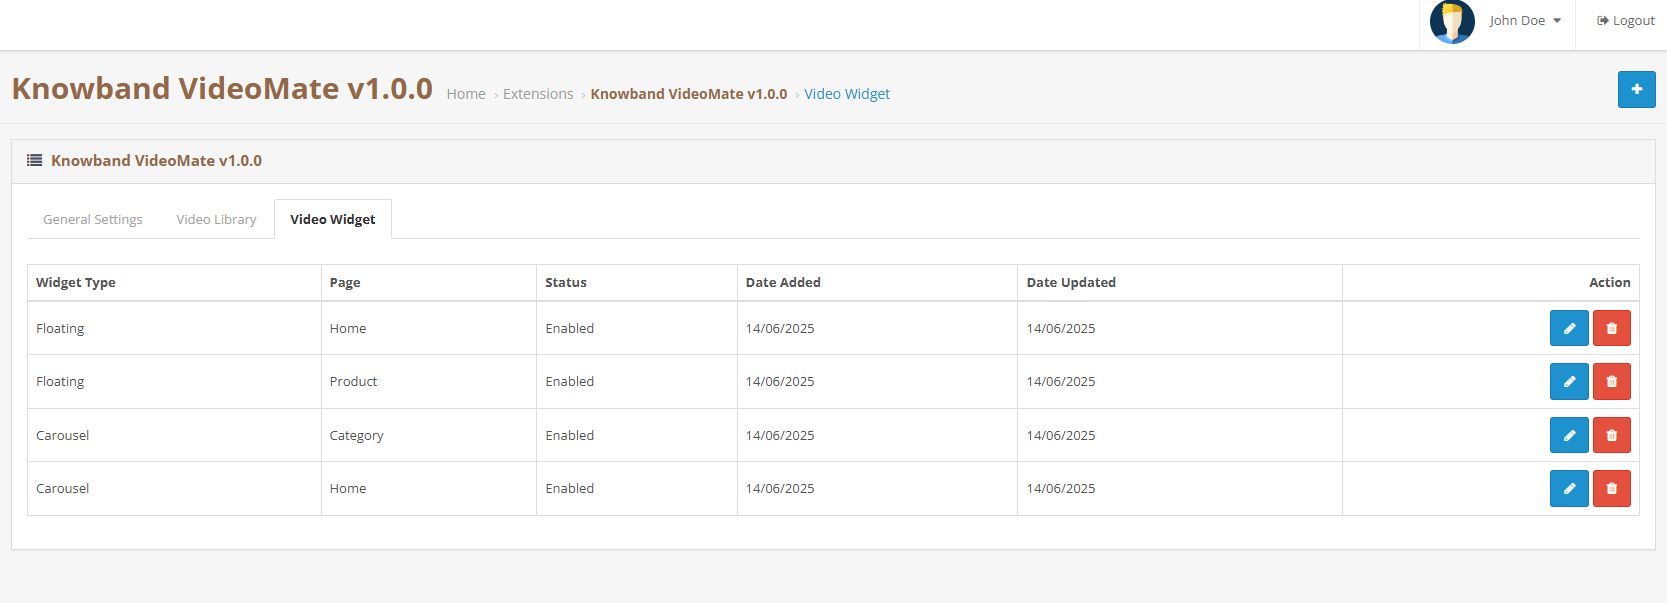
Easily configure a new video widget to showcase content on product pages, category listings, or the homepage.

Select Page Type:
Choose where the widget will appear—whether on the homepage, specific product pages, or category sections.

Map to Products or Categories:
Assign your videos or clips to selected products or categories for targeted and relevant video placement.

Widget Type: Select either a carousel or a floating video widget, depending on your store’s layout, customer browsing habits, or visual design preferences.

Carousel Display: Create engaging multi-video sliders effortlessly with the WooCommerce Video Manager Extension. Use the video carousel feature to showcase several videos in a sleek, scrollable layout. Simply choose the clips you want to feature—ideal for promoting products, highlighting offers, or sharing brand stories in a single interactive view.
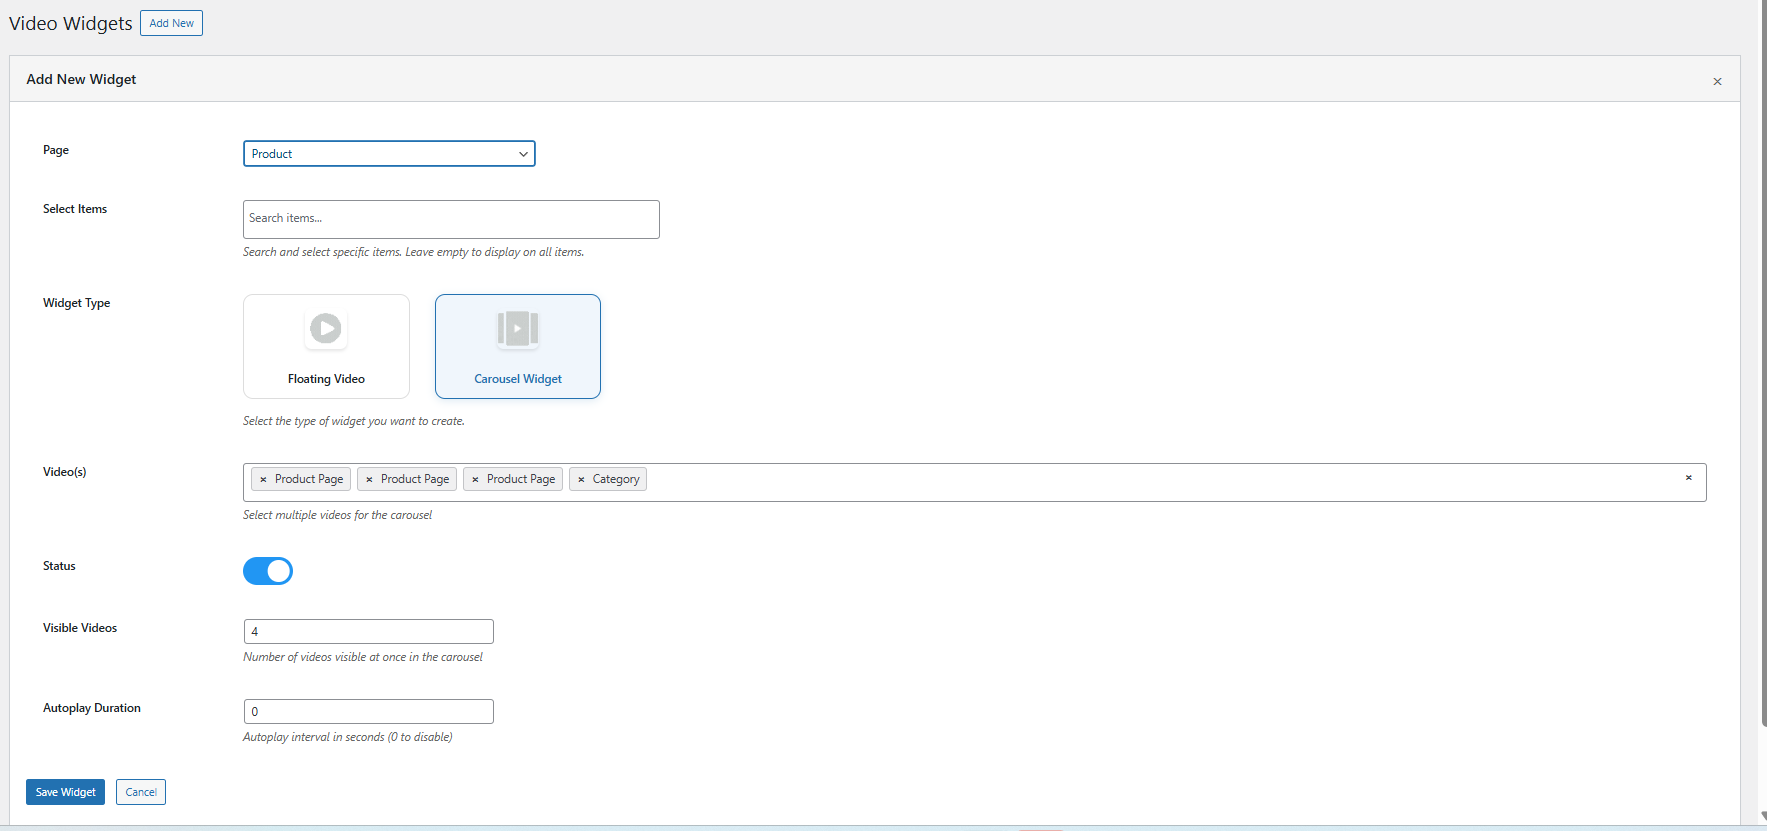
 

Floating: Add a floating widgets for video via the WooCommerce floating video widget extension.


Autoplay Configuration: Adjust how long each video plays automatically by setting a specific timer value in seconds for every widget. This feature ensures videos begin automatically after a specified delay, helping to capture attention without user interaction.

Display Positioning: Customize the exact placement of your floating video to align perfectly with your store’s layout and visual design.

Maximum Video Limit: Limit the video count in the carousel to keep your storefront organized and visually appealing.

Widget Visibility Control: Effortlessly enable or disable individual widgets with a simple toggle. This flexibility is ideal for seasonal campaigns, limited-time offers, or experimenting with different layouts

4.0 Benefits of Using WooCommerce VideoMate Plugin

Keep Customer Hooked with Engaging Videos

To begin with, using video through the WooCommerce product video Extension or product video WooCommerce Extension encourages shoppers to stay longer, explore deeper, and make better-informed buying decisions. As a result, it enhances user experience and reduces bounce rates significantly.

Turn Views into Sales with Video Conversions

Additionally, the WooCommerce VideoMate Plugin is a powerful solution for implementing effective video marketing on WooCommerce stores. By demonstrating product value through in-store video content, you can create emotional connections, build trust, and ultimately drive higher conversion rates.

Place Videos Where They Convert Best

In addition, with the WooCommerce Video Manager Plugin, you can position content exactly where it matters most. Whether it’s on your homepage, product pages or in collections via the WooCommerce video Plugin, your videos remain both strategic and impactful. Plus, display content elegantly using the WooCommerce video carousel Extension for an engaging visual layout.

Plug in Social Proof with TikTok & Reels

Furthermore, enhance your storefront with dynamic, real-time video content using the WooCommerce VideoMate Extension. Easily upload trending TikTok videos and embed clips using the Instagram video on WooCommerce Plugin. Moreover, this is perfect for influencer campaigns, customer testimonials, and user-generated content.

Manage Videos with Ease—No Code Needed

With the intuitive design of the WooCommerce Video Manager Plugin, you can add videos to WooCommerce Plugin-based stores without touching a single line of code. With plugins like the video uploader WooCommerce Plugin by KnowBand, managing your media becomes quick, centralized, and seamless

5.0 Support & Assistance

If you face any issues during installation or while using the plugin, feel free to reach out to our support team:

Email: support@knowband.com
Helpdesk: knowband.com/helpdesk

We’re happy to assist you with configuration, troubleshooting, or any feature-related queries regarding your WooCommerce video integration plugin.


 

From Clicks to Conversions: Fashion Plano’s Journey with VideoMate for PrestaShop

Fashion Plano, a modern fashion eCommerce brand, was looking for ways to make their online store more engaging and conversion-friendly. While images worked for a basic product showcase, the team realized they needed a more dynamic approach to truly connect with shoppers. That’s when they discovered Knowband’s PrestaShop VideoMate Addon—a powerful video plugin built to bring products to life through rich, visual content.

The Challenge: Making Products More Trustworthy and Engaging

The fashion industry thrives on visuals. But even with high-quality photos, Fashion Plano felt something was missing, a way to convey fabric texture, fit, and real-world use. Customers often had follow-up questions or hesitations, especially for new arrivals. The team knew that product videos could bridge this gap, but they lacked the technical resources to implement it manually.

They needed a solution that was easy to use, flexible, and worked seamlessly with their PrestaShop platform.

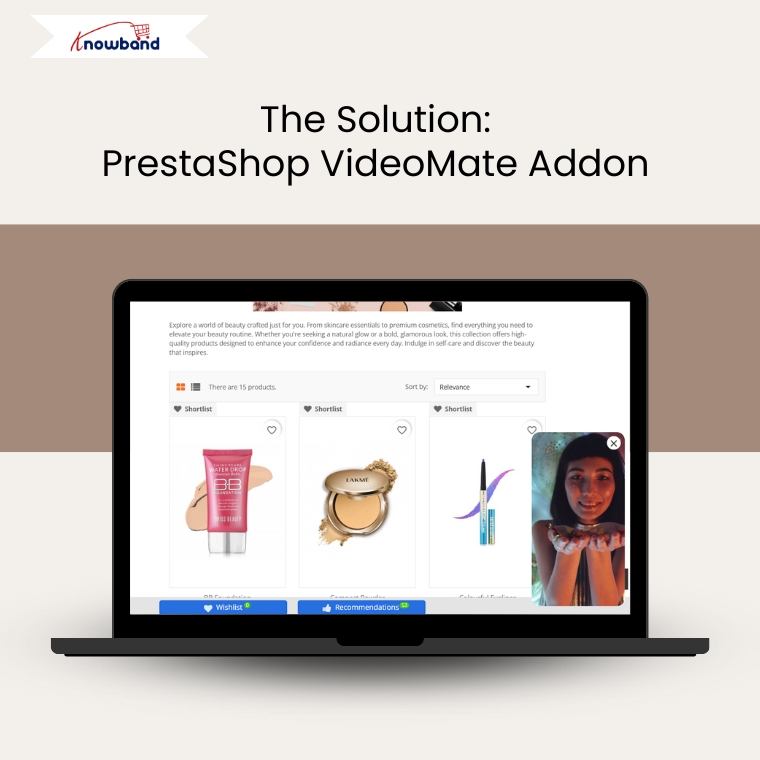
The Solution: PrestaShop VideoMate Addon

After evaluating several options, Fashion Plano partnered with Knowband to implement the PrestaShop VideoMate Addon. This module allowed them to add product videos directly to product pages, the home page, New Arrivals, Best Sellers, and even category sections—all without writing a single line of code.

With just a few clicks, the team could now integrate Instagram, YouTube, and any product review videos across their store, helping customers experience products in a more realistic and interactive way.

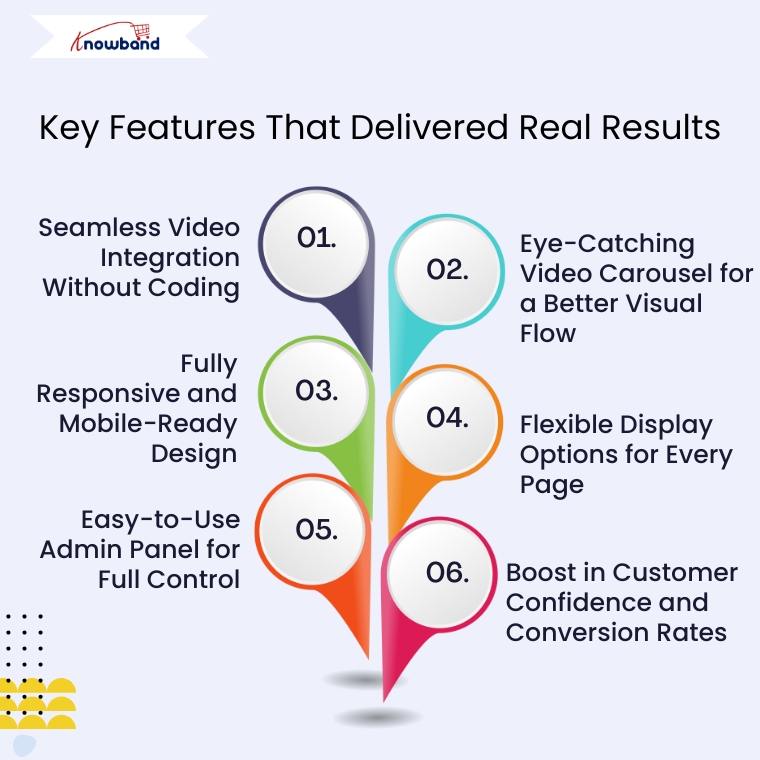
Key Features That Delivered Real Results

1. Seamless Video Integration Without Coding

The biggest win for Fashion Plano was how effortlessly they could integrate videos. Thanks to its simplicity, the PrestaShop Video Addon allows users to add videos from their device and instantly display them on store pages. This way, it eliminated the need for heavy code for video.

Furthermore, the team could now quickly add videos for new collections, styling tips, and detailed product overviews. As a result, this improved product understanding, especially for first-time buyers, and significantly reduced pre-purchase doubts.

2. Eye-Catching Video Carousel for a Better Visual Flow

https://www.knowband.com/blog/wp-content/uploads/2025/06/CopyofVideoMateKnowbandemail13June11-ezgif.com-gif-to-mp4-converter.mp4

Another powerful feature is the PrestaShop Video Carousel Extension, which lets store owners create an interactive slider to showcase multiple videos in a clean and attractive layout. For example, Fashion Plano used this to highlight various looks, behind-the-scenes footage, and influencer testimonials.

With this in place, their homepage and category sections became more engaging. As a result, customers could scroll through content without leaving the page, which ultimately helped increase time-on-site and reduced bounce rates.

3. Fully Responsive and Mobile-Ready Design

Fashion Plano’s customers often shop on the go. That’s why the responsive design of the Prestashop Video Manager was a major benefit. Whether browsing from a smartphone, tablet, or desktop, the videos auto-adjust to every screen size without breaking the layout.

This ensured that every visitor had a smooth, consistent experience, which in turn made the store feel more professional and trustworthy.

4. Flexible Display Options for Every Page

With this Video addon for Prestashop, Fashion Plano could place videos exactly where they wanted—on product pages, homepage banners, best sellers, New arrivals, or even within category listings. This flexibility gave them creative freedom to build storytelling-focused product displays.

The module even supports widgets and layout controls, so they could decide how many videos to show, in what order, and where they should appear. As a result, the visual structure of the store improved significantly.

5. Easy-to-Use Admin Panel for Full Control

Managing videos across an entire eCommerce site might sound tricky, but not with this plugin. The admin interface is clean, intuitive, and beginner-friendly. Fashion Plano’s team didn’t need any developer support. They could upload, delete, reorder, and preview video placements—all within minutes.

This ease of use saved them time and gave them more control over their content strategy. It also allowed them to react quickly to seasonal trends or customer feedback by updating video content instantly.

6. Boost in Customer Confidence and Conversion Rates

By showing videos of models wearing the outfits, sharing styling guides, and showcasing real-use scenarios, Fashion Plano built stronger trust with its audience. Shoppers could better understand the product before buying, which helped reduce returns and increased overall satisfaction.

As a result, the brand witnessed a boost in conversions on pages where videos were added.

The Result: A Modern, Video-Driven Shopping Experience

After integrating the PrestaShop Video Manager Addon, Fashion Plano’s store looked and felt more dynamic. As a result, their product pages transformed from static listings into engaging, story-driven experiences. Customers could now explore styles in motion, connect with the brand’s visual identity, and shop with greater confidence.

In a short time, Fashion Plano noticed:

  • Significantly higher engagement on video-enabled product pages
  • Notably improved time-on-site metrics
  • Consequently, increased sales and reduced return rates

Moreover, by embracing video as part of their visual marketing, the brand took a major step forward in modernizing its customer experience.

Ready to Enhance Your Store Like Fashion Plano?

If you’re running a PrestaShop store and looking to create a more compelling, visual, and trustworthy shopping environment, then the PrestaShop VideoMate Addon is the perfect fit.

Whether you want to show product usage, styling ideas, customer testimonials, or behind-the-scenes stories, this module ensures it’s incredibly simple.

With no coding required and complete design flexibility, it helps you:

  • Easily increase customer trust
  • Effectively reduce cart abandonment
  • Ultimately boost conversions
  • And create a more modern and interactive online store

So why wait? Get started with the PrestaShop Video Manager Extension today and give your products the spotlight they deserve, just like Fashion Plano did.

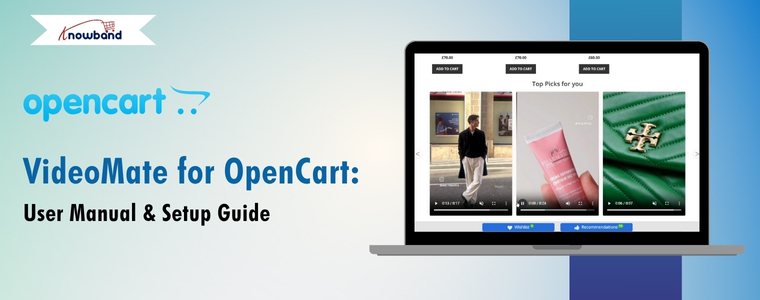
VideoMate for OpenCart: User Manual & Setup Guide

Elevate your online store with the OpenCart Video Manager Extension, a powerful and flexible extension designed to integrate high-impact video content throughout your e-commerce site. Whether you’re aiming to improve product visibility, boost user engagement, or increase conversions, this all-in-one video plugin for OpenCart makes video integration seamless and efficient.

With support for various display options such as the carousel extension, floating video widget, and single video embeds—you can highlight featured products, promotions, or brand stories directly on your homepage, product pages, or category listings. The module includes flexible placement settings, making it simple to adapt to your layout and marketing goals.

Designed for simplicity, the OpenCart VideoMate extension includes a powerful video uploader built for smooth integration with OpenCart. Moreover, the video manager for opencart features browser-based (client-side) validation to ensure files meet format and size requirements before they’re uploaded, reducing errors and improving speed. A built-in video library makes it easy to manage and organize content right from your admin panel—no technical expertise is needed.

Moreover, you can easily update video status, manage uploads, and organize your media for quick access and consistent presentation. The extension also supports displaying downloaded Instagram and Twitter reels, along with social clips from other platforms—making it a comprehensive, all-in-one video manager extension for OpenCart.

Furthermore, whether you’re aiming to create an immersive shopping experience, build a captivating in-store video gallery, or leverage video content for promotions, tutorials, or customer reviews, this plugin is purpose-built to deliver results. With powerful features like OpenCart homepage video integration and category-level video embedding, you can strategically position engaging content where it captures the most attention and maximizes impact.

Ideal for modern merchants, this video marketing plugin for OpenCart is fully responsive, highly customizable, and designed for ease of use—no coding required. Boost conversions and strengthen customer engagement with this all-in-one e-commerce video extension built to elevate your store’s visual experience.

1.0 Key Features of OpenCart VideoMate Extension

Transform Your OpenCart Store with Engaging Video Content: First and foremost, bring your storefront to life with dynamic video integration. Whether you’re showcasing products, running promotions, or telling your brand story, this all-in-one OpenCart video plugin empowers you to create a visually engaging and conversion-driven shopping experience.

Easy Video Uploads with Built-In Library Management: Next, upload and manage clips, reels, or videos directly from your OpenCart admin panel using the intuitive and reliable video uploader. Organize your media effortlessly and access your complete video library from one centralized location—no coding required.

Targeted Video Placement Where It Matters Most: Moreover, with advanced video mapping, you can assign videos to specific products, categories, or custom pages. Whether using the OpenCart product video extension or the category video plugin, you’re fully in control of where your content appears—maximizing relevance and visibility.

Choose from Multiple Responsive Widget Types: In addition, display multiple videos in an interactive, scrollable layout using either the video carousel or floating video widget. This is ideal for showcasing featured products, tutorials, or promotional clips in a sleek, engaging format.

User-Controlled Video Players: Furthermore, the OpenCart Video Manager Extension is fully responsive, ensuring seamless adaptation across desktops, tablets, and mobile devices for a consistent user experience.

Customize Every Detail with Display Controls: Finally, fine-tune how your videos appear and perform. Set autoplay timers, define widget titles, control the maximum number of displayed videos, and adjust additional display settings—all with ease. These customizable features help align your video content with your store’s branding and customer experience strategy.

Boost First Impressions with Homepage Video Integration: Leverage the OpenCart homepage video extension to capture attention the moment visitors arrive. Significantly, the extension is ideal for showcasing promotions, introducing your brand, or delivering impactful storytelling right on your storefront’s front page.

Enhance Browsing with Category-Level Video Support: Upload videos directly on category landing pages using the OpenCart category video plugin. Showcase themed collections, seasonal content, or product highlights to encourage exploration and boost click-through rates.

Connect Your Store to Social Media
Seamlessly incorporate external content with built-in support for Instagram and Twitter video formats on the OpenCart plugin. Showcase real-time engagement, customer testimonials, or influencer partnerships—all without requiring visitors to leave your store.

Fully Responsive and Mobile-Optimized
No matter how your customers browse—on desktop, tablet, or smartphone—your video content will look and perform flawlessly. This Knowband’s VideoMate extension for Opencart ensures a smooth, responsive experience across all devices.

Simplified Management with Centralized Admin Control
Additionally, manage all video assets, widgets, and settings from a single, user-friendly dashboard. Whether you’re updating a single video or overhauling your entire video strategy, the streamlined admin interface makes everything quick and efficient.

The Complete Video Marketing Toolkit for OpenCart
Finally, from promotional clips to product tutorials and authentic social proof, this powerful e-commerce video extension provides everything you need to build a media-rich, high-converting OpenCart store. It’s customizable, responsive, and simple to manage—your all-in-one solution for modern video integration

2.0 Installation Guide for Knowband’s OpenCart VideoMate Extension

Step 1: Download the Extension

After purchasing, download the videomate.ocmod.zip file, which contains the complete video plugin for OpenCart.

1. Unzip the downloaded file – this will contain the videomate.ocmod.zip and necessary folders.
2. Go to the upload folder and locate the admin and catalog files.


3. Copy these files into the root directory of your OpenCart store

Step 2: Upload via Extension Installer

  1. Go to Extensions > Extension Installer in your OpenCart admin panel.
  2. Upload the videomate.ocmod.zip file.
  3. Once installed, go to Extensions > Modifications, and click Refresh to apply changes.

Step 3: Assign User Permissions

Navigate to System > Users > User Groups, then edit your group and enable permissions for extension/module/videomate.

Step 4: Enable the Module

Navigate to Extensions > Extension Installer in your OpenCart admin dashboard.

3.0 Admin Panel Configuration of OpenCart Video Manager Extension

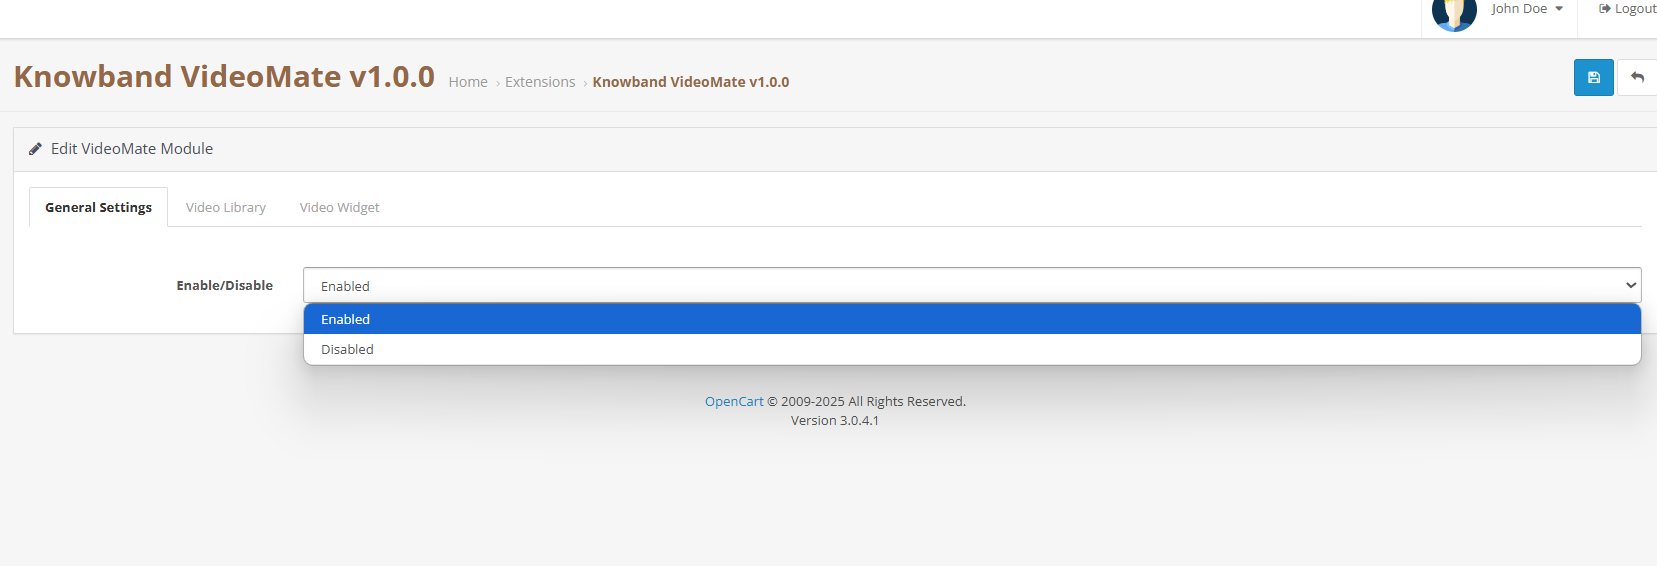
3.1 General Settings

  • Enable/Disable Module: Easily turn the OpenCart video plugin on or off with a simple toggle as no complex setup is required.

3.2 Video Library Management

  • Add New Video: Upload files and assign alias names. Moreover, store owners can preview the videos before setting up the widget using Knowband’s Opencart Video Integration Extension. 
  • Status Toggle: Easily activate or deactivate any video, clips or reel from the Video Library by clicking on edit.
  • Social Media Videos or Clip Upload: Add downloaded reels, and clips from Instagram or Twitter to display via the social media video OpenCart plugin.
  • Delete: Remove any videos you no longer need with a single click—quick and hassle-free.
  • Preview: Preview the videos before mapping to the widgets.

3.3 Video Widget Configuration

  • Widget Title: Assign custom titles to each video widget to match your branding or content strategy. For example, use titles like “Top Picks for You”, “Product Highlights”, or “How-To Videos” to guide your customers and create a more personalized experience.
  • Create a New Widget: Define a new widget for products, categories, home, or custom pages.
  • Page Type Selection: Choose display location (homepage, category, product, custom layout).
  • Entity Mapping: Select specific products or categories to which you want to add clips or videos.
  • Widget Type: Choose between a carousel or floating video widget based on your store’s layout, user behaviour, or current design trends. Each option offers a unique way to present engaging video content.
  • Carousel: Enables multi-video sliders via the OpenCart video carousel extension.
  • Showcase multiple videos in a sleek, scrollable slider using the OpenCart video carousel extension. Simply select and add the videos you want to be featured in the carousel—perfect for highlighting products, promotions, or brand content in one interactive view.
  • Floating: Choose Floating as video widgets for videos via the Knowband’s OpenCart floating video widget extension.
  • Autoplay Settings: Set a custom autoplay timer (in seconds) for each video widget. This feature ensures videos start automatically after a defined delay, helping to capture attention without user interaction.
  • Widget Positioning: Store owners can choose to place the video to be placed on the right or left. Control exactly where your floating video appears to align with your store’s layout and design
  • Max Videos: Set the maximum number of videos to display within the carousel to keep your layout clean, focused, and user-friendly.
  • Widget Status: Easily control the visibility of each widget with a simple enable/disable toggle. Show or hide video sections on demand—perfect for seasonal content, limited-time promotions, or testing different layouts.

4.0 Benefits of Using OpenCart VideoMate Extension

Increase Engagement & Time on the Site
First and foremost, using video through the OpenCart product video extension encourages customers to explore products longer and make informed purchase decisions.

Improve Conversion Rates
Secondly, VideoMate is ideal for in-store video marketing, which can significantly boost product page conversions by showcasing product value more effectively.

Versatile Video Placements
In addition, you can display content on the homepage, category pages, product pages, or custom layouts using various video formats and widget types to suit your store’s needs.

Instagram Video Integration
Moreover, enhance your storefront with real-time, dynamic content by uploading downloaded Instagram videos directly into the OpenCart VideoMate plugin—perfect for showcasing social proof, influencer clips, or behind-the-scenes moments.

Easy to Use
Lastly, with its intuitive UI and centralized controls, the OpenCart Video Manager Extension makes it simple to add videos to OpenCart plugin-based stores without any technical expertise.

5.0 Tutorial: Watch the Video Guide

To help you set up and use the Opencart Video Manager Plugin, we have created a comprehensive YouTube tutorial. This step-by-step video guide walks you through the installation process, configuration options, and how to effectively add and manage video content on your store.

6.0 Support & Assistance

If you encounter any issues during installation or usage, please contact our support team via:

We are happy to assist you with configuration, troubleshooting, or feature-related questions for your OpenCart video integration plugin.

New Release: Supercharge Your eCommerce Store with VideoMate – Now on PrestaShop, WooCommerce & OpenCart

In today’s competitive eCommerce space, standing out requires more than just great products. It demands immersive, informative, and visually engaging shopping experiences. While product images serve as a basic necessity, they often fail to deliver the full picture. This is where video content becomes a game-changer—and why merchants across platforms are turning to modern video solutions to enhance the aesthetic appeal of their stores and connect with today’s visual-first customers.

Recognizing this growing demand, Knowband has launched the much-anticipated VideoMate Addon. Now available for PrestaShop, WooCommerce, and OpenCart, VideoMate is an all-in-one eCommerce video solution designed to bring your store to life with high-impact video marketing. Whether you want to display how-to guides, showcase product reviews, tell your brand story, or integrate short-form content from social platforms, this robust e-commerce video module simplifies it all.

Why Your Store Needs Video

To begin with, modern customers prefer to see products in action. The video gives them the next best thing to a hands-on experience, offering clarity, confidence, and connection that static visuals can’t match.

Studies show that customers are more likely to convert after watching a product video. That’s because video:

  • Provides better product understanding
  • Reduces hesitation and return rates
  • Builds trust through authenticity
  • Enhances emotional engagement
  • Increases time-on-site and improves SEO

Clearly, integrating video isn’t just a creative enhancement—it’s a conversion strategy.

How Video Content Influences Buyer Behavior

More specifically, video content speaks directly to the way online customers consume information. A PrestaShop Video Manager Module, for instance, lets customers see a product’s features, texture, and use cases. Similarly, a well-placed OpenCart product video extension builds credibility with visual proof, making it easier for customers to say “yes.”

Through a Prestashop Video Manager addon, you can share your brand’s mission, showcase behind-the-scenes content, or present video testimonials that make your store feel more human. In addition, short-form content such as downloaded Instagram Reels or Twitter videos can be uploaded using the PrestaShop Instagram Reels Addon or the OpenCart Twitter video plugin—further extending your reach and consistency across channels.

How Knowband’s VideoManager Addon for Prestashop, Opencart & WooCommerce Helps Your Store Stand Out

Fortunately, VideoMate takes the complexity out of video marketing. Whether you’re running PrestaShop, WooCommerce, or OpenCart, this addon allows you to upload, place, and manage videos across your store with ease. As a result, you can enhance product pages, boost homepage engagement, and even feature time-sensitive offers with floating widgets—all without technical skills.

By supporting formats such as a PrestaShop homepage video module, a PrestaShop video carousel module, and a floating video widget for both OpenCart and PrestaShop, VideoMate offers unmatched flexibility.

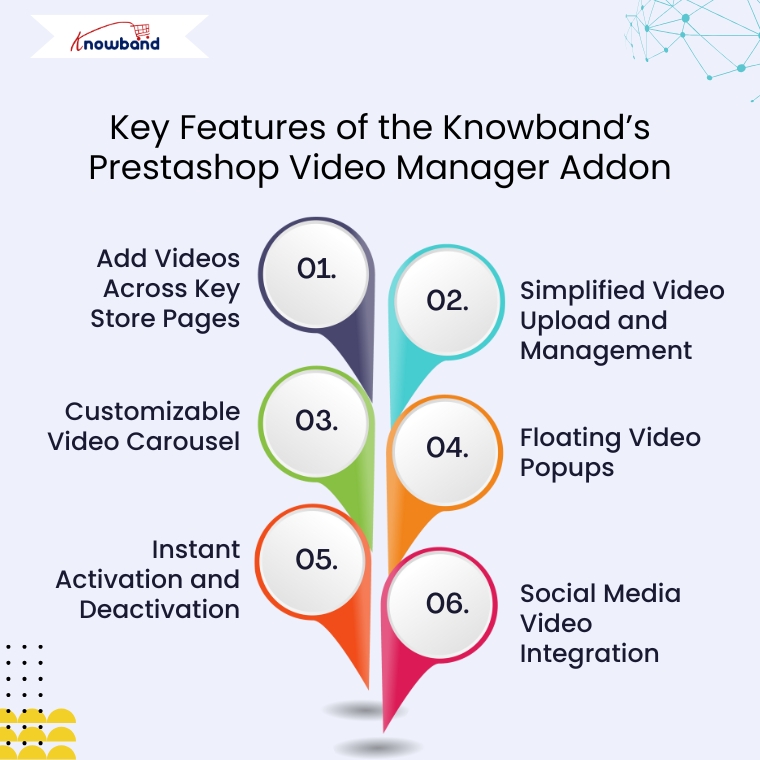
Key Features of the Knowband’s Prestashop Video Manager Addon

Add Videos Across Key Store Pages

First and foremost, VideoMate enables video placement on all crucial store pages. This includes product pages, category pages, homepages, best-seller sections, and even new arrivals. With options like the PrestaShop homepage video module and the OpenCart category video plugin, you can deliver compelling content exactly where it matters most.

Simplified Video Upload and Management

Next, the built-in video uploader for OpenCart video manager extension makes adding videos incredibly simple. Upload directly from your local system, assign content to specific pages, and edit or remove videos anytime—no coding required. This level of ease turns your store into a flexible video-powered selling machine.

Customizable Video Carousel

To further boost interactivity, the PrestaShop video carousel module and its OpenCart equivalent let you create scrollable, auto-playing video sections. Add custom headings, adjust transition timing, and control how many videos are displayed. This not only modernizes your store’s design but also improves customer engagement.

Floating Video Popups

For time-sensitive promotions or feature highlights, the floating video widget module for PrestaShop and OpenCart floating video extension provide an elegant solution. These popups can be positioned left or right, and are designed to attract attention without disrupting the browsing flow.

Instant Activation and Deactivation

For ultimate control, you can enable or disable videos directly from the admin panel. Whether you’re running seasonal campaigns, testing performance, or updating content, you have real-time flexibility without needing developer support.

Social Media Video Integration

Lastly, the PrestaShop social media video addon and OpenCart video plugin support embedded content from platforms like Instagram and Twitter. This means you can repurpose engaging short-form content—such as reels, product clips, or influencer shoutouts—right into your store. It’s a powerful way to unify your eCommerce and social marketing efforts.

Conclusion

In conclusion, integrating video into your online store is no longer just an enhancement—it’s a necessity. The VideoMate Addon equips merchants on PrestaShop, OpenCart, and WooCommerce with the trending features needed to transform static shopping experiences into engaging, video-rich journeys that build trust and boost sales.

With support for everything from product videos and video carousels to floating widgets and Instagram Reels, this addon combines ease of use with powerful functionality. Whether you’re telling your brand story, showcasing reviews, or launching new collections, VideoMate Plugin for WooCommerce helps you connect with customers in the most compelling way possible.

Explore the full potential of videos with the eCommerce Video Manager Addon because a product seen in videos is a product one step closer to being sold.

VideoMate for PrestaShop: User Manual & Setup Guide

VideoMate is a comprehensive PrestaShop video addon designed to transform your online store with engaging video content. As a powerful PrestaShop product video module, VideoMate allows you to easily integrate MP4 videos into your store, creating dynamic and interactive experiences that help showcase your products, promotions, and brand story more effectively.

Furthermore, this versatile PrestaShop VideoMate Addon supports multiple widget types, including responsive video carousels, floating video players, and single video displays, giving you full control over how videos appear across your site. Whether you want to highlight your best sellers, or new products, or simply add captivating videos on the homepage or category pages, VideoMate offers flexible video mapping and display options tailored to your needs.

Additionally, with features like video library management, status toggling, and client-side validation, managing your video assets is effortless and secure. Meanwhile, the floating video module allows you to add stylish, movable video players that users can minimize or close, while the carousel module displays multiple videos with autoplay and navigation controls, ensuring a smooth and modern user experience.

Moreover, designed for seamless integration, Knowband’s PrestaShop product video addon enhances product pages with rich media content that increases user engagement and boosts conversion rates. Ultimately, whether you are looking for a PrestaShop category video module, a homepage video solution, or a full-featured video marketing module, VideoMate offers an all-in-one video widget module for PrestaShop that is responsive, customizable, and easy to manage.

[New] Latest Updates of PrestaShop Video Manager Module v1.0.4

PrestaShop VideoMate Manager v1.0.4 has been released with the following changes:

Dashboard and Reports: Now you can track impressions, plays, product clicks, and add to cart with charts, tables, date filters, and CSV export.
Shoppable Video: Attach products to a video, with a product card and Add to cart on the storefront.
YouTube and Vimeo: Add videos by link, with cover images fetched automatically or uploaded by you.
Widget Controls: Schedule widgets, set delay or scroll triggers, target pages and devices, and choose landscape, portrait, or square video.

[New] Latest Updates of Prestashop Video Manager Module v1.0.3

This major update brings the new enhancement that now you can generate videos using AI Platforms.The Prestashop Video Manager Module now supports AI-powered video generation using Gemini and ChatGPT. Create product and promotional videos automatically with advanced AI technology. 

[New] Latest Updates of Prestashop Video Manager Module v1.0.2

The new version of the PrestaShopVideomate module now includes new enhancements that give store owners greater control over video content and how customers interact with the videos.

1. Video Upload Type Options

Now, store owners can choose between two methods of video type for their store:

Direct Upload: They can select and upload video files stored locally on their computer

External URL: Store owners can also add URLs to videos hosted on supported platforms using their URLs, which are publicly accessible.

These options give you flexibility in managing your video content based on your preferred hosting method.

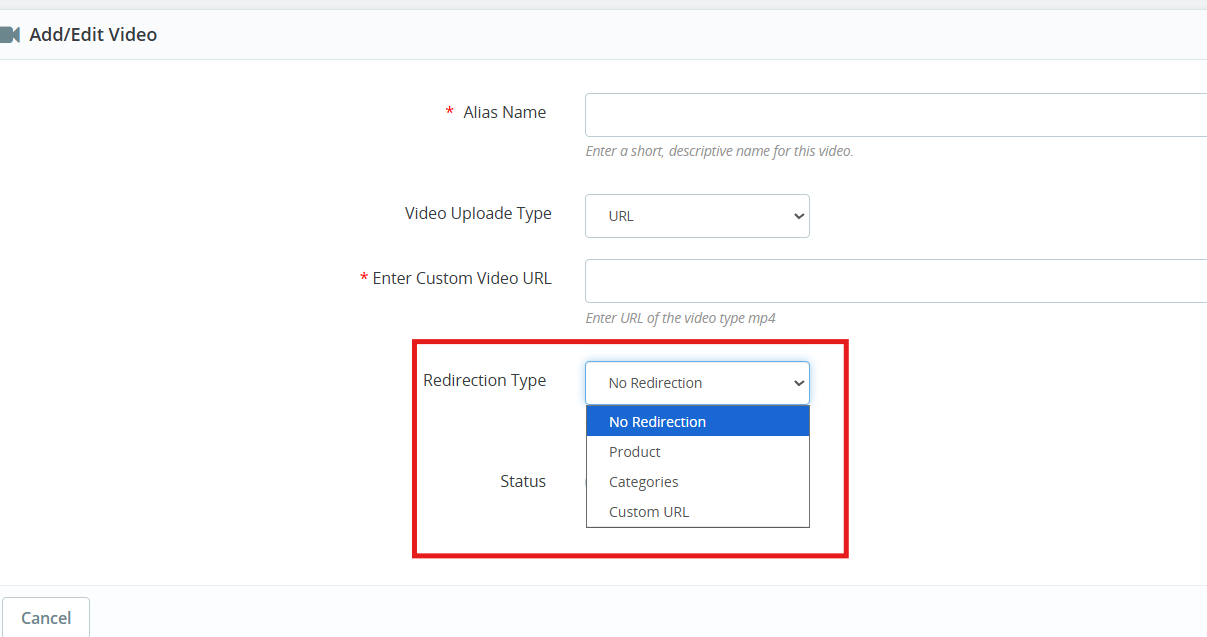
2. Configurable Redirection Settings

The Prestashop Video Manager module introduces redirection controls that determine where customers land after clicking on a video. 

You can direct them to redirection URLs of products and categories as well as any custom URL.

3. Video Integration on Product Pages

Videos now appear within the product image gallery on individual product pages. When you add a video, it displays alongside your product photos in the same viewing area.

These key features specially helps in

  1. Demonstrate how products work in real
  2. Keep potential buyers engaged longer on your product pages
  3. Deliver more detailed product information without cluttering the page layout


1.0 Key Features of Prestashop VideoMate Addon

Video Library Management First and foremost, with the VideoMate PrestaShop Addon, upload MP4 videos (up to 50MB) and manage them easily using alias names, status toggle, and in-admin previews.

Video Mapping Management Additionally, this PrestaShop product video addon lets you map videos to products, categories, home pages, Best Sellers, or New Product pages with flexible widget types.

Frontend Video Display. Furthermore, use a carousel, single, or floating widget to display videos beautifully across your store. A responsive video module for PrestaShop ensures smooth playback on all devices.

Broad Widget Placement Moreover, this PrestaShop video carousel module supports placement on product pages, category pages, home pages, and special listings, maximizing visibility and customer engagement.

Custom Widget Configuration In addition, configure widget settings like autoplay, video count, position, and custom headings—making it a PrestaShop custom video display module with high flexibility.

Centralized Admin Panel Subsequently, manage all configurations from a clean admin panel with global enable/disable controls—ideal for store-wide video campaign control.

Optimized Performance & Compatibility Meanwhile, this lightweight PrestaShop MP4 video integration works seamlessly with prestashop versions 1.7 to 8. x.x.

Effective Video Marketing Strategies As a result, a true PrestaShop video marketing module, VideoMate enhances your store’s product pages with engaging video content that boosts conversions and customer trust.

Fully Responsive & Mobile-Friendly Consequently, VideoMate is a responsive video module built specifically for PrestaShop that automatically optimizes video display across all devices, delivering seamless playback on desktop, tablet, and mobile screens.

Knowband’s PrestaShop Addon to Show Product Videos Ultimately, VideoMate serves as your comprehensive video display solution for PrestaShop, offering versatile functionality as a homepage video module, category video module, or floating video module to meet all your site’s video integration needs.

2.0.0 Installation Guide for PrestaShop VideoMate Addon

Step 1: Purchase and download the Knowband’s Prestashop VideoMate Addon After your purchase is complete, you’ll receive the videomate.zip file. VideoMate is your complete PrestaShop video marketing module, designed to transform and enhance your storefront with professional video integration.

Step 2: Access Module Manager Once logged in, go to Modules > Module Manager > Upload a Module to begin the installation of your PrestaShop MP4 video integration solution.

Step 3: Upload and Install the Module Then, drag and drop the videomate.zip file or manually upload it. PrestaShop will automatically install this feature-rich video widget module for PrestaShop.

Step 4: Configure the Addon Finally, click Configure to start managing your video library, mapping videos to products, categories, or special pages like Best Seller and New Product – all with one of the best PrestaShop addons to show product videos.

3.0. Admin Panel Configuration

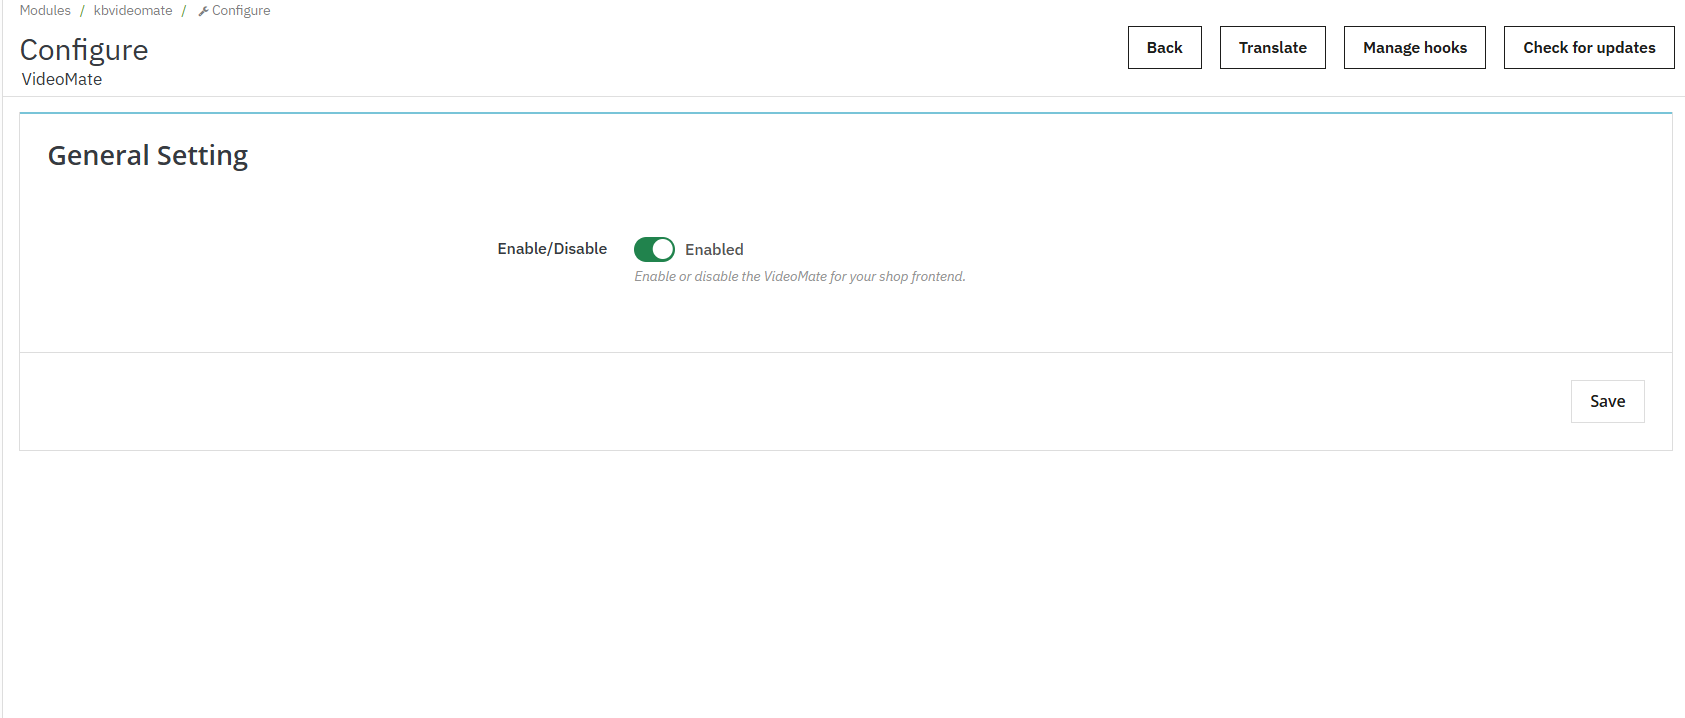
3.0.1 General Settings

Enable or disable the entire video widget functionality across your store with a single toggle. Additionally, this is useful for temporary deactivation without losing configurations.

3.0.2 Video Library Management

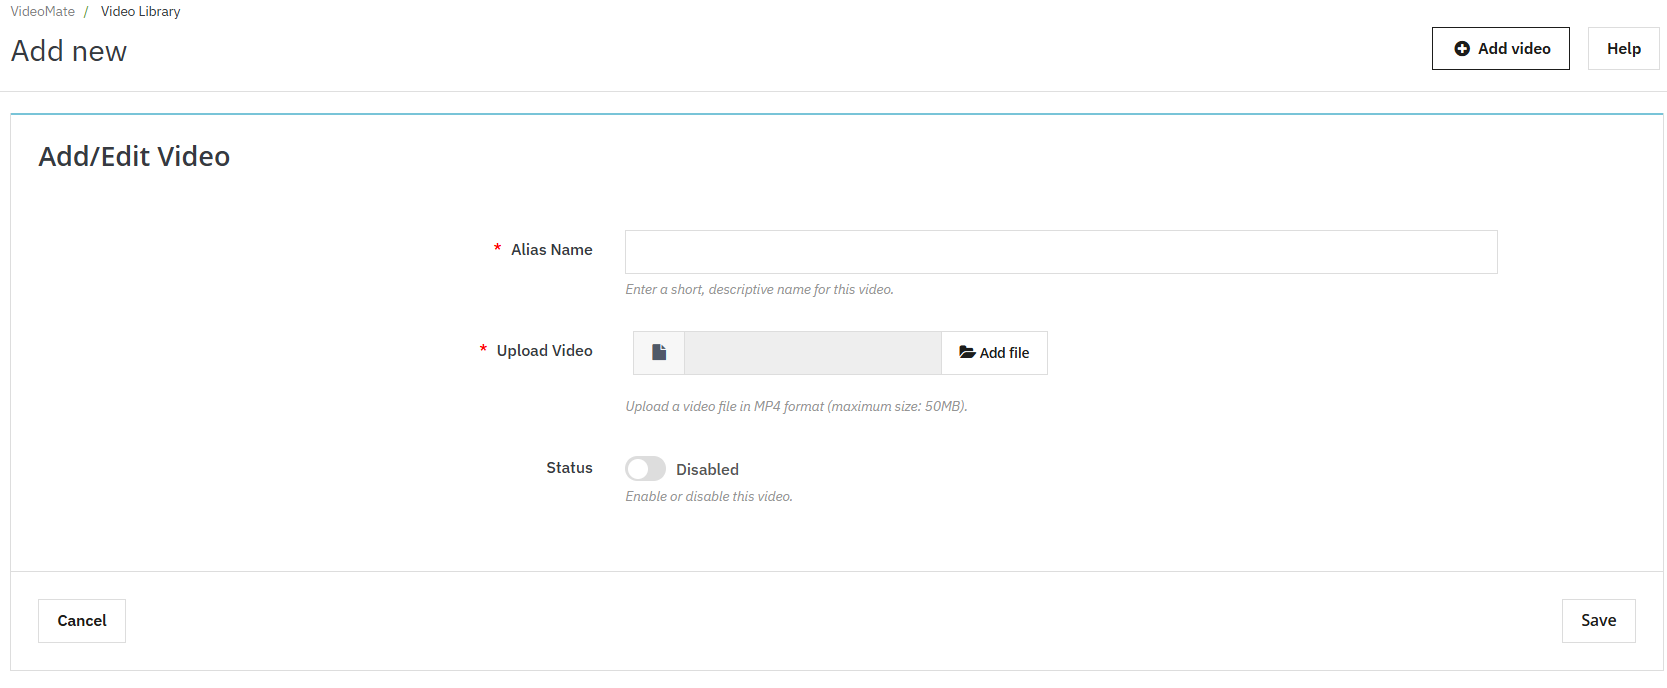
  • Add New Video: Click “Add New” to upload MP4 videos (up to 50MB) to the library. This feature enables PrestaShop MP4 video integration.
  • Alias Name: Assign a unique name to each video for easy identification and mapping.
  • Upload Video: The Videomate allows the store owners to browse and upload mobile-friendly video files in MP4 format.
  • Preview Option: Knowband’s VideoMate Prestashop Module allows store owners to preview before being mapped or published.
  • Redirection URL: The store owners can now link their videos to product pages, category pages and custom page URLs using the Prestashop Video Manager Module


3.0.3 AI Video Generation in Prestashop Video Manager Module

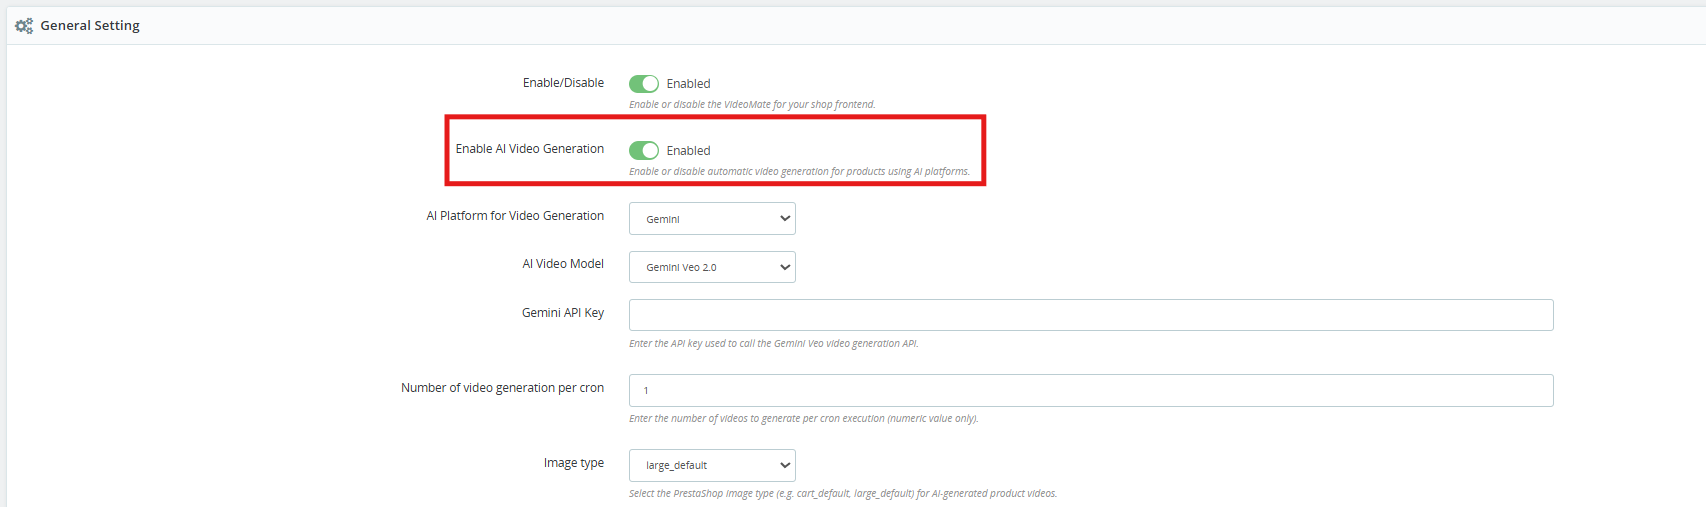
[New] Enable AI Video Generation: Enable this option to start the AI-powered video generation functionality.


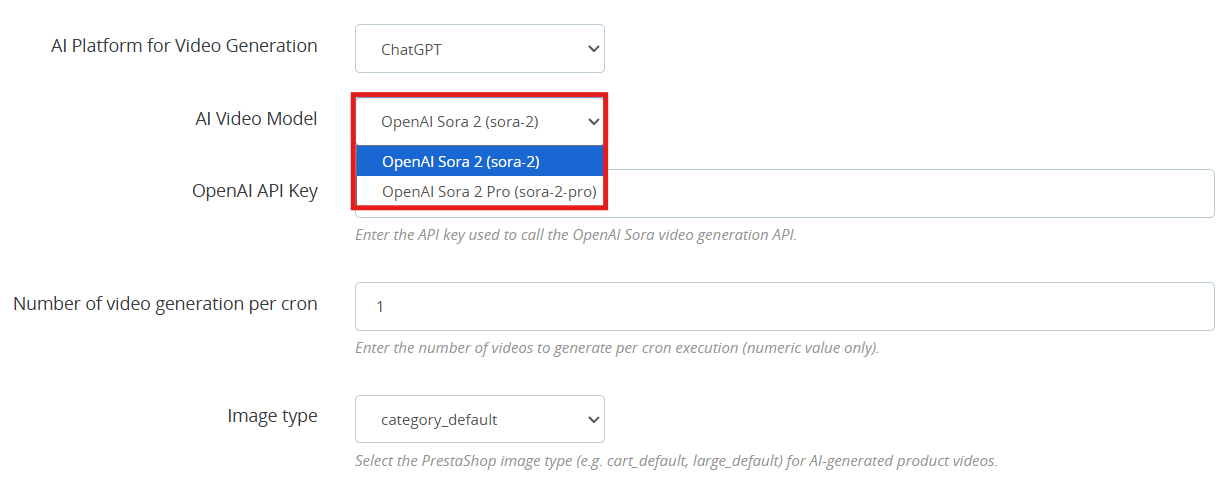
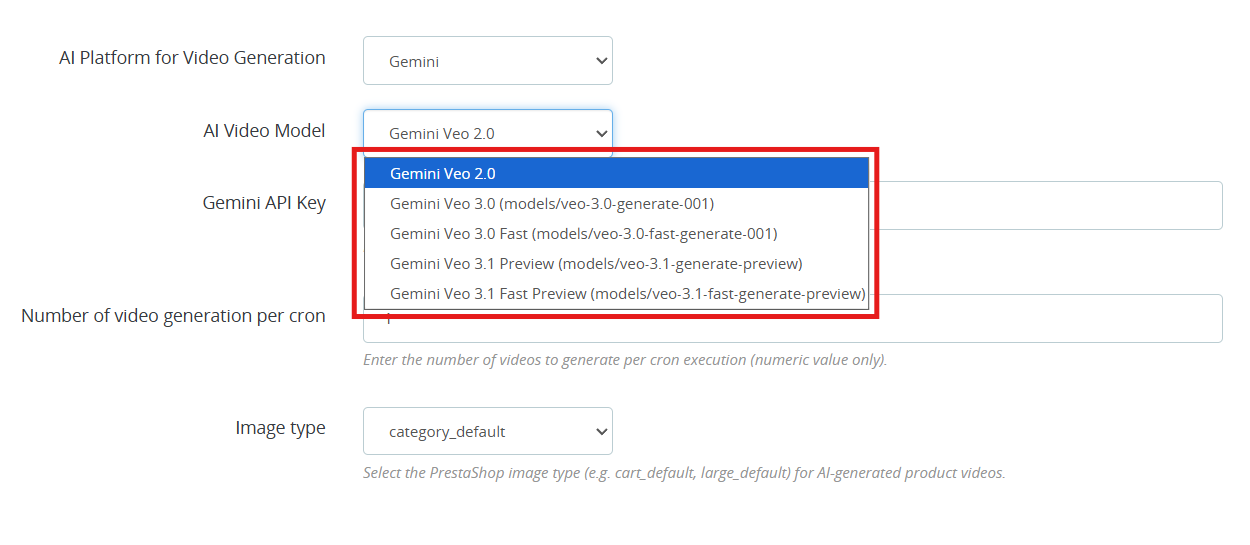
[New] AI Platform for Video Generation: Select either ChatGPT or Gemini as your generation platform. Both AI platforms work well and it really comes down to which fits your requirement and what you are willing to spend.

[New] AI Video Generation Models: VideoMate is one of the popular Prestashop AI Video Generation Module which is available right now. Whether you are going with the ChatGPT video generator or the Gemini video generation, you have clear options to work with.

ChatGPT Models (OpenAI)

  • OpenAI Sora 2: This model turns text prompts into sharp, visually strong videos. A good all-around pick for PrestaShop AI product video generation.
  • OpenAI Sora 2 Pro: this OpenAI ChatGPT model steps it up with finer detail, support for longer clips, and cleaner results on more complicated scenes. Worth it if your store needs polished, high-end AI-generated product videos.

Gemini Models (Google)

  • Gemini Veo 2.0 Output in Veo 2.0 is consistent and predictable, which makes it a natural fit for PrestaShop Gemini video generation tasks.
  • Gemini Veo 3.0 (models/veo-3.0-generate-001) Noticeably better motion handling and prompt accuracy over  Veo 2.0. You can go here for PrestaShop marketing video generation or any product showcase.
  • Gemini Veo 3.0 Fast (models/veo-3.0-fast-generate-001) is designed for throughput. If you are running bulk AI video generation in PrestaShop through cron jobs, this is the one to use.
  • Gemini Veo 3.1 Preview (models/veo-3.1-generate-preview) handles more nuanced prompts better than previous versions.
  • Gemini Veo 3.1 Fast Preview (models/veo-3.1-fast-generate-preview) Same generation quality as 3.1 Preview but tuned for speed. It is practical for high-volume PrestaShop product video automation where you cannot afford long wait times.

  • OpenAI API Key: Paste your OpenAI key here to get PrestaShop ChatGPT video generation running. Steps are in section 3.4.
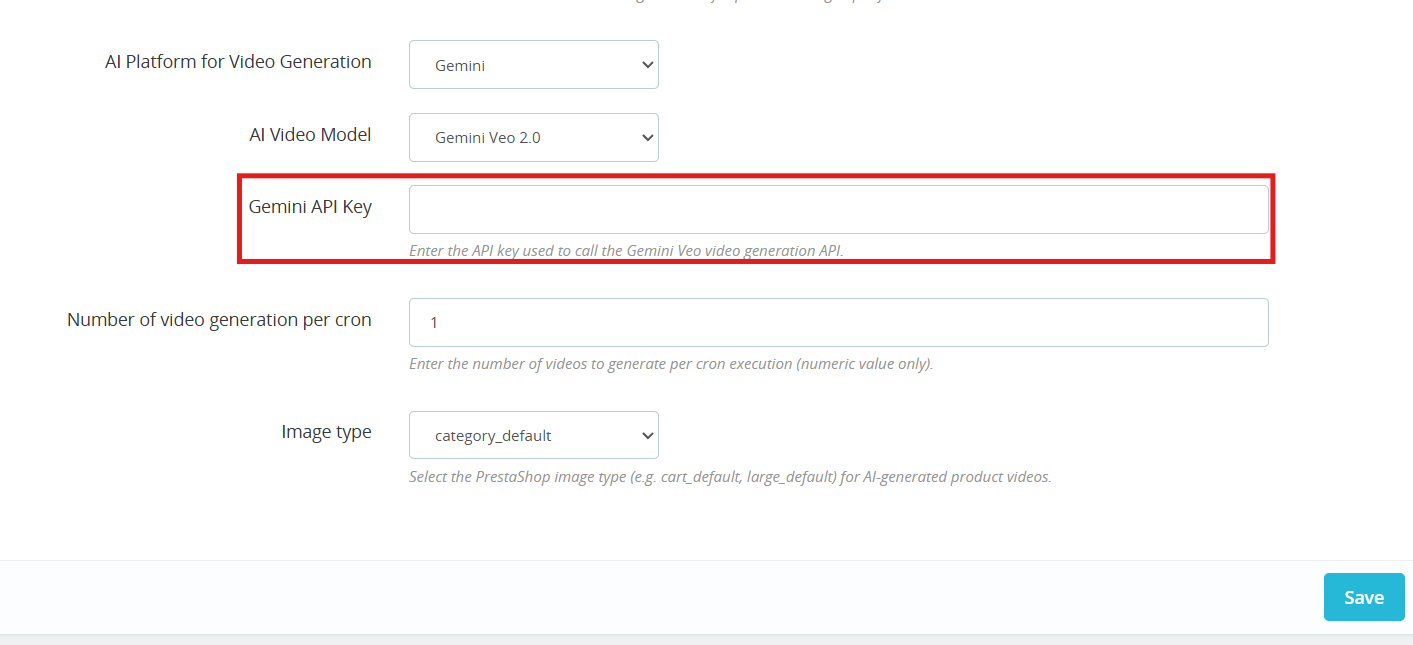
  • Gemini API Key Add your Gemini key to switch on PrestaShop Gemini AI video generation. Steps are in section 3.5.
  • Number of Videos per Cron Controls how many videos the PrestaShop AI Video Generation module queues up each time the cron runs.
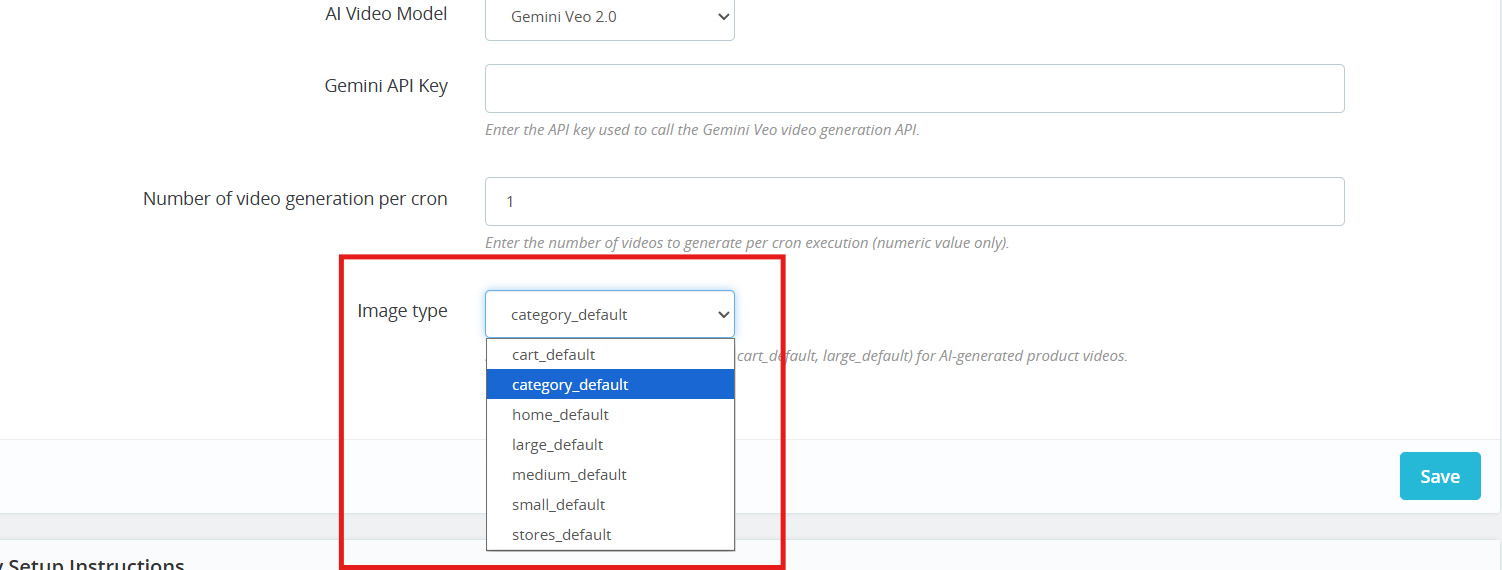
  • Image Type: Choose which image size gets passed to the AI during PrestaShop AI video generation: cart, large, small, medium, stores, or category.

Cron URL: Run the cron URL provided in the General Configuration section to automatically generate videos using AI.

3.0.4 AI Video Library

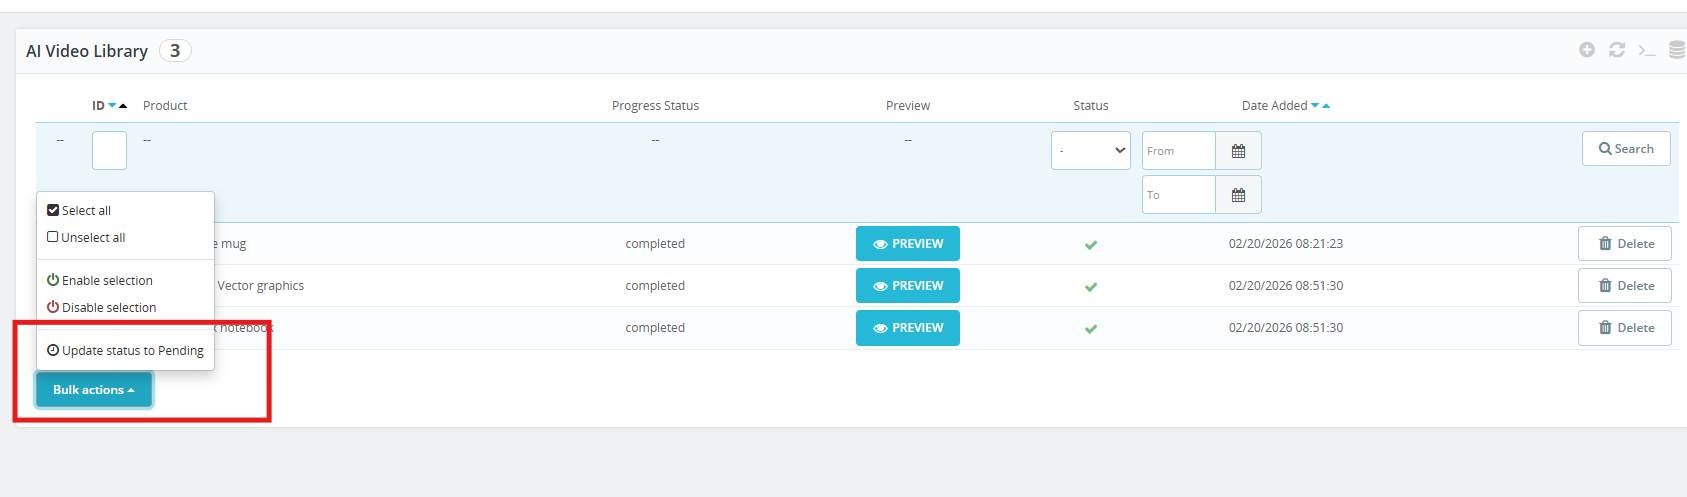
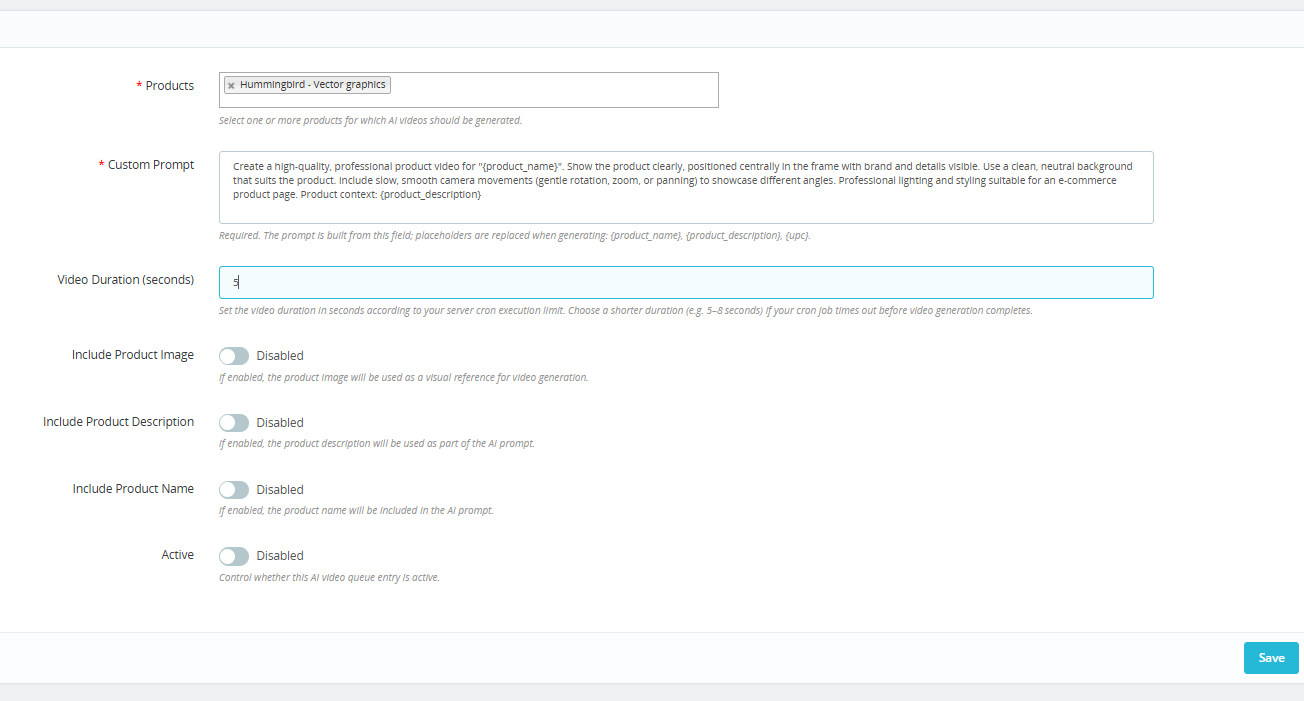
This is where all your PrestaShop AI Video Library entries live, queued, paused, or active. Click + to set up a new one.

  • Products: Choose the products you want to cover. The PrestaShop AI Video Generation module handles the rest, generating a video for each one through ChatGPT or Gemini.
  • Custom Prompt: Type out what you want the AI to do. Add in {product_name}, {product_description}, or {upc} where needed. The module add these variable with live product data each time a video runs, which keeps your PrestaShop AI product video prompts scalable without extra manual work.
  • Video Duration (seconds) Staying in the 5 to 8 second range helps you avoid cutoffs during automated PrestaShop video generation.
  • Include Product Image: Allow the AI model to take your product photo as a reference so the output stays visually close to the real item. Helps the PrestaShop AI video generator stay on brand.
  • Include Product Description Gives the AI more to work with. More context generally means more relevant AI-generated product videos in PrestaShop.
  • Include Product Name Keeps the prompt tied to the right product so there is no mismatch in the final PrestaShop AI video output.
  • Active: You can enable or disable the AI Generation settings for the product. If this is disabled, then products will not be added to the queue for video generation.

Generated AI Video Demonstration:

3.0.5 Video Widgets Configuration

The VideoMate PrestaShop Module exhibit the feature to place the dynamic video widgets across multiple pages.

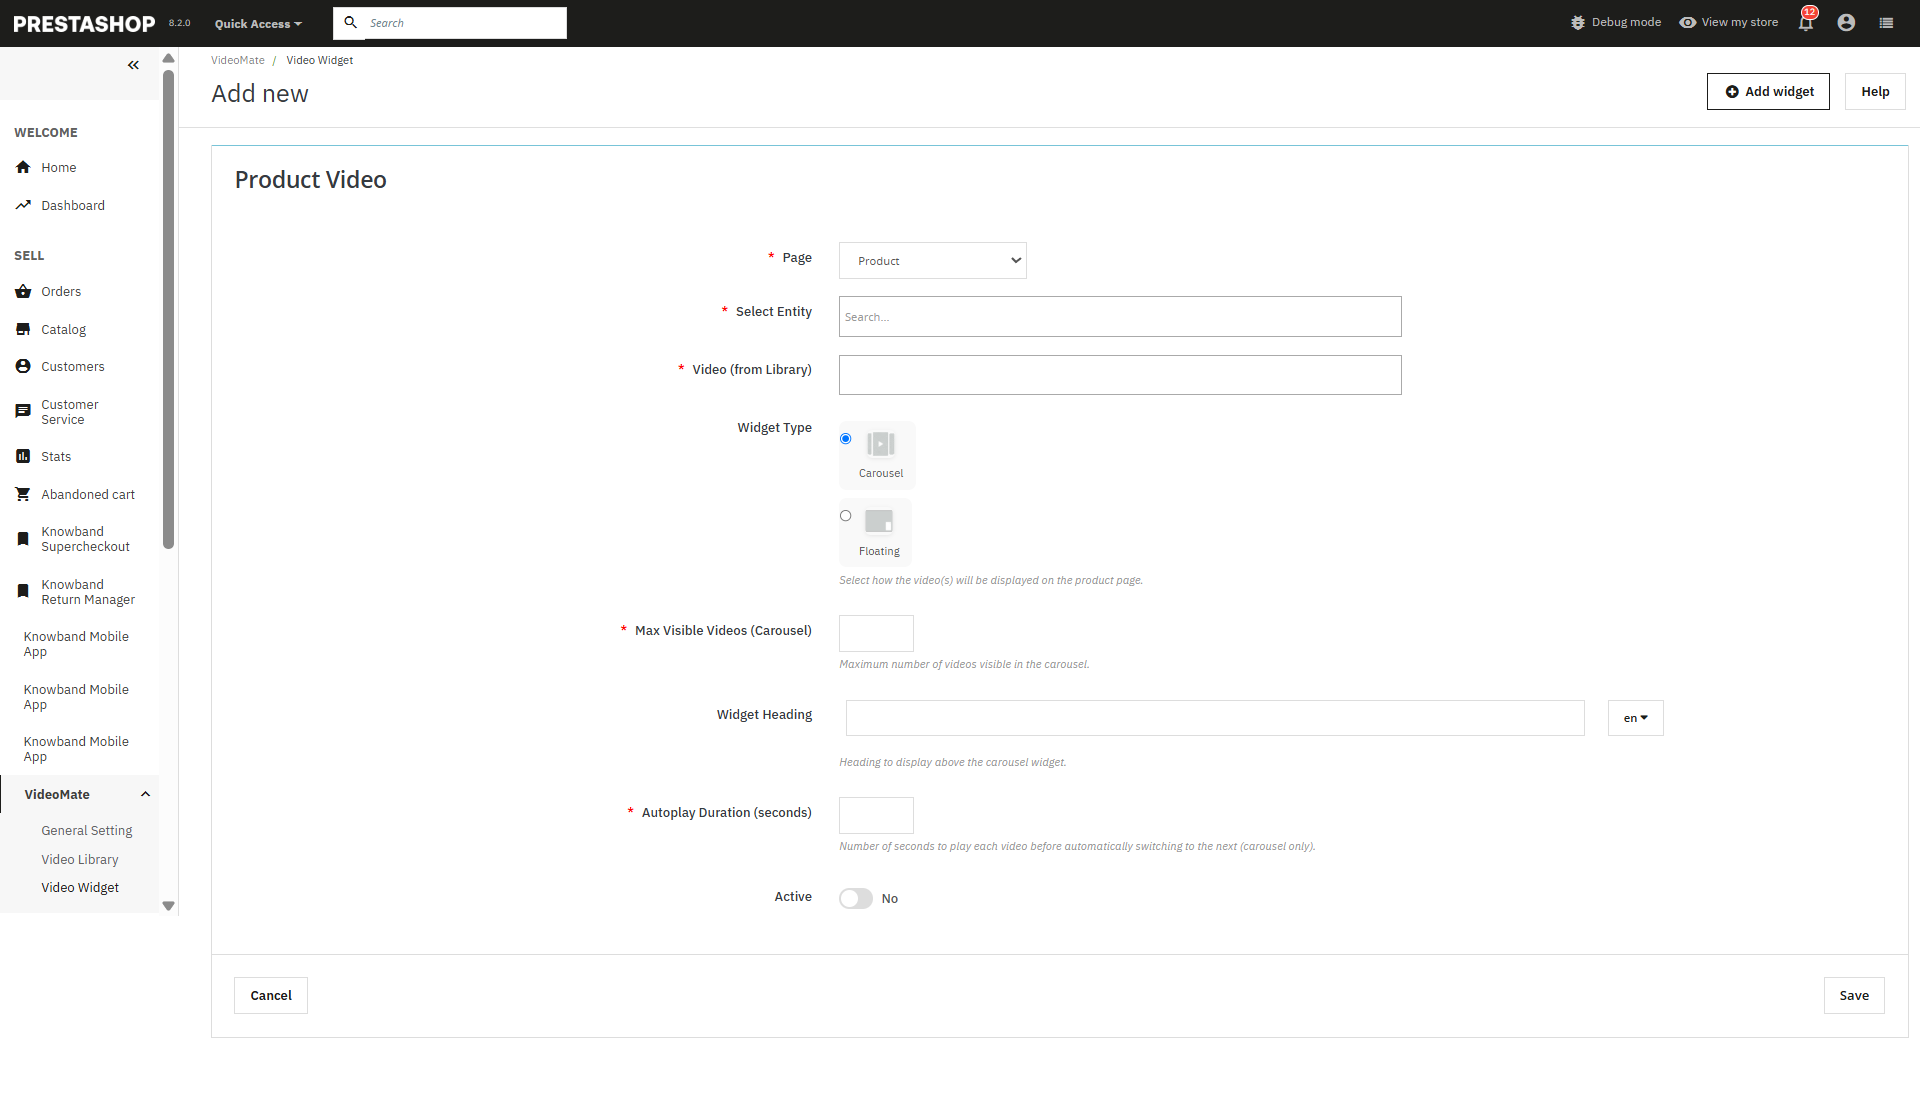
  • Add New Widget: Click to create a new video widget for YouTube or MP4 videos.
  • Page Selection: Choose where to display videos — Homepage, Product Page, Category Page, Best Seller, or New Product.
  • Select Entity: Dynamically assign videos to specific products or categories.
  • Video Selection: Select from videos already available in your media library.
  • Widget Type: Select between:
    • Carousel – For multiple videos in a slider format.
    • Floating – Provides a movable video player positioned at the bottom-left or bottom-right of the screen.
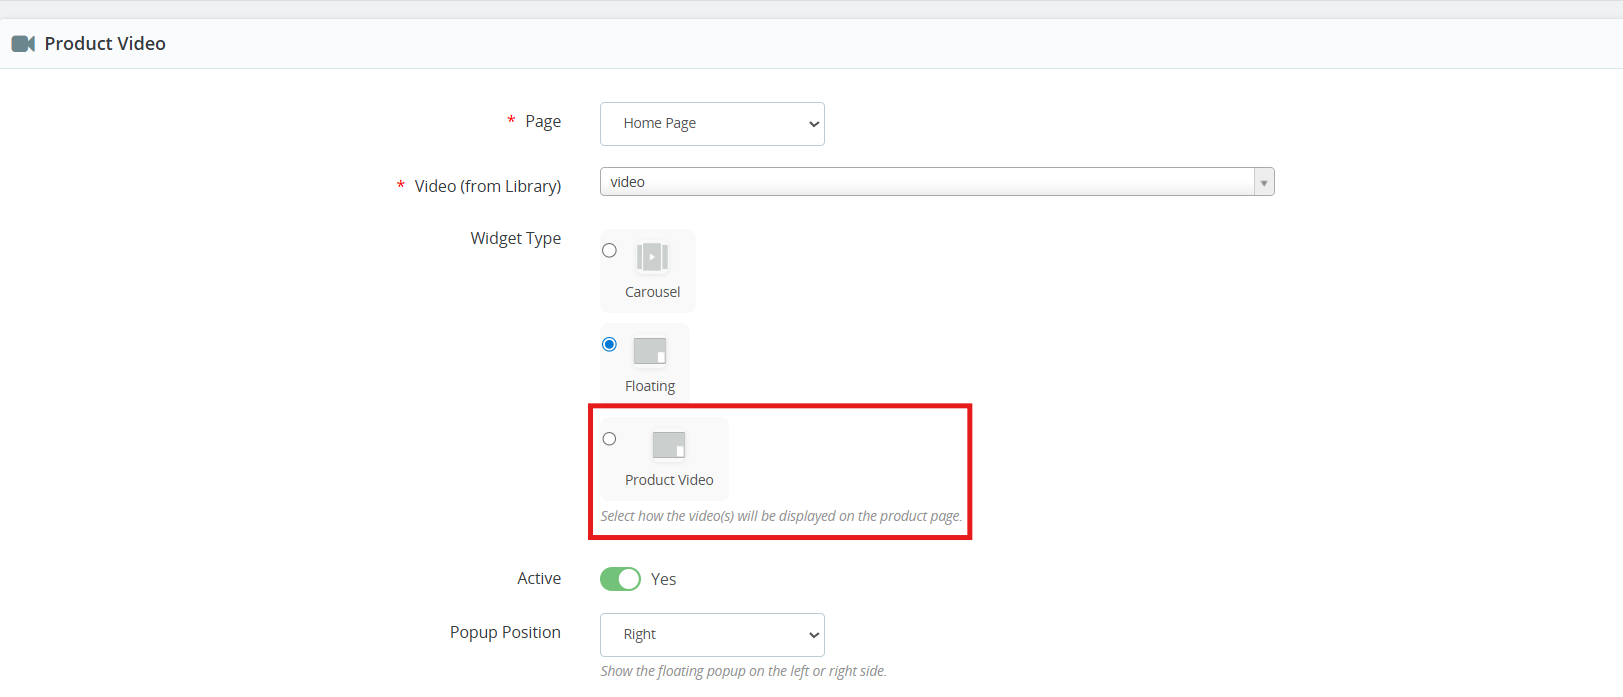
    • [New] Product Video: Store owners can now add videos to product pages using the new Product Video widget of the PrestaShop Video Manager. The added product videos will be displayed alongside product images on the product image section, allowing merchants to showcase product visuals more effectively.
  • Maximum Visible Videos: Prestashop video marketing module allows the store owners to define how many videos should be shown in a carousel (shows 5 in case of 5 maximum videos).
  • Widget Heading: The Responsive video module for PrestaShop allows the module to optionally set a title above the widget to engage users.
  • Autoplay Video: The Prestashop VideoMate Module allows the e-merchant to set the autoplay time in seconds for videos to begin automatically.
  • Status (Active/Inactive): This feature of the PrestaShop floating video module enables or disables the status of the widget without deleting it.

Store owners can disable the widgets added in the video Widgets.

  • Save: Click to save your configurations and apply the widget to your selected pages.

3.0.6 PrestaShop Video Dashboard

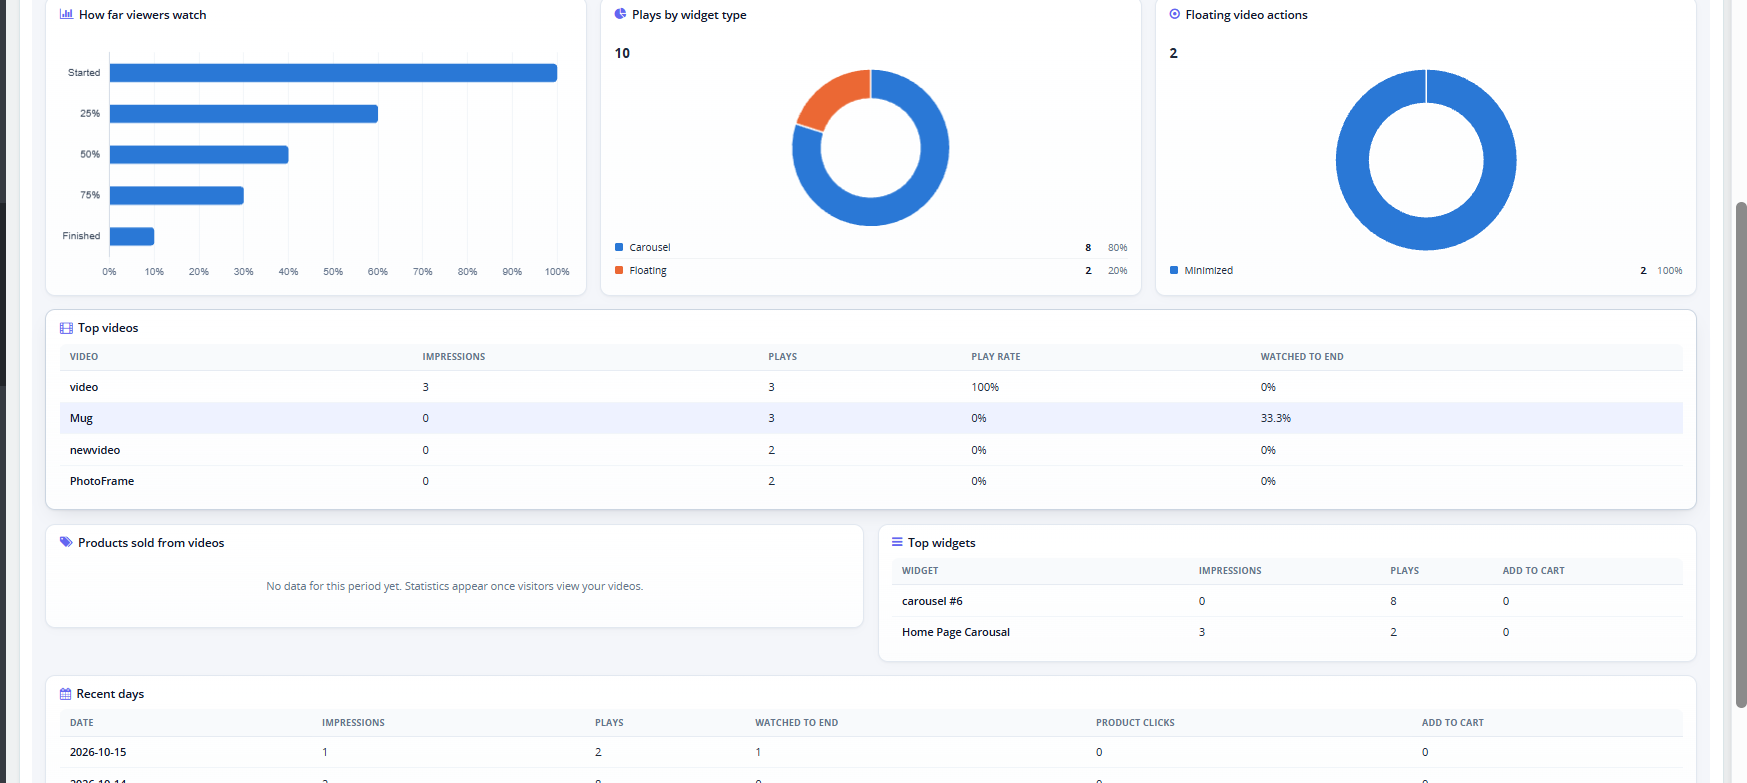
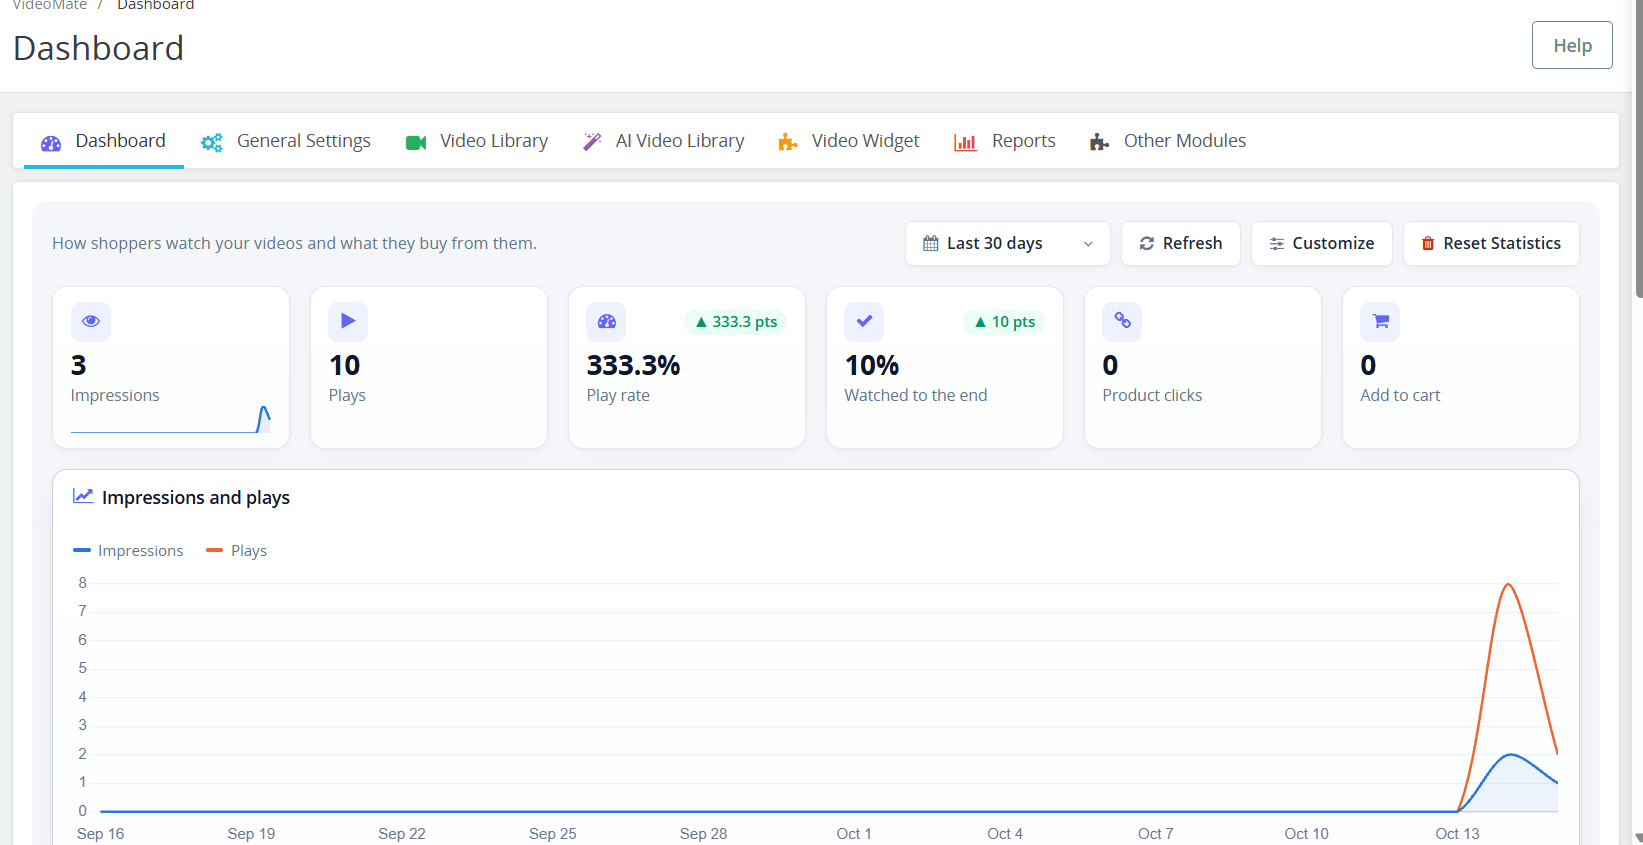
The Dashboard tab within the PrestaShop VideoMate plugin allows for tracking the way the customers watch your videos and which products they purchase through your videos. All your PrestaShop video statistics will be available to you in one place!


Period: choose the time period for all charts.
Refresh: refreshes the statistics.
Customize: Add, remove, and rearrange dashboard elements. Changes to the layout will be saved only to your admin profile.
Clear Statistics:
permanently removes the collected statistics.
Cards: Impressions, Plays, Play rate, Watched to the end, Product clicks, and Add to cart.

Charts: Impressions and plays over time, how far viewers watch (Started, 25%, 50%, 75%, Finished), plays by widget type, and floating video actions.

Tables: Top videos, Products sold from videos, Top widgets, and Recent days.

3.0.7 YouTube and Vimeo Videos in PrestaShop

This YouTube Vimeo PrestaShop module lets you add videos by link. In Video Library, the Video Source field now includes YouTube and Vimeo. Select one, paste the video link, and the module builds the embed automatically.

3.0.8 PrestaShop Video Cover Image (Poster)

The Poster Upload field sets the PrestaShop video cover image shown before the video plays. It accepts JPG, PNG, or WebP files up to 3 MB, at least 16×16 px. For YouTube and Vimeo videos the cover is fetched automatically, and you can upload your own to replace it.

3.0.9PrestaShop Shoppable Video

You can turn any video into a PrestaShop shoppable video by attaching products to it.

  • Shoppable Products: start typing a product name and select it from the list. You can attach up to 100 products to one video.
  • Bulk Add Products: paste product IDs or references, separated by commas or new lines, to add up to 1000 at once.

On the storefront, each attached product appears as a card with the image, name, price, and an Add to cart button. This PrestaShop video add to cart option lets customers buy without leaving the video. After a product is added, a View cart button appears. If a product has options, the card links to its product page instead.

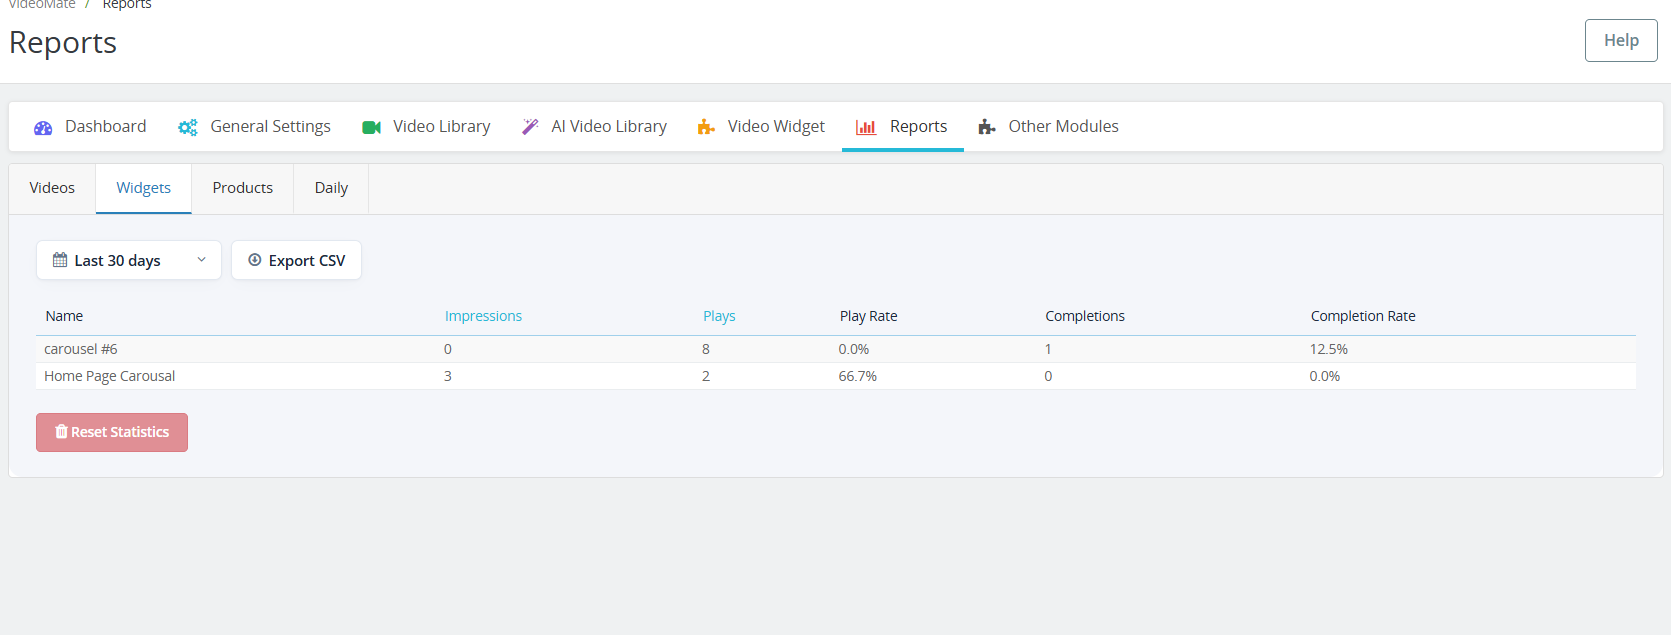
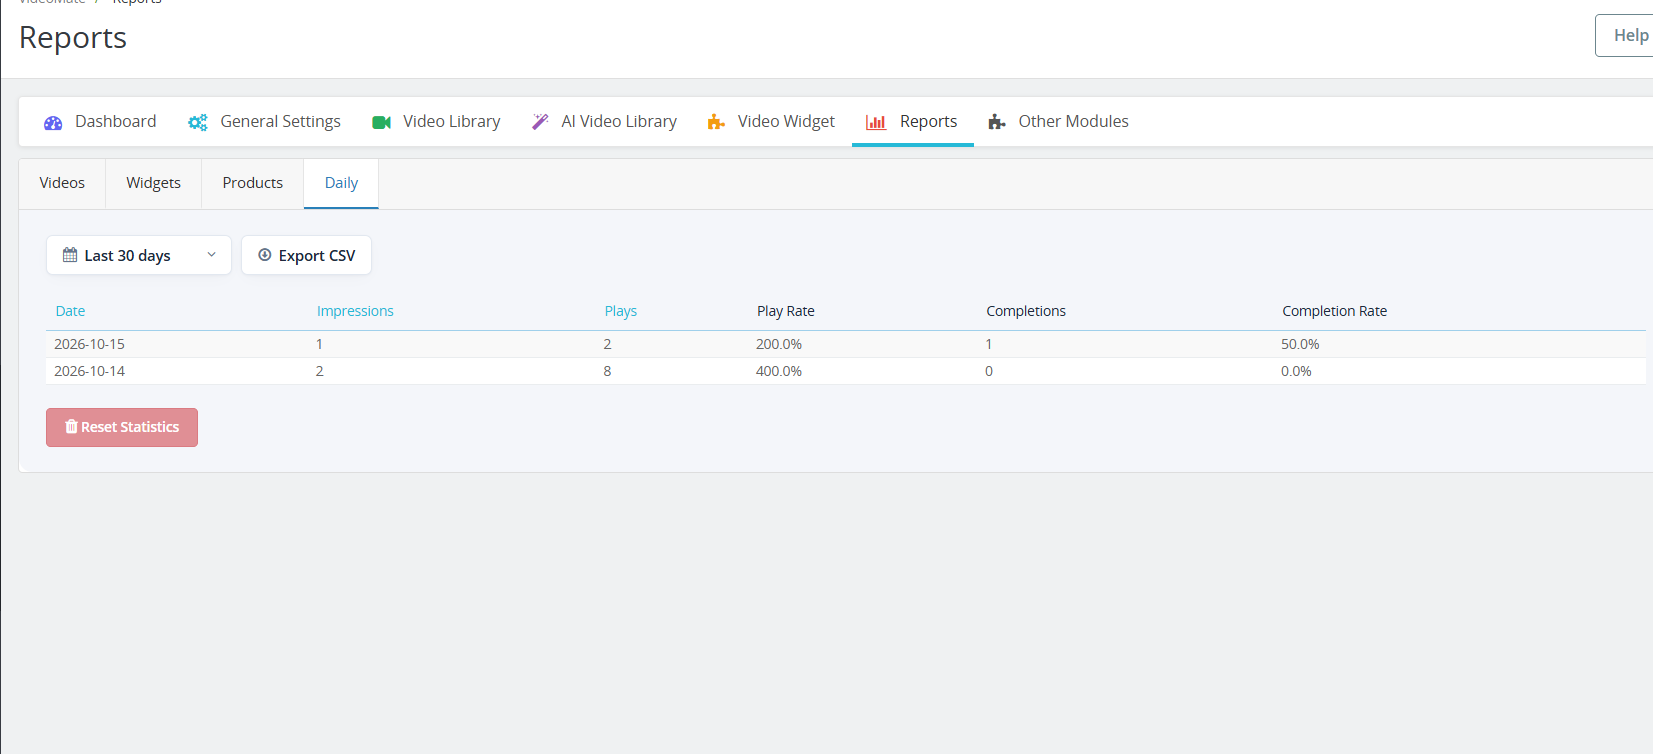
3.1.0 PrestaShop Video Reports

The new Reports tab has four sub-tabs: Videos, Widgets, Products, and Daily. Each one shows impressions, plays, play rate, completions, and completion rate.

  • Choose a period to filter the data.
  • Click Impressions or Plays to sort the table.
  • Click Export CSV to download the table. PrestaShop video reports can then be opened in Excel or Google Sheets.
  • Click Reset Statistics to clear the recorded data.

4.0 Benefits of PrestaShop VideoMate Module 

Boosts Product Engagement

Videos provide a richer shopping experience, helping customers understand product features better and reducing purchase hesitation.

Improves Conversion Rates

Significantly, customers are more likely to convert when they see video demos or tutorials, making VideoMate a powerful PrestaShop product video module for increasing sales.

Flexible Video Placement

Add videos across product pages, category pages, homepage, Best Seller, and New Product pages – ensuring visibility where it matters most.

Multiple Display Options

Choose from the carousel, floating, or single video widgets for a dynamic and responsive presentation tailored to your design.

Supports A & YouTube Links

Furthermore, seamlessly upload MP4 videos (up to 50MB) or trending social media videos, enabling full PrestaShop video integration.

Mobile-Responsive Design

All video widgets are fully responsive, ensuring smooth performance across desktop, tablet, and mobile devices.

Tutorial: Watch the Video Guide

To help you set up and use the PrestaShop VideoMate Module, we have created a comprehensive YouTube tutorial. This step-by-step video guide walks you through the installation process, configuration options, and how to effectively add and manage video content on your store.

 If you experience any difficulties during installation or when using the Prestashop VideoMate Extension, our support team is ready to assist you. Reach out to us through email at support@knowband.com or by submitting a ticket at knowband.com/helpdesk for prompt assistance with any technical issues or questions you may have.

WooCommerce Google Tag Manager (gtag, GA4, GTM Events) Plugin– User Manual

The Knowband WooCommerce Google Tag Manager Plugin is a robust solution that streamlines the integration of Google Tag Manager (GTM) with your WooCommerce store. Designed with ease of use in mind, this plugin allows store owners to effortlessly implement and manage various Google tags—no technical knowledge is required.

Moreover, with the WooCommerce GTM Plugin, you can accurately track key customer interactions, including product views, category views, add-to-cart and remove-from-cart actions, checkout steps, payment processes, shipping details, and order confirmations. As a result, these insights help you better understand customer behaviour and optimize the user journey.

In addition, the Google Tag Manager for WooCommerce also captures UTM parameters, giving you a clearer picture of how your marketing campaigns are performing. By doing so, it allows store owners to identify which campaigns generate the most traffic and conversions. Consequently, this enables smarter budget allocation and an improved return on investment (ROI).

Ultimately, this plugin is ideal for businesses aiming to enhance their analytics, boost conversions, and elevate the overall shopping experience. The Knowband WooCommerce Google Tag Manager Extension supports Google Analytics, GA4, and other Google marketing tools—thereby empowering data-driven decision-making with precision and ease

Key Features of WooCommerce Google Tag Manager Plugin

Effortless Google Tag Manager Integration
Knowband’s WooCommerce Google Marketing Integration user-friendly integration tool makes it easy to connect Google Analytics 4 to your WooCommerce store with no technical skills or coding experience needed.

Moreover, this plugin allows the store admins to track key e-commerce metrics like product views, add-to-cart events, purchases, and more in real-time. Make data-driven decisions to boost conversions and grow your business, all from an intuitive dashboard.

Real-Time Event Tracking for Actionable Insights
WooCommerce Google Marketing Integration Plugin allows store owners to track critical customer interactions as they happen, including product views, add-to-cart actions, checkout steps, coupon usage, and selected payment and shipping methods, giving you immediate visibility into user behaviour.

Campaign Tracking with UTM Parameter Support
Furthermore, Custom Event Tracking WooCommerce Plugin automatically capture UTM parameters to evaluate your marketing campaign performance and identify the channels driving the highest traffic and conversions.

Enhanced eCommerce Tracking for Smarter Decisions
GTM WooCommerce Plugin allows the store owners to gain deeper insights into your store’s performance with advanced tracking of product engagement, cart activity, and completed purchases—perfect for data-driven strategy optimization.

Fast and Simple Setup – No Technical Knowledge Needed
The WooCommerce Google Event Tracker Plugin features an intuitive interface that enables a smooth, hassle-free setup—allowing users to manage tracking tags effortlessly, with no coding required.

Powerful Admin Dashboard for Complete Control
Moreover, you can manage all your tracking tags and events directly from your WooCommerce admin panel using a streamlined and user-friendly dashboard.

Multi-Language Compatibility for Global Reach
Knowband’s WooCommerce Google Analytics Integration is designed for international stores, the extension supports multiple languages to help you deliver a consistent, localized shopping experience across different regions.

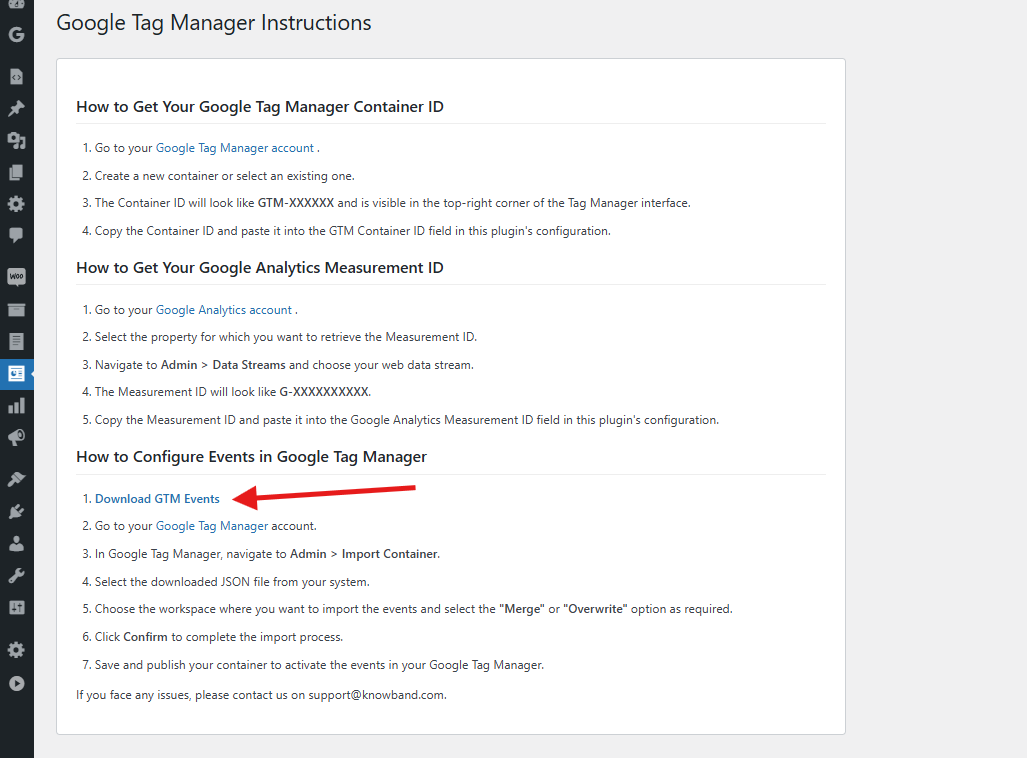
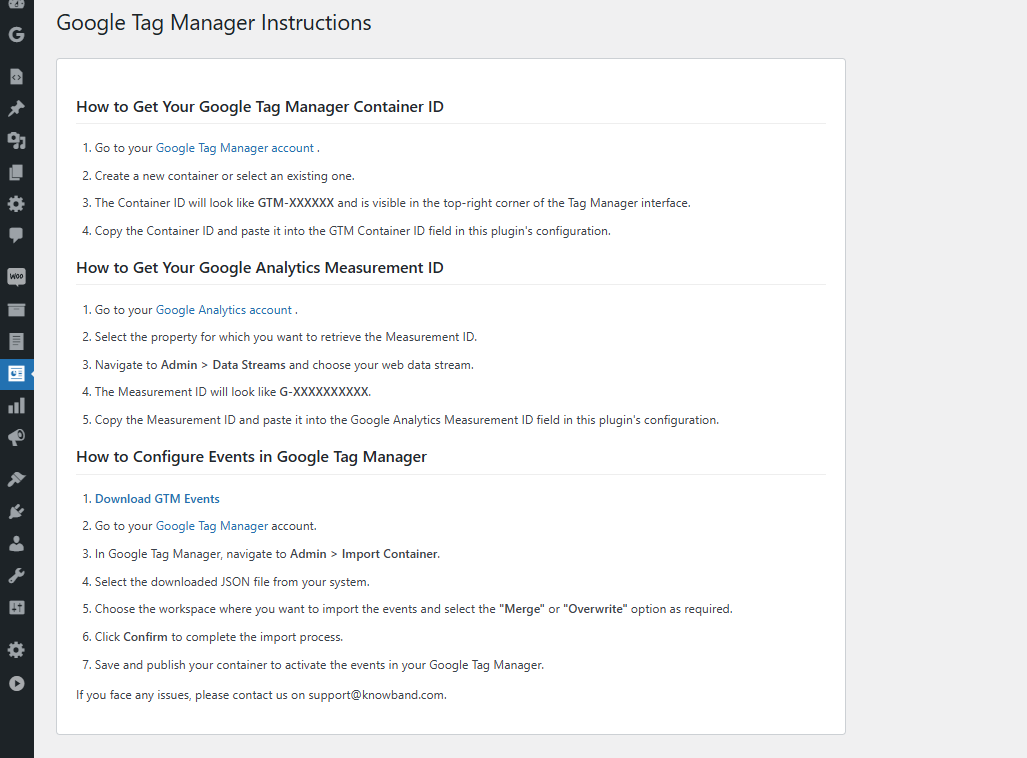
2.1 Steps to Get the Google Tag Manager ID and Google Analytics Measurement ID

2.1.1 Steps to Get Google Tag Manager ID

Step 1: Access the Google Tag Manager account.

Step 2: Create a new container or select an existing container within your Google Tag Manager account.

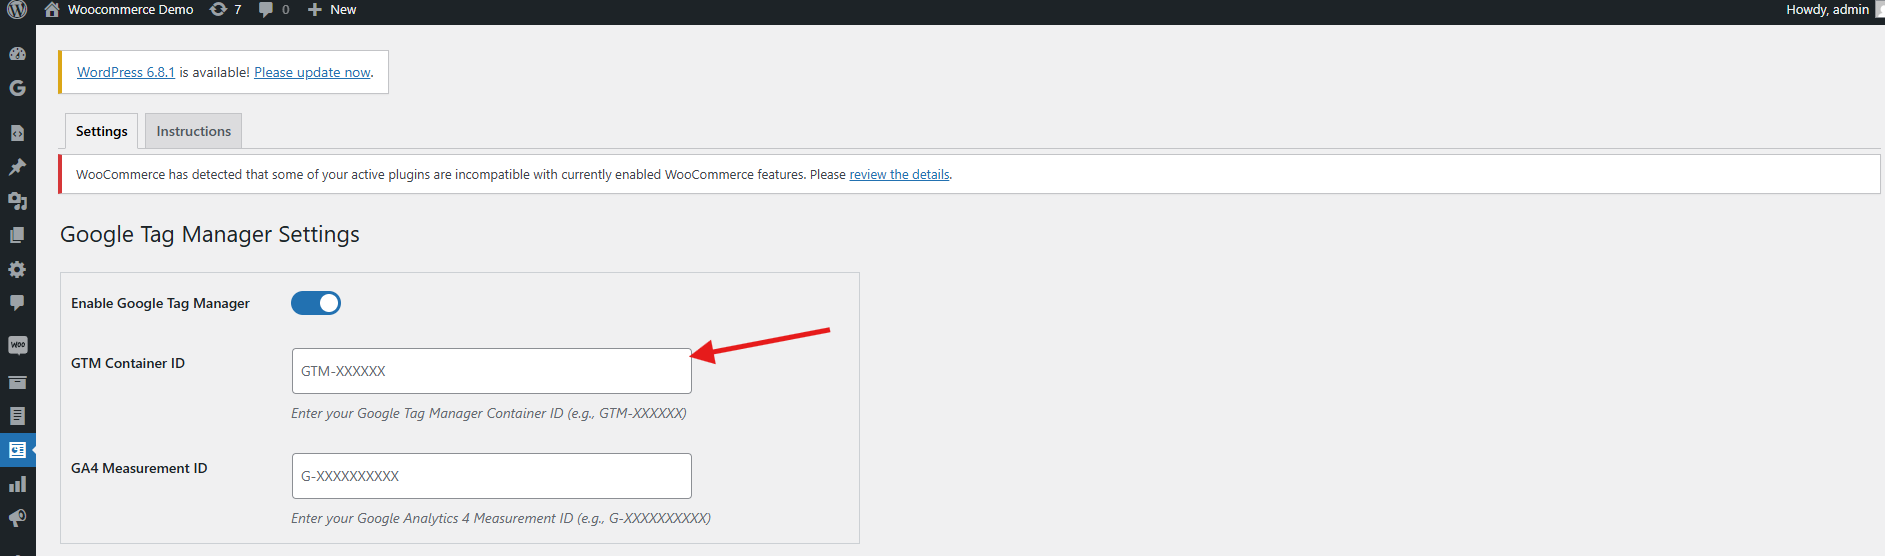
Step 3: The Container ID will be displayed in the top-right corner of your Google Tag Manager dashboard, typically formatted as: GTM-XXXXXX.

Step 4: Copy the Container ID and add it to the GTM container ID field in the configuration field.

2.1.2 Follow these steps to get Google Measurement ID 

Step 1: Visit the Google Analytics account.

Step 2: Select the property for which you want to get the Measurement ID.

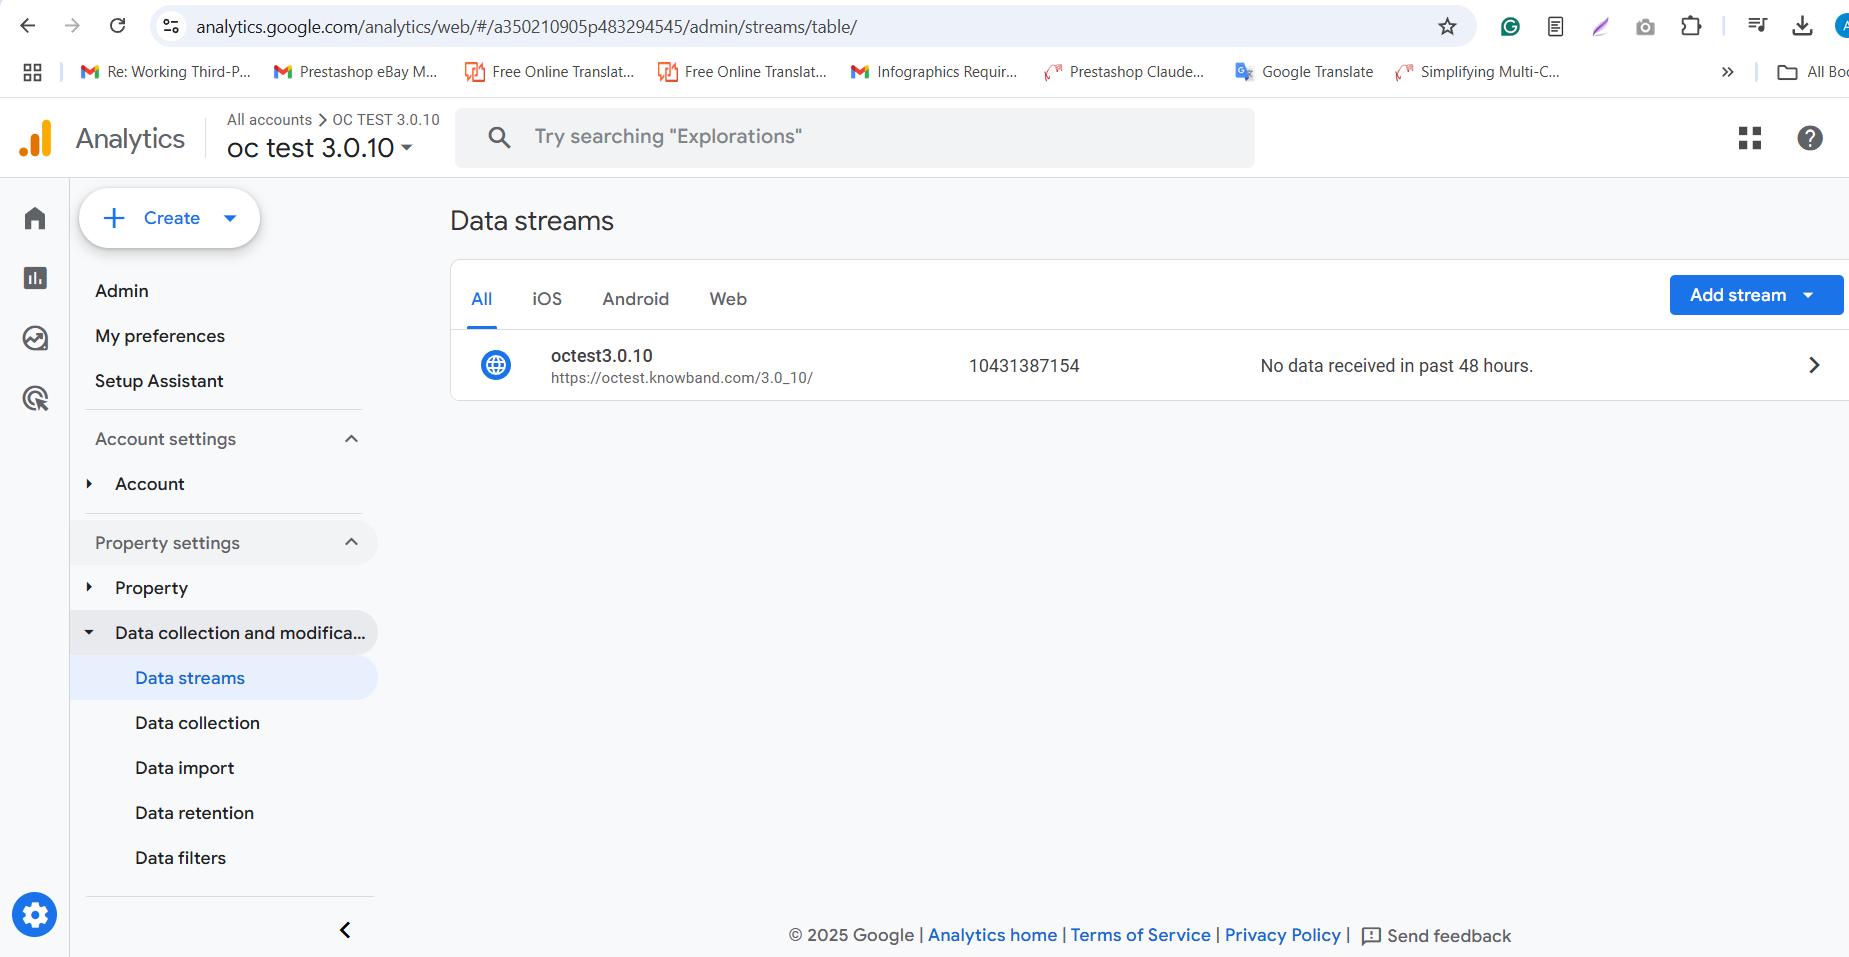
Step 3: Navigate to Admin ->Data Streams and choose your web data stream.

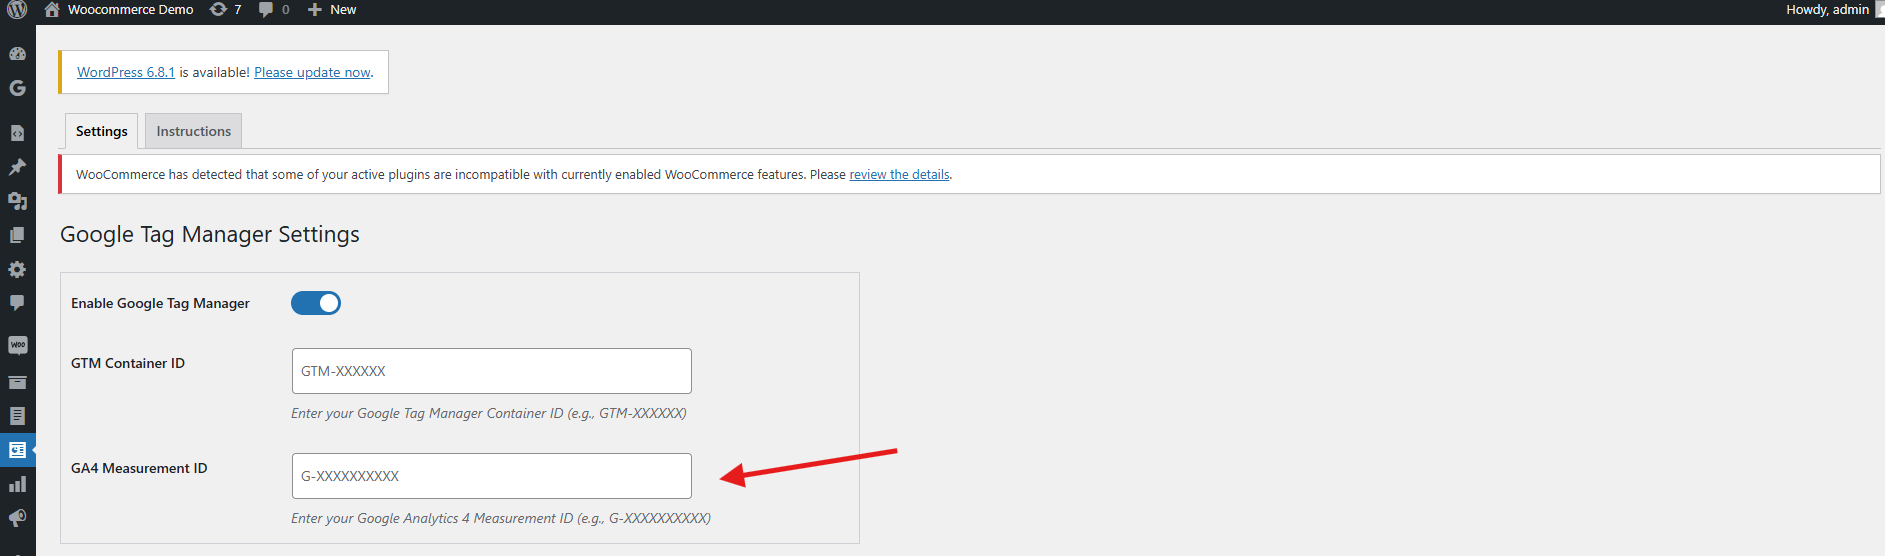
Step 4: Navigate to Admin > Data Streams in your Google Analytics account, then locate the Measurement ID, which appears in this format: G-XXXXXXXXXX.

Step 5: Copy this ID and paste it into the Google Measurement ID field within the module’s configuration settings.

3.1 Configuring Events in Google Tag Manager

To enable event tracking in your WooCommerce store using the WooCommerce Google Analytics Integration Plugin, follow these steps:

Step 1: Download the GTM Events File
Navigate to the WooCommerce gtag Integration Plugin’s configuration panel and go to the Instructions tab. There you’ll find a direct link to download the GTM events JSON File.

Step 2: Log into Google Tag Manager
Access your Google Tag Manager account.

Step 3: Import the Events Container
Go to Admin > Import Container in your GTM dashboard.

Step 4: Upload the JSON File
Select the downloaded JSON file from your computer.

Step 5: Choose the Workspace and Import Option
Pick the GTM workspace where you’d like to import the events. Then choose either Merge (to combine with existing settings) or Overwrite (to replace them entirely), based on your preference.

Step 6: Confirm the Import
Click Confirm to complete the import process.

Step 7: Publish the Container
Save and publish the updated container to activate the new events in your GTM account

By following the above steps, you can successfully configure the WooCommerce gtag Integration Extension. However, if you face any issues, please feel free to contact us at support@knowband.com.

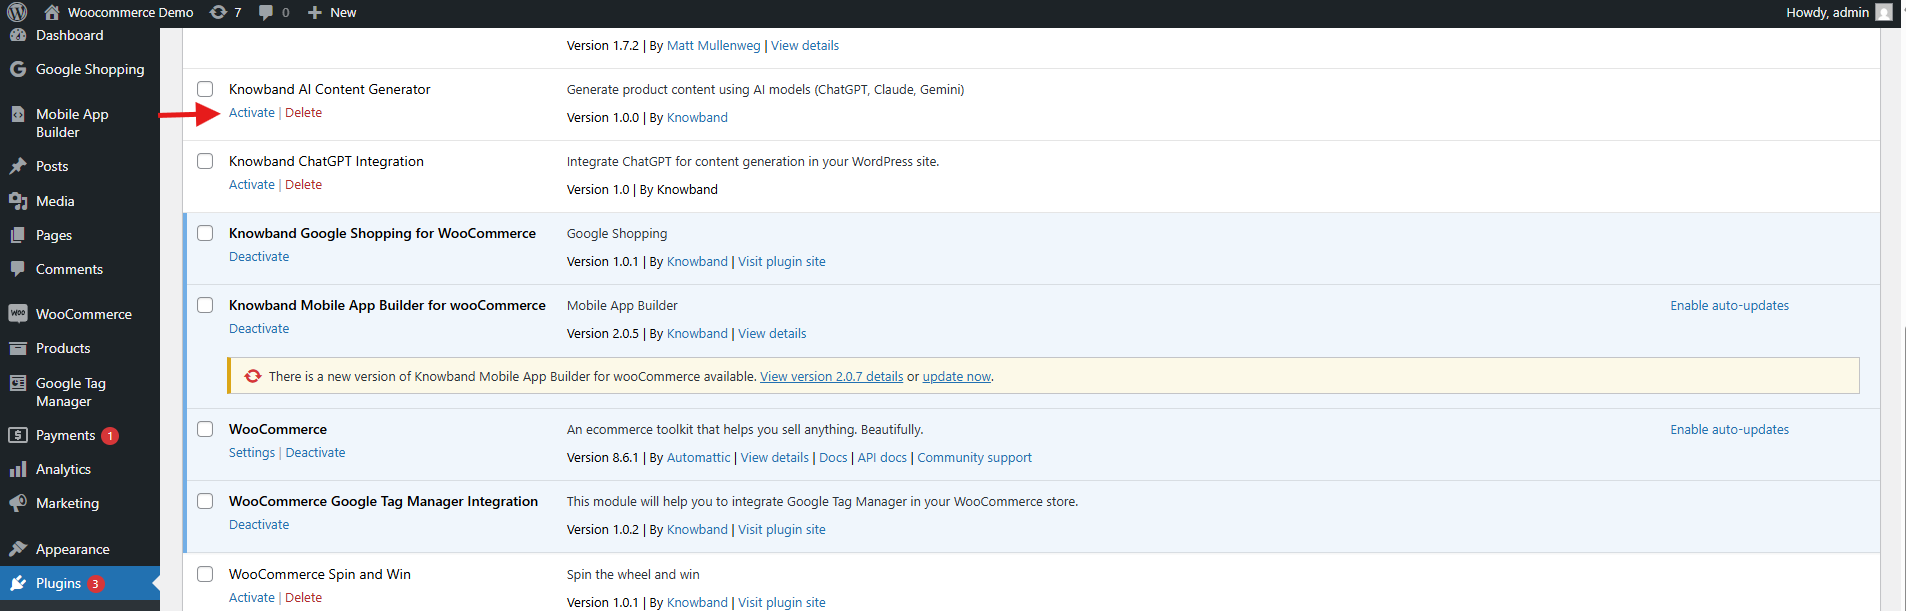
4.0 Set Up WooCommerce Google Analytics Integration Plugin in 3 Simple Steps

Log in to your WordPress Admin Dashboard.

Navigate to Plugins > Add New.

Upload the zipped file provided with the WooCommerce GA4 Integration purchase.

Click Install Now next to the plugin, then click Activate once installed.

5.0. Admin Panel Overview of WooCommerce eCommerce Measure Extension

The Google Tag Manager for WooCommerce extension includes a user-friendly admin dashboard that allows store owners to easily configure and manage tracking tags directly from the WooCommerce backend—no technical expertise required.

Core Features of the Admin Panel

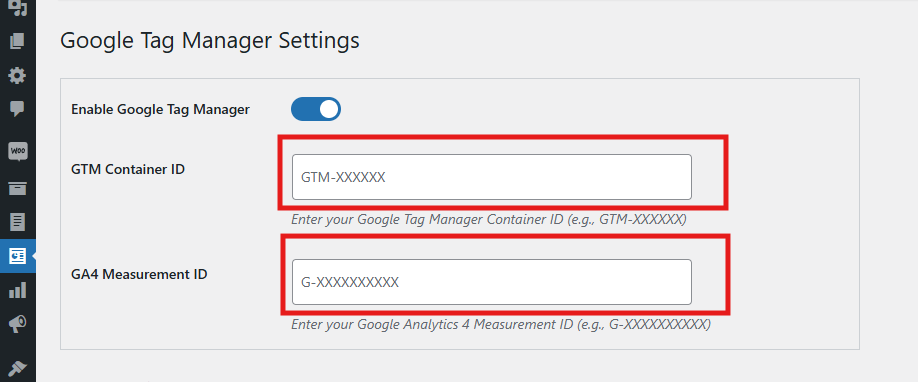
  • Enable or Disable Extension
    Instantly activate or deactivate the module as needed with a simple toggle.
  • GTM Container ID
    Please enter your Google Tag Manager Container ID in this field to seamlessly connect your WooCommerce store with GTM.
  •  Refer to section 1.1 for guidance on locating this ID.
  • Google Analytics ID
    Input your Google Analytics Measurement ID to link Google Analytics with GTM and start tracking store performance.

Event-Based Tag Management

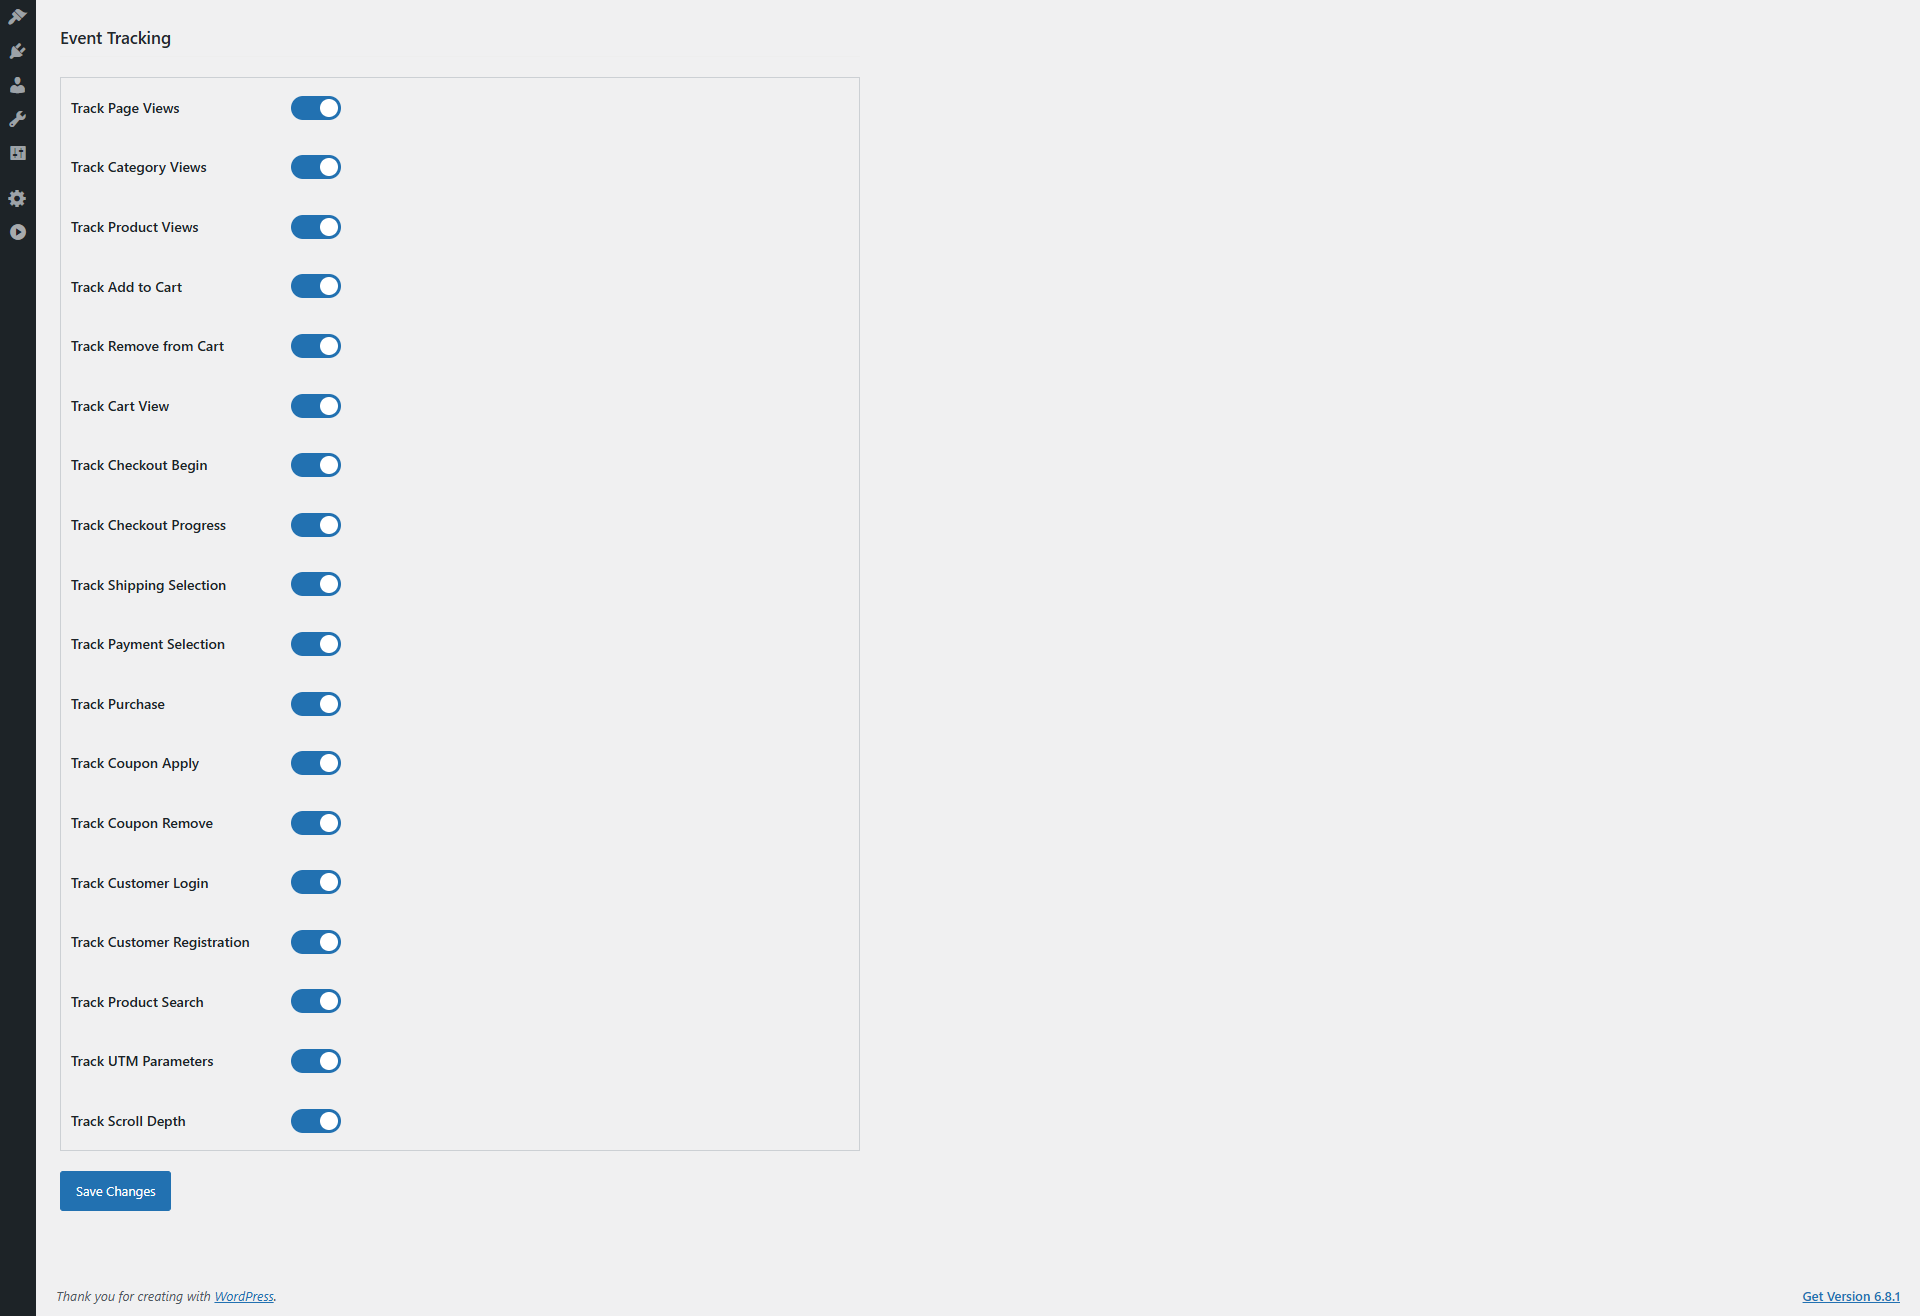
Each event listed below can be individually enabled or disabled based on your store’s specific tracking requirements in the WooCommerce GA4 Integration Plugin. Consequently, this flexibility allows you to tailor the data collection, enabling Google Analytics to provide more relevant insights and helping you make smarter business decisions.

  • Track Page Views
    You can enable or disable the event as per your need. This event tracks every page visit, which helps GA analyze overall site traffic and user navigation patterns. Therefore, it is crucial to understand customer behaviour and optimise your site structure.
  • Category Views
    Enable or disable as needed. Moreover, this tracks visits to product categories, allowing GA to identify popular sections. As a result, you can focus your marketing efforts and manage inventory more effectively.
  • Product Details Page
    Furthermore, you can enable or disable the event as needed. This event in WooCommerce GA4 Integration Extension monitors engagement with individual product pages, providing valuable insights into which products attract the most attention. Thus, it aids in product promotion and stock management.
  • Add to Cart
    Enable or disable as needed. This event in WooCommerce GA4 eCommerce Events tracks when customers add products to their shopping cart, giving GA critical data on purchase intent. Consequently, you can optimize your sales funnel and remarketing strategies.
  • Cart Removal
    Enable or disable as needed. It detects when items are removed from the cart, which helps identify potential obstacles in the purchasing process.  Hence, you can improve the user experience to reduce cart abandonment.
  • Cart Views
    Enable or disable as needed. This monitors how often customers view their cart, providing insight into shopper engagement and possible bottlenecks before checkout.
  • Checkout Start
    Enable or disable as needed. It captures when a user begins the checkout process, allowing GA to track funnel progression. Therefore, you can improve the checkout experience to minimize drop-offs.
  • Checkout Page
    Enable or disable as needed. This tracks detailed interactions on checkout pages, offering valuable data for optimizing conversions at this critical step.
  • Address Selection
    Enable or disable as needed. It monitors when customers add or select shipping addresses, helping identify preferences or issues during checkout.
  • Shipping Method Choice
    Enable or disable as needed. This tracks which shipping options customers select, providing insights into customer preferences and aiding logistics and marketing planning.
  • Order Confirmation
    Enable or disable as needed. The WooCommerce eCommerce Measure Extension’s order confirmation captures successful order completions, the primary conversion event for GA. Consequently, it is essential for accurate revenue tracking and ROI measurement.
  • Customer Login
    Enable or disable as needed. This tracks when users log in to their accounts, offering insights into returning customer behaviour and loyalty program effectiveness.
  • Customer Registration
    Enable or disable as needed. It monitors new account creations, useful for tracking customer acquisition and growth trends.
  • Discount Code Use
    Enable or disable as needed. This monitors the usage of promotional or discount codes, helping assess the effectiveness of marketing campaigns and incentives.
  • Discount Code Removal
    Enable or disable as needed. It tracks when discount codes are removed during checkout, highlighting friction points that may cause cart abandonment.
  • Search Product Tracking
    Enable or disable as needed. This captures the search terms customers enter, offering valuable data to optimize product offerings and merchandising.
  • Capture UTM Parameters
    Enable or disable as needed. It automatically collects UTM parameters from URLs, allowing GA to accurately attribute traffic and conversions to specific marketing campaigns. Consequently, this is essential for boosting your campaign’s ROI.

5.0 Configuration Instructions:

The WooCommerce No-Code Google Tag Manager Integration provides straightforward, beginner-friendly setup instructions—no technical knowledge required. Store admins can easily access the Google Tag Manager and Google Analytics Consoles and follow simple steps to retrieve the necessary credentials for integration.

Moreover, these clear instructions are designed to guide you through the entire WooCommerce gtag Integrator Plugin configuration process with ease.

If you encounter any issues during setup or while using the extension, our support team is here to help. You can contact us by:

Now Live: Knowband’s AI Content Generation Plugin for WooCommerce!

Running an online store means creating lots of content. However, writing product descriptions, meta titles, and page content takes time. Fortunately, the Knowband’s WooCommerce AI Content Generator Plugin offers a simple solution. This powerful Plugin helps store owners create quality content quickly and easily.

What Is the AI Content Generator for WooCommerce?

The AI Content Generator for WooCommerce is a smart plugin that writes content for you. Instead of spending hours writing product descriptions, this Plugin does the work in minutes. Moreover, it uses advanced AI technology to create professional content that sounds natural and engaging.

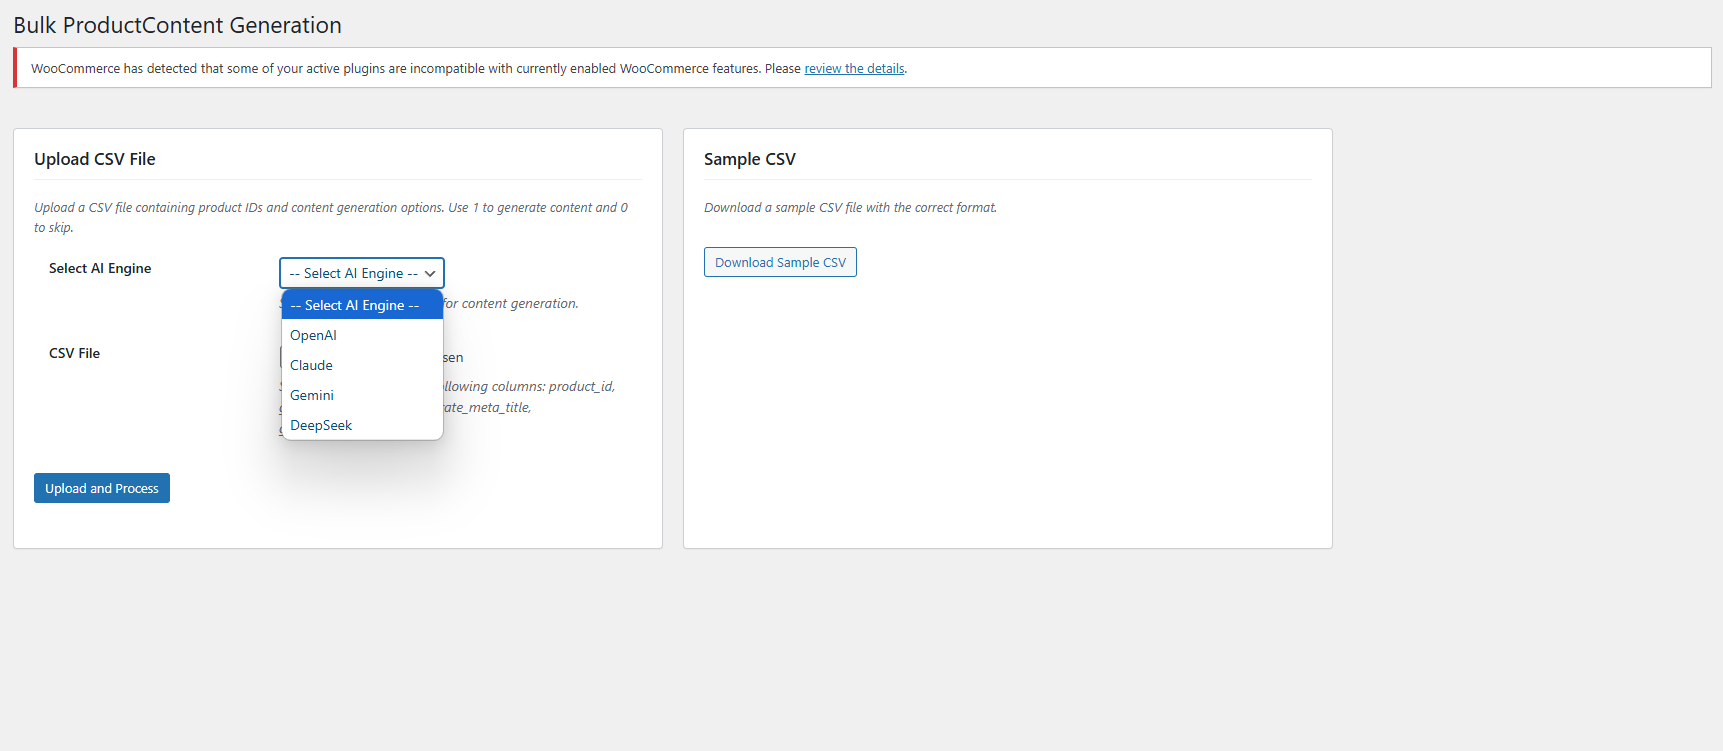
Furthermore, the WooCommerce AI Generator Plugin supports multiple AI engines. This means you can choose from different AI models like ChatGPT, Claude, Gemini, and DeepSeek. As a result, you get content that fits your store’s unique style and needs.

Key Features Of WooCommerce AI Content Generator

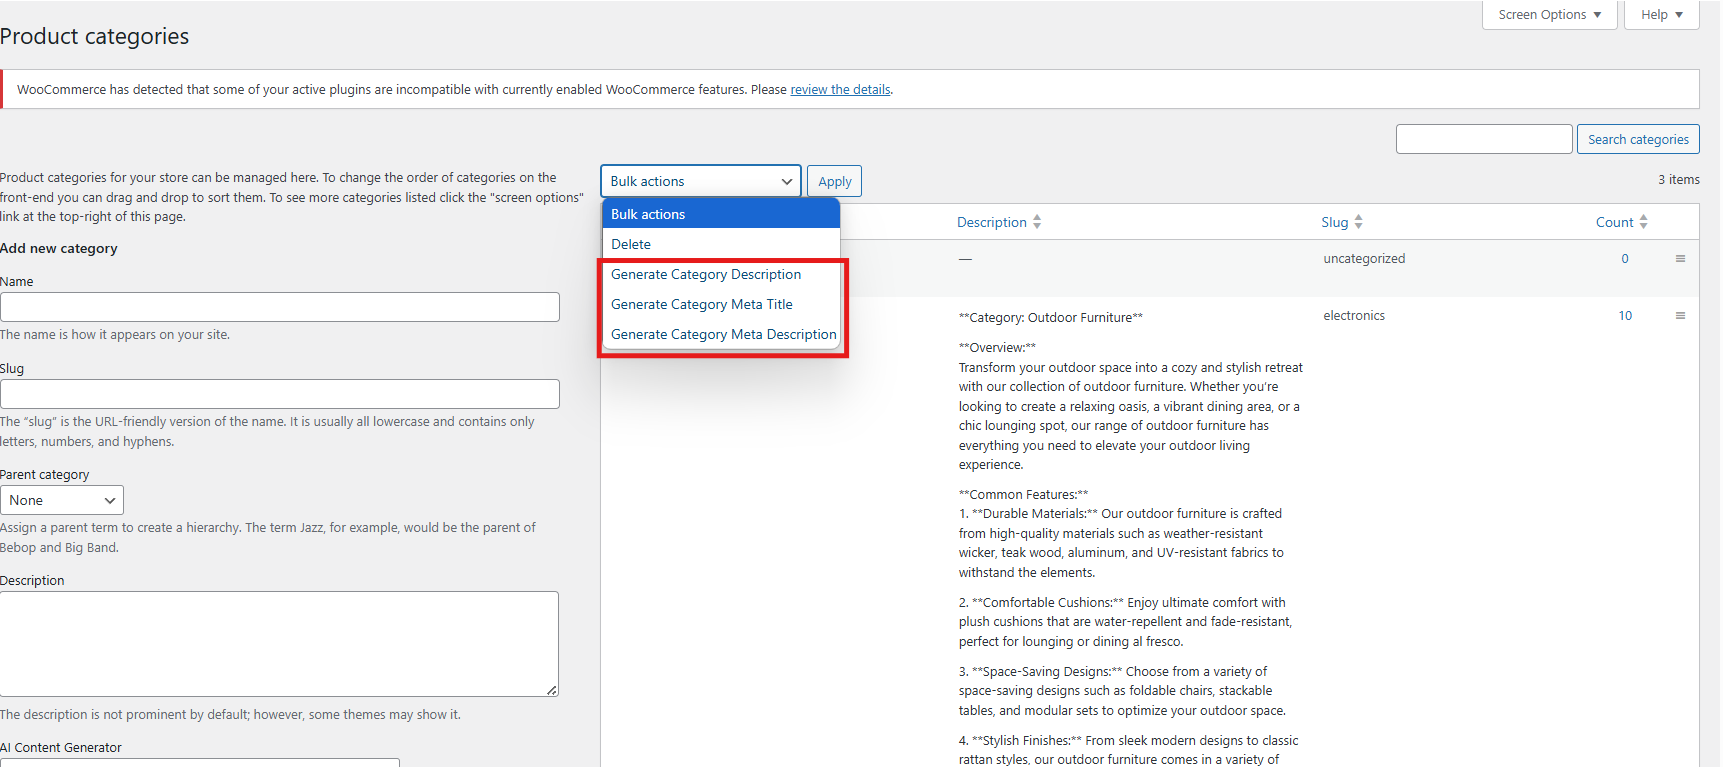
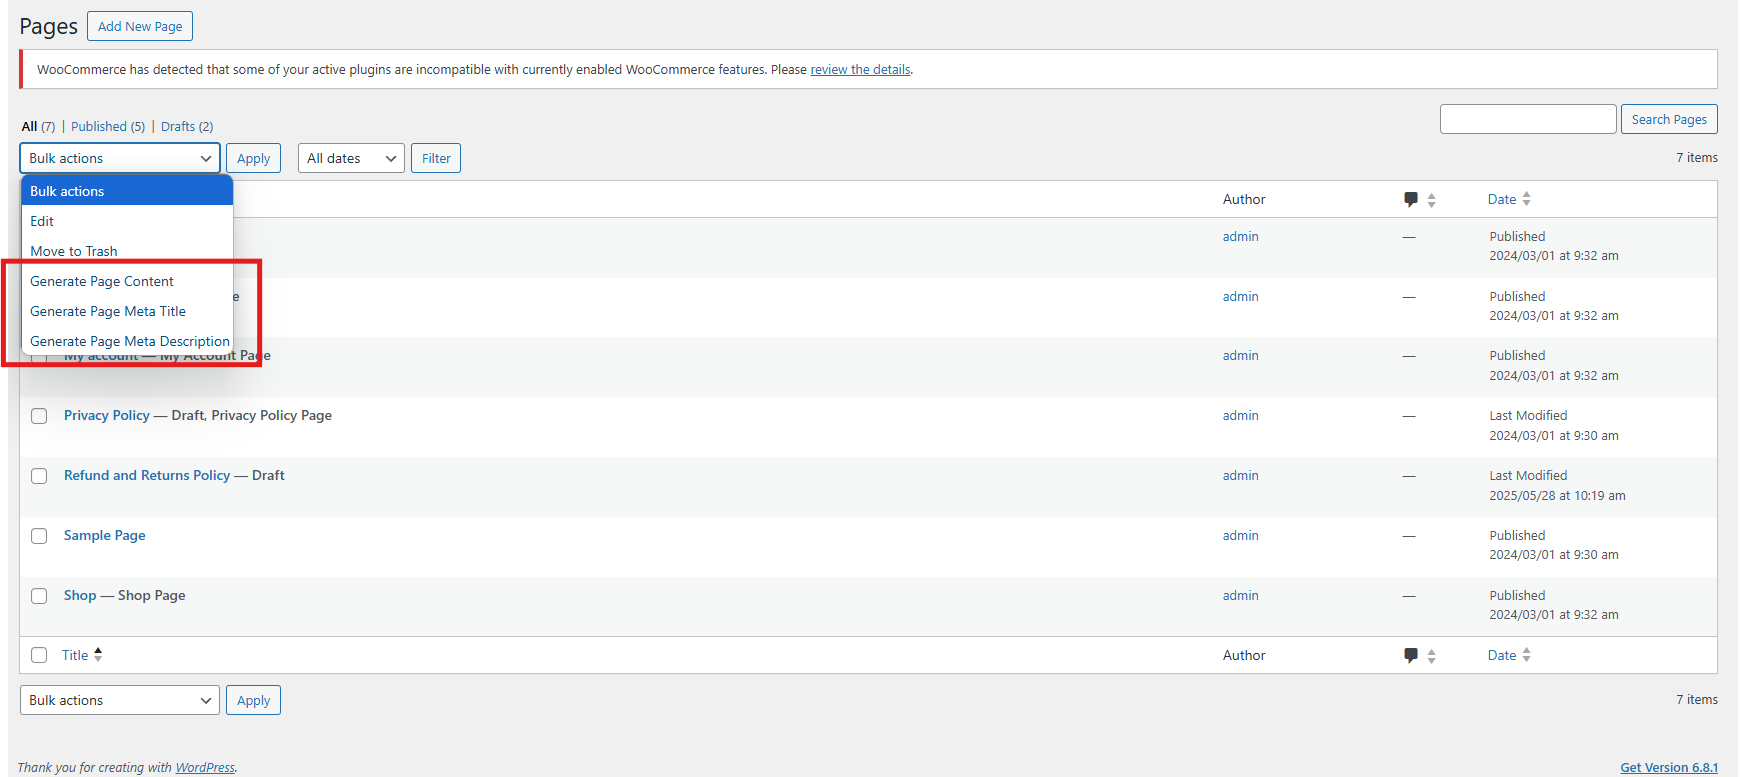
The WooCommerce AI Content Creation Extension comes with many helpful features. First, it creates content for products, categories, and CMS pages automatically. Additionally, it generates SEO-friendly titles and descriptions that help your store rank better in search results.

Another great feature is bulk processing. The WooCommerce AI Bulk Content Generator can handle hundreds of products at once. Therefore, even large stores can update their content quickly without manual work.

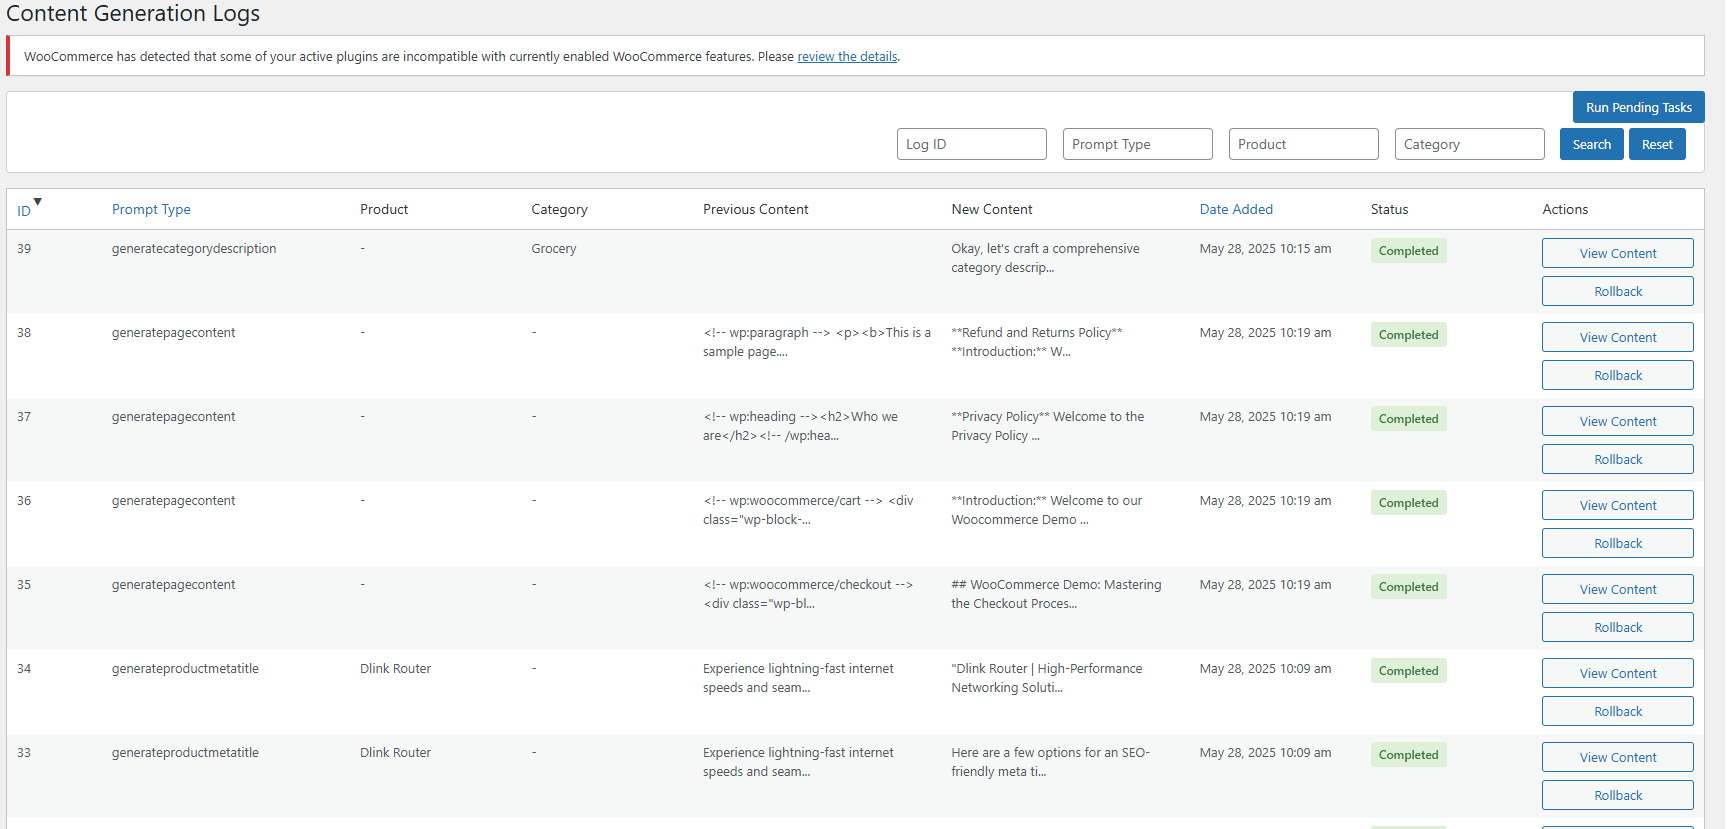
The plugin also tracks all changes with detailed logs. This way, you can see what content was created and when. Consequently, managing your store’s content becomes much easier.

Multiple AI Engines for Better Results

What makes this Plugin special is its variety of AI options. The WooCommerce AI Content Generator uses Claude AI, Gemini and ChatGPT for natural-sounding content that works best for your products.

Perfect for All Types of Content

The AI Product Description Generator WooCommerce creates compelling product descriptions that sell. These descriptions highlight key features and benefits while using the right keywords. This helps in making your product highlighting to customers.

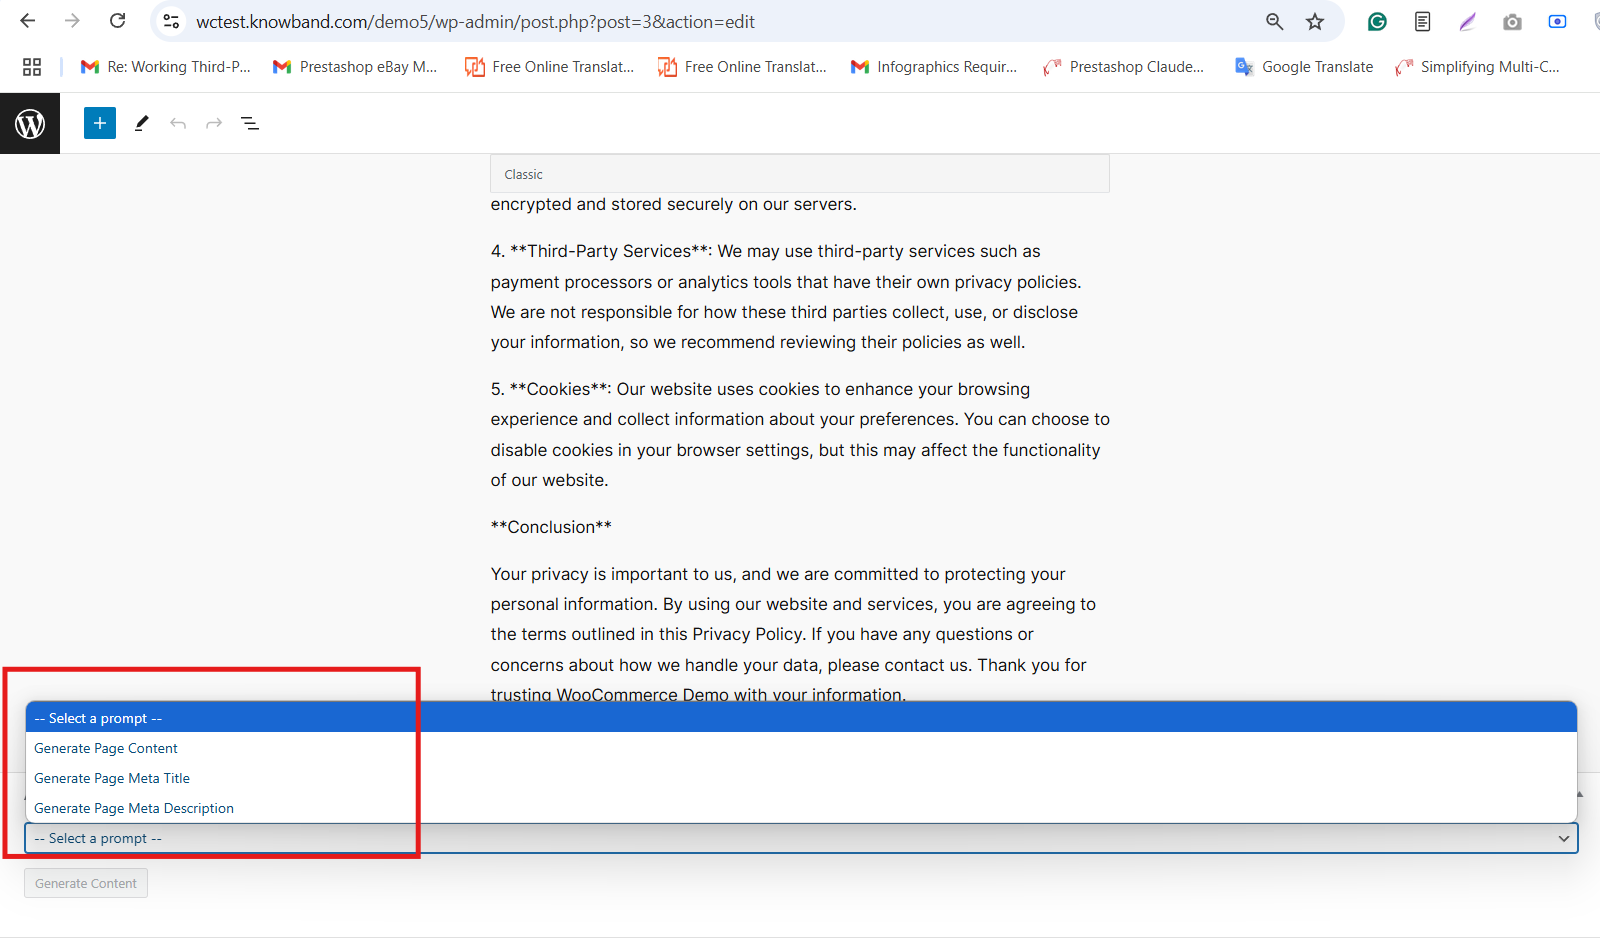
Not only products pages, the AI CMS Page Content Generator WooCommerce also genrates the content for categories as well as CMS Pages like Privacy Policy, etc. For instance, it can write About Us pages, FAQ sections, and shipping policies. Furthermore, this means your entire website can have professional content without extra effort.

Boost Your SEO Rankings

Search engine optimization (SEO) is important for the success of any online store. It helps your products appear higher in search engine results like Google, making it easier for customers to find you. The SEO Meta Title Generator in the WooCommerce AI plugin helps by creating product meta descriptions and title that include the right keywords.

These titles are not only made to rank well on search engines but are also easy for people to read and understand. This means your products are more likely to be seen, clicked on, and purchased by potential customers.

All-in-One Content Solution

The Multi-engine AI Content Generator for CMS and Products by Knowband combines everything you need in one plugin. Rather than using separate Plugins for different content types, this solution handles everything together. Moreover, this helps in time management and SEO rankings.

The plugin also supports multiple languages, which helps you reach global customers. Furthermore, it follows SEO best practices automatically, so you don’t need to be an expert to get good results.

Simple Setup and Easy Use

Setting up the plugin is straightforward, even for beginners. Once installed, you simply choose your preferred AI engine and start generating content. The user-friendly interface makes the process smooth and hassle-free.

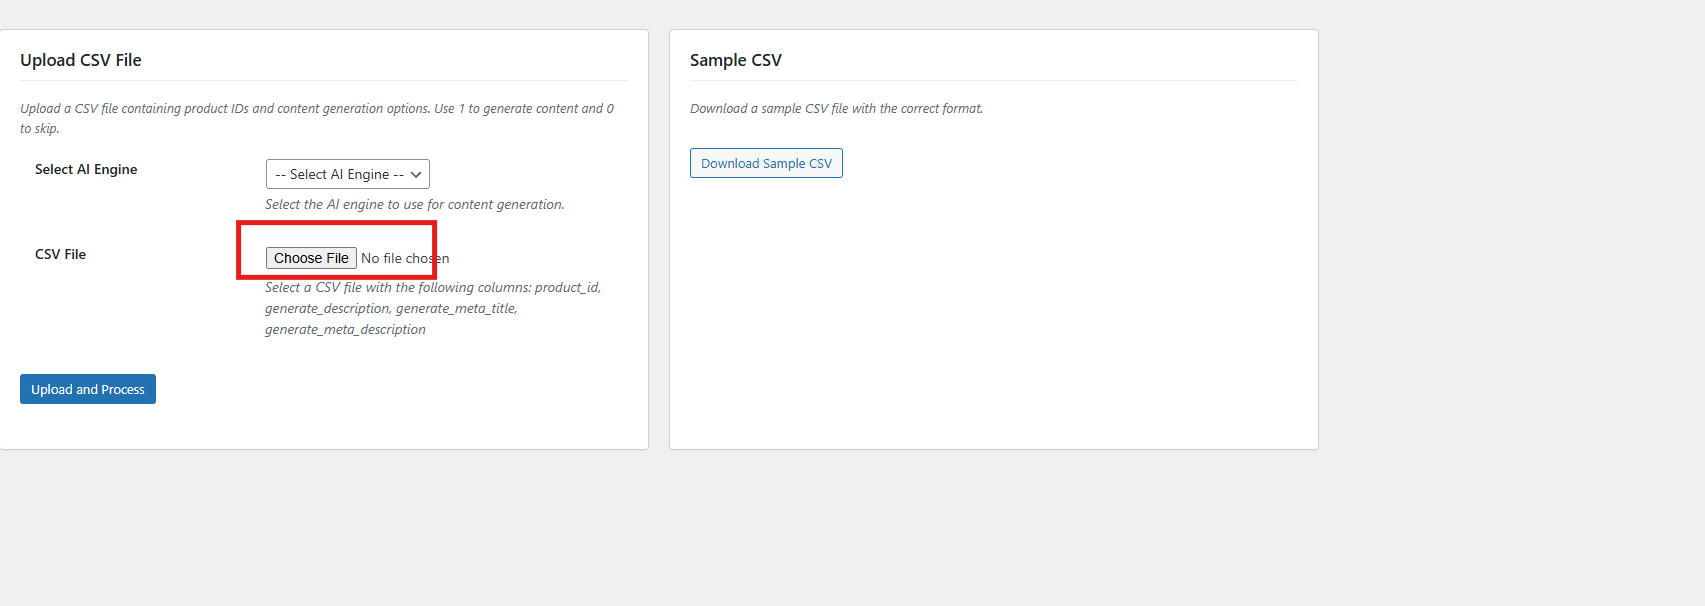
Additionally, the bulk content generation feature allows you to create product content at scale by simply uploading a CSV file with product details. Once uploaded, the AI automatically generates titles, descriptions, and other relevant content for all listed items in one go.

This functionality is especially valuable for WooCommerce stores managing large inventories, saving hours of manual work and ensuring consistent, high-quality content across the catalog.

Benefits of WooCommerce AI Content Generator to the E-Merchants

Time-Saving: Automates content creation, freeing up countless hours for you to focus on other business tasks.

Consistent Quality: Delivers high-quality, professional content across all your product pages.

SEO-Friendly: Generates content optimized for current SEO best practices, helping improve your store’s search engine rankings.

Increased Visibility: Better rankings mean more organic traffic, helping customers find your store without relying on paid ads.

Cost-Effective: Reduces the need for hiring copywriters, cutting down on operational expenses..

Get Started Today

The WooCommerce AI content generation Plugin by Knowband make running an online store much easier. Whether you need product descriptions, meta tags, or page content, AI can help you create everything quickly and professionally.

With multiple AI engines, bulk processing, and SEO optimization built-in, these Plugins provide everything needed for successful content creation. Start using AI content generation today and transform how you manage your online store.

WooCommerce AI Content Generator Plugin– User Manual

The WooCommerce AI Content Generator Plugin is a powerful plugin designed to help WooCommerce store owners effortlessly create high-quality product content. By integrating the advanced capabilities of Claude AI, ChatGPT API, Gemini API, and DeepSeek, the plugin enables the generation of SEO-optimized product, category and CMS page descriptions, meta titles, and meta descriptions, all while maintaining a natural and authentic brand voice.

Moreover, the AI Content Generator for WooCommerce also functions as a robust, AI-powered plugin for seamless content creation across multiple languages. As a result, your store can connect with global customers and expand its reach without compromising quality or consistency.

Furthermore, Knowband’s WooCommerce AI Generator Plugin offers a variety of AI Models for content generation. Store owners can select from ChatGPT options like GPT-3.5 and GPT-4.0; Claude models such as Haiku 3, Haiku 3.5, Sonnet 3.5 (Old), and Sonnet 3.5 (New); along with Gemini variants, including Gemini 1.5 Pro, 1.5 Flash, 1.5 Flash-8b, 2.0 Flash, and 2.0 Flash – Lite Preview. In addition, DeepSeek offers both chat and coder reasoner models.

With support for bulk content generation, the plugin dramatically reduces the time and effort required for manual writing. Whether you’re creating content from scratch or updating existing product information, the WooCommerce AI Content Generator ensures accuracy, consistency, and speed.

Additionally, the WooCommerce SEO AI Content Generator plugin supports content generation for category pages and CMS pages, including About Us, FAQs, Shipping Policy, and more. This means you can create a fully optimized, content-rich WooCommerce store without needing to write manually. Whether launching a new store or updating an existing one, users can apply AI assistance to all key areas of their website.

1.0 Key Features of the WooCommerce AI Content Creation Extension

AI-Powered Content Generation
The WooCommerce Claude AI Content Generator Extension automatically creates high-quality product and category descriptions, meta titles, meta descriptions, and CMS page content by leveraging advanced AI technologies—including ChatGPT, Claude, Gemini, and DeepSeek. This ensures your entire store’s content is professional, engaging, and SEO-optimized.

Enhanced SEO Performance
All generated content follows best SEO practices, thereby improving your store’s search engine rankings and boosting visibility through strategic keyword placement and well-structured metadata.

Flexible AI Model Selection
The AI Content Generator for WooCommerce offers a wide variety of AI models for content creation. Store owners can choose from ChatGPT options like GPT-3.5 and GPT-4.0; Claude models including Haiku 3, Haiku 3.5, Sonnet 3.5 (Old), and Sonnet 3.5 (New); Gemini variants such as Gemini 1.5 Pro, 1.5 Flash, 1.5 Flash-8b, 2.0 Flash, and 2.0 Flash – Lite Preview; as well as DeepSeek Chat and Coder Reasoner.

User-Friendly Interface
Designed for ease of use, the extension provides an intuitive interface that allows store owners, regardless of technical experience, to generate professional, high-quality content quickly and effortlessly.

Bulk Processing Capabilities

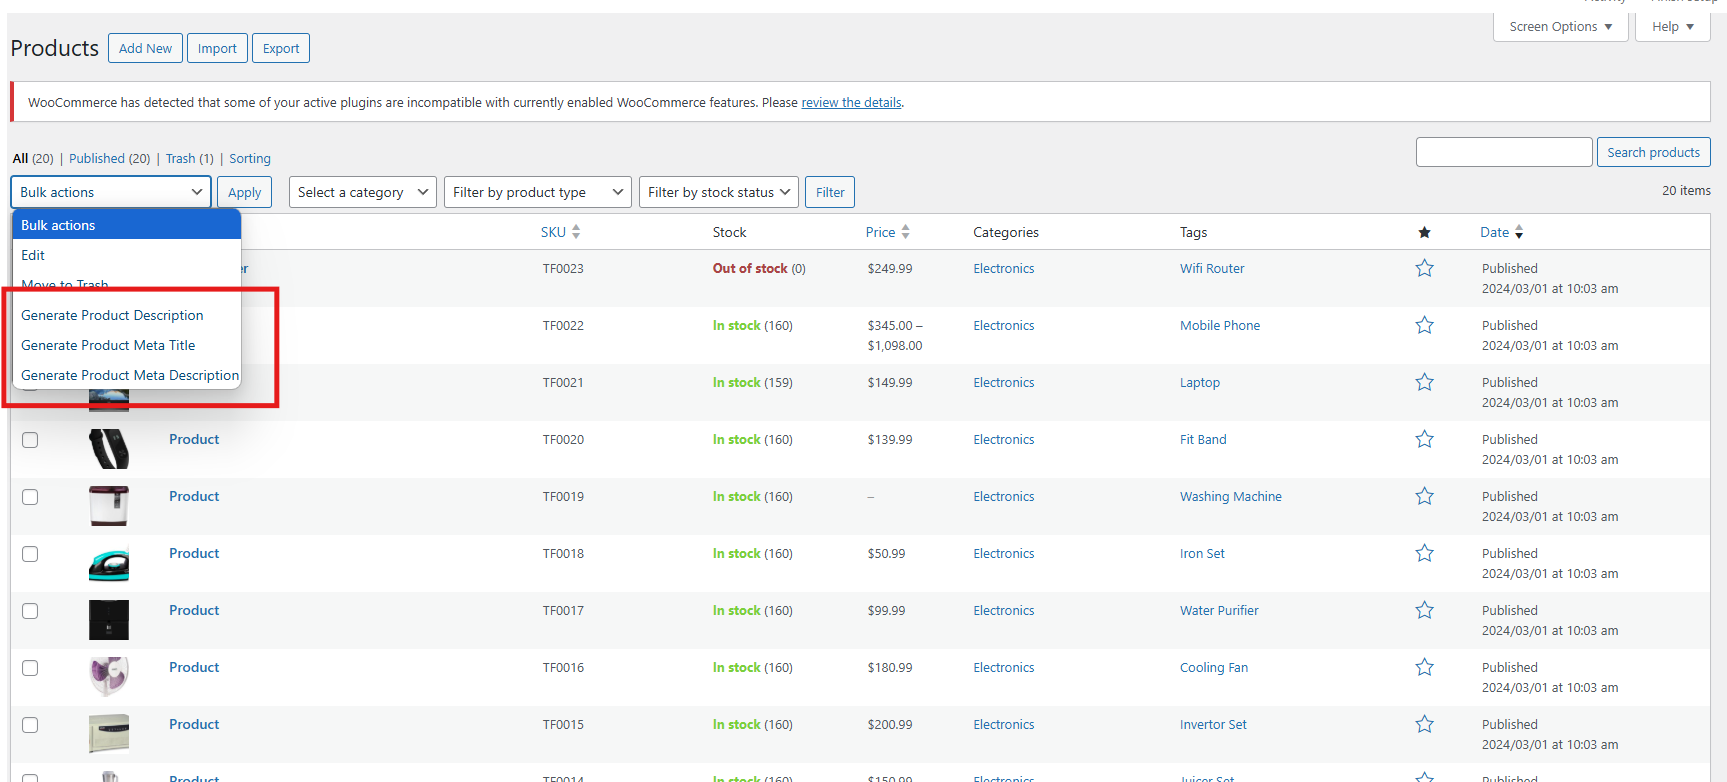
Ideal for stores with large product catalogues, the WooCommerce DeepSeek AI Content Generator enables bulk content generation for multiple products simultaneously—saving both time and effort. 

Additionally, it supports bulk CSV import, allowing users to upload files and select specific entries for AI-generated content creation or updating, which offers flexible and efficient content management.

Comprehensive Activity Tracking
The plugin keeps a detailed log of all actions taken, including timestamps and summaries of changes. As a result, store owners benefit from transparency and easy tracking of content updates and modifications.

2.0 Benefits of WooCommerce AI Content Generator Plugin for E-Merchants

Time Savings
AI Product Description Generator WooCommerce quickly generates high-quality content in minutes, reducing manual writing efforts and freeing you to focus on your core business.

Improved SEO Performance
Create AI-optimized product content that follows SEO best practices to boost search engine rankings and organic traffic.

Superior Content Quality
Generate professional, engaging, and brand-consistent product descriptions that enhance your store’s credibility.

Cost Efficiency
Save on copywriting expenses by automating content creation with advanced AI technology.

Competitive Edge
Stay ahead by providing better, faster, and more accurate product information than your competitors.

Enhanced Customer Experience
Deliver clear, detailed content that helps customers make informed decisions and increases conversions.

Performance Monitoring
Track all AI-generated content changes with an activity log to review and improve your content strategy over time.

3.0. Installation Steps of the AI CMS Page Content Generator WooCommerce

Follow these simple steps to install the WooCommerce AI Content Generator Plugin on your WooCommerce site:

Step 1: Purchase the Plugin
Buy the WooCommerce AI Content Generator plugin from the Knowband store. After purchase, you will receive a zipped file containing the plugin’s source code.

Step 2: Access the WordPress Dashboard
Access your WordPress admin dashboard, then navigate to Plugins → Add New.

Step 3: Upload the Plugin
On the “Add Plugins” page, click the Upload Plugin button.

Step 4: Upload the File
Click Choose File, select the zipped plugin file you downloaded, and upload it.

After the upload completes, click Activate Plugin. 
4.0 API Key Generation

Steps to Generate Anthropic Claude API

  1. Visit Anthropic’s website, and click “Start Building”.
  2. Sign up for an account, and go to your Dashboard.
  3. Click on the Create key.

4. Copy the key and make sure to copy it.

Steps to Generate Gemini API for AI Content Generator for WooCommerce

  1. Visit the Google AI Studio website.
  2. Create your API Keys by clicking ”Get API Key”.

3. Copy the Key for the Plugin.
Steps to Generate ChatGPT API Key for WooCommerce AI Content Generator 

  1. Go to OpenAI’s website and sign in.
  2. Create your API Key by clicking Create API Key.

3. Make sure to copy the key immediately and store it safely.

DeepSeek API Content Generation Steps

Follow these steps to generate content using the DeepSeek API within the WooCommerce AI Content Generator plugin:

Step 1: Get Your DeepSeek API Key

  1. Register or log in to your DeepSeek account at their official website.
  2. Navigate to the API section and create or copy your unique API key.

3. Copy the API key to enable the functionality of DeepSeek AI Engine in WooCommerce AI Content Generator Plugin

4. Copy the DeepSeek API key for the OpenCart AI Content Generator Extension

4.0.0 Admin Interface of Knowband’s WooCommerce AI Content Generator Plugin

4.0.1 General Settings of WooCommerce Claude AI Content Generator

The WooCommerce Bulk AI Content Generator Extension allows store admins to customize AI settings and efficiently handle large-scale content generation tasks.

Configuration Options:

  • Enable/Disable- Enable or disable the module as per your need.
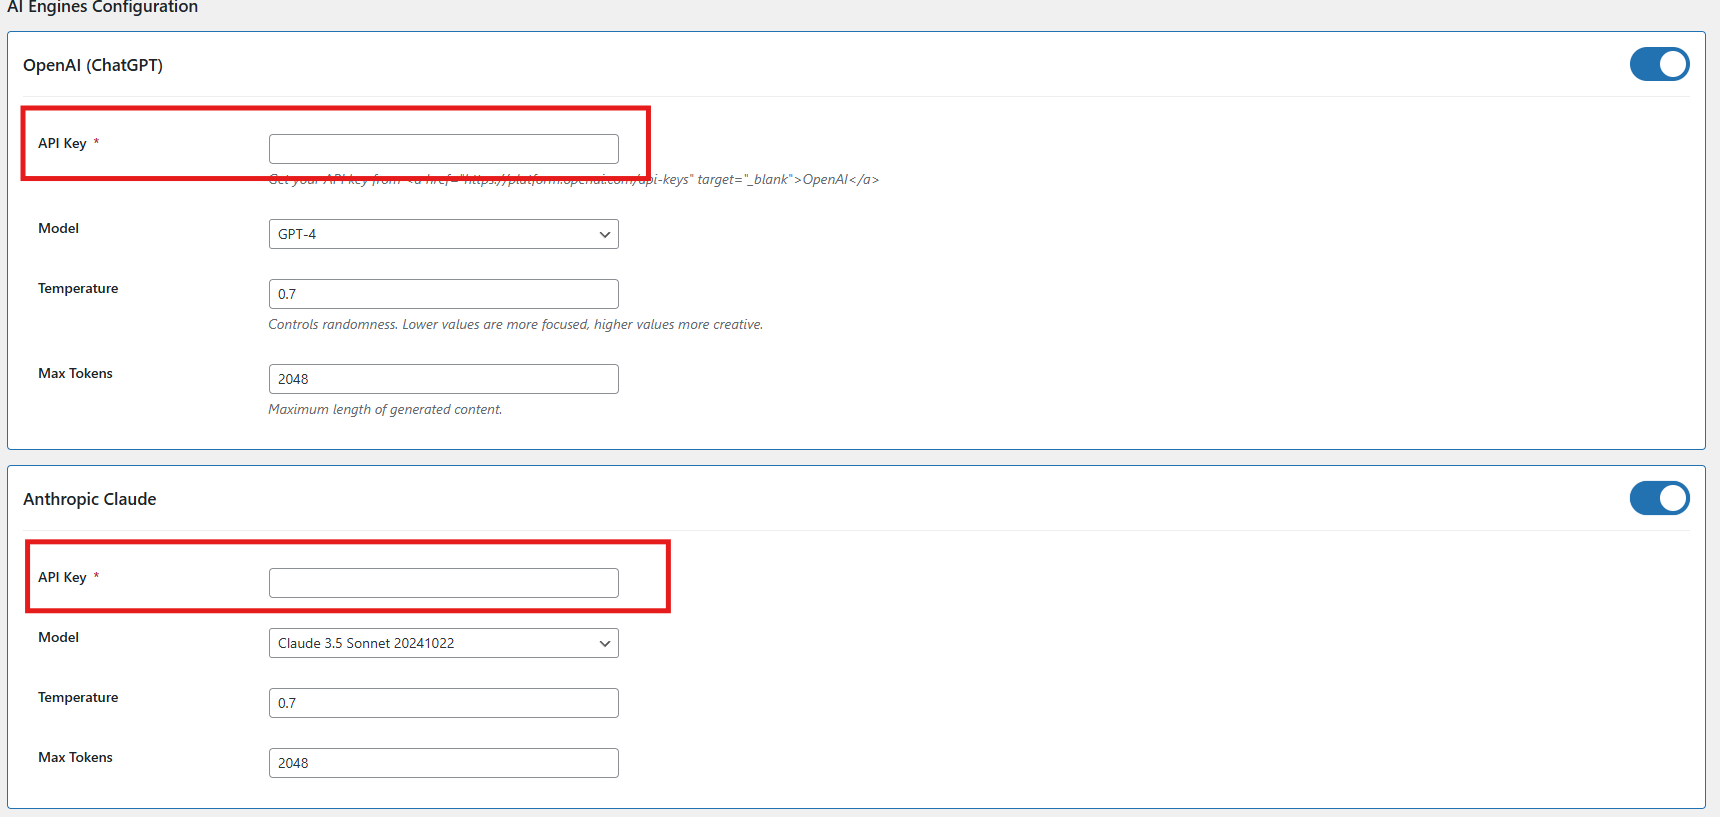
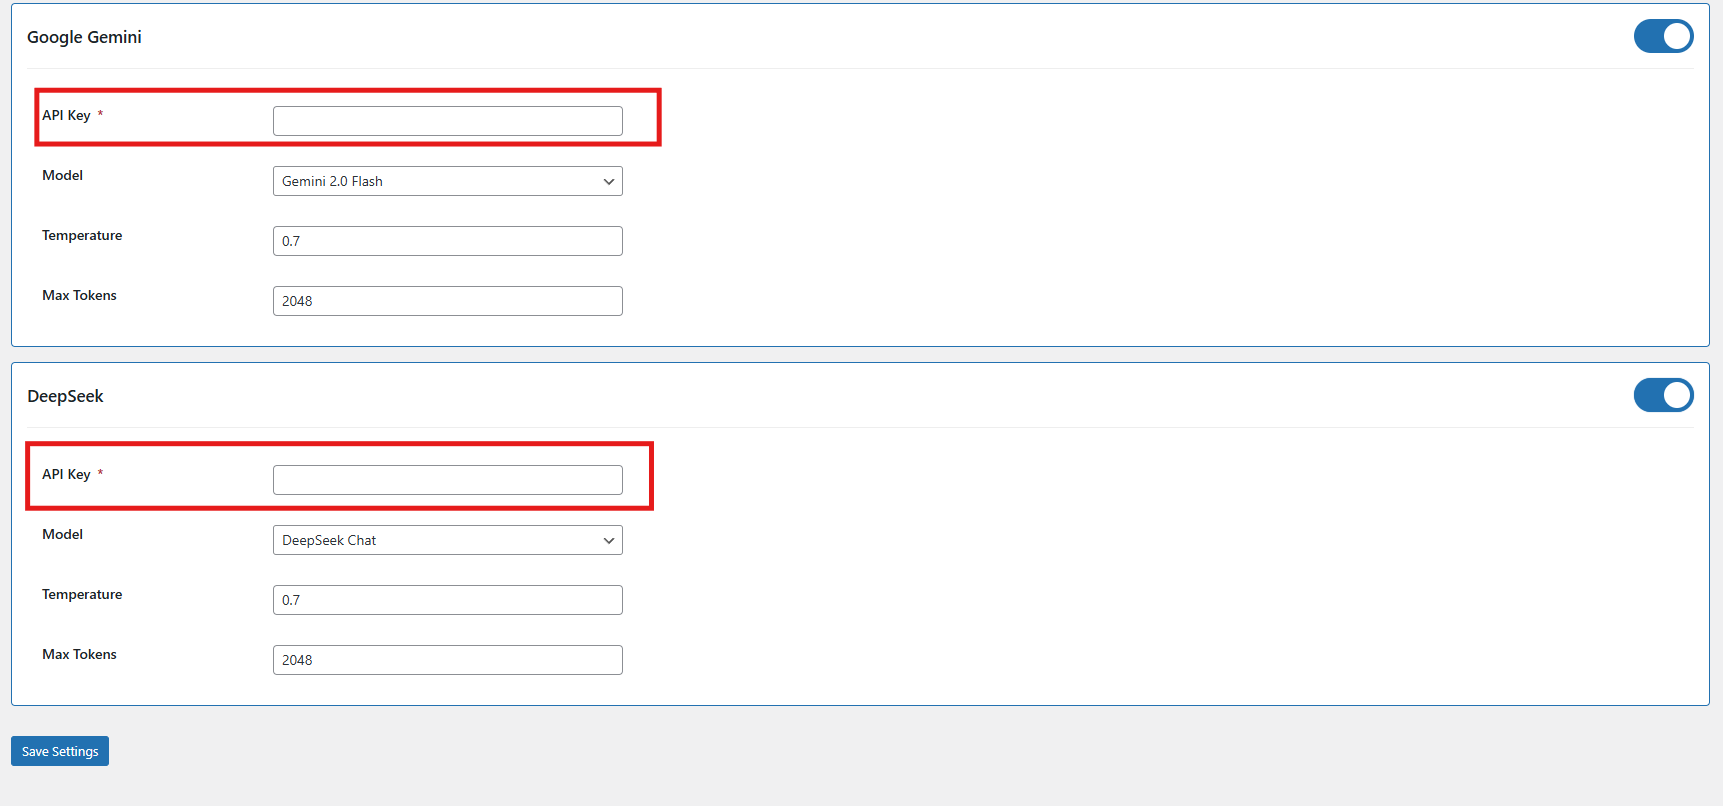
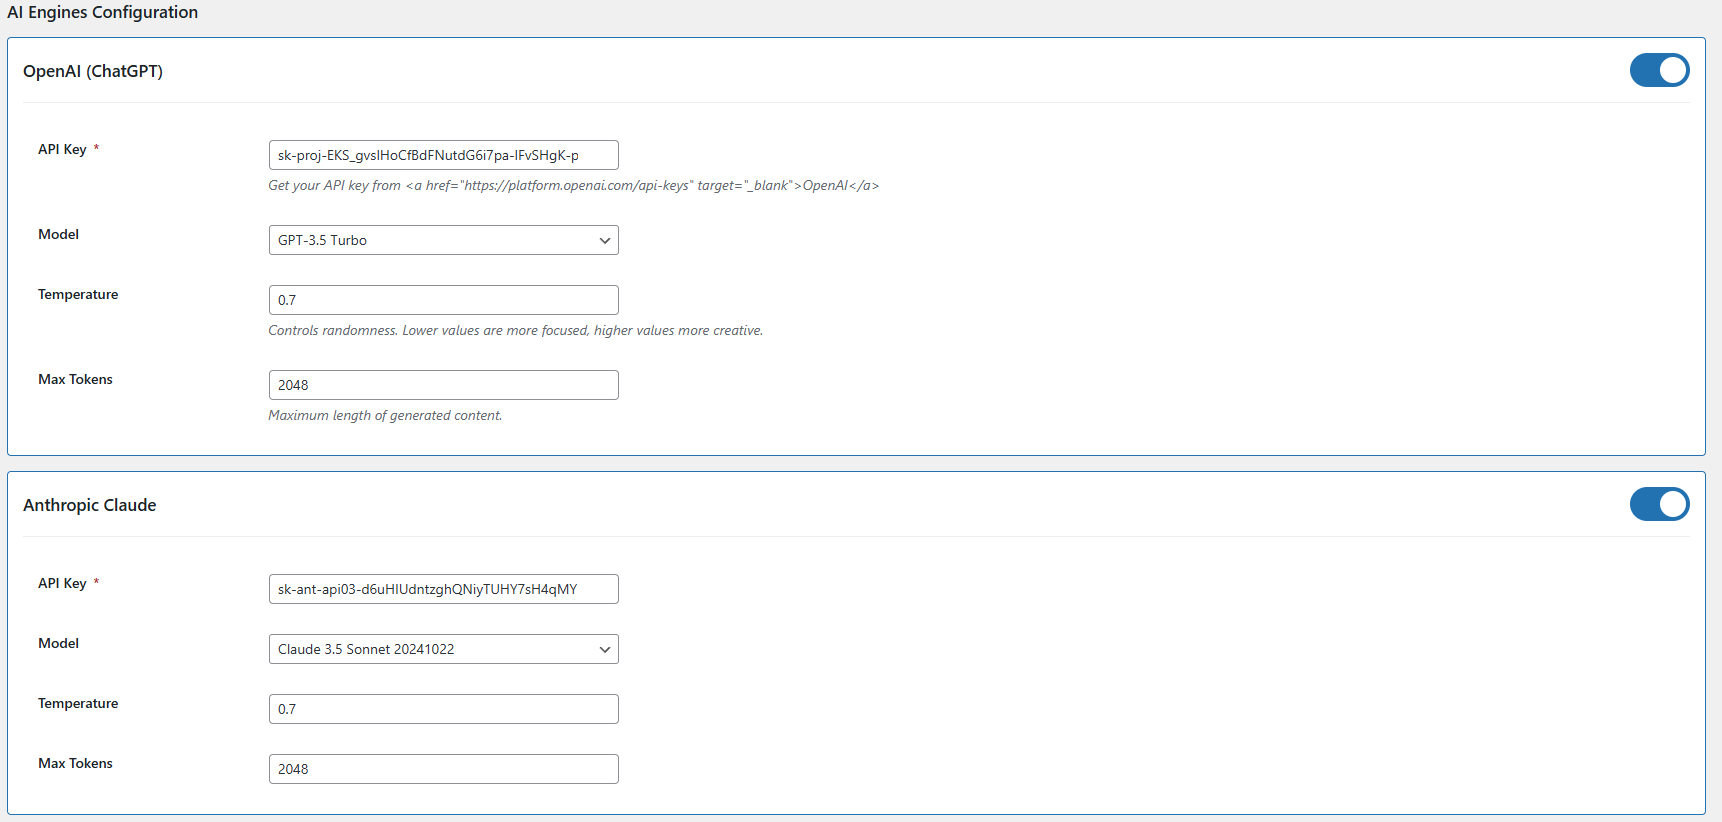
  • API Key Configuration – Add API keys for all supported AI models, including Claude, ChatGPT, Gemini, and DeepSeek, to ensure seamless integration and functionality.
  • Claude Engine Toggle – Quickly enable or disable the Claude AI engine with a single click based on your content generation needs.
  • API Key for Claude – Enter the necessary API key to activate Claude AI’s features for content generation and language.
  • Claude Model Selection – Select from a range of Claude AI models, such as Haiku 3, Haiku 3.5, Sonnet 3.5 and Sonnet 3.5, to power your content creation tasks.
  • Token- Add the token limit for the content generator default 2048, you can add up to 32000 as a token limit which will apply to all AI models
  • Enable/Disable ChatGPT – Turn the ChatGPT AI engine on or off to control its role in generating content for your store.
  • API Key for ChatGPT – Enter your ChatGPT API key to activate content generation capabilities.
  • Select ChatGPT Model – Choose between ChatGPT 3.5 and ChatGPT 4.0 for generating high-quality, SEO-friendly content.
  • Enable/Disable Gemini AI – Easily activate or deactivate the Gemini AI engine to manage content creation workflows.
  • API Key for Gemini – Provide your Gemini API key to enable its integration with the content generator.
  • Select Gemini Model – Choose from Gemini models like 1.5 Pro, 1.5 Flash, 1.5 Flash-8b, 2.0 Flash, or 2.0 Flash–Lite Preview based on your performance and output needs.
  • DeepSeek Model – Enable the DeepSeek engine by selecting the preferred mode for content generation.
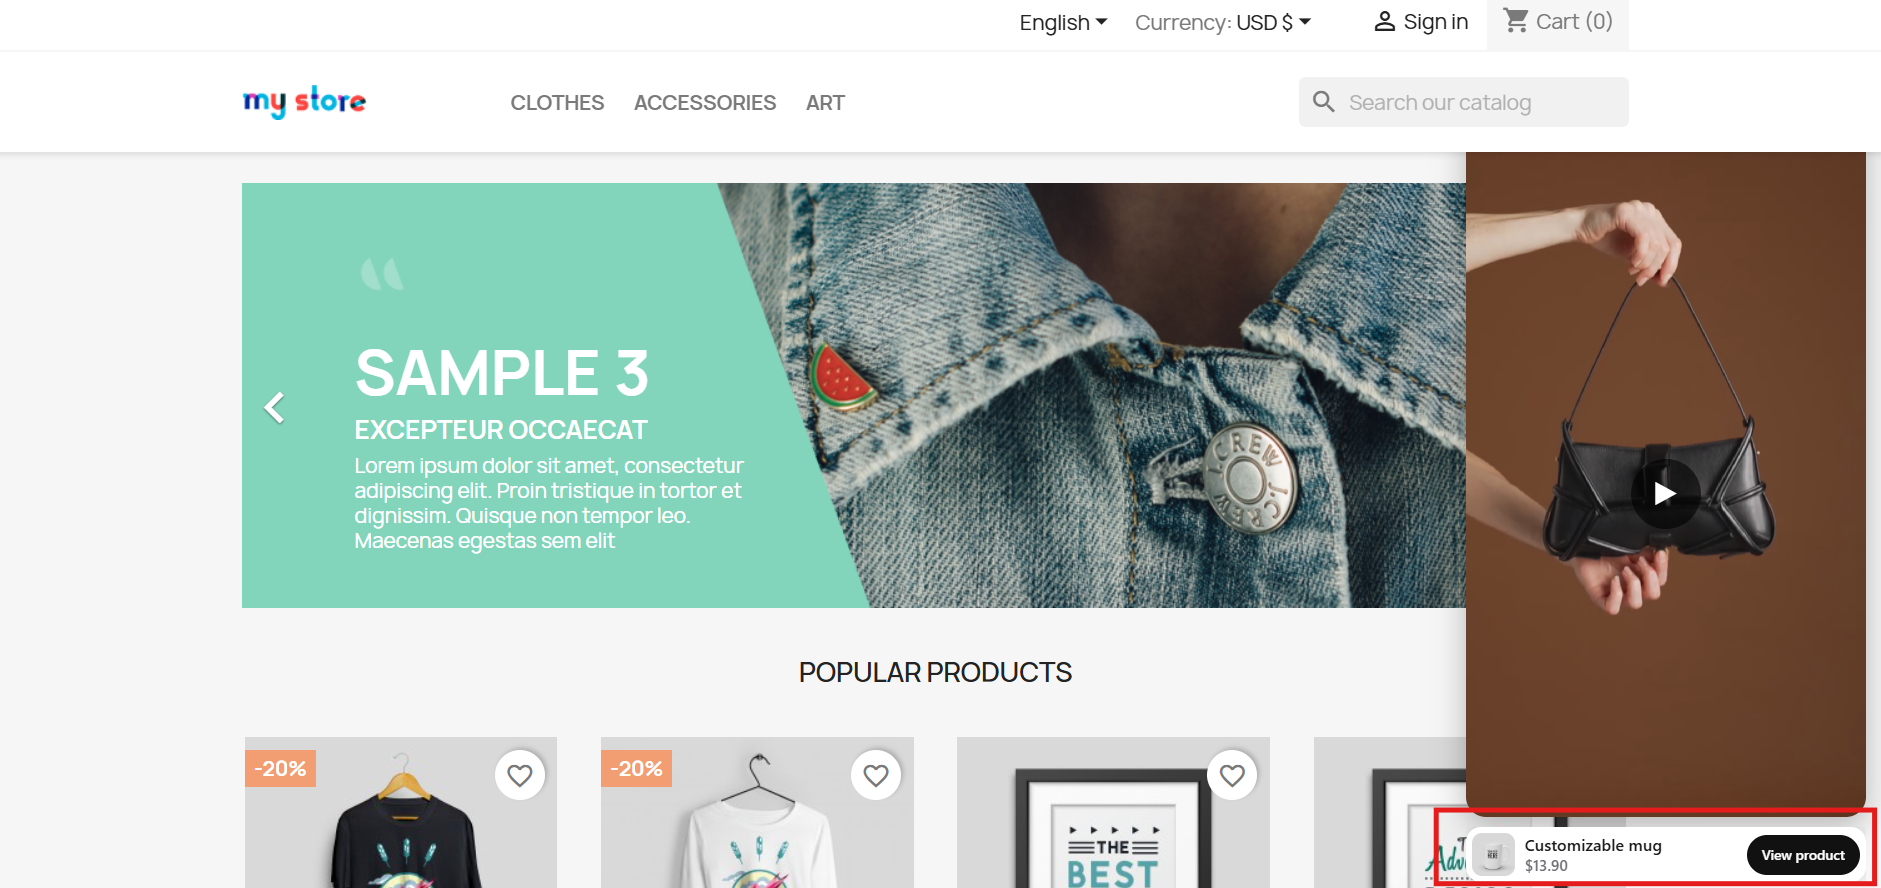
  • Select DeepSeek Model Type – Choose between the Chat or Coder model based on the type of content you need to generate.
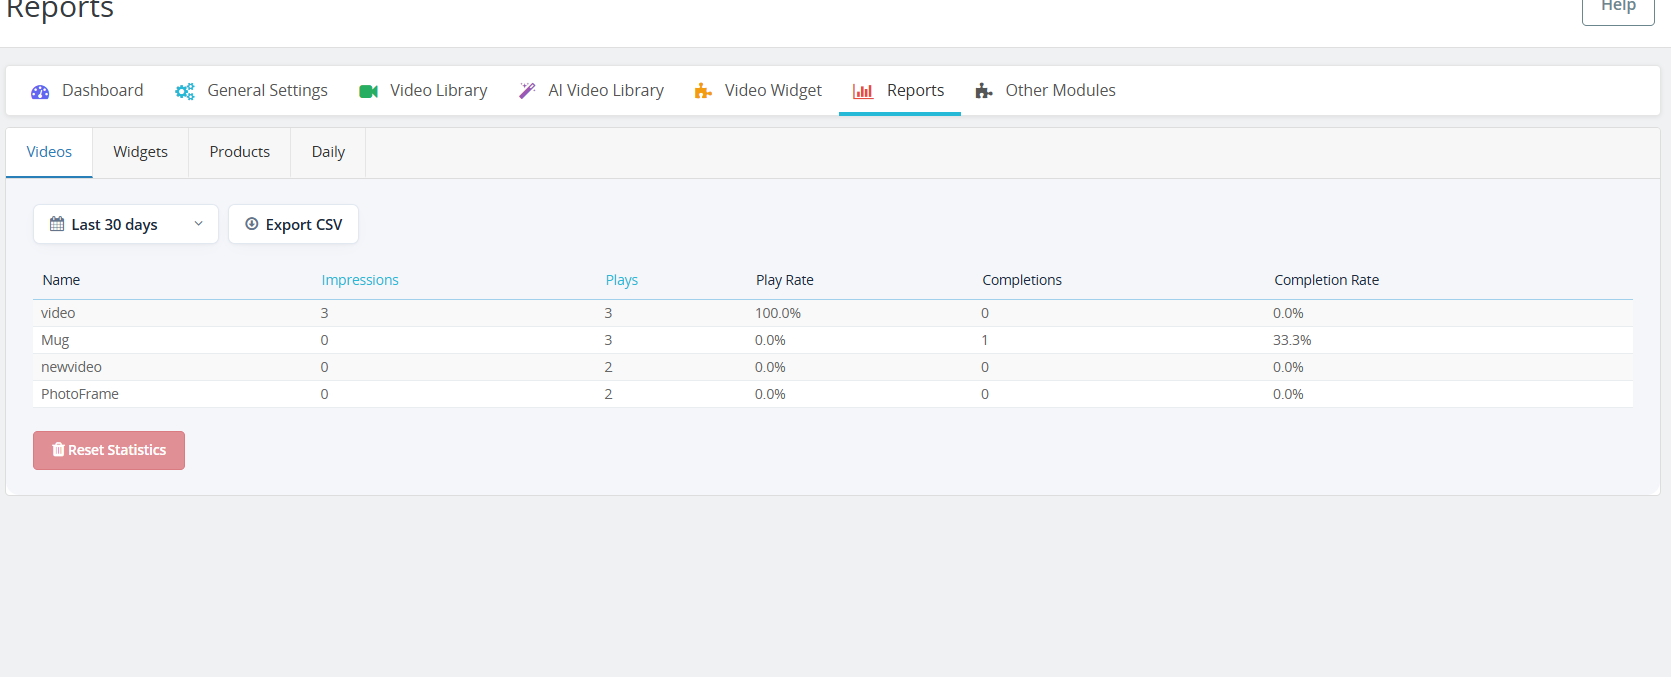
  • Temperature Setting – Adjust the creativity level of AI-generated content (range: 0.0 to 1.0). Lower values offer more consistency, while higher values produce more creative outputs.

4.0.2 Content Generation Prompts for WooCommerce Gemini AI Content Generator Plugin

The Knowband WooCommerce Gemini AI Content Generator plugin offers ready-to-use AI prompts tailored specifically for e-commerce content creation.

Product Content Generation Prompts

  • Generate Product Description- Creates SEO-optimized and well-structured product descriptions that emphasize key features and benefits.
  • Generate Product Meta Title- Generates concise, keyword-rich meta titles under 60 characters to improve search visibility.
  • Generate Product Meta Description-  Crafts engaging meta descriptions within 140 characters designed to attract clicks.

Category Content Generation:

  • Generate Category Description- Develop detailed category content with proper HTML formatting for better presentation.
  • Generate Category Meta Title- Produces keyword-focused category titles under 60 characters to boost SEO.
  • Generate Category Meta Description-  Creates clear and concise category descriptions within 140 characters for search engines.

Page Content Generator for Multi-engine AI Content Generator for CMS and Products

  • Generate Page Meta Description: Create an SEO-friendly meta description that summarizes the CMS page content clearly and effectively.
  • Generate Page Meta Title: Generate a concise meta title including main keywords and your store’s name for better search ranking.
  • Generate Page Content: Produce well-structured, engaging content for CMS pages to inform and attract your visitors.

5.0. Bulk Product Content Generation

The SEO Meta Content Generator WooCommerce exhibit the feature that allows you to generate product content for multiple products at once by uploading a CSV file. This saves time and effort when managing large product catalogues.

Steps To Generate Bulk Product Content

1. Upload CSV File

Upload the CSV file by clicking Choose File and selecting your file.

2. Select AI Engine
Choose your preferred AI engine from the dropdown menu.

3. Upload and Process
After selecting your file and AI engine, click the Upload and Process button to start generating content for the products listed in your CSV. The plugin will process the file and create the requested content accordingly.

6.0. Task Logs In WooCommerce AI Content Extension

The WooCommerce AI Content Generator Plugin keeps a detailed log of all AI-generated content. This log includes information such as the type of prompt used, language, product or category involved, timestamp, status, previous content, and the newly generated content. Moreover, this helps you track changes, review past updates, and monitor the evolution of your content.

6.0 Steps to Execute the Prompts in AI Meta Description Generator for Woocommerce

Use the WooCommerce AI Content Generator plugin to create content easily for products, categories, and CMS pages such as descriptions, meta titles, and meta descriptions.

Follow these steps to execute the prompts–

Step 1: Navigate to Products, Categories, or CMS Pages in your WordPress admin panel.

Step 2: Select the specific items or pages you want to generate content for. You can work on individual items or select multiple for bulk processing.

Step 3: Click the Bulk Actions dropdown menu (for bulk) or use individual action buttons (for single items).
Step 4: Choose the AI operation you want to perform options include generating descriptions, meta titles, and meta descriptions.

Step 5: Select the AI engine you want to use for the content creation tasks.

Step 6: Review the AI-generated content carefully and approve it before publishing to ensure accuracy and brand consistency.

If you have any questions, need further assistance, or want to provide feedback about the WooCommerce AI Content Generator, please don’t hesitate to reach out to our support team. We’re here to help you make the most of the plugin and ensure a smooth content generation experience.
Contact us anytime at: support@knowband.com

Top Features of Knowband’s eBay PrestaShop API Integrator You Should Know

In the world of competitive e-commerce, expanding your store across multiple marketplaces is vital. Listing your product on marketplaces helps drive sales and gain new customers. For this reason, Knowband has introduced Prestashop eBay Integration Addon which is a game changer for the prestashop stores. The PrestaShop eBay Marketplace Integration Module integrates with the Prestashop store seamlessly. It not only seamlessly integrates but automatically lists the product through a synchronization feature. As a result, the store admin does not need to manually list the product. Moreover, the Prestashop eBay API Integrator Module automatically syncs all the features and attributes to eBay from your Prestashop store.

[Exciting Update] Prestashop eBay Marketplace Addon v2.2.1 is Here!

Knowband has the latest version of the Prestashop eBay Marketplace Addon (v2.2.1), designed to make your PrestaShop – eBay integration faster, smarter, and more efficient. Furthermore, this update brings powerful features to simplify inventory and API management.

What’s New in v2.2.1?

 Enhanced Inventory Sync
Now, keep your eBay listings and PrestaShop store perfectly aligned. The improved Inventory Comparison tab has been added in Knowband’s Prestashop eBay API Connector Module, which identifies stock differences automatically, helping you prevent overselling and maintain accurate product availability across both platforms.

Real-Time API Usage Tracker
Stay ahead of API limits with the upgraded Rate Limit Monitor. Now, with the new version 2.2.1, you can view real-time data for all eBay APIs, including total limits, usage, and remaining calls. Moreover,  this ensures uninterrupted synchronisation between your store and eBay, so your operations never skip a beat.

Why Upgrade?

  • Accurate Inventory Management: Reduce manual errors and overselling with the new release

  • Smooth Integration: Keep your PrestaShop and eBay stores perfectly in sync.

  • Active API Monitoring: Avoid downtime due to exceeded API limits because now you can check before listing. 

Upgrade today to v2.2.1 and experience a more reliable, hassle-free PrestaShop–eBay connection!

Need guidance? Refer to the updated user manual for step-by-step instructions.

Why Use Knowband’s PrestaShop eBay Integration Module?

Managing multiple sales channels manually can be complicated and time-consuming. Keeping track of product listings, inventory, prices, and orders on both PrestaShop and eBay often leads to mistakes. It also takes up valuable time. That’s why the PrestaShop eBay Integration Plugin make it all easy for store admins as it removes all the stress by automating the entire process.

With that in mind, everything becomes faster and easier. The module includes uploading products, updating stock levels, and processing orders. You don’t need to switch between platforms or worry about missing updates. In fact, the module keeps everything synced between your PrestaShop store and your eBay account. This gives you more time to focus on growing your business.

Key Features of the Prestashop eBay Marketplace Integration

Quick & Easy Setup: Even without technical expertise, the installation and configuration are straightforward. The PrestaShop eBay API Integration Module gets your products live on eBay swiftly.

Bulk Product Uploads: The module allows you to upload hundreds of products simultaneously. It includes accurate descriptions, images, and prices. In addition, you can also align your store categories with eBay’s categories. This boosts product discoverability and sales.

Live Inventory & Price Updates: Say goodbye to overselling. The eBay PrestaShop Connector instantly synchronizes your stock quantities in PrestaShop. This happens whenever orders are placed on eBay. At the same time, it ensures that any pricing updates are reflected simultaneously on both platforms.

Centralized Order Management: Orders placed on eBay are directly imported into PrestaShop. This happens via the eBay PrestaShop API Integrator. This means you can track sales and manage fulfilment in one place. You won’t need to juggle different dashboards.

Flexible Shipping Settings: Tailor your shipping options with custom profiles. These work for specific eBay marketplaces like eBay US and UK. You also have the ability to enable or exclude international shipping destinations.

Advanced Attribute Mapping: Map the store’s product attributes with eBay attributes. This ensures your listings meet marketplace standards. It also helps them appear in the right search filters.

Advantages of Using the Knowband eBay PrestaShop Integrator

Expand Your Reach Globally: Connect your PrestaShop store with the vast eBay customer base effortlessly. The PrestaShop eBay Integration Free Module makes cross-border selling accessible. This works even for small businesses.

Save Time with Automation: Automate product uploads, stock syncing, pricing updates, and order processing. This way, you can focus on growing your business instead of handling tedious manual work.

Single Dashboard Control: Manage everything related to your eBay listings within your PrestaShop admin panel. This includes inventory, orders, and shipping. This improves efficiency and reduces errors.

Detailed Activity Logs: Keep track of all synchronization events with transparent logs. These monitor product updates, stock changes, and order statuses. This gives you full control.

How to Integrate Your Store with eBay Using Knowband’s Module

  1. Create an account on the eBay Developer Program.
  2. Next, obtain your API credentials by generating your Dev ID, App ID, and Cert ID.
  3. Configure the PrestaShop eBay Integrator by entering your API keys and PrestaShop store URL.
  4. Integrate your store’s categories with the appropriate eBay categories. Then set up your shipping options to ensure accurate product listings and hassle-free deliveries.
  5. Finally, start syncing your products, inventory, and orders seamlessly.

Final Thoughts

For PrestaShop store owners looking to scale their operations internationally, Knowband’s PrestaShop eBay Integration Addon offers an all-in-one solution. It simplifies multi-channel selling. Whether you’re interested in a free Prestashop eBay Integration addon or a feature-rich paid module, Knowband’s modules ensure your store stays up-to-date. As a result, your customers receive timely service.

So why wait? Leverage the power of the Prestashop eBay Integrator today. Unlock new growth opportunities with minimal effort.

The Ultimate Solution for eCommerce Tracking: PrestaShop GTM Module

In the competitive eCommerce, accurate data tracking is no longer optional but it has become a critical requirement for businesses to ensure effective marketing and performance analysis. From understanding customer behaviour to optimizing your ad campaigns, powerful analytics can drive smarter decisions and boost revenue. For PrestaShop users, the best way to streamline tracking and marketing integrations is with Knowband’s Prestashop Google Tag Manager.

Whether you’re new to analytics or want to integrate with advanced tracking tools like GA4, the PrestaShop Google Tag Manager Addon makes it easier than ever.

Why Choose the PrestaShop Google Tag Manager Addon?

Integrating GTM to your prestashop store manually can be complex, especially for non-developers. That’s where the PrestaShop Google Tag Manager Addon comes in. 

The Prestashop Google Tag Manager is developed especially for merchants who don’t have coding knowledge or have less technical expertise.

The e-merchants can run the Google Tag Manager just by installing it. Additionally, the PrestaShop Google Tracking Module automatically tracks crucial eCommerce events like purchase events, and page view events, letting you focus on data-driven growth without worrying about script placements or event handling.

Features of the Prestashop No Code Google Tracking Module


Quick and Simple Integration

To begin with, store owners simply need to add their GTM container ID, and the module takes care of the rest. In other words, there’s no need to manually insert any tracking code into your theme files.

Enhanced eCommerce Tracking

Furthermore, the PrestaShop Google Marketing Integration Module fully supports enhanced eCommerce events such as Page View, View Category, View Product Detail, Add to Cart, Remove from Cart, Checkout Begins, Order Confirmation, Apply Discount Code, View Cart, Customer Login, Customer Registration, Add to Wishlist, Remove from Wishlist, Search Product, Capture UTM Parameters, and Scroll Bar Depth.

As a result, all of this event data is sent through GTM to your connected analytics tools, giving you deep insights into the entire customer journey.

GA4 Integration Support

In addition, the module works seamlessly with PrestaShop GA4 Integration. It effectively tracks key actions such as when a product is viewed, added to the cart, or purchased—thus helping you better understand customer behaviour.

UTM Parameter Tracking for Marketing Campaigns

Moreover, the module automatically captures UTM parameters from your marketing campaigns. Consequently, it allows you to track campaign performance across various channels and optimize your marketing strategies with data-driven decisions.

Seamless Multi-Store & Multi-Language Support

Finally, whether you operate multiple stores or use different languages, the module offers full support for multi-store and multi-language environments. This ensures that your tracking and data collection remain accurate and consistent across all setups.

Benefits of the Prestashop Google Tag Manager Module

Faster Setup & Deployment

The PrestaShop Google Tag Manager module is simple to set up and easy to configure. They also need to enter their GTM Container ID and Google Analytics Measurement ID to make sure everything works smoothly.

Accurate Data Collection

With the PrestaShop Google Analytics Integration Module connected through GTM, you get more reliable tracking. Moreover, it helps avoid errors caused by outdated tracking codes or conflicting scripts.

Unified Tag Management

To get started, store owners just need to enter their GTM container ID, and the module handles everything else. This means there’s no need to manually add any tracking code to your theme files.

Works for Multi-Store and Multi-Language

If you’re running multiple stores or languages, the PrestaShop eCommerce Measure Addon ensures everything is tracked accurately across all setups without duplicating efforts.

Use Cases Of Google Tag Manager for PrestaShop

Here’s how store owners commonly use this module:

  • Monitor abandoned carts by sending event data to Google Analytics 4 (GA4) using Google Tag Manage
  • Improve the checkout process by finding out where customers drop off in the funnel.
  • Retarget visitors who viewed products but didn’t buy, using Facebook and Google Ads.
  • Understand product performance with detailed tracking of clicks, views, and other interactions.

Steps to set up the PrestaShop Google Tag Manager Addon?

Step 1: Install the Google Tag Manager addon in your PrestaShop store by uploading the zip file through your admin panel.

Step 2: If you haven’t already, create an account on Google Tag Manager and copy the container ID provided.

Step 3: Go to the addon settings in your PrestaShop dashboard and enter the container ID in the given field.

Step 4: Log in to your GTM account and create the tags, triggers, and variables you want to track.

Step 5: Your tracking setup is ready! You’ll now start receiving data without writing any code

Conclusion

In conclusion, the PrestaShop Google Tag Manager Module is a smart choice for store owners who want accurate tracking without a complex setup. Moreover, the module helps you understand customer behaviour, track key events, and improve your marketing performance.

With support for Google Analytics 4, UTM tracking, and multi-store environments, the Prestashop Google Tracking Module makes data collection simple and reliable. If you want to grow your store with the power of insights, this plugin is worth considering.