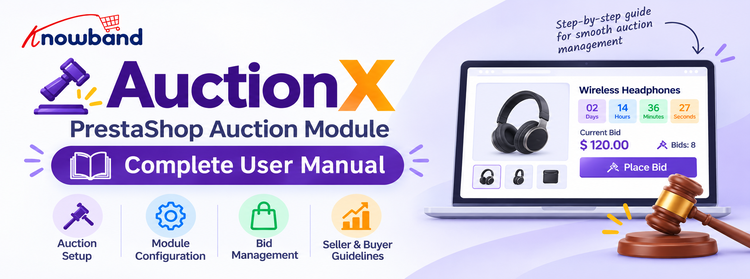
AuctionX – PrestaShop Auction Module Complete User Manual

The Knowband PrestaShop Auction Module (also called AuctionX) allow store owners to run live auctions on products and on individual product variants. This manual walks store admins through installing the PrestaShop auction extension, setting it up, creating auctions, and handling live bidding through to the winner’s order.

1. Introduction to the PrestaShop Auction Module

The PrestaShop Auction Module is a product bidding system for PrestaShop. With it you can run timed auctions, accept customer bids, keep a bid history, and move the winning bid into a normal order.

It includes a back office auction dashboard, a storefront auction listing, live countdown timers, customer bid history, an optional watchlist, winner selection, and auction email notifications.

How the PrestaShop Bidding System Works

  1. The admin creates an auction for a product or a product combination, sets the bidding rules and dates, and publishes it.
  2. Customers open the auction, place bids while it is running, and track results from their account.
  3. When the auction closes, the module picks the winners automatically, or the admin picks them by hand.
  4. A winner places the order at the winning amount before the set deadline.

2. Key Features of the PrestaShop Auction Addon 

These are the main features of the module. Together they let a merchant run controlled online auctions in PrestaShop, manage who takes part, choose winners, and finish the sale.

Product Auctions and Variant Bidding

Create an auction for any active product and, if needed, for one specific combination. The form covers starting price, bid increment, optional maximum bid, reserve price, waiting time between bids, visibility options, scheduling, and closing rules.

Live Bidding on the Product Page

Logged in customers bid straight from the product page. The module checks the minimum amount, bid increment, maximum bid, bidder status, stock, and the minimum time between bids. The live view updates through polling, shows a countdown, and displays the statistics the admin has chosen.

Auction Scheduling and Auto Extension

An auction can stay in Draft or be published to start at a later time. With Auto Extension on, a bid placed within the trigger period pushes the end time back.

Winner Selection and Order Completion

Winner Selection Mode can be Auto or Manual. In Auto mode the module ranks each bidder by their highest bid, leaves out blocked bidders, applies the reserve price, and settles ties in favor of whoever reached the amount first. In Manual mode the admin chooses winners from Live View once bidding has ended. Each winner gets an order deadline and a private order link under My Bids. 

Watchlists and Auction Announcements

With the watchlist turned on, customers can save auctions to My Watchlist. Watchers can be emailed when other users bid and when an auction starts, as long as the matching email template is enabled.

Dashboard and Email Notifications

The dashboard has configurable KPI widgets, charts, and tables of recent activity. The Email Templates page holds subjects and bodies in several languages for bid confirmations, winning bids, auction announcements, order events, bidder blocks, cancellations, and other events.

3. Installing the PrestaShop Auction Module

Install and activate the module in the PrestaShop back office before you create any auction. Follow these steps in order.

  1. Sign in to the PrestaShop Admin Panel.
  2. Go to Modules > Module Manager.
  3. Choose the upload option and upload the Knowband PrestaShop Auction Module archive.
  4. Install the module and wait for PrestaShop to finish.
  5. Go to Sell > Knowband PrestaShop Auction Module. During installation the module creates its database tables, default settings, email templates, CRON token, hooks, and back office tabs.
  6. Open General Settings, enable the module, and set the storefront options.
  7. Set up the CRON job shown on the General Settings page if you want scheduled status changes, automatic winner processing, and deadline processing to run without anyone visiting a page.

Uninstalling the module only removes its back office menu entries. Auction data, bids, winners, watchlists, email templates, logs, dashboard layouts, and settings stay in place, and they are still there if you reinstall.

4. Opening the Module in the Back Office

After installation, every auction function is under Sell > Knowband PrestaShop Auction Module. The pages are:

  • Dashboard
  • General Settings
  • Customization Settings
  • Email Templates
  • Auctions
  • Winners List
  • Other Modules

General Settings, Customization Settings, and Email Templates are also reachable from the in page Settings menu.

5. Admin Panel Overview

The admin area is split into separate sections, so settings, auction work, notifications, reports, and winner records can each be handled on their own.

Dashboard

Shows auction KPIs, charts, and recent activity for the current shop, so you can check how things are going without opening each auction. Widgets can be turned on or off, reordered, and resized.

General Settings

Turns the bidding system on or off and decides where auction summaries show on the storefront. It also holds the CRON URL and an example server crontab entry.

Customization Settings

Sets the colors used for auction boxes, buttons, progress bars, watchlist controls, body areas, and status badges.

Email Templates

Lists the fixed notification templates with their codes and status. Every template has one translation row for each installed language, with an editor for the subject and a rich text body. These emails keep admins, bidders, watchers, and winners informed during the auction.

Auctions

The place to view the auction list, apply filters, add or edit auctions, open Live View, block bidders, select winners, and run lifecycle actions.

Winners List

A read only history of closed auctions with winner and order details. Auctions that closed without a winner are included.

Other Modules

A catalog of other Knowband extensions. It has no auction settings.

6. PrestaShop Auction Module Configuration

This section covers each configurable area. Check these values before you publish an auction, because they affect bidding rules, what shows on the storefront, notifications, and winner processing.

General Settings

Enable Module. The main switch for the module. Leave it on No while you are still preparing things if you do not want customers to see auctions. Choose Yes to turn on storefront and bidding behavior. Options: Yes or No. Default: No.

Enable Watchlist. Allows logged in customers save auctions and come back to them. Turn this on after enabling the module. Options: Yes or No. Default: No. Customers must be logged in.

Show Recent Auctions on Home Page. Adds a block of recent auctions to the home page for extra exposure. Options: Yes or No. Default: No.

Number of Recent Auctions. Sets how many auctions the home page block lists. Enter a whole number from 1 to 20. It applies only when Show Recent Auctions on Home Page is Yes. Default: 5.

Display auction info on Category page. Adds auction status to product cards on category pages, so shoppers can spot products that are in an auction now or soon. Options: Yes or No. Default: No. The badge appears on category pages only, not on every page that reuses a product list template.

CRON URL. The server calls this URL to run scheduled auction tasks, which matters for auctions that must move forward without page visits. The page shows a generated URL and a crontab line that runs every minute and sends a silent curl request to that URL. Use Copy to copy either one. Regenerate CRON token makes the old URL invalid, so update your server crontab right after using it. The URL contains a secret token, so keep it private.

Customization Settings

These settings allows you match the auction look to your store theme. Every field is a color input, is required, and must be a six digit hex code such as #ffffff.

Setting What it controls Default
Header Background Color Auction header background #2456e7
Header Text Color Text in the auction header #ffffff
Button Color Auction action buttons #2456e7
Button Text Color Text on auction buttons #ffffff
Progress Bar Color Bidding progress bar #2456e7
Add to Watchlist Color Watchlist control #2456e7
Box Body Background Color Auction box body #ffffff
Box Text Color Text in the auction box #1f2430
Live / In Progress Badge Color Live status badge #dc2626
Upcoming Badge Color Upcoming status badge #4f46e5
Ended / Expired Badge Color Ended and expired badges #64748b

Click Save to apply the colors. Blank or wrongly formatted values are rejected.

Managing Auctions

The Auctions section is where you create, set up, publish, watch, and manage each auction from start to finish.

Auction List

The list allow you search, filter, and inspect auctions and run actions on them. Its columns are ID, Reference Number, Auction Title, Product, Status, Starting Price, Start Date, and End Date.

The Status filter offers Draft, Scheduled, Ongoing, Inactive, Completed, Winner Selected, Order Pending, Order Placed, Winner Expired, Reassigned, and Cancelled.

Available actions are Add New Auction, View, Edit, Publish, Duplicate, Pause, Resume, Force Cancel, Delete, and Bulk Delete, depending on the auction’s current status. Ongoing auctions cannot be deleted. Bulk Delete skips ongoing rows and tells you which IDs it skipped.

Basic Information

This part names the auction, links it to a product, sets its starting state, and defines the schedule and storefront behavior.

  • Auction Title. Required, up to 30 characters, and unique across the whole store setup.
  • Reference Number. Required, up to 64 characters, and unique. Use letters, numbers, hyphens, and underscores.
  • Select Product. Pick an active product. You may also pick a combination for variant bidding.
  • Auction Status. Draft or Publish. Publishing gives Scheduled status if the start time is ahead, and Ongoing status if the start time has already come.
  • Hide Product Price. Hides the normal product price while the auction box is shown.
  • Hide Add to Cart Button. Hides the normal Add to Cart button for the auction product.
  • Continue Selling. Decides whether normal selling can go on while the auction is set up.
  • Starting Date/Time and End Date/Time. Enter these in the form’s Asia/Kolkata timezone. The start cannot be in the past. The end must come after the start and, when editing, must be in the future.

Bidding Configuration

These are the money and participation rules that decide which bids are accepted and what bidders can see.

  • Starting Price. Required and above zero. The first bid must reach this amount.
  • Bid Increment. Required and above zero. Each later bid must be at least the current highest bid plus this amount.
  • Maximum Bid. Optional. Must be above the Starting Price. Once it is reached, no more bids are accepted.
  • Minimum Time Between Bids (minutes). Optional whole number. Sets a waiting period between bids from the same customer.
  • Reserve Price. Optional and hidden from bidders. It must be at least the Starting Price and no more than the Maximum Bid. Automatic winner selection only works if the reserve price is met.
  • Show Highest Bid. Allow customers see the current highest bid.
  • Show Bid Rank. Allow a bidder see their own rank.
  • Show Total Bids. Shows the total number of bids.
  • Show Bidder Information. Decides whether bidder details are shown.
  • Show Last Bid Time. Shows when the last bid was placed.

All the visibility switches use Yes and No.

Auction Extension

Auction Extension guards the final stretch of an auction by letting late bids move the end time.

  • Enable Auto Extension. Turns on extension when a bid comes in inside the trigger window.
  • Extension Trigger (minutes). Required and above zero when auto extension is on. This is the window before the scheduled end in which a bid causes an extension.
  • Extension Duration (minutes). Required and above zero when auto extension is on. This is how much time gets added when the trigger is met.

Winner Configuration

This part sets how winners are chosen and how long they have to buy.

  • Winner Selection Mode. Auto ranks bids and creates winners by itself. Manual lets you pick winners from Live View once bidding ends.
  • Number of Winners. Default 1. Must be at least 1 and cannot be more than the available stock. It is hidden or ignored in Manual mode.
  • Winner Order Deadline. Enter a number (default 48) and choose Hours or Days. Winners must order before this deadline.

Dashboard

The Dashboard gives a quick view of auction activity and results through KPIs, charts, and recent activity tables.

Use the period selector to choose Last 7 days, Last 30 days, Last 3 months, Last 6 months, or Last 12 months. Save Layout and Reset Layout are available.

KPI widgets: Total Auctions, Upcoming Auctions, Ongoing Auctions, Completed Auctions, Order Pending Auctions, Orders Placed, Total Bids, and Unique Bidders.

Charts: Auction Status, Auction Statistics, Bid Statistics, and Conversion Statistics.

Tables: Recent Auctions, Recent Bids, Recent Orders, Top Products, and Top Bidders.

Drag widgets to reorder them, switch them on or off in the Widget Library, and set their column span from 1 to 12. KPI values show the current state of the shop. The period selector affects the period based charts and the Top Bidders data.

Email Templates

Email Templates controls which messages go out at key points in an auction. Enable the ones you need and edit the text for each installed language.

The first grid shows ID, Title, Code, and Status, with a Manage Translations option. Status is Disabled or Enabled. All templates start out disabled, so turn on each notification your store should send.

The translation grid shows Language, Subject, Enabled or Disabled status, and Edit. The editor has a Subject, a rich text Body, a placeholder legend, and Save. The subject is required and limited to 255 characters. The body is required.

Built in notifications:

  • Email to Admin on Bid Place
  • Email to Customers on Bid Place by Other Users
  • Email to Watchers on Bid Place by Other Users
  • Email to Watchers on Auction Start
  • Email to Customer on Winning and Place Order
  • Email to Other Customers Who Placed a Bid but Did Not Win
  • Email to Admin on Order Place
  • Email to Admin on Auction Close or No Bid
  • Email to Admin on Auction Close and Winner Selected
  • Cancelled Auction: Notify Users Who Placed a Bid
  • Email to Users on Block/Unblock Bidding on Any Auction
  • Email to Admin on Maximum Bid Reached

Use only the placeholders listed in the editor’s legend. If a translation is missing, the shop default language is used. Each email attempt is saved in the email log. If an email fails, the bid, order, or auction step still goes through.

Winners List

The Winners List is a read only record of closed auctions with their winners and order details. Columns: Auction ID, Reference Number, Product, End Date, Actual End Date, Winner, Winning Bid, Order Status, Order Deadline, and Order Reference. Order Status can be Pending, Placed, Expired, or Reassigned.

An auction with no winner appears with empty winner fields and a no winner label. Use View Auction to open the related auction.

7. Field Types and Options

This summary shows what kind of input each part of the module uses.

  • General Settings: Yes/No switches and one number field.
  • Customization Settings: color inputs.
  • Auction form: text fields, a product and combination picker, status choice, date and time inputs, numeric price and duration fields, and Yes/No switches.
  • Winner Configuration: Auto/Manual choice, numeric winner count, numeric deadline, and an Hours/Days choice.
  • Lists: searchable, filterable tables with status, date, product, and reference filters where offered.
  • Dashboard: draggable widgets, an enable/disable library, a period selector, and column span controls.
  • Email Templates: status toggle, language table, text subject, rich text body, and a Save button.

8. Admin Actions

Admin actions either change an auction’s state or help you manage customers and winners. Which actions you see depends on the auction’s status.

  • Save stores settings, colors, dashboard layouts, or email translations, depending on the page.
  • Publish moves a Draft to Scheduled or Ongoing.
  • Pause moves a Scheduled or Ongoing auction to Inactive. Resume brings an Inactive auction back.
  • Force Cancel cancels an Ongoing auction.
  • Duplicate makes a copy of an auction.
  • Delete removes an eligible auction. Ongoing auctions are protected.
  • Bulk Delete deletes the eligible selected rows and skips Ongoing ones.

In Live View you can Refresh, Block or Unblock a bidder, Pause, Resume, Cancel Auction, Edit Auction, and select manual winners where it applies. In Manual mode, the order in which you select bidders sets their winner rank.

9. Storefront Behavior: What Customers See

This section describes the customer side of the PrestaShop bidding system: bidding, auction listings, account pages, and limits on winning orders.

Product Page Auction Box

The product page can show an auction box for auctions that are scheduled, ongoing, won, lost, no bid, no winner, ended pending, or inactive. For an ongoing auction, depending on your settings, the box can show the countdown, the current or next minimum bid, a progress bar, the bidder count, rank, total bids, last bid time, a bid field, the Place Bid button, a watchlist control, a blocked bidder message, and a maximum bid message.

Bidding Rules for Customers

Customers must be logged in to bid, and guests see a login prompt. A customer cannot right away outbid their own bid, and blocked bidders cannot bid. Stock levels and PrestaShop out of stock rules also affect whether a bid is accepted. The page polls every 10 seconds by default to refresh status, timing, minimum bid, statistics, winner state, and extension notices.

Auction List Page

The public Auction List has tabs for All, Upcoming, In Progress, and Expired. The Expired tab is optional. Ended cards are greyed out and do not link to the product. The home page block and category badges follow their General Settings switches.

Customer Account: My Bids and My Watchlist

The customer account has an Auction entry that opens My Bids. My Bids shows bid history, best bid, result, ranking where allowed, and a Place Your Order or View Order action. When the watchlist is on, My Watchlist lists scheduled and ongoing auctions, and Include past/cancelled shows older watched ones.

Quantity Limit for Winning Orders

Products bought at a winning price are limited to a quantity of 1 in the cart and at checkout. If the module corrects a higher quantity, it shows a notice explaining why.

10. Multi-language, Multi-store, and Currency Behavior

Auction, bid, watchlist, winner, and dashboard data belong to a shop. In single shop context, admin lists show only the current shop. In the All Shops context, nothing is restricted. Auction reference numbers and titles must be unique across all shops.

Email subjects and bodies are stored per language. Languages that exist at install time are seeded, and a missing translation falls back to the shop default language. A language added after installation may not get translation rows automatically.

Auction amounts are stored and compared in the shop default currency. Storefront values are converted to the customer’s chosen currency, while admin notification emails use the shop default currency. The auction form and admin dates use Asia/Kolkata time, and stored dates use UTC.

11. CRON Job and Automated Tasks

The CRON job handles time based work, so scheduled starts, closings, winner selection, and expired winner deadlines are processed even when nobody visits the store or admin pages.

Call the CRON web URL every minute with the token shown on the page. Each run can:

  1. Move due Scheduled auctions to Ongoing and notify watchers.
  2. Close expired Ongoing auctions.
  3. Select winners for Auto auctions.
  4. Process expired winner deadlines and reassign or expire winner slots.

Each run handles at most 200 records. Product views, bids, polls, and the Auctions list also do some limited just in time expiry processing, but CRON is needed for auctions that get no page visits.

12. External Services and API Settings

The module needs no external API connection. The CRON URL is an HTTP endpoint on your own PrestaShop installation, not an outside service. There are no external credentials to enter. Keep the token private, and regenerate it if it may have been exposed.

13. Troubleshooting the PrestaShop Auction Module

If an auction, bid, email, or winner order is not working as expected, check the causes and fixes below. If the problem remains, contact Knowband support.

The auction does not show on the storefront

Possible cause: The module is disabled in PrestaShop, Enable Module is No, or the auction is in Draft, is inactive, or belongs to a different shop or product combination. Fix: Enable the module in PrestaShop and in General Settings, check the auction status and dates, and confirm the selected product or combination.

Customers cannot use the watchlist

Possible cause: Enable Watchlist is No, or the customer is not logged in. Fix: Turn on the setting and test while logged in.

Scheduled auctions or winners are out of date

Possible cause: The CRON URL is not being called, the token was regenerated but the server job was not updated, or the module is disabled. Fix: Copy the current URL from General Settings, update the server crontab, run it every minute, and make sure Enable Module is Yes.

Email notifications are not sent

Possible cause: The template or the language translation is disabled or incomplete. Fix: Enable the template, edit the translation, make sure the Subject and Body are filled in, and look at the email log and PrestaShop logs. Email failures do not block bidding or order processing.

A bid is rejected

Possible cause: The bid is under the starting price or required increment, the maximum bid was reached, the bidder is blocked, the waiting period has not passed, stock rules reject it, or the auction is no longer ongoing. Fix: Review the auction’s bidding settings and status. The customer must be logged in and cannot immediately outbid their own bid.

A winning customer cannot place the order

Possible cause: The winner token or deadline is invalid, the product or combination does not match, the paid amount is different from the winning amount, or the cart quantity is not exactly 1. Fix: Have the customer open My Bids, use the active Place Your Order link before the deadline, pick the right product or combination, and keep the quantity at 1.

Category auction badges are missing or look wrong

Possible cause: The category display switch is off, the auction is not live or upcoming, or a heavily customized theme changes the product card selectors. Fix: Enable Display auction info on Category page, check the auction status, and review the theme’s product list markup if the styling is off.

14. Best Practices for Running PrestaShop Auctions

These tips help you avoid setup mistakes, keep automated tasks running, and give customers a steady auction experience.

  • Keep Enable Module off while you prepare auctions, then test one full auction before opening more.
  • Use unique, clear Reference Numbers and short Auction Titles.
  • Double check start and end times in the Asia/Kolkata admin timezone.
  • Pick a Bid Increment that suits the product’s value, and review Maximum Bid and Reserve Price together.
  • Turn on only the statistics and bidder details you want customers to see.
  • Set up CRON before publishing scheduled auctions.
  • Enable and review each email template in every language your store uses.
  • Treat the CRON URL as a secret and regenerate it if it leaks.
  • Test a winning order with the right product, combination, winning amount, and a quantity of 1.
  • Use Live View to watch for odd bidding, block bidders when needed, and keep a record of manual winner choices.
  • Update the module to the latest Knowband release for security and compatibility.

15. Conclusion

The Knowband PrestaShop Auction Module is a full bidding extension for scheduled product auctions, live bidding, customer bid history, watchlists, winner selection, and winner order handling. General Settings controls activation and storefront placement, Auctions defines each product auction, Customization Settings controls the look, Email Templates controls notifications, and the Dashboard and Winners List help with daily auction management.


 

How to Create an SEO-Friendly Blog in PrestaShop: A Practical Guide to Content, SEO & AI Search

A blog should do more than bring visitors to your store. Content built around customer questions can move readers from search discovery toward relevant products.

A PrestaShop Blog Module provides the infrastructure for that process inside the store. The commercial result depends on how the content is planned and connected.

Build a PrestaShop Blog Module Strategy Around Products

Start with the products or categories you want to grow.

Prioritize products that require comparison or research before purchase. Then list the questions customers ask. A skincare store, for example, could create a guide about choosing products for a specific concern and connect it to suitable products.

This gives each article a commercial context without making it promotional.

For merchants looking to implement this approach directly within their store, a blog module for PrestaShop can provide the publishing environment needed to connect content with the catalogue.

Match Every Article to a Real Search Intent

Match the article to the customer’s intent: informational, comparison-based, or purchase-focused.

Use a simple map:

  • Problem: What challenge is the customer looking to address?
  • Search: What might they type into Google?
  • Content: What answer would genuinely help?
  • Product: Which products solve the problem?
  • Next step: Where should the reader go after learning?

PrestaShop’s own SEO guidance recommends broader terms around categories and more specific long-tail expressions around products, supporting a funnel-based approach to ecommerce search.

A blog management workflow can support this process by letting merchants associate products with posts and display linked posts on product pages. The PrestaShop Blog Module by Knowbadn also provides related-product connections and linked blog posts on product pages.

Turn an Article Into a Product Discovery Journey

The article should not end when the reader gets an answer.

For example, a coffee grinder guide can explain grind size, brewing methods, and capacity before presenting relevant grinders.

The journey becomes search query → useful answer → relevant product → product page → purchase consideration.

Keep the product connection relevant. Recommend products because they solve the problem discussed. Answer the main question early, use descriptive headings, and cover the subquestions buyers are likely to have. This guide to AI search provides additional context on how ecommerce content can be structured for AI-driven discovery.

Build Content Clusters Around Commercial Categories

One article rarely answers every question around a category. Build a cluster.

For a home fitness store, a category could support:

  • How to choose resistance bands for beginners
  • Resistance bands vs free weights
  • How to build a home workout routine
  • Common mistakes when using resistance bands
  • Which resistance band strength should you choose?

These topics target different questions around the same category.

This is where a PrestaShop AI Content Addon can reduce production friction. Knowband’s PrestaShop Blog Module assists with post content, excerpts, tags, metadata, ALT text, and translations within the post workflow.

Use AI to accelerate execution, not to decide what customers need. The Module should remain a supporting part of that workflow, not the strategy itself. Review outputs for accuracy, originality, product relevance, and brand voice before publishing.

Make SEO Part of Publishing

A useful article can still underperform if its search presentation and structure are neglected.

Before publishing, check:

  • Does the title match the searcher’s question?
  • Is the URL clear and relevant?
  • Do H2 and H3 headings explain the structure?
  • Are metadata and image ALT text useful?
  • Are relevant articles and product pages internally linked?
  • Sitemap: Is the page included in the sitemap and accessible to search engine crawlers?

A PrestaShop SEO Blog Addon can support this process with controls for blog URLs, metadata, sitemap inclusion, RSS feeds, and content organization. The manual documents URL patterns, meta fields, sitemap controls, RSS settings, and related content options.
Then connect SEO metrics with commercial behaviour. Search impressions and clicks show discovery, while product clicks, cart activity, and conversions reveal commercial impact.

Prepare Content for AI Search Without Writing for Machines

AI-driven search changes how shoppers may discover information, but the underlying principle remains useful content.

Answer the main question early, use descriptive headings, and cover the subquestions buyers are likely to have.

Google continues to emphasize helpful, people-first content, while current ecommerce content strategies increasingly map articles to different stages of the customer journey.

For a PrestaShop Blog Module, the practical goal is simple: make the page easy for people to understand and easy for search systems to interpret.

Use AI to Scale Execution, Not Strategy

Content teams often lose time on repetitive production work. Once the topic, search intent, product relationship, and editorial angle are decided, AI can accelerate execution.

Knowband’s PrestaShop AI Content Addon can assist with post content, excerpts, metadata, tags, image ALT text, and translations through configured AI providers.

Knowband also gives merchants a way to keep that work closer to the store administration. Publishing becomes easier to manage across categories or languages. The merchant still decides which products, questions, and actions matter.

Measure Revenue Paths, Not Just Blog Traffic

Traffic is an early indicator, not the final objective.

Monitor each content cluster for:

  • Organic visits
  • Search impressions and clicks
  • Clicks from articles to products
  • Product-page engagement
  • Add-to-cart activity
  • Assisted conversions
  • Revenue associated with content-assisted journeys

If an article gets traffic but little product engagement, revisit the intent match or internal journey. Repeat topics that consistently introduce shoppers to products.

Knowband’s PrestaShop Blog Manager can fit into this workflow by keeping posts, product relationships, SEO settings, publishing, and content organization within the PrestaShop administration environment.

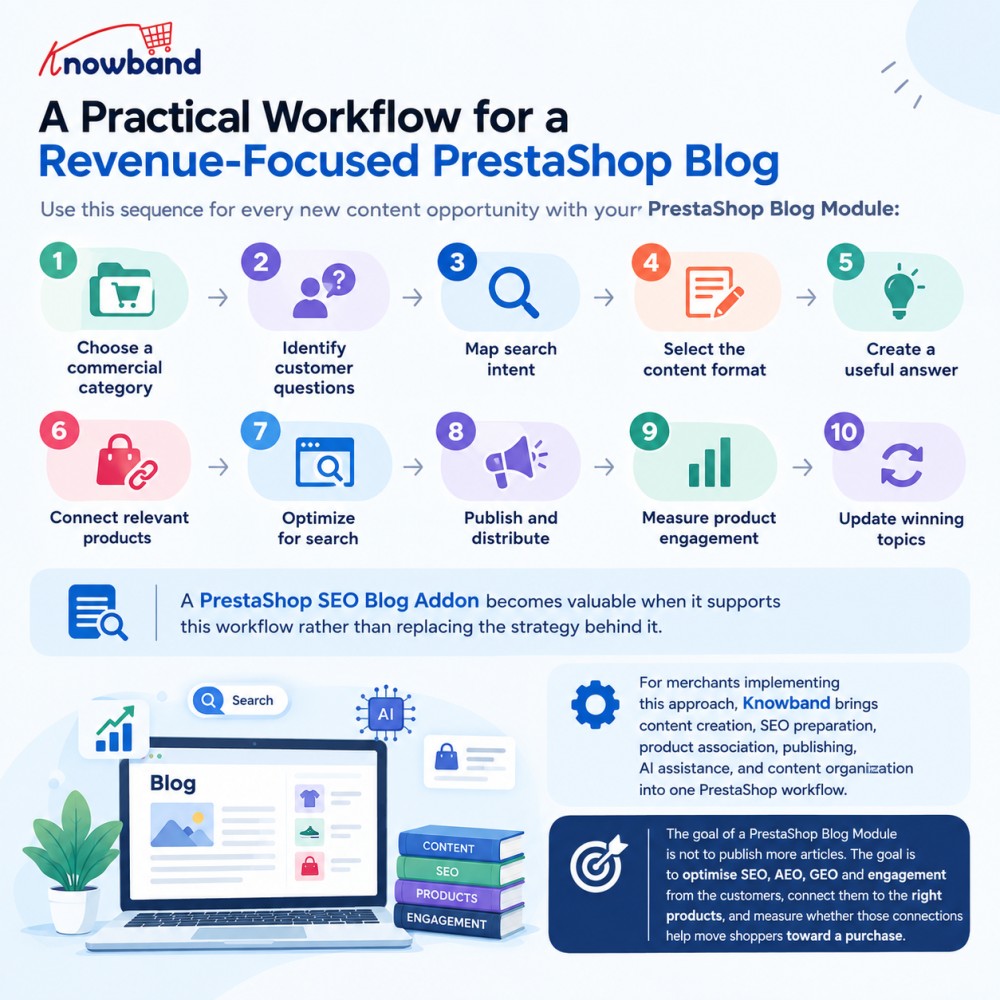
A Practical Workflow for a Revenue-Focused PrestaShop Blog

Use this sequence for every new content opportunity with your PrestaShop Blog Module:

A PrestaShop SEO Blog Addon becomes valuable when it supports this workflow rather than replacing the strategy behind it.

For merchants implementing this approach, Knowband brings content creation, SEO preparation, product association, publishing, AI assistance, and content organization into one PrestaShop workflow.

Explore  PrestaShop Blog Manager also available on Prestashop Addons to see how this content-to-commerce workflow can be implemented in a PrestaShop store.

Explore this tutorial to learn how to add blogs to your PrestaShop website without any coding knowledge.


PrestaShop 9.2 Ask AI vs AI Admin Assistant: Which Is Better for Store Management?

PrestaShop’s new Ask AI, introduced with PrestaShop 9.2, is a promising sign of where the platform is headed a native assistant built right into the back office that lets you query your store in plain language. It’s tied to PrestaShop 9.2 specifically, and it relies on two companion modules, the PrestaShop MCP Server and MCP Tools, being installed and configured alongside it before it can see any of your store’s data.

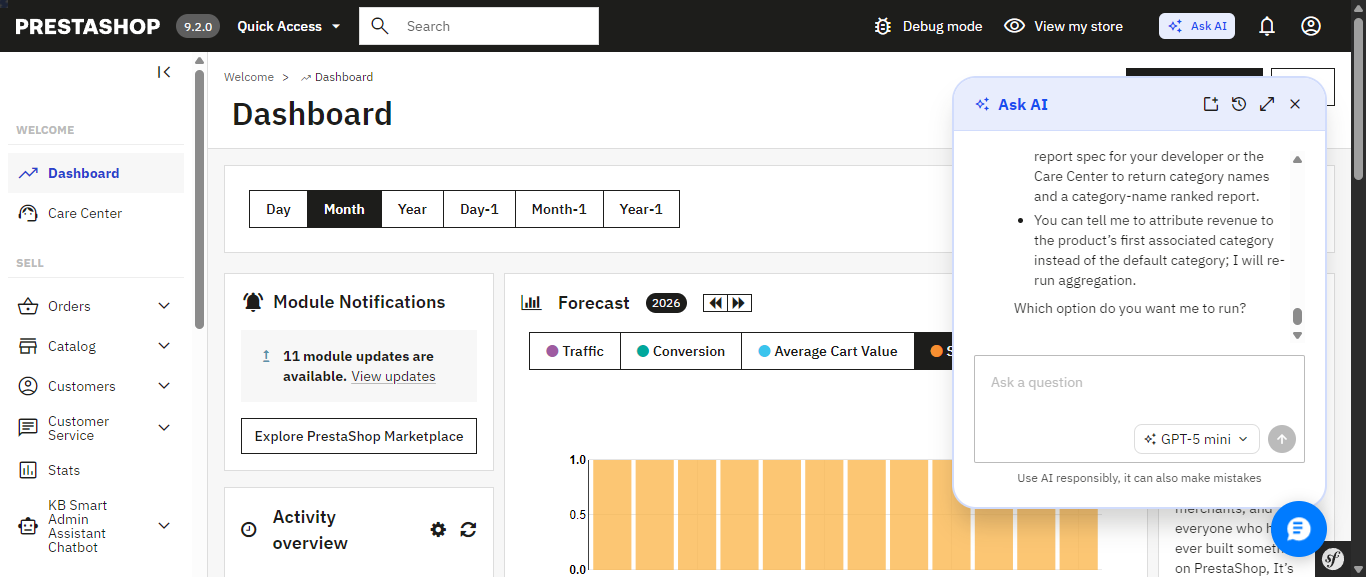
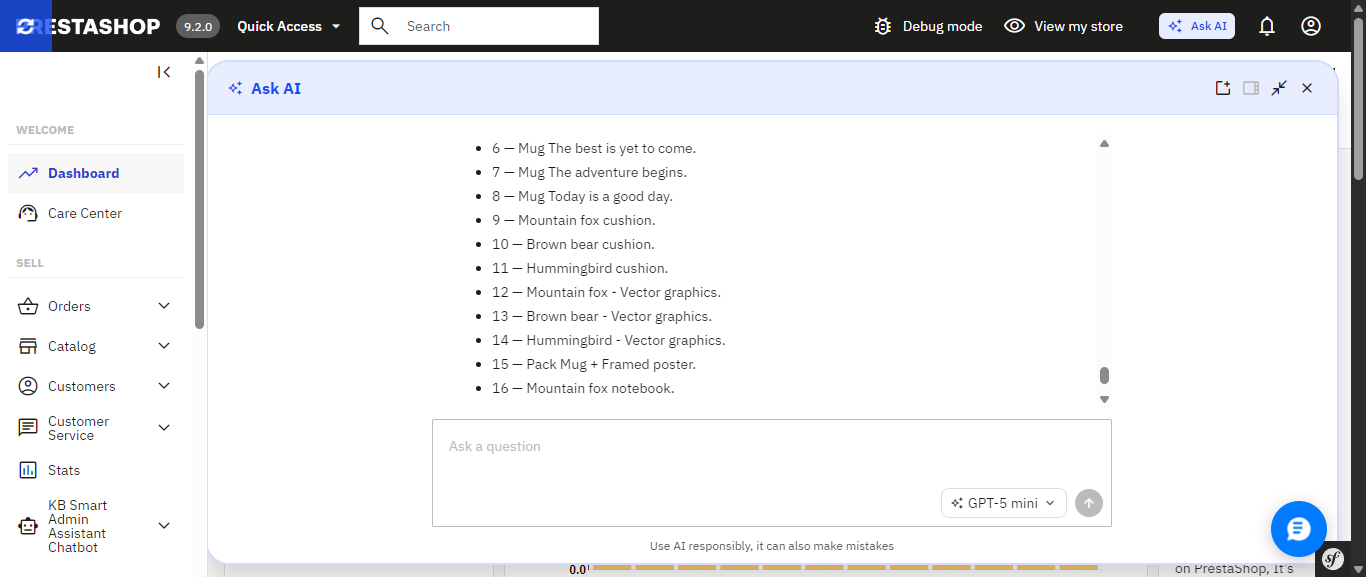
In practice, opening Ask AI drops a chat panel into the corner of whichever admin page you’re on, and it remembers your previous conversation the next time you reopen it. Ask something like “Which products are out of stock right now?” and it doesn’t just answer quietly in the background it shows its work: the specific MCP tool it’s about to call, a “Tool approved” confirmation step, a stated goal, and its reasoning before handing back the answer as a formatted list. That’s a genuinely nice trust signal, though the trade-off is no visible SQL you see the tool call and the goal, not the underlying query.

PrestaShop’s native Ask AI panel, opened from the top admin bar it remembers the previous conversation across sessions.

Ask AI shows its work: the MCP tool it calls, a tool-approval step, and its stated reasoning before answering.

The finished answer, expanded to full width a plain list of out-of-stock products with a follow-up question box ready.

If you’d rather skip that setup, or you’re running an earlier PrestaShop version where Ask AI isn’t an option at all, there’s a module you can install today that already delivers a natural-language AI assistant and builds a good deal more around it, much of which Ask AI simply doesn’t include yet. It’s called Smart AI Admin Assistant.


PrestaShop Ask AI vs Knowband Smart AI Admin Assistant

Feature PrestaShop Ask AI Knowband Smart AI Admin Assistant
PrestaShop version support 9.2 1.7.x to 9.x.x
Setup requirements Requires the separate PrestaShop MCP Server and MCP Tools modules Install the module, add your API key, and start asking questions
How it accesses your data Through the PrestaShop MCP Server using defined tool calls Natural-language-to-SQL against curated, read-only database views
Taking action on your store Can execute actions with explicit confirmation required Read-only; blocks DELETE, DROP, UPDATE, INSERT and TRUNCATE
Query transparency MCP tool calls; SQL is not directly visible ✓ View, edit and re-run the generated SQL
Built-in analytics dashboard Not Available ✓ 44 widgets covering revenue, orders, stock, best sellers and more
Data export Not Available ✓ Excel and CSV exports, including full-dataset exports
Voice input Not Available ✓ Browser-based speech recognition
Quick-access shortcuts Context-aware suggestions on Product, Order and Customer pages ✓ Editable quick-query chips for common questions
Employee access control Not Available ✓ Role-based, per-employee configuration
Audit logging 30-day conversation history per user; no SQL or action-level log ✓ Timestamped query and audit log, including executed SQL

Ask AI’s confirmation-before-action design and its native integration into PrestaShop’s core are real strengths, and worth keeping an eye on. But most of what makes Smart AI Admin Assistant a complete toolkit the dashboard, the exports, the access control, the audit trail, the voice input is territory Ask AI hasn’t entered yet.

The Problem that AI Assistant

Every PrestaShop store owner knows this routine: check yesterday’s revenue, scroll through orders looking for anything stuck, check which products are running low, maybe export something to send to a partner. None of it is hard. All of it is repetitive, and all of it eats into the hours you’d rather spend on the parts of the business that actually need your judgment.

Smart AI Admin Assistant replaces that routine with a conversation. You type or speak a question the way you’d ask a colleague, and you get a precise, live answer straight from your store’s database. No dashboards to navigate. No report builder. No SQL. Just a question and an answer, in seconds.

Ask Anything, Get a Real Answer

And this is what the entire module is based upon: an engine that will help analyze the language in the question regarding orders, customers, products, sales, inventory, and coupons without requiring any technical background whatsoever. There’s no need to fill in forms or make choices from a drop-down menu; all one has to do is:

  • “How many orders were placed today?”
  • “Show me low stock products.”
  • “Which customers spent the most this month?”
  • “What’s my revenue this week compared to last week?”
  • “Which products are missing descriptions or images?”
  • “What are my top 10 best-selling products this quarter?”

Both Ask AI and Smart AI Admin Assistant let you ask this kind of question in plain language that part isn’t unique to either one. The difference shows up in everything built around it, starting with how each one actually reaches your data.

Choose the AI Model That Fits the Question. Ask AI Doesn’t Offer This Level of Control

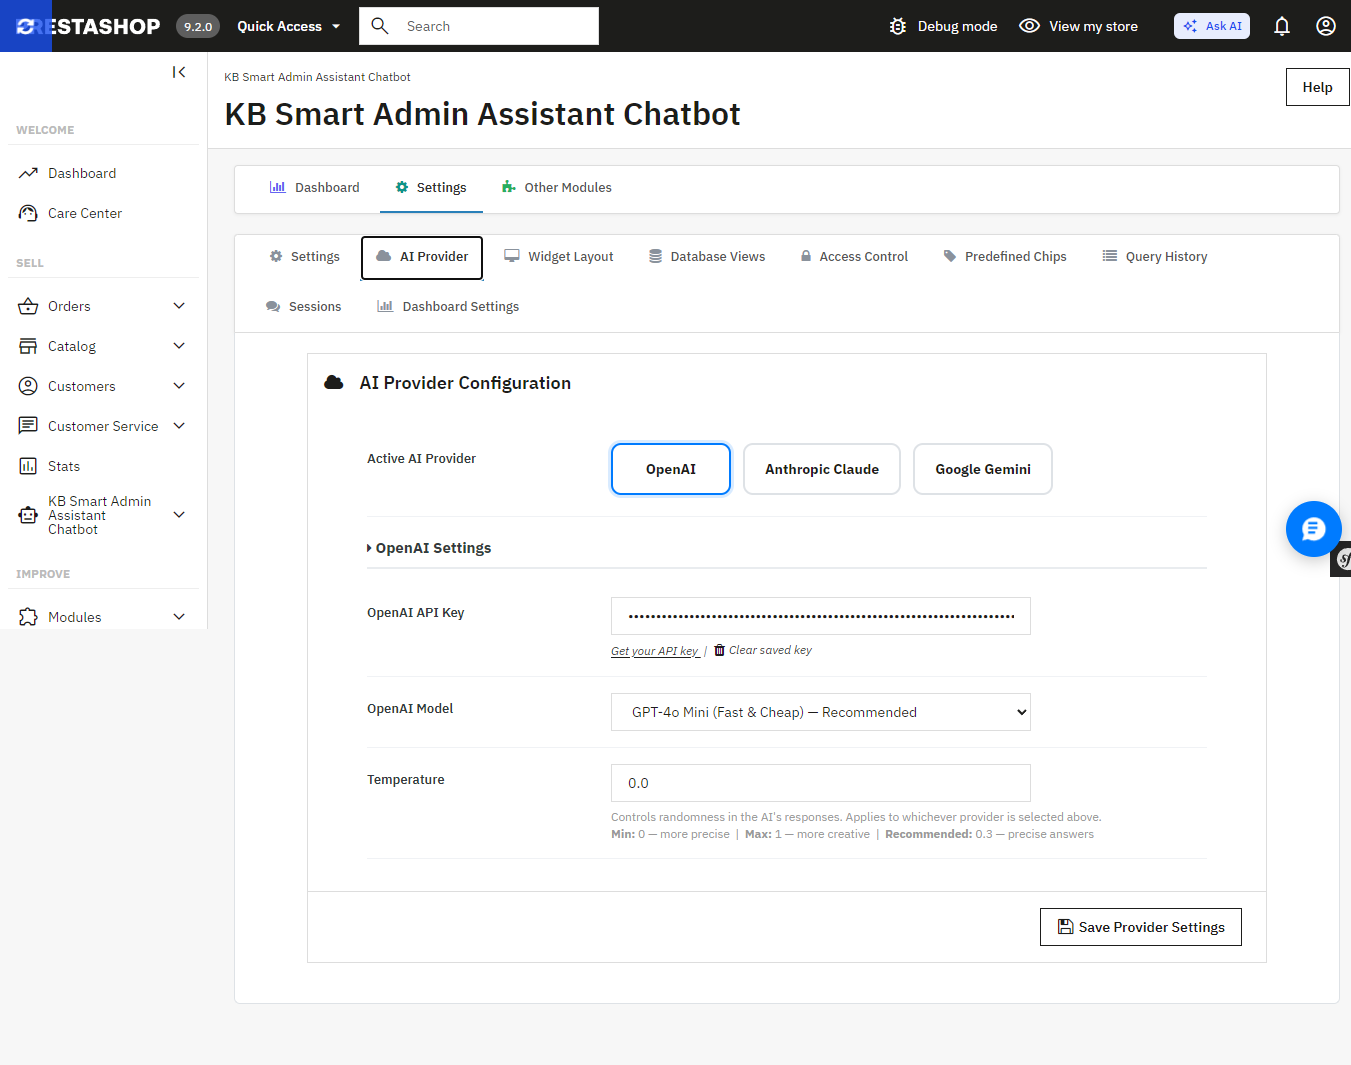
Smart AI Admin Assistant provides a true choice between the providers and the tier models without changing the code, using one settings panel:

  • OpenAI GPT-4o Mini, GPT-4o, or GPT-5.5
  • Anthropic Claude Haiku 4.5, Sonnet 4.6, or Opus 4.7
  • Google Gemini 3.5 Flash or 3.1 Flash-Lite

Want fast, low-cost answers for quick daily checks? Point it at a lighter model. Want the deepest possible breakdown of a slow sales month? Switch to a flagship tier for that one query. Ask AI, by contrast, connects to whichever single provider key you’ve configured it doesn’t offer this kind of tier-by-tier switching from within the assistant itself.


Smart AI Admin Assistant’s AI Provider settings switch between OpenAI, Anthropic Claude, and Google Gemini, and pick a model tier for each.

An Answer, Not Just a Table of Numbers


Every query comes back with more than raw data the assistant generates a plain-language summary alongside it, calling out the trend or number that actually matters. Ask about your inventory and you don’t just get a table; you get told which products are about to become a problem.

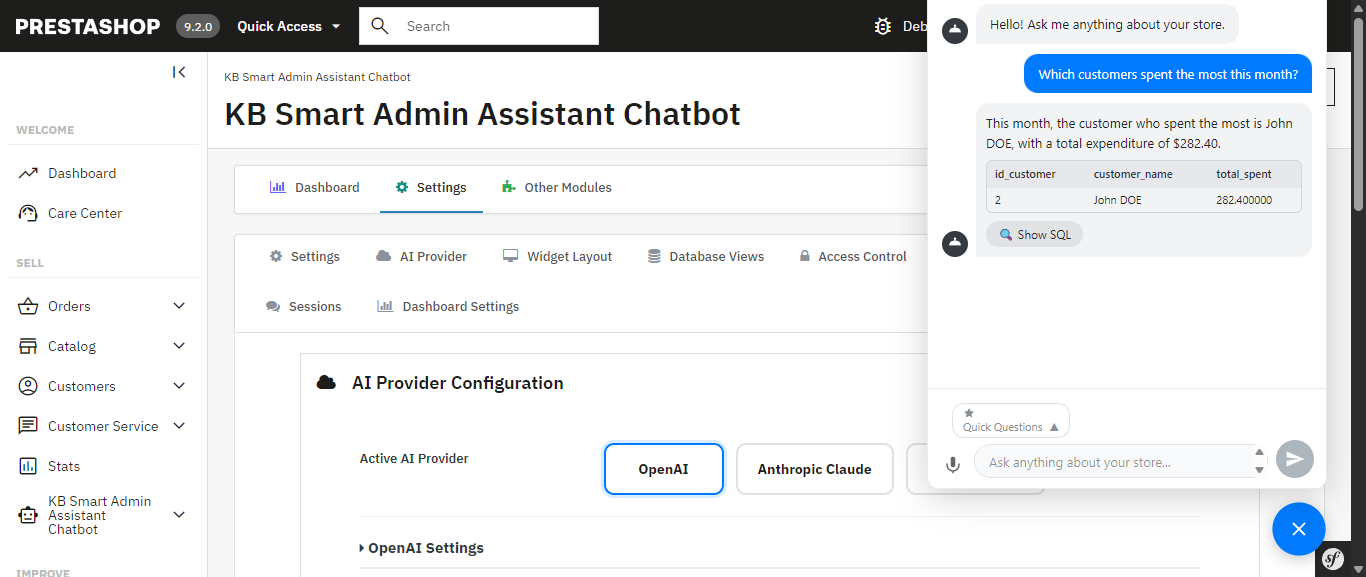
Smart AI Admin Assistant for Prestashop answering “Which customers spent the most this month?” with a plain-language summary and the underlying data.

A Full Analytics Dashboard Comes Built In Something Ask AI Doesn’t Have

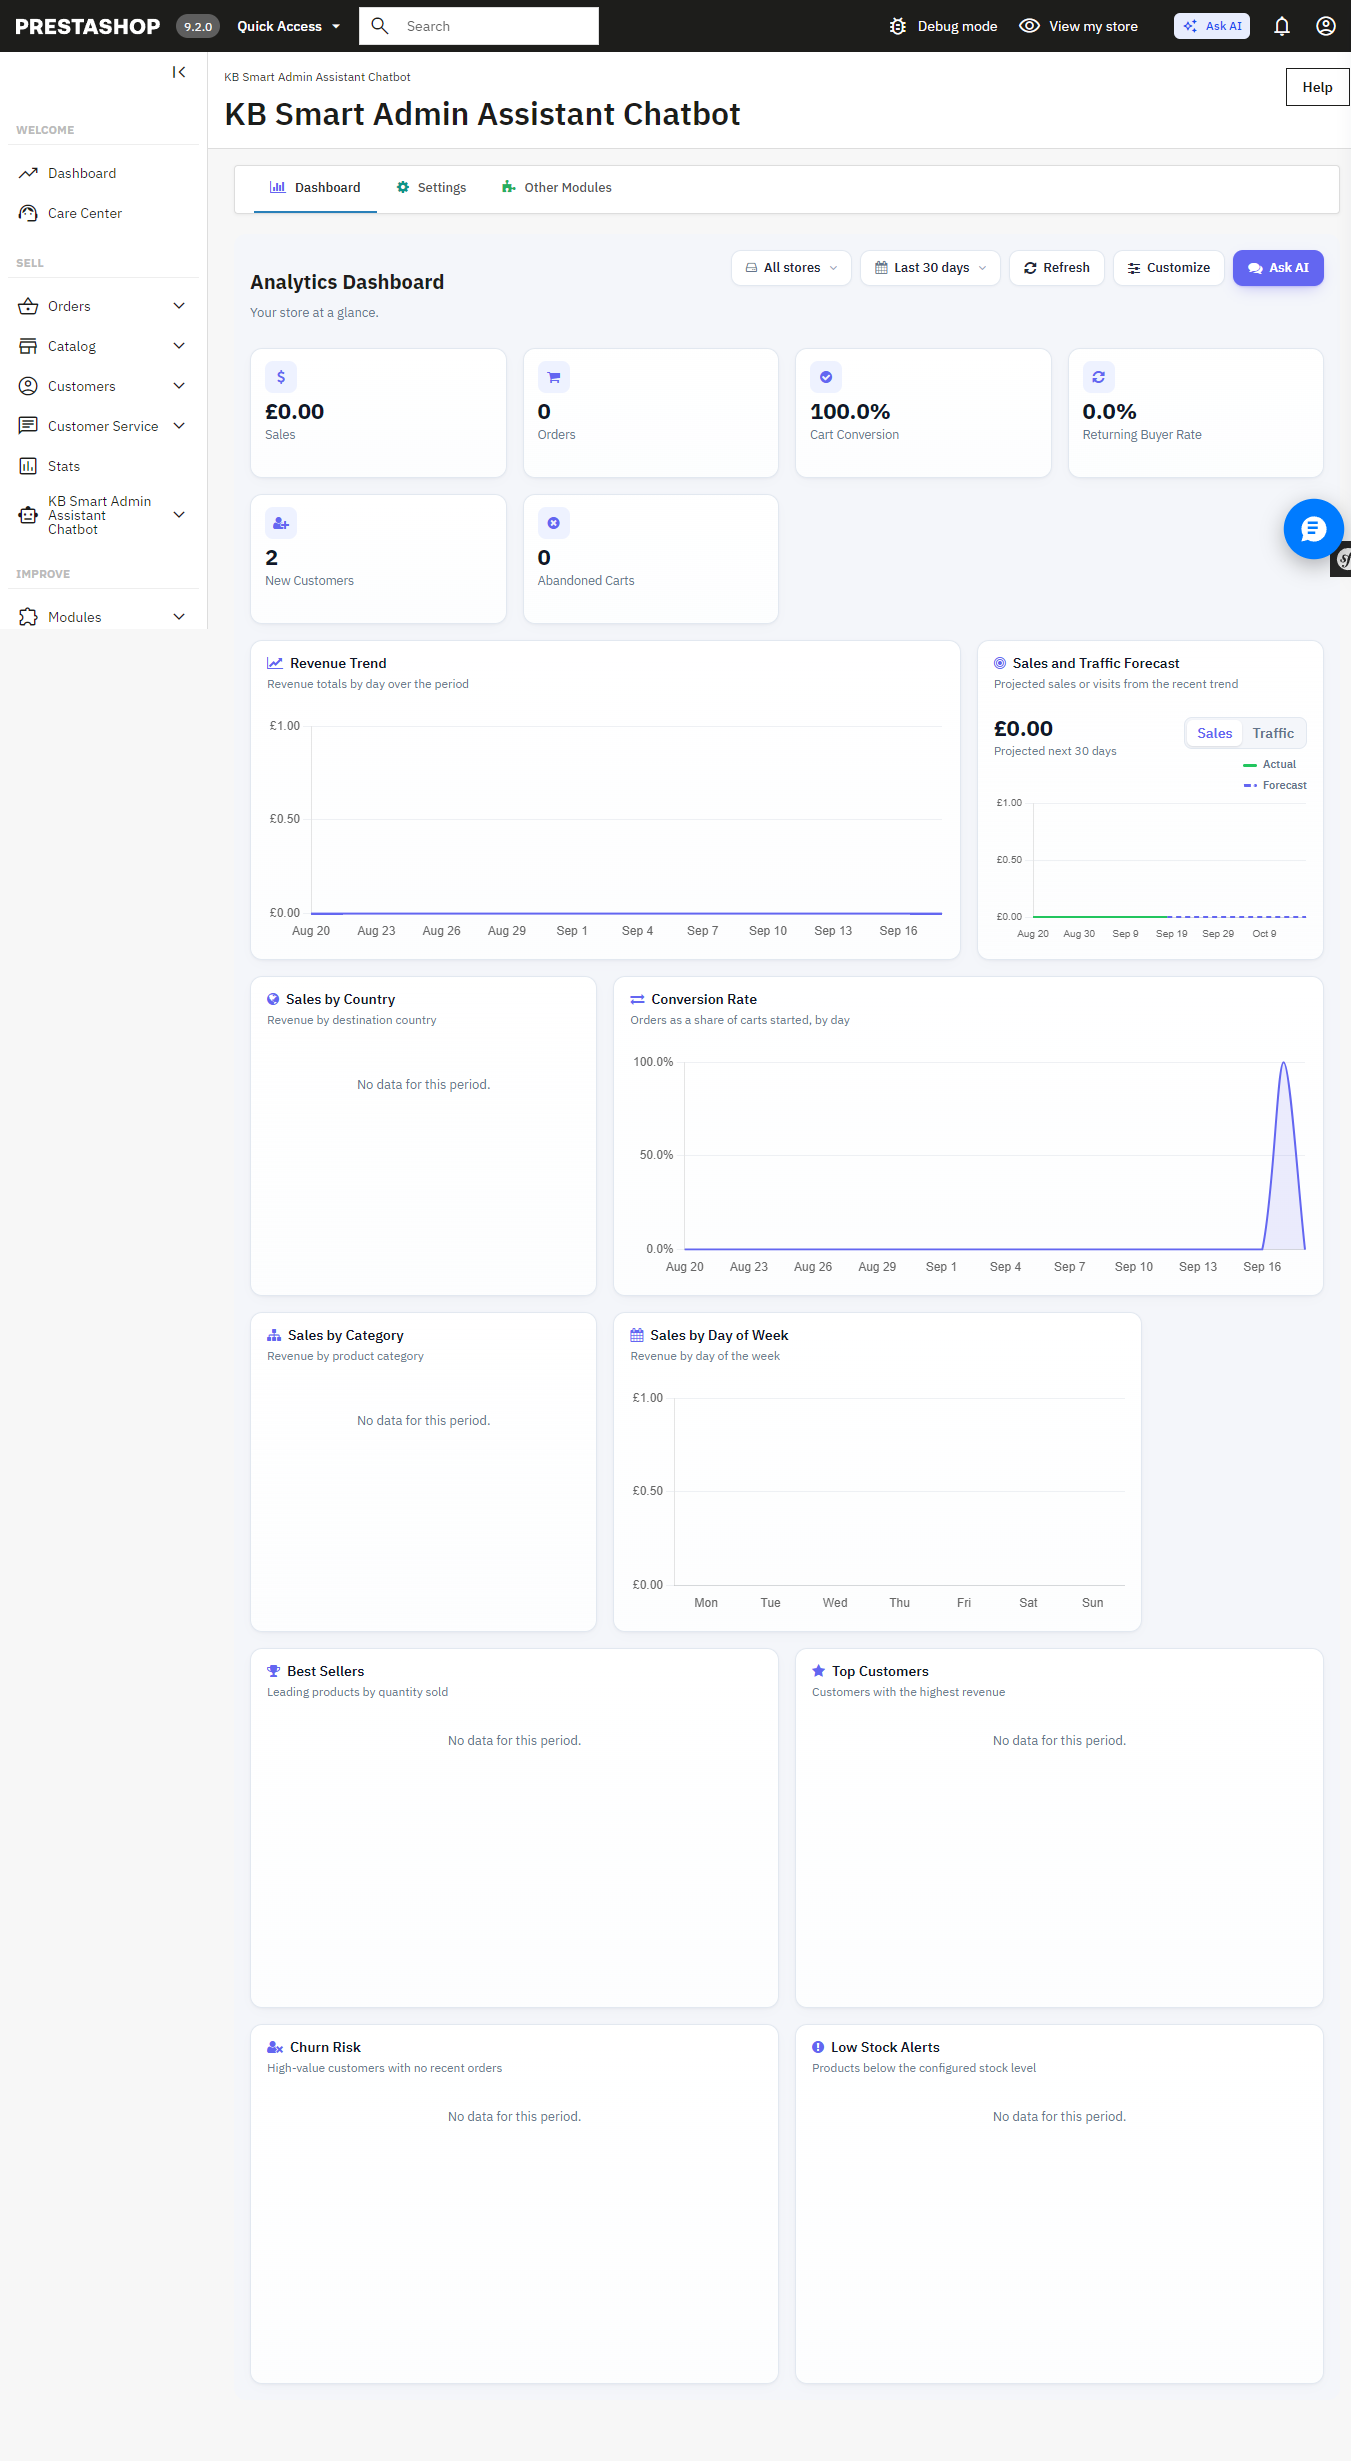
Beneath the chat interface is the full back office analytics dashboard with 34 widgets such as revenue analytics, order quantity, cart conversion rates, customer retention rates, inventory alerts at product level, best sellers, churn rate analytics, sales by countries, categories, payment methods, time slots, etc. Each of these widgets is easily toggleable and reorderable to create your perfect dashboard view. It can also be used as the PrestaShop back office home page.

The built-in Analytics Dashboard revenue, orders, cart conversion, and more, all on one page.

Answers You Can Export, Share, and Verify Not Available in Ask AI

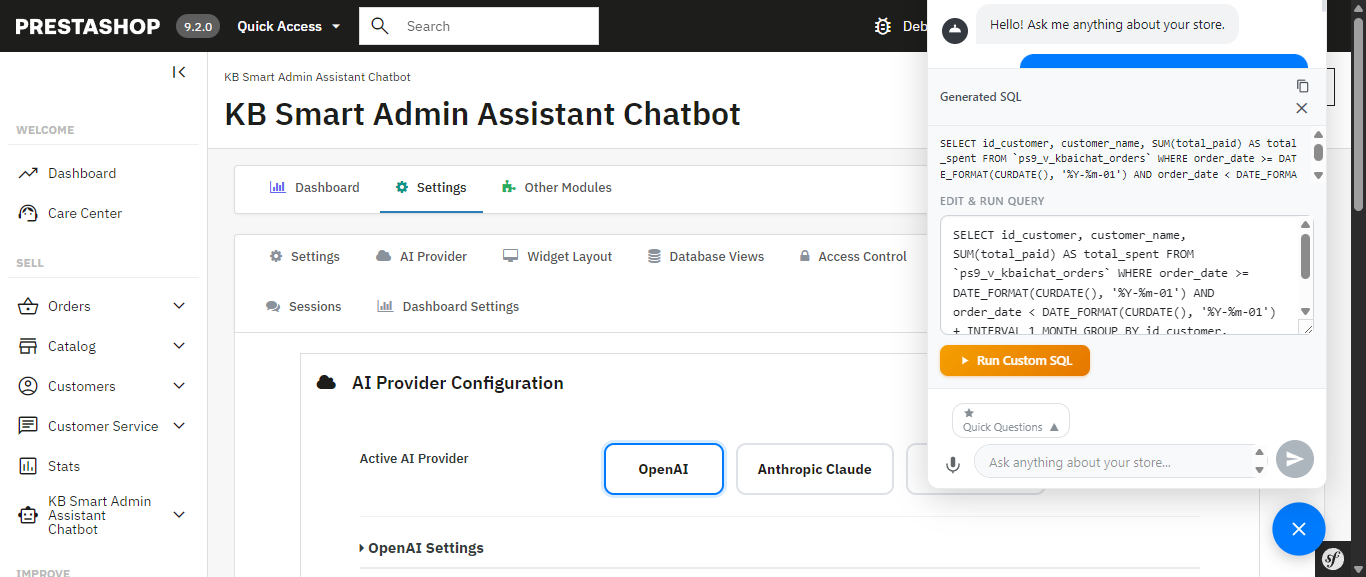
The exact generated SQL is visible, editable, and re-runnable nothing is a black box.
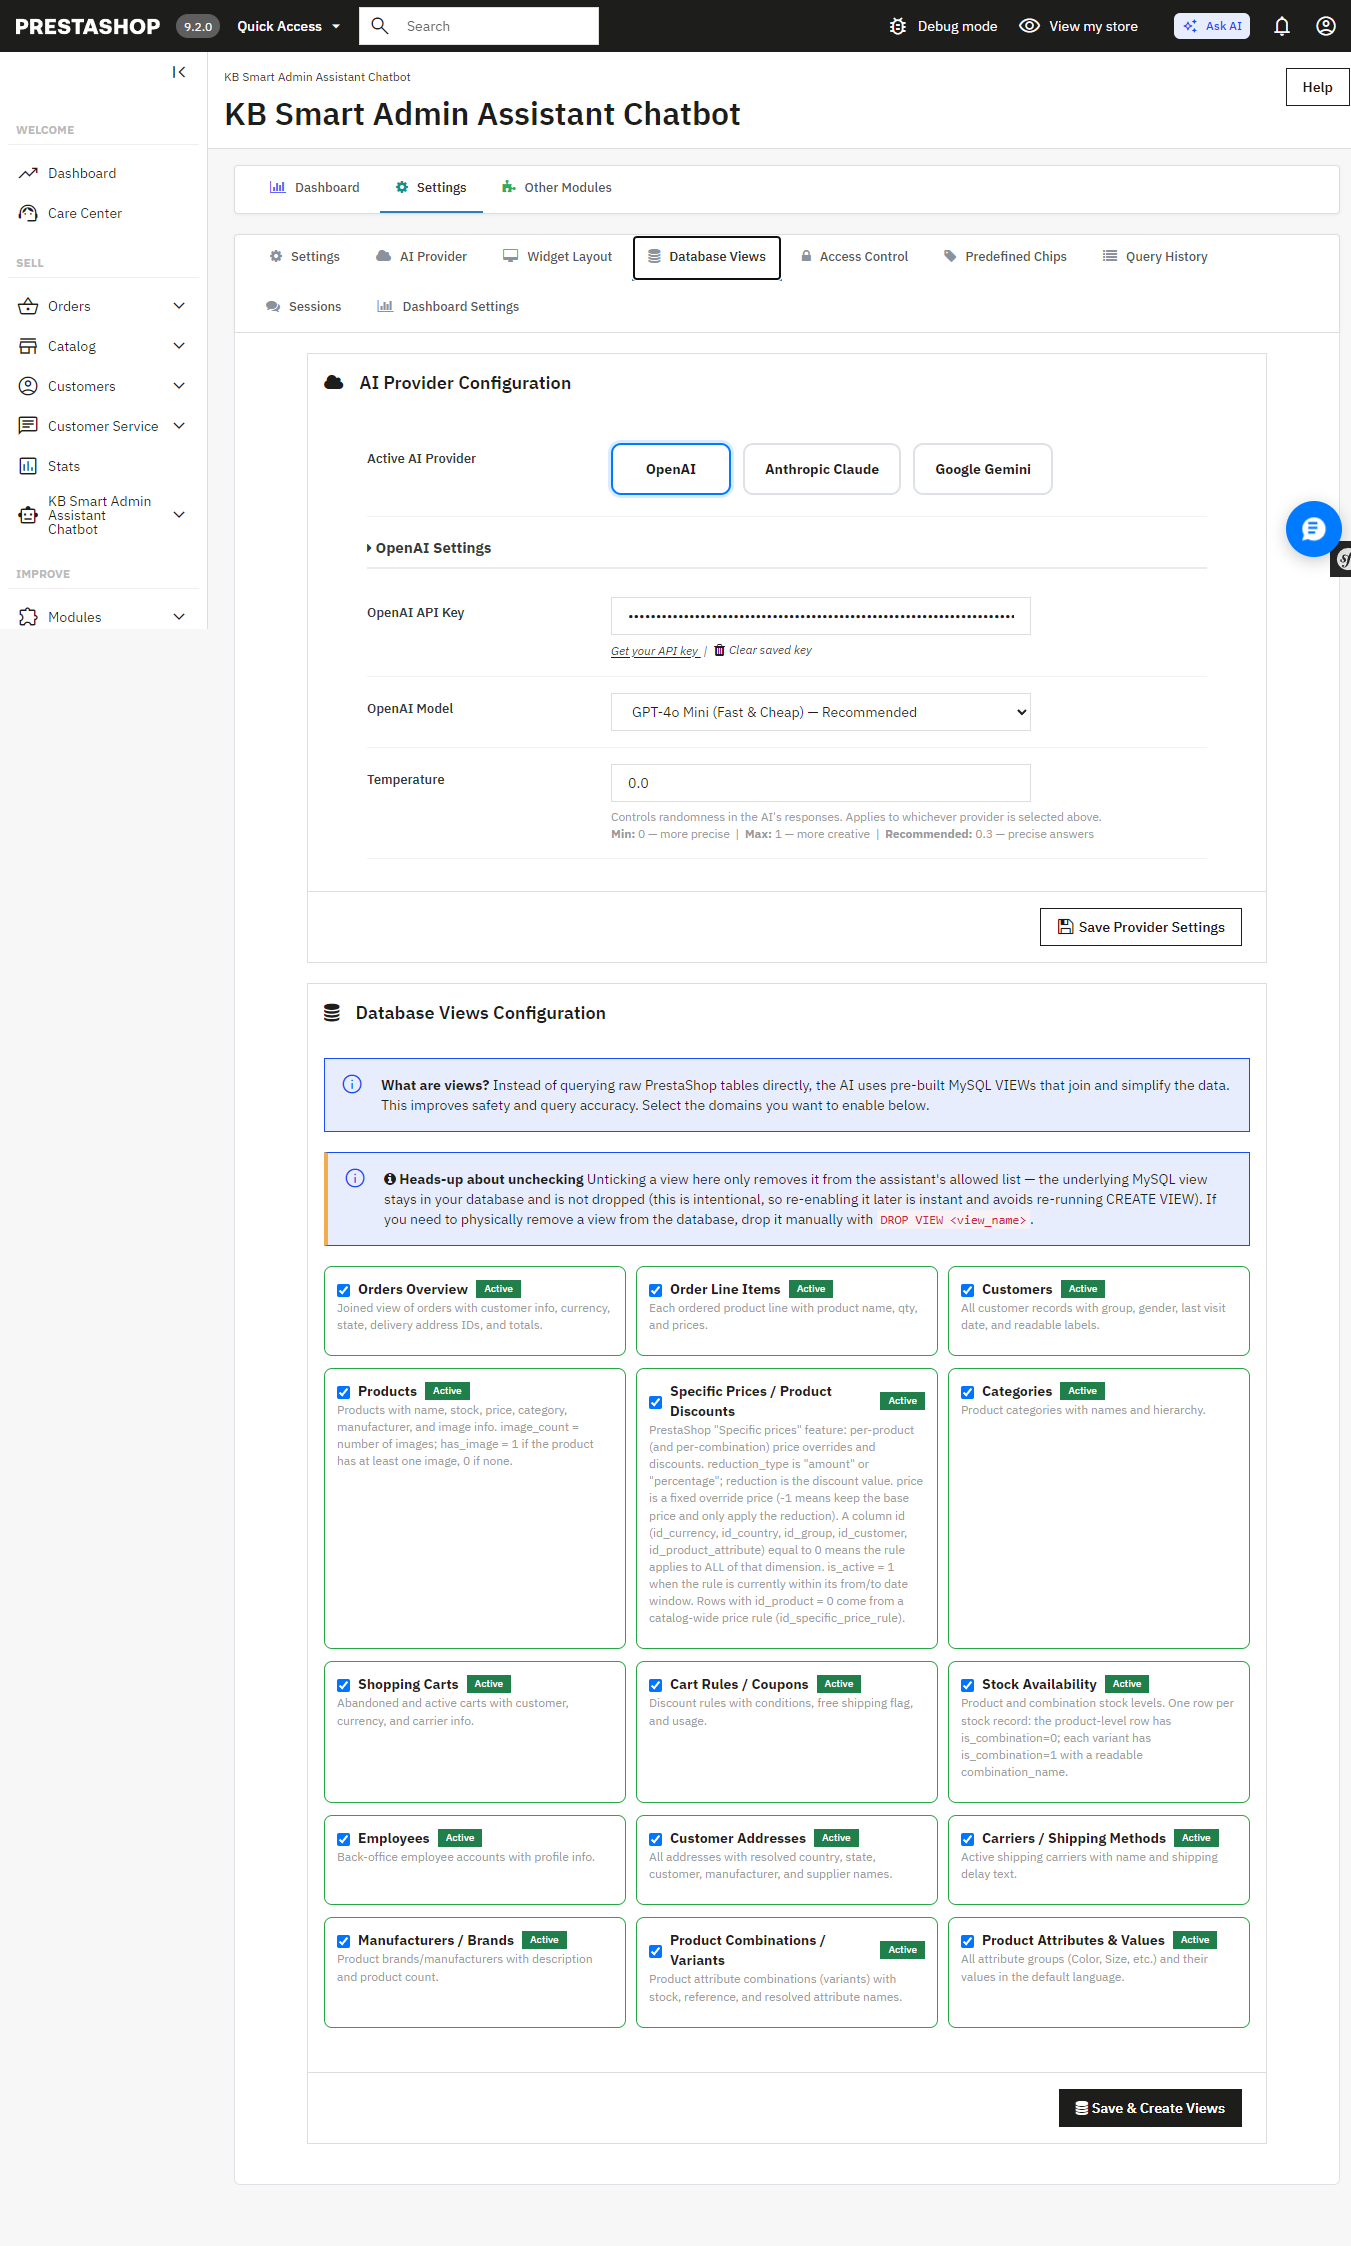
Database Views configuration the AI queries curated, read-only MySQL views instead of raw tables I

Get a result you need to hand off? Export it instantly to Excel or CSV full datasets, not just the rows visible on screen. Ask AI has no export functionality; any data it surfaces stays inside the chat conversation.

Allowing the assistant access to your database must be carefully considered, and the module has been designed with this in mind: strict restrictions on DELETE, DROP, UPDATE, INSERT, and TRUNCATE ensure that the assistant can only access your information, not write to it.. Multi-statement execution is blocked and SQL-injection patterns are screened automatically and unlike Ask AI, which works through MCP tool calls with nothing to inspect, you can view, edit, and re-run the exact SQL Smart AI Admin Assistant generated yourself. Nothing runs as a black box.

The exact generated SQL is visible, editable, and re-runnable nothing is a black box.

Database Views configuration the AI queries curated, read-only MySQL views instead of raw tables.

Built for Teams, Not Just Solo Store Owners Ask AI Has No Equivalent

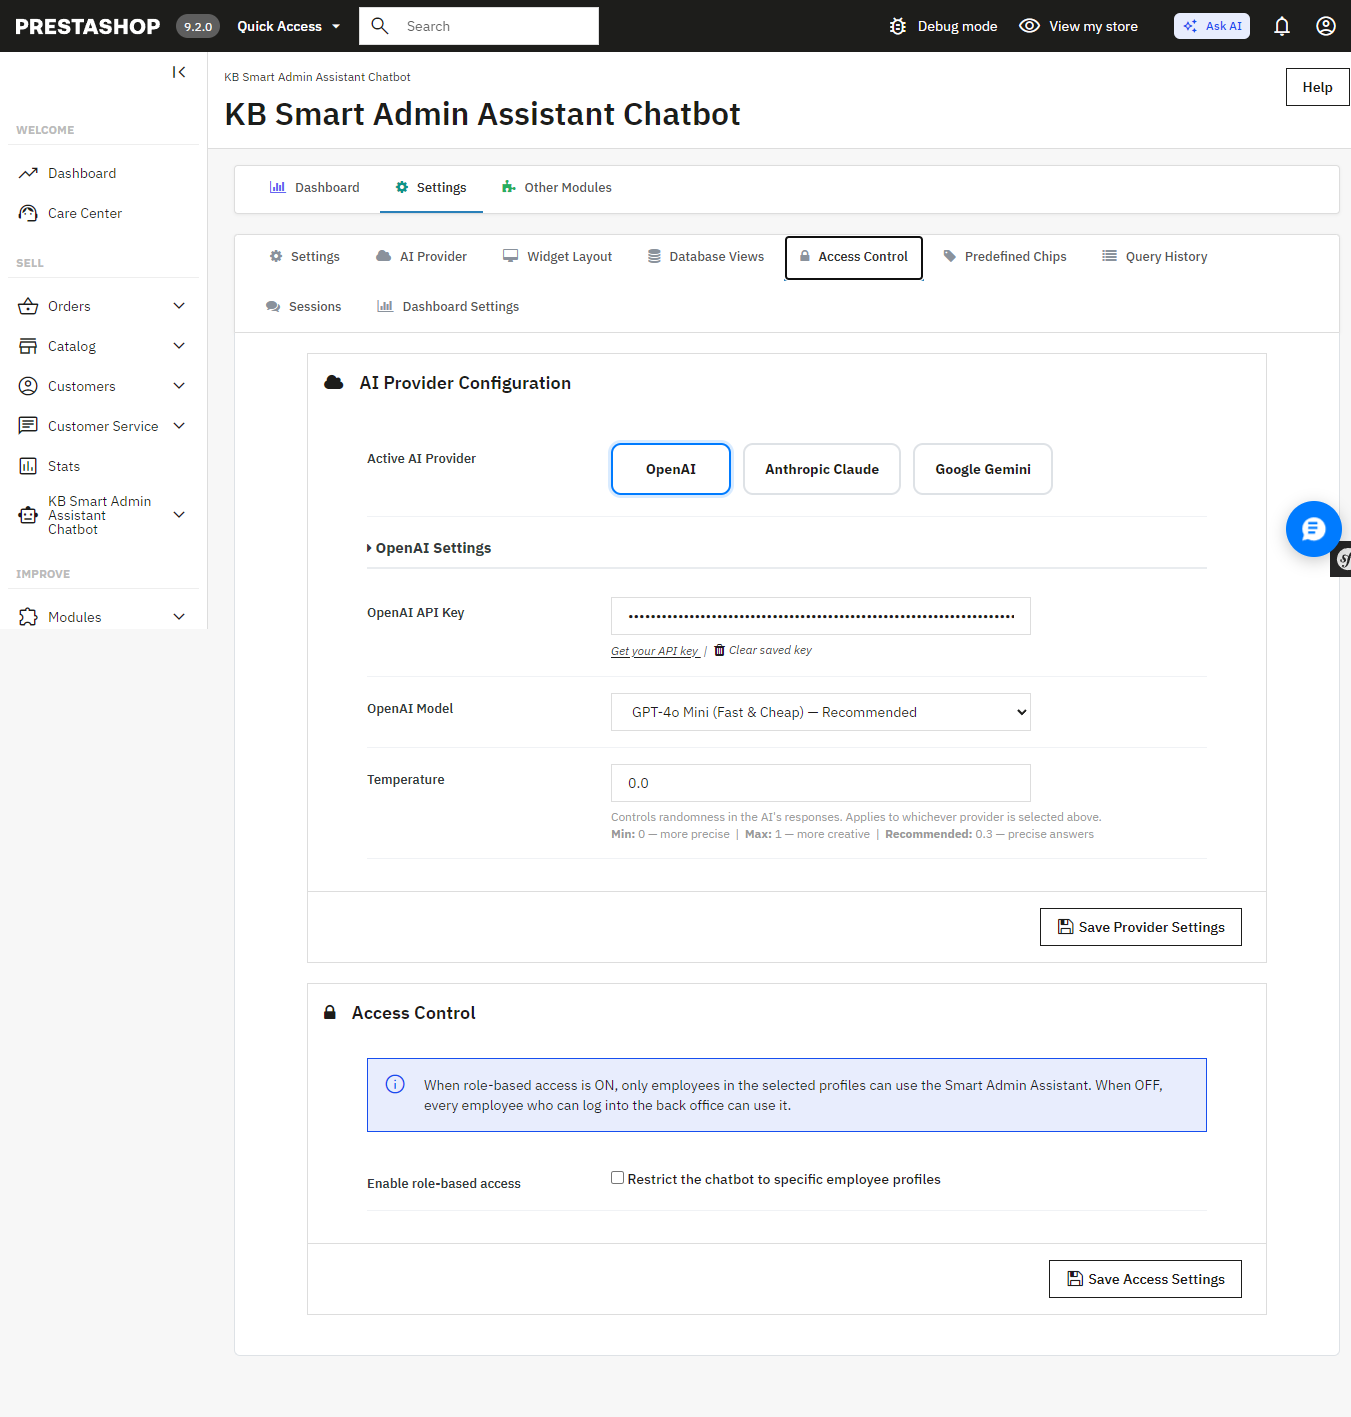
If you have a shop with several admins or you manage this on behalf of your clients as an agency, the module comes with role-based employee access controls, and you get to determine precisely which employees have access to the assistant and what they are permitted to ask. All queries will be timestamped and recorded to provide you with a full audit trail. The Ask AI platform provides 30 days of chat history for each individual; however, it does not provide user permissions and an audit trail per query.

Access Control restricts the assistant to specific employee profiles.

Query History a full, timestamped audit log of every question asked, including the generated SQL.

Speak Instead of Type Ask AI Doesn’t Support Voice Input

Voice input, built on the browser’s native speech recognition, lets you ask your question out loud instead of typing it useful on a warehouse floor, during a busy order-processing morning, or anytime your hands are full. Ask AI is text-only.

Quick-Access Shortcuts for the Questions You Ask Every Day More Flexible Than Ask AI’s Suggestions

The Prestashop AI Admin Assistant ships with ready-to-use “quick query chips”: Total Orders Today, Revenue This Month, Low Stock Products, Abandoned Carts (Last 30 Days), Top Customers by Revenue, and more that you can fully edit and customize. Ask AI offers contextual suggestions on Product, Order, and Customer pages, but they aren’t something you can edit or add to.

Get Started

If you’re ready to stop digging through admin screens and start just asking your store what you need to know, Smart AI Admin Assistant is available, with live admin and front-end demos and a full user manual so you can see exactly what you’re getting before you buy:

Get PrestaShop Smart AI Admin Assistant

Prestashop Point of Sale Module User Manual

Knowband PrestaShop Point of Sale Module is an all-in-one PrestaShop Multiple Store POS module that is specially designed for merchants who have one or multiple physical stores in addition to their online store. The Knowband PrestaShop POS module comes in handy for such merchants as it integrates functionalities like store-level sales, stock management, and employee management directly into their PrestaShop back-end, making it a viable PrestaShop POS Module Alternative to other POS systems.

The module is built around Multi-Outlet POS approach. Every physical location, which is called an outlet in admin terms, is configurable on its own using its own unique address, currency, language, and sales regulations, but all outlets will still work under one single PrestaShop website. Thus, the Prestashop Point of sale Addon is appropriate for Multi-Outlet Retail business models including but not limited to boutique chains, franchise counters, pop-ups, and warehouses with retail activity in addition.

Knowband Point of Sale is not a payment method in itself. It records POS sales through its own internal order flow and always uses a fixed internal payment method for POS transactions; the order status applied once a sale is paid is configurable in Settings, and shipping, discounts, and commission are layered on top of that flow.

1.1 What the module includes

The Prestashop Point of Sale Module includes functionalities like dashboard, multi-outlet creation, commission tracking, inventory sync and many more.

  • Sales dashboard module for PrestaShop: a customizable, draggable widget grid for reviewing outlet performance, oversold orders, and sales trends
  • Outlet management: creating, editing, and activating individual outlets, each with its own address, currency, language, and override rules
  • PrestaShop sales agent management: assigning PrestaShop employees to outlets as cashiers, and flagging specific employees as POS managers
  • Commission tracking: recording salesperson commission per sale, with reporting broken down by employee and outlet
  • POS Customer Management for PrestaShop: Searching, creating and configuring guest check-out behavior based on outlet
  • PrestaShop Barcode Scanner Module: Matching the barcodes entered through the scanner with a user configurable barcode field such as EAN13, UPC, ISBN, MPN, and Reference
  • Inventory Synchronization for PrestaShop: Maintaining the correct stock visibility while assigning, selling and returning products in various outlets
  • Offline order module for PrestaShop: queuing sales when the connection drops and syncing them automatically once connectivity returns, using idempotency keys to prevent duplicate orders
  • PrestaShop POS with receipt printing: generating printed receipts through standard browser-based HTML printing, with configurable discount line display
  • Return and refund POS trail: order-level visibility into paid amounts, order status, and oversold flags so that returns and refunds can be traced back to the original outlet and salesperson
  • PWA-style panel access: a public POS panel URL, optionally customised, that can be opened in a browser tab or installed as an app-like shortcut on a desktop device

2.0 Requirements and Compatibility for Prestashop Point Of Sale Addon

2.1 PrestaShop compatibility

The module is compatible for Prestashop 1.7, Prestashop 8.x. and Prestashop 9. x.x. Store owners can use it feel free, in case if you face any issue, our team is always available at supprot@knowband.com

2.2 Module dependencies

The Multi-Outlet POS system creates and relies on its own database tables for outlets, product-to-outlet assignment, stock allocation, discount logs, offline order queues, and commission records, in addition to standard PrestaShop tables for employees, customers, carriers, and orders.

2.3 Required permissions

The administrator installing or configuring the module needs valid PrestaShop back-office access with rights to manage modules, products, carriers, customers, employees, and orders. Outlet management in particular touches products and carriers directly, so an store adins without those permissions will not be able to complete outlet setup.

3.0 Installation and Activation of Prestashop Multi Outlet POS System

3.1 Installing the module

Install Knowband PrestaShop Point of Sale from the PrestaShop module list in the back office, the same way any standard PrestaShop module is installed. 

  • Navigate to Module Manager > Modules
  • Click on the Upload option and upload Knowband Prestashop Point of Sale
  • After installation, click on configure, this will redirect you to the configuration module.

3.2 Activation

Installing the module is not the same as activating it for live sales.  Enable the module from the Enable POS module Tab.

4.0 Module Tabs Structure in POS 

After installation, you will see the module Knowband Prestashop Point of Sale under the PrestaShop SELL menu. 

  • Dashboard
  • Settings
  • Outlets
  • Employees
  • Orders
  • Reports
  • Receipt Settings
  • Other Modules

5.0 Admin Panel Module Configuration in Prestashop POS System

5.1 Dashboard

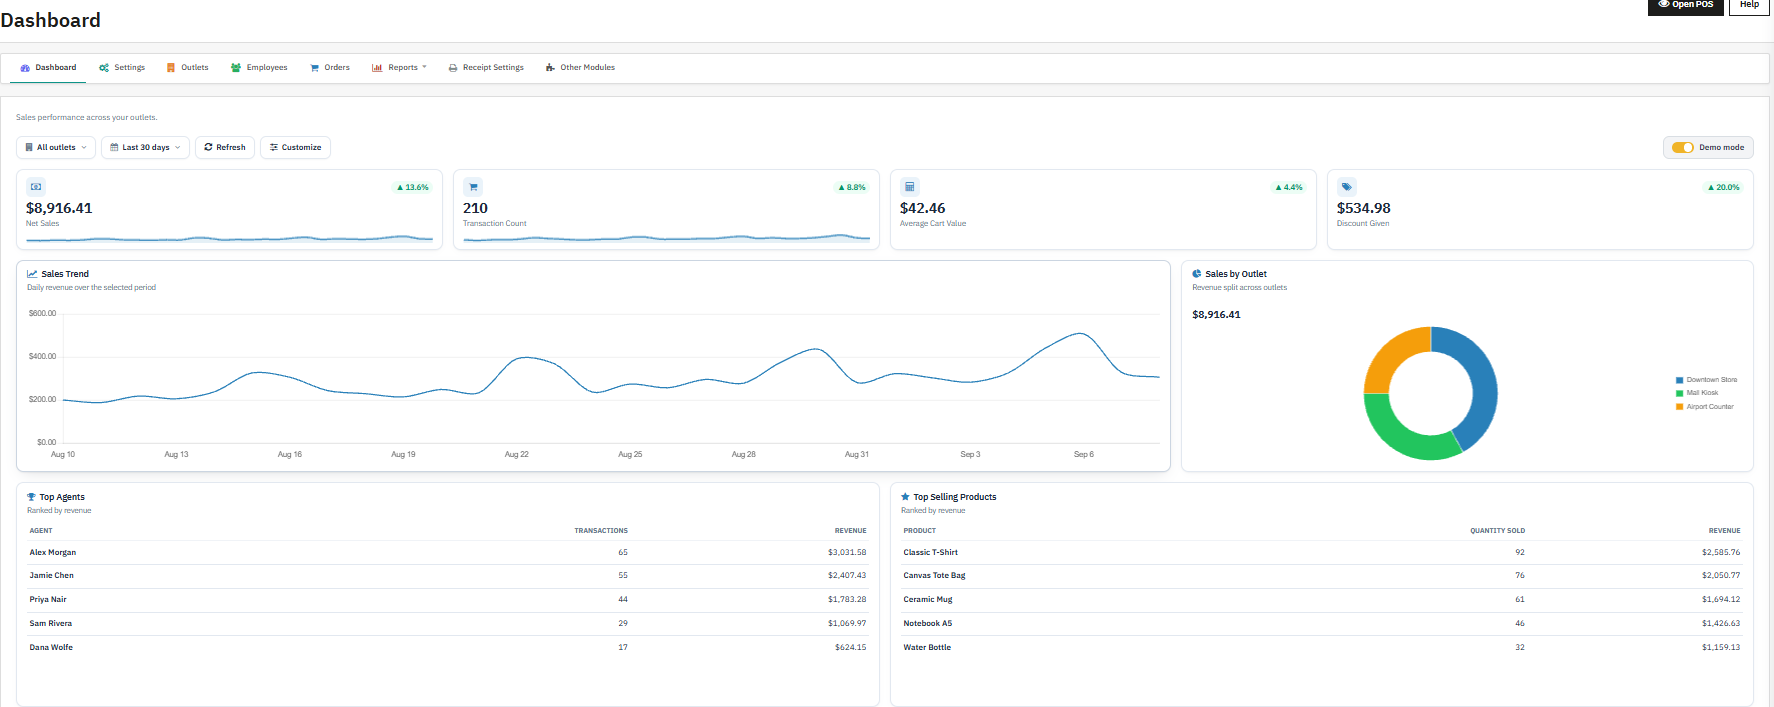
The Dashboard is the landing page of the sales dashboard module for PrestaShop and gives the administrator an outlet-scoped overview of POS activity as soon as they open the Knowband Prestashop Point Of Sale menu.

5.1.1 Purpose

  • Review recent sales activity and trends across outlets.
  • Check individual outlet performance.
  • See oversold order counts, which relate directly to inventory sync accuracy.
  • Open the POS panel quickly from a single screen.
  • Customise the widget layout to match how the store owner or manager wants to review data.

5.1.2 Fields and controls

  • Outlet selector: switches the dashboard view to a specific outlet or to all accessible outlets, central to multi-outlet management
  • Period selector: changes the reporting period used by the dashboard widgets
  • Widget customise controls: allow enabling, rearranging, and saving the widget layout
  • Oversold orders quick link: opens the Orders screen filtered to orders flagged as oversold

5.1.3 Buttons and actions

  • Open POS: opens the POS panel in a new browser tab
  • Reset dashboard layout: returns the widget arrangement to the default layout
  • Demo mode toggle: switches the dashboard to a demo dataset instead of live data, useful for screenshots or training

5.1.4 Important behavior

  • Widget data loads through AJAX rather than a full page reload.
  • Dashboard content is always outlet-specific once an outlet is selected.
  • The widget layout and demo mode setting are saved per shop, so multi-shop PrestaShop installs keep separate dashboard preferences.

5.2 General Settings

Settings is the main configuration area for the module’s behaviour and is organised into five sub-tabs: General, Product, Customer, Payment, and Shipping.

5.2.1 General

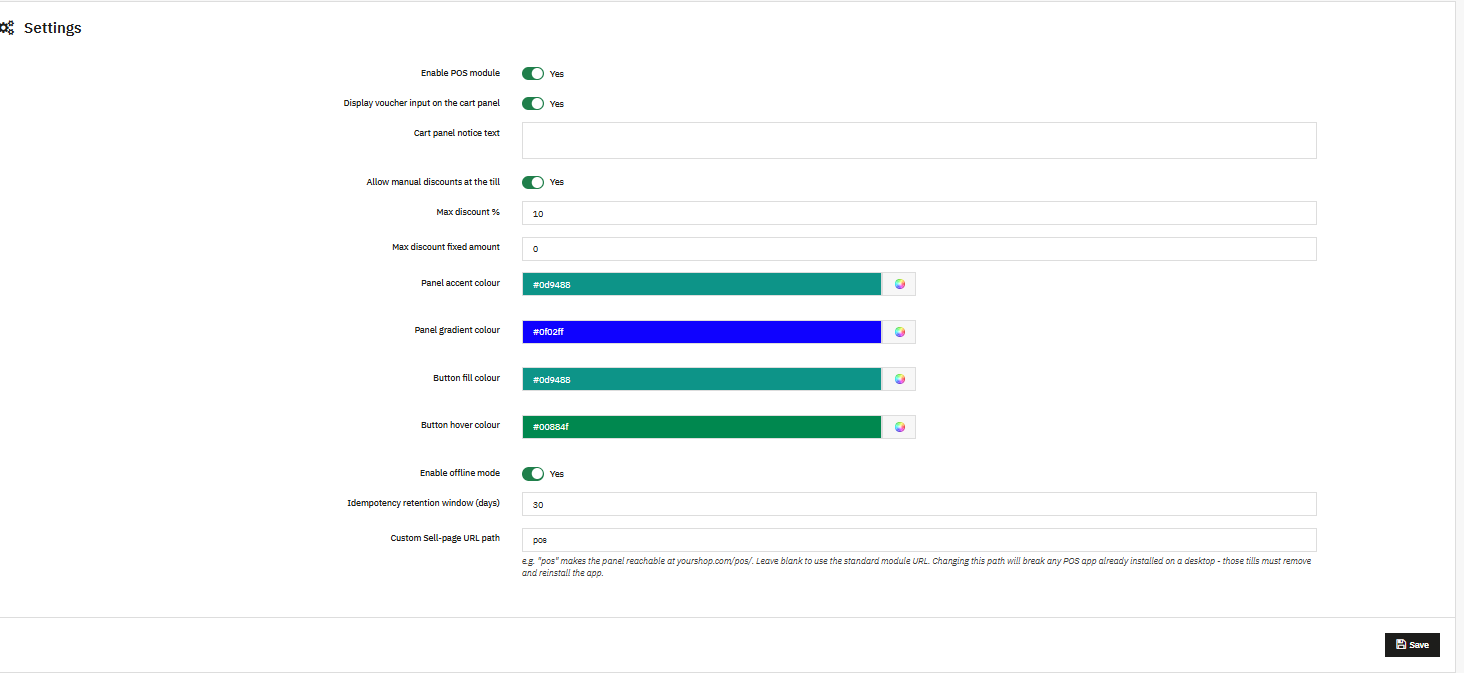
It controls the core operational behaviour of the PrestaShop POS module: whether it is active, how discounts and offline mode work, panel colours, and the public panel URL.

  • Enable POS module: turns the entire module on or off; when disabled, the POS panel becomes unavailable
  • Display voucher input on the cart panel: shows or hides the voucher field in the POS cart
  • Cart panel notice text: optional message shown above the POS cart
  • Allow manual discounts at the till: enables cashier discounting
  • Max discount %: maximum manual discount percentage a cashier may apply
  • Max discount fixed amount: maximum fixed discount amount a cashier may apply
  • Panel accent colour: main colour used by the POS interface
  • Panel gradient colour: secondary colour for the POS background gradient
  • Button fill colour: main colour for action buttons in the POS panel
  • Button hover colour: button hover state colour
  • Enable offline mode: activates the offline order module for PrestaShop, allowing sales to be queued while connectivity is lost and synced automatically once it returns
  • Idempotency retention window (days): number of days to retain de-duplication keys for offline sales, preventing the same offline sale from being recorded twice
  • Custom Sell-page URL path: This option allows the POS panel use a custom public URL path, such as /pos/, and supports PWA-style shortcut installation

Note: Changing the custom panel path can break already-installed desktop app shortcuts, because an installed shortcut points to the URL it was created with.

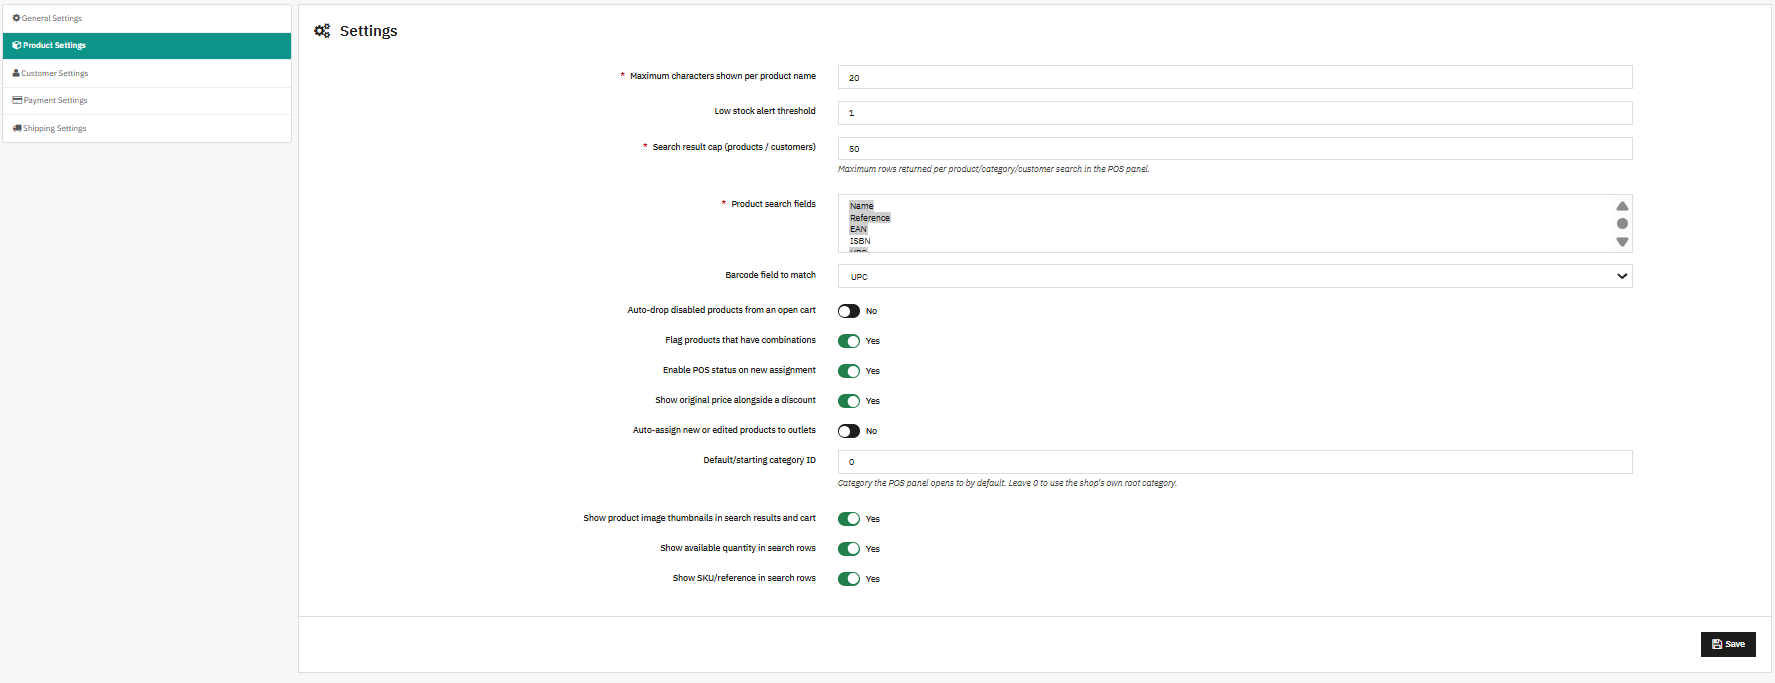
5.2.2 Product

Controls how products are searched, displayed, assigned, and managed in the POS, and is the main configuration point for both the barcode scanner module for PrestaShop and the inventory sync module for PrestaShop.

  • Maximum characters shown per product name: truncates long product names in the POS interface
  • Low stock alert threshold: flags low stock when allocated stock falls to or below the chosen value
  • Search result cap (products / customers): maximum number of rows returned in product or customer searches
  • Product search fields: selects which product fields are text-matched in POS search, from Name, Reference, EAN, ISBN, UPC, MPN, and Tags
  • Barcode field to match: selects which barcode field the barcode scanner module for PrestaShop uses when scanning or typing a code, from EAN13, UPC, ISBN, MPN, and Reference
  • Auto-drop disabled products from an open cart: removes disabled or de-assigned products from an open cart automatically
  • Flag products that have combinations: marks products with variants so the cashier knows a choice is required before completing the line
  • Enable POS status on new assignment: makes newly assigned products immediately available for POS sale
  • Show original price alongside a discount: displays both original and discounted pricing for price-reduced products
  • Auto-assign new or edited products to outlets: automatically assigns products to active outlets, supporting the inventory sync module for PrestaShop
  • Default/starting category ID: category the POS panel opens to by default; set to 0 to use the shop root category
  • Show product image thumbnails in search results and cart: displays small product images
  • Show available quantity in search rows: displays outlet stock in product search results
  • Show SKU/reference in search rows: shows product reference text under the product name

5.2.3 Customer

Handles the global portion of PrestaShop POS customer management. Most customer-related configuration now lives at the outlet level rather than here.

  • Let cashiers pick customer groups on creation: shows a customer group selection box when a cashier creates a customer from the panel

5.2.4 Payment

Controls the payment status applied to POS sales and the salesperson commission rules that drive commission tracking.

  • How POS sales are paid: a display-only field explaining that all POS sales use one fixed internal payment method
  • Status applied once paid: the order status assigned once a sale is marked paid
  • Enable salesperson commission tracking: turns commission calculation on or off for commission tracking
  • Commission rate (% of order total): percentage of each sale total used for salesperson commission

5.2.5 Shipping

Controls shipping behaviour for POS orders, including which carriers a cashier can offer.

  • Allow shipping a POS sale to the customer: enables shipping at the POS
  • Carriers available at the till: multi-select list of all carriers a cashier may choose from
  • Pre-selected carrier: default carrier chosen when a cashier enters shipping mode

5.3 How to add Multi Outlets in Prestashop Point of Sale

Outlets are the core of Multi-Outlet Retail configuration. This section covers the outlet listing, the add and edit outlet form, and the outlet products panel used for inventory sync.

5.3.1 Outlets listing

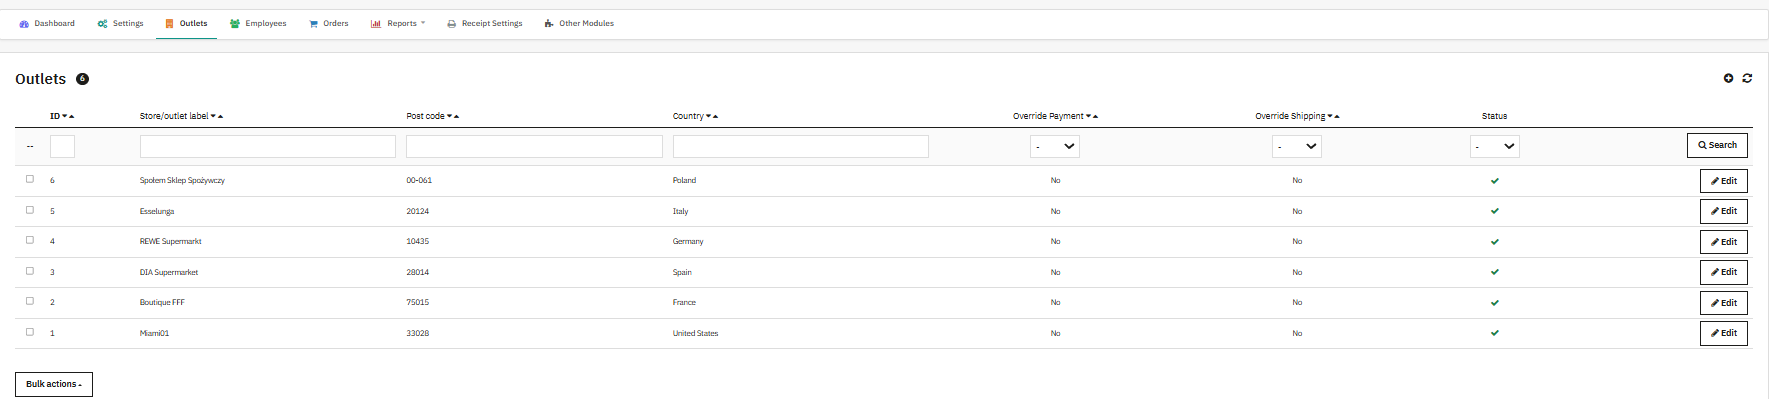
Lists every outlet configured for the current shop and is the entry point for outlet management.

Listing columns: ID, Store/outlet label, Post code, Country, Override Payment, Override Shipping, Status

  • Edit: opens the outlet configuration form
  • Status toggle: enables or disables the outlet
  • Open POS: opens the POS panel for that context in a new tab
  • Add new outlet: creates a new outlet record

5.3.2 How to Add an Outlet using PrestaShop Point of Sale System

Creates or edits a single outlet, defining its physical profile plus its local payment, shipping, and guest checkout rules.

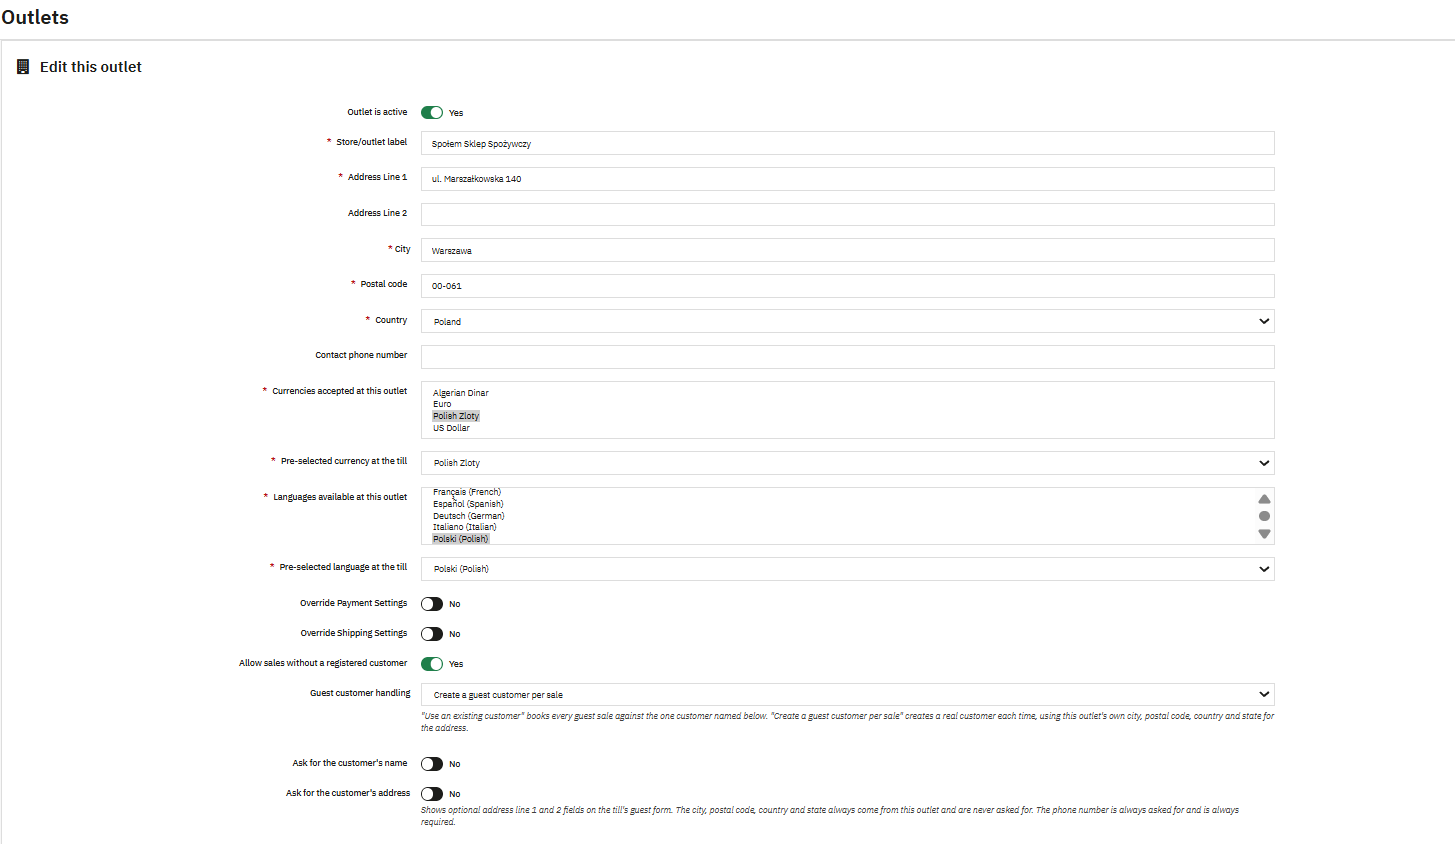
Core fields: Outlet is active, Store/outlet label, Address Line 1, Address Line 2, City, Postal code, Country, State, Contact phone number, Currencies accepted at this outlet, Pre-selected currency at the till, Languages available at this outlet, Pre-selected language at the till

5.3.3 Payment override group

  • Override Payment Settings: turns the outlet payment override on or off
  • Status applied once paid: order status assigned to paid POS sales at this outlet
  • Enable salesperson commission tracking: enables commission tracking at the outlet level
  • Commission rate (% of order total): commission percentage specific to this outlet

5.3.4 Shipping override group

  • Override Shipping Settings: turns the outlet shipping override on or off
  • Allow shipping a POS sale to the customer: enables shipping at this outlet
  • Carriers available at the till: allowed carriers for this outlet
  • Pre-selected carrier: default shipping carrier for this outlet

5.3.5 Guest checkout group

This group is the outlet-level half of PrestaShop POS customer management.

  • Allow sales without a registered customer: enables guest sales at this outlet
  • Guest customer handling: selects whether guests use an existing customer record or a new guest customer created per sale
  • Guest checkout customer email: email of the existing customer used for guest sales
  • Ask for the customer’s name: shows name fields on the guest form
  • Ask for the customer’s address: shows address fields on the guest form

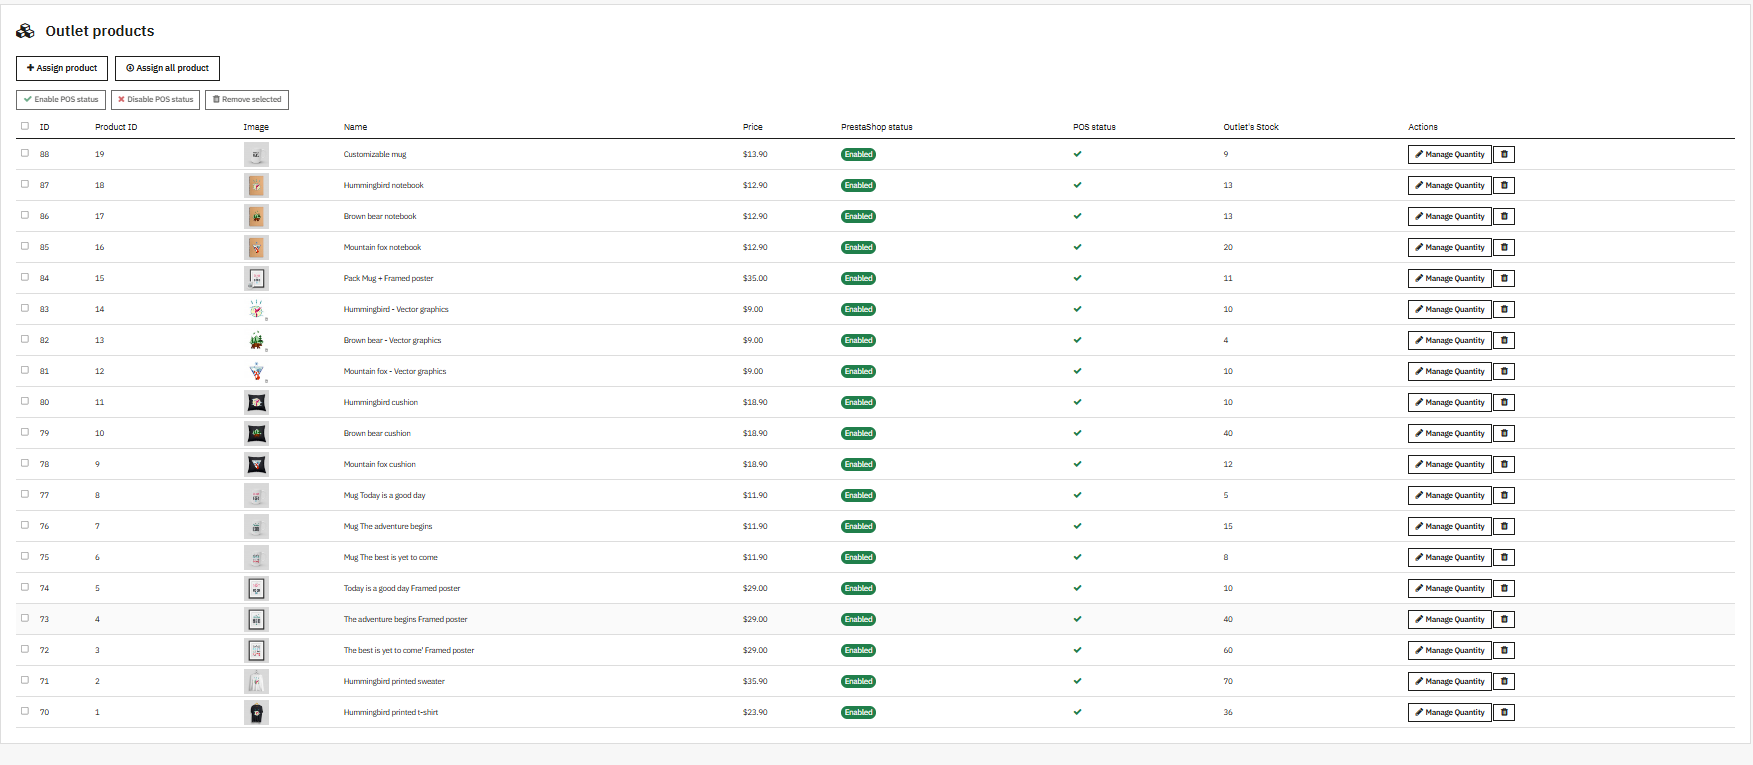
5.3.6 How to Assign Products to Outlet 

Appears when editing an existing outlet and is the working screen for the inventory sync module for PrestaShop at outlet level.

  • Assign product to outlet
  • Assign all products to outlet
  • Manage quantity for assigned products
  • Remove a product from this outlet

5.4 Employees

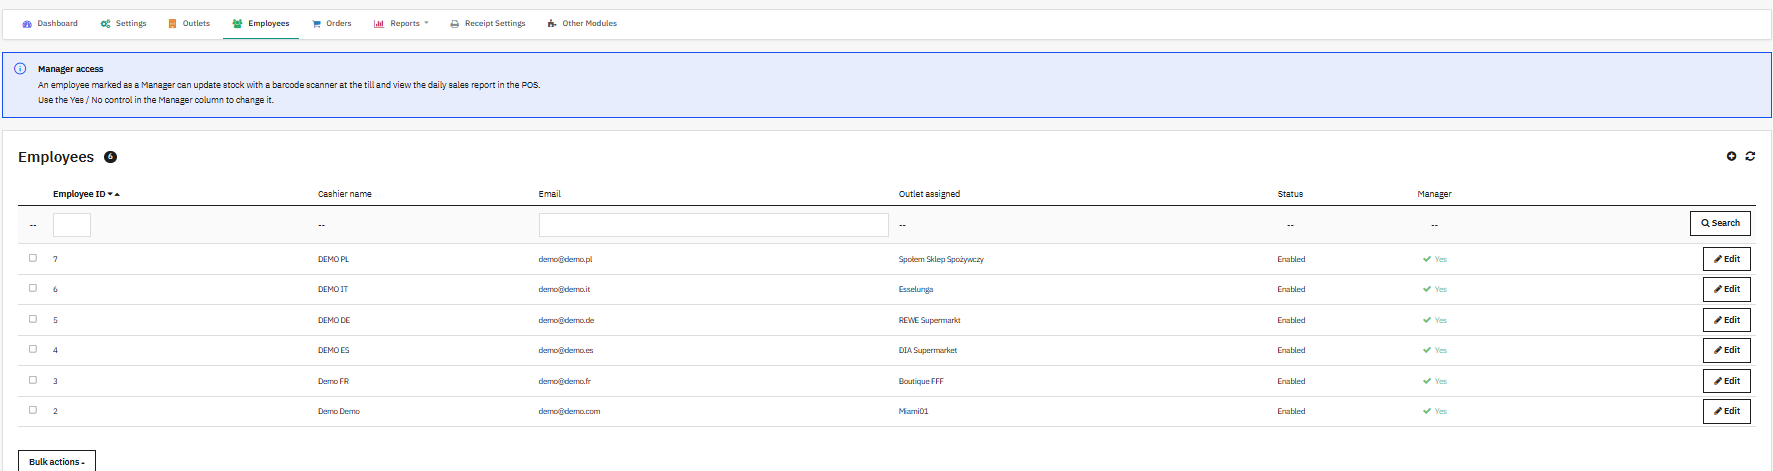
The Employees screen is the PrestaShop sales agent management view, listing every PrestaShop employee assigned to a POS outlet.

Listing columns: Employee ID, Cashier name, Email, Outlet assigned, Status, Manager

  • Edit: opens the employee record in the standard PrestaShop employee editor

The Employee tab provides functionality for the creation of employee accounts and configuring of permissions and outlets that employees will have access to.

  • First Name: Provide the first name of the employee.
  • Last Name: Provide the last name of the employee.
  • Avatar: Upload the avatar image of the employee.
  • Enable Gravatar: Specify whether you want to use the employee’s Gravatar image (Yes/No).
  • Email Address: Provide the employee’s email address. This email can be used as a login and account information exchange channel.
  • Password: Provide a password of at least 8 characters for the employee.
  • Language: Provide the language used by the employee in the administration panel.

Access and Permissions

  • Active: Select Yes if you want to give the employee access to the Admin panel; otherwise select No.
  • Role: Choose the role of the employee. Based on the chosen role, the employee gets permission and access to functions.
  • Default Page: Choose the page that should be opened right after logging in by the employee.

POS Access

  • POS Outlet Assigned To: Choose the POS outlet that belongs to the employee.

If this field is left blank/uninitialized, the employee is not considered a cashier and hence does not get POS access.

  • Employee Image: Choose the photo/image of the employee. It could help in recognizing the employee in the system. Once all the necessary data is entered, save the employee’s record.

5.5 How to sync orders in POS 

The Orders screen lists all POS-originated orders and is the primary place to review sales history and the starting point for any return and refund POS trail investigation.

Listing columns: ID, Reference, Customer, Outlet, Salesperson, Commission Amount, Status, Total, Paid, Oversold, Date

Filters: Outlet filter, Salesperson filter, Date filter

View: opens the detailed order view for that sale, including outlet, salesperson, and payment detail useful for tracing a return

CSV export is available through the standard PrestaShop helper list export mechanism, which makes it straightforward to pull a return and refund POS trail or a reconciliation file for accounting.

5.6 How to Analyse Reports 

The Reports parent tab groups the two reporting screens used for commission tracking and discount oversight.

5.6.1 Discount Report

Summarises discount activity by employee and outlet, helping administrators identify cashiers who discount heavily or frequently.

Listing columns: Employee ID, First name, Last name, Outlet, Times discounted, Total discounted, Per-item discounts, Per-item total, Whole-cart discounts, Whole-cart total, Last discount

Filters: Employee name filters, Outlet filter, Last discount date range

This is a read-only report. It is based on discount activity logged by the module and does not include voucher-related discount rows.

5.6.2 Commission Report

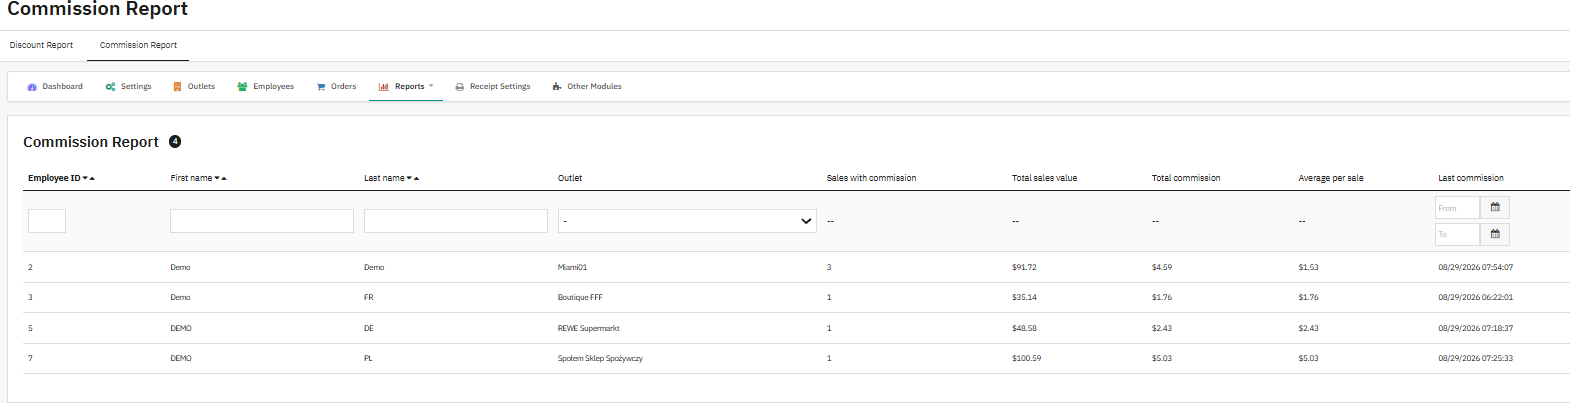
The primary screen for commission tracking, summarising commission earned by a salesperson at each outlet.

Listing columns: Employee ID, First name, Last name, Outlet, Sales with commission, Total sales value, Total commission, Average per sale, Last commission

Filters: Outlet filter, Last commission date range

View orders: opens the Orders page filtered to the related salesperson and outlet

Note: This report is grouped by salesperson and outlet, which matters when a single employee works across multiple outlets under Multi-Outlet POS operations.

5.7 Receipt Settings

Controls how PrestaShop POS with receipt printing displays discounts and whether new customers receive a welcome email.

  • Print each line’s own discount: prints a separate discount line for each discounted product on the receipt
  • Print the whole-cart discount total: prints a separate total line for cart-level discounts
  • Email new customers a welcome message: sends a welcome email when a cashier creates a new customer from the POS.

6.0 Conclusion

Knowband PrestaShop Point of Sale also called as PrestaShop Multi-Outlet Point of Sale (POS) module for stores that need genuine multi-outlet management inside PrestaShop rather than a bolted-on third-party system. It gives admins the tools to create outlets, assign employees through sales agent management. Also, this module keep stock accurate with the inventory sync module for PrestaShop, scan products with the barcode scanner module for PrestaShop, take sales while offline through the offline order module for PrestaShop, configure shipping and payment behavior, print receipts, and monitor discount and commission trends from a single sales dashboard module for PrestaShop. If you find any issue with the module, please feel free to contact us at support@knowband.com
Watch the video tutorials below to learn how to configure and use the PrestaShop Point of Sale Module step by step.

Prestashop SEO Audit Module: Complete User Manual

1. Introduction

Prestashop SEO Audit Manager is the SEO Audit module that allows prestashop store owners to conduct a SEO audit from scratch to the product, category, CMS and manufacturer. Rather than using separate modules or plugins to check pages for meta tags, redirects, sitemap, and analytical data, this module gathers all scoring, technical checks.

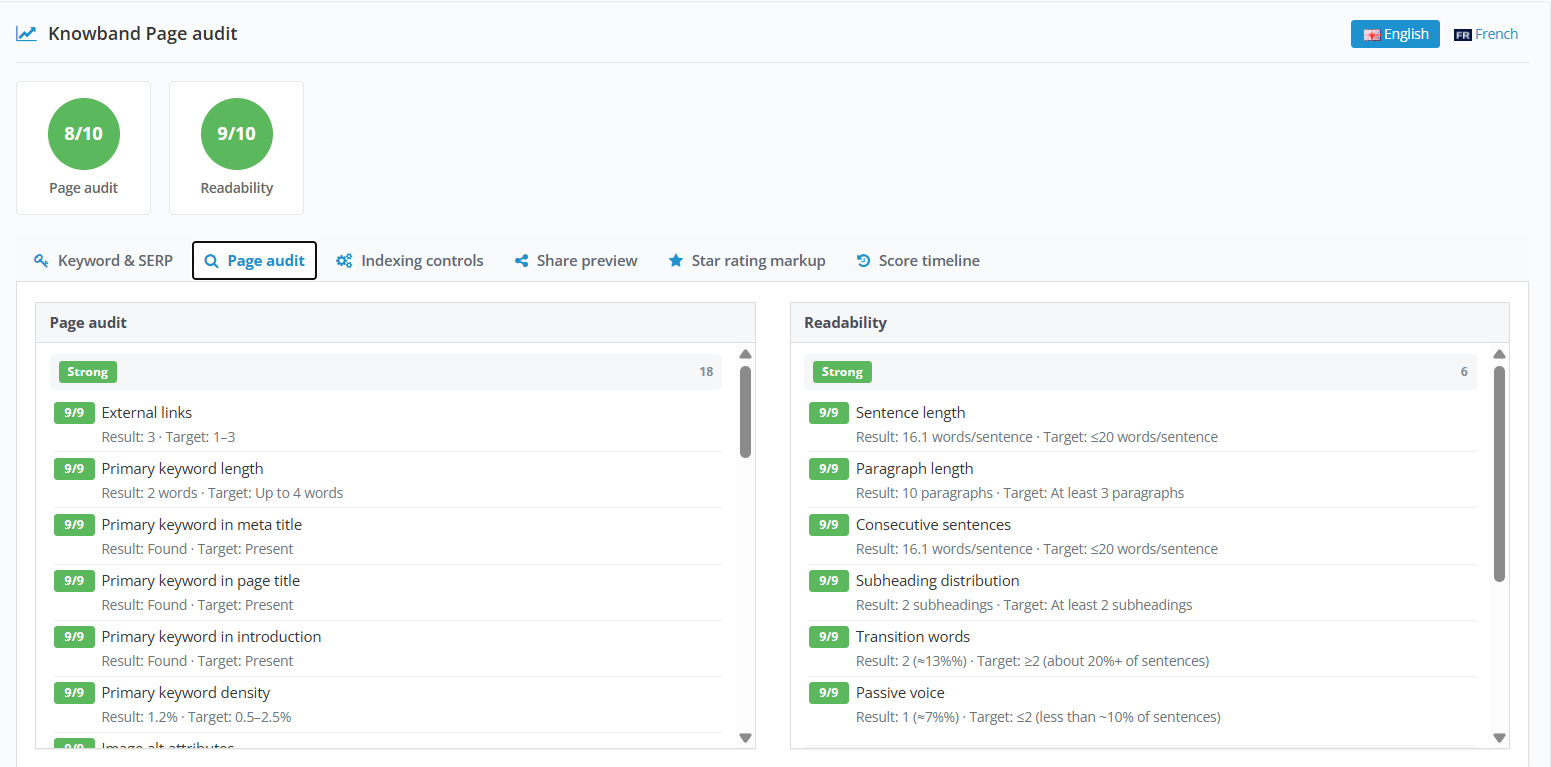
The module is designed for PrestaShop store administrators with no professional SEO experience. The result and target of each audit are shown in layman’s terms so that a person immediately understands why the description is 24 words long when the target is 300 words.

Technically, the module allows spotting thin content, lack of or duplicate meta title and description, broken internal links causing 404 errors, colliding URLs creating duplicate slugs, problems with configuring sitemap and robots.txt files, as well as slow loading time. Once the problem is spotted, there is usually a solution to fix the issue right within the module – editing the redirect, making the new meta description via ChatGPT, or fixing the sitemap options.

Prestashop SEO Audit Module also integrates with Google Analytics 4, Google Search Console, and PageSpeed Insights to let audit scores be analysed along with real traffic numbers, real search performance and page speed metrics, rather than in isolation. This is how a PrestaShop SEO audit changes from being a mere checklist into a live workspace.

2. Key Features of Prestashop SEO Audit Module

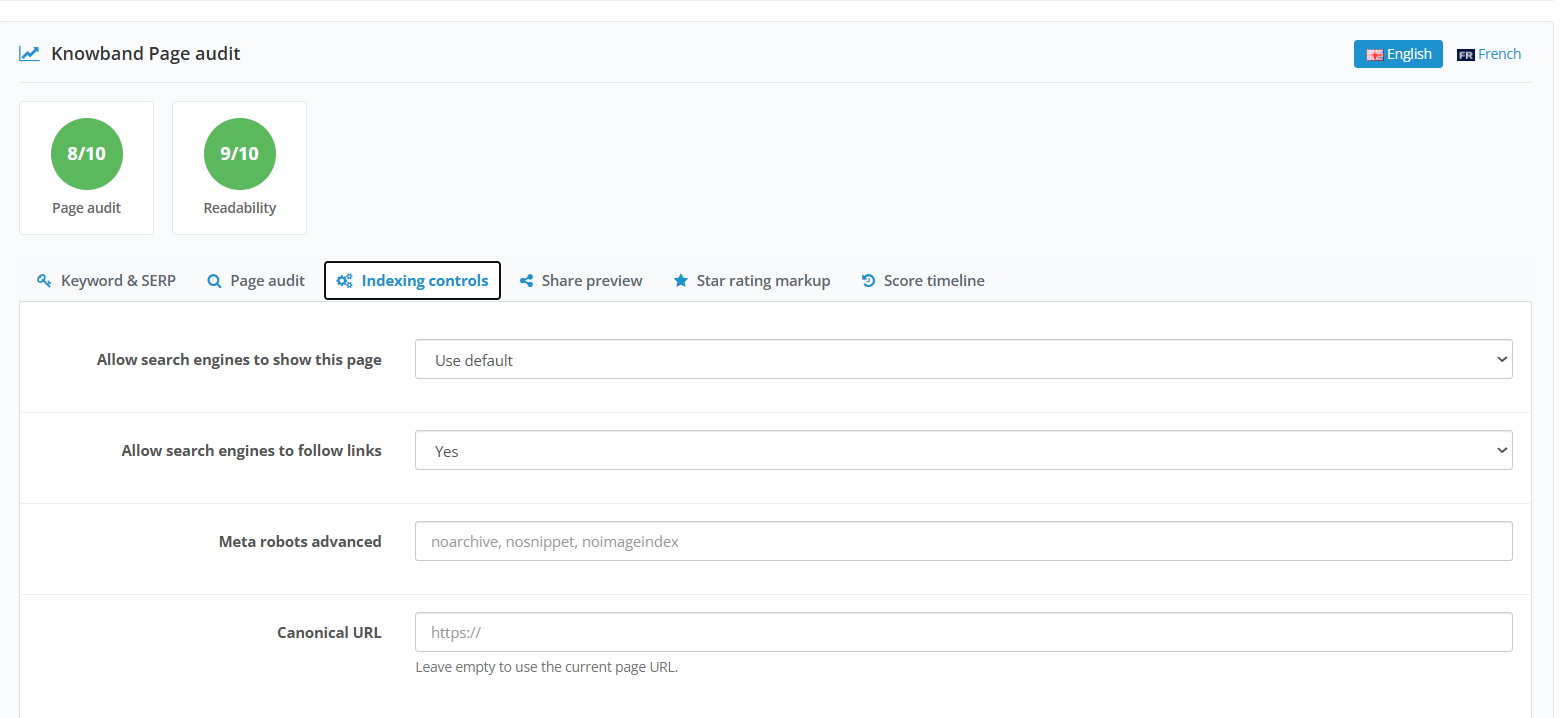
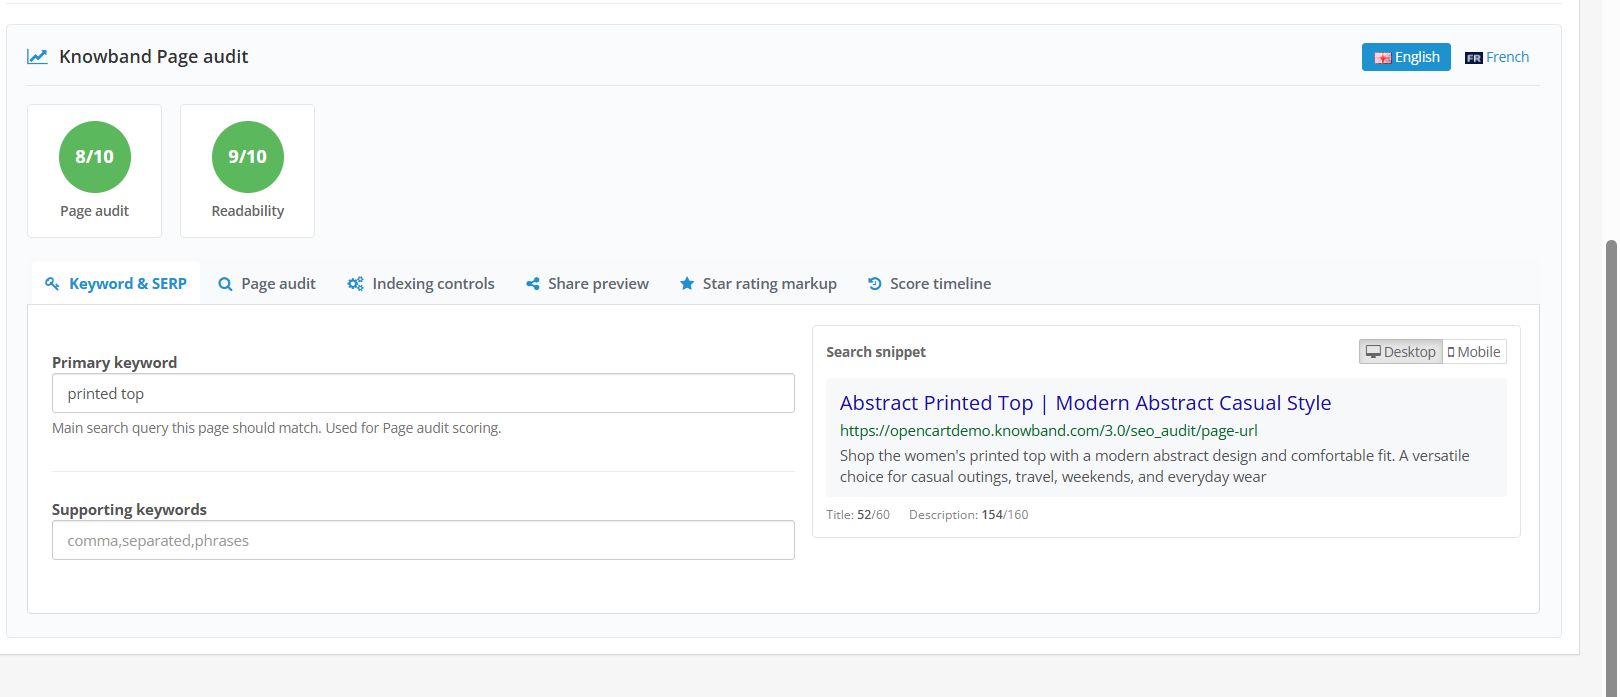
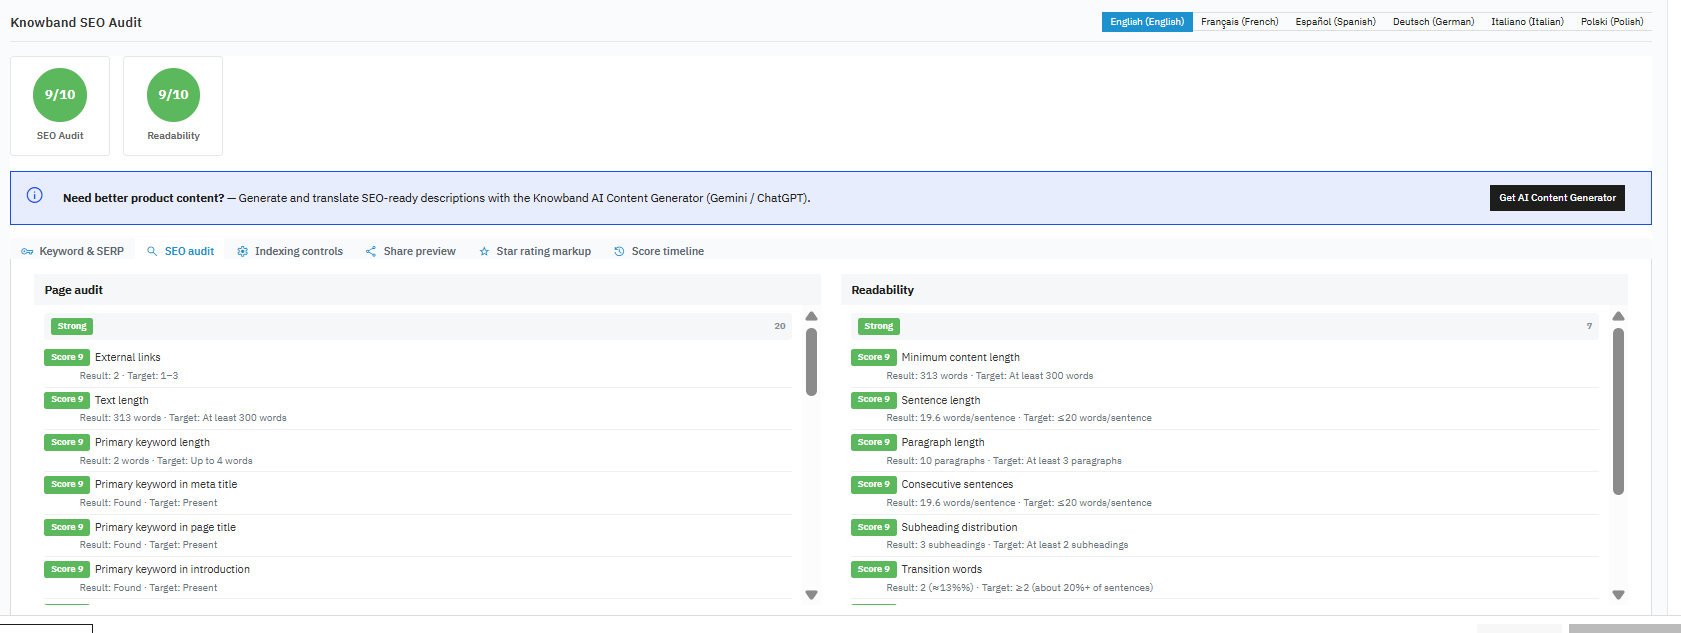
  • Page-level SEO audit and readability audit with a 0 to 10 score
  • Dashboard summarising store-wide SEO health, meta completeness, and index status
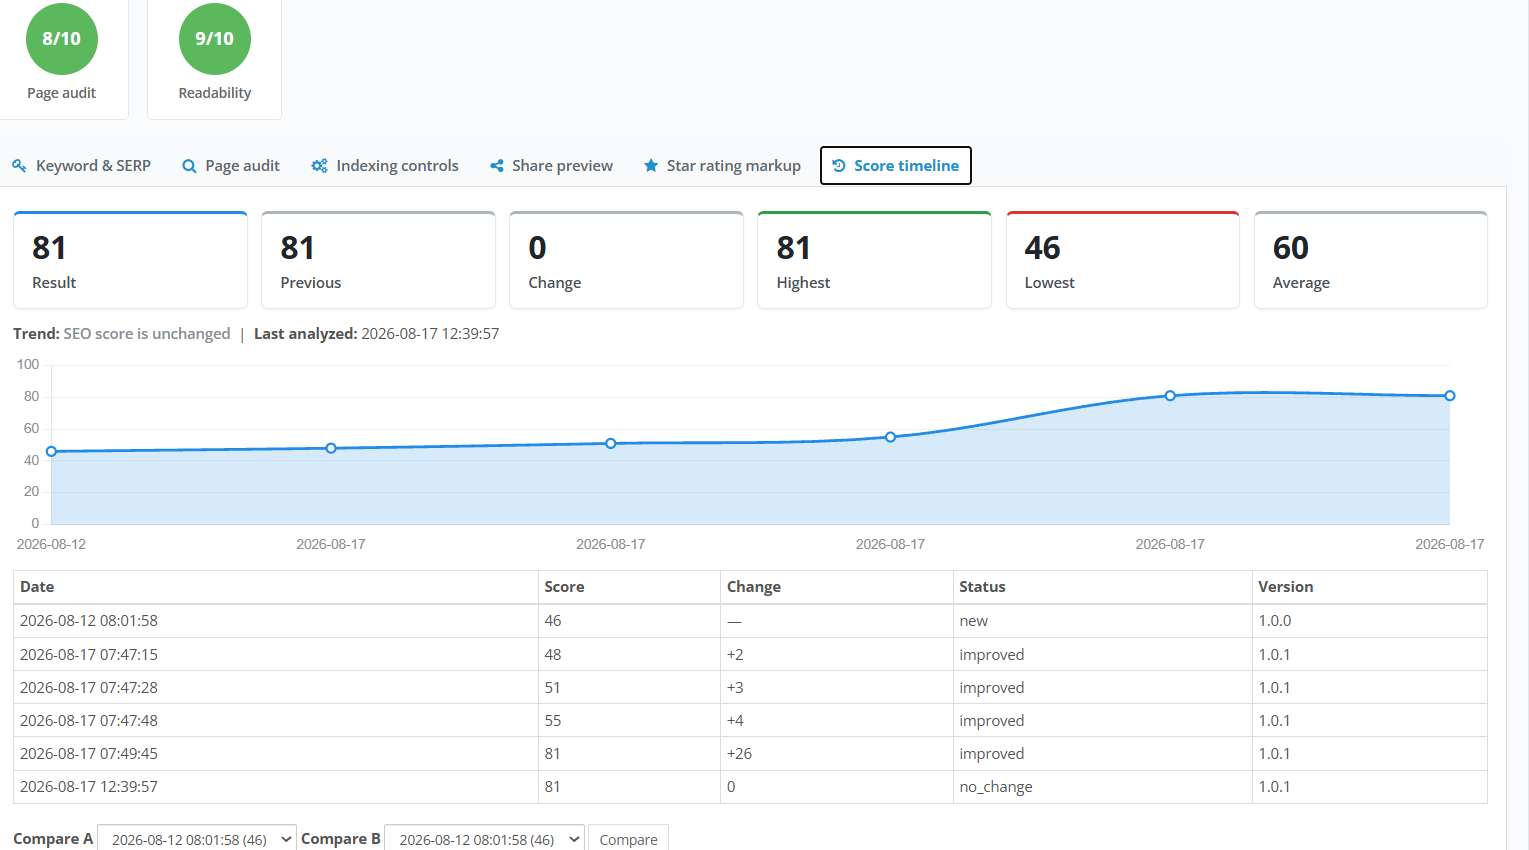
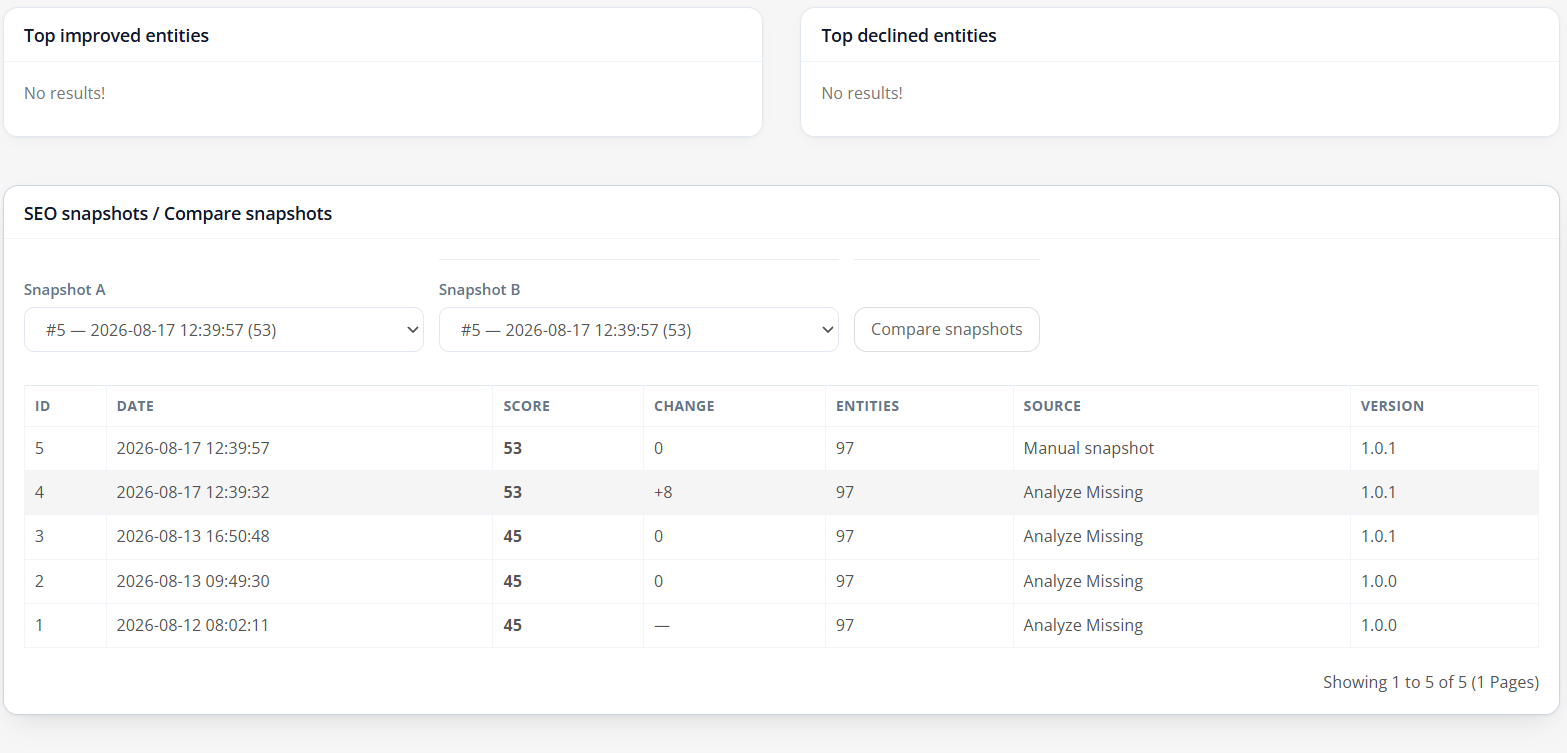
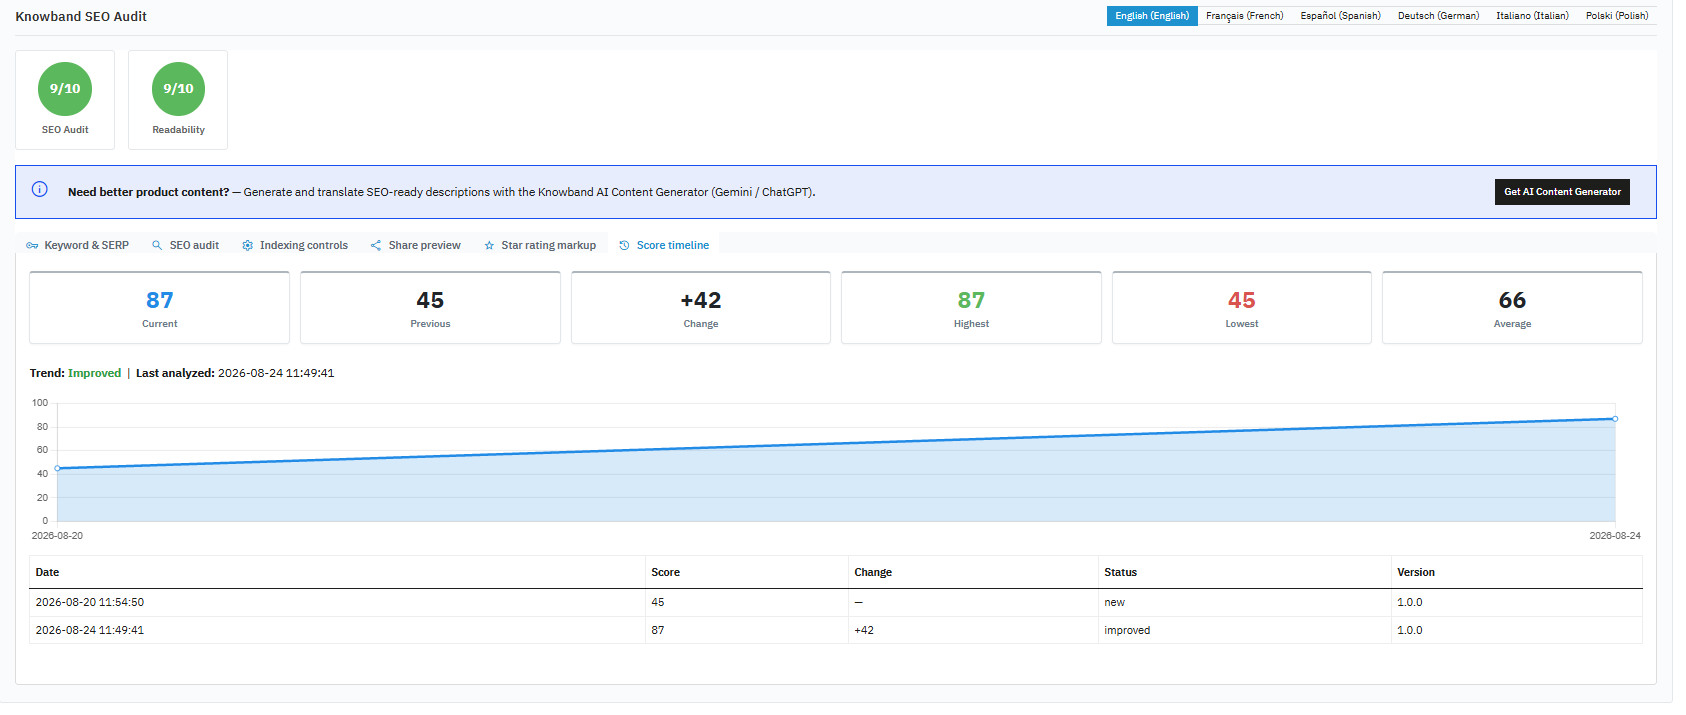
  • Score History with trend charts and snapshot comparison
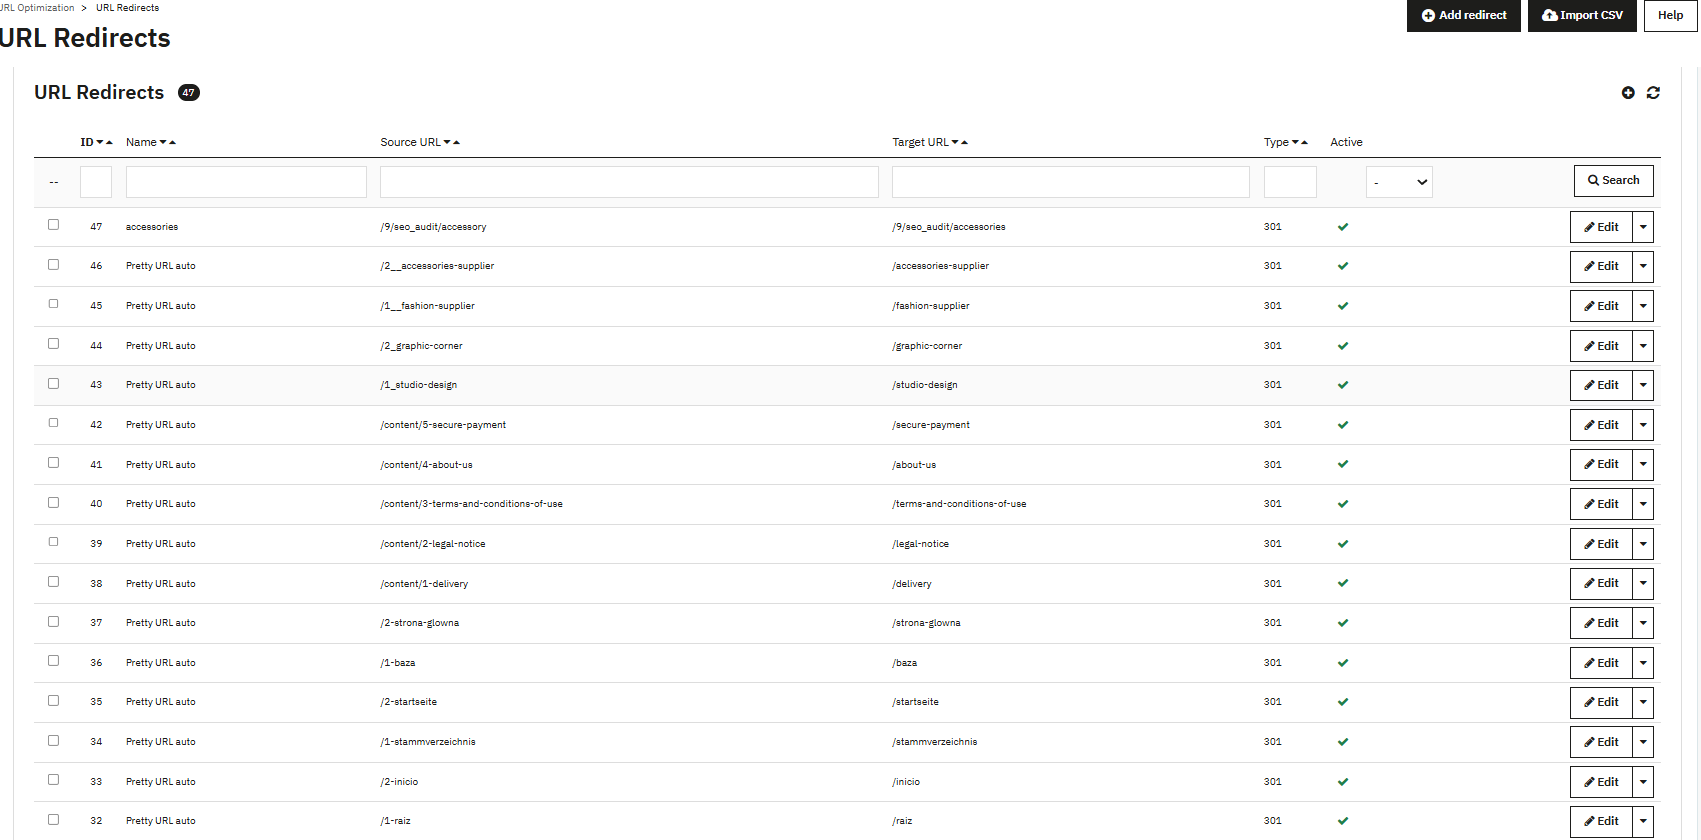
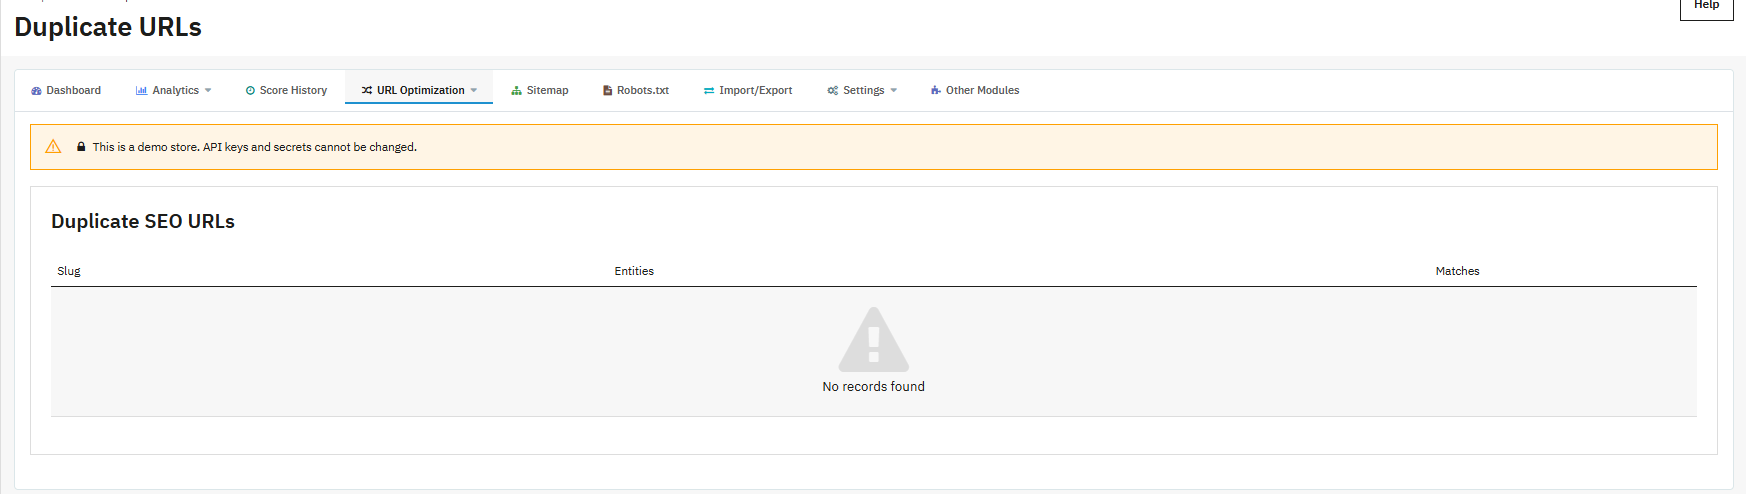
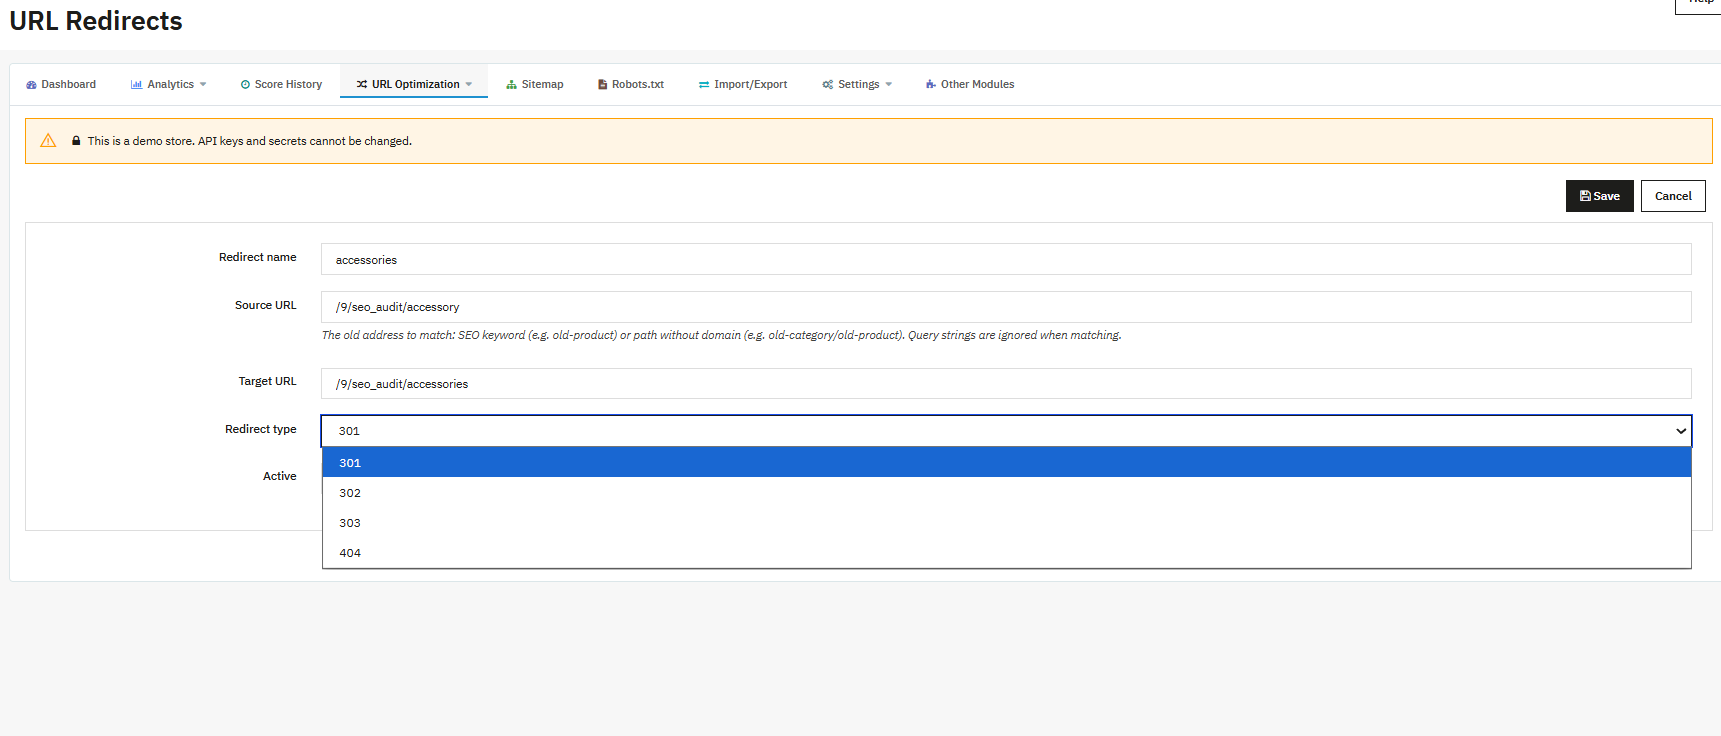
  • URL Optimisation tools: Pretty URLs, 404 monitoring, duplicate URL detection, URL redirects
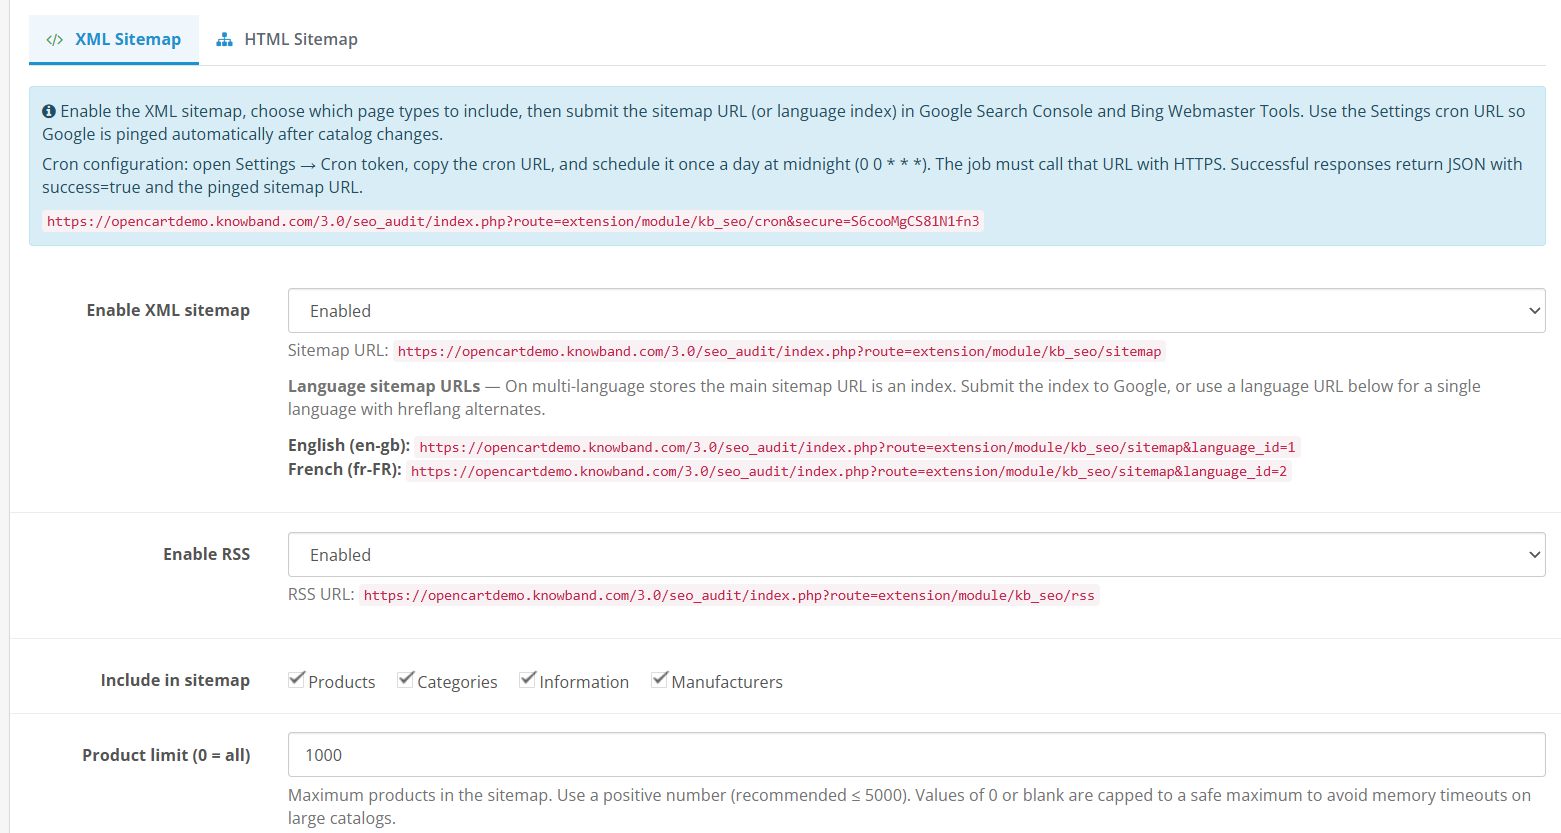
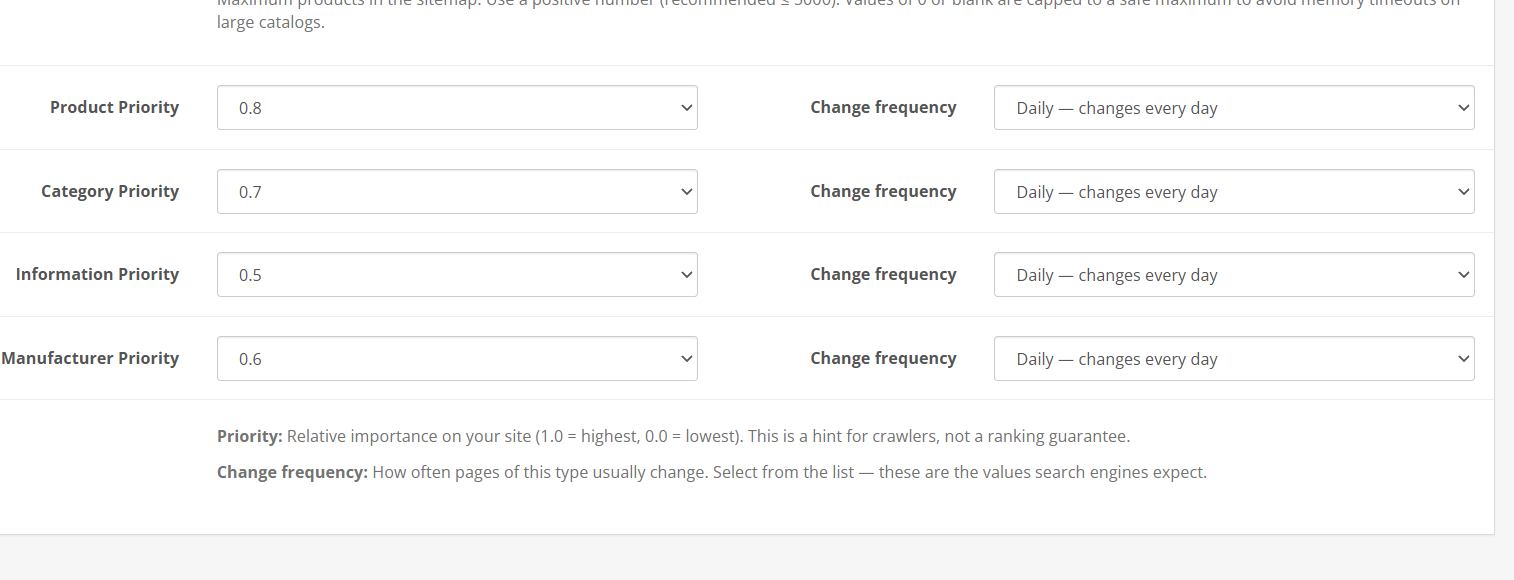
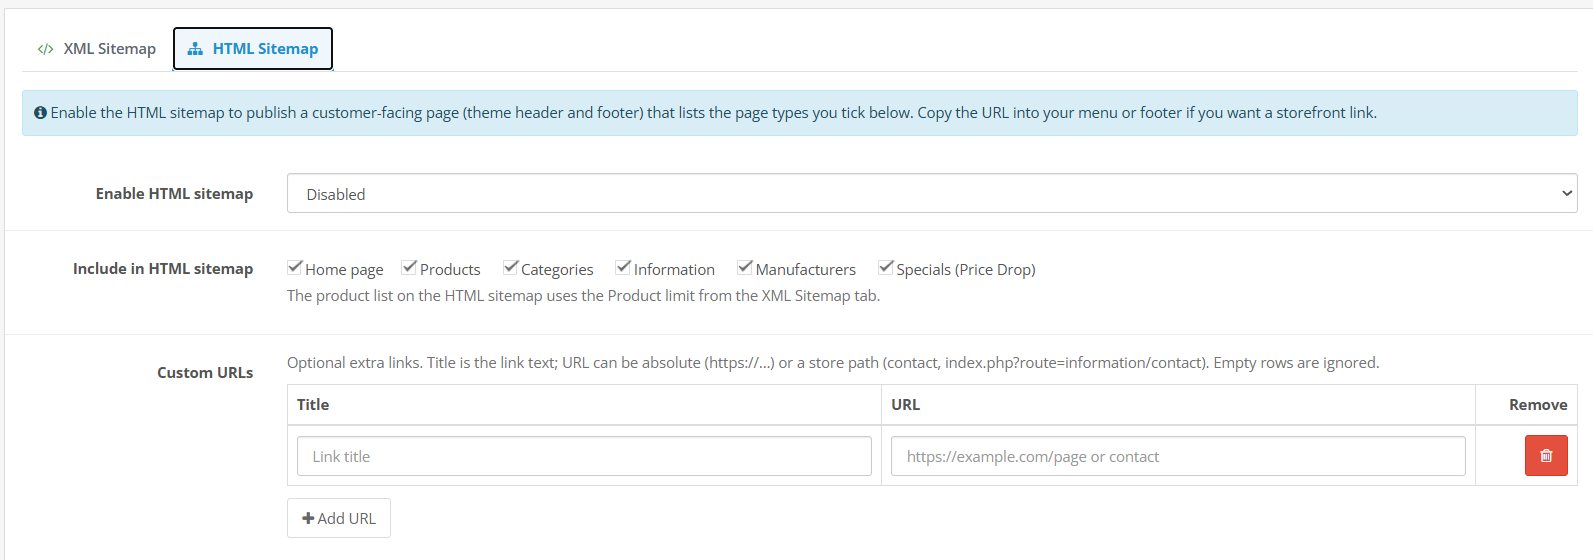
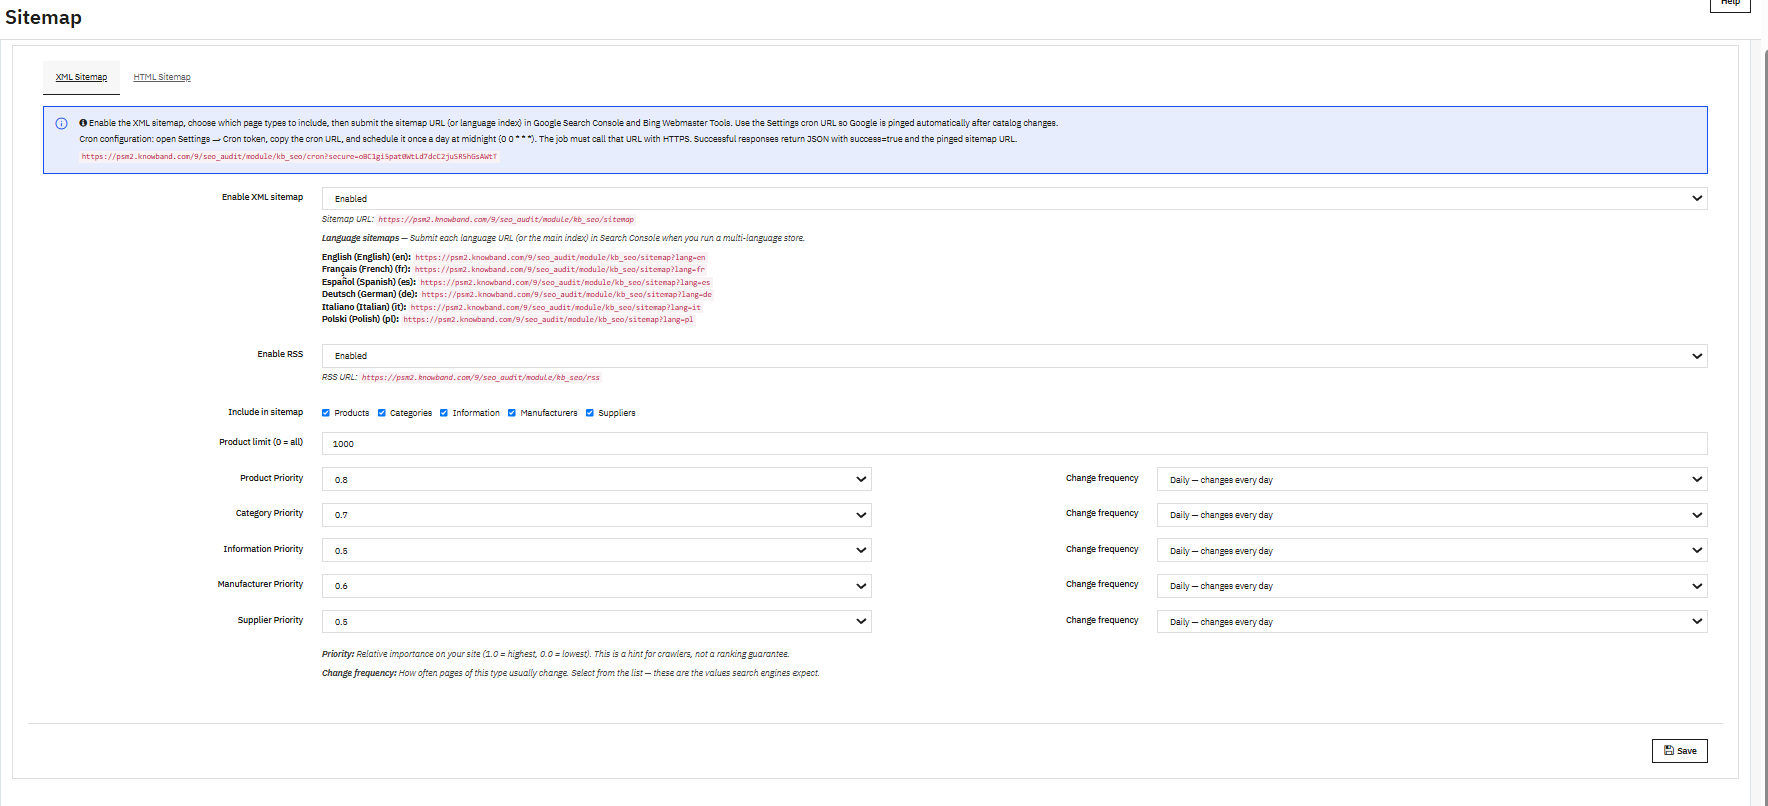
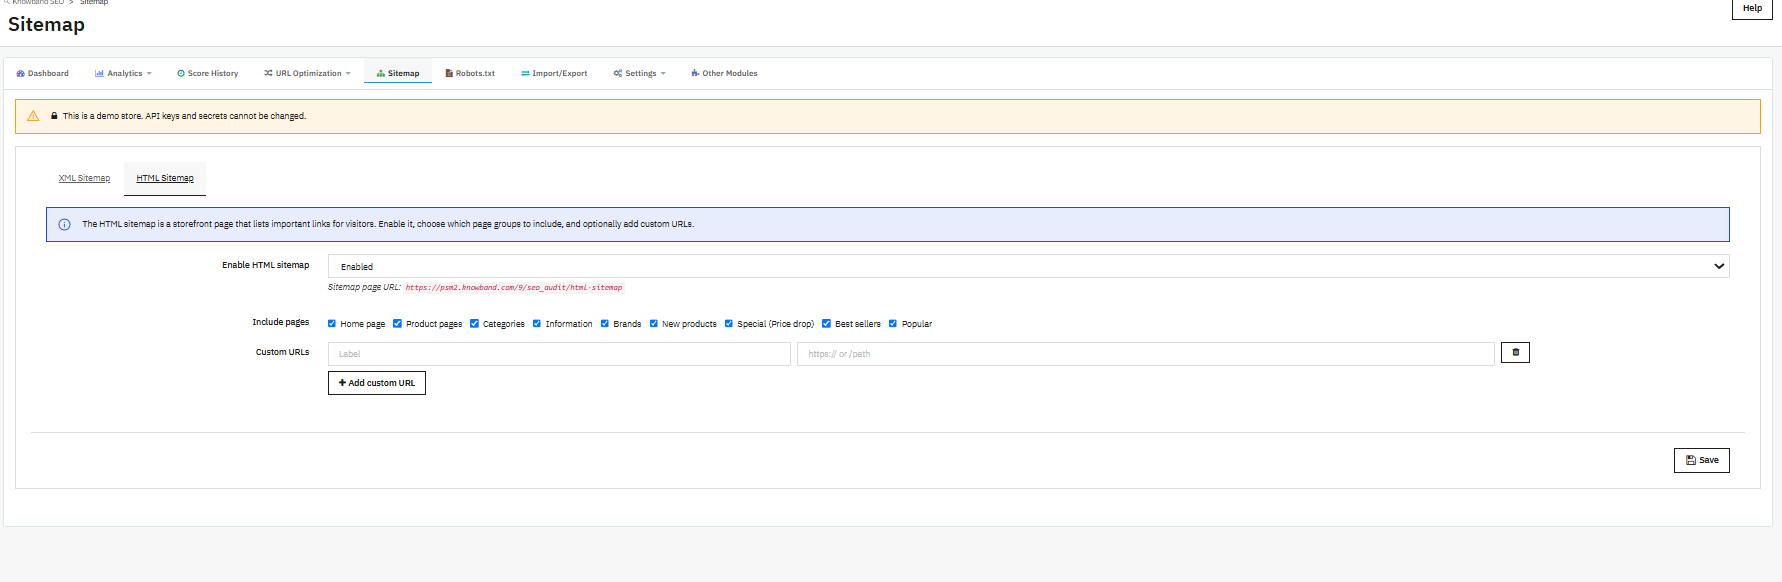
  • XML Sitemap and HTML Sitemap management, plus RSS output
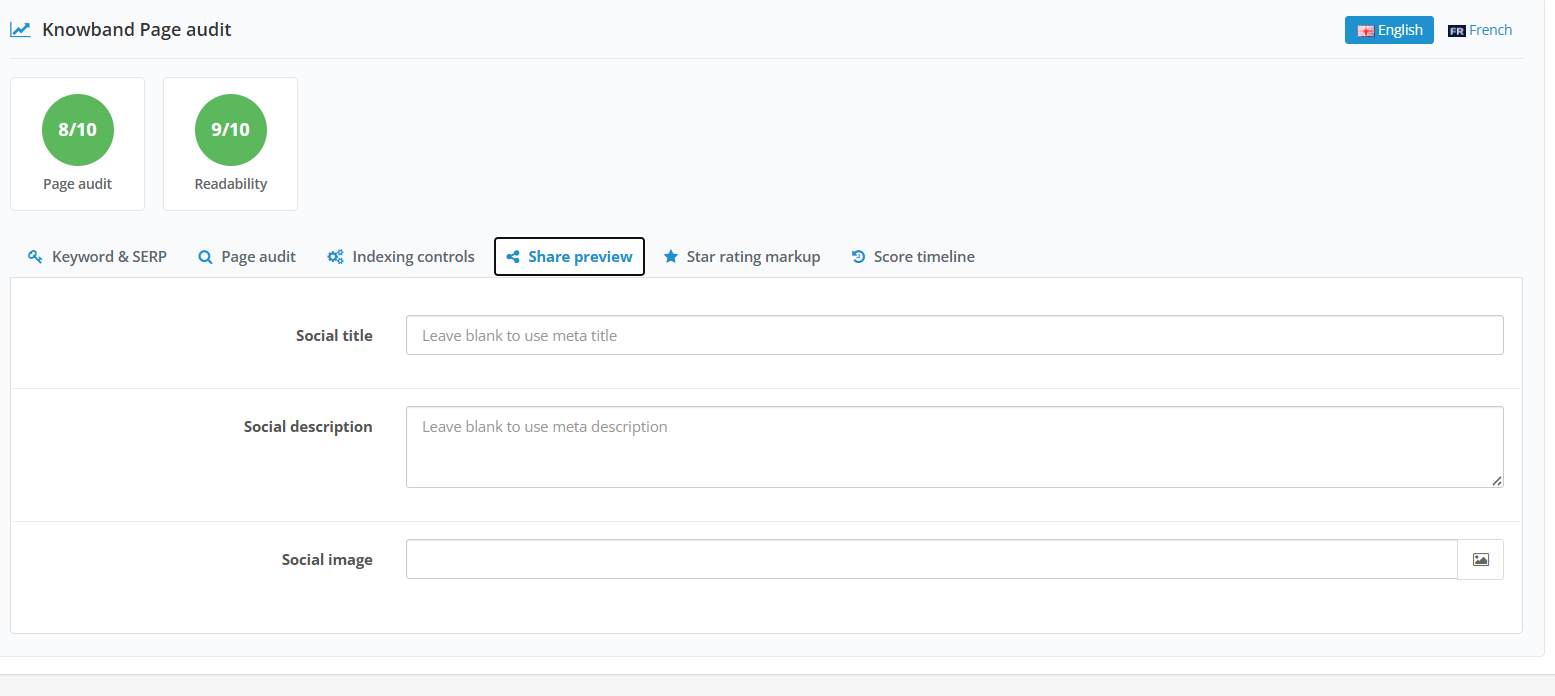
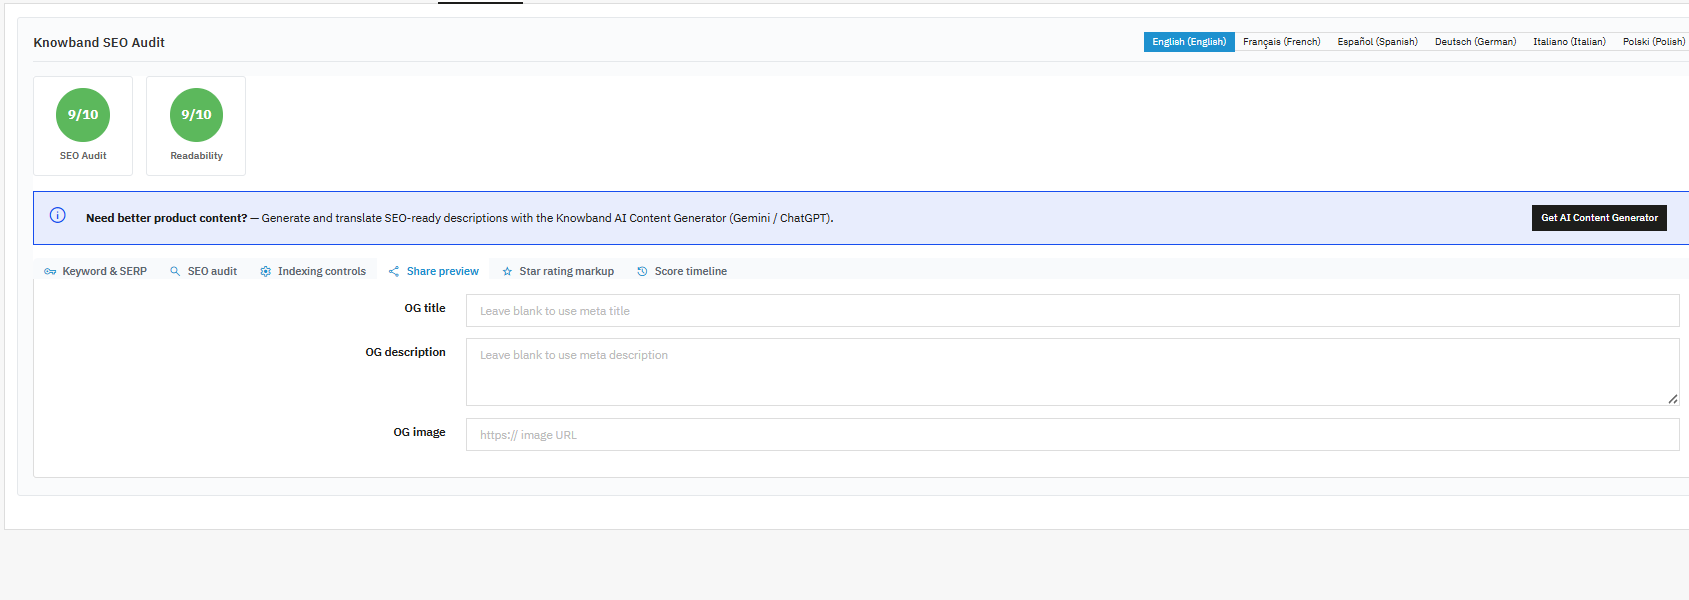
  • Social Cards for Open Graph and Twitter metadata
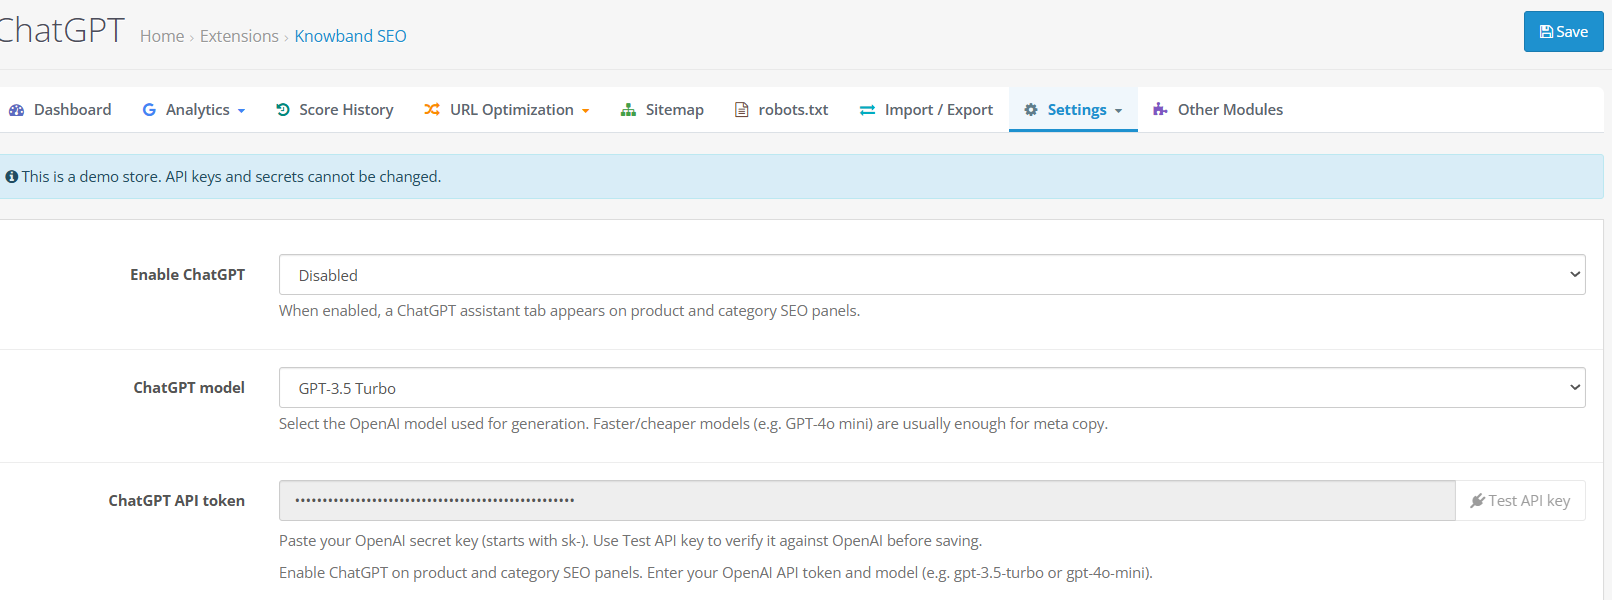
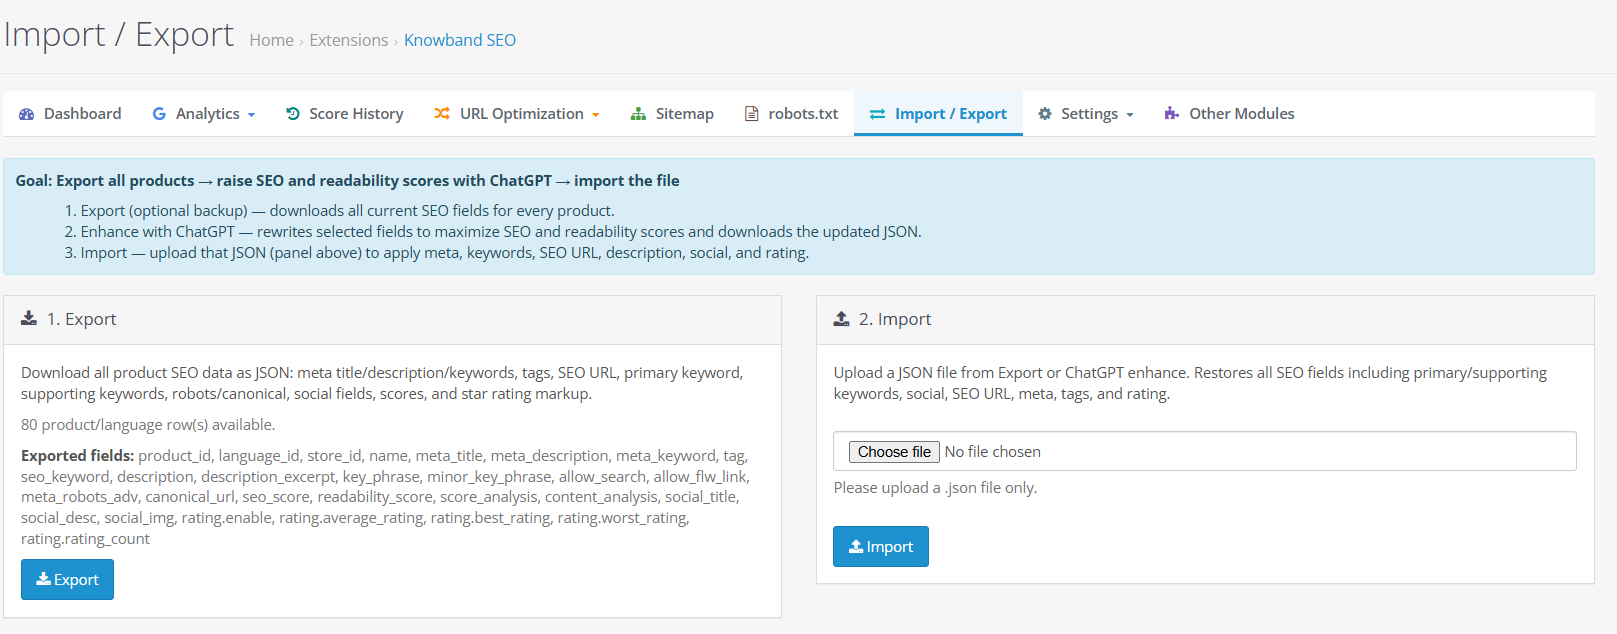
  • Built-in ChatGPT integration for meta titles, meta descriptions, and other SEO fields
  • Robots.txt editor tied to the live file
  • Google Analytics 4, Google Search Console, and PageSpeed Insights reports

3. How to Install the Prestashop SEO Audit Module

  1. Install the Prestashop SEO Audit Module and from the PrestaShop Admin Panel, go to Modules -> Module Manager to install the module. This module builds its own database for SEO, History, Redirects, 404 Monitoring, ChatGPT, and Sitemap
  2. A new Prestashop SEO Audit Module entry appears in the left menu, under Sell. This master switch determines if the module will affect the storefront at all.
  3. Turn on features that you will be using: SEO analysis, Readability analysis, Record 404s, URL redirects, XML sitemap, RSS.
  4. In case you will be using Google integration or ChatGPT, go to Analytics > Settings and ChatGPT, where you should provide the necessary credentials. It can be done later.
  5. Open any product, category, CMS page, manufacturer or supplier, where you should find the SEO Audit tab in the edit form; here SEO work will be done.
  6. As the module modifies metadata of storefront, redirects and generates public robots.txt and sitemap files, staged installation, starting with analysis and readability score generation, followed by redirects and sitemap generation once you gain confidence in generated data, is recommended rather than full activation from the very beginning.

4. Admin Overview of PrestaShop On-Page SEO checklist

Tabs included in the Prestashop SEO Audit Module Sidebar: Dashboard, Analytics, Score History, URL Optimisation (Pretty URLs, 404 URLs, Duplicate URLs, URL Redirects), Sitemap (XML Sitemap, HTML Sitemap), Social Cards, ChatGPT, Robots.txt, Import / Export, Settings and Others Modules. All tabs have been described field-wise below such that every setting which is visible to users is explained separately.

4.1 Dashboard

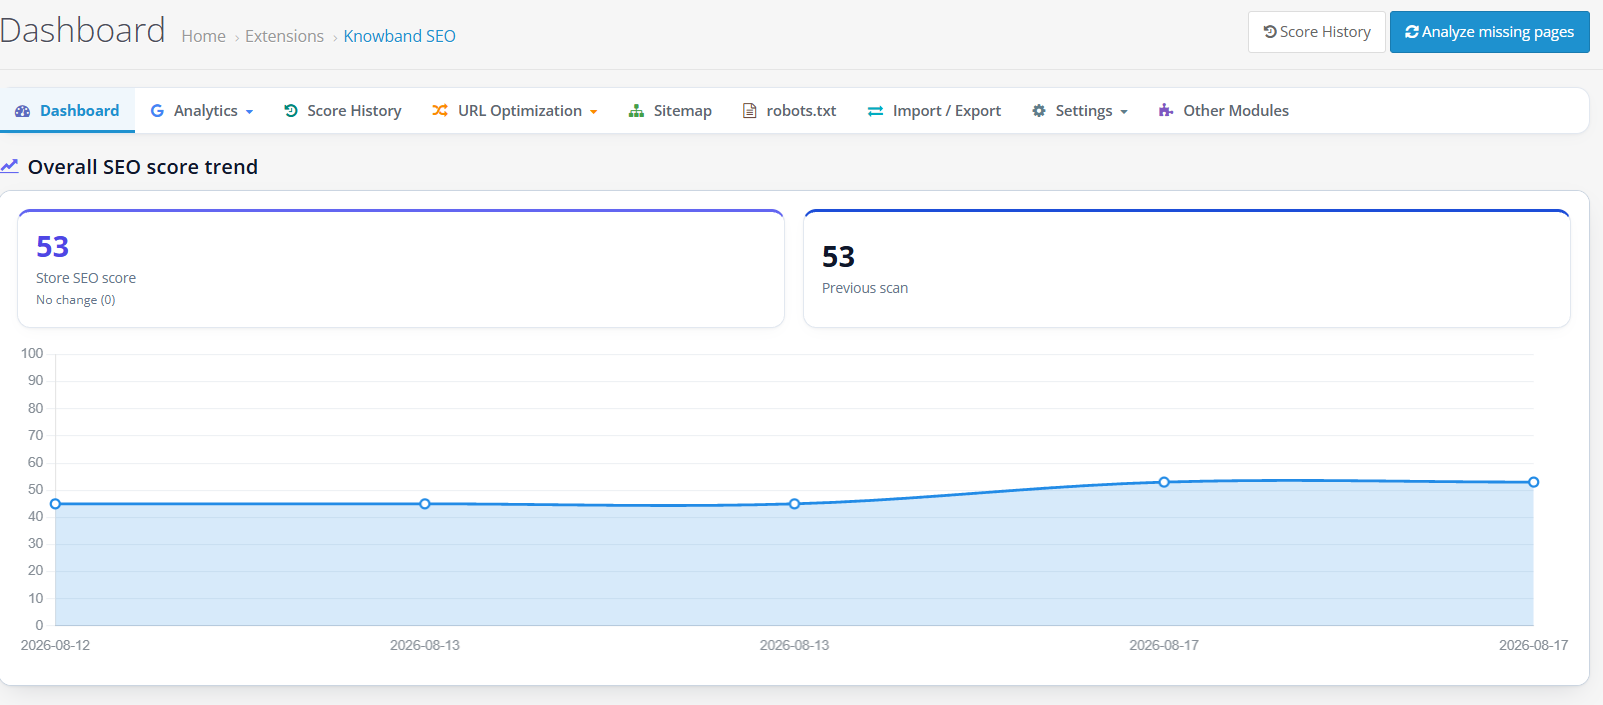
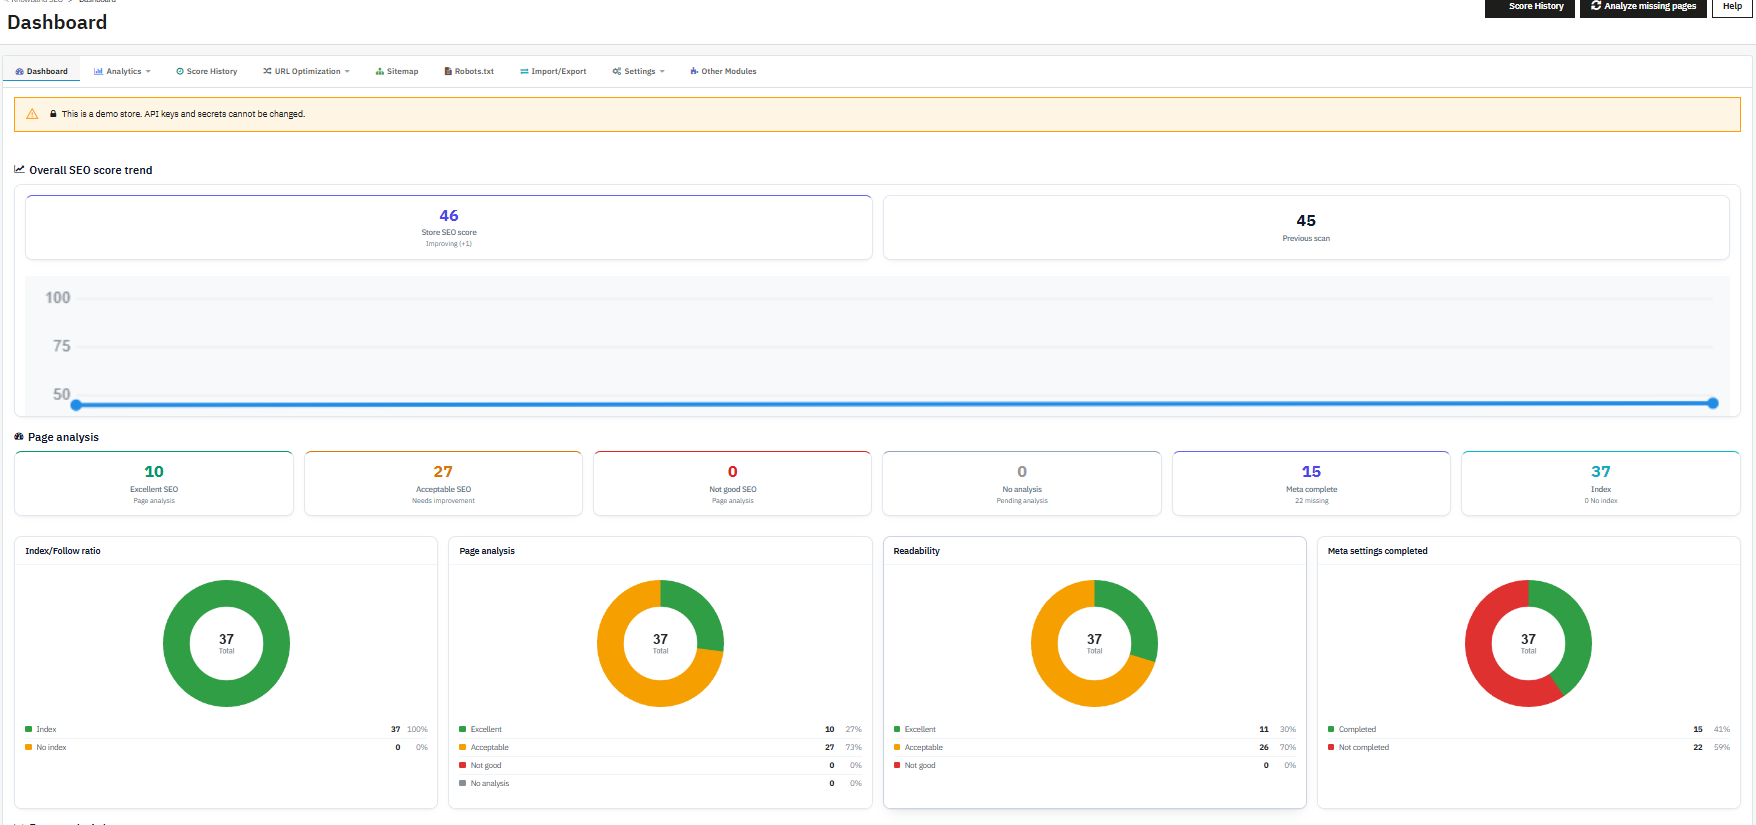
The Dashboard provides an overview of your store’s current SEO health.

Top Actions

  • History button: Will immediately redirect you to the page of historical trends
  • Analyse missing pages button: Prestashop SEO Audit Module performs the batch analysis for all products, categories, information pages, manufacturers, suppliers, which do not yet have the stored SEO score.

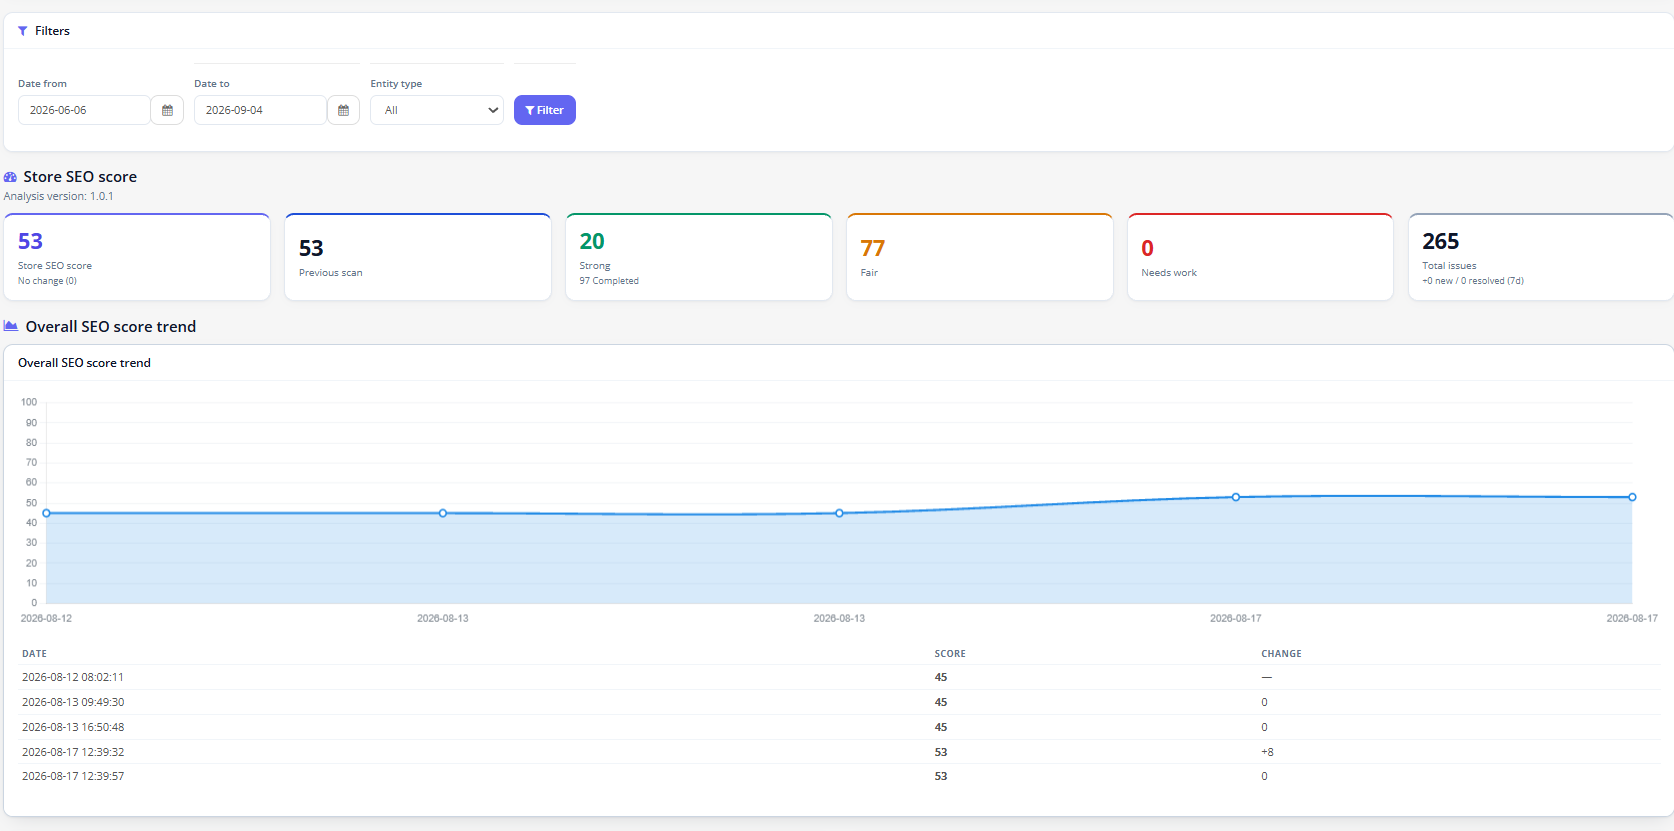
Panel of Overall SEO score trend

  • Store SEO score: The current overall score of the store (for instance, 46), which is derived by the score of each analysed page. This is the one figure to follow every week.
  • Label improving/declining/no change: Appears right beside the Store SEO score (for instance, “Improving (+1)”). It will instantly show you the direction of the change of the SEO of your store.
  • Score of previous scan: The score of the store from the last snapshot.
  • Trend graph: The line graph showing Store SEO score by recent snapshots.

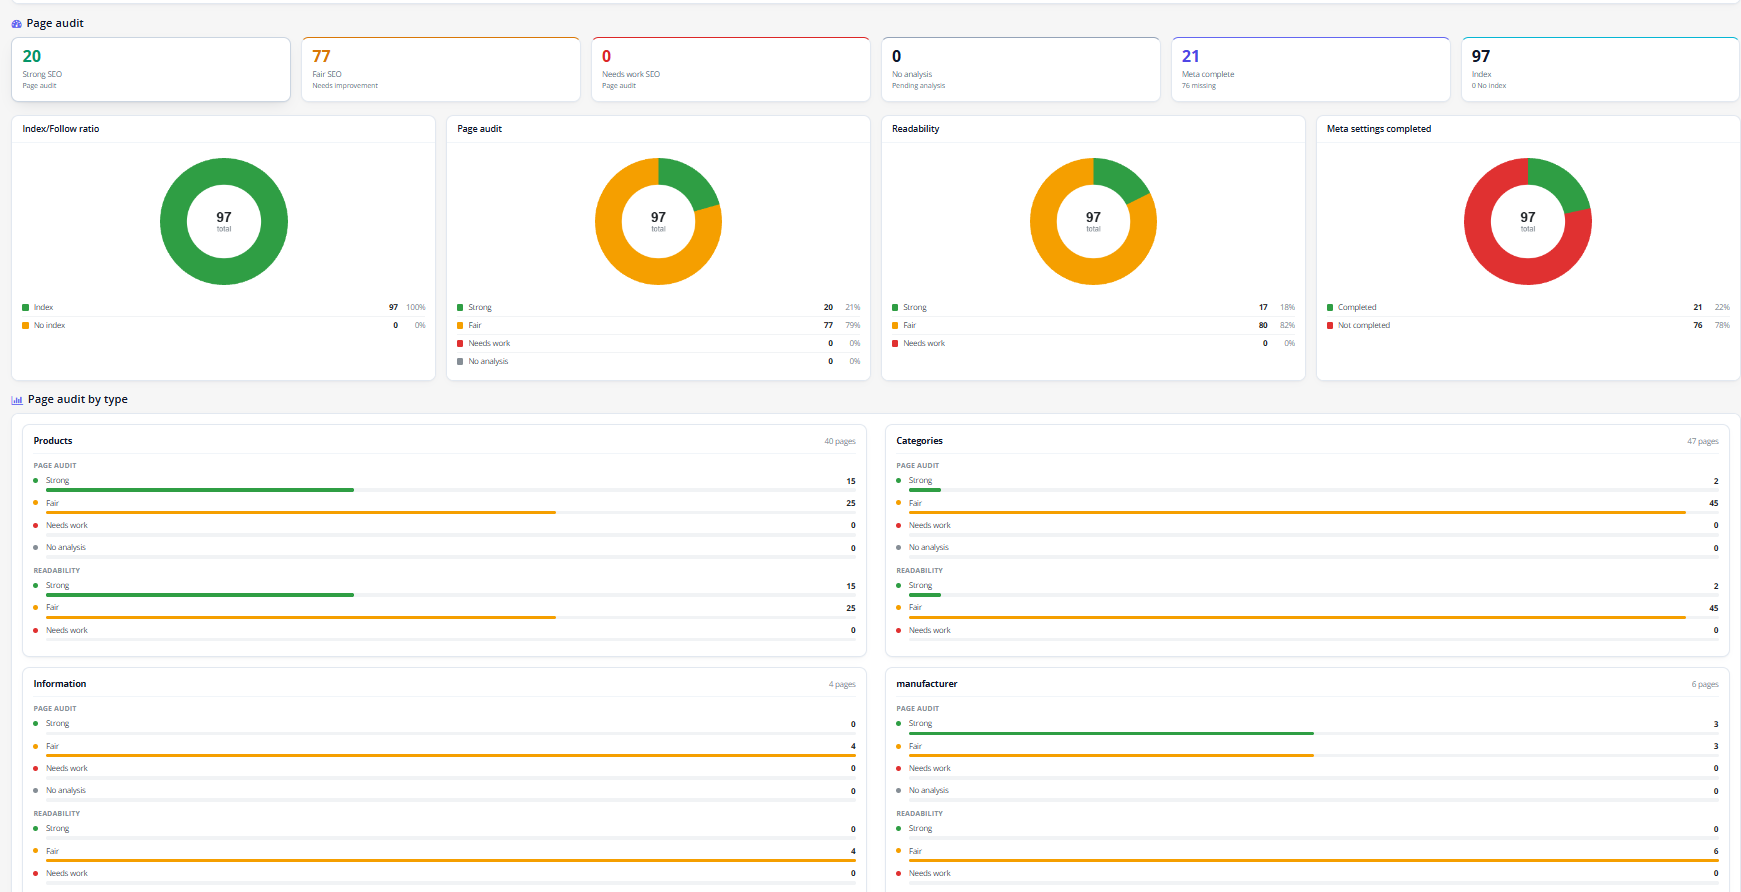
Page analysis cards

  • Excellent SEO: Count of analysed pages that pass nearly all audit rules. A rising number here means more of the catalogue is fully optimised.
  • Acceptable SEO (Needs improvement): Count of pages that are functional but have room to improve; this is usually the largest bucket in a growing catalogue.
  • Not good SEO: Count of pages failing most audit rules and needing priority attention.
  • No analysis (Pending analysis): Count of pages that have never been scored. A non-zero number here is a signal to run Analyse missing pages.
  • Meta complete/missing: How many pages have both a meta title and meta description filled in, and how many are still missing one or both. Missing metadata is one of the fastest, highest-value fixes available.
  • Index / No index: How many analysed pages are set to be indexed by search engines versus deliberately excluded. A high No index count on pages that should be visible is worth investigating.

Donut charts

  • Index/Follow ratio: Shows the proportion of analysed pages set to Index versus No index, so you can confirm important pages are not accidentally hidden from search engines.
  • Page analysis: Breaks the same Excellent/Acceptable/Not good/No analysis buckets down as percentages of the total analysed catalogue.
  • Readability: Shows the same breakdown for the Readability score specifically, separate from the SEO Audit score.
  • Meta settings completed: Shows what percentage of pages have finished meta title and description setup versus still needing attention.

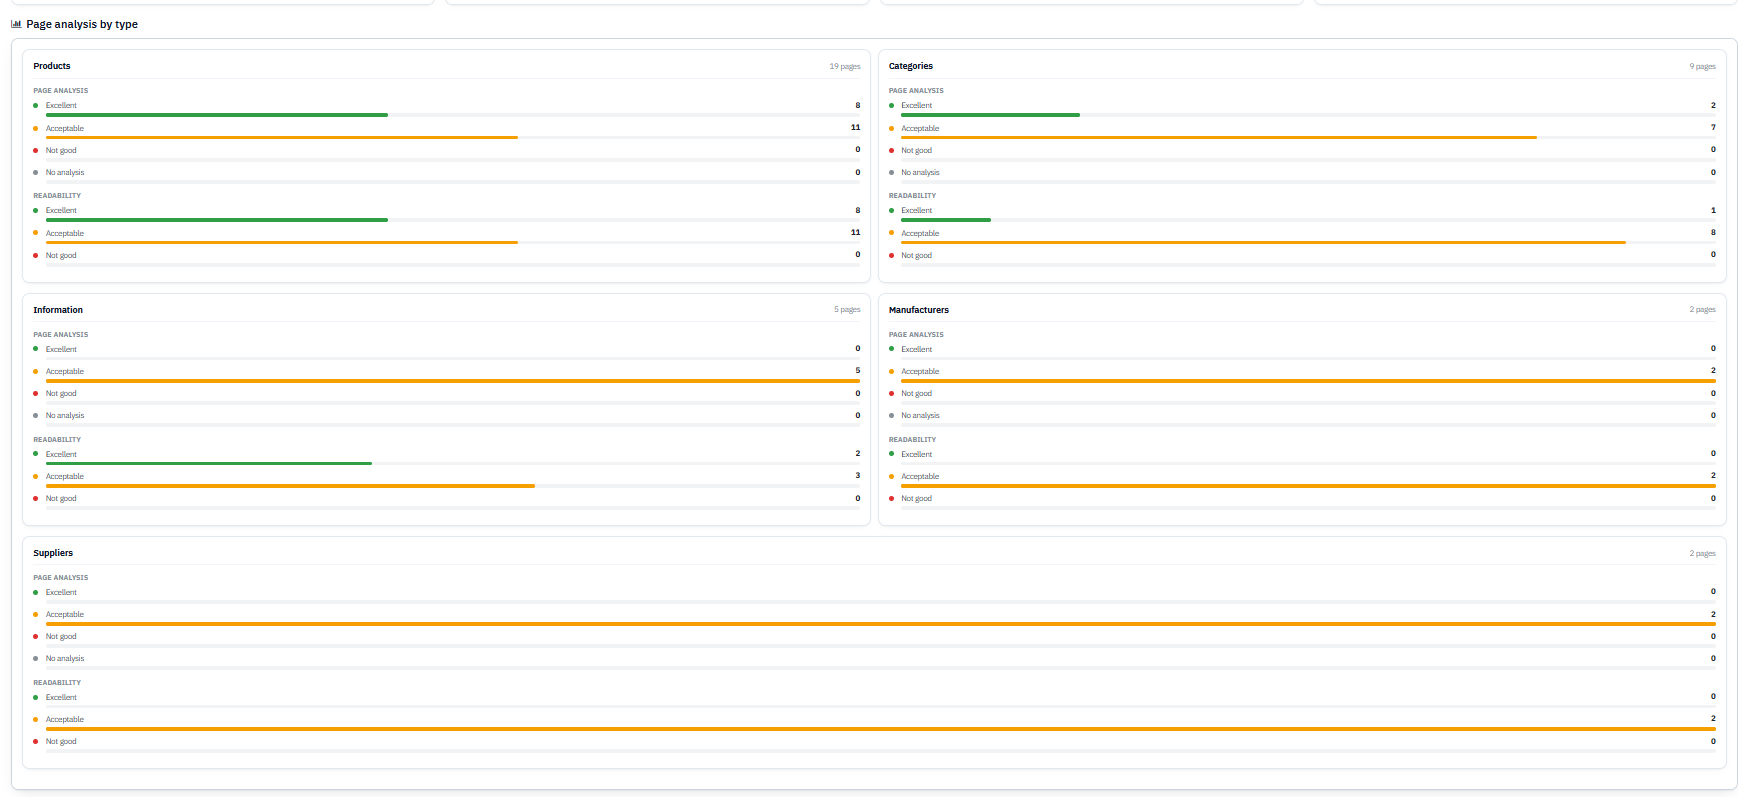
Page analysis by type

The above pattern, repeated for each entity type (Products, Categories, Information, Manufacturers, Suppliers), with each displaying the number of pages belonging to this category and their respective Page Analysis (Excellent/Acceptable/Not good/No analysis) and Readability (Excellent/Acceptable/Not good) statistics. For example, the above illustrates the relatively poor performance of Categories compared to Products in terms of readability.

SEO checklist

A list of ten store-level requirements, each shown as Completed or Not completed with an action button:

  • SEO URLs enabled: Confirms PrestaShop’s own friendly URL setting is active, a prerequisite for clean, readable page addresses.
  • SSL enabled: Confirms the storefront is served over HTTPS, which search engines treat as a baseline trust signal.
  • XML sitemap enabled: Confirms the module’s XML sitemap output is switched on.
  • Robots.txt exists: Confirms a robots.txt file is present and reachable at the storefront.
  • Maintenance mode is off: Confirms the store is not accidentally left in maintenance mode, which would block all crawling and all visitors.
  • Webmaster verification configured: Confirms a Google or Bing verification code has been entered under Settings
  • URL redirects enabled: Confirms the redirect engine is active, so any redirects you create actually take effect on the storefront.
  • RSS enabled: Confirms the RSS feed output is switched on.
  • Knowband Blog: Indicates whether the companion Knowband Blog module is installed; shown with a Buy button when it is not, since blog SEO features only appear once that module is present.
  • LLMs.txt available: Indicates whether an llms.txt file, used to describe the site to AI crawlers, is available

4.2 Analytics

The Analytics section connects Prestashop SEO Audit Module to Google Analytics 4, Google Search Console, and PageSpeed Insights, and is organized into an overview page, three data-source reports, and a Settings page.

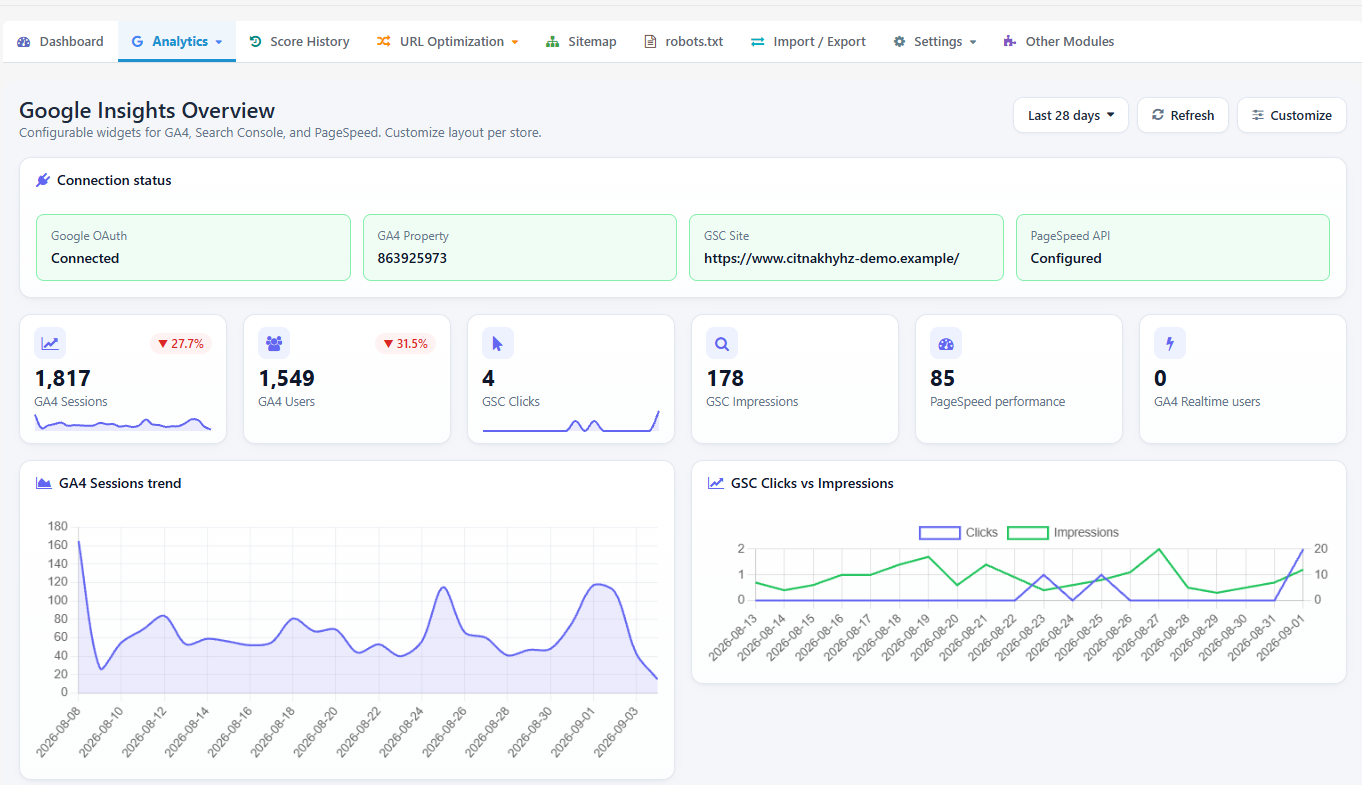
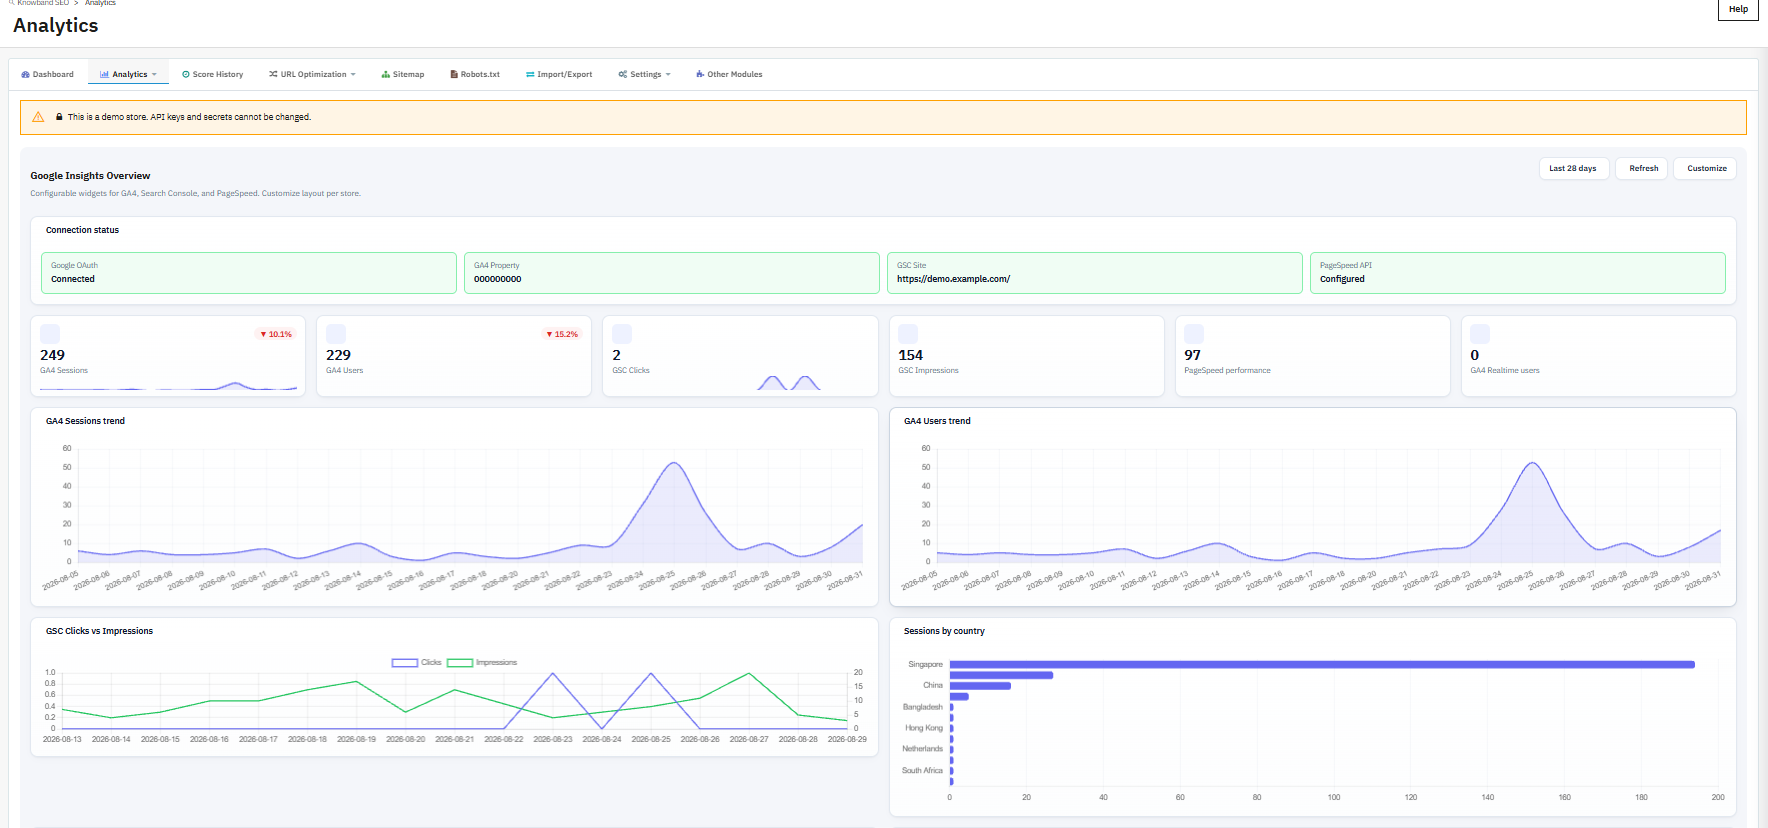
4.2.1 Analytics overview (Google Insights Overview) in Prestashop SEO Audit Module

  • Period selector (for example, Last 28 days): Sets the reporting window used across all the summary cards and charts on this page.
  • Refresh button: Reloads the widgets with the latest data from Google without leaving the page.
  • Customise button: Opens the widget library so you can control which cards appear.
  • Connection status panel: Shows four indicators at a glance: Google OAuth (Connected or not), GA4 Property (the connected property ID), GSC Site (the connected Search Console property URL), and PageSpeed API (Configured or not). This is the fastest way to confirm the integration is actually working before trusting any numbers below it.
  • GA4 Sessions card: Total GA4 sessions for the period, with a percentage change versus the prior period.
  • GA4 Users card: Total GA4 users for the period, with a percentage change.
  • GSC Clicks card: Total Search Console clicks for the period.
  • GSC Impressions card: Total Search Console impressions for the period, with a percentage change.
  • PageSpeed performance card: The most recent PageSpeed performance score.
  • GA4 Realtime users card: Users active on the storefront in the last 30 minutes.
  • Trend lines for GA4 Sessions / Trend line for GA4 Users charts: Daily line graphs for GA4’s top metrics.
  • Chart for GSC Clicks vs Impressions: Shows both clicks and impressions on the same chart to see if there is conversion of the impression numbers into clicks.
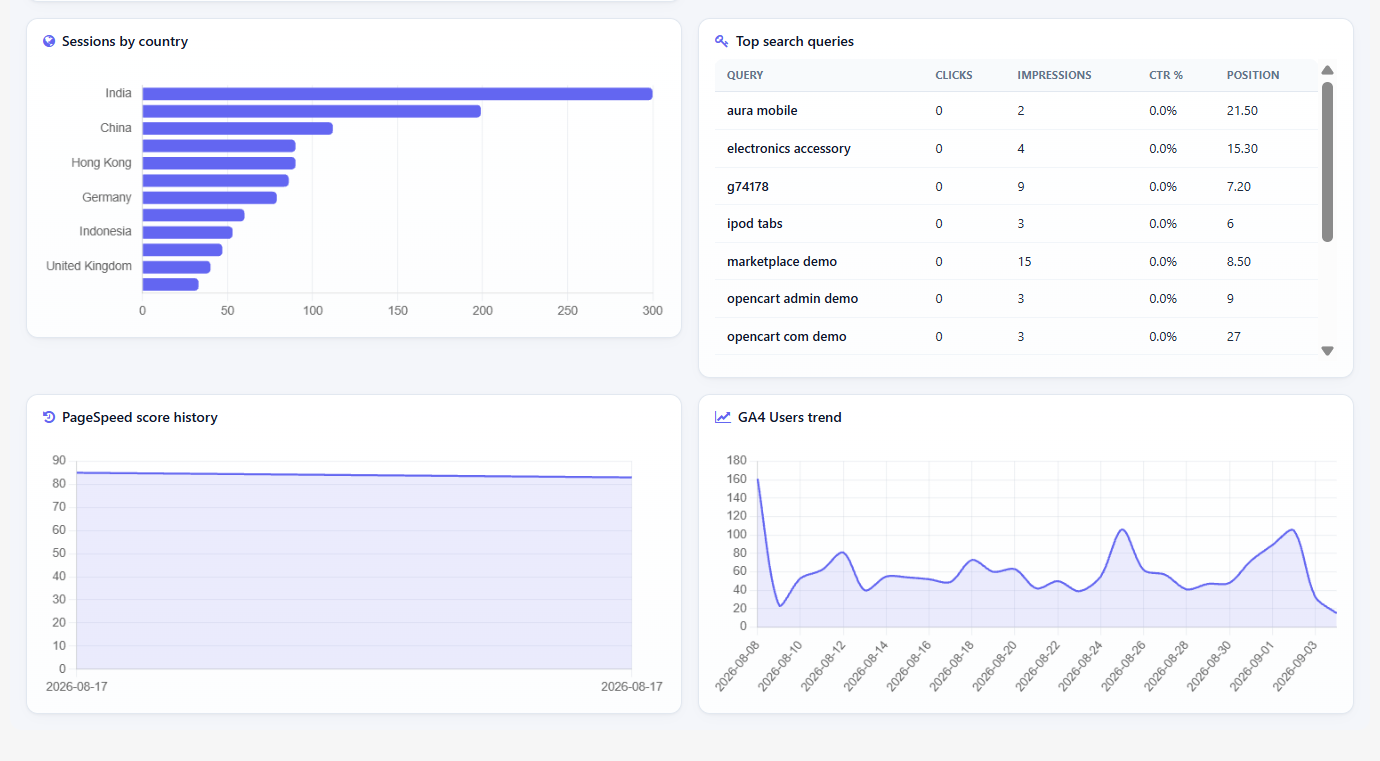
  • Sessions by Country chart: Bar graph of sessions by visitor country, helpful in seeing if traffic is matching up with target market.
  • Table for Top Search Queries: List of Search Console queries that generate traffic, with Clicks, Impressions, CTR, and Position columns.
  • Trend line for PageSpeed Score history chart: Graph that tracks the history of PageSpeed scores – easy to see the impact of a theme or content change in a regression.

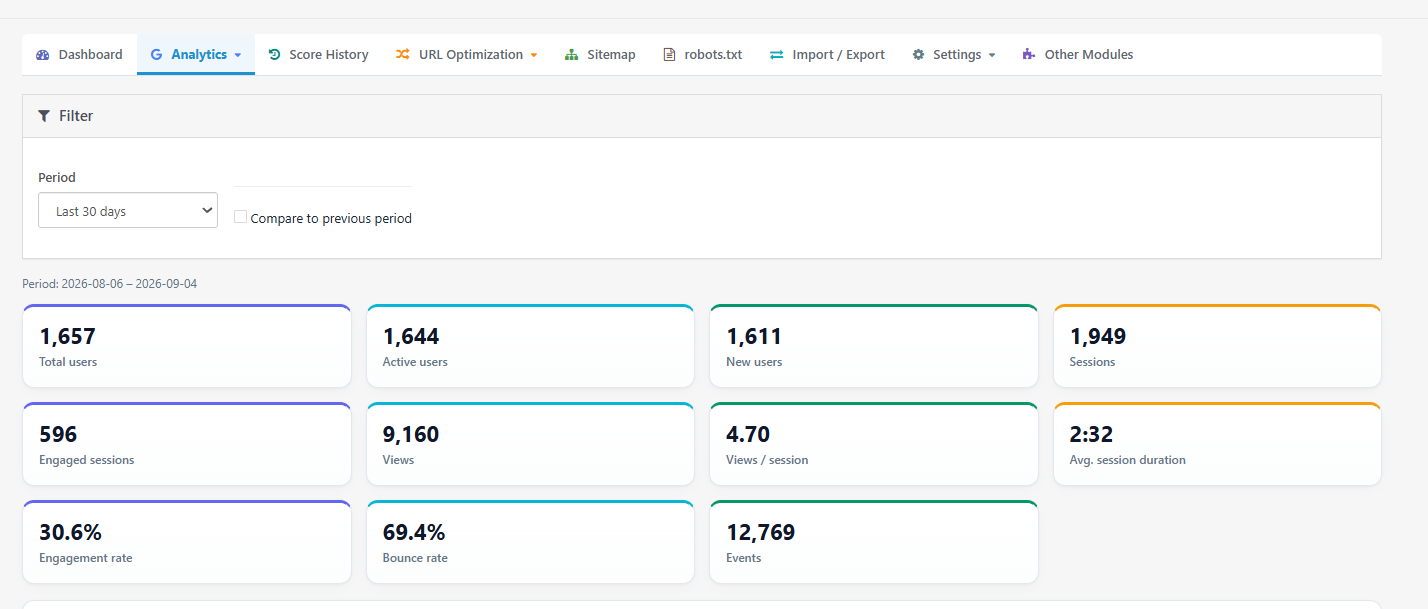
4.2.2 How to check GA4 report  for Prestashops store

  • Period dropdown: Chooses the reporting window (for example, Last 28 days).
  • Compare to previous period checkbox: Check to compare the current data to that of the previous period
  • Total users / Active users / New users: Default GA4 audience measures – reach, active visitors and new visitors, respectively.
  • Sessions: Total number of visits.
  • Engaged sessions: Number of sessions that passed GA4’s engagement criterion (interaction beyond immediate bounce).
  • Views: Total number of page views during the period.
  • Views / Session: Average pages viewed per session, i.e. how deep the visitor is exploring the site.
  • Avg. session duration: Average time spent per visit.
  • Engagement rate / Bounce rate: % of engaged sessions / % of bounces (these two are in inverse correlation and should be watched together).
  • Events: Total number of tracked GA4 events during the period.
  • Realtime panel (Active users, By country, By device, By page): Who is on the website right now and where are they from, helpful for validating traffic driven by campaigns/promotions.
  • Traffic over time graph (Sessions/Users/Views checkboxes): Combined graph that allows to show/hide sessions/users/views.
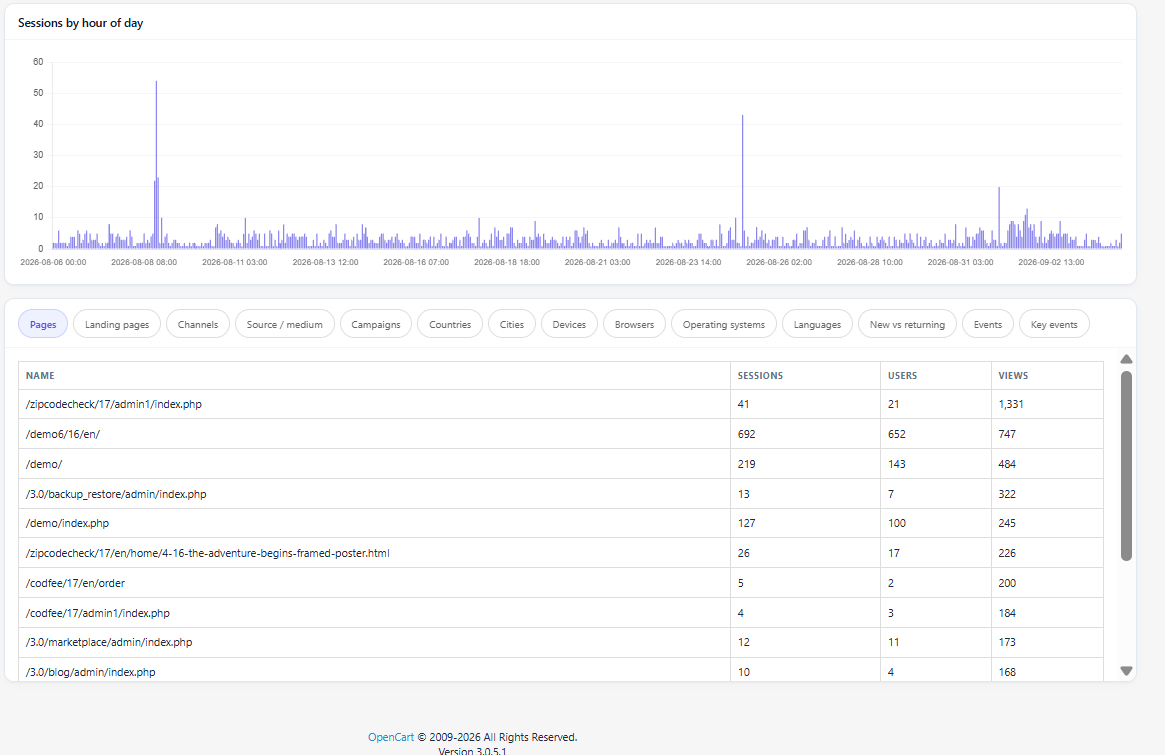
  • Sessions by hour of day graph: Sessions distribution by hour of the day, allowing to determine most active hours, good for scheduling promotions or maintenance.
  • Dimension tabs (Pages, Landing pages, Channels, Source/medium, Campaigns, Countries, Cities, Devices, Browsers, Operating systems, Languages, New vs returning, Events, Key events): Tabs with Sessions, Users, and Views data segmented by the corresponding dimension, allows to ask very specific questions such as “which landing page performs better” or “which traffic channel performs better”.

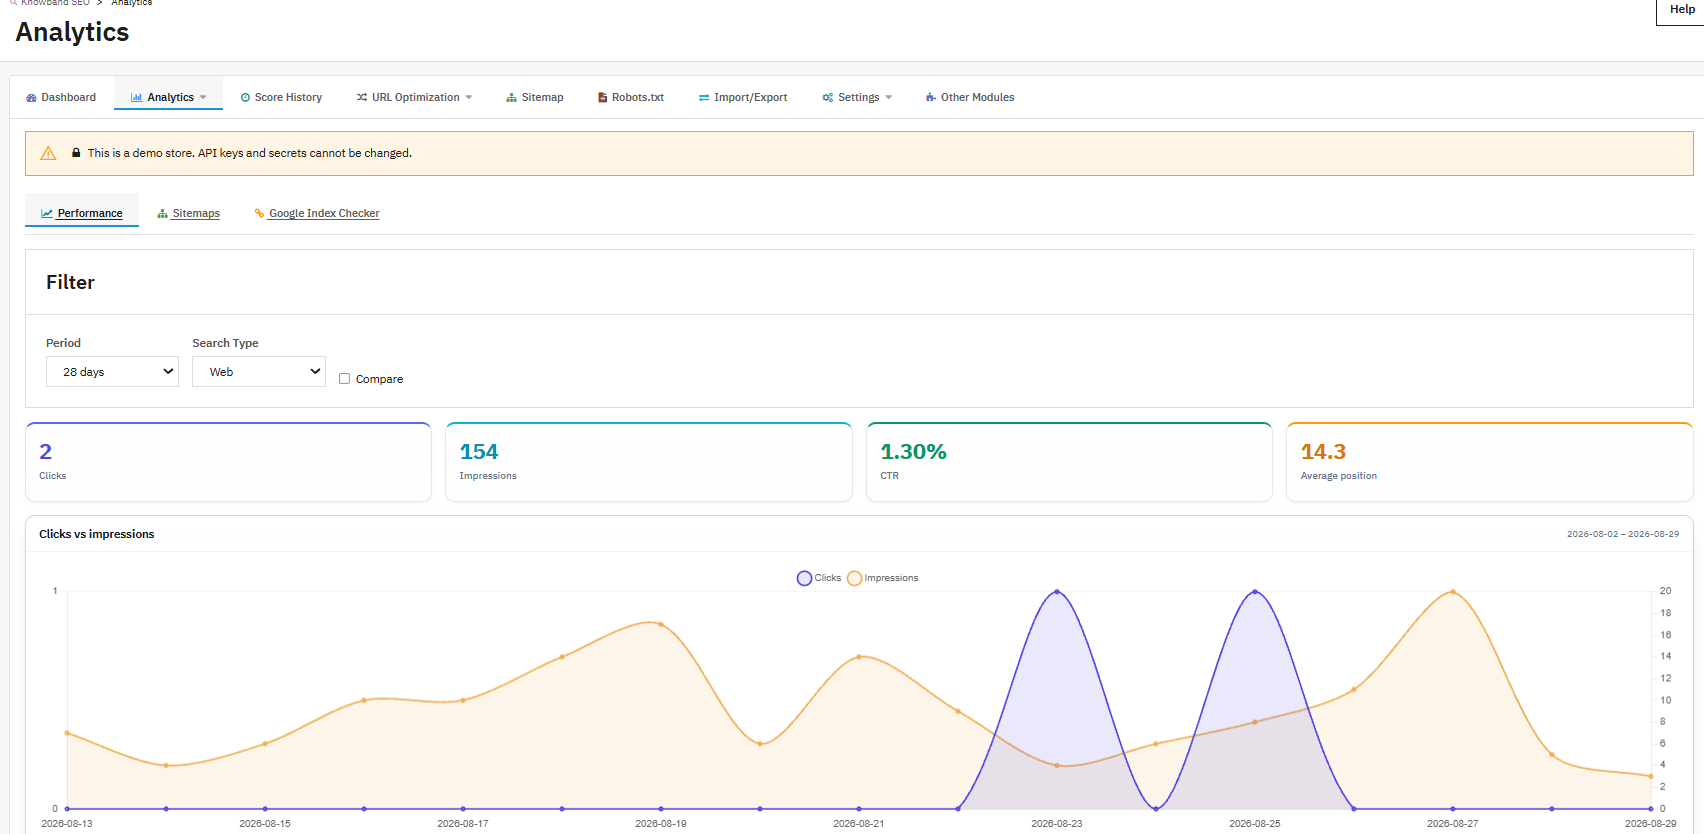
4.2.3 How to Analyse the Google Search Console report

  • Period dropdown: Sets reporting period (e.g. 28 days).
  • Search Type dropdown (Web, Image, Video, News, Discover, googleNews): Allows filtering the report to specific type of Google search result.
  • Compare checkbox: Allows comparing the current data with the previous period when checked.
  • Clicks card: Total number of clicks to your storefront from Google search results.
  • Impressions card: Total number of impressions in Google search results, including unclicked results.
  • CTR card: Click-through rate, % of impressions that converted into clicks.
  • Average position card: The average ranking position of your pages for the queries that triggered them; a lower number is better.
  • Comparison of clicks and impressions graph: Displays the relationship between these two measures to determine if the rate of visibility is rising or falling in comparison to clicks.
  • Queries/Pages/Countries/Devices/Search Appearance tabs: All these allow you to break down the Clicks, Impressions, CTR, and Positions by these parameters to determine, for instance, what query results in the largest number of clicks or what country has the highest impressions.
  • Sitemaps sub-tab: Manages sitemap URLs without leaving Search Console/

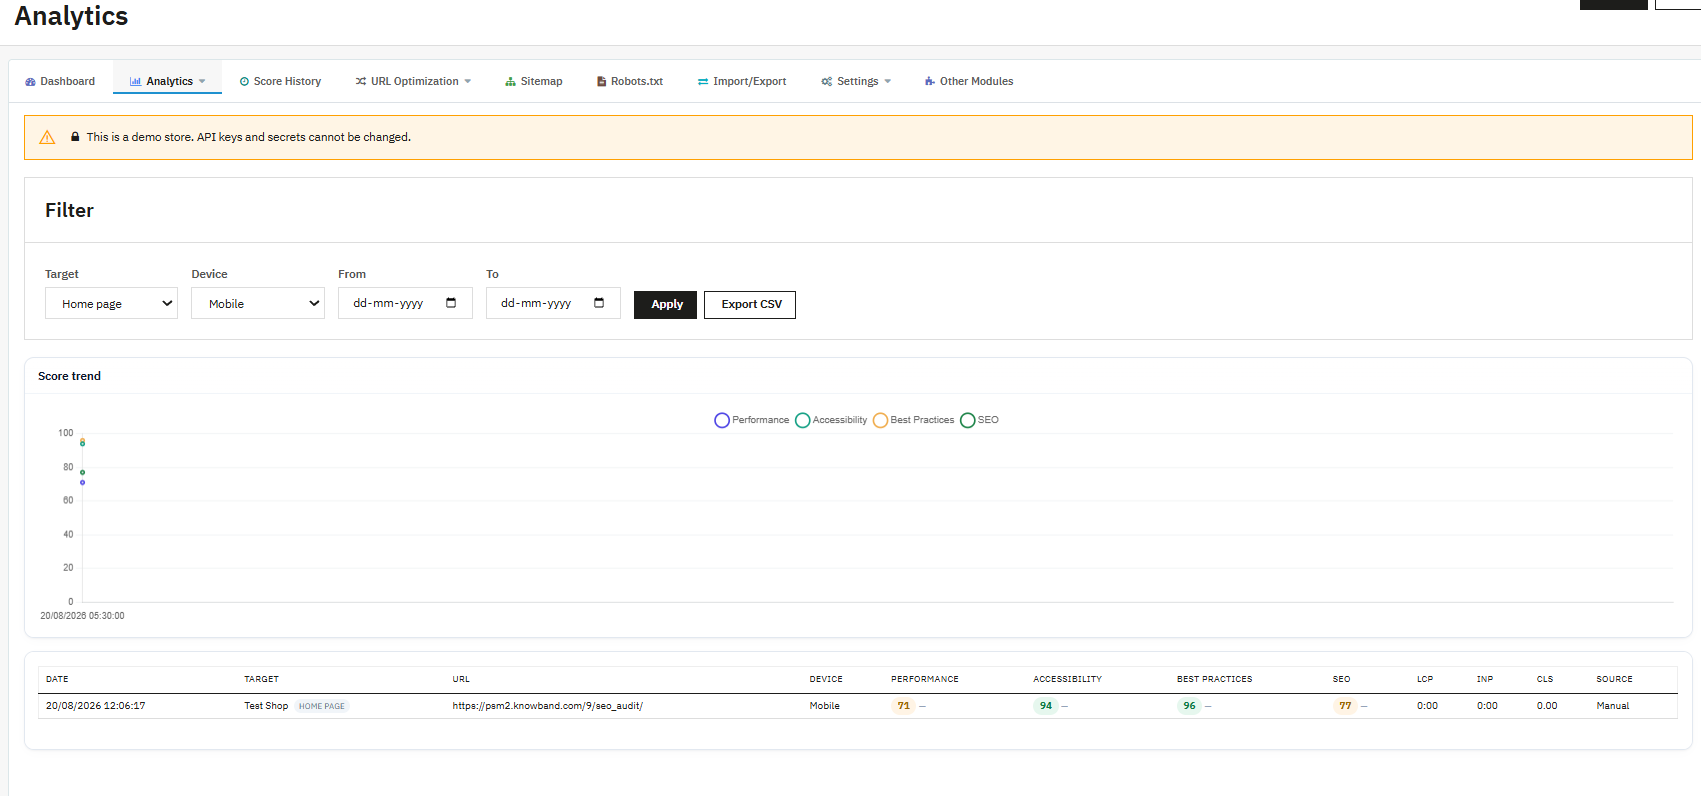
4.2.4 PageSpeed report

  • Run button: Starts a new PageSpeed test against the selected target.
  • Target dropdown (Home page, Category, Product, Custom URL): Chooses which page type to test.
  • Device dropdown (Mobile, Desktop): Chooses which device profile to filter the history table by; a full Run tests both automatically.
  • From / To date fields: Restrict the history table to a specific date range.
  • Apply Button: Applies the applied filters to the History Table that follows.
  • Export to CSV Button: This exports the filtered history data in CSV format so that it can be analyzed later on
  • Score Trend Graph (Performance, Accessibility, Best Practices, SEO): This is the graph where all the four PageSpeed scores will be plotted throughout time, and this will help you to know whether there are any improvements or deterioration in the PageSpeed score since the latest modifications.
  • History Table Fields: Date (Test date), Target (Type of web page tested), URL (URL tested), Device (Mobile/Desktop), Performance/Accessibility/Best Practices/SEO (PageSpeed Score), LCP/INP/CLS (Core Web Vitals field/lab), and Source (Manual/Cron).4.2.5 Analytics Settings (Analytics Settings)

General Setting Configuration

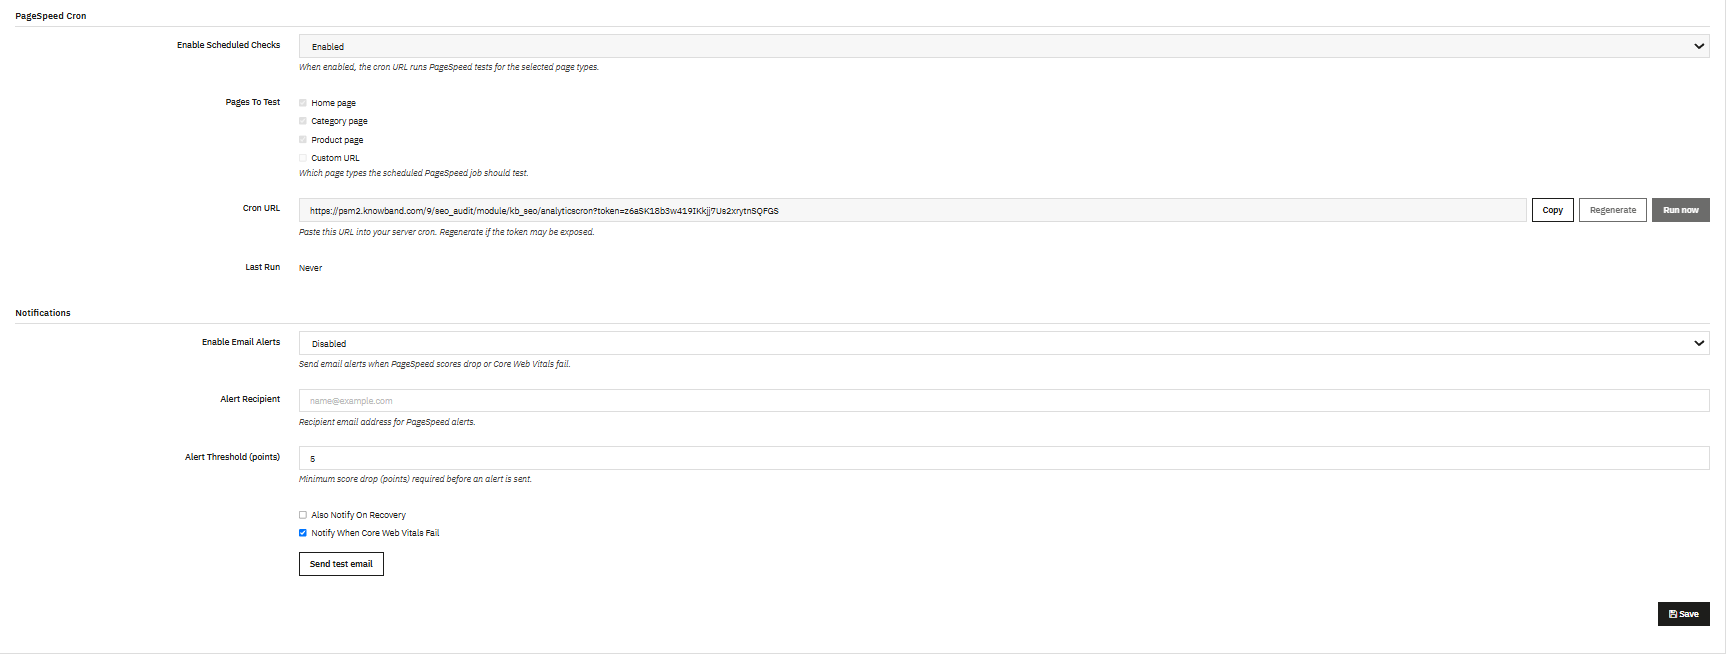
  • Analytics Status: Enables or disables Analytics data collection and dashboards store-wide. Nothing in the Analytics section works until this is Enabled.
  • Default Period (days): The default reporting window, in days, used by dashboard widgets when no other period is selected (for example, 28).
  • API Cache TTL (minutes): How long API responses are cached before the module requests fresh data again. A higher value reduces API usage but delays how quickly new data appears; a lower value shows fresher data but calls the Google APIs more often.
  • Search Console Data Lag (days): Search Console data is delayed by Google itself, so this setting tells the module to skip the most recent N days when querying, avoiding incomplete or misleading recent-day figures.
  • History Retention (days): How many days of PageSpeed history to keep before older rows are automatically pruned, keeping the history table from growing indefinitely.

How to create Google Client Secret ID and Client ID for Google Analytics 4

  • PageSpeed API Key: Your Google PageSpeed Insights API key from Google Cloud, required for the PageSpeed report and scheduled checks to run at all.
  • Google OAuth Client ID: The OAuth 2.0 Client ID from your Google Cloud credentials, used to authorize the module to read GA4 and Search Console data on your behalf.
  • Google OAuth Client Secret: The matching OAuth 2.0 Client Secret. Both this and the Client ID must be saved before the Connect with Google button becomes usable.
  • Connected indicator and Disconnect Google button: Shows whether the module currently has an active Google connection, and lets you revoke stored access, refresh, and expiry tokens if you need to reconnect or switch Google accounts.

Properties (Store)

  • Search Console Property: The Search Console property URL used for this specific store; select one from the loaded list or enter it manually if the list fails to load. A refresh icon reloads the list of properties your connected Google account has access to.
  • GA4 Property: The GA4 property ID used for this store, selected from the loaded list or entered manually, with the same refresh option.
  • PageSpeed Test URL: The default URL tested when no other target is specified; if left blank, the store’s home URL is used instead.
  • Custom Test URL: An optional additional URL, used only when Custom URL is selected as a PageSpeed Cron target.

PageSpeed Cron

  • Enable Scheduled Checks: Turns on automatic, scheduled PageSpeed testing rather than relying on manual Run clicks.
  • Pages To Test (Home page, Category page, Product page, Custom URL checkboxes): Chooses which page types the scheduled job actually tests each time it runs.
  • Cron URL, Copy button, Regenerate button, Run now button: A unique, tokenized URL to paste into your server’s scheduled task system so PageSpeed tests run automatically on a timer. Copy grabs the URL, Regenerate invalidates the old token and issues a new one (useful if the URL was ever exposed), and Run now triggers the configured job immediately for testing.
  • Last Run: Shows the timestamp of the most recent scheduled run, or “Never” if the cron has not fired yet, which is a quick way to confirm your server scheduler is actually calling the URL.

Notifications

  • Enable Email Alerts: Turns on email notifications when PageSpeed scores drop or Core Web Vitals fail.
  • Alert Recipient: The email address that receives these alerts.
  • Alert Threshold (points): The minimum score drop, in points, required before an alert is triggered, preventing alerts from firing on minor, normal fluctuation.
  • Also Notify On Recovery checkbox: When enabled, sends a follow-up notification once a previously dropped score recovers.
  • Notify When Core Web Vitals Fail checkbox: Controls whether Core Web Vitals status changes specifically trigger their own alert.
  • Send test email button: Sends a sample alert to the configured recipient so you can confirm delivery before relying on real alerts.

4.3 Score History

  • Date from / Date to fields: Set the custom date range for every chart and table on the page.
  • Entity type dropdown (All, Products, Categories, and so on): Restricts the history shown to a single page type, useful for isolating whether one part of the catalog is improving or declining.
  • Filter button: Applies the selected date range and entity type.
  • Store SEO score card: The current store-wide score with its trend label (Improving, Declining, or No change).
  • Previous scan card: The score from the prior snapshot, for direct comparison.
  • Excellent / Acceptable / Not good cards: Counts of analyzed pages in each quality band for the selected filters.
  • Total issues card (with new/resolved counts): The total number of failing audit rules across all analyzed pages, plus how many are new and how many were resolved within the selected window (for example, over the last 7 days).
  • Overall SEO score trend chart and Date/Score/Change table: A visual and tabular record of every stored snapshot, showing exactly how the store score has moved over time.
  • SEO issues trend chart (New issues, Resolved issues, Open issues): Tracks how the total number of failing rules is changing, separate from the single score number, which can hide a rising issue count even while the overall score looks stable.
  • Product SEO score trend / Category SEO score trend charts: The same trend view scoped specifically to products and to categories.
  • Top improved entities / Top declined entities panels: Lists the specific pages that moved the most in either direction between snapshots, so you can investigate what changed on a page that suddenly improved or dropped.
  • Snapshot A / Snapshot B dropdowns and Compare snapshots button: Pick any two stored snapshots and generate a direct comparison table (ID, Date, Score, Change, Entities, Source, Version), useful for measuring the exact effect of a specific batch of changes, such as a redirect cleanup or a ChatGPT content pass.

4.4 URL Optimisation in Prestashop

4.4.1 Pretty URLs

  • Settings / Structure sub-tabs: Settings holds the on/off switch described below; Structure defines the actual URL patterns applied when Pretty URLs is enabled.
  • Enable Pretty URLs dropdown: Turns the feature on or off. When enabled, the module rewrites default PrestaShop URL patterns into cleaner, more readable versions.
  • Reset to PrestaShop defaults button: Restores the store’s original URL routing, useful if you want to fully undo Pretty URLs rather than simply disabling the toggle.
  • Save button: Applies changes made on this page.
  • The page’s own notes clarify that patterns which include an ID use PrestaShop’s own SEO routes, ID-less patterns use the module’s router, disabling the feature restores previous SEO routes from backup when one exists, and automatic redirects for Pretty URL changes only apply while the separate Redirects feature is also enabled.

4.4.2 How to fix 404 URLs in Prestashop

  • ID column: The internal record number for the 404 hit.
  • URL column: The exact storefront path that returned a 404.
  • Referer column: The page or external site the visitor came from before hitting the broken URL, useful for tracing where a bad link lives.
  • Visits column: How many times that specific URL has been hit, letting you prioritize the most frequently broken links first.
  • Last visited column: The timestamp of the most recent hit, useful for telling a stale one-off request apart from an ongoing problem.
  • Delete button (per row): Removes that recorded hit from the monitor once it has been reviewed or resolved.
  • Search filters (ID, URL, Referer, date range) and Search button: Narrow the list down to a specific URL pattern or time window.
  • Bulk actions button: Applies an action to multiple selected rows at once rather than one at a time.

4.4.3 How to detect Duplicate URLs (Duplicate SEO URLs) in Prestashop

  • Slug column: The specific friendly URL segment that is colliding across more than one page.
  • Entities column: Lists which pages (products, categories, CMS pages, manufacturers) share that slug.
  • Matches column: The number of pages involved in that particular collision.
  • Update action: Opens the group so you can change the friendly URL on the pages that need to become unique, then save to apply the fix.
  • When the store has no collisions, the page simply shows “No records found.”

4.4.4 How to add 301, 302, 303 redirects to URLs in Prestashop using Prestashop SEO Audit Module

  • Add redirect button: Opens a blank form to create a new redirect.

  • Import CSV button: Uploads many redirects at once from a CSV file instead of adding them individually.
  • Redirect count badge: Shows the total number of redirects currently stored for the shop.
  • ID column: The internal record number.
  • Name column: A label you assign for your own reference; it does not affect redirect behavior.
  • Source URL column: The old or broken URL that visitors and crawlers currently request.
  • Target URL column: The URL they are sent to instead.
  • Type column: The redirect type in use (301, 302, 303, or 404).
  • Active column: Whether the redirect is currently enforced on the storefront.
  • Edit button (per row): Opens the redirect for editing.
  • Search filters (ID, Name, Source URL, Target URL, Type, Active) and Search button: Narrow the list down when it grows large.
  • Individual redirect form fields: Name (your internal label), Source URL (required; the old path), Target URL (required; must be a relative path or a full http/https URL), Redirect type (301 for a permanent move, 302 for a temporary one, 303 for specific post-form-submission cases, or 404 to explicitly mark a URL as not redirected), and Status (active or inactive, active by default).

4.5 How to Edit Sitemap.xml in Prestashop

4.5.1 XML Sitemap

  • Enable XML sitemap dropdown: Turns the XML sitemap output on or off.
  • Sitemap URL display: Shows the live, public sitemap URL once enabled, ready to copy into Search Console.
  • Language sitemap URLs list: For stores with more than one active language, shows a separate sitemap URL per language, each of which should be submitted individually.
  • Enable RSS dropdown: Turns the RSS feed output on or off, independent of the sitemap.
  • RSS URL display: Shows the live RSS feed URL once enabled.
  • Include in sitemap checkboxes (Products, Categories, Information, Manufacturers, Suppliers): Chooses which entity types are listed in the sitemap; all five are checked by default.
  • Product limit (0 = all) field: Caps how many products are included in the sitemap; set to 0 to include every product regardless of catalog size.
  • Priority dropdowns (per entity type, for example Product Priority 0.8, Category Priority 0.7): A relative-importance hint passed to crawlers for that page type. As the page itself notes, this is a hint, not a ranking guarantee.
  • Change frequency dropdowns (per entity type, defaulting to Daily): Tells crawlers how often that page type typically changes, helping them plan how often to revisit it.
  • Save button: Applies all sitemap settings on this page.
  • An info banner also explains the recommended cron setup: submit the sitemap URL (or each language URL) in Google Search Console and Bing Webmaster Tools, then schedule the shown cron URL once a day at midnight so Google is automatically pinged after catalog changes.

4.5.2 HTML Sitemap

  • Enable HTML sitemap dropdown: Turns on a storefront page that lists important links for human visitors, separate from the XML sitemap built for crawlers.
  • Sitemap page URL display: Shows the live URL of that visitor-facing page once enabled.
  • Include pages checkboxes (Home page, Product pages, Categories, Information, Brands, New products, Special (Price drop), Best sellers, Popular): Chooses which page groups are linked from the HTML sitemap.
  • Custom URLs (Label and URL fields, delete icon, Add custom URL button): Lets you manually add extra links, such as an off-catalog landing page, that would not otherwise appear in the automatic groups.
  • Save button: Applies the HTML sitemap configuration.

4.6  How to edit Social OpenGraph Tags on Source Page 

  • Facebook Open Graph toggle: Enables Open Graph metadata (used by Facebook and many other platforms) on storefront pages so shared links show a proper title, description, and image.
  • Twitter cards toggle: Enables Twitter-specific card metadata on storefront pages.
  • Twitter card type dropdown (default summary_large_image): Chooses the visual layout used when a page is shared on Twitter/X.
  • Site name field: The name shown alongside shared links, typically your store’s brand name.
  • Site type dropdown (default Organization): Describes the nature of the site in structured data terms.
  • Facebook URL, Twitter URL, Instagram URL, LinkedIn URL, YouTube URL, Pinterest URL fields: Your store’s profile links on each platform, used to connect your storefront to your official social presence in structured data.
  • Save button: Applies all Social Cards settings.

4.7 How ChatGPT helps in Generating Content in Prestashop 

  • Enable ChatGPT toggle (default Disabled): Turns the AI content assistant on for the product and category SEO panels and for the Import/Export bulk workflow.
  • ChatGPT model dropdown (options include GPT-4o, GPT-4o mini, GPT-4 Turbo, GPT-4, and GPT-3.5 Turbo, default GPT-3.5 Turbo): Chooses which OpenAI model generates content; more capable models generally produce stronger output at a higher cost per request.
  • ChatGPT API token field: Your OpenAI API key, which the module needs to make generation requests on your behalf.
  • Save button: Stores the enabled state, model choice, and token.
  • Test API key button: Calls OpenAI directly to confirm the token and model actually work, before you rely on them inside a product panel.
  • A promotional banner on this and related pages also points to a separate Knowband add-on, the Knowband AI Content Generator (supporting Gemini and ChatGPT for product content and translation), which is a distinct product from this built-in ChatGPT tab and is outside the scope of this manual.

4.8 What is Robots.txt and How to edit it using Knowband’s Prestashop robots.txt editor

  • Public URL display: Shows the live, public web address of the robots.txt file, useful for confirming what crawlers actually see after saving.
  • File path display: Shows the exact server file path being written to, useful for troubleshooting with your hosting provider if saves fail.
  • Writable warning: Appears automatically if the server file cannot currently be written to, telling you to fix permissions on the shop root, or create a writable robots.txt file, before your changes will take effect.
  • Robots content textarea: The actual directives that will be published, defaulting to a permissive configuration:

 User-agent: *

  Allow: /

  • Save button: Publishes the entered directives to the live, public robots.txt file immediately.

4.9 How to Update the content of the Products in Bulk

  • Goal info box: Summarizes the intended three-step workflow: export as an optional backup, enhance selected fields with ChatGPT, then import the result.
  • Row count display (for example, “114 product/language row(s) available”): Shows exactly how many rows will be included in an export before you run it.
  • Exported fields list: Documents every field the export will contain: product, language, and store identifiers, name, meta title, meta description, meta keywords, tags, SEO URL, description and excerpt, focus keyphrase, minor keyphrases, allow search and allow follow link directives, advanced robots meta, canonical URL, SEO score, readability score, score analysis, content analysis, social title, social description, social image, and rating snippet fields (enable, average rating, best rating, worst rating, rating count).
  • Export button: Downloads the full JSON file described above.
  • Choose file control (Import panel): Selects a JSON file from your computer to upload.
  • Import button: Applies the selected file’s SEO fields, keyphrases, social data, and rating data to the matching products; only .json files are accepted.
  • ChatGPT enhance (SEO + readability) field checkboxes (Meta title, Meta description, Meta keywords, Focus keyphrase, Minor keyphrases, SEO URL, Social title, Social description, Tags, Description): Chooses exactly which fields the bulk ChatGPT pass should regenerate.
  • All products option / Max products field: Either processes the entire catalog, or limits the run to a specific whole number of products, useful for testing quality on a small batch first.
  • This panel stays disabled, with a message and a ChatGPT settings link, until ChatGPT is enabled and a token is saved under the ChatGPT tab.

4.10 General Settings for all the configuration in Prestashop SEO Audit Manager

General

  • Status toggle: The master switch for the entire module’s storefront behavior, including meta output, redirects, panels, and list scores. Nothing else works while this is off.
  • Enable SEO analysis toggle: Turns on SEO score cards, the SEO Audit sub-tab, and SEO columns on catalog list pages.
  • Enable readability analysis toggle: Turns on the readability scoring shown alongside the SEO score.
  • Enable auto analysis on edit toggle: When enabled, pages are automatically re-analyzed whenever they are saved, so scores stay current without a manual re-run.
  • Record 404 requests toggle: Turns on the 404 Monitor’s data collection.
  • Enable URL redirects toggle: Turns on redirect matching for storefront visitors; without this, entries in URL Redirects are stored but not actually applied.
  • Enable XML sitemap toggle: Turns on the XML sitemap output described in Section 4.5.
  • Enable RSS toggle: Turns on the RSS feed output.
  • Title separator field (default ” – “): The character or characters inserted between parts of a generated meta title, such as between the product name and the shop name.
  • Show products / categories / manufacturers / suppliers / CMS pages in search by default toggles: Sets the default index behavior for each entity type when an individual page has no override of its own; enabled by default for all five.

Meta templates

  • Product / Category / CMS / Brand / Supplier meta title template fields: The pattern used to build a meta title automatically when a page’s own meta title is empty, or when Force template is enabled for that type. Each supports shortcodes such as {product_name}, {category_name}, {cms_title}, {brand}, {supplier_name}, {shop_name}, and {title_separator}.
  • Product / Category / CMS / Brand / Supplier meta description template fields: The same idea applied to meta descriptions; these are blank by default, so no automatic description is generated unless you fill one in.
  • Force product / category / CMS / brand / supplier meta templates toggles: When enabled, the template is applied even if the page already has its own meta value, effectively overwriting it. When disabled (the default), the template only fills in genuinely empty values.

Cron and score history

  • Cron secure token field: A unique token used in the module’s cron URL; calling that URL with the correct token triggers a Store SEO score snapshot when score history is enabled. Leaving the field blank regenerates the token.
  • Enable SEO score history toggle: Turns on the snapshot system that powers the Score History page.
  • History retention dropdown (default Keep all history): Chooses whether old snapshots are kept indefinitely or pruned after a set period.
  • Retain history for (days) field (default 365): When retention is limited rather than set to keep everything, this sets how many days of history are preserved.
  • Automatic snapshot schedule dropdown (default Daily, midnight): Sets how often a new snapshot is taken automatically via the cron URL.

Search engine verification

  • Google verification code field: Paste your Google Search Console verification content value here if your site is not already verified another way, letting the module output it in the page header.
  • Bing verification code field: The same idea for Bing Webmaster Tools.

Save button: Applies every setting on the page in a single action.

5. Steps to Analyse On Page SEO for Product and Catogies Pages

Store owners can easily see the score of readability and SEO within Product , Categories and Brand Pages listing.

  • SEO Audit score circle (0 to 10): The page’s on-page SEO score, color-coded from red (low) through orange to green (strong) will be visible on the product listing pages using Prestashop SEO Audit Module
  • Readability score circle (0 to 10): The page’s readability score, scored and colored the same way but based on writing-style checks instead of structural checks.

  • Language selector: Switches the entire panel, including scores and every field below, to a different active store language, since each language is scored and edited independently.
  • AI Content Generator banner: Promotes the separate Knowband AI Content Generator add-on described in Section 4.7; it is not part of the scoring engine documented here.

Keyword & SERP sub-tab

  • Primary keyword field: The single main keyword this page is being optimized for; most of the primary-keyword checks in the SEO audit sub-tab read directly from this field, and several of them show “Not set” until it is filled in.

  • Supporting keywords field: A comma-separated list of additional, secondary phrases the page should also reflect where natural.
  • Search result preview panel: Simulates how the page’s title, URL, and meta description are likely to appear in a search result.
  • Desktop / Mobile toggle: Switches the preview between how it typically renders on a desktop search results page versus a mobile one, since mobile often truncates titles and descriptions more aggressively.
  • Title character count: Shown against a target of 60 characters, the general point at which titles start getting cut off in search results.
  • Description character count: Shown against a target of 160 characters, the equivalent limit for meta descriptions.

SEO audit sub-tab

Two columns, Page audit and Readability, each listing individual rules grouped under a Strong or Needs work heading. Every rule shows a numeric score, the rule name, a Result (what the page currently has), a Target (what it should have), and, for failing rules, a short tip. The verified rules visible in the panel are:

Page audit checks: Single H1; Image alt attributes; Supporting keyword in title, in description, in content, in subheading, in meta description, and in slug; Supporting keyword density (target 0.3 to 1.5 percent); Supporting keyword length (target up to 4 words); External links (target 1 to 3); Internal links; Text length (target at least 300 words); Primary keyword length (target up to 4 words); Primary keyword in meta title; Primary keyword in page title; Primary keyword in introduction (target: present in the opening roughly 150 characters); Primary keyword density (target 0.5 to 2.5 percent); SEO title width (target 30 to 60 characters); Meta description length (target 120 to 160 characters); Primary keyword in meta description; and Primary keyword in URL slug.

Readability checks: Sentence length (target 20 words or fewer per sentence); Flesch reading ease (target 60 or higher); Consecutive sentences; Passive voice (target roughly 10 percent or less of sentences); Minimum content length (target at least 300 words); Paragraph length (target at least 3 paragraphs); Subheading distribution (target at least 2 subheadings); and Transition words (target roughly 20 percent or more of sentences using connector words).


Indexing controls sub-tab

Covers whether the page is set to show in search results and whether links on the page should be followed by crawlers, along with any advanced robots directive or canonical URL override for that specific page and language.

Share preview sub-tab

Shows how the page will look when shared on social platforms, reflecting the Social Cards settings from Section 4.6 combined with any page-specific social title, description, and image you set here.

Star rating markup sub-tab

Available on products and categories, this controls whether a star rating snippet is generated for the page and, if so, the average rating and rating count values used to build it.

Score timeline sub-tab

Repeats the Current, Previous, Change, Highest, Lowest, Average, Trend, and Last analyzed figures, plus a history chart and table, that appear on the store-wide Score History page (Section 4.3), but scoped to this individual page only.

6. How to do a Complete SEO Audit in Prestashop 

Prestashop SEO Audit Module can run a PrestaShop SEO audit on products, categories, CMS pages, manufacturers, and suppliers, producing two separate 0 to 10 scores per page: an SEO Audit score covering structural checks such as keyword placement, meta length, alt text, and linking, and a Readability score covering sentence length, paragraph structure, passive voice, and transition words. A page can score well on one and poorly on the other.

A low score points to a specific, fixable gap rather than a vague quality problem, because every rule pairs a Result with a Target, as detailed field by field in Section 5. To act on it, open the page’s SEO Audit panel, work through Needs work items, and prioritize content quality (text length, primary keyword placement) before smaller technical checks like linking counts, which need editorial judgment rather than mechanical fixing.

None of these checks claim to be a direct Google ranking signal by themselves. They represent established on-page SEO and content-quality practices, things search engines and readers both respond well to, rather than guarantees of a specific ranking outcome.

7. Frequently Asked Questions

Question 1: I found several 404 URLs. How can I redirect them?
Open URL Optimisation> 404 URLs in the Knowband Prestatshop SEO Audit Module, find the entry, and use its Redirect action, which opens the URL Redirects form with the source URL prefilled. Add the target URL, choose a type (301 for a permanent change), and save. Only redirect when a genuinely relevant destination exists.

Question 2: How should I handle a URL that is no longer available?
If the content moved, add a 301 redirect from the old URL to the new one under URL Optimisation> URL Redirects. If nothing relevant replaces it, leaving it as a 404 is acceptable rather than forcing a redirect to an unrelated page.

Question 3: How can I improve a page with a low SEO score?
Open the page’s SEO Audit panel in Knowband’s Prestashop SEO Audit Manager and its SEO audit sub-tab, then work through the rules listed under Needs work using the Result and Target shown for each one.

Question 4: How to use ChatGPT to generate meta titles and descriptions?
You can use ChatGPT to generate meta title, description, social graph tags using the PrestaShop Complete SEO Module. Click on ChatGPT Tab, save a valid OpenAI token, then use the ChatGPT sub-tab inside a product or category SEO panel to generate, review, apply, and save.

Question 5: How can I check duplicate URLs?
Open URL Optimisation in the PrestaShop SEO Audit Addon and click on duplicate URLs. Colliding friendly URL slugs appear grouped by slug with affected entities listed, and each page’s URL can be updated to a unique value.

Question 6: How can I check my XML sitemap?
By using Knowband’s Prestashop Sitemap XML Editor, you can make changes in sitemap and submit it inside Google Search Console’s Sitemaps tool.

Question 7: Can I connect Google Search Console for my Prestashop website?
Now you can Google OAuth Client ID and Secret, click Connect with Google, then select your Search Console Property or enter its URL manually.

Question 8: Can I view Google Analytics data inside the module?
Yes. Once GA4 is connected and a property is selected, the Analytics section shows sessions, users, views, engagement, traffic trends, and dimension breakdowns without opening Google Analytics separately.

Question 9: How can I identify SEO issues on product or category pages?
Review Score History’s issue trends or open the page directly and check its SEO Audit panel, which surfaces the specific rules failing along with the target value needed to pass.

Question 10: Does the redirect tool support bulk changes?
Yes. Knowband’s Prestashop Redirection Module allow to import CSV on the URL Redirects page to add many redirects in one upload instead of creating them individually.

Question 11: Is ChatGPT-generated content published automatically?
No. Generated content is written into the selected field for review, and the administrator must check it and save the host form for it to take effect.

Question 12: What does the Search Console Data Lag setting actually do?
This setting tells the module to skip the most recent few days when pulling Search Console data, since Google itself delays that data; without this adjustment, the newest days in a report could appear artificially low.

Question 13: Why does my Cron URL matter if I never open it manually?
The Cron URL is meant to be called automatically by your server’s scheduled task system, not opened by hand. It is what actually triggers daily score snapshots, sitemap pings to Google, and scheduled PageSpeed checks, so it needs to be added to your server scheduler to keep those features running without manual effort.

The Prestashop SEO Audit Module integrates scoring, technical maintenance, and Google reporting in one module, making an SEO audit of PrestaShop not require the use of different modules for different processes. If you have faced any issue with this module, feel free to contact us at support@knowband.com.

PrestaShop Security in the AI Era: What Are Your Concerns?

Running a PrestaShop store means protecting more than a website. Your store holds customer accounts, order histories, addresses, admin credentials plus whatever payment, shipping, marketing, and analytics services you’ve plugged in. So PrestaShop security isn’t really a technical checkbox. It’s a business risk, full stop.

AI hasn’t changed security threats so much as it’s sped them up. Phishing emails don’t have the broken grammar and weird phrasing they used to; they read like something a colleague would actually send. Scanning a store for outdated, vulnerable modules used to take a person real time and effort. Now it’s automated and near instant. Same with credential stuffing: what used to require manual grinding can now run at a scale one attacker alone could never have managed a few years ago.

Whether AI is “good” or “bad” for security is kind of the wrong debate anyway. The question that actually matters for a store owner is simpler: is your current setup built to handle attacks that move faster and hit harder than what you were dealing with two or three years ago?

That comes down to the basics, done properly. An out-of-date PrestaShop core version and module version is still the most common source of store compromise. Control access to administrator accounts and their privileges. Authenticate properly and not just using password. Watch for unusual activity instead of assuming silence means safety. Run malware scans regularly. Vet third-party integrations before installing them. And have an actual recovery plan, tested, not just assumed, because eventually something will get through, AI-assisted or not.

1.0 Why PrestaShop Security Concerns Are Changing

Security problems haven’t suddenly become entirely new because of AI. SQL injection, XSS, stolen passwords, malware, vulnerable modules, malicious file changes, and payment-page attacks have existed for years.

The difference lies in how rapidly and in what numbers these vulnerabilities can be found by the attackers.

With the help of AI, they can automate their reconnaissance activities, produce credible phishing material, detect vulnerabilities, and multiply the number of credential attacks.

For a web store, this means that an otherwise unobserved vulnerability may be discovered much sooner.

A typical PrestaShop store may include:

  • PrestaShop core
  • Payment modules
  • Shipping integrations
  • Analytics and advertising scripts
  • Custom modules
  • Third-party themes
  • Server software
  • CDN or WAF services
  • APIs and webhooks
  • Administrator accounts
  • Customer accounts

Every additional module/scripts creates another dependency that needs to be maintained. 

That doesn’t mean you should avoid integrations. It means you need visibility into what is installed, what has access to your store, and what happens when one component becomes vulnerable.

2.0 The Biggest PrestaShop Security Concerns for Store Owners

1. Outdated PrestaShop Core and Modules

One of the most basic security controls is still one of the easiest to neglect: keeping software updated.

PrestaShop maintains a security advisory process, and its current security policy states that security updates are typically applied to the latest release.

This becomes particularly important when a vulnerability affects an older version or a third-party component.

Patching a vulnerability and cleaning a compromised website are two different jobs.

If you discover suspicious PHP files, unexpected JavaScript, modified templates, unfamiliar administrator accounts, or unexplained redirects, don’t assume that upgrading PrestaShop alone has removed the attacker.

Investigate the store first.

2. Administrator Accounts Are High-Value Targets

Your PrestaShop back office deserves the same level of protection as your storefront. A compromised administrator account can give an attacker access to sensitive settings, customer data, modules, and store content. With sufficient permissions, they could even make changes that introduce malicious code or redirect parts of the shopping experience.

That’s why password-only authentication is increasingly difficult to justify for privileged accounts.

Use MFA/2FA for administrators wherever possible. Also review which employees actually need administrative access and remove dormant accounts.

The principle is simple: give each person only the permissions required to perform their job.

Additional controls can help too. Depending on your environment, you might restrict back-office access through trusted IP addresses, VPN access, firewall rules, or additional authentication layers.

Hiding an administrator URL can reduce exposure to some automated scanning, but it shouldn’t be treated as a replacement for authentication, authorisation, or patching.

3. Credential Stuffing and Automated Login Attacks

Credential stuffing is particularly relevant to e-commerce.

Password guessing is not always needed for attackers; they can use stolen username/password pairs from completely different breaches and try them against other sites.

In case the client reused the password, the attacker might use your store as the next victim.

It is also a case with admin accounts, and the situation is much worse in that case.

Rate limiting, brute-force prevention, strong passwords, MFA, suspicious login detection, and proper account controls should be used in conjunction.

AI and automation make this more relevant because attackers can operate at high volume. AI-related cybersecurity guidance also identifies credential stuffing and password attacks as areas where automation can increase the threat.

4. Malware and Unexpected File Changes

A compromised PrestaShop store doesn’t always look broken.

The storefront may continue to load normally while malicious code sits inside a theme, module, PHP file, JavaScript file, or another part of the application.

That is why malware scanning and file-change monitoring matter.

A particularly serious scenario is payment-page manipulation. PrestaShop issued a security alert in February 2026 describing a digital skimmer that could replace legitimate payment buttons with fraudulent ones. The malicious script was loaded through a modified theme file.

For a merchant, this is a useful reminder that “the website is working” doesn’t mean “the website is secure.”

Regular scanning should be combined with investigation of unexpected changes. If a critical file changes unexpectedly, you need to know:

  1. What changed?
  2. When did it change?
  3. Who or what changed it?
  4. Was the change legitimate?
  5. What other files or accounts should be investigated?

5. Third-Party Modules and Custom Code

PrestaShop’s extensibility is one of its strengths, but every module and customization expands the attack surface.

Security testing should therefore consider more than the PrestaShop core.

A security audit can examine the core application, themes, add-ons, custom code, integrations, authentication controls, and server configuration. Astra’s PrestaShop audit guidance similarly emphasizes examining the broader application rather than treating the core platform as the entire security boundary.

This matters especially for stores that have existed for several years.

A module installed five years ago may still be active even though nobody remembers why it was installed. A custom override may remain after the original developer has left. An abandoned integration may still have API credentials.

A useful maintenance exercise is to create an inventory of:

  • Installed modules
  • Active themes
  • Custom overrides
  • External APIs
  • Webhooks
  • Cron jobs
  • Administrator accounts
  • Server services
  • DNS/CDN/security services

Remove what you no longer need.

3.0 What Does AI Actually Change for PrestaShop Security?

AI isn’t a substitute for a secure PrestaShop installation. Think of AI as an accelerator on both sides.

3.1 Attackers can automate more

The bigger concern for an online store is speed. An attacker no longer needs to perform every step manually. Automated and AI-assisted tools can help with target research, phishing, stolen-credential testing, and large-scale bot activity. For e-commerce businesses, that can translate into more attempts at account takeover, payment fraud, credential stuffing, and scraping,

3.2 Defenders can analyse more

The same basic capability can help defenders.

Security systems can analyse login activity, request patterns, IP reputation, API activity, traffic anomalies, and other events much faster than a person manually reviewing raw logs.

For instance, a manager usually logs into the system from a usual country during office hours. Then, many login failures occur, followed by a successful login from an unusual location. If the system can perform behavioral analysis, then such an event can be detected much quicker than analysing the access logs from yesterday.

AI can also help prioritize alerts. That’s useful because a store generating thousands of requests per minute cannot realistically have a person inspect every event.

4.0 PrestaShop Security Best Practices: A Practical Layered Approach

Security works better as layers than as one “security plugin.”

A practical setup for a PrestaShop store should include several levels.

Layer 1: Keep the application current

Maintain supported versions of:

  • PrestaShop
  • PHP
  • Server software
  • Themes
  • Modules
  • Libraries

Test updates in a staging environment where the store has substantial customizations.

Don’t postpone security updates indefinitely because a normal feature upgrade is inconvenient.

Layer 2: Protect privileged access

For administrator accounts:

  • Enable MFA/2FA.
  • Use unique passwords.
  • Remove unused employees.
  • Apply least-privilege permissions.
  • Consider IP/VPN restrictions for sensitive environments.
  • Monitor successful and failed logins.

Layer 3: Protect the application

A WAF can help filter malicious HTTP requests before they reach the application. Security headers can add browser-level protections. CAPTCHA or bot controls can reduce automated abuse of public forms.

These controls don’t eliminate vulnerabilities in the application itself, rather they add a defensive layer.

Layer 4: Monitor the filesystem

Regular malware scan and file change monitoring can help in detecting the compromises that aren’t visible from the storefront.

Pay particular attention to:

  • Theme files
  • PHP files
  • JavaScript
  • Configuration files
  • Upload directories
  • Module directories

Unexpected modifications deserve investigation.

Layer 5: Monitor the infrastructure

The PrestaShop application isn’t the only thing that needs protection.

Review:

  • SSH access
  • Firewall rules
  • Database exposure
  • Server users
  • File permissions
  • Cron jobs
  • SSL/TLS configuration
  • Backup access
  • Cloud credentials
  • CDN/WAF configuration

A secure application on an exposed or poorly maintained server is still vulnerable.

5.0 Where a PrestaShop Security Manager Can Fit

Store owners often end up assembling security controls from several independent tools. That can create its own maintenance problem: different settings, update schedules, logs, compatibility issues, and configuration interfaces.

The Knowband Prestashop Advanced Security Manager is one option worth evaluating as part of a layered PrestaShop security setup. Its current product documentation lists controls including 2FA, brute-force protection, administrator IP restrictions, a WAF, security headers, CAPTCHA, login monitoring, and scheduled malware scanning. It supports PrestaShop 1.7, 8, and 9 according to the vendor’s current documentation.

The important point is not to treat a security module as a complete security strategy.

A module can strengthen application-level defenses, but it doesn’t replace:

  • Secure server configuration
  • Timely patching
  • Safe development practices
  • Backups
  • Incident response
  • Vulnerability assessment
  • Secure third-party integrations

6.0 Don’t Forget Backups and Recovery in Prestashop

Store owners need to have a reliable recovery plan when something goes wrong.

A backup is useful when it’s available, protected, and can be restored. Ideally, keep backups separate from the production environment and test restoration periodically.

You should have reliable backups of:

  • Database 
  • Product images and other store files 
  • Customer and order data 
  • Configuration 
  • Themes 
  • Custom modules 
  • Critical server files 

In case of store owners looking to automate the whole process, one of best backup module which is Prestashop Backup & Restore Module can be taken into consideration. This software enables users to take scheduled backups of their databases and files, provides offsite storage, encryption, retention, and restoration facility.

7.0 When Should You Consider a Security Audit?

Automated scanning is useful, but it isn’t the same as a security audit or penetration test.

Vulnerability scanning finds known bugs on the surface & inform what is broken, but can’t tell you how deep a hacker can go.

Penetration testing simulates a real attack. It chains small flaws together to break deep into your systems and tests the business logic.

For a mature or high-revenue store, consider periodic security assessments, particularly after:

  • A major PrestaShop upgrade
  • A large custom development project
  • A new payment integration
  • A major module installation
  • A server migration
  • A security incident
  • Significant infrastructure changes

A proper assessment should cover the application and the surrounding environment rather than focusing exclusively on the storefront.

8.0 A Store Owner’s Security Checklist

Before considering your PrestaShop website secure, check the basics:

  • PrestaShop is running a supported/current release appropriate to your environment.
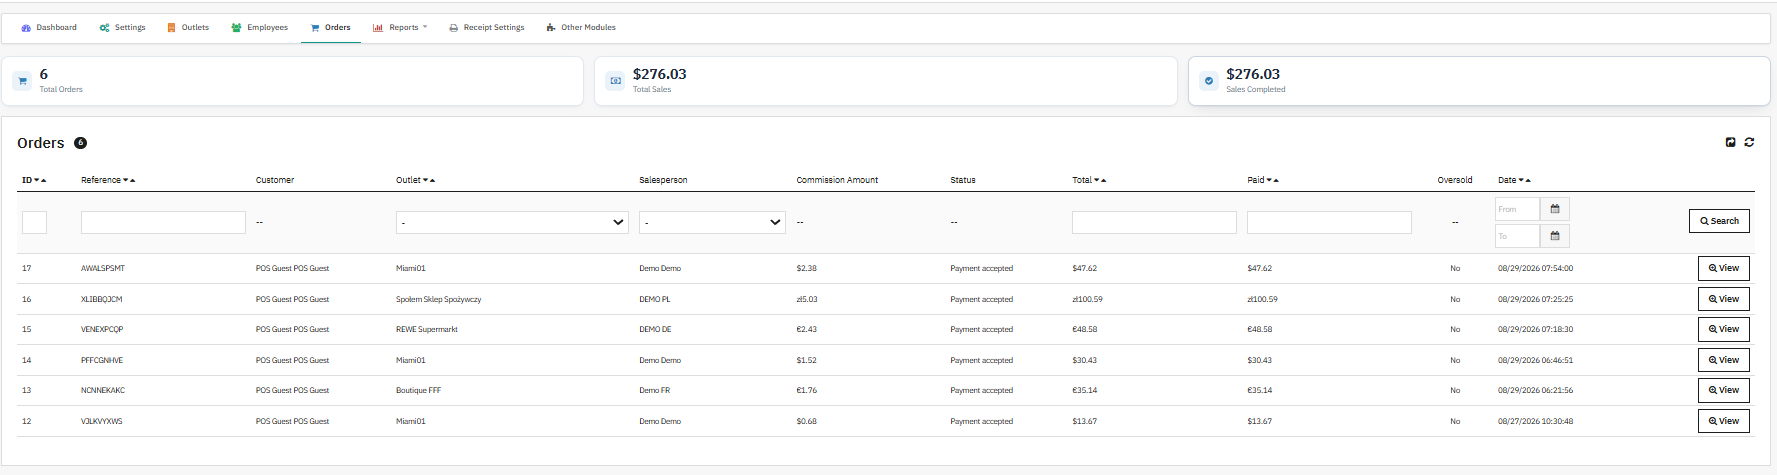
  • Modules and themes are maintained and updated.
  • Unused modules and accounts have been removed.
  • Administrator accounts use MFA/2FA.
  • Administrator privileges follow least privilege.
  • Failed and successful admin logins are monitored.
  • Brute-force protection is enabled.
  • A WAF or equivalent application-layer protection is configured where appropriate.
  • Security headers are configured correctly.
  • Public forms have appropriate bot/spam protection.
  • Malware scanning is performed regularly.
  • Unexpected file changes can be detected.
  • Server access is restricted and monitored.
  • Backups are isolated from production and restoration has been tested.
  • Payment and third-party integrations are reviewed.
  • There is a documented incident-response procedure.
  • A security audit or penetration test is performed when the store’s risk justifies it.

9.0 The Real Concern: Speed of Attack Versus Speed of Response

The biggest change brought by AI isn’t that every PrestaShop store suddenly faces an entirely new category of vulnerability.

It’s that the gap between a weakness becoming available and someone exploiting it can become smaller.

That changes how store owners should think about security.

Waiting for a customer to report a strange checkout page isn’t monitoring. Discovering a compromised administrator account after fraudulent orders have been placed isn’t detection. Installing a security tool but never reviewing its alerts isn’t a security process.

A secure PrestaShop store needs layers that work before, during, and after an attack: patching to reduce vulnerabilities, authentication to protect accounts, application controls to filter malicious traffic, monitoring to detect abnormal activity, malware/file scanning to identify compromise, and tested backups to support recovery.

AI can make defensive systems faster and more capable, but the foundation remains the same: reduce the attack surface, control access, monitor what changes, and be prepared to recover.

For store owners looking to strengthen application-level protection, a solution such as Knowband Prestashop Advanced Security Manager can be considered as one component of that layered approach. The right choice depends on your PrestaShop version, hosting environment, existing security stack, and operational requirements.

The best time to discover a security weakness is before an attacker does.

Managing Database Changes During Module Updates in PrestaShop

There’s a particular support ticket I’ve learned to dread. A merchant updates a module; it appears to go through, then something stops behaving. Never the whole store. One PrestaShop controller page misbehaving, or a config value that refuses to save, or a listing column that has emptied itself. When I look, the module code is on the new version and the database underneath is still on the old.

That gap is what this article is about. A PrestaShop module is not only the PHP you shipped but it is that PHP plus the tables and columns the PHP expects to find. Skip the PrestaShop database update that should travel with a code release, and you get a module that is installed, apparently working, and quietly wrong.

I have done this to myself more than once. What follows is what I learned about PrestaShop module database updates, the hard way.

1.0 How PrestaShop module updates actually handle the database

store jumping from update from1.9.0 to 2.1.0 doesn’t skip ahead, it runs every upgrade script in between, in order.

Plenty of assumptions float around here, and some are wrong.

Drop a new version into /modules/ and your install routine does not re-run. Tables untouched. What happens instead: PrestaShop reads the module’s upgrade/ folder, finds the files named upgrade-<version>.php sitting between the recorded version and the one your module class declares, and runs those in order.

A store on 1.9.0 receiving 2.1.0 runs three scripts, in order.

Three things follow from that, and all three matter for PrestaShop database changes.

The version in the `module` table is the source of truth. Not the one in your main class file. PrestaShop reads both. What it acts on is the recorded one, and that decides how many upgrade scripts you are about to run.

Your `install()` method is for fresh installs only. Say version 2.0 needs a new table. Put it in install() and anybody coming to 2.0 fresh is covered. The store sitting on 1.9 gets nothing, because its install ran a year ago and is never running again.

One failure stops everything. Return false from an upgrade function and three things happen: PrestaShop halts, records which version fell over, and disables the module. No moving on to the next script. That is deliberate, though it means a half-applied schema change leaves you disabled rather than broken.

The enabling auto-update for modules page sets out the file-naming rules. Read it once properly rather than from memory.

The upgrade function naming trap

This one cost me an afternoon. Either upgrade_module_2_0_1 or upgradeModule201 works as a function name, and PrestaShop looks for both. What it also does, before your file is included, is check whether one of those names exists already. Find it and the file gets marked a duplicate and skipped.

Copying an old upgrade script as a template is exactly how people get here. The name inside it never gets changed. Nothing upgrades, and the error message won’t tell you much.

2.0 PrestaShop database migration: what goes wrong on real stores

All of these happened on stores I worked on.

PrestaShop database schema changes that drift between installs

Version 2.0 needs a new column, so you update install() and write an upgrade script. Both correct. Three versions on, somebody renames the module folder or a merchant reinstalls. On some installs, install() created that column. On others the upgrade path did. Two definitions, drifting apart, and a single version number now covers both of them.

So the definition lives in a single method both paths call. PrestaShop database schema changes cannot drift if there is only one.

Upgrade scripts that assume a clean starting point

ALTER TABLE … ADD COLUMN on a column that already exists throws an error, your function returns false, the module gets disabled. Interrupt a previous update, restore a partial backup, sync from staging twice over: any of those and you are there.

Every schema change I write now checks first. Adding a column means a SHOW COLUMNS beforehand, creating a table means SHOW TABLES, an index means SHOW INDEX. A few lines, and the script survives a second run. That matters, because a stranger’s database can be in any state at all. There is IF NOT EXISTS in both MySQL and MariaDB, but only on some operations, so the explicit check travels better.

Multistore: configuration rows written for one shop only

Quiet and nasty, this one. A per-shop setting arrives in the new version. Default row created by the upgrade script, tested by the developer, all looking fine. But one row got written, for whichever shop was in context, and the merchant runs four.

Three stores are now missing it. Depending how your code reads that, you get a PHP notice, an empty value treated as a real setting, or a blank where a price should be. The multistore documentation covers the context rules. Loop every shop ID in any upgrade touching configuration or per-shop data.

On a single-shop install, this bug is invisible.

ALTER TABLE locks on large catalogue tables

Nothing about adding a column to a 400,000-row table is instant. Depending on the operation, the MySQL version and the storage engine, the whole table may get copied. On a live store during trading hours that lock runs long enough for customers to notice.

So I check table size before writing the migration. If it’s large: maintenance window, or restructure to avoid the rebuild.

The config key with no default value

The one I see most often in other people’s modules, and no table involved.

You add a setting in the new version. The admin form reads it. So does the front controller. Both were written on a machine where the settings page had been saved at least once already. So the key exists and everything looks right. Ship that, and every existing install is reading a Configuration key nobody ever wrote.

What comes back is false. Your default never appears, nor an empty string you could at least test for. From there it goes on to be used as a number, or handed to a function that wanted a string. Debug mode off, and you often get away with it: the merchant sees a page that’s slightly wrong and thinks nothing of it. Debug mode on, and it surfaces as a notice or a type error. Which is how this reaches you as “the module breaks in debug mode”, when debug mode is the only honest party involved.

The same code, with and without the default written.

The fix is dull. Every new config key gets its default written in the upgrade script, for every shop, shipping with the code that reads it. Read it defensively too, because you cannot be sure the upgrade ran.

PrestaShop module database migration versus schema change

Schema changes are the easy half. The hard half is when the meaning of existing data changes: splitting a column in two, moving a CSV field into a related table, re-encoding a status.

That is where I have seen the most damage. A botched ALTER TABLE fails loudly; a botched data transformation succeeds and writes nonsense. A PrestaShop module database migration that moves data needs a count before and after, then compared. Better found inside the upgrade script than by a merchant three weeks later.

3.0 PrestaShop module upgrade best practices I’d actually defend

The ones that have saved me:

Make every migration idempotent

Nothing should change on the second run that the first run did not already handle. Get that property and a whole category of support problem disappears, because the state of the database stops being something you need to establish first. Before writing raw SQL against core tables, PrestaShop’s database layer notes are worth an hour.

The guarded version survives a second run.

Log every failure instead of returning false silently

A bare return false is enough for PrestaShop to stop and disable the module. Not enough for you. So wrap the work. Catch whatever comes out of it, and hand that to PrestaShopLogger with the module name and version attached. Otherwise a merchant reports a failed update and you are guessing.

On PHP 7 and above, catch Error as well as Exception. Get a type error in your own migration code and it arrives as an Error, so a handler watching only for Exception lets it through.

Support every version you have ever shipped

A merchant can be on any version you have released. Somebody going 1.4 to 3.0 runs every script in between, in order, so each has to work on whatever schema the previous one left. That is why old upgrade files stay in the module. Somebody two years behind has no other route forward.

Test on staging, not on a clean local install

A fresh install of the new version proves nothing about the upgrade to it. What you want instead: install the old version, put realistic data in, then upgrade. On multistore too, if you support it.

Better still: take a copy of a real store, and put the upgrade through that instead. Your local install has clean data and four products, which is why it surfaces nothing. A real store carries half-finished imports, rows left by a module uninstalled two years ago, columns a previous developer added by hand, a catalogue big enough that ALTER TABLE takes a while.

Then timing. An upgrade wanting six minutes against real data is better learnt while booking a maintenance window than at eleven on a Friday.

Back up before schema changes, and say so

No snapshot gets taken of your tables before a module upgrade. Not by PrestaShop, not by anything. So if the merchant has no backup and your migration stops halfway through transforming data, that data has gone. Say so in the changelog rather than discovering it together.

Recovering a failed PrestaShop database update

An update failed on a live store; module disabled. Roughly this order:

Find out which version failed. That gets recorded, and if you wrote a log message it’ll be sitting there too. Between them you know which script to open and which changes landed before it stopped.

Check the actual schema, not the version number. All the module table knows is what the last successful upgrade wrote. The real tables are where the answer is, held up against whatever the failed script was trying to do.

Fix forward, not backwards. Rolling the version number back is tempting and usually wrong, because the earlier scripts have already run and re-running them against a partly changed schema turns one problem into three. Write a corrective migration from wherever the schema is to where it should be.

Then work out why the migration was not idempotent. That is the real bug.

A short checklist before you ship a module update

The list I run:

  1. Main class version, highest upgrade-*.php file: do they match?
  2. Each upgrade function named for its own file’s version?
  3. Every schema change checking first whether it already applied?
  4. Every configuration write looping over all shops?
  5. Every new config key given a default for existing installs?
  6. Run against a staging copy of a real store yet?
  7. Old version installed, data added, then upgraded?
  8. Same path on multistore?
  9. Something useful logged before each return false?
  10. Catching Error as well as Exception?
  11. Old upgrade files still in place for merchants several versions behind?
  12. Changelog telling merchants to back up?
  13. On a large table, how long is that ALTER holding a lock?

Items 6 and 7 are the ones people skip, and between them they catch most of it.
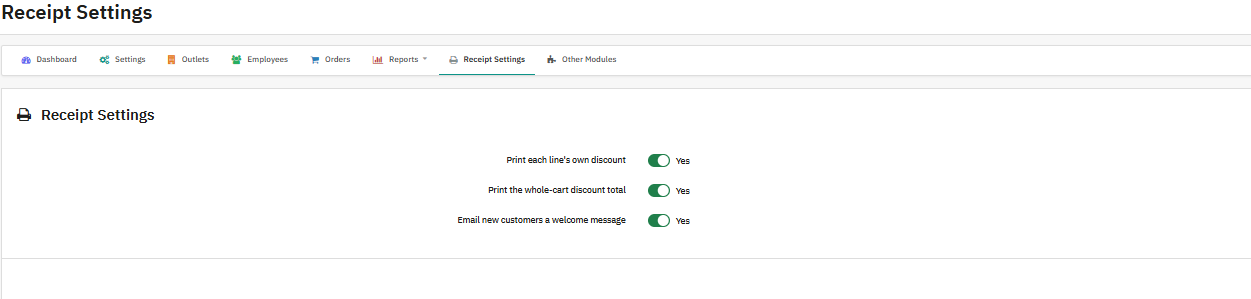
Conclusion

PrestaShop module upgrade problems are awkward for one reason: nothing announces them. The module reports its new version quite happily. The admin page loads. No logs, unless you wrote them. Meanwhile your code expects one thing, the database holds another, and that sits untouched until somebody uses the one feature caught in between.

Treat the schema as part of the release. Write migrations that survive a second run. Log what happened. Put it through staging before any merchant does. On the framework side, PrestaShop’s module development documentation is the place to start.
If you have questions or need assistance for your website performance or migration, Our experts are here to help. Contact the Knowband team at support@knowband.com today for reliable ecommerce plugins tailored to your eCommerce needs.