OpenCart Affiliate and Referral Program Extension – User Manual

1.0 Introduction

As a shopper, you must have seen many of the online stores provide their customers with additional income from the store by providing them the option to become affiliate customers and invite new customers to the store. So, there are several tools out there to provide affiliate customer and referral commissions to the customers. However, with the OpenCart Affiliate Program extension, the admin allows the customers to become an affiliate and earn a commission whenever a new customer registers using the affiliate customer’s referral code or order products. And even can customize the commission rate globally or individually for an affiliate customer and so on.

2.0 Salient Features of OpenCart Affiliate and Referral module

  1. Users can register as affiliates to earn commissions on referrals.
  2. The admin can enable or disable the new affiliate register option.
  3. Admin can select the referral methods which will be available on the affiliate customer dashboard by which affiliate can invite customers.
  4. The admin can enable or disable the social sharing for Facebook, Twitter, and Pinterest.
  5. Admin can set if the affiliate is permanent or it will auto become a normal customer after input days.
  6. The admin can set if the affiliate always gets commissions for orders from the referrals or the commission will be closed after how many orders.
  7. Admin can set when the referral will be counted for commission.
  8. The admin can view affiliate customers and edit and update their details like commission rate and all.
  9. The admin can view the list of referrals that have been entered by the customer. Moreover, he can approve and reject them for commission.
  10. Admin can see the total commission earned by the affiliate customer and his commission history.
  11. The admin can see the lists of payout requests and can accept and reject them.
  12. Users can see the list of all the commissions earned by him/her, also can see the commission is from order or user register.
  13. Users can pay out the commission using vouchers and direct payout requests.

3.0 Installation Guide

Before starting the installation process, you have to buy the Affiliate & Referral Program Extension by Knowband. Once purchased, you will receive the following files in your registered email.

  • Source code of OpenCart Affiliate & Referral Program extension in zipped file format.
  • User Manual of OpenCart Affiliate & Referral Program extension.
  • Now to install this on your online shop, follow the given steps:

Step 1: Unzip the zip file. You will get the folders as shown in the image below

OpenCart Affiliate and Referral module_installation

Step 2: Copy the content of one of the folders as per your OpenCart version. You will get the following files inside.
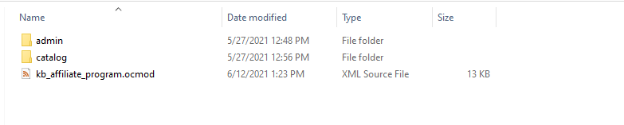
Step 3: Copy these folders to the root folder of your website. In case of any issue, you can reach us.

Step 4: After copying this go to your admin panel and install the module with the modification file.

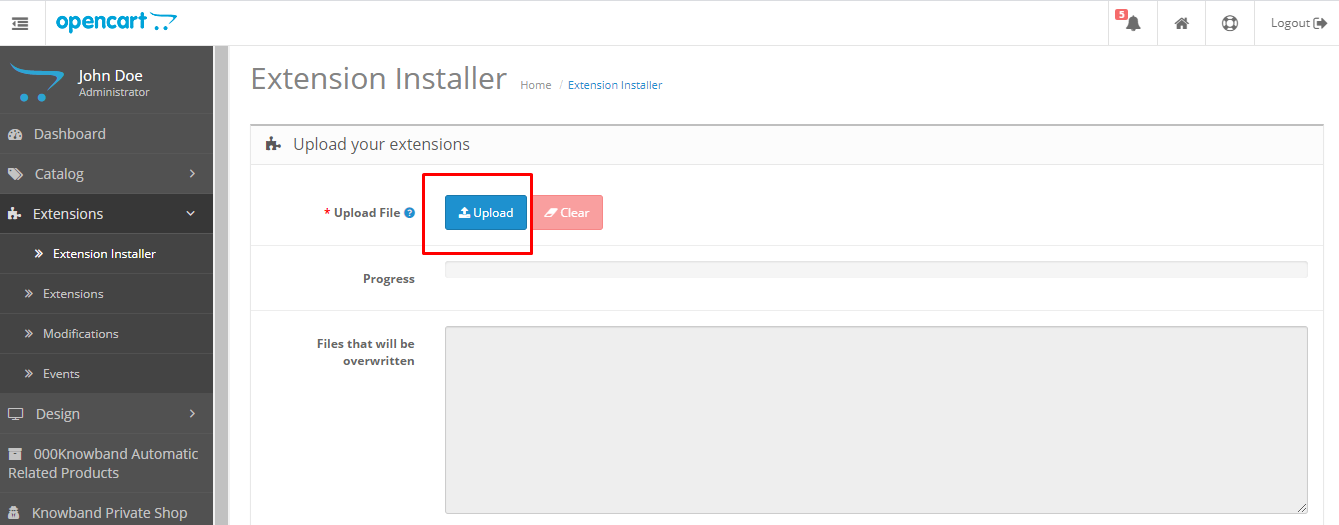
Step 5: After uploading the ocmod file your module will be ready to use. You can go to the extensions and install and configure the module as per your need.

4.0 Admin Interface of OpenCart Affiliate Program

To configure the OpenCart Affiliate Program extension you can navigate to the module configuration page either by clicking on the Knowband Affiliate Program menu in the side menu.
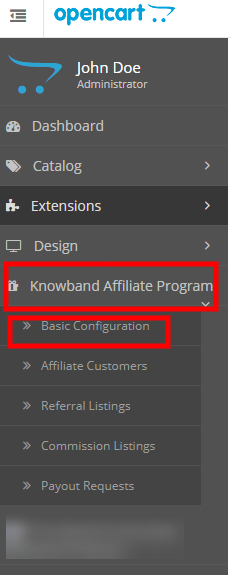
Or you can go to the Extensions > Modules > Knowband Affiliate Program.

In the admin you will see the following main settings tabs those are:

  1. Basic Configuration
  2. Affiliate Customers
  3. Referral Listing
  4. Commission Listing
  5. Payout Requests

4.0.1 Basic Configurations

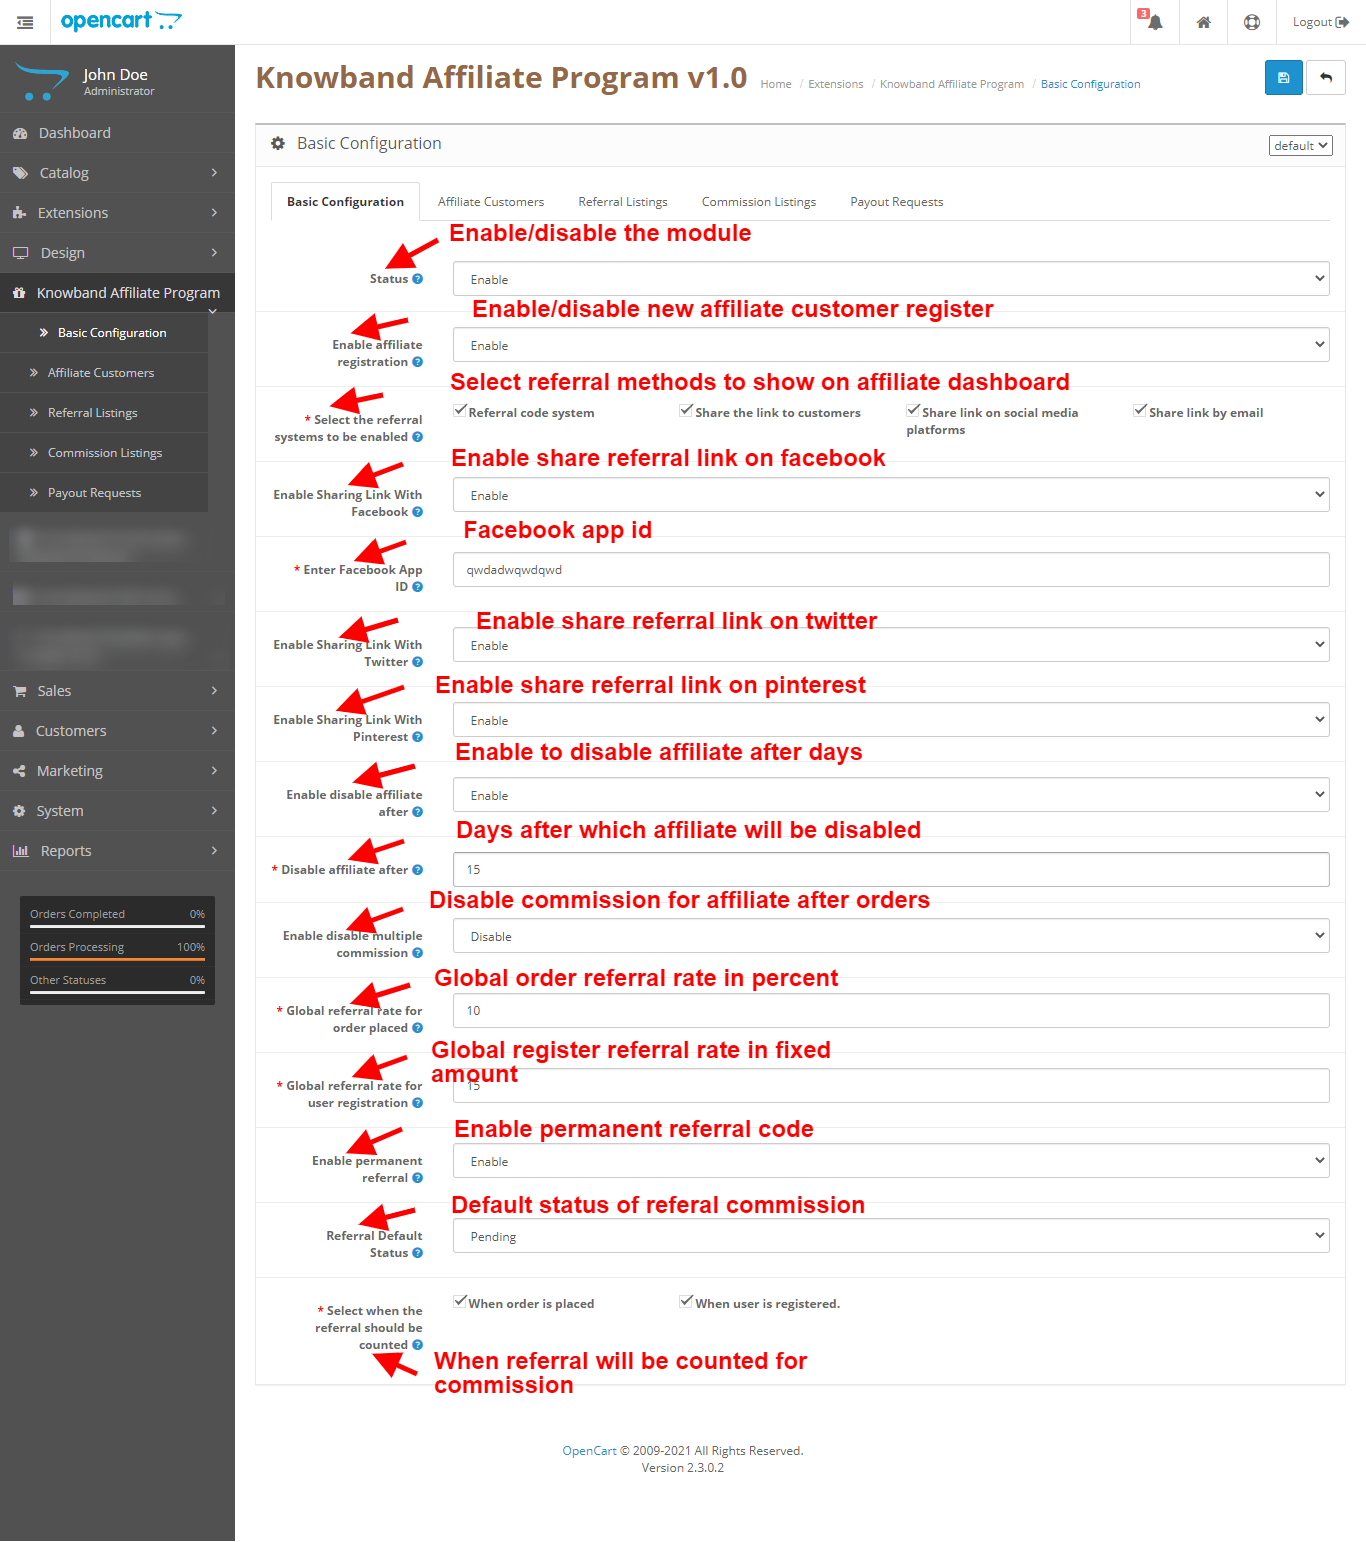
These are the basic settings that you can apply regarding the referral rates, referral methods, and module settings. Here you have the option to enable disable the module and much more.
4.0.1.1 Status

Enable/Disable this module.

4.0.1.2 Enable affiliate registration

Enable the option for normal customers to become affiliate customers and get a chance to earn a commission.

4.0.1.3 Select the referral systems to be enabled

Referral methods to show on affiliate customer dashboard using which he/she can share the referral link and get commission.

4.0.1.4 Enable Sharing Link With Facebook

Enable to show share on Facebook in referral methods on affiliate customer dashboard.

4.0.1.5 Enable Sharing Link With Twitter

Enable to show share on Twitter in referral methods on affiliate customer dashboard.

4.0.1.6 Enable Sharing Link With Pinterest

Enable to show share on Pinterest in referral methods on affiliate customer dashboard.

4.0.1.7 Enable/disable affiliate after

Enable to disable the affiliate customer after the number of days.

4.0.1.8 Disable affiliate after

Several days after which affiliate gets disabled.

4.0.1.9 Enable/disable multiple commission

Enable this to disable affiliate commission after several orders.

4.0.1.10 Disable commission after

The number of orders after which the affiliate gets disabled.

4.0.1.11 Global referral rate for orders placed

Input the global rate for orders placed which the affiliate customer will get as a commission, will be treated as a percent of order value.

4.0.1.12 Global referral rate for user registration

Input the global rate for user registers which the affiliate customer will get as a commission will be treated as a fixed amount.

4.0.1.13 Referral Default Status

Default status of referral and commission when a new referral is entered into the system.

4.0.1.14 Select when the referral should be counted

Options when the referral and commission will be counted.

4.0.2 Affiliate Customer

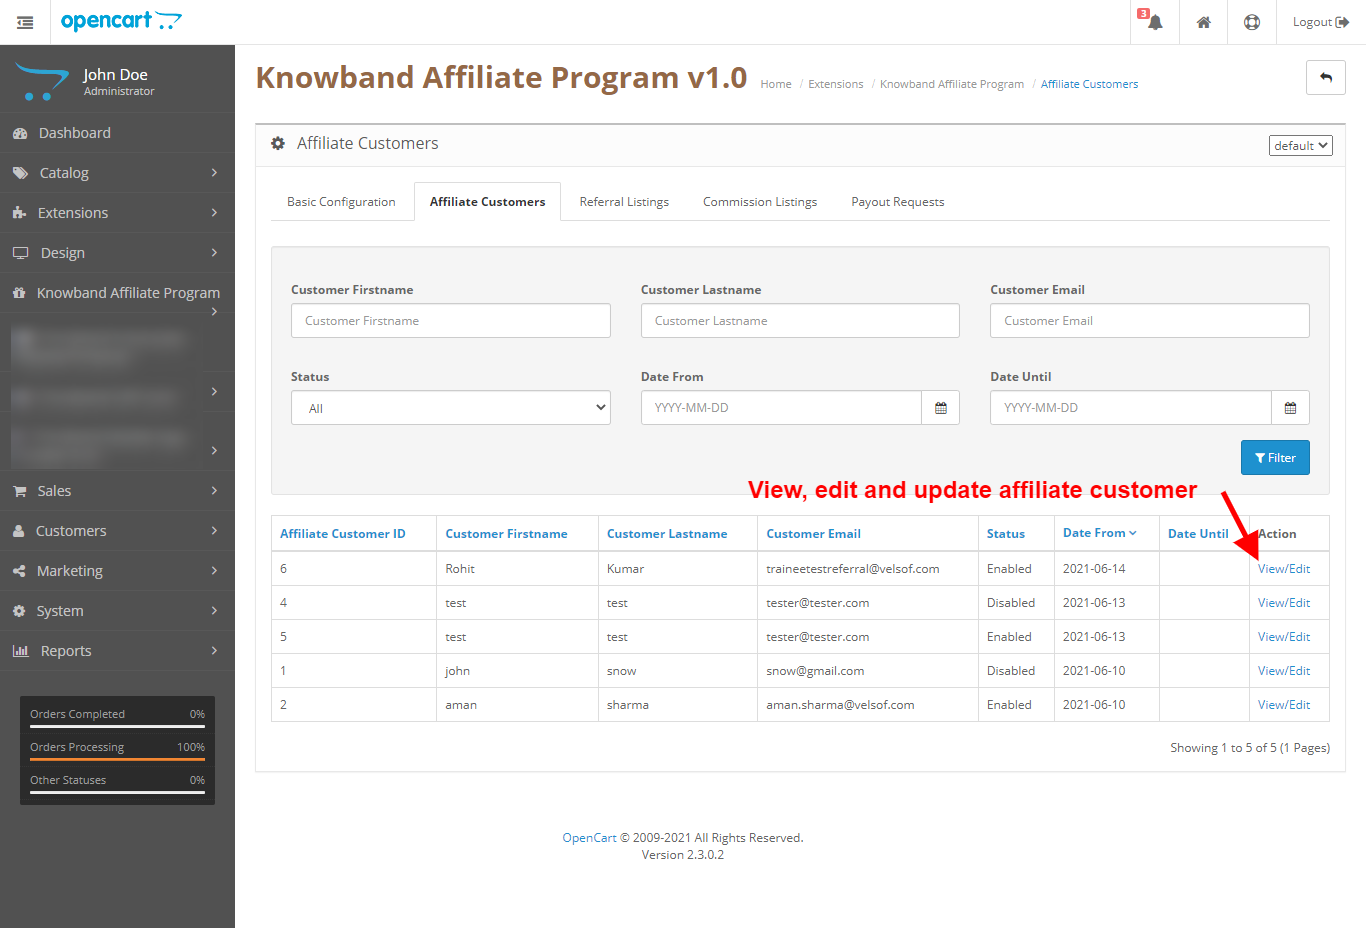
In this tab, the admin can view the list of affiliate customers with their status and also have the sorting functionality and filters.

In the list of customers, the admin has the option to sort the columns on the and have the options to filter data based on customer first name, customer last name, customer email, customer status, customer date from, and customer date until.

Also, the admin has the link to the customer view/edit page.
4.0.3 View/Edit Affiliate Customer

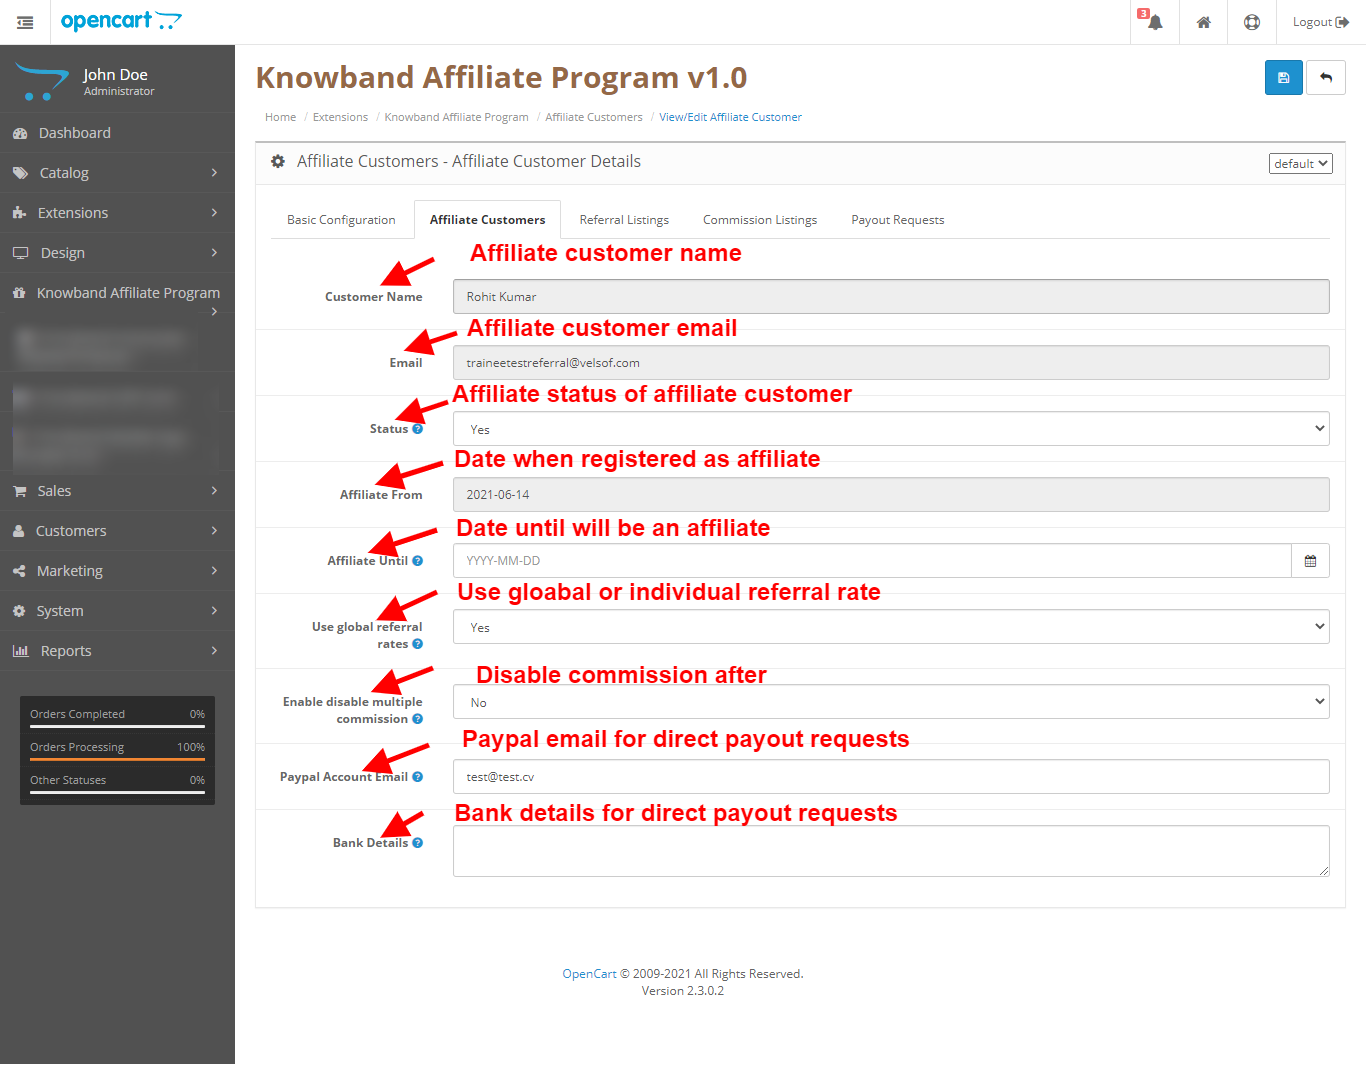
On this page of the OpenCart Affiliate and Referral program extension, the admin can view the details of the individual affiliate customer and can edit them individually.
4.0.3.1 Customer Name

Affiliate customer name.

4.0.3.2 Email

Affiliate customer email.

4.0.3.3 Status

Affiliate customer status.

4.0.3.4 Affiliate From

Date when customer joined as an affiliate customer.

4.0.3.5 Affiliate Until

Date till when the customer will be treated as an affiliate customer.

4.0.3.6 Use global referral rates

Option to set whether to use global rates for orders defined in basic configuration or use individual affiliate customer rates.

4.0.3.7 Paypal Account Email

Paypal email to send approved payout request amount directly to the customer Paypal account(manually).

4.0.3.8 Bank Details

Bank details to send approved payout request amount directly to the customer bank account(manually).

4.0.4 Referral Listing

In this tab of the OpenCart Affiliate Program extension, the admin can view the list of referrals that have been interacted after getting the referral code from the affiliate customers.

In the list of customers, the admin has the option to sort the columns on the and have the options to filter data based on customer first name, customer last name, customer email, and customer status.

Also, the admin has the link to the referral view/edit page.

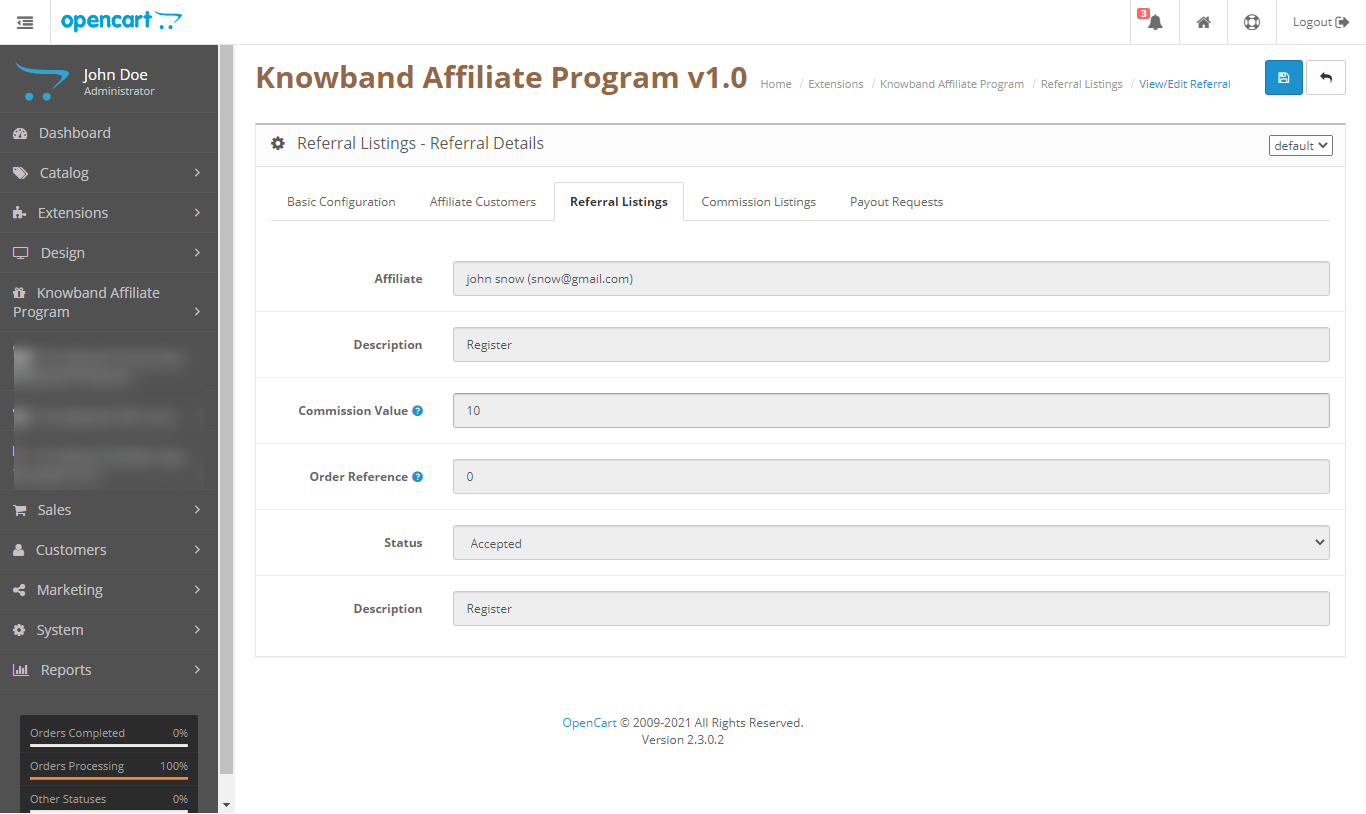
4.0.5 View/Edit Referral

In this tab of the OpenCart Referral Program extension, the admin can view the referral and edit their status only when it is not accepted, once accepted nothing can be changed.
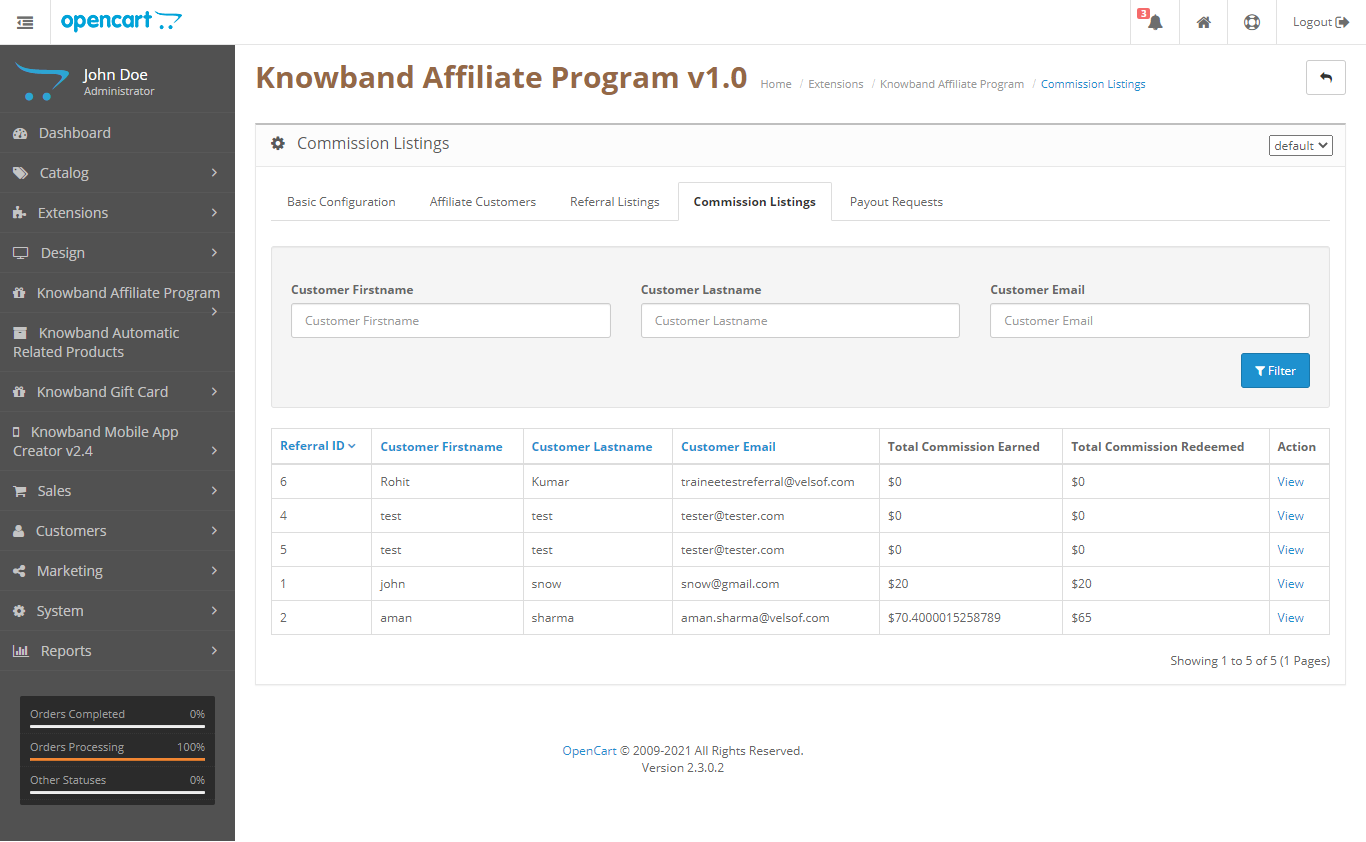
4.0.6 Commission Listing

In this tab, the admin can view all the affiliates with the data like how much in total they have earned as commission and how much they have redeemed.

Also, they have the link to view the commission history as per each referral for that affiliate customer.
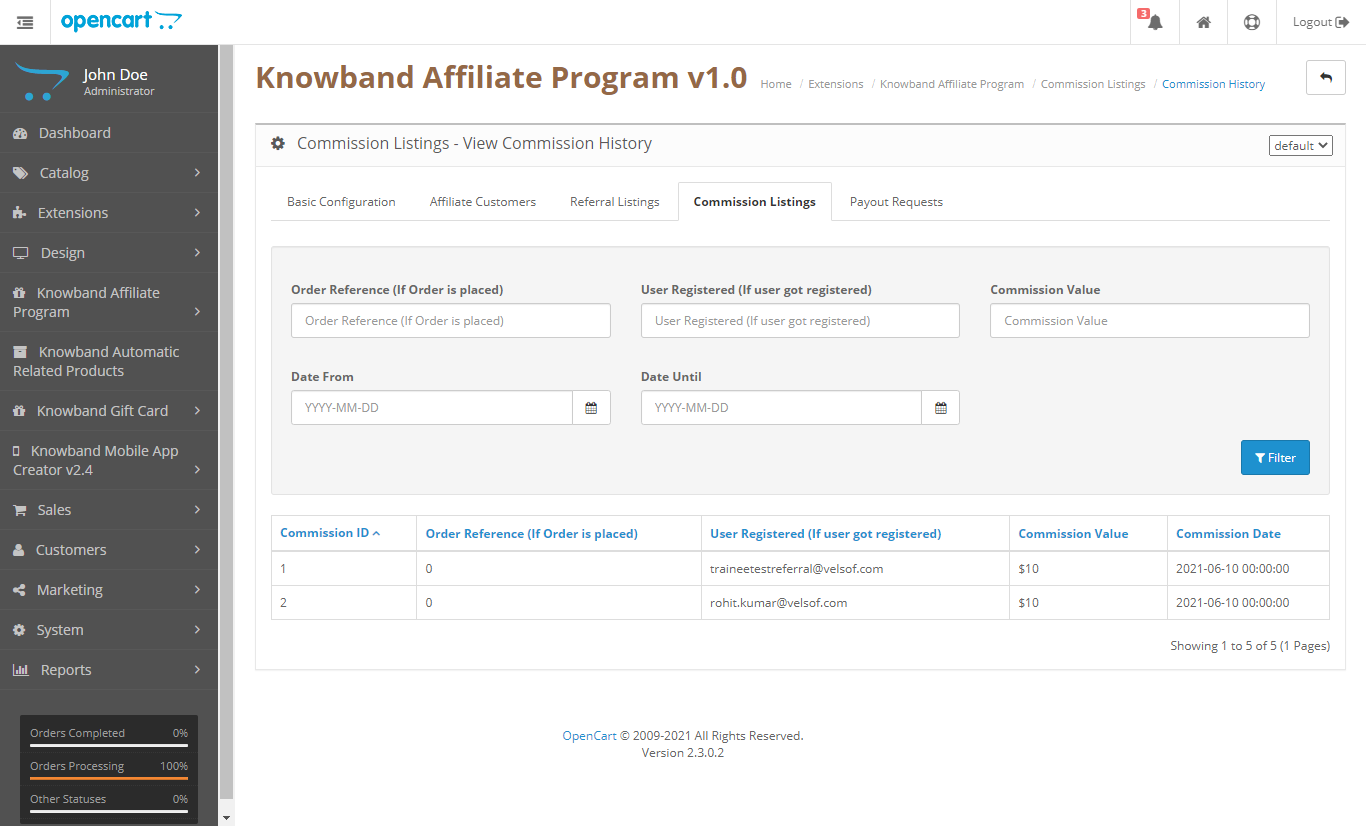
4.0.7 View Affiliate Commission History

In this tab, the admin can view the commission history of the individual affiliate.
4.0.8 Payout Requests

In this tab of the OpenCart Affiliates module, the admin can view the payout request from the affiliate customers and can accept them and reject them.

5.0 Front End Interface for the OpenCart Affiliate Program

On the front end, we will have a separate dashboard for the affiliate customers in which we have the following tabs:

  1. Affiliate Dashboard
  2. Referral Methods
  3. Commission Listing
  4. Payouts:
  • Voucher
  • Payout

5.0.1 Affiliate Dashboard

In the affiliate dashboard, customers can see his statistics as the affiliate customer like how much commission he has earned till now, how much he has redeemed, how much is not accepted yet, and how much payment request is not accepted yet.

Also, there is a graph that shows the last 8 day’s commission earned statistics.

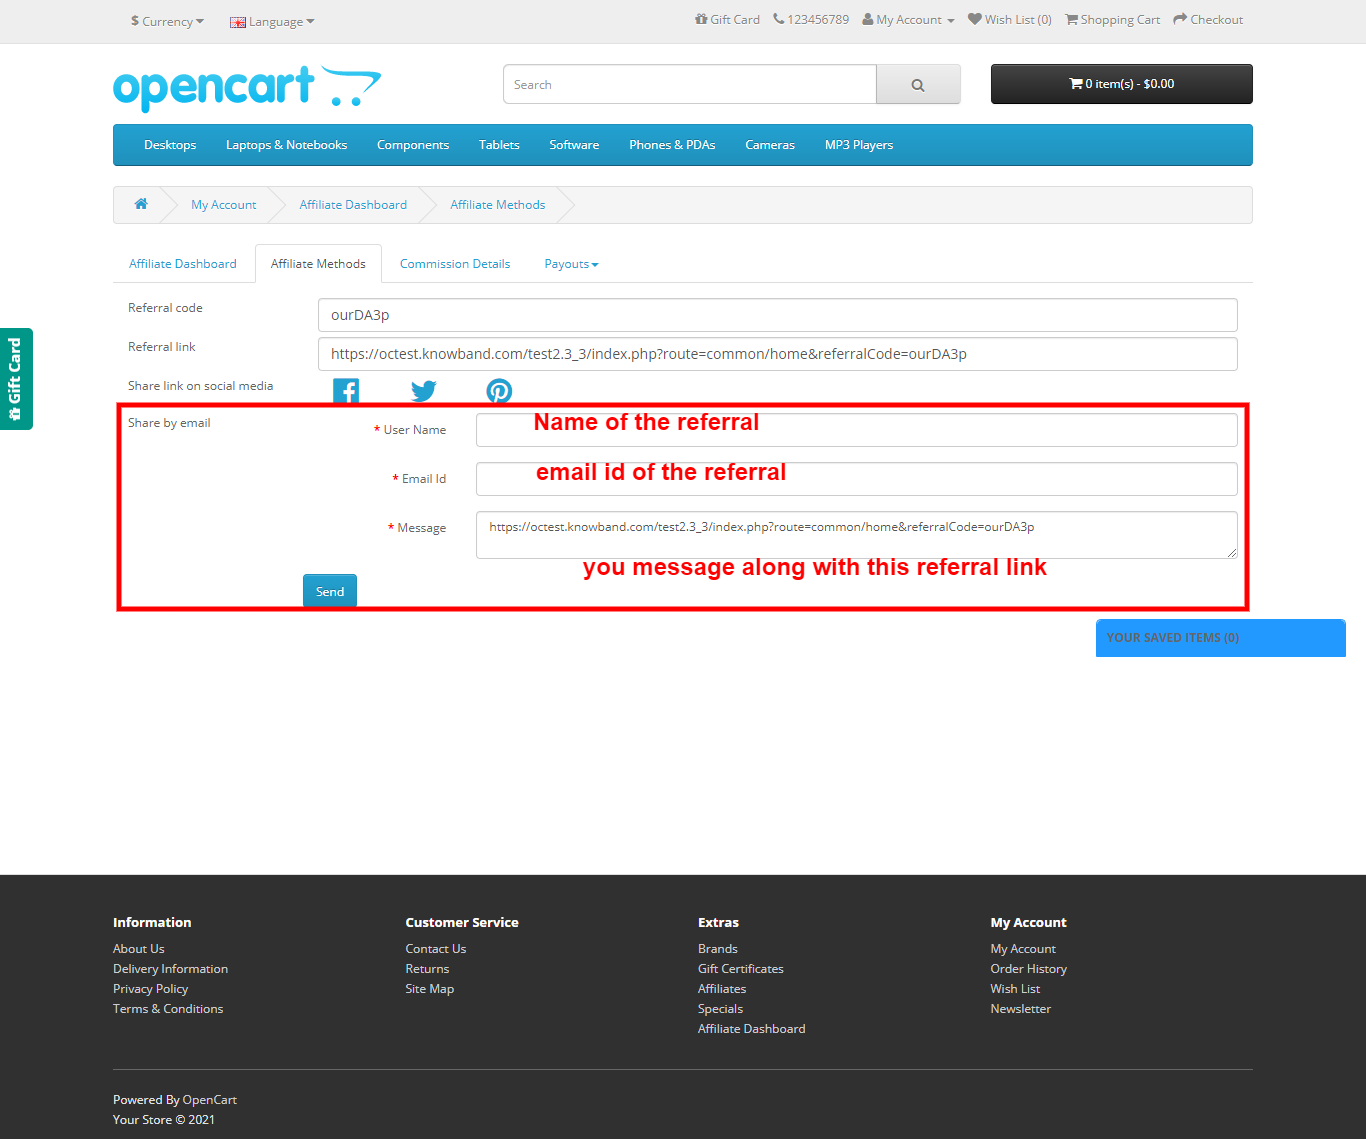
5.0.2 Referral Methods

In this tab of the OpenCart Referrals plugin, we have all the options listed that were selected as the referral system in the basic configuration settings of the OpenCart Affiliate and Referral module.

In this, you can directly copy the referral code and referral link and give it to your friends.

Also, you have the option to share the referral code on social media.

Moreover, you have the option to share the referral code by email.
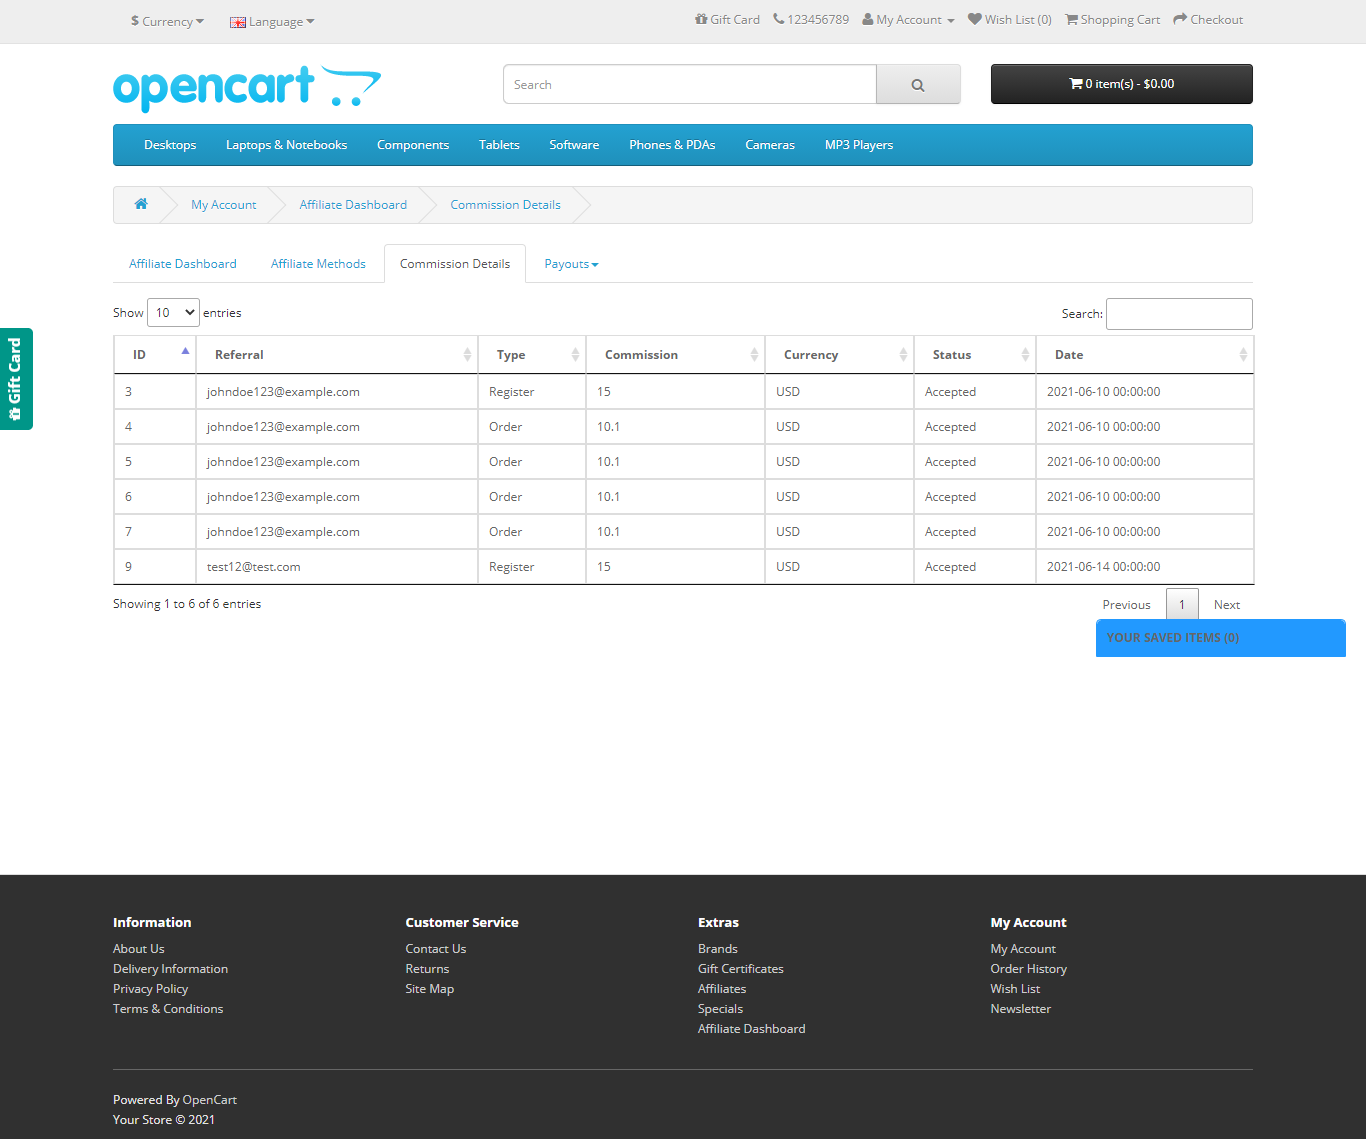
5.0.3 Commission Details

In this tab of the OpenCart Referral Program extension, we have all the details of the commission for the affiliate customer which he has earned with their status even if they are accepted or not yet.
5.0.4 Payout > Vouchers

In this tab, we have all the details of the coupons that were generated by the affiliate customer to redeem his commission in the form of vouchers to use on the site.

Also, affiliate customers can generate vouchers from this page and will receive those on their email.

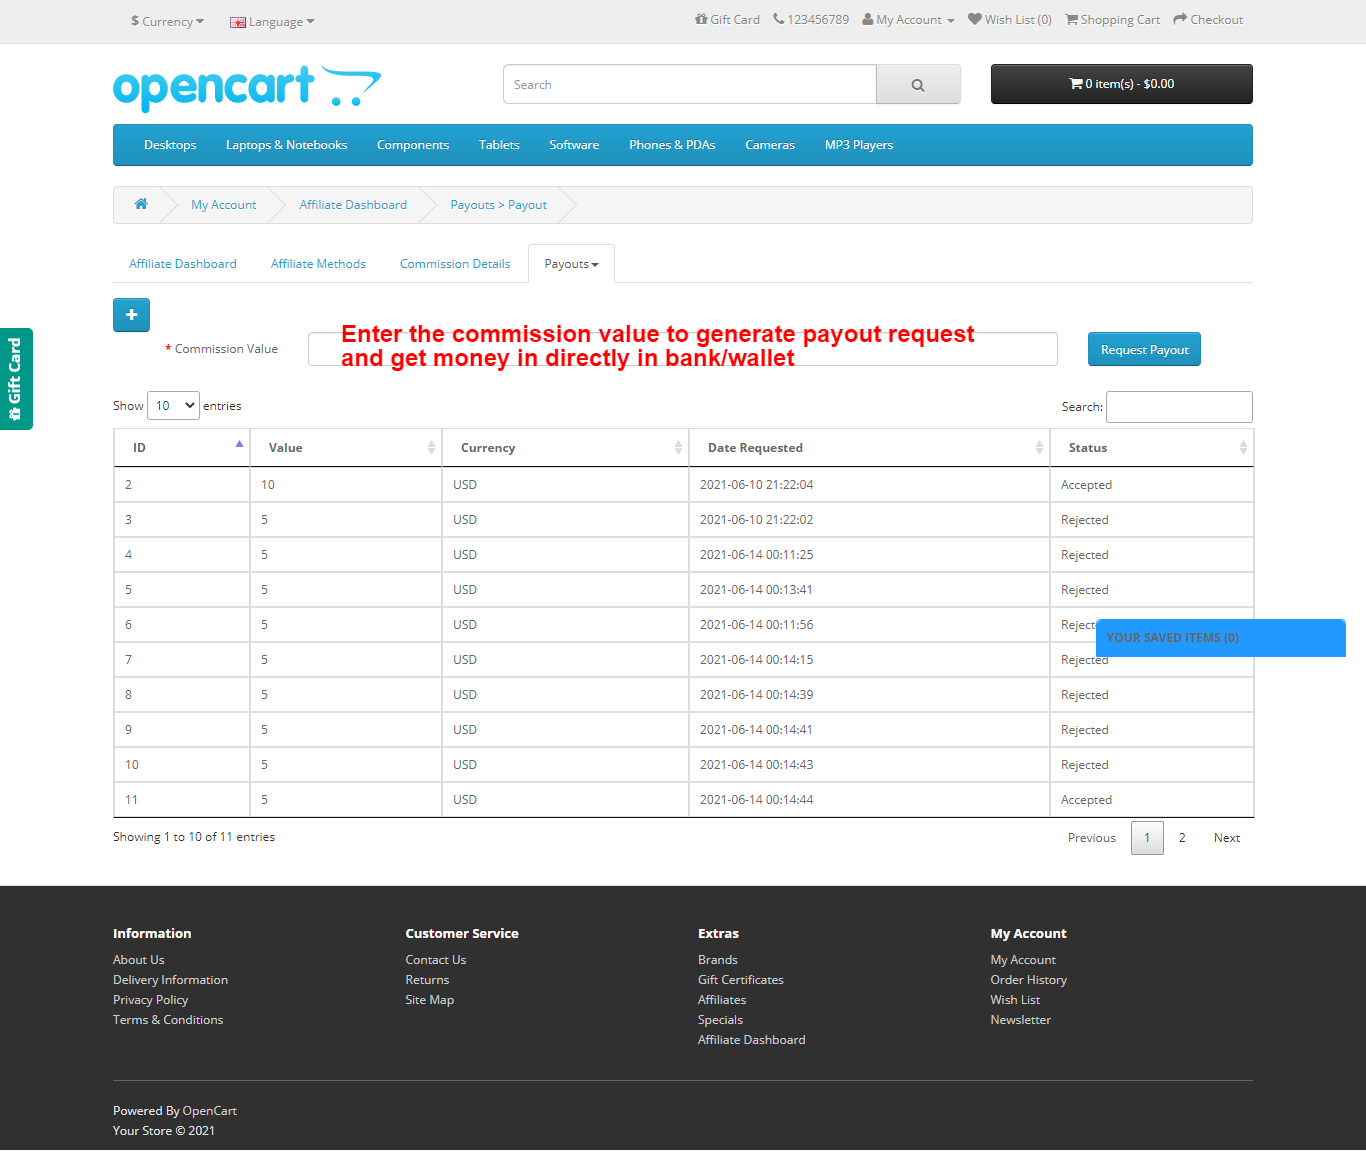
5.0.5 Payout > Payout

In this tab of the OpenCart Affiliate and Referral module, we have all the details of the payout request. Further, the details the affiliate customer made to get the commission amount directly into his bank account/wallet.

Affiliate customers can request payout requests and their status and payout request will be visible in the list.
For more details, click below:

Knowband’s OpenCart Affiliate and Referral module Product Link

OpenCart Affiliates module Marketplace Link

The OpenCart Referrals plugin Admin Demo

OpenCart Affiliate and Referral module Front Demo

Prestashop Wallet System module_User Manual

1.1 Introduction

The Prestashop Wallet System module is an addon that enables the customer to make the payment for the product purchased at the time of check-out using the e-wallet system. Thus, simplifying the customer buying experience by providing them with a simple and easy-to-use digital payment method.

2. Installation Guide

The folder structure of the Prestashop Customer Wallet System module folder.

Copy the module folder under the “root_directory/modules/” of the admin store via FTP or use the Prestashop interface to upload the plugin.
Further, after copying, the Prestashop module will be listed on the module listing page in the admin panel as given in the below screen.

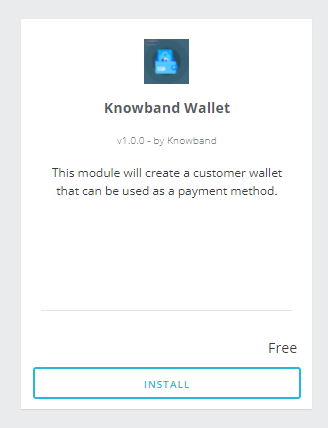
The admin will be able to find the Prestashop Wallet System ready to be installed in the Modules in the admin PrestaShop store as shown below.
Therefore, click on the Install link to install the plugin.

3. User Manual

This User Manual provides the admin with the guidelines of this Prestashop Wallet System Addon. In fact, this e-wallet module contains 2 interfaces:

  • Admin Interface
  • Front-End Interface

3.1 Admin Interface

To access this module, click on the “Wallet Module” button of Prestashop Customer Wallet Addon. Further, on clicking, the admin will get three different options:

  • General Settings
  • Customer Wallets
  • Orders

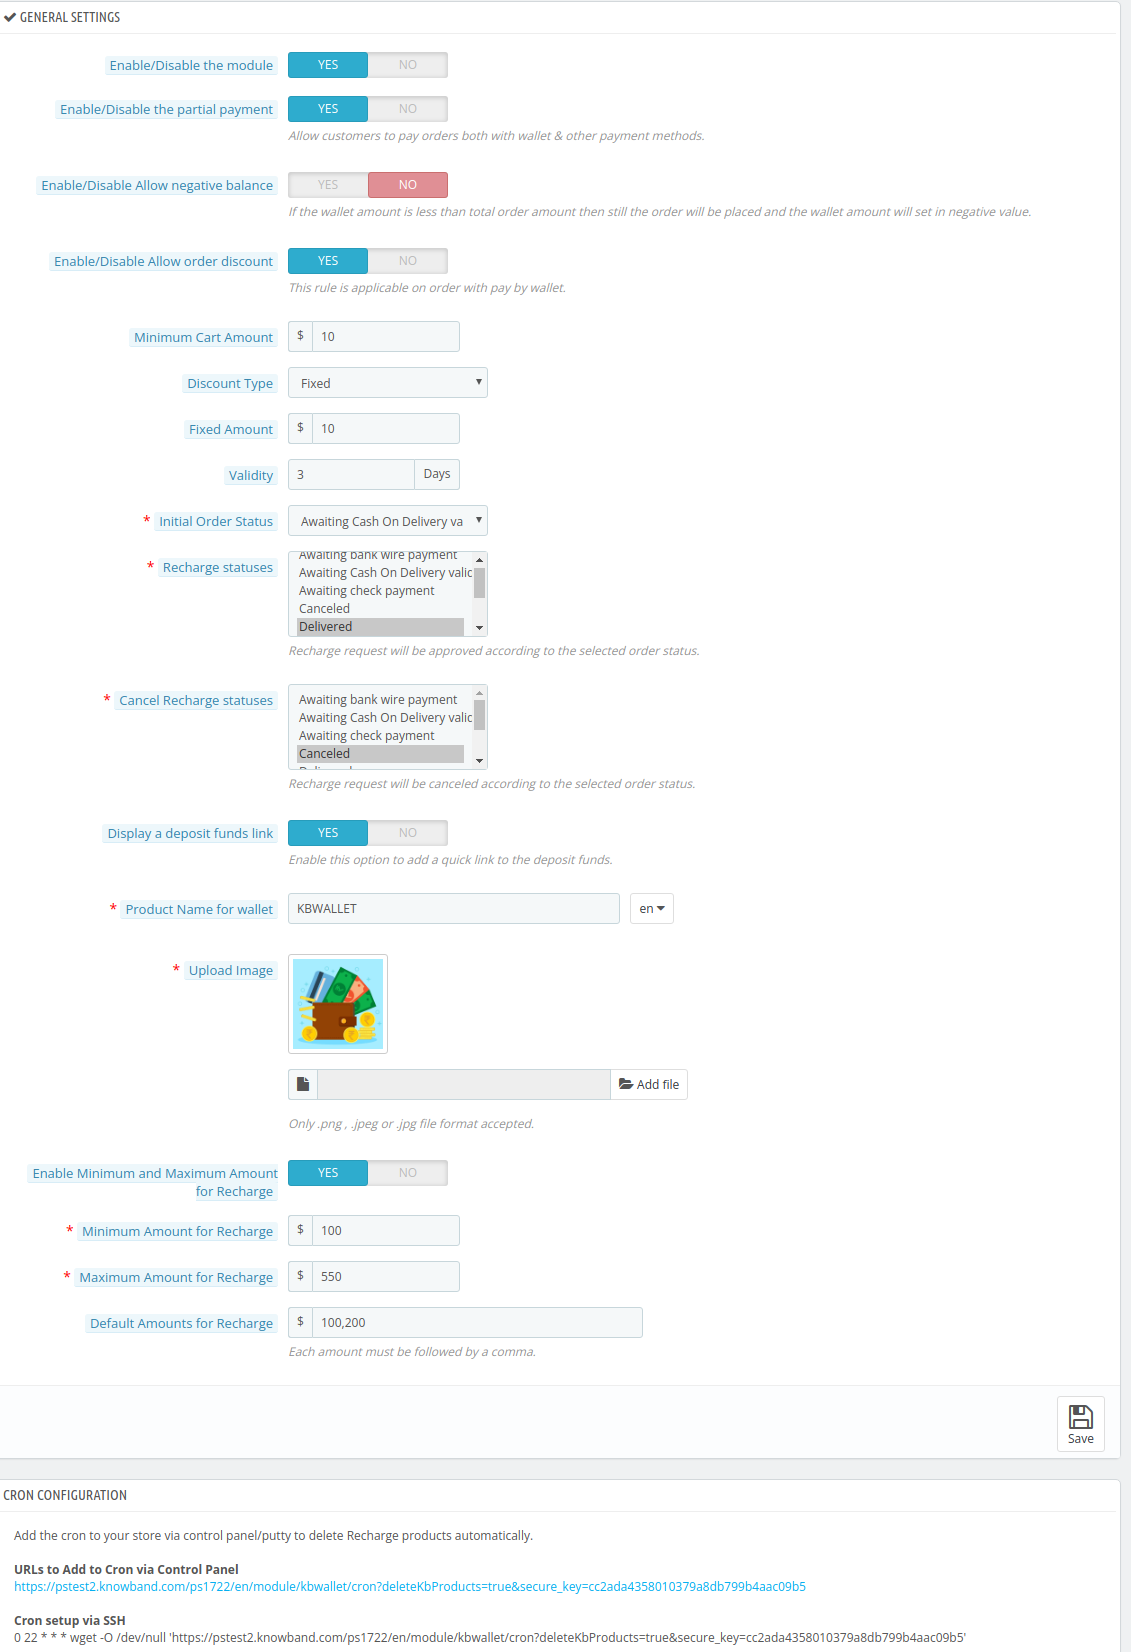
3.1.1 General Settings

3.1.1.1 Enable/Disable the Module

Using this button the admin can easily enable the Prestashop Customer Wallet plugin. In fact, the admin just needs to toggle from No to Yes.

Note: The default value will be “No.”

3.1.1.2 Enable/Disable the partial payment

This Prestashop Customer Wallet Addon will help the admin empower the customer to make a part payment using the digital wallet. In addition, the remaining payment is usable from the other payment options. In fact, to enable this option the admin just needs to switch the Enable button from No to Yes.

3.1.1.3 Activate/Deactivate Allow negative balance

Through this option, the admin can simply allow the negative balance in the e-wallet. Further, the default option selected here will be No. In fact, if the admin wants to enable it, he needs to toggle the button to Yes.

Note: If the wallet amount is less than the total order amount then still the order will be placed and the wallet amount will be set in negative value.

3.1.1.4 Enable/Disable Allow order discount

Using this option, the admin can either enable or disable the option to permit a discount on placing an order using the wallet. However, the customer will be able to enjoy the discounted price of the product only when they choose Wallet as their payment option.

In addition to this, if the admin enables it, he will get different options

3.1.1.5 Minimum Cart Amount

This will help the admin to set the minimum order amount on which the discount will be applicable. For Instance, $100.

3.1.1.6 Discount Type

Using the Prestashop customer wallet addon, the admin will be able to choose between two different types of discounts:

a. Fixed: For Instance $10

b. Percentage: For Instance 10%

On the basis of this, the customer will be able to reap the benefits of discounts under this e-wallet system plugin.

3.1.1.7 Validity

This option of Prestashop Customer wallet addon will help the admin to set the time period for which the discount will be valid.

3.1.1.8 Initial Order Status

The admin can choose the initial order status to display when the customer chooses to pay from the wallet. The following are the options:

  • Awaiting Bank Wire Payment
  • Awaiting Cash on Delivery Validation
  • Canceled
  • Awaiting Check Payment
  • Delivered
  • Mobile App Awaiting PayPal Payment
  • Mobile App PayPal Payment Accepted
  • On Back Order (Not Paid)
  • On Back Order (Paid)
  • Payment Accepted
  • Payment Error
  • Processing in Progress
  • Refunded
  • Remote Payment Accepted
  • Shipped
3.1.1.9 Recharge Statuses

Depending on the Order status, the admin can set the recharge statuses. The options available are:

  • Awaiting Bank Wire Payment
  • Awaiting Cash on Delivery Validation
  • Canceled
  • Awaiting Check Payment
  • Delivered
  • Mobile App Awaiting PayPal Payment
  • Mobile App PayPal Payment Accepted
  • On Back Order (Not Paid)
  • On Back Order (Paid)
  • Payment Accepted
  • Payment Error
  • Processing in Progress
  • Refunded
  • Remote Payment Accepted
  • Shipped
3.1.1.10 Cancel Recharge Statuses

Depending on the Order status, the admin can cancel the recharge statuses. The options available are:

  • Awaiting Bank Wire Payment
  • Awaiting Cash on Delivery Validation
  • Canceled
  • Awaiting Check Payment
  • Delivered
  • Mobile App Awaiting PayPal Payment
  • Mobile App PayPal Payment Accepted
  • On Back Order (Not Paid)
  • On Back Order (Paid)
  • Payment Accepted
  • Payment Error
  • Processing in Progress
  • Refunded
  • Remote Payment Accepted
  • Shipped
3.1.1.11 Display a deposit funds link

By utilizing this option, the admin can easily enable or disable the static quick link. If this option is enabled the customer will be able to recharge the wallet while staying on the product page.

3.1.1.12 Product Name for the wallet

As the option suggests, the admin can easily set the e-wallet name. For instance, PSWALLET.

3.1.1.13 Upload Image

By using this option of the Prestashop customer wallet plugin, the admin can easily upload and set the image for the e-wallet.

3.1.1.14 Enable Minimum and Maximum Amount for Recharge

This option will allow the admin to set the minimum and maximum range for recharging the e-wallet. To enable this feature Switch the option from No to Yes.

  • Minimum Amount for Recharge: For instance $100
  • Maximum Amount for Recharge: For instance $500

Note: If you disable this option, the admin needs to set the default values for digital wallet recharge. Moreover, the admin needs to keep in mind that he needs to separate the default recharge values by comma.

3.1.1.15 Executing Cron functionality

The admin can add the cron to the store via control panel/putty to delete Recharge products automatically.

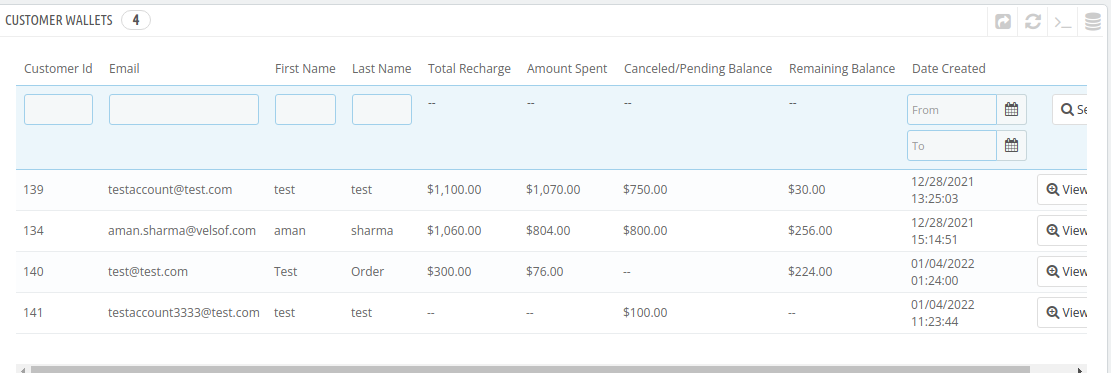
3.2 Customer Wallets

In this section of the Prestashop Customer Wallet System addon, the admin can track all the customers using the wallet. In fact, he can even view the following details of the customers:

  • Customer ID
  • Email
  • First Name
  • Last Name
  • Total Recharge
  • Amount Spent
  • Canceled/Pending Balance
  • Remaining Balance; and
  • Date Created

In fact, the admin can view a detailed report of every customer in this section. In addition, he can also edit the same. For instance, he can recharge the customer’s wallet. Further, he can even debit an amount from the same.

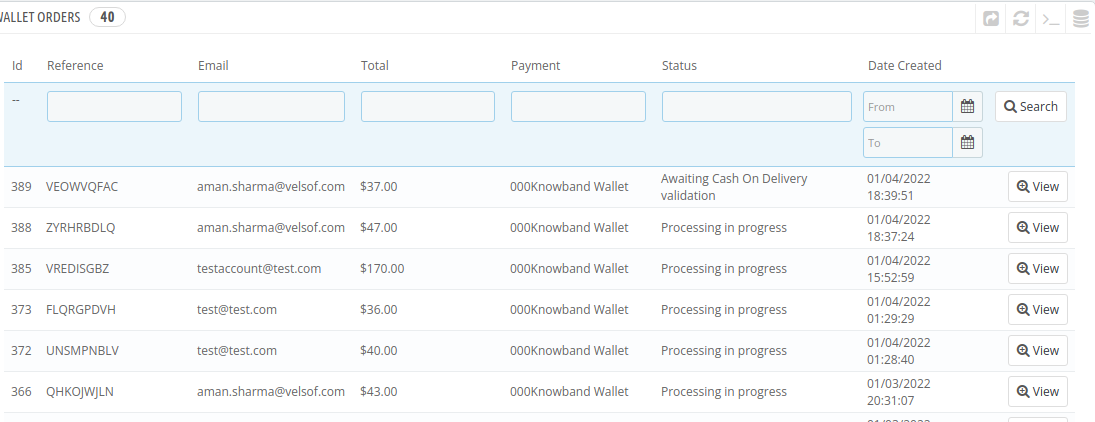
3.3 Wallet Orders

In this section of the Prestashop Customer Wallet Addon, the admin can view all the transactions made with the wallet. In addition, he can apply filters as per the date the orders were placed.

Please contact us at support@knowband.com for any query or custom change request as per your business requirement.

OpenCart Loyalty Points Extension – User Manual

1.0 Introduction

Did you know that increasing your customer retention rate by 5% boosts your profits by as much as 95%? But far too often, businesses choose to focus on attracting new shoppers – not looking after existing ones. Understandably, you want to grow your customer base. But how do you keep hold of the people who are more likely to buy from you again? Well, one solution is to create a customer loyalty program that rewards those shoppers who come back. Knowband OpenCart Loyalty Points Extension can easily solve this problem.

1.1 What are Loyalty Points?

Loyalty points are the reward-based points that are awarded to the customers when they fulfill some conditions on your online store. These conditions can be anything like a specific product, minimum cart value, category, etc. The points collected by the customer can be converted into discounts which can be used by the customer to decrease some amount of the cart.

A loyalty points program is a marketing strategy designed to encourage customers to continue to shop or use the services of a business associated with the program. This is used to engage the customer in making more and more shopping decisions on our web store by giving them more and more points so that the customer has more and more interest in buying more items from the store.

The process of creating a loyalty point program can be a very difficult task, hereby Knowband’s OpenCart Loyalty Points extension will simplify this task for you. This plugin allows the admin to create different types of conditions, if the customer satisfies any of these conditions, the customer will be automatically awarded the loyalty points defined by the admin. This reward point extension will also keep the track of the loyalty points rewarded.

1.2 How does it work?

The working of the OpenCart Loyalty Points module is explained by the following points.

  • Firstly the Admin needs to create rules in the loyalty point rules tab.
  • The Admin also needs to add conditions according to the rules type he/she is creating.
  • Once the rules are created, if the customer fulfills the conditions of a rule, the customer will be rewarded according to the points stated in that particular rule he/ she fulfilled.
  • Once the customer gains some points, they can use those points to get discounts on their next purchase.
  • Once the customer has applied points in the cart and placed an order, the points will be automatically removed according to the points they have used.

1.3 Salient Features of the OpenCart Loyalty Point module

  1. OpenCart Loyalty points system grants loyalty points to your customers for placing an order with a specific cart value, creating an account, ordering a certain product, etc. The loyalty points are defined specifically for different rules.
  2. OpenCart Loyalty reward points can be offered manually or automatically to the customers based on their cart value, product selection, or site activity.
  3. With this Loyalty points module, you can set the discount equivalent to a single loyalty point. A custom conversion rate can be set to different currencies of the module.
  4. OpenCart Loyalty points module gives an option to set minimum cart amount to be eligible to apply loyalty points discount.
  5. The tax over OpenCart loyalty discount coupons can be enabled or disabled from the backend.
  6. The loyalty points module for OpenCart allows you to set various progression names in multiple languages.
  7. OpenCart Loyalty Points module lets you create unlimited loyalty points rules based on the customer’s Cart, Product, or Behavior.
  8. With this reward point plugin, you can set the title, description, the number of loyalty points, start date, end date, and validity for each rule.
  9. You can modify, enable, disable or delete the existing rules from the module Admin settings of the Reward points extension.
  10. The status and detailed history of OpenCart loyalty discount points can be viewed at the backend.
  11. With the OpenCart customer loyalty system, you can easily get into the details of loyalty points earned by the customers of the store. It keeps a list of customers with how many points they have spent, available, and on hold.
  12. The different emails sent for points, credit points cancellation and points redemption can be modified from the back-office of this OpenCart Loyalty reward points module.
  13. OpenCart Loyalty points system is simple to enable or disable from the module Admin settings interface.
  14. The OpenCart loyalty points module is multi-lingual compatible.

2.0 Installation Guide

Once purchased, you will receive the following files in your registered email.

Source code of OpenCart Loyalty Points module in zipped file format.

User Manual of OpenCart Loyalty Points module.

Now to install this on your OpenCart Store, follow the given steps:

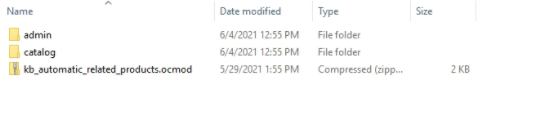
Step 1: Unzip the zip file. You will get the folders as shown in the image below

Step 2: Now choose the OpenCart version according to your store and open that specific OC folder. After opening it you will see the following content.

Step 3: Copy and paste the content inside the upload folder inside your Opencart store folder.

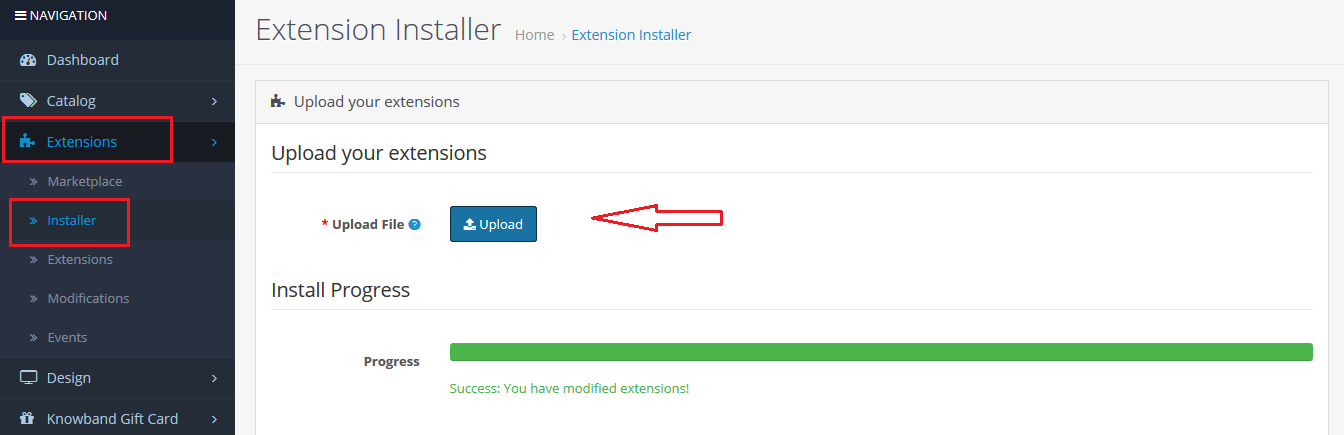
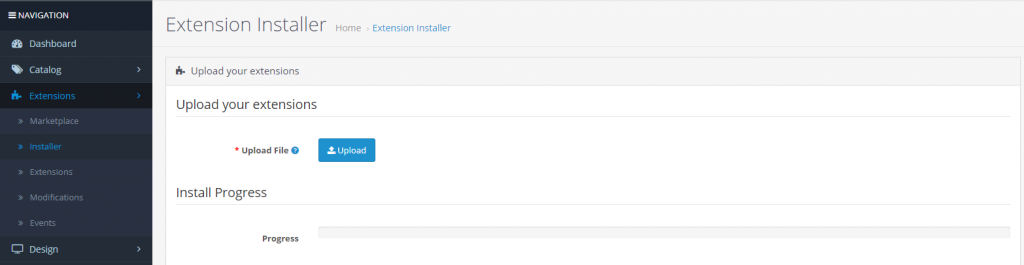
Step 4: Go to Extensions and then Installer. From here, you can upload the ” kbloyalty_point.ocmod.zip” (for OC3.0.x) file and install the extension.

So, the OpenCart Loyalty Points Module is now successfully installed and is ready to use at your store. Go to the admin menu and click on the extensions. Choose the Extension Type as Modules. You will find a list of modules. Select the Knowband Loyalty Point Module.

3.0 Admin Interface

The Admin Interface of OpenCart Abandoned cart recovery email extension includes the following main settings:

  • Module Configuration
  • Loyalty Points Rules
  • Loyalty Points Balance
  • Loyalty Point History

3.0.1 Module Configuration

This tab consists of all the module configurationally settings.

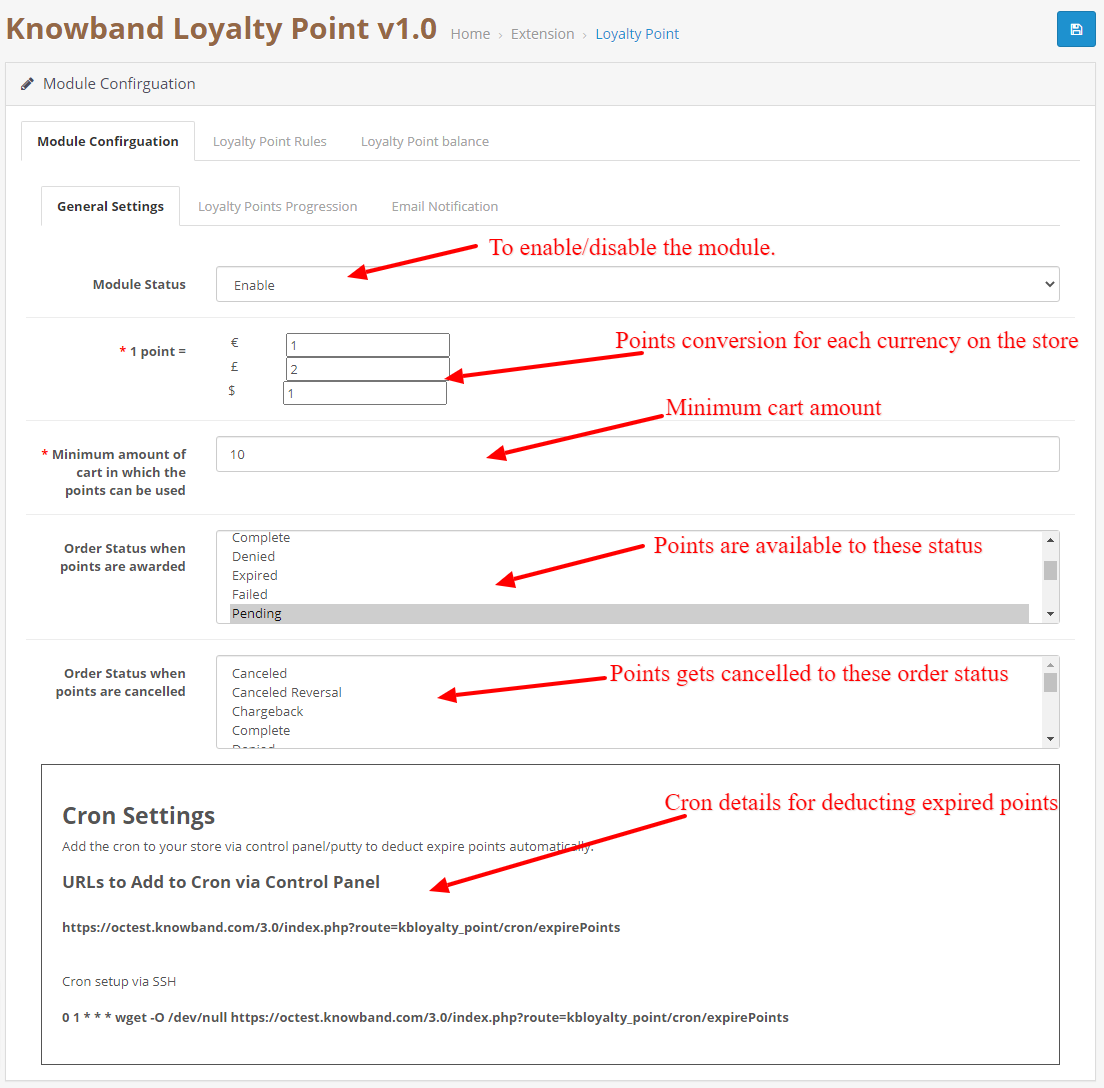
3.0.2.1 General Settings

  1. Enable/Disable: Initially, this field of the OpenCart loyalty points module by Knowband will be “OFF”. Admin can enable/disable the Opencart module by turning ON/OFF in this setting.
  2. Point Conversion: In this field, you can set the conversion rate for each currency added to your store.
  3. Minimum Cart Amount: This filed allows you to set a minimum cart amount on which the points can be used or not.
  4. Apply Taxes:  If enabled, the discount generated by the points will be applied to the taxes as well and if it is disabled the discount will not be applied to the taxes.
  5. Order Status for Available points:  If the order status gets the selected status from admin the points will be automatically available to the customer.
  6. Order status for Cancelled points: If the order status gets the selected status from admin the points will be automatically available to the customer.
  7. Cron Settings: Details of the cron are showed, This cron is used to deduct available points from the customer who has not used and passed the expiration date.

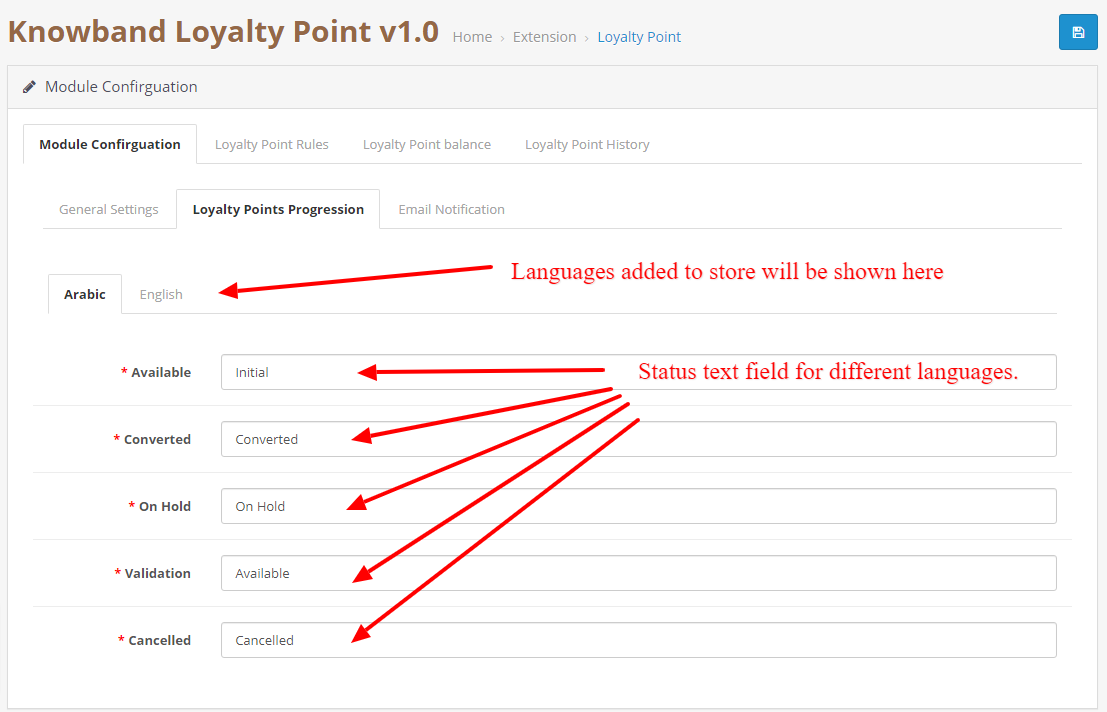
3.0.2.2 Points Progression Settings

This allows you to change the language/text as per your requirement of the loyalty points progression statuses. You can change the language for each status in each language added to your store.

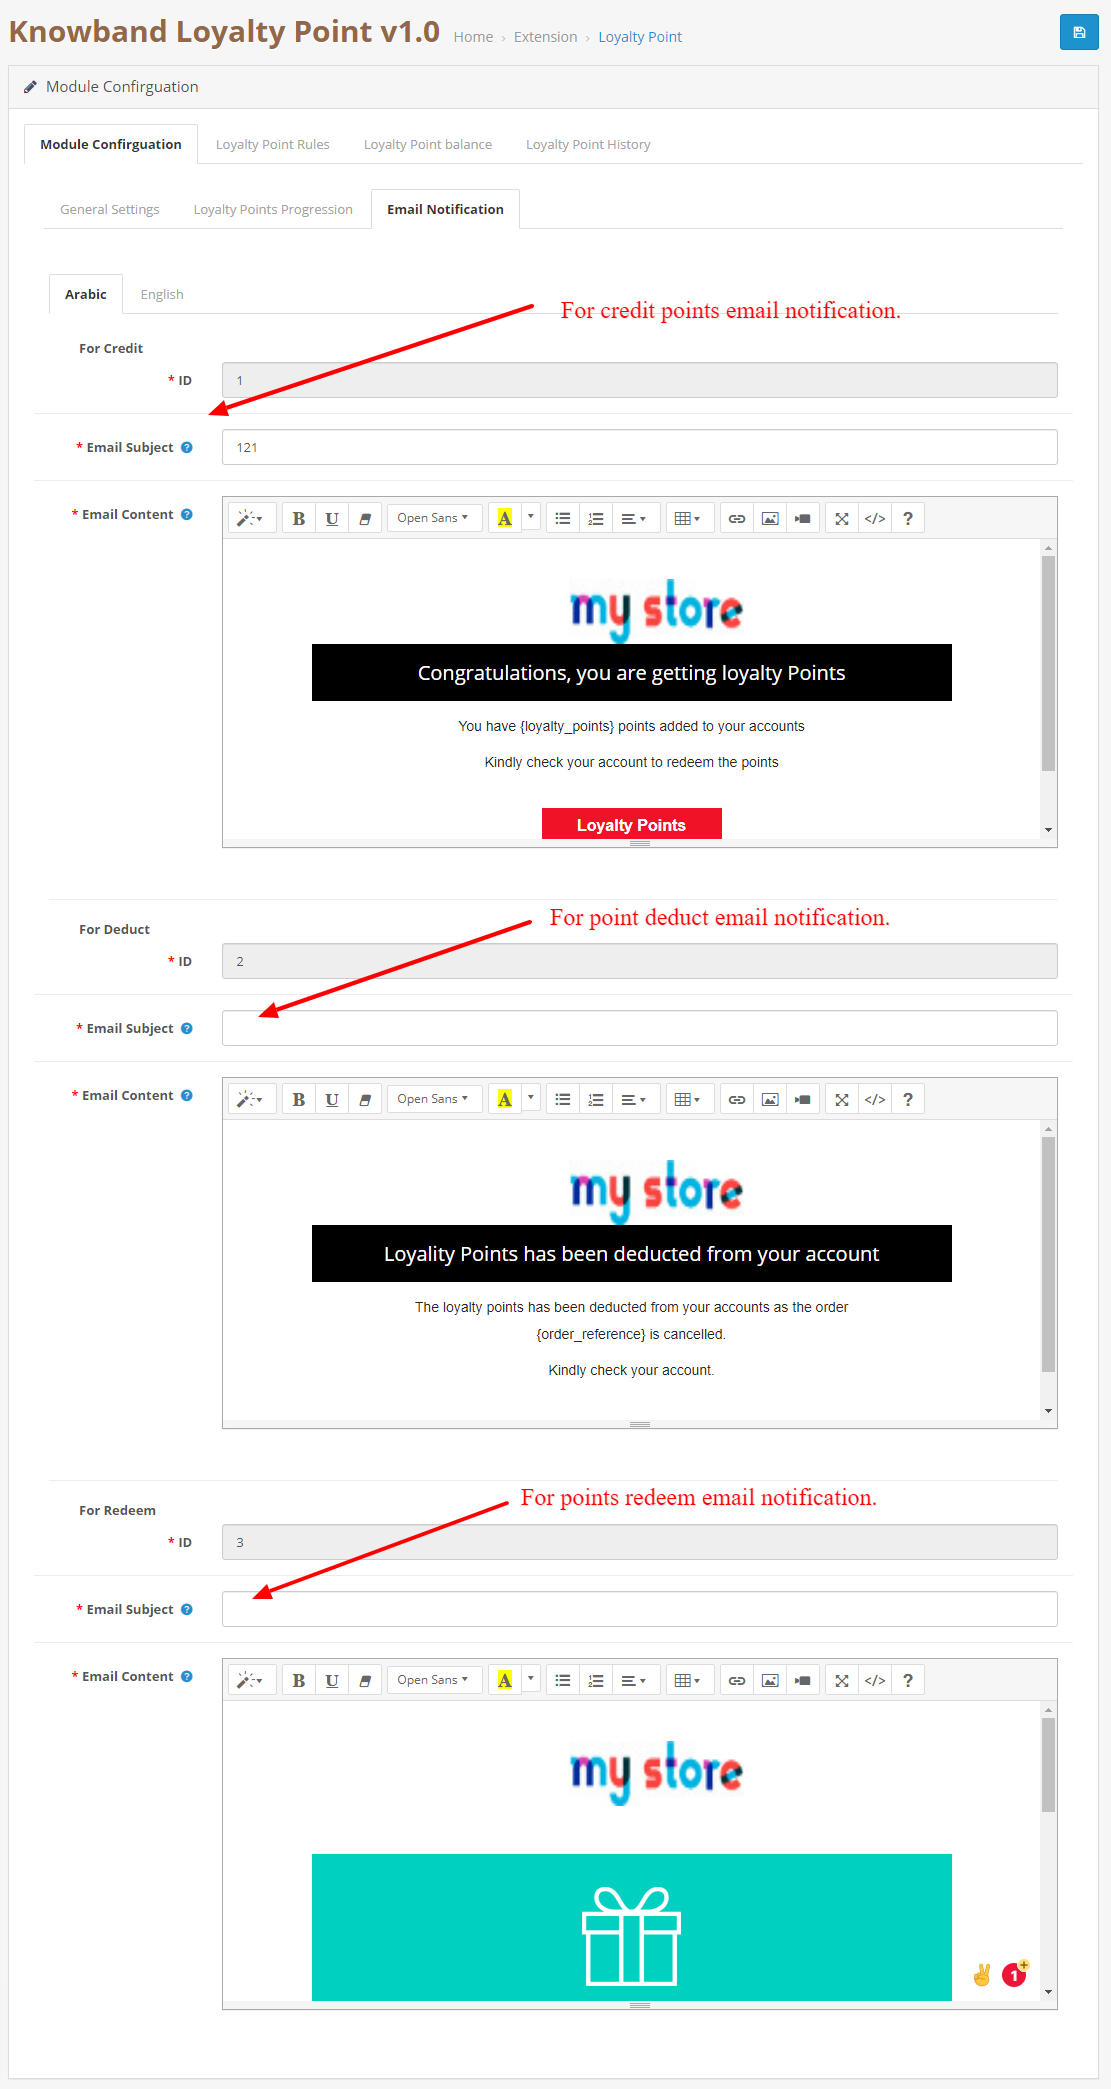
3.0.2.3 Email Notification.

In this tab, you can customize the credit, deduct and redeem notification emails for each language.

3.0.3 Loyalty Point Rules

In this tab, you can see all the rules that are created in the store. The Admin can create new rules and edit the existing rules using this tab.

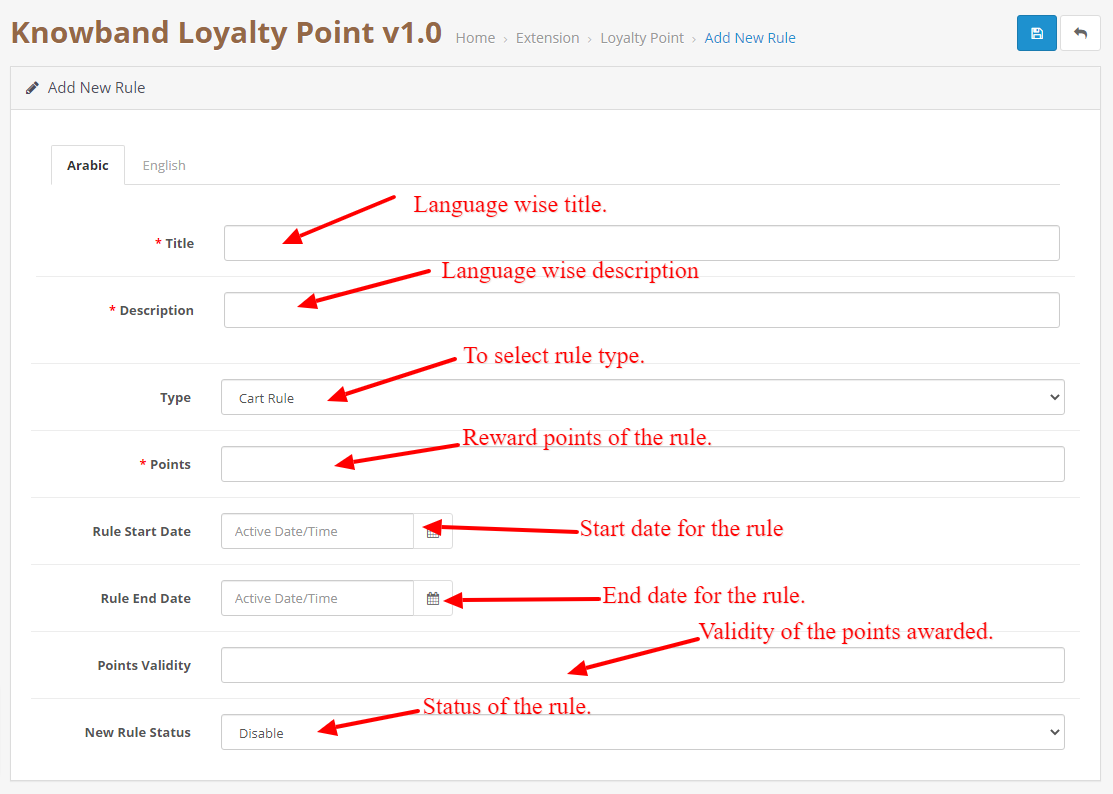
3.0.3.1 New Rule

When the Admin will click on the new rule button, they will be redirected to the New rule page. On this page, you can create a new rule by filling the form.

  • Title: Add a title to the rule in each language added to the store.
  • Description: Add description to the rule in each language added to the store.
  • Rule Type: Select the rule type. It can be a cart, product, or behavior rule.
  • Points: Add the number of points that will be awarded to the customer if the conditions are fulfilled.
  • Rule Start Date: This field will be used to add a Start date for the rule.
  • Rule End Date: This field will be used to add an End date for the rule.
  • Validity: This field is used to add validity to the points which will be added to the customer. You can add no. of days in the field.
  • Rule Status: To enable/disable the rule.

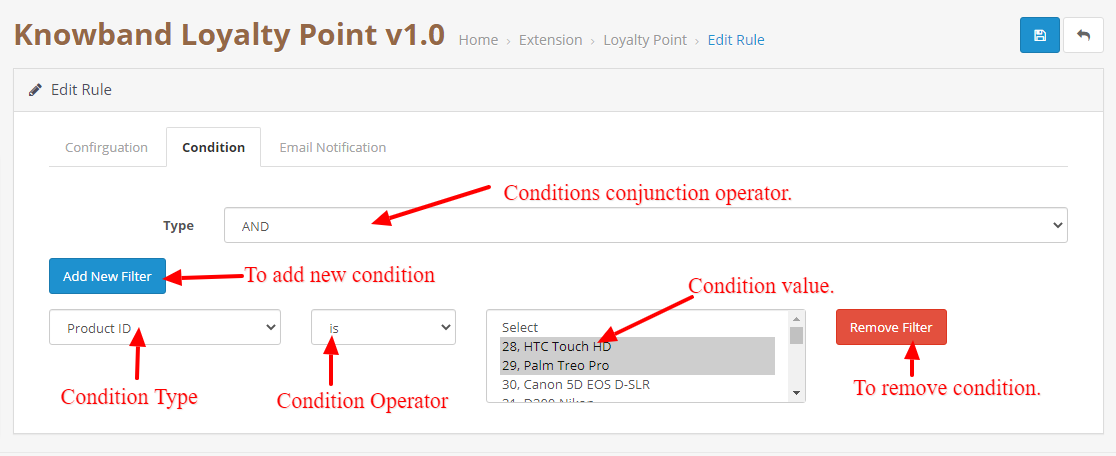
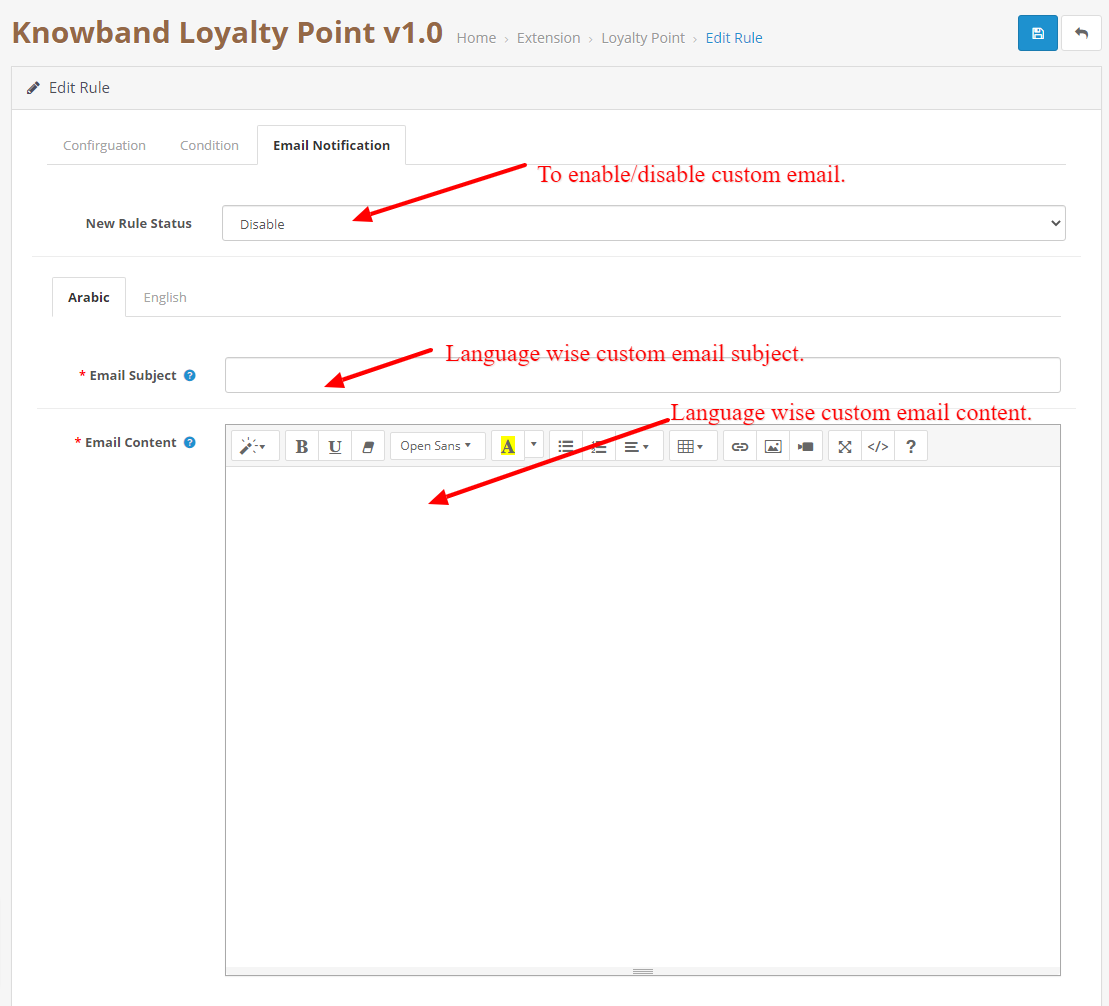
3.0.3.2 Edit Rule

This page is used to edit the rule data. It consists of the following tabs:

  • Configuration: This tab is exactly similar to add a new tab but here you can change the details of the rules except for the rule type.
  • Condition: This tab is used to add the condition to the rule. The admin can add or delete the conditions as per their liking and different rule types have different conditions.

  • Email Notification: This is to add a custom rule notification. This email will be sent if the rule condition is satisfied by the customer and points are awarded to the customer.

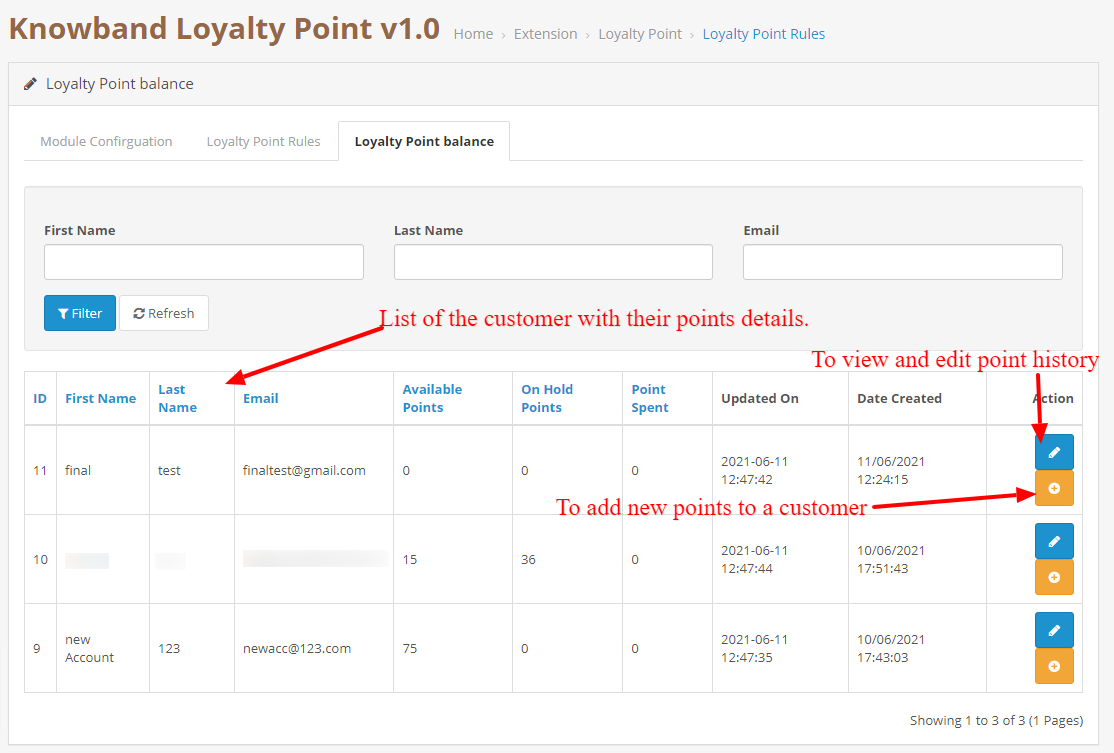
3.0.4 Loyalty Point Balance

This tab consists of a listing of each customer that has been awarded points. It will contain a list which will describe how many points are available to the customer, how much are on hold, how much they have spent.

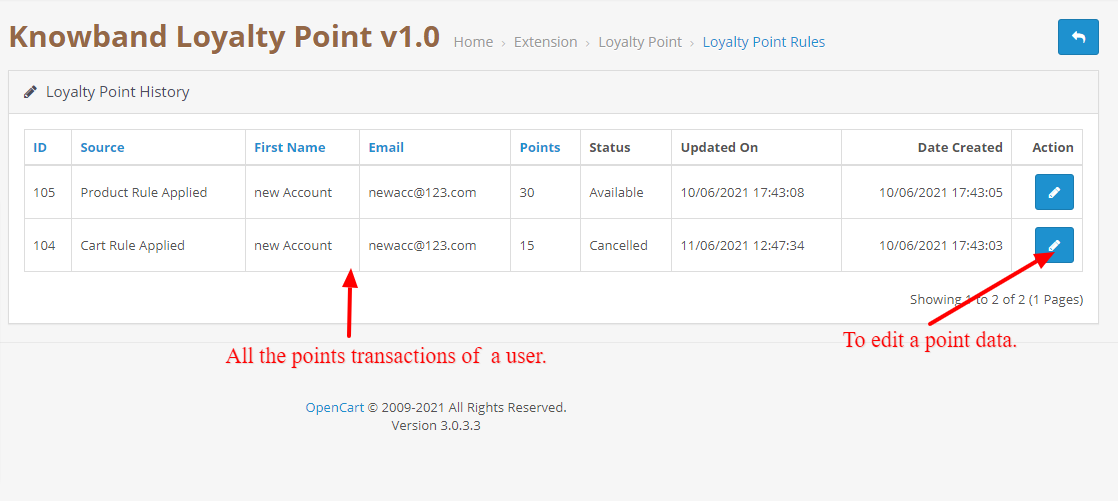
3.0.4.1 Loyalty Point History

When the Admin will click on the edit history button, they will be redirected to the history page which will show all the transactions of the selected customer.

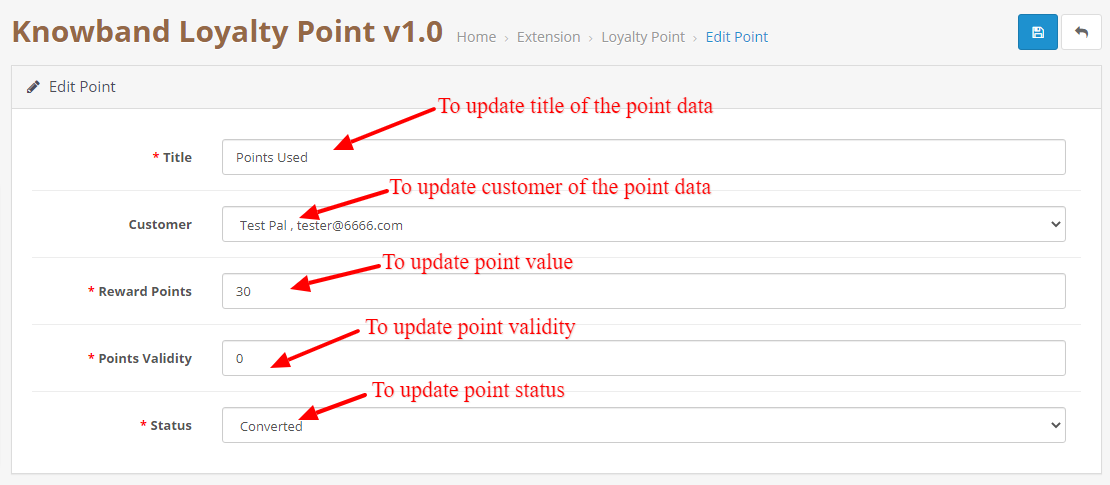
3.0.4.1.1 Edit Point Data

This page can be used to change the point data. This can be used to change the status of the point, point value, point title, and validity. This page is also similar to add a new point data page but this is used to update the data.

3.0.4.1.2 Add New Point Data

This will be opened when the admin will click on the add points button in the balance tab. This is used to add new points to the selected customer.

4.0 User Interface

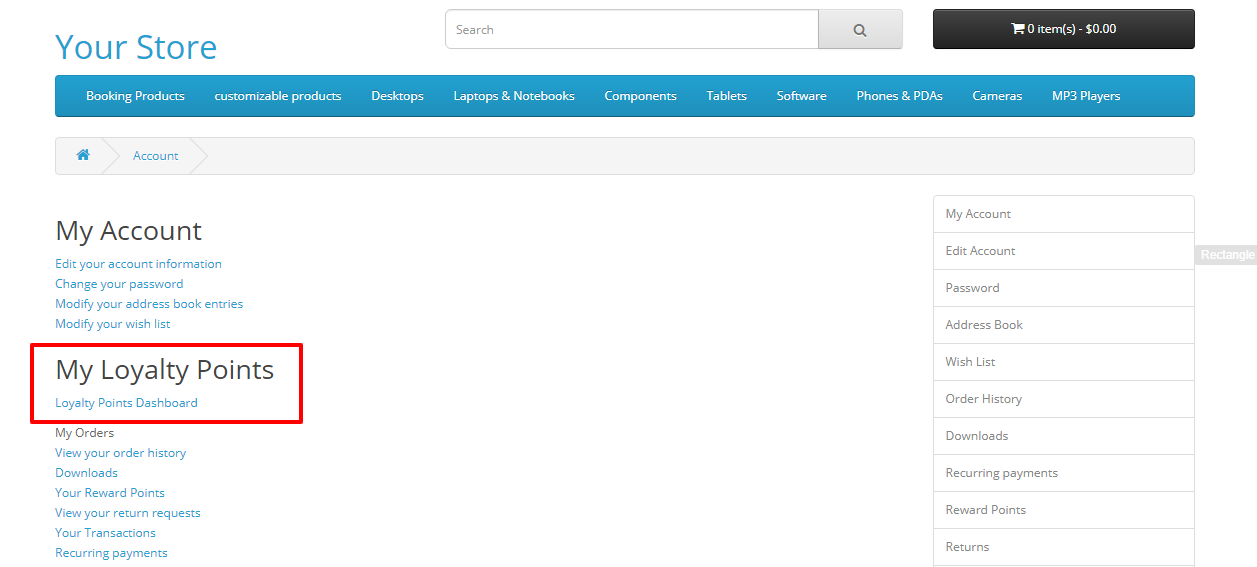
4.1 Once the module is enabled from the customer can go to their loyalty point dashboard by clicking the Loyalty points dashboard in the account section.

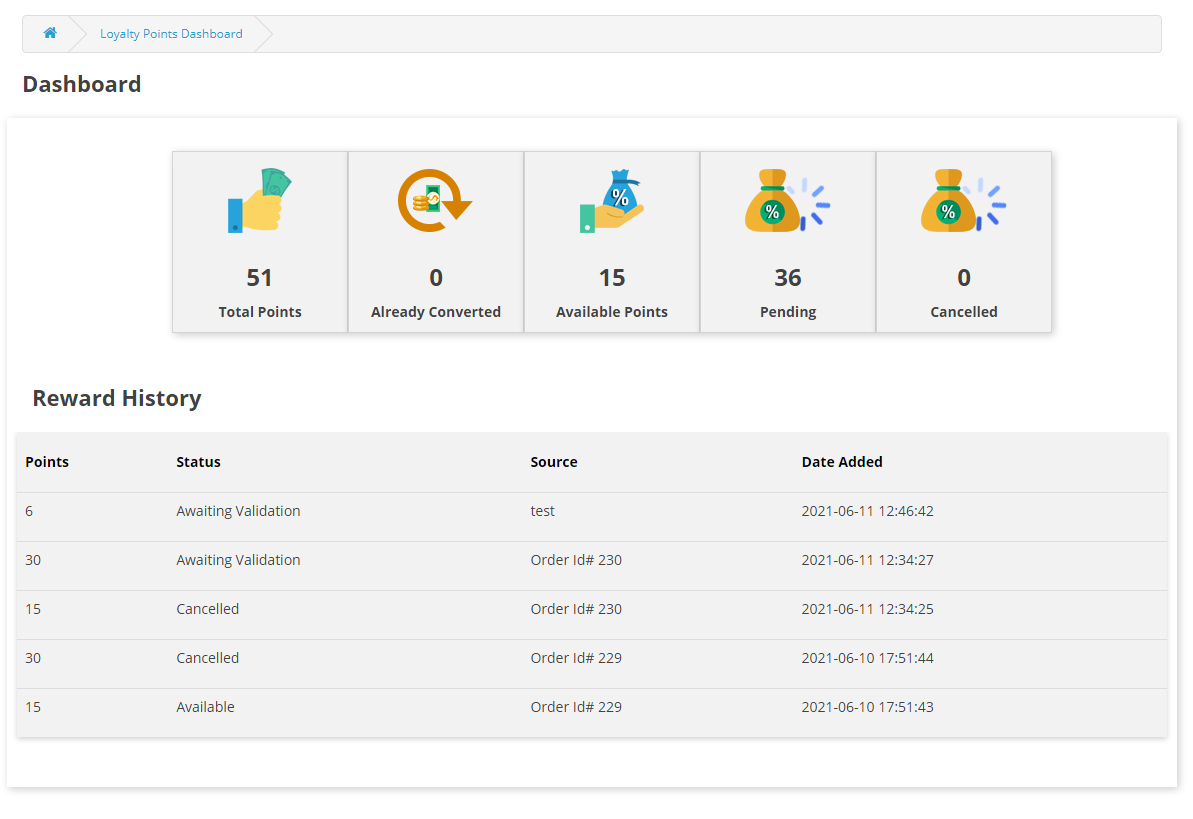
4.2 In the dashboard the customer can see all the point transactions as well as how many points are available to them, how many they have spent and how many points are on hold.

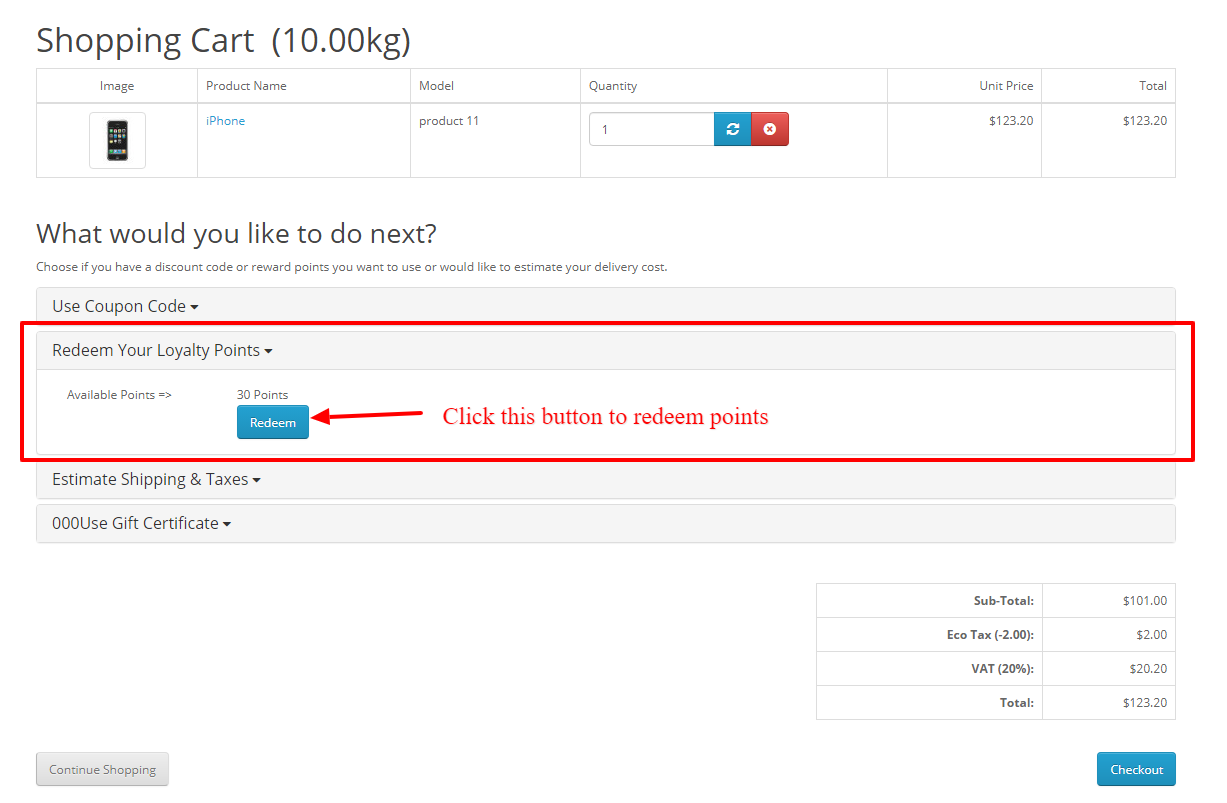
4.3 If the customer has some loyalty points then an accordion will be shown on the cart page where the customer can use those points to convert them into discounts. They just have to click on the redeem now button and the points will be converted into discounts.

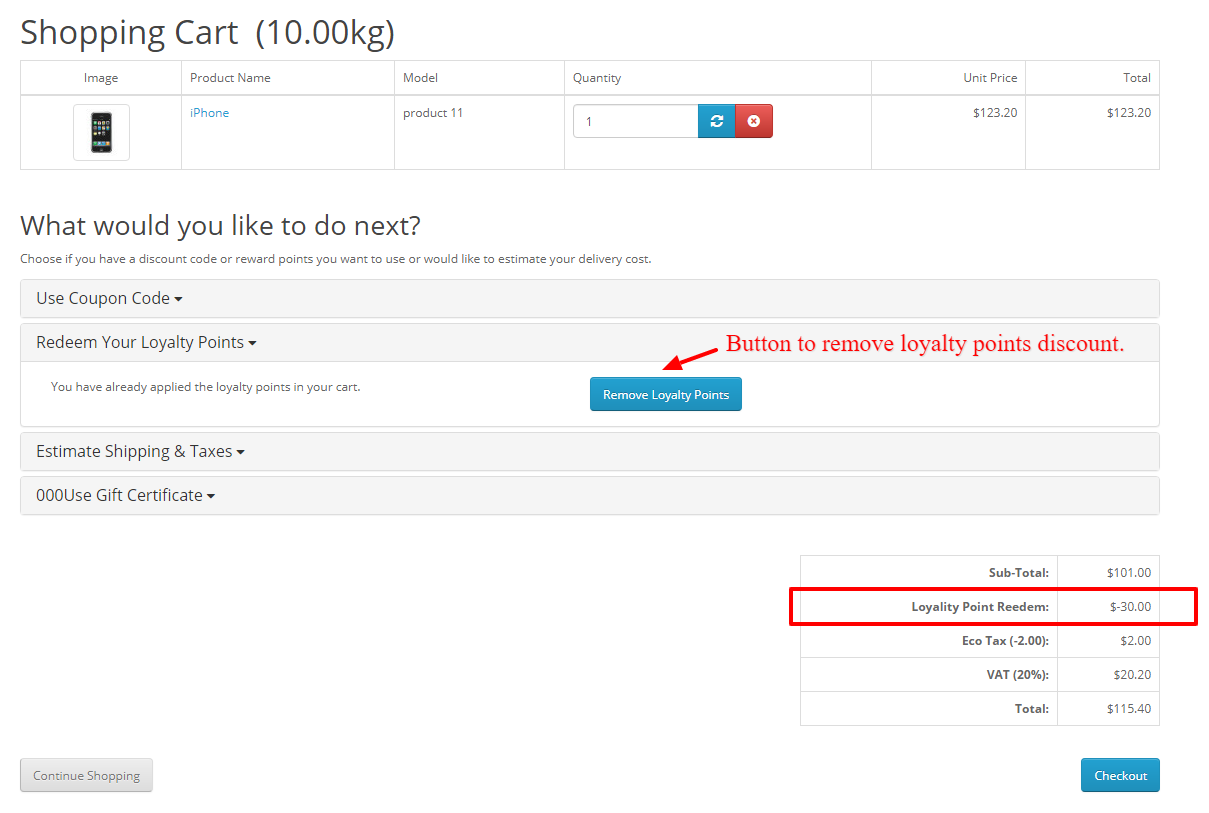
4.4 Once the points are redeemed they will be shown in the cart total section and the customer can also cancel points if they want to by clicking on the remove points button.

In case of any issue, drop an email to support@knowband.com OR click here to raise the ticket.

Buy OpenCart Loyalty Points extension: https://www.knowband.com/opencart-loyalty-points

Admin Demo:

Front Demo:

OpenCart Loyalty Points extension from the OpenCart Marketplace:

OpenCart Automatic Related Product – User Manual

1.0 Introduction

With the help of the OpenCart Automatic Related Product extension, the eCommerce merchants can easily get the customers to increase their cart value. Further, this is done by displaying the Related Products block on the front-end. Hence, when the merchant displays related products on the website pages including Product Page, Home Page, Checkout Page, and others. With the help of the OpenCart Automatic Related Product Module, the store admin can easily integrate the feature of displaying related products on the website to generate more sales.

1.1 Benefits for Merchants

  1. This OpenCart related products module helps the admin encourage the customers to increase their cart value.
  2. The OpenCart similar products extension builds potential sales. Thus, by allowing the customers to see what similar options they have in the similar product block, they choose better.
  3. The store admin can showcase absolutely relevant products to increase sales and offer a better store experience to the customers.
  4. The OpenCart related products plugin allows the admin to place the Related Products block in the right place on the website. Further, this is done where the customers can easily notice the products.
  5. There are multiple conditions available for showing similar products in an advanced way.
  6. This OpenCart related products extension allows the store admin to hide the ‘Out-of-Stock products’. In addition, only the in-stock products will be displayed.
  7. With the help of this OpenCart alike product module, the admin can reduce the bounce rate of the website. Moreover, it is done by engaging the customers with similar products.
  8. With the OpenCart advance related product extension, the admin can display new arrivals, bestsellers, and selected products as similar products. In fact, the merchant can show any product in order to promote it.
  9. The OpenCart Automatic Related Product module allows the store admin to display the related products on different website pages. For instance, Home Page, Product Page, Category Page, Cart Page, Manufacturer Page, and Order Confirmation Page.

1.2 Salient Features of the OpenCart Automatic Related Product module:

  1. The store admin can display the relevant products on the different pages of the website. The pages include Home Page, Product Page, Category Page, Cart Page, Manufacturer Page, and Order Confirmation Page. He/she can do it easily with the OpenCart product cross-selling module.
  2. The admin can effortlessly hide the out-of-stock products and display only the in-stock products on the front end. With the help of the OpenCart Automatic Related Product extension, the admin can disable the out-of-stock products from showing on the front-end.
  3. The OpenCart advance related product extension provides the opportunity to the admin to show different categories in the related products block. The merchant can display specific products, top visited products, best sellers, new arrivals or even use the user history for showing the related products.
  4. The admin can easily set the maximum number of the related product to be shown on the different pages. He/she can fix the number from the back-end of the OpenCart similar products extension.
  5. The OpenCart related products extension allows the admin to set the method priority to show the related products.

2.0 Installation Guide

Before beginning the installation, make the purchase of the OpenCart related products plugin from Knowband. Once purchased, the admin will receive the following files on your registered email.

  • The zipped file consists of the source code of this Automatic Related Product extension.
  • User Manual

Next, follow these steps to install the OpenCart Automatic Related Product extension:

The admin needs to unzip the zipped file. This file includes some files and folders and paste them into the “Modules” folder of the store’s directory. Further, the admin can follow the path – Root Directory/modules/.

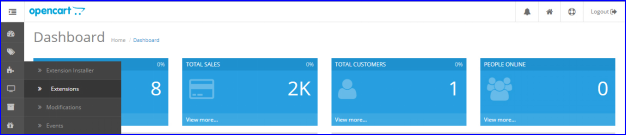
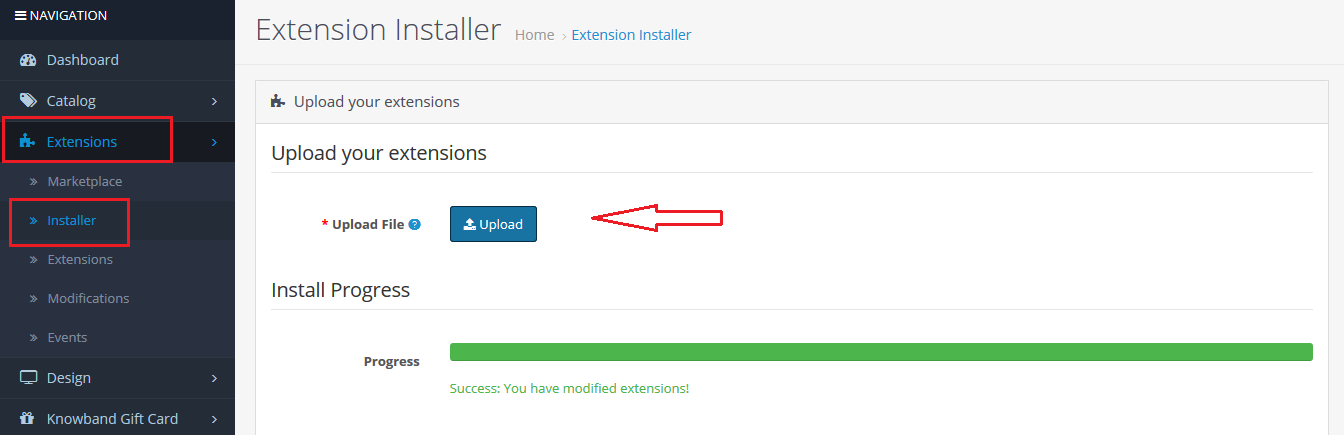
  • Now in the admin panel, click on Extensions in the left side menu. Then click on Installer (Home->extension).

After uploading the OCMOD file your module will be ready to use.

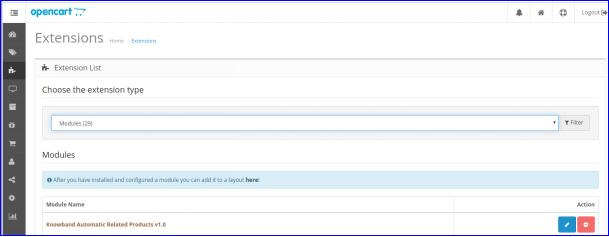
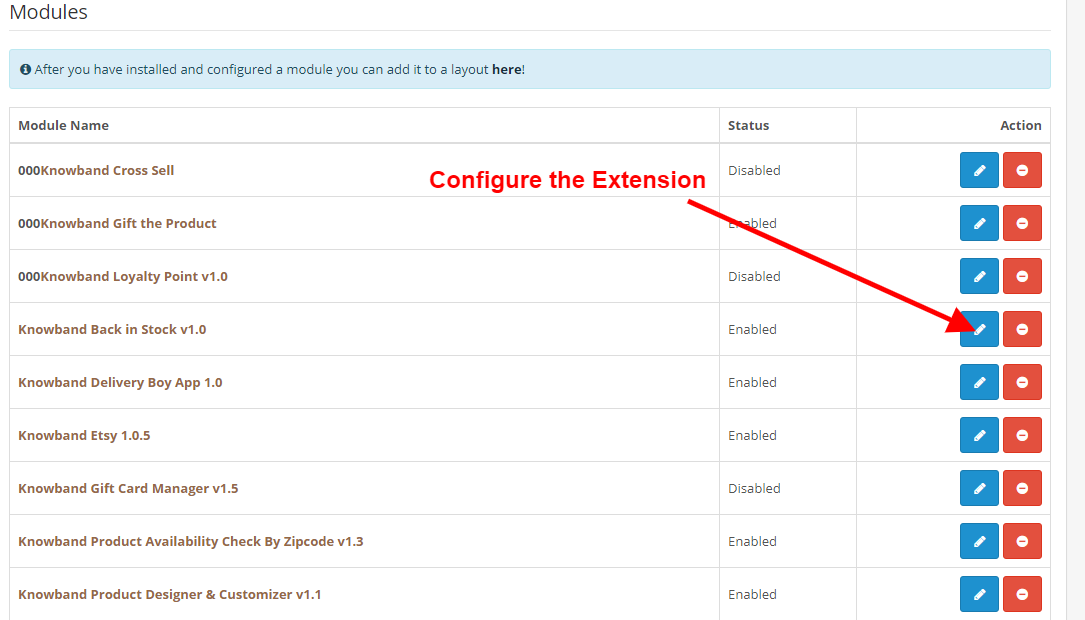
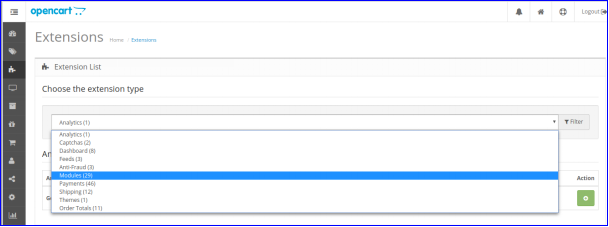
Now, the store owner can install the Automatic Related Product extension. In fact, as an eCommerce store owner, the admin can find that in Extensions. Follow the image below:

3.0 Admin Interface

The Admin Interface includes the following main settings:

  1. Basic Settings
  2. Home Page Settings
  3. Product Page Settings
  4. Category Page Settings
  5. Cart Page Settings
  6. Manufacturer Page Settings
  7. Order Confirmation Settings

3.0.1 Basic Settings

Through this setting of OpenCart similar products extension, the admin can do a lot of changes. Further, follow below to know all the settings. The screen will look like as shown below:

  • Status: The admin can click on the tab to either enable the OpenCart related products plugin or disable it.
  • Show only in-stock products: When the admin enables this setting, only the ‘in-stock will be displayed on the front-end in the Related Products block. If disabled, both – out of stock and in-stock products will be shown.
  • Show price with tax included: When the admin enables this function, the product prices will include the tax and be displayed to the customer. If disabled, the product prices will exclude the tax from the price.
  • Enter slider Previous/Next button Color: This setting of the OpenCart related products extension allows the admin to change the color of the Previous/Next button color on the front end.
  • Custom CSS: With this setting of the OpenCart alike product module, the admin can add the Custom CSS.
  • Custom JS: With this setting of the OpenCart advance related product extension, the admin can add the Custom JS.

3.0.2 Home Page Settings

  • Enable/Disable Home Page Setting: With this part of the setting for Home Page, the admin can click the button to either enable the function or disable it. Furthermore, the admin can either display the Related Products block on the Home Page or hide it.
  • Block Title: With the Block Title setting, the admin can change the name of the Related Products block on the front.
  • Show Home block title on the front: With this setting of the OpenCart Automatic Related Product extension, the admin can either display or hide the Block Title on the front end.
  • Select Display Column: When the admin clicks on this setting, he/she can show the related products on the content top, left column, right column, or page bottom.
  • Select Display Position: When the admin clicks on this setting of the OpenCart related products module, he/she can change the position of the related products. The Related Products block can be displayed at the top, below slideshow, below featured, or below the carousel.
  • Select Methods: The admin can select the method which has to be displayed on the front-end. There are various methods including top-visited products, bestsellers, new products, user’s user history products, and specific products.
  • Choose Specific Products: In this setting of the OpenCart similar products extension, the store admin can type in the name of specific products that he/she wants to display in the Related Products section.
  • Max Products to be Displayed: The store admin can select the maximum number of products to display as related products.

The store admin can set the priority of the methods. if there is no product on the higher priority method, then the OpenCart advance related product extension will show the product from the lower priority.

3.0.3 Product Page Settings

  • Enable/Disable Product Page Setting: This setting of the OpenCart Automatic Related Product extension allows the store admin to either enable the function of Related Products on the front-end or disable it.
  • Block Title: The store admin can change the title of the Related Products block on the front end with this setting.
  • Show Home block title on the front: This setting of the OpenCart related products module allows the admin can choose to either display or hide the Block Title on the front end.
  • Select Display Column: The Related Products section can be displayed at various columns including top, column left, column right, or bottom of the content.
  • Select Display Position: The store admin can set the position of the related products with this setting of OpenCart similar products extension. The Related Products block can be displayed at the top.
  • Select Methods: The store admin can choose the methods which have to be shown on the front-end. The methods included in this setting are top-visited products, bestsellers, new products, user’s user history products, and specific products.
  • Choose Specific Products: With this setting of the OpenCart related products plugin, the store admin can enter the name of specific products that he/she wants to display in the Related Products section.
  • Max Products to be Displayed: The store admin can select the maximum number of products to display as related products.

The store admin can set the priority of the methods. if there is no product on the higher priority method, then the OpenCart related products extension will show the product from the lower priority.

3.0.4 Category Page Settings

  • Enable/Disable Category Page Setting: The store admin can change the settings for Home Page. If the admin wants to either enable the function or disable it, the admin can do that. By doing so, the admin can either display the Related Products block on the Category Page or hide it.
  • Block Title: This setting of the OpenCart related products plugin allows the admin to change the title of the Related Products block on the front end.
  • Show Home block title on the front: With this setting of the OpenCart alike product module, the admin can choose to either display or hide the Block Title on the front end.
  • Select Display Column: The Related Products block can be displayed at the different columns of the page. The columns can be content top, column left, column right, or content bottom.
  • Select Display Position: The store admin can set the position of the related products with this setting of OpenCart advance related product extension. The Related Products block can be displayed at the top, below slideshow, below featured, or below the carousel.
  • Select Methods: The store admin can choose the methods which have to be shown on the front-end. The methods included in this setting are top-visited products, bestsellers, new products, user’s user history products, and specific products.
  • Choose Specific Products: With this setting of the OpenCart product cross-selling module, the store admin can enter the name of specific products that he/she wants to display in the Related Products section.
  • Max Products to be Displayed: The store admin can select the maximum number of products to display as related products.

The store admin can set the priority of the methods. if there is no product on the higher priority method, then the OpenCart Automatic Related Product extension will show the product from the lower priority.

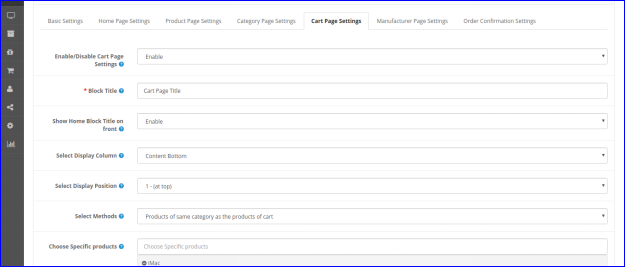
3.0.5 Cart Page Settings

  • Enable/Disable Cart Page Setting: The store admin can change the settings for Home Page. Moreover, if the admin wants to either enable the function or disable it, the admin can do that. By doing so, the admin can either display the Related Products block on the Cart Page or hide it.
  • Block Title: This setting allows the admin to change the title of the Relevant Products block on the front end.
  • Show Home block title on the front: With this setting of the OpenCart advance related product extension, the admin can choose to either display or hide the Block Title on the front end.
  • Select Display Column: The Related Products block can be displayed at the different columns of the page. The columns can be content top, column left, column right, or content bottom.
  • Select Display Position: The store admin can set the position of the related products with this setting of OpenCart product cross-selling extension. The Related Products block can display at the top, below slideshow, below featured, or below the carousel.
  • Select Methods: The store admin can choose the methods which have to be shown on the front-end. The methods included in this setting are top-visited products, bestsellers, new products, user’s user history products, and specific products.
  • Choose Specific Products: With this setting, the store admin can enter the name of specific products that he/she wants to display in the Related Products section.
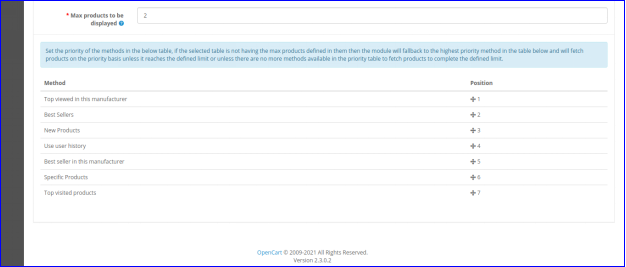
  • Max Products to be Displayed: The store admin can select the maximum number of products to display as related products.

The store admin can set the priority of the methods. Howsoever, if there is no product on the higher priority method, then the OpenCart related products module will show the product from the lower priority.

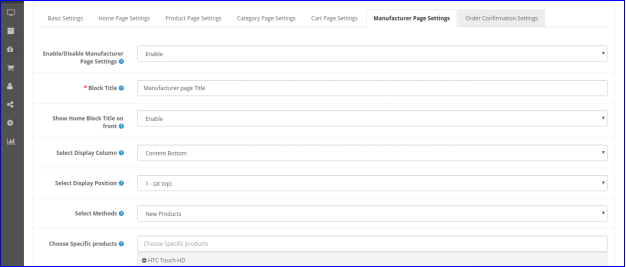
3.0.6 Manufacturer Page Settings

  • Enable/Disable Manufacturer Page Setting: Using this setting, the admin can either display the function of Related Products or hide it.
  • Block Title: The store admin can change the name/title of the Related Products block on the front with this setting.
  • Show Home block title on the front: With this setting OpenCart similar products extension, the admin can either display or hide the Block Title on the front end.
  • Select Display Column: The store admin can show the related products on the different columns of the page. The columns include content top, left column, right column, or page bottom.
  • Select Display Position: The store admin can change the position of the related products. The Related Products block can be shown at the top, below slideshow, below featured, or below the carousel.
  • Select Methods: The admin can select the method which has to be displayed on the front-end. There are various methods included in this setting. For instance, top-visited products, bestsellers, new products, user’s user history products, and specific products.
  • Choose Specific Products: In this setting of the OpenCart similar products extension, the store admin can type in the name of specific products. The ones that he/she wants to display in the Related Products section.
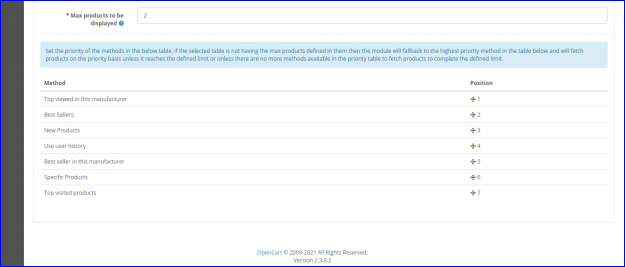
  • Max Products to be Displayed: The store admin can select the maximum number of products to display as related products.

The store admin changes the priority of the methods. Moreover, if there is no product on the higher priority method, then the OpenCart related products plugin will show the product from the lower priority.

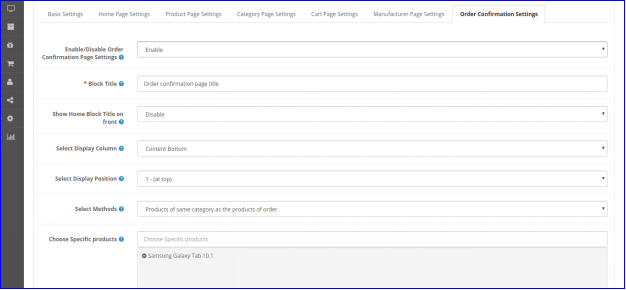
3.0.7 Order Confirmation Settings

  • Enable/Disable Category Page Setting: The store admin choose to either enable the function or disable it from the front-end.
  • Block Title: This setting allows the admin to change the title of the Related Products block using the OpenCart Automatic Related Product extension
  • Show Home block title on the front: With this setting, the store admin can choose to either display or hide the Block Title on the front end.
  • Select Display Column: The Related Products block can display in the different columns of the page. The columns can be top, column left, column right, or bottom of the content.
  • Select Display Position: The store admin can set the position of the related products with this setting of OpenCart advance related product extension. The Related Products block can be displayed at the top.
  • Select Methods: The store admin can choose the methods which have to be shown on the front-end. Furthermore, the methods included in this setting are many. For instance, top-visited products, bestsellers, new products, user’s user history products, same category products from the, and specific products.
  • Choose Specific Products: With this setting, the store admin can enter the name of specific products to display in the Related Products section.
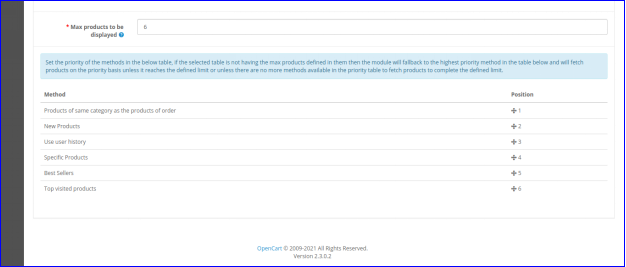
  • Max Products to be Displayed: The store admin can select the maximum number of products to display as related products.

The store admin can set the priority of the methods. Further, if there is no product on the higher priority method, then the OpenCart related products extension will show the product from the lower priority.

4.0 Front-end Interface

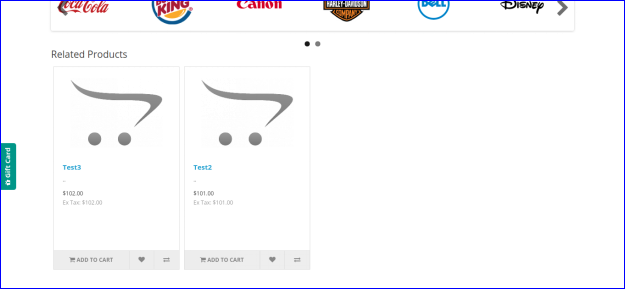
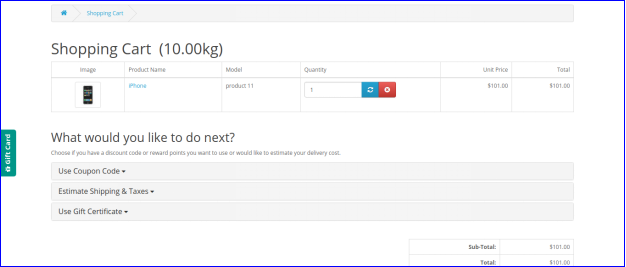
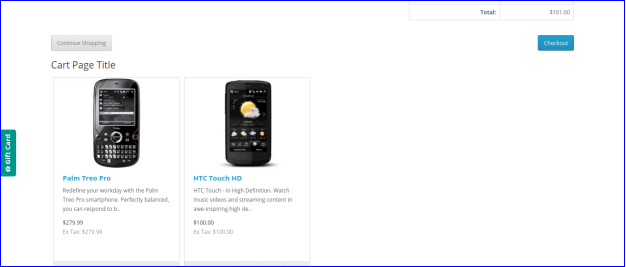
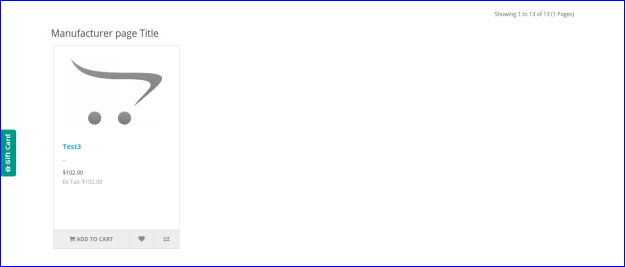
The customers can view the related products as shown in the below-mentioned images.

4.0.1 Home Page

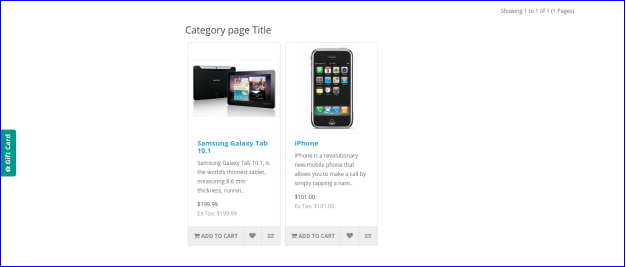
4.0.2 Category Page

4.0.3 Cart Page

4.0.4 Manufacturer Page

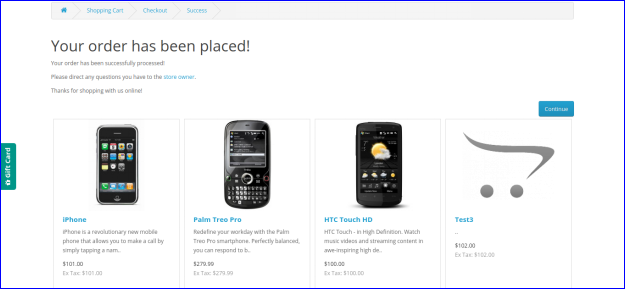
4.0.5 Order Confirmation

For more, you can visit Knowband.

The OpenCart Automatic Related Product extension Product Page

OpenCart similar products extension Admin Demo link

The OpenCart product cross-selling extension Front Demo link
OpenCart alike product module User Manual link

Please contact us at support@knowband.com for any query or custom change request as per your business requirement.

OpenCart Back in Stock Notification – User Manual

1.0 Introduction

Online shoppers get disappointed when the product they are looking to purchase is out-of-stock. This majorly happens during the launch of a smartphone when it gets out of stock even before the user has added it to his cart. Furthermore, if the shopper is not notified, when the product comes back in stock, the store owner can lose that sale. Hence, this problem can be solved with the help of the simple Back in Stock notification with the OpenCart Back in Stock Extension by Knowband.
1.0.1 What is Back in Stock notification?

A back-in-stock notification is an email that is sent to those users who have subscribed to receive updates regarding an out-of-stock product. When the product is back-in-stock, the shoppers are informed via email about its availability so that they can purchase it as soon as possible or before it goes out of stock again.

Many of the users can miss out on the purchase if they aren’t notified and this eventually leads to some lost revenue.

The sole purpose of the back-in-stock email is to boost your sales. Besides, it helps you drive huge traffic to your website, encourages customer retention, helps you understand the touchpoint of your customers, and builds a strong connection between the brand and the consumers.

To save these missed out sales and make the shopper buy the product when it comes back in stock, You need to mail every shopper which will take a lot of time and effort.

Hereby, the OpenCart Back in Stock Extension will simplify this for you. This module allows the Admin to view all the customers who have subscribed to the product and can send the back-in-stock email accordingly. The admin can also create, edit or use the default email template for notification. The Admin can also choose to whether send a Low Stock Alert email or not via this module.

1.0.2 How does it work?

The working of the OpenCart Back in Stock module is explained by the following points.

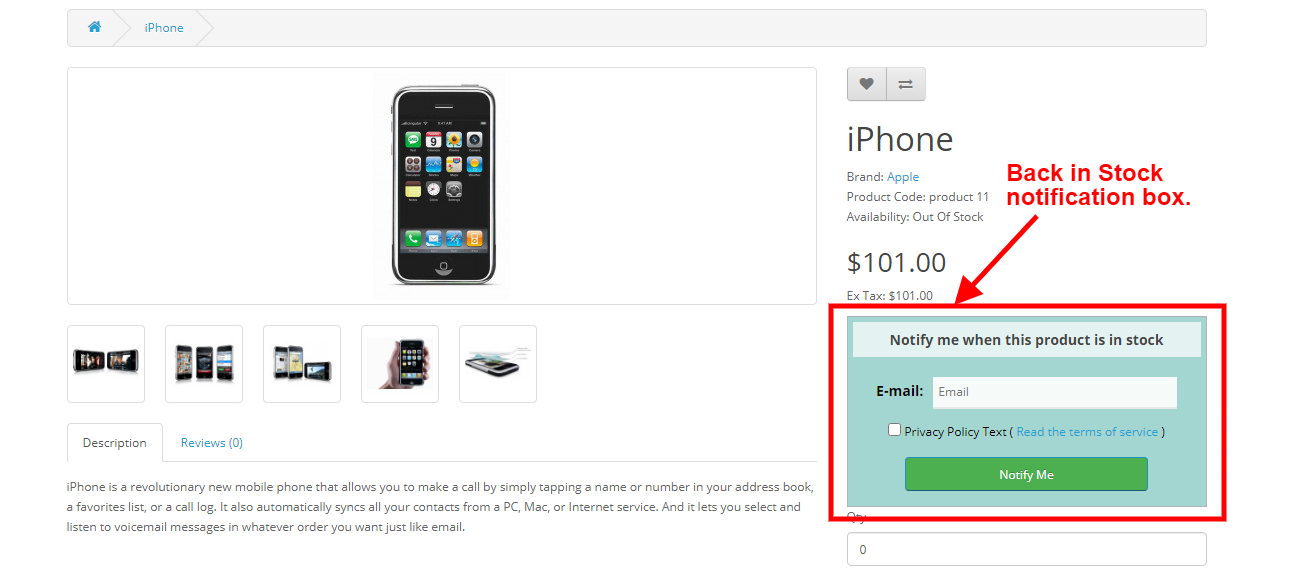
  1. If the shopper visits a product page where the product is out of stock, The user will be shown a Back in the Stock box where the user can add his/her email id to get subscribed to that product.
  2. Once a product is subscribed it will be shown to the Admin, Where The Admin can see who and which product has subscribed and whether the email is sent to them or not.
  3. Admin can manually run or schedule the cron file to send the Back in Stock email. The cron file will automatically send the email to the users who have subscribed to the product. It will also check whether the email is not sent to the user already to prevent spam.
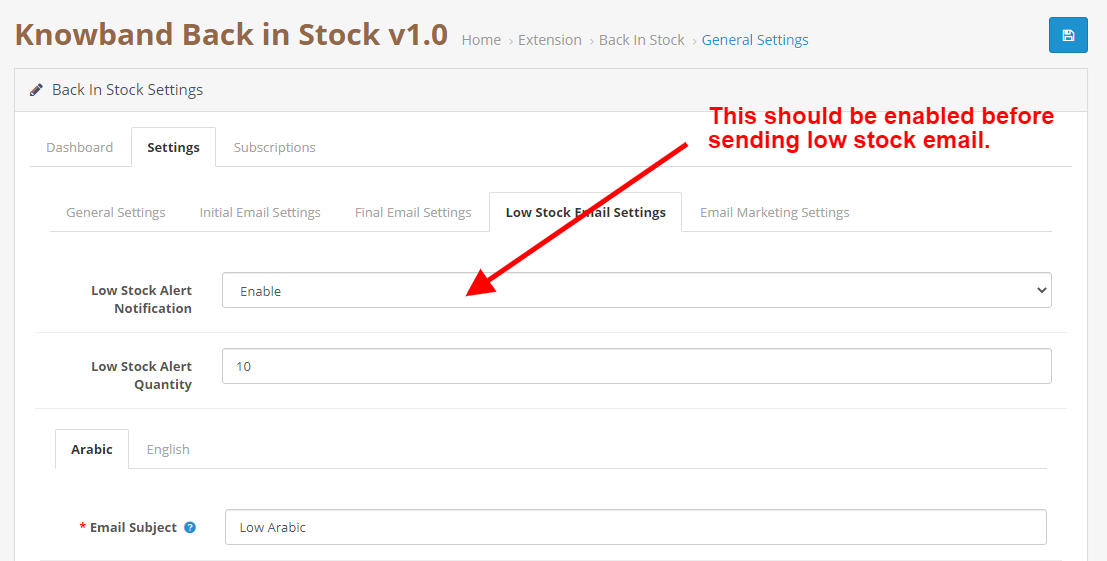
  4. If the Admin has enabled the Low Stock Alert functionality, Then Admin can also send the Low Stock alerts via Cron file using a similar process.

1.0.3 Salient Features of the OpenCart Back in Stock extension

  1. The online merchant can use this OpenCart Back in Stock module for sending email notifications of the product back in stock to those users who subscribed for the same.
  2. Admin can enable privacy policy settings and apply the related configurations from the admin interface of this OpenCart Back in Stock module.
  3. In OpenCart Back in Stock module, the online users have an option to view the subscribed products list.
  4. The online merchant can also send low stock alert notifications to the subscribers for the subscribed products.
  5. OpenCart Back in Stock module allows adjusting the color of the notification box as well as the background color of the heading using the color picker tool.
  6. Admin can also enter the custom CSS and JS code for the advanced look and feel management.
  7. The Admin can integrate Mailchimp, Constant Contact email integrator for creating a list of customers for email marketing activities in the future.
  8. The store admin can view a list of highly demanded products from the dashboard section.
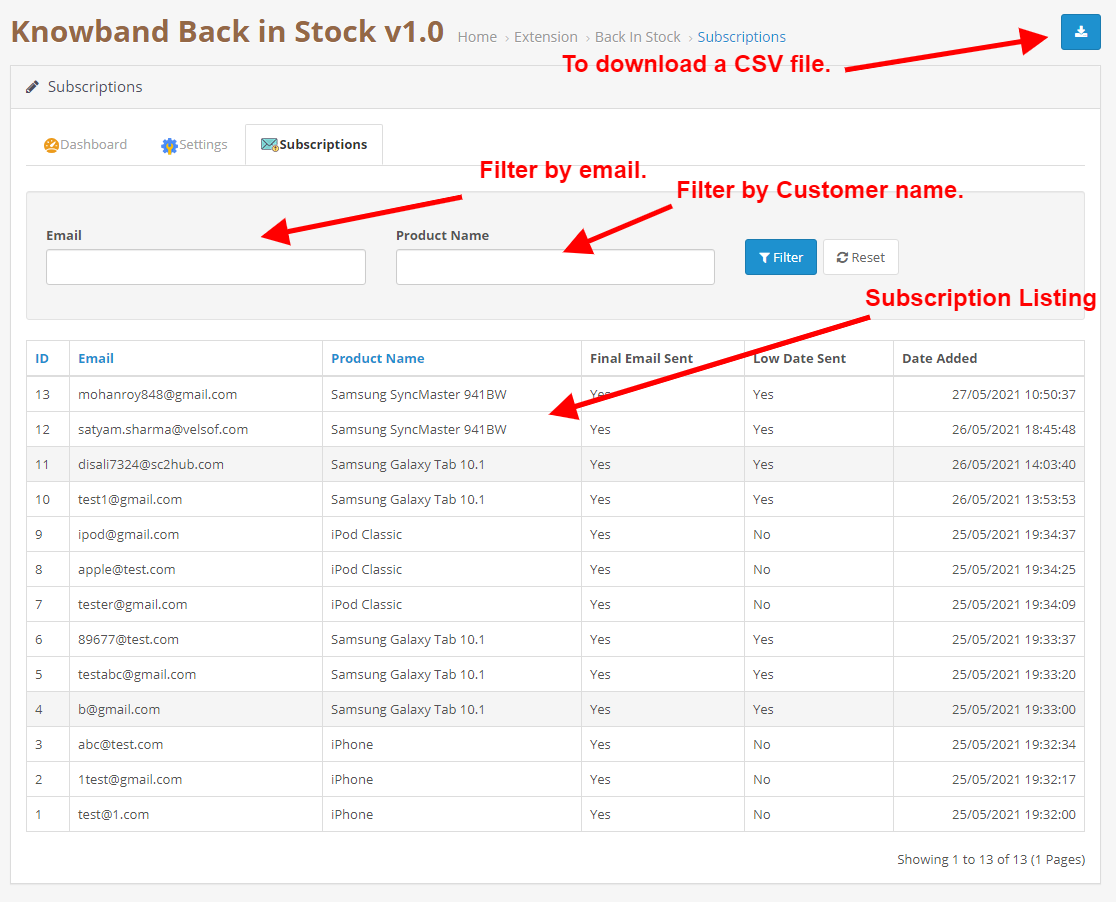
  9. The Admin can download the subscriber list in CSV format from the subscriptions tab of the Back In Stock Module.
  10. The OpenCart Back in Stock module offers multi-store and multi-lingual support.
  11. OpenCart Back in Stock module Admin can share subscribed products, in stock, and low stock updates via email. The Admin can easily customize the subject and body of the emails.

2.0 Installation Guide

Once purchased, you will receive the following files in your registered email.

  1. Source code of OpenCart Back in Stock module in zipped file format.
  2. User Manual of OpenCart Back in Stock module.

Now to install this on your OpenCart Store, follow the given steps:

  • Unzip the zip file. You will get the folders as shown in the image below

  • Now choose the OpenCart version according to your store and open that specific OC folder. After opening it you will see the following content.

  • Copy and paste the content inside the upload folder inside your Opencart store folder.
  • Go to Extensions and then Installer. From here, you can upload the ” kbback_in_stock.ocmod.zip” (for OC3.0.x) file and install the extension.

So, Opencart Back in Stock Extension is now successfully installed and is ready to use at your store. Go to the admin menu and click on the extensions. Choose the Extension Type as Modules. You will find a list of modules. Select the Knowband Back in Stock.

3.0 Admin Interface

The Admin Interface of OpenCart Back in Stock extension includes the following main settings:

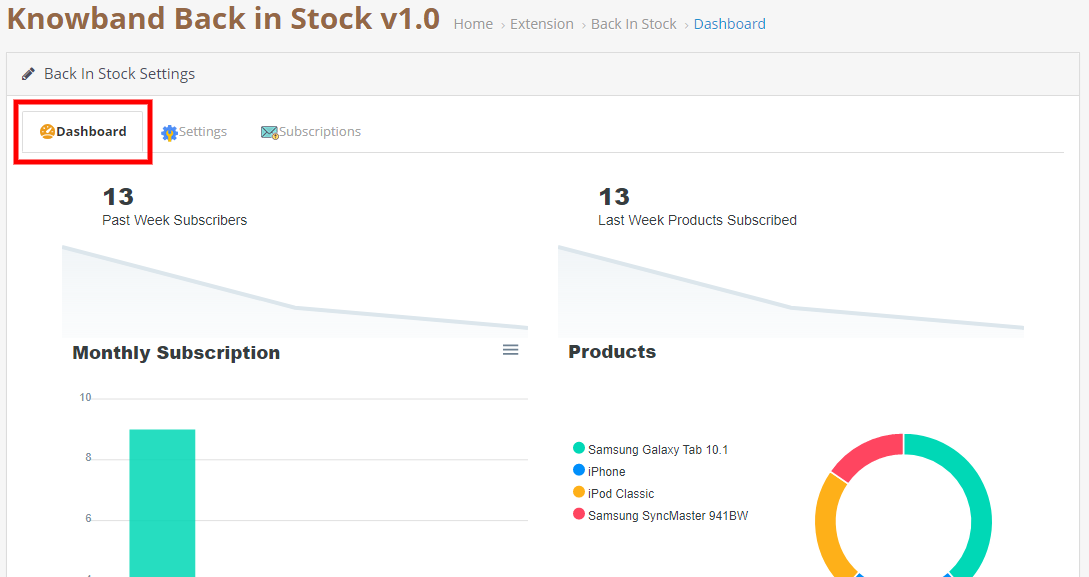
  • Dashboard
  • Settings
  • Subscriptions

3.0.1 Dashboard

This tab is used to display different types of graphs which can be used to analyze which products are most subscribed, past week subscription, etc.

3.0.2 Settings

This tab consists of all the module configurationally settings.

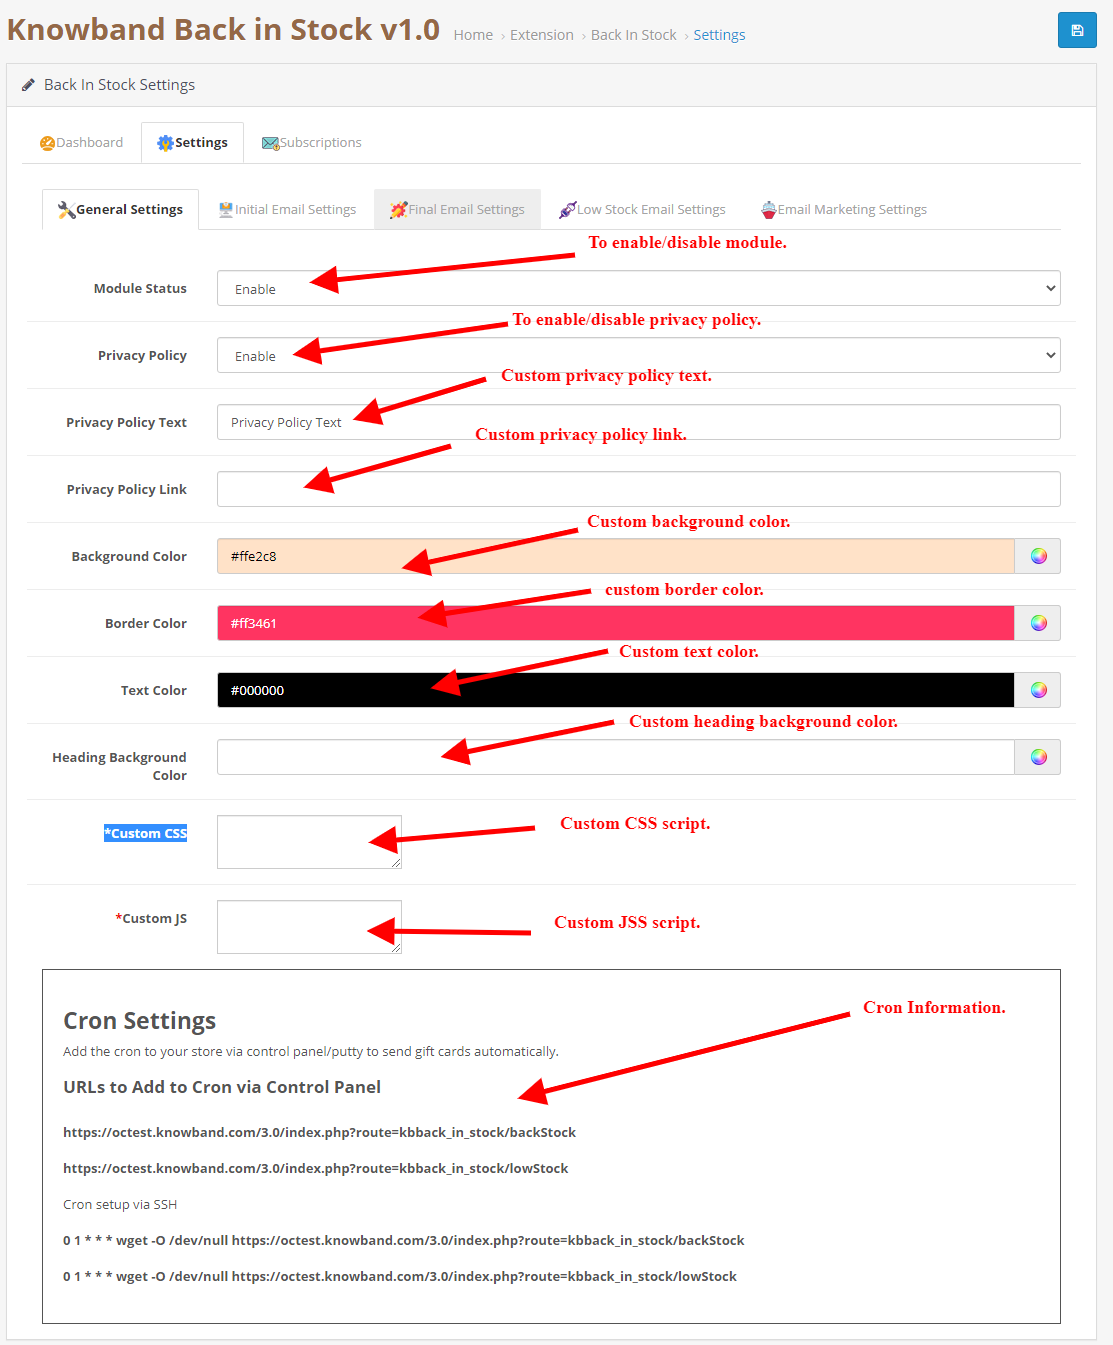
3.0.2.1 General Settings

  • Enable/Disable: Initially, this field of OpenCart back in the stock module by Knowband will be “OFF”. Admin can enable/disable the Opencart module by turning ON/OFF in this setting.
  • Privacy Policy: Enable this toggle button to display the privacy policy option at the front end. The Privacy Policy will be shown at Notify Me block.
  • Privacy Policy Text: The admin can enter the desired text for a privacy policy. The text can be changed whenever needed.
  • Privacy Policy Page URL: The admin can easily set his choice of URL to the privacy policy.
  • Background Color: Initially, this field of our module will be filled with some default values. Admin can change the background color of the subscription box by picking the color from the color picker that will be reflected on the front end of the OpenCart back in the stock notification module.
  • Border Color: Using this option of the OpenCart back in stock notification module, the admin can set the border color of the subscribed box using the color picker.
  • Text Color: This field of OpenCart back in the stock module allows the admin to change the text color of the notify box.
  • Heading Background Color: This field of OpenCart Back in Stock Extension allows the admin to change the Heading background color of the notify box.
  • Custom CSS: This option of the OpenCart stock alert module allows the admin to write their CSS as per requirement and will be reflected in the front end of this OpenCart module.
  • Custom JS: This field of OpenCart Back in Stock Extension allows the admin to write their JavaScript as required.

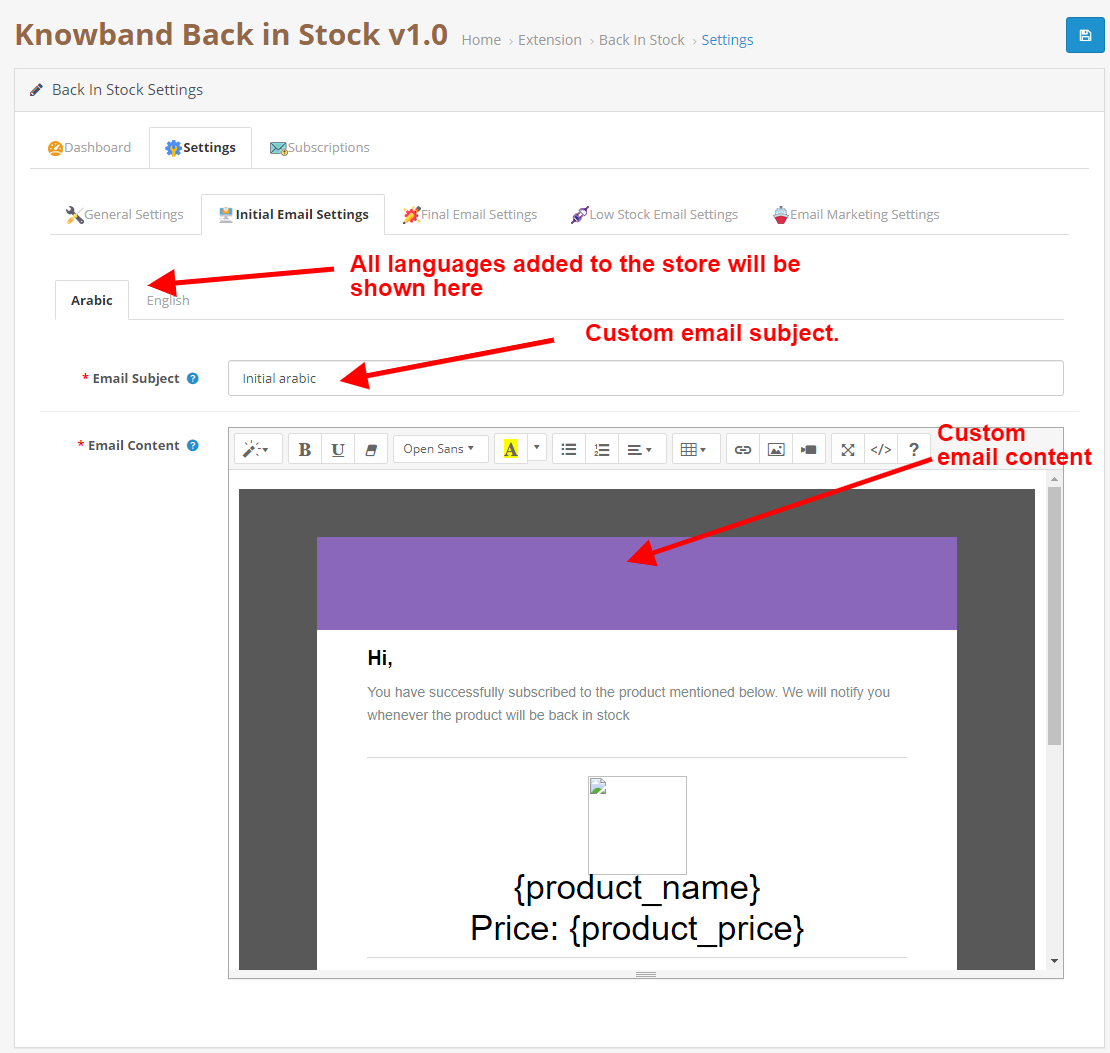
3.0.2.2 Initial Email Settings

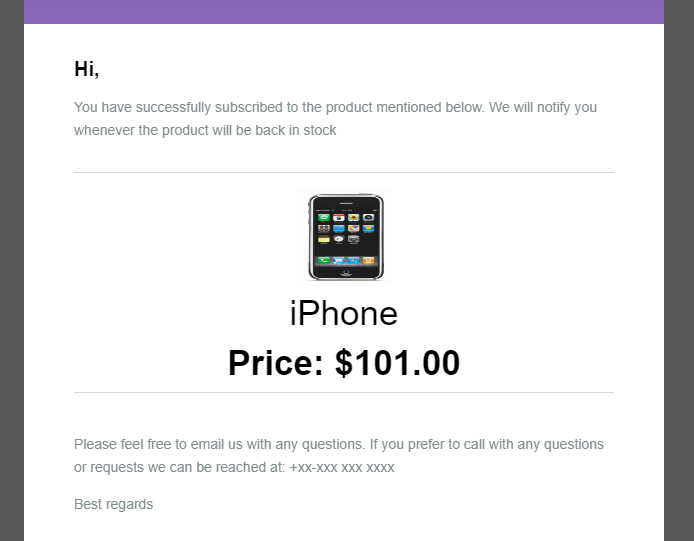
In this tab, you can configure custom subject and content for the initial email which will be sent to the user for subscription confirmation.

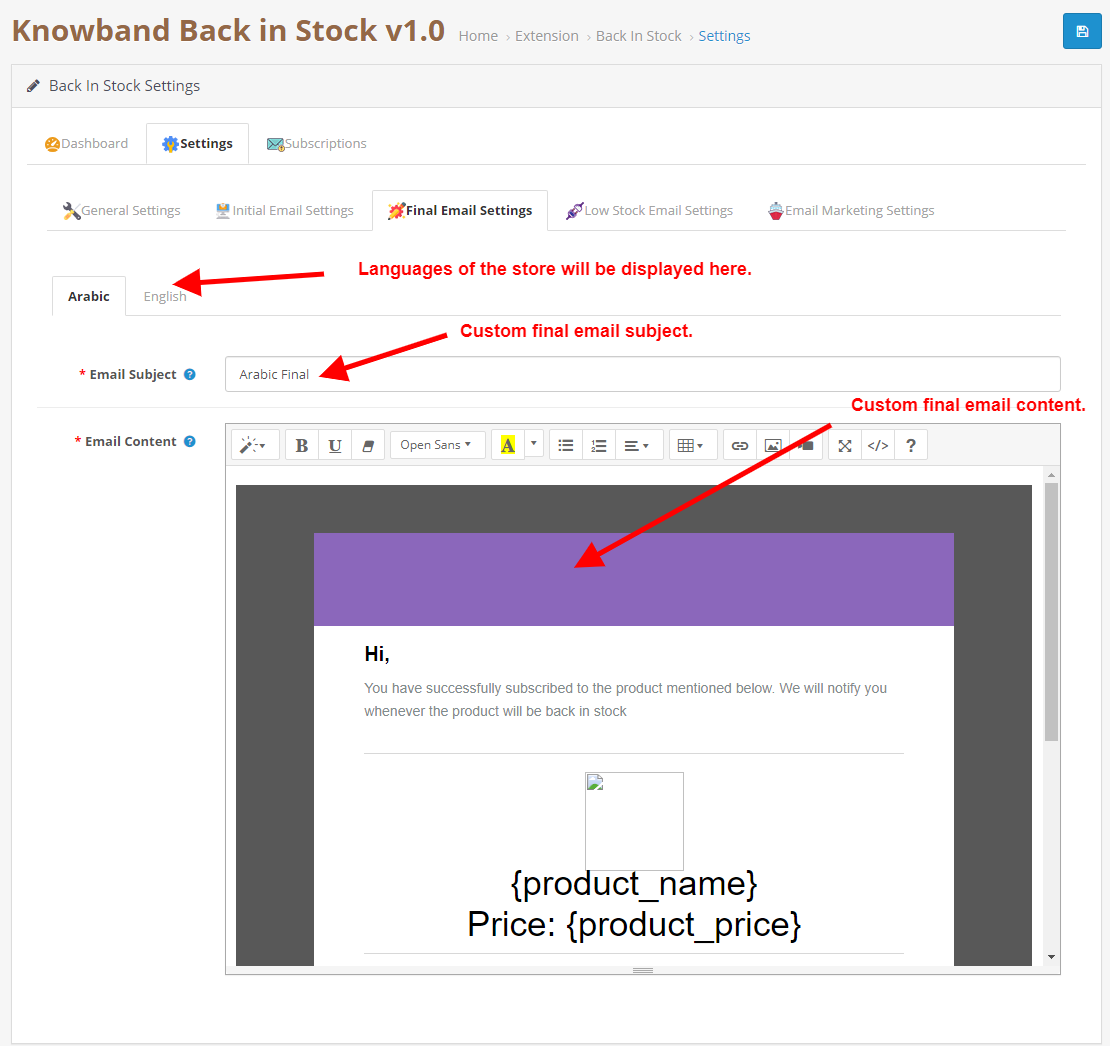
3.0.2.2 Final Email Settings

In this tab, you can configure custom subject and content for the final email which will be sent to the user when the product comes back in stock.

3.0.2.2 Low Stock Email Settings

In this tab, you can configure enable/disable the low stock alert functionality. You can also configure the custom subject and content for the low stock alert email which will be sent to the user when the product goes low in stock than the specified quantity.

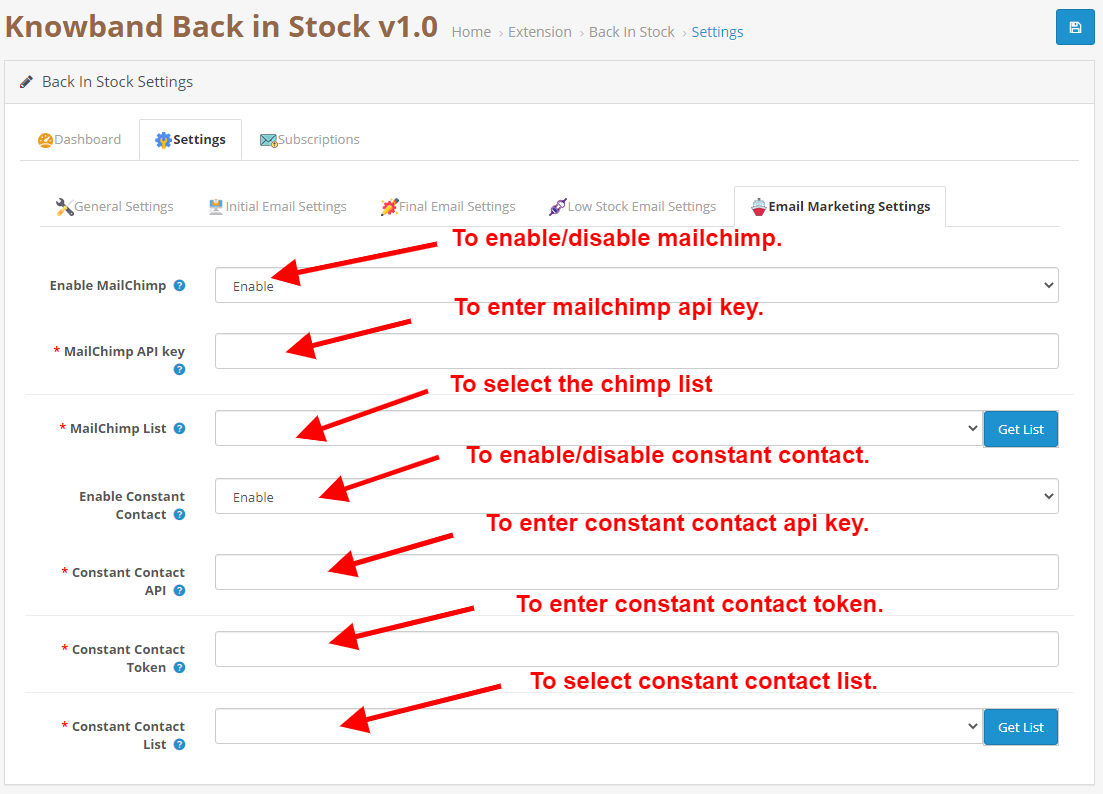
3.0.2.3 Email Marketing Settings

To enable/disable the Mailchimp/Constant Contact functionality this tab is used.

3.0.3 Subscription

This tab contains the list of all the subscriptions and It also contains a button that is used to download the CSV file for the subscriptions.

3.0.4 Useful Cron Instructions

3.0.4.1 Reasons/Cases when the email is not sent to the customers

  • Low Stock Alert not sent.

  • Check the product quantity if an email is not sent for a particular product, The product might still be out of stock (quantity = 0).
  • If you have not set up the Cron properly or if the Cron is not working.

3.0.4.2 Types of Crons

Two types of cron can run according to Admin con settings.

  • Cron to send Back in the Stock email: This is used to send the back in stock emails to all the customers in the list of the subscription if they did have already sent them back in stock for the same product.
  • Cron to send the low stock email: This cron will send the low stock alert email if it is enabled from the settings tab. It will check the quantity of the product is lower than the specified quantity in the module settings and If the back-in-stock mail is already sent to the customer then it will send low stock alert mail.

3.0.4.3 Procedure to configure CRON job

What is a cron?

A cron is a service that allows a user to automatically execute a script at a specific time.

For example, you can set a particular PHP script to be automatically executed every day at midnight.

Add the cron to your store via control panel/putty to send reminder mail automatically.

Example URLs to Add the Cron via Control Panel

https://octest.knowband.com/test2.3_1/index.php?route=kbback_in_stock/cron/backStock

https://octest.knowband.com/test2.3_1/index.php?route=kbback_in_stock/cron/lowStock

Cron setup via SSH

10 * * * * wget -O /dev/null https://octest.knowband.com/test2.3_1/index.php?route=kbback_in_stock/cron/backStock

5 * * * * wget -O /dev/null https://octest.knowband.com/test2.3_1/index.php?route=kbback_in_stock/cron/lowStock

4.0 User Interface

4.1

The online users can view an out-of-stock product notification box on the product pages which are out of stock and they can share email id for notification. The subscription block of the OpenCart Back in Stock module would appear as follows:

4.2

When the customer enters the email id and clicks on the button notify me the initial mail is sent to the entered email address and the message showing subscribed.

4.3

OpenCart Back in stock module will prevent the customer from subscribing to the same product twice. It will display an “already subscribed” message on the front end of the store.

4.4

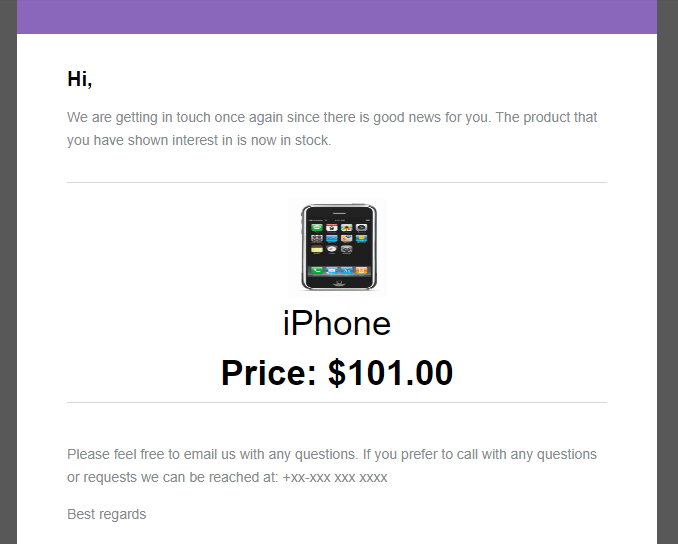
The users can get an email notification when the product is available in stock.

4.5

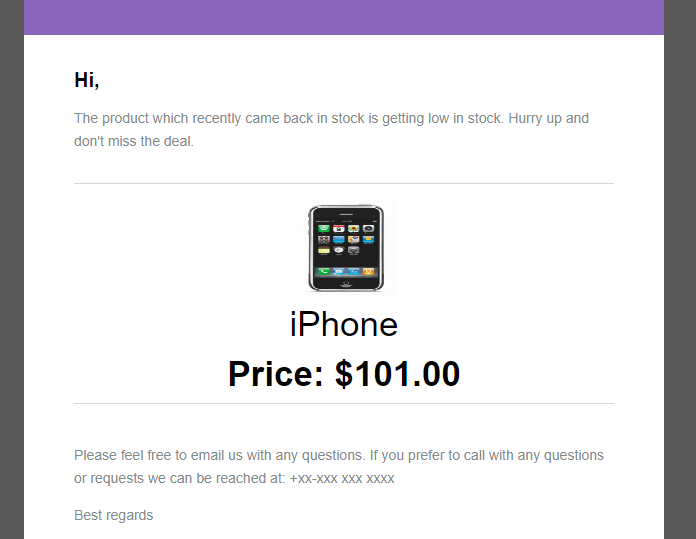
They can also view a low stock alert email for the subscribed product in the case of running stocks.

In case of any issue, drop an email to support@knowband.com OR click here to raise the ticket.
Buy OpenCart Back in Stock Extension: https://www.knowband.com/opencart-back-in-stock-notification
Admin Demo: https://opencartdemo.knowband.com/3.0/backinstock/admin/
Front Demo: https://opencartdemo.knowband.com/3.0/backinstock/