How to display price in all currencies on OpenCart Product Page?

Objectives of the blog

After reading this blog we will be able to display price in all currencies in the product page of OpenCart 3.x

Problem Statement

By default, OpenCart 3.x display price of the product into the currency set as default or chosen by the end user. And to display the price in all available currencies there will be few changes in the default or core files of OpenCart. (In case you do not want to change the core files then it can be done either through VqMod or OcMod.)

Requirement

We would need to modify the below-mentioned files to show the price of the product in all available currencies in the product page.

Procedure to solve the issue-

Follow the below-mentioned steps –

Open product.php from Catalog/Controller/Product and search for

$results =

$this->model_catalog_product->getProductImages($this->request->get['product_id

']);

2. And, add the following statement after that –

$currencies = $this->model_localisation_currency->getCurrencies();

3. Again find following code snippet in the same file –

if ($this->customer->isLogged() || !$this->config->get('config_customer_price')) {

   $data['price'] = $this->currency->format($this->tax->calculate($product_info['price'], $product_info['tax_class_id'], $this->config->get('config_tax')), $this->session->data['currency']);

} else {

   $data['price'] = false;

}

4. And replace it with –

$data['price'] = array(); 
if ($this->customer->isLogged() || !$this->config->get('config_customer_price')) {

   foreach ($currencies as $currency) {

       if ($currency['status']) {

           $data['price'][] = $this->currency->format($this->tax->calculate($product_info['price'], $product_info['tax_class_id'], $this->config->get('config_tax')), $currency['code']);

       }

    }

}

5. Open product.twig from catalog/view/theme/default/template/product and search for

<h2>{{ price }}</h2>

5. And replace it with –

{% for currency_price in price %} <h2>{{ currency_price }}</h2> {% endfor %}

Then, clear all Caches (ocmod cache, twig cache, vqmod cache)

That’s all.

Refer the screenshot below after applying changes into the code –
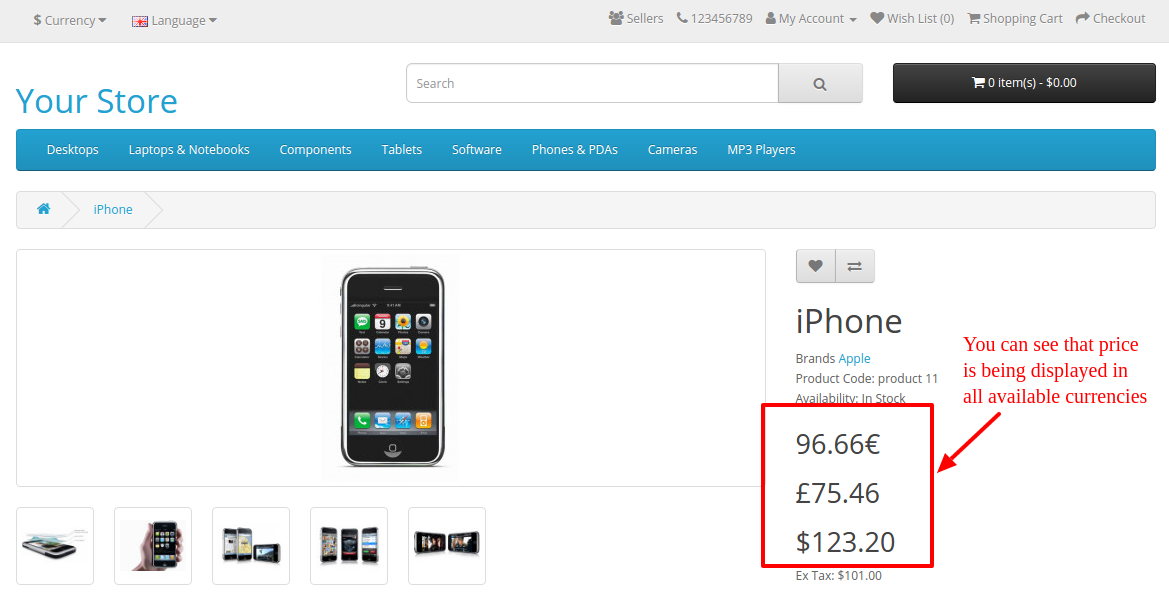
product-prices-in-all-currencies

Summary

After following the above procedure, you will be able to display the price in all available currencies in Product Page.
Xdebug Installation & Configuration – Part 1

Introduction

This document contains steps to install Xdebug and Configure it with Netbeans.

Steps to install Xdebug and Configure it with Netbeans

To install Xdebug and Configure it with Netbeans, steps are given below –

1. Install Xdebug for PHP by running following command in Linux environment

sudo apt-get install php5-xdebug

2. Setup Xdebug.ini for Linux

sudo vi /etc/php5/apache2/conf.d/20-xdebug.ini

Add the following lines –

xdebug.profiler_output_dir=/tmp
xdebug.profiler_output_name=cachegrind.out.%p
xdebug.profiler_enable_trigger=1
xdebug.profiler_enable=0
xdebug.remote_enable=true
xdebug.remote_host=127.0.0.1
xdebug.remote_port=9001
xdebug.remote_handler=dbgp
xdebug.remote_autostart=0

3. Restart Apache

sudo service apache2 restart

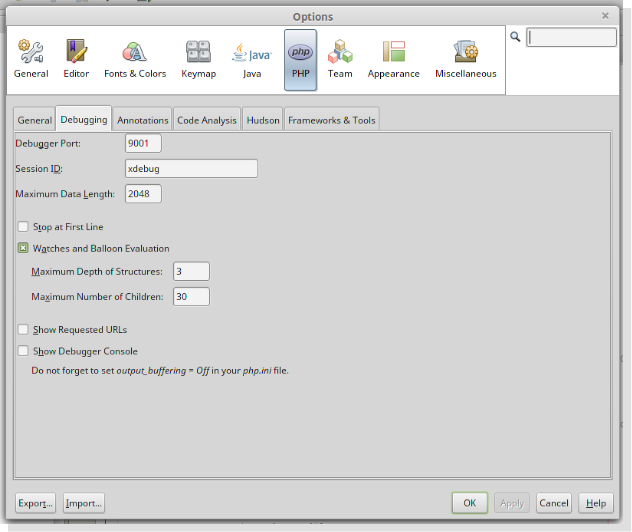
4. Now, configure Netbeans by following given steps below and shown in screenshot –

  • Go to Tools -> Options -> PHP -> Debugging
  • Set Debugging Port : 9001
  • Press OK button and then start debugging your project by CTRL + F5 or file by CTRL + SHIFT + F5

Video Tutorial:

Looks helpful? Also, read the other part of the article for complete & detailed information: 

Xdebug Installation & Configuration – Part 2

Xdebug Installation & Configuration using NetBeans – Part 2

Introduction

This document is all about the Xdebug installation & configure it with Netbeans in Windows.

How to debug through Xdebug in a project?

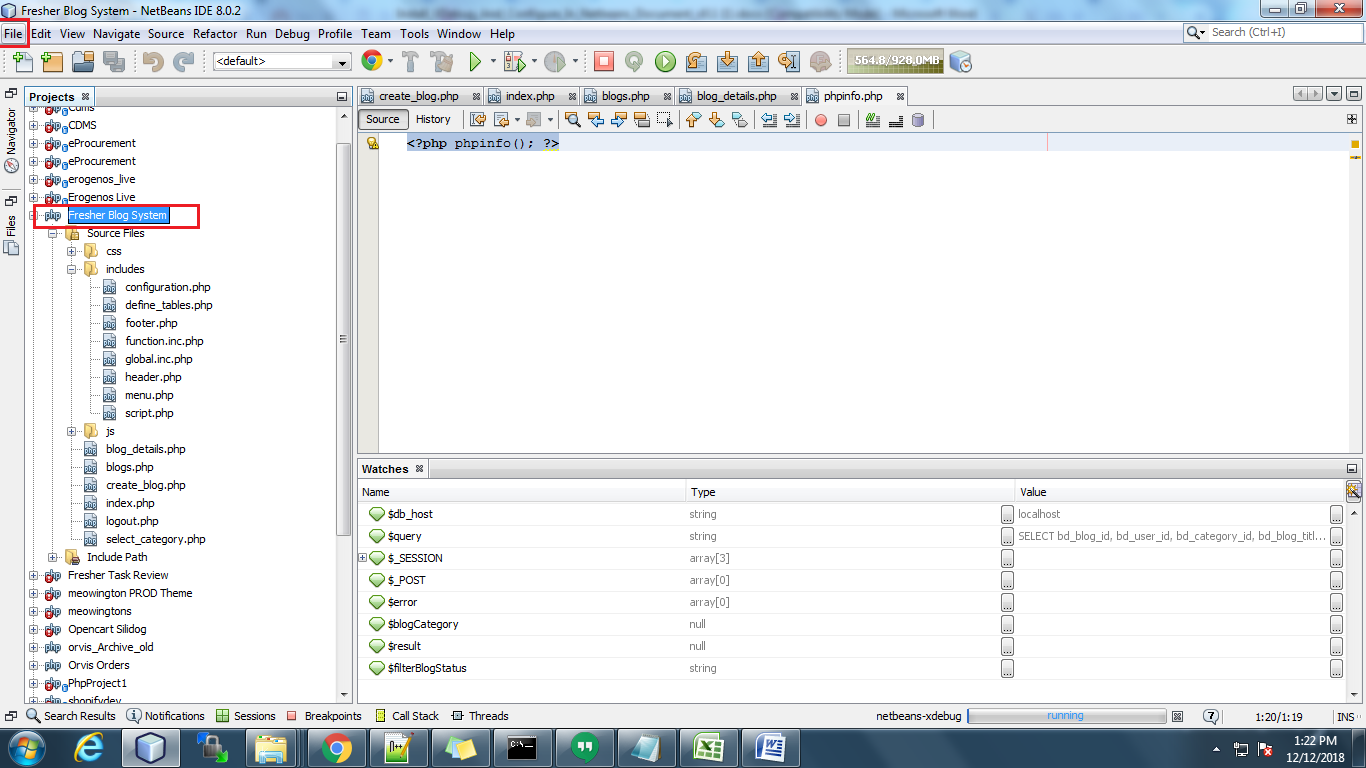
To debug through Xdebug you have to set up the project in Netbeans. Setup the Blog system project in NetBeans. After setting up the project in NetBeans select the project for which you want to debug. Now, go to the File menu in the top menu bar.

Then click on Project properties.

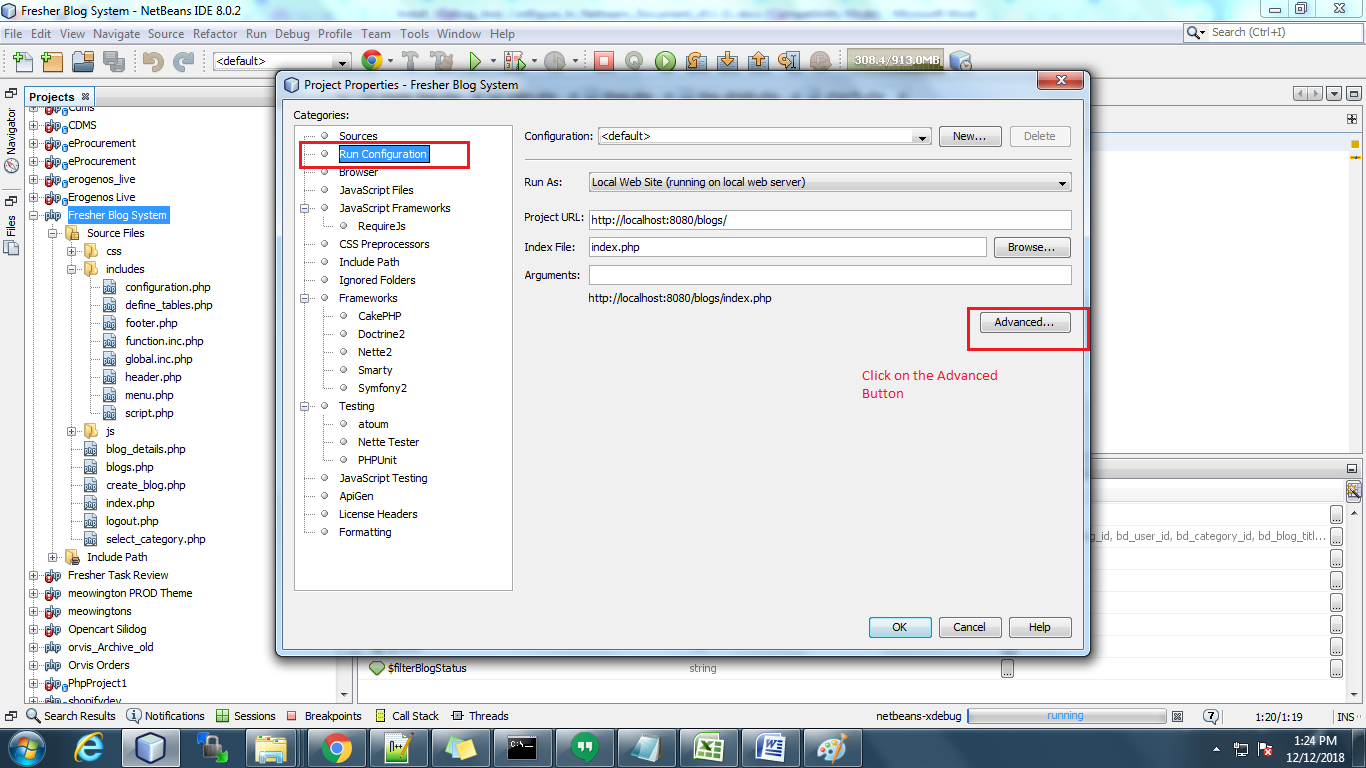
After clicking on this, a popup will open where you have to select the Run Configuration tab.

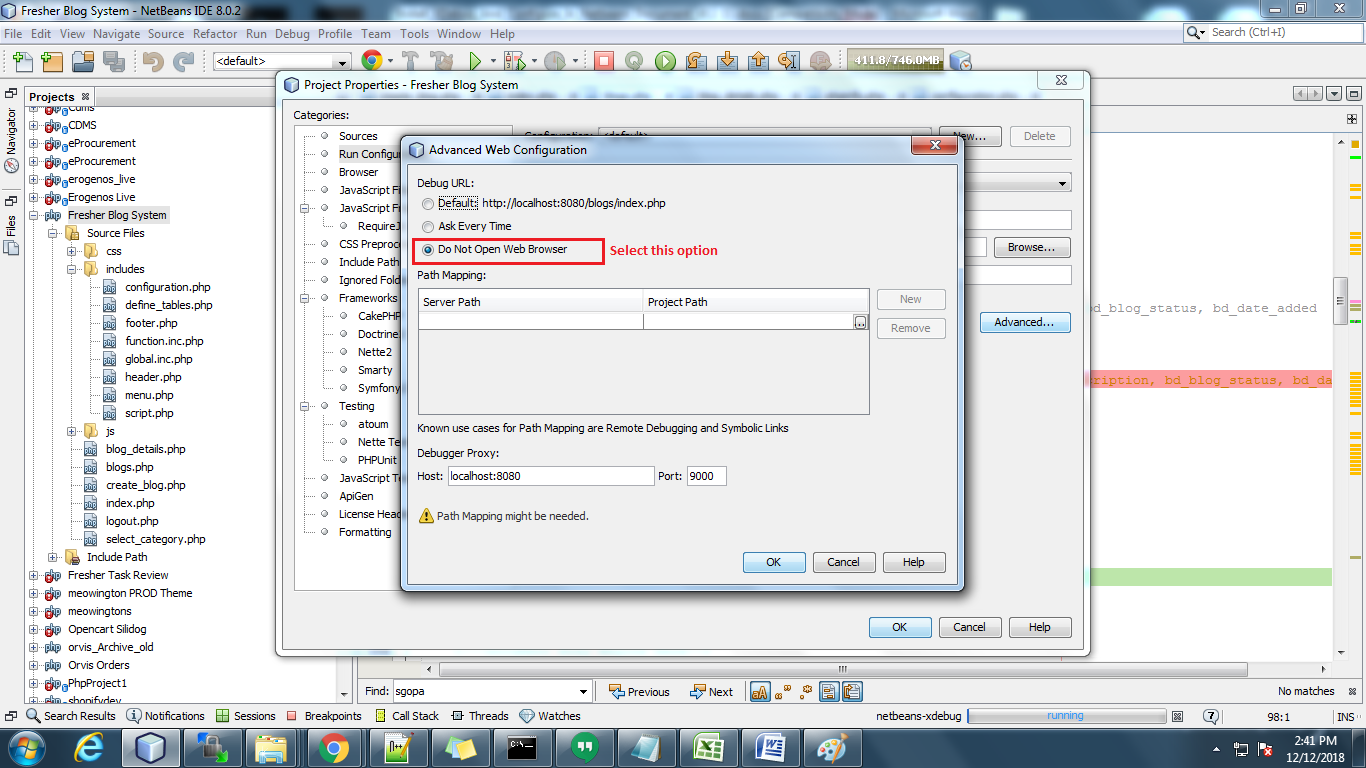
After clicking on this, a popup will open where you have to select the Run Configuration tab. Then you can see the Advanced button there. Click on this and select the “Do not Open Web  Browser” option and click on OK.

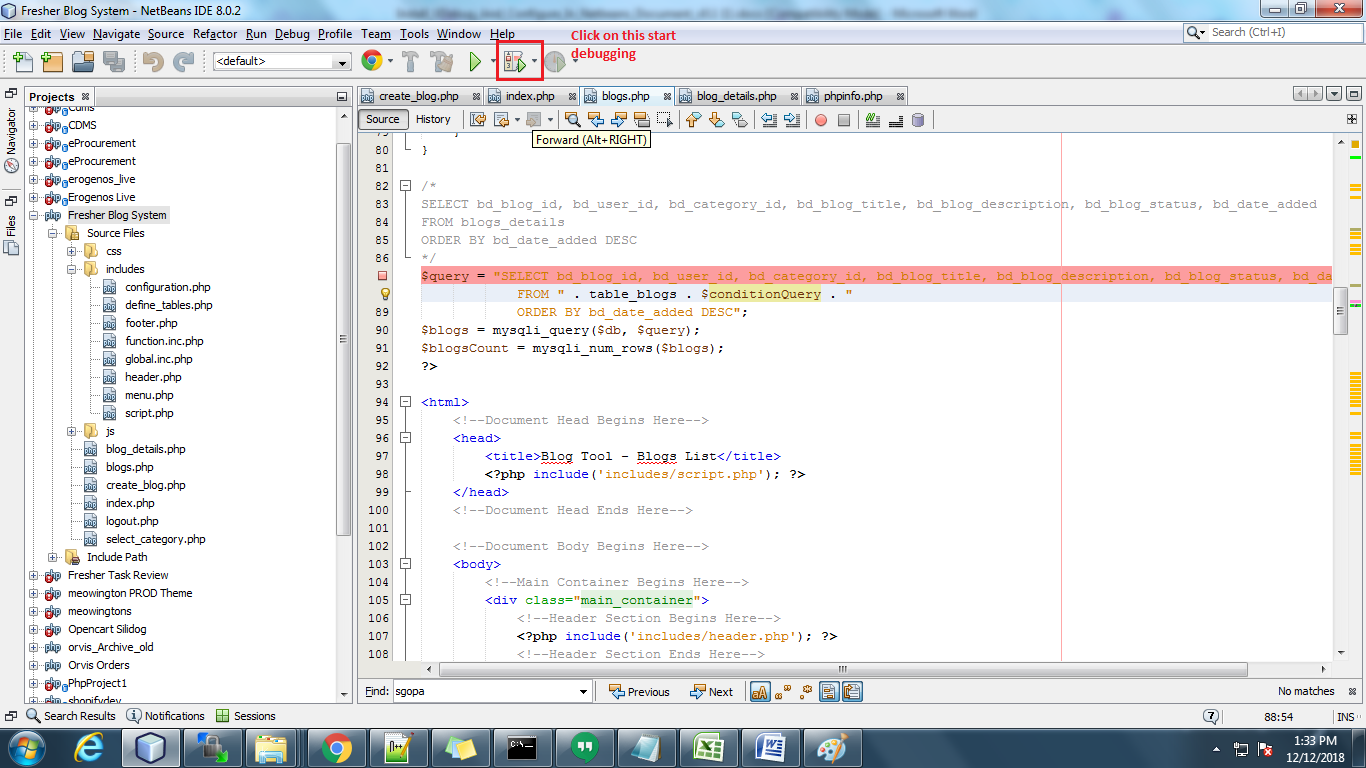
Now click on debugger to start debugging. Please see in screenshot. And before that you have to open the project in browser :
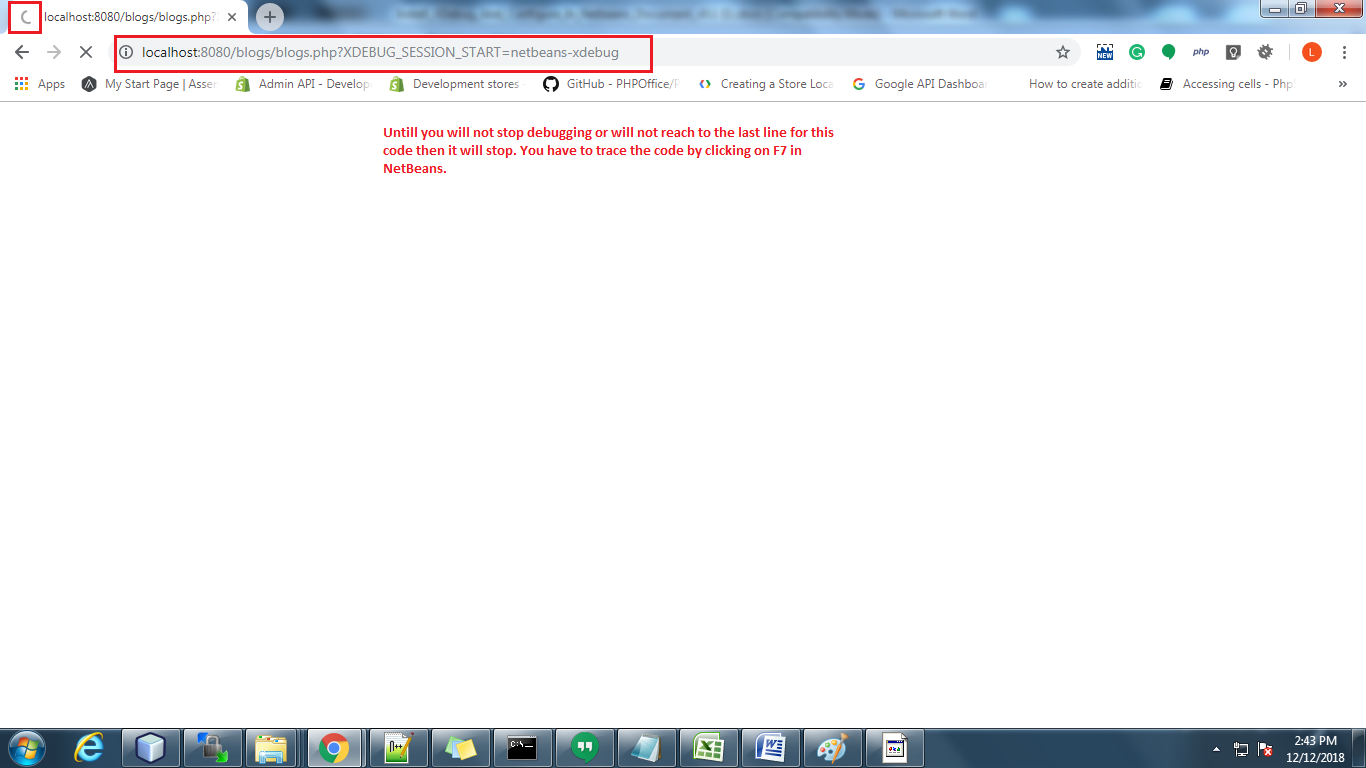
For example: https://localhost:8080/blogs/blogs.php?XDEBUG_SESSION_START=netbeans-xdebug
Note: The Highlighted part in the URL above is the xdebug session id. You have to pass it on the page which you want to debug.

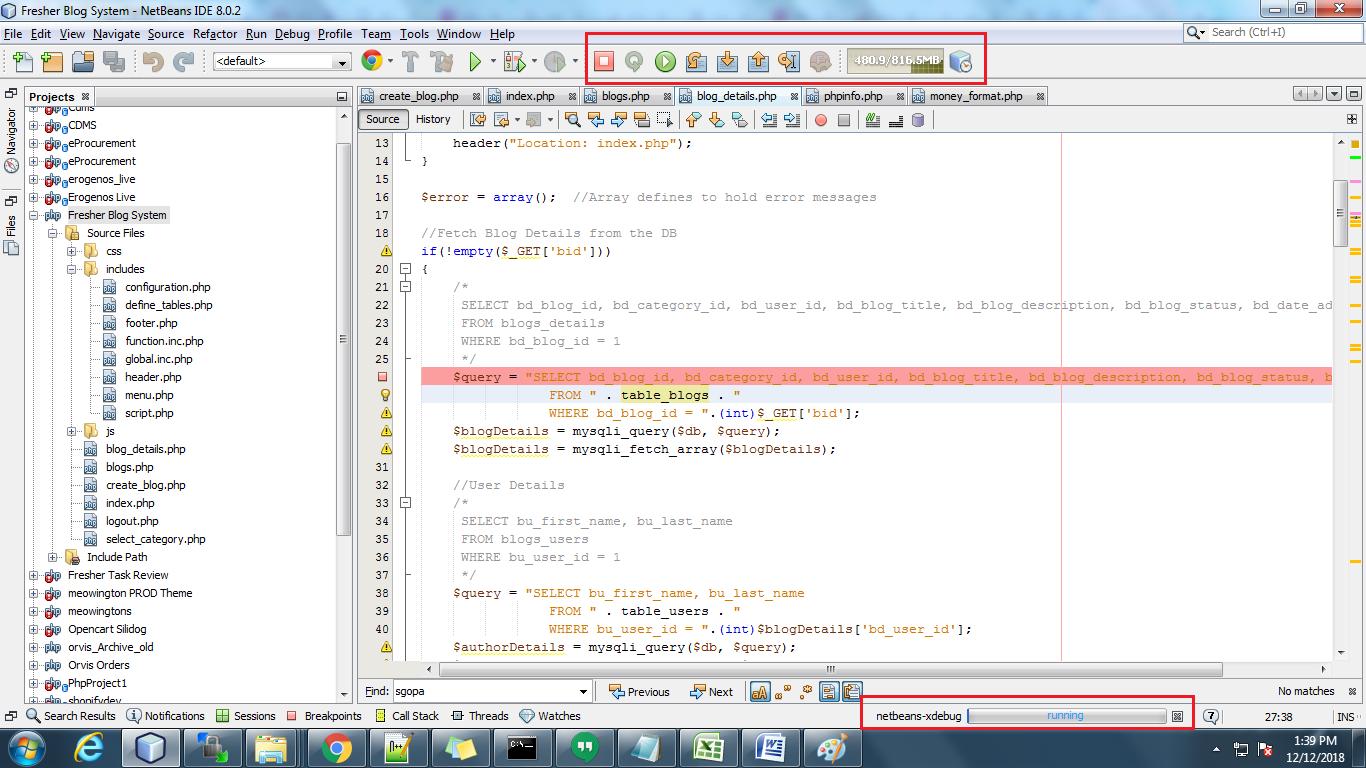
You can see the Xdebug in running state in below the NetBeans notification bar in the snapshot below:

Then you have to add a breakpoint in the code file. The code will stop at that point and you can check the values. You can trace the code by clicking on F7 in NetBeans.

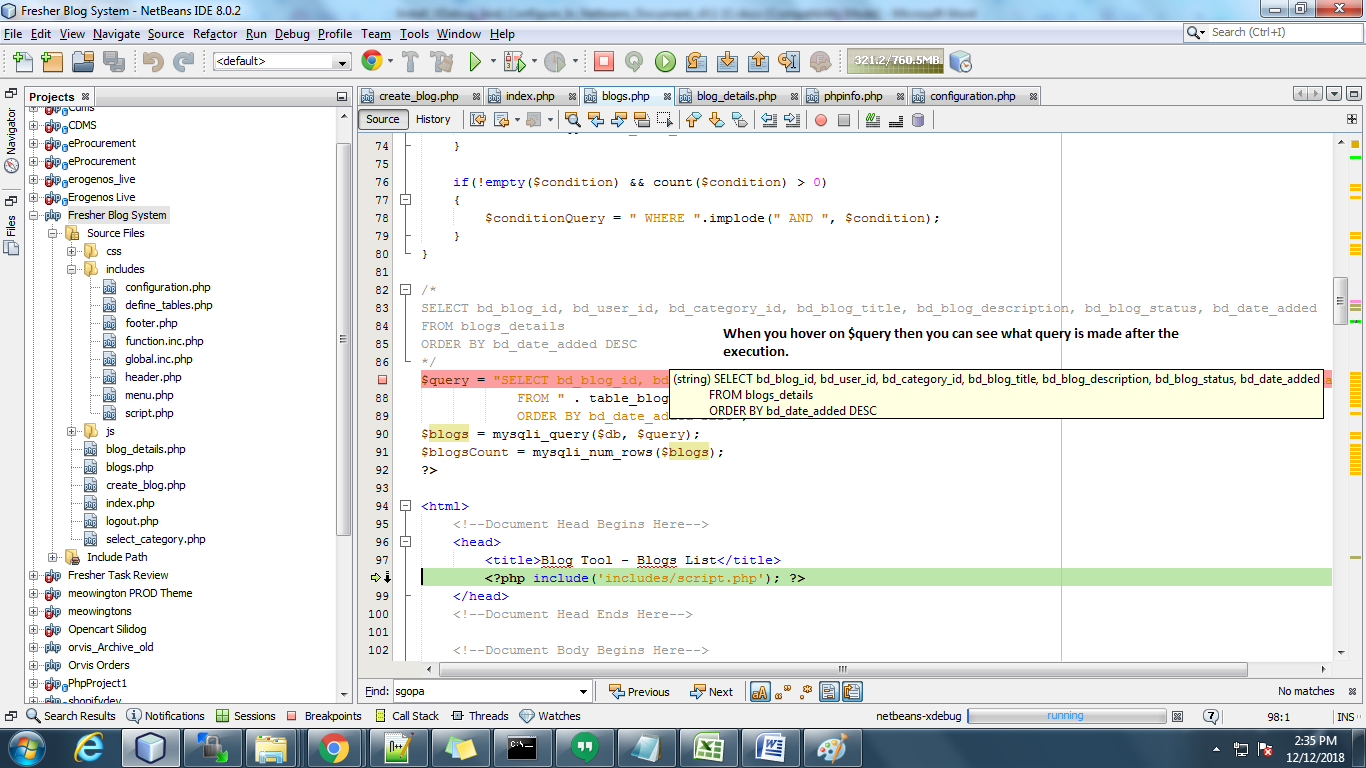
You can check the value of dynamic variables by hovering the variables. You can also add the variable in watch list.

Until you will not complete or reach the last line for the code which you are debugging, in the browser, it will stop. It just showed loading. After completing the debugging or closing the debugging session it will come to page ((in browser) which you are opening.

Watch the complete tutorial in the following video:

Looks helpful? Also, read the other part of the article for complete & detailed information: 

Xdebug Installation & Configuration – Part 1

How to calculate Free Shipping based on final Total Price in Prestashop ?

After reading this blog we will be able to calculate Free Shipping based on the final Total Price of the Cart.

Problem Statement

Presently, when we add products into the cart and move to the checkout section to avail of discount and shipping then we see that the discount applies after shipping.
Let’s say,

  • Cart total amount is $100 which avail Free Shipping and some discount of 5% is also added
  • Then after the discount Total Amount of the cart is set to below $100 but still, Free Shipping applies which should not happen. Free Shipping must apply to the Final Total amount of the cart after the discount.
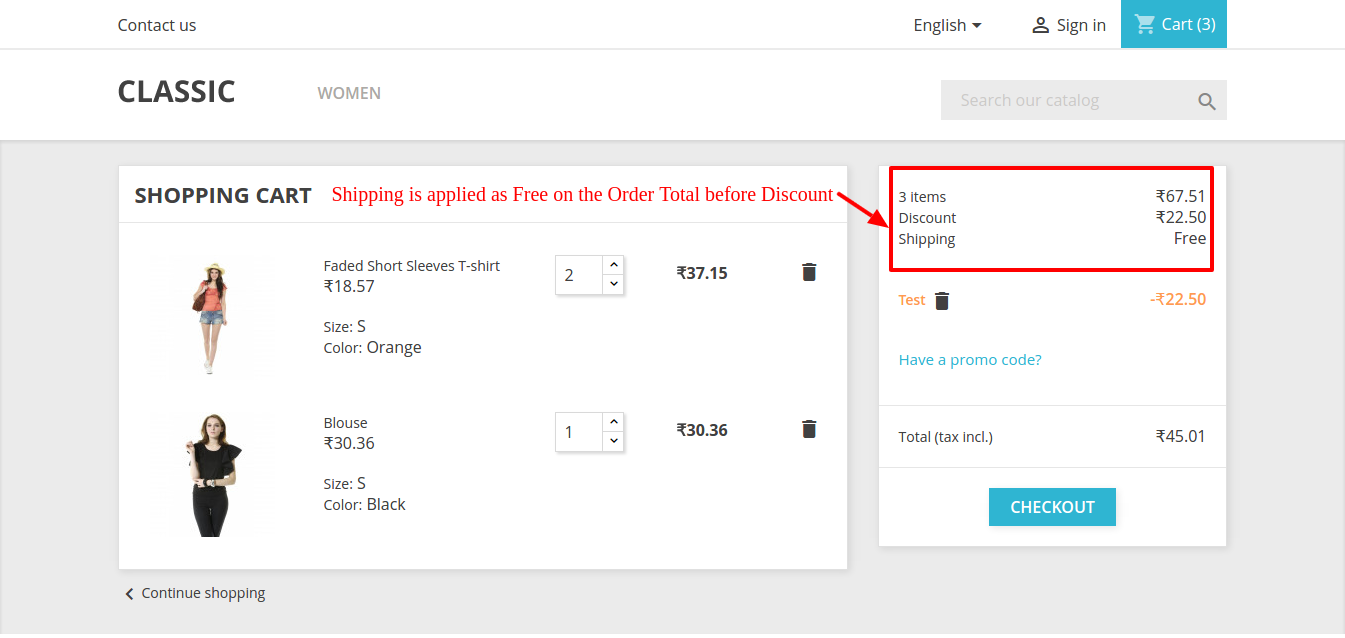
  • This is the default process of Prestashop. Refer to the screenshot below where shipping must be Free if Order Total is > 50 but it has applied Free Shipping while Order Total is < 50 after discount –

Recommended Read: Free Shipping Strategies: Why to Offer? How to Offer? When to Offer?

Why the current issue is there?

The current issue is there because the shipping amount is being calculated on the Order Total amount which is set into the Cart before applying the discount. You can check the lines of code below where Order Total without discount amount is being used to calculate shipping –

$shipping_cost += $carrier->getDeliveryPriceByPrice($the_total_price, $id_zone, (int)$this->id_currency);

Requirement

We need to modify the below-mentioned file to fix the same. We will be overriding the corresponding lines of the class file to avoid any changes in Core files.

Below is the list of class files which will be overridden-

1. Root dir\classes\Cart.PHP

Procedure to Solve the issue-

Follow the below-mentioned steps –

1. Rewrite function getPackageShippingCost

2. After the line given below –

// Order total in default currency without fees $order_total = $this->getOrderTotal(true, Cart::BOTH_WITHOUT_SHIPPING, $product_list);

3. Add the following statement –

$listeDiscounts = $this-&gt;getCartRules();
$total_discounts = 0;
if (is_array($listeDiscounts)) {
if (isset($listeDiscounts[0]['value_real']))
$total_discounts = $listeDiscounts[0]['value_real'];
}
$price_to_apply_shipment = floatval($order_total) - floatval($total_discounts);

<strong>Recommended Read: </strong><a href="https://www.knowband.com/blog/opencart-blog/best-free-shipping-manager-extension-opencart-store/">Best Free Shipping Manager Extension for OpenCart Store</a>

4. Replace the lines mentioned below –

Replace this line

$check_delivery_price_by_price = Carrier::checkDeliveryPriceByPrice($row['id_carrier'], $total_order, (int)$id_zone, (int)$this->id_currency);

With

$check_delivery_price_by_price = Carrier::checkDeliveryPriceByPrice($row['id_carrier'], $price_to_apply_shipment, (int)$id_zone, (int)$this->id_currency);

————AND—————–

Replace this line

$shipping_cost += $carrier->getDeliveryPriceByPrice($the_total_price, $id_zone, (int)$this->id_currency);

With

$shipping_cost += $carrier->getDeliveryPriceByPrice($price_to_apply_shipment, $id_zone, (int)$this->id_currency);

5. Clear the cache and run.

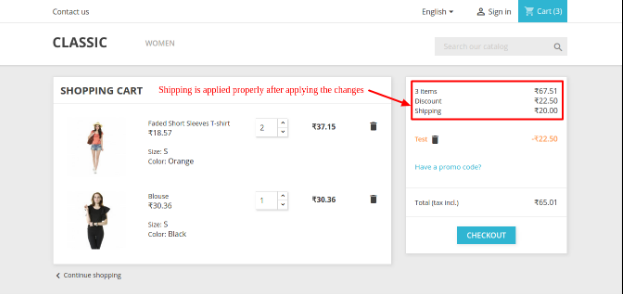
Refer to the screenshot below after applying changes to the code –

After following the above procedure, you will be able to calculate Shipping on the Final Total amount of the Cart.

Conclusion

When it comes to online buying, the whole pricing structure plays a crucial role for the customers. One of the factors that might make or break your conversions is the availability of free shipping. One method for determining the shipping options and costs on an eCommerce website is the Free shipping Manager Addon by Knowband. One of the most important requirements for increasing average sales is providing openness in the transaction.

The shops that used this free shipping module boosted site traffic, revenue, and conversion rates. With the help of this free shipping plugin, store administrators can define the guidelines and conditions for shipping costs. Even better, this feature can be added or removed from the website by the store administrator.

The threshold over which free shipping is offered can be set by online retailers. As a result, it even encourages customers to make larger purchases in order to qualify for free shipping. To know further about the functionality of the Free Shipping Module, feel free to contact us at support@knowband.com