1.0 Introduction
Managing the customer return request is not an easy task. It takes a lot of time and effort. The RMA system plays an important role in an eCommerce store. Without the RMA system, the store owner enables to manage of the customer request with ease and customer are also enabled to return and refund the product. Worry no more! The Prestashop Return Manager Addon adds the functionality to manage return requests for any order placed by a customer as well as a guest customer. The Prestashop return manager addon allows admin to adds a return manager button link to the front-end through which any customer/guest customer can apply for the return of any product contained in an order placed earlier.
IT is very easy to use and the customer can return any product in order completely or partially, which means the customer can also return half or less quantity of any product in the order.
How can Prestashop return manager work:
The first process this, the customer can initiate the product return request from their account page, after initiating the request the Store admin receives the return request.
When a user requests a product return, the admin can verify the return request genuine or not. If the request is genuine then they can approve the return request. The admin change return product status form the back end interface.
This Prestashop Return Manager addon offer two functionality:
For the login users- The Prestashop order refund addon shows the return manager link appears in the header as well as the ‘My Account’ page. When the logged-in customer opens a My Account page this page containing the list of all the orders that he/she placed and the products that are eligible for return have a link to apply for a return. This page also contains the history of returns applied by the logged-in customer.
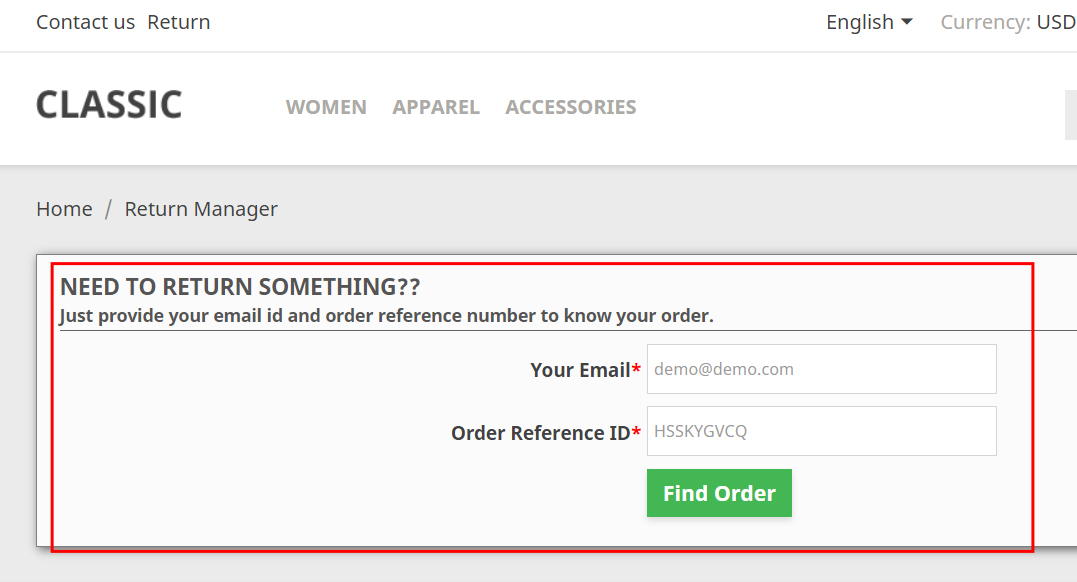
For the Guest users- In case the user is not logged-in the website then the return manager link opens a page containing a form to find any order. After finding an order using the form the order detail appears and the products from that particular order that is eligible for return have a link to apply for a return. This page also contains the history of returns applied by the guest customer who has placed this particular order.
In the updated version of this Prestashop Order refund manager module, the online users can also cancel their order for a limited period. The online merchant can apply the related settings from the admin interface.
What is new in the version v3.0.8:
In the updated version,
- The Return Manager module allows the admin to use the module form the left menu of the Prestashop backend.
- The admin can check the status of returns & cancellations at one place.
- The admin can also a custom text explaining the order status or any other details in the return status email template.
- The admin gets an option to select the order status from which he wants the return policy to apply for customers.
- Return Manager module allows admin to send the test email before making the email live.
- the Return Manager module allows the admin use the module form the left menu of the Prestashop backend.
- The admin can check the status of returns & cancellations at one place.
- The admin can also a custom text explaining the order status or any other details in the return status email template.
- The admin gets an option to select the order status from which he wants the return policy to apply for customers.
- Return Manager module allows admin to send the test email before making the email live.
1.1 Benefit of Merchant
- This Prestashop return manager addon allows the admin to enable/disable the functionality as per the desires.
- This Prestashop return manager Extension enables the admin to select the return method i.e. Credit, Refund, and Replacement.
- The Admin can manage or change the credit return message, refund return message, and replacement return message from the admin interface of the Prestashop return manager Module.
- ThisPrestashop order return manager Extension allows admin to customize the look and feel of the Return Manager link that shows the Front End.
- Prestashop order return manager plugin gives the freedom to the merchant to manage the return slip settings. The store admin sets the return address or adds the return address and they can also change return guidelines that print on the return slip.
- This Prestashop RMA enables admin to select the default return and refund policy and they can also add the new return policy.
- This PrestaShop return product addon allows admin to set the return reason on the back-end and he/she also adds the new return reason.
- The Store admin can change the return status of the online customer from the back-end.
- It generates a return request from the back-end and the admin can find any order by simply providing the reference number and the corresponding email and then apply for a return accordingly.
- The Prestashop store admin can customize the email templates accordingly with the help of the Prestashop order refund addon.
- Prestashop order return manager Addon allows the merchant to view all the pending returns and refunds of the buyers.
- The Prestashop Return Manager plugin enables the admin to view the active return list.
- The Admin can set filter the archives list and view all return requests that are complete.
- Customers can inquire about the status of their actions return requests. They also get an option to cancel that request.
- Prestashop order return manager Addon allows customers to return their order for the selected order status.
- Prestashop return manager extension allows you to set minimum and maximum days for each type “Credit/Refund/Replacement” within a return policy.
- It is easy to update the pending and active return requests list by clicking the Refresh button provided at the Prestashop refund order Extension admin interface.
- When the active return requests are marked completed, the inventory is automatically completed.
- You can generate and send the discount voucher to the customers for submitting a refund request.
- Admin can also include custom CSS and JS code from the admin interface of Return Manager for Prestashop.
- The online store merchant can allow the online users to select the products which he/she wants in replacement.
- The online merchant can allow the users to return the whole order by selecting products.
- This Prestashop return manager module allows the store merchant to set custom fields from the admin interface.
- Admin can now allow the online users to send order cancellation requests from the website front-end interface.
- The Prestashop Return Manager Module allows the admin to set up the order status on which the users can cancel their orders.
Note: Prestashop Return Manager Addon is now compliant with the GDPR. We have integrated the GDPR hooks on our return manager module. Please refer to the General Settings to know more about the GDPR.
2.0 Installation Guide
To install this Prestashop Return Manager Addon, please follow the following steps:
1. Copy the whole folder named as “return manager” into your modules folder of the root directory of your PrestaShop store through FTP.
2. You will be able to find the Prestashop return manager extension ready to be installed in the “Modules” in your PrestaShop store as shown below.
For version 1.6 –
For version 1.7 –
Click on the Install link to install the Prestashop return manager addon.
2.1 Module Implementation
The Prestashop Return Manager Addon implementation will have two sections:
1- Admin Module
2- Front-End Module
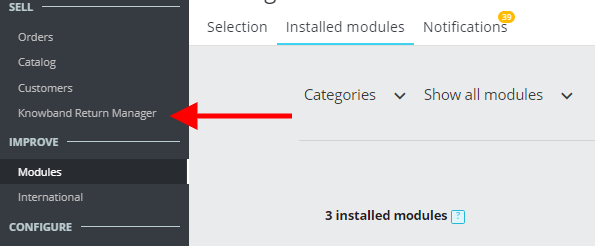
3.0 Admin Module
In the admin module, there will be the following options to configure this Prestashop replacement manager Addon. The Prestashop replacement manager Module includes 18 tabs and they are as follows.
Return Manager Prestashop extension allows admin to check the status of all return and cancellation requests at a single click.
Easy Navigation: The admin can access the module from the left menu of the Prestashop backend easily.
The Prestashop return manager addon will provide the following interface:
- General Settings
- Custom CSS/JS
- Return Slip Settings
- Return Policies
- Return Reasons
- Cancel Reasons
- Return Statuses
- Return Address
- Create a Return
- Email Templates
- Pending Order Cancel List
- Complete Order Cancel
- Pending Return List
- Active Returns List
- Canceled Returns List
- Archives List
- Custom Fields
- Other Plugins
Each tab contains some specific settings/functionality that can be changed according to the need. Each tab of this Prestashop Return Manager Addon explained below.
3.1 General Settings
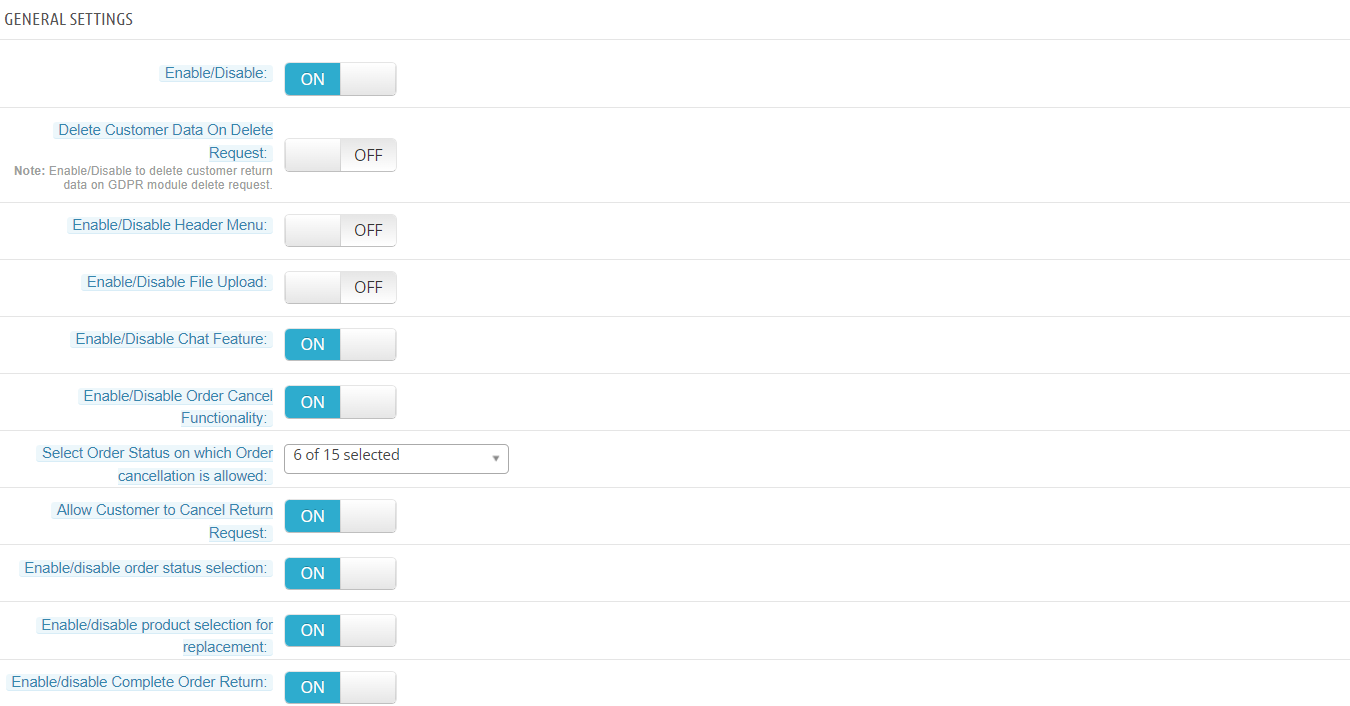
After clicking on the configure link on the Prestashop replacement manager Module listing page (configure link will automatically appear once you install the plugin), the system will open general settings tabs by default.
This tab will be having the following options to configure the Prestashop replacement manager Module.
Initially, fields in the above form will be already filled with their default values.
- Enable/Disable: Initially, this Prestashop order return addon general settings will be “OFF”. The Online store admin can enable/disable this Prestashop order refund extension by turning ON/OFF in this setting.
- Delete Customer Data on Delete Request: This feature allows the store admin to delete the customer data from the back-office. The module deletes the subscriber details automatically. If you are using the official GDPR module then you must need to enable this setting. The main purpose of this feature is to export and deletes user data on the PrestaShop GDPR module request. The Customer Data will be deleted on if this setting is ON.
Note: It is also compatible with our Prestashop GDPR Module. - Enable / Disable Header Menu: When the field is enabled, the Return tab will be available in the store’s header through which placed orders can be returned.
- Enable/Disable File Upload: In this tab, the admin can enable/disable the File Upload option button. This option allows the customer to upload the return product image.
- Enable/Disable Chat Feature: This option enables or disables the ticket system for your store. If this feature is enabled, customers can raise a ticket and chat regarding their return requests.
- Enable/disable Order Cancel Functionality: Activate or deactivate the functionality of order cancellation.
- Select Order Status on which Order cancellation is allowed: Select the order status on which you want to allow order cancellation.
- Enable/disable Order Status selection for Return Policy: Return Manager module Admin can set order status after reaching which the return policy will be considered. Once this feature is enabled then the admin can select the Order Status from which Return policies are applicable.
- Allow Customer to Cancel Return Request: This option allows or disallows the customer to cancel their return request. if this option is enabled, the customer can cancel their return request.
- Enable/Disable Order Status Selection: This functionality lets you enable or disable product returns on selected order status.
- Enable disable product selection for replacement: The merchant can allow the online users to select the products which they want in replacement.
- Enable Disable complete order return: Customers can return the whole order if they wish to do so. Admin can activate or deactivate the complete order return facility from the admin interface of the Prestashop order return manager Module. Users can select the products which he wants to return.
- Select Order Status on which Order Return is Allowed: With this option, admin can set the specific order status on which they want to allow returns on the store.
- Enable/disable Order Status selection for the Return Policy: When the field is enabled the user can select the order status on which the Return Policy will be applicable.
- Success Messages Language: This drop-down contains all the languages available and enabled in the system, to save the success messages in a different language you have to choose the desired language from this dropdown. The success messages will be saved for the selected language when you submit the form.
- Allowed Return Method: This option allows the admin to select the return method which they want to offer.
- Order Cancellation Message: Here, the admin can set the message for display to the users after creating order cancel request.
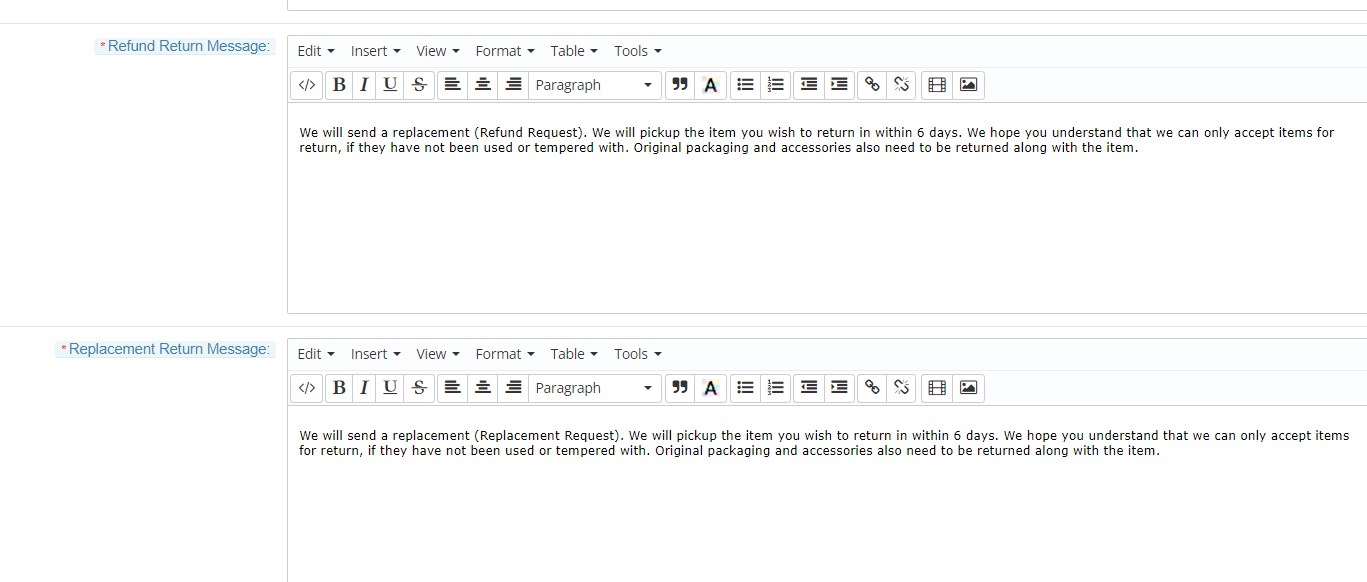
- Credit Return Message: It allows the admin to change the text as well as the format (HTML Design) of the text that will be displayed on the successful submission of a return request (Credit Type) by any customer.
- Refund Return Message: This option enables the admin to change the text as well as the format (HTML Design) of the text that will be displayed on the successful submission of a return request (Refund Type) by any customer.
- Replacement Return Message: This Prestashop return manager addon enables the admin to change the text as well as the format (HTML Design) of the text that will be displayed on the successful submission of a return request (Replacement Type) by any customer.
3.2 Custom CSS and JS
- Add CSS Code: With this option, you can add additional CSS code.
- Add JS Code: With this option, you can add additional JS code.
3.3 Return Slip Settings
In this tab, the merchant can alter the settings and content of the Return Slip. This return slip is generated automatically when the admin approves any return request (if the feature is enabled). The return slip is generated in the ‘PDF’ format and is mailed to the customer in the mail for Return Request Approval Notification.
The Prestashop store admin needs to implement these settings:
- Enable/Disable Return Slip: Initially, this will be “OFF”. Admin can enable/disable the Return Slip feature by turning ON/OFF in this setting. Return slips are only generated when the feature is turned ON.
- Select Slip Language: This drop-down contains all the languages available and enabled in the system, to save the Return Slip content in a different language you have to choose the desired language from this dropdown. The content will be saved for the selected language when you submit the form.
- Return Address: This address will be printed on the return slip and will also be displayed on the return request form.
- Return Guidelines: These guidelines will be printed on the return slip.
3.4 Return Policies
In this tab, the admin can add new return policies and can also edit or delete an existing return policy for the PrestaShop product return extension.
There is also an option to map the return policies to categories. A product is eligible for return only if it’s Default Category is mapped to a policy.
3.4.1 How to find the Default Policy of a product?
It allows the store admin to find the default policy. Following are the steps to find default policy of a product –
1. Go to Catalog > Products
2. Click on the “Edit” button of the desired product.
3. Click on the “Associations” tab.
The “Default Category” of the desired product will be displayed.
Note: One category can only be mapped with at-most one policy. But one policy can be mapped with more than one category.
This PS module provides an option to map the return policies to products.
This tab contains a list of existing return policies for the Prestashop replacement manager Module. The admin can also create a new return policy using the Add New button at the bottom of the policies tab. After clicking on the add new button a pop-up appears containing the form to create the return policy.
3.4.2 How to add a new policy?
The Prestashop refund order Extension provides the store admin option to add the new return policy. Following are the steps to add a new policy –
1. Go to Module and Services > Search module “Return Manager” > Click on the “Configure” button. > “General Setting” tab will display.
2. Click on the “Return Policies” tab.
3. Click on the “Add New” button. A pop-up will display to add a new policy.
4. Fill all the mandatory fields and click on the “Save” button.
5. After the successful validation, the new policy would be added to the “Return Policies List” table.
The form contains several input fields to enter the data of the policy like the name of the policy, validity, terms and condition of the policy and the option to choose the parameters i.e. Credit, Return and Replacement.
The admin can also enter the minimum and maximum days applicable to this return policy for different options as shown in the form below.
3.4.3 How to apply on policy for any product/category?
The Prestashop RMA extension allows the seller to apply policy for any product/category. Following are the steps to apply no policy for some product/category –
1. Go to Module and Services > Search module “Return Manager” > Click on the “Configure” button. > “General Setting” tab will display.
2. Click on the “Return Policies” tab.
3. Enter Product Id / Category Id at the field Exceptional Product Ids / Exceptional Category Ids respectively for which no policy would be applicable.
4. Click on the “Save” button.
3.4.4 How to edit a policy?
The Prestashop refund order Extension allows the eCommerce merchant to edit the already added policy. Following are the steps to edit a policy –
1. Go to Module and Services > Search module “Return Manager” > Click on the “Configure” button. > “General Setting” tab will display.
2. Click on the “Return Policies” tab.
3. Click on the “Edit” icon of the desired policy.
4. A pop-up will open with all the data already persist on the field as shown below.
5. Fill all the mandatory fields and click on the “Save” button.
Actions
1. The admin can edit any policy using the first link in the Action column from the policy listing table. On clicking this link a modal containing the form for the policy will appear and the data for that policy is already filled in the fields. The admin can edit any data and can save the changes made.
2. The second link in the actions column is for mapping categories to the policy. On clicking this link a modal will appear containing the options to map the categories to that particular policy.
3.4.5 How to map policy with categories?
The Prestashop RMA extension allows the admin to map. Following are the steps to map policy with categories –
1. Go to Module and Services > Search module “Return Manager” > Click on the “Configure” button. > “General Setting” tab will display.
2. Click on the “Return Policies” tab.
3. Click on the “map” icon of a particular policy.
4. A pop will display with a drop-down field to map this policy with the categories as shown below.
5. Click on the “Save” button.
Note: The policy for a particular product would be decided based on the “Default Category” of the product.
3. The third link in the Action column is for deleting any particular policy.
3.4.6 How to delete a policy?
The Prestashop product return manager module allows the eCommerce store merchant to delete the pre-defined. Following are the steps to delete a policy –
1. Go to Module and Services > Search module “Return Manager” > Click on the “Configure” button. > “General Setting” tab will display.
2. Click on the “Return Policies” tab.
3. Click on the “Delete” icon for the policy you want to delete.
4. Confirm by clicking on the “OK” button.
3.5 Return Reasons
In this tab, a list of return reasons will appear in the form of a table. By default, there are 5 reasons already added into the Prestashop RMA and they are non-editable. The admin can further add any numbers of reasons into the Prestashop return manager addon.
The two links below the action column in the reasons list are for editing and deleting the existing return reasons.
3.5.1 How to add a new Return Reason?
The Prestashop return manager addon allows the store admin to add and edit the new return reason. Following are the steps to add a return reason –
1. Go to Module and Services > Search module “Return Manager” > Click on the “Configure” button. > “General Setting” tab will display.
2. Click on the “Return Reasons” tab.
3. Click on the “Add New” button. A pop-up will display to add a new Return Reason.
4. Fill all the mandatory fields and click on the “Save” button.
5. After the successful validation, the new return reason would be added to the “Return Reasons List” table.
The admin can add as many reasons as required to the system using the ‘Add New’ link at the bottom of the listing tab. On clicking on the link a form will appear to add new Return Reason into the Prestashop Order Refund Extension. The form is shown below:
3.5.2 How to edit a Return Reason?
The Prestashop return manager addon allows the store admin to edit the return reason. Following are the steps to edit a return reason –
1. Go to Module and Services > Search module “Return Manager” > Click on the “Configure” button. > “General Setting” tab will display.
2. Click on the “Return Reasons” tab.
3. Click on the “Edit” icon of the desired reason.
4. A pop-up will open with data already persist in the field.
5. Fill the mandatory fields and click on the “Save” button.
3.5.3 How to delete a Return Reason?
The Prestashop return manager module allows the store admin to delete the already added return reason. Following are the steps to delete a return reason –
1. Go to Module and Services > Search module “Return Manager” > Click on the “Configure” button. > “General Setting” tab will display.
2. Click on the “Return Reasons” tab.
3. Click on the “Delete” icon of the return reason you want to delete.
4. Confirm by clicking on the “OK” button.
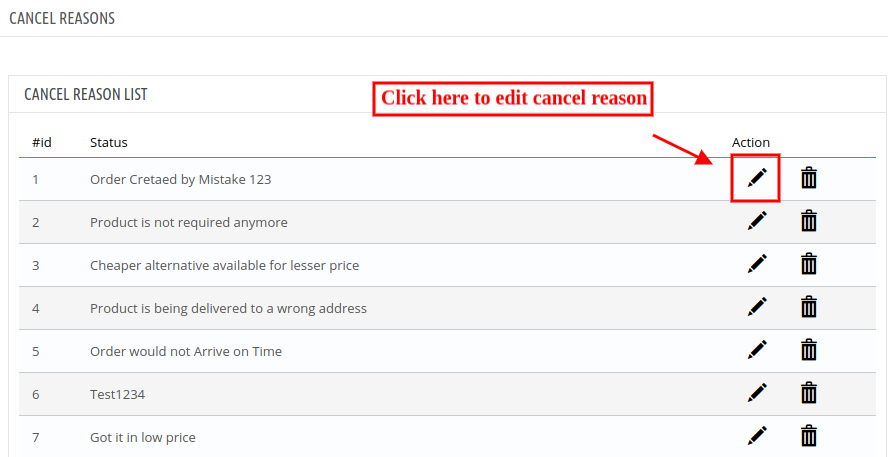
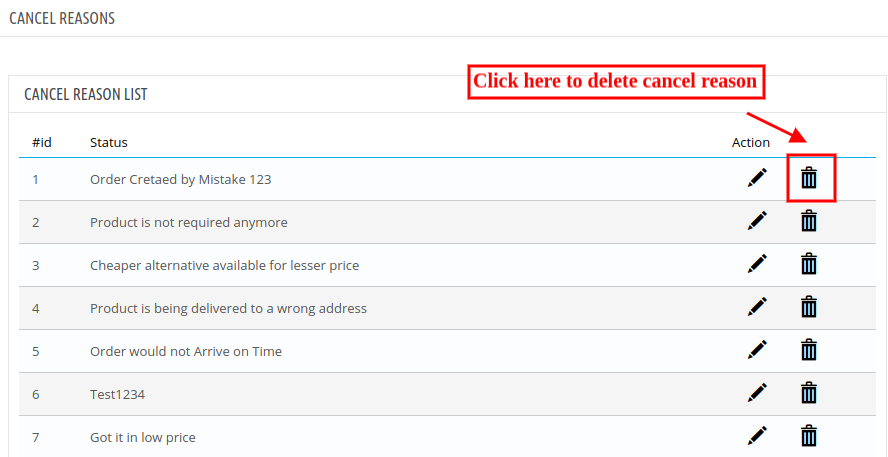
3.6 Cancel Reasons
The online merchant can list the reasons for order cancellation. The online users can choose from these listed reasons while creating an order cancellation request.
Admin can add, delete and edit any cancel reason from the admin interface of this Prestashop Return Manager Module.
3.6.1 Steps for adding new cancel reasons:
Admin needs to click on add new button and enter the reasons in different languages. Please check the below screenshot:
3.6.2 Steps for editing any cancel reason:
Admin needs to click on edit option and change the reason. After that, he can save it. Check the screenshot:
3.6.3 Steps for Deleting cancel reason:
Admin needs to click on the delete icon and in the message box click on ok button. Check the below screenshot:
3.7 Return Statuses
This tab contains a list of return statuses in the form of a table. By default, there are 5 statuses already added to the Prestashop return manager addon and they are non-editable. The admin can further add any numbers of statuses into the system. The tab also contains an option to choose default and the final status of any return request.
The two links below the action column in the statuses list are for editing and deleting the existing return statuses.
The admin can also change the default return status and final return status from the drop-downs in this tab.
3.7.1 How to add a new Return Status?
The Prestashop return manager addon allows the store admin to add the new return status. Following are the steps to add new return status –
1. Go to Module and Services > Search module “Return Manager” > Click on the “Configure” button. > “General Setting” tab will display.
2. Click on the “Return Statuses” tab.
3. Click on the “Add New” button. A pop-up will display to add a new Return Status.
4. Fill all the mandatory fields and click on the “Save” button.
5. After the successful validation, the new return status would be added to the “Return Reasons List” table.
The admin can add as many statuses as required to the system using the ‘Add New’ link at the bottom of the listing tab. On clicking on the link a form will appear in a modal to add new Return Reason into the system. The form is shown below:
3.7.2 How to edit a Return Status?
The Prestashop product return manager addon allows the store admin to edit the return status. Following are the steps to edit return status –
1. Go to Module and Services > Search module “Return Manager” > Click on the “Configure” button. > “General Setting” tab will display.
2. Click on the “Return Statuses” tab.
3. Click on the “Edit” icon of the desired return status.
4. A pop-up will open with data already persist in the field.
5. Fill the mandatory fields and click on the “Save” button.
3.7.3 How to delete a Return Reason?
The Prestashop RMA module allows the store admin to delete the return reason. Following are the steps to delete return status –
1. Go to Module and Services > Search module “Return Manager” > Click on the “Configure” button. > “General Setting” tab will display.
2. Click on the “Return Statuses” tab.
3. Click on the “Delete” icon of the return status you want to delete.
4. Confirm by clicking on the “OK” button
3.8 Return Addresses
The online merchant can add, delete and modify return address from the admin interface of this Return manager module. The admin can view a list of added addresses and also modify it or disable it anytime.
Admin can add a new address by clicking on the “+” sign. After that, the admin needs to add address details like area, zip code, city, country and state.
The online merchant can easily edit and disable the generated address without any hassle.
3.9 Create a Return
This tab is used to generate a return request from the admin panel itself. The tab contains a form through which the admin can find any order by simply providing the reference number and the corresponding e-mail and then apply for return accordingly.
3.9.1 How to Create a Return?
The Prestashop product return manager addon allows the store admin to create the return. Following are the steps to create a return –
- Go to Module and Services > Search module “Return Manager” > Click on the “Configure” button. > “General Setting” tab will display.
- Click on the“Create a Return” tab.
- Enter Email Id of the customer and the Reference Id of the order.
- Order Details will be displayed in that particular order as shown below.
- Click on “Return Button” for the desired product. A pop up will be displayed to completed the return process.
- Filled all the mandatory fields and agree to Terms and Conditions.
- Click on the “Submit” button. The return request would be sent and order details would be added in “Pending Returns List” tab
Note:
- Any return request whether it is created by admin or customer is moved to the pending returns and the admin has to approve it first to further change the status of the return request or to take any further action.
- The orders that are delivered are only eligible for return.
- By default, the status of the return request is set to default return status set by the admin in the ‘Return Statuses’ tab.
- When the admin finds an order using the find order form then the order detail for the respective order will appear containing the list of products and a return button in front of products eligible for return. When the admin clicks on the return button a pop-up will appear containing the return form and enter specific data for the return request. Admin can fill the form for generating a return request on behalf of users.
3.10 Email Templates
This tab contains an interface through which the admin can edit or translate (to any language) any email template that is used in this system.
3.10.1 How to edit an Email Template?
The Prestashop order return manager Addon allows the store admin to edit the email template. Following are the steps to edit an email template –
1. Go to Module and Services > Search module “Return Manager” > Click on the “Configure” button. > “General Setting” tab will display.
2. Click on the “Email Templates” tab.
3. Select the desired template you want to edit.
4. Fill all the mandatory fields, apply the desired change and click on the Save button at the bottom of the form.
There are 20 email templates available that are used by this Prestashop return manager Addon:
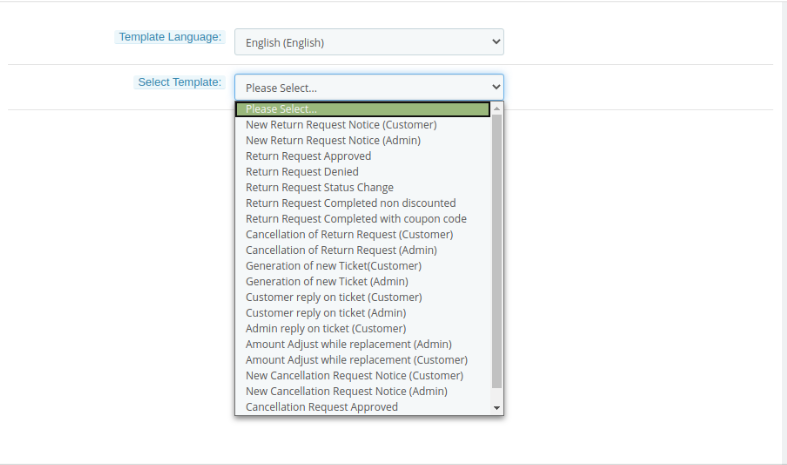
- New Return Request Notice (Customer): This mail template is used to notify the customer regarding the new Return Request generated by the customer itself. The customer who has created the return request will only receive this mail.
- New Return Request Notice (Admin): This mail template is used to notify the Store Owner regarding the new Return Request generated by any customer.
- Return Request Approved: This mail template is used to notify the customer regarding the Approval of the Return Request that is created by the customer earlier.
- Return Request Denied: This mail template is used to notify the customer regarding the Dis-Approval of the Return Request that is created by the customer earlier.
- Return Request Status Change: This mail template is used to notify the customer regarding the update in the status of the Return Request that is created by the customer earlier.
- Return Request Completed non-discounted: This mail template is used to notify the customer regarding the completion of the Return Request that is created by the customer earlier.
- Return Request Completed with coupon code: In this mail template, the customers will get return request completion information along with the coupon code.
- Cancellation of return request(Customer): This email template will be used to notify customers regarding return request cancellation done by them.
- Cancellation of return request(Admin): This email template will notify the store admin regarding return request cancellation.
- Generation of New Ticket(Customer): When the customer generates any new ticket, this email template will be used for sending emails regarding this ticket generation.
- Generation of New Ticket(Admin): Whenever customers generate a new ticket, this email template will be used to notify the store admin regarding ticket generation.
- Customer Reply on Ticket(Customer): Customers will get an email notification when they reply on any ticket.
- Customer Reply on Ticket(Admin): Admin will get the notification on customers to reply to the ticket.
- Admin Reply on Ticket(Customer): Customers will get a notification on the admin’s reply on tickets.
- Amount Adjust while replacement(Admin): Admin will get notification regarding Amount Adjust while replacement.
- Amount Adjust while replacement(Customer): Customers will get notification regarding Amount Adjust while replacement.
- New Cancellation Request Notice(Customer): Customers will get notification regarding their cancellation request.
- New Cancellation Request Notice(Admin): Admin will get notification regarding the new cancellation request.
- Cancellation Request Approved: Notification regarding approval of cancellation request.
- Cancellation Request Declined: Notification regarding rejection of cancellation request.
To edit or translate any email template the admin has to choose the desired email template and language. On doing the same the email template data will appear in a form below, to save the changes made the admin has to click on the ‘Save’ button at the bottom.
Admin can send the test email while setting up the template before making it live.
Admin can add a custom text using placeholders in the return status emails.
3.11 Pending Order Cancel List
Admin can view the order cancellation requests which are pending. Admin can approve or decline the request from here. Admin can also refresh the list and check new cancellation requests.
3.12 Complete Order Cancel
Here, the admin can view the approved canceller orders and also check the customer notes if available.
3.13 Pending Returns List
This tab contains a list of all the returns that are pending i.e. are not approved by the admin. The admin has to approve a return request to perform several operations on the return request like changing the status and completing the return process.
3.13.1 How to approve a return request?
The Prestashop product return manager addon allows the store admin to edit the return request. Following are the steps to approve a return request –
1. Go to Module and Services > Search module “Return Manager” > Click on the “Configure” button. > “General Setting” tab will display.
2. Click on the “Pending Returns List” tab.
3. Click on the tick button.
3.13.2 How to deny a return request?
The Prestashop RMA manager module allows the Prestashop store merchant to deny the return request. Following are the steps to deny a return request –
1. Go to Module and Services > Search module “Return Manager” > Click on the “Configure” button. > “General Setting” tab will display.
2. Click on the “Pending Returns List” tab.
3. Click on the cross button.
You will find the “Refresh List” button which fetches and updates all the pending return requests.
The admin can approve or deny a return request using the actions available in front of the list.
Once the admin approves a return request then it is moved to the Active Returns List.
On the other hand, if the admin denies a return request that it is removed from the list and this action can not be undone.
The admin can view the detail of the product, the details of the order and also the details of the customer by clicking on the respective links from the list of the pending return.
Admin can view the reason corresponding to a return request.
They can view extra product return notes if provided by the customer.
If the ticket system is enabled, customers can raise a ticket from the return section of their account. Corresponding to the order return request, admin can view the ticket as shown below:
3.14 Active Returns List
This tab contains a list of all the returns that are approved by the admin. The admin can proceed with the return process after approving the return request using this tab. The admin can view the return status history, change the status of the return request, and can also deny a request from this tab as well.
You will find the “Refresh List” button which fetches and updates all the active return requests.
The actions that can be performed from this tab for the active returns are:
- Deny the return request.
- Change the status of the return request.
- View history of the return request.
- View customer comments.
- Mark the return request as complete.
- View the ticket information
When the admin marks a return request as complete then it is moved to the archives list.
When the admin clicks on the view history link in front of the return from the active returns list then a modal will appear containing the details of the order and the return status history for that return request. The modal is as follows:
3.14.1 How to change return status?
The Prestashop return manager extension allows the store admin to change the return status. Following are the steps to change return status –
1. Go to Module and Services > Search module “Return Manager” > Click on the “Configure” button. > “General Setting” tab will display.
2. Click on the “Active Returns List” tab. A pop up will display with the field to change the status.
3. Change the status and click on the “Save” button
3.15 Canceled Return List
Customers can cancel their placed return requests from their account section. The information about those canceled requests can be checked under this section.
3.16 Archives List
This tab contains all the return requests that are complete. The tab also contains a form through which the admin can filter the archives list and can also export the list of completed return requests based on certain filters to a CSV file.
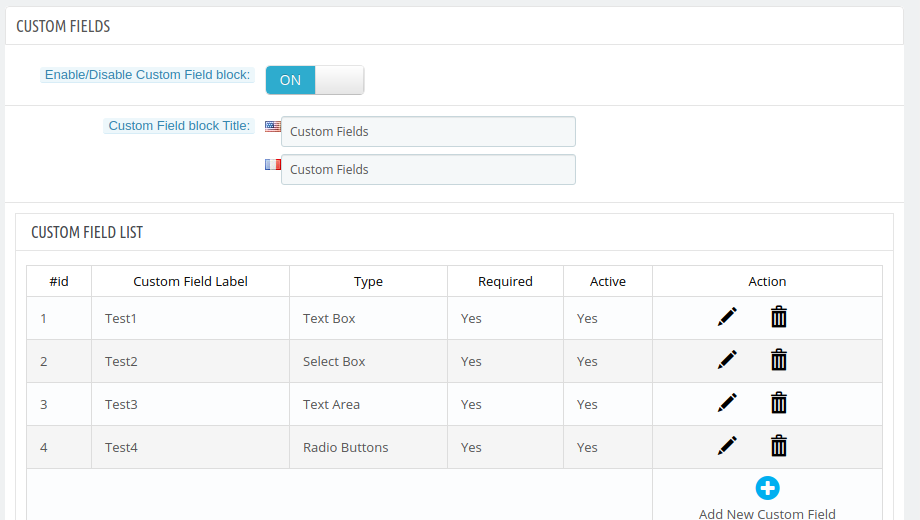
3.17 Custom Field
In the updated version, the online store merchant can also create custom fields from the admin interface. They can add, update and delete custom fields.
The online merchant can click on add new custom fields for creating new custom fields. After clicking on this, the admin will get these options as shown below:
The online merchant can enter these details and create a field as shown below:
- Field Label: Enter Field Label in multiple languages.
- Help Text: Set Help text in various languages.
- Type: Select from available field type. Admin can select from the text box, select box, text area, radio buttons and checkboxes.
- Default Value: Enter the default value here.
- Validation Type: Select from available validation type. Admin can set none validation type, isint, isname and isemail validation type.
- Required: Admin can set any field as required field.
- Active: Admin can enable or disable any field.
3.18 Other Plugins
As the admin clicks on this “Other Plugins” tab, they will be redirected to the Addon store where they can buy other plugins for their Prestashop store.
4.0 Front End Module
After enabling the Prestashop Reward Point module the front-end user will see a link in the header of the front-end through which the user can navigate to a new page.
The link in the header of the front-end will appear as follows:
For Version 1.6-
The link for the Returns Manager page will also appear on the ‘My Account’ page of any customer. This link only appears to a logged-in customer on the ‘My Account’ page.
For Version 1.6-
For Version 1.7-
When the customer clicks on this link then a new page will open based on the logged-in status of the customer.
In case the user is a guest and is not logged into the website then the page will contain a form to find the order as follows:
For Version 1.6-
After proving the order reference number and the respective email the details of that order will appear including the return history based on the email provided by the customer. The order details will appear as follows:
For Version 1.6-
There will be a popup on which customers can add details for generating the return request.
For Version 1.7-
The products that are eligible for return in that particular order will have a return button. Through this button, the customer can apply for the return of that particular product.
On clicking on the Return button a pop-up will appear containing the form for return of that particular order. The form will appear as follows:
This PrestaShop Return Manager addon allows the customer has to fill the above form and then click on submit then a success form will appear showing the successful submission of the return request as shown below :
– In case the user is a registered customer and is logged into the website then the page will contain a list of all the orders placed by the customer. The page will appear as follows:
For Version 1.6-
For Version 1.7-
Customers can also generate a ticket for return related information.
For Version 1.6-
For Version 1.7-
In the updated version, the online users can select the product for return and also enter the details in custom fields s shown below:
While selecting the replacement option, the online users can get an option to select the products which he wants in return.
The online users can return overall order or return only selected product which he wants to return.
The online users can also return the whole order if he wishes to do so.
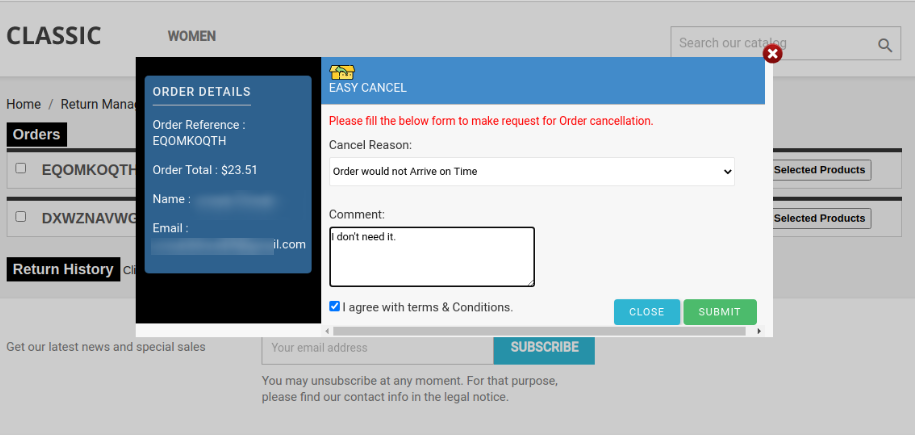
Order Cancellation:
The online users gets an option to cancel the order for a short period. The customers need to go to the My Account >> Return Manager section to cancel the order as shown below:
The online users can select from the listed reasons and also write their comment for order cancellation.
After submitting the request, users can view this message:
Once the online merchant approves the request, the user will view the status as canceled and also get an email notification while requesting the order cancellation and approval/decline.
5.0 Recommendations
1. Refresh the home-page of your store every time you enable/disable plugin.
2. If the Prestashop product return manager is not working after installation then please check permissions on the modules folder. The folder should be writable. Please make the folder permission to 755.
This way, Knowband’s Prestashop return manager module makes return management simple and hassle-free for the online store admin. This feature-rich Prestashop addon offers a simple and user-friendly platform for handling return requests. At the same time, it makes the overall return process simple for online users. The online users can easily create return requests and also generate tickets for followup. This PrestaShop Return manager module is mobile responsive and offers smooth functioning.
You can try Prestashop addon for on your Prestashop website. Prestashop Return Product extension helps you increase customer engagement to your store & increase brand awareness.
For more details about Prestashop return manager Module, please visit here:
Prestashop return manager Module Link
Prestashop return manager Extension Admin Demo Link