1.0 Introduction
OpenCart Google Shopping Integration Plugin by Knowband offers an excellent and fully-functional integration solution to the OpenCart store admin. Further, he can list and display their products on Google sponsored ads. In fact, the most advanced OpenCart Google Shopping Integration module offers an easy way to display your products on Google Shopping. Moreover, get thousands of new customers on your online shop.
1.1 Merchant Benefits of Knowband’s OpenCart Google Shopping Integration Plugin:
- OpenCart Google Shopping Marketplace Integration allows the store admin to well-rank their products on Google Shopping in the shortest time.
- OpenCart Google Shopping Marketplace Integration Module makes it easier for the store admin to connect the store and list the products.
- The OpenCart Google Shopping Marketplace Integration Extension makes it easier to set up the connection. Further, this happens in a few simple steps.
- OpenCart Google Shopping Marketplace Integration Plugin offers profile-based product upload. Thus, the products can list in bulk and inventory is manageable with ease.
- With the help of the Google Shopping OpenCart Integration, the store admin can map the categories of the OpenCart with the category of Google Shopping.
- Multiple categories of OpenCart are mappable with a single category of Google Shopping via Google Shopping OpenCart API Integration.
- The admin can remove the category at a single click from the back-end of the OpenCart Google Shopping API Integration.
- The attributes of the products are mappable with the attribute of Google Shopping with the help of the Google Shopping OpenCart Connector.
- OpenCart Google Shopping synchronization module can upload thousands of products in one go. In fact, the products of the mappable category can upload in bulk.
- The inventory is manageable from the back-end of the admin interface of the OpenCart Google Shopping Integration plugin. Further, the products can remove easily.
- OpenCart Google Shopping Connector allows the merchants to create feeds and schedule their uploads.
- The admin can set the country and the corresponding language for feed.
- The Google Shopping integration module allows for easy integration. In fact, the admin can download the feed file and upload it to Google Merchant Center.
- In case the admin is not comfortable with a cron job, the admin can get manual synchronization. Additionally, the synchronization happens page-wise with the help of Google shopping OpenCart integration.
- The audit report offered by the OpenCart Google Shopping feed synchronization extension allows the admin to keep a track of the various task being performed in the back-end.
- The admin can see the errors that occurred while product listing with the help of the OpenCart to Google Shopping Synchronization.
2.0 How to install the OpenCart Google Shopping plugin?
1. Download the zipped file of the OpenCart Google Shopping module from OpenCart & unzip it into a folder. Further, after unzipping the folder structure of the Google Shopping plug-in will be similar to shown in the below screen.
4. Give write permission (775 OR 777) to the google shopping folder and its subsequent folders. the google shopping folder can be one of the locations mentioned below.
system/google shopping
5. The OpenCart Google Shopping extension is now ready to be installed in your OpenCart store.
7. To access the Google Shopping plugin, Click on the edit button in of OpenCart Google Shopping module as shown below.
3.0 Admin Interface
The OpenCart Google Shopping Integration plugin offers several configuration options that allow the store admin to connect their store. Moreover, list their products. Further, the various customization tabs offered by the Google Shopping OpenCart Integration extension includes:
- Connection Settings
- General Settings
- Profile Management
- Feed Management
- Product Listing
- Synchronization
Lets us discuss the various tabs one by one.
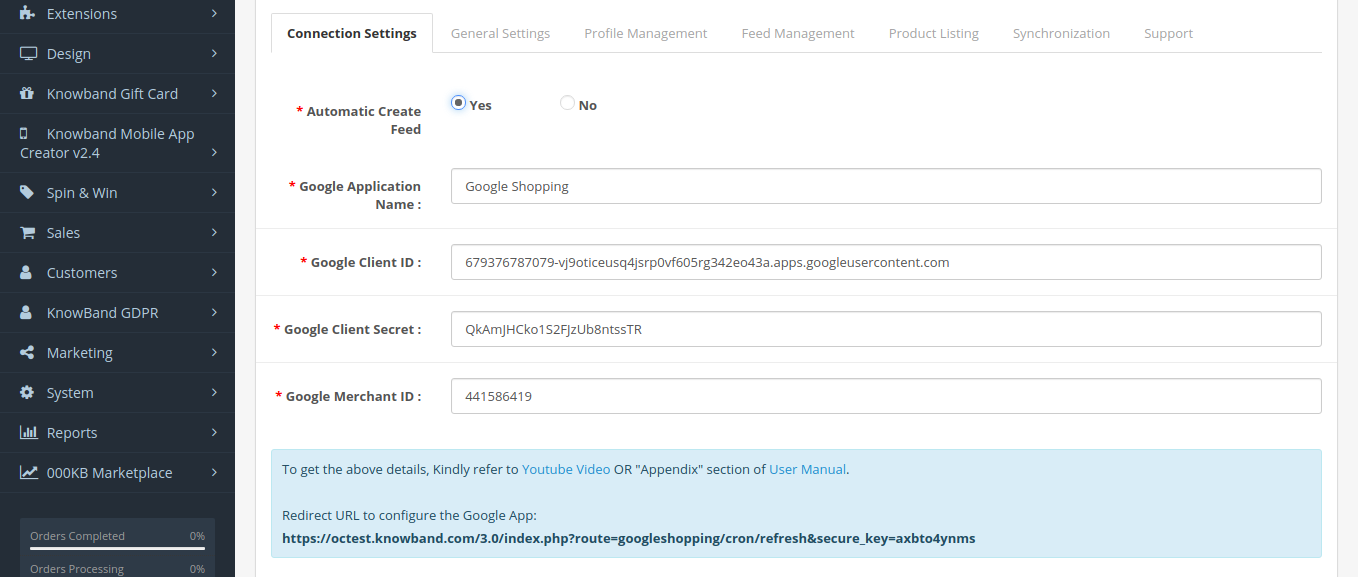
3.1 Connection Settings
On the connection settings page, there is an option provided “Automatic Create Feed Yes, No.
- If it’s set to Yes, then only the connection settings field will display. Moreover, If it’s set to No, Fields will hide there is no need to add the Google Credentials.
- Google Application Name: Enter the name of the project/application that you created for Google Shopping. (See Appendix)
- Google Client ID: Enter the Client ID that will authenticate the connection between the store and Google Merchant. By default empty but required field. (See Appendix A)
- Google Client Secret: Enter the client secret to set up the connection. By default empty but required field. (See Appendix A)
- Google Merchant ID: By default empty but required field. Here, you will provide the merchant ID of your Google merchant center account.
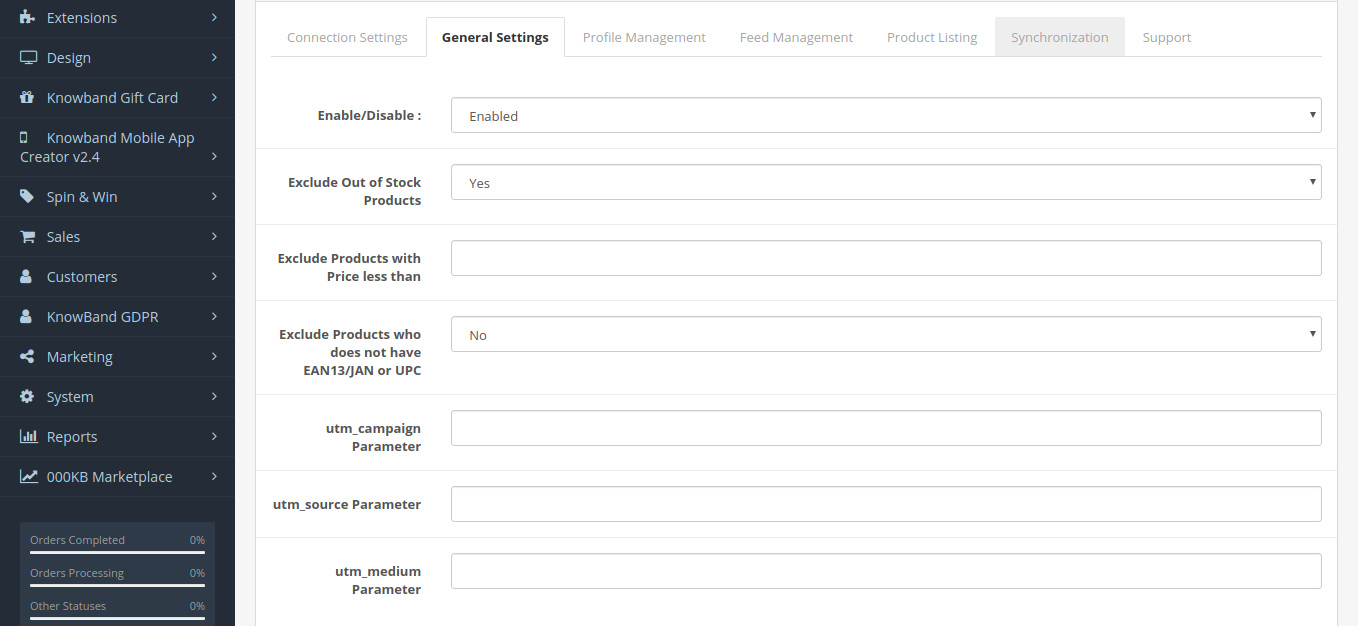
3.2 General Settings
The General Settings tab of the Google Shopping OpenCart Integration plugin allows the admin to make some basic changes and authenticate the OpenCart Google Shopping integration.
- Enable/Disable: Enable/disable the OpenCart Google Shopping integration plugin by selecting the options from the drop-down menu.
- Image Size of Product: Select the default size of the images from the drop-down menu.
- Exclude Out of Stock Products: Select Yes from the drop-down menu if you want to exclude the out-of-stock products. In fact, if yes is selected, then, the products that are not in the inventory will not display in the Google search results.
- Exclude Products with Price Less than This field enables you to exclude the products whose price is below a specified limit. For instance, if the admin enters the amount ‘X’ here, then, any product whose price is below ‘X’ will not display in the Google Shopping results.
- Exclude Products that do not have EAN13/JAN or UPC: If you want to exclude the products that do not have EAN13/JAN or UPC, then, select Yes.
- Sync Type: Select the type of synchronization from the drop-down menu.
- Utm_campaign, Utm_source, Utm_medium Parameter: Enter the UTM for tracking the performance.
- Select your Default Language: Select the default language that you want to use for feed synchronization. Therefore, the OpenCart Google Shopping Feed synchronization extension offers multi-lingual support.
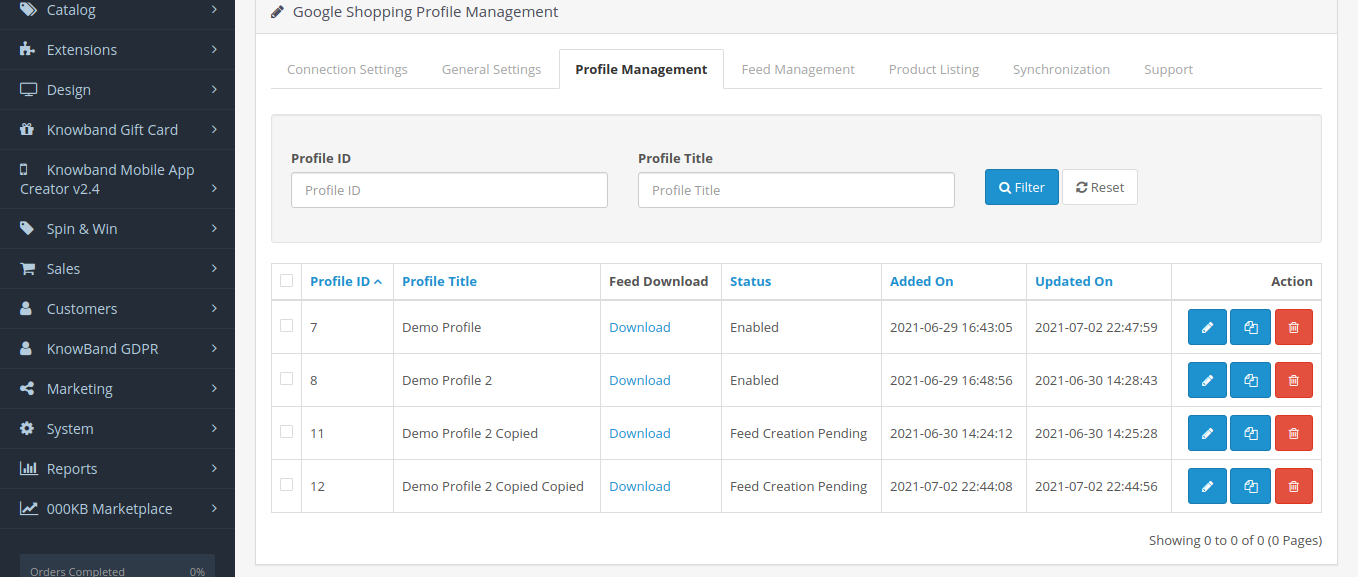
3.3 Profile Management
In the “Profile Management” tab clicking on the copy link again, the profile will copy the profile data. However, the profile will be disable. Store category will also not be copied. Further, once the store category will be selected in the copied profile the status will change to enabled.
3.3.1 How to Create New Profiles?
To create a new profile, click on the ‘+’ sign on the top right position of the admin interface of the OpenCart Google Shopping Feed synchronization plugin.
On clicking, you’ll head to the profile creation page. Further, the various fields are discussed in detail below:
- Country: Select the country where you want to showcase the products of the profile in the Google Shopping section.
- Language: Select the language for profile creation.
- Currency: Select the currency in which you want the price of the products to display.
- Profile Title: Enter a title for the respective profile.
- Google Category: Select the category of Google that is to map with the categories of the OpenCart store.
- Store Category: OpenCart Google Shopping connector offers one-to-many category mapping. In fact, select the categories of the store that you want to map with the selected category of Google.
- GTIN: Select the unique field mapping for the product attributes. Furthermore, the Google Shopping OpenCart connector will identify the products according to the mappable attribute.
- Material: Select the material of the product from the drop-down list.
- Pattern: Choose the pattern from the list.
- Gender: Select the Gender for which the product is intended. In fact, the various options list in the drop-down list.
- Age Group: Select the expected age group of the users of the product.
- Adult Content: Specify if the product has any adult content or not.
- Color: The color attribute describes the color of the product. Further, these attributes help create accurate filters and narrow down the search results.
- Size: The size attribute specifies the standardized size of the product.
- Size Type: The attribute describes the cut of your product. In fact, this helps create accurate filters.
- Size System: With this attribute, you can explain which country’s sizing system your product uses.
- Product Shipping: Select the type of shipping rate that is to be charged.
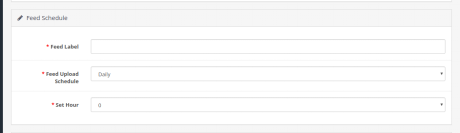
In addition, the Feed Schedule option is now provided under the profile creating a page. Further, no need to create the feed separately under the Feed Management tab.
- Feed Label: Enter a unique name for the feed.
- Feed Upload Schedule: Select the schedule for the feed synchronization.
- Set Hour: Set the Hours of the days for the feed upload schedule.
3.3.2 How to Edit/Delete the Profiles?
The admin can easily edit or delete the profiles from this section of the OpenCart Google Shopping integrator. In fact, to do so, click on the ‘Edit’ or ‘Delete’ button corresponding to each profile.
3.4 Feed Management
The Google Shopping OpenCart integrator offers a user-friendly interface to manage the feeds. Further, the admin can create feeds and sync the same with the Google Merchant Center with the least hassle.
3.4.1 How to Create new Feeds?
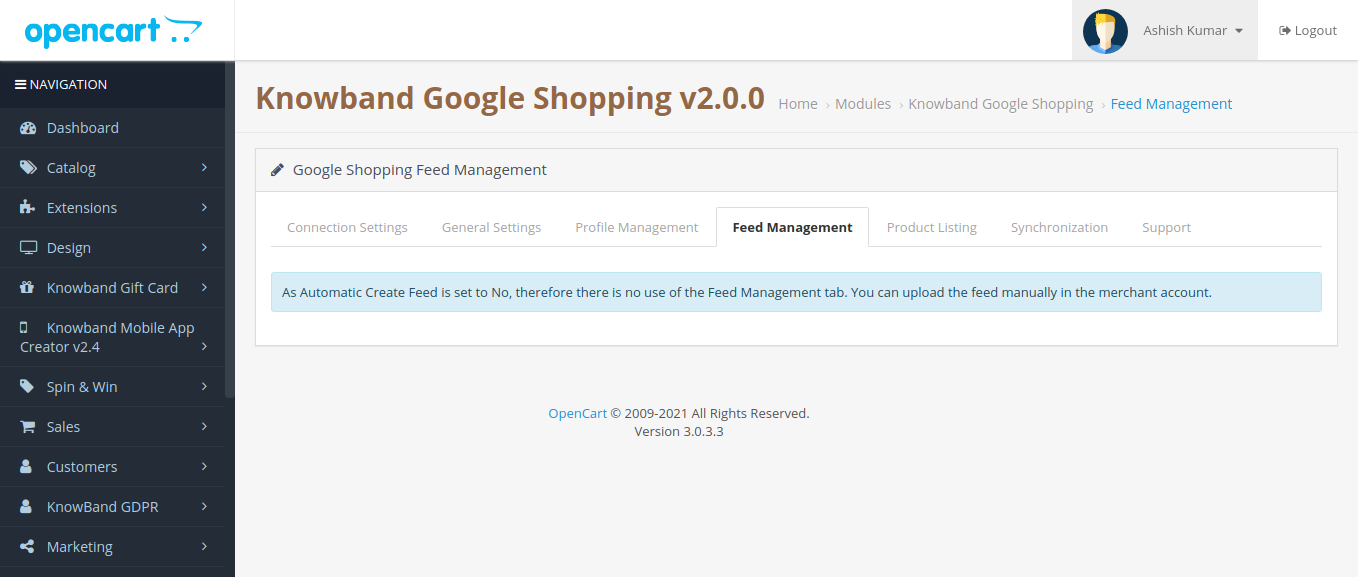
If the Automatic Create Feed is set to No, then in the “Feed Management”, Show the message “As Automatic Create Feed is set to No, therefore there is no use of the Feed Management tab. In fact, you can upload the feed manually in the merchant account”.
If the Automatic Feed is set to No, then the Feed URL will be generated so that customers can copy the feed URL & create the feed in the Google Merchant account manually.
Synchronize the feeds by executing cron in the synchronization section of the OpenCart Google Shopping integration plugin. (See Section 3.)
3.4.2 How to Edit/Delete Feeds?
To edit/delete the feeds, click on the Edit or Delete corresponding to each feed as shown in the image below:
3.4 Product Listing
The product listing is available in this tab of the Google Shopping OpenCart integrator.
You can renew or remove the products by clicking the ‘Relist’ or ‘Remove’ button corresponding to each product.
The admin can even view the errors that occurred while product listing by clicking on the ‘View Error’ button.
The listing status specifies the status of the products. The status of the products can be synced from Google Shopping by executing cron in the Synchronization tab of the Google Shopping OpenCart connector. (See Section 3.5)
3.5 Synchronization
The cron jobs offered by the OpenCart Google Shopping feed integration module allow the admin to keep everything up-to-date without any manual synchronization.
- Feed Synchronization: This cron job allows the admin to sync the feeds on Google Shopping.
- Product Status Synchronization: Product Status CRON will also give the message that “This functionality is not available as Automatic Create Feed is selected NO in the Connection Settings Tab”. In case, the Automatic Create Feed is set to Yes, then it will synchronize the Product Status from Google Merchant to the Knowband module.
Appendix
How to Create Google Shopping Account?
Before uploading your products on Google shopping, you must have your Google merchant account. If you don’t have then please follow the below URL:
Follow the instructions given on the above URL and create your account.
After creating your account, you will head to your merchant center homepage as shown in below screen:
Copy your merchant id highlighted in the above screen and save it in module configurations.
Verify your Website for Google Merchant Account
This verification process is a compulsory process to upload your products to Google Shopping. If you do not verify your site then the module will not be able to upload products and may result in an error.
To verify your website, please follow the below instructions:
Step 1: Go to the “Business Information” tab in your Google Merchant Account.
Step 2: Under the “About Your Business” tab, provide the URL of your store. For example, https://www.example.com. Save URL.
Step 3: After saving a website URL, Under the “Website” tab, click on the “Claim Your Website” link. Furthermore, this will show you the link to an HTML file. Hence, download this file and upload it to your root directory of the store.
Step 4: After uploading the HTML file, execute the URL given by Google in step 3.
Step 5: Click on the “Verify & Claim” link.
How to get Client ID and Secret
To get a Google client id and secret you need to create a project in a Google developer account. Further, please go to the below URL to sign in to the Google developer account.
https://console.developers.Google.com
On the above URL, create a project by clicking the link shown in below screen:
Step 1: Name your Project Name. In addition, click on the “Create” link. Furthermore, after creating a project, Google will redirect to the same page and your new project will be selected.
Step 2: Go to the library tab, search for “Content API for Shopping ”. Furthermore, enable this API for this project.
Step 3: Click on the “Credentials” tab. Therefore, this tab will show 3 tabs.
Stage 4: Set your application name in “OAuth Consent Screen” and save it.
Step 5: Click on the “Credentials” tab. Moreover, click on the “Create Credentials” button.
Step 6: After clicking the “Create Credentials” button, Google will be shown credentials type options. In fact, choose “OAuth client ID”.
Step 7: Set application type as “Web Application”.
Step 8: Set the “Authorized Redirect URIs” field. Further, your redirect URI is given on the module configuration page. Additionally, please copy from there and paste it into this field.
Step 9: Click on the “Create” button. After saving credentials, Google will generate the client id and secret for you. Copy and paste them into the corresponding field in module configuration.
Note: For more detailed instructions, follow URL https://developers.Google.com/identity/sign-in/web/devconsole-project
Note: If you are getting an error while getting your refresh token. Further, please also try after “Allowing Less Secure App” in your Google account.
In fact, For more values, please follow the below URL and read the documentation:
https://support.google.com/merchants/answer/7052112?hl=en
Click Here for Module Link.
Click Here for Admin Demo.