
1.0 Introduction
Collecting customer data without a reliable solution results in missed feedback, unanswered enquiries, and lead-generation opportunities that go nowhere. Whether you need a basic contact form, a product feedback form, or a post-purchase customer satisfaction survey, the OpenCart Form Builder extension handles it all from one place.
This OpenCart Form Builder extension lets store owners create unlimited forms without writing a single line of code. Contact forms, survey forms, registration forms, lead generation forms, every data collection need an eCommerce store has is covered. This OpenCart contact form plugin works equally well for both small and huge businesses.
Form creation, spam protection via Cloudflare Turnstile, email notifications to admins and customers, Mailchimp and Brevo integration, form submission management, and IP and email blacklisting. The Knowband OpenCart Survey Extension covers the full workflow, use it as your OpenCart contact form plugin, survey tool, or lead capture form, all from one extension, without needing separate solutions for each job.
2.0 Installation Guide
System Requirements
Before installing the extension, confirm your environment meets the following:
- OpenCart version 3.x
- A working email configuration in your OpenCart admin panel
Installing the Extension
Step 1: Download the ZIP file and log in to your OpenCart admin panel.
Step 2: Go to Extensions, then Installer. Click the Upload button, select the ZIP file, and confirm. OpenCart processes the upload automatically.
Step 3: Once the upload completes, go to Extensions. Select the extension category from the dropdown. Find OpenCart Form Studio in the list and click Install.
Step 4: After installation, click Edit to open the extension configuration panel.
Step 5: If the extension does not appear in the list, clear your OpenCart cache under Dashboard, then click the blue cog icon and select Refresh.
Common Installation Issues
Upload fails: The server is rejecting the file size. Ask your host to raise upload_max_filesize and post_max_size to at least 32 MB.
Emails not going out: Head to System, then Settings, then the Mail tab. The extension pulls from the store’s default mail setup unless you have set a form-level override.
The page looks broken: Run a browser cache clear and reset the OpenCart theme cache from the Dashboard refresh panel.
3.0 Admin Panel Overview
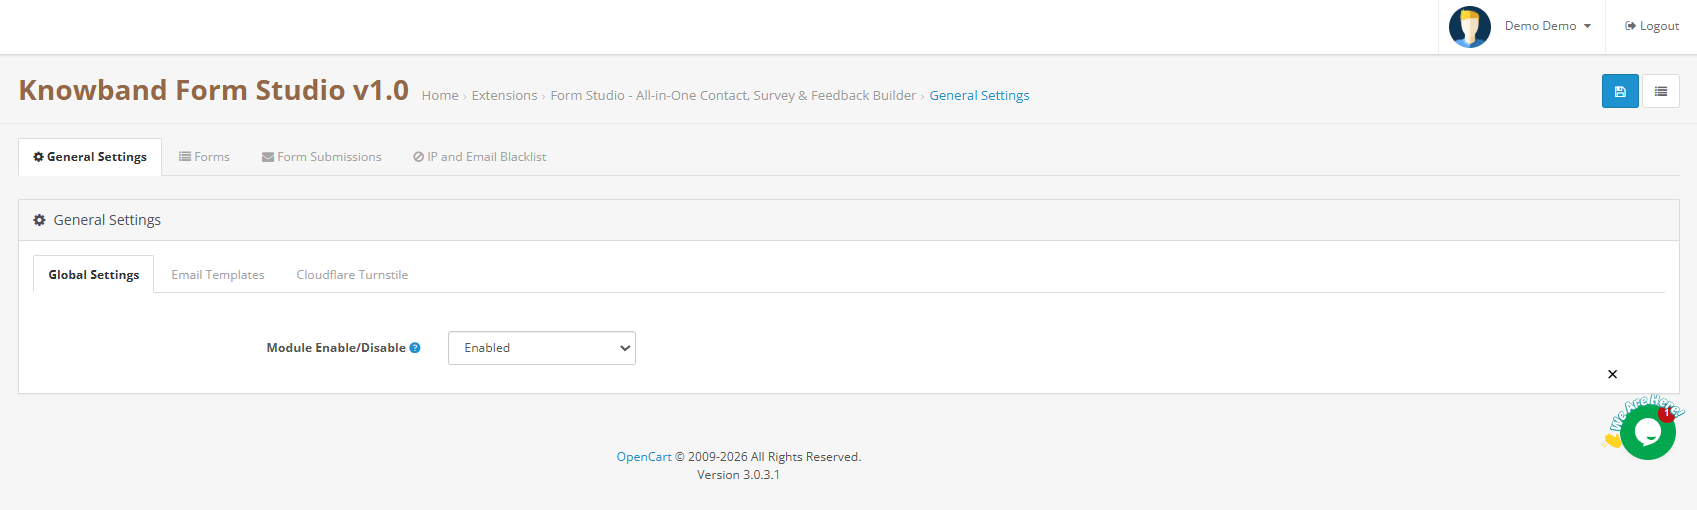
After installation, the extension adds four sections to the admin:
- General Settings: Turn the extension on or off, set global mail templates, configure Cloudflare Turnstile, and handle the IP and email blocklist.
- Forms: Build, update, and organise all forms. Each one has its own tab structure.
- Form Submissions: One view for every submission across every form.
- IP and Email Blacklist: Block addresses from reaching your forms entirely.
4.0 General Settings
The General Settings section has three sub-tabs: Global Settings, Email Templates, and Cloudflare Turnstile.
4.1 Global Settings
Module Enable/Disable: The main toggle for the OpenCart Survey Plugin. Set to Enabled to make all active forms live on the front end. Switching to Disabled hides every form from visitors without touching any saved data or configuration.
4.2 Email Templates
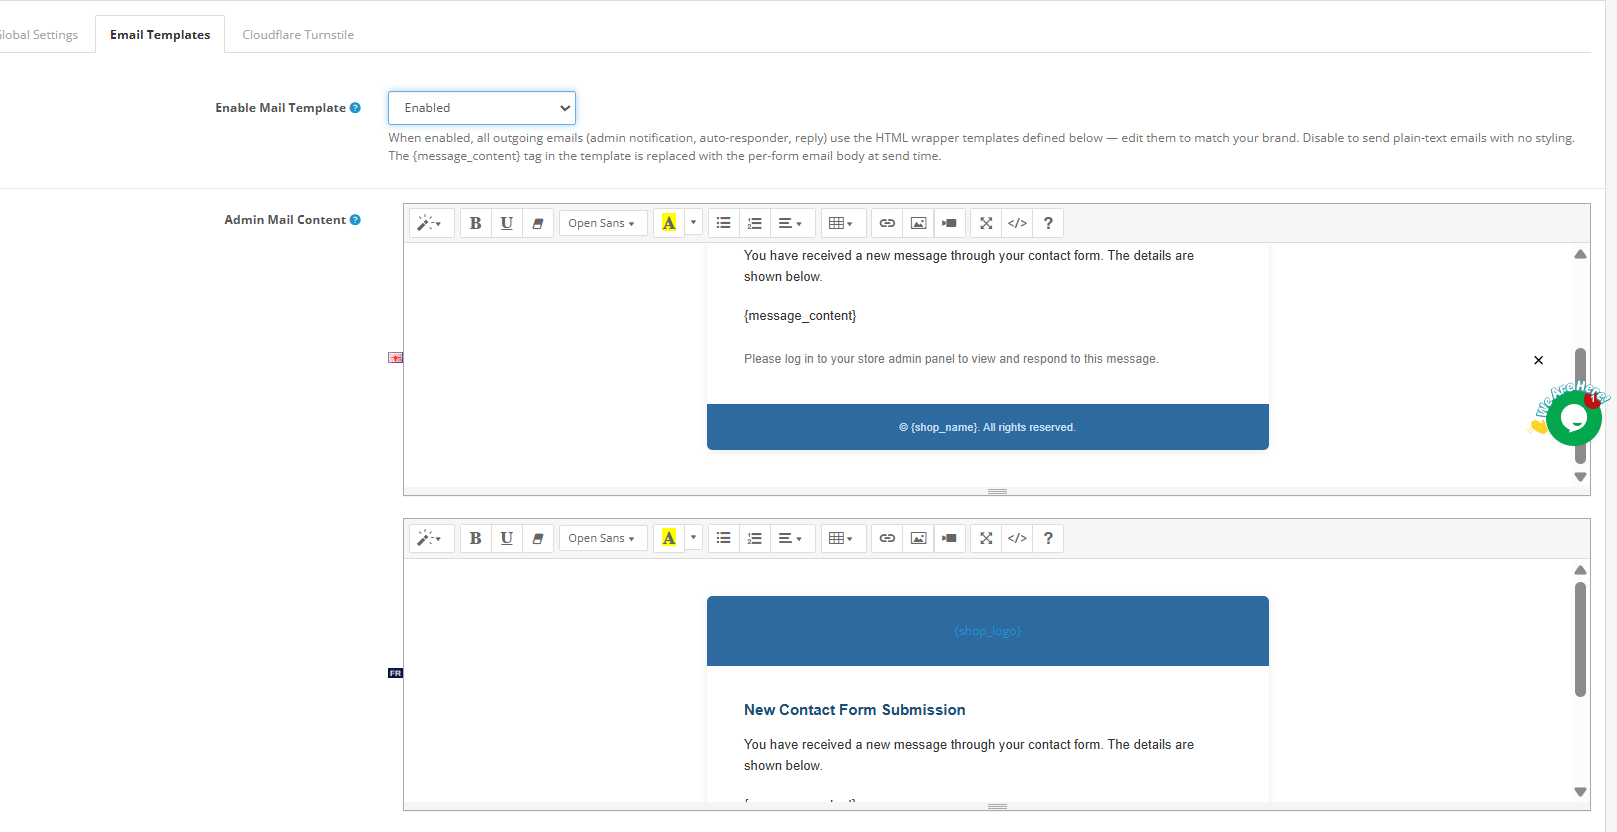
Enable Mail Template: Turns the global HTML email template system on or off. When enabled, all outgoing emails, admin notifications, auto-responder, and manual replies use the HTML wrapper templates defined in this section. Disable this to send plain-text emails with no styling. The {message_content} tag in the template is replaced with the per-form email body at send time.
Admin Mail Content: The notification your team gets on each submission. Write the subject and body in the rich text editor and click variable tags from the Template Variables panel to pull in field values from the submission automatically.
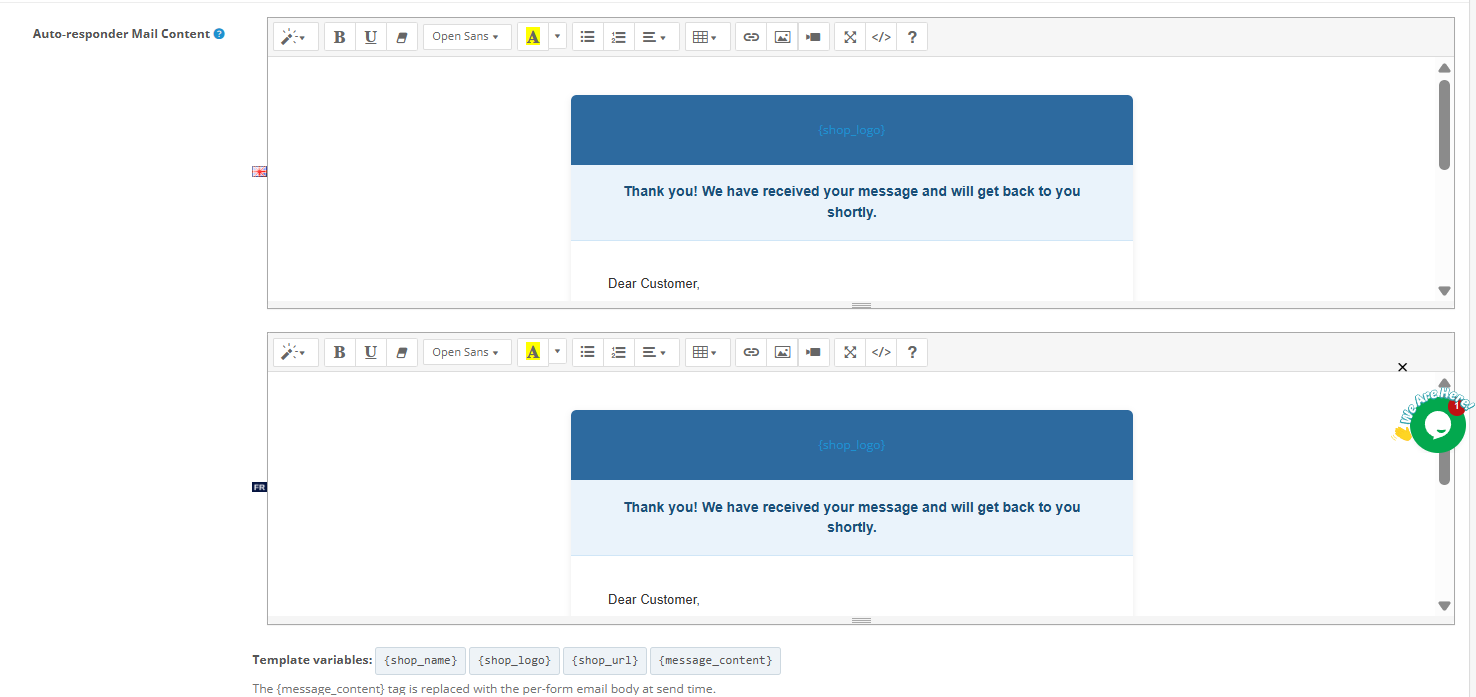
Auto Responder Content: Goes straight to the customer after they submit. Use it to confirm receipt, give them a timeframe, or point them to the next step.
Reply Email: Defines the layout for manual replies your team sends from the Form Submissions panel.
All three email templates support rich text formatting, including bold, italic, links, lists, and HTML, so the emails can match your store branding without any custom development.
4.3 Cloudflare Turnstile Spam Protection
Any public-facing form attracts bot submissions. This Cloudflare Turnstile OpenCart integration blocks automated submissions without showing customers any visual puzzle or CAPTCHA challenge. Real visitors go through without any extra friction.
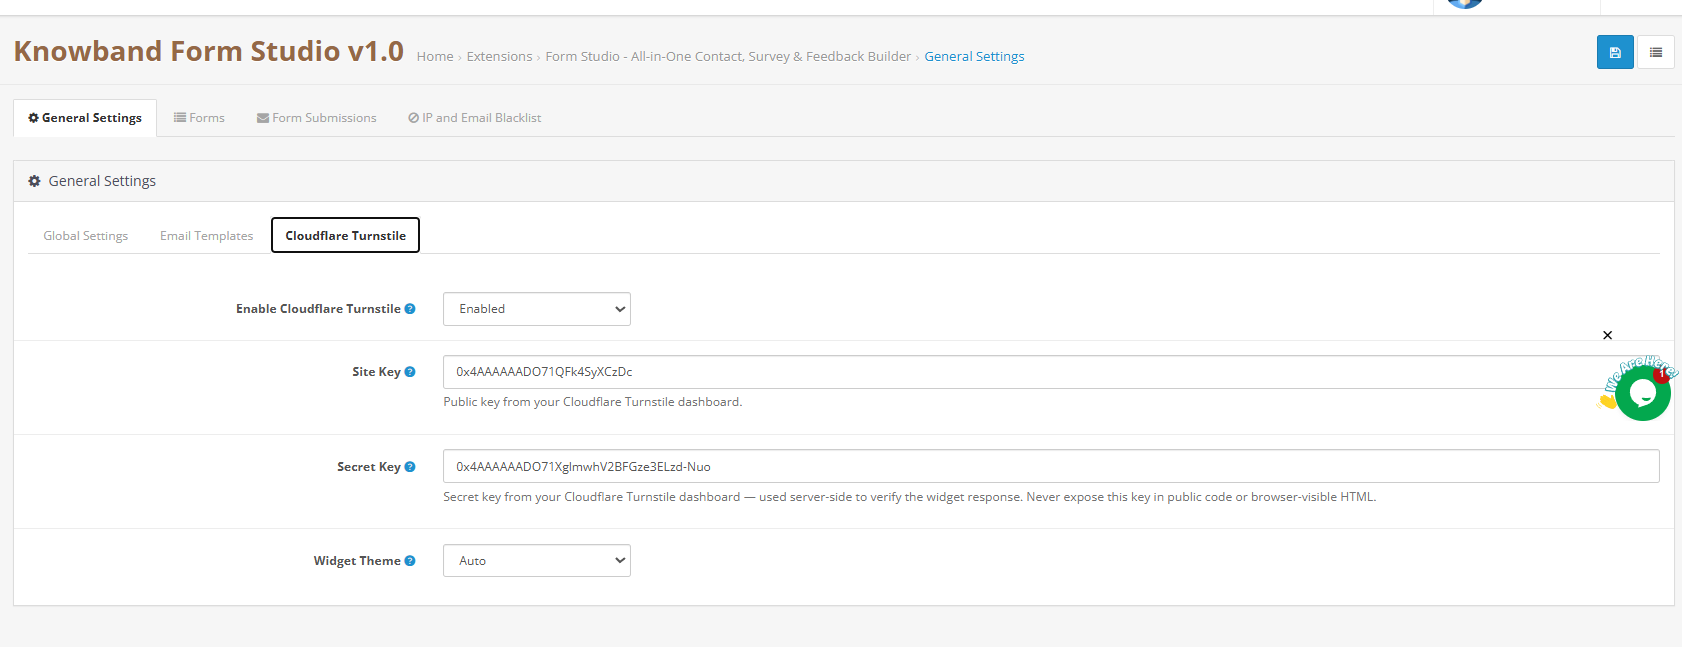
Switch the Enable Cloudflare Turnstile dropdown to Enabled, then paste the Site Key and Secret Key from your Cloudflare account into the fields provided. The Widget Theme can be set to Auto, Light, or Dark to match your store.
Steps to get your Cloudflare Site Key and Secret Key:
- Sign in to your Cloudflare account at dash.cloudflare.com.
- From the left menu, go to Protect and Connect, then Application Security, then Turnstile.
- Click Add Widget and fill in your domain details.
- Select a widget mode and finish creating the widget.
- Copy the Site Key and Secret Key that appear on the confirmation screen.
- Paste both into the Cloudflare Turnstile fields in the extension and save.
Once configured globally, the Cloudflare Turnstile field can also be added directly inside individual forms by dragging it into the form layout from the field selector.
5.0 Creating and Managing Forms
5.1 Forms List
The Forms section shows every form created using the OpenCart Form Builder. Each row in the list displays the form ID, title, short code, form URL, view count, message count, active status, and action buttons for viewing, editing, or deleting the form.
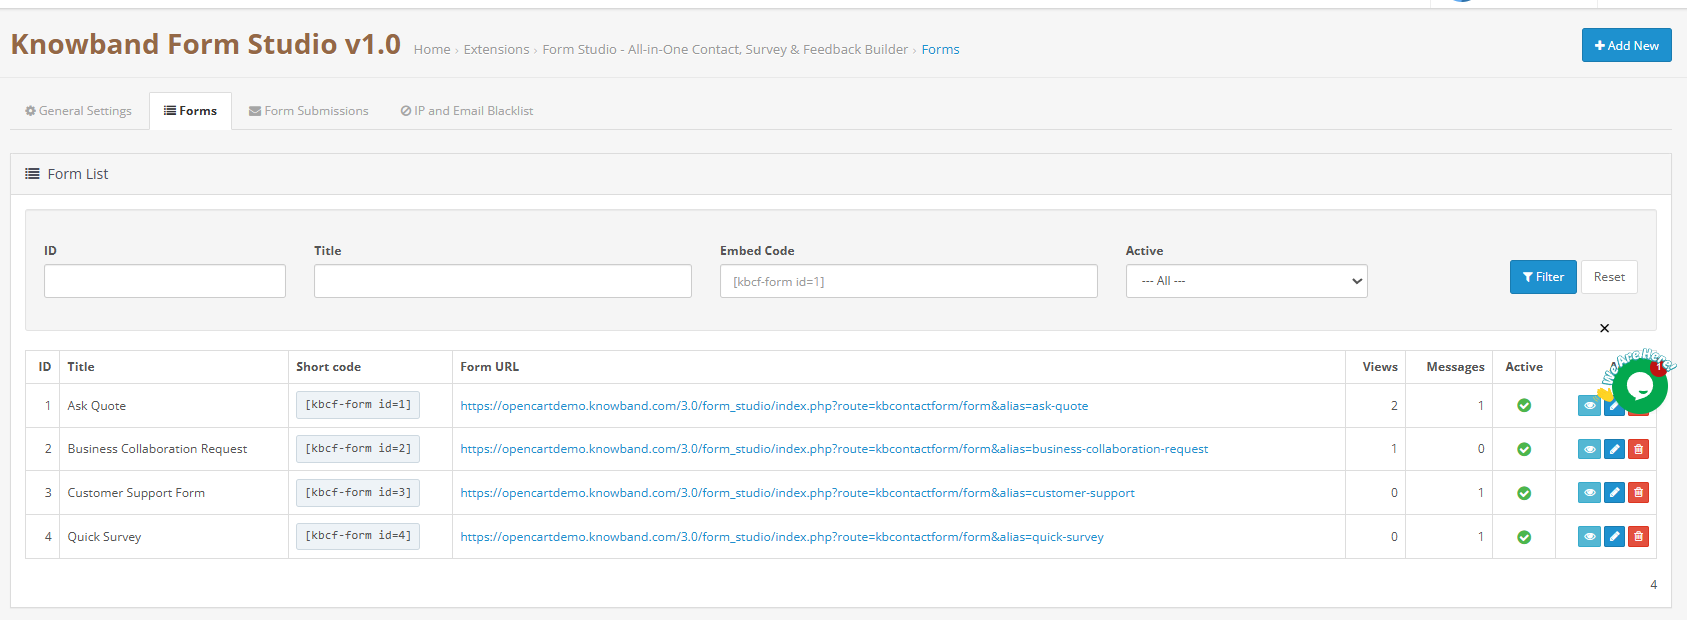
The short code column shows the embed code for each form in the format [kbcf-form id=1]. Paste this shortcode into any CMS page or content area in your OpenCart store to embed the form directly at that location without using the Placements tab.
Click Add New to create a form. Each form opens with eight configuration tabs: Info, Form, Mail, Notifications, Thank You Page, Settings, Placements, and Synchronization.
5.2 Info Tab: Form Identity and SEO Settings
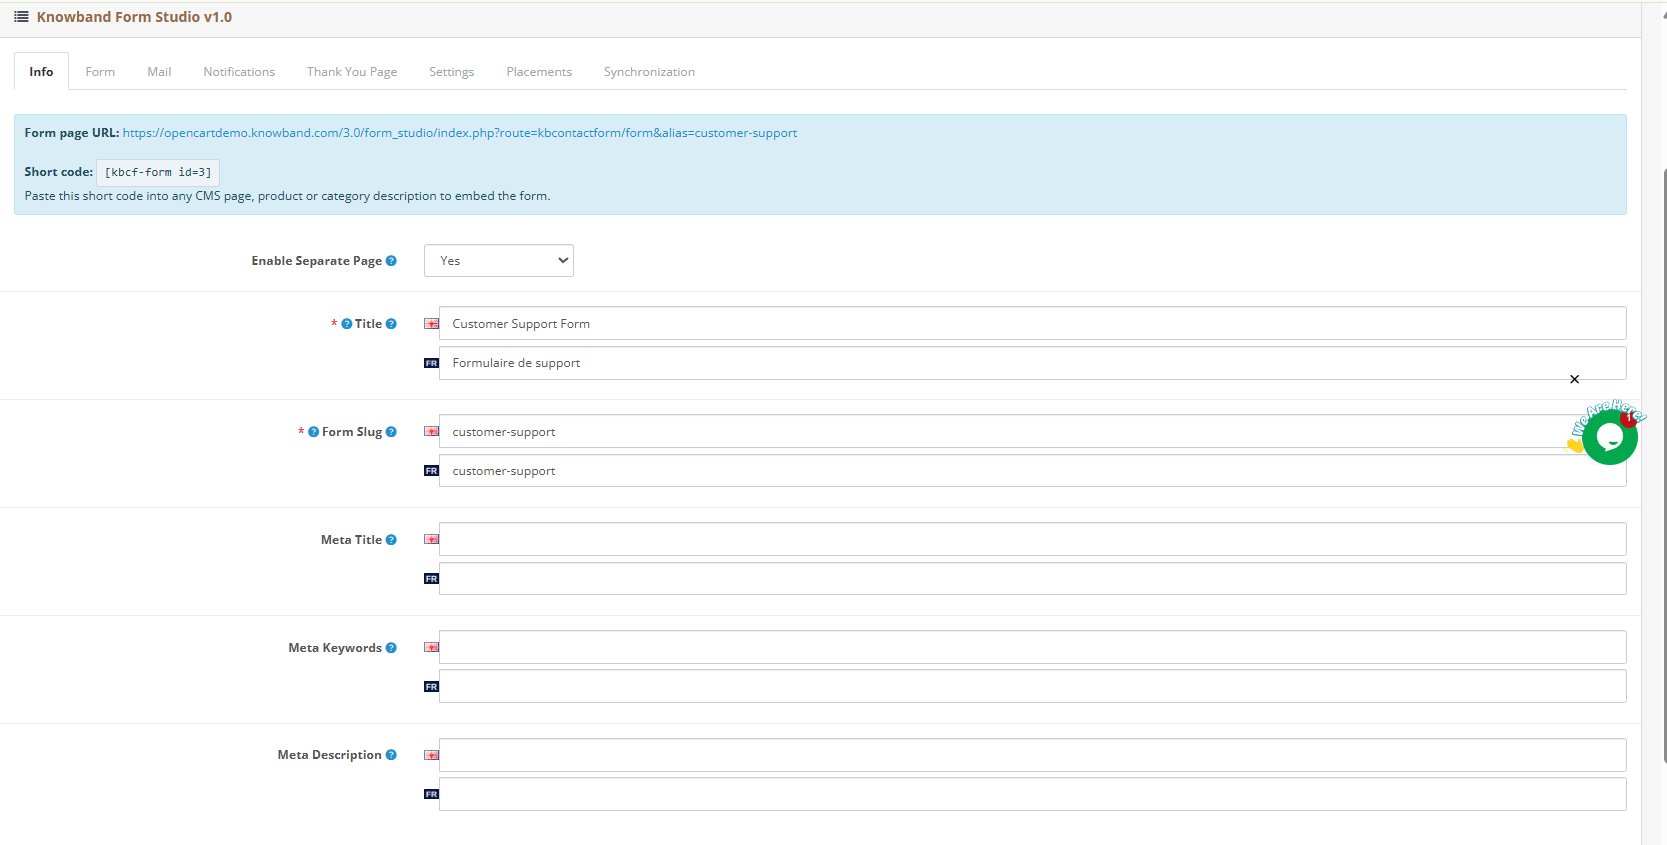
Enable Separate Form Page: When set to Yes, the OpenCart Form Creator generates a standalone page for this form with its own URL based on the slug you enter.
Form Title: The name displayed to customers above the form on the front end. Supports English and French language inputs.
Form Slug: The URL path for the standalone form page. For example, entering contact-us produces the URL yourstore.com/contact-us. Supports multiple languages.
Meta Title: The SEO title for the standalone form page. Supports multiple languages.
Meta Keywords: Meta keywords for the form page to support internal content categorisation. Supports multiple languages.
Meta Description: The search engine description for the standalone form page. Keep it under 160 characters.
5.3 Form Tab: Building the Form Layout
The Form tab starts empty with a prompt to add a row. Click Add Row to open the layout selector.
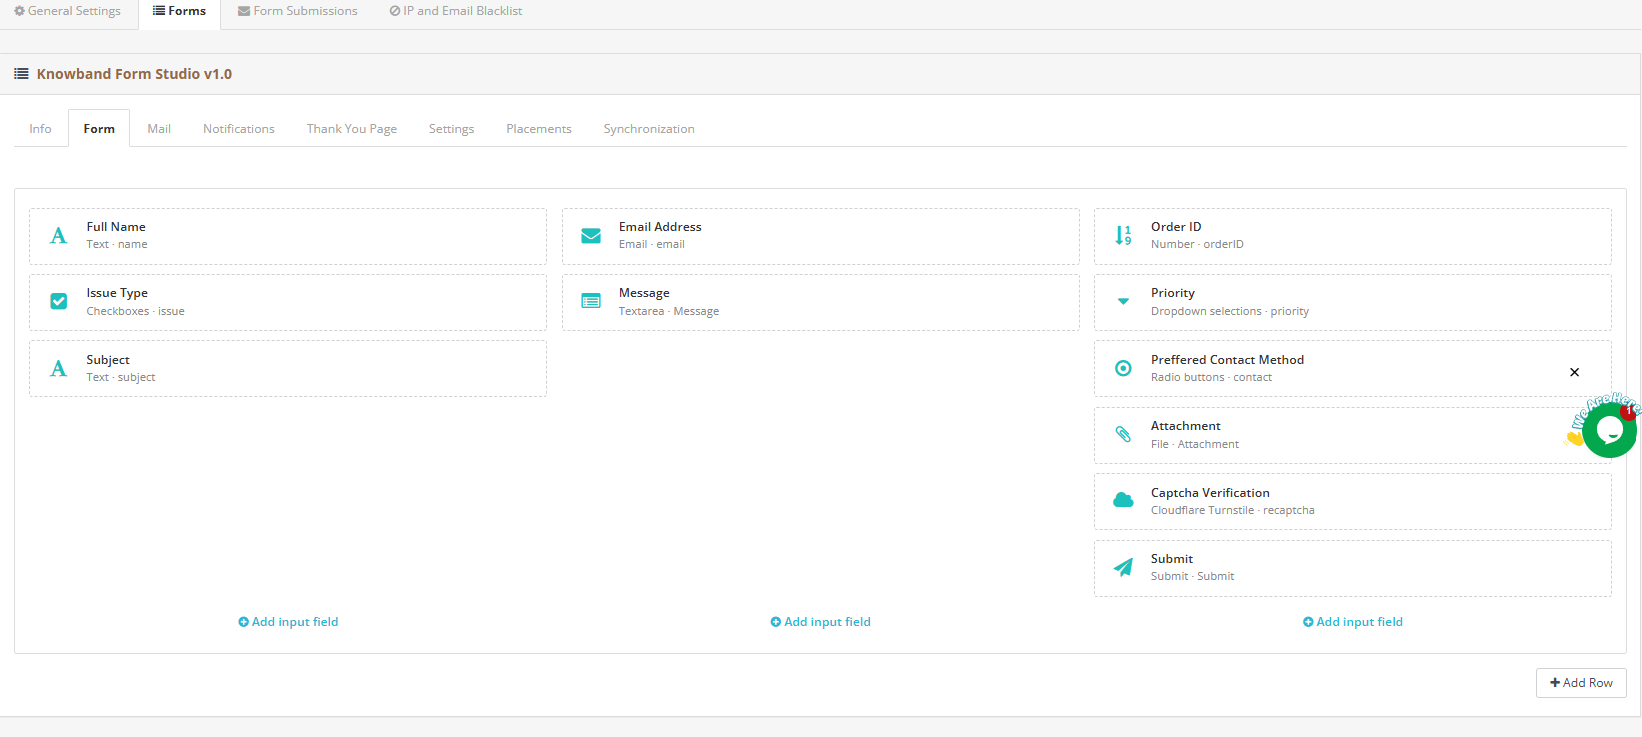
You can select any layout out of the 9 options available.
After adding a row, click Add Input Field inside any column to open the field selector.
Available field types:
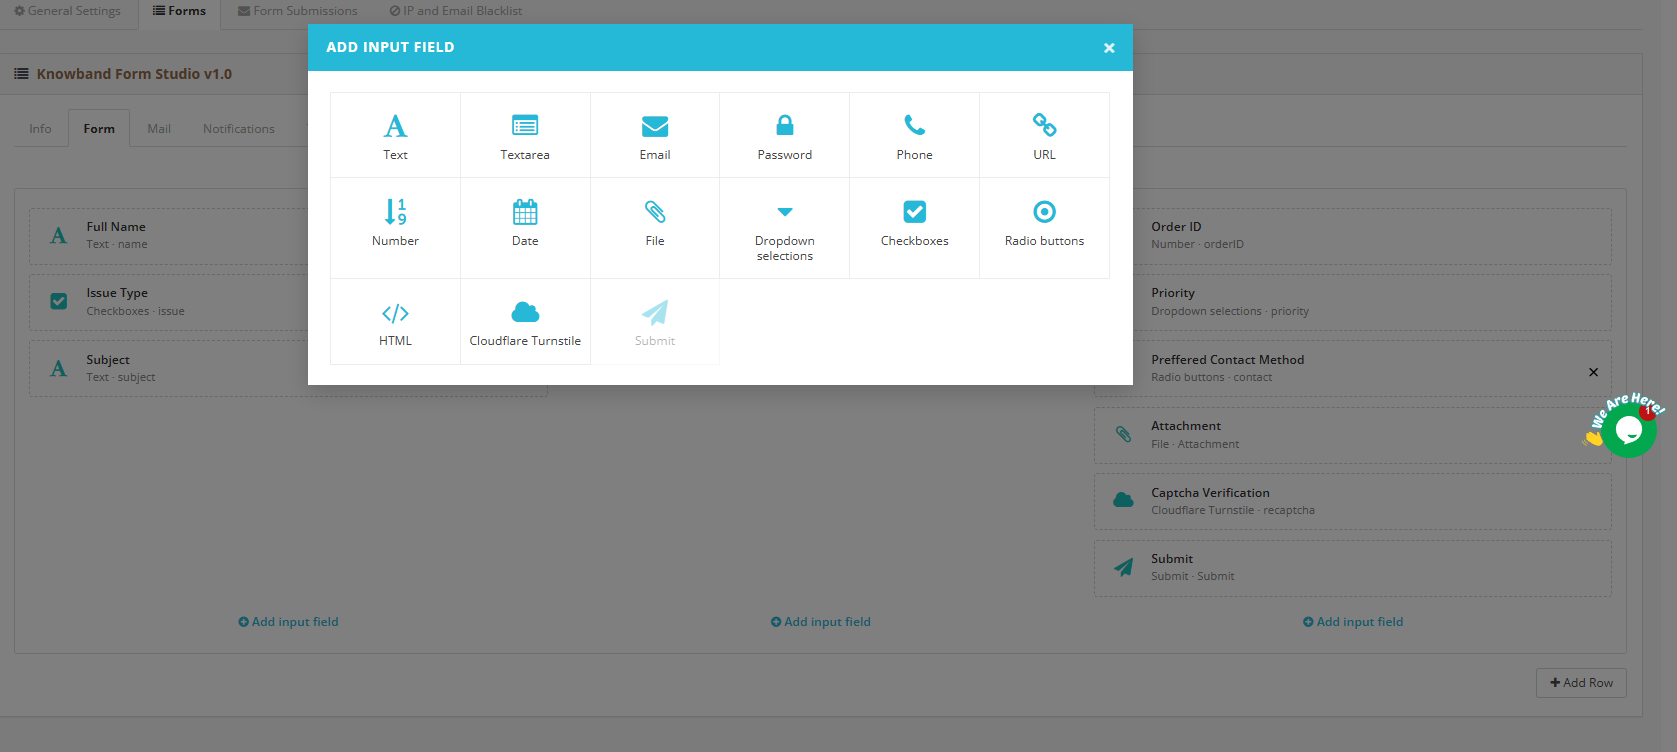
- Text: short written responses
- Textarea: long written responses
- Email: with format validation
- Password: masked input field
- Phone: phone number input with validation
- URL: web address input with format validation
- Number: numeric input with validation
- Date: date selection with format validation
- File: customer attachment uploads in formats you specify
- Dropdown selections: single-select multiple choice
- Checkboxes: multiple-choice
- Radio buttons: single-select with visible options
- HTML: embed custom markup or section headers inside the form
- Cloudflare Turnstile: Place the spam protection widget at a specific position
- Submit: trigger configured actions on form completion
5.4 Mail Tab: Per-Form Email Configuration
The Mail tab has two sub-tabs: Email to admin and Auto responder.
Email to admin handles the notification your team receives on each new submission. Configure:
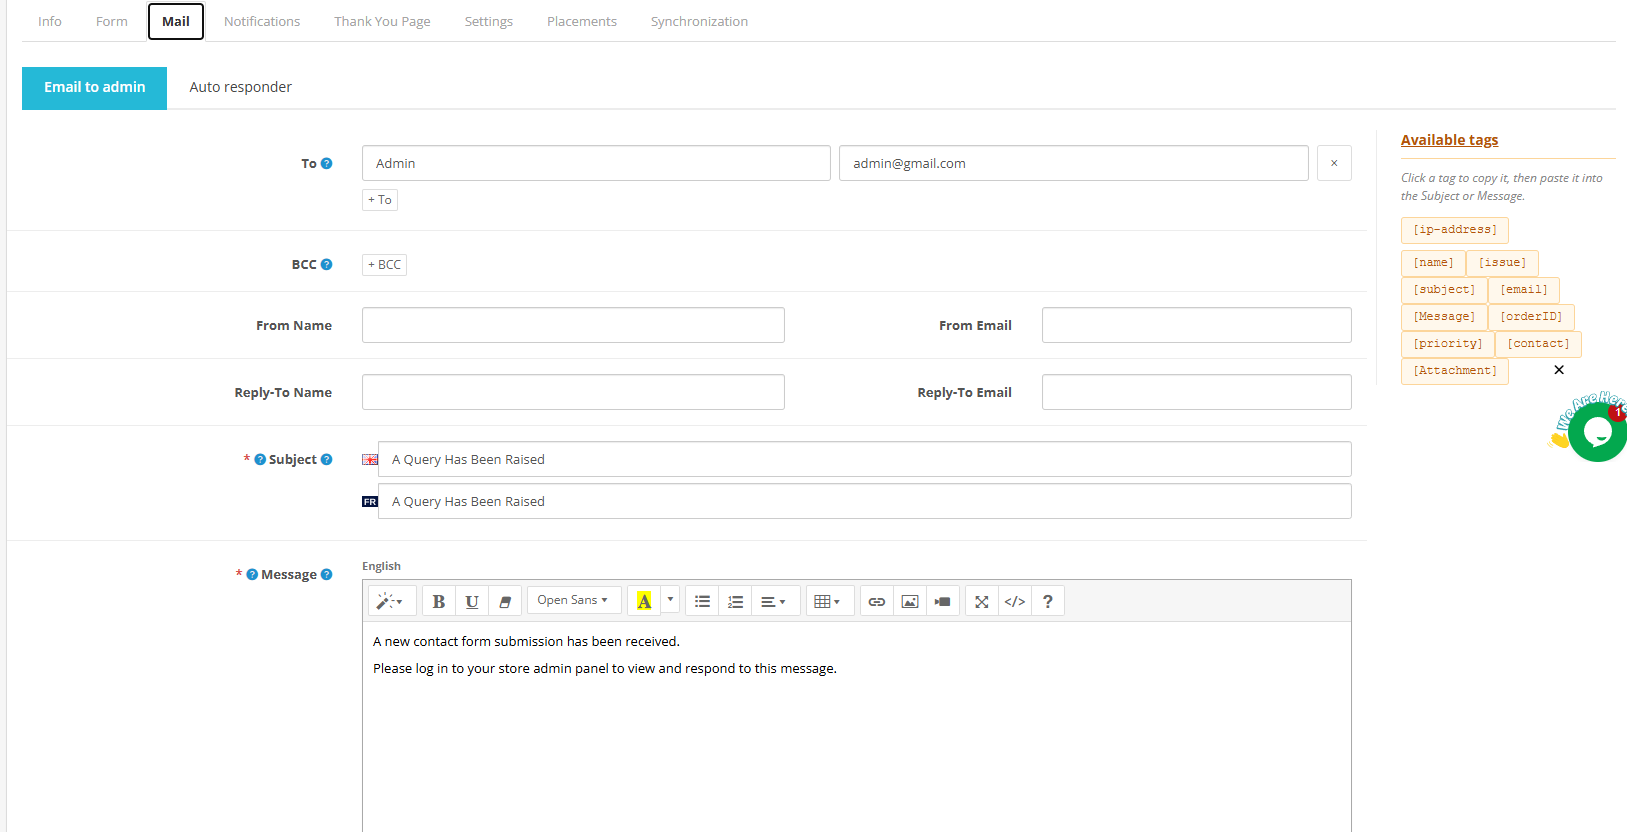
- To: Recipient name and email address. Add multiple recipients using the + To button.
- BCC: Hidden recipients. Add using the + BCC button.
- From Name and From Email: The sender identity shown in the notification.
- Reply-To Name and Reply-To Email: Where customer replies are routed.
- Subject: The email subject line. Supports English and French.
- Message: The email body is using the rich text editor. Supports English and French. Use the Available Tags panel on the right to insert dynamic values from the submission.
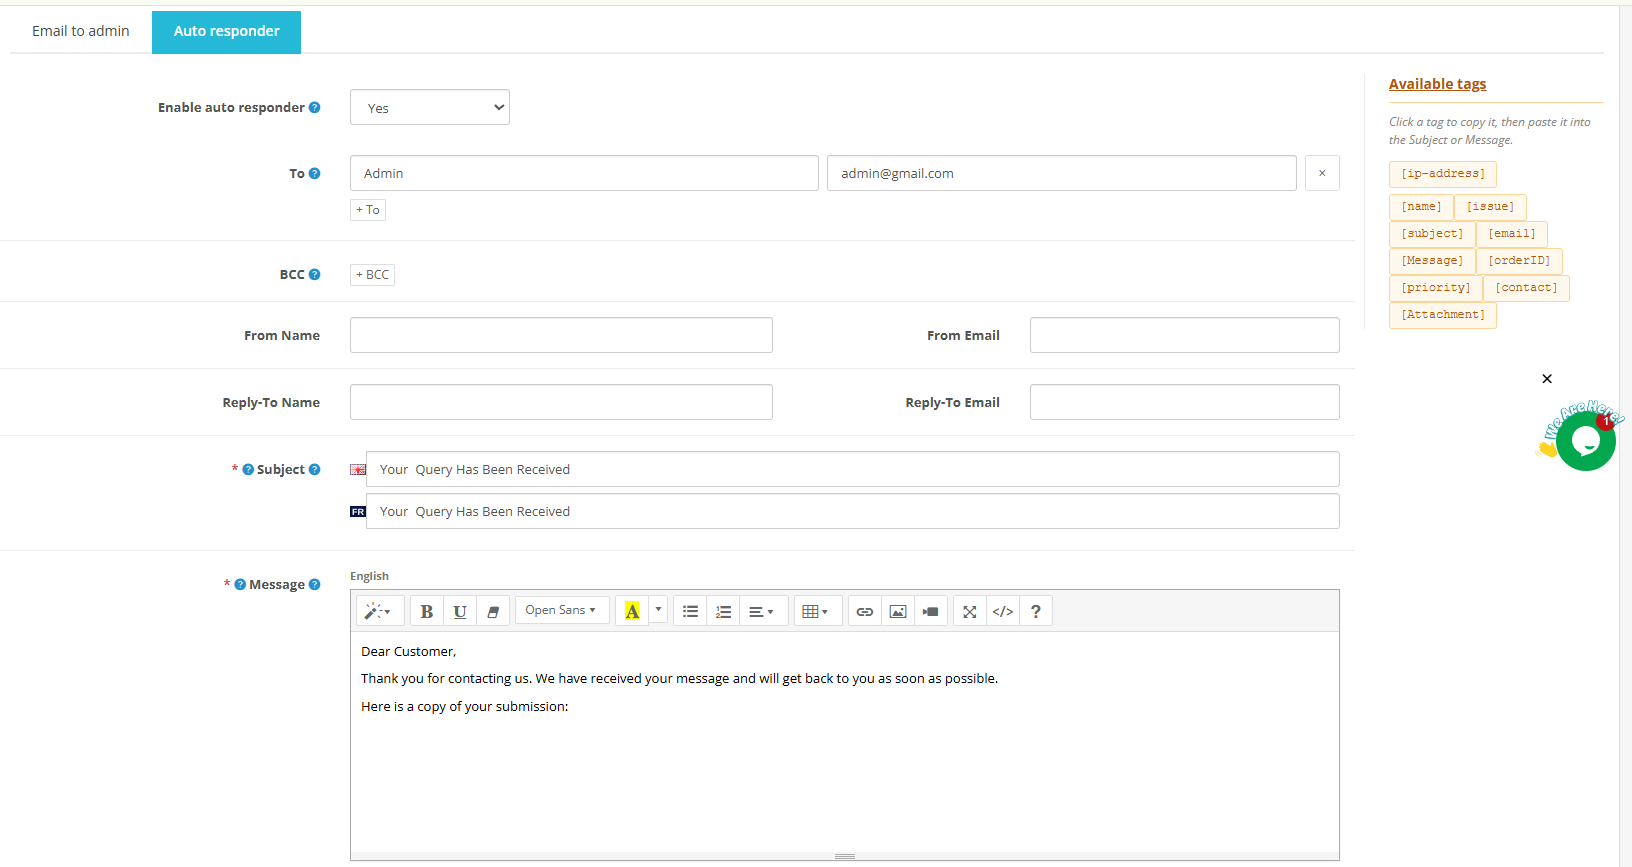
Auto responder mirrors the same fields for the customer-facing confirmation email. Enable Auto Reply and configure the subject, message, and sender details. The auto-responder fires immediately after submission with no manual action needed.
5.5 Notifications Tab: Custom Validation Messages
The Notifications tab sets per-form, per-language messages shown to the visitor when specific events occur during form submission. Leave any field empty to use the extension-level defaults.
Each message supports English and French language inputs. The configurable messages are:
- Success Message: shown when the form submits successfully (default: Message Sent Successfully)
- Failed Submission Message: shown when submission fails (default: Unable To Send Message)
- Spam Detection Message: shown when spam is detected (default: Spam Activity Detected)
- Required Field Validation Error: shown when a required field is left empty (default: Required Field Missing)
- Maximum Length Validation Error: shown when input exceeds the allowed length (default: Input Exceeds Allowed Length)
- Unknown File Upload Error: shown on unidentified upload failures (default: Unknown Upload Failure)
- Invalid File Type Error: shown when an unsupported file format is uploaded (default: Unsupported File Type)
- File Size Limit Error: shown when an uploaded file exceeds the size limit (default: File Size Limit Exceeded)
- PHP File Upload Error: shown on server-side upload errors (default: Server Upload Error)
- Invalid Number Format Error: shown when a number field receives an invalid value (default: Invalid Number Format)
- Minimum Number Validation Error: shown when a number is below the allowed minimum (default: Number Below Minimum Limit)
- Maximum Number Validation Error: shown when a number exceeds the allowed maximum (default: Number Exceeds Maximum Limit)
- Invalid Email Address Error: shown when an invalid email is entered (default: Invalid Email Address)
- Invalid URL Error: shown when an invalid URL format is entered (default: Invalid URL Format)
- Invalid Phone Number Error: shown when an invalid phone number is entered (default: Invalid Phone Number)
- Blacklisted IP Address Error: shown when a blocked IP attempts to submit (default: IP Address Blocked)
- Blacklisted Email Address Error: shown when a blocked email attempts to submit (default: Email Address Blocked)
5.6 Thank You Page Tab
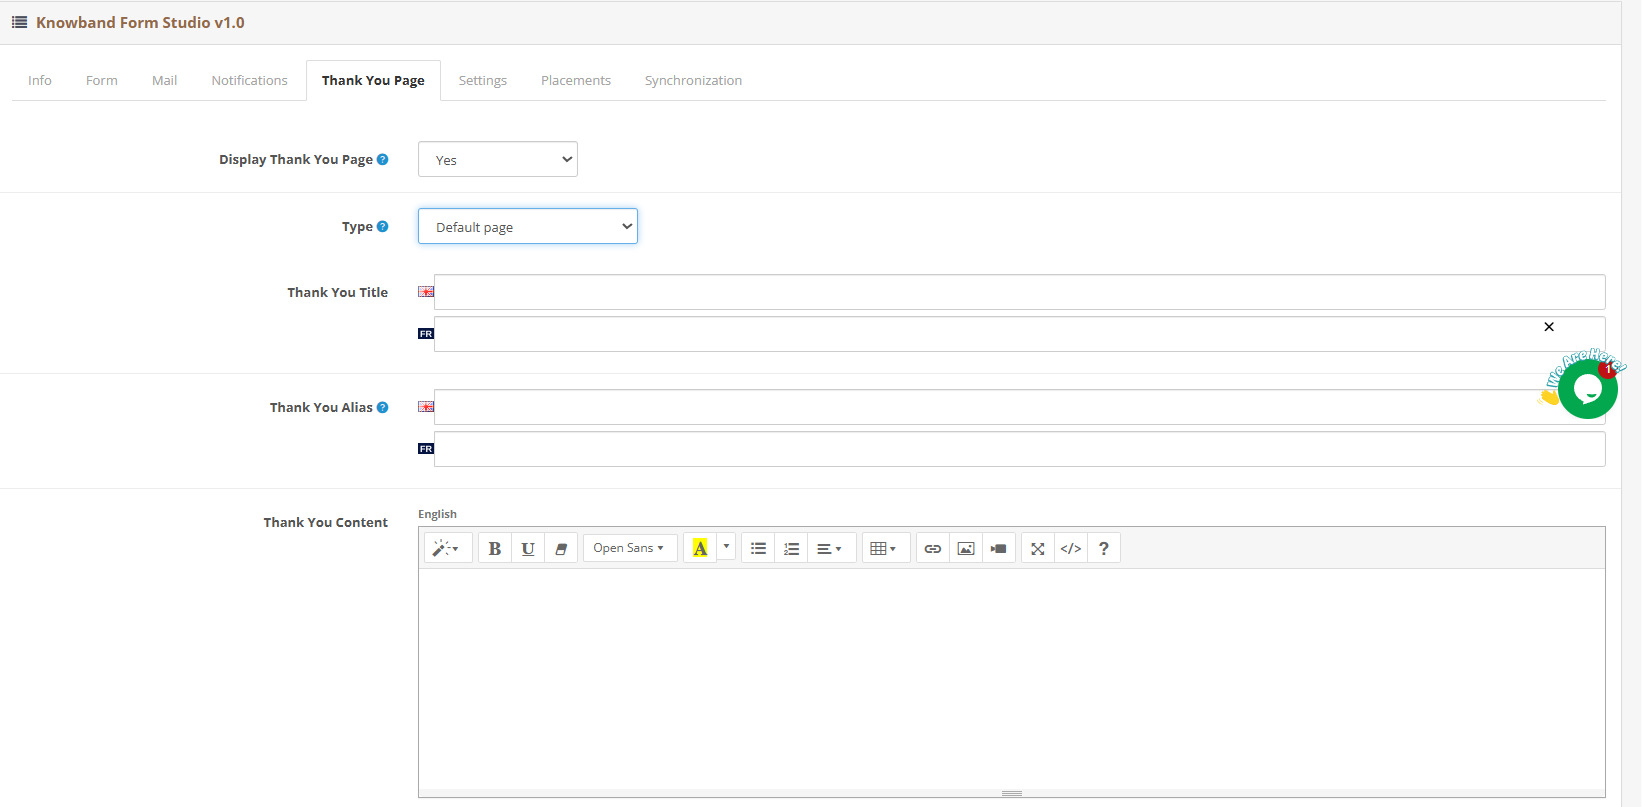
Display Thank You Page: Set to Yes to activate a post-submission page for this form.
Type:
- Default page: A built-in confirmation page configured inside the extension. No separate CMS page needed.
- Custom URL: Redirects the customer to any URL you specify after submission.
Thank You Title: The heading shown on the default thank you page. Supports English and French.
Thank You Alias: The URL slug for the thank you page. Supports multiple languages.
Thank You Content: Body text of the thank you page, editable with the rich text editor. Supports English and French. Accepts bold, italic, links, images, tables, and raw HTML.
5.7 Settings Tab: Display and Behaviour Controls
Active: Turns this specific form on or off on the front end. Set to Yes to make it live. Everything configured stays saved when set to No.
Customer Groups: Controls which customer groups can see this form. Tick the Default checkbox to limit visibility to the default customer group. Leave empty to allow all customer groups, including guests. This maps directly to the customer groups configured in your OpenCart store, not a Visitor/Guest/Customer segmentation.
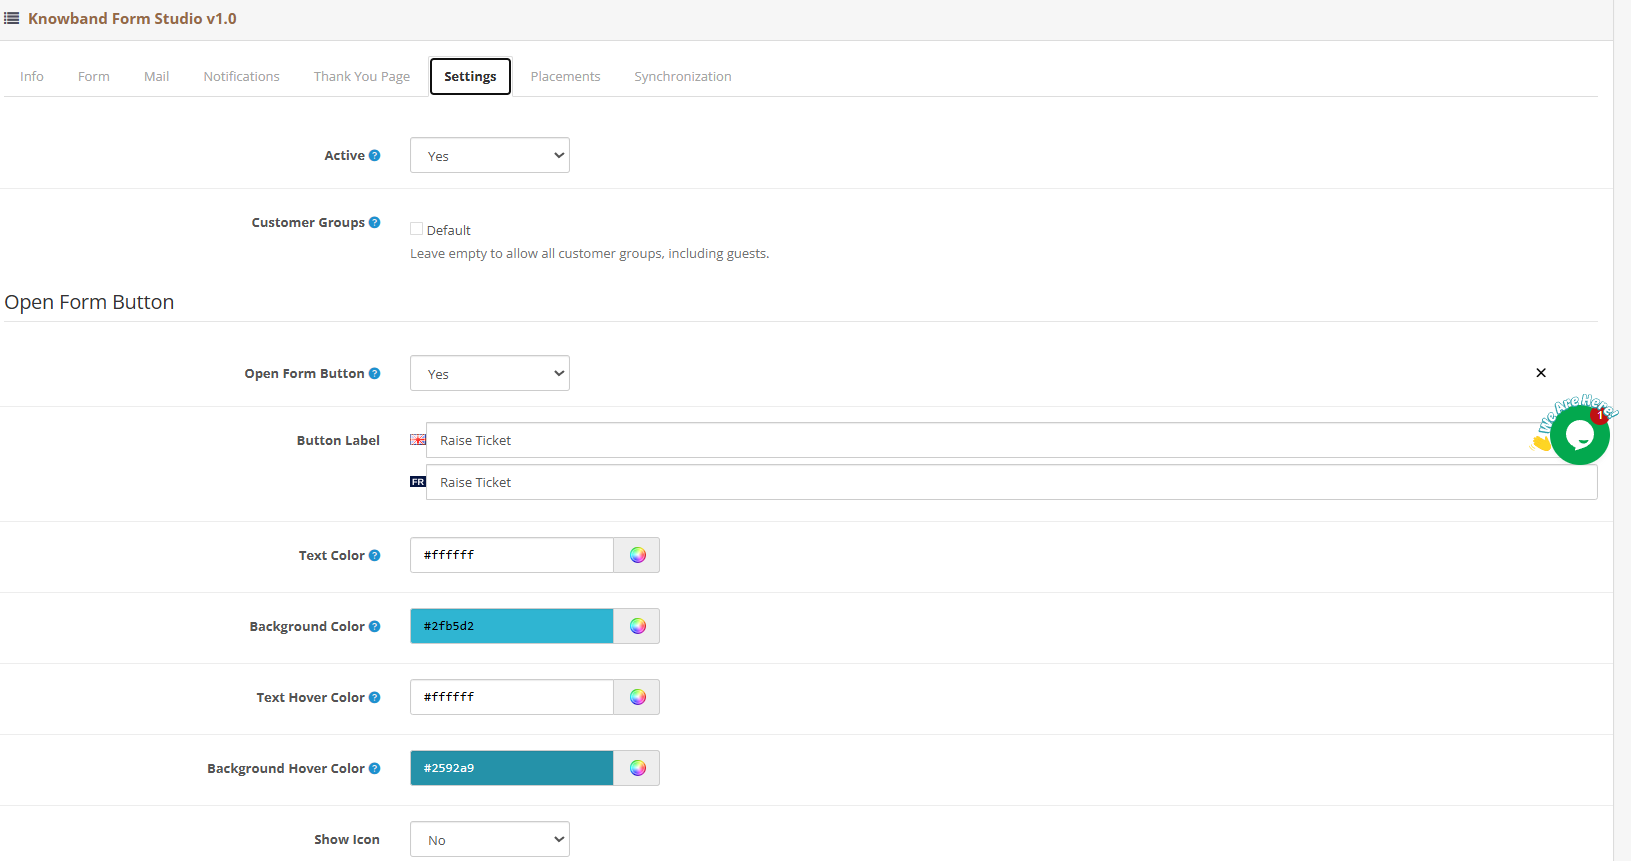
Open Form Button: Toggle to Yes to replace the inline embedded form with a button that opens the form as a pop-up when clicked. When enabled, the following styling options appear:
- Button Label (multilingual)
- Text Color
- Background Color
- Text Hover Color
- Background Hover Color
- Show Icon (Yes/No)
- Custom Icon (file upload)
Floating Button: Toggle to Yes to fix the Open Form Button to the screen so it stays visible as the visitor scrolls. When enabled, the following options appear:
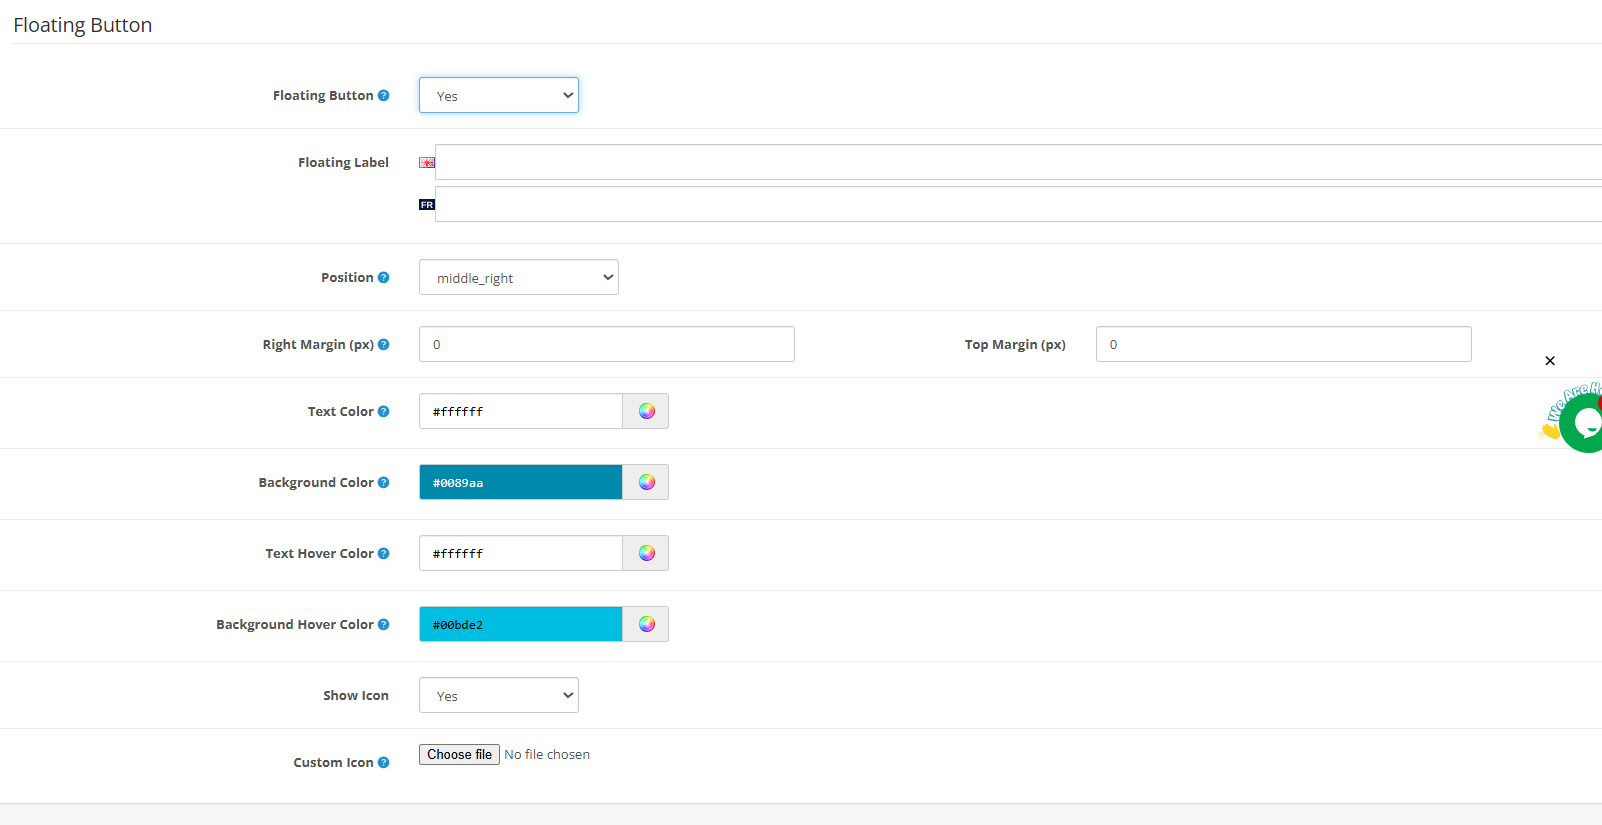
- Floating Label (multilingual)
- Position (default: middle_right)
- Right Margin (px)
- Top Margin (px)
- Text Color
- Background Color
- Text Hover Color
- Background Hover Color
- Show Icon (Yes/No)
- Custom Icon (file upload)
5.8 Placements Tab: Where the Form Appears
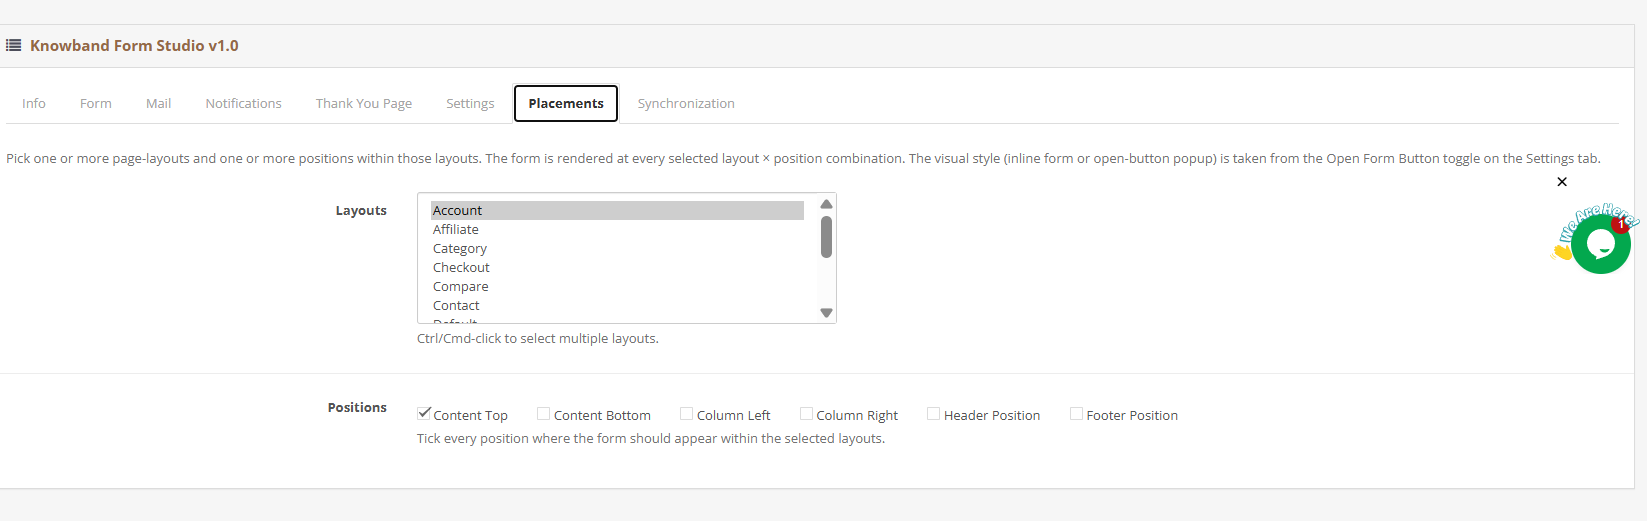
The Placements tab controls where each form is displayed across your store. Pick one or more page layouts and one or more positions within those layouts. The form renders at every selected layout and position combination. The visual style, inline form or open-button pop-up, is taken from the Open Form Button toggle in the Settings tab.
Layouts available:
- Account
- Affiliate
- Category
- Checkout
- Compare
- Contact
- Default
- Home
- Information
- Manufacturer
- Product
- Search
- Sitemap
Use Ctrl or Cmd and click to select multiple layouts at once.
Positions available:
- Content Top
- Content Bottom
- Column Left
- Column Right
- Header Position
- Footer Position
Tick every position where the form should appear within the selected layouts. No theme edits or custom code are needed.
For example, picking Product under Layouts and ticking Content Bottom under Positions puts the form below the product description on every product page. Picking Home with Content Top puts it above the page content on the homepage.
5.9 Synchronisation Tab: Email Marketing Integration
The Synchronization tab connects the form to Mailchimp or Brevo so submitted email addresses are added to your marketing lists automatically. Map form fields to provider fields before saving. Only the Email field is required. For Mailchimp, address fields must be mapped all-or-none.
Mailchimp:
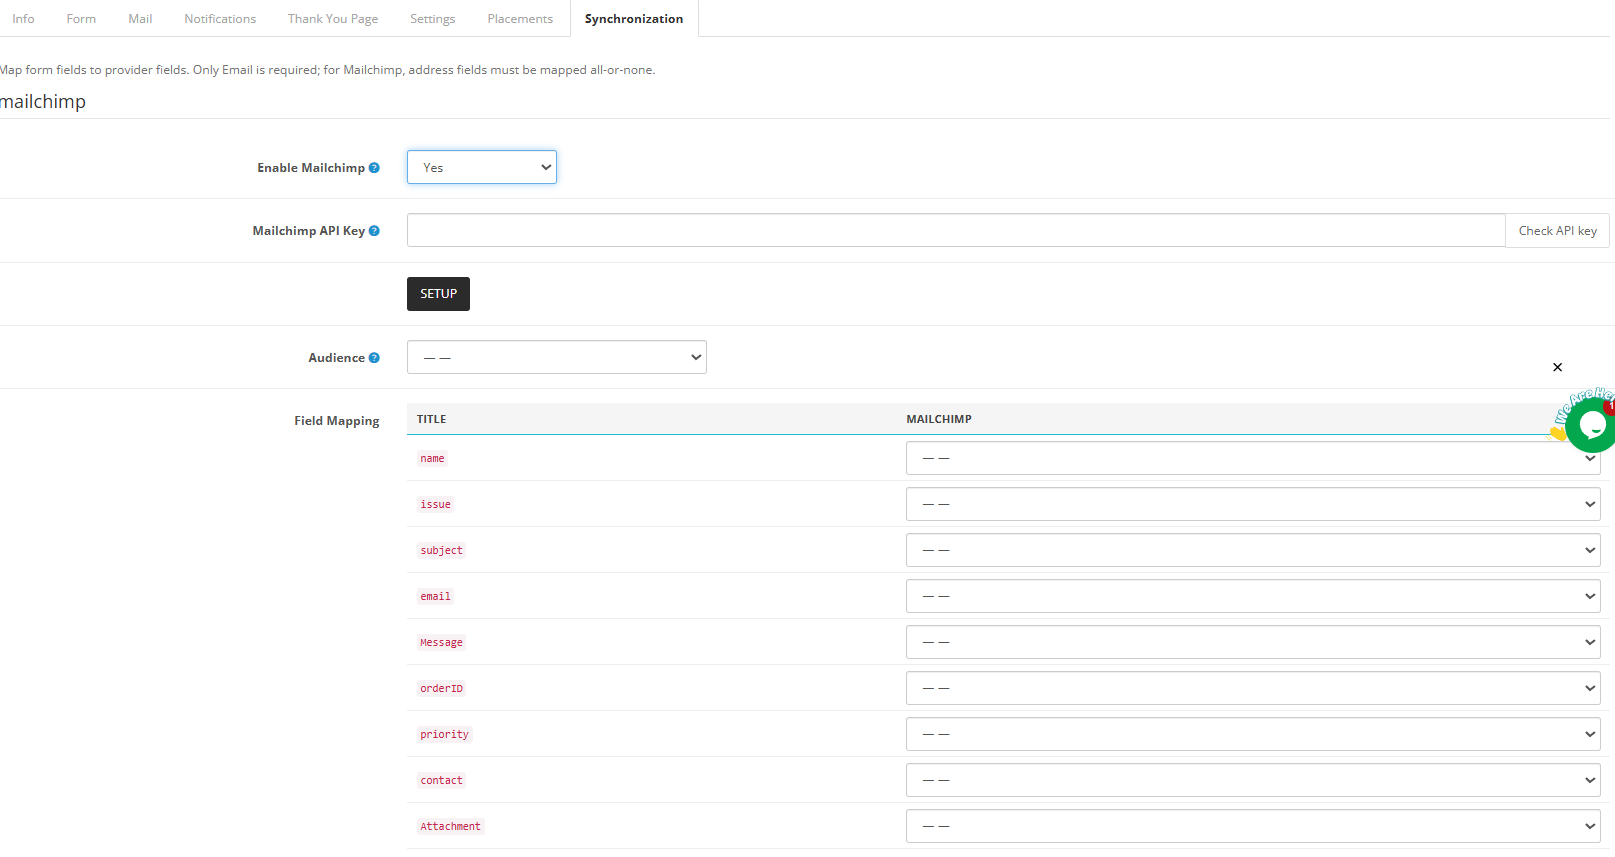
- Enable Mailchimp: Set to Yes to activate the integration for this form.
- Mailchimp API Key: Paste your Mailchimp API key. Click Check API key to verify it.
- SETUP: Click to load your Mailchimp account data.
- Audience: Select the Mailchimp audience list to add subscribers to.
- Field Mapping: Map your form fields to the corresponding Mailchimp fields using the Title and Mailchimp columns.
Brevo:
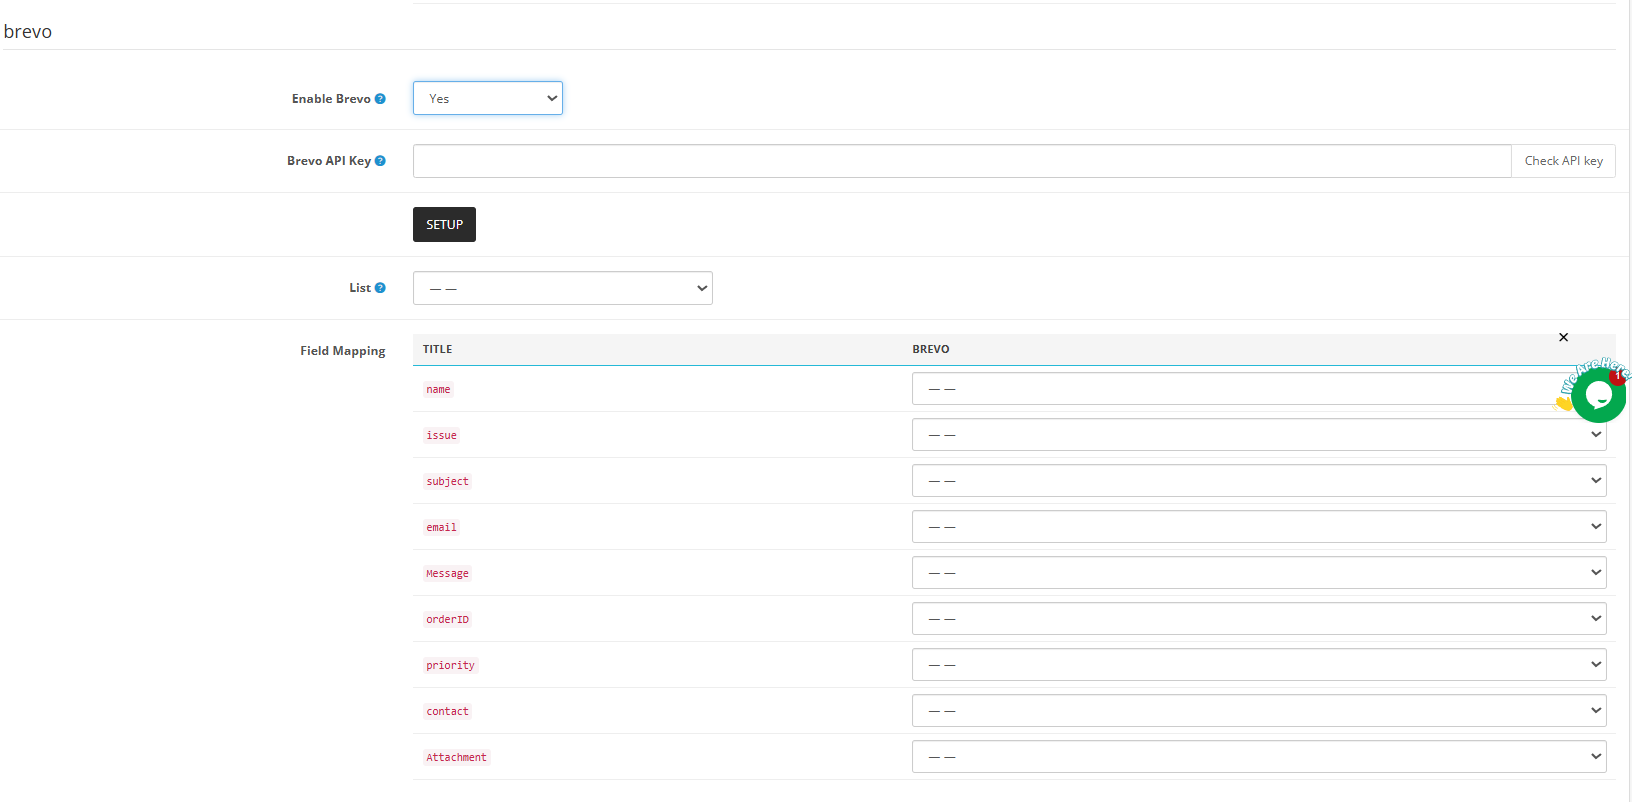
- Enable Brevo: Set to Yes to activate the integration for this form.
- Brevo API Key: Paste your Brevo API key. Click Check API key to verify it.
- SETUP: Click to load your Brevo account data.
- List: Select the Brevo contact list to add subscribers to.
- Field Mapping: Map your form fields to the corresponding Brevo fields using the Title and Brevo columns.
6.0 Form Submissions Management
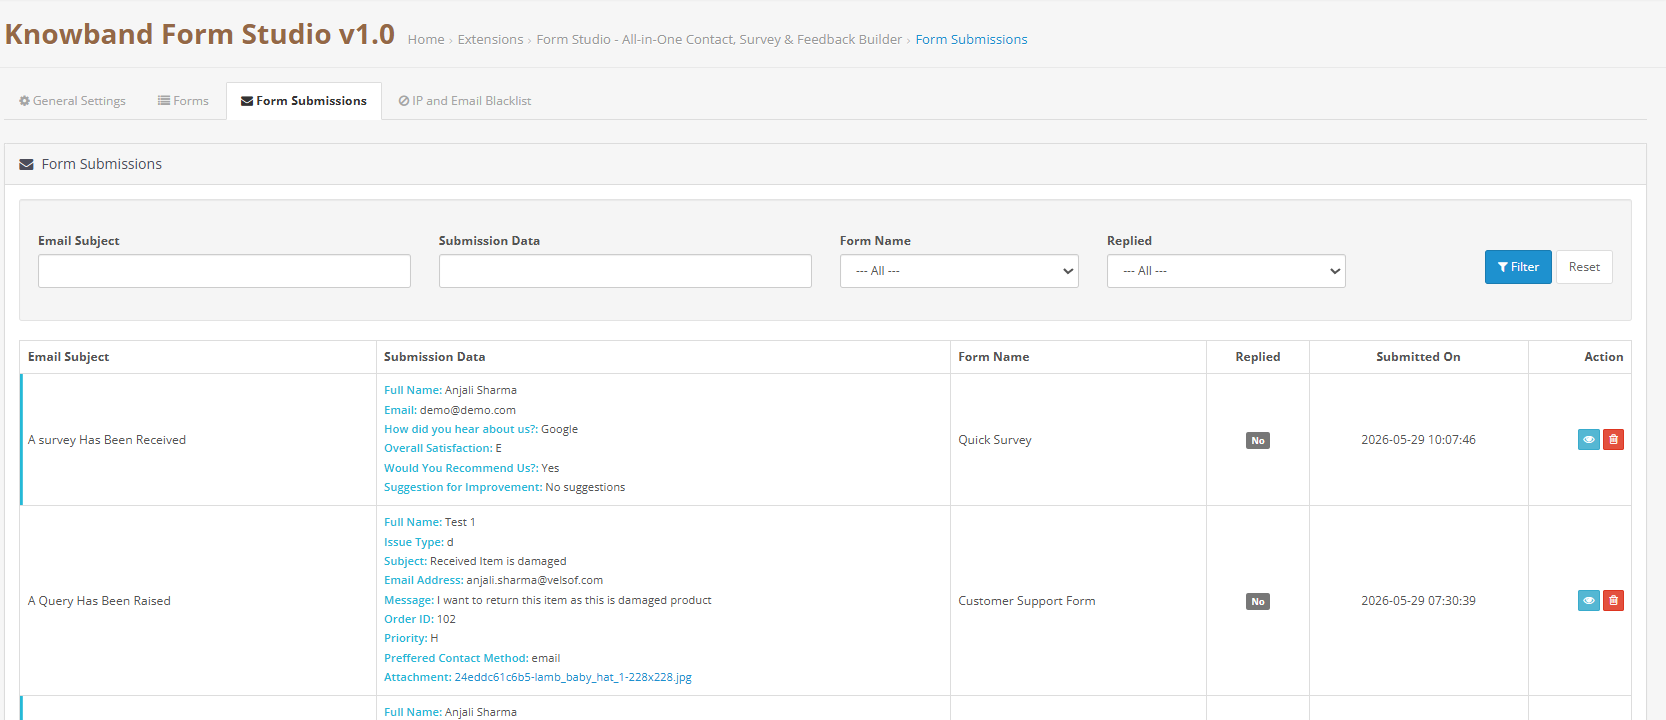
Every form submission across your store appears in the Form Submissions panel, making form submission management in OpenCart straightforward for any team size. Filter submissions by Email Subject, Submission Data, Form Name, or Replied status using the filter bar at the top.
The panel shows the email subject from the admin notification, the full submission data with field labels and values, the form name the submission came from, whether a reply has been sent, and the submission date and time.
Click the view icon on any row to open the full submission and reply directly from the same screen. The reply form includes From, To, Reply-To, and Subject fields pre-filled from the original submission. Attach files in JPG, JPEG, PNG, GIF, ZIP, or PDF format up to 8 MB if needed.
7.0 IP and Email Blacklist
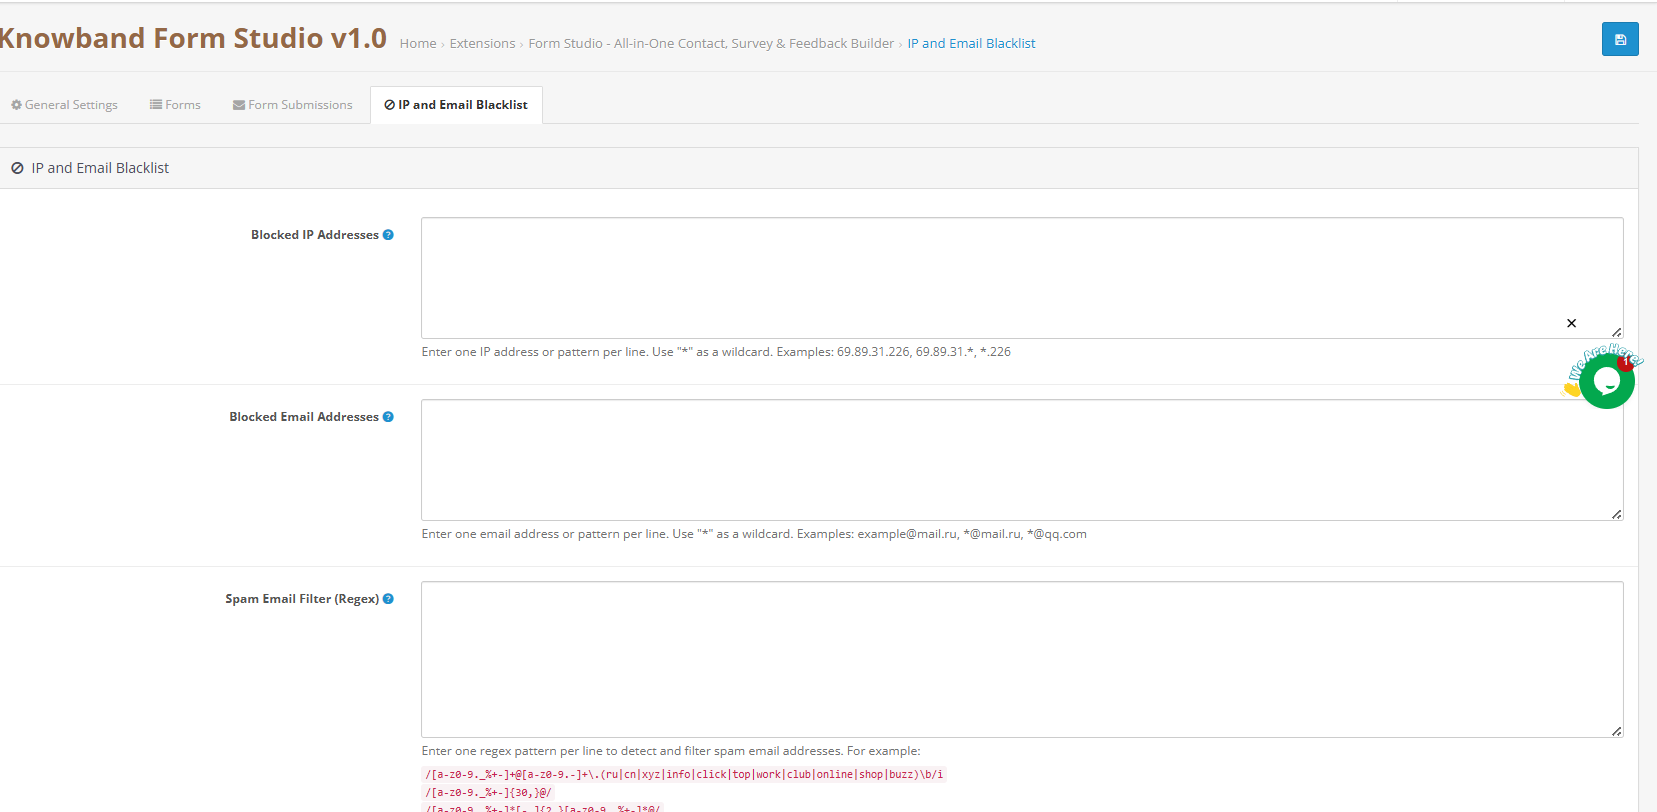
The IP and Email Blacklist section handles repeat spam submissions at the source level. Any entry added here is checked before a form submission is recorded or sent to anyone.
Blocked IP Addresses: Enter one IP address or pattern per line. Use a single address for an exact block or a wildcard to cover a range. For example, 69.89.31.* stops every address in that range. Using *.226 blocks any IP ending in those digits.
Blocked Email Addresses: Follows the same logic as IP blocking. One address per line. Entering *@mail.ru shuts out every address from that domain. *@qq.com does the same for that provider.
Spam Email Filter (Regex): Write regex patterns here that run against incoming email addresses. Any address matching a pattern gets blocked before the submission goes any further. Add one pattern per line. The extension includes ready-to-use example patterns covering the most common high-spam domains and address structures. Paste them in, and they apply immediately.
8.0 Frequently Asked Questions
Q: What is the OpenCart Form Builder extension, and what does it do?
The Knowband OpenCart Survey Extension is a form builder tool that lets OpenCart store owners create unlimited contact forms, surveys, feedback forms, lead generation forms, and registration forms without writing any code. It includes drag and drop form creation, Cloudflare Turnstile spam protection, per-form email setup, auto-responder, Mailchimp and Brevo sync, form submission tracking, and placement control through the Placements tab. Works with OpenCart 3.x.
Q: How do I create a survey in OpenCart using the OpenCart Survey Builder?
Open the extension and click Add New Form. Give the form a title and a slug. Inside the Form tab, add a row, then drop in radio button fields for ratings, dropdowns for categories, and textarea fields for written feedback. Head to the Mail tab to set up the auto-responder, go to the Thank You Page tab to configure the post-submission message, pick the placement in the Placements tab, and turn the form on. No developer needed at any point.
Q: How do I collect customer feedback in OpenCart without a developer?
The OpenCart Survey Builder Plugin, also available on OpenCart Marketplace, manages the full feedback collection process from the admin panel. Build the form, go to the Settings tab, and set the Customer Groups to limit visibility, then pick the layout in the Placements tab. Once enabled, all submissions show up in the Form Submissions panel ready for your team to read and respond to.
Q: How do I display forms on product pages in OpenCart?
Go to the Placements tab inside the form. From the Layouts list, pick Product. In the Positions section, tick Content Bottom or Content Top. The form shows up at that position on every product page without any changes to the theme.
Q: Does this OpenCart survey plugin support email notifications?
Yes. Every form carries its own email setup in the Mail tab under the Email to admin sub-tab. The admin notification goes to whichever address you configure and fires as soon as a customer submits. The Auto responder sub-tab handles the customer-facing confirmation. Subject line, body text, and reply-to address are all set per form in the OpenCart Survey Builder using multilingual rich text editors.
Q: How do I build unlimited forms in OpenCart with this OpenCart Survey Extension?
This OpenCart Survey Extension has no cap on forms, fields, or submissions. Add as many as your store needs, contact forms, product feedback form OpenCart, customer satisfaction survey OpenCart, lead generation forms, registration forms, and post-purchase surveys. Each one runs on its own settings with separate placement rules, email routing, and a dedicated submission log.
Q: What is the easiest way to create a survey in OpenCart?
Open the OpenCart Form Creator, click Add New Form, name it, and set the slug. Use the drag and drop form builder OpenCart interface to pull fields into the layout rows. Set up the email and placement settings, switch the form on, and it goes live. A first-time user with no technical background can go from opening the extension to a live survey in under 15 minutes.
Q: What is the best OpenCart form builder plugin in 2026?
The best OpenCart form builder plugin in 2026 covers form creation, placement, spam filtering, email automation, and submission management from one installation with no developer needed for any of it. This extension covers all of these: drag and drop builder, Cloudflare Turnstile, per-form email and auto-responder, Mailchimp and Brevo integration with field mapping, layout-based placement control, and a full submission management panel with direct reply capability.
Q: How does spam protection work in the OpenCart Form Studio?
Switch Cloudflare Turnstile to Enabled in the General Settings Cloudflare Turnstile tab by entering the Site Key and Secret Key from your Cloudflare account. Once active globally, drag the Cloudflare Turnstile field into any individual form layout. This spam protection form OpenCart approach, blocks bots silently before the submission is recorded. Real customers see no challenge or CAPTCHA. The IP and Email Blacklist adds a second layer for blocking known bad actors by address or domain.
Q: Is the OpenCart Form Builder extension compatible with the latest OpenCart version?
Yes. This responsive form builder OpenCart extension is compatible with OpenCart 3.x. Check the Knowband OpenCart Form Builder product page for the most current compatibility information and version support details.
9.0 Conclusion
The OpenCart Form Studio covers every form-related need an OpenCart store has from one admin panel. Unlimited forms, drag and drop form builder, OpenCart functionality, spam protection, per-form email configuration, email marketing sync, placement control through the Layouts and Positions system, and a complete submission management panel, all without writing a single line of code.
For support, custom requirements, or OpenCart extension development, contact the Knowband team directly.


