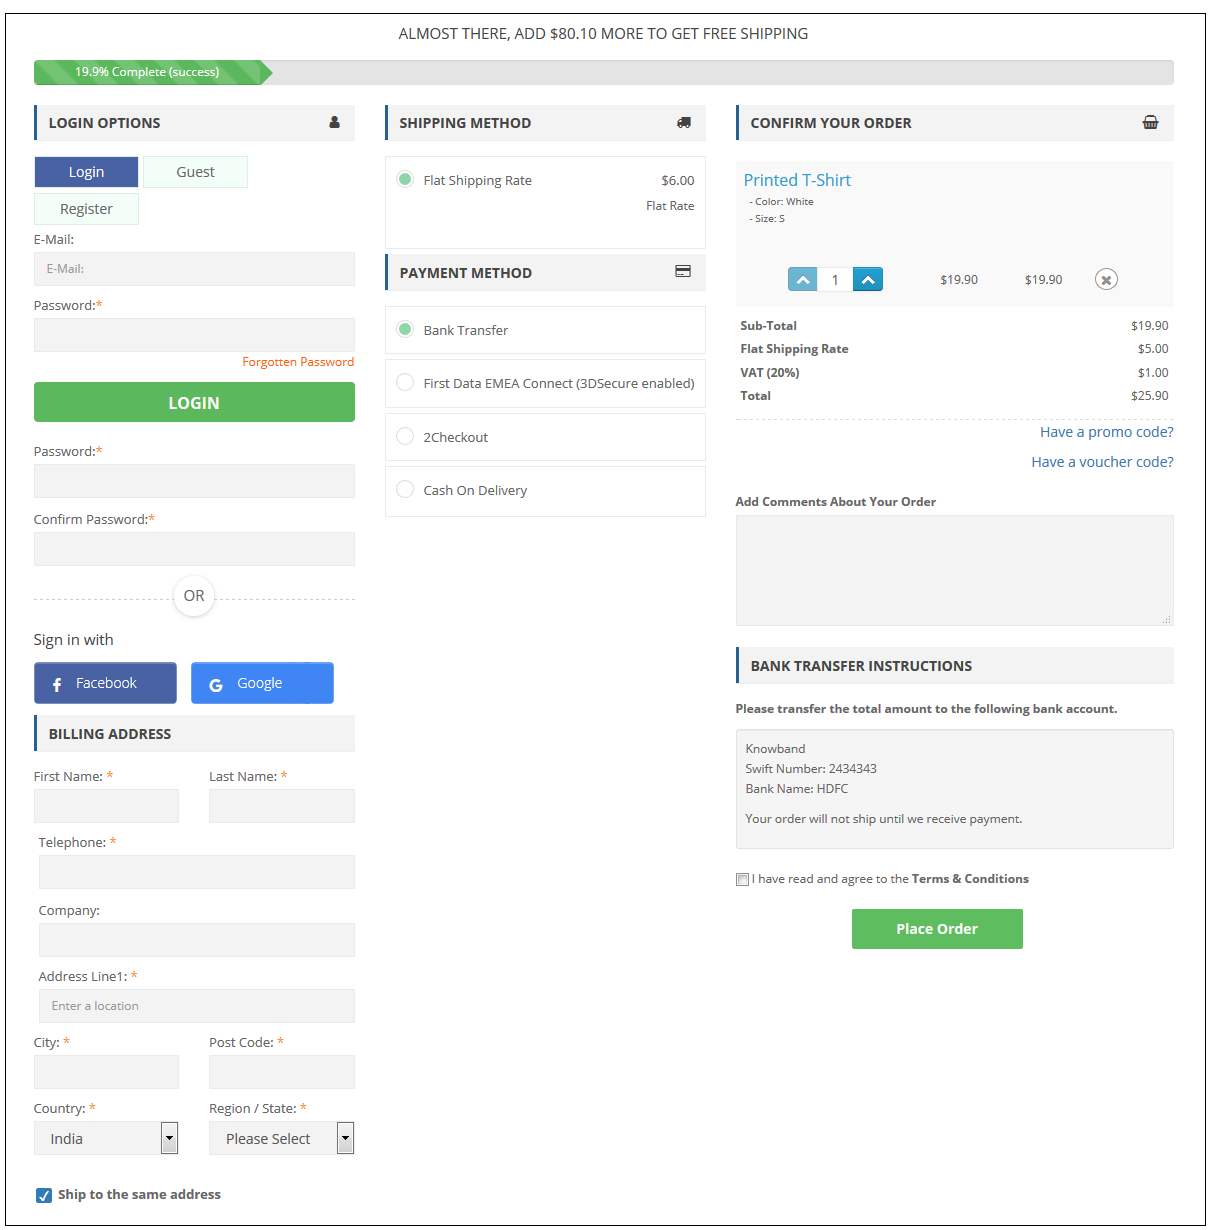
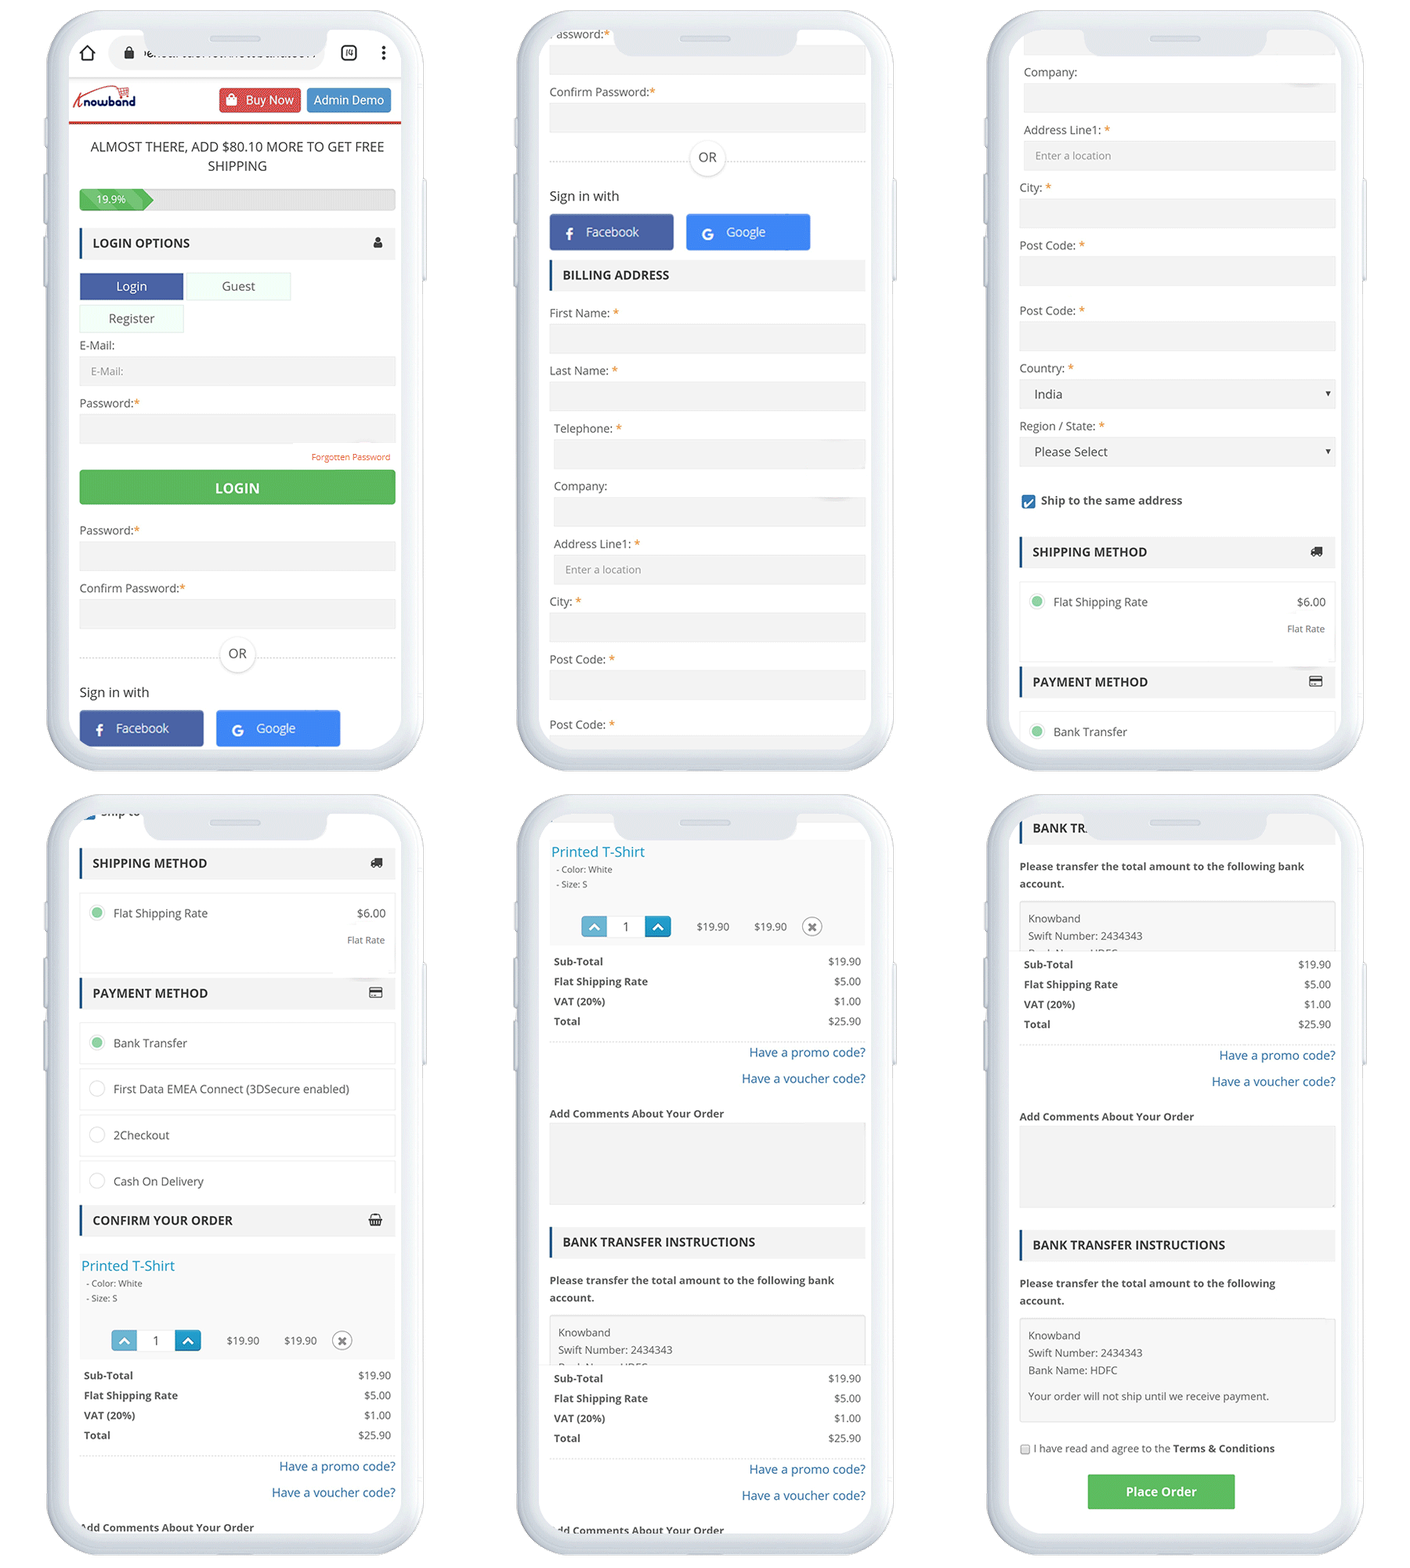
One page checkout on websites is present for finishing the checkout process swiftly. All the important information is present on one page. This includes the order total, shipping and billing addresses, product information, payment methods, and delivery choices. The Fast Checkout pluginis the opposite of multi-step checkout, which breaks the checkout process into several phases.
The goal of a simplified checkout is to enhance the customer’s experience by making the transaction as quick and easy as humanly possible. Store owners will be able to boost sales as a result of the implementation of this module.
The Pros of One Page Checkout
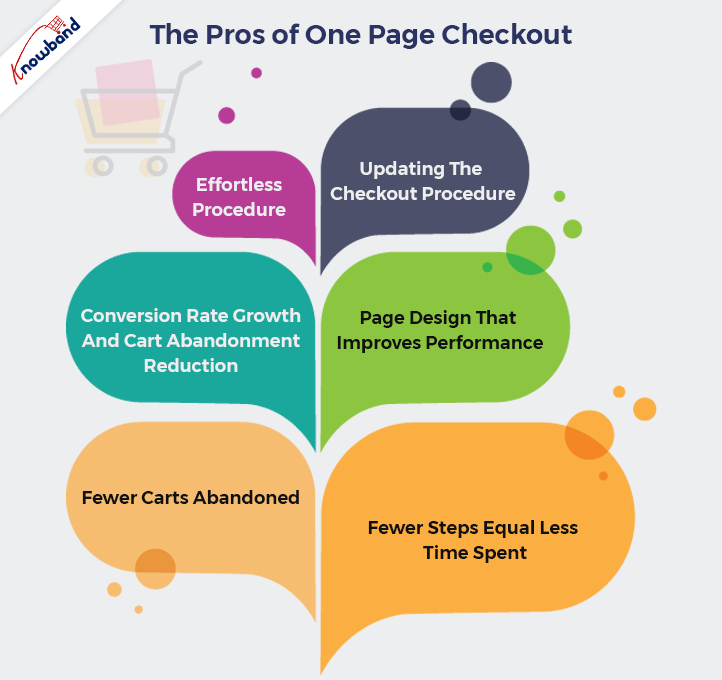
Effortless Procedure
Using the One Step Checkout extension, you can streamline the checkout process for your store by putting all the information fields on a single page. Quick checkout addon can help your customers complete their transactions more quickly by allowing them to fill out all of the information at once. Both conversions and the checkout process improve as a result.
Updating The Checkout Procedure
The One Page Checkout is more user-friendly than the more popular multi-page checkout. Additionally, by having every stage of the checkout process on one page, the chance of cart abandonment can be significantly decreased. The procedures for finalizing the purchase will be simpler for users to follow.
The checkout process becomes faster up by utilizing One Page Supercheckout. One Step Checkout makes it easier for customers to go on to the next phase of the checkout process.
Conversion Rate Growth And Cart Abandonment Reduction
Conversion rates can increase dramatically with a straightforward checkout. It guarantees that if you use a single-page checkout, your conversion rate will be high. Suppose two companies use single-page checkout and multi-step checkout respectively. The one that is using the one-page checkout will surely have more conversions.
Ecommerce websites need a fast checkout process. Furthermore, a transaction in the normal multi-page checkout takes under 2 minutes. But with single page checkout, the process takes only a minute.
Page Design That Improves Performance
Waiting for many pages to load is something nobody enjoys. Your customer can become irritated and leave your cart if the checkout procedure is complex and lengthy. You can’t afford that to happen. If you’ve installed the One Step Checkout extension, your customers may place their orders from a single page! Conversion rates at your store will increase as a result, improving the entire purchasing experience.
Using the Responsive one page checkout extension in your store has numerous other benefits in addition to those already discussed. The entire shopping experience will improve as a result of this module, which will significantly increase conversions.
Fewer Carts Abandoned
Online shoppers sometimes abandon their purchases before reaching the checkout step. By reducing the checkout process to a single page, you can increase conversion rates and decrease the number of cart abandonments. When customers arrive at the checkout page, they should not find it difficult to complete the payment form. Since the single-page checkout brings all the information in one place, it takes less than a minute to complete payment.
Fewer Steps Equal Less Time Spent
Customers wouldn’t need to browse various websites to preview their baskets. Single Page checkout includes the pages where they enter their personal information, make payments, etc. The checkout process will be quicker because the payment will be completed in a single step rather than requiring many pages. On the same screen, customers may also alter and update their information.
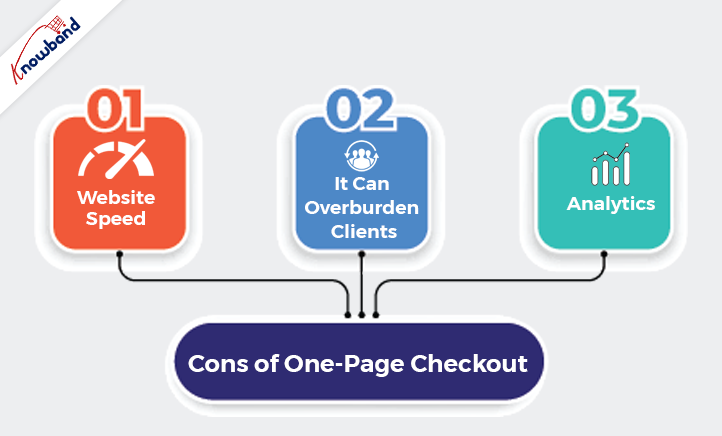
Cons of One Step Checkout
Website Speed
The website may take longer than usual to load when there are too many items on one page. Customers always want to make speedy purchases. Therefore, you should make sure that your checkout page not only works well but also loads rapidly. If not, you can lose customers who will not be investing their important time on the slow checkout page.
It Can Overburden Clients
When customers are on checkout, then the checkout page should look clean and with minimal important information. It’s critical to remember that asking customers to fill in all the shipping, payment, and billing choices on one page at once may confuse them. It’s ideal to ensure that you optimize the checkout page and remove all the superfluous information to give your customers more focus. The checkout page should not consist of any unnecessary elements. It should be clean and offer a smooth purchasing experience for the customer.
Analytics
It is harder to identify and access the reasons why customers want to stop shopping. Identifying the reason for abandoning the cart gets harder when there is a one page checkout. The reasons behind the drawbacks that we need to consider for later development become very difficult. Making the appropriate changes and modifications to the quick checkout module will get harder in the future.
Final Words
If you want to know more about the simplified checkout module, then we will be happy to assist you with it. If you have any concerns or issues regarding the fast checkout module features, then please contact us at support@knowband.com. We will also assist you with any custom requirements as per your business demands. We can make modifications to the One Step Checkout module and also help you with your customization demands. Kindly contact Knowband for the same and we will be happy to assist you with it.
Most of the visitors leave the checkout for the desired product just because they find the process complex and lengthy to complete. This ultimately leads to more and more number of abandoned carts. To control the exit and cart abandonment rates, Knowband has offered OpenCart One Page Checkout Pro plugin for OpenCart stores. Further, by implementing One Page Checkout for your eCommerce site, you can improve the conversion rates as it replaces the multi-step checkout page with a single page checkout.
Mobile View:
Salient Features of the OpenCart One Page Checkout extension:
The extension offers Guest checkout functionality by which the users can easily and quickly complete their orders as guest customers without creating a new account on the online store.
The OpenCart Fast Checkout extension allows the customers to quickly log in to the website using their Google, Facebook, and Paypal accounts.
The fields on the checkout page can be easily customized by the admin from the back-end of the OpenCart One Page Checkout Pro extension. The store admin can show or hide any of the fields from the checkout page or can make them optional or mandatory for the users to fill. The admin can also re-arrange the position fields with drag and drop functionality.
The store owner can easily customize the look and feel of the checkout page including changing the color of the buttons, background button color, text color, etc.
The OpenCart One Page Supercheckout offers multi-store and multi-lingual compatibility.
The OpenCart One Step Checkout extension supports nearly all the major shipping and payment methods that boost the confidence of the customers to choose their desired method from the checkout page.
The e-merchant can apply any of the design layouts from 3 different checkout layouts I.e., 1-column, 2-column, or 3-column. The fields can be easily rearranged by dragging and dropping.
The OpenCart Quick Checkout module offers integration with MailChimp, Klaviyo, and SendinBlue that allows you to sync your users’ database automatically with these accounts of yours without any manual efforts.
The e-merchant can also customize the look and feel of the extension through custom CSS and JS.
The OpenCart Responsive One Step Checkout module offers the Testing mode feature by which the store owner can check and view the customizations done before making the customizations live on the website.
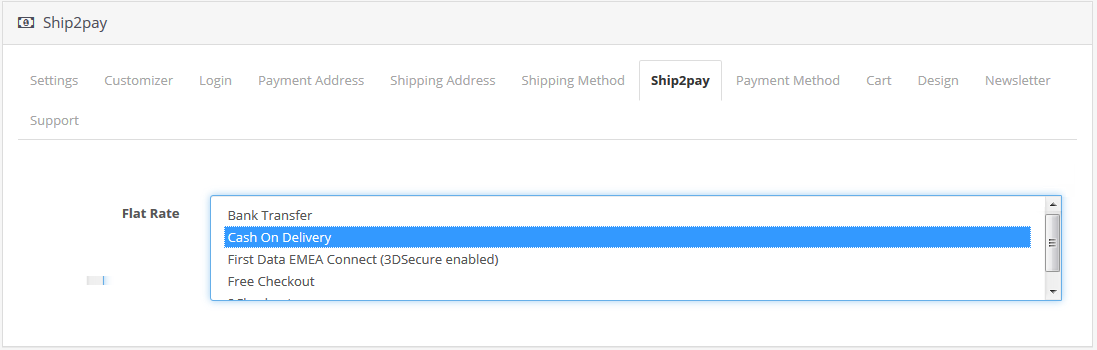
The OpenCart Simplified Checkout module offers the Ship2Pay feature by which the store owner can map particular payment methods with selected delivery methods. It hides all the other payment methods on selecting a particular delivery method and shows only those payment methods that are mapped to the selected delivery method to the user.
2.0 Installation Guide of OpenCart One Page Checkout extension
Before starting the installation process, you have to buy the OpenCart One Page Checkout extension from the Knowband store. Once purchased, you will receive the following files in your registered email.
Source code of OpenCart One Page Checkout Extension in zipped file format.
User Manual of OpenCart One Page Checkout extension.
Now to install this OpenCart Single Page Checkout on your online shop, follow the given steps:
1. Unzip the zip file. You will get the folders as shown in the image below
2. Copy all the folders of the zip file in the Root Directory of OpenCart setup via FTP manager.
Steps to install the OCMOD file
After unzipping the folder, you will find a file supercheckout_pro.ocmod.xml as shown below:
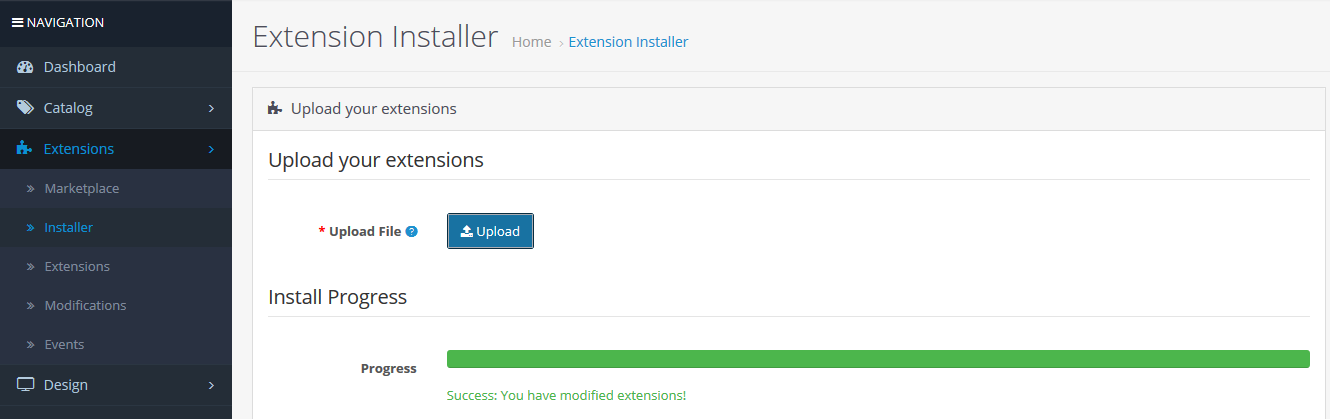
Now in the admin panel, click on Extensions in the left side menu. Then click on Extension Installer ( Home->extension).
Now, Upload the supercheckout_pro.ocmod.xml. A success message is shown once the file is uploaded.
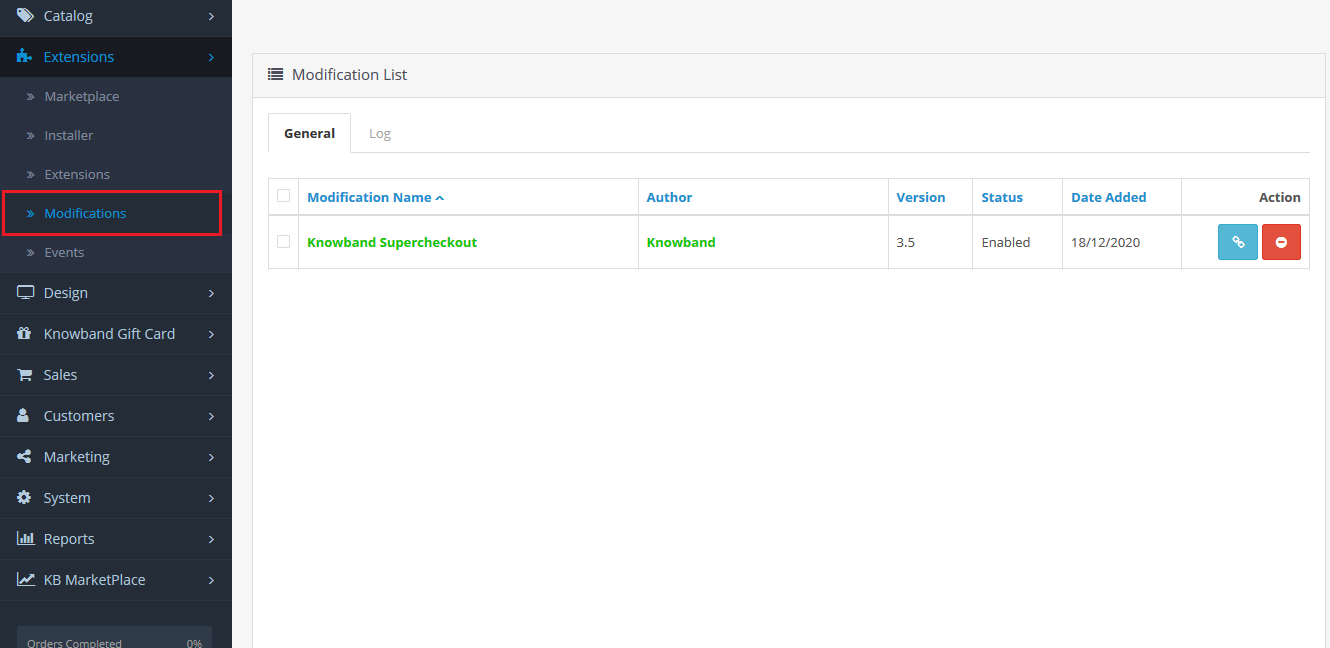
After the file is uploaded go to Home->Modification
You will find a file with the name Supercheckout Pro v2.8 (this means your ocmod has been installed successfully). Click on the corresponding “+” icon to enable it. The green icon turns into the red as shown below.
Finally, click on the refresh button (This is mandatory).
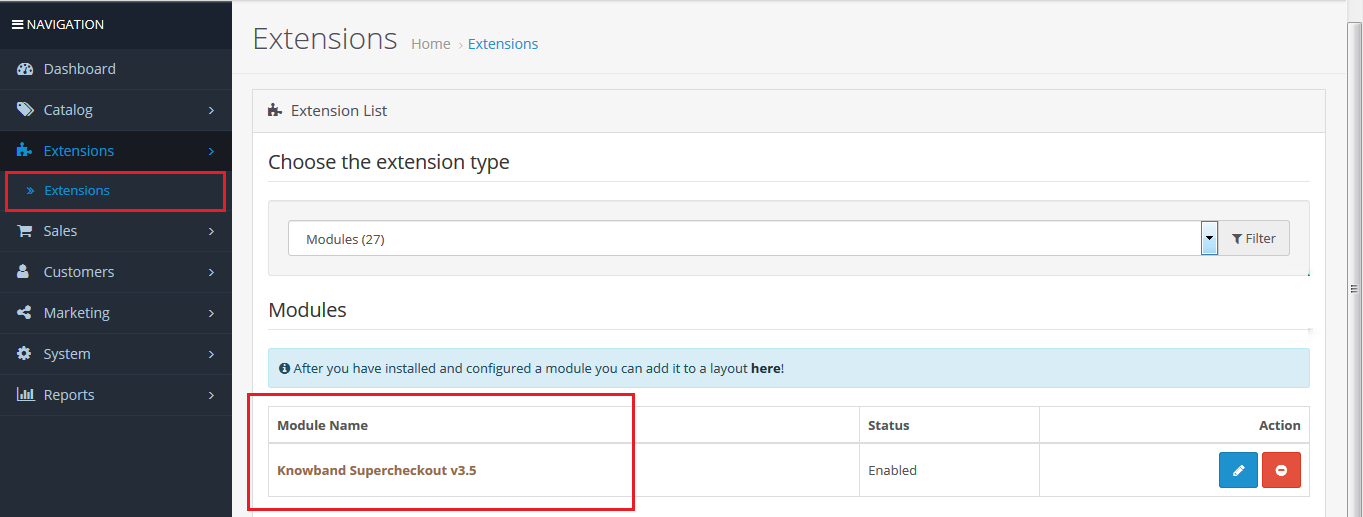
So, OpenCart One Page Checkout Pro is now successfully installed and is ready to use at your store. Go to the admin menu and click on the Extensions and then on Modules. Click the configure button next to Knowband Supercheckout.
3.0 Admin Interface of OpenCart responsive one step checkout module
Just after the successful installation of the One Page Checkout for OpenCart website, you can configure the checkout form fields as per your requirements. You have to navigate the settings in the given order: Admin Panel > Extensions > Modules > Knowband Supercheckout
The easy to understand admin interface of OpenCart One Page Checkout Pro is divided into ten sections namely:
1. General Settings
2. Customizer
3. Login Settings
4. Payment Address
5. Shipping Address
6. Shipping Method
7. Ship2Pay
8. Payment Method
9. Cart
10. Design
11. Newsletter
Each of these sections has been discussed below:
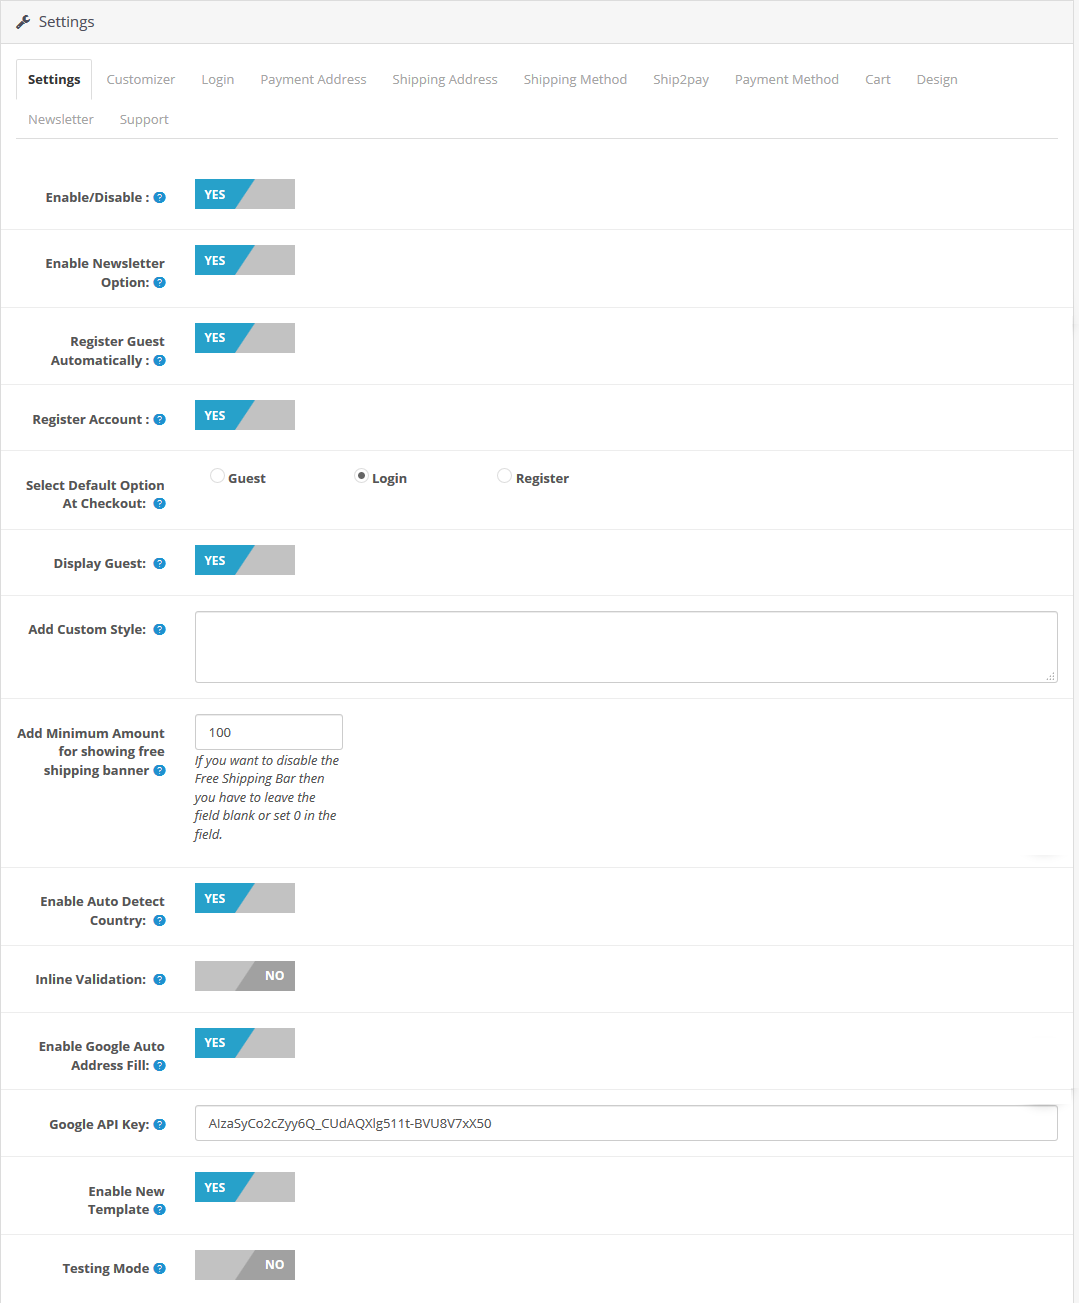
3.1 General Settings
Enable/Disable: Using this option, you can enable or disable the complete functionality of the OpenCart One Page Checkout Pro plugin from OFF to ON.
Enable Newsletter Option: You can enable or disable the Newsletter option on the Supercheckout page. Once you have enabled this button, the following will be the cases:
a.) Newsletter option will be visible to Guest checkout customers, only if you have enabled Register Guest Automatically option.
b.) Newsletter option will always be visible to customers if they are creating a new account.
c.) Newsletter option will never be visible to logged-in customers.
Register Guest Automatically: You can enable this option to automatically register the guest customers at your store. By enabling this option, you can register your customers to the store and send them a generated password on their email.
Register Account: By enabling this field, you can show a password field on the supercheckout page so that the new users can easily set the desired password for their account.
Select Default Option at Checkout: With this option, you can set a default option in the login section of your OpenCart One Page Supercheckout page out from the options as Guest, Login, and Register.
Disable Guest: You can enable or disable the guest functionality for the users in the login section of One Page Checkout.
Add Custom Style: With this option, you can add or include custom style to the Supercheckout page. To apply some custom CSS on the Supercheckout page, you can write that CSS in the text box which is just to the right of the Add Custom Style label. For eg: You can change the color of the buttons on the Supercheckout page.
Add Minimum Amount for showing free shipping banner: From this tab, the admin can add a minimum amount which is required after which the customers will be eligible to get free shipping of their order.
Enable Auto-detect Country: After enabling this feature, the extension will detect and fill the country of the user automatically in the country section.
Inline Validation: With this feature, the extension displays an error every time the user misses filling a mandatory field on the checkout page.
Enable Google Auto-address to fill: As soon as the user starts typing his address, the extension suggests his address if this feature is enabled.
Enable or Disable New Template: With the OpenCart One Page Checkout extension, the store owner can either apply the new or old checkout template as per his desire from the General settings.
Testing Mode: This option helps you to enable or disable the test mode functionality of this OpenCart One Page Checkout extension.
Testing URL: Once you enable the testing mode, you can set a supercheckout URL where you can test the functionality of one page checkout.
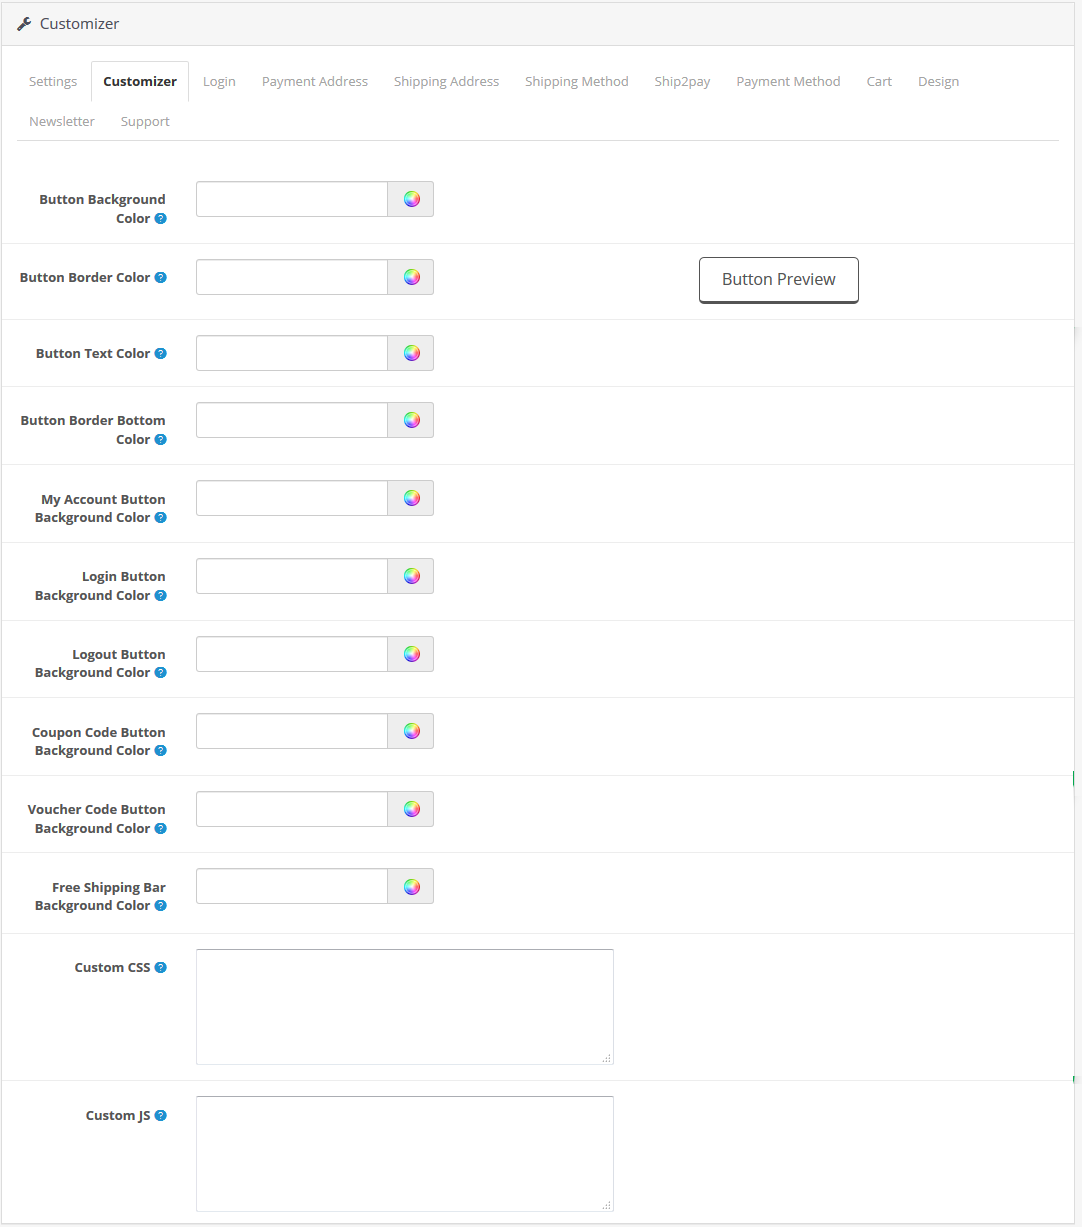
Customizer
From the Customizer tab, you can customize the Button Background Color, Button Border Color
Button Preview, Button Text Color, Button Border Bottom Color, My Account Button Background Color, Login Button Background Color, Login Button Background Color, Logout Button Background Color, Coupon Code Button Background Color, Voucher Code Button Background Color, etc.
Free Shipping Bar Background color: This section allows you to change the background color of the Free Shipping Bar on the checkout page.
Custom CSS and JS: This section allows you to customize the look and feel of the checkout page with custom CSS and JS.
3.2 Login
Under this tab, you will find options to configure Facebook, Google, and Paypal login options as shown below.
Enable Facebook Login: With this option, you can enable/disable the Facebook Login option on One Page Checkout.
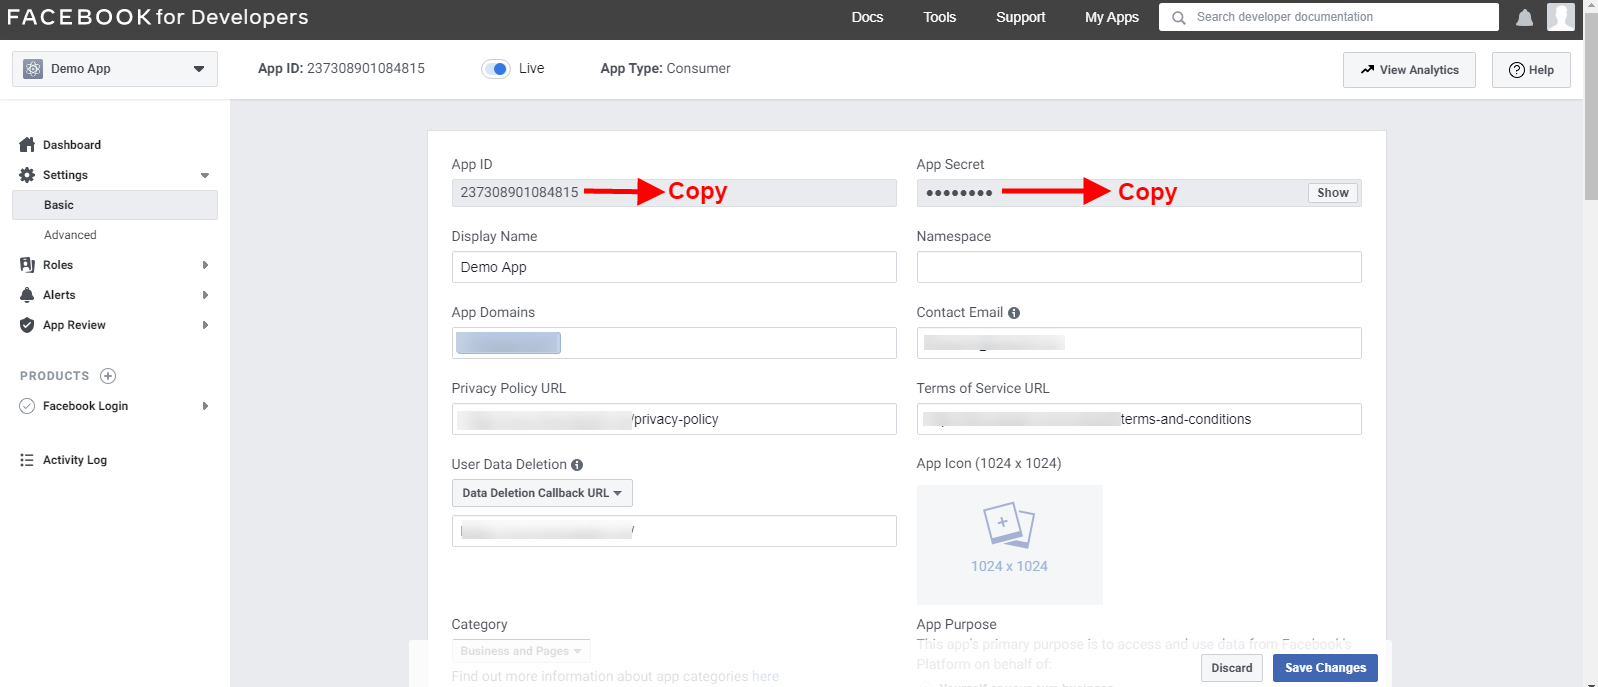
Facebook App ID: This option lets you set the Facebook App ID which can be generated using Facebook Developer’s account.
Facebook App Secret: Using this option, set the secret key generated using Facebook Developer’s account.
Enable Google Login: With this option, you can enable/disable the Google Login option on One Page Checkout.
Google App ID: This option lets you set the GoogleApp ID.
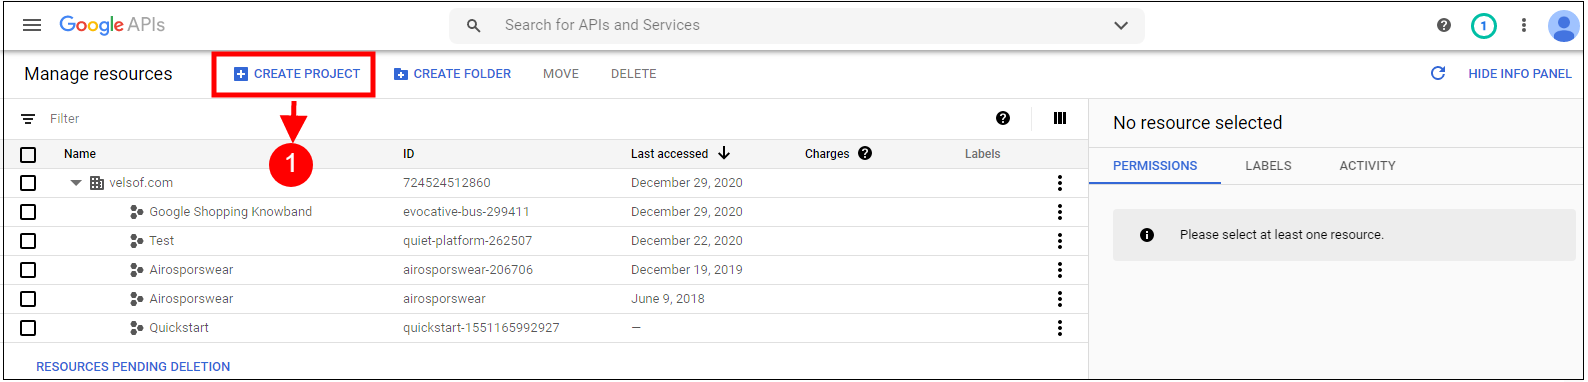
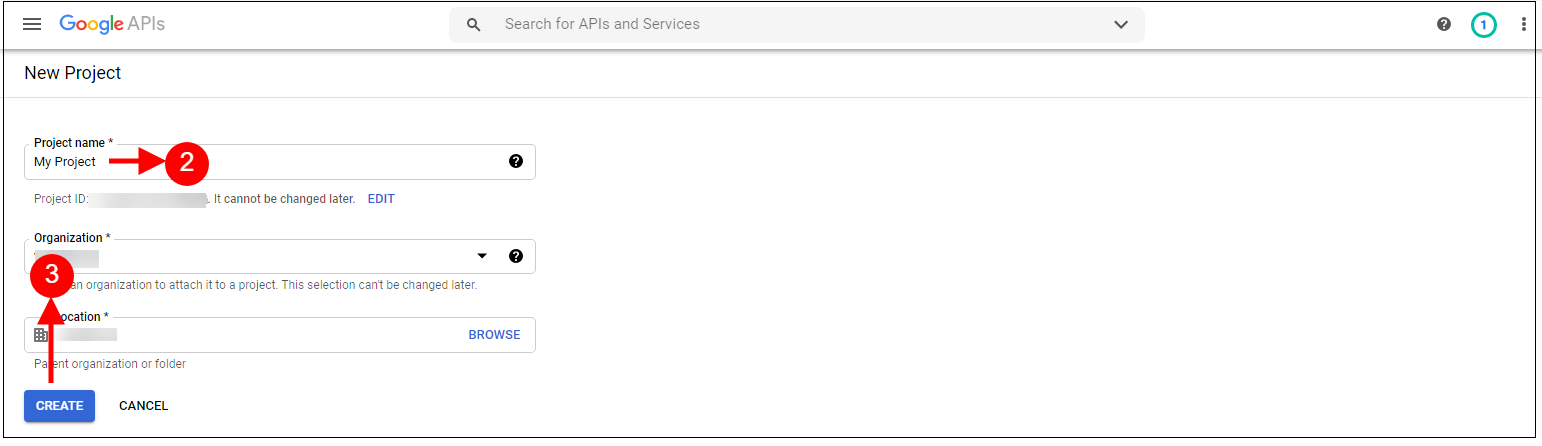
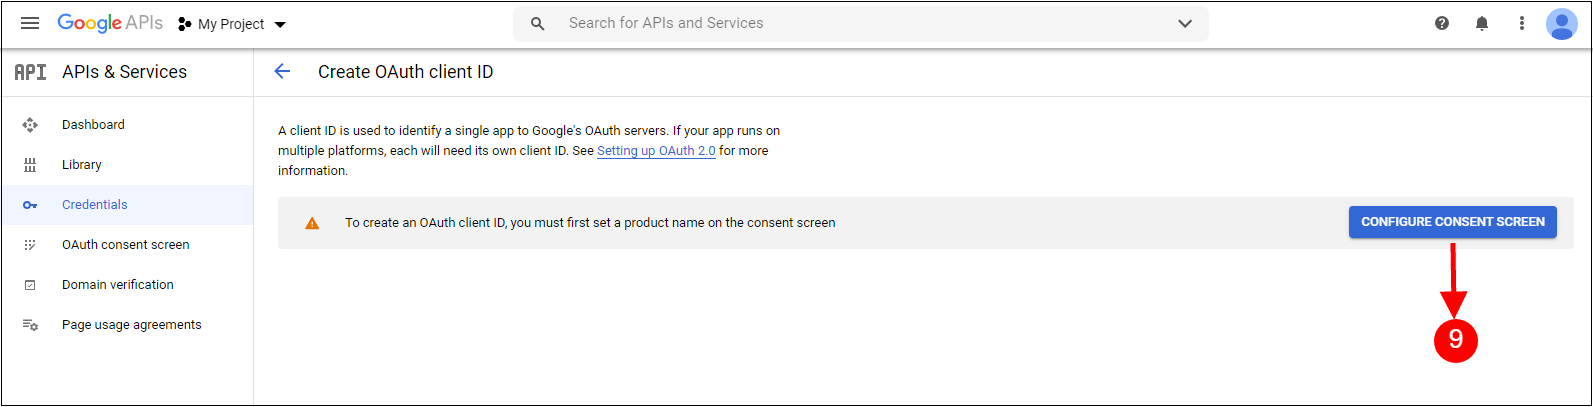
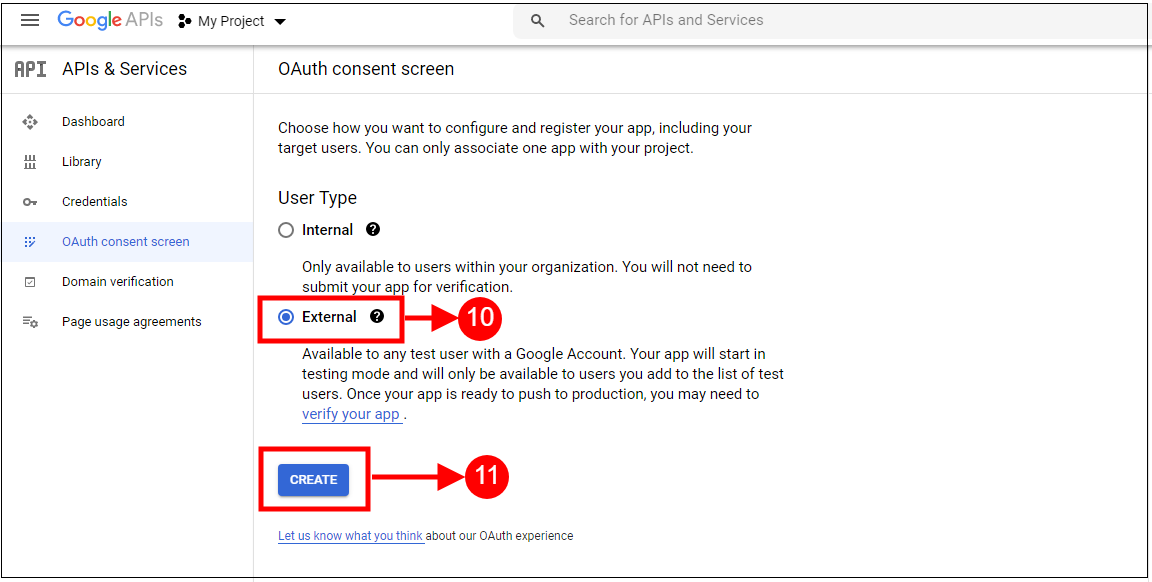
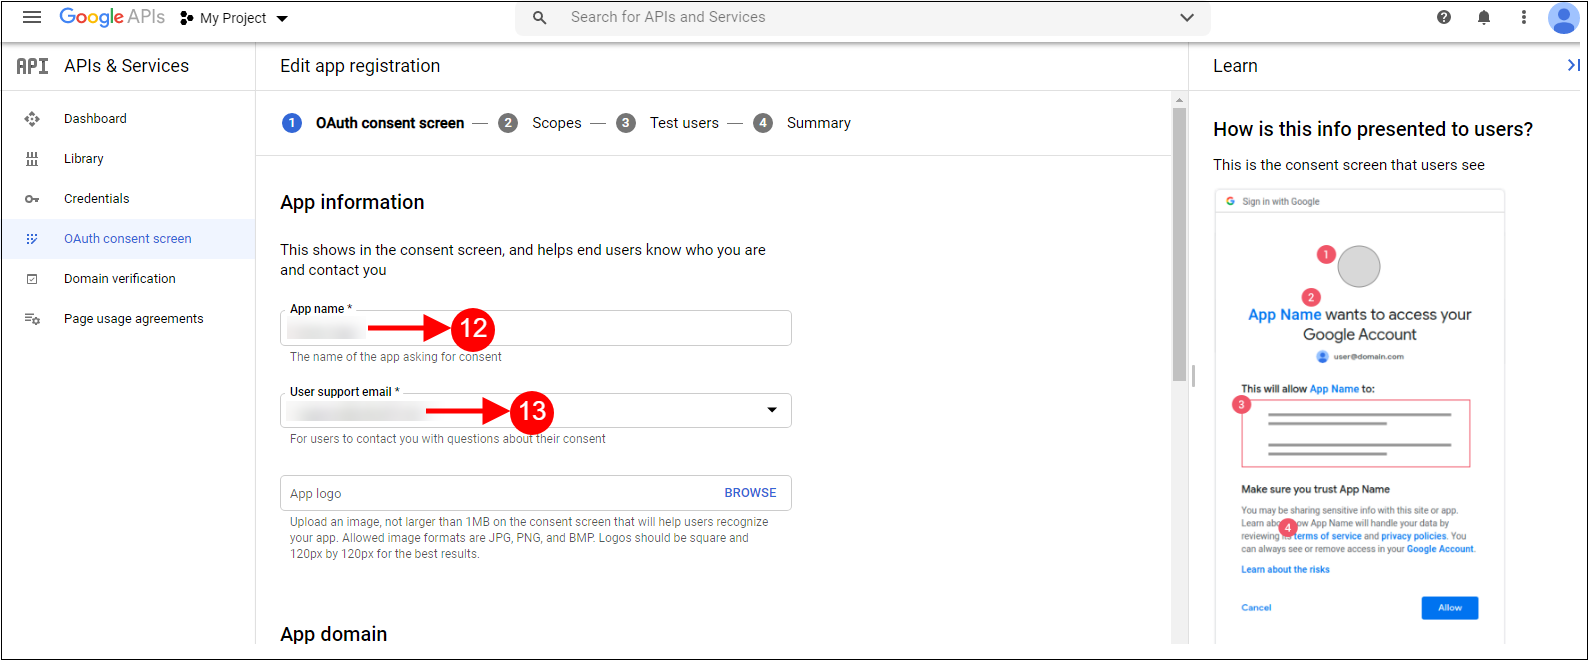
The Google Client ID: This field lets you set the Google client ID created from the Google console.
Google App Secret: Using this option, you can set the App secret key generated using Google console.
Enable Paypal Login: With this option, you can let your customers log in through their Paypal accounts.
Paypal Client ID: This option lets you add your Paypal Client ID.
Paypal Client Secret: This option lets you add your Paypal Client Secret ID.
For detailed instructions to generate App ID, App Secret Key, and Client ID, jump to the next section.
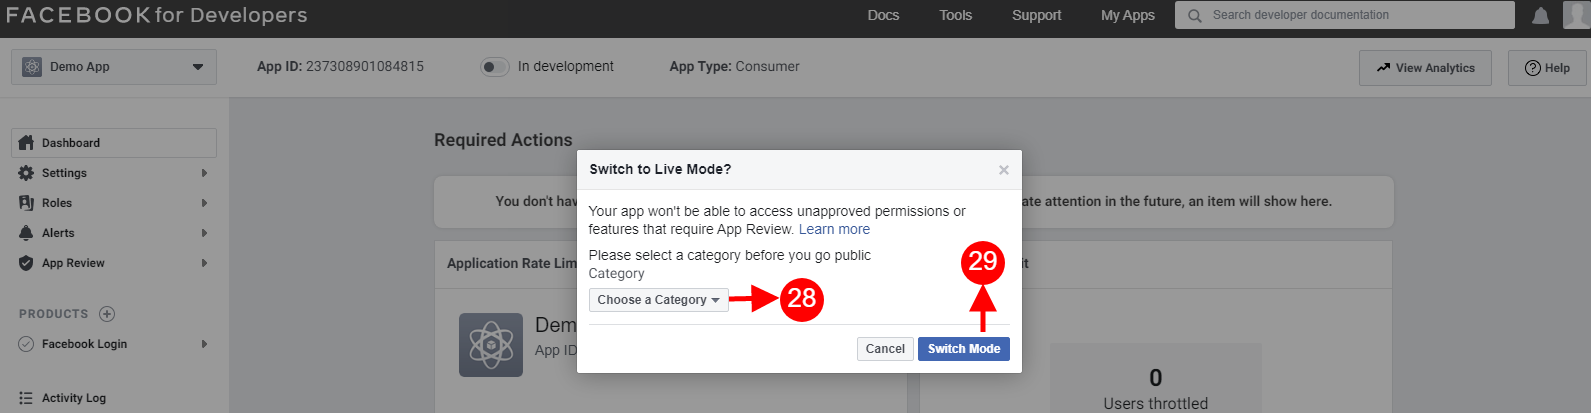
3.2.1 How to Set up Facebook Login?
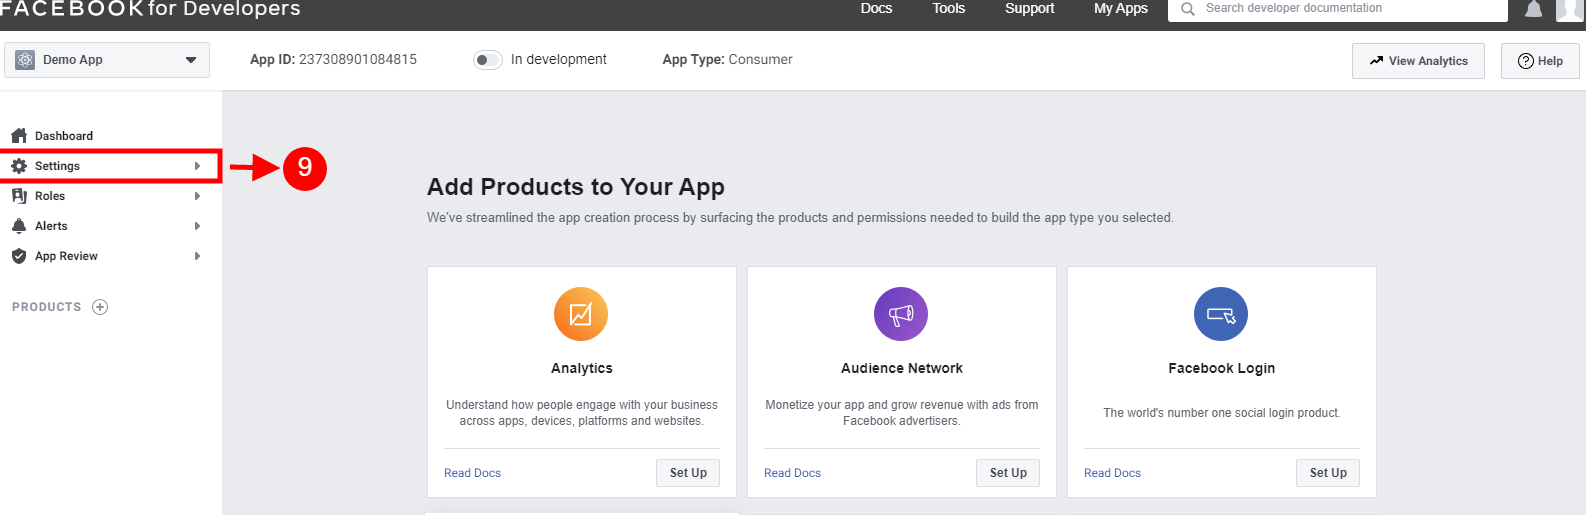
Facebook App can be created by below-mentioned steps:-
1: Go to the given URL: https://developers.facebook.com/apps/
2: Click on the “Create App” button.
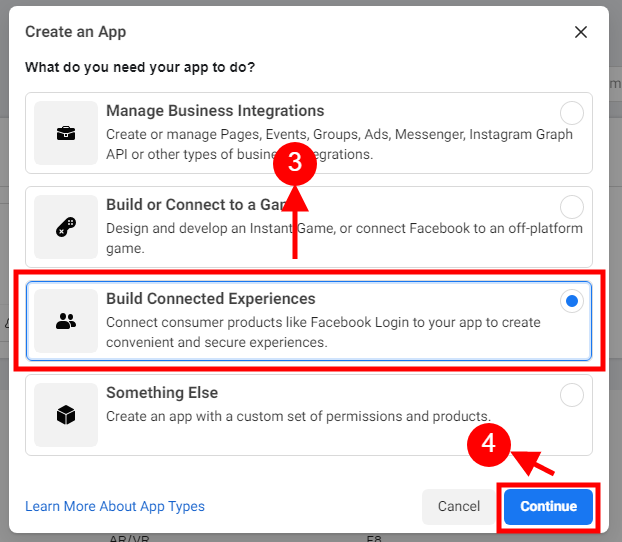
3&4: Select the “Build Connected Experiences” option and click on the ‘Continue’ button.
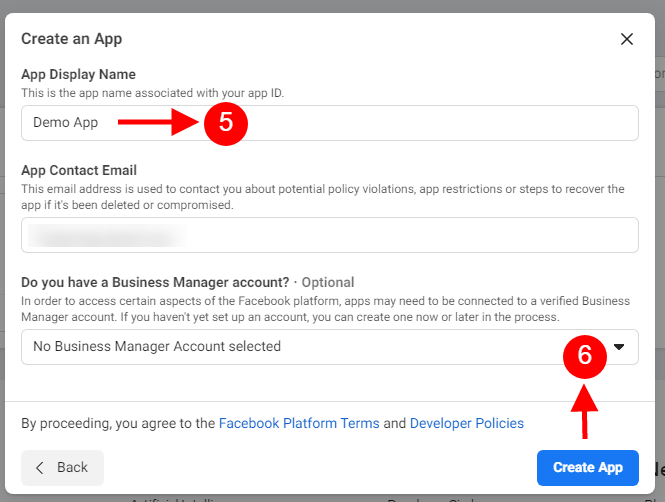
5&6: Add “App Display Name”, “App Contact Email”, and choose from the “Do you have a Business Manager Account?” and then click on the “Create App” button.
7&8: After clicking on Create App ID you will have to go through a security check as shown:
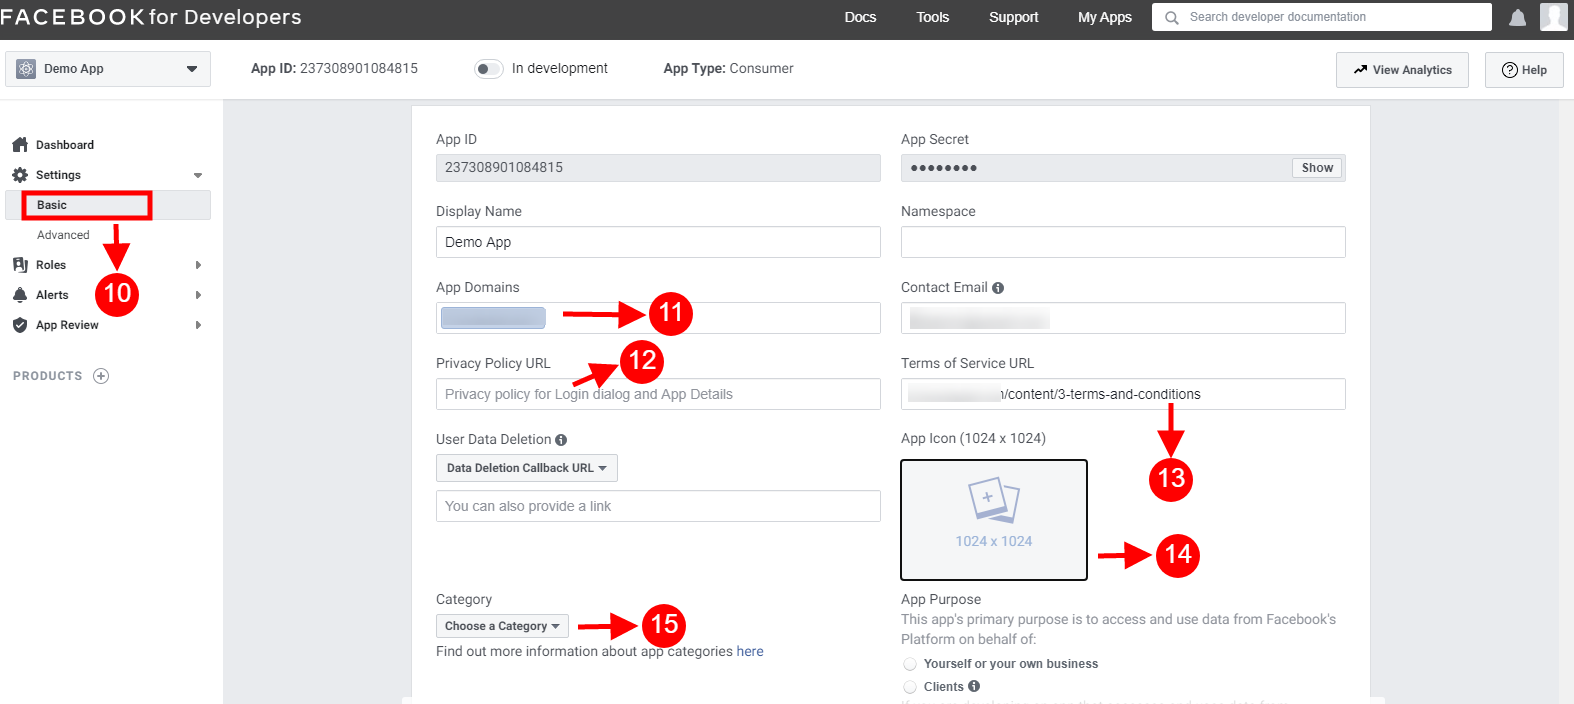
10-15: Two options will be available in the dropdown, Basic and Advanced, click on “Basic”. And then enter your “App Domain”, ”Privacy URL”, ”Terms of Service URL”, ”Add Icon”, ”Select Category” and click on the “Save Changes” button.
App Domains:
yourdomain.com is correct
yourdomain.com/store is incorrect
www.domain.com is incorrect
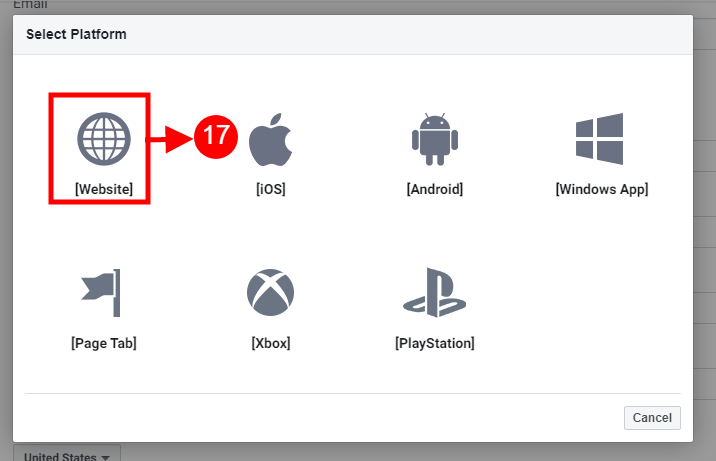
16: Now click on “+Add Platform”.
17: And select Website as Platform.
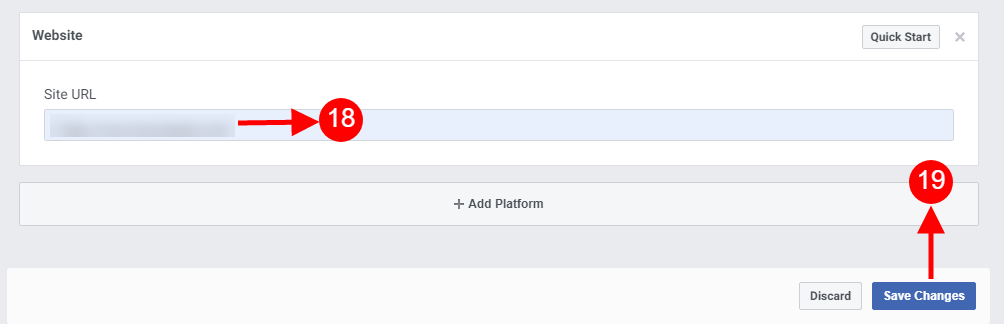
18&19: Now Enter your site URL.
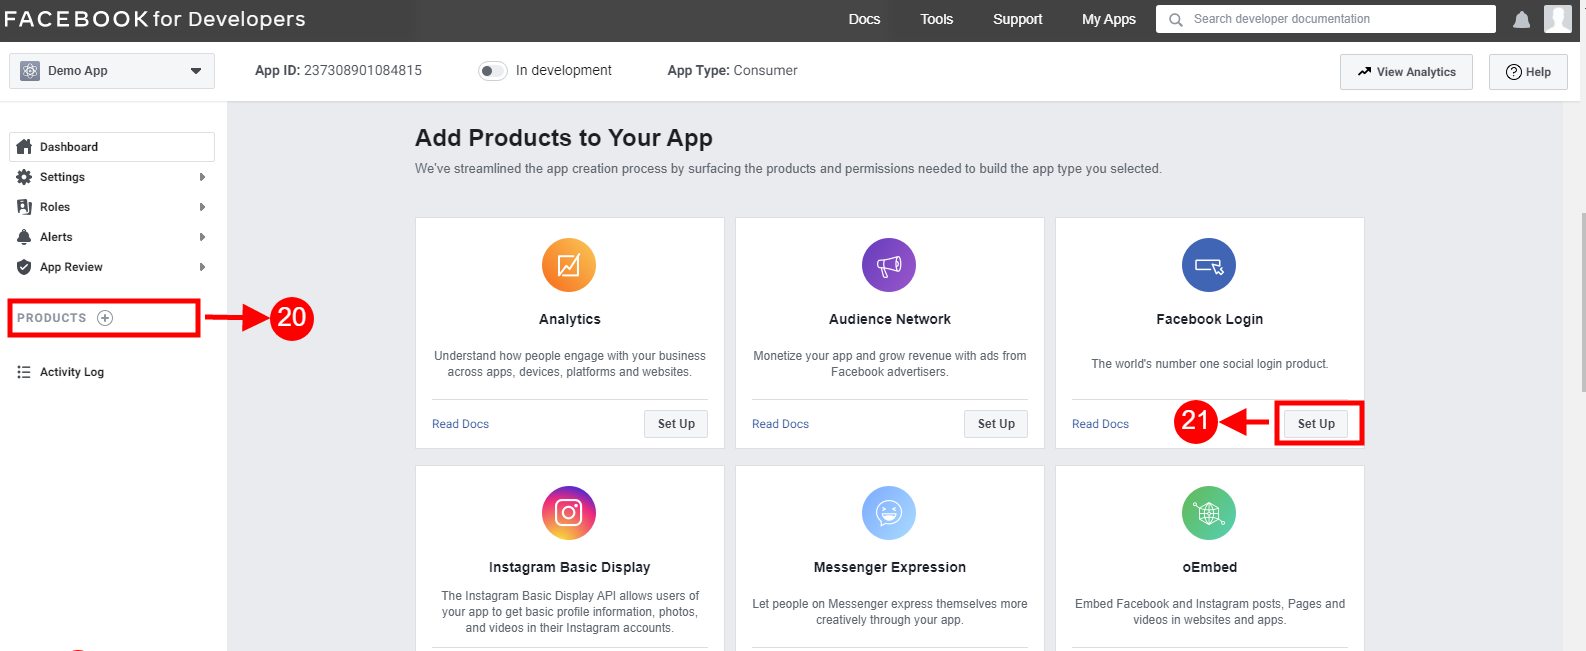
20&21: Click on “Products+” and click on the Setup button from the Facebook login tab.
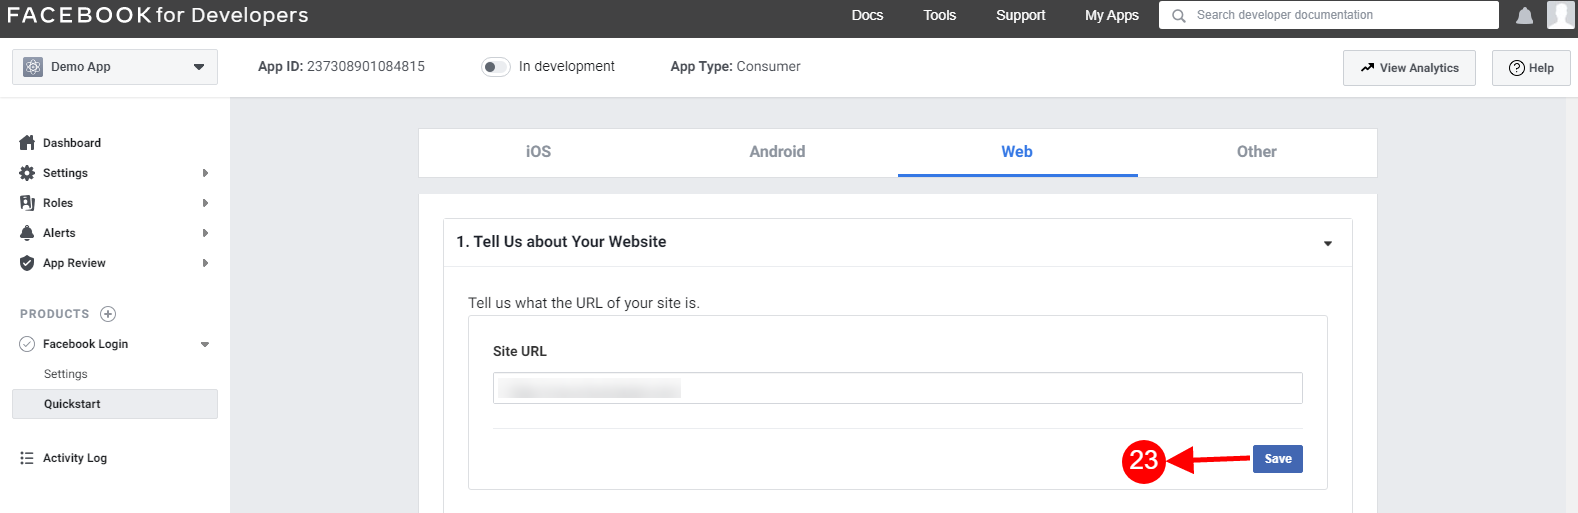
22: Select the web as the platform for the app.
23: Add Site URL and click on save.
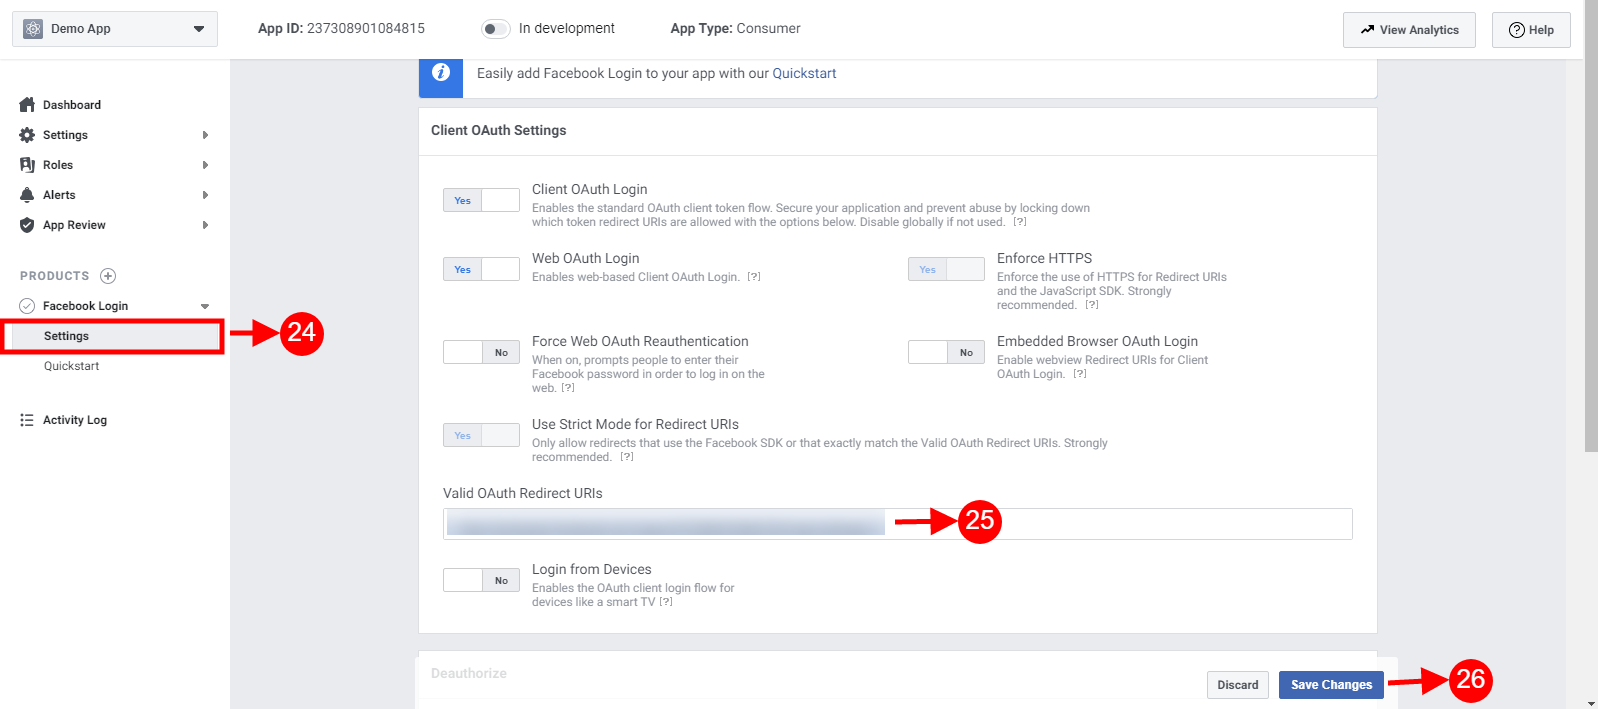
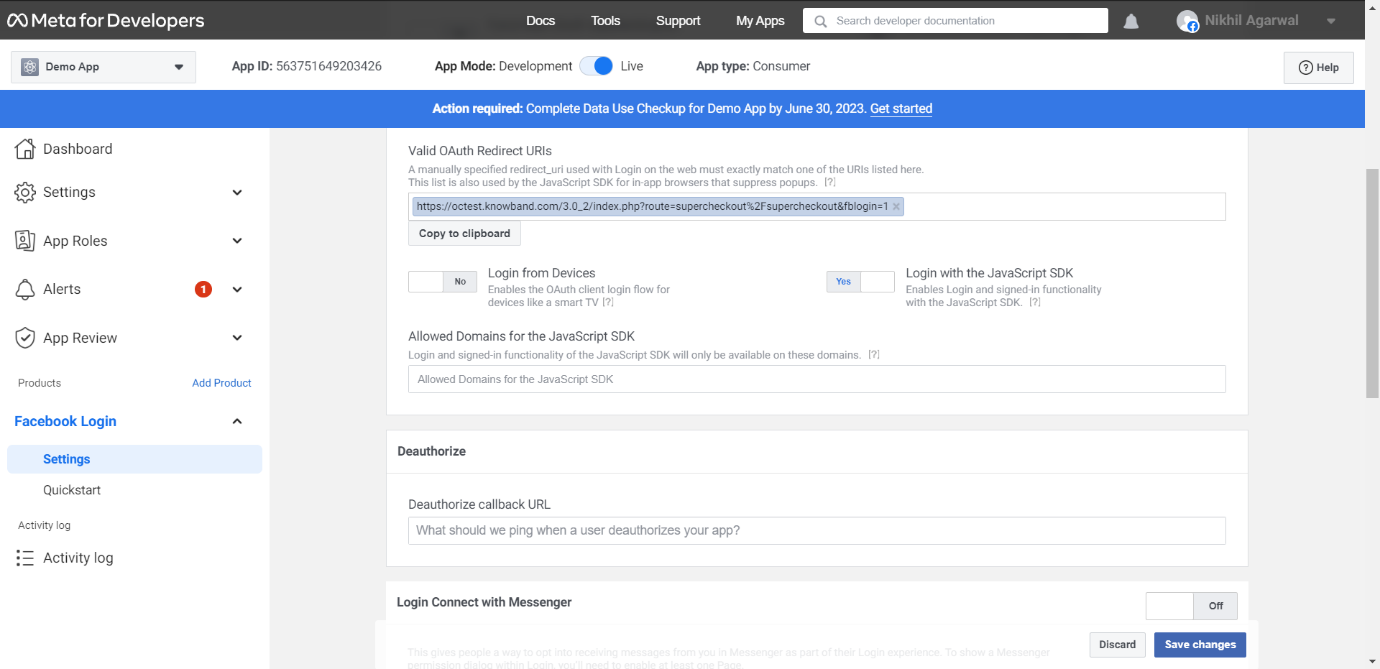
24-26: Click on Settings and add a Valid OAuth Redirect URIs.
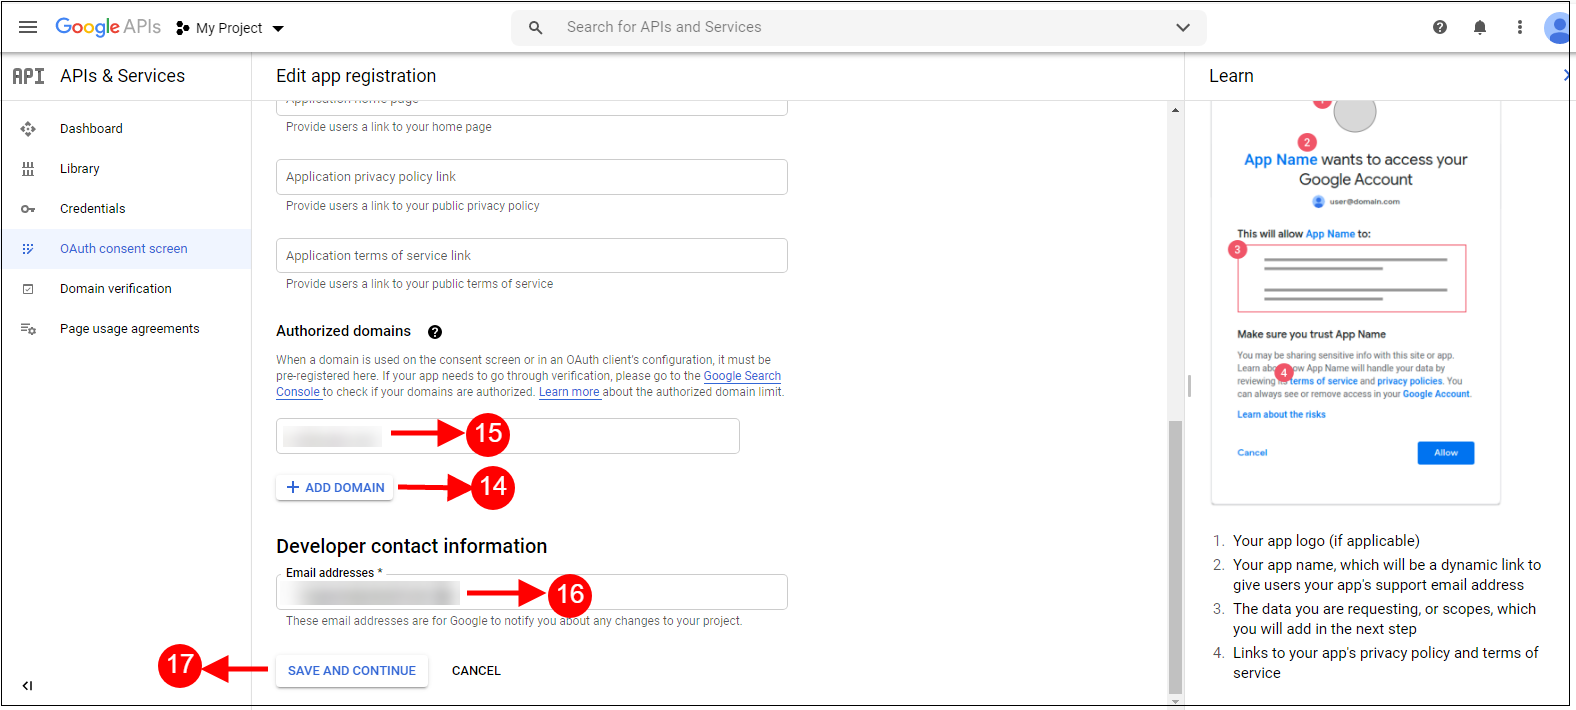
9. Click on Add Domain and add Authorised Domain and then click on Save and Continue.
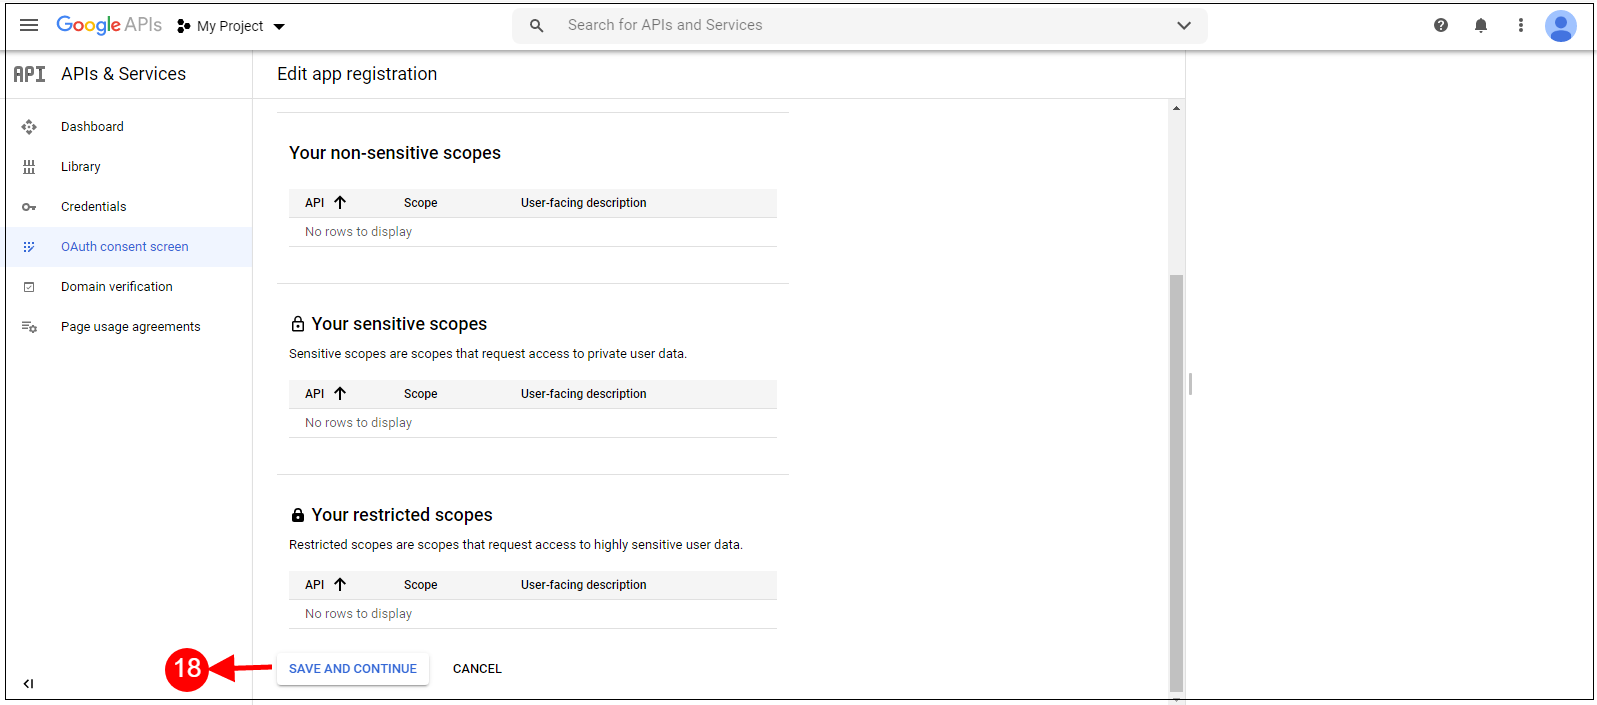
10. Click on Save and Continue button.
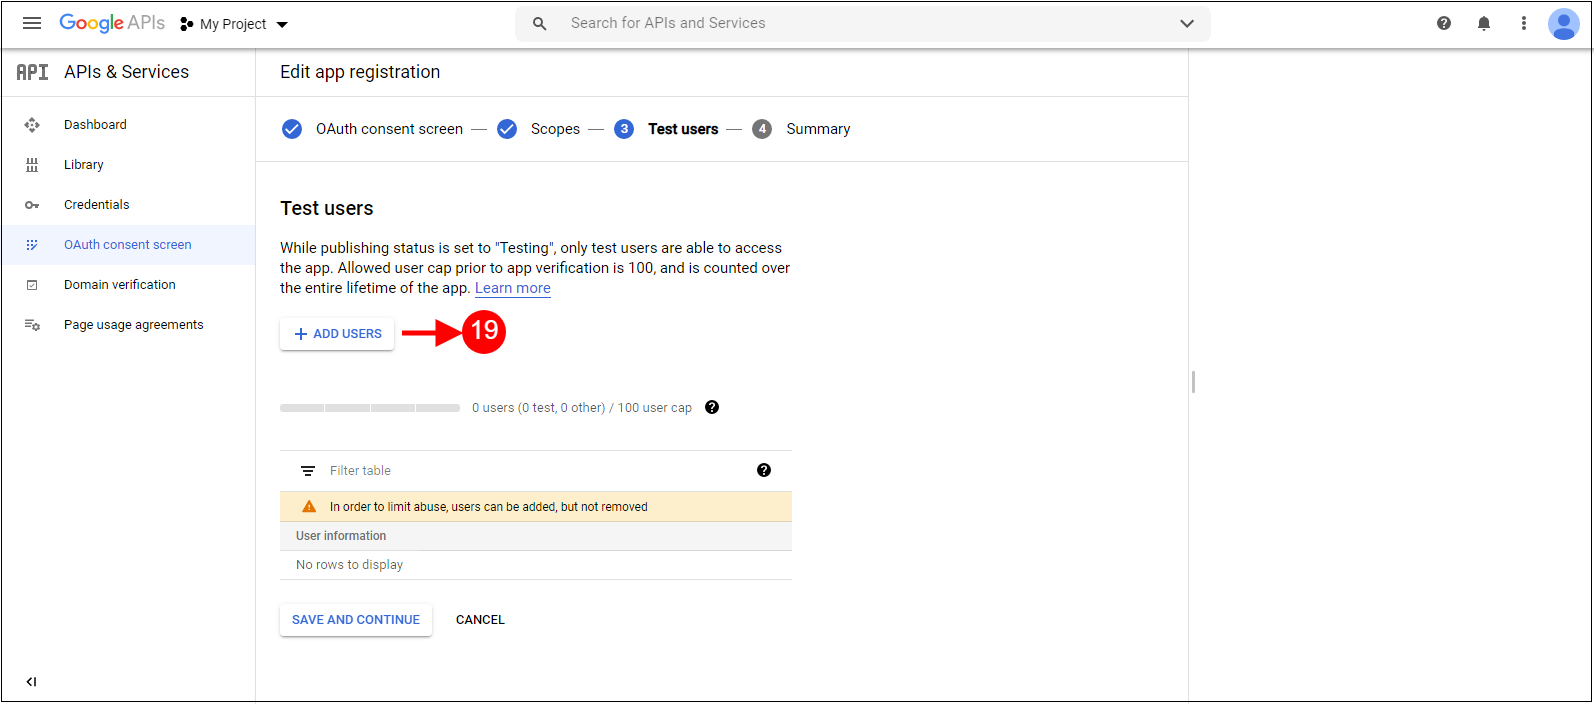
Click on +Add Users.
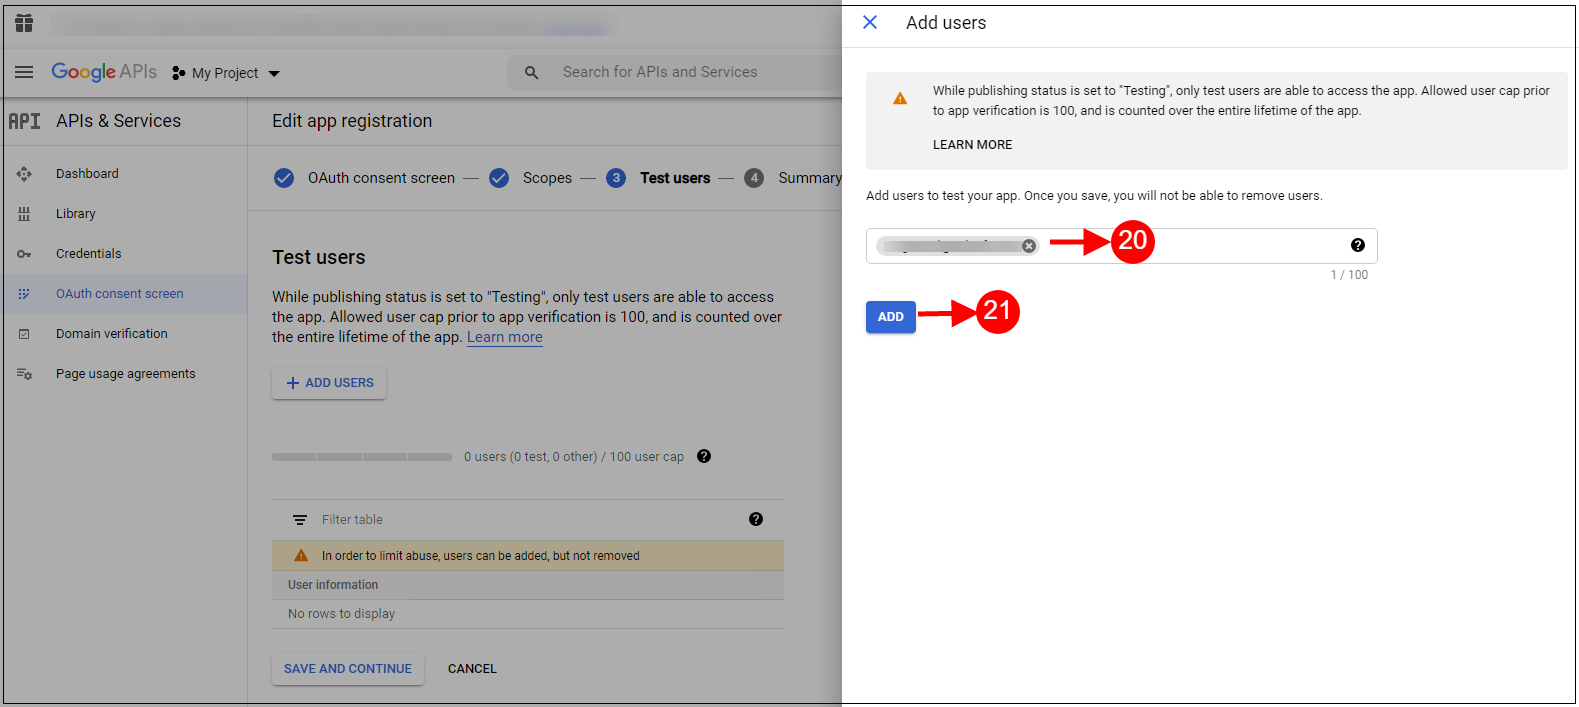
11. Add a user name and click on Add button.
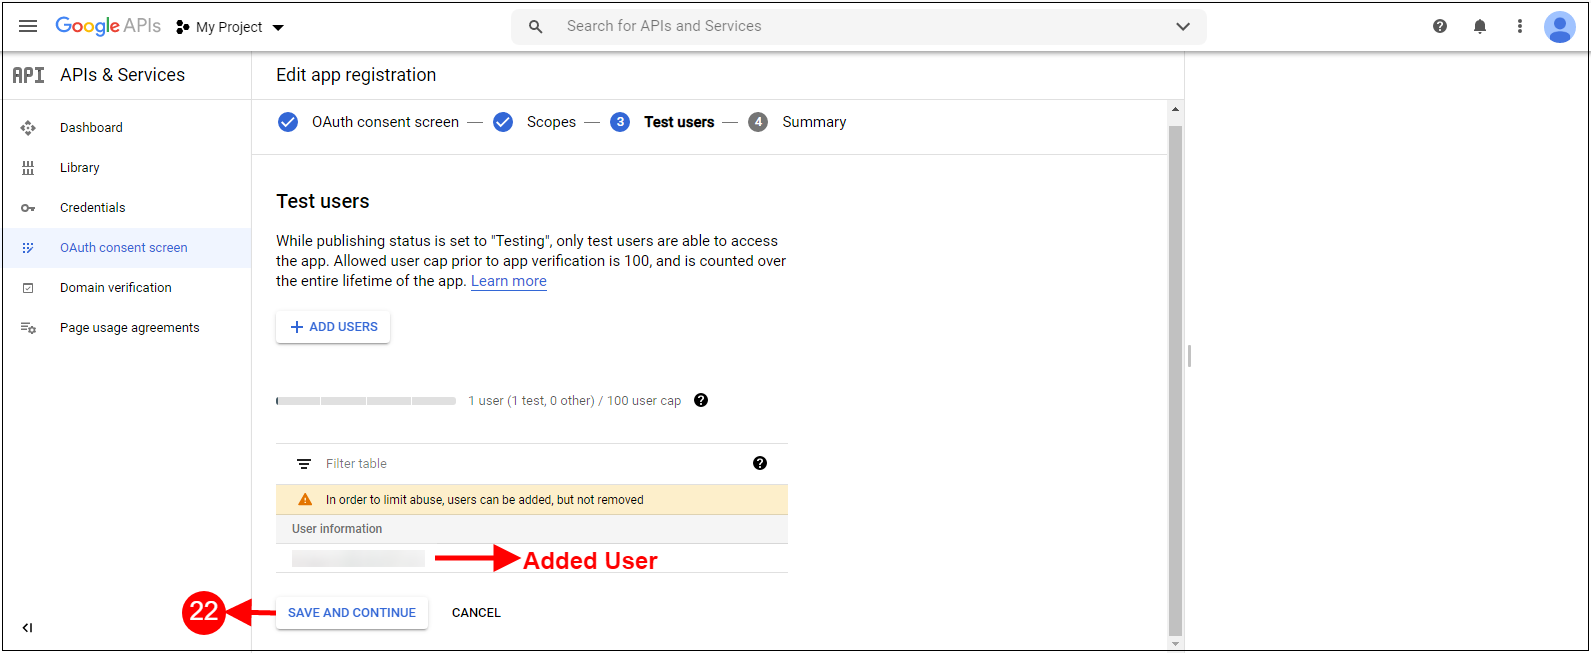
12. The Added user will be visible and then click on Save and continue button.
13. Click on the Oath content screen and then click on Publish Add button.
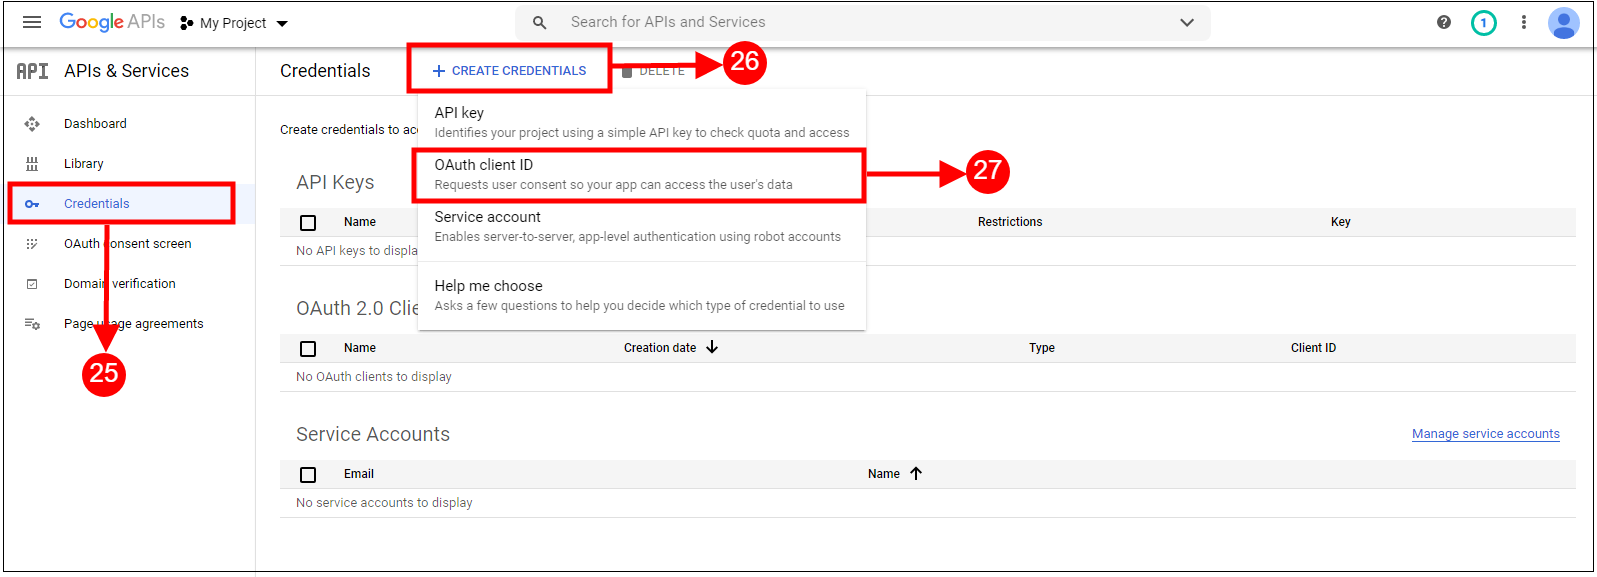
14. Click on Credentials and then +Create Credentials button and then select Oath Client ID.
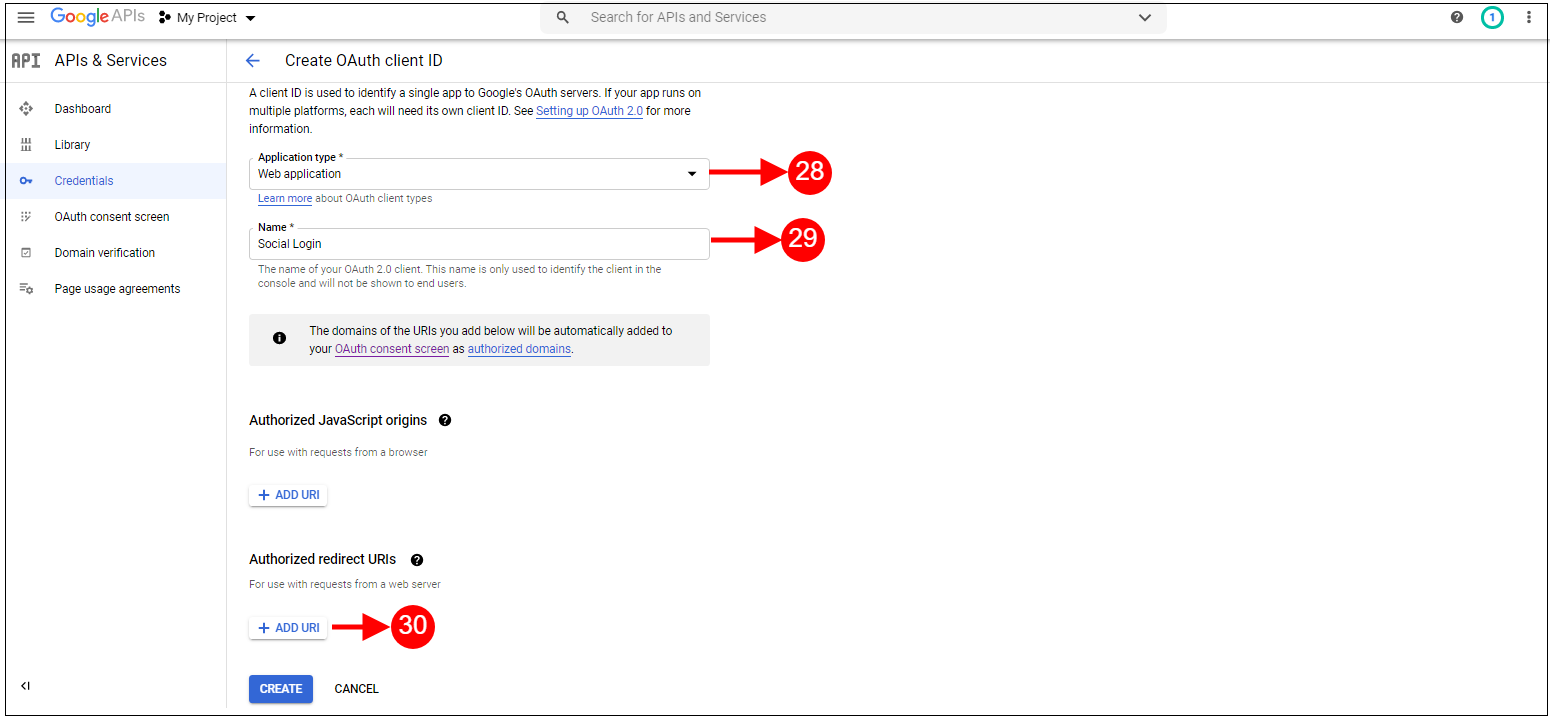
15. Add Application type and Name and then click on Add button.
16. Add the URLs and then click on Create button.
17. Copy and paste Client ID and Client Secret in the Text Field shown below in the Prestashop one page checkout module’s
How to Generate the Google API key:
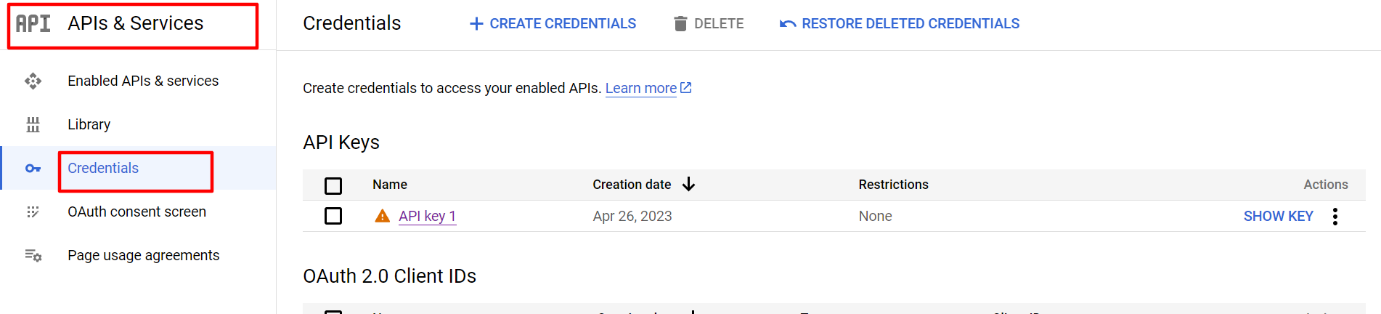
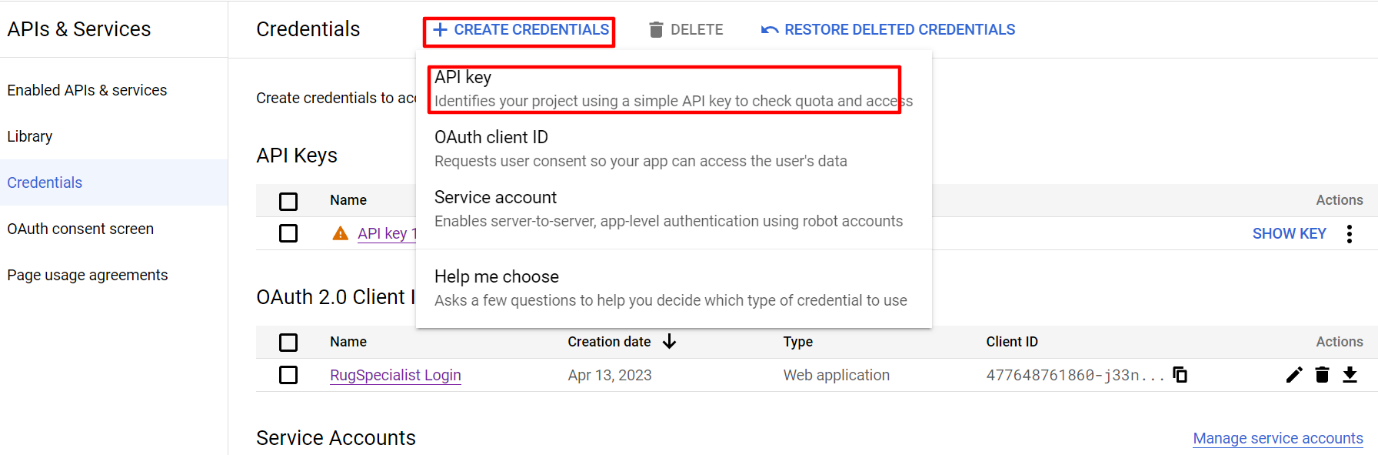
1) Go to API Manager, click on the left menu, click on API & Services, and then click on Credentials.
2) Click on Create Credentials & then select the API key.
3)Copy the API key and enter the same into the Google App Id field of the admin end module’s login page.
3.3 Payment Address
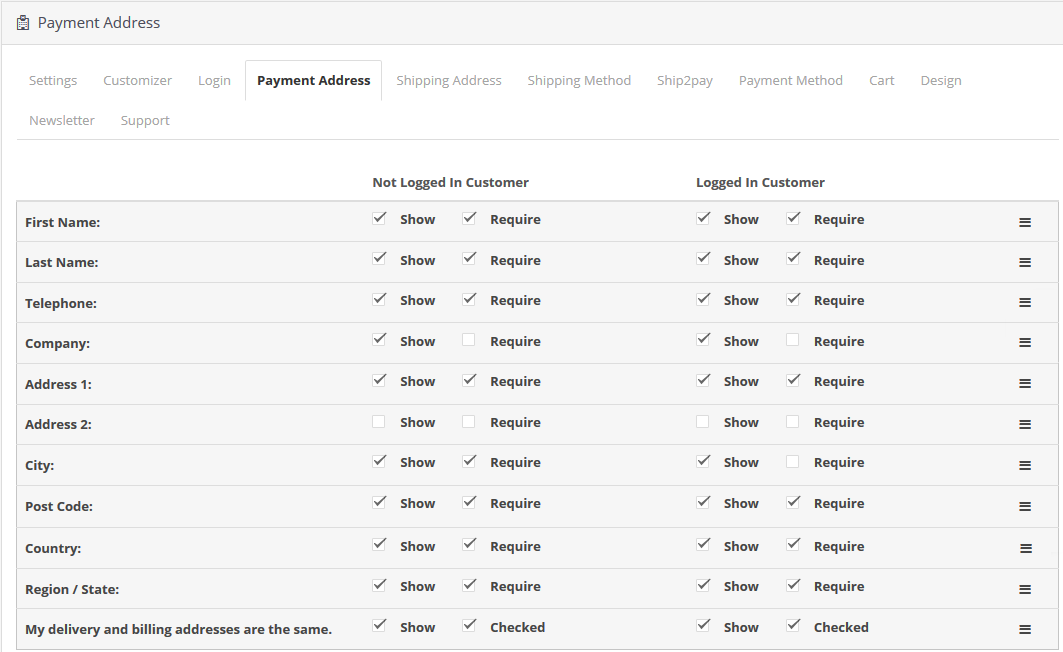
This tab contains settings for the fields which are to be shown in the Payment or Billing Address section on the checkout page as shown below.
It consists of two sections. The one on the left is for Guest Customers and the right one for logged-in customers.
To make a field display/hide in the checkout page check the checkbox just to the left of the Show label.
To make a field mandatory (required field) check the checkbox just to the left of Require Label.
The fields can also be rearranged according to the requirement. To rearrange just move the cursor to the drag icon and drag & drop the field wherever it is required as shown below.
On saving, the fields will be rearranged as per the changes.
3.4 Shipping Address
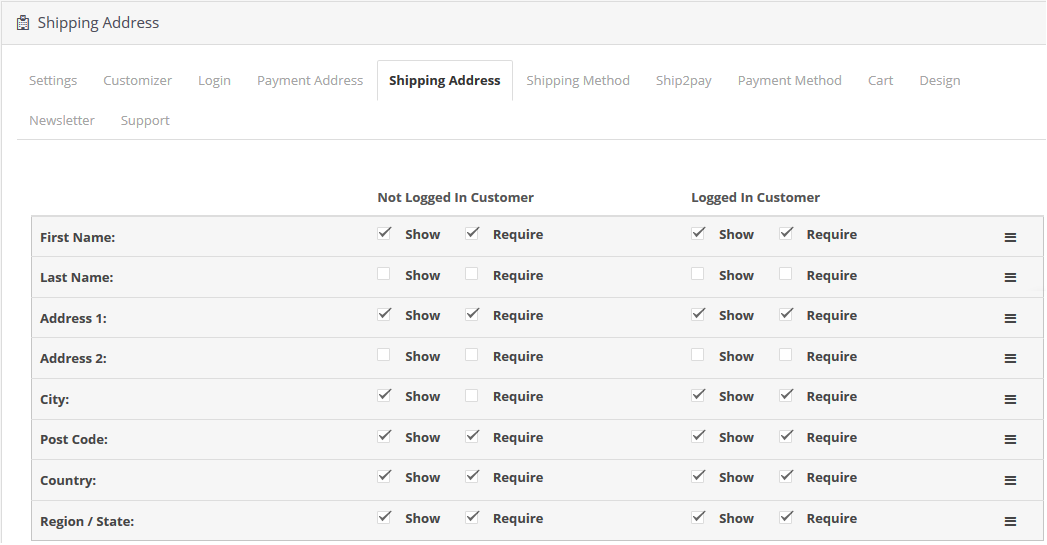
This tab contains settings for the fields which are to be shown in the Shipping Address section on the checkout page as shown below.
It consists of two sections. The one on the left is for Guest Customers and the right one for registered customers.
To make a field display/hide in the checkout page check the checkbox just to the left of the Show label.
To make a field mandatory (required field) check the checkbox just to the left of Require Label.
The fields can also be rearranged according to the requirement. To rearrange just move the cursor to the drag icon and drag & drop the field wherever it is required as shown below.
On saving, the fields will be rearranged as per the changes.
3.5 Shipping Method
This tab contains settings for the shipping method which is shown on the checkout page. It contains settings for enabling/disabling and setting the default shipping method as shown below:
Display Shipping Methods: By this option, you can show/hide the shipping methods on the checkout page. For this, you have to switch the button from ON to OFF or vice-versa.
Display Style: This option allows you to select the display style for the shipping methods you have added to your website. You can choose any style out of three options as Text Only, Image Only, or Text with Images.
Display Shipping Method Title: With this option, you can enable or disable the title for the shipping methods displayed on the checkout page.
Select a Default Shipping Method: This option helps you to select any method as the default shipping method for your store.
Title: With this option, you can set titles corresponding to each of the shipping methods added and configured for your store. You can set the title in English or French language.
Logo: This option allows you to set the desired logo corresponding to each of the shipping methods configured for your store.
3.6 Ship2Pay
The ship2pay feature offered by the OpenCart Supercheckout module automatically disables the payment methods based on the shipping method selected by the customer. That is, the admin can map some particular payment options with some particular Shipping options on the store.
3.7 Payment Method
This tab contains settings for payment methods shown on the checkout page like enabling/disabling or selecting a default method.
Display Payment Methods: By this option, you can show/hide the payment methods on the checkout page. For this, you have to switch the button from ON to OFF or vice-versa.
Display Style: This option allows you to select the display style for the payment methods you have added to your website. You can choose any style out of three options as Text Only, Image Only, or Text with Images.
Select a Default Payment Method: This option helps you to select any method as the default payment method for your store.
Title: With this option, you can set titles corresponding to each of the payment methods added and configured for your store. You can set the title in English or French language.
Logo: This option allows you to set the desired logo corresponding to each of the payment methods configured for your store.
3.8 Cart
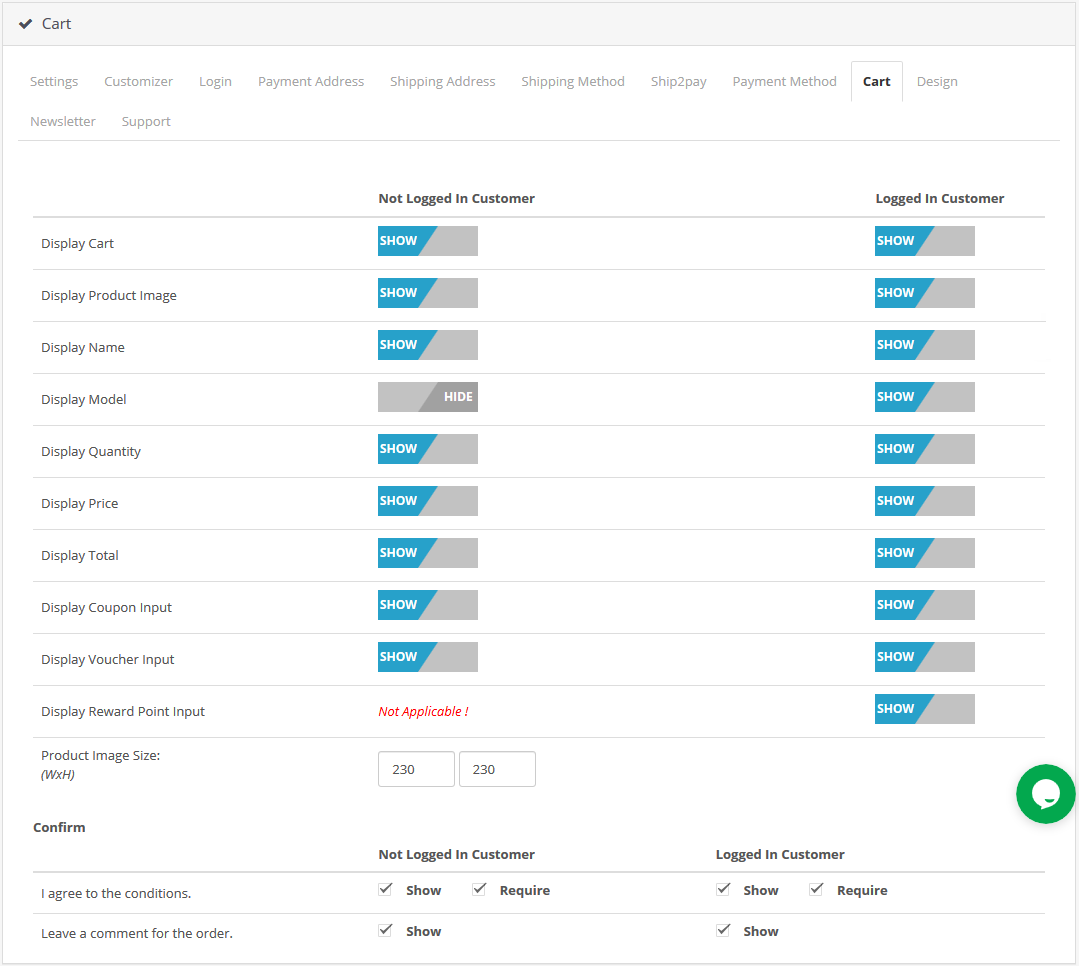
Under this section, you will find the cart fields divided into two sections, the left one is for Guest Customers, and the Right one is for Registered or Logged in customers.
To Display/Hide the cart from the checkout page check uncheck the checkbox present in front of the Display Cart label.
In order to enable/ disable any column in the cart check/uncheck the checkbox in front of that respective column.
To enable/disable the popup images for the product check/uncheck the checkbox in front of that respective column.
To change the size of image popup, enter the width and height of the popup in textbox in front of Product Image Size label.
Coupon , Reward Points and Voucher options can also be disabled or enable by checking/unchecking the checkbox in front of that respective field. Kindly note that rewards point text box will only be visible on Supercheckout page once following three conditions are fulfilled.
a.) Customer must be logged in.
b.) He must have atleast 1 reward point in his account.
c.) He must have a product in the cart which can be purchased with reward points.
Confirm:
This tab is again divided into two sections, the left one is for Guest Customers and Right one for Registered or Logged in customers.
To enable the comment box for the order by customer check the checkbox in front of that Leave a comment for the order label & to disable uncheck the same checkbox.
To enable agree to the term or any other information saved in the admin for the store check/uncheck the checkbox in front of I agree to the conditions label.
3.9 Design Tab
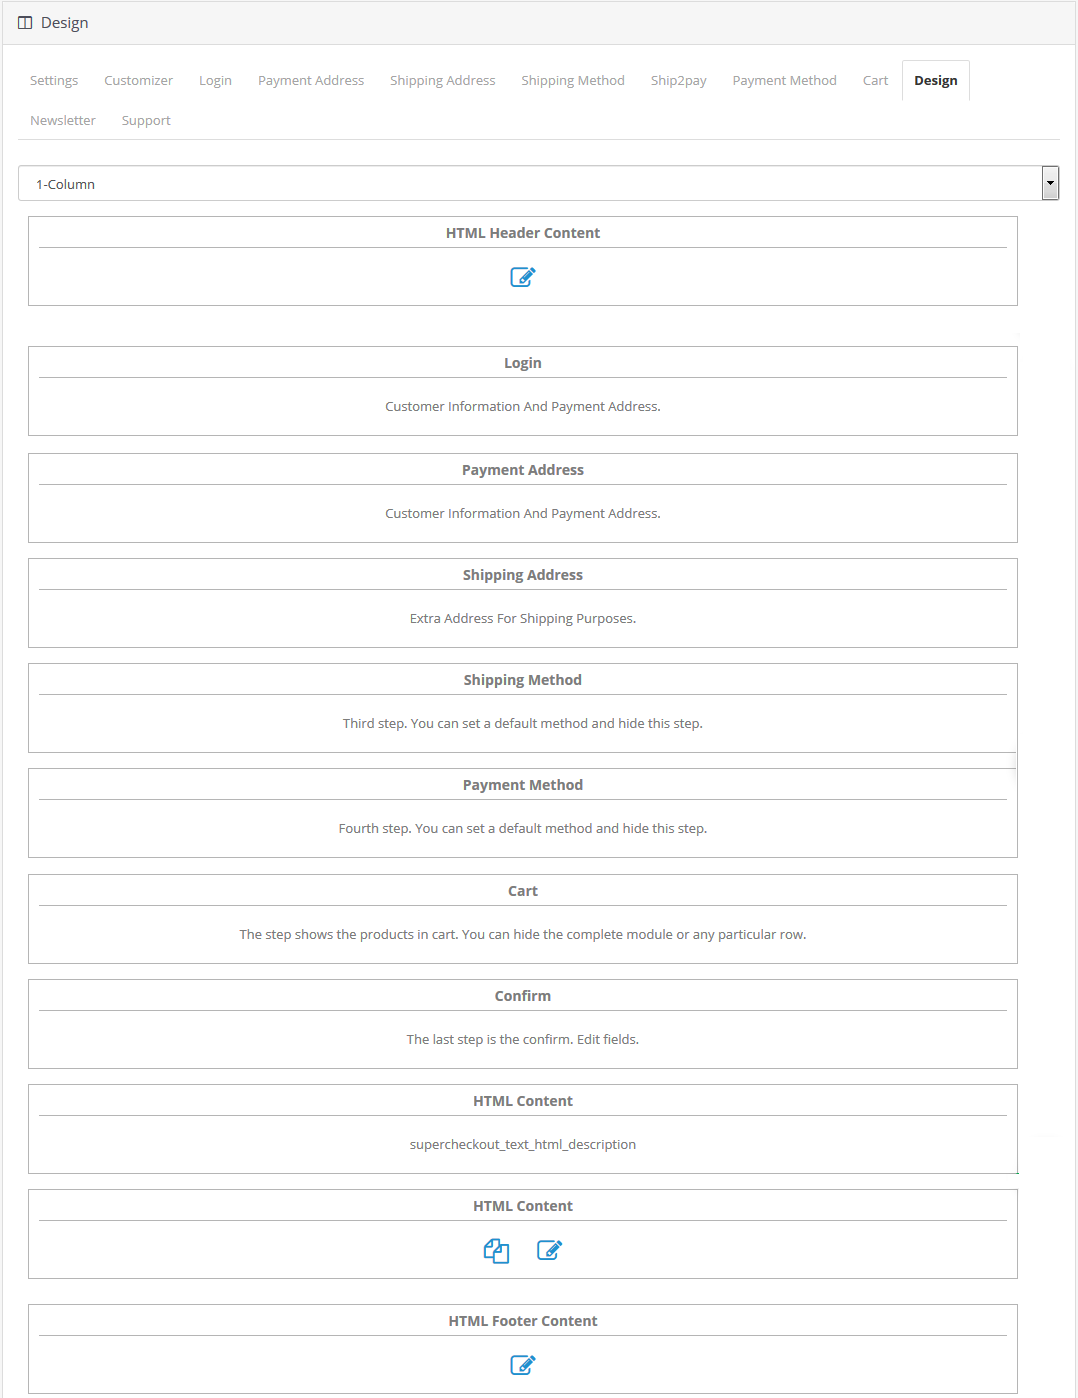
This tab contains the settings for the design of OpenCart One Page Checkout Pro as shown below:
1-Column
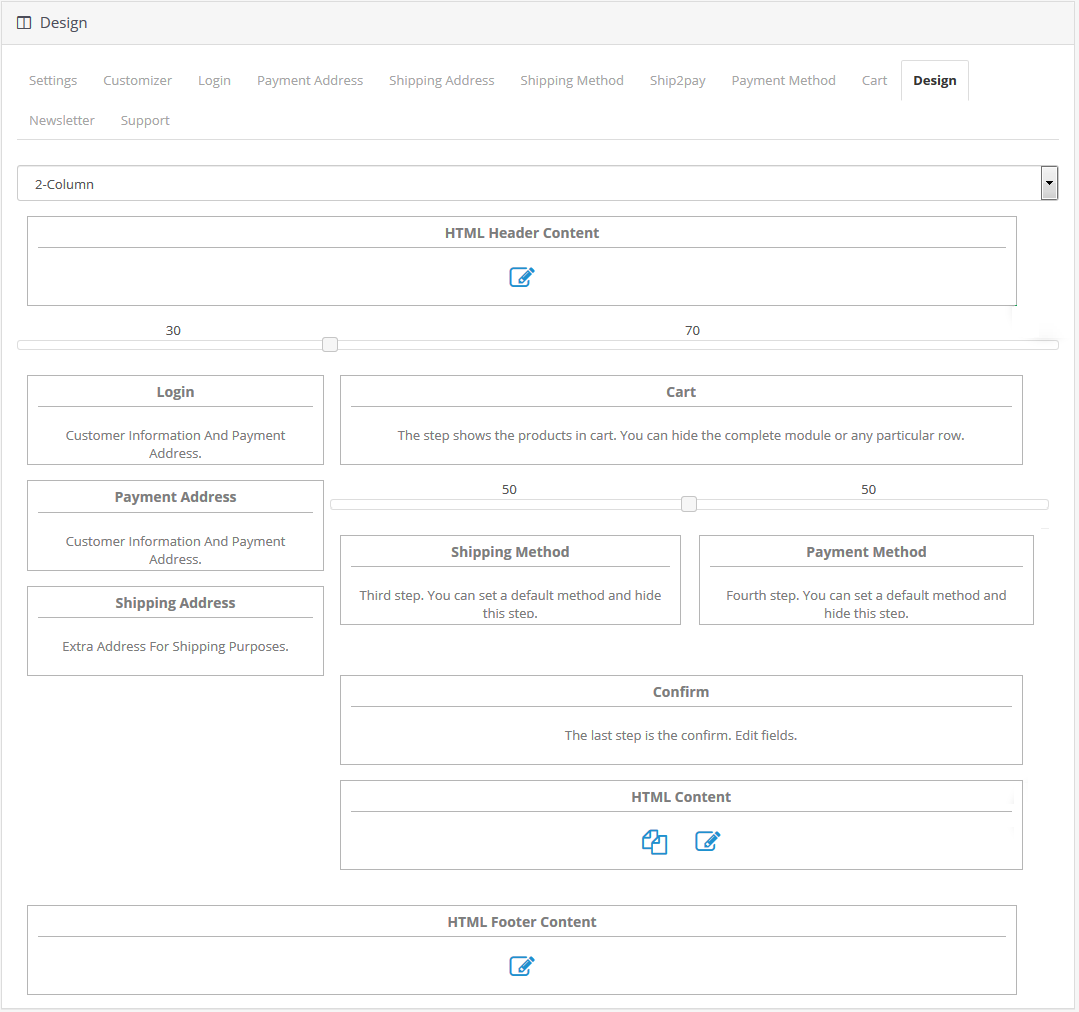
2-Column
3-Column
You can easily change the width of any column adjust the slider present at the top as shown below.
Also, you can reposition different blocks of checkout page using simple drag and drop action. On saving, the block will be rearranged in the checkout page as per the changes.
3.10 Newsletter
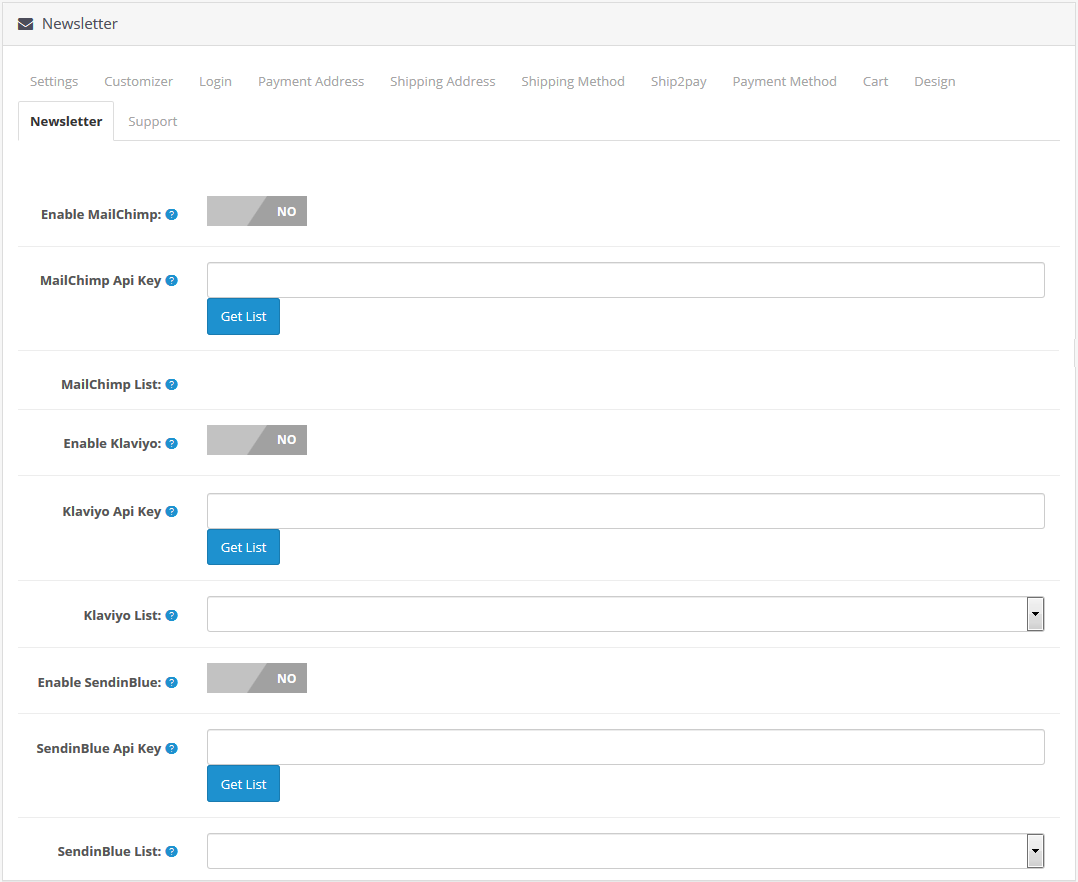
By clicking on the Newsletter tab of the OpenCart responsive one-step checkout module, you can configure the MailChimp, SendinBlue, and Klaviyo Integrator settings as shown below:
Enable MailChimp: You can enable or disable the MailChimp Integrator functionality for your store. You can enable this option if you want to boost newsletter subscriptions for your store.
MailChimp API Key: This option helps you to set the Mailchimp API key for capturing customer’s emails.
MailChimp List: Once the key is configured with this OpenCart fast checkout extension, you can fetch and select the MailChimp List.
The same can be done for SendinBlue and Klaviyo.
4.0 Front Interface of OpenCart One Step Checkout Extension
When the user clicks on “Add to Cart” button corresponding to a product and performs its checkout, they will see the following supercheckout on their screen.
5.0 Tutorial of Opencart One Page Checkout Pro by Knowband
To make the installation, setup, and configuration process completely hassle-free, we have created a detailed and easy-to-understand tutorial for OpenCart One Page Checkout Pro by Knowband. This step-by-step guide walks you through everything, from downloading and installing the module to configuring all its powerful features for a faster, smoother, and more user-friendly checkout experience.
Whether you are new to OpenCart or an experienced user, the tutorial ensures you can effortlessly customise fields, manage social login options, enable guest checkout, configure payment and shipping methods, and optimise the overall design without any confusion.
Watch the full tutorial here to ensure a seamless installation and smooth operation of the One Page Checkout Pro Extension.