What are different ways of reducing Post-Holiday Returns?

It is very essential to reduce post-holiday returns. Industry, sales channel, product type, and how to return data are collected and counted all affecting return rates. Further, the younger customers are driving the trend according to the reports. The reason is, they see internet purchases as rentals. Moreover, returns might rapidly undo your holiday success if you don’t account for them and discover:

  1. Sales are lower than expected
  2. Converted fewer clients than the originally
  3. Compared to sales cost and profit margins, sales cost is higher and profit margins are lower.

Therefore, in this blog, we will be discussing ways of reducing holiday returns and automating the returns process. However, before that, we will understand why it’s important to reduce the returns?

Why it’s important to reduce the returns?

The first step is to analyze why do people are returning products as this will give you valuable insights and even make you understand the real problem. Furthermore, it is to everyone’s best advantage to reduce the number of returns you receive. 

You might not be aware but lesser returns can save a lot of money on replacement items, shipping, as well as other factors. Moreover, it provides a better as well as efficient customer experience which is again good for eCommerce business. As a result, trust is created between your business and potential buyers.  

Henceforth, keeping the rate of return lower can result in better business. 

What are the ways of reducing returns?

  • Begin with quality control

The first way that helps in reducing post-holiday returns is “Begining with quality control”. Furthermore, 23% of returns happen as companies ship an incorrect item. Mis-ship happens usually when businesses grow.

Being a small retailer, you can wrap as well as send every order. It would be great if you double-check the order before shipping. When you adopt a hands-on approach, it’s easy to ensure that shipments are proper. Whereas larger businesses can opt for automation that can help you in resolving the issues. Furthermore, the Inventory management software includes a warehouse management feature that helps in reducing the number of returns your receive. 

  • High-Quality Photos

High-quality photos can even help in reducing post-holiday returns. Furthermore, such photos help customers understand the product better. Make sure you take pictures from different angles to make customers understand each feature of the product. 

In case you are not good at photography, feel free to hire a professional photographer. Money spent on getting good pictures will pay for itself with a reduced return rate. 

  • Better Product Descriptions

Writing better product descriptions can help customers understand the product well. Speaking about better product descriptions, make sure you include everything about the product. For example, if you have been selling furniture, make sure your product descriptions consist of measurement of the product, color, and material. This way customers can decide better and this will create transparency which is liked by customers a lot. 

  • Represent Sizing Correctly

Products that do not fit are one of the most common reasons for returns in the apparel industry. Because online buyers can’t try on garments before buying them, it’s understandable that products be returned because they don’t fit.

With the assistance of resources like size software and sizing charts, you may limit the number of returns you receive due to sizing concerns.

Knowband Modules assist in reducing post-holiday returns

Knowband, known as an eCommerce solution provider and module development company. Furthermore, Knowband has earned a reputation for offering efficient development services and post-sales support. Moreover, it offers a boost to your business by offering best-in-class plugins for different eCommerce platforms such as Magento, Prestashop, OpenCart, Shopify, and others. 

Knowband even offers some great modules for reducing post-holiday returns as well as reading the specifications of these modules helps in reducing the chances of return.

Module 1: Product size chart
The product size chart module helps in reducing post-holiday returns. Knowband offers this module for different eCommerce platforms such as:

Prestashop Addons

Magento 2 ® Extensions

Magento ® Extensions

Opencart Extension

Module 2: Product Video

The product video module is highly beneficial for eCommerce businesses. This helps customers to understand the product better. As a result, the return chances get reduced. Knowband even offers the module for different eCommerce platforms:

Magento 2 ® Extensions

Magento ® Extensions

OpenCart Extensions

Prestashop Addons

Module 3: Gift Card

Digital Gift Cards are a blessing for eCommerce stores. These enable customers to purchase accordingly from the specific store. Gift cards even provide freedom to permit them to purchase what they need. Furthermore, this offers the satisfaction of having gifted well.

PrestaShop Addons

Opencart Extensions

Magento 2 ® Extensions

Magento ® Extensions

Module 4: Product Review

Product review also helps customers make decisions better and feel more confident. Furthermore, the more reviews you have, the more confident a customer is that they’re making the right choice. Reviews can also assist a store’s internet visibility.

Product Review Reminder And Incentives – Prestashop Addons

Review Reminder And Incentives – Magento 2 ® Extensions

Review Reminder And Incentives – Magento ® Extensions

Final Note

Analyzing as well as testing your approach to returns and ways of measuring up to your peers is a great way of generating a return on your post-holiday returns. Along with that, another way of generating a return on post-holiday returns is by utilizing these modules.

In case you face trouble, feel free to write us at support@knowband.com

Knowband Magento Product Video Extension – User Manual

Introduction

Product Video is an extension which can be used to assign videos to a product and show them on the product view page. The Store admin can assign unlimited videos for a product. Each video can be set to active or inactive individually. One video can also set as default video. Videos on the front page are shown inside a division and queued in the form of a slider. Admin has the option to select videos from “YouTube”, “Vimeo” and “Dailymotion”. Admin can also choose the location of the videos to be shown on the product view page.

Features:

  • Easy to install and configure.
  • There is no need to change codes for implementation.
  • Magento Product Video extension is highly customizable.
  • Adding video module allows showing video in different positions.
  • You can add videos from various platforms(YouTube, DailyMotion, and Vimeo).
  • Magento video upload allows adding multiple videos on a product page.
  • Magento extension offers autoplay video option.
  • Vimeo extension allows admin to show/hide display controls.
  • The store admin can exclude Jquery files.
  • Adding video module is SSL enabled stores.
  • Dailymotion addon is multi-store compatible.
  • Product video upload is multi-lingual compatible.

Installation

Follow the following steps for installing Product Video Module:

  • Download the extension package.
  • Unzip the package on your root folder of Magento setup via FTP manager (like Filezilla or WinSCP – download here).
  • In Admin Panel go to “System > Knowband Extensions > Product Video”.

  • That is all – Your system is ready.

User Manual

This User Manual Guide users through the Admin Module/Store Front settings and features of the Product Video Module.

Admin Panel Settings

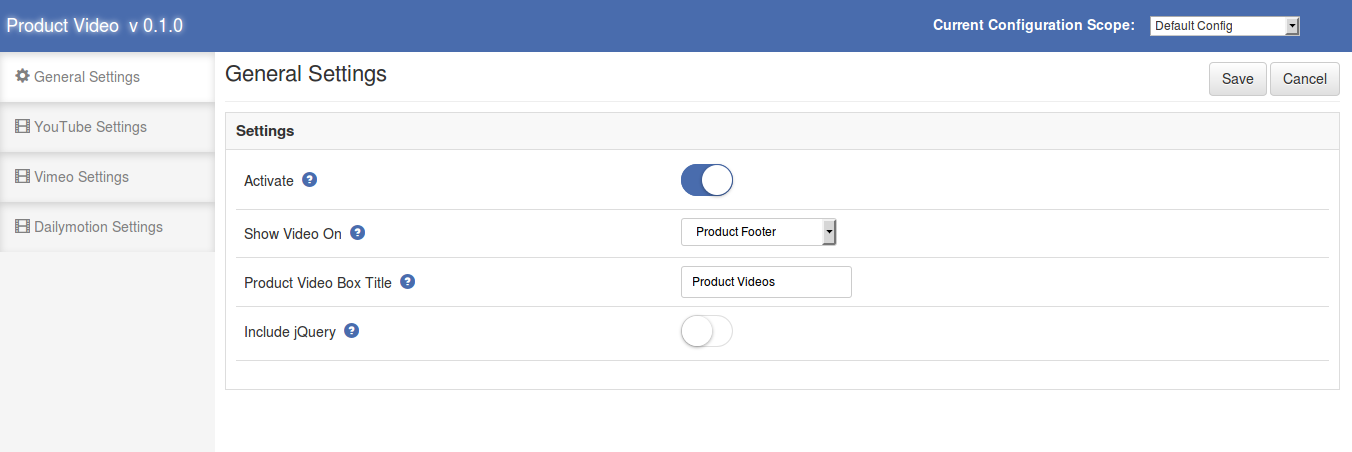
Admin Panel Settings contains the 4 tabs for settings.

1. General Settings

The General Settings has following options:

  • Activate: Enables or Disables the plugin. Switch it on to enable the module.
  • Show Video On: Select the position of the video box to be shown in the product view page. There are two options to choose. Select “Product Footer” if you want to show the video(s) near the footer area of the page and “Product Right Column” option is to show the video(s) below the add to cart button at the right column in the product view page.
  • Video Box Title: Set the title of the video box in front. Leave it blank if you don’t want to show any text in the header part of the module.
  • Include jQuery: This option allows us to include jQuery in our module so that the module can work for other versions of the Magento also.

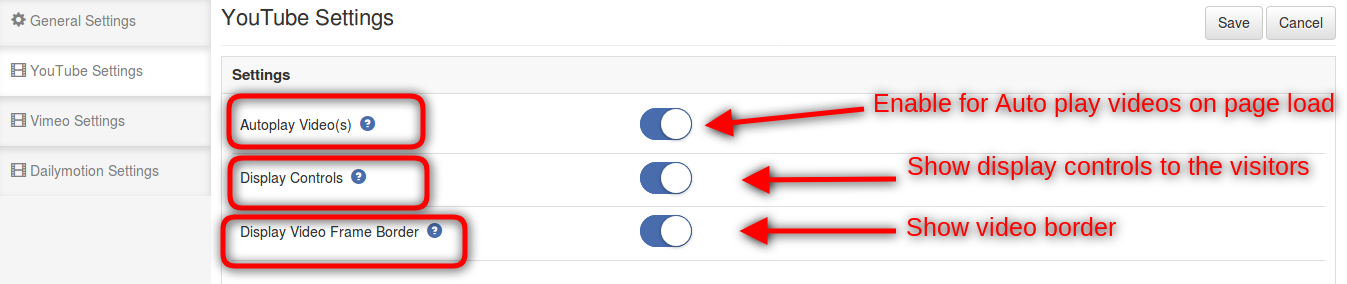
2. YouTube Settings

This tab is used to change the settings of the youtube videos shown in front. It has following options:

  • Autoplay Video(s): Switch on this option to make the videos play automatically whenever the product view page is loaded.
  • Display Controls: When this option is switched on, then video controls are shown whenever the videos on the product view page are played.
  • Display Video Frame Border: Check on this option to show the Frame border for the video.

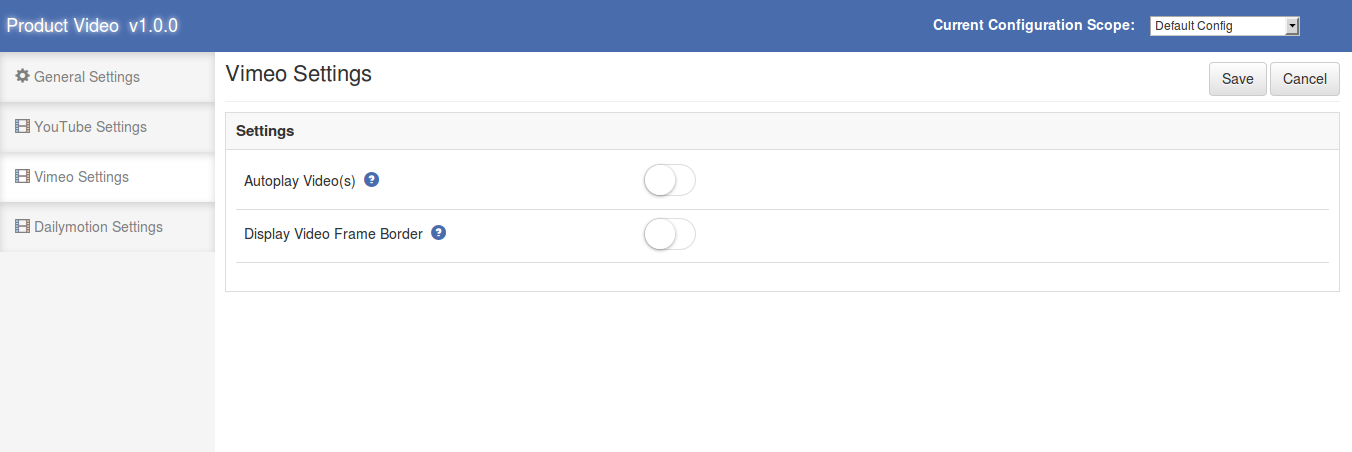
3. Vimeo Settings

Vimeo Settings tab is used to change the settings for Vimeo videos. It has the following options:

  • Autoplay Video(s): Switch on this option to make the videos play automatically whenever the product view page is loaded.
  • Display Video Frame Border: Check on this option to show the Frame border for the video.

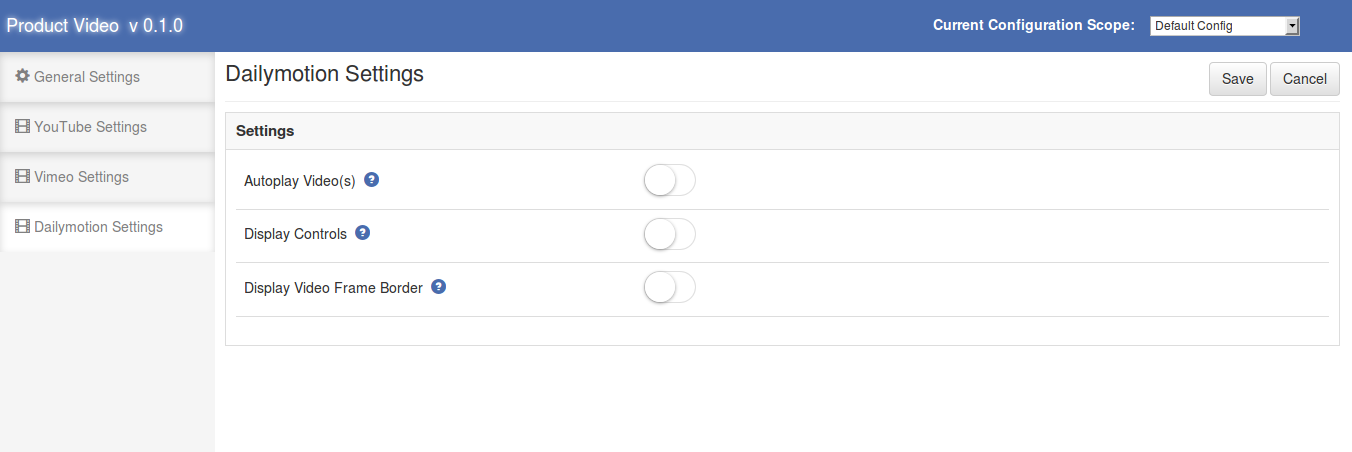
4. Dailymotion Settings

Dailymotion video settings can be changed from here. It has following options:

  • Autoplay Video(s): Switch on this option to make the videos play automatically whenever the product view page is loaded.
  • Display Controls: When this option is switched on, then video controls are shown whenever the videos on the product view page are played.
  • Display Video Frame Border: Check on this option to show the Frame border for the video.

Admin Panel Video Settings

Admin Panel Video Settings contains the following options/features.

1. Product Video Tab

When the module is enabled from the “General Settings” tab in admin panel, the “Product Video” tab is added in the options bar shown in the left panel of product edit page.

When this tab is clicked a table is displayed. This table contains details of all the videos assigned to that product. We can add new videos, edit existing videos and delete them.

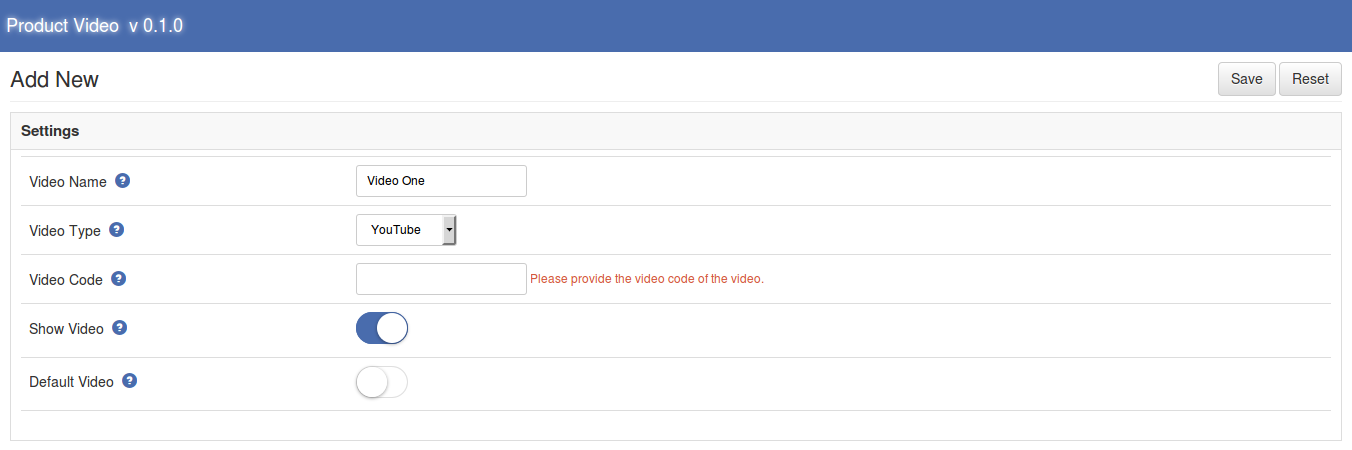
2. Add Video

To add new video click on the “Add New” button shown in the table head area. When we click this button, a new form openes where we have to fill the details of the new video. Add new video form has following fields:

  • Video Name: This is the name of the video that we are adding.
  • Video Type: Here we have to select the type of the video that we want to show in the front. If you want to show the YouTube video then you have to select the youtube option same for rest of the options.
  • Video Code: This is the most important data to show video in the front and should be filled very carefully. Video code is uniquely defined code for every video. You dont have to give the full URL of the video just give the right video type and copy the video code. Video code is taken by following way.

Example –

  • For YouTube, if the video page URL is “https://www.youtube.com/watch?v=LCohV07kSRi” then the video code will be “LCohV07kSRi”.
  • For Vimeo, if the video page URL is “https://vimeo.com/142220544” , then the video code will be “142220544”.
  • For Dailymotion videos, if the page URL is “https://www.dailymotion.com/video/x2v0voc_micromax-yu-yuphoria-camera-review_tech”, then the video code will be “video/x2v0voc_micromax-yu-yuphoria-camera-review_tech”.

Full URL of the video can also be given.

  • Show Video: This option is used to make a video visible or hide from the front. Switch this option to show the video in the front.
  • Default Video: Using this option we can make a video default video. The default video is shown first on the front. Only one video can be a default. Whenever we turn on this option and save the video, then all the other videos are set to ‘not default’ videos and the current video is set as default video.

3. Edit Video

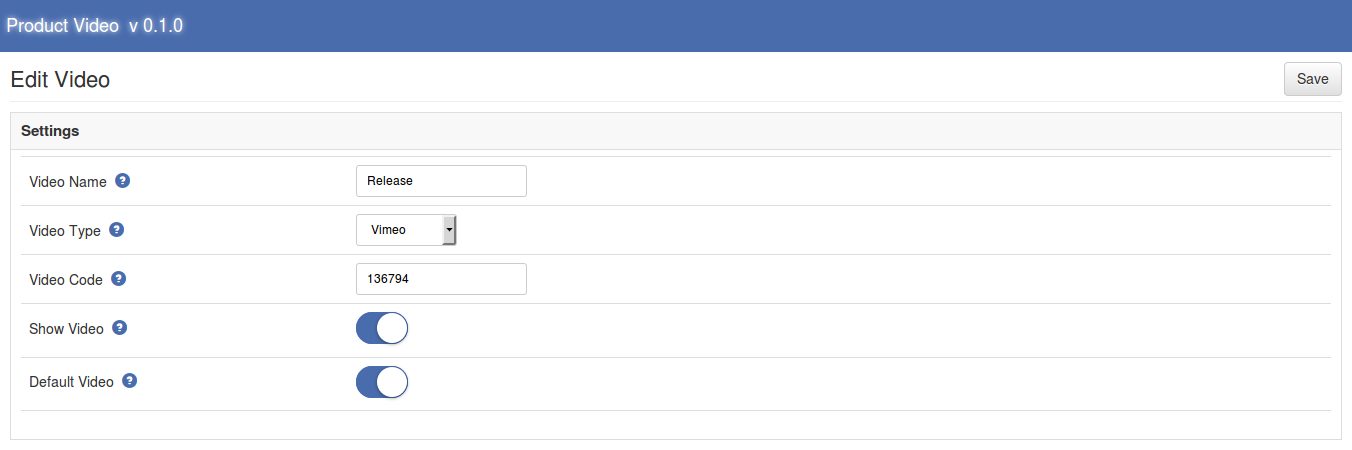
To edit a video details, click on the “Edit” link provided in the last of every table row. When we click on the “Edit” link a new page is opened. Edit page provides a form which is filled already by current values and we can change those values.

Edit page has the same options as the add page but the only difference is that by default the values are filled in the Edit page.

4. Delete and Mass Delete

These options provide the functionality to remove assigned video(s).

If you want to remove only one video from the list, then go to the video table and click on the “Delete” link shown in the front of every row, the respective video will be deleted.

If you want to remove/delete multiple videos at a time then check the checkbox for the video that you want to remove and then click in the “Delete Selected” button to delete all the checked videos.

These both actions cannot be undone.

Store Front

If the module is enabled, and at least one video is active then the video box is shown on the product view page. The location of the box depends upon the settings given in admin panel. The video box is not shown in following cases:

  • The product has no video assigned
  • Product has videos but no video is active
  • Module is disabled from the admin panel

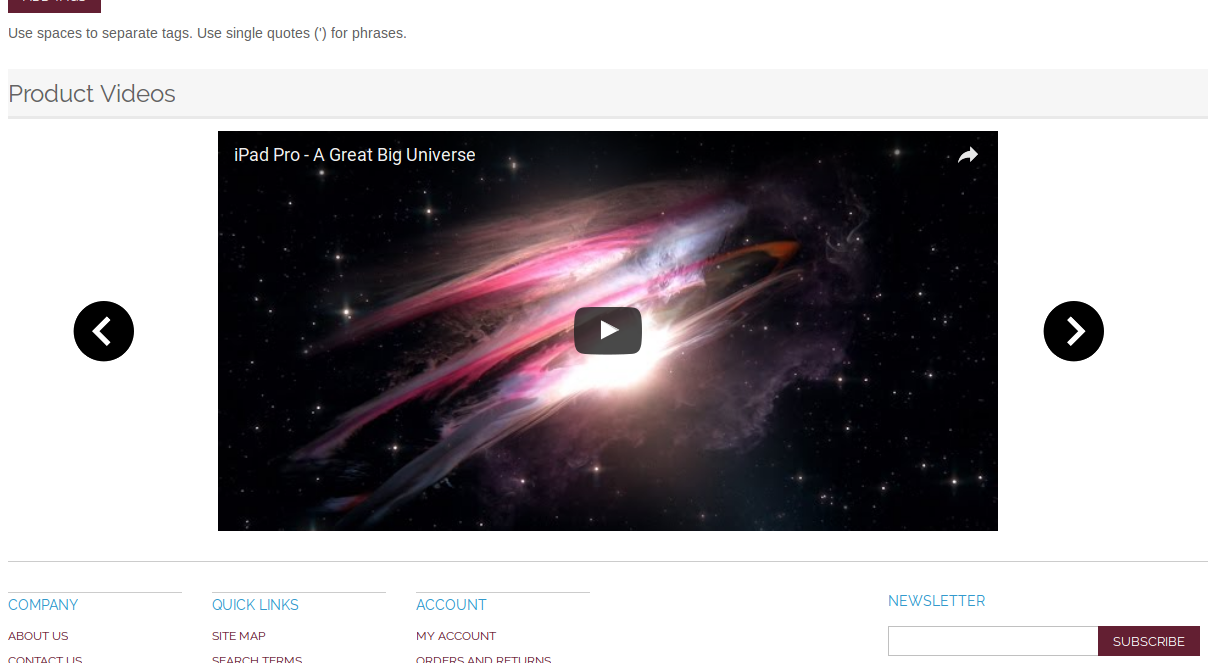
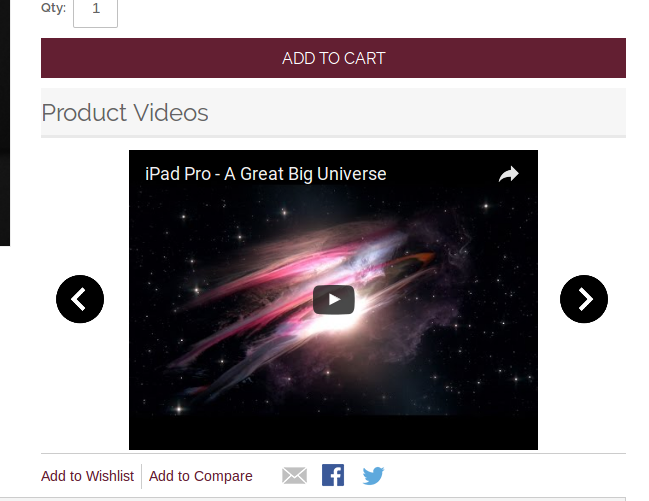
The module at the front-end appears as follows:

Module at footer area.

Module at the right column.

For more details:

Module Link: https://www.knowband.com/magento-product-video

Watch Video: https://www.youtube.com/watch?v=U9AhCFH-b18&feature=youtu.be

Admin Demo Link:

https://mademo1.knowband.com/index.php/productvideo/adminhtml_index/index/key/ac91efaa6d652ee58a922da7896dbb33/

Front Demo Link: https://mademo1.knowband.com/

Please contact us at support@knowband.com for any query or custom change request as per your business requirement.