How to Install Magento In Ubuntu?

Magento is one of the most popular Content Management System(CMS) for an E-commerce website. It is one of the most flexible E-commerce platforms. Magento uses MySQL as its database, PHP as the programming language and elements of zend framework. It has two Editions one is a Paid edition and other is an Unpaid edition:

  • Enterprise Edition ( Paid )
  • Community Edition ( Unpaid )

The tutorial runs you through the ways to install Magento on Ubuntu. Read on to know:
picture1

Prerequisites for installing Magento

Before we begin, there are few steps that are needed to be completed in order to install magento. These steps include :

  • You will need at least 2 GB ram for installing magento on Virtual private server (VPS).
  • You will need a LAMP(Linux, Apache, Mysql and PHP) stack installed on your VPS server.
  • Now for installing it you need to first download magento, you can get a community edition version of magento online.

Getting Started

  • After complete download you will see a ZIP folder named mazento.zip on your downloads folder.
  • Copy the Zip Folder to the path provided below :

/var/www/html

  • Extract the files here by right clicking on the zipped folder and then left clicking on the Extract here option.

Creating Database using PHPMyAdmin

For creating a database follow the steps provided below :

  • Open a new tab of your browser and enter the following on the address bar :

localhost/phpmyadmin/

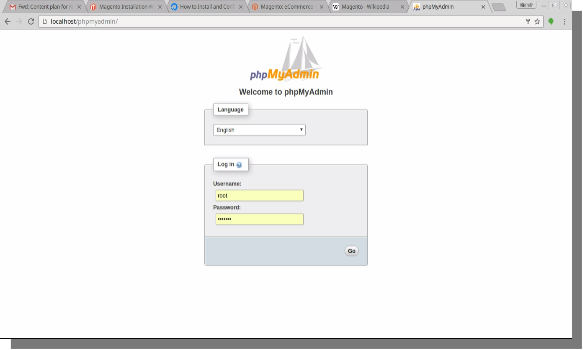
  • Press enter you will see the login page of PHPMyAdmin. Enter the Username and Password and click on Go to login. The login page will look like this.
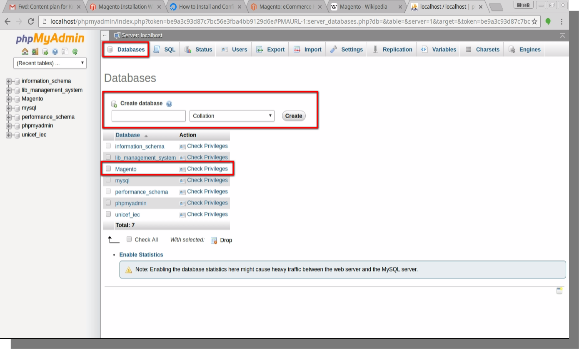
  • You will see phpmyadmin main page, click on database, you will see a create database option.
  • Enter the name of database( say magento) and click on create option, your database will be created as shown below.
Importing sample database on Your database

After successfully creating the database, you have to import the sample database on your database. Now for that you have to follow the below mentioned steps:

  • Click the import option on phpmyadmin page.
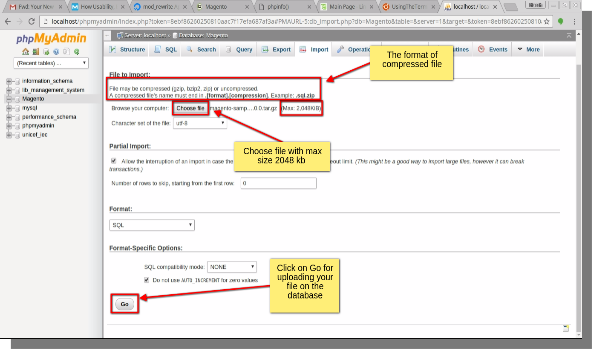
  • Now click on the choose file to upload the sample database on your database.For uploading a file you have to note the following properties of the uploaded file:
  • The maximum size of the file must be 2048 kb.
  • The format of the file must be .sql format.
  • The type of compression used to compress large files must be .zip
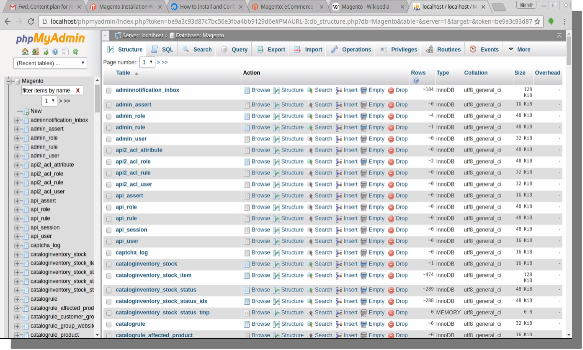
  • Now click on Go option and your file containing sample database will be uploaded on your database.You will see that the files are uploaded on your database.
Triggering magento setup file

Now all you have to do is to trigger the magento setup file. Consider the following steps for the same.

  • Now open a new tab of your browser and enter the following path:

Localhost/magento or

localhost/magento/index.php/install

License Agreement

  • You will be directed to Magento’s installation page, accept the agreement’s terms and conditions and click on continue.

Localization

  • Select the Locale(language), Time zone and Default currency and click on continue.

Configuration

  • Here you will encounter the “write permission issue”, you have to fix all these issues before continuing further.
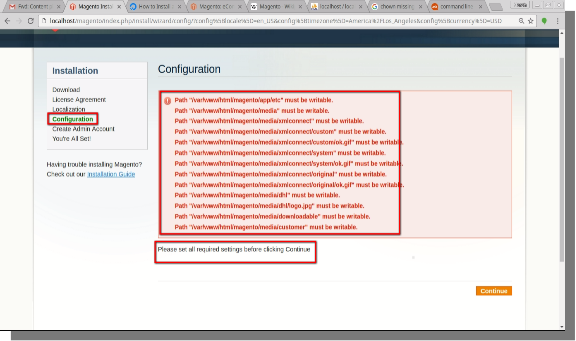
  • For fixing the write permission issue follow the below mentioned steps:
  • Open the terminal of your system.( CTRL+ALT+T )
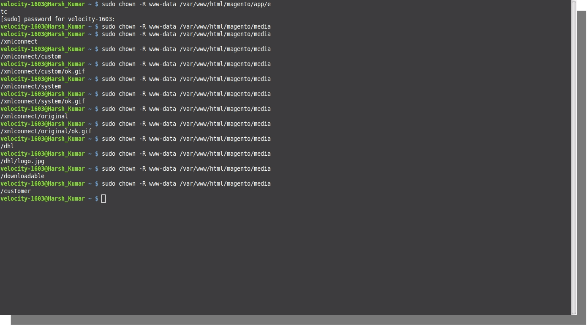
  • Enter the following command to resolve the permission issues:

sudo chown -R www-data /file path

Eg: sudo chown -R www-data /var/www/html/magento/app/etc

  • It will ask you for the system password, enter your system password and press enter, it will ask the password only once.
  • Enter the command for all the files having same issue, using the example above and then click continue option on the magento installation page.
  • After clicking on the continue option you will encounter php extension loading error. It is shown below:
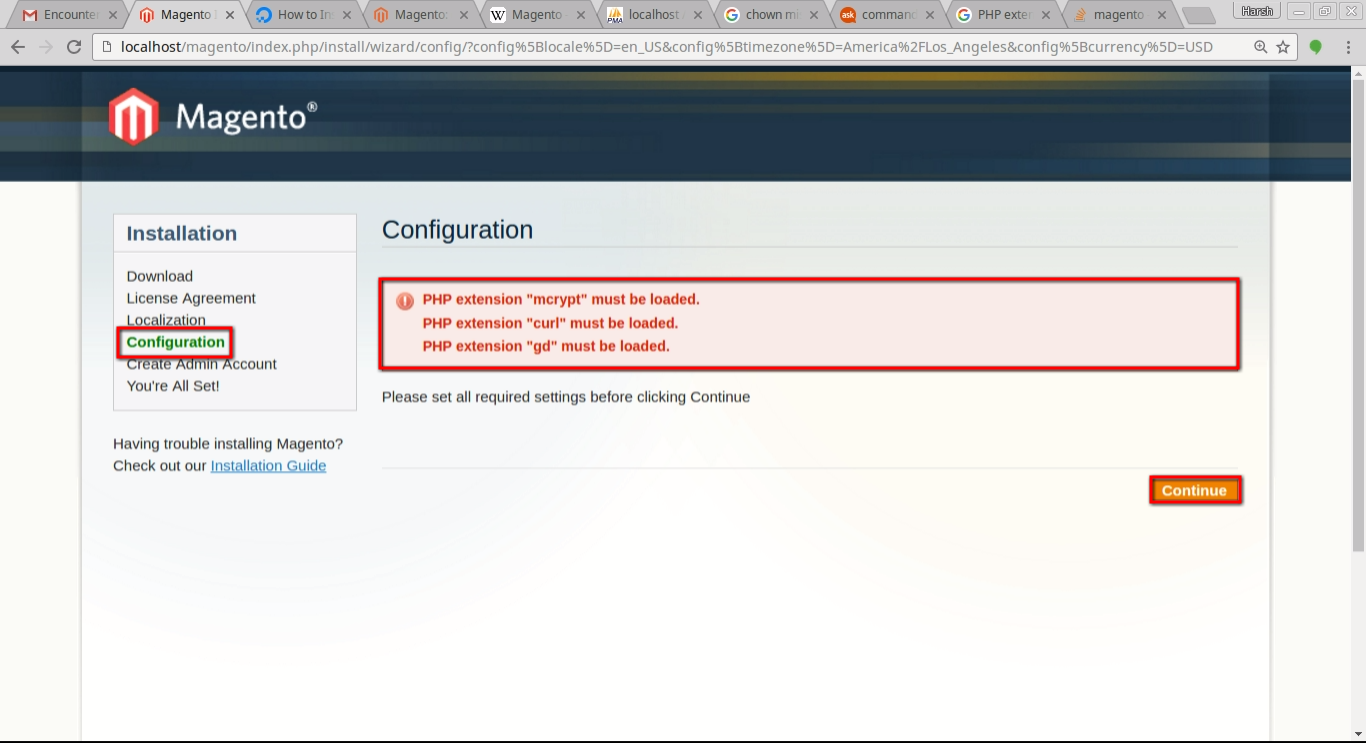
  • If you encounter this error follow the steps below:
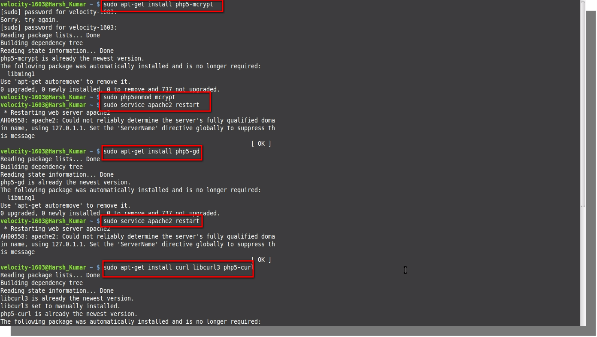
  • Open the terminal and enter the command below :
  • For installing mcrypt

sudo apt-get install php5-mcrypt

sudo php5 enmod mcrypt

sudo service apache2 restart

  • For installing curl

sudo apt-get install curl libcurl3 php5-curl

sudo service apache2 restart

  • For installing gd

sudo apt-get install php5-gd

sudo service apache2 restart

  • Then click continue on the magento installation page.

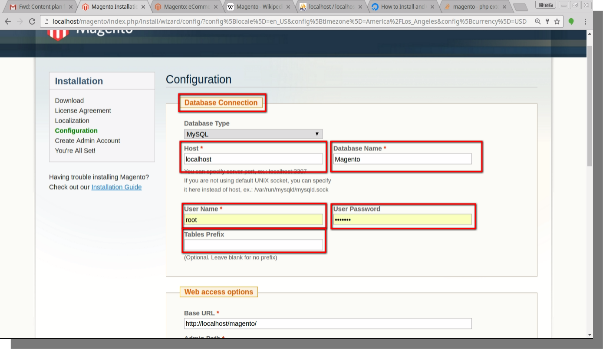
Database Connection Page

  • After clicking continue you will be directed to a database connection page where you can:
  • Set a Username and Password.
  • Change the database name.
  • Set the table prefixes. (optional)

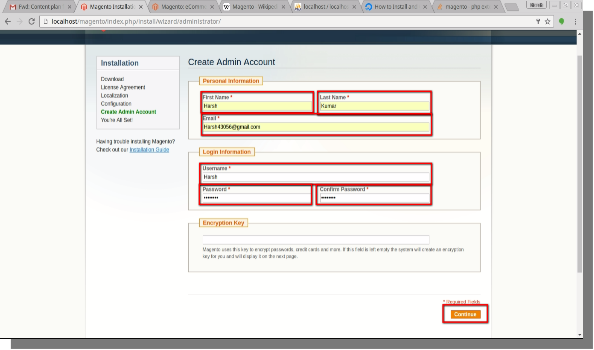
Create Admin Account

After Completing all the processes under configuration, you will be directed to create admin account, where you have to :

  • Enter your Personal details:
  • First Name
  • Last Name
  • E-mail Id
  • Enter Login Information:
  • Username
  • Password
  • Confirm Password
  • Enter Encryption Key (Optional)
  • Then click on continue button.

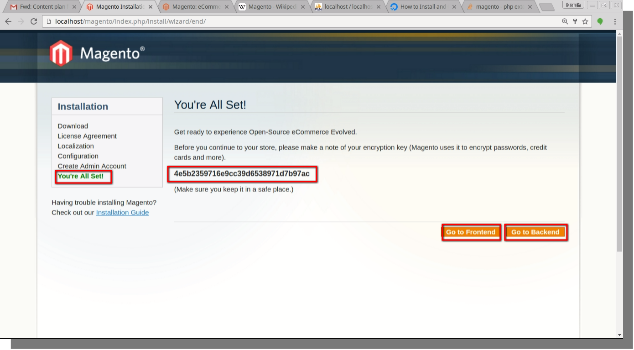
You are all set

This is the last step in the installation process of magento. Here you will be provided with an encryption key which you have to save, as magento uses it to encrypt passwords, credit cards etc.

  • Now you have two options on your screen:
  • Go to Front-End
  • Go to Back-End
  • You can visit either of them.

Front-End And Back-End

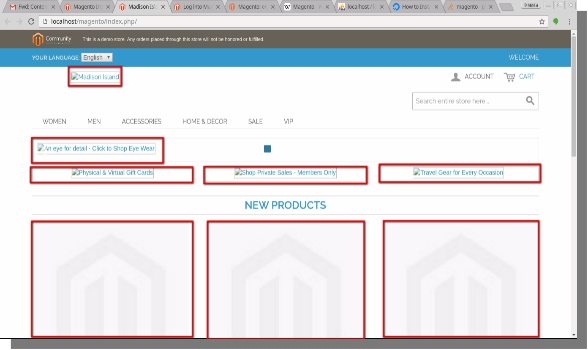
When You visit your Front-End, you will notice that there are no logos, banners and images for any product or brand. Therefore for that you have to make some changes from the Back-End to make sure that everything works well before you can work on magento.
Necessary changes

  • For Uploading Images on the front end
  • Copy Media and Skin folders from magento-sample-data and paste them on your setup folder.
  • Setup folder will already contain these folders, just you have to do is replace them.
  • Then go to your Front-End and refresh the page. You will see that the logos, images and banners are uploaded.
  • In some case you will see there is no updation, the Front-End is still blank. In that case follow the below mentioned steps:
  • Open the terminal and type the command:

sudo chown -R www-data/var/www/html/magento/media/

  • Then go to your Back-End, hover your cursor over system menu in the admin panel menu bar and click on the cache management on the drop-down option.
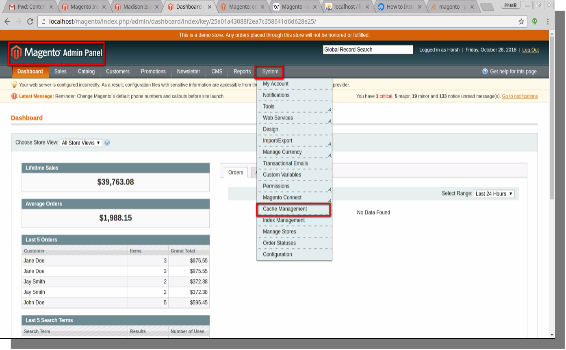
  • After clicking on the cache management option you will be directed to a new page where you will see two options on the top right corner of the page:
  • Flush Magento Cache
  • Flush Cache storage
  • Click on these options to Flush Magento Cache and Cache Storage.
  • Now Go to your Front-end and refresh the page, you will see that all the banners, logos, images are updated, you will get your Front-end ready.
  • Modifying File Index.php
  • Now Open Index.php, you will find index.php at the path provided below:

/var/www/html/magento

  • Click on the Index.php file and open it.
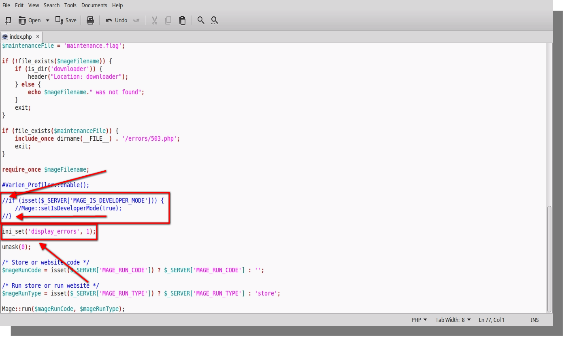
  • You will see a Php code, go to line 73,74 and 75 and place double slash at the beginning of these lines and remove “#” at the beginning of line 77 as shown below:
  • Now save the file and close it.
  • Modifying File Varien.php
  • Now Open Varien.php, you will find Varien.php at the path provided below:

/var/www/html/magento/app/code/core/Mage/Core/Model/Session/

Abstract

  • Click on the Varien.php file and open it.
  • You will see a Php code, go to line 99, 100 and 101 and assign values as shown below:
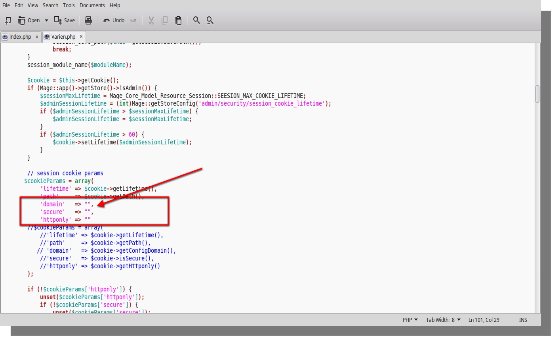
  • Remove the lines like $cookie->getconfigDomain() from line 99,100 and 101 and place double quotes as shown in the figure.
  • Now save the file and close it.

You Might Also Like:

How to Install Magento In Ubuntu?

Magento is one of the most popular Content Management System(CMS) for an E-commerce website. It is one of the most flexible E-commerce platforms. Magento uses MySQL as its database, PHP as the programming language and elements of zend framework. It has two Editions one is a Paid edition and other is an Unpaid edition:

  • Enterprise Edition ( Paid )
  • Community Edition ( Unpaid )

The tutorial runs you through the ways to install Magento on Ubuntu. Read on to know:

Prerequisites for installing Magento

Before we begin, there are few steps that are needed to be completed in order to install magento. These steps include :

  • You will need at least 2 GB ram for installing magento on Virtual private server (VPS).
  • You will need a LAMP(Linux, Apache, Mysql and PHP) stack installed on your VPS server.
  • Now for installing it you need to first download magento, you can get a community edition version of magento online.

Empezando

  • After complete download you will see a ZIP folder named mazento.zip on your downloads folder.
  • Copy the Zip Folder to the path provided below :

/ Var / www / html

  • Extract the files here by right clicking on the zipped folder and then left clicking on the Extract here option.

Creating Database using PHPMyAdmin

For creating a database follow the steps provided below :

  • Open a new tab of your browser and enter the following on the address bar :

localhost/phpmyadmin/

  • Press enter you will see the login page of PHPMyAdmin. Enter the Username and Password and click on Go to login. The login page will look like this.

  • You will see phpmyadmin main page, click on database, you will see a create database option.
  • Enter the name of database( say magento) and click on create option, your database will be created as shown below.

Importing sample database on Your database

After successfully creating the database, you have to import the sample database on your database. Now for that you have to follow the below mentioned steps:

  • Click the import option on phpmyadmin page.

  • Now click on the choose file to upload the sample database on your database.For uploading a file you have to note the following properties of the uploaded file:
  • The maximum size of the file must be 2048 kb.
  • The format of the file must be .sql format.
  • The type of compression used to compress large files must be .zip
  • Now click on Go option and your file containing sample database will be uploaded on your database.You will see that the files are uploaded on your database.

Triggering magento setup file

Now all you have to do is to trigger the magento setup file. Consider the following steps for the same.

  • Now open a new tab of your browser and enter the following path:

Localhost/magento or

localhost/magento/index.php/install

Acuerdo de licencia

  • You will be directed to Magento’s installation page, accept the agreement’s terms and conditions and click on continue.

Localización

  • Select the Locale(language), Time zone and Default currency and click on continue.

configuración

  • Here you will encounter the “write permission issue”, you have to fix all these issues before continuing further.

  • For fixing the write permission issue follow the below mentioned steps:
  • Open the terminal of your system.( CTRL+ALT+T )
  • Enter the following command to resolve the permission issues:

sudo chown -R www-data /file path

Eg: sudo chown -R www-data /var/www/html/magento/app/etc

  • It will ask you for the system password, enter your system password and press enter, it will ask the password only once.
  • Enter the command for all the files having same issue, using the example above and then click continue option on the magento installation page.

  • After clicking on the continue option you will encounter php extension loading error. It is shown below:

  • If you encounter this error follow the steps below:
  • Open the terminal and enter the command below :
  • For installing mcrypt

sudo apt-get install php5-mcrypt

sudo php5 enmod mcrypt

Sudo service apache2 restart

  • For installing curl

sudo apt-get install curl libcurl3 php5-curl

Sudo service apache2 restart

  • For installing gd

sudo apt-get install php5-gd

Sudo service apache2 restart

  • Then click continue on the magento installation page.

Database Connection Page

  • After clicking continue you will be directed to a database connection page where you can:
  • Set a Username and Password.
  • Change the database name.
  • Set the table prefixes. (optional)

Crear cuenta de administrador

After Completing all the processes under configuration, you will be directed to create admin account, where you have to :

  • Enter your Personal details:
  • Nombre
  • Apellido(s)
  • E-mail Id
  • Enter Login Information:
  • Nombre de usuario
  • Contraseña
  • Confirmar contraseña
  • Enter Encryption Key (Optional)
  • Then click on continue button.

You are all set

This is the last step in the installation process of magento. Here you will be provided with an encryption key which you have to save, as magento uses it to encrypt passwords, credit cards etc.

  • Now you have two options on your screen:
  • Go to Front-End
  • Go to Back-End
  • You can visit either of them.

Front-End And Back-End

When You visit your Front-End, you will notice that there are no logos, banners and images for any product or brand. Therefore for that you have to make some changes from the Back-End to make sure that everything works well before you can work on magento.

Necessary changes

  • For Uploading Images on the front end
  • Copy Media and Skin folders from magento-sample-data and paste them on your setup folder.
  • Setup folder will already contain these folders, just you have to do is replace them.
  • Then go to your Front-End and refresh the page. You will see that the logos, images and banners are uploaded.
  • In some case you will see there is no updation, the Front-End is still blank. In that case follow the below mentioned steps:
  • Open the terminal and type the command:

sudo chown -R www-data/var/www/html/magento/media/

  • Then go to your Back-End, hover your cursor over system menu in the admin panel menu bar and click on the cache management on the drop-down option.

  • After clicking on the cache management option you will be directed to a new page where you will see two options on the top right corner of the page:
  • Flush Magento Cache
  • Flush Cache storage
  • Click on these options to Flush Magento Cache and Cache Storage.
  • Now Go to your Front-end and refresh the page, you will see that all the banners, logos, images are updated, you will get your Front-end ready.
  • Modifying File Index.php
  • Now Open Index.php, you will find index.php at the path provided below:

/var/www/html/magento

  • Click on the Index.php file and open it.
  • You will see a Php code, go to line 73,74 and 75 and place double slash at the beginning of these lines and remove “#” at the beginning of line 77 as shown below:

  • Now save the file and close it.
  • Modifying File Varien.php
  • Now Open Varien.php, you will find Varien.php at the path provided below:

/var/www/html/magento/app/code/core/Mage/Core/Model/Session/

Resumen

  • Click on the Varien.php file and open it.
  • You will see a Php code, go to line 99, 100 and 101 and assign values as shown below:

  • Remove the lines like $cookie->getconfigDomain() from line 99,100 and 101 and place double quotes as shown in the figure.
  • Now save the file and close it.

También puede interesarte:

Your license is inactive or expired, please subscribe again!

How to Install Magento In Ubuntu?

Magento is one of the most popular Content Management System(CMS) for an E-commerce website. It is one of the most flexible E-commerce platforms. Magento uses MySQL as its database, PHP as the programming language and elements of zend framework. It has two Editions one is a Paid edition and other is an Unpaid edition:

  • Enterprise Edition ( Paid )
  • Community Edition ( Unpaid )

The tutorial runs you through the ways to install Magento on Ubuntu. Read on to know:

Prerequisites for installing Magento

Before we begin, there are few steps that are needed to be completed in order to install magento. These steps include :

  • You will need at least 2 GB ram for installing magento on Virtual private server (VPS).
  • You will need a LAMP(Linux, Apache, Mysql and PHP) stack installed on your VPS server.
  • Now for installing it you need to first download magento, you can get a community edition version of magento online.

Commencer

  • After complete download you will see a ZIP folder named mazento.zip on your downloads folder.
  • Copy the Zip Folder to the path provided below :

/ Var / www / html

  • Extract the files here by right clicking on the zipped folder and then left clicking on the Extract here option.

Creating Database using PHPMyAdmin

For creating a database follow the steps provided below :

  • Open a new tab of your browser and enter the following on the address bar :

localhost/phpmyadmin/

  • Press enter you will see the login page of PHPMyAdmin. Enter the Username and Password and click on Go to login. The login page will look like this.

  • You will see phpmyadmin main page, click on database, you will see a create database option.
  • Enter the name of database( say magento) and click on create option, your database will be created as shown below.

Importing sample database on Your database

After successfully creating the database, you have to import the sample database on your database. Now for that you have to follow the below mentioned steps:

  • Click the import option on phpmyadmin page.

  • Now click on the choose file to upload the sample database on your database.For uploading a file you have to note the following properties of the uploaded file:
  • The maximum size of the file must be 2048 kb.
  • The format of the file must be .sql format.
  • The type of compression used to compress large files must be .zip
  • Now click on Go option and your file containing sample database will be uploaded on your database.You will see that the files are uploaded on your database.

Triggering magento setup file

Now all you have to do is to trigger the magento setup file. Consider the following steps for the same.

  • Now open a new tab of your browser and enter the following path:

Localhost/magento or

localhost/magento/index.php/install

Accord de licence

  • You will be directed to Magento’s installation page, accept the agreement’s terms and conditions and click on continue.

Localisation

  • Select the Locale(language), Time zone and Default currency and click on continue.

configuration

  • Here you will encounter the “write permission issue”, you have to fix all these issues before continuing further.

  • For fixing the write permission issue follow the below mentioned steps:
  • Open the terminal of your system.( CTRL+ALT+T )
  • Enter the following command to resolve the permission issues:

sudo chown -R www-data /file path

Eg: sudo chown -R www-data /var/www/html/magento/app/etc

  • It will ask you for the system password, enter your system password and press enter, it will ask the password only once.
  • Enter the command for all the files having same issue, using the example above and then click continue option on the magento installation page.

  • After clicking on the continue option you will encounter php extension loading error. It is shown below:

  • If you encounter this error follow the steps below:
  • Open the terminal and enter the command below :
  • For installing mcrypt

sudo apt-get install php5-mcrypt

sudo php5 enmod mcrypt

service sudo apache2 redémarre

  • For installing curl

sudo apt-get install curl libcurl3 php5-curl

service sudo apache2 redémarre

  • For installing gd

sudo apt-get install php5-gd

service sudo apache2 redémarre

  • Then click continue on the magento installation page.

Database Connection Page

  • After clicking continue you will be directed to a database connection page where you can:
  • Set a Username and Password.
  • Change the database name.
  • Set the table prefixes. (optional)

Create Admin Account

After Completing all the processes under configuration, you will be directed to create admin account, where you have to :

  • Enter your Personal details:
  • Prénom
  • Nom
  • E-mail Id
  • Enter Login Information:
  • Nom d’utilisateur
  • Mot de passe :
  • Confirme votre nouveau mot de passe:
  • Enter Encryption Key (Optional)
  • Then click on continue button.

You are all set

This is the last step in the installation process of magento. Here you will be provided with an encryption key which you have to save, as magento uses it to encrypt passwords, credit cards etc.

  • Now you have two options on your screen:
  • Go to Front-End
  • Go to Back-End
  • You can visit either of them.

Front-End And Back-End

When You visit your Front-End, you will notice that there are no logos, banners and images for any product or brand. Therefore for that you have to make some changes from the Back-End to make sure that everything works well before you can work on magento.

Necessary changes

  • For Uploading Images on the front end
  • Copy Media and Skin folders from magento-sample-data and paste them on your setup folder.
  • Setup folder will already contain these folders, just you have to do is replace them.
  • Then go to your Front-End and refresh the page. You will see that the logos, images and banners are uploaded.
  • In some case you will see there is no updation, the Front-End is still blank. In that case follow the below mentioned steps:
  • Open the terminal and type the command:

sudo chown -R www-data/var/www/html/magento/media/

  • Then go to your Back-End, hover your cursor over system menu in the admin panel menu bar and click on the cache management on the drop-down option.

  • After clicking on the cache management option you will be directed to a new page where you will see two options on the top right corner of the page:
  • Vider le cache Magento
  • Flush Cache storage
  • Click on these options to Flush Magento Cache and Cache Storage.
  • Now Go to your Front-end and refresh the page, you will see that all the banners, logos, images are updated, you will get your Front-end ready.
  • Modifying File Index.php
  • Now Open Index.php, you will find index.php at the path provided below:

/var/www/html/magento

  • Click on the Index.php file and open it.
  • You will see a Php code, go to line 73,74 and 75 and place double slash at the beginning of these lines and remove “#” at the beginning of line 77 as shown below:

  • Now save the file and close it.
  • Modifying File Varien.php
  • Now Open Varien.php, you will find Varien.php at the path provided below:

/var/www/html/magento/app/code/core/Mage/Core/Model/Session/

Abstrait

  • Click on the Varien.php file and open it.
  • You will see a Php code, go to line 99, 100 and 101 and assign values as shown below:

  • Remove the lines like $cookie->getconfigDomain() from line 99,100 and 101 and place double quotes as shown in the figure.
  • Now save the file and close it.

Vous aimerez aussi:

Your license is inactive or expired, please subscribe again!

How to Install Magento In Ubuntu?

Magento is one of the most popular Content Management System(CMS) for an E-commerce website. It is one of the most flexible E-commerce platforms. Magento uses MySQL as its database, PHP as the programming language and elements of zend framework. It has two Editions one is a Paid edition and other is an Unpaid edition:

  • Enterprise Edition (kostenpflichtig)
  • Community Edition (unbezahlt)

The tutorial runs you through the ways to install Magento on Ubuntu. Read on to know:

Voraussetzungen für die Installation von Magento

Bevor wir beginnen, gibt es einige Schritte, die abgeschlossen werden müssen, um Magento zu installieren. Diese Schritte umfassen:

  • Sie benötigen mindestens 2 GB RAM für die Installation von Magento auf Virtual Private Server (VPS).
  • Sie benötigen einen LAMP-Stack (Linux, Apache, Mysql und PHP), der auf Ihrem VPS-Server installiert ist.
  • Jetzt für die Installation müssen Sie zunächst Magento herunterladen, können Sie eine Community-Edition-Version von Magento online bekommen.

Anfangen

  • Nach dem vollständigen Download sehen Sie in Ihrem Download-Ordner einen ZIP-Ordner namens mazento.zip.
  • Kopieren Sie den ZIP-Ordner in den folgenden Pfad:

/ Var / www / html

  • Extrahieren Sie die Dateien hier, indem Sie mit der rechten Maustaste auf den gezippten Ordner klicken und dann mit der linken Maustaste auf die Option Hier extrahieren klicken.

Datenbank mit PHPMyAdmin erstellen

Befolgen Sie für das Erstellen einer Datenbank die folgenden Schritte:

  • Öffnen Sie einen neuen Tab Ihres Browsers und geben Sie Folgendes in die Adressleiste ein:

localhost / phpmyadmin /

  • Drücken Sie die Eingabetaste, um die Login-Seite von PHPMyAdmin zu sehen. Geben Sie den Benutzernamen und das Passwort ein und klicken Sie auf Gehe zu Login. Die Anmeldeseite wird so aussehen.

  • Sie werden die Hauptseite von phpmyadmin sehen, klicken Sie auf Datenbank, Sie werden eine Datenbank erstellen Option sehen.
  • Geben Sie den Namen der Datenbank ein (zB Magento) und klicken Sie auf die Option create, Ihre Datenbank wird wie unten gezeigt erstellt.

Beispieldatenbank in Ihre Datenbank importieren

Nach dem erfolgreichen Erstellen der Datenbank müssen Sie die Beispieldatenbank in Ihre Datenbank importieren. Dazu müssen Sie die folgenden Schritte ausführen:

  • Klicken Sie auf die Importoption auf der Seite phpmyadmin.

  • Klicken Sie nun auf die Datei auswählen, um die Beispieldatenbank in Ihre Datenbank hochzuladen. Zum Hochladen einer Datei müssen Sie folgende Eigenschaften der hochgeladenen Datei beachten:
  • Die maximale Größe der Datei muss 2048 kb sein.
  • Das Format der Datei muss das Format .sql haben.
  • Die Art der Komprimierung, die zum Komprimieren großer Dateien verwendet wird, muss .zip sein
  • Klicken Sie nun auf die Option Go und Ihre Datei mit der Beispieldatenbank wird in Ihre Datenbank hochgeladen. Sie werden sehen, dass die Dateien in Ihre Datenbank hochgeladen werden.

Magento Setup-Datei auslösen

Jetzt müssen Sie nur noch die Magento Setup-Datei auslösen. Berücksichtigen Sie die folgenden Schritte für dasselbe.

  • Öffnen Sie nun einen neuen Tab Ihres Browsers und geben Sie folgenden Pfad ein:

Localhost / Magento oder

localhost / magento / index.php / installieren

Lizenzvereinbarung

  • Sie werden zur Magento-Installationsseite weitergeleitet, akzeptieren die Allgemeinen Geschäftsbedingungen des Vertrags und klicken auf Weiter.

Lokalisierung

  • Wählen Sie das Gebietsschema (Sprache), die Zeitzone und die Standardwährung aus und klicken Sie auf Weiter.

Konfiguration

  • Hier stoßen Sie auf das Problem der "Schreibberechtigung". Sie müssen alle diese Probleme beheben, bevor Sie fortfahren.

  • Befolgen Sie die folgenden Schritte, um das Problem mit der Schreibberechtigung zu beheben:
  • Öffne das Terminal deines Systems (STRG + ALT + T)
  • Geben Sie den folgenden Befehl ein, um die Berechtigungsprobleme zu beheben:

sudo chown -R www-data / Dateipfad

ZB: sudo chown -R www-data / var / www / html / magento / app / etc

  • Sie werden nach dem Systemkennwort gefragt, geben Ihr Systemkennwort ein und drücken die Eingabetaste. Das Kennwort wird nur einmal abgefragt.
  • Geben Sie den Befehl für alle Dateien mit demselben Problem ein, indem Sie das obige Beispiel verwenden und dann auf der Magento-Installationsseite auf die Option "Weiter" klicken.

  • Nach einem Klick auf die Option continue wird der Ladefehler der PHP-Erweiterung angezeigt. Es ist unten gezeigt:

  • Wenn dieser Fehler auftritt, führen Sie die folgenden Schritte aus:
  • Öffnen Sie das Terminal und geben Sie den folgenden Befehl ein:
  • Für die Installation von Mcrypt

sudo apt-get installieren php5-mcrypt

sudo php5 enmod mcrypt

Sudo service apache2 neu starten

  • Zum Installieren von Curl

sudo apt-get installieren curl libcurl3 php5-curl

Sudo service apache2 neu starten

  • Für die Installation von gd

sudo apt-get installieren php5-gd

Sudo service apache2 neu starten

  • Klicken Sie dann auf der Magento-Installationsseite auf Weiter.

Datenbankverbindungsseite

  • Nachdem Sie auf "Weiter" geklickt haben, werden Sie zu einer Datenbankverbindungsseite weitergeleitet, auf der Sie Folgendes tun können:
  • Legen Sie einen Benutzernamen und ein Passwort fest.
  • Ändern Sie den Datenbanknamen.
  • Legen Sie die Tabellenpräfixe fest. (wahlweise)

Erstellen Sie ein Administratorkonto

Nachdem Sie alle Prozesse unter Konfiguration abgeschlossen haben, werden Sie aufgefordert, ein Administratorkonto zu erstellen, in dem Sie Folgendes tun müssen:

  • Geben Sie Ihre persönlichen Daten ein:
  • Vorname
  • Nachname
  • E-Mail-ID
  • Login-Informationen eingeben:
  • Benutzername
  • Kennwort
  • Passwort bestätigen
  • Verschlüsselungsschlüssel eingeben (optional)
  • Dann klicken Sie auf die Schaltfläche Weiter.

Sie sind fertig

Dies ist der letzte Schritt in der Installation von Magento. Hier erhalten Sie einen Verschlüsselungsschlüssel, den Sie speichern müssen, da er von Magento zur Verschlüsselung von Passwörtern, Kreditkarten etc. verwendet wird.

  • Jetzt haben Sie zwei Möglichkeiten auf Ihrem Bildschirm:
  • Gehe zum Frontend
  • Gehe zum Back-End
  • Sie können beide besuchen.

Front-End und Back-End

Wenn Sie Ihr Front-End besuchen, werden Sie feststellen, dass es keine Logos, Banner und Bilder für ein Produkt oder eine Marke gibt. Daher müssen Sie einige Änderungen am Back-End vornehmen, um sicherzustellen, dass alles gut funktioniert, bevor Sie mit Magento arbeiten können.

Notwendige Änderungen

  • Zum Hochladen von Bildern am Frontend
  • Kopiere Media- und Skin-Ordner aus Magento-Sample-Daten und füge sie in deinen Setup-Ordner ein.
  • Der Setup-Ordner enthält diese Ordner bereits, Sie müssen sie nur ersetzen.
  • Gehe dann zu deinem Front-End und aktualisiere die Seite. Sie werden sehen, dass die Logos, Bilder und Banner hochgeladen werden.
  • In einigen Fällen wird es keine Aktualisierung geben, das Front-End ist noch leer. In diesem Fall folgen Sie den unten aufgeführten Schritten:
  • Öffne das Terminal und gib den Befehl ein:

sudo chown -R www-daten / var / www / html / magento / media /

  • Gehen Sie dann zu Ihrem Back-End, bewegen Sie den Mauszeiger über das Systemmenü in der Menüleiste des Admin-Steuerfelds und klicken Sie auf die Cache-Verwaltung in der Drop-Down-Option.

  • Nach dem Klicken auf die Cache-Management-Option werden Sie zu einer neuen Seite weitergeleitet, auf der Sie rechts oben auf der Seite zwei Optionen sehen:
  • Magento-Cache leeren
  • Flush-Cache-Speicher
  • Klicken Sie auf diese Optionen, um Magento Cache und Cache Storage zu leeren.
  • Jetzt gehen Sie zu Ihrem Front-End und aktualisieren Sie die Seite, Sie werden sehen, dass alle Banner, Logos, Bilder aktualisiert werden, Sie werden Ihr Front-End fertig bekommen.
  • Ändern der Datei Index.php
  • Jetzt öffnen Sie Index.php, Sie finden index.php unter dem folgenden Pfad:

/ var / www / html / Magento

  • Klicken Sie auf die Datei Index.php und öffnen Sie sie.
  • Sie werden einen PHP-Code sehen, gehen Sie zur Zeile 73,74 und 75 und setzen Sie einen doppelten Schrägstrich am Anfang dieser Zeilen und entfernen Sie "#" am Anfang der Zeile 77, wie unten gezeigt:

  • Speichern Sie die Datei und schließen Sie sie.
  • Änderung der Datei Varien.php
  • Öffnen Sie jetzt Varien.php, Sie finden Varien.php auf dem unten angegebenen Pfad:

/ var / www / html / magento / app / code / kern / Mage / Core / Model / Session /

Abstrakt

  • Klicke auf die Datei Varien.php und öffne sie.
  • Sie sehen einen PHP-Code, gehen zu den Zeilen 99, 100 und 101 und weisen die Werte wie folgt zu:

  • Entfernen Sie die Zeilen wie $ cookie-> getconfigDomain () aus der Zeile 99,100 und 101 und setzen Sie doppelte Anführungszeichen, wie in der Abbildung gezeigt.
  • Speichern Sie die Datei und schließen Sie sie.

Sie konnten auch mögen:

Your license is inactive or expired, please subscribe again!

How to Install Magento In Ubuntu?

Magento is one of the most popular Content Management System(CMS) for an E-commerce website. It is one of the most flexible E-commerce platforms. Magento uses MySQL as its database, PHP as the programming language and elements of zend framework. It has two Editions one is a Paid edition and other is an Unpaid edition:

  • Edizione Enterprise (a pagamento)
  • Community Edition (non pagata)

The tutorial runs you through the ways to install Magento on Ubuntu. Read on to know:

Prerequisiti per l'installazione di Magento

Prima di iniziare, sono necessari alcuni passaggi da completare per installare Magento. Questi passaggi includono:

  • Avrai bisogno almeno di ram 2 GB per installare Magento su Virtual Private Server (VPS).
  • Avrai bisogno di uno stack LAMP (Linux, Apache, Mysql e PHP) installato sul tuo server VPS.
  • Ora per installarlo è necessario prima scaricare Magento, è possibile ottenere una versione di edizioni della comunità di Magento online.

Iniziare

  • Dopo il download completo, verrà visualizzata una cartella ZIP denominata mazento.zip nella cartella dei download.
  • Copia la cartella Zip nel percorso fornito di seguito:

/ Var / www / html

  • Estrai qui i file facendo clic con il tasto destro sulla cartella zippata e poi facendo clic con il tasto sinistro sull'opzione Estrai qui.

Creazione del database utilizzando PHPMyAdmin

Per creare un database segui i passaggi forniti di seguito:

  • Apri una nuova scheda del tuo browser e inserisci quanto segue nella barra degli indirizzi:

localhost / phpmyadmin /

  • Premi invio vedrai la pagina di accesso di PHPMyAdmin. Inserire il nome utente e la password e fare clic su Vai per accedere. La pagina di accesso sarà simile a questa.

  • Vedrai la pagina principale di phpmyadmin, fai clic sul database, vedrai un'opzione di creazione del database.
  • Immettere il nome del database (ad esempio Magento) e fare clic sull'opzione di creazione, il database verrà creato come mostrato di seguito.

Importazione di un database di esempio sul tuo database

Dopo aver creato correttamente il database, devi importare il database di esempio sul tuo database. Ora per quello devi seguire i seguenti passaggi:

  • Fare clic sull'opzione di importazione sulla pagina phpmyadmin.

  • Ora fai clic sul file scelto per caricare il database di esempio sul tuo database. Per caricare un file devi notare le seguenti proprietà del file caricato:
  • La dimensione massima del file deve essere 2048 kb.
  • Il formato del file deve essere in formato .sql.
  • Il tipo di compressione utilizzato per comprimere file di grandi dimensioni deve essere .zip
  • Ora fai clic sull'opzione Go e il tuo file contenente il database di esempio verrà caricato nel tuo database. Vedrai che i file sono caricati sul tuo database.

Attivazione del file di installazione di Magento

Ora tutto ciò che devi fare è attivare il file di installazione di Magento. Considerare i seguenti passaggi per lo stesso.

  • Ora apri una nuova scheda del tuo browser e inserisci il seguente percorso:

Localhost / Magento o

localhost / magento / index.php / install

Accordo di licenza

  • Sarai indirizzato alla pagina di installazione di Magento, accetti i termini e le condizioni del contratto e fai clic su Continua.

Localizzazione

  • Seleziona Locale (lingua), Fuso orario e Valuta predefinita e clicca su continua.

Configurazione

  • Qui troverai il "problema dell'autorizzazione alla scrittura", devi risolvere tutti questi problemi prima di continuare.

  • Per risolvere il problema dei permessi di scrittura segui i passaggi riportati sotto:
  • Apri il terminale del tuo sistema. (CTRL + ALT + T)
  • Immettere il seguente comando per risolvere i problemi di autorizzazione:

sudo chown -R www-data / percorso file

Ad esempio: sudo chown -R www-data / var / www / html / magento / app / ecc

  • Ti chiederà la password di sistema, inserisci la tua password di sistema e premi invio, chiederà la password una sola volta.
  • Immettere il comando per tutti i file con lo stesso problema, utilizzando l'esempio precedente e quindi fare clic su Continua opzione nella pagina di installazione di Magento.

  • Dopo aver fatto clic sull'opzione continua, si verificherà l'errore di caricamento dell'estensione php. È mostrato di seguito:

  • Se riscontri questo errore, procedi nel seguente modo:
  • Apri il terminale e inserisci il comando qui sotto:
  • Per l'installazione di mcrypt

sudo apt-get install php5-mcrypt

sudo php5 enmod mcrypt

Riavviare apache2 sudo service

  • Per l'installazione di arricciatura

sudo apt-get install curl libcurl3 php5-curl

Riavviare apache2 sudo service

  • Per l'installazione di gd

sudo apt-get install php5-gd

Riavviare apache2 sudo service

  • Quindi fare clic su Continua nella pagina di installazione di Magento.

Pagina di connessione al database

  • Dopo aver fatto clic su Continua, sarai indirizzato a una pagina di connessione al database dove puoi:
  • Imposta un nome utente e una password.
  • Cambia il nome del database.
  • Imposta i prefissi della tabella. (opzionale)

Crea account amministratore

Dopo aver completato tutti i processi in fase di configurazione, ti verrà chiesto di creare un account amministratore, in cui devi:

  • Inserisci i tuoi dati personali:
  • Nome
  • Cognome
  • E-mail identificativo utente
  • Inserisci le informazioni di accesso:
  • Nome utente
  • Password
  • Confermare password
  • Immettere la chiave di crittografia (facoltativo)
  • Quindi fare clic sul pulsante Continua.

Siete a posto

Questo è l'ultimo passo nel processo di installazione di Magento. Qui ti verrà fornita una chiave di crittografia che devi salvare, poiché Magento la utilizza per crittografare password, carte di credito, ecc.

  • Ora hai due opzioni sullo schermo:
  • Vai a Front-End
  • Vai a Back-End
  • Puoi visitare entrambi.

Front-End e Back-End

Quando visiti il ​​tuo Front-End, noterai che non ci sono loghi, banner e immagini per qualsiasi prodotto o marca. Pertanto per questo devi apportare alcune modifiche dal back-end per assicurarti che tutto funzioni bene prima di poter lavorare su Magento.

Cambiamenti necessari

  • Per caricare immagini sul front-end
  • Copia le cartelle Media e Skin da magento-sample-data e incollale nella cartella di installazione.
  • La cartella di installazione conterrà già queste cartelle, è sufficiente sostituirle.
  • Quindi vai al tuo front-end e aggiorna la pagina. Vedrai che i loghi, le immagini e i banner sono stati caricati.
  • In alcuni casi vedrai che non ci sono aggiornamenti, il front-end è ancora vuoto. In tal caso, segui i passaggi indicati sotto:
  • Apri il terminale e digita il comando:

sudo chown -R www-data / var / www / html / magento / media /

  • Quindi vai al tuo Back-End, passa con il cursore sul menu di sistema nella barra dei menu del pannello di amministrazione e fai clic sulla gestione della cache sull'opzione a discesa.

  • Dopo aver fatto clic sull'opzione di gestione della cache, sarai indirizzato a una nuova pagina in cui vedrai due opzioni nell'angolo in alto a destra della pagina:
  • Flush Magento Cache
  • Archiviazione di Flush Cache
  • Fare clic su queste opzioni su Flush Magento Cache and Cache Storage.
  • Ora vai al tuo front-end e aggiorna la pagina, vedrai che tutti i banner, i loghi, le immagini sono aggiornati, il tuo front-end sarà pronto.
  • Modifica del file Index.php
  • Ora apri Index.php, troverai index.php nel percorso fornito di seguito:

/ Var / www / html / Magento

  • Clicca sul file Index.php e aprilo.
  • Vedrai un codice Php, vai alla riga 73,74 e 75 e inserisci una doppia barra all'inizio di queste righe e rimuovi "#" all'inizio della riga 77 come mostrato di seguito:

  • Ora salva il file e chiudilo.
  • Modifica del file Varien.php
  • Ora Apri Varien.php, troverai Varien.php nel percorso fornito di seguito:

/ Var / www / html / Magento / app / code / core / Mage / core / Modello / Session /

astratto

  • Clicca sul file Varien.php e aprilo.
  • Vedrai un codice Php, vai alla riga 99, 100 e 101 e assegna i valori come mostrato di seguito:

  • Rimuovere le linee come $ cookie-> getconfigDomain () dalla riga 99,100 e 101 e posizionare le virgolette come mostrato nella figura.
  • Ora salva il file e chiudilo.

Potrebbe piacerti anche:

Your license is inactive or expired, please subscribe again!

How to Install Magento In Ubuntu?

Magento is one of the most popular Content Management System(CMS) for an E-commerce website. It is one of the most flexible E-commerce platforms. Magento uses MySQL as its database, PHP as the programming language and elements of zend framework. It has two Editions one is a Paid edition and other is an Unpaid edition:

  • Edycja korporacyjna (płatna)
  • Wydanie społecznościowe (nieopłacone)

The tutorial runs you through the ways to install Magento on Ubuntu. Read on to know:

Wymagania wstępne dotyczące instalacji Magento

Zanim zaczniemy, musimy wykonać kilka kroków, aby zainstalować Magento. Te kroki obejmują:

  • Będziesz potrzebował co najmniej 2 GB RAM do instalacji magento na Virtual Private Server (VPS).
  • Będziesz potrzebował stosu LAMP (Linux, Apache, Mysql i PHP) zainstalowanego na twoim serwerze VPS.
  • Teraz, aby go zainstalować, musisz najpierw pobrać Magento, możesz pobrać wersję Magento w wersji online.

Pierwsze kroki

  • Po zakończeniu pobierania pojawi się folder ZIP o nazwie mazento.zip w folderze pobierania.
  • Skopiuj folder Zip do ścieżki podanej poniżej:

/ Var / www / html

  • Wyodrębnij pliki, klikając prawym przyciskiem myszy folder zip, a następnie klikając lewym przyciskiem myszy opcję Wypakuj tutaj.

Tworzenie bazy danych za pomocą PHPMyAdmin

Aby utworzyć bazę danych, wykonaj następujące czynności:

  • Otwórz nową kartę przeglądarki i wprowadź na pasku adresu:

localhost / phpmyadmin /

  • Naciśnij enter, aby wyświetlić stronę logowania do PHPMyAdmin. Wprowadź nazwę użytkownika i hasło i kliknij Przejdź do logowania. Strona logowania będzie wyglądać następująco.

  • Zobaczysz stronę główną phpmyadmin, kliknij bazę danych, zobaczysz opcję tworzenia bazy danych.
  • Wprowadź nazwę bazy danych (powiedz magento) i kliknij opcję tworzenia, twoja baza danych zostanie utworzona, jak pokazano poniżej.

Importowanie przykładowej bazy danych w bazie danych

Po pomyślnym utworzeniu bazy danych należy zaimportować przykładową bazę danych do bazy danych. Teraz musisz wykonać następujące czynności:

  • Kliknij opcję importu na stronie phpmyadmin.

  • Teraz kliknij na plik, aby przesłać przykładową bazę danych do bazy danych. Aby przesłać plik, musisz zwrócić uwagę na następujące właściwości przesłanego pliku:
  • Maksymalny rozmiar pliku musi wynosić 2048 kb.
  • Format pliku musi być w formacie .sql.
  • Typ kompresji używanej do kompresowania dużych plików musi być .zip
  • Teraz kliknij opcję Przejdź, a plik zawierający przykładową bazę danych zostanie przesłany do Twojej bazy danych. Zobaczysz, że pliki są przesyłane do Twojej bazy danych.

Wywoływanie pliku instalacyjnego magento

Teraz wystarczy wyzwolić plik instalacyjny magento. Rozważ następujące kroki dla tego samego.

  • Teraz otwórz nową kartę przeglądarki i wprowadź następującą ścieżkę:

Localhost / magento lub

localhost / magento / index.php / install

Umowa licencyjna

  • Zostaniesz przekierowany na stronę instalacji Magento, zaakceptuj warunki umowy i kliknij Dalej.

Localization

  • Wybierz Ustawienia regionalne (język), Strefa czasowa i Domyślna waluta i kliknij Kontynuuj.

konfiguracja

  • Tutaj napotkasz "problem uprawnień do zapisu", musisz naprawić wszystkie te problemy, zanim przejdziesz dalej.

  • Aby rozwiązać problem z prawem do zapisu, wykonaj następujące czynności:
  • Otwórz terminal twojego systemu. (CTRL + ALT + T)
  • Wprowadź następujące polecenie, aby rozwiązać problemy z uprawnieniami:

sudo chown -R www-data / ścieżka pliku

Np .: sudo chown -R www-data / var / www / html / magento / app / etc

  • Poprosi cię o hasło systemowe, wpisz hasło systemowe i naciśnij enter, poprosi o hasło tylko raz.
  • Wprowadź polecenie dla wszystkich plików o tym samym numerze, używając powyższego przykładu, a następnie kliknij opcję kontynuuj na stronie instalacji programu magento.

  • Po kliknięciu opcji kontynuuj napotkasz błąd ładowania rozszerzenia php. Pokazano poniżej:

  • Jeśli napotkasz ten błąd, wykonaj następujące czynności:
  • Otwórz terminal i wprowadź poniższe polecenie:
  • Do instalacji mcrypt

sudo apt-get install php5-mcrypt

sudo php5 enmod mcrypt

Sudo service apache2 restart

  • Do instalacji curl

sudo apt-get install curl libcurl3 php5-curl

Sudo service apache2 restart

  • Do instalacji gd

sudo apt-get install php5-gd

Sudo service apache2 restart

  • Następnie kliknij przycisk kontynuacji na stronie instalacji programu magento.

Strona połączenia z bazą danych

  • Po kliknięciu przycisku Kontynuuj nastąpi przekierowanie do strony połączenia z bazą danych, w której można:
  • Ustaw nazwę użytkownika i hasło.
  • Zmień nazwę bazy danych.
  • Ustaw przedrostki tabeli. (opcjonalny)

Utwórz konto administratora

Po zakończeniu wszystkich procesów w konfiguracji zostaniesz przekierowany do utworzenia konta administratora, w którym musisz:

  • Wprowadź swoje dane osobowe:
  • Imię
  • Nazwisko
  • ID e-mail
  • Wprowadź dane logowania:
  • Nazwą użytkownika
  • Hasło
  • Potwierdź hasło
  • Wprowadź klucz szyfrowania (opcjonalnie)
  • Następnie kliknij przycisk Kontynuuj.

Wszystko gotowe

To jest ostatni krok w procesie instalacji magento. Tutaj dostaniesz klucz szyfrowania, który musisz zapisać, ponieważ magento używa go do szyfrowania haseł, kart kredytowych itp.

  • Teraz masz dwie opcje na ekranie:
  • Idź do Front-End
  • Idź do Back-End
  • Możesz odwiedzić którekolwiek z nich.

Front-end i back-end

Kiedy odwiedzasz swój Front-End, zauważysz, że nie ma logo, banerów i obrazów dla żadnego produktu lub marki. Dlatego musisz wprowadzić pewne zmiany z Back-End, aby upewnić się, że wszystko działa dobrze, zanim będziesz mógł pracować na Magento.

Potrzebne zmiany

  • Przesyłanie obrazów z przodu
  • Skopiuj foldery Media i Skin z danych przykładowych magenta i wklej je w folderze instalacyjnym.
  • Folder Setup będzie już zawierać te foldery, wystarczy je zastąpić.
  • Następnie przejdź do Front-end i odśwież stronę. Zobaczysz, że logo, obrazy i banery są przesyłane.
  • W niektórych przypadkach zobaczysz, że nie ma aktualizacji, Front-End jest nadal pusty. W takim przypadku wykonaj poniższe kroki:
  • Otwórz terminal i wpisz polecenie:

sudo chown -R www-data / var / www / html / magento / media /

  • Następnie przejdź do Back-End, umieść kursor nad menu systemowym na pasku menu panelu administratora i kliknij zarządzanie pamięcią podręczną w rozwijanej opcji.

  • Po kliknięciu opcji zarządzania pamięcią podręczną zostaniesz przekierowany do nowej strony, na której zobaczysz dwie opcje w prawym górnym rogu strony:
  • Opróżnij pamięć podręczną Magento
  • Płukanie pamięci podręcznej
  • Kliknij te opcje, aby opróżnić pamięć podręczną Magento i pamięć podręczną.
  • Teraz przejdź do swojego interfejsu i odśwież stronę, zobaczysz, że wszystkie banery, logo, obrazy są aktualizowane, dostaniesz swój Front-end gotowy.
  • Modyfikowanie pliku Index.php
  • Teraz otwórz Index.php, znajdziesz index.php w ścieżce podanej poniżej:

/ var / www / html / magento

  • Kliknij plik Index.php i otwórz go.
  • Zobaczysz kod PHP, przejdź do linii 73,74 i 75 i umieść podwójny ukośnik na początku tych linii i usuń "#" na początku linii 77, jak pokazano poniżej:

  • Teraz zapisz plik i zamknij go.
  • Modyfikowanie pliku Varien.php
  • Teraz otwórz Varien.php, znajdziesz Varien.php w ścieżce podanej poniżej:

/ var / www / html / magento / app / code / core / Mage / Core / Model / Session /

Abstrakcyjny

  • Kliknij plik Varien.php i otwórz go.
  • Zobaczysz kod PHP, przejdź do linii 99, 100 i 101 i przypisz wartości jak pokazano poniżej:

  • Usuń linie takie jak $ cookie-> getconfigDomain () z linii 99,100 i 101 i umieść podwójne cudzysłowy, jak pokazano na rysunku.
  • Teraz zapisz plik i zamknij go.

Zobacz także:

Your license is inactive or expired, please subscribe again!

How to Install Magento In Ubuntu?

Magento is one of the most popular Content Management System(CMS) for an E-commerce website. It is one of the most flexible E-commerce platforms. Magento uses MySQL as its database, PHP as the programming language and elements of zend framework. It has two Editions one is a Paid edition and other is an Unpaid edition:

  • Enterprise Edition (pago)
  • Community Edition (não pago)

The tutorial runs you through the ways to install Magento on Ubuntu. Read on to know:

Pré-requisitos para instalar o Magento

Antes de começarmos, há algumas etapas que precisam ser concluídas para instalar o magento. Essas etapas incluem:

  • Você precisará de pelo menos 2 GB para instalar o magento no Virtual private server (VPS).
  • Você precisará de uma pilha LAMP (Linux, Apache, Mysql e PHP) instalada no seu servidor VPS.
  • Agora, para instalá-lo, você precisa primeiro fazer o download do magento, você pode obter uma versão de edição comunitária do magento online.

Começando

  • Após o download completo, você verá uma pasta ZIP chamada mazento.zip na sua pasta de downloads.
  • Copie a pasta Zip para o caminho fornecido abaixo:

/ Var / www / html

  • Extraia os arquivos clicando com o botão direito do mouse na pasta zipada e clicando com o botão esquerdo na opção Extrair aqui.

Criando banco de dados usando o PHPMyAdmin

Para criar um banco de dados, siga as etapas fornecidas abaixo:

  • Abra uma nova guia do seu navegador e digite o seguinte na barra de endereço:

localhost / phpmyadmin /

  • Pressione enter, você verá a página de login do PHPMyAdmin. Digite o nome de usuário e senha e clique em Ir para login. A página de login ficará assim.

  • Você verá a página principal do phpmyadmin, clique no banco de dados, você verá uma opção de criação de banco de dados.
  • Digite o nome do banco de dados (digamos magento) e clique na opção create, seu banco de dados será criado como mostrado abaixo.

Importando banco de dados de amostra em seu banco de dados

Depois de criar com êxito o banco de dados, você precisa importar o banco de dados de amostra no banco de dados. Agora, para isso, você precisa seguir as etapas abaixo mencionadas:

  • Clique na opção de importação na página do phpmyadmin.

  • Agora clique no arquivo de escolha para fazer o upload do banco de dados de amostra no banco de dados. Para fazer o upload de um arquivo, observe as seguintes propriedades do arquivo enviado:
  • O tamanho máximo do arquivo deve ser 2048 kb.
  • O formato do arquivo deve ser o formato .sql.
  • O tipo de compactação usado para compactar arquivos grandes deve ser .zip
  • Agora clique na opção Go e seu arquivo contendo banco de dados de amostra será carregado em seu banco de dados.Você verá que os arquivos são carregados em seu banco de dados.

Acionando o arquivo de configuração do magento

Agora tudo que você precisa fazer é acionar o arquivo de configuração do magento. Considere os seguintes passos para o mesmo.

  • Agora abra uma nova aba do seu navegador e digite o seguinte caminho:

Localhost / magento ou

localhost / magento / index.php / install

Termos de licença

  • Você será direcionado para a página de instalação do Magento, aceite os termos e condições do contrato e clique em continuar.

Localização

  • Selecione o local (idioma), fuso horário e moeda padrão e clique em continuar.

Configuration

  • Aqui você vai encontrar o "problema de permissão de gravação", você tem que corrigir todos esses problemas antes de continuar.

  • Para corrigir o problema de permissão de gravação, siga as etapas abaixo mencionadas:
  • Abra o terminal do seu sistema. (CTRL + ALT + T)
  • Digite o seguinte comando para resolver os problemas de permissão:

sudo chown -R www-data / caminho do arquivo

Por exemplo: sudo chown -R www-data / var / www / html / magento / app / etc

  • Ele pedirá a senha do sistema, digite a senha do seu sistema e pressione enter, ele pedirá a senha apenas uma vez.
  • Digite o comando para todos os arquivos com o mesmo problema, usando o exemplo acima e clique na opção continue na página de instalação do magento.

  • Depois de clicar na opção continuar, você encontrará o erro de carregamento da extensão do php. É mostrado abaixo:

  • Se você encontrar esse erro, siga as etapas abaixo:
  • Abra o terminal e digite o comando abaixo:
  • Para instalar o mcrypt

sudo apt-get install php5-mcrypt

sudo php5 enmod mcrypt

sudo service apache2 reiniciar

  • Para instalar o curl

sudo apt-get instalar curl libcurl3 php5-curl

sudo service apache2 reiniciar

  • Para instalar o gd

sudo apt-get instala php5-gd

sudo service apache2 reiniciar

  • Em seguida, clique em continuar na página de instalação do magento.

Página de conexão do banco de dados

  • Depois de clicar em continuar, você será direcionado para uma página de conexão com o banco de dados, onde poderá:
  • Definir um nome de usuário e senha.
  • Altere o nome do banco de dados.
  • Defina os prefixos da tabela. (opcional)

Criar conta de administrador

Depois de completar todos os processos em configuração, você será direcionado para criar uma conta de administrador, onde você deve:

  • Digite seus dados pessoais:
  • Nome
  • Sobrenome
  • Identificação do email
  • Insira as informações de login:
  • Nome de usuário
  • Senha
  • Confirmar senha
  • Digite a chave de criptografia (opcional)
  • Em seguida, clique no botão continuar.

Estás pronto

Este é o último passo no processo de instalação do magento. Aqui você será fornecido com uma chave de criptografia que você tem que salvar, como o Magento usa para criptografar senhas, cartões de crédito etc.

  • Agora você tem duas opções na sua tela:
  • Ir para o front-end
  • Ir para o back-end
  • Você pode visitar qualquer um deles.

Front-end e back-end

Quando você visita seu front-end, você notará que não há logotipos, banners e imagens para qualquer produto ou marca. Portanto, para isso, você precisa fazer algumas alterações no Back-End para garantir que tudo funcione bem antes de poder trabalhar no magento.

Mudanças necessárias

  • Para carregar imagens no front end
  • Copie as pastas Media e Skin de magento-sample-data e cole-as na sua pasta de configuração.
  • A pasta de instalação já conterá essas pastas, basta você substituí-las.
  • Em seguida, vá para o seu Front-End e atualize a página. Você verá que os logotipos, imagens e banners são enviados.
  • Em alguns casos, você verá que não há updation, o Front-End ainda está em branco. Nesse caso, siga as etapas abaixo mencionadas:
  • Abra o terminal e digite o comando:

sudo chown -R www-data / var / www / html / magento / media /

  • Em seguida, vá para o seu Back-End, passe o cursor sobre o menu do sistema na barra de menus do painel de administração e clique no gerenciamento de cache na opção suspensa.

  • Depois de clicar na opção de gerenciamento de cache, você será direcionado para uma nova página, onde verá duas opções no canto superior direito da página:
  • Flush Magento Cache
  • Armazenamento de cache nivelado
  • Clique nestas opções para Limpar o Cache do Magento e o Armazenamento do Cache.
  • Agora vá para o seu front-end e atualize a página, você verá que todos os banners, logotipos, imagens são atualizadas, você terá seu Front-end pronto.
  • Modificando o arquivo Index.php
  • Agora, abra Index.php, você encontrará index.php no caminho abaixo:

/ var / www / html / magento

  • Clique no arquivo Index.php e abra-o.
  • Você verá um código Php, vá para a linha 73,74 e 75 e coloque uma barra dupla no início dessas linhas e remova "#" no início da linha 77 como mostrado abaixo:

  • Agora salve o arquivo e feche-o.
  • Modificando o arquivo Varien.php
  • Agora abra Varien.php, você encontrará Varien.php no caminho abaixo:

/ var / www / html / magento / app / código / core / Mage / Core / Modelo / Sessão /

Abstrato

  • Clique no arquivo Varien.php e abra-o.
  • Você verá um código php, vá para a linha 99, 100 e 101 e atribua valores como mostrado abaixo:

  • Remova as linhas como $ cookie-> getconfigDomain () da linha 99,100 e 101 e coloque aspas duplas como mostrado na figura.
  • Agora salve o arquivo e feche-o.

Também poderá gostar de:

Your license is inactive or expired, please subscribe again!