
Prestashop Blog Manager is a complete PrestaShop Blog Module developed for e-merchants who want to add blogs to their stores. Instead of relying on a separate blogging platform, you can publish articles, guides, and news directly inside prestashop store, then link that content back to your products for stronger SEO and better engagement. In other words, this Prestashop Blog Module works as both a publishing tool and a PrestaShop Content Marketing Module, so your writing effort translates into real commercial value.
As a comprehensive PrestaShop Blog Module, this gives you:
- Blogs management with rich text, gallery images, video or audio embeds, SEO fields, and related products links.
- Integration of categories, flexible tags, and author profiles individually, keep your content well organized while improving search engine visibility and user navigation.
- Reader comments with moderation, replies, star ratings, emoji reactions, likes, and bookmarks, all of which work together as a PrestaShop Blog Engagement Addons suite.
- Built-in AI content generation and translations through ChatGPT or Google Gemini, which speeds up writing without compromising the blog content quality.
- Bulk import from WordPress exports and RSS or Atom feeds, so migrating an existing blog takes minutes rather than days.
- An XML sitemap, RSS feed, friendly URLs, and GDPR-ready hooks that keep your blog compliant and easy for search engines to crawl.
- Full multistore and multilanguage support, since every setting can be scoped per shop and per language.
Altogether, these capabilities make Prestashop Blog Manager one of the most complete PrestaShop Blog Addons available on Prestashop Addons, whether your goal is search visibility, community building, or simply keeping customers on your site longer.
2. Installation and Uninstallation
- Upload the zipped file from the Upload Option in the module manager.
- In the Back Office, go to Modules > Module Manager, search for “KB Blog,” and click Install.
- Once installation is complete, you will see the configuration button on the page.
- Click on Configure; now you will be redirected to the general setting page of the Prestashop Blog Module
NOTE: Important: If the Clean Database on Uninstall setting (found under General Settings, then Maintenance) is set to Yes, all blog data, including posts, categories, and comments, will be permanently deleted. Therefore, leave this set to No if you plan to reinstall the module later and want to keep your content.
3. Admin Panel Overview of the Blog Manager Module
In this section, you are going to learn how to create blog, manage content on your website. This module also helps your website to rank higher.
Once installed, a dedicated Knowband Blog Module sections appears in the PrestaShop Back Office sidebar. This is the control centre for your PrestaShop Blog Module, and it includes the following sub-sections:
Dashboard – shows KPI summary and sample-data generator
General Settings – includes all global configuration for the module
Posts –Using posts, you will create and manage blog articles
Categories– Manage nested post categories for the listed blogs
Tags– Manage flat tag taxonomy per blogs
Authors – Manage author profiles for the blogs
Image Type – Define named image-size presets for blogs
Comments – Moderate reader comments
Sliders – Manage home-page slider slides
Banners – Manage zone-targeted promotional banners

AI – Configure AI content-generation providers
Import – Import from WordPress or RSS feeds
4. DASHBOARD
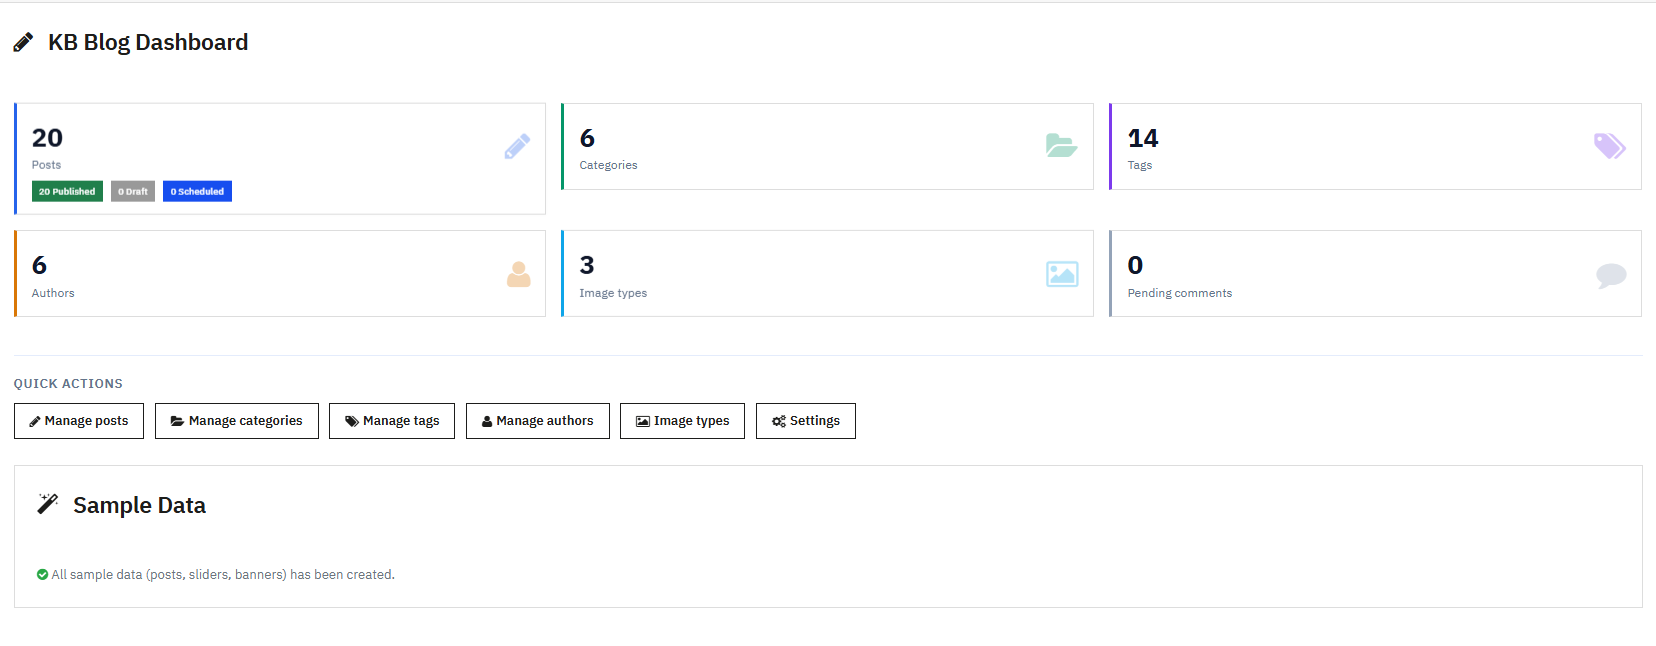
The Dashboard is the first screen you see when you open this PrestaShop Blog Manager Module, and it gives you a quick snapshot of how your blog is performing.
KPI Cards
Six KPI cards summarise your content at a glance. The Posts card shows the total number of posts, broken down into Published, Draft, and Scheduled sub-badges. The Categories card shows your total category count, and the Tags card shows your total tag count. The Authors card totals your author profiles, while the Image Types card totals your configured image-size presets. Finally, the Pending Comments card shows how many comments are still waiting for moderation, and it highlights in red whenever that number is greater than zero, so nothing slips through unnoticed.
Quick Action Buttons
Each KPI card includes a direct link button, such as Manage Posts or Manage Categories, so you can move from overview straight to action in a single click, without hunting through menus.
Sample Data Generator
If the Posts, Sliders, or Banners sections are still empty, a Create Sample Data button appears. Use this feature whenever you want to explore the module before writing real content. Clicking it automatically generates one sample author named Jane Doe, complete with a bio, three sample categories called News and Updates, Tips and Tutorials, and Product Highlights, and six sample tags: PrestaShop, E-Commerce, Marketing, SEO, Design, and Tutorial.
5. GENERAL SETTINGS
To configure the PrestaShop Blog Manager Module, navigate to KB Blog > General Settings.
Keep in mind that changes only take effect after you click the Save button at the bottom of the page. All General Settings fields are part of a single form, so even if you switch tabs before saving, clicking Save on any tab will save the changes made across all tabs.
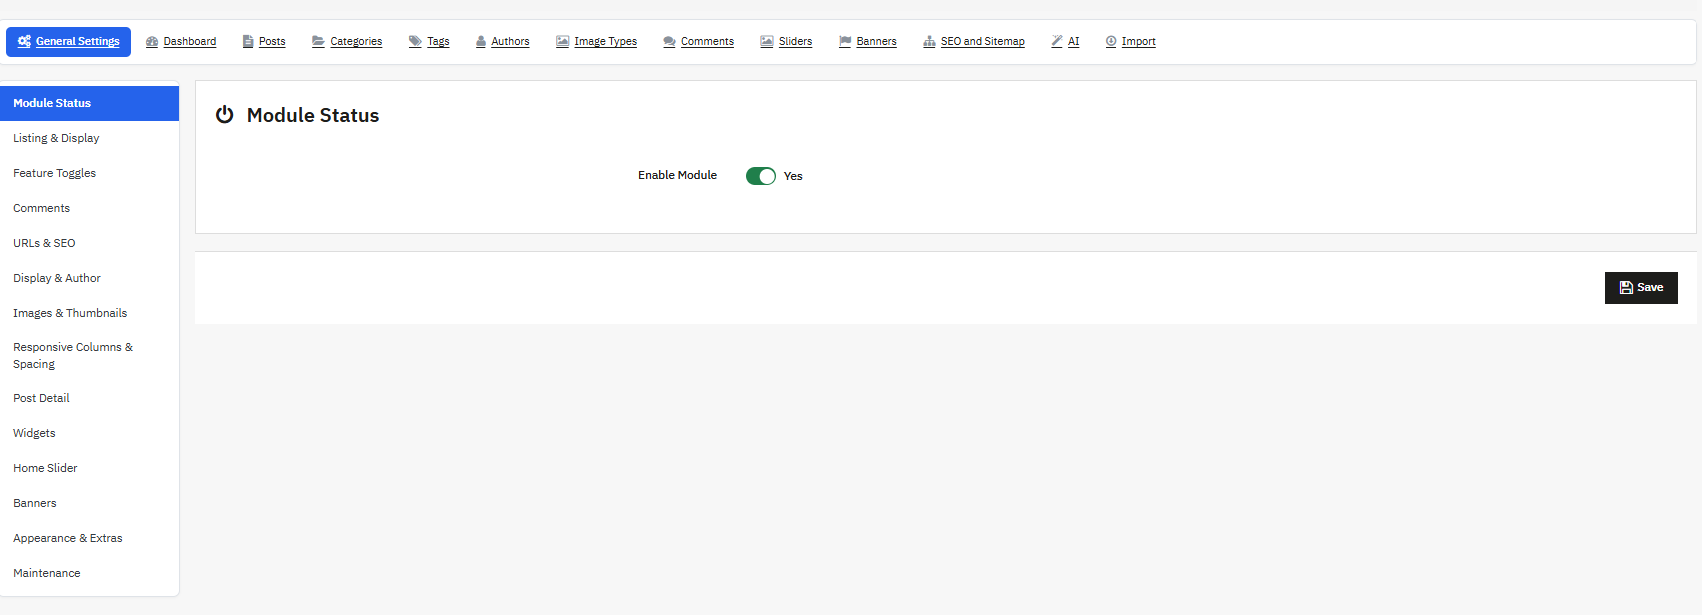
Module Status
When disabled, the blog is completely hidden from the storefront, which is useful during setup, testing, or maintenance windows. Enable it to see the functionality of the module.
5.1 Listing and Display
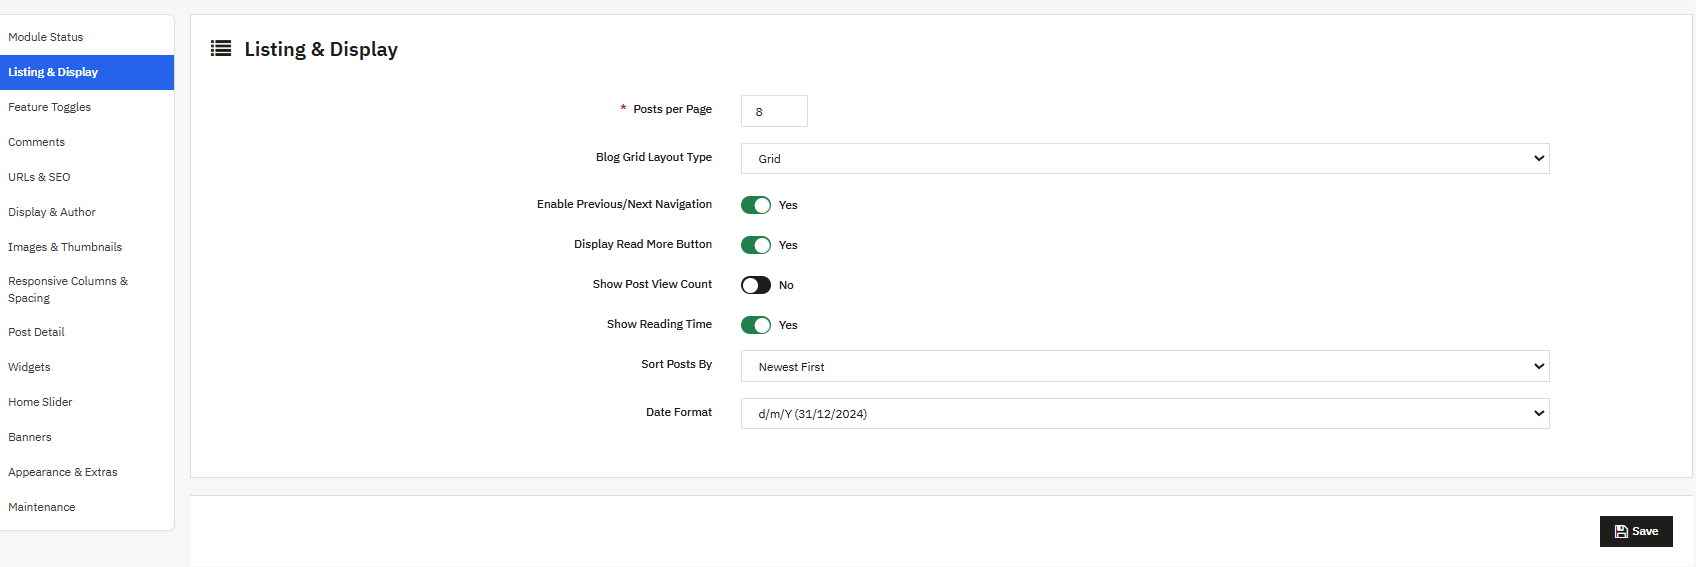
This part of the settings shapes how your PrestaShop Responsive Blog Addons layout looks and behaves for visitors.
Posts per Page sets how many posts show on each listing page, and the value must fall between one and two hundred, with ten used as the default.
Blog Grid Layout Type controls the visual layout of the post listing, and you can choose between a clean Grid, a simple List, or a magazine-style Masonry layout, with Grid selected by default.
Enable Previous/Next Navigation adds Prev and Next links on individual post pages, so readers can keep browsing without returning to the listing, and this is on by default.
Display Read More Button shows a Read More button on post cards in listings, which tends to improve click-through rate, and it is also on by default.
Show Post View Count displays how many times a post has been viewed, adding a layer of social proof for popular articles, and Show Reading Time displays an estimated reading time so readers can decide whether to dive in now or bookmark the article for later; both are enabled by default.
Sort Posts By sets the default sorting order for every post listing, offering Newest First, Oldest First, Most Viewed, Title A to Z, or Title Z to A, with Newest First as the default.
Finally, Date Format determines how dates are formatted on the storefront, and you can choose from eight PHP date presets, with d/m/Y used as the default format.
5.3 Feature Toggles
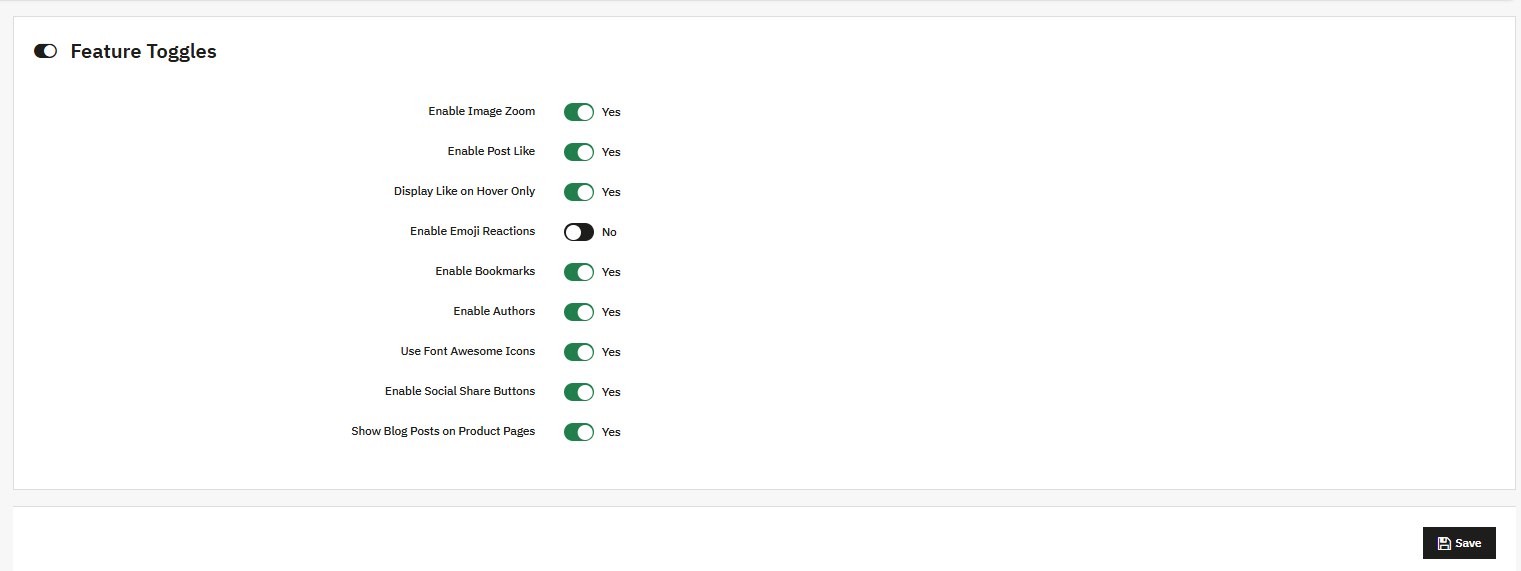
The blog module of prestashop allow the store owner to activate the engagement with users using blogs features available on the frontend.
- Enable Image Zoom : Allow visitors to zoom into the featured image on the post detail page. : a click/hover triggers a zoom overlay.
- Enable Post Like : Shows a like/heart button on posts, which readers click to register a like without leaving a comment.
- Display Like on Hover Only : Keeps the like button hidden until a visitor hovers over the post card. Please note that this feature requires Post Like to already to be enabled; the button is rendered but visually hidden until hover.
- Enable Emoji Reactions : Adds emoji reaction buttons to posts.
- Reaction Set : As you enable the emoji reaction, these emoji reactions appear. The type of reaction set includes Love, Haha, Wow, Sad, Angry.
- Enable Bookmarks : Allow readers to save posts for later. Now store owner can add a bookmark feature to the post so that reader can save the blog and read later.
- Enable Authors : Shows author information on posts and generates author listing pages.
- Use Font Awesome Icons : This feature loads the Font Awesome icon library, which ensures icons render consistently across the blog UI.
- Enable Social Share Buttons : Adds share buttons for Facebook, X/Twitter, LinkedIn, WhatsApp, and Email.
- Show Blog Posts on Product Pages : Displays a linked blog posts block on product pages. This shows posts explicitly linked to that product via the post editor’s Products section. This can help in increasing ranking of the product pages.
5.4 Comments
This tab turns the module into a fully moderated comment system, giving you control over how, when, and by whom comments are posted on your website.
- Enable Comments: Allows readers to leave comments on posts as part of your website comment system. When switched off, the comment form and the entire comment thread are hidden from the storefront, effectively letting you turn off comments on your website.
- Allow Guest Comments: Permits visitors who are not logged in to comment, removing the login requirement from the comment form and enabling anonymous commenting. This lowers friction and increases engagement by letting people comment without login.
- Auto-Accept Comments: Determines whether comments are published immediately or held for review in the comment moderation queue. When turned off, every new comment enters the moderation queue, so pre-moderation and comment approval stay active until this setting is changed.
- Enable Comment Replies: Allows one level of threaded replies (nested comments), so readers and admins can respond directly under an existing comment using the reply to comments feature.
- Enable Star Rating: Adds a 1-5 star rating field to the comment form, turning it into a simple comment rating system where the rating is captured alongside the comment text.
- Enable reCAPTCHA: Protects the comment form with Google reCAPTCHA v2 for spam protection on your comment form. This requires a Site Key and a Secret Key to function, and the reCAPTCHA widget is embedded directly in the form to help prevent comment spam.
- Site Key / Secret Key: Authenticate the reCAPTCHA widget against Google’s service as part of your reCAPTCHA v2 setup, and are entered once reCAPTCHA is enabled. Without both keys, reCAPTCHA cannot function.
- Admin Email Notification on New Comment: Sends an email notification for new comments to the admin whenever a new comment is submitted.
- Notification Email Address: Specifies the address used for comment notification settings and receives comment notifications, falling back to the shop’s default email if left empty.
- Comment System: Determines which comment plugin powers storefront comments, swapping the rendered comment widget accordingly. Available options are Native, Disqus, Facebook Comments, and Disabled, with Native set as the default, letting you choose the best comment system for your website.
- Disqus Shortname: Required when Comment System is set to Disqus; identifies your Disqus site as part of your Disqus shortname setup.
- Facebook App ID: Required when Comment System is set to Facebook Comments; authenticates the Facebook comments plugin widget.
- Facebook Comment Count: Sets how many comments display initially when using Facebook Comments, with a minimum of 1. Default number of comment has been set 5.
- Facebook Colour Scheme: Sets the visual theme of the Facebook widget, with Light or Dark mode as the available values and Light as the default.
5.5 URLs and SEO Meta
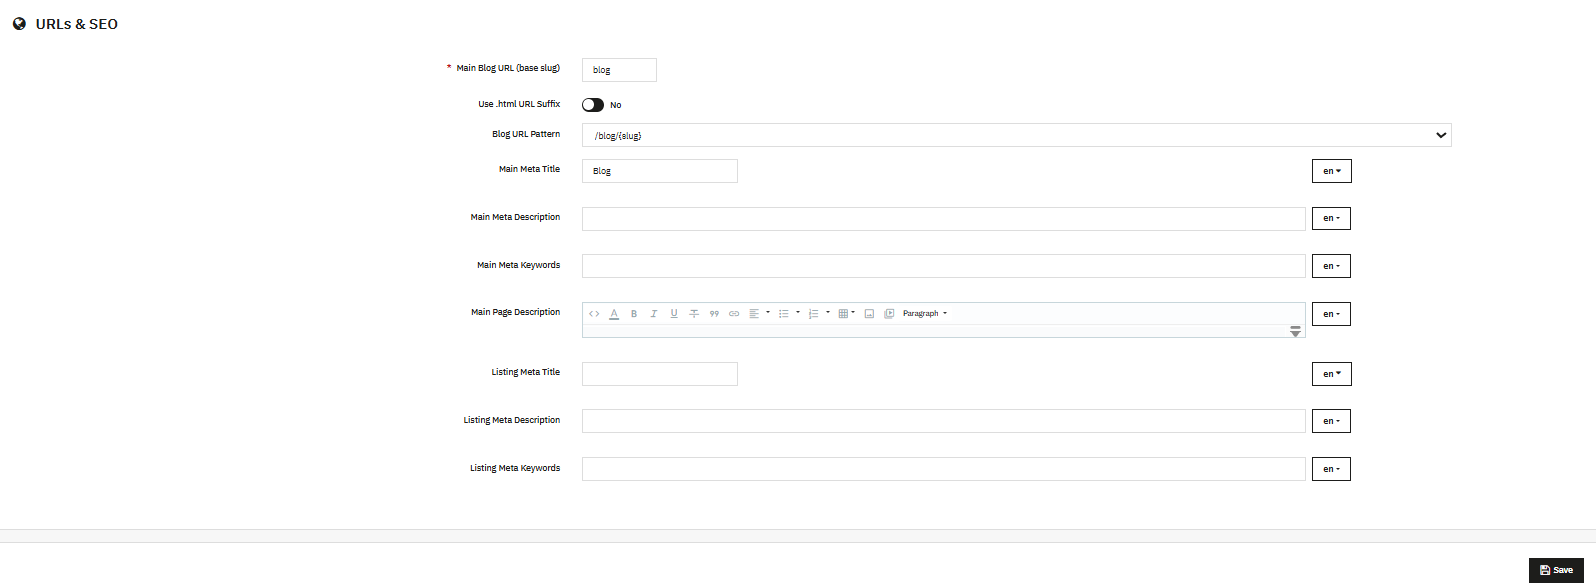
This URLs and SEO Meta controls how blog URLs and meta tags appear to search engines and is the heart of the module’s on-page SEO configuration.
- Main Blog URL: Sets the base URL slug for the blog. For example, entering “blog” produces yourdomain.com/blog. Only letters, numbers, and hyphens are accepted. Default value: blog.
- Use .html URL Suffix: Appends .html to every blog URL. This rewrites generated URLs to end in .html for a traditional SEO style.
- Blog URL Pattern: Determines how individual post URLs are built by selecting the rewrite pattern applied to new URLs. Available values: /blog/{slug}, /blog/{category}/{slug}, and /blog/{year}/{month}/{slug}. The default is the simple slug pattern.
- Main Meta Title / Main Meta Description / Main Meta Keywords: These fields set the meta tags for the main blog listing page. Each is available per language and is rendered in the page’s <head> section, influencing how the blog listing appears in search results.
- Main Page Description: A rich-text introduction to your content strategy, displayed on the main blog listing page for both readers and search engines.
- Listing Meta Title / Listing Meta Description / Listing Meta Keywords: These apply the same meta concept specifically to category, tag, and author listing pages. Each is available per language and reused consistently across all listing-type pages.
5.6 Display and Author
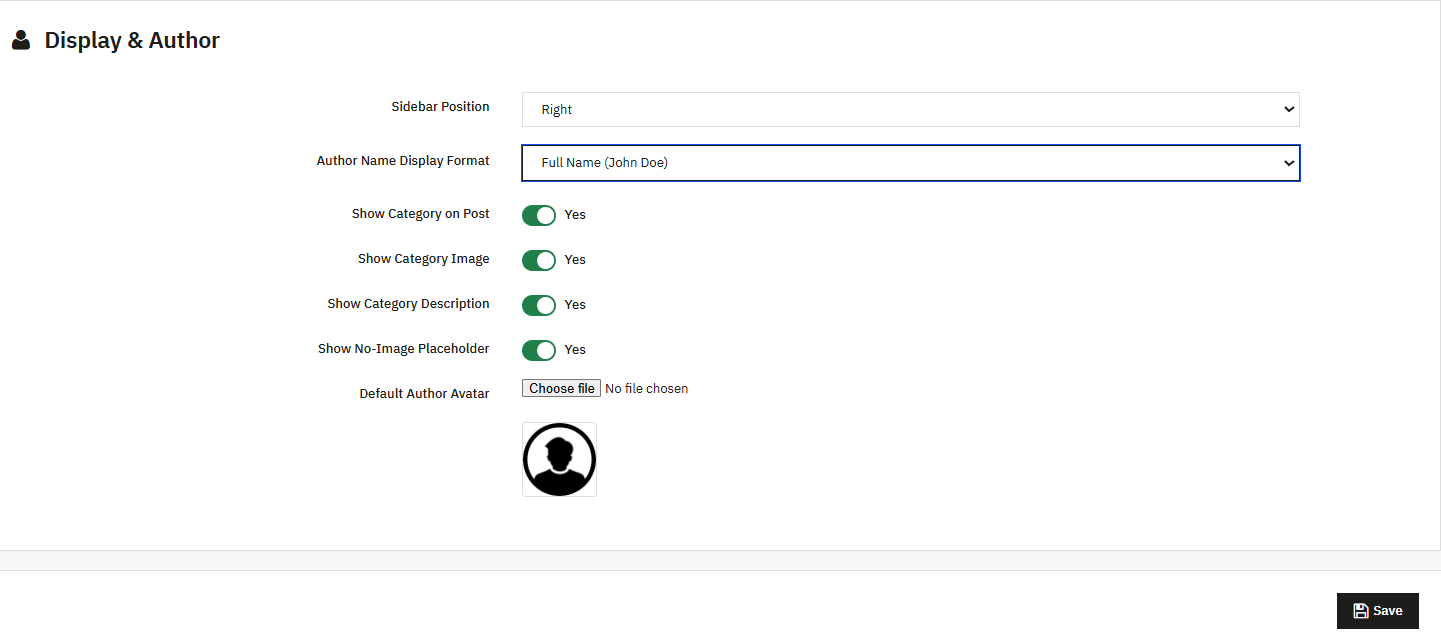
This tab controls page layout and author presentation, giving you full control over how your PrestaShop blog module content appears to visitors.
- Sidebar Position: Sets where the widget sidebar appears. Values: Right, Left, None. Default: Right.
- Author Name Display Format: Controls how author names are displayed across your blog manager. Values: Full Name, First Name Only, Last then First, Username. Default: Full Name.
- Show Category on Post: Displays the post’s category on cards and detail pages, helping readers and search engines understand your content structure.
- Show Category Image: Shows the category thumbnail on listing pages for a more visual, professional blog layout.
- Show Category Description: Shows the category’s description text to give visitors more context before they click through.
- Show No-Image Placeholder: Shows a placeholder graphic when a post or category has no image, preventing a broken-image icon from appearing on the storefront.
- Default Author Avatar: Sets a fallback avatar image used when an author has no personal avatar. Accepted formats: JPG, PNG, GIF, or WEBP, up to 2 MB.
5.7 Images and Thumbnails
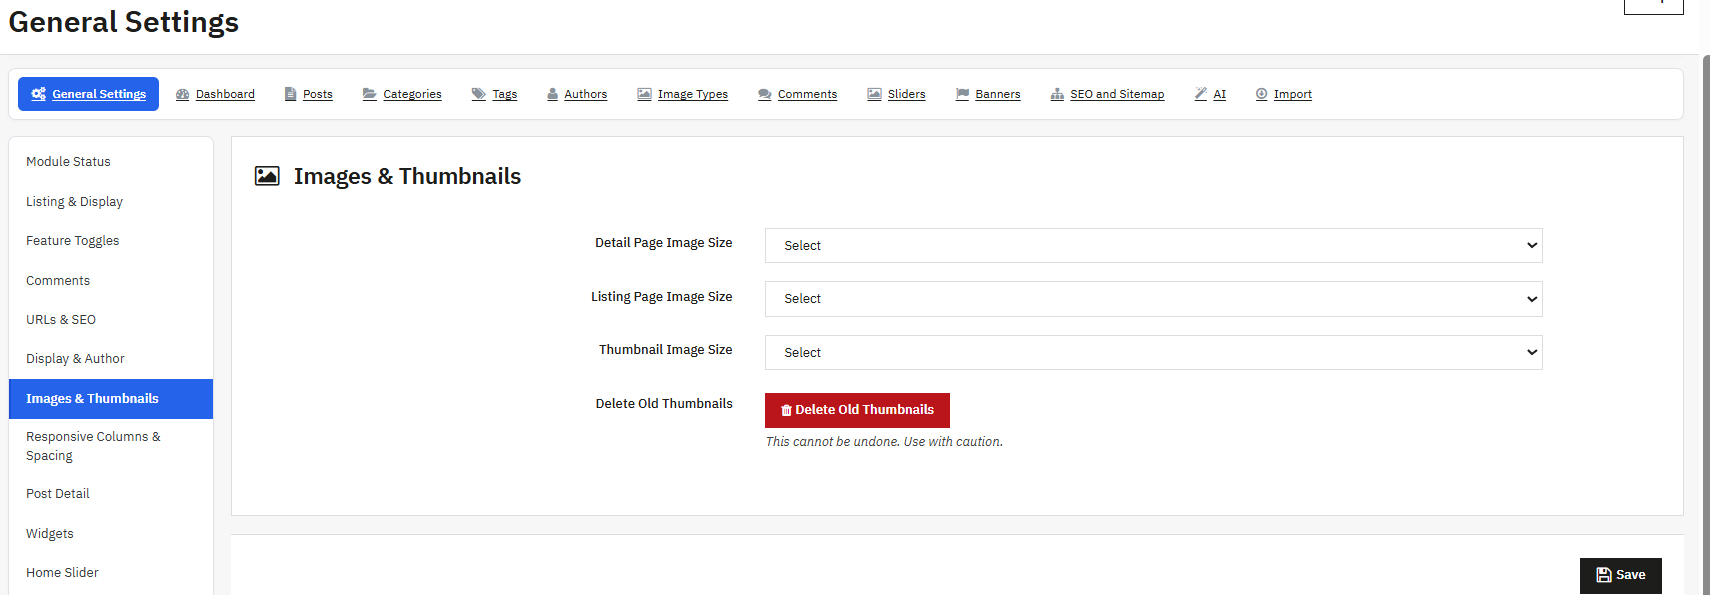
This tab controls which image-size presets are used where, and lets you regenerate thumbnail files across your PrestaShop blog module.
- Detail Page Image Size: Chooses the preset applied to the featured image on post detail pages. Populated automatically from your active Image Types (Section 10).
- Listing Page Image Size: Chooses the preset applied to post cards in listings.
- Thumbnail Image Size: Chooses the preset applied to small thumbnails in widgets and related posts.
- Delete Old Thumbnails (button): Deletes all previously regenerated thumbnail files (JPG, PNG, WEBP) from the posts, categories, and authors image directories. Use this before regenerating thumbnails with new sizes, so no stale files remain in your blog manager.
Tip: After creating or changing Image Types and selecting new sizes here, use Regenerate Thumbnails in the Image Types section (Section 10) to rebuild every thumbnail accordingly.
5.8 Responsive Columns and Spacing
This tab fine-tunes how many post cards appear per row at each screen size, along with the spacing between them, ensuring your blog module looks polished on any device.
- Desktop Large (≥1200px): Columns default 4, Spacing default 20px.
- Desktop (992–1199px): Columns default 3, Spacing default 20px.
- Tablet (768–991px): Columns default 2, Spacing default 15px.
- Mobile (<768px): Columns default 1, Spacing default 10px.
Each breakpoint has its own independent column and spacing value, applied via CSS grid rules on the storefront. The minimum number of columns per row at any breakpoint is 1, and spacing values can never be negative. As a result, the post grid re-flows automatically as the visitor’s screen size changes, keeping your responsive blog layout consistent across devices.
5.9 Post Detail Settings
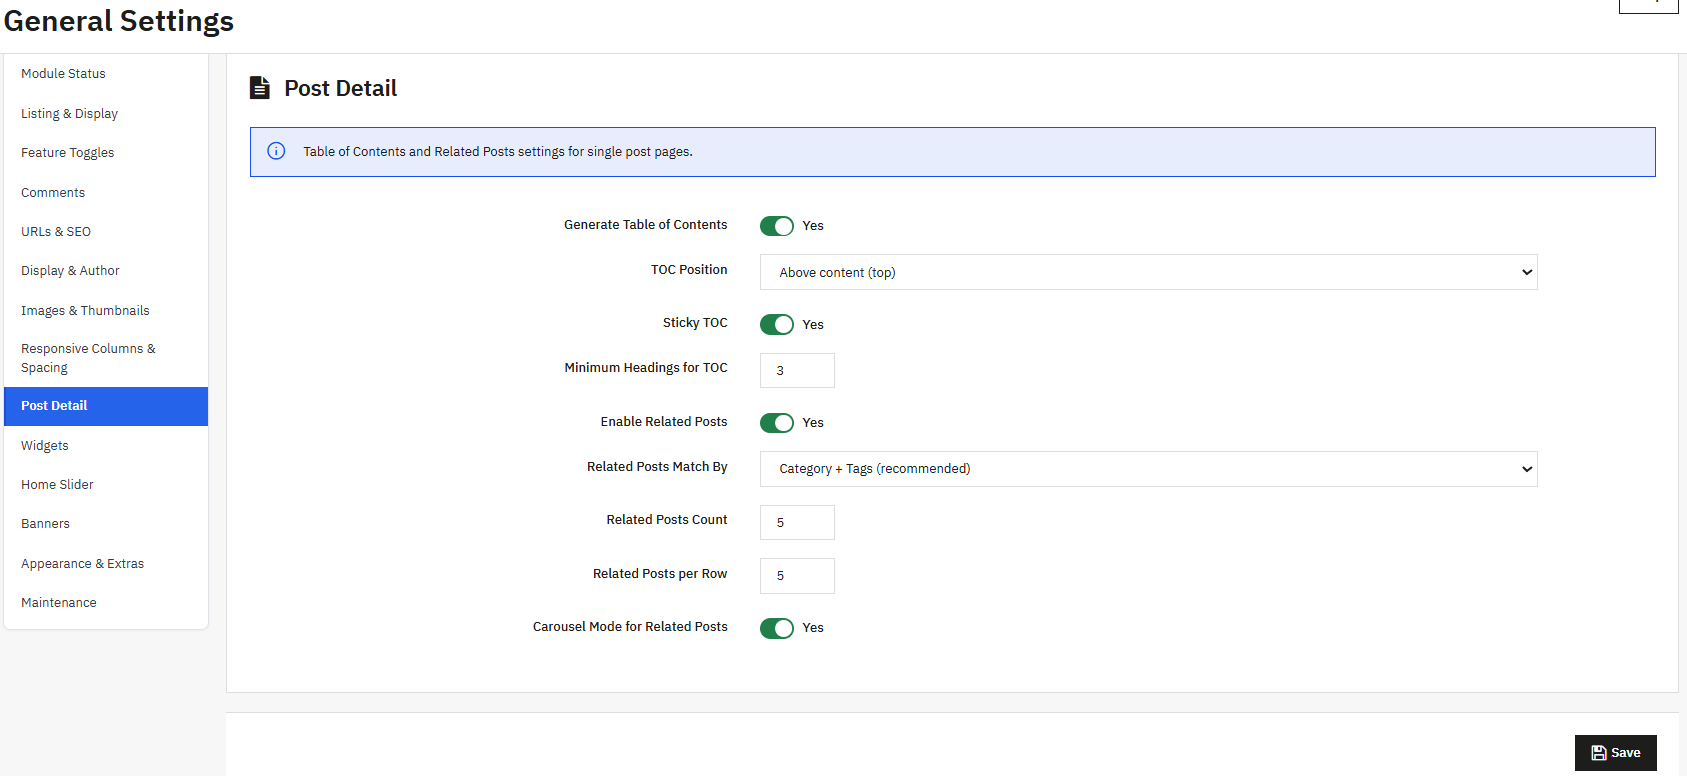
This tab controls two related feature groups shown on individual post pages: the Table of Contents and Related Posts, both designed to improve readability and engagement on your blog.
5.9.1 Table of Contents
- Generate Table of Contents: Automatically builds a linked table of contents from heading tags (h2, h3) in the post content. Recommended for long-form guides to improve readability and keep readers on the page longer.
- TOC Position: Sets where the table of contents is inserted. Values: Top, Left, Right. Default: Top.
- Sticky TOC: Keeps the table of contents fixed in place as the reader scrolls. Values: On/Off.
- Minimum Headings for TOC: Sets the minimum number of headings a post must contain before a TOC is generated, preventing short posts from being cluttered with an unnecessary outline. Default: 3.
5.9.2 Related Posts
- Enable Related Posts: Shows a grid of related posts at the bottom of each post detail page, keeping visitors engaged and reducing bounce rate.
- Related Posts Match By: Determines how related posts are selected. Values: Category only, Tags only, or Category and Tags combined. Default: combined.
- Related Posts Count: Sets the total number of related posts displayed. Default: 3.
- Related Posts per Row: Sets how many related posts appear per row. Default: 3.
- Carousel Mode: Makes related posts scroll as a carousel instead of a static grid, adding a more dynamic feel to your PrestaShop blog module.
5.10 Widgets
This tab configures the sidebar and other widget-area building blocks of your PrestaShop Blog Widget Module. Each widget can be enabled or disabled, titled, and shown or hidden per device where relevant.
- Recent Posts Widget: Lists the most recent posts. Fields include an Enabled toggle, a Title, a Number of posts field, and Devices (Desktop, Tablet, Mobile), each independently toggleable.
- Categories Widget: Lists blog categories. Fields include a Title and a Maximum categories shown field, where entering 0 shows all categories.
- Tags Widget: Displays a tag cloud. Fields include a Title and a Number of tags shown field.
- Popular Posts Widget: Lists the most-viewed articles. Fields include a Title and a Number listed field.
- Archives Widget: Lists monthly archive links in a dropdown. Fields include a Title and a Number of months listed field.
- Search Widget: Shows or hides a blog search box in the sidebar. Fields include a Title.
- Footer Blog Block: Shows a compact list of recent blog links in the storefront footer, giving your latest articles extra site-wide visibility.
- Home Page Blog Block: Shows a recent-posts section on the storefront home page. Fields include a Title and a Display count. This block respects the same Desktop, Tablet, and Mobile device settings as other widgets.
5.11 Home Slider Settings
This tab controls the behavior of the home-page image slider, one of the standout visual features among the PrestaShop Blog Addons bundled with this module. The actual slide content itself is managed separately in the Sliders section (Section 12).
- Enable Home Slider: Activates the slider on the storefront home page.
- Autoplay Slides: Advances slides automatically without visitor interaction. Values are On or Off.
- Autoplay Interval: Sets the time between slide transitions, measured in milliseconds. The minimum accepted value is 1000ms.
- Show Dot Navigation: Displays clickable dot indicators below the slider.
- Show Arrow Navigation: Displays left and right arrow buttons.
- Pause on Hover: Stops autoplay while the cursor hovers over the slider, giving readers time to read a slide before it advances.
- Transition Effect: Sets the animation used when switching slides. Values are Slide or Fade.
- Thumbnail Navigation: Shows small thumbnail previews below the slider for quick navigation.
- Slider Theme: Sets the overall visual skin of the slider. Values include Default, Dark, and Boxed.
5.12 Banners
This tab contains the master toggle for zone banners. Individual banner content is managed separately in the Banners section (Section 13).
- Enable Zone Banners: Turns every promotional banner placed across blog zones on or off at once. This acts as a master switch layered above each individual banner’s own Enabled toggle.
5.13 Appearance and Extras
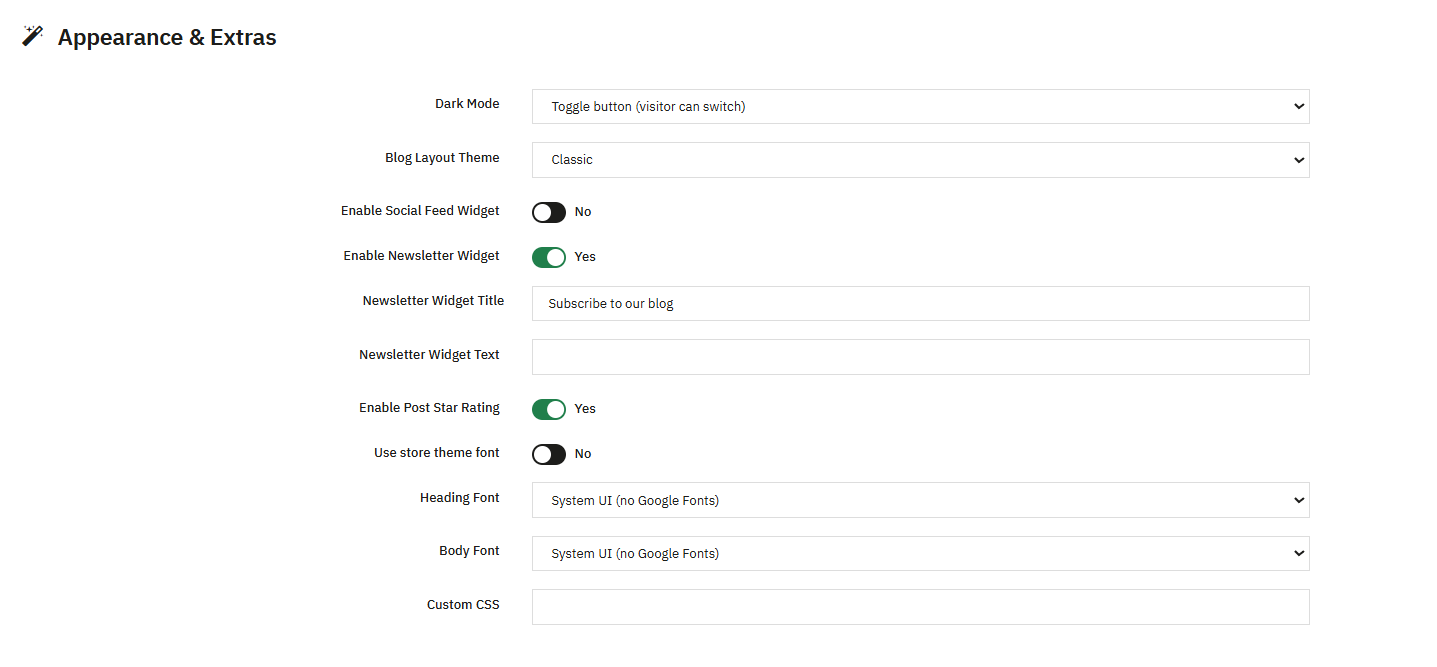
This tab covers general visual theming and optional extra widgets.
- Dark Mode: Sets the blog’s colour theme. Values include Off, On, and Auto ( according to system) and a Toggle button in which the user can change the mode.
- Blog Layout Theme: Sets the visual theme preset for blog pages. Values include Classic, Magazine, Minimal, and Full-width.
- Enable Social Feed Widget: Shows a sidebar widget embedding social media content. Fields once enabled include a Facebook Page URL and a Twitter/X Handle, entered without the @ symbol.
- Enable Newsletter Widget: Shows a newsletter sign-up widget. Fields once enabled include a Newsletter Widget Title and Newsletter Widget Text.
- Enable Post Star Rating: Shows a star-rating widget on post detail pages, separate from comment ratings.
- Use Store Theme Font: Makes the blog use your PrestaShop theme’s font instead of the Google Fonts below. When Off, two font pickers become active.
- Heading Font: Chooses the font used for headings when Use Store Theme Font is Off, with 8 options available.
- Body Font: Chooses the font used for body text when Use Store Theme Font is Off, with 8 options available.
- Custom CSS: A textarea for injecting custom CSS rules across all blog pages. <style> and <script> tags are stripped automatically for security.
5.14 Maintenance
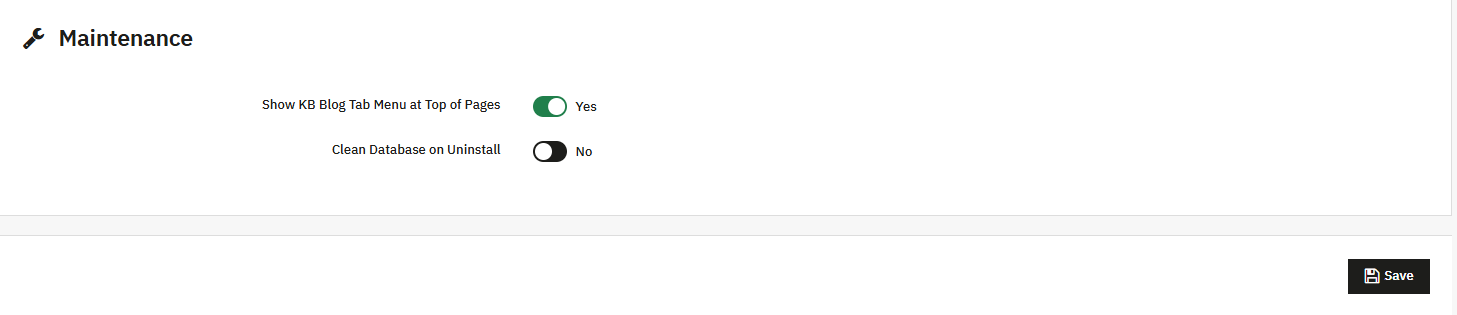
This tab covers admin convenience and data-retention behavior.
- Show KB Blog Tab Menu at Top of Pages: Displays the horizontal quick-navigation bar at the top of every KB Blog admin page.
- Clean Database on Uninstall: Drops every KB Blog database table the moment the module is uninstalled. This permanently deletes all blog data, including posts, categories, and comments, on uninstall. Treat this setting with real caution and set it to Off if you intend to reinstall later and keep your content.
Once every field above has been reviewed, click Save to apply all settings on the General Settings page.
6. How to create a blog in PrestaShop
To create a blog in PrestaShop, navigate to Prestashop Blog Manager Module by Knowband, click on the Posts. Now you will have the options to create blog by clicking on Add, then proceed to add the informations like Post title, URL, Content, meta details etc. This section will walk you through all the feature available in Posts .
6.1 Creating or Editing a Post
Post creation is divided into five sections in Prestashop Blog Module.
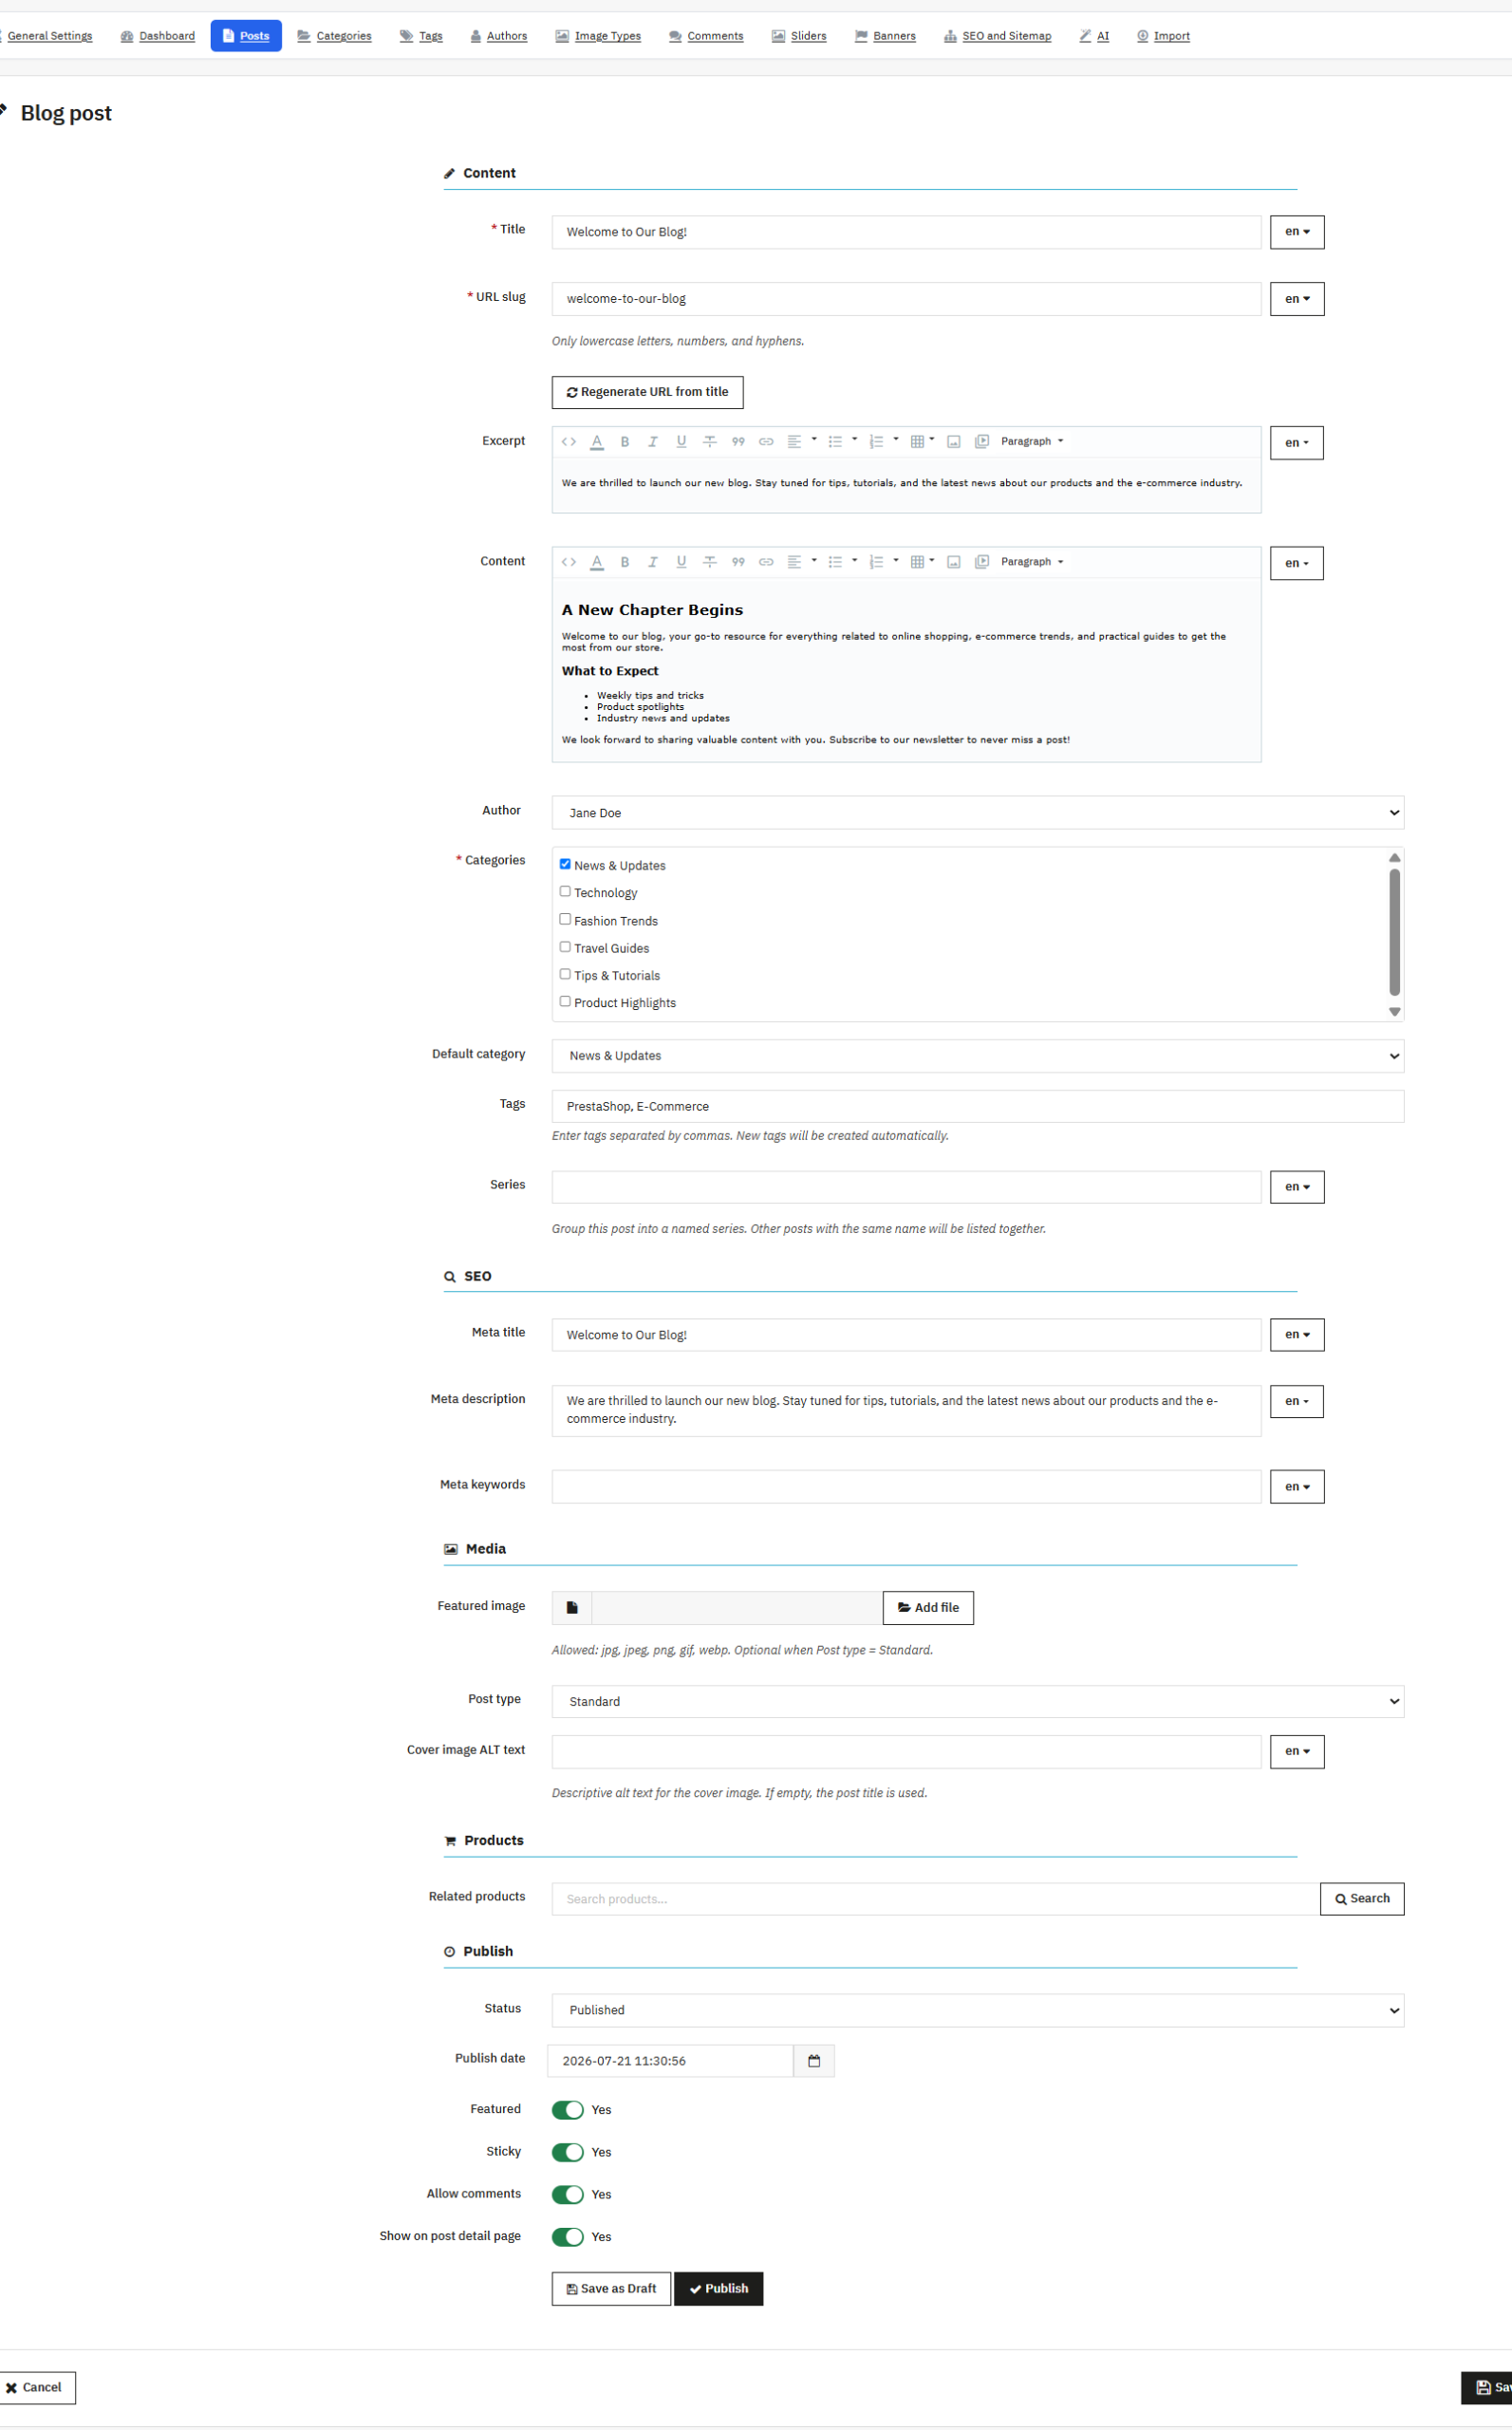
6.1 Content
- Title: The post headline, required in the default language and limited to 255 characters.
- URL Slug: A Regenerate URL from Title button allow you to refresh it anytime.
- Excerpt: A summary shown on listing pages and in the Related Posts section.
- Content: The full post body, written through a rich-text editor. Once AI is configured (Section 15), buttons appear inside this field to generate content, generate an excerpt, or translate the post.
- Author: Store owners can assign a post to an author from your Authors list, or leave it as None if no author should be shown.
- Categories: Assigns the post to one or more categories via a nested picker. At least one category must be ticked.
- Default Category: Chooses the primary category used for URL generation. This is only relevant when the category-based URL pattern is selected (Section 5.5).
- Tags: Here you can add the tags for the blog post, which will differentiate your post within the website using posts.
- Series: Groups a post into a named content series such as “Fashion Basics” helping readers read the blog post in a series, in this way this module also work as PrestaShop Content Marketing Module strategy.
6.2.2 How to improve blog SEO in Prestashop
- Meta Title: The post’s search-result title, available per language, with an AI Generate button.
- Meta Description: The post’s search-result summary, available per language, with an AI Generate button.
- Meta Keywords: Target keywords for the post, available per language, with an AI Generate button.
6.2.3 Media
- Post Type: Determines the media format of the post. Values include Standard, Video, Audio, and Gallery.
- Featured Image: The main image for the post, required for the Standard type. Accepted formats include JPG, JPEG, PNG, GIF, and WEBP.
- Cover Image ALT Text: It is recommended to add the alt text fo the cover image as, it also helps in ranking the blog post.
- Video URL: Appears only when Post Type is Video and holds the source URL for the embedded video.
- Audio URL: Appears only when Post Type is Audio and holds the source URL for the embedded audio.
- Gallery: Appears when Post Type is Gallery and lets you upload multiple images, drag them into any order, delete individual images, and set one image as the cover. The gallery displays in a lightbox on the post detail page.
6.2.4 Products
- Related Products: This Prestashop blog Manager is best blog module which also helps in marketing and cross selling. This module allow you to attach PrestaShop products to the post, one of the most valuable PrestaShop Related Products Blog Addons for driving cross-sell traffic.
6.2.5 Publish
- Status: Sets the post’s publication state. Values include Draft, Published, and Scheduled.
- Publish Date: Records when a Published post went live.
- Scheduled Date: Sets the future date and time a Scheduled post auto-publishes. This is required whenever Status is Scheduled.
- Featured: Pins or highlights the post.
- Sticky: Pins the post to the top of the listing.
- Allow Comments: Enables or disables comments for this specific post, overriding the module’s global Comments setting.
- Show on Post Detail Page: When Off, hides the post from its own detail URL, though it may still appear in listings.
- Save as Draft / Publish (buttons): Quick actions that save the post and set the respective status in a single click.
7. How to manage blog categories
Navigate to Knowband Prestashop Blog Manager> Categories to organize your content. This section covers everything on how to add categories in a blog and manage them at scale.
7.1 Browsing the Categories List
The list shows each category’s internal ID and Name with bulk actions which let you Enable Selected, Disable Selected, or Delete Selected. A category cannot be deleted while it still has child categories, so remove the children first.
7.2 Creating or Editing a Category
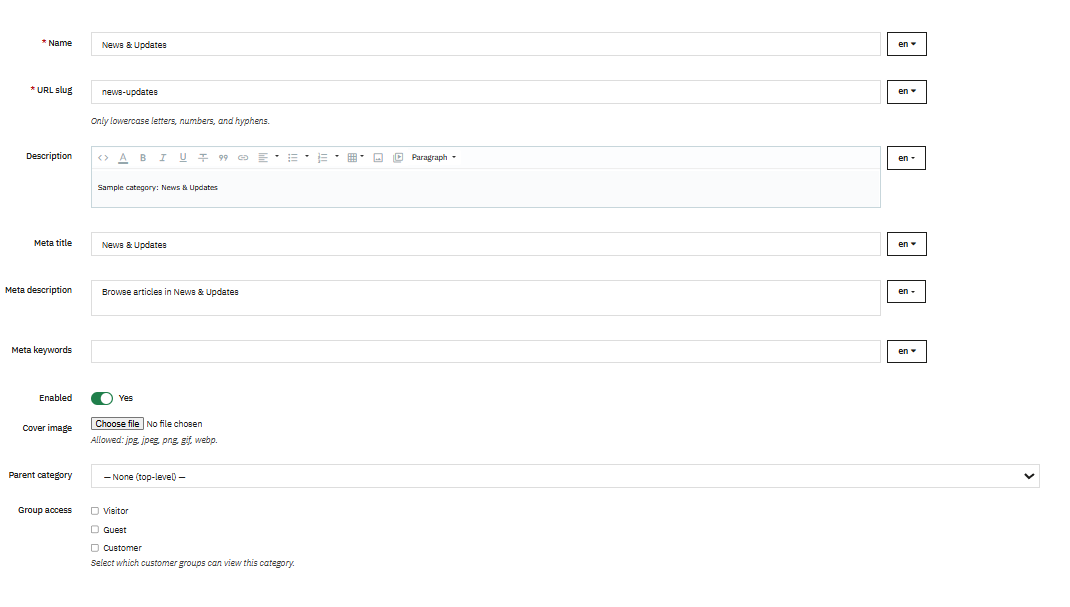
If you’re wondering how to add categories in a blog using this module, this user guide covers every field you’ll need:
- Name: The category’s display name.
- URL Slug: The category’s URL-friendly identifier, validated as a link-rewrite.
- Description: Rich-text content shown on the category listing page.
- Meta Title / Meta Description / Meta Keywords: The SEO fields for the category’s listing page.
- Enabled: Controls storefront visibility for new categories.
- Cover Image: A category thumbnail. Accepted formats include JPG, JPEG, PNG, GIF, and WEBP.
- Parent Category: Sets the category’s place in the hierarchy. Circular references, where a category becomes its own ancestor, are automatically blocked.
- Group Access: Selects which customer groups can view posts in this category.
8. Tags
Navigate to Knowband Blogs > Tags to manage the tags taxonomy using these PrestaShop Blog Tags Addons.
8.1 Browsing the Tags List
The list shows each tag’s internal ID, Name, and a Posts column counting how many posts carry that tag.
8.2 Creating or Editing a Tag
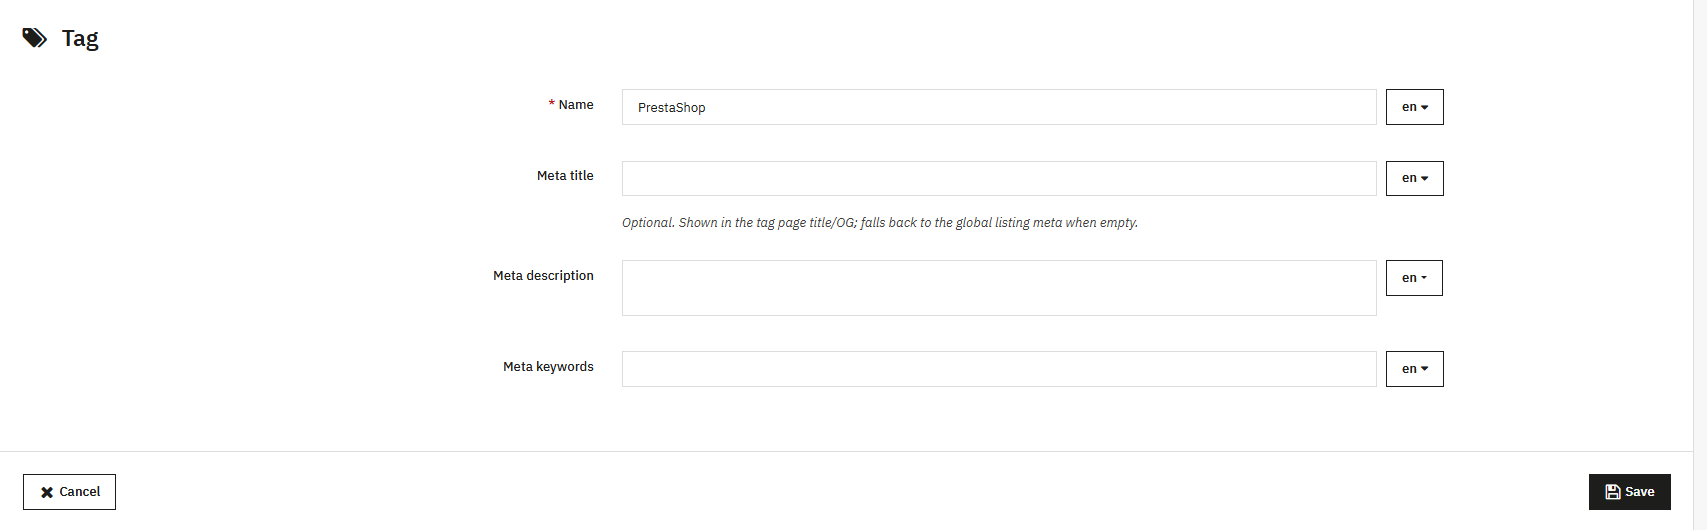
From here, you can add the tag with details like tag title, meta description, meta title and meta keywords. Furthermore, you can also add the tags from the Post Creation. There you will find an option to add tags. After the tag addition, these tags will display individually here.
9. Authors
9.1 Browsing the Authors List
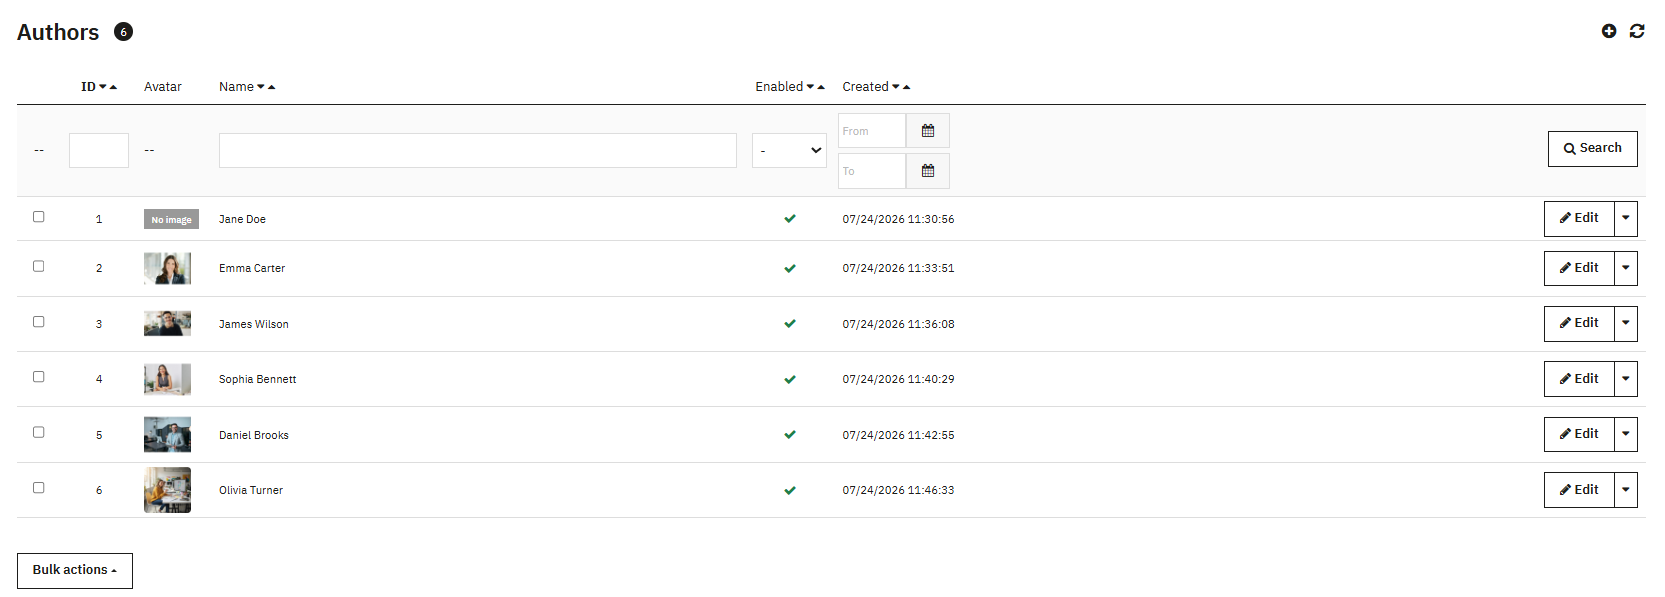
The list shows each author’s internal ID, a small Avatar thumbnail, Name, an Enabled toggle, and the Created date. Bulk actions allow you to Enable Selected, Disable Selected, or Delete Selected authors.
9.2 How to add Author in a Blog
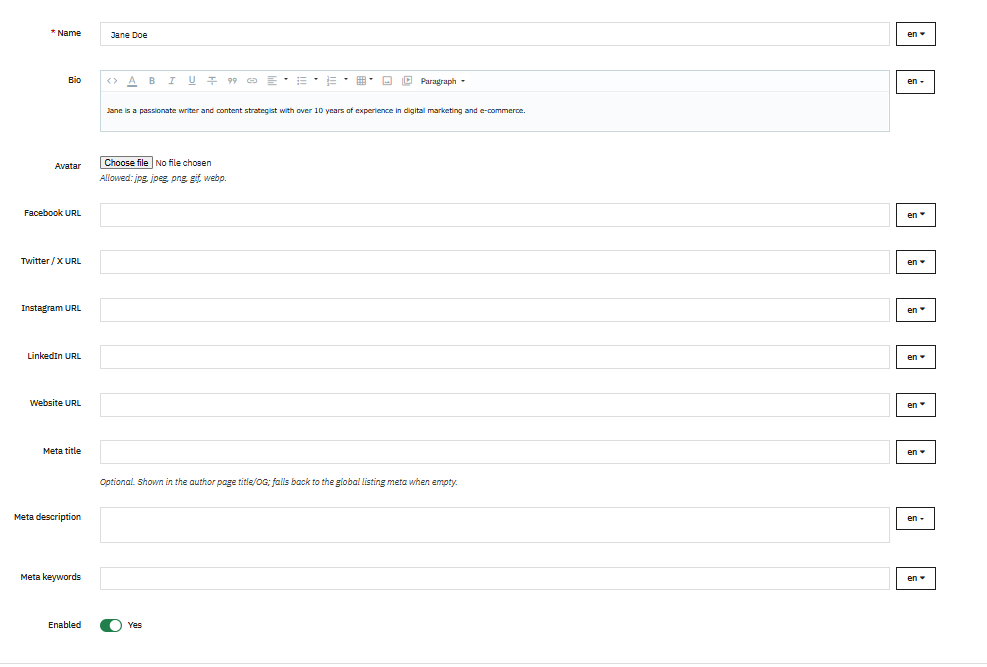
As a core piece of the PrestaShop Blog Module, this module supports full author profiles, which helps in SEO as well.
- Name: The author’s display name, required in the default language.
- Bio: The author’s biography, shown on the author page and optionally on posts. Supports rich text.
- Avatar: The author’s profile photo. Accepted formats include JPG, JPEG, PNG, GIF, and WEBP, up to 2 MB.
- Facebook URL / Twitter/X URL / Instagram URL / LinkedIn URL / Website URL: Each links out to the corresponding social profile.
- Meta Title / Meta Description / Meta Keywords: The SEO fields for the author’s listing page.
- Enabled: Controls whether the author appears on the storefront at all.
10. Image Types
Navigate to Knowband Blog Manager > Image Type to control image quality and performance across the blog. Image types define named size presets used to generate thumbnails for posts, categories, and authors.
10.1 Browsing the Image Types List
Each entry shows its internal ID, preset Name (such as blog_large), target Width and Height in pixels, the Entity it applies to (Post, Category, or Author), and an Enabled toggle. A single bulk action, Delete Selected, is available. Out of the box the module ships with three presets. blog_large is sized 800×600 for Posts, blog_medium is sized 400×300 for Posts, and blog_thumb is sized 150×150 for Posts.
10.2 Creating or Editing an Image Type
- Name: A unique identifier for the preset, limited to 64 characters. Spaces are not recommended.
- Width / Height: Define the target dimensions in pixels. Both are required positive integers.
- Applies To: Determines which entity uses this size. Values include Post, Category, and Author.
- Enabled: Controls whether this size appears in the Image Size dropdowns under Settings.
10.3 Regenerating Thumbnails
- Regenerate Thumbnails (button): Triggers a background process that loops through every post, category, and author image, generating a resized copy for each active image type matching the corresponding entity. Use this whenever you add new image types or change existing sizes, so images stay sharp and properly sized across the blog.
11. How to Enable Blog Comments
Navigate to Knowband PrestaShop Blogs> Comments to moderate reader comments with this PrestaShop Blog Comment Module. Comments are submitted by readers or users on the frontend, so this section is strictly for moderation. You cannot create a comment directly from the Back Office.
11.1 Browsing the Comments List
Each row shows the comment’s internal ID, the Post it belongs to (filterable), the commenter’s Author name and Email (filterable), and a Comment preview that reveals the full text on hover. Status appears as Pending, Approved, or Spam, with inline quick-action buttons. A Rating column shows the star rating given, if enabled; a Reply column flags admin replies, and a Date column records submission time. Store owner can filter by post, email, or status. Bulk actions let you Approve Selected, Mark as Pending, Mark as Spam, or Delete Selected. Row-level actions include View, Reply, and Delete.
11.1 Replying to a Comment
Clicking Reply opens a form with a single required Reply textarea. Submitting it creates a new comment entry marked as an admin reply, displayed differently on the storefront. If the original commenter left a valid email address, they receive a notification email containing your reply.
12. Sliders
Navigate to Knowband PrestaShop Blog> Sliders to manage the home-page slider with this PrestaShop Blog Slider Module. The slider appears on the storefront home page once Enable Home Slider is turned on under General Settings (Section 5.11).
12.1 Browsing the Sliders List
Each slide shows its internal ID, a Title with a small thumbnail preview, a drag-and-drop Position column, and an Enabled toggle. Bulk actions let you Enable Selected, Disable Selected, or Delete Selected.
12.2 Creating or Editing a Slide
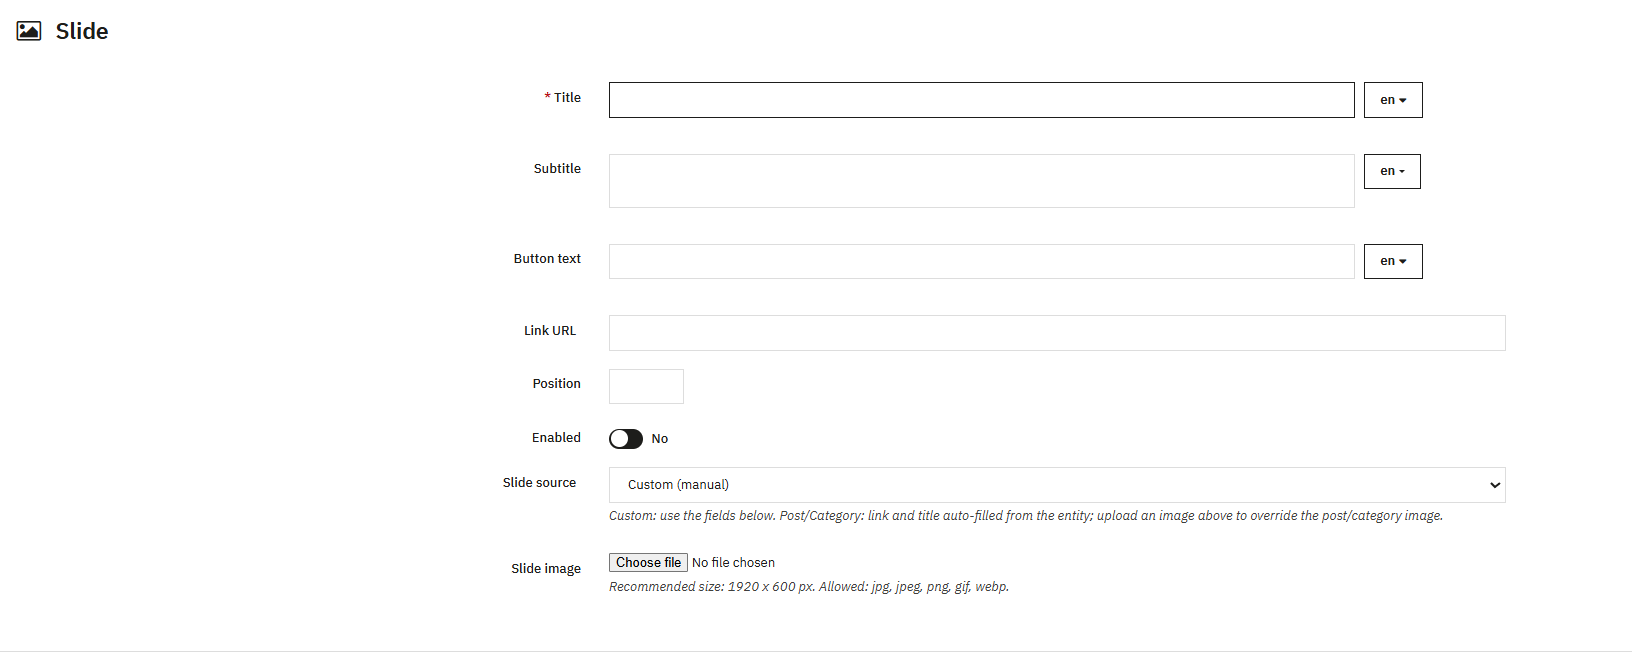
- Title: The slide’s headline, shown as an overlay and required in the default language.
- Subtitle: Adds a secondary line of text below the title.
- Button Text: Sets the label for the call-to-action button, such as “Read More.”
- Link URL: Sets the destination when the slide or button is clicked.
- Position: Sets the numeric sort order within the slider.
- Enabled: Controls whether the slide appears at all.
- Slide Source: Determines how the slide’s content is populated. Values include Custom, where you enter data manually, Blog Post, which auto-fills from a chosen post’s title, image, and URL, and Blog Category, which auto-fills from a chosen category. Choosing Blog Post or Blog Category reveals a corresponding selection field and lets you promote existing content without duplicating work.
- Slide Image: Uploads a custom slide image. The recommended size is 1920×600px, and accepted formats include JPG, JPEG, PNG, GIF, and WEBP.
13. Banners
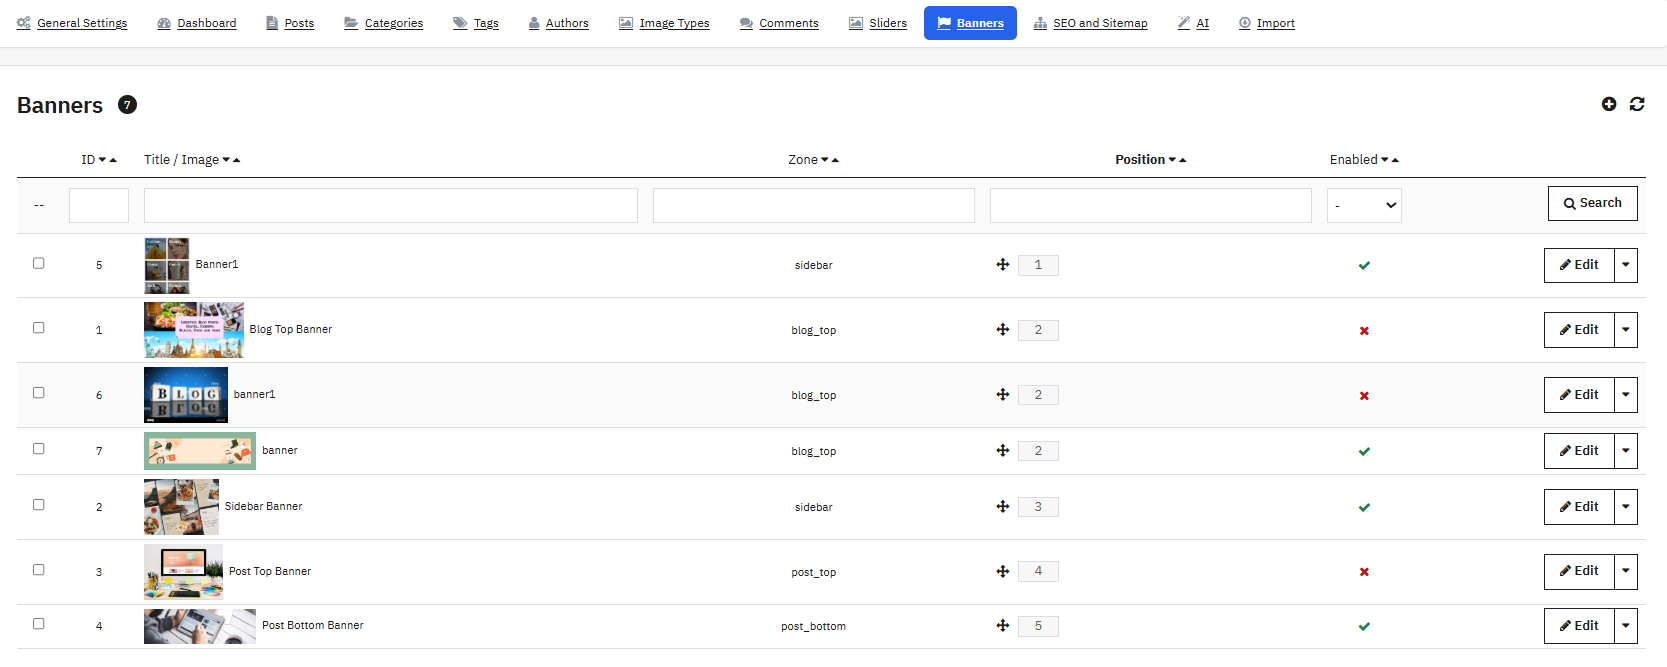
Navigate to KB Blog > Banners to configure promotional banners shown in defined zones on blog pages using these PrestaShop Blog Banner Addons. Banners only display once Enable Zone Banners is turned on under General Settings (Section 5.12).
Five zones are available. Blog Top sits above the main blog listing, Blog Bottom sits below it, Sidebar sits inside the blog sidebar, and Post Top and Post Bottom sit above and below the post content on detail pages.
13.1 Browsing the Banners List
Each banner shows its internal ID, a Title and Image with a small thumbnail, the Zone it occupies, a drag-and-drop Position within that zone, and an Enabled toggle. Bulk actions let you Enable Selected, Disable Selected, or Delete Selected.
13.2 Creating or Editing a Banner
- Title: An internal label for the banner, not shown to visitors.
- Image Alt Text: Accessibility alt text for the banner image.
- Zone: Determines the display location and is required. Values include Blog Top, Blog Bottom, Sidebar, Post Top, and Post Bottom.
- Link URL: Sets where the banner points when clicked.
- Position: Sets the sort order within the selected zone.
- Enabled: Controls whether the banner is active.
- Start Date / End Date: Optionally let a banner appear only within a defined window, useful for time-limited promotions.
- Banner Image: The actual graphic. Accepted formats include JPG, JPEG, PNG, GIF, and WEBP.
Tip: Placing a banner in the Post Bottom zone can direct engaged readers straight toward a relevant product or promotion, another example of these PrestaShop Blog Banner Addons working double duty for conversions.
14. SEO and Sitemap
Move to Knowband Prestashop Blog> SEO and Sitemap to fine-tune search-engine indexing settings as part of this PrestaShop SEO Blog Addons suite.
14.1 Sitemap Settings
- Enable Sitemap: Includes the blogs in XML sitemap for search engines.
- Include Posts / Include Categories / Include Tags / Include Authors / Include Archives: Store owners are allowed to choose or control whether that content type is added to the sitemap.
- Change Frequency: Signals how often the sitemap indicates content changes. Values include Always, Hourly, Daily, Weekly, Monthly, Yearly, and Never.
- Priority: Sets the sitemap priority value, on a scale from 0 to 1.
14.2 RSS Feed Settings

- Enable RSS Feed: Generates a standard RSS 2.0 feed for the blog, letting subscribers and content aggregators follow new posts automatically.
Click Save to apply the settings above.
14.3 Information Panel
After saving, a read-only panel displays:
- Sitemap URLs: One per installed language, following a pattern like yourdomain.com/blog/sitemap?lang=en.
- RSS Feed URLs: One per installed language.
- Content Counts: Published Posts, Active Categories, Tags, Active Authors, Archive Months.
- Ping Bing (button): Sends a sitemap ping directly to Bing’s search engine. Google retired direct sitemap pinging in 2023, so submit your sitemap through Google Search Console instead. This makes the PrestaShop SEO Blog Addons here especially useful for merchants managing multi-engine indexing.
15. How to use AI for blog writing
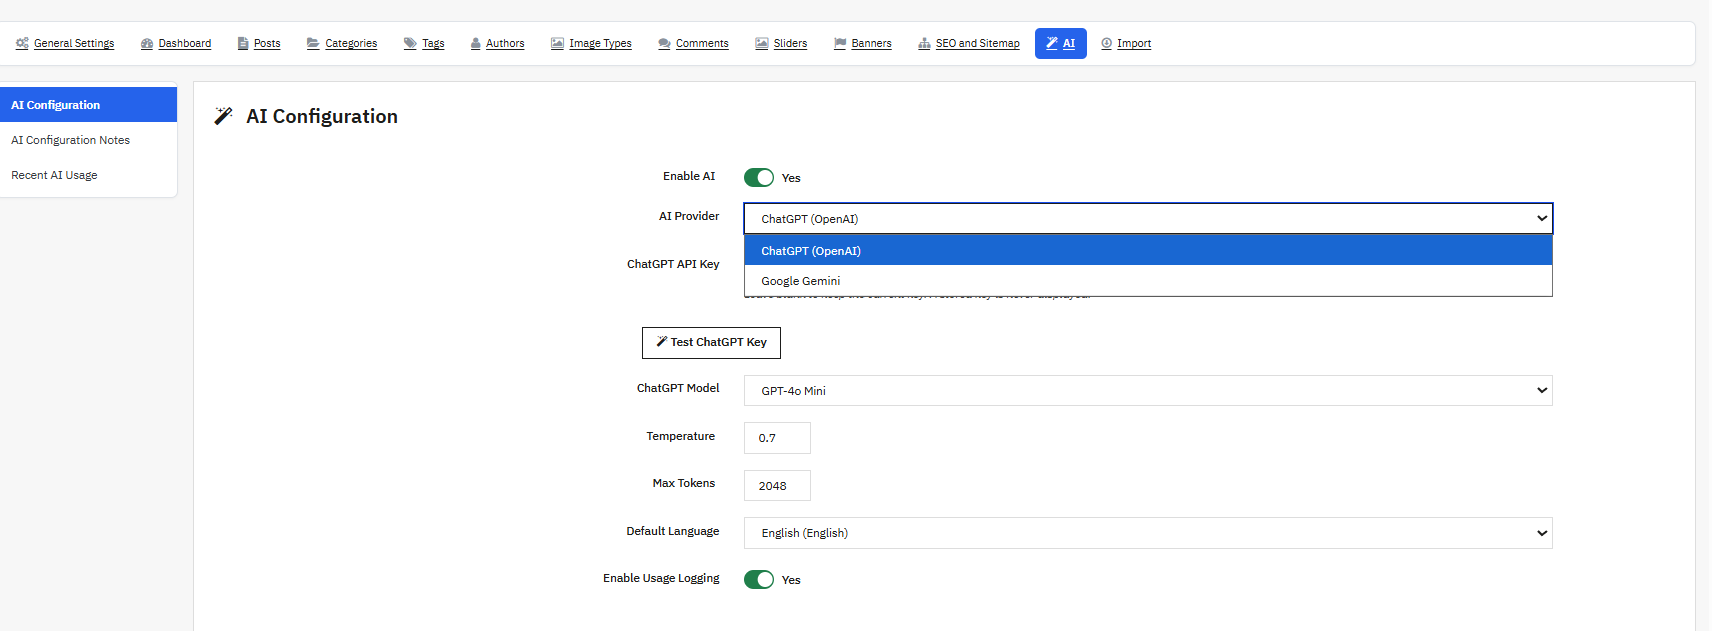
Navigate to Knowband Prestashop Blog > AI to connect the blog to OpenAI’s ChatGPT or Google Gemini as part of this PrestaShop AI Blog Module, helping you write post content, excerpts, metadata, ALT text, tags, and translations directly from the post editor.
15.1 Configuration
- Enable AI: The master toggle for all AI features. AI buttons only appear in the Post editor once this is On and a valid API key has been saved.
- AI Provider: Chooses which AI service powers generation, either ChatGPT (OpenAI) or Google Gemini.
- ChatGPT API Key / Gemini API Key: Store your provider credentials securely. Neither is ever displayed in plaintext after saving, and a Test Key button lets you verify each one.
- ChatGPT Model: Picks which OpenAI model to use, populated from your account’s available models, with options such as GPT-4o Mini, GPT-4o, GPT-4.1 Mini, and GPT-4.1.
- Gemini Model: Picks which Gemini model to use, with options such as Gemini 2.5 Flash, Gemini 2.5 Pro, and Gemini Flash Lite.
- Temperature: Controls creativity versus focus in AI outputs, on a scale from 0 (fully deterministic) to 2 (very creative).
- Max Tokens: Sets the maximum length of AI responses, on a scale from 1 to 8192.
- Default Language: Sets the language AI-generated content is produced in, following your shop’s default language unless changed.
- Enable Usage Logging: Records every AI call, including provider, action, token count, employee, and success or fail status, in a log table. No prompt text or API keys are ever stored in that log.
Click Save to apply these settings.
15.2 Where AI Features Appear in the Post Editor
Once AI is enabled and a valid key is saved, these buttons appear directly in the post form as part of the PrestaShop AI Content Addons toolkit:
- Generate Post Content (Content field): Builds a full blog post body using the title and excerpt as context.
- Generate Excerpt (Content field): Summarizes the existing content into a short excerpt.
- Translate To (Content field, with language selector): Translates the current content into another language.
- Suggest Tags (Tags field): Suggests relevant tags based on the post content.
- Generate Meta Title / Generate Meta Description / Generate Meta Keywords (SEO section): Write SEO-optimized versions of each field.
- Generate ALT Text (Featured Image): Writes descriptive alt text for the cover image automatically.
These PrestaShop AI Content Addons features save significant time for merchants publishing content at scale.
15.3 Recent AI Usage Log
A table at the bottom of the AI page lists the most recent AI calls, showing Date, Employee, Provider, Action, Tokens consumed, and Status (OK or Failed).
16. Import
Navigate to Knowband Prestashop Blog > Import to bring existing content into the module.
16.1 How to Import a WordPress Blog
Use this to migrate content from an existing WordPress site.
- In WordPress, go to Tools > Export and export All Content, producing a .xml file in WXR format.
- In KB Blog, under Import > WordPress Import, choose that exported file. The maximum file size is 20 MB.
- Select Default Status for Imported Posts: Sets the status assigned to imported posts. You can use the status from the export file itself, force everything to Draft, or force everything to Published.
- Click Import. Progress and results display live as the migration runs.
Items already imported previously are skipped automatically, since they are tracked in an internal import log.
16.2 RSS Import
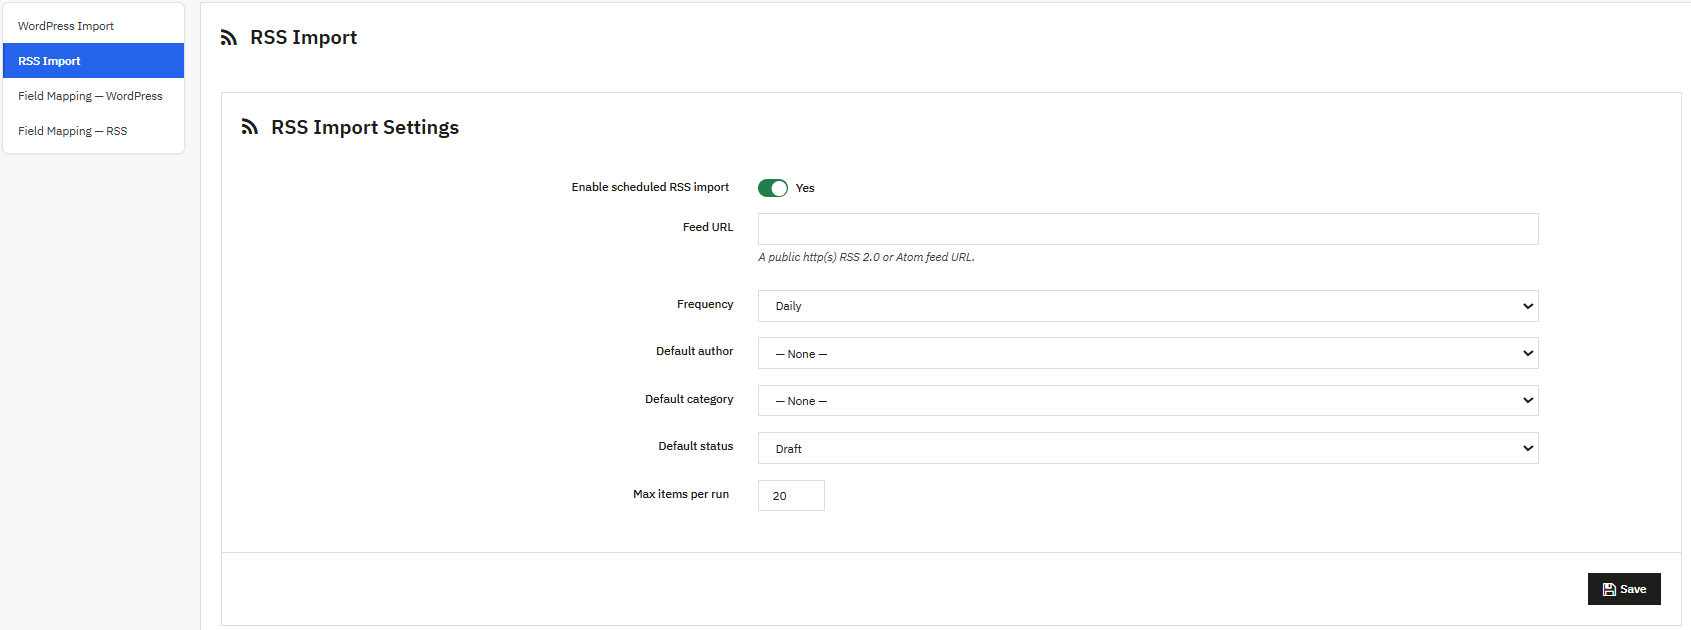
Sets up automated content import from any RSS or Atom feed.
- Enable Scheduled RSS Import: Gates the cron endpoint responsible for automated imports.
- Feed URL: The full http or https address of the RSS or Atom feed to import from.
- Frequency: Sets how often the cron job runs an import. Values include Hourly, Daily, and Weekly.
- Default Author: Assigns every imported post to a specific author.
- Default Category: Assigns every imported post to a specific category.
- Default Status: Sets whether imported posts land as Draft or Published.
- Max Items per Run: Caps how many feed items import during a single cron run, on a scale from 1 to 100.
After saving, three tools become available:
- Run Now: Immediately imports up to the configured Max Items from the feed via AJAX, with no page reload.
- Test Feed: Fetches and parses the feed without importing anything, then reports the item count and feed title.
- Cron URL: A link to copy into your server’s cron or task scheduler, such as cPanel Cron Jobs or a Linux crontab entry. It includes a built-in security token and respects your configured Frequency, so calling it more often than scheduled simply does nothing.
16.3 Field Mapping for WordPress
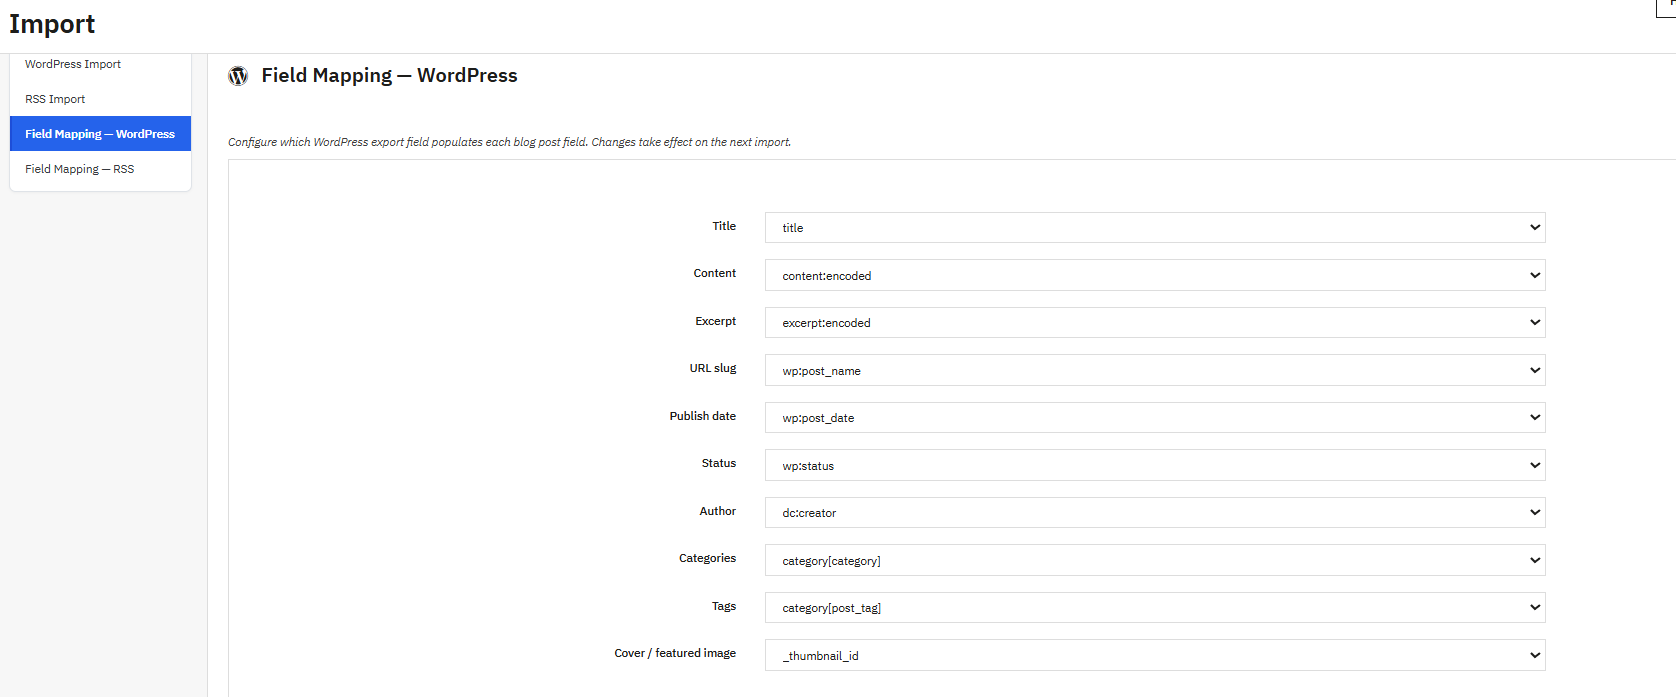
This mapping is saved as JSON inside the module configuration. Select None for any field you would rather not import. Store owners are allowed to map the parameters like title, categories, authors slug etc. This module really helps owners in blog management.
16.4 Field Mapping for RSS
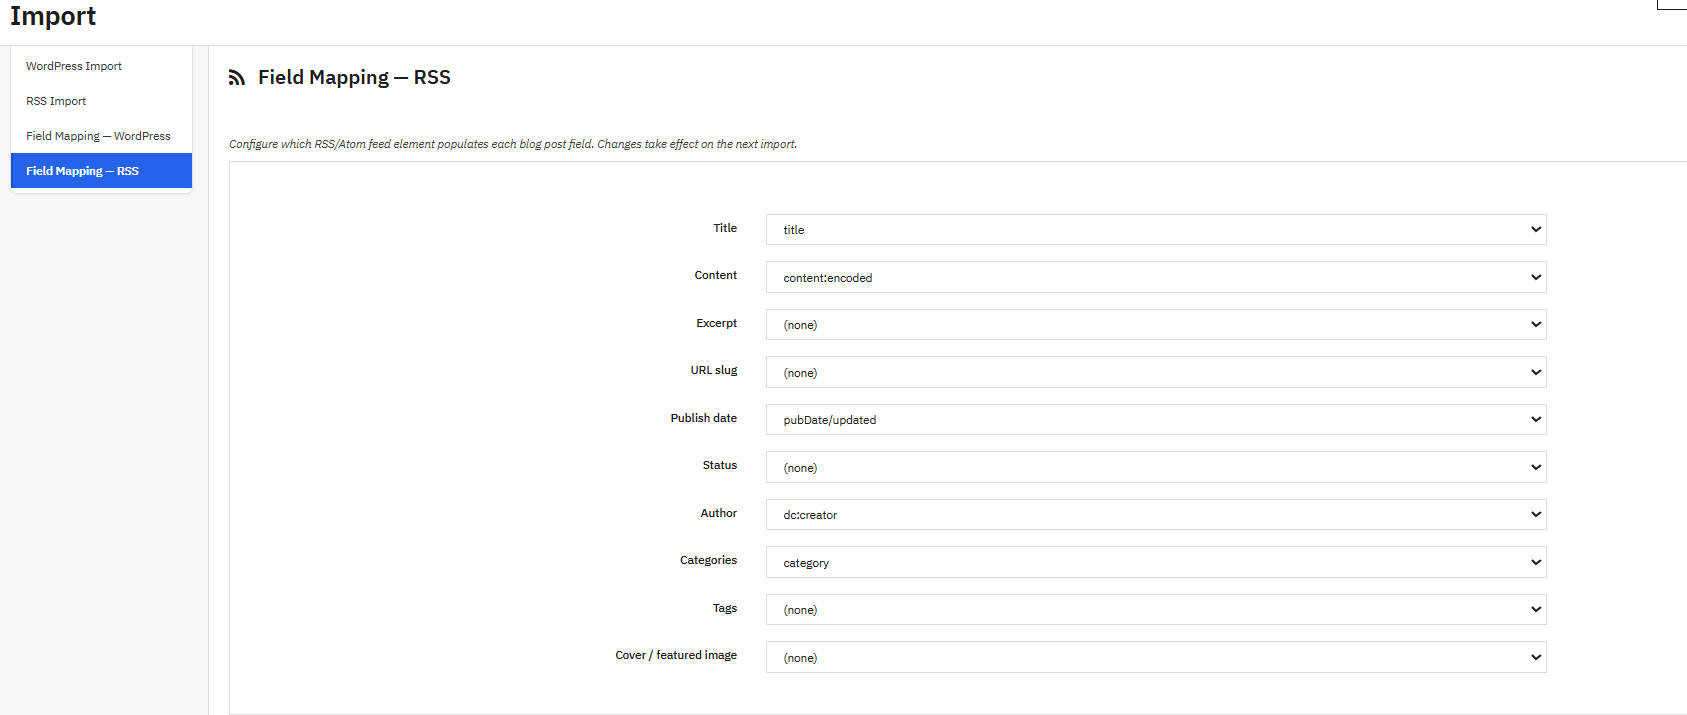
This mapping is saved as JSON inside the module configuration. Store owners are allowed to map the parameters from RSS Feed blogs like title, categories,cover image, content, excerpt, tags authors,slug etc
16.5 Recent Import Log
This log shows the last 100 import operations. Columns include Date, Source (WordPress or RSS), resulting Status (Imported, Skipped, Failed), and a Message with further details or an error description.
Final Thoughts
From writing your first article to configuring AI-assisted content and multi-author profiles, Knowband Prestashop Blog gives PrestaShop merchants a genuinely complete PrestaShop Blog Module, covering SEO, reader engagement (likes, reactions, comments), and traffic-driving links back to product pages. Whether you’re running it as a standalone PrestaShop Content Marketing Module or layering it on top of an existing storefront, it’s built to scale with your content strategy. For technical support, contact Knowband at support@knowband.com
👉Explore the Module with Our Video Guide
