How to Delete Products from the Catch Marketplace?

Objective of the blog

After reading this blog, you will be able to understand how a seller can delete products from the catch marketplace.

Methods to delete Products from the catch marketplace

You can delete products from the catch marketplace by two methods:

  1. By deleting manually from merchant account
  2. By Using Offer Feed

1.0 Delete manually from merchant account

  • Login to the Catch merchant account (URL: https://marketplace.catch.com.au/login).
  • After logged in, you will be redirected to the home page where you need to select the offer list from the “My Inventory” tab as shown in the image given below:
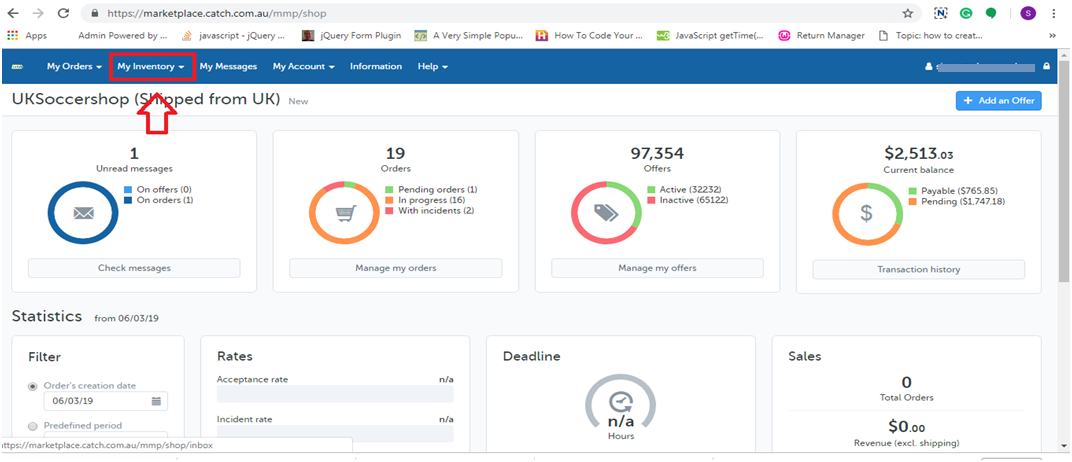
My Inventory

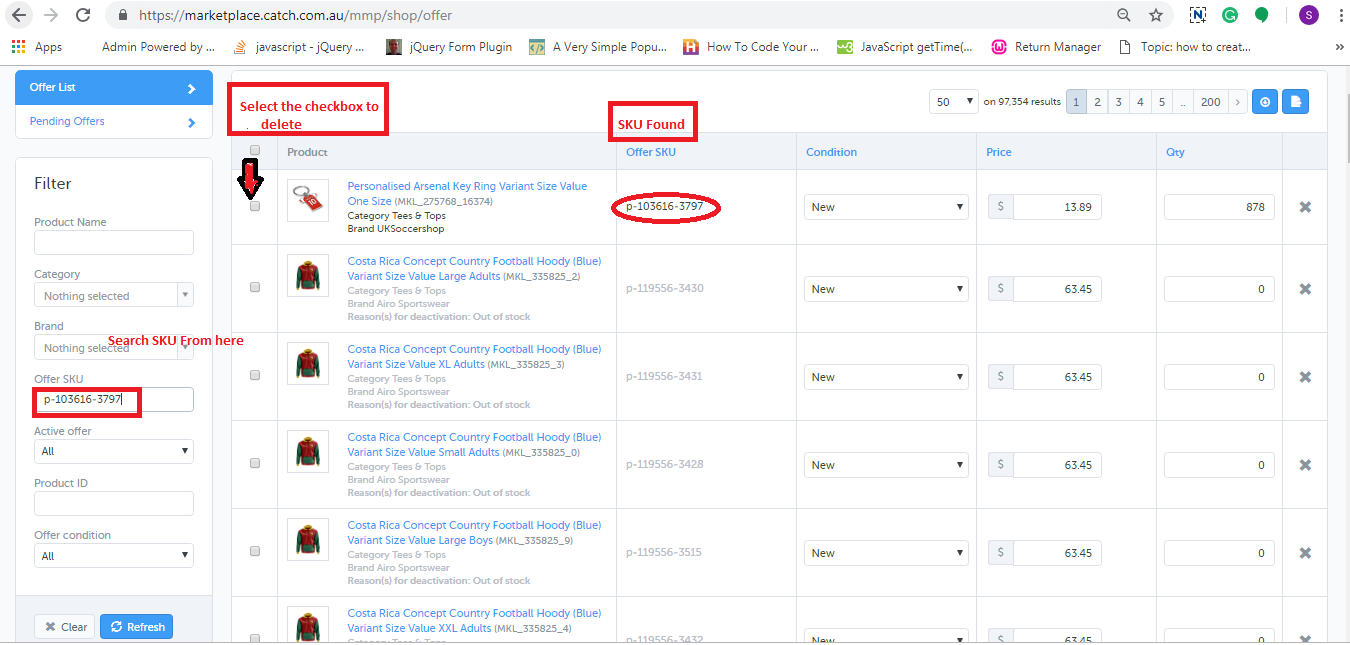
  • In the offer list page you need to search the SKU by using “Offer SKU” field and check the checkboxes corresponding to those SKU which you want to delete as shown in the image below.
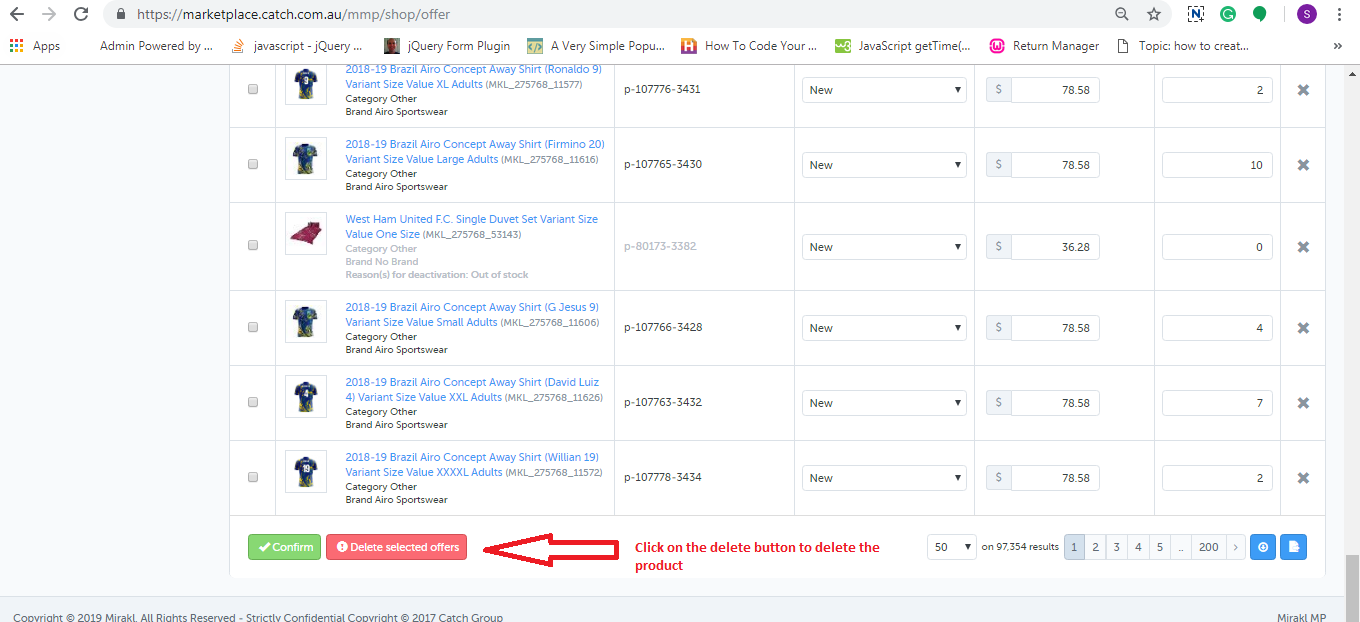
  • At the bottom of the page, you will find a button to delete the product as shown in the image below.
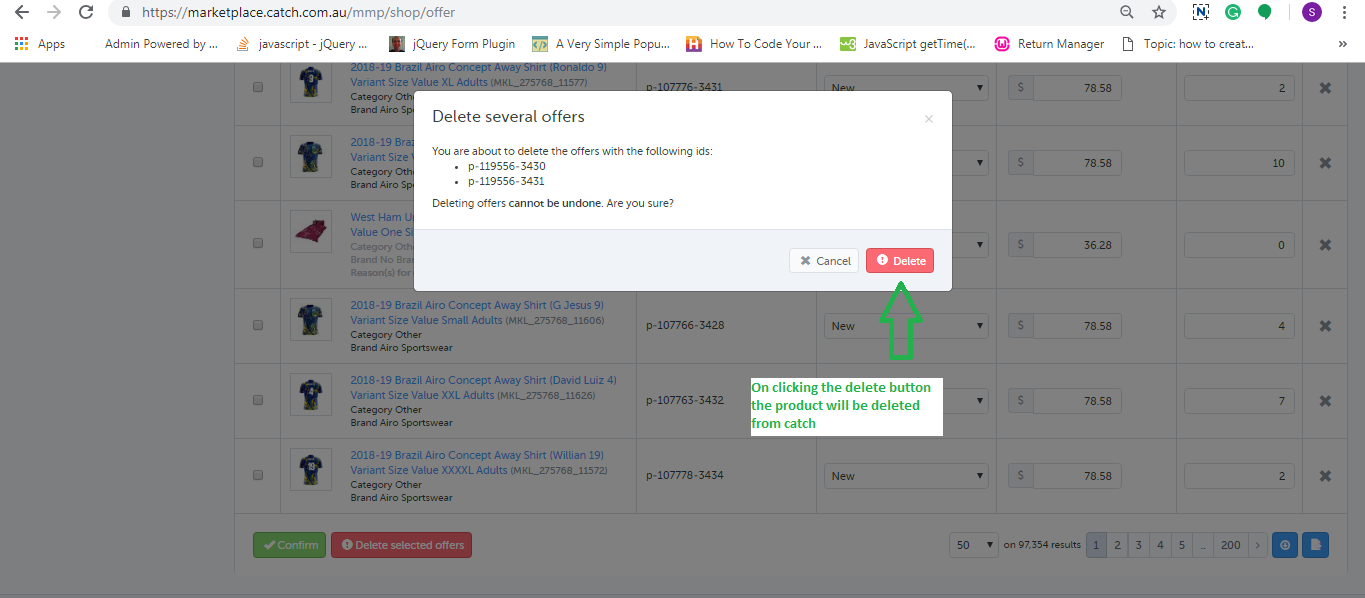
  • On clicking that button, a popup will be appeared on the screen which will show the list of SKUs that you have selected to delete and the button to delete those products. This is shown in the image below:
2.0 Using Offer Feed

You can delete the products in bulk from the Catch marketplace using offer feed. You can download the sample offer feed from the link given below:

Click Here to download offer feed

In this feed, you need to fill the data in the following fields:

  1. SKUs:  Enter the SKU which you want to delete
  2. update-delete:  Enter  “DELETE” in this column.
  3. club-catch-eligible: Enter FALSE
  4. tax-au: 0

After creating the feed, you need to upload the feed on the catch merchant account. The steps are given below:

  • Login to the Catch merchant account (URL: https://marketplace.catch.com.au/login).
  • After logged in, you will be redirected to the home page in which you need to select the “Import From File” option from the “My Inventory” tab.
  • On the Import file page you need to upload the feed as shown in the image:
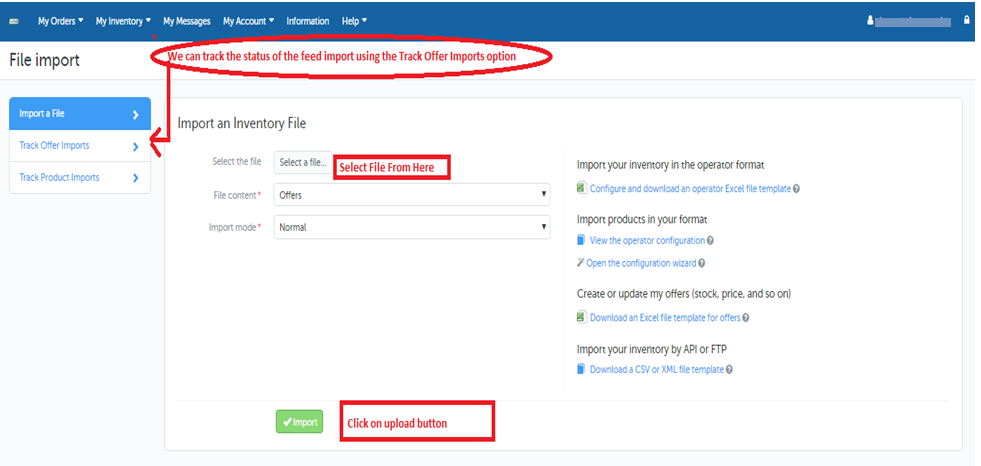
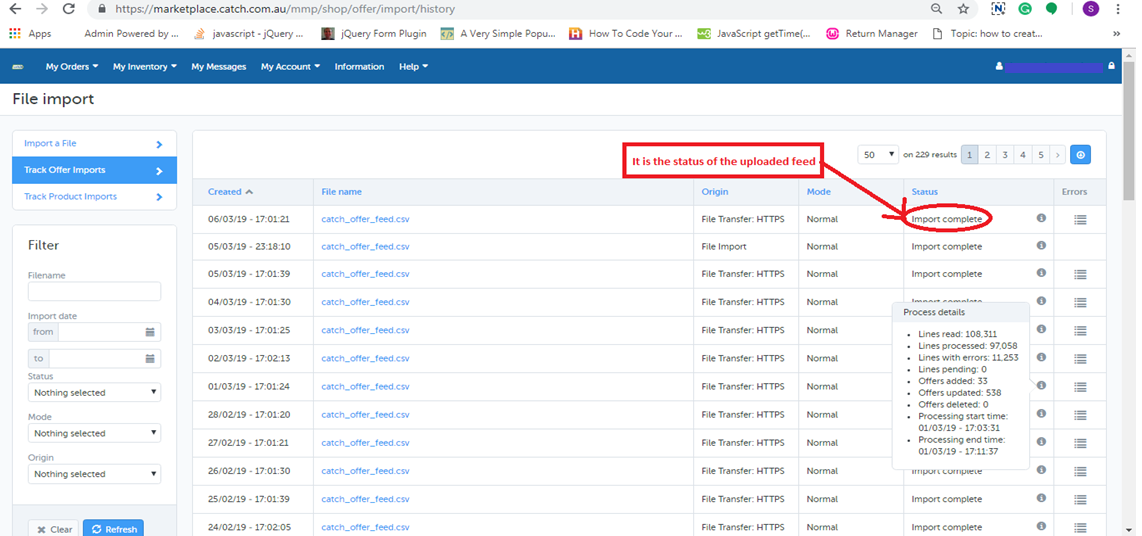
  • You can track the status of the uploaded feed using Track Offer Import Option as shown in the image given above. On clicking on the Track Offer Import option, a new page will be opened where you can check the status of the uploaded feed. If the feed is imported successfully then you can also check the processing status of the feed as shown in the image below:
Summary

After reading this document you (seller) can easily delete your products from the Catch marketplace.
How to Create Multiple Thumbnails While Uploading Image?

Objectives of the blog

After reading this blog we will be able to create multiple thumbnails while uploading an image. In this blog we can learn how to resize the image size using code.

Let’s know about the thumbnails

Thumbnails are the reduced-size versions of pictures or videos. Thumbnails are created from the original image by reducing their dimension and size. By creating thumbnails we can represent a large sized image by a small size image. The website such as online ecommerce stores use thumbnail images instead of large images to reduce the loading time of their web page which also make the site faster.

To understand the working of the thumbnails technically we will make a simple program. The requirement has been shared below:

Requirement

Let’s understand the requirement first.

Let’s say we have a website named as Knowband which sells the modules for the e-commerce platform like Magento, Prestashop, Opencart etc. It shows so many images on the listing page of Knowband modules. The original images are of large size so it directly increases the loading time of the listing page so to reduce the loading time of the page Knowband site uses thumbnail images on the listing page.

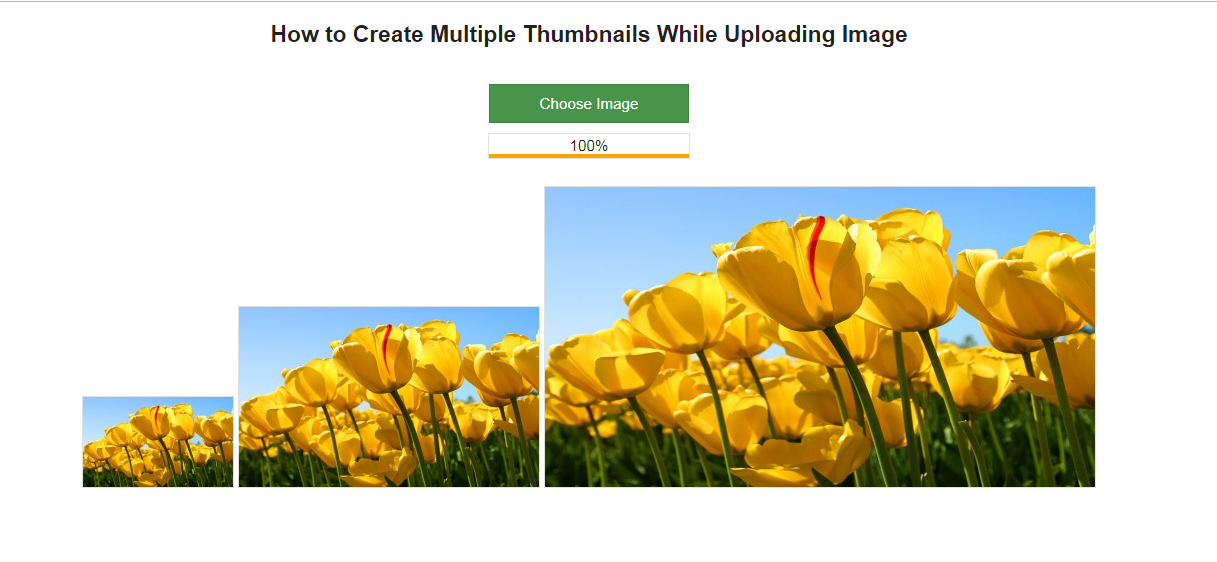
In this blog, we can learn how to create multiple thumbnails of an image. Let’s consider an example, where we will create three thumbnails as shown in the image given below:

Function to create the Thumbnail

Let’s understand the main functionality or code which is actually responsible for creating the thumbnails.

A function is given below which is responsible for creating the thumbnail. Let understand the function how it actually worked.

Below function have 4 parameters

The code of creating multiple thumbnails while uploading an image is given below:

  • $source_path: This contains the path of the original image.
  • $target_path: This contains the path of the thumbnail which will be created.
  • $file_type: This contains the image extension e.g. jpg, png etc.
  • $thumb_width: It is the width of the required thumbnail image.
  • $thumb_height: It is the height of the required thumbnail image.

This function simply fetches the image from the source file and after validating the image it creates the thumbnail of given width and height. So to create the ‘n’ number thumbnails we have to call this function ‘n’ number of times with the required width and height of the thumbnail. This function will return TRUE if thumbnail created successfully else it will return FALSE.

function create_thumbnail($source_path, $target_path, $file_type, $thumb_width, $thumb_height) {
//Checking the file type.
    if ($file_type == 'jpeg' || $file_type == 'jpg') {
        $source = imagecreatefromjpeg($source_path);
    } else if ($file_type == 'png') {
        $source = imagecreatefrompng($source_path);
    } else if ($file_type == 'gif') {
        $source = imagecreatefromgif($source_path);
    }
 
    // get the width of the original image
    $width = imagesx($source);
 
    // get the height of the original image
    $height = imagesy($source);
 
    // Create a black image of thumb image size
    $thumb_image = imagecreatetruecolor($thumb_width, $thumb_height);
 
    // It copy and resize part of an original image and resampled in thumb image to create a reduced size image of the original image
    imagecopyresampled($thumb_image, $source, 0, 0, 0, 0, $thumb_width, $thumb_height, $width, $height);
 
    // creates a JPEG file from the given image and save it in the targeted folder.
    if (imagejpeg($thumb_image, $target_path, 90)) {
        // destroy the images to free the memory associate with them
        imagedestroy($thumb_image);
        imagedestroy($source);
        return TRUE;
    } else {
        return FALSE;
    }
}

Click here to download the complete project.

Summary

After reading this document you can try the same code on your system. After doing the same you can easily know how the thumbnails works.