Amazon SQS setup and MWS Subscriptions for AnyOfferChanged Notification

Objective of the blog

After reading this blog, you will be able to understand how SQS is setup and how MWS is subscribed for any notification.

Let’s Create an Amazon SQS and Enable this for MWS Subscription

The Amazon MWS Subscriptions section enables us to subscribe to receive notifications. To receive notifications, you must first create and register a Destination, such as an Amazon Simple Queue Service (Amazon SQS) queue. Then, you will need to create a Subscription for the NotificationType that you want to receive.

How the queue is created and how MWS Subscription is done for the NotificationType are described below.

Create Amazon Simple Queue Service (Amazon SQS) queue

1. Login SQS Management Console using https://console.aws.amazon.com/sqs/home?region=us-west-2# URL and credentials. Page will look like below image.
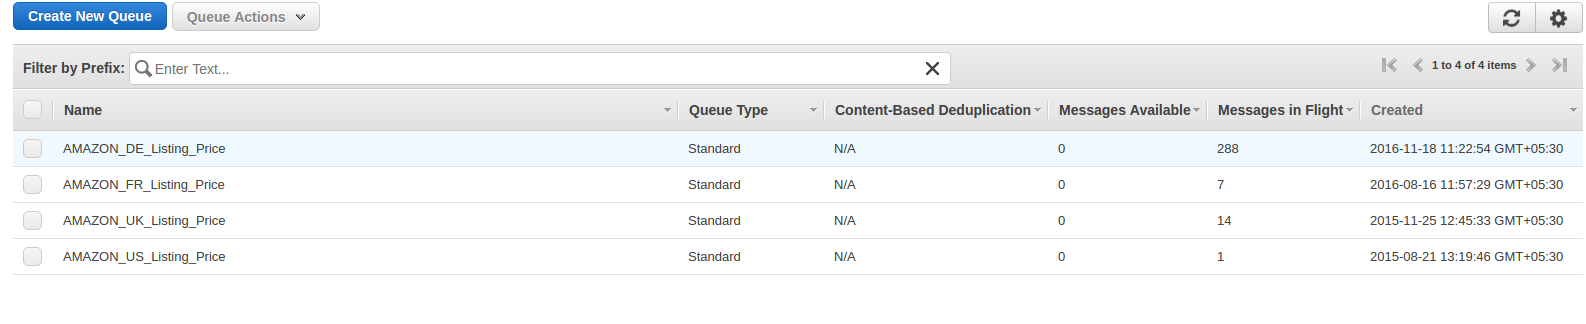
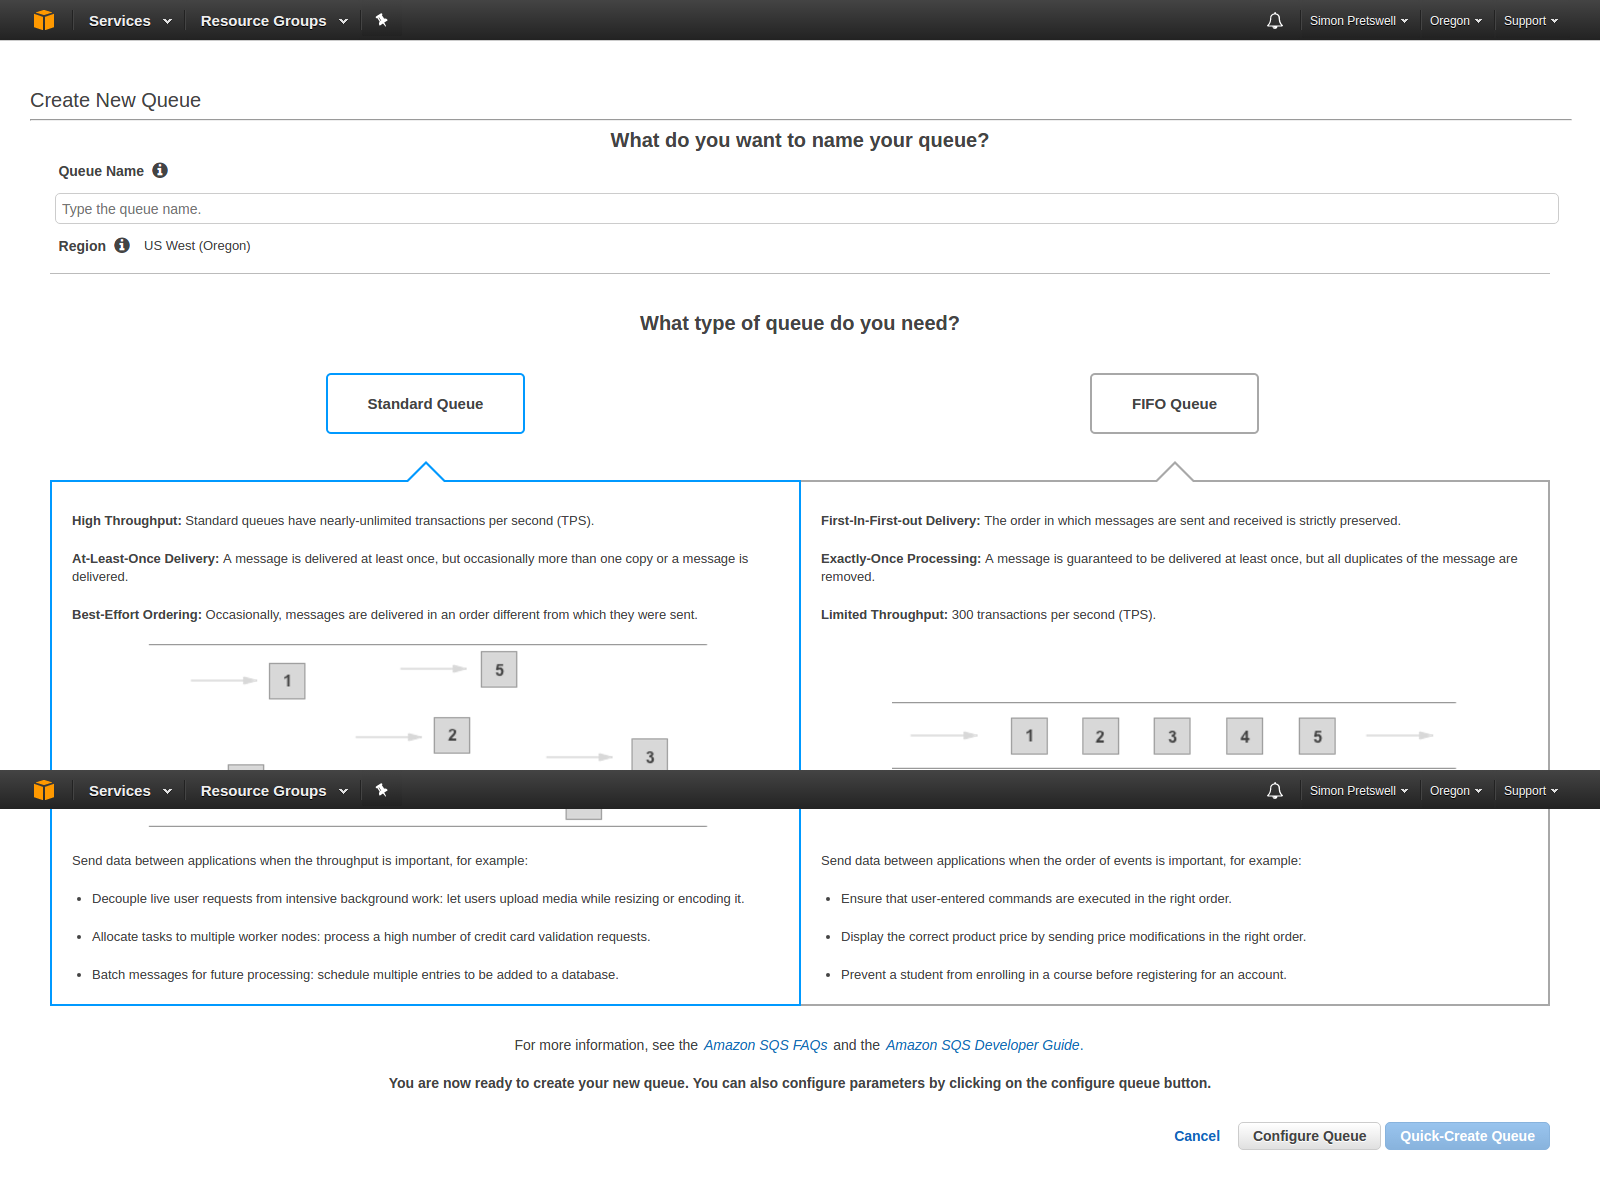
Login SQS Management Console2. Click on Create New Queue button. Page to create and configure queue will be opened and this will look like below image.

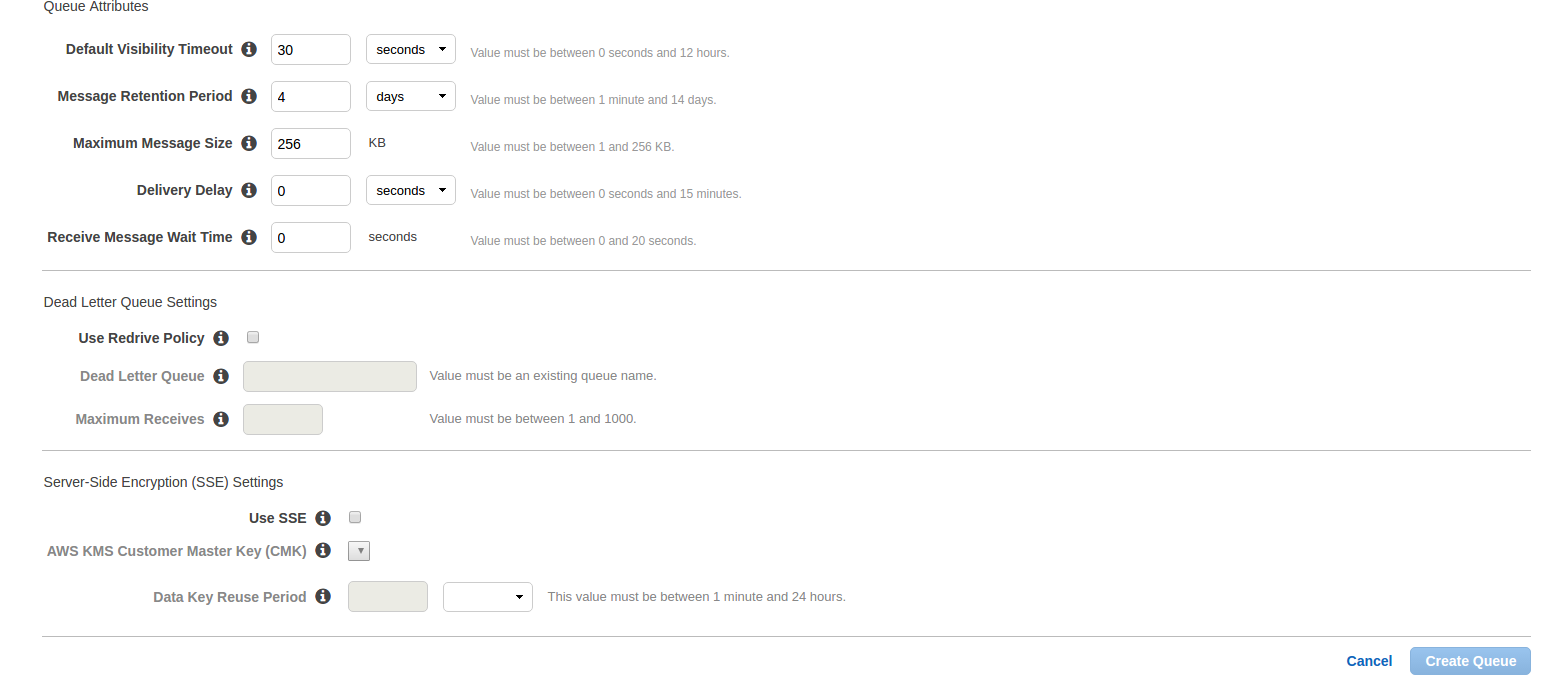
Here, enter Queue Name which you want. Select queue type. By default, Standard Queue will be selected. Now click on Configure Queue and after click on this, you will get the options to configure queue like below image.

  • Default Visibility Timeout: This is the time for which a received message from the queue will not be available to receive again.
  • Message Retention Period: This is the time for which any message will reside in the queue if that message is not forcefully deleted. After entered time, that message will be automatically deleted from the queue.

    These are two most important fields. Other fields are:

  • Maximum Message Size: Highest message size (in bytes) accepted by Amazon SQS.
  • Delivery Delay: The amount of time to delay the first delivery of all messages added to this queue.
  • Receive Message Wait Time: The highest amount of time that a long-polling receive call will wait for a message to become available before returning an empty response.

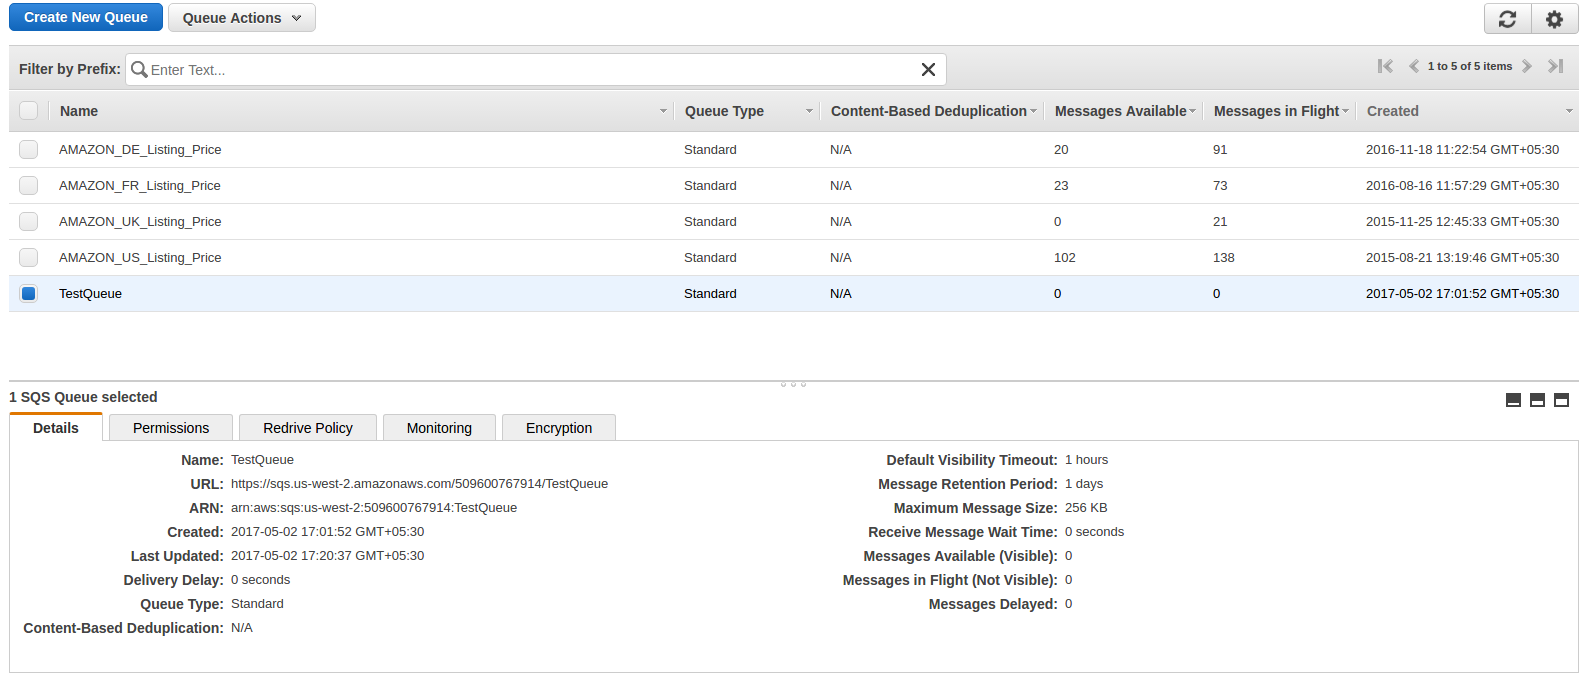
After enter detail, click on Create Queue button and you will be redirected on queue list page and your new queue will also be shown as shown in below image and basic detail of queue will also be displayed.

In basic detail, there is URL which is the most important attribute and this will be used to register and subscribe for notification.
Now click on Permissions tab and click on Add a Permission button. A popup will be opened like below image. Enter your AWS account number and in action, check All SQS Actions checkbox and click on Add permissions.
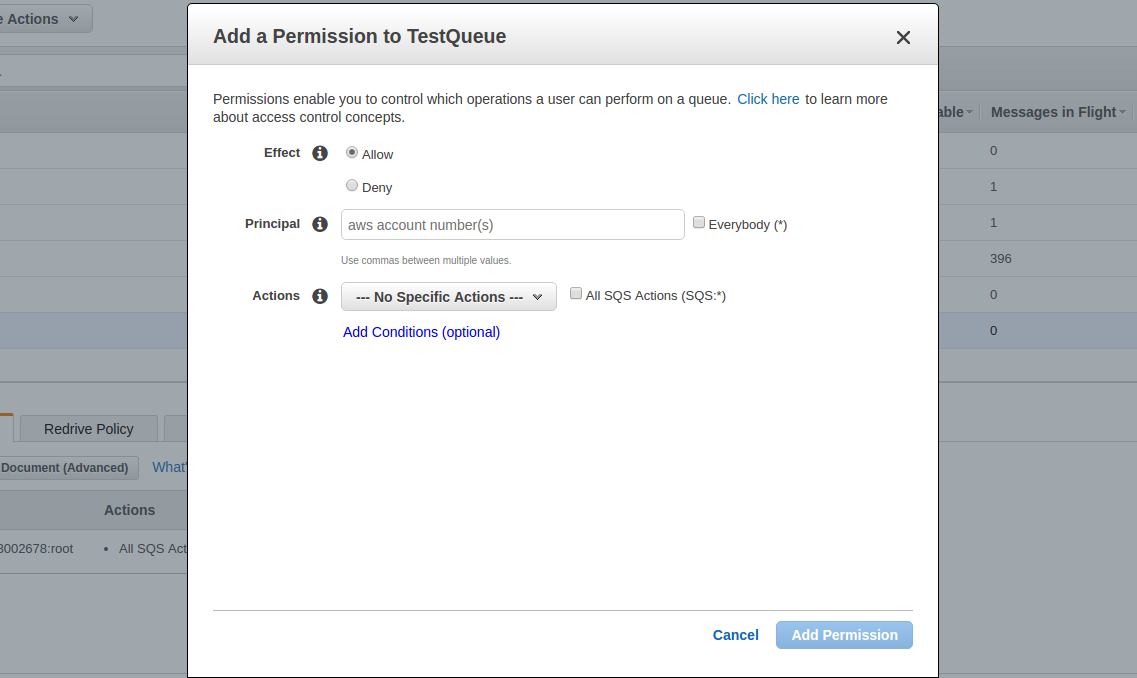

You can add multiple permissions as you want.

Register a Destination (Created Queue)

Now queue has been created and you need to register this queue for notifications. For this, you need to use RegisterDestination operation on MWS. The RegisterDestination operation specifies a location where you want to receive notifications and adds it to the list of registered destinations.

For this, open https://mws.amazonservices.co.uk/scratchpad/index.html or https://mws.amazonservices.com/scratchpad/index.html depending on the marketplace. Select subscriptions from API Section and RegisterDestination from operation as below image.
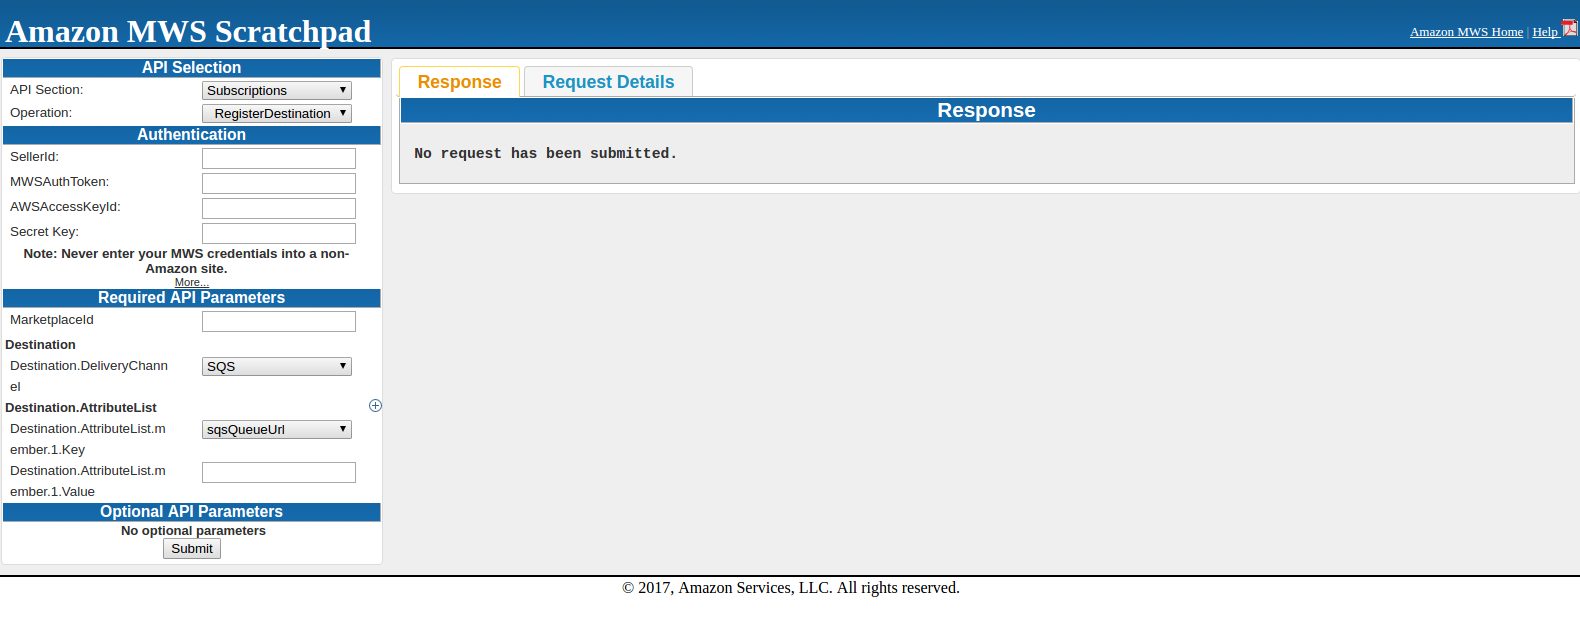

Here enter SellerId, AWSAccessKeyId, Secret Key and MarketplaceI. In Destination, SQS should be selected because you are using SQS queue as destination. Destination.AttributeList.member.1.Key should be sqsQueueUrl and in Destination.AttributeList.member.1.Value, you need to enter SQS URL which was under details in SQS Queue like below image.
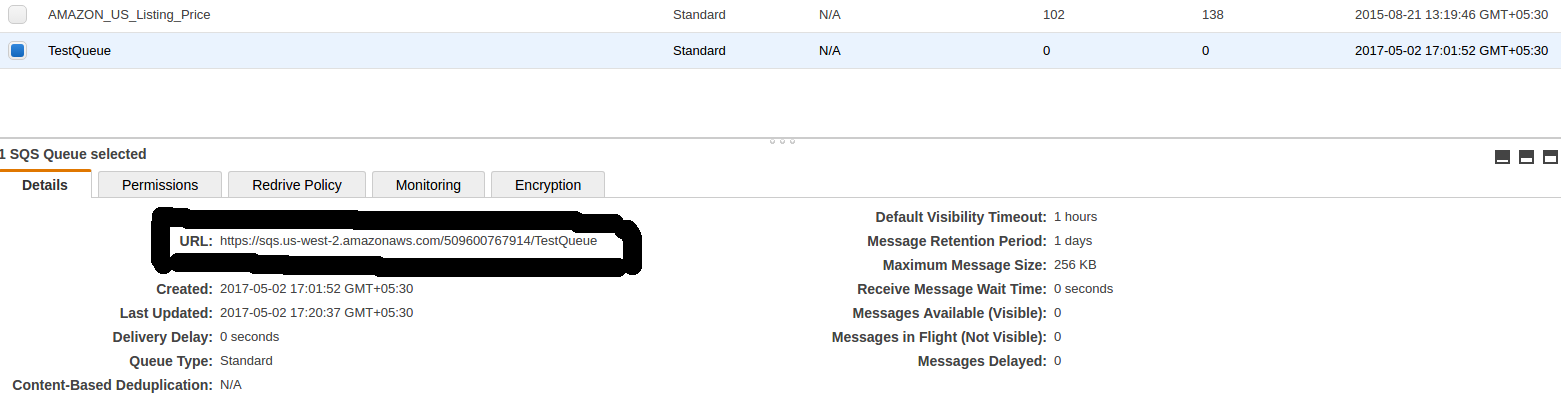
When submitting the request, either you can get success response or error response. If you get below response, it means registered successfully.

<?xml version="1.0"?>
<RequestReportResponse xmlns="https://mws.amazonservices.com/doc/2009-01-01/">
    <RequestReportResult>
        <ReportRequestInfo>
            <ReportRequestId>2291326454</ReportRequestId>
            <ReportType>_GET_MERCHANT_LISTINGS_DATA_</ReportType>
            <StartDate>2009-01-21T02:10:39+00:00</StartDate>
            <EndDate>2009-02-13T02:10:39+00:00</EndDate>
            <Scheduled>false</Scheduled>
            <SubmittedDate>2009-02-20T02:10:39+00:00</SubmittedDate>
            <ReportProcessingStatus>_SUBMITTED_</ReportProcessingStatus>
        </ReportRequestInfo>
    </RequestReportResult>
    <ResponseMetadata>
        <RequestId>88faca76-b600-46d2-b53c-0c8c4533e43a</RequestId>
    </ResponseMetadata>
</RequestReportResponse>

If a request is unsuccessful, the main response element will be ErrorResponse, irrespective of the action requested and error detail will also be in response.

<ErrorResponse xmlns="https://mws.amazonservices.com/doc/2009-01-01/">
    <Error>
        <Type>Sender</Type>
        <Code>InvalidClientTokenId</Code>
        <Message> The AWS Access Key Id you provided does not exist in our records. </Message>
        <Detail>com.amazonservices.mws.model.Error$Detail@17b6643</Detail>
    </Error>
    <RequestID>b7afc6c3-6f75-4707-bcf4-0475ad23162c</RequestID>
</ErrorResponse>

After register Destination, try SendTestNotificationToDestination operation to verify that notifications are receiving or not. This operation sends a test notification to the Destination that you specify.

Subscribe for Notification

For this, you need to use CreateSubscription operation and this operation creates a new subscription for the specified notification type and destination. Select subscriptions from API Section and CreateSubscription from operation as below image.
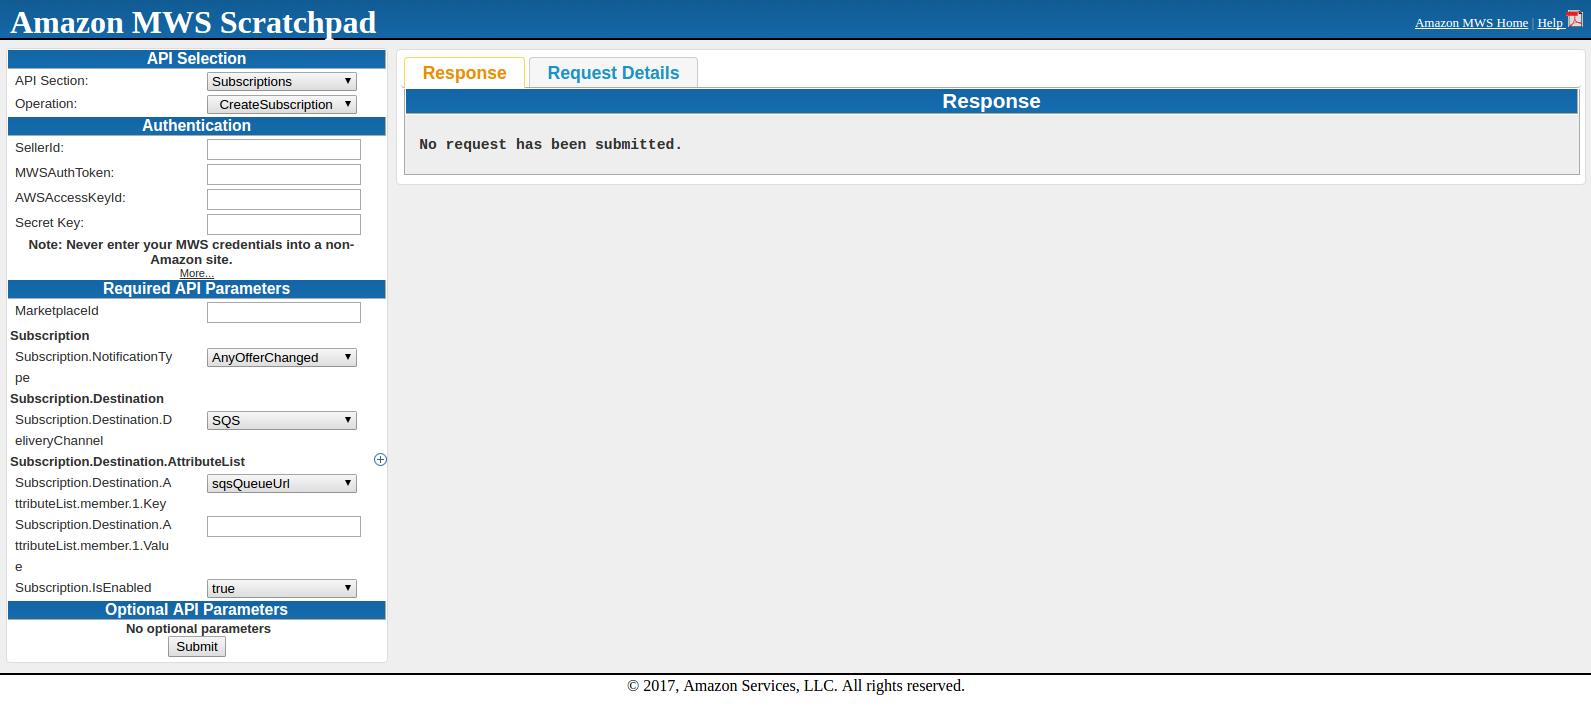

Here enter SellerId, AWSAccessKeyId, Secret Key and MarketplaceId. Subscription.NotificationType should be AnyOfferChanged if you want to get other seller offer price. In Subscription.Destination.DeliveryChannel, SQS should be selected because SQS queue is being used as destination. Subscription.Destination.AttributeList.member.1.Key should be sqsQueueUrl and in Subscription.Destination.AttributeList.member.1.Value, you need to enter SQS URL which was under details in SQS Queue. Subscription.IsEnabled will be true.

When submitting the request, either you will get success or error in response. Once you get success in response, all is done to get notifications.

After this, you can fetch notification from SQS using CURL request.

How to use Catch_Lite?

Objective of the blog

After reading this blog, you will be able to understand how cache_lite is used to create cache for the HTML.

Let’s know about the Cache_Lite

Cache_Lite is a caching system which can be used for high traffic website. The simple logic of cache lite is to serve the HTML from cache if cache is already created for that HTML so that time to fetch/prepare from the database/code execution for creating the HTML can be saved.

Cache_Lite creates cache of HTML for a page on basis of an id when request of that page comes first time and simply serve the page first time without cache. Now, when request for the same page will come again, HTML will be simply fetched from the cache corresponding to the id and will show the page i.e. system will not create HTML again and will throw the HTML from cache.

Checking before Cache_Lite Implementation

Before implementing cache_lite, you need to check whether PEAR is installed or not. For this, create a file in the root and save the below lines of code in that file and run the same on browser.

<?php
require_once 'Cache/Lite.php';
var_dump(class_exists('Cache_Lite', false));
?>

If you get boolean true in response, the PEAR is already installed and have Cache_Lite package. But if you get boolean false or any other error in the response, you further need to check whether PEAR is not installed or PEAR does not have Cache_lite package. For this create a file in the root and save the below lines of code in that file and run the same on browser.

<?php
require_once 'System.php';
var_dump(class_exists('System', false));
?>

If you get boolean true in response, the PEAR is installed but PEAR does not have Cache_Lite package. In this case, please refer https://pear.php.net/package/Cache_Lite. If you still get boolean false or any other error, either PEAR is not installed or include_path is not set. In this case, please refer https://pear.php.net.

Cache_Lite Implementation

If PEAR is installed and have Cache_Lite package, you can start implementing the Cache_Lite. The process to create cache lite is as below:

  1. Firstly, include Cache_Lite package. For this require Cache/Lite.php file.
  2. Create an id which should be unique for that HTML so that it can be identified in the cache folder at the time of fetch from cache. Encrypt this id using md5.
  3. Define the directory where you want to save cache and refresh time after which you want to refresh the cache. If you want to refresh cache once in a day then set 86400. Now when a page is opened first time, cache will be created and that page will be served by cache for next 24 hour (this 24 hour will be calculated after creating cache). Now cache will be refreshed only when page will be loaded again after 24 hour.
  4. After that, create an object of cache_lite and check whether cache is created for id or not. If cache is created, uncompress the cache data and load the data on browser. And if cache is not created, get data from output buffer, compressed this data and save in cache.

For more understanding, please look the code snippet written below:

define('CACHE_LITE_STATUS', 'ON'); //Set other than ON if you don't want to serve HTML from cache
define('CACHE_LITE_REFRESH_TIME', '43200'); //This is cache lifetime after which you want to refresh cache.
if (CACHE_LITE_STATUS == 'ON') {
    require_once('Cache/Lite.php');
    $id = 'testid';//This is the unique id using which cache will be created.
    $id = md5($id);
    $options = array(
        'cacheDir' =>  "testDir/",//testDir is the directory where cache will be saved. Cache will be created with the same name as id so director name should be with a trailing slash at the end
        'lifeTime' => CACHE_LITE_REFRESH_TIME
    );
    $Cache_Lite = new Cache_Lite($options);
    if ($data = $Cache_Lite->get($id)) {
        echo gzuncompress($data); //To uncompress a compressed string. This is to uncompress the data fetched from cache
    }else{
        ob_start(); //Turn on output buffering
        $data = ob_get_contents(); // This will return the contents of the output buffer
        $data = gzcompress($data, 9); //To compress output buffer data
        $Cache_Lite->save($data); //To save the compressed data in the cache
        ob_end_flush(); //Flush the output buffer and turn off output buffering
    }
}

Summary

After reading this document you can try the same code on your system to serve the HTML using Cache_Lite. Please let us know for further improvement.

How to get MWS credentials from Amazon Seller central

Objective of the blog

After reading this blog, you will be able to get the MWS credentials so that you can build applications using MWS.

Let’s know how get MWS credentials

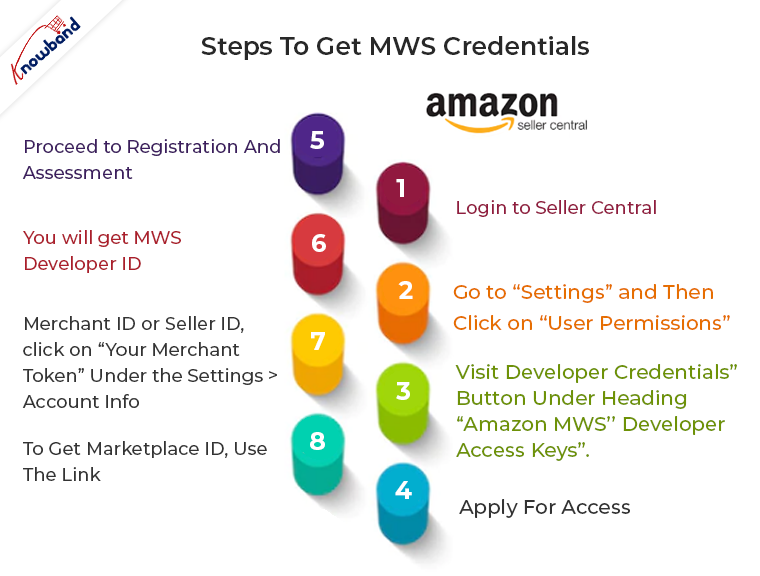
Below are the steps to get MWS credentials.

1. Firstly login to seller central using the credentials.

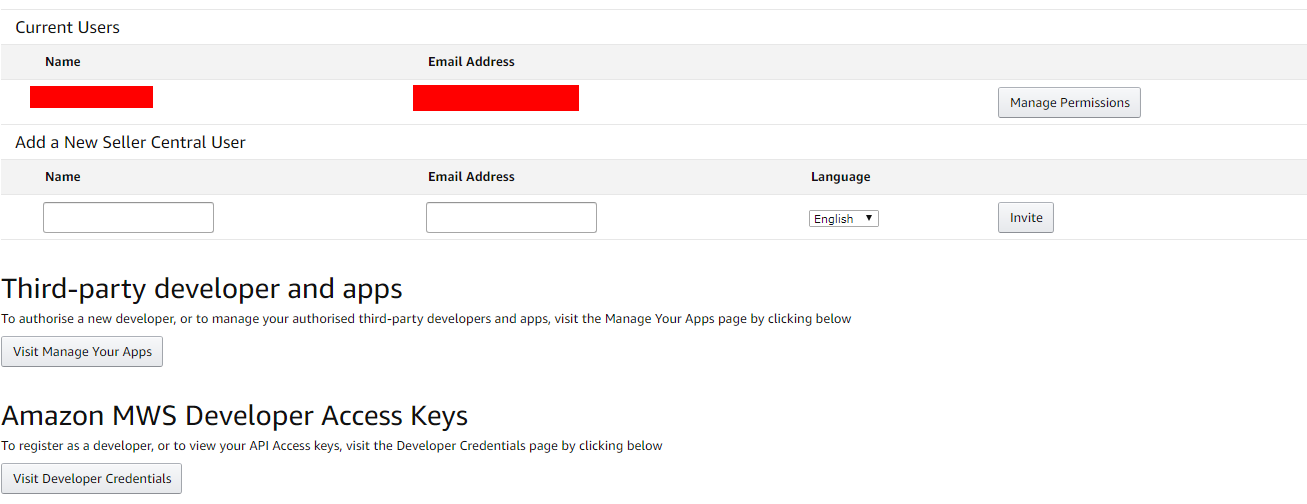
2. After this, go to “Settings” (at the top right corner) and then click on “User Permissions”. A page will be open which will look like below image.

3. Now click on “Visit Developer Credentials” button under heading “Amazon MWS Developer Access Keys”.

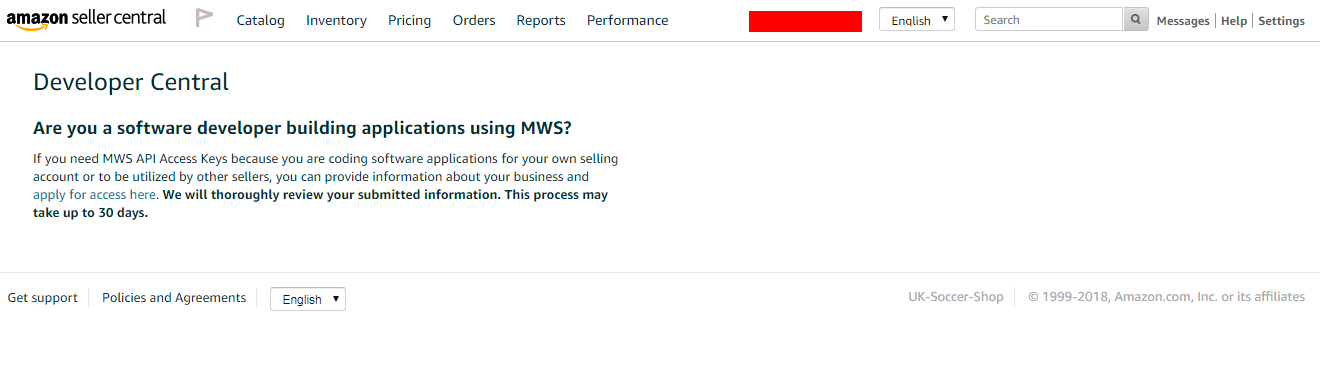
4. You will get the page as shown in below image if till now you are not registered as developer. In this case, click on “apply for access here”.

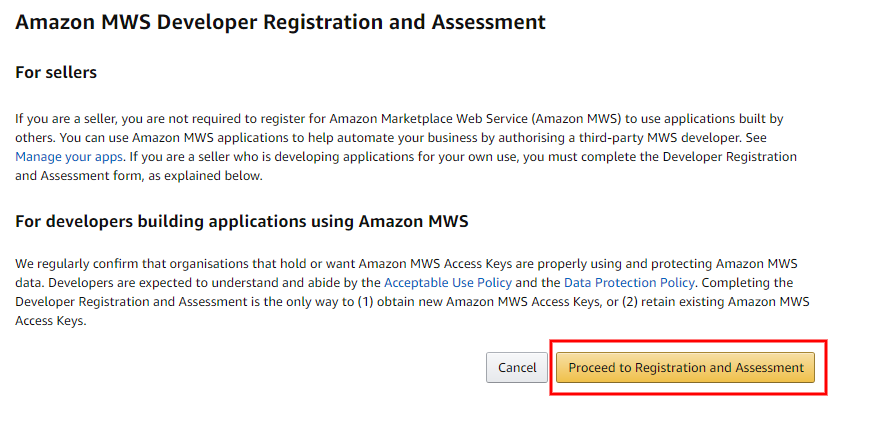
5. You will be redirected on a page which will look like below image. Here click on “Proceed to Registration and Assessment” and follow further steps.

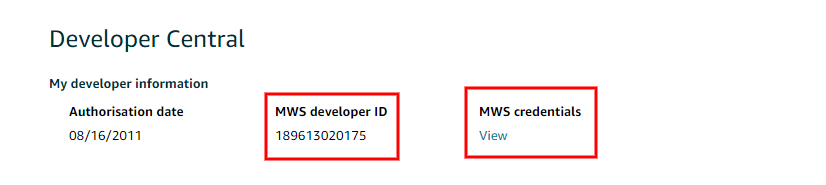
6.If you are already registered as develop, in this case you will get page which will look like below image when you will follow the Step 3.

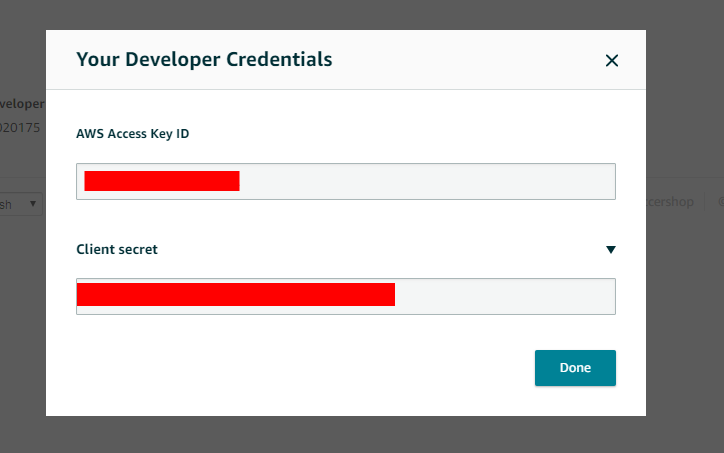
7.Here, you will get MWS developer id. For Access key id and Client secret, you need to click on “View” button and on click of this, a popup will be opened which will look like below image from where you will get both credentials.

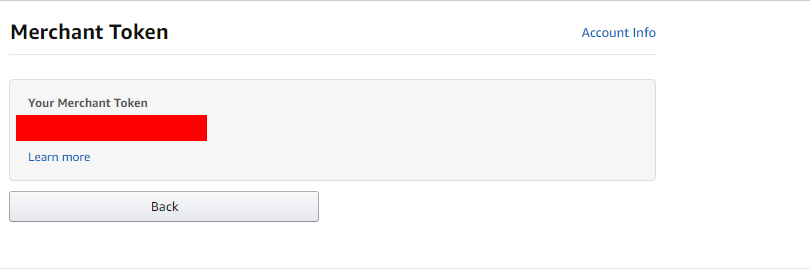
8.To get Merchant ID or Seller ID, click on “Your Merchant token” under the Settings > Account Info. You will be redirected to the page which will look like below image. This Merchant token is the Merchant id (Seller id).

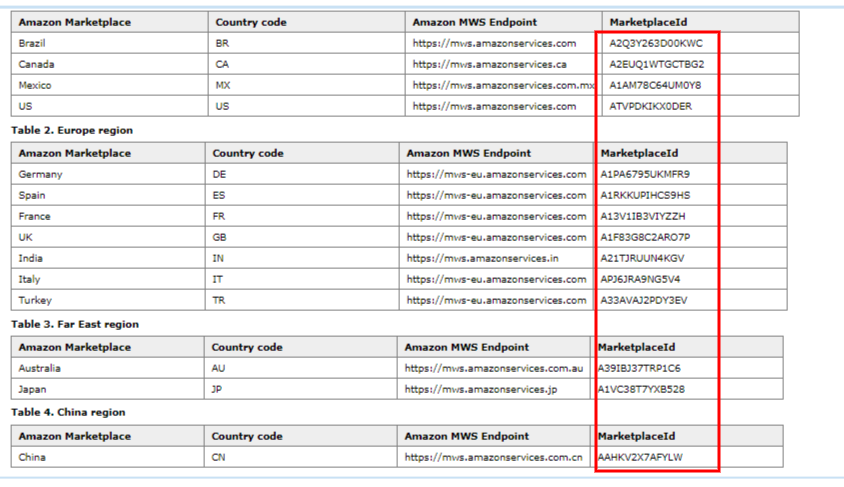
9.To get Marketplace ID, use the link -https://docs.developer.amazonservices.com/en_ES/dev_guide/DG_Endpoints.html

Summary

After reading this document, you are able to get MWS credential from seller central.

If you face any issues, please feel free to get in touch with us at support@knowband.com. Knowband also provides marketplace integration for the major CMS platforms like Prestashop, Opencart, Magento, Magento 2.

Know more here.