

The SocialAI Pro is an AI Social Media Post Generator Module that connects your product catalogue directly to Facebook, LinkedIn, and X (Twitter) through AI-powered automation, which is available for Prestashop and Opencart. Store admins can generate platform-specific social media posts for any product in their catalogue, publish them automatically through rule-driven triggers, or create and send posts manually without writing a single word of copy from scratch.
This guide covers every section of the PrestaShop Social Media Automation Module from installation through to post history management. Whether you are configuring the module for the first time or setting up a new rule for a product category, every field and setting is documented here exactly as it appears in your PrestaShop admin panel.
1.0 This PrestaShop AI Social Media Post Generator Module Is For
The Knowband SocialAI Pro is the right tool for:
- Store admins who want automated social media posts for new products or restocked inventory without writing copy daily
- Marketing teams managing social presence across Facebook, LinkedIn, and X from a single PrestaShop backend
- Merchants running large or fast-moving catalogues where manual social posting is not sustainable
- Agency operators managing multiple PrestaShop stores who need fully isolated social automation per store
- Store owners who want brand-voice control over AI-generated content without hiring a copywriter
2.0 Installation Guide
2.1 System Requirements
Before installing the Knowband PrestaShop AI Social Media Post Generator Module, confirm your environment meets the following requirements:
- PrestaShop 1.7.x, 8.x, or 9.x
- PHP 7.4 or higher
- A valid API key from at least one supported AI provider – OpenAI GPT, Google Gemini, or Anthropic Claude
- At least one active social media platform account – Facebook Page, LinkedIn Page, or X (Twitter) account, for OAuth connection
- HTTPS enabled on your store (required by all three social platform OAuth flows)
- CRON access on your server if you plan to use scheduled or event-triggered automation
2.2 Installing the Knowband SocialAI Pro on PrestaShop
Store admins can complete the full installation in under five minutes through the standard PrestaShop module installer. No core file edits are required at any point.
Open your PrestaShop admin panel and navigate to Modules, then Module Manager. Click Upload a Module in the top right corner of the screen.
Select the ZIP file you received from Knowband after purchase and click Open. Once the upload completes, click Install when the prompt appears. After installation finishes, click Configure to open the SocialAI Pro settings for the first time.
If the module does not appear automatically after installation, type SocialAI Pro or Knowband Social into the Module Manager search bar and click Configure from the result.
3.0 Admin Panel Overview
Now we will see the admin panel in detail in the Prestashop SocialAI Pro Automatic Post Scheduler. When installation is successful, you will be redirected to the module’s General setting. This module consists of three individual pages tabs, including General Settings, Rules Creation, Manager and Post History.
General Settings: Where store admins configure the AI engine, enter API credentials, set token limits, and connect social media platforms through OAuth.
Rules: Where store admins create the automation rules that automatically post the social media post after clicking on generate. Each rule defines which products to post, what triggers the post, which platforms it goes to, how the content should sound, and when it publishes.
Post History: The post history feature includes the logs of every post generated through the PrestaShop AI Social Media Post Generator Module. This tab includes also including status, platform, AI engine used, source, and a preview of the content. Furthermore, store admins can also create posts manually from this tab without running a rule.
4.0 General Settings
Store admins should complete the General Settings tab before creating any rules or attempting to publish posts. This tab connects the module to both the AI models and the social media platforms that will receive automated content.
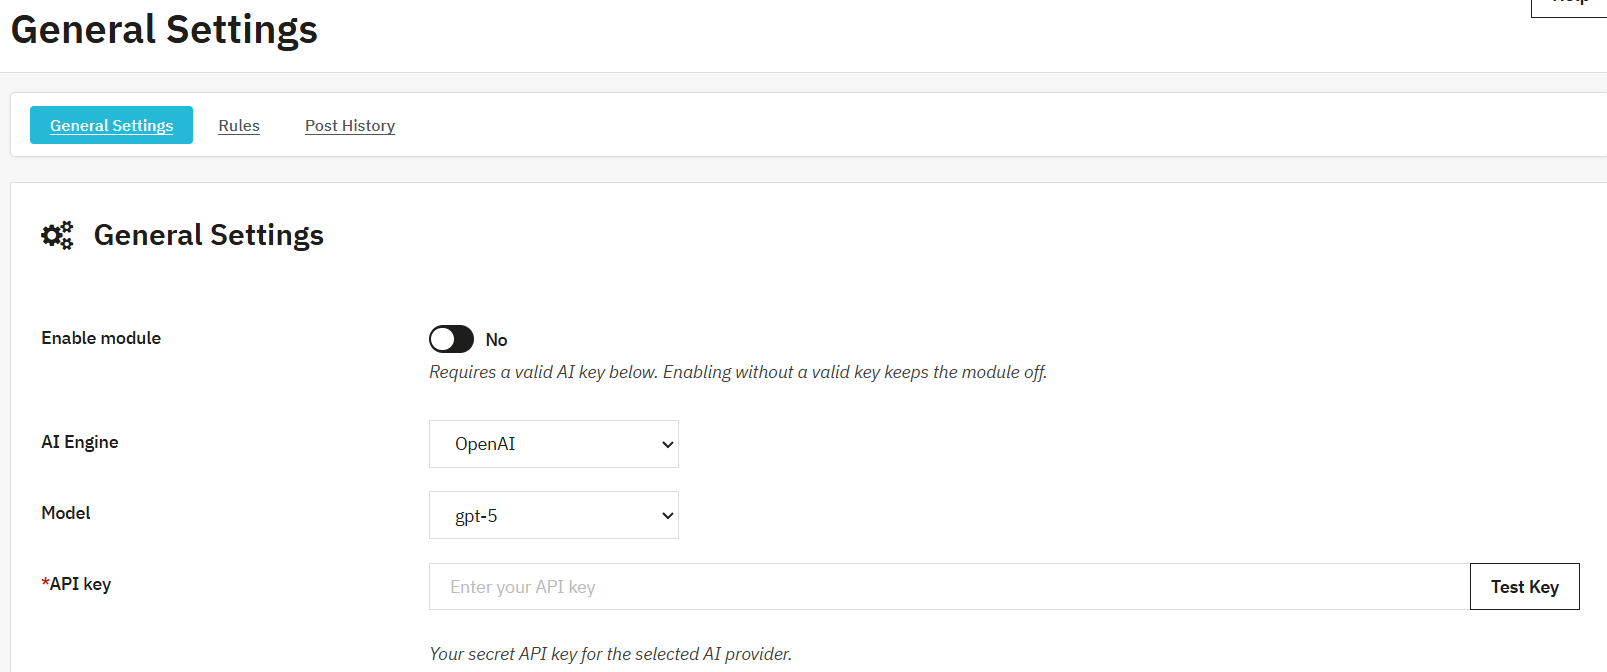
4.1 Enable Module
The Enable Module toggle is used to manage the entire PrestaShop Social Media Automation Module. If you are setting it to Yes, then it will activate all automation, rule triggers, and publishing. Setting it to No stops all outbound activity immediately so that no posts are generated, no rules fire, and no platform connections are called.
Store admins should note that enabling the module requires a valid AI API key to be saved in the API Key field below the model selection.
4.2 AI Engine Selection
The Knowband SocialAI Pro PrestaShop AI Social Media Post Generator Module gives store admins direct access to three leading AI providers OpenAI’s GPT, Anthropic’s Claude and Google’s Gemini from a single dropdown. Select the engine your store will use for content generation.
Models Available in AI Platforms

OpenAI GPT: This supports GPT-5, GPT-5 Mini, GPT-5 Nano, GPT-4.1, GPT-4.1 Mini, and GPT-4o. Store admins using OpenAI GPT Connect through their own OpenAI API key can switch between models at any time without even reconfiguring rules.
Google Gemini: The Prestashop Automated Social Media Posts supports Gemini 3 Pro, Gemini 2.5 Pro, Gemini 3.5 Flash and Gemini 2.5 Flash. Merchants can use this engine when they prefer Google’s AI infrastructure.
Anthropic Claude: Supports Claude Opus 4.8, Claude Sonnet 4.6, and Claude Haiku 4.5. Store admins who prefer Anthropic’s output quality or have existing Claude API access can connect through their Claude API key here.
Only one engine is active at a time across the entire module. Additionally, switching engines applies to all subsequent post-generation immediately. Previously generated posts in Post History are not affected by an engine change in the module.
4.3 API Key
To enable the functionality of the AI models, Store admins must enter their API key for the selected AI provider in the given field.
The API key must be a live, active key with sufficient credits or billing enabled on the provider account. An expired or revoked key returns an error on the first post-generation attempt. The key is saved locally to your PrestaShop database and called directly from your server to the AI provider’s API.
4.4 Temperature

A value of temperature 0 produces focused, consistent, and predictable output and the same product brief generates very similar copy each time. A value of 1 introduces more variation and creative phrasing, which works well for stores wanting less repetitive social copy across a large catalogue.
Kindly note that specifically, OpenAI GPT-5 and Claude Opus 4 do not accept a temperature setting. They run at their own internal default regardless of what value is entered here.
4.5 Max Tokens Per Request
Store admins set the maximum number of tokens the AI engine can use per word-generation request in this field. The accepted range is 100 to 2,000.
4.6 Twitter X Handle Settings
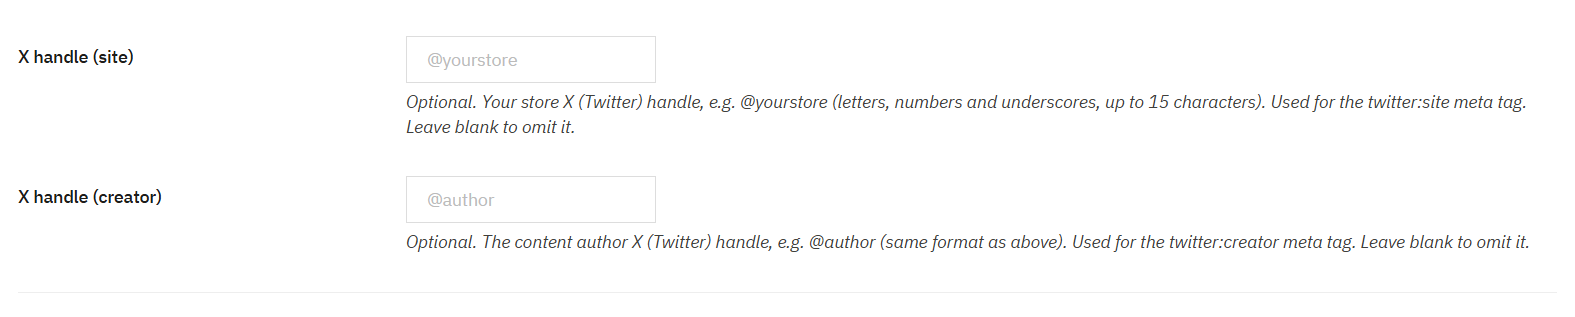
X Handle (Site): Store admins can add their store’s X handle, for example, @yourstore.
You can leave blank if your store does not have an active X account.
X Handle (Creator): Store admins can add their X handle, for example, @author.
These fields are optional and do not affect post publishing.
4.7 Connecting Social Media Platforms
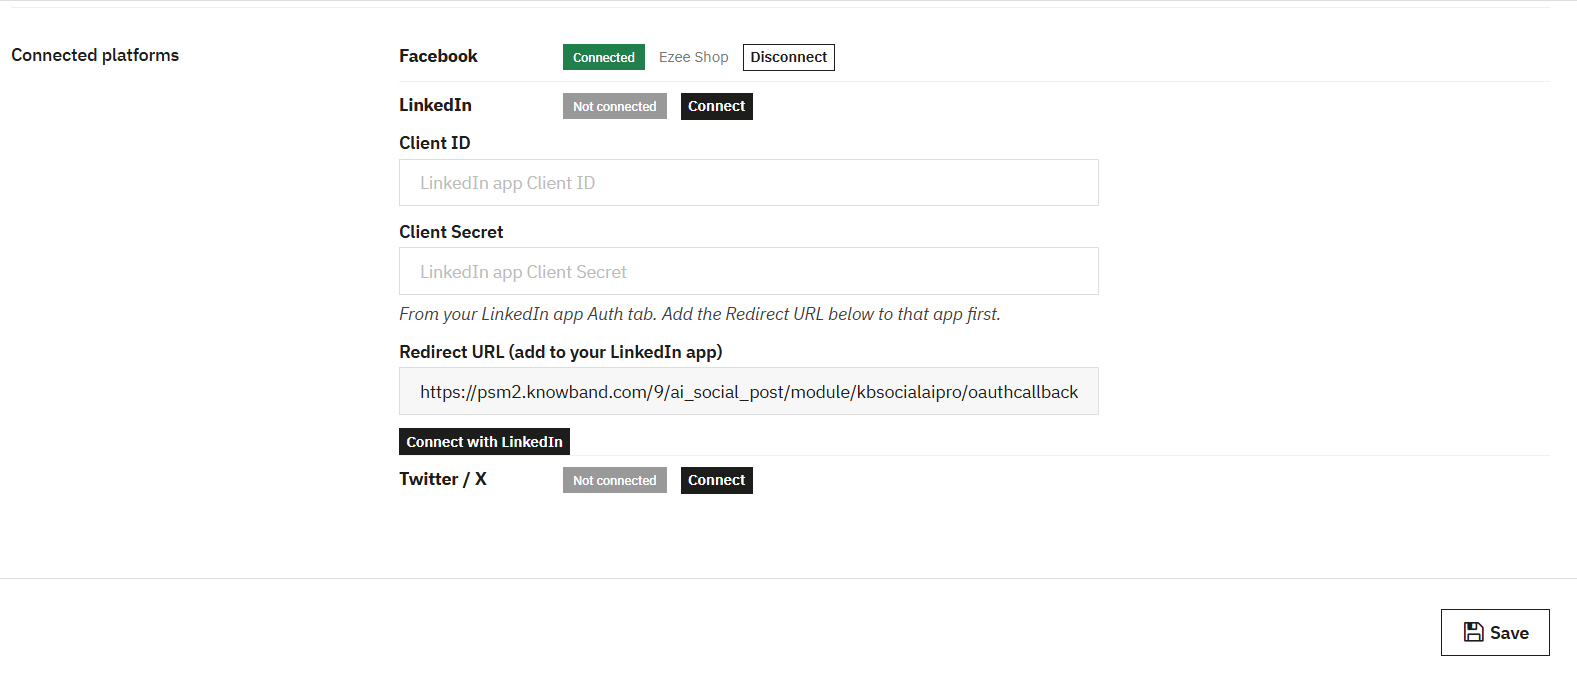
Facebook, LinkedIn, and X are all connected from the General Settings tab inside the Knowband PrestaShop Social Media Automation Module. Setting up each platform takes just a few steps and each one follows its own process.
Click Connect Facebook, and a pop-up window will appear on the screen. From there, grant the necessary permissions to allow posting on the Facebook Page. Anyone managing more than one Page will see a selector appear right after; just pick the correct Page from the list. The connection status will reflect the change immediately, showing the linked Page name once everything is confirmed.
Before anything else, log into the LinkedIn Developer Portal and pull up the registered app. Under the Auth tab, both the Client ID and Client Secret will be listed. Copy these and drop them into the matching fields inside the module. One extra step is needed before clicking authorise, add the Redirect URL from the module and paste it into the Authorised Redirect URLs section within the LinkedIn app settings. Save that change first, then return to the module and click Connect LinkedIn to wrap up the process.
X (Twitter)
Start by visiting the X Developer Portal and opening the Keys and Tokens section for the registered app. Copy the Client ID and Client Secret and enter both into the relevant fields inside the module. The Redirect URL shown in the module also needs to be added to the callback URLs listed under the app’s authentication settings, do this before attempting to connect. Once those details are in place, click Connect Twitter/X and authorise through the pop-up. A quick thing to check beforehand: the X account needs write access switched on under its posting permissions, since the integration will not go through without it.
5.0 Rules
The Rules tab is where store admins build the automation logic that drives the Knowband PrestaShop AI Social Media Post Generator Module. Each rule is a complete instruction set that defines what gets posted, when it gets posted, where it goes, and how the copy sounds.
Store admins can see all existing rules in the Rules table. Each row shows the Rule ID, Rule Name, Products covered, Trigger type, Platforms selected, Publish Mode, Status, and a Generate button for manual runs.
5.1 Understanding the Rules Table in SocialAI Pro
The Rules table gives store admins complete control of all configured automation at a glance.
E-Merchants can create as many rules as their catalogue requires. Each rule operates independently with its own product scope, trigger, platform selection, brand voice, and publish settings.
5.0 Rules
The Rules tab is where store admins build the automation logic that drives the Knowband PrestaShop AI Social Media Post Generator Module. Each rule is a complete instruction set that defines what gets posted, when it goes out, where it is published, and how the copy sounds. Store admins can run rules manually, let them fire automatically on product events, or schedule them across a time window, all from the same rule configuration.
5.1 How to Create the rule in Prestashop AI Social Media Post Generator
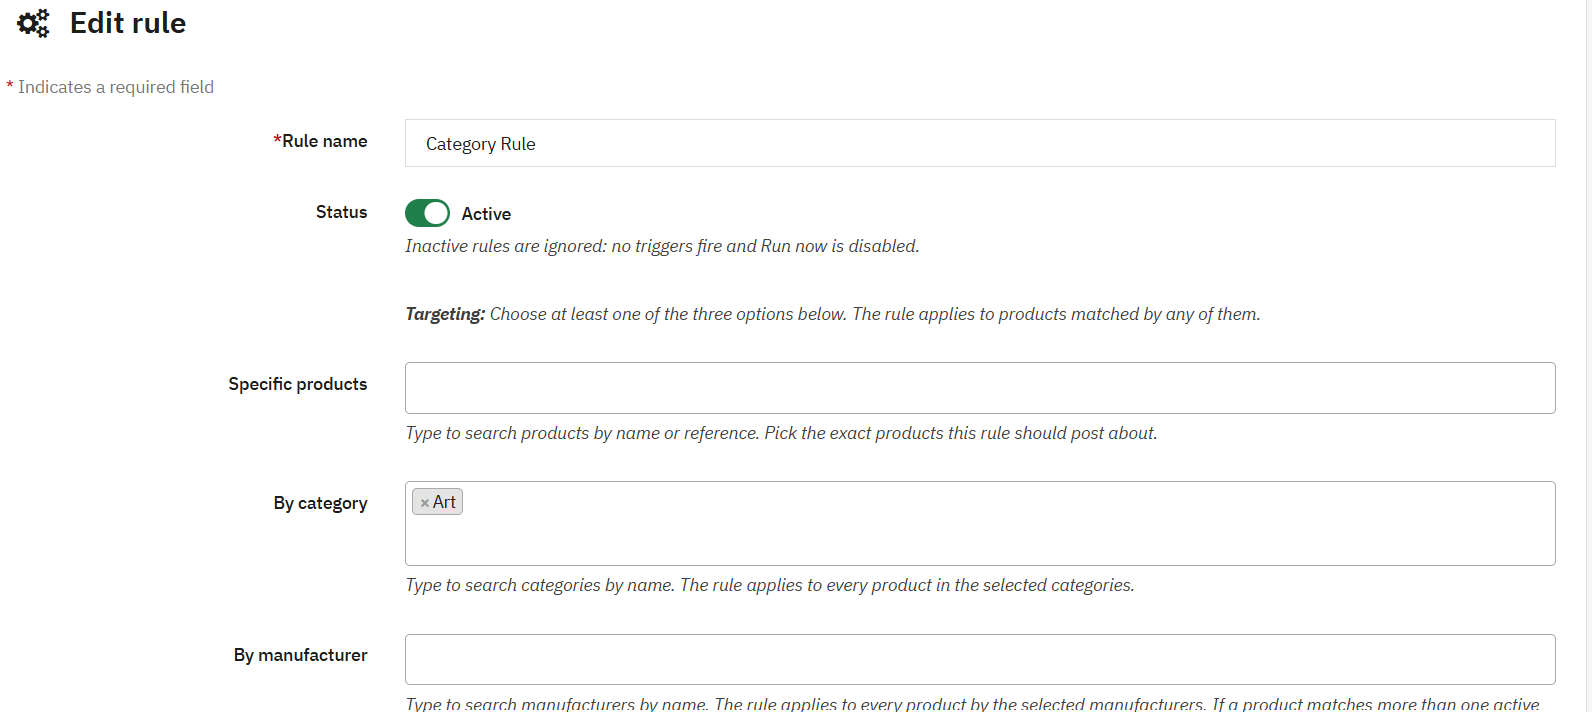
Rule Name: You can add the rule name to identify the rule. This name should be unique so that you do not get confused between the names. This name appears in Post History against every post the rule generates in Prestashop AI Post Generator, making it easy to trace which rule produced which content.
Products: You can select the product for which you want to generate the post. You can also select multiple products at one time.
Categories: This feature is added in case if you want to generate the post for categories.
Manufacturer: Similarly, if you want to generate a post for the manufacturer brand, you can add the manufacturer in the field.
Trigger: These are the triggers that decide the type of rule we are creating. This helps in displaying the trigger type configured, like New Product, Back in Stock, or Manual. Kindly note that rules set to Manual only fire when a store admin clicks Generate on that row.

New Product: The rule fires when a product when a new product is added to the store for the first time.
Back in Stock: The rule triggers when a product quantity goes from zero to a positive quantity. Knowband SocialAI Pro handles product variants correctly, restocking one variant does not trigger posts for other variants in the same product group.
Manual: The rule does not fire automatically. Store admins run it by clicking the Generate button on the Rules table row or by using the Run Now option inside the rule.
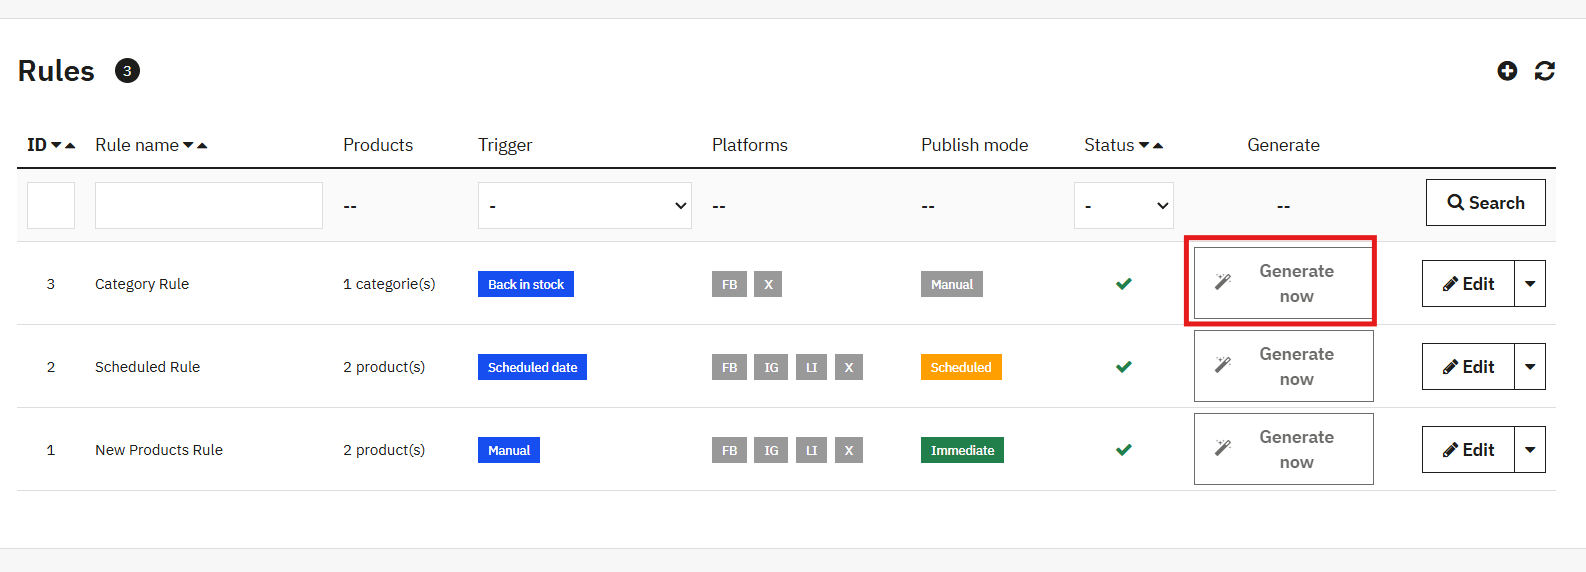
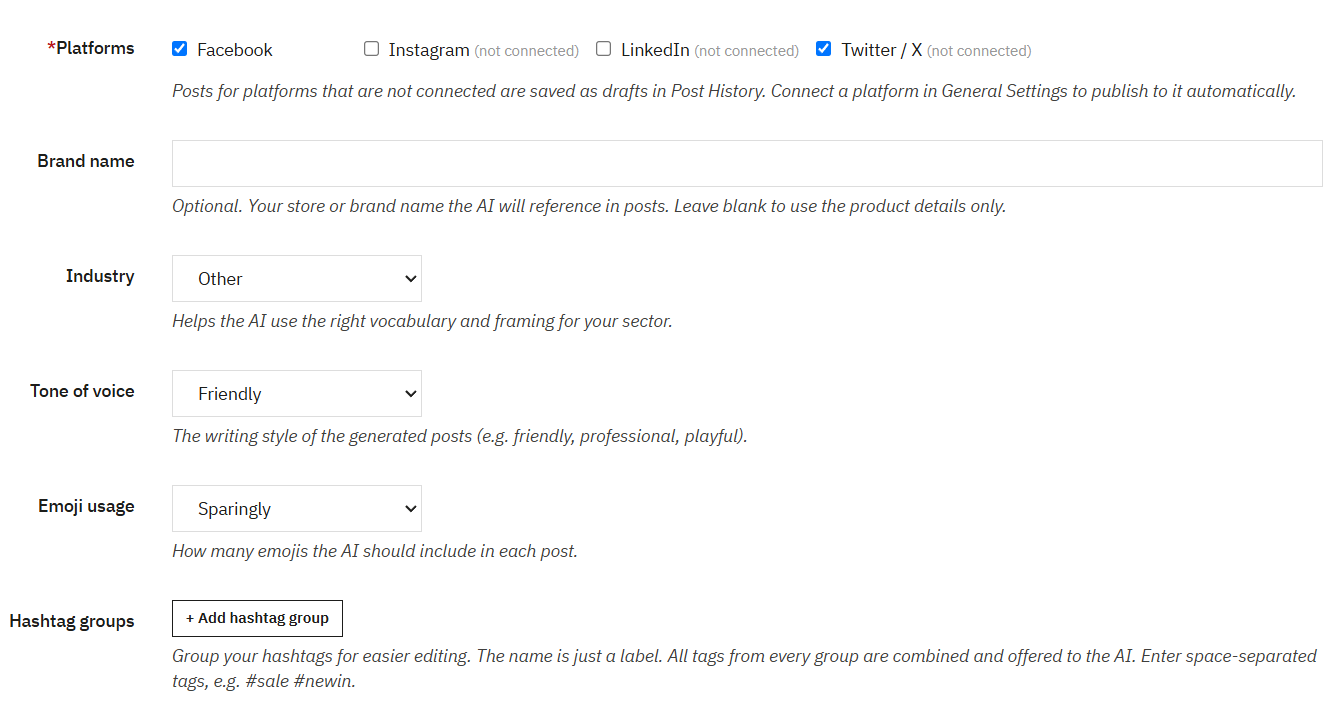
Platforms: This option allows the store owners to choose the platforms in which they want to share the post for example Facebook, LinkedIn, and X based on what was selected during rule setup.
Publish Mode: This publish mode shows whether this rule publishes posts immediately on trigger, or will be keep as drafts for manual review, or distributes them across a scheduled delay window.
Immediate: Posts go live on the selected platforms the moment they are generated. No admin review step occurs.
Manual (Draft): Generated posts land in Post History as Drafts. Store admins review, edit if needed, and publish each post individually from the Post History tab.
Scheduled: Posts are held after generation and released at a random point within a configurable minimum-to-maximum day window. This mode distributes bulk posts naturally across days rather than hitting all connected feeds simultaneously.
Scheduled Delay Window (Min / Max Days)
Visible only when Publish Mode is set to Scheduled. Store admins enter a minimum and maximum number of days. Each generated post is assigned a random publish time within that window. The merchant can use this to make a catalogue run of 50 products appear as organic, spaced-out content rather than an automated batch.
Brand Name
The store or brand name the AI includes in generated copy. Store admins enter the exact name they want referenced in posts, for example, “Knowband Store” or their store’s trading name. This ensures every post attributes content to the correct brand identity.
Industry
A brief description of the store’s industry or product niche. Store admins enter this so the AI understands the market context when writing copy, for example, “digital art assets,” “fashion accessories,” or “home electronics.” The industry field shapes vocabulary and reference points in the generated output.
Tone of Voice
Store admins select the communication tone for all posts generated by this rule. Five options are available:
Professional
Friendly
Playful
Urgent
Inspirational
Emoji Usage Policy
Store admins can control whether the AI includes emojis in generated posts. Store admins can choose the options from the dropdown. For example, when never is chosen, it will not add the emoji. When sparingly is added, it will add the emojis according to the content. Emojis are used more frequently on Facebook and X posts and more sparingly on LinkedIn, regardless of this setting.
Hashtag Groups
Store admins enter the hashtags they want included in generated posts for this rule. Hashtags can be entered as a comma-separated list in the module. Morover, the AI tools place them in the post according to platform convention: inline for Facebook and X, grouped at the end for LinkedIn. Leave blank to let the AI generate contextually relevant hashtags automatically.
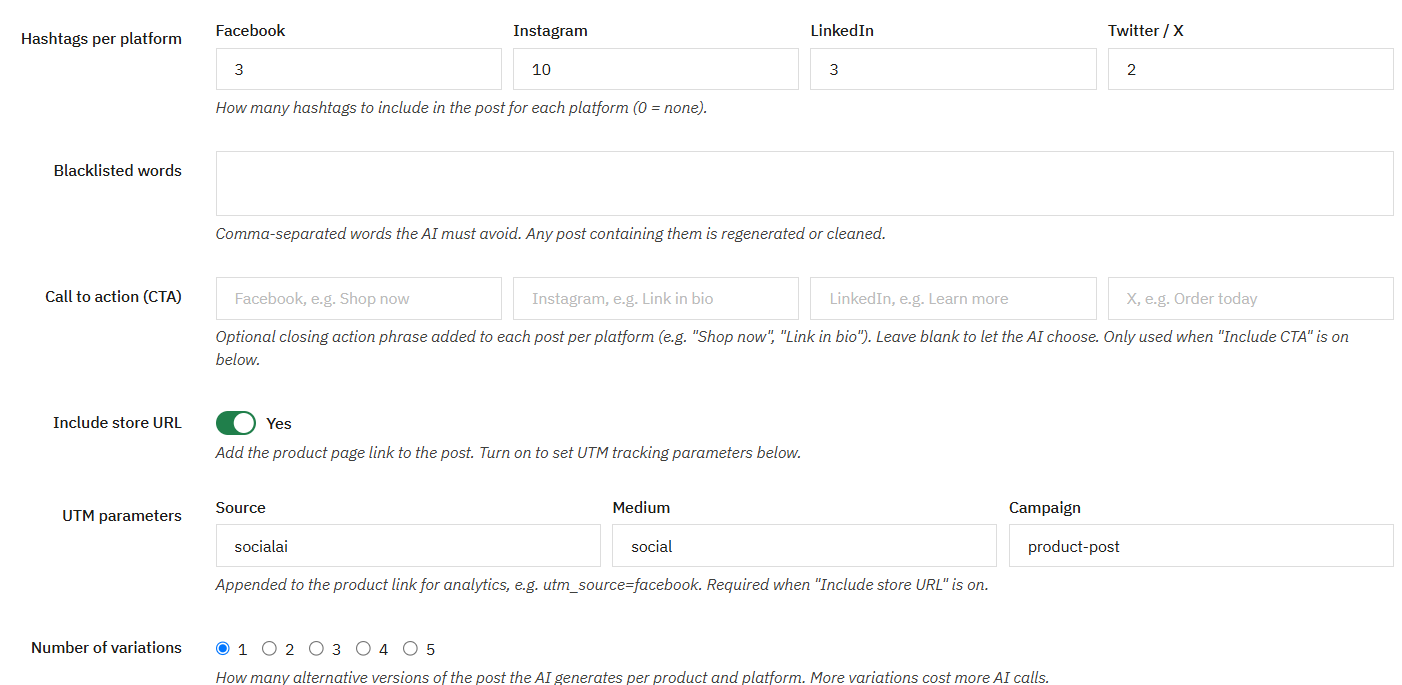
Word Blacklist
Furthermore, store admins enter the terms separated by commas, for example, competitor names, discontinued product references, terms that conflict with brand guidelines, or any language not suitable for the target audience.
Per-Platform Call-to-Action (CTA) Phrases
Store admins enter a specific CTA phrase for each selected platform. The AI uses these phrases in the closing line of each post. For example, “Shop now at our store” for Facebook, “Explore the full catalogue” for LinkedIn, and “Grab yours today” for X. If you leave the field CTA blank, then AI will write its own closing line for that channel.
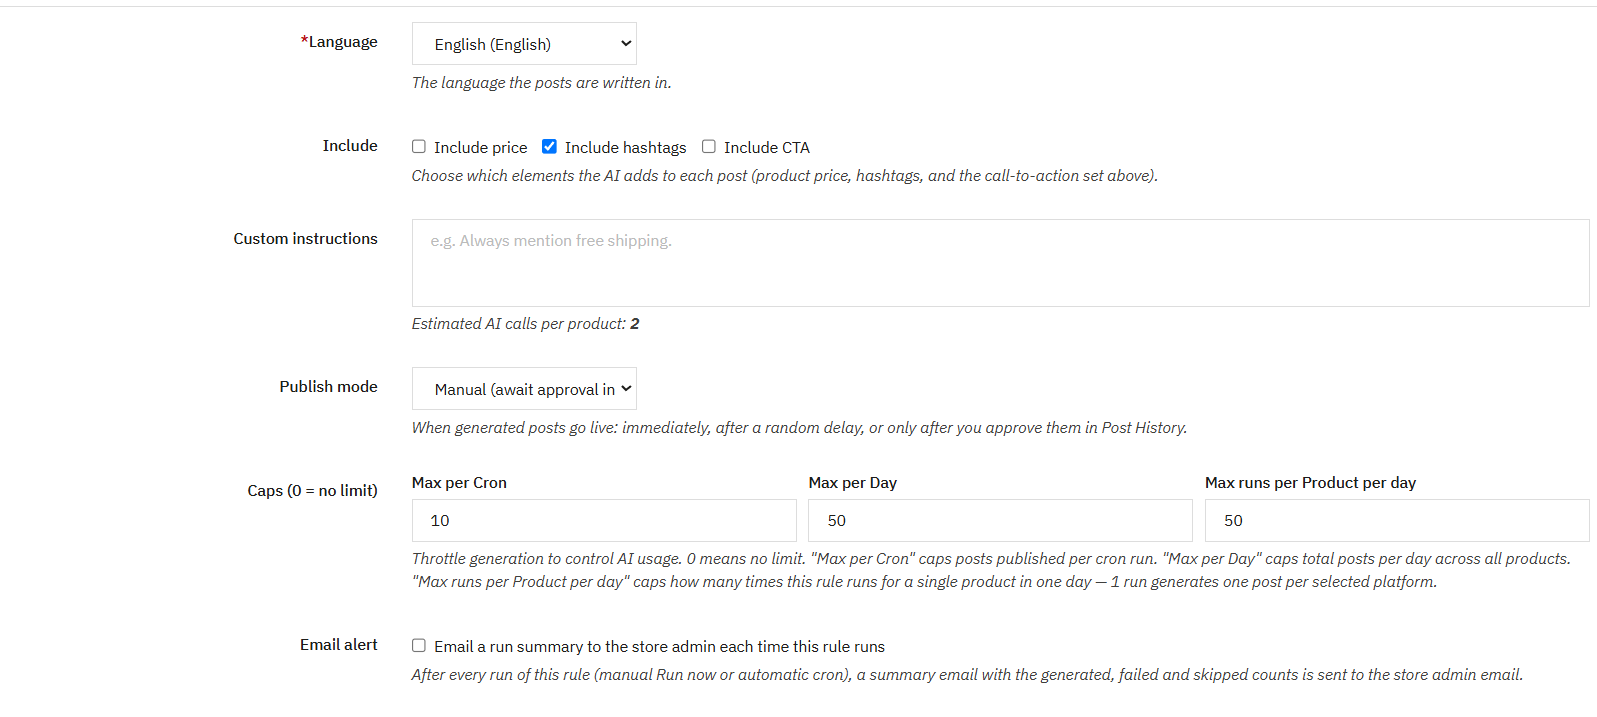
Custom Instructions
The merchant can use this for anything not covered by the structured fields above, for example, “Always mention free shipping,” “Reference the seasonal sale,” or “Keep the copy under 100 words for all platforms.” These instructions are appended to every AI prompt this rule generates.
Max Posts Per Cron Run
Sets the maximum number of posts this rule can generate in a single cron execution
Max Posts Per Day
The total number of posts this rule can generate across all cron runs within a single calendar day. Once this limit is reached, the rule stops generating for that day regardless of how many qualifying products remain.
Max Posts Per Product Per Day
Prevents the same product from being posted more than a set number of times in a single day. Store admins typically set this to 1 to avoid the same product appearing multiple times across connected feeds on the same day.
5.3 Saving and Running a Rule
Once all fields are configured, store admins click Save Rule to add it to the Rules table. The rule is immediately active if Status is set to Active and the trigger is set to New Product or Back in Stock, it will fire the next time the trigger condition is met.
For Manual trigger rules, or to test any rule immediately after saving, store admins click the Generate button on the rule’s row in the Rules table. The Knowband Prestashop AI Post Generator processes all qualifying products in the rule scope, generates platform-native posts for each selected channel, and adds them to Post History with the rule name, engine, and source recorded against each entry.
Store admins can edit any rule at any time by clicking Edit on its row. Changes take effect on the next rule run. Posts already generated by the rule before the edit are not retroactively updated.
6.0 Post History
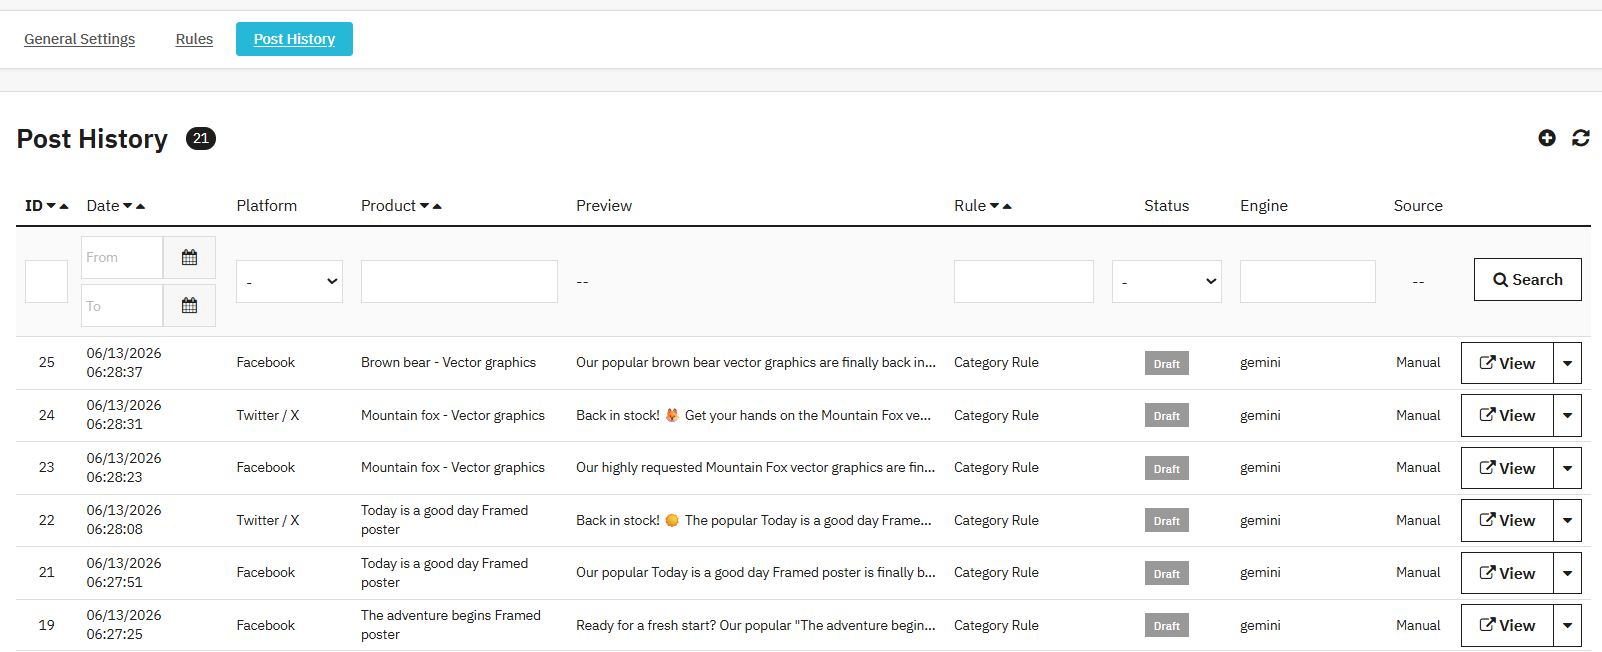
The Post History tab in the Prestashop Auto Post Generator by AI tools is the complete record of logs of every post the Knowband SocialAI Pro PrestaShop AI Social Media Post Generator Module has generated. Moreover, store admins can review generated content, check publish status, and identify failed posts with their exact error.
Each row in the Post History table in the module contains:
ID: This is the unique identifier assigned by the PrestaShop AI-Powered Content Generator Module.
Date: This shows the exact date according to your server configuration.
Platform: This helps in identifying the platforms for which the post was generated.
Product: Name of the Product.
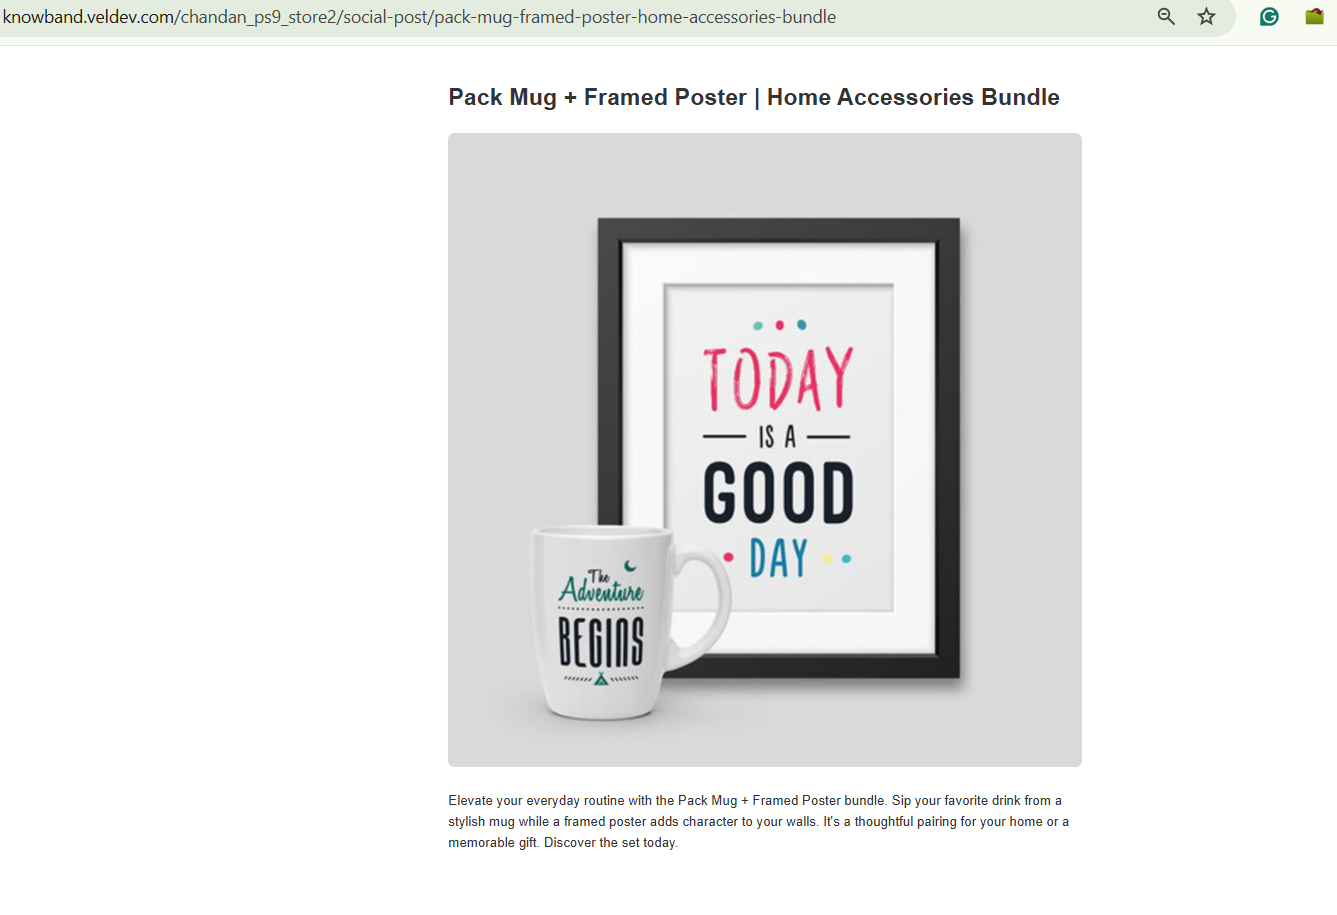
Preview: You can preview the social media post, which includes a unique URL for the social media post.
Rule: The rule name that triggered this post generation using the Auto Publish module.
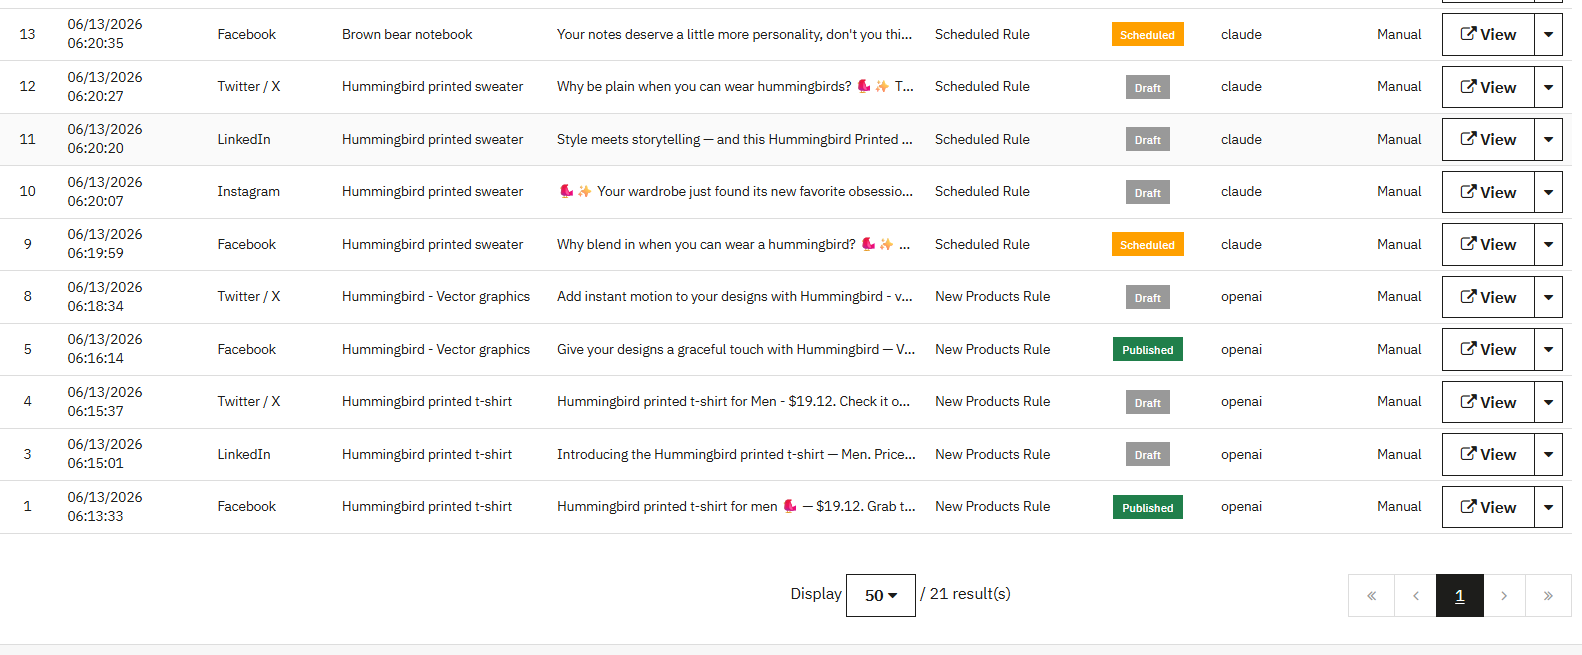
Status: The current state of the post, Draft, Scheduled, Published, or Failed. Draft posts have been generated but not yet published. Store admins can review and edit Draft posts before sending them live.
Engine: The AI engine that generated this post, OpenAI GPT, Gemini, or Claude.
Source: Whether the post was generated automatically by a rule trigger (Auto) or created manually by an admin (Manual).
6.2 Creating a Manual Post from Post History
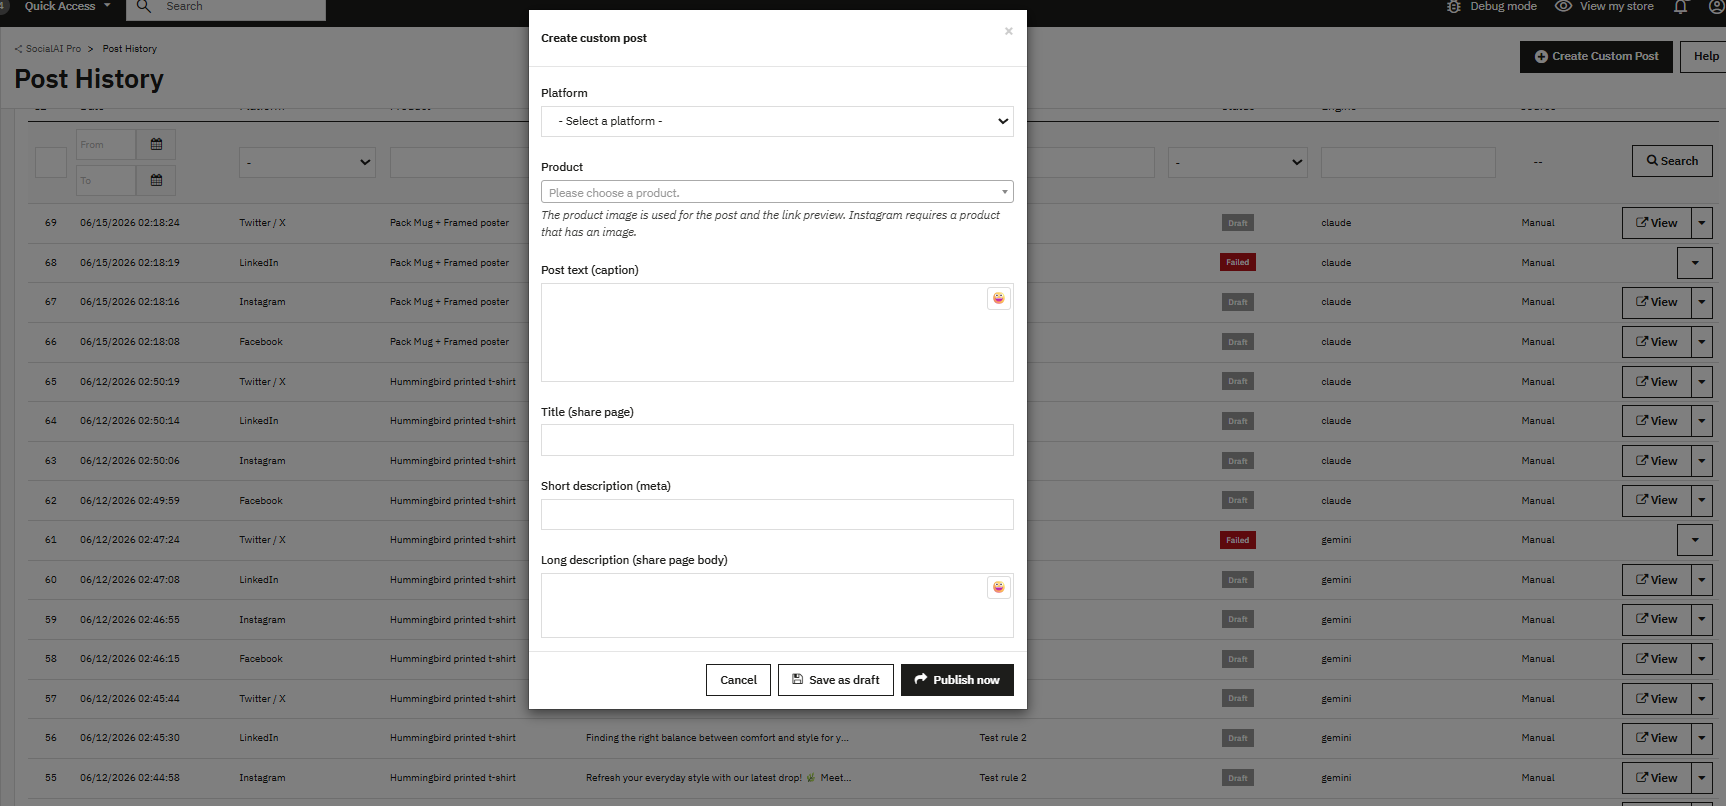
Store admins can create a post manually from the Post History tab without running a rule or waiting for an event trigger. This is the feature for one-off announcements, specific product highlights, flash sale posts, or any content where full admin control over timing and copy is needed.
The merchant can use this feature by clicking the Create Post button at the top of the Post History tab. Select the product, choose the target platforms, pick the AI engine and model for this post, enter any specific instructions for the copy, and click Generate. The post appears in Post History as a Manual source Draft immediately. From there, store admins can review the generated copy, edit it if needed, and publish it directly or save it as a scheduled post.
7.0 Frequently Asked Questions
Q: Can store admins switch AI engines without losing their existing rules?
Switching the AI engine in General Settings applies to all future post generation but does not affect existing rules, scheduled posts, or Post History entries. Rules do not store engine settings at the rule level; the engine is a global module setting. Additionally, store admins switching from OpenAI to Gemini mid-campaign will find that all subsequent generation uses Gemini while previously generated Draft posts retain their original engine label in Post History.
Q: Why is a post showing as Draft after the rule ran?
The merchant can check the rule’s Publish Mode setting. If the rule is set to Manual publish mode, all generated posts land in Post History as Draft regardless of the trigger. Store admins need to review and publish them from the Post History tab. To switch to automatic publishing, edit the rule and change the Publish Mode to Immediate or Scheduled.
Q: How does the Knowband SocialAI Pro handle the 280-character limit on X?
The PrestaShop AI Social Media Post Generator Module generates platform-specific copy for each channel and enforces character limits after generation. X posts are written and trimmed to fit within 280 characters before the post is saved to Post History. A post that would exceed the limit is caught and adjusted automatically; it never reaches the X API at an invalid length.
Q: Can more than one social platform be connected at the same time?
Store admins can connect Facebook, LinkedIn, and X simultaneously from the General Settings tab. Each platform maintains its own independent OAuth connection. Disconnecting one platform does not affect the others, and each rule can target any combination of connected platforms independently.
8.0 Conclusion
The Knowband SocialAI Pro PrestaShop AI Social Media Post Generator Module gives PrestaShop store admins a complete social media automation system built inside their existing admin panel. AI generates the copy. Rules decide when and where it goes. Post History keeps the full record. And store admins retain editorial control at every step through Draft review, manual post creation, and brand voice settings per rule.
For installation support, feature questions, or custom changes, contact the our support team at support@knowband.com. Module updates are available on the Knowband website.
Also available on Prestashop Addons: https://addons.prestashop.com/en/social-commerce-facebook-prestashop-modules/98107-socialai-pro-prestashop-ai-post-generator-for-facebook-linkedin-x.html


