What is Prestashop Product Sales Count Addon?
Sometimes customer who is purchasing something wants to know the popularity of the plugin and how many customers have already bought it. With the help of this information, the customer gets an assurance that this product is popular and is being bought by many other customers. In default PrestaShop store, this feature is not available through which the customer can extract this information.
1.0 Introduction
This product sales count module helps the Prestashop eCommerce store owner to add a new block on the product page showing relevant information and product sales count.
Product Sales Count is the module which facilitates ‘Admin’ to display the number of sales of the product in the Front End users(Customers).
Admin can set dummy Product Sales Count as well as Actual Purchase Count at different pages and position. Admin can also set the Look and Feel of the module to make the page look more attractive and promote the product.
The addon provides a lot of features which are as follows:
- The Prestashop product sales count module allows displaying the number of sales on product listing at Homepage and product page.
- The product number of sales module allows displaying dummy number of sales of the product.
- Admin can choose the minimum number of sales of the product for Dummy Value.
- Admin can select 3 different display position i.e. Center, Right, Only Product listing Page.
- The sales information module allows the store admin to enable and disable Product listing option.
- Admin can set look and feel setting of the block like Background color, Text color in both the product and product listing page.
- Admin can add Custom CSS and Custom JS for the product sales count block.
- Customers can able to see the number of sales of the product on a different page.
- Prestashop Product Sales Count Extension shows a product sales count popup giving sales data in last one hour.
- Admin can set a custom text message which will be shown over the popup.
- The store merchant can set the minimum and maximum sales quantity which will be displayed over the popup.
- With Prestashop sales information module, admin can hide the message after a specific time limit.
- The background color, font color, and border color of the popup can be changed as per site theme.
- The Prestashop product sales count extensions is multi-store compatible.
- The product number of the sales module is fully customizable.
2.0 Installation Manual
Follow the following steps for installing Product Sales Count addon:
- Download the addon package.
- Unzip the package in /modules directory of your Prestashop store via FTP manager (like Filezilla or WinSCP – download here: https://filezilla-project.org/). Folder structure for Product Sales Count addon is shown in the image below:
Note: The Module folder “kbproductsalescount” should be writable for the proper working of the module. Please make the folder permission to 755.
3.0 User Manual
This User Manual will guide you through the Admin Module/Store Front settings and various features of the this Product Sales Count Addon.
4.0 Admin Interface
This will contain 2 tabs ‘General Setting Tab’ and ‘Look and Feel Setting Tab’ after successful installation.
4.1 General Setting Tab
This Tab will contain these fields. Steps –
1. Go to Modules and Services > Search module ‘Product Sales Count’ > Click on “ Configure” Button > Select General Setting Tab.
Steps –
Go to modules and Setting > Search Module ‘Product Sales Count’> Click on Configure button > Select General Setting > Select Only Dummy Values > Click On Save.
Fields
- Enable :
By default, the value will be OFF. Whole functionality of this plugin will depend on the value of this setting.
Steps – Go to modules and Setting >Search Module ‘Product Sales Count’> Click on Configure button > Select General Setting > Click on Yes Option > Click On Save.
- Display Dummy Count :
By default OFF. When admin will ON this, then point 3 and point 4 settings will display to admin to set values.
Steps – Go to modules and Setting >Search Module ‘Product Sales Count’> Click on Configure button > Select General Setting > Click on Yes at Display Dummy Count > Click On Save.
- Minimum dummy count :
This field will be hidden by default but if setting in point 2 will be ON then they will appear. Store owner can set minimum value of product sales count.
Steps – Go to modules and Setting >Search Module ‘Product Sales Count’> Click on Configure button > Select General Setting > Enter Minimum Values > Click On Save.
- Display Position:
It will be a drop down list and by default “Center block” will be selected. There are three positions on product page where admin can display the count to customers.
Steps – Go to modules and Setting > Search Module ‘Product Sales Count’> Click on Configure button > Select General Setting > Select Center / Right / Only Product Listing Page Option > Click On Save.
- Center block
- Right Block.
- Only Product Listing Page
Note: To display on Only in Product Listing Page, make sure that ‘Display in Product List’is Enabled.
- Display in Product List:
By default, it will be OFF. When admin enables/ IN this setting, then the count will also show the product on the category page.
Steps – Go to modules and Setting > Search Module ‘Product Sales Count’> Click on Configure button > Select General Setting > Select Display in Product List Option > Click On Save.
- Save Button: When admin will click on this button, module will first validate all the fields with valid values. After successful validation, module will save settings into database and return back with success message.
Steps – Go to modules and Setting > Search Module ‘Product Sales Count’> Click on Configure button > Select General Setting / Look & Feel Setting Tab > Click On Save.
4.2 Look and Feel Setting Tab
This tab will contain all the look and feel features of the module for both product and product listing page as shown below.
Steps –
1 . Go to Modules and Services > Search module ‘Product Sales Count’ > Click on “ Configure” Button > Select Look and Feel Setting Tab.
Fields
- Sales Count Block Text Colour(Product Page) :
This will set the colour of the text inside the block at product view page.
Steps – Go to modules and Setting >Search Module ‘Product Sales Count’> Click on Configure button > Select Look & Feel Setting Tab > Select and Colour at Sales Block Text Colour(Product Page) > Click On Save.
- Sales Count Block BackGround Colour(Product Page) :
This will set the colour of the background inside the block at product view page.
Steps – Go to modules and Setting >Search Module ‘Product Sales Count’> Click on Configure button > Select Look & Feel Setting Tab > Select and Colour at Sales Block Background Colour(Product Page) > Click On Save.
- Sales Count Block Text Colour(Productlist Page) :
This will set the colour of the text inside the block at product listing (category) page
Steps – Go to modules and Setting >Search Module ‘Product Sales Count’> Click on Configure button > Select Look & Feel Setting Tab > Select and Colour at Sales Block Text Colour(Product Listing Page) > Click On Save.
- Sales Count Block BackGround Colour(Product Page) :
This will set the colour of the background inside the block at product listing (category) page
Steps – Go to modules and Setting >Search Module ‘Product Sales Count’> Click on Configure button > Select Look & Feel Setting Tab > Select and Colour at Sales Block Background Colour(Product Listing Page) > Click On Save.
- Custom CSS :
This will set the CSS of the block . Steps –
Go to modules and Setting >Search Module ‘Product Sales Count’> Click on Configure button > Select Look & Feel Setting Tab > Enter any CSS Code at Custom CSS Field > Click On Save.
Note: Enter CSS content excluding <style> — inner content– </style> Tags (only write inner content ).
- Custom JS :
This will set the Javascript code for the block. Steps –
Go to modules and Setting >Search Module ‘Product Sales Count’> Click on Configure button > Select Look & Feel Setting Tab > Enter any JS Code at Custom JS Field > Click On Save.
Note: Enter CSS content excluding <script> –inner content– </script> Tags (only write inner content ).
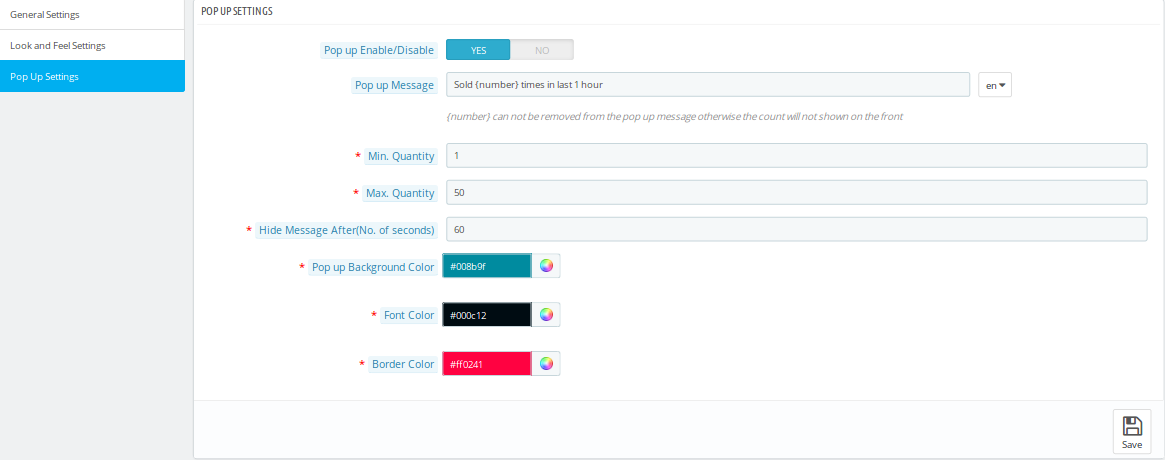
4.3 Popup Settings Tab
Prestashop product sales count addon features a product sales count popup on the product page which shows the sales count in last one hour. You can customize the popup settings using the following options:
- Pop up Enable/Disable: This option lets you enable or disable the popup displayed on the frontend.
- Pop up Message: Admin can set a custom popup message for different languages.
- Min. Quantity: This option lets you set the minimum sales count displayed over the popup.
- Max. Quantity: This option lets you set the maximum sales count displayed over the popup.
- Hide Message After: Admin can specify the time duration(in seconds) after which they want to hide the popup message.
- Popup Background Color: Admin can set a desired color for the background of popup.
- Font Color: Admin can choose a color for the text shown over the popup.
- Border Color: Admin can set the border color for the popup shown on Product page.
Front End Interface
In this the user will able to see the number of sales count of the product.
Product Page
At Center
At Right
Product Listing Page
Popup displaying product count for last 1 hour
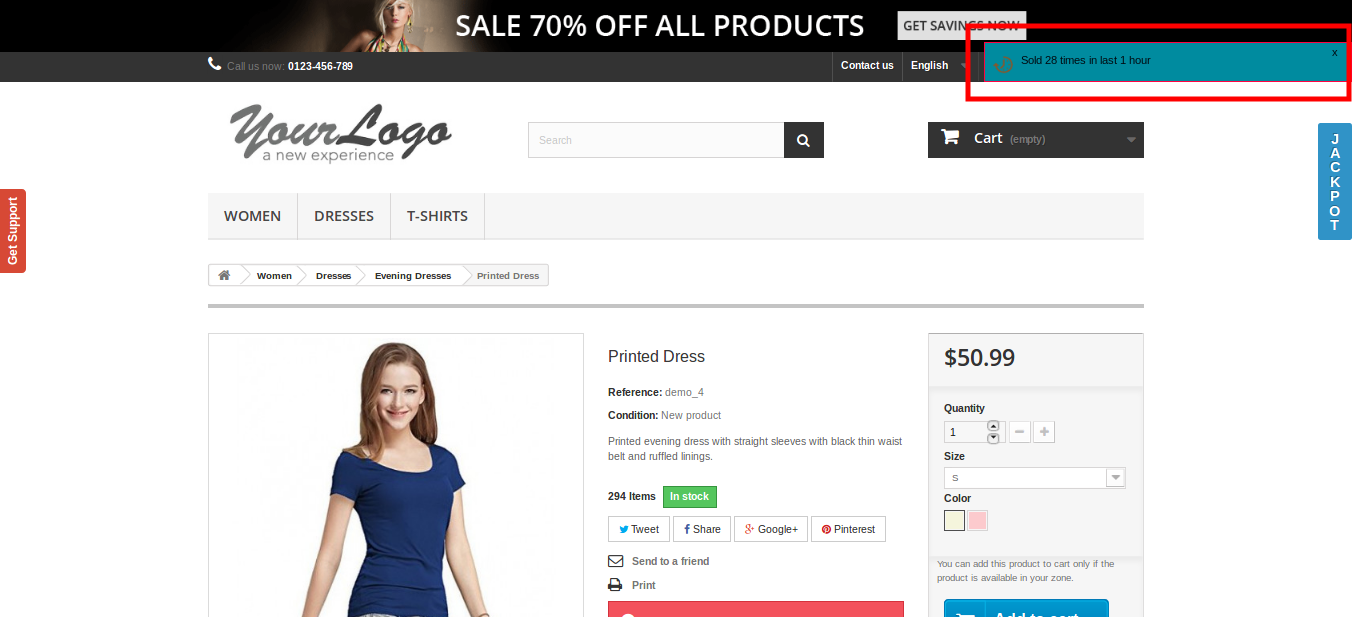
Recommendation
The Module folder “kbproductsalescount” should be writable for the proper working of module. Please make the folder permission to 755.
For more details about this Prestashop addon:
Module Link: https://www.knowband.com/prestashop-product-sales-count
Front Demo:
https://ps.knowband.com/demo4/16/en/evening-dresses/4-printed-dress.html
Watch Video:
https://www.youtube.com/watch?v=z6ry7KKm9sk&feature=youtu.be
Addon Store link:
https://addons.prestashop.com/en/additional-information-product-tab/25768-knowband-product-sales-count.html
Please contact us at support@knowband.com for any query or custom change request as per your business requirement.