1.0 Introduction
Knowband has developed an interface for the Prestashop store owners that can help them start selling on the Etsy marketplace. Further, the Prestashop Etsy integration addon saves the time of the sellers. How? By reducing the time involved in the manual listing process. In fact, the Prestashop Etsy marketplace integration module offers them a feature to handle the inventory. In addition, handle orders for the Etsy shop from the Prestashop back office.
Etsy is a marketplace that works as an intermediary between customers and artists. In addition, craftsmen of handmade items, or collectors of vintage products. Furthermore, the Etsy marketplace connector provides a unique platform to sellers to showcase their products. Thus, they can spread awareness regarding their products and services through this platform. It is also important for the marketplace to offer the best services to consumers. In fact, consumers like to have options and alternatives to choose from. Hence, the marketplaces are competing to win the sellers and offer great services to them to connect with their stores. Further, Etsy has more than 25 million visitors each month. Further, which gives sellers a wonderful opportunity to reach a larger audience network.
1.1 Key features of the Prestashop Etsy Integration module:
- Simple installation and quick starting: The Etsy Prestashop integration module can install quickly. Further, the user-friendly interface of the Prestashop Etsy integration allows an easy process to list the products on the Etsy marketplace.
- Bulk uploading of the products: By using this Prestashop Etsy integration addon, the admin can upload products in bulk.
- Mapping of the store category with Etsy category: Sellers can easily map the product attributes and category with the Etsy category. Further, with the profile-based listing of the Prestashop Etsy API integrator.
- Shipping template synchronization: Create shipping templates from the back-end of the Prestashop Etsy integration extension. Moreover, sync these templates with Etsy with the help of the cron jobs.
- Order Synchronization: Manage and keep track of Etsy orders from the admin interface of the Etsy Prestashop API integration addon.
- Order Status update: The Admin can update the order status of the Etsy marketplace orders with the help of the cron jobs. Furthermore, offered by the Prestashop Etsy integration module.
- Inventory management: The admin can manage inventory for the Etsy store products from the Prestashop Back Office. The current status of the products can sync with the help of the cron jobs. Further, offered by the Prestashop Etsy synchronization extension. Suppose, they make any changes in the product inventory or attributes in the Prestashop store. Further, they can synchronize with Etsy at a button click with the Etsy Prestashop synchronization module.
- Language translations: Prestashop Etsy integrator offers multi-lingual support. The admin can select the second language for the store. Moreover, easily synchronize it with the Etsy marketplace shop. Further, through the cron job offered by the Etsy Prestashop integrator.
New Features offered by Knowband’s Prestashop Etsy Integrator Version 2.0.0:
- UX-related changes: To improve the user experience the interface of the shipping template has been changed. In addition, all the options for shipping template creation have been merged onto the same page. Furthermore, just like the Prestashop Etsy Marketplace interface.
- Code Optimization: Now the admin can sync the products from the Products Listings page. There are 3 options for product sync:
- Local Sync: Local Sync option allows the admin to sync the PrestaShop store products to the Etsy PrestaShop Integration module. All the products which are mappable to a Profile will list in the Product Listings. Moreover, the admin can list the individual products on the Etsy Marketplace.
- Sync Products: Sync Products option will sync the products to the Etsy Marketplace. All the enabled products will sync to the Etsy Marketplace. To avoid the syncing error, the admin can select the number of products. Further, to sync in one go under the General Settings. Cron setup is available to automate the process to list the products.
- Sync Product Status: The admin can get the listing status of the syncing products by using the Sync Product Status.
- Products Listings:
- In case you want to set the products as Inactive, Delete those products from this page only (Instead from the Etsy account). In fact, setting the product as Inactive on the Etsy account directly will relist the item on Etsy. Further, on the next CRON run.
- The admin can view the Etsy store products from the Products Listings tab. Further, click on the Listing Id. In addition, it will open the Etsy store listing.
- The admin can view the PrestaShop store listing by clicking the Product Name.
- The admin can view the product listing page in the back office by clicking the ID.
- Store admin can add Etsy store orders with store carriers.
- Store admin can add the tracking numbers on Etsy orders.
- Stora admin can add a size chart image for each profile and this additional image will be uploaded to Etsy.
- Now instead of listing the variations separately on the Products Listings page, all the variations list under the product name.
- The admin can sync the individual products to the Etsy Marketplace instead of listing the entire profile.
- The admin can Disable/Enable Items before syncing and only enabled items will list to the Etsy store.
Additional features of the Etsy Prestashop Integration module
- Attribute Mapping: All the PrestaShop store attributes will sync to the Etsy Marketplace Integration module automatically. In addition, the admin just needs to map these attributes to the Etsy Marketplace.
- Etsy Category Attribute: The Etsy Category Attributes are now available in the Etsy Marketplace Integration module. Further, the admin can set the various attributes. For instance, Primary Color, Secondary Color, Holiday, and Accessory Style.
- Product or Category Mapping: The PrestaShop Etsy marketplace Integration module enables syncing. Further, the selected products or entire category to the Etsy Marketplace. Furthermore, under the Profile Management tab of the Etsy Marketplace connector module, the admin can select the Product/Category option to sync the store products.
- Custom Pricing: Etsy Prestashop integration module allows the admin to list the products on the marketplace at a different price. In fact, the admin can change the price of the products. Further, that displays on the marketplace by a fixed amount or a percentage amount. As per the requirement, the admin can increase or decrease the price of the products. In fact, he can do it from the back-end of the Prestashop Etsy integration addon.
- Sales Report: The sales report tab of the Etsy Prestashop integration plugin allows the sellers to check the order and revenue report.
- Product Sales Report: The admin can even view the sales report of particular products. In fact, he can do it from the back-end of the Prestashop Etsy integration plugin.
- Shop Section: The Prestashop addon offers an option of adding a shop section in the front-end of the Etsy marketplace to the e-sellers. Further, the shop section allows the admin to categorize the products in a particular category. In fact, the created shop section will display at your Etsy shop.
- Product Description Template: The e-sellers can use different placeholders for their product description to make them more impactful.
2.0 Installation
After purchasing the Prestashop Etsy integration extension, you will get the following files as available below:
1. kbetsy.zip (contains source code of the module)
2. User Manual
Follow the following steps to install the Etsy Prestashop integration extension:
- Unzip the kbetsy.zip file. It would contain files and folders as shown below –
- Copy all the files and folders of the unzipped folder into your store “modules” directory on the path – Root Directory/modules/.
- Now module is ready to install on your store. Moreover, you can find that in Store Admin -> Modules and Services. Further, it would be shown as below –
In case, you are not able to find the module in the admin modules list. Further, please try searching the module with the following details –
Keyword – Etsy
Category – Other
Filter By – Installed & Not Installed / Enabled & Disabled
- Click on the “Install” button to install the module. It would show a pop-up for your confirmation. Further, click on the “Proceed with the installation” option. In fact, this step will install the module and show a notification – “Module(s) installed successfully”.
3.0 System Setup
Before proceeding ahead, it is important to know what is the correct flow of actions. Further, to set up this system as several things are dependent on other things. In addition, if we do not take care, then it will become difficult to process smoothly or may be error-prone.
4.0 Etsy Prestashop Integration- Seller Account Setup
You need a seller account on Etsy to start selling on Etsy Marketplace. Moreover, to configure the Etsy Prestashop integration addon. In this section, we are listing all the steps to create a seller account on Etsy. Please find them below –
- Go to the link – https://www.etsy.com
- Click on the “Sell on Etsy” button present at the top right corner.
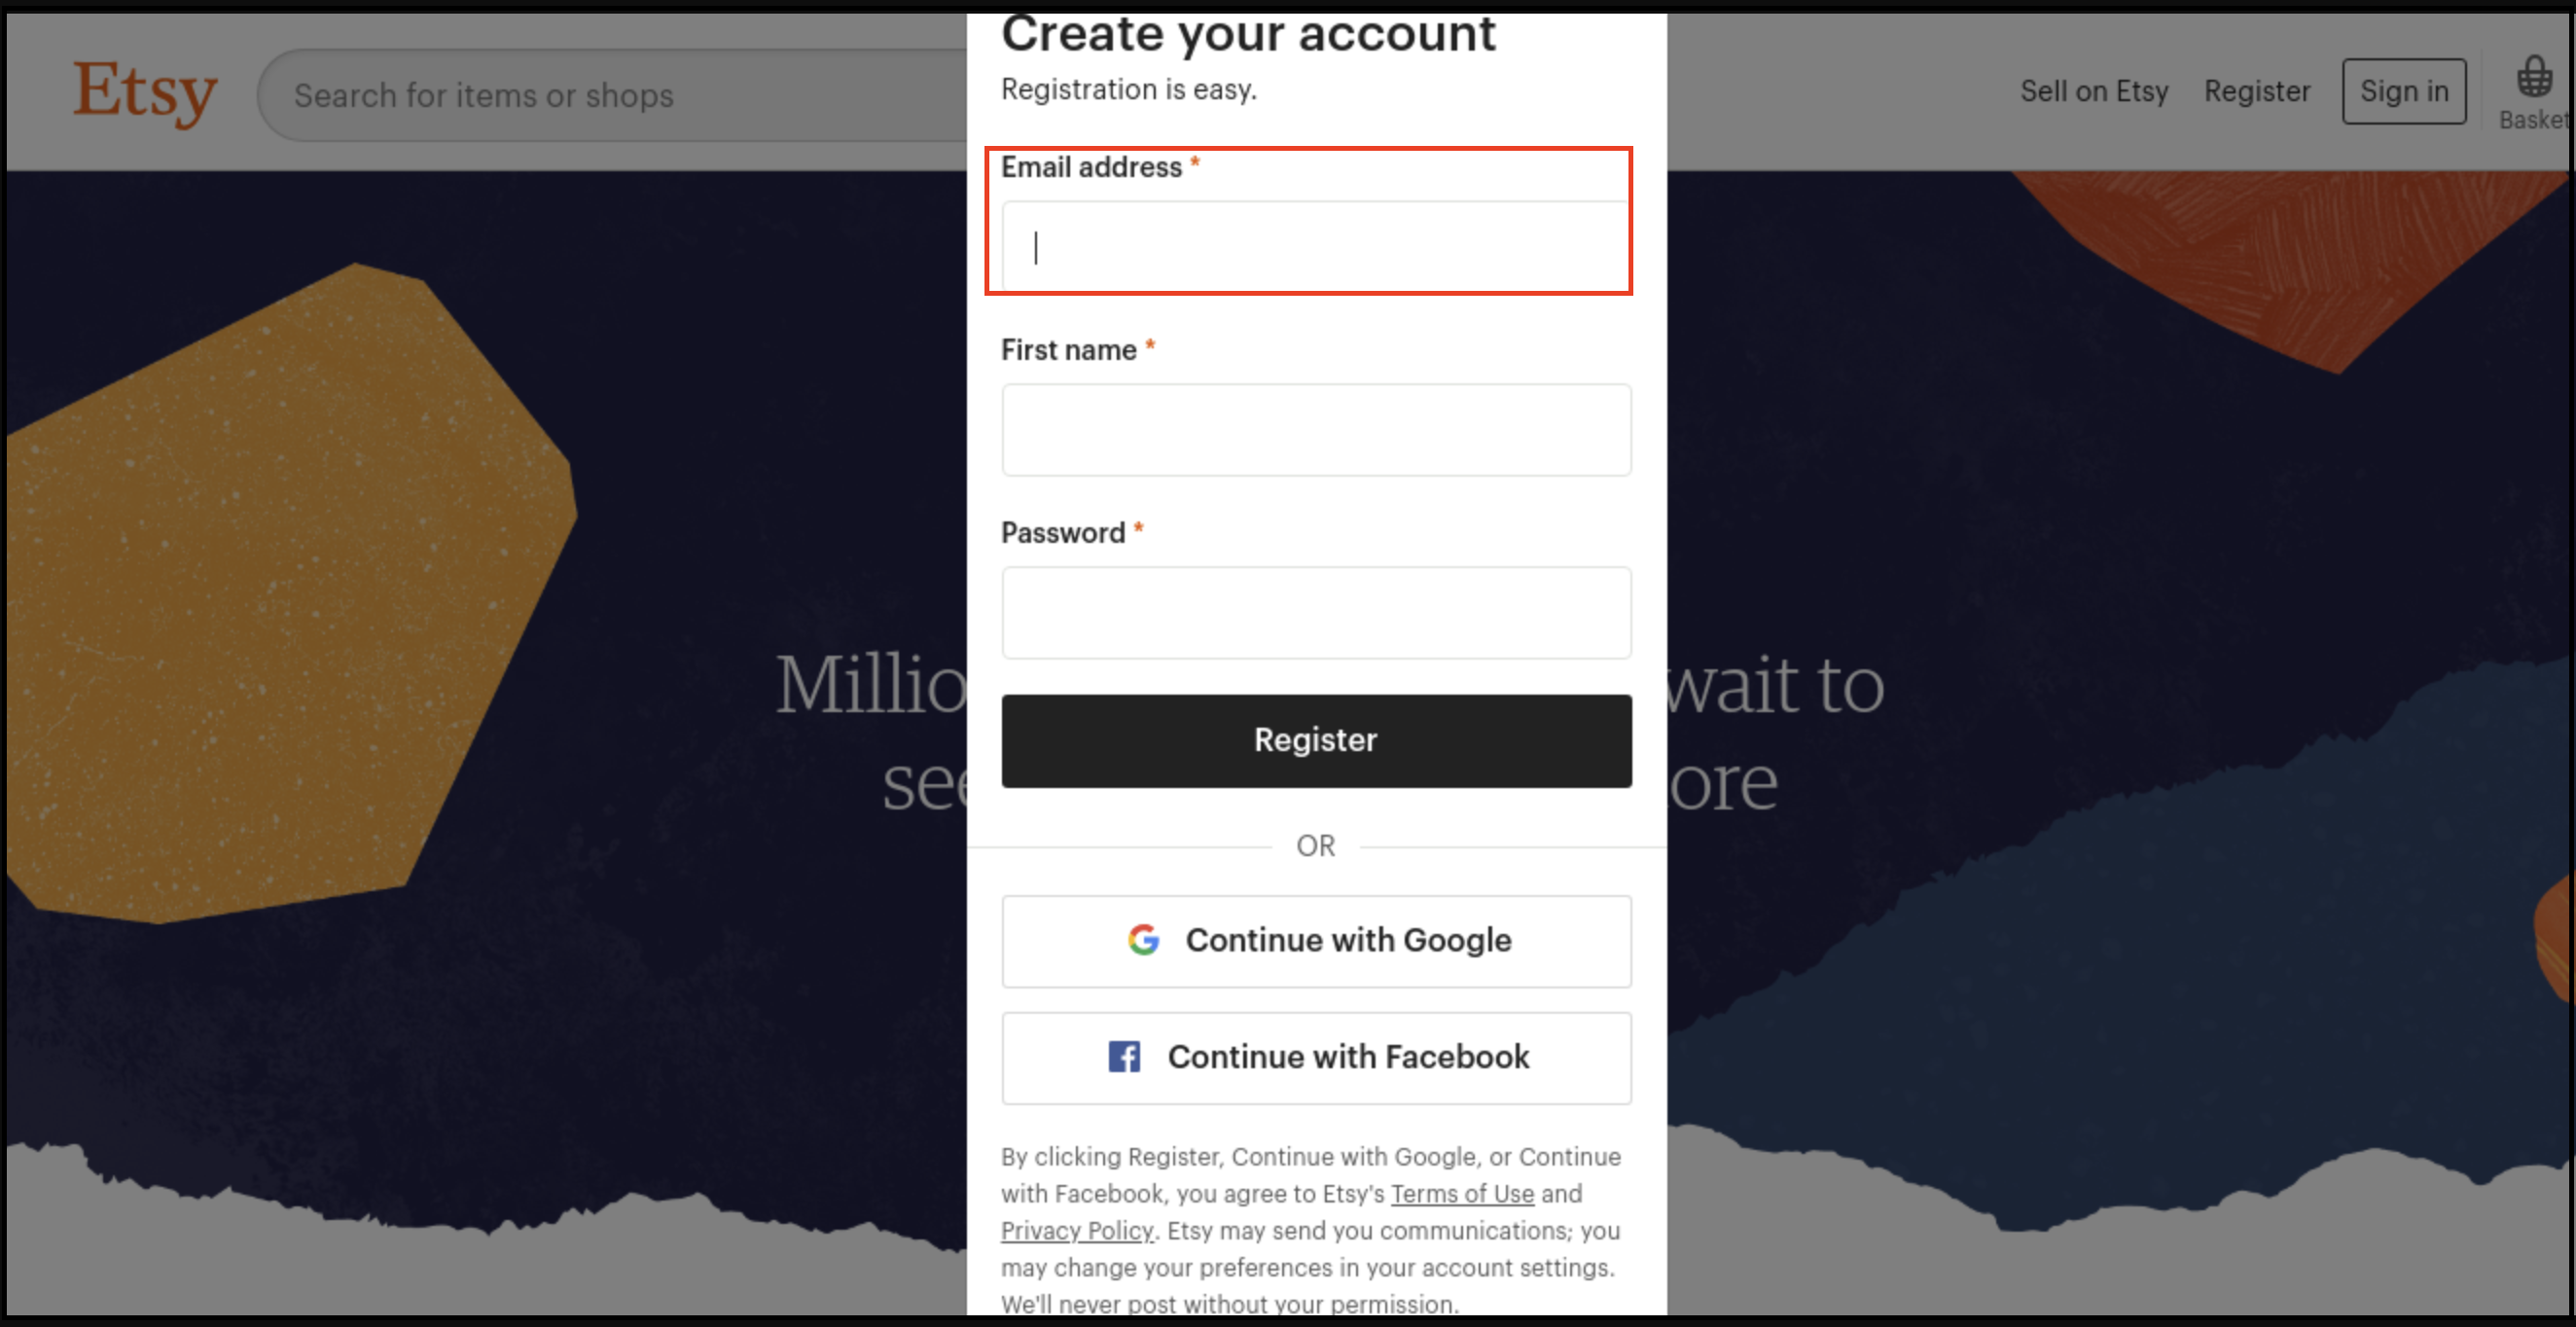
- Click on the “Register” button on the page you are visiting now. Further, refer to the screenshot given below.
- Fill up the registration form and click on the “Register” button. In fact, it would create your seller account and send a verification email to the provided email address.
- Now, it would also redirect you to another page as shown below.
- Now, it is asking to set up your shop preferences. Further, complete all the highlighted sections. For instance, Shop Preferences and Name your shop, Stock your shop, How you will get paid, and Set up Billing.
5.0 Etsy Marketplace Integration- Setup an App
To start communication between Prestashop Store and Etsy Seller Account, you need to create an App on Etsy Marketplace. Further, the following are the steps to create an App on Etsy –
- Go to the link – https://www.etsy.com/developers/register
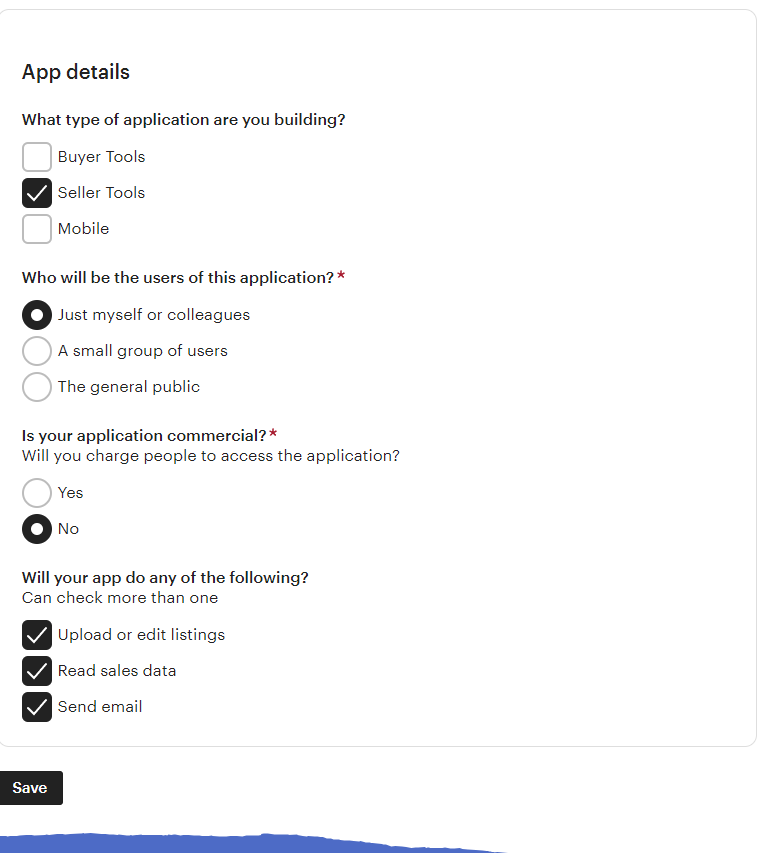
- It would open a page where a form will be shown with a few input fields as shown below.
- Fill up the form and click on “Read Terms and Create App”. Further, please make sure that you left the “Inventory Management Compatibility” checkbox is checked.
- It would ask to accept “terms and conditions”. In fact, accept and click on the “Create App” button.
- It would register your App on Etsy Marketplace and provide API details.
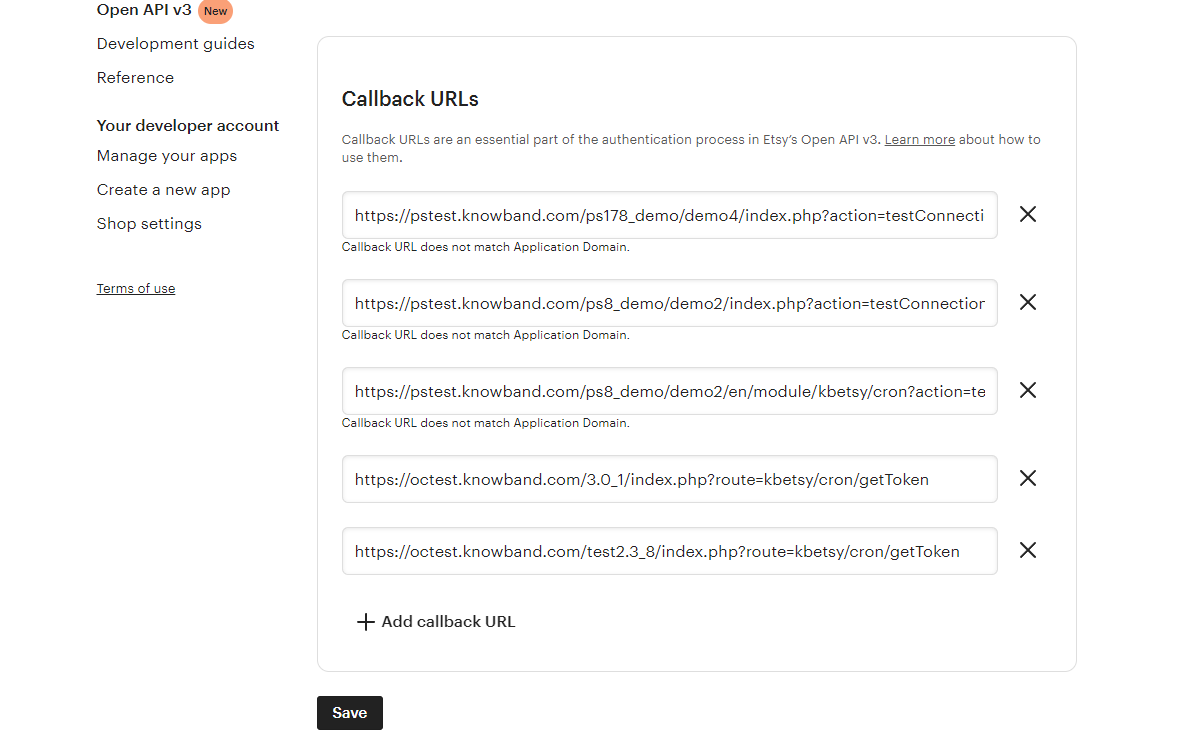
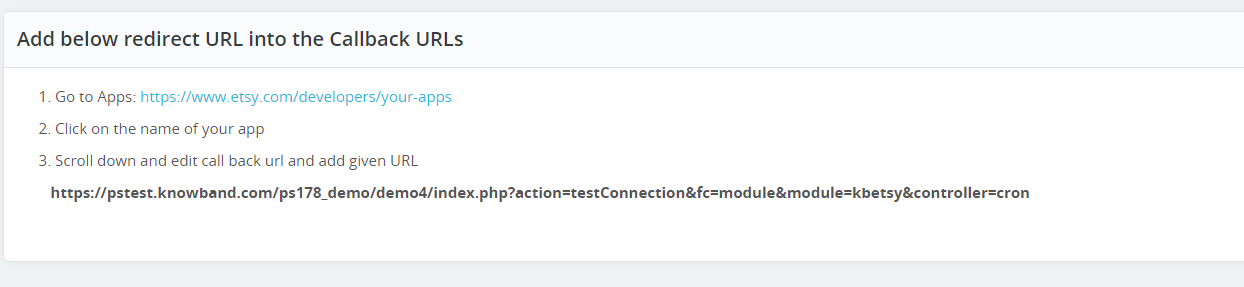
- Once you successfully created the API, add the callback URL.
- Click on the name of your App
- Click on edit your callback URLs. After clicking on the following button, the page shown in the image will appear.
For finding the callback URL, please refer to the general setting section of our Prestashop Etsy Marketplace module. Copy the shown URL in the below image and paste the same on the Etsy.
Click on the save button.
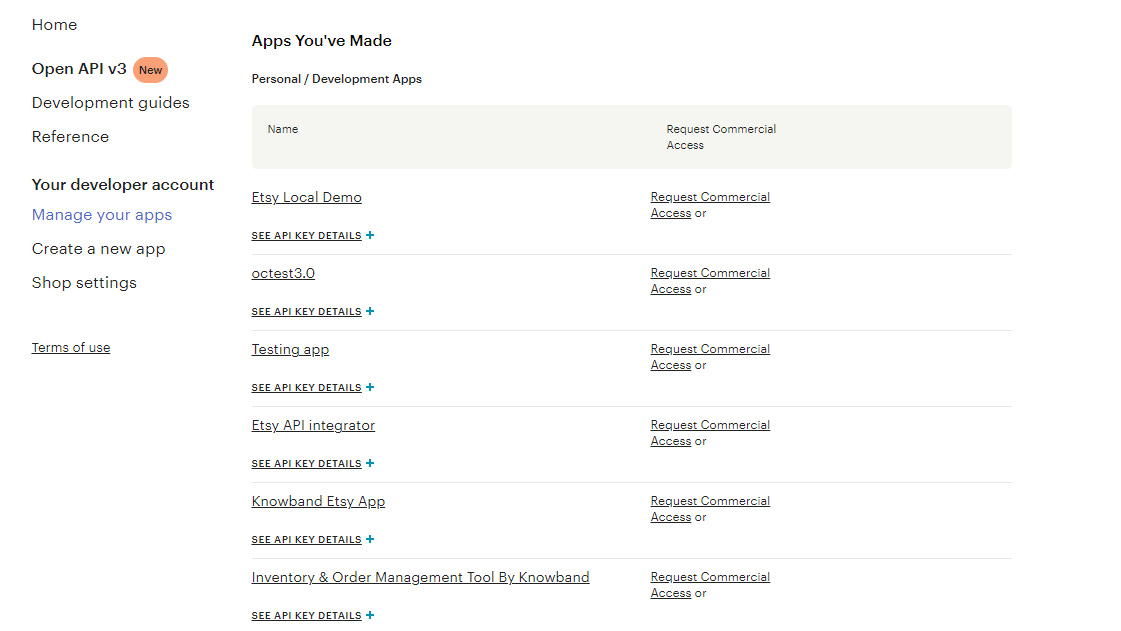
After saving the data, you will find the API page, where you can manage all of your Etsy Apps.
6.0 Admin Interface
This Prestashop Etsy Integration addon is configurable. Moreover, the configuration settings can be updated via the admin interface. Further, after installation, store admin can find a menu named “Etsy Marketplace” in the left panel of Admin as shown below –
- General Settings
- Attribute Mapping
- Shop Section
- Shipping Templates
- Profile Management
- Products Listing
- Orders Listing
- Synchronization
- Sales Report
- Product Sales Report
- Audit Log
Each tab is explained below.
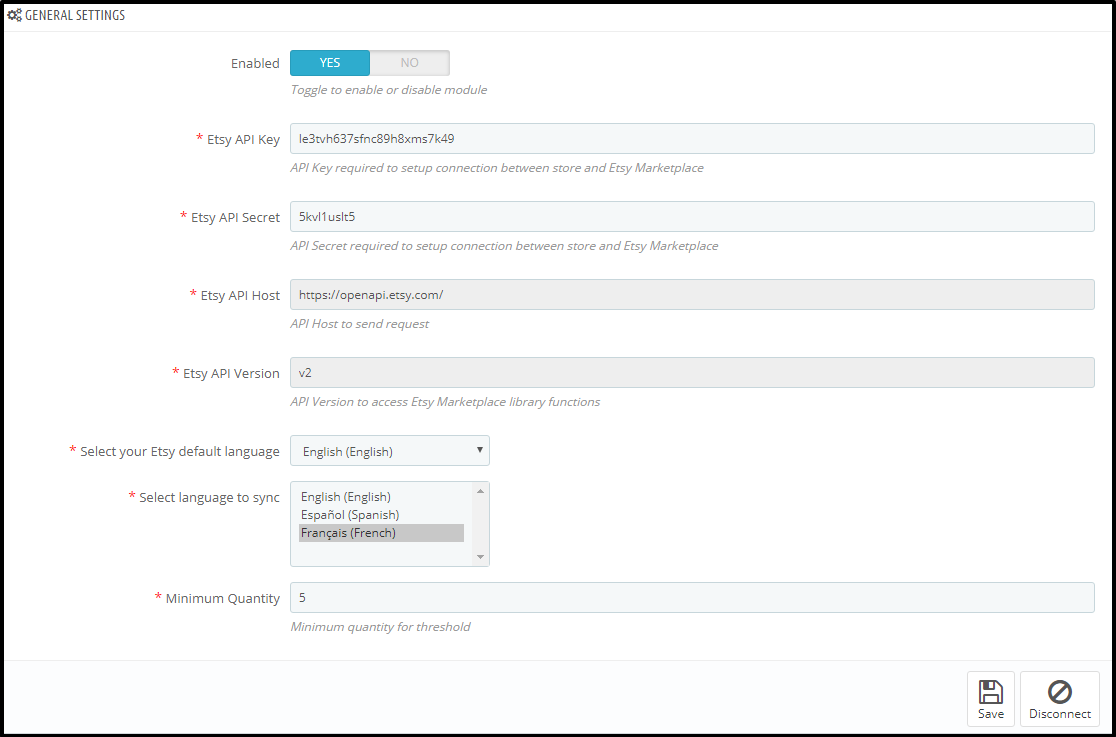
6.1 General Settings
The General Settings tab of the Prestashop Etsy API integrator is there for capturing details. Further, of Etsy Prestashop Marketplace API like API Key, Host, etc. Please find the description of each input field below –
1. Enabled
Admin can Enable/Disable this Etsy Prestashop API integration module by the toggling button. If enabled, the Prestashop Etsy connector and all its settings will be working. Further, otherwise, there will be no impact of this module on the store.
2. Etsy Currency
This is a drop-down where the admin has to choose the appropriate currency. Further, for their which is similar to their Etsy Account.
3. Etsy API Key
This is a text box in which the admin has to enter Etsy API Key. Furthermore, which will authenticate the connection being established between the store and Etsy.
4. Image Size of Product
This feature allows the admin to select the size of the product image. Further, that will sync to Etsy Marketplace from PrestaShop.
5. Etsy API Secret
This is a text box in which the admin has to enter Etsy API Secret Key mandatory for authentication. Furthermore, between the Prestashop store and Etsy Marketplace.
6. Map Etsy Orders with Store Carrier
If enabled then the imported orders will be mappable with the select carrier.
7. Select Shipping Methods for Etsy orders
Store admin can select the shipping methods for Etsy Orders from the given list.
8. Etsy Default Language
The Etsy Prestashop Integration module allows the store admin to select the default language of the store.
9. Select Language to Sync
Admin can select the secondary languages to sync with Etsy Marketplace.
10. Select the Description type to sync on Etsy
This option enables Etsy sellers to the long description and short descriptions. In fact, or both they want to sync with the marketplace. Furthermore, they can select any one option from the descriptions that will sync according to the selection.
11. Upload the Order Tracking Number On Etsy
If enabled then the store admin can add the tracking number on orders and it will be uploaded on Etsy.
12. Etsy Carrier Name for Tracking Url
Store admin can choose the carrier used for tracking Etsy orders.
13. Order Default Status
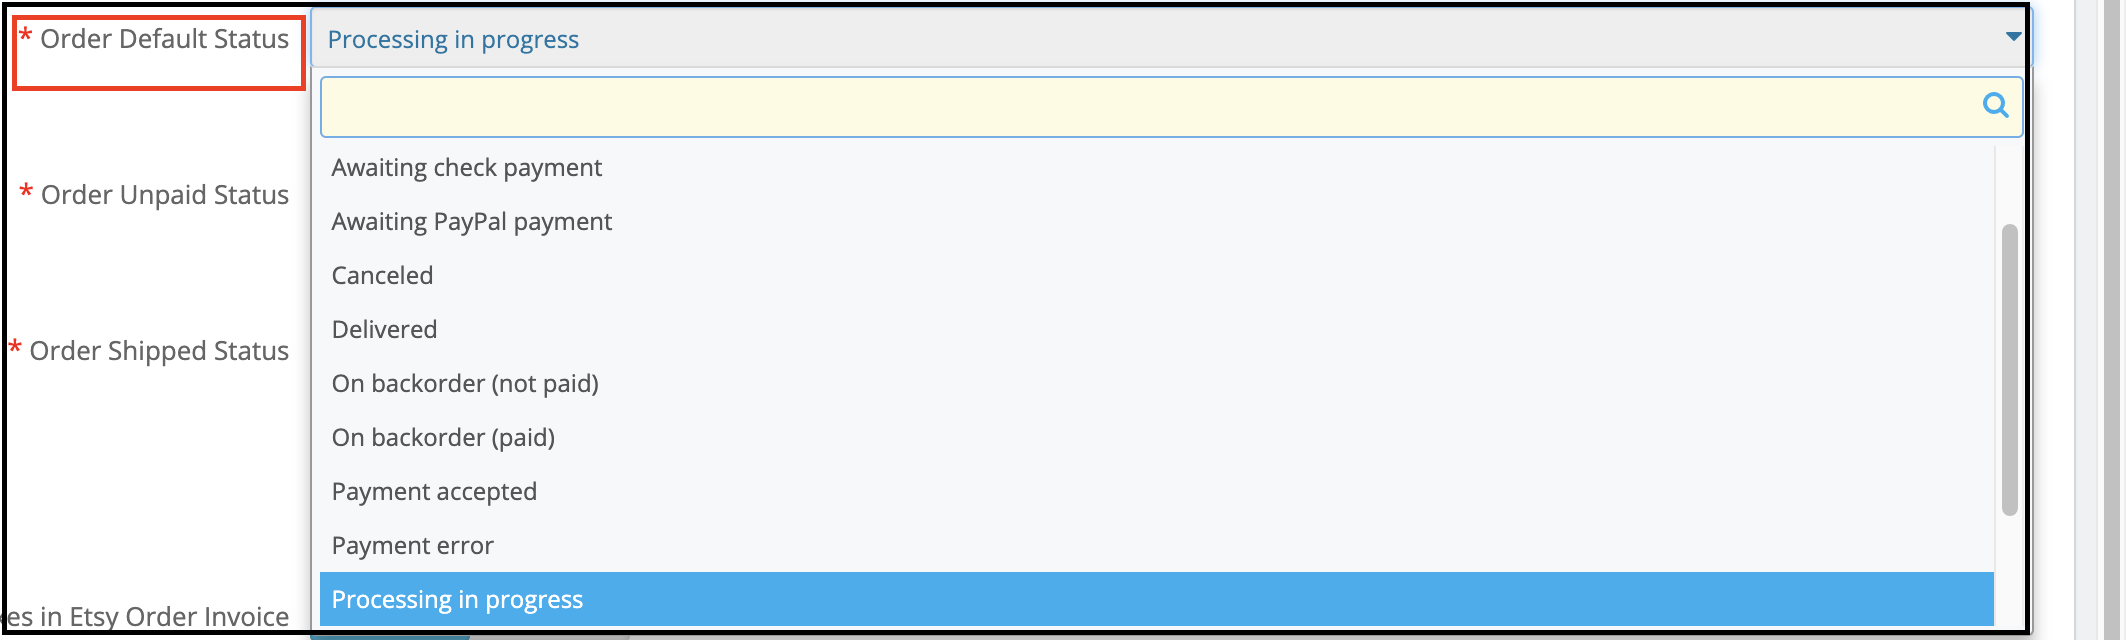
This is a drop-down menu. Moreover, the admin has to choose order default status for orders imported from Etsy to PrestaShop.
14. Order Unpaid Status
This is a drop-down menu. Moreover, the admin has to choose order unpaid status imported for orders imported from Etsy to PrestaShop.
15. Order Shipped Status
This is a drop-down menu and the admin has to choose order shipped status for orders imported. In addition, if the order status is set to this status the orders will be marked as shipped on Etsy.
16. Show taxes in Etsy Order Invoice
If enabled then the tax breakup will be shown in Etsy orders.
17. No. of Items sync per cron
This is a text box and the admin has to define several items that he wants to sync per cron.
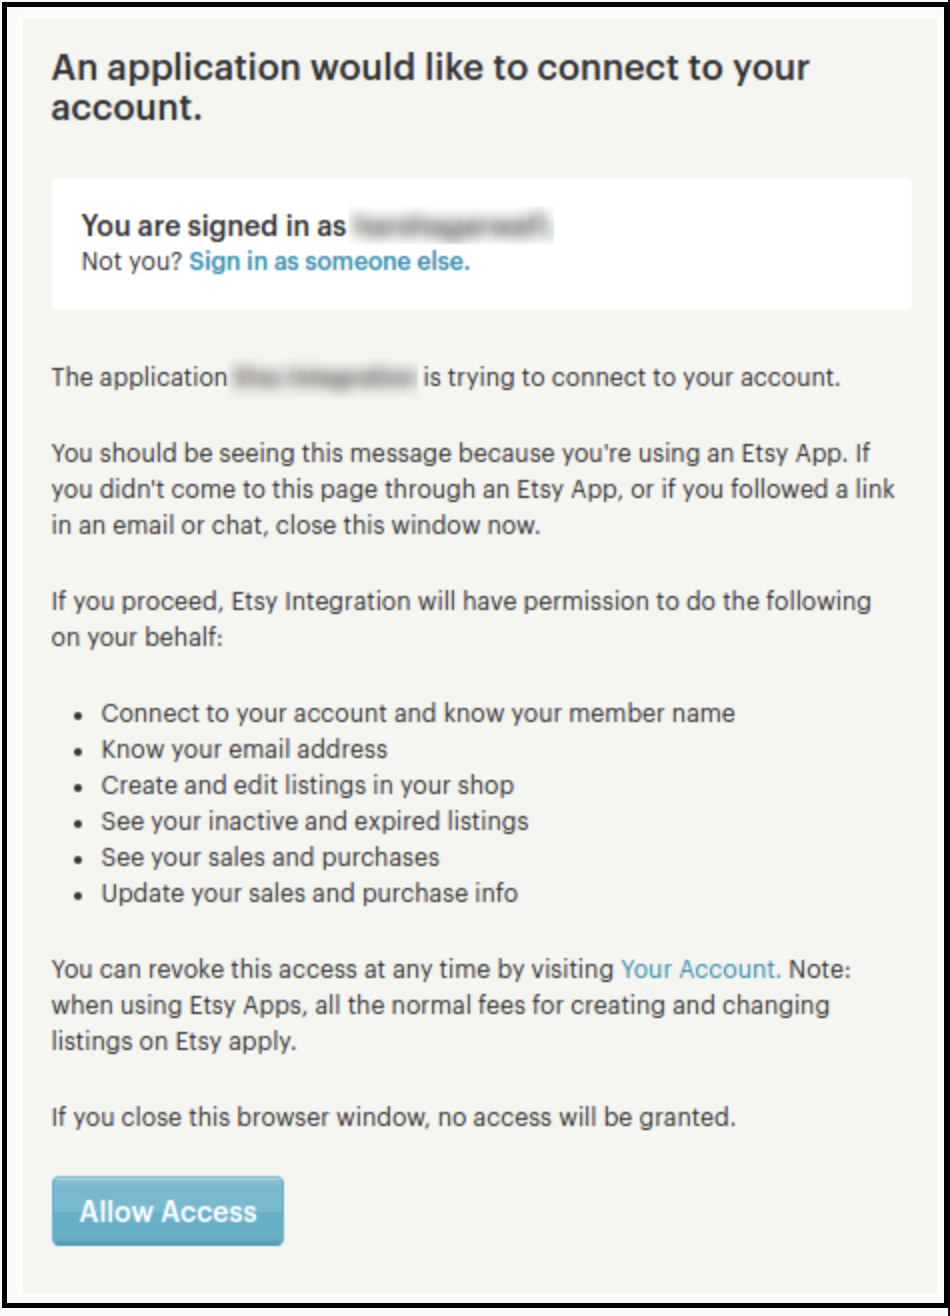
After providing these details or filling up the form, click on the “Connect” button. In fact, it would redirect admin to Etsy Marketplace to allow the App Access to the store. Furthermore, click on the “Allow Access” button as shown below. Moreover, it would establish a connection between the store and Etsy Marketplace.
It would also redirect admin back to the same page of “General Settings”. In addition, show the “Disconnect” button instead of “Connect” as the connection has now been set up with Etsy Marketplace. In fact, you can find the screenshot below –
6.2 Attribute Mapping
All the PrestaShop store attributes will sync to the Etsy Marketplace Integration module automatically. Moreover, the admin just needs to map these attributes to the Etsy Marketplace attributes.
6.3 Shop Section
The shop section option offered by the Prestashop Etsy API integrator enables the e-merchants to create separate sections. Further, for the products of the same type. For instance, they can create sections like fashion, sports, and others. In fact, the customers can hit the section of their choice. Moreover, directly land on the products of their choice without browsing the entire assortment.
6.3.1 How to create new shop sections?
To add new shop sections, click on the Add New option at the top right position of the admin interface.
This will redirect you to the shop section creation interface.
Enter the name of the shop section in ‘Shop Section Title’ and save the changes.
To sync the section with the marketplace click on the Sync Shop Sections button at the top right corner of the interface. Further, the cron option will sync all the sections in one go.
The synced sections will display in the ‘Profile Management’ tab. Further, the Prestashop Etsy Integrator is shown in the image below.
The admin can select the shop section and the products of that particular profile will list under the selected section.
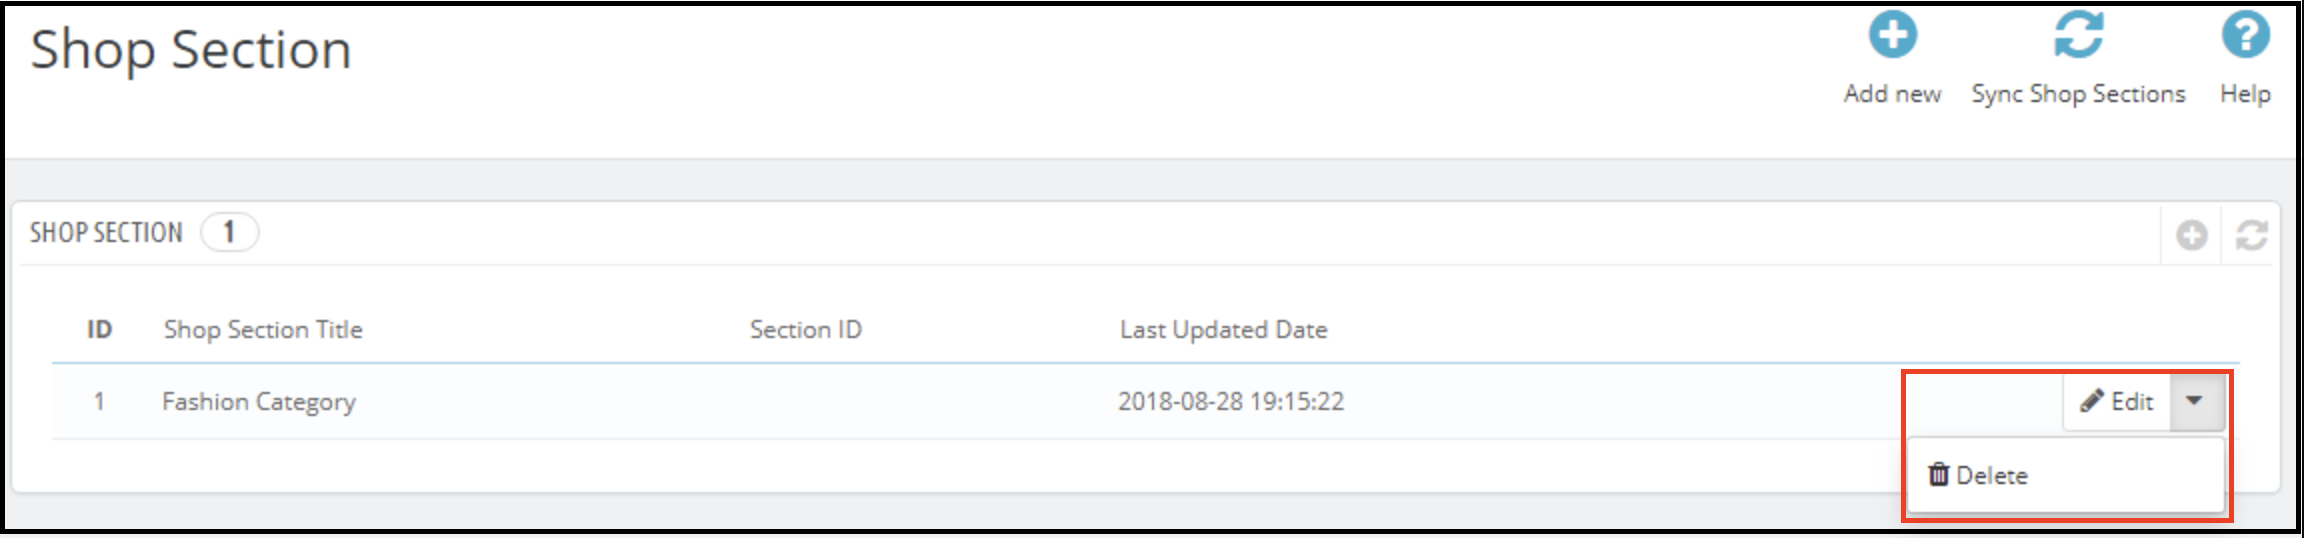
6.3.2 How to edit or delete the shop sections?
To edit a particular shop section, click on the ‘Edit’ button corresponding to it. Likewise, to remove the same, click on the corresponding ‘Delete’ button.
The created sections will display at the front-end as shown in the image below:
6.4 Shipping Templates
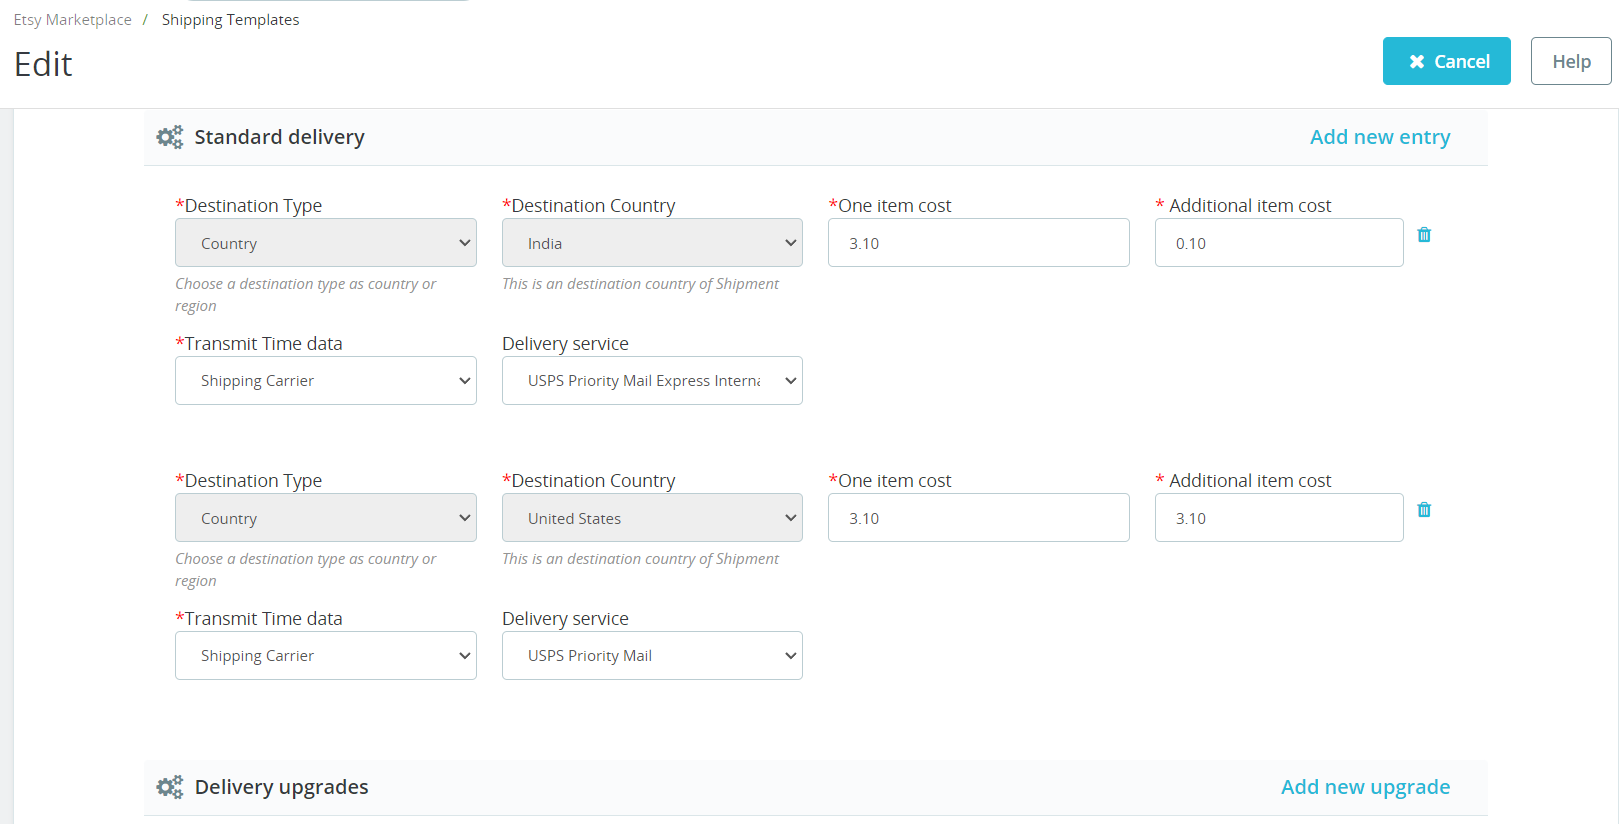
Etsy Prestashop connector allows the store admin to create the Shipping Templates to manage shipping options on the Etsy marketplace. Further, in this tab of the Prestashop Etsy integrator, the admin can create Shipping Templates. Furthermore, that contains shipping details. For instance, Shipping Origin Country, Minimum and maximum processing time for the orders, etc. In fact, the admin can create multiple Shipping Templates as per the need of the system. Further, the admin will have to map Shipping Templates to the Profiles (In Profile Management Tab) to make it work on Etsy Marketplace. This is explained later in this document. Thus, each Shipping Template can have multiple shipping entries. Further, to define shipping destinations and their cost according to the destinations.
Note – One Shipping Template can have one origin. However, multiple destinations with their costs. Further, the admin can add different standard entries and delivery upgrades for the shipping templates.
6.4.1 Steps to Add Shipping Templates
Following are the steps to add a Shipping Template to the system –
- Go to the Etsy Marketplace connector addon-> Shipping Templates (Menu Option)
- It would display the page where already added Shipping Templates will list (If any). Click on the “+” (Plus Icon – as shown in the above screenshot).
- It would redirect the admin to the new page where a form with some input field will be shown (Screenshot is shown below).
- Fill up the following input fields of the form –
- Shipping Template Title
- Origin Country
- Origin Post Code
- Processing Days (Min and Max)
- Destination Type
- Destination Country
- One Item Cost
- Additional Item Cost
- Transmit Time Data (Choose Shipping career or add custom Delivery time.)
- Choose Delivery Service (If the previous option is selected as a shipping career).
- Or Choose Min and Max Processing days (if the previous option is selected as Delivery time).
Click on the “Save” button.
It would validate the provided data and save the details into the system if valid.
6.4.2 Steps to Edit/Delete Shipping Template
Following are the steps to edit/delete Shipping Template from the system –
- Go to the Prestashop Etsy Marketplace Integration addon-> Shipping Templates (Menu Option)
- It would display the page where already added Shipping Templates will list (If any). In fact, click on the “Edit/Delete” link given under the drop-down being shown corresponding to each Shipping Template.
- If the admin has chosen the “Edit” option then it would redirect the admin to a new page. Further, where a form with an already filled input field will be shown. Admin can simply update values. Moreover, save the details by clicking on the “Save” button.
- If the admin has chosen the “Delete” option then it would delete the Shipping Template. In addition, all its Shipping Template Entries are from the system.
After creating shipping templates it is required to synchronize the Shipping Templates. Further, the admin needs to click the “Sync Shipping Templates” button under the “Shipping Templates” tab of the Etsy marketplace integration module. In fact, only after successful synchronization, these shipping templates will appear on the listing page.
6.4.3 Delivery Upgrades
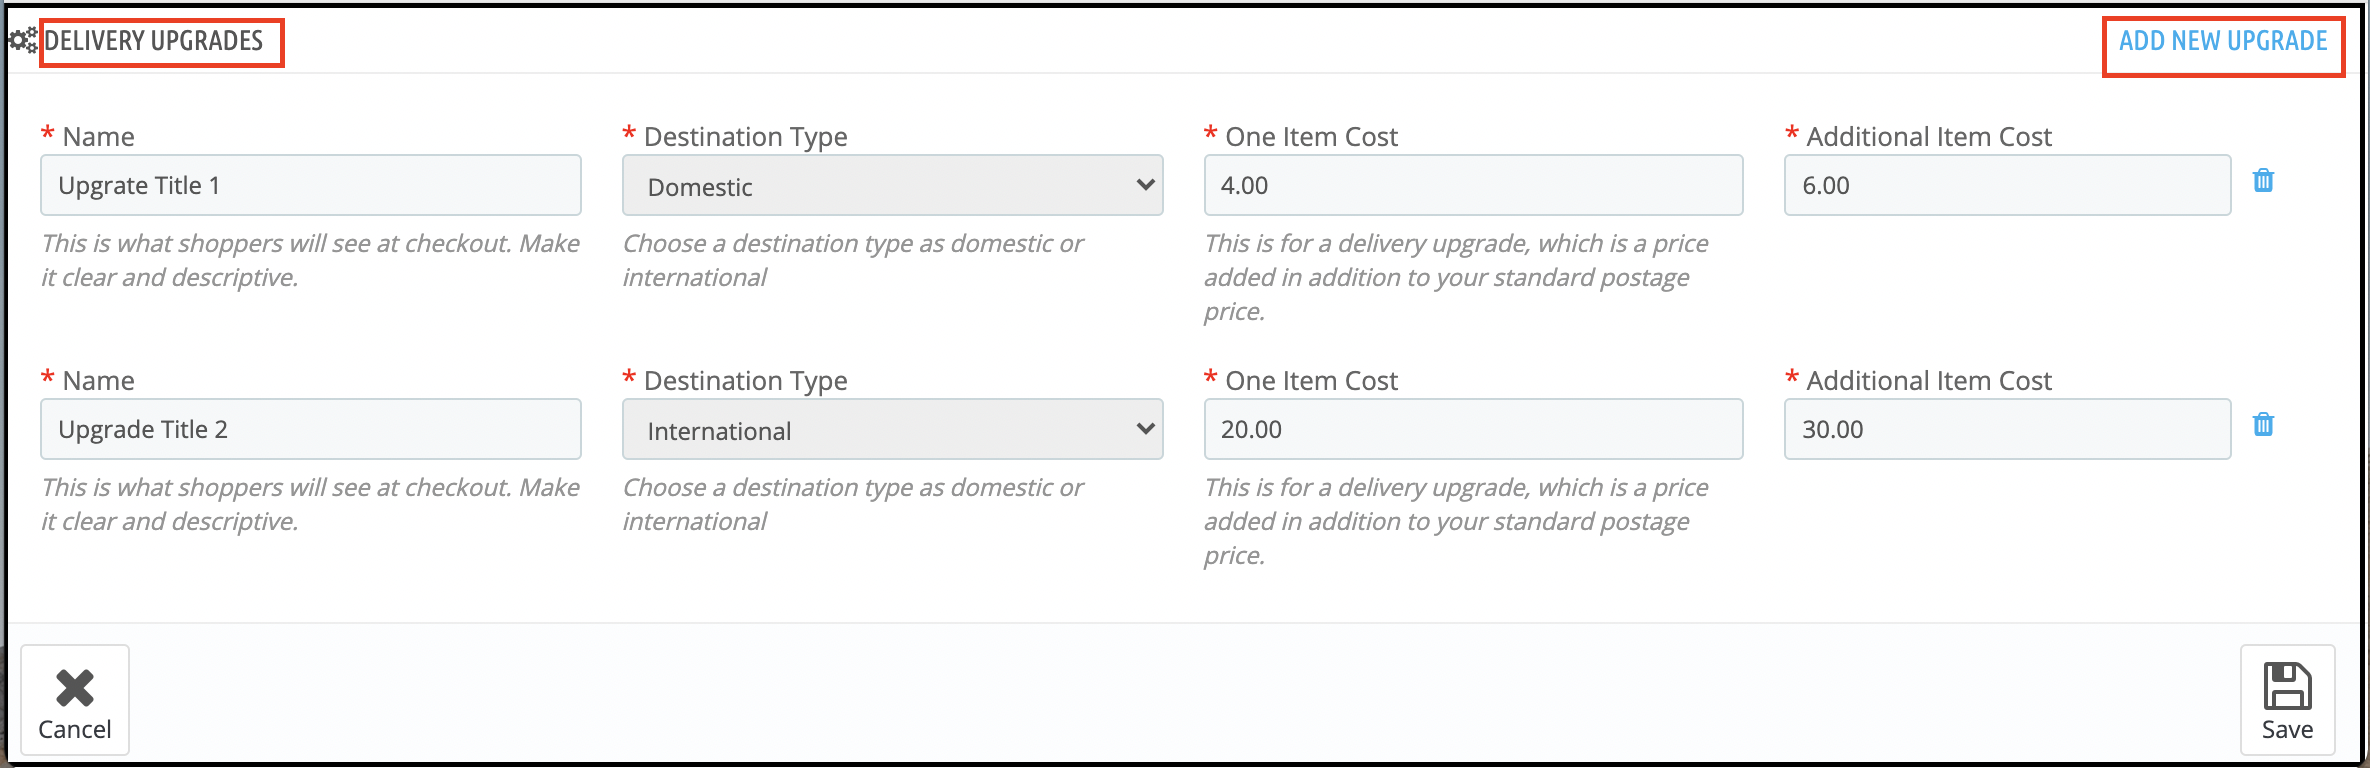
Admin can add the delivery upgrades to the Shipping Templates from this tab of the Etsy Prestashop integrator. In fact, the Delivery Upgrades tab of the Etsy Prestashop integration module displays the list of the Delivery upgrades added to the shipping templates.
6.4.4 Add Delivery Upgrades for a Shipping Template
Following are the steps to add Delivery Upgrades to the Shipping Templates-
- Go to the Prestashop Etsy Integrator -> Shipping Templates (Menu Option)
- It would display the page where already added Shipping Templates will list (If any). Click on any of the Shipping Templates in which you want to add Delivery Upgrades.
- It would redirect to that particular Shipping Template Page.
- Click on the “Add New Upgrade” at the bottom right side of the Etsy Prestashop Integrator and it would open a drop-down form with, the input field will be shown.
- Fill up the following form fields –
- Delivery Upgrade Name
- Destination Type
- One Item Cost
- Additional Item Cost
- Transmit Time Data (Choose Shipping career or add custom Delivery time.)
- Choose Delivery Service (If the previous option is selected as a shipping career).
- Or Choose Min and Max Processing days (if the previous option is selected as Delivery time).
Click on the “Save” button.
It would validate and save the details to the system if valid.
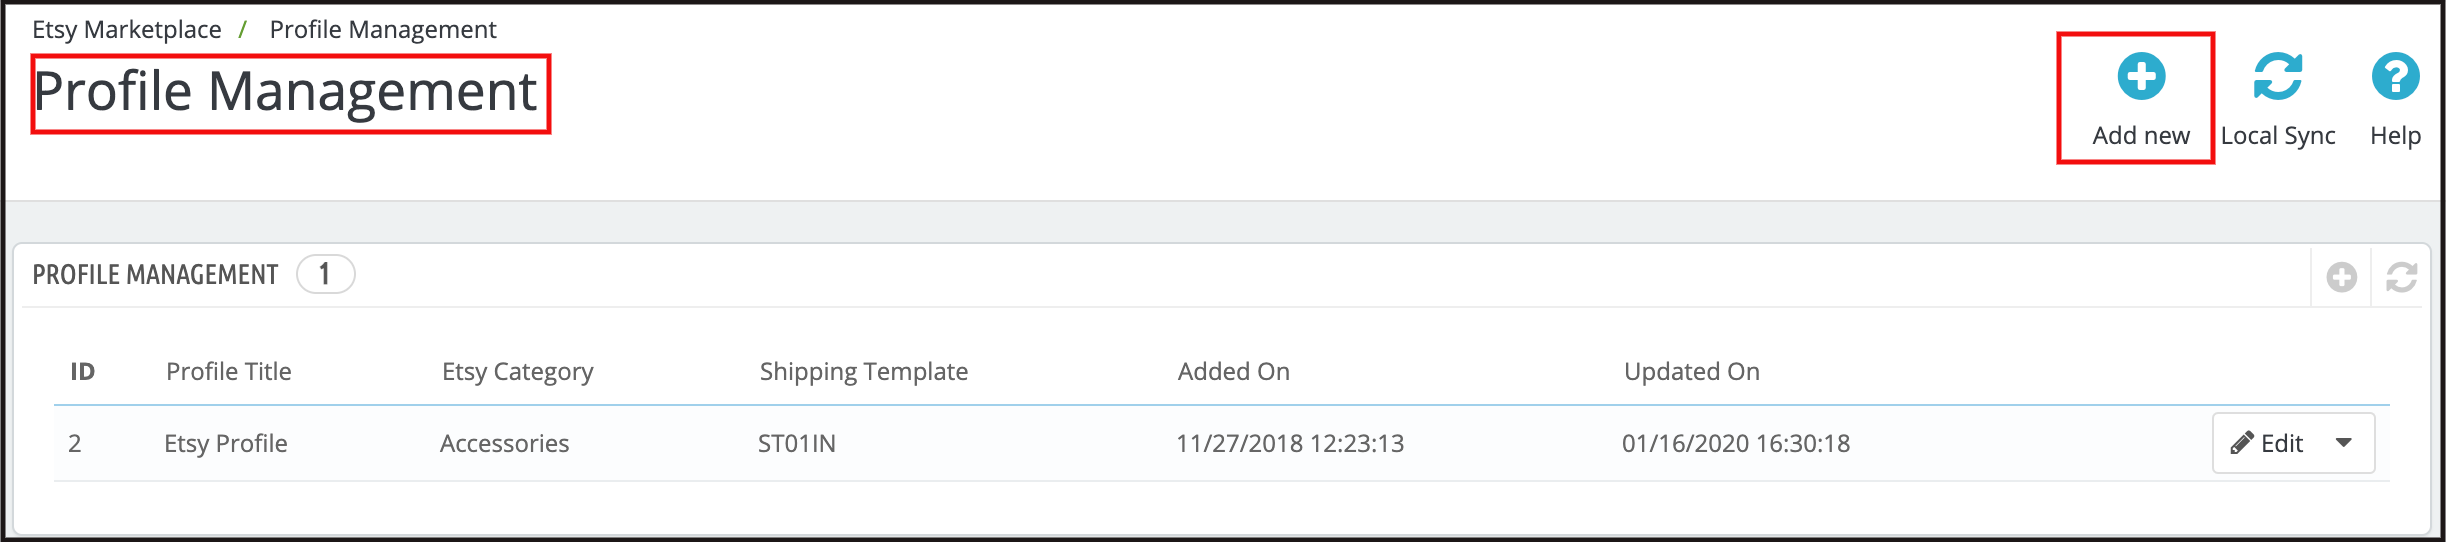
6.5 Profile Management
The Profile Management tab provides options to create a profile for product listing. Further, profile-based listing allows the seller to list the attribute and categories of the Prestashop products. Furthermore, with the Etsy marketplace attributes and categories. In fact, the seller can select multiple Prestashop store categories at a time if there is only one category on Etsy for these products.
Under Profile Management admin can select the Shop Section in which he wants to show products for that profile.
Note: Please make sure to synchronize the Shipping Templates otherwise these details will not reflect in the Profile Management. Go to the Shipping Template tab of Prestashop Etsy Integration Addon and run the “Sync Shipping Templates” cron.
6.5.1 Add Profile to the System
Following are the steps to add Profile into the system –
- Go to the Prestashop Etsy Integration Module -> Profile Management (Menu Option)
- It would redirect the admin to a page where already added profiles will list (If any). Click on the “+” on the top right side of Etsy Prestashop Integrator (Plus icon as shown in the screenshot below) and it would redirect the admin to a new page where a form with some input fields will be shown.
- Fill up the following input fields –
- Profile Title
- Etsy Category (List of Etsy Marketplace categories)
- Store Category (List of Store Categories)
- Shipping Template (List of Shipping Templates)
- Primary Color
- Secondary Color
- Holiday
- Accessory Style
- Product Selection Type
- Customize Product Title
- Enable Custom Pricing
- Customizable Product
- Alter Quantity
- Enable AutoRenewals
- Who made it
- When did you make it
- Recipient
- Occasion
- Materials Used
- Shop Section
- Enable Size Chart Image
- Size Chart Image
and click on the “Save” button.
- It would validate and save the details into the system if valid.
6.5.2 Edit/Delete Profile
Following are the steps to edit/delete a profile from the system created in the Prestashop Etsy Integration plugin-
- Go to the Prestashop Etsy Integration plugin -> Profile Management (Menu Option)
- It would redirect the admin to a page of the Prestashop Etsy Integration module where already added profiles will list (If any, shown in the screenshot below).
- Click on the “Edit/Delete” link given corresponding to each profile as shown in the above screenshot.
- If the admin has chosen the “Edit” option then it would redirect the admin to a new page where a form with some already filled input fields will be shown. Admin can simply update values and save the details by clicking on the “Save” button.
- If the admin has chosen the “Delete” option then it would delete the selected Profile from the system.
6.5.3 Product Selection Type
This is a drop-down and from this admin can select whether he wants to select the whole category to list or select particular products to add.
6.5.4 Etsy Category Attribute
Etsy Category Attributes are now available in the Etsy Marketplace Connector module. The admin can now choose the Primary Color, Secondary Color, Holiday, Accessory Style.
6.5.5 Size Chart Image
By using this feature admin can also add an image for the product.
6.6 Products Listing
This section of Etsy Prestashop Integrator shows the list of all the products selected to list or listed on the Etsy Marketplace with their listing status and other details as shown in the screenshot below:
There are the following options cron options offered in the product listing tab of Prestashop Etsy Integration module –
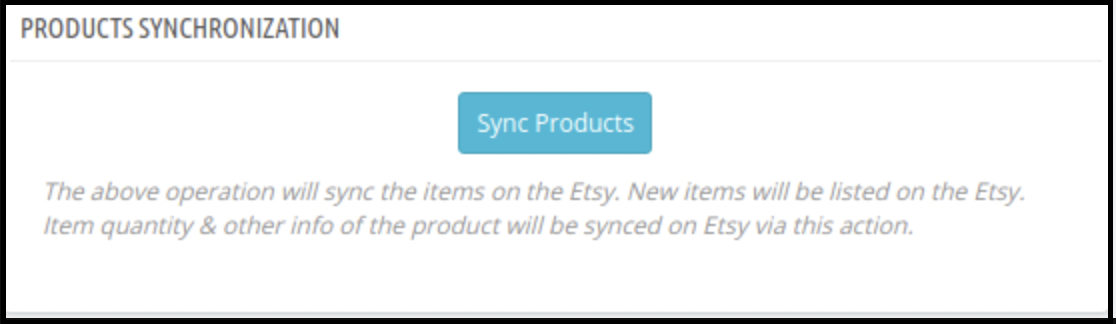
6.6.1 Sync Products
This option syncs the products of the category that was mappable in the profile. As the ‘Sync Products’ is executed, all the products of the profile will list at etsy.com.
6.6.2 Sync Product Status
The listing status of the products can sync back from the marketplace to the store by executing this cron of the Prestashop Etsy integrator.
6.6.3 Delete Products
This option allows the admin to delete product listing from Etsy Marketplace in bulk. To delete product listing, the admin has to select the products that they want to remove and click on “Delete Product”. This will remove all the selected products from the listing.
6.6.4 Renew Products
This option allows the admin to renew the product in case the listing is expired on Etsy Marketplace in bulk. Furthermore, to renew the product, the admin has to select the products that they want to renew and click on the “Renew Product” action.
Along with this, the admin even gets the option to renew or relist one particular product. In fact, there is a Renew option corresponding to each product that has expired.
After setting up a product for renewal or relisting, these actions will replace with the “Delete” action.
Note – Product Renewal is chargeable on Etsy Marketplace.
6.6.5 Local Sync
Admin can sync all the products of their profiles using Local Sync and then every profile’s products list on the Product Listing Page. From there, the admin has an option to list individual products or lists in bulk.
6.7 Order Listing
This tab of Etsy Prestashop Integrator shows the list of orders placed on Etsy Marketplace for your store products on Etsy as shown in the screenshot below –
Note: Please make sure to click on the “Sync Orders Listing” option under the Synchronization tab of the Etsy Prestashop integration module. Furthermore, only after successful sync orders will synchronize to the Prestashop back office.
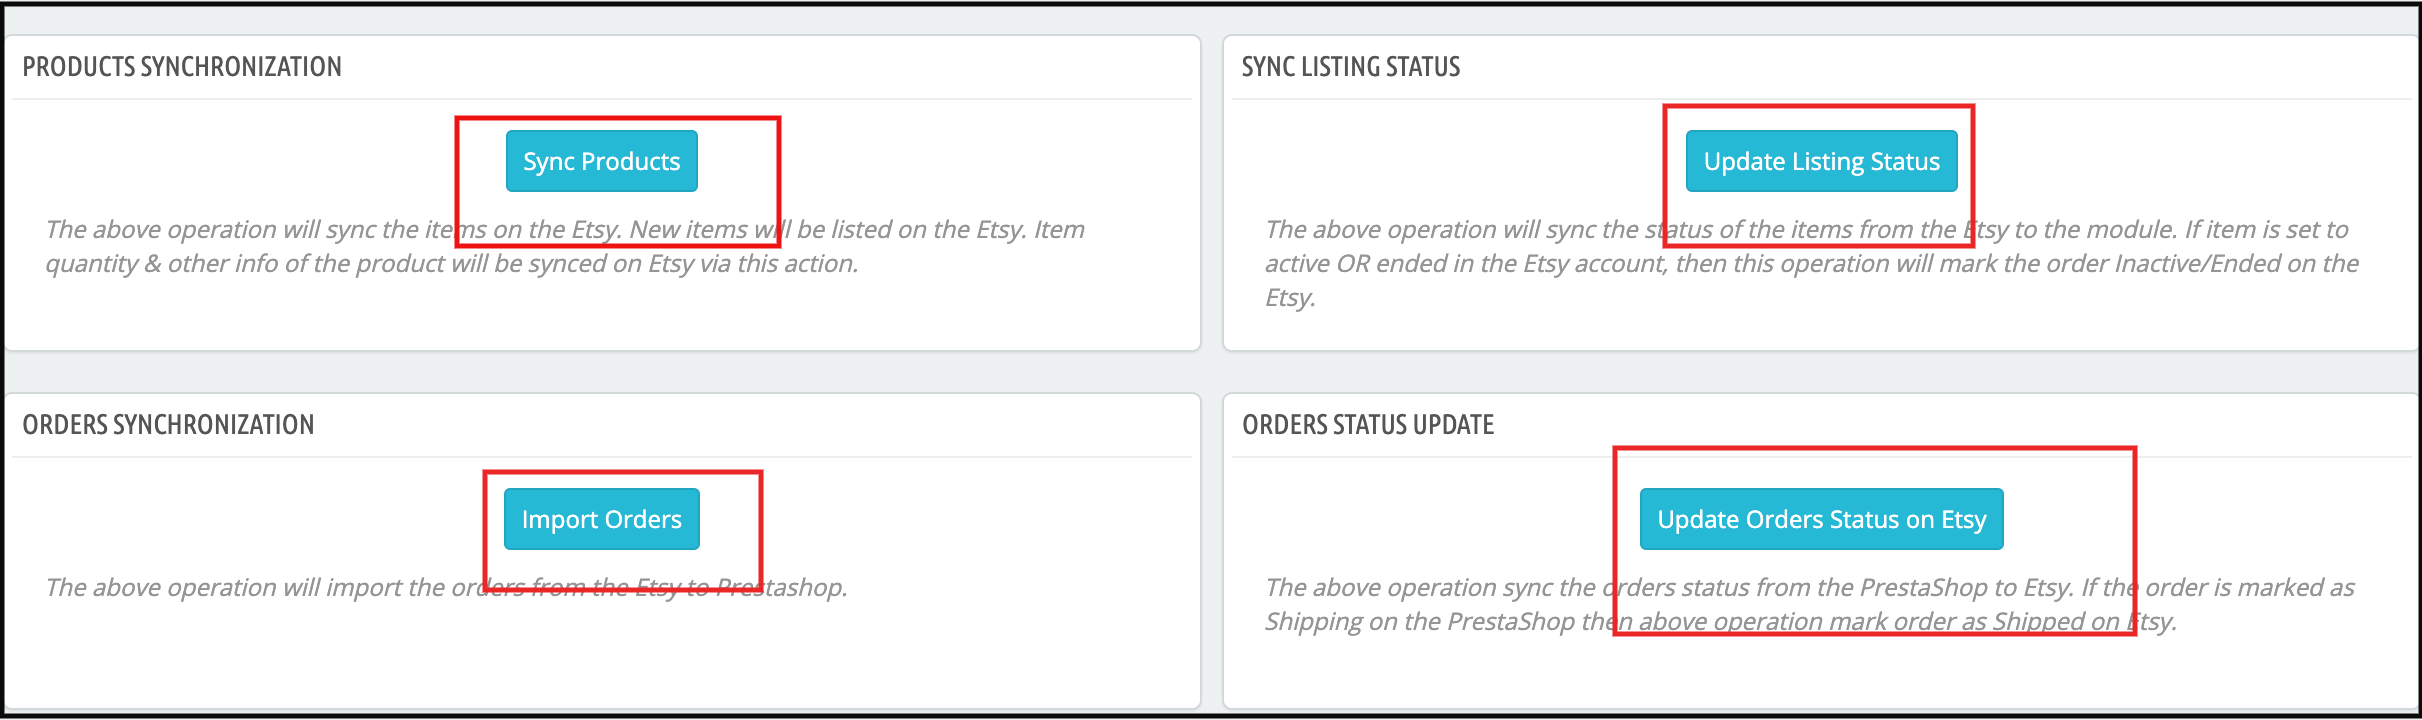
6.8 Synchronization
All tabs offered by Etsy Prestashop integration addon defined above are basically for saving the settings. Further, also the options into the system which are used during synchronization between Prestashop Store and Etsy Marketplace. In fact, there are the following cron jobs to synchronize content between Prestashop Store and Etsy Marketplace which you can find below –
6.8.1 Products Listing on Etsy Marketplace
Following are the steps to synchronize Products Listing on Etsy Marketplace –
- Go to the Etsy Prestashop Integration addon -> Synchronization (Menu Option)
- It would redirect the admin to a new page where all synchronization actions are listed as shown in the above screenshot.
- Click on the “Sync Products ” button shown below.
- It would perform the following actions –
- Update Products list based on the profiles created in the system.
- Add Products to Etsy Marketplace with product details (e.g. Price, Quantity, Image, etc.)
- Update Products on Etsy marketplace which are already listed on Etsy Marketplace
- Renew Products on Etsy Marketplace for that renewal are enabled.
- Delete Products on Etsy Marketplace which are marked deleted on the Store.
- Update Listing Status of each product listed on Etsy Marketplace.
If synchronization completes successfully then it would display a message – “Synchronization completed” else “Synchronization failed”.
6.8.2 Orders Listing from Etsy Marketplace
Following are the steps to synchronize Products Variations Listing on Etsy Marketplace –
- Go to the Prestashop Etsy Connector -> Synchronization (Menu Option)
- It would redirect the admin to a new page where all synchronization actions are listed as shown in the above screenshot.
- Click on the “Import Orders” button shown below.
- It would perform the following actions –
- Get Orders and Transaction details from Etsy Marketplace
- Create Customers and Shipping Carriers into the Store as per the details that come from Etsy Marketplace
- Create Orders into the Store as per the details that come from Etsy Marketplace and set the order status as per the configuration settings updated in the “Order Settings” tab of this module in admin.
If synchronization completes successfully then it would display the message – “Synchronization completed” else “Synchronization failed”.
6.8.3 Orders Status on Etsy Marketplace
Following are the steps to update the status of orders on Etsy Marketplace –
- Go to the Prestashop Etsy connector -> Synchronization (Menu Option)
- It would redirect the admin to a new page where all synchronization actions are listed as shown in the above screenshot.
- Click on the “Update Orders Status on Etsy” button shown below.
- It would perform the following actions –
- Check if there is any status update recorded by the module for any Etsy Order.
- Update the Status of Orders as per the configuration settings updated in the “Order Settings” tab of this module in the admin
If synchronization completes successfully then it would display the message – “Synchronization completed” else “Synchronization failed”.
6.8.4 Update Product Listing Status from Etsy Marketplace
Sync the product status from Etsy to the Prestashop store by clicking this cron under the Synchronization tab.
1. Go to the Etsy Integration module -> Synchronization.
2. Click on the Update Listing Status from Etsy Marketplace.
6.9 Sales Report
Etsy Prestashop integration module allows the store admin to check the sales report for the Etsy shop orders. Admin can use the date filter to check the sales report.
6.10 Product Sales Report
Etsy Prestashop Integration extension allows the store admin to generate the reports product-wise.
6.11 Audit Log
The audit log section of the Etsy PrestaShop connector helps to keep track of all the takes performed by the administrator.
For More Information about Prestashop Etsy Integration Extension, click here:
See Admin Demo of Etsy Prestashop Integration Addon here
Buy the Prestashop Etsy Integration Extension from the Addon store
Watch Tutorial Video of Prestashop Etsy synchronization Addon:
Related Stories:
- First, How to activate/deactivate a listing in Etsy Marketplace?
- Second, How to add a product in Etsy Marketplace?
- Third, How to add a production partner and connect with listing in Etsy Marketplace?
- Fourth, How to add a shipping profile in Etsy Marketplace?
- Last, How to update the shipping profile in Etsy Marketplace?