
1. Introduction
Prestashop SEO Audit Manager is the SEO Audit module that allows prestashop store owners to conduct a SEO audit from scratch to the product, category, CMS and manufacturer. Rather than using separate modules or plugins to check pages for meta tags, redirects, sitemap, and analytical data, this module gathers all scoring, technical checks.
The module is designed for PrestaShop store administrators with no professional SEO experience. The result and target of each audit are shown in layman’s terms so that a person immediately understands why the description is 24 words long when the target is 300 words.
Technically, the module allows spotting thin content, lack of or duplicate meta title and description, broken internal links causing 404 errors, colliding URLs creating duplicate slugs, problems with configuring sitemap and robots.txt files, as well as slow loading time. Once the problem is spotted, there is usually a solution to fix the issue right within the module – editing the redirect, making the new meta description via ChatGPT, or fixing the sitemap options.
Prestashop SEO Audit Module also integrates with Google Analytics 4, Google Search Console, and PageSpeed Insights to let audit scores be analysed along with real traffic numbers, real search performance and page speed metrics, rather than in isolation. This is how a PrestaShop SEO audit changes from being a mere checklist into a live workspace.
2. Key Features of Prestashop SEO Audit Module
- Page-level SEO audit and readability audit with a 0 to 10 score
- Dashboard summarising store-wide SEO health, meta completeness, and index status
- Score History with trend charts and snapshot comparison
- URL Optimisation tools: Pretty URLs, 404 monitoring, duplicate URL detection, URL redirects
- XML Sitemap and HTML Sitemap management, plus RSS output
- Social Cards for Open Graph and Twitter metadata
- Built-in ChatGPT integration for meta titles, meta descriptions, and other SEO fields
- Robots.txt editor tied to the live file
- Google Analytics 4, Google Search Console, and PageSpeed Insights reports
3. How to Install the Prestashop SEO Audit Module
- Install the Prestashop SEO Audit Module and from the PrestaShop Admin Panel, go to Modules -> Module Manager to install the module. This module builds its own database for SEO, History, Redirects, 404 Monitoring, ChatGPT, and Sitemap
- A new Prestashop SEO Audit Module entry appears in the left menu, under Sell. This master switch determines if the module will affect the storefront at all.
- Turn on features that you will be using: SEO analysis, Readability analysis, Record 404s, URL redirects, XML sitemap, RSS.
- In case you will be using Google integration or ChatGPT, go to Analytics > Settings and ChatGPT, where you should provide the necessary credentials. It can be done later.
- Open any product, category, CMS page, manufacturer or supplier, where you should find the SEO Audit tab in the edit form; here SEO work will be done.
- As the module modifies metadata of storefront, redirects and generates public robots.txt and sitemap files, staged installation, starting with analysis and readability score generation, followed by redirects and sitemap generation once you gain confidence in generated data, is recommended rather than full activation from the very beginning.
4. Admin Overview of PrestaShop On-Page SEO checklist
Tabs included in the Prestashop SEO Audit Module Sidebar: Dashboard, Analytics, Score History, URL Optimisation (Pretty URLs, 404 URLs, Duplicate URLs, URL Redirects), Sitemap (XML Sitemap, HTML Sitemap), Social Cards, ChatGPT, Robots.txt, Import / Export, Settings and Others Modules. All tabs have been described field-wise below such that every setting which is visible to users is explained separately.
4.1 Dashboard
The Dashboard provides an overview of your store’s current SEO health.
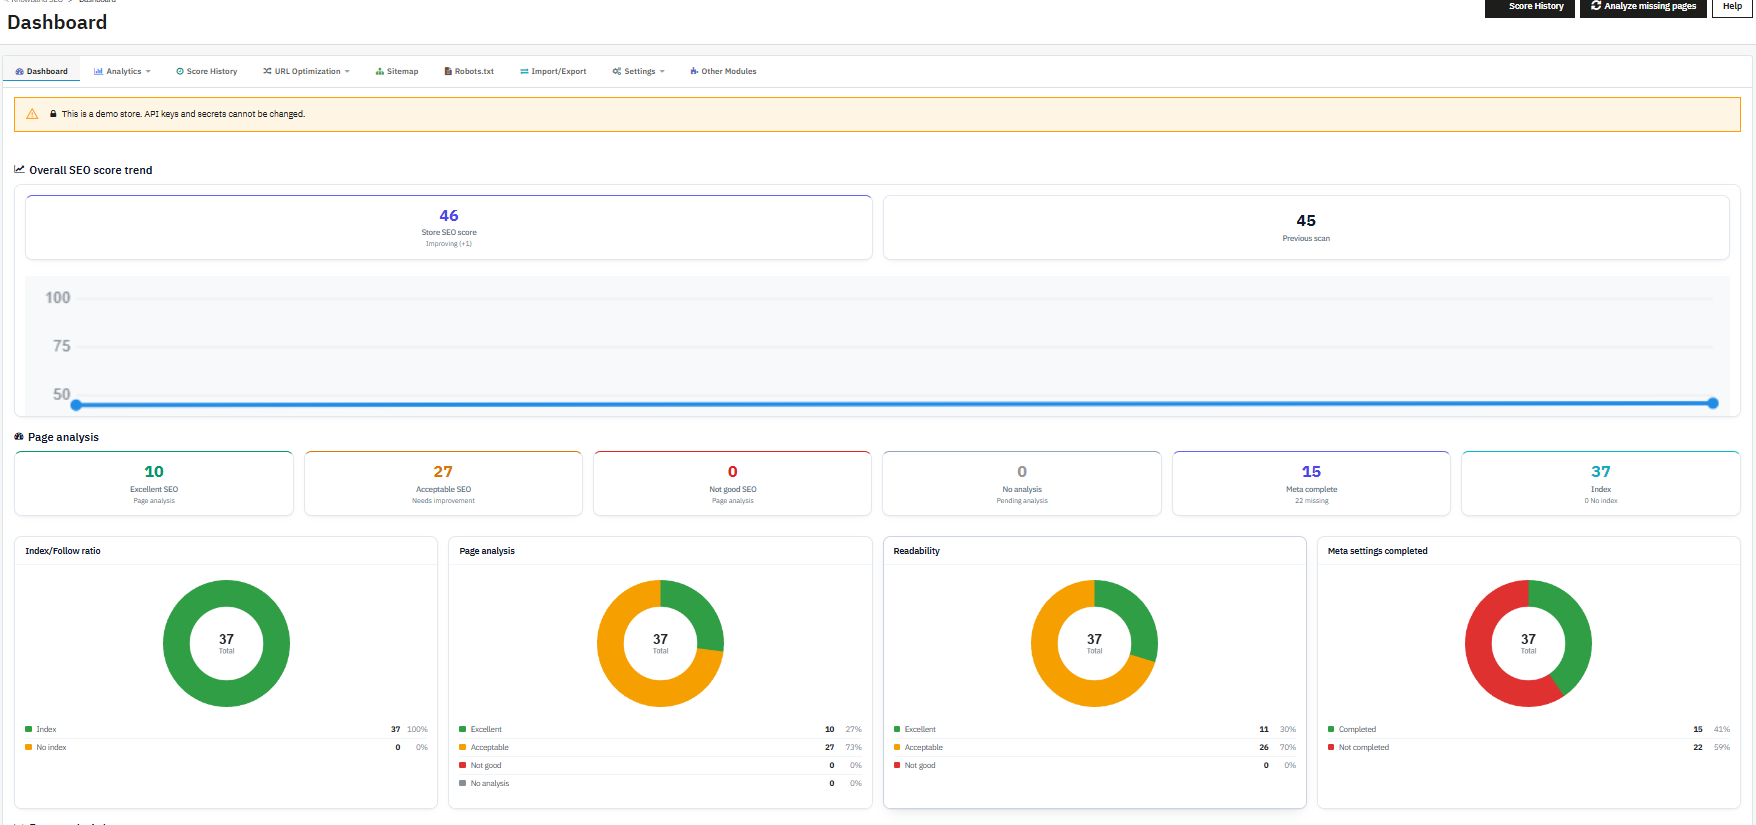
Top Actions
- History button: Will immediately redirect you to the page of historical trends
- Analyse missing pages button: Prestashop SEO Audit Module performs the batch analysis for all products, categories, information pages, manufacturers, suppliers, which do not yet have the stored SEO score.
Panel of Overall SEO score trend
- Store SEO score: The current overall score of the store (for instance, 46), which is derived by the score of each analysed page. This is the one figure to follow every week.
- Label improving/declining/no change: Appears right beside the Store SEO score (for instance, “Improving (+1)”). It will instantly show you the direction of the change of the SEO of your store.
- Score of previous scan: The score of the store from the last snapshot.
- Trend graph: The line graph showing Store SEO score by recent snapshots.
Page analysis cards
- Excellent SEO: Count of analysed pages that pass nearly all audit rules. A rising number here means more of the catalogue is fully optimised.
- Acceptable SEO (Needs improvement): Count of pages that are functional but have room to improve; this is usually the largest bucket in a growing catalogue.
- Not good SEO: Count of pages failing most audit rules and needing priority attention.
- No analysis (Pending analysis): Count of pages that have never been scored. A non-zero number here is a signal to run Analyse missing pages.
- Meta complete/missing: How many pages have both a meta title and meta description filled in, and how many are still missing one or both. Missing metadata is one of the fastest, highest-value fixes available.
- Index / No index: How many analysed pages are set to be indexed by search engines versus deliberately excluded. A high No index count on pages that should be visible is worth investigating.
Donut charts
- Index/Follow ratio: Shows the proportion of analysed pages set to Index versus No index, so you can confirm important pages are not accidentally hidden from search engines.
- Page analysis: Breaks the same Excellent/Acceptable/Not good/No analysis buckets down as percentages of the total analysed catalogue.
- Readability: Shows the same breakdown for the Readability score specifically, separate from the SEO Audit score.
- Meta settings completed: Shows what percentage of pages have finished meta title and description setup versus still needing attention.
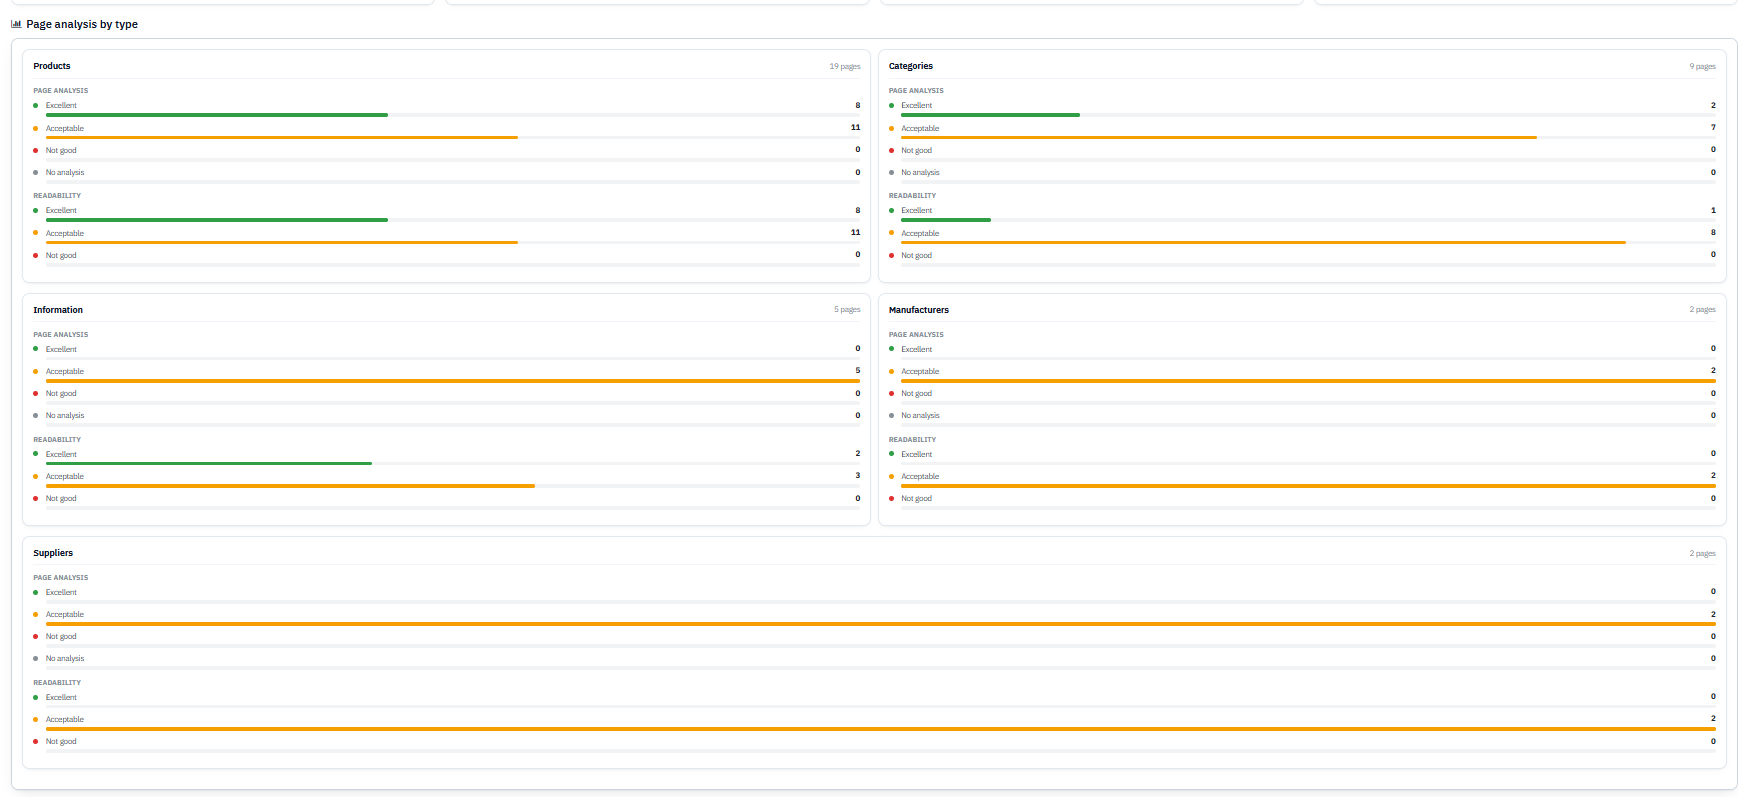
Page analysis by type
The above pattern, repeated for each entity type (Products, Categories, Information, Manufacturers, Suppliers), with each displaying the number of pages belonging to this category and their respective Page Analysis (Excellent/Acceptable/Not good/No analysis) and Readability (Excellent/Acceptable/Not good) statistics. For example, the above illustrates the relatively poor performance of Categories compared to Products in terms of readability.
SEO checklist
A list of ten store-level requirements, each shown as Completed or Not completed with an action button:

- SEO URLs enabled: Confirms PrestaShop’s own friendly URL setting is active, a prerequisite for clean, readable page addresses.
- SSL enabled: Confirms the storefront is served over HTTPS, which search engines treat as a baseline trust signal.
- XML sitemap enabled: Confirms the module’s XML sitemap output is switched on.
- Robots.txt exists: Confirms a robots.txt file is present and reachable at the storefront.
- Maintenance mode is off: Confirms the store is not accidentally left in maintenance mode, which would block all crawling and all visitors.
- Webmaster verification configured: Confirms a Google or Bing verification code has been entered under Settings
- URL redirects enabled: Confirms the redirect engine is active, so any redirects you create actually take effect on the storefront.
- RSS enabled: Confirms the RSS feed output is switched on.
- Knowband Blog: Indicates whether the companion Knowband Blog module is installed; shown with a Buy button when it is not, since blog SEO features only appear once that module is present.
- LLMs.txt available: Indicates whether an llms.txt file, used to describe the site to AI crawlers, is available
4.2 Analytics
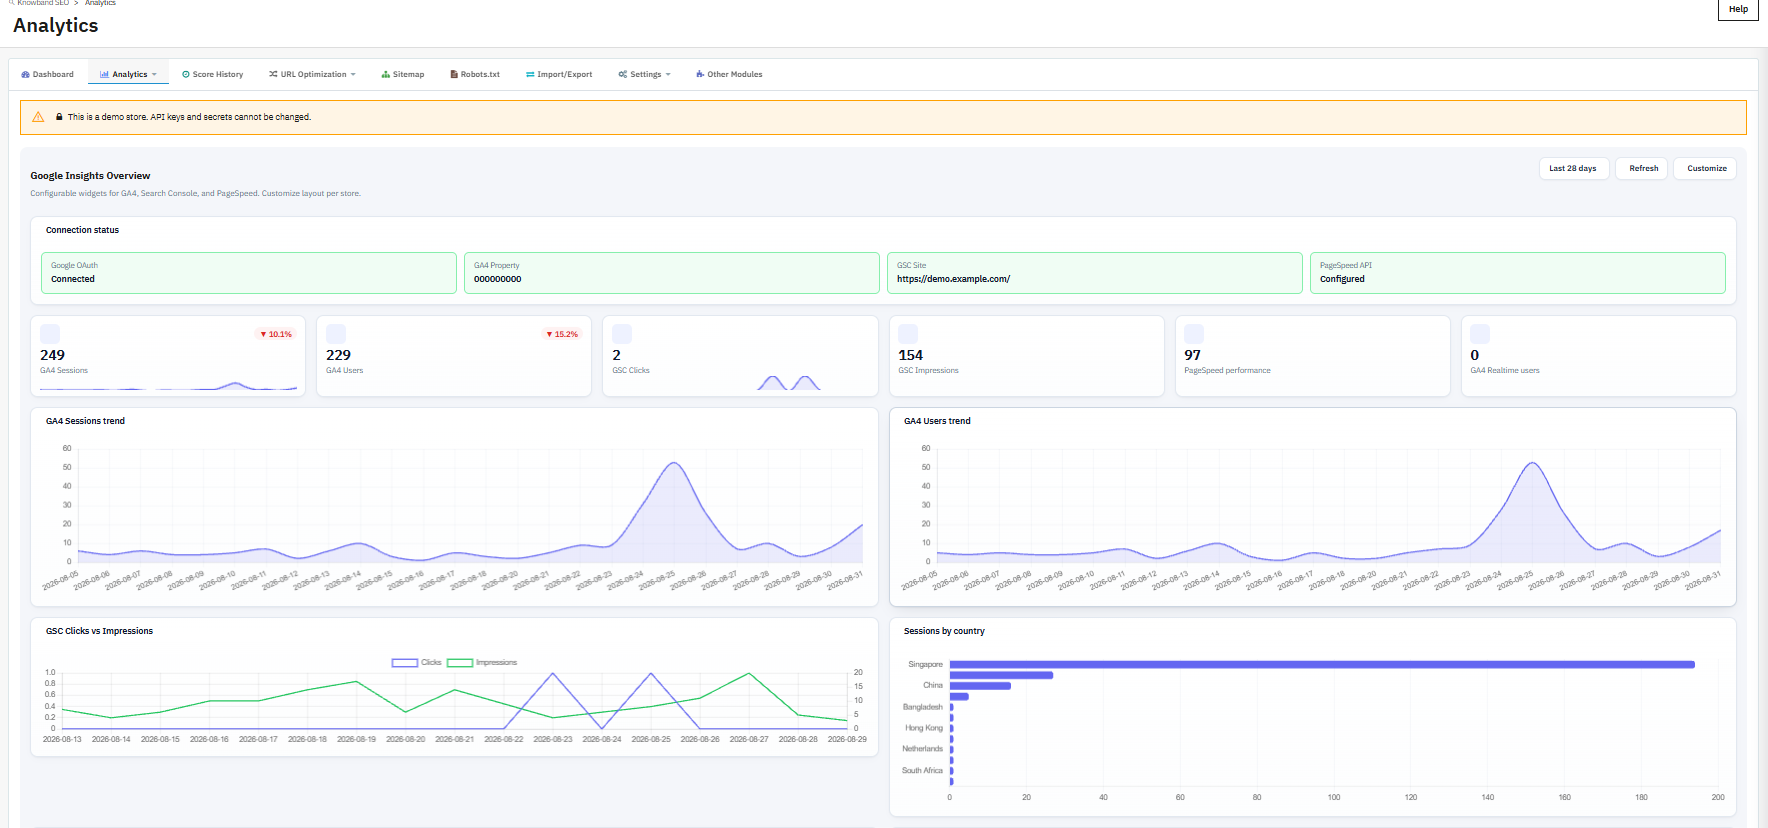
The Analytics section connects Prestashop SEO Audit Module to Google Analytics 4, Google Search Console, and PageSpeed Insights, and is organized into an overview page, three data-source reports, and a Settings page.
4.2.1 Analytics overview (Google Insights Overview) in Prestashop SEO Audit Module
- Period selector (for example, Last 28 days): Sets the reporting window used across all the summary cards and charts on this page.
- Refresh button: Reloads the widgets with the latest data from Google without leaving the page.
- Customise button: Opens the widget library so you can control which cards appear.
- Connection status panel: Shows four indicators at a glance: Google OAuth (Connected or not), GA4 Property (the connected property ID), GSC Site (the connected Search Console property URL), and PageSpeed API (Configured or not). This is the fastest way to confirm the integration is actually working before trusting any numbers below it.
- GA4 Sessions card: Total GA4 sessions for the period, with a percentage change versus the prior period.
- GA4 Users card: Total GA4 users for the period, with a percentage change.
- GSC Clicks card: Total Search Console clicks for the period.
- GSC Impressions card: Total Search Console impressions for the period, with a percentage change.
- PageSpeed performance card: The most recent PageSpeed performance score.
- GA4 Realtime users card: Users active on the storefront in the last 30 minutes.
- Trend lines for GA4 Sessions / Trend line for GA4 Users charts: Daily line graphs for GA4’s top metrics.
- Chart for GSC Clicks vs Impressions: Shows both clicks and impressions on the same chart to see if there is conversion of the impression numbers into clicks.
- Sessions by Country chart: Bar graph of sessions by visitor country, helpful in seeing if traffic is matching up with target market.
- Table for Top Search Queries: List of Search Console queries that generate traffic, with Clicks, Impressions, CTR, and Position columns.
- Trend line for PageSpeed Score history chart: Graph that tracks the history of PageSpeed scores – easy to see the impact of a theme or content change in a regression.
4.2.2 How to check GA4 report for Prestashops store
- Period dropdown: Chooses the reporting window (for example, Last 28 days).
- Compare to previous period checkbox: Check to compare the current data to that of the previous period
- Total users / Active users / New users: Default GA4 audience measures – reach, active visitors and new visitors, respectively.
- Sessions: Total number of visits.
- Engaged sessions: Number of sessions that passed GA4’s engagement criterion (interaction beyond immediate bounce).
- Views: Total number of page views during the period.
- Views / Session: Average pages viewed per session, i.e. how deep the visitor is exploring the site.
- Avg. session duration: Average time spent per visit.
- Engagement rate / Bounce rate: % of engaged sessions / % of bounces (these two are in inverse correlation and should be watched together).
- Events: Total number of tracked GA4 events during the period.
- Realtime panel (Active users, By country, By device, By page): Who is on the website right now and where are they from, helpful for validating traffic driven by campaigns/promotions.
- Traffic over time graph (Sessions/Users/Views checkboxes): Combined graph that allows to show/hide sessions/users/views.
- Sessions by hour of day graph: Sessions distribution by hour of the day, allowing to determine most active hours, good for scheduling promotions or maintenance.
- Dimension tabs (Pages, Landing pages, Channels, Source/medium, Campaigns, Countries, Cities, Devices, Browsers, Operating systems, Languages, New vs returning, Events, Key events): Tabs with Sessions, Users, and Views data segmented by the corresponding dimension, allows to ask very specific questions such as “which landing page performs better” or “which traffic channel performs better”.
4.2.3 How to Analyse the Google Search Console report
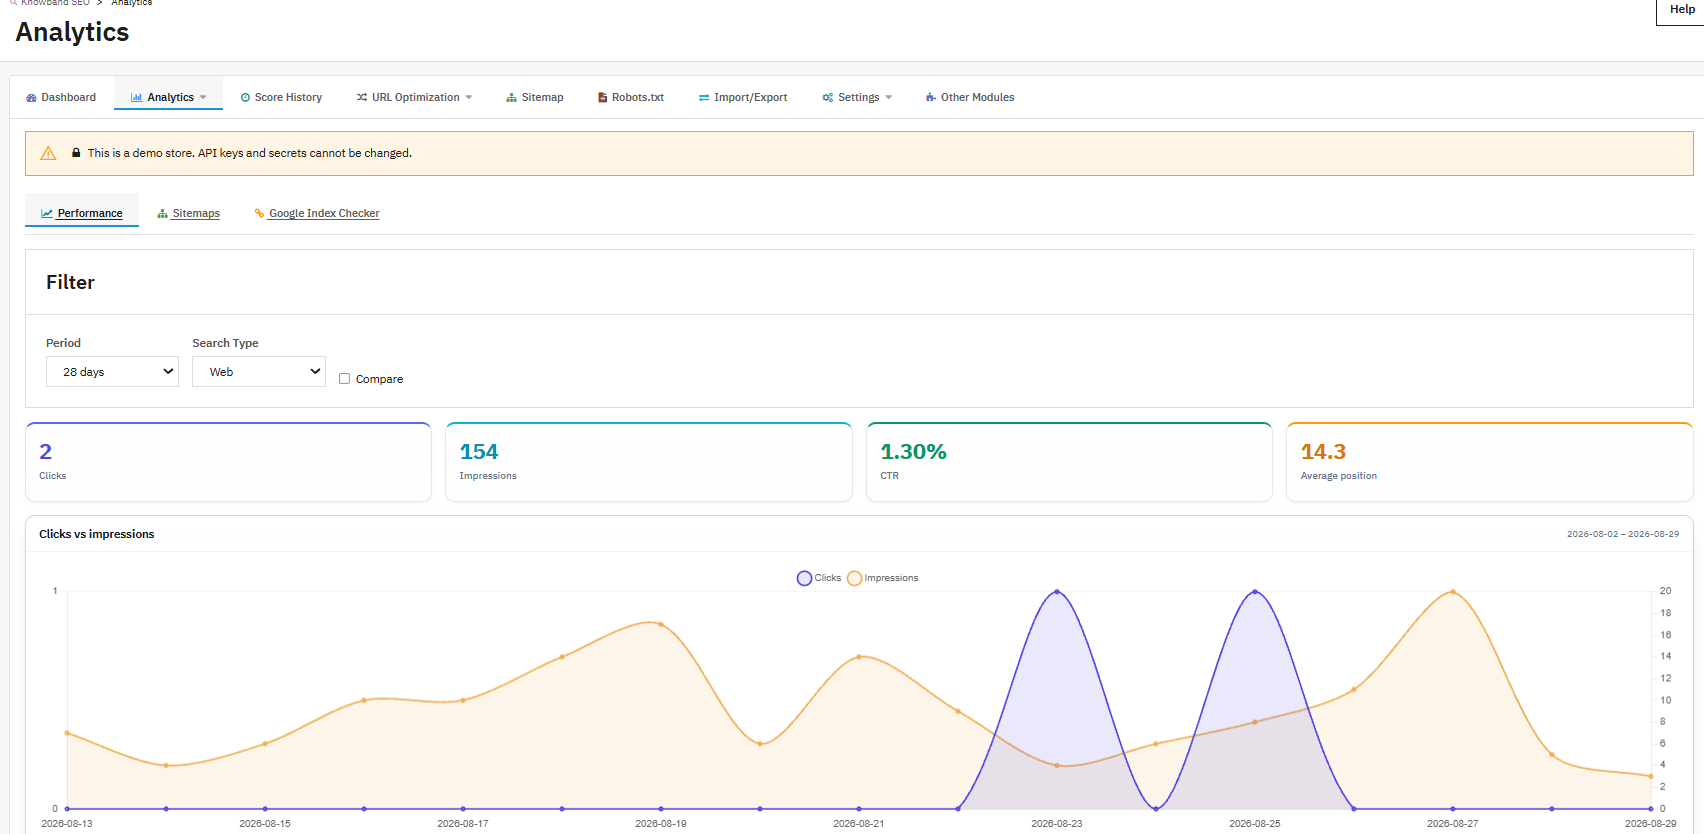
- Period dropdown: Sets reporting period (e.g. 28 days).
- Search Type dropdown (Web, Image, Video, News, Discover, googleNews): Allows filtering the report to specific type of Google search result.
- Compare checkbox: Allows comparing the current data with the previous period when checked.
- Clicks card: Total number of clicks to your storefront from Google search results.
- Impressions card: Total number of impressions in Google search results, including unclicked results.
- CTR card: Click-through rate, % of impressions that converted into clicks.
- Average position card: The average ranking position of your pages for the queries that triggered them; a lower number is better.
- Comparison of clicks and impressions graph: Displays the relationship between these two measures to determine if the rate of visibility is rising or falling in comparison to clicks.
- Queries/Pages/Countries/Devices/Search Appearance tabs: All these allow you to break down the Clicks, Impressions, CTR, and Positions by these parameters to determine, for instance, what query results in the largest number of clicks or what country has the highest impressions.
- Sitemaps sub-tab: Manages sitemap URLs without leaving Search Console/
4.2.4 PageSpeed report
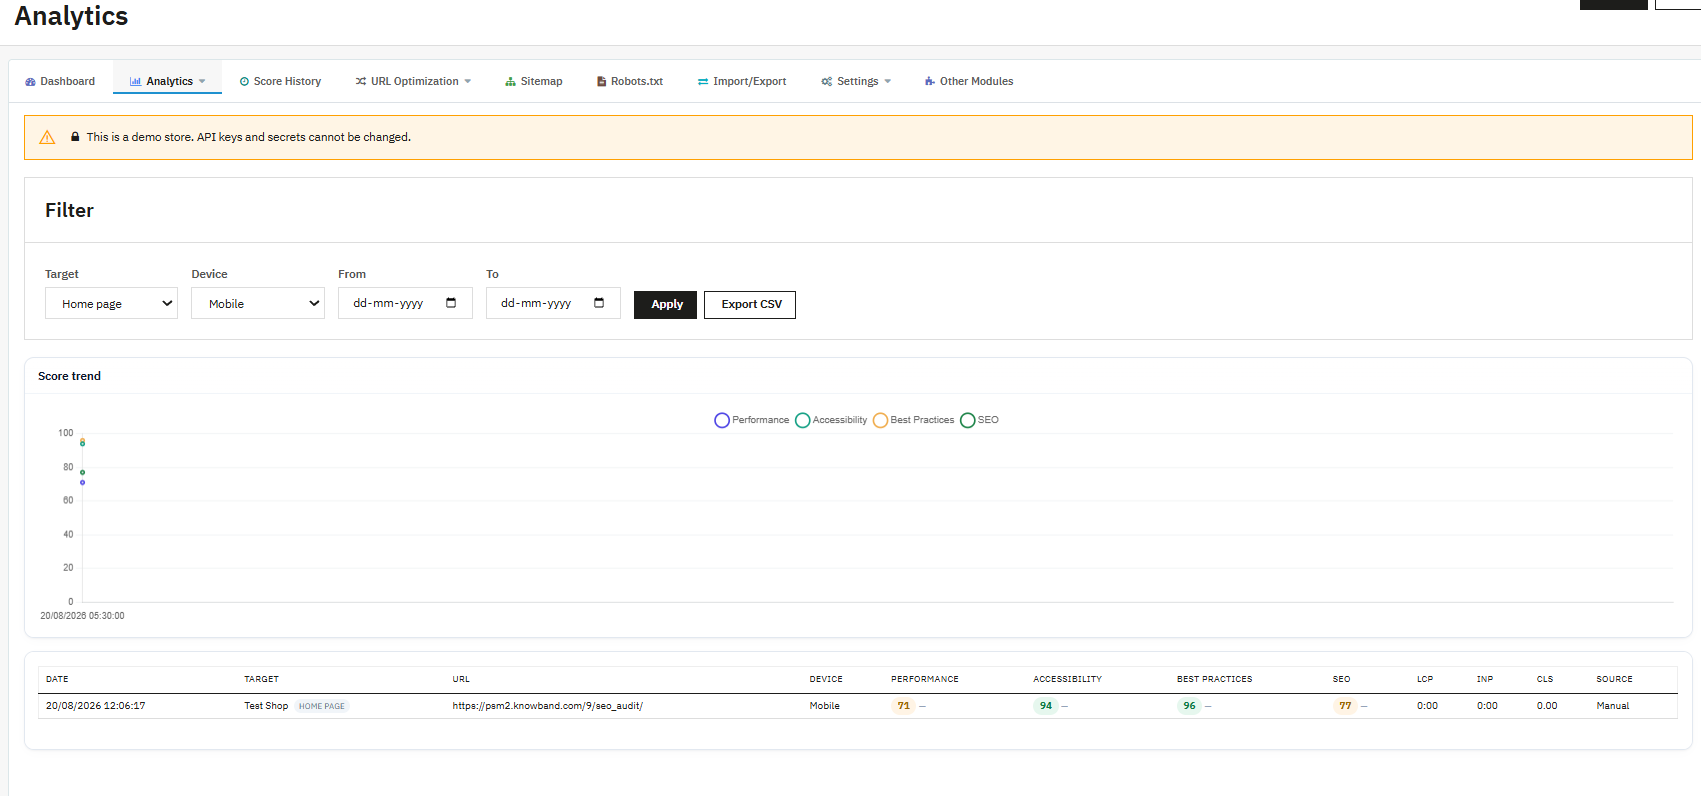
- Run button: Starts a new PageSpeed test against the selected target.
- Target dropdown (Home page, Category, Product, Custom URL): Chooses which page type to test.
- Device dropdown (Mobile, Desktop): Chooses which device profile to filter the history table by; a full Run tests both automatically.
- From / To date fields: Restrict the history table to a specific date range.
- Apply Button: Applies the applied filters to the History Table that follows.
- Export to CSV Button: This exports the filtered history data in CSV format so that it can be analyzed later on
- Score Trend Graph (Performance, Accessibility, Best Practices, SEO): This is the graph where all the four PageSpeed scores will be plotted throughout time, and this will help you to know whether there are any improvements or deterioration in the PageSpeed score since the latest modifications.
- History Table Fields: Date (Test date), Target (Type of web page tested), URL (URL tested), Device (Mobile/Desktop), Performance/Accessibility/Best Practices/SEO (PageSpeed Score), LCP/INP/CLS (Core Web Vitals field/lab), and Source (Manual/Cron).4.2.5 Analytics Settings (Analytics Settings)
General Setting Configuration

- Analytics Status: Enables or disables Analytics data collection and dashboards store-wide. Nothing in the Analytics section works until this is Enabled.
- Default Period (days): The default reporting window, in days, used by dashboard widgets when no other period is selected (for example, 28).
- API Cache TTL (minutes): How long API responses are cached before the module requests fresh data again. A higher value reduces API usage but delays how quickly new data appears; a lower value shows fresher data but calls the Google APIs more often.
- Search Console Data Lag (days): Search Console data is delayed by Google itself, so this setting tells the module to skip the most recent N days when querying, avoiding incomplete or misleading recent-day figures.
- History Retention (days): How many days of PageSpeed history to keep before older rows are automatically pruned, keeping the history table from growing indefinitely.
How to create Google Client Secret ID and Client ID for Google Analytics 4

- PageSpeed API Key: Your Google PageSpeed Insights API key from Google Cloud, required for the PageSpeed report and scheduled checks to run at all.
- Google OAuth Client ID: The OAuth 2.0 Client ID from your Google Cloud credentials, used to authorize the module to read GA4 and Search Console data on your behalf.
- Google OAuth Client Secret: The matching OAuth 2.0 Client Secret. Both this and the Client ID must be saved before the Connect with Google button becomes usable.
- Connected indicator and Disconnect Google button: Shows whether the module currently has an active Google connection, and lets you revoke stored access, refresh, and expiry tokens if you need to reconnect or switch Google accounts.
Properties (Store)

- Search Console Property: The Search Console property URL used for this specific store; select one from the loaded list or enter it manually if the list fails to load. A refresh icon reloads the list of properties your connected Google account has access to.
- GA4 Property: The GA4 property ID used for this store, selected from the loaded list or entered manually, with the same refresh option.
- PageSpeed Test URL: The default URL tested when no other target is specified; if left blank, the store’s home URL is used instead.
- Custom Test URL: An optional additional URL, used only when Custom URL is selected as a PageSpeed Cron target.
PageSpeed Cron
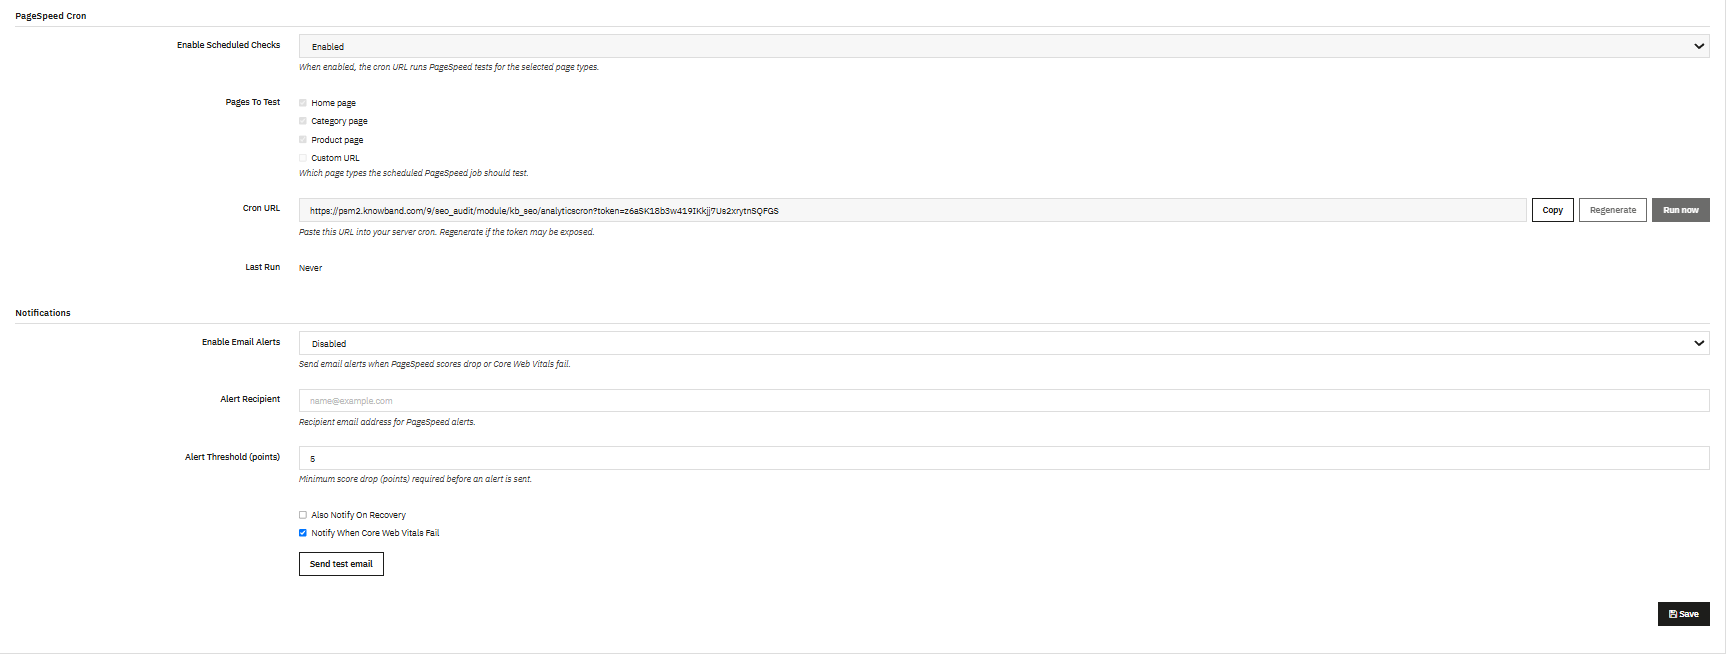
- Enable Scheduled Checks: Turns on automatic, scheduled PageSpeed testing rather than relying on manual Run clicks.
- Pages To Test (Home page, Category page, Product page, Custom URL checkboxes): Chooses which page types the scheduled job actually tests each time it runs.
- Cron URL, Copy button, Regenerate button, Run now button: A unique, tokenized URL to paste into your server’s scheduled task system so PageSpeed tests run automatically on a timer. Copy grabs the URL, Regenerate invalidates the old token and issues a new one (useful if the URL was ever exposed), and Run now triggers the configured job immediately for testing.
- Last Run: Shows the timestamp of the most recent scheduled run, or “Never” if the cron has not fired yet, which is a quick way to confirm your server scheduler is actually calling the URL.
Notifications
- Enable Email Alerts: Turns on email notifications when PageSpeed scores drop or Core Web Vitals fail.
- Alert Recipient: The email address that receives these alerts.
- Alert Threshold (points): The minimum score drop, in points, required before an alert is triggered, preventing alerts from firing on minor, normal fluctuation.
- Also Notify On Recovery checkbox: When enabled, sends a follow-up notification once a previously dropped score recovers.
- Notify When Core Web Vitals Fail checkbox: Controls whether Core Web Vitals status changes specifically trigger their own alert.
- Send test email button: Sends a sample alert to the configured recipient so you can confirm delivery before relying on real alerts.
4.3 Score History
- Date from / Date to fields: Set the custom date range for every chart and table on the page.
- Entity type dropdown (All, Products, Categories, and so on): Restricts the history shown to a single page type, useful for isolating whether one part of the catalog is improving or declining.
- Filter button: Applies the selected date range and entity type.
- Store SEO score card: The current store-wide score with its trend label (Improving, Declining, or No change).
- Previous scan card: The score from the prior snapshot, for direct comparison.
- Excellent / Acceptable / Not good cards: Counts of analyzed pages in each quality band for the selected filters.
- Total issues card (with new/resolved counts): The total number of failing audit rules across all analyzed pages, plus how many are new and how many were resolved within the selected window (for example, over the last 7 days).
- Overall SEO score trend chart and Date/Score/Change table: A visual and tabular record of every stored snapshot, showing exactly how the store score has moved over time.
- SEO issues trend chart (New issues, Resolved issues, Open issues): Tracks how the total number of failing rules is changing, separate from the single score number, which can hide a rising issue count even while the overall score looks stable.
- Product SEO score trend / Category SEO score trend charts: The same trend view scoped specifically to products and to categories.
- Top improved entities / Top declined entities panels: Lists the specific pages that moved the most in either direction between snapshots, so you can investigate what changed on a page that suddenly improved or dropped.
- Snapshot A / Snapshot B dropdowns and Compare snapshots button: Pick any two stored snapshots and generate a direct comparison table (ID, Date, Score, Change, Entities, Source, Version), useful for measuring the exact effect of a specific batch of changes, such as a redirect cleanup or a ChatGPT content pass.
4.4 URL Optimisation in Prestashop
4.4.1 Pretty URLs
- Settings / Structure sub-tabs: Settings holds the on/off switch described below; Structure defines the actual URL patterns applied when Pretty URLs is enabled.
- Enable Pretty URLs dropdown: Turns the feature on or off. When enabled, the module rewrites default PrestaShop URL patterns into cleaner, more readable versions.
- Reset to PrestaShop defaults button: Restores the store’s original URL routing, useful if you want to fully undo Pretty URLs rather than simply disabling the toggle.
- Save button: Applies changes made on this page.
- The page’s own notes clarify that patterns which include an ID use PrestaShop’s own SEO routes, ID-less patterns use the module’s router, disabling the feature restores previous SEO routes from backup when one exists, and automatic redirects for Pretty URL changes only apply while the separate Redirects feature is also enabled.
4.4.2 How to fix 404 URLs in Prestashop
- ID column: The internal record number for the 404 hit.
- URL column: The exact storefront path that returned a 404.
- Referer column: The page or external site the visitor came from before hitting the broken URL, useful for tracing where a bad link lives.
- Visits column: How many times that specific URL has been hit, letting you prioritize the most frequently broken links first.
- Last visited column: The timestamp of the most recent hit, useful for telling a stale one-off request apart from an ongoing problem.
- Delete button (per row): Removes that recorded hit from the monitor once it has been reviewed or resolved.
- Search filters (ID, URL, Referer, date range) and Search button: Narrow the list down to a specific URL pattern or time window.
- Bulk actions button: Applies an action to multiple selected rows at once rather than one at a time.
4.4.3 How to detect Duplicate URLs (Duplicate SEO URLs) in Prestashop
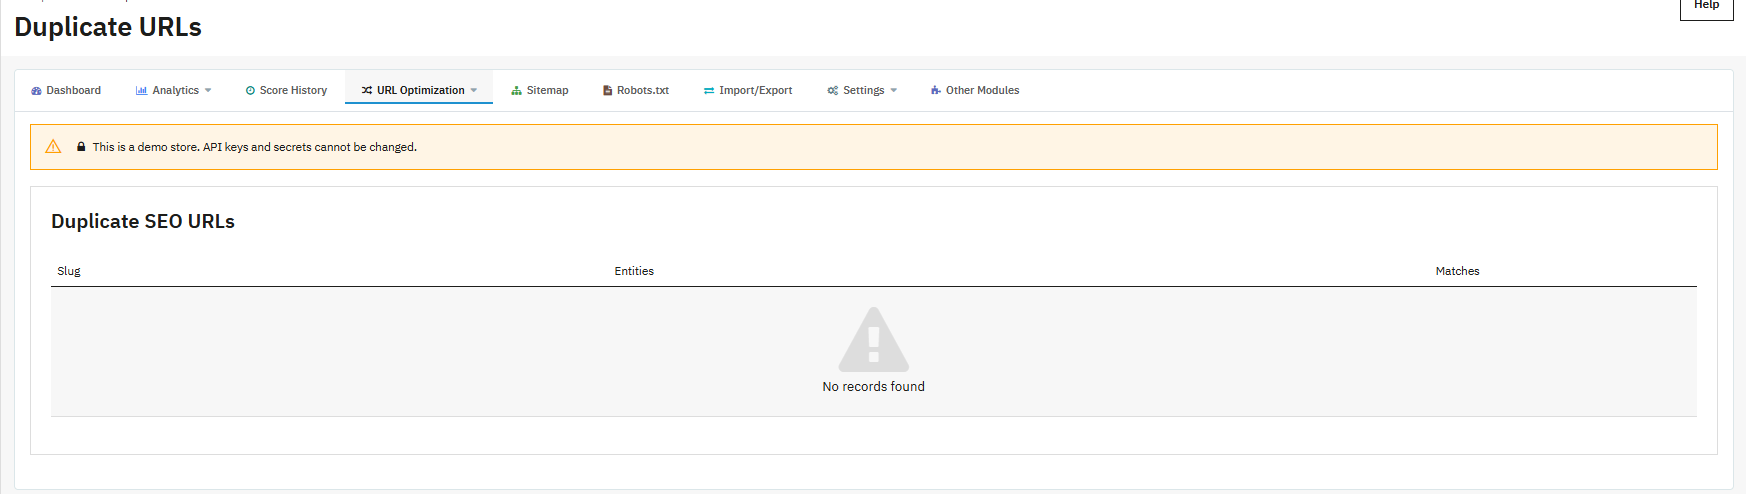
- Slug column: The specific friendly URL segment that is colliding across more than one page.
- Entities column: Lists which pages (products, categories, CMS pages, manufacturers) share that slug.
- Matches column: The number of pages involved in that particular collision.
- Update action: Opens the group so you can change the friendly URL on the pages that need to become unique, then save to apply the fix.
- When the store has no collisions, the page simply shows “No records found.”
4.4.4 How to add 301, 302, 303 redirects to URLs in Prestashop using Prestashop SEO Audit Module
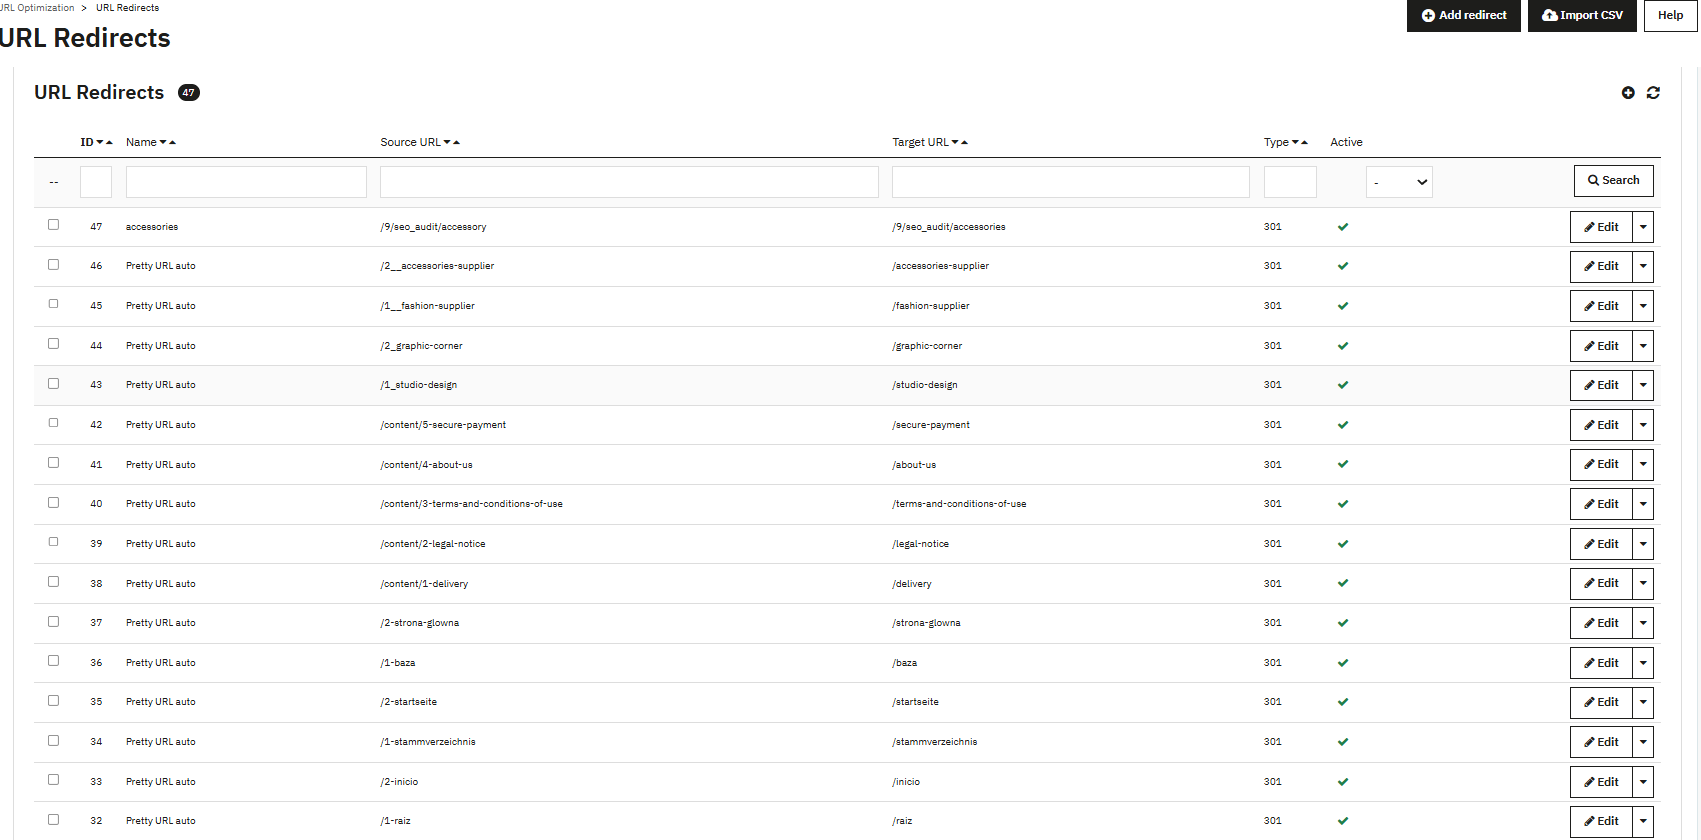
- Add redirect button: Opens a blank form to create a new redirect.
- Import CSV button: Uploads many redirects at once from a CSV file instead of adding them individually.
- Redirect count badge: Shows the total number of redirects currently stored for the shop.
- ID column: The internal record number.
- Name column: A label you assign for your own reference; it does not affect redirect behavior.
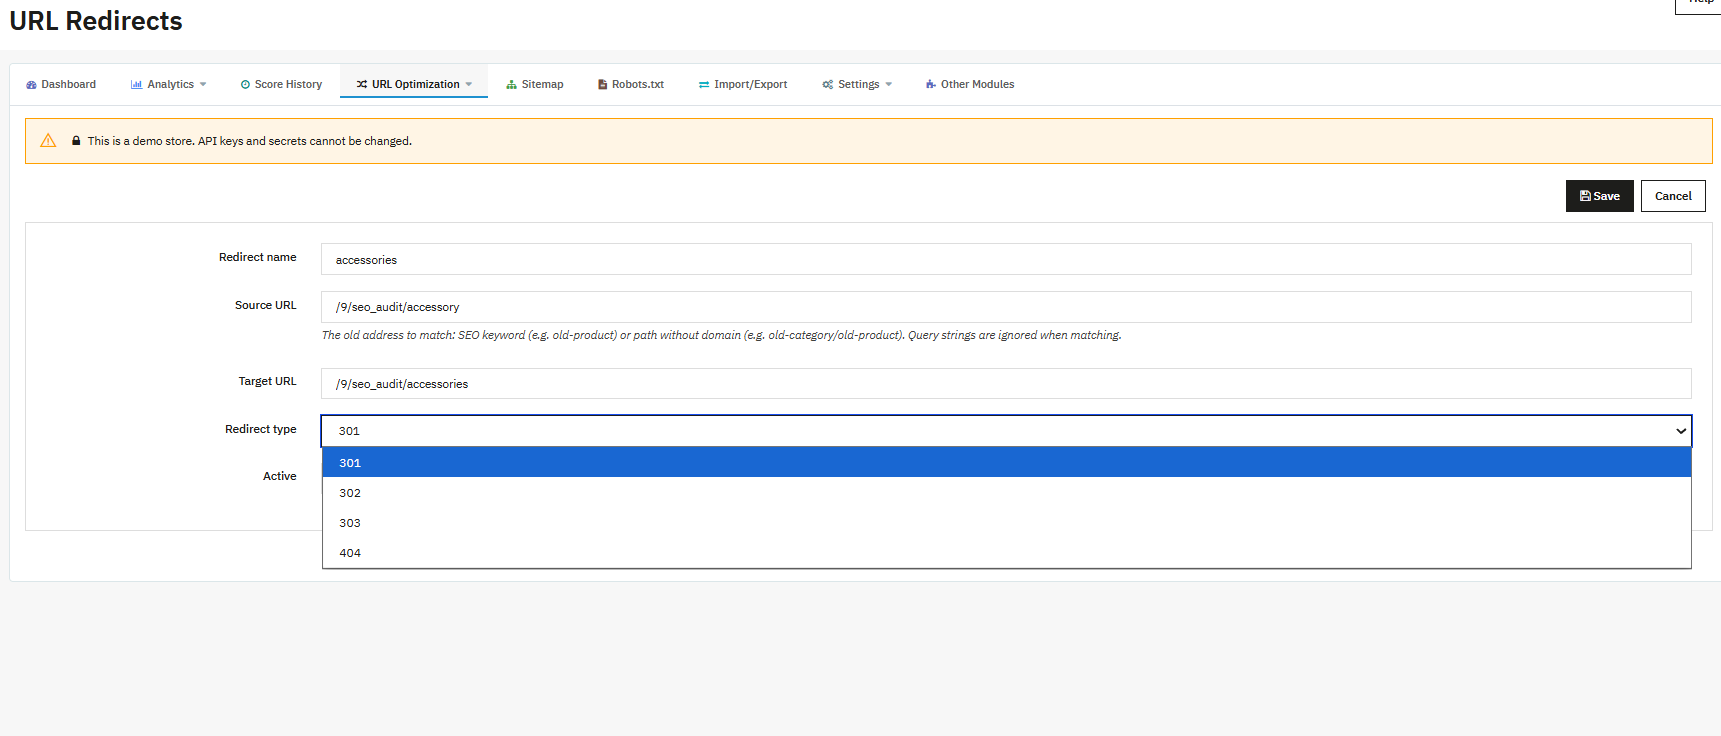
- Source URL column: The old or broken URL that visitors and crawlers currently request.
- Target URL column: The URL they are sent to instead.
- Type column: The redirect type in use (301, 302, 303, or 404).
- Active column: Whether the redirect is currently enforced on the storefront.
- Edit button (per row): Opens the redirect for editing.
- Search filters (ID, Name, Source URL, Target URL, Type, Active) and Search button: Narrow the list down when it grows large.
- Individual redirect form fields: Name (your internal label), Source URL (required; the old path), Target URL (required; must be a relative path or a full http/https URL), Redirect type (301 for a permanent move, 302 for a temporary one, 303 for specific post-form-submission cases, or 404 to explicitly mark a URL as not redirected), and Status (active or inactive, active by default).
4.5 How to Edit Sitemap.xml in Prestashop
4.5.1 XML Sitemap
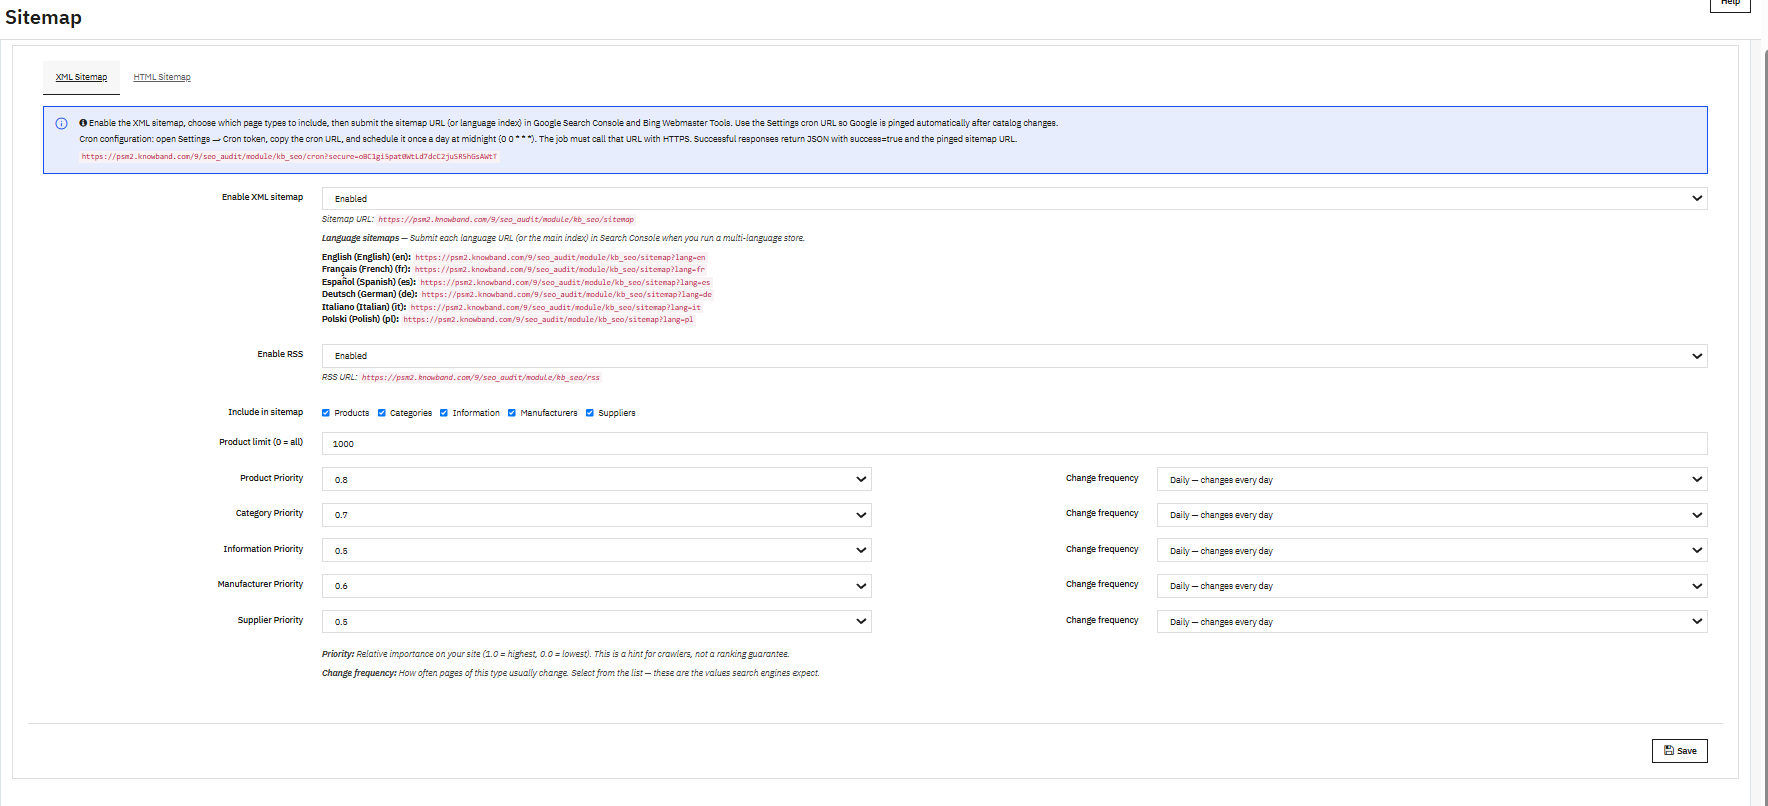
- Enable XML sitemap dropdown: Turns the XML sitemap output on or off.
- Sitemap URL display: Shows the live, public sitemap URL once enabled, ready to copy into Search Console.
- Language sitemap URLs list: For stores with more than one active language, shows a separate sitemap URL per language, each of which should be submitted individually.
- Enable RSS dropdown: Turns the RSS feed output on or off, independent of the sitemap.
- RSS URL display: Shows the live RSS feed URL once enabled.
- Include in sitemap checkboxes (Products, Categories, Information, Manufacturers, Suppliers): Chooses which entity types are listed in the sitemap; all five are checked by default.
- Product limit (0 = all) field: Caps how many products are included in the sitemap; set to 0 to include every product regardless of catalog size.
- Priority dropdowns (per entity type, for example Product Priority 0.8, Category Priority 0.7): A relative-importance hint passed to crawlers for that page type. As the page itself notes, this is a hint, not a ranking guarantee.
- Change frequency dropdowns (per entity type, defaulting to Daily): Tells crawlers how often that page type typically changes, helping them plan how often to revisit it.
- Save button: Applies all sitemap settings on this page.
- An info banner also explains the recommended cron setup: submit the sitemap URL (or each language URL) in Google Search Console and Bing Webmaster Tools, then schedule the shown cron URL once a day at midnight so Google is automatically pinged after catalog changes.
4.5.2 HTML Sitemap
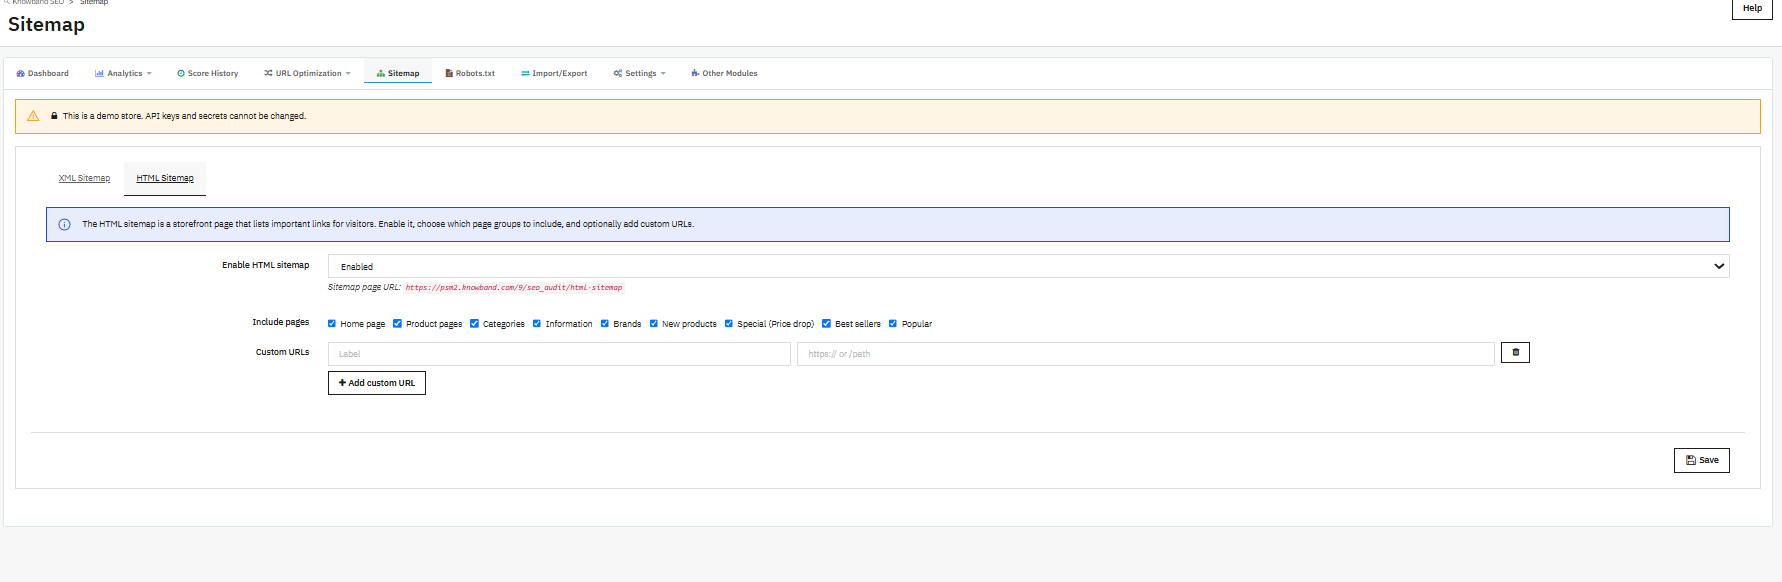
- Enable HTML sitemap dropdown: Turns on a storefront page that lists important links for human visitors, separate from the XML sitemap built for crawlers.
- Sitemap page URL display: Shows the live URL of that visitor-facing page once enabled.
- Include pages checkboxes (Home page, Product pages, Categories, Information, Brands, New products, Special (Price drop), Best sellers, Popular): Chooses which page groups are linked from the HTML sitemap.
- Custom URLs (Label and URL fields, delete icon, Add custom URL button): Lets you manually add extra links, such as an off-catalog landing page, that would not otherwise appear in the automatic groups.
- Save button: Applies the HTML sitemap configuration.
4.6 How to edit Social OpenGraph Tags on Source Page
- Facebook Open Graph toggle: Enables Open Graph metadata (used by Facebook and many other platforms) on storefront pages so shared links show a proper title, description, and image.
- Twitter cards toggle: Enables Twitter-specific card metadata on storefront pages.
- Twitter card type dropdown (default summary_large_image): Chooses the visual layout used when a page is shared on Twitter/X.
- Site name field: The name shown alongside shared links, typically your store’s brand name.
- Site type dropdown (default Organization): Describes the nature of the site in structured data terms.
- Facebook URL, Twitter URL, Instagram URL, LinkedIn URL, YouTube URL, Pinterest URL fields: Your store’s profile links on each platform, used to connect your storefront to your official social presence in structured data.
- Save button: Applies all Social Cards settings.
4.7 How ChatGPT helps in Generating Content in Prestashop
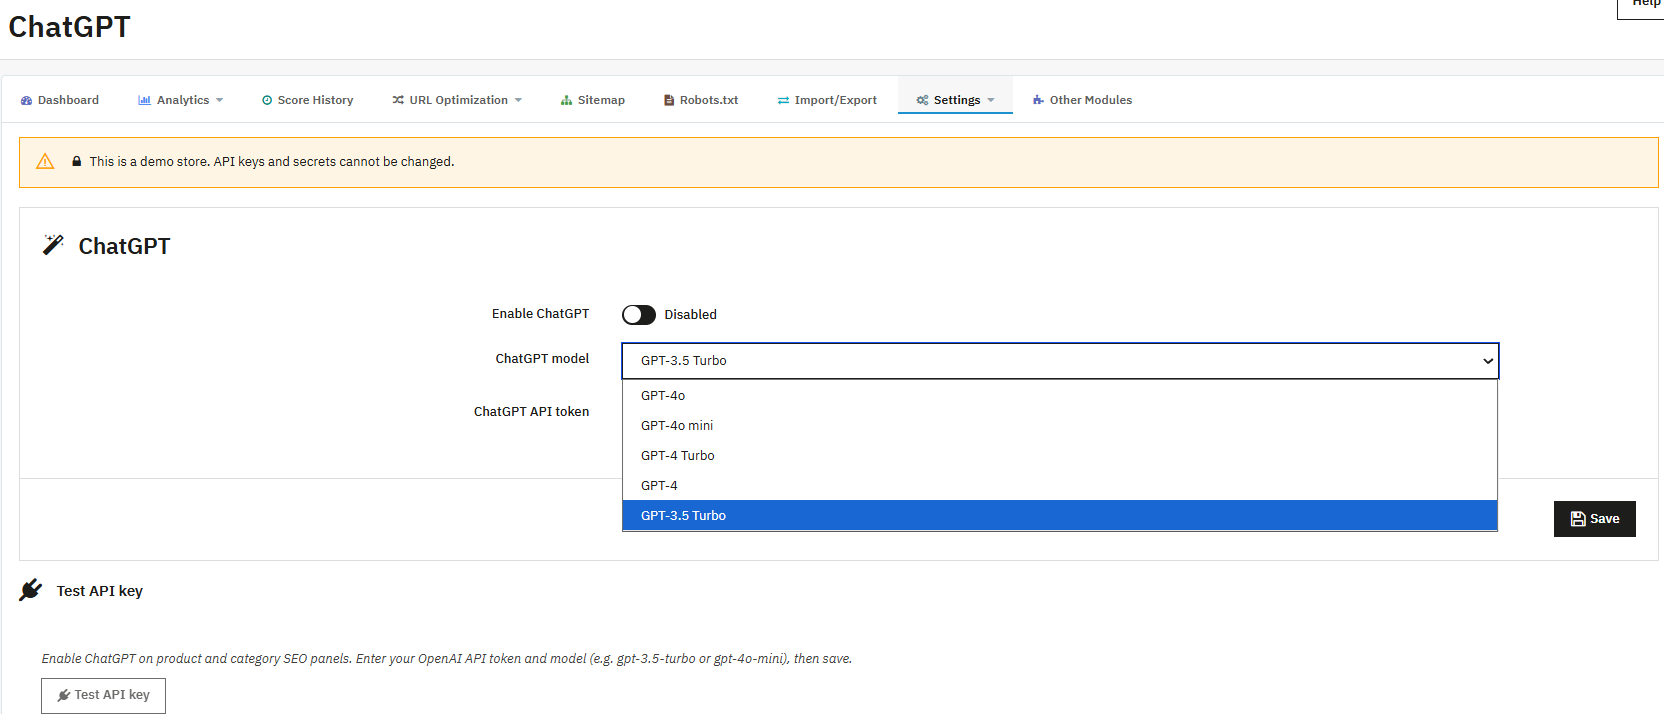
- Enable ChatGPT toggle (default Disabled): Turns the AI content assistant on for the product and category SEO panels and for the Import/Export bulk workflow.
- ChatGPT model dropdown (options include GPT-4o, GPT-4o mini, GPT-4 Turbo, GPT-4, and GPT-3.5 Turbo, default GPT-3.5 Turbo): Chooses which OpenAI model generates content; more capable models generally produce stronger output at a higher cost per request.
- ChatGPT API token field: Your OpenAI API key, which the module needs to make generation requests on your behalf.
- Save button: Stores the enabled state, model choice, and token.
- Test API key button: Calls OpenAI directly to confirm the token and model actually work, before you rely on them inside a product panel.
- A promotional banner on this and related pages also points to a separate Knowband add-on, the Knowband AI Content Generator (supporting Gemini and ChatGPT for product content and translation), which is a distinct product from this built-in ChatGPT tab and is outside the scope of this manual.
4.8 What is Robots.txt and How to edit it using Knowband’s Prestashop robots.txt editor
- Public URL display: Shows the live, public web address of the robots.txt file, useful for confirming what crawlers actually see after saving.
- File path display: Shows the exact server file path being written to, useful for troubleshooting with your hosting provider if saves fail.
- Writable warning: Appears automatically if the server file cannot currently be written to, telling you to fix permissions on the shop root, or create a writable robots.txt file, before your changes will take effect.
- Robots content textarea: The actual directives that will be published, defaulting to a permissive configuration:
User-agent: *
Allow: /
- Save button: Publishes the entered directives to the live, public robots.txt file immediately.
4.9 How to Update the content of the Products in Bulk
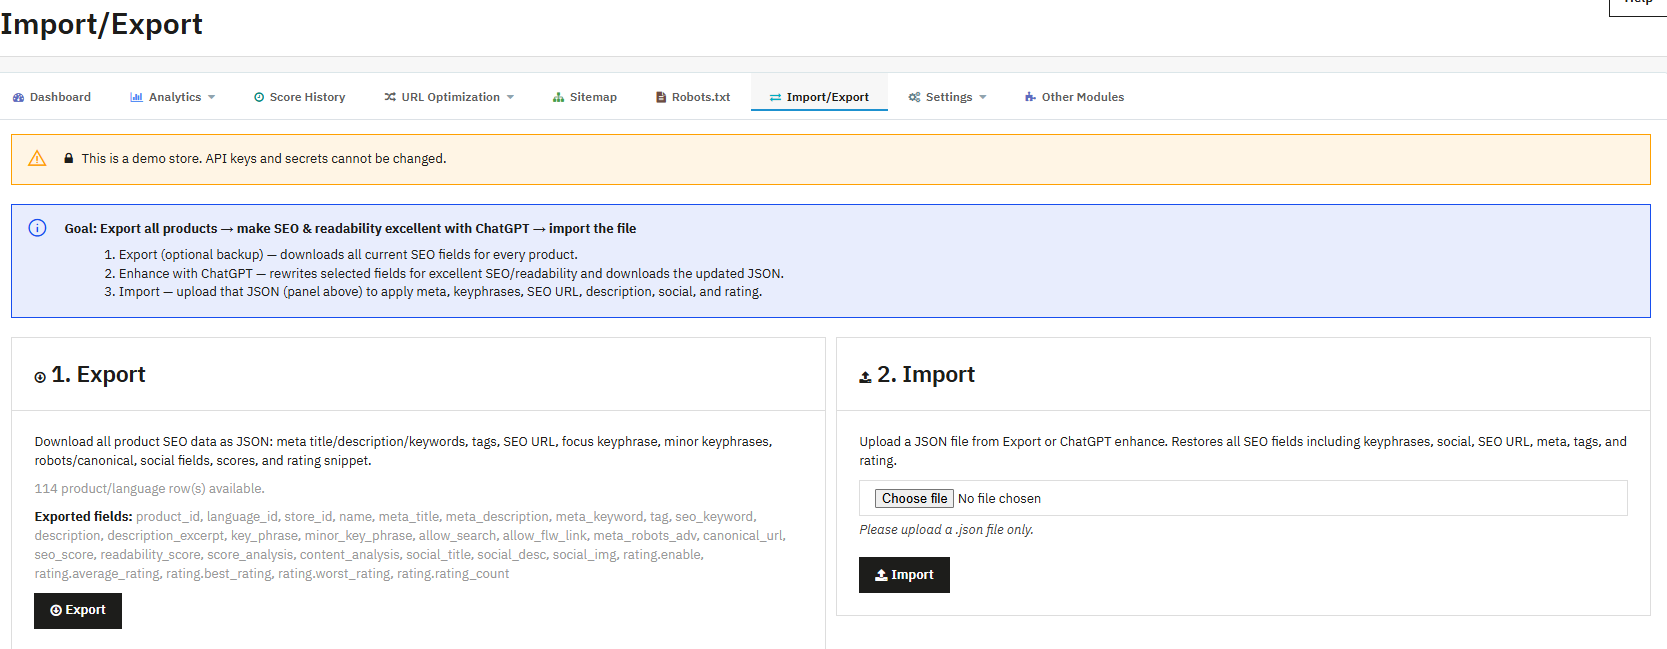
- Goal info box: Summarizes the intended three-step workflow: export as an optional backup, enhance selected fields with ChatGPT, then import the result.
- Row count display (for example, “114 product/language row(s) available”): Shows exactly how many rows will be included in an export before you run it.
- Exported fields list: Documents every field the export will contain: product, language, and store identifiers, name, meta title, meta description, meta keywords, tags, SEO URL, description and excerpt, focus keyphrase, minor keyphrases, allow search and allow follow link directives, advanced robots meta, canonical URL, SEO score, readability score, score analysis, content analysis, social title, social description, social image, and rating snippet fields (enable, average rating, best rating, worst rating, rating count).
- Export button: Downloads the full JSON file described above.
- Choose file control (Import panel): Selects a JSON file from your computer to upload.
- Import button: Applies the selected file’s SEO fields, keyphrases, social data, and rating data to the matching products; only .json files are accepted.
- ChatGPT enhance (SEO + readability) field checkboxes (Meta title, Meta description, Meta keywords, Focus keyphrase, Minor keyphrases, SEO URL, Social title, Social description, Tags, Description): Chooses exactly which fields the bulk ChatGPT pass should regenerate.
- All products option / Max products field: Either processes the entire catalog, or limits the run to a specific whole number of products, useful for testing quality on a small batch first.
- This panel stays disabled, with a message and a ChatGPT settings link, until ChatGPT is enabled and a token is saved under the ChatGPT tab.
4.10 General Settings for all the configuration in Prestashop SEO Audit Manager
General
- Status toggle: The master switch for the entire module’s storefront behavior, including meta output, redirects, panels, and list scores. Nothing else works while this is off.
- Enable SEO analysis toggle: Turns on SEO score cards, the SEO Audit sub-tab, and SEO columns on catalog list pages.
- Enable readability analysis toggle: Turns on the readability scoring shown alongside the SEO score.
- Enable auto analysis on edit toggle: When enabled, pages are automatically re-analyzed whenever they are saved, so scores stay current without a manual re-run.
- Record 404 requests toggle: Turns on the 404 Monitor’s data collection.
- Enable URL redirects toggle: Turns on redirect matching for storefront visitors; without this, entries in URL Redirects are stored but not actually applied.
- Enable XML sitemap toggle: Turns on the XML sitemap output described in Section 4.5.
- Enable RSS toggle: Turns on the RSS feed output.
- Title separator field (default ” – “): The character or characters inserted between parts of a generated meta title, such as between the product name and the shop name.
- Show products / categories / manufacturers / suppliers / CMS pages in search by default toggles: Sets the default index behavior for each entity type when an individual page has no override of its own; enabled by default for all five.
Meta templates
- Product / Category / CMS / Brand / Supplier meta title template fields: The pattern used to build a meta title automatically when a page’s own meta title is empty, or when Force template is enabled for that type. Each supports shortcodes such as {product_name}, {category_name}, {cms_title}, {brand}, {supplier_name}, {shop_name}, and {title_separator}.
- Product / Category / CMS / Brand / Supplier meta description template fields: The same idea applied to meta descriptions; these are blank by default, so no automatic description is generated unless you fill one in.
- Force product / category / CMS / brand / supplier meta templates toggles: When enabled, the template is applied even if the page already has its own meta value, effectively overwriting it. When disabled (the default), the template only fills in genuinely empty values.
Cron and score history
- Cron secure token field: A unique token used in the module’s cron URL; calling that URL with the correct token triggers a Store SEO score snapshot when score history is enabled. Leaving the field blank regenerates the token.
- Enable SEO score history toggle: Turns on the snapshot system that powers the Score History page.
- History retention dropdown (default Keep all history): Chooses whether old snapshots are kept indefinitely or pruned after a set period.
- Retain history for (days) field (default 365): When retention is limited rather than set to keep everything, this sets how many days of history are preserved.
- Automatic snapshot schedule dropdown (default Daily, midnight): Sets how often a new snapshot is taken automatically via the cron URL.
Search engine verification
- Google verification code field: Paste your Google Search Console verification content value here if your site is not already verified another way, letting the module output it in the page header.
- Bing verification code field: The same idea for Bing Webmaster Tools.
Save button: Applies every setting on the page in a single action.
5. Steps to Analyse On Page SEO for Product and Catogies Pages
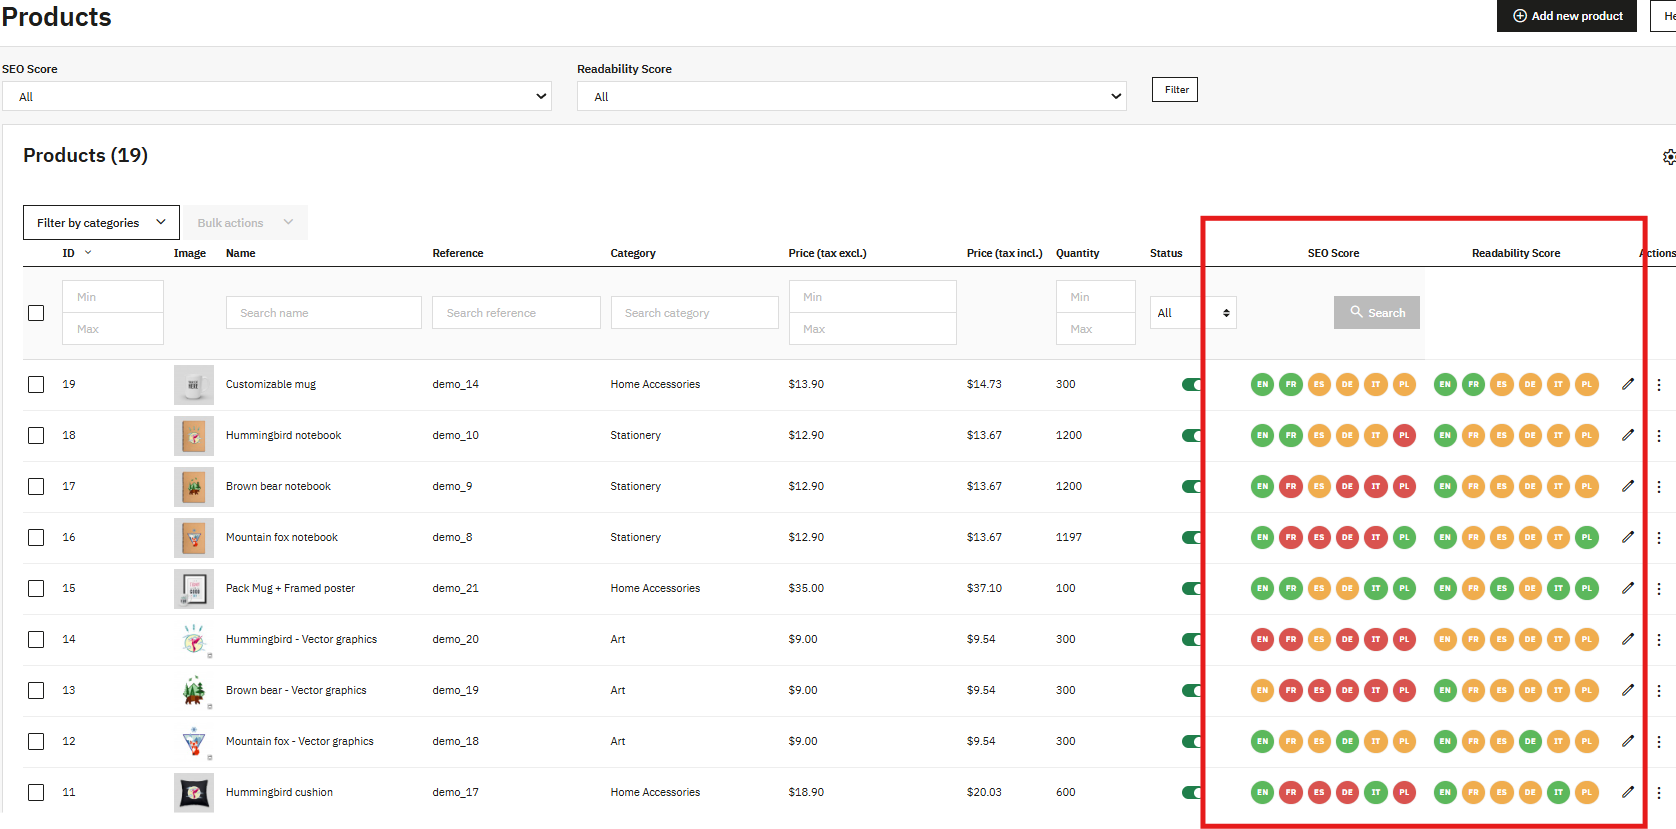
Store owners can easily see the score of readability and SEO within Product , Categories and Brand Pages listing.
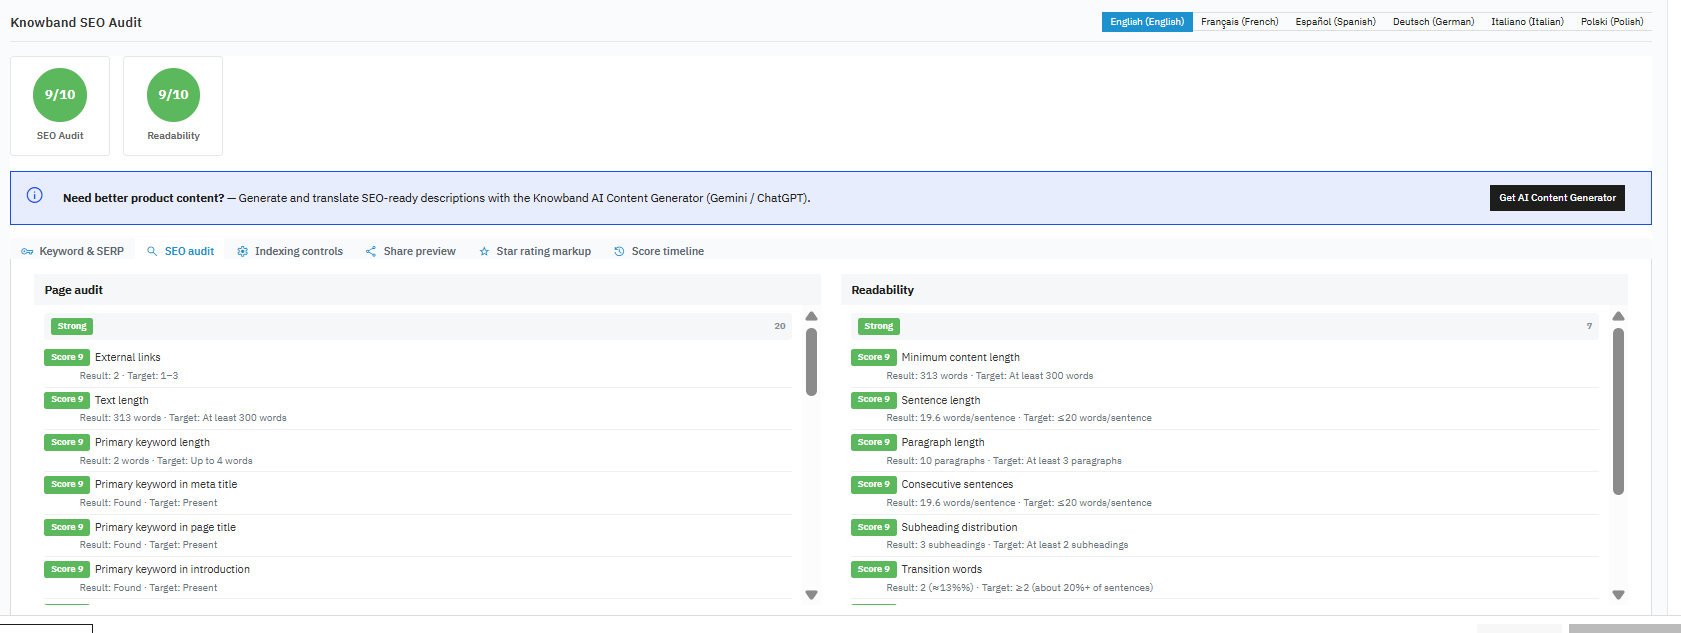
- SEO Audit score circle (0 to 10): The page’s on-page SEO score, color-coded from red (low) through orange to green (strong) will be visible on the product listing pages using Prestashop SEO Audit Module
- Readability score circle (0 to 10): The page’s readability score, scored and colored the same way but based on writing-style checks instead of structural checks.
- Language selector: Switches the entire panel, including scores and every field below, to a different active store language, since each language is scored and edited independently.
- AI Content Generator banner: Promotes the separate Knowband AI Content Generator add-on described in Section 4.7; it is not part of the scoring engine documented here.
Keyword & SERP sub-tab
- Primary keyword field: The single main keyword this page is being optimized for; most of the primary-keyword checks in the SEO audit sub-tab read directly from this field, and several of them show “Not set” until it is filled in.
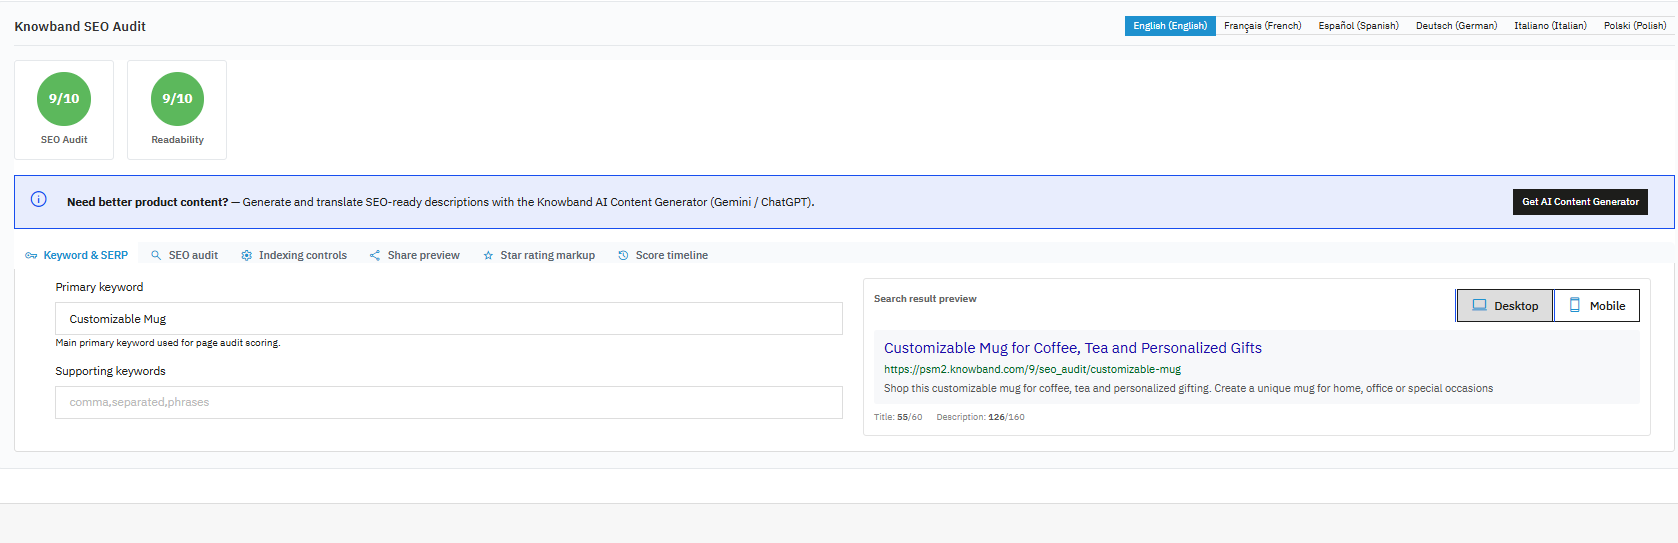
- Supporting keywords field: A comma-separated list of additional, secondary phrases the page should also reflect where natural.
- Search result preview panel: Simulates how the page’s title, URL, and meta description are likely to appear in a search result.
- Desktop / Mobile toggle: Switches the preview between how it typically renders on a desktop search results page versus a mobile one, since mobile often truncates titles and descriptions more aggressively.
- Title character count: Shown against a target of 60 characters, the general point at which titles start getting cut off in search results.
- Description character count: Shown against a target of 160 characters, the equivalent limit for meta descriptions.
SEO audit sub-tab
Two columns, Page audit and Readability, each listing individual rules grouped under a Strong or Needs work heading. Every rule shows a numeric score, the rule name, a Result (what the page currently has), a Target (what it should have), and, for failing rules, a short tip. The verified rules visible in the panel are:
Page audit checks: Single H1; Image alt attributes; Supporting keyword in title, in description, in content, in subheading, in meta description, and in slug; Supporting keyword density (target 0.3 to 1.5 percent); Supporting keyword length (target up to 4 words); External links (target 1 to 3); Internal links; Text length (target at least 300 words); Primary keyword length (target up to 4 words); Primary keyword in meta title; Primary keyword in page title; Primary keyword in introduction (target: present in the opening roughly 150 characters); Primary keyword density (target 0.5 to 2.5 percent); SEO title width (target 30 to 60 characters); Meta description length (target 120 to 160 characters); Primary keyword in meta description; and Primary keyword in URL slug.
Readability checks: Sentence length (target 20 words or fewer per sentence); Flesch reading ease (target 60 or higher); Consecutive sentences; Passive voice (target roughly 10 percent or less of sentences); Minimum content length (target at least 300 words); Paragraph length (target at least 3 paragraphs); Subheading distribution (target at least 2 subheadings); and Transition words (target roughly 20 percent or more of sentences using connector words).
Indexing controls sub-tab
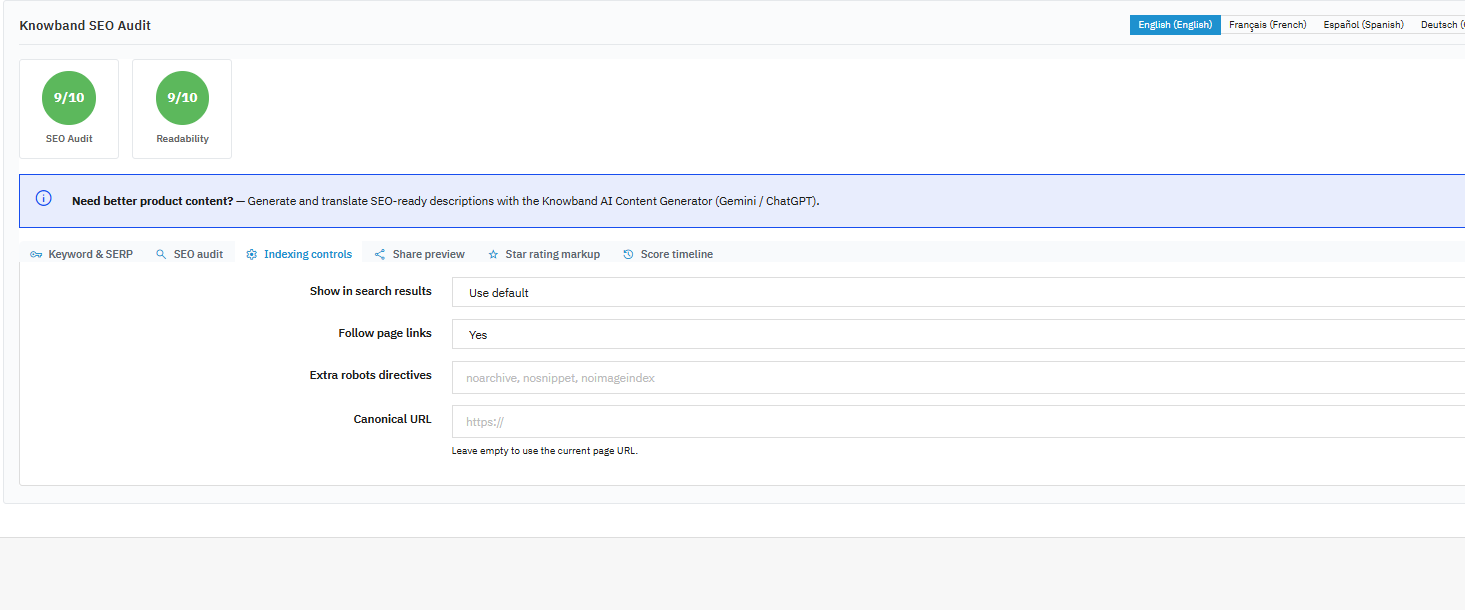
Covers whether the page is set to show in search results and whether links on the page should be followed by crawlers, along with any advanced robots directive or canonical URL override for that specific page and language.
Share preview sub-tab
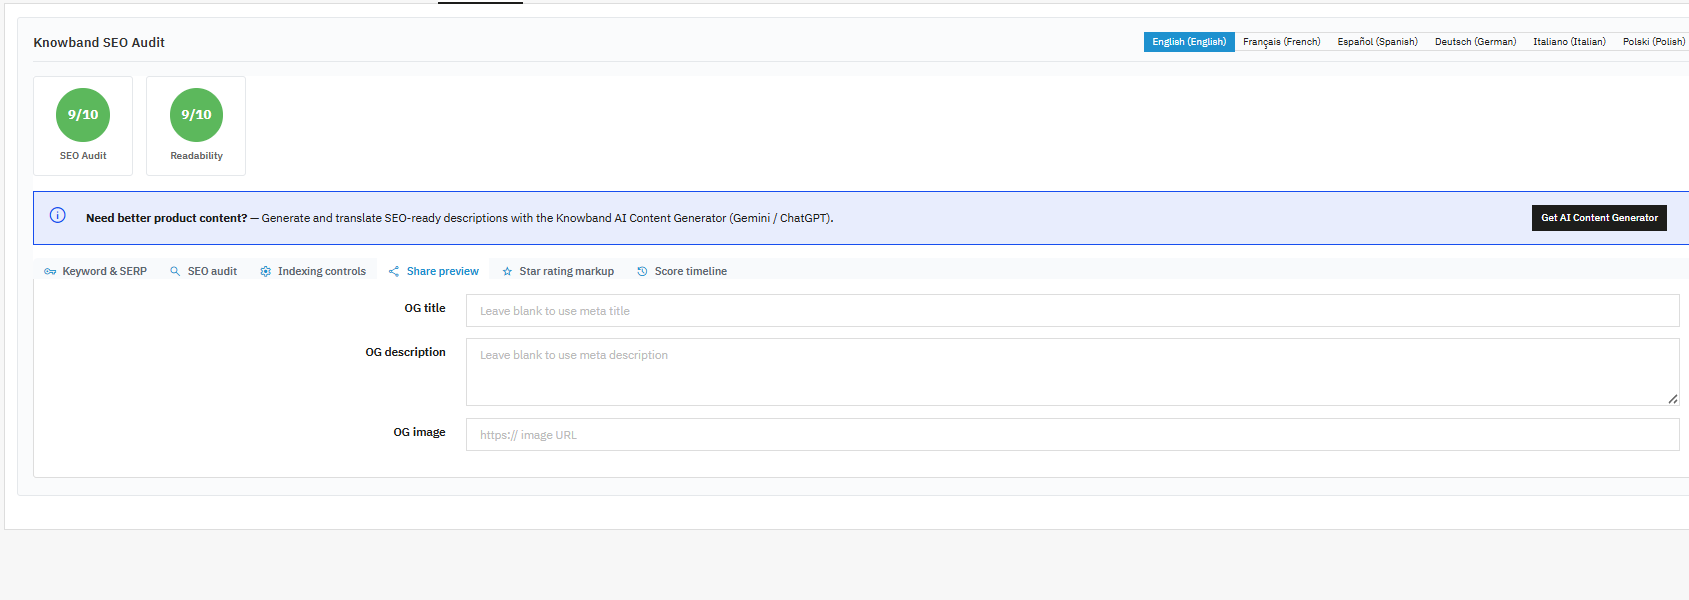
Shows how the page will look when shared on social platforms, reflecting the Social Cards settings from Section 4.6 combined with any page-specific social title, description, and image you set here.
Star rating markup sub-tab
Available on products and categories, this controls whether a star rating snippet is generated for the page and, if so, the average rating and rating count values used to build it.
Score timeline sub-tab
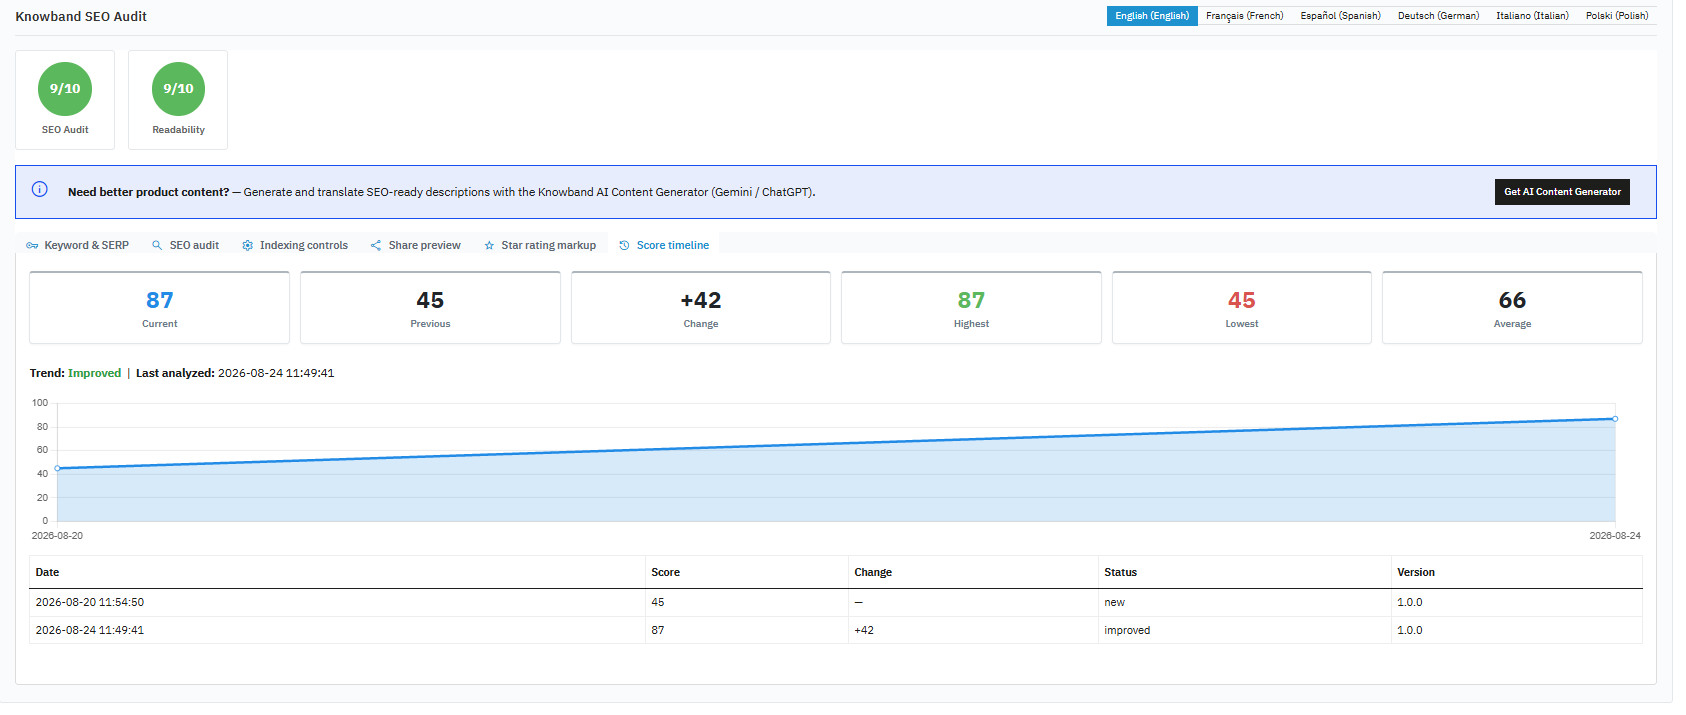
Repeats the Current, Previous, Change, Highest, Lowest, Average, Trend, and Last analyzed figures, plus a history chart and table, that appear on the store-wide Score History page (Section 4.3), but scoped to this individual page only.
6. How to do a Complete SEO Audit in Prestashop
Prestashop SEO Audit Module can run a PrestaShop SEO audit on products, categories, CMS pages, manufacturers, and suppliers, producing two separate 0 to 10 scores per page: an SEO Audit score covering structural checks such as keyword placement, meta length, alt text, and linking, and a Readability score covering sentence length, paragraph structure, passive voice, and transition words. A page can score well on one and poorly on the other.
A low score points to a specific, fixable gap rather than a vague quality problem, because every rule pairs a Result with a Target, as detailed field by field in Section 5. To act on it, open the page’s SEO Audit panel, work through Needs work items, and prioritize content quality (text length, primary keyword placement) before smaller technical checks like linking counts, which need editorial judgment rather than mechanical fixing.
None of these checks claim to be a direct Google ranking signal by themselves. They represent established on-page SEO and content-quality practices, things search engines and readers both respond well to, rather than guarantees of a specific ranking outcome.
7. Frequently Asked Questions
Question 1: I found several 404 URLs. How can I redirect them?
Open URL Optimisation> 404 URLs in the Knowband Prestatshop SEO Audit Module, find the entry, and use its Redirect action, which opens the URL Redirects form with the source URL prefilled. Add the target URL, choose a type (301 for a permanent change), and save. Only redirect when a genuinely relevant destination exists.
Question 2: How should I handle a URL that is no longer available?
If the content moved, add a 301 redirect from the old URL to the new one under URL Optimisation> URL Redirects. If nothing relevant replaces it, leaving it as a 404 is acceptable rather than forcing a redirect to an unrelated page.
Question 3: How can I improve a page with a low SEO score?
Open the page’s SEO Audit panel in Knowband’s Prestashop SEO Audit Manager and its SEO audit sub-tab, then work through the rules listed under Needs work using the Result and Target shown for each one.
Question 4: How to use ChatGPT to generate meta titles and descriptions?
You can use ChatGPT to generate meta title, description, social graph tags using the PrestaShop Complete SEO Module. Click on ChatGPT Tab, save a valid OpenAI token, then use the ChatGPT sub-tab inside a product or category SEO panel to generate, review, apply, and save.
Question 5: How can I check duplicate URLs?
Open URL Optimisation in the PrestaShop SEO Audit Addon and click on duplicate URLs. Colliding friendly URL slugs appear grouped by slug with affected entities listed, and each page’s URL can be updated to a unique value.
Question 6: How can I check my XML sitemap?
By using Knowband’s Prestashop Sitemap XML Editor, you can make changes in sitemap and submit it inside Google Search Console’s Sitemaps tool.
Question 7: Can I connect Google Search Console for my Prestashop website?
Now you can Google OAuth Client ID and Secret, click Connect with Google, then select your Search Console Property or enter its URL manually.
Question 8: Can I view Google Analytics data inside the module?
Yes. Once GA4 is connected and a property is selected, the Analytics section shows sessions, users, views, engagement, traffic trends, and dimension breakdowns without opening Google Analytics separately.
Question 9: How can I identify SEO issues on product or category pages?
Review Score History’s issue trends or open the page directly and check its SEO Audit panel, which surfaces the specific rules failing along with the target value needed to pass.
Question 10: Does the redirect tool support bulk changes?
Yes. Knowband’s Prestashop Redirection Module allow to import CSV on the URL Redirects page to add many redirects in one upload instead of creating them individually.
Question 11: Is ChatGPT-generated content published automatically?
No. Generated content is written into the selected field for review, and the administrator must check it and save the host form for it to take effect.
Question 12: What does the Search Console Data Lag setting actually do?
This setting tells the module to skip the most recent few days when pulling Search Console data, since Google itself delays that data; without this adjustment, the newest days in a report could appear artificially low.
Question 13: Why does my Cron URL matter if I never open it manually?
The Cron URL is meant to be called automatically by your server’s scheduled task system, not opened by hand. It is what actually triggers daily score snapshots, sitemap pings to Google, and scheduled PageSpeed checks, so it needs to be added to your server scheduler to keep those features running without manual effort.
The Prestashop SEO Audit Module integrates scoring, technical maintenance, and Google reporting in one module, making an SEO audit of PrestaShop not require the use of different modules for different processes. If you have faced any issue with this module, feel free to contact us at support@knowband.com.