PrestaShop is a robust open-source e-commerce platform designed for flexibility and customization. It allows developers to modify and enhance its core functionality using hooks, which are predefined entry points in the system. These hooks enable seamless integration of custom features, ensuring that updates and maintenance of the core system remain hassle-free.
This blog provides a comprehensive guide to adding, saving, and displaying custom fields for both product and customer forms in PrestaShop.
By the end of this blog, you will have a thorough understanding of how to create custom form fields in Prestashop, store their data in the database, and display this information in the Admin panel.
Step 1: Adding Custom Fields to Product and Customer Forms-
The first step in customizing PrestaShop involves injecting new fields into the forms for products and customers.
Adding Custom Fields to the Product Form
For this, we will use the displayAdminProductsExtra hook to append the custom field to the product form. This hook is triggered whenever a product is edited in the admin panel.
Hook Overview: This hook allows you to add any extra fields or information to the product creation/edit page.
Explanation of Code:
The example provided demonstrates how to fetch existing data for a custom field from the database and display it in the form. The product ID is retrieved dynamically from the $params, ensuring that the data displayed corresponds to the product being edited.
Add Custom Fields on the Customer Registration Form
Similarly, the displayAdminCustomersForm hook provides an entry point for injecting fields into the customer form.
Hook Overview: This hook is triggered when rendering the customer creation/edit form.
By assigning Smarty variables, the template for the custom field is seamlessly integrated into the admin interface.
Step 2: Creating the Database Fields-
Why Modify the Database?
PrestaShop adheres to a relational database model. By adding custom columns to the ps_product and ps_customer tables, you ensure that your custom data remains associated with its respective product or customer.
SQL Queries:
The provided SQL scripts demonstrate how to add columns to the ps_product and ps_customer tables. These queries are executed once to prepare the database for storing the custom field values.
SQL Query for Product:
SQL Query for Customer:
Best Practices:
Ensure creating a backup of the database before implementing or proceeding with displayAdminProductsExtra any schema changes.
Use column names that clearly describe their purpose to avoid confusion.
Step 3: Designing the Custom Form Templates-
Templates play a vital role in ensuring that custom fields blend seamlessly into the PrestaShop admin UI. Using Smarty, PrestaShop’s templating engine, you can design user-friendly and responsive forms.
Product Form Template (custom_product_form.tpl):
Customer Form Template (custom_customer_form.tpl):
Enhancements:
Add validation: Use JavaScript to validate user input before submission.
Styling: Enhance the form with CSS classes for a consistent look and feel.
Step 4: Saving the Custom Field Values-
Once the form fields are submitted, the values need to be saved to the database. PrestaShop hooks like actionProductSave and actionCustomerSaveAfter allow developers to execute custom logic during the save operation.
Saving Product Field Values
The actionProductSave hook ensures that the custom field data is saved when a product is saved/updated:
Saving Customer Field Values
The actionCustomerSaveAfter hook is used to save the custom customer field data:
Step 5: Displaying Custom Field Values-
Displaying custom fields involves retrieving the stored values and rendering them appropriately in the admin interface.
Displaying Product Custom Field Values
Use the same displayAdminProductsExtra hook to show the custom field value alongside other product details. The retrieved data can be displayed in either a read-only or editable format, depending on the use case.
Displaying Customer Custom Field Values
Similarly, the displayAdminCustomersForm hook retrieves and displays the custom field value on the customer form.
Additional Tips for Developers
1. Testing and Debugging:
Use PrestaShop’s debug mode to identify issues.
Test your custom fields with various inputs to ensure compatibility.
2. Scalability:
If you want to use multiple custom fields, consider creating a separate table to store them dynamically.
Use indexed columns for faster queries.
3. Security:
Always validate and sanitize user inputs using pSQL().
Restrict access to these fields based on user roles, if required.
4. Future Compatibility:
Use hooks exclusively to avoid modifying core files.
Regularly update your code to remain compatible with newer PrestaShop versions.
Conclusion
Adding custom fields to products in PrestaShop is a simple yet powerful way to extend the platform’s functionality. By following this guide, you can ensure that your customizations remain modular, maintainable, and compatible with future PrestaShop updates.
Feel free to adapt these techniques to other areas of your PrestaShop store, and share your results in the comments below!
The Prestashop store owners can now gather more information about their customers by adding the custom fields on the registration form of the website. If Prestashop store owners will get to know more information about the customer, then they can use the same to prepare the marketing and sales pitch of the products. Prestashop Custom Registration Fields addon allows the store admin to add new custom fields and edit the old ones in the registration form. To validate the fields, it is easy to set validation rules from the admin interface. The Prestashop addon lets the admin add any type of field and set the validation rules for the same.
The store owners can even create various sections on the registration form in order to place the custom field. The best part is that all this can be done without making any changes in the code. The Prestashop admin can add the custom field, text box, radio button, or checkboxes.
NOTE: The Knowband’s Prestashop Custom Registration Field Module is compatible with GDPR.
1.1. Benefits of Prestashop Custom Registration Fields Module:
Prestashop custom registration fields module allows the store owner to optimize the registration form of their website with minimal effort and in a matter of moment.
The Prestashop store admin can create new custom fields for the registration form of the website and can edit the existing ones at a button click.
The Prestashop Custom Registration Fields module allows the admin to create the sections on the registration form. This makes the placement of the custom fields easier. Using these custom fields sections store admin can set the custom fields on the top or bottom of the registration form.
Validated various fields easily in a few simple steps.
Prestashop custom registration fields module allows the store admin to mark any custom field as mandatory to fill.
The entire fields created can be effortlessly exported in an excel sheet.
It allows the admin to add new fields without making any changes in codes.
This Prestashop Custom Registration Fields addon helps you to know your customer by gathering more information through the Custom Fields.
Prestashop custom registration fields module is GDPR compliant.
Prestashop custom registration field extension allows the store admin to add custom CSS to change the look and feel of the registration form.
2.0 Installation for Prestashop Custom Registration Fields
In order to install the addon follow the below-mentioned steps.
1. Purchase the module from KnowBand. You’ll be provided with the following files:
kbcustomfield.zip
User Manual
2. Unzip the kbcustomfield.zip file. It would contain a number of files and folders as shown below –
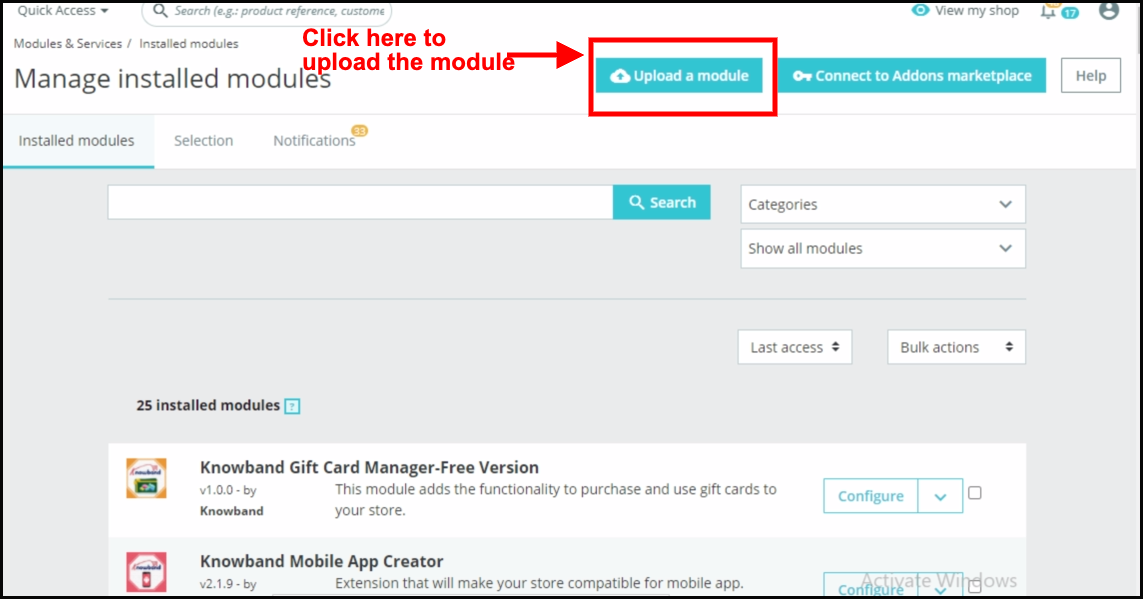
3. Now navigate to the“Module and services” section from the side menu and click on the “Upload a module” button. You can drag and drop the file or can simply select the file from the system. Once the file is completely uploaded, a notification of “Module(s) installed successfully” will be displayed.
4. Now module is ready to be installed on your store and you can find that in Store Admin -> Modules and Services. It would shown as below –
In case, you are not able to find module in admin modules list, please try searching module with following details –
Keyword – Custom Field
Category – Front office
Filter By – Installed & Not Installed / Enabled & Disabled
5. Click on the “Enable” button to activate the Prestashop custom registration field module.
6. Now the module is ready to use and you can configure it by clicking on the “Configure” button as shown below:
3.0 Admin Interface of Prestashop Custom Registration Fields
This module is configurable and configuration settings can be updated via the back-end of the admin interface.
3.1 How can the Prestashop Custom Registration Fields module be configured?
Once the module is installed, you can now enter the admin interface. In this Prestashop custom field registration module, you will find three customization options.
Module Configuration
Custom Field Section
Custom Fields
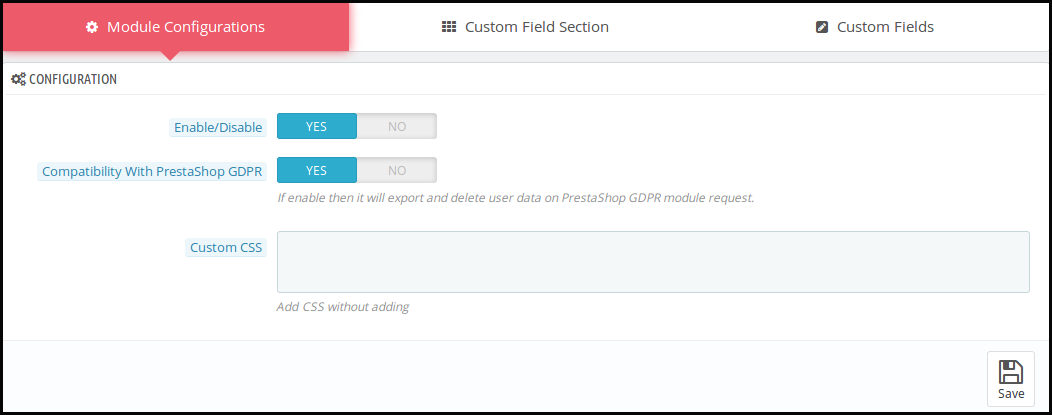
Module Configuration: In this, Prestashop store admin can enable the module and also can set the custom CSS.
Enable/Disable Module: The admin gets to customize the look and feel of the same by entering the Custom CSS code. Without getting much into the complexity of the coding, the admin can enter the code in the section shown below.
Compatibility with Prestashop GDPR: The admin can enable or disable this feature. Enabling this feature will export and delete the user data on the Prestashop GDPR module request.
Custom CSS: The admin gets to customize the look and feel of the same by entering the Custom CSS code. Without getting much into the complexity of the coding, the admin can enter the code in the section shown below.
3.2 How to create the custom field section?
The custom field section refers to the blocks in the registration form where the various created fields will be placed.
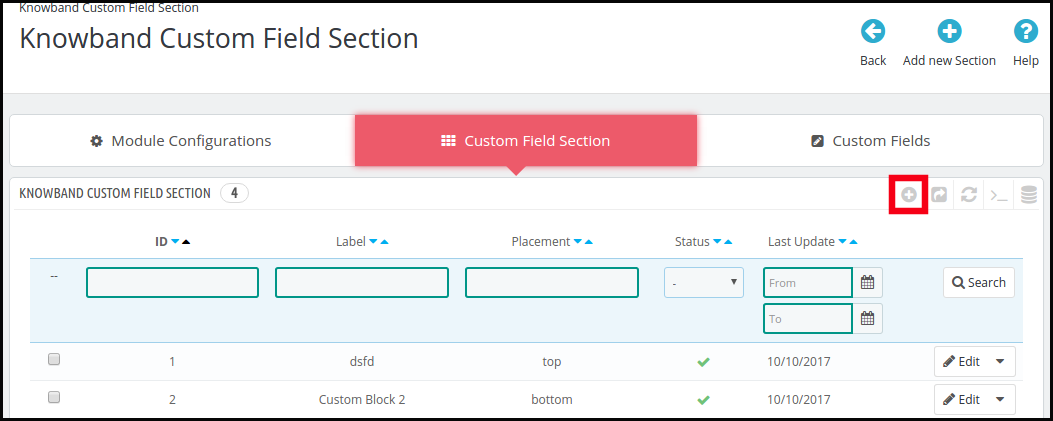
Add Custom Field Section: In order to create a new field section, go to the Custom Field Section Tab and click on the ‘+’ sign in the right side as shown below.
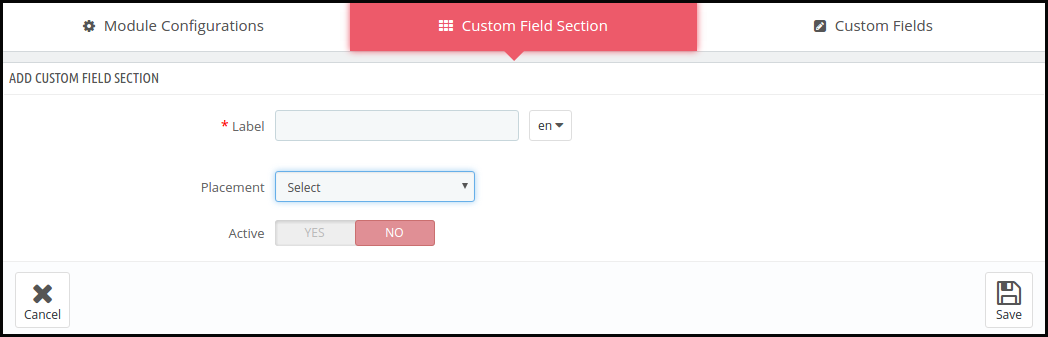
On clicking here, the admin will be redirected to the custom fields section creation page.
The store admin is required to fill in the information and the section will be created.
Label: This refers to the name of the section. The label name can be entered in multiple languages as per the requirement of the website.
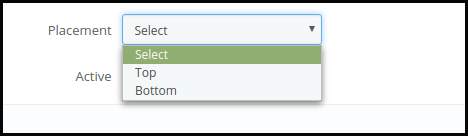
Placement: The admin can select the position where he wants to place that particular custom field section.
Active: The created section can be deactivated by just toggling the button.
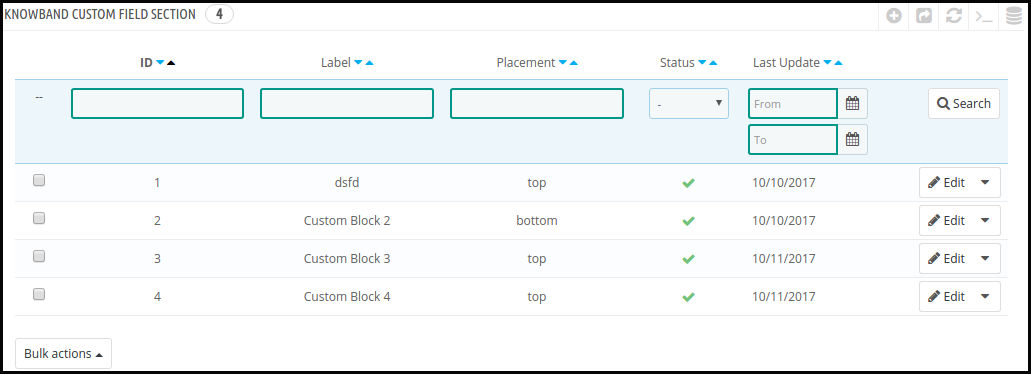
View Custom Field Section: The entire list of the field sections created will be seen in this tab as shown in the image below.
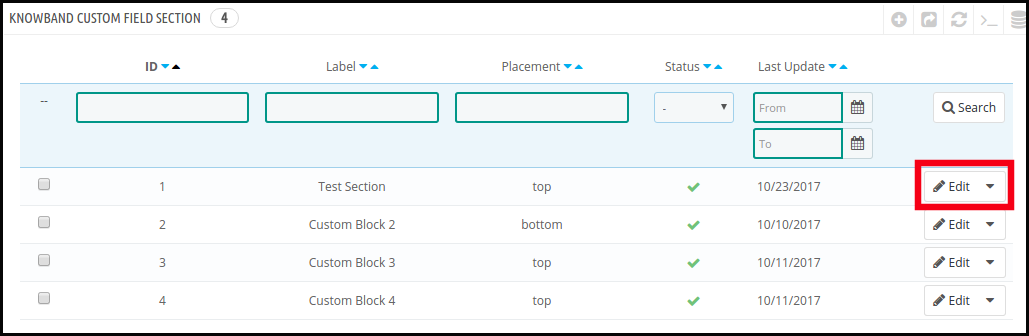
Edit Custom Field Section List: In case of any changes required to be done in the created sections, the admin can go to the edit section and complete their modifications.
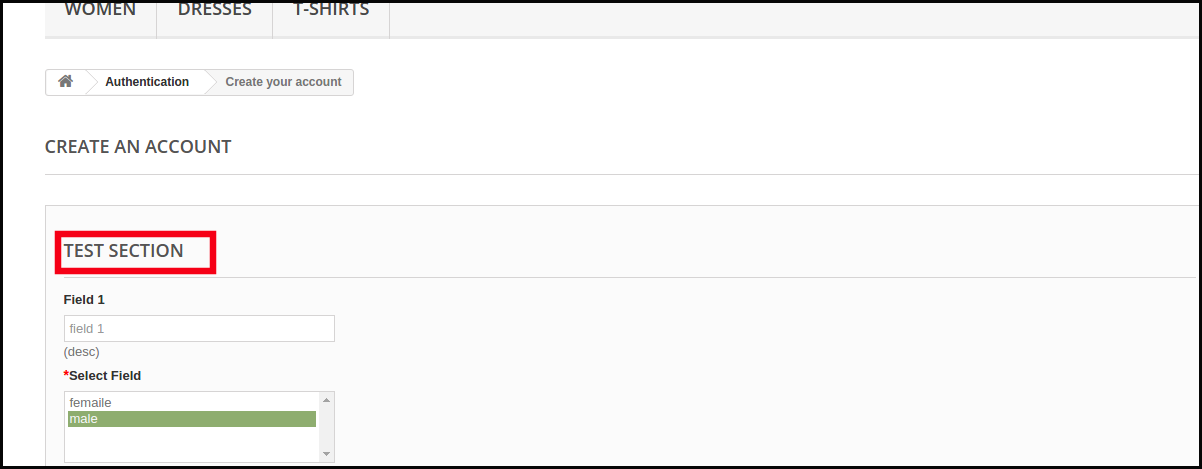
The section created will be shown in the front end of the website as shown in the below image.
3.3 How to create the custom field for the registration forms?
Once the Prestashop Custom Registration Fields module is enabled, the admin gets an option to create ‘N’ numbers of fields. All what the store admin needs to do is to click on the ‘+’ sign in the right side of the admin panel as shown in the image below.
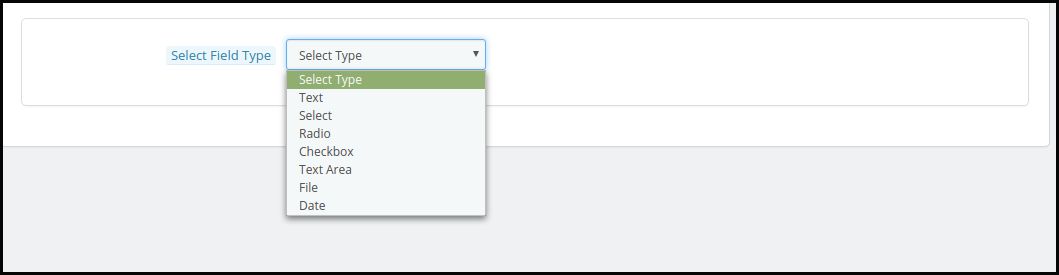
This will redirect the Prestashop store admin to the field creation page. The admin will be required to select the type of field that he is looking to create. The various type of fields is provided in the dropdown list. The admin can select any one of them.
The various options offered by Prestashop Custom Registration Fields Module are given below.
Text
Select
Radio
Checkbox
Text Area
File Date
Different field types required different information to be filled in. Let us discuss them one by one.
3.3.1 Text Field
The text fields allow the customers to enter their personal information in a textbox. This field may be used for Name, Last Name, Address, and other such information.
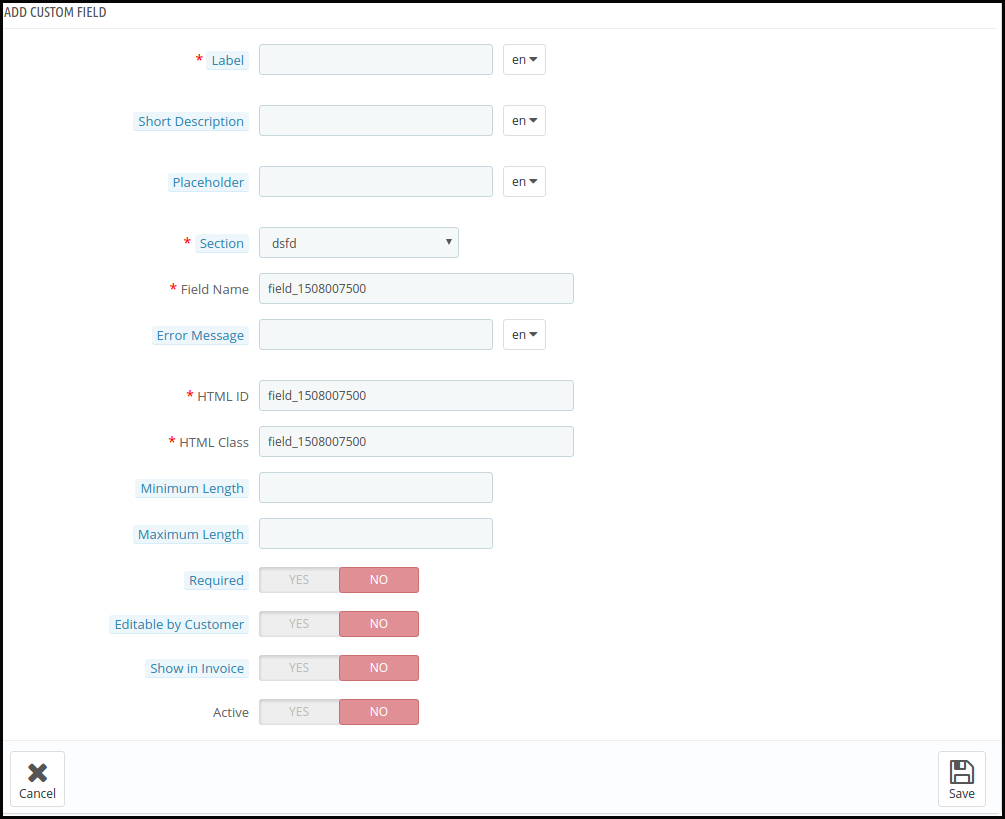
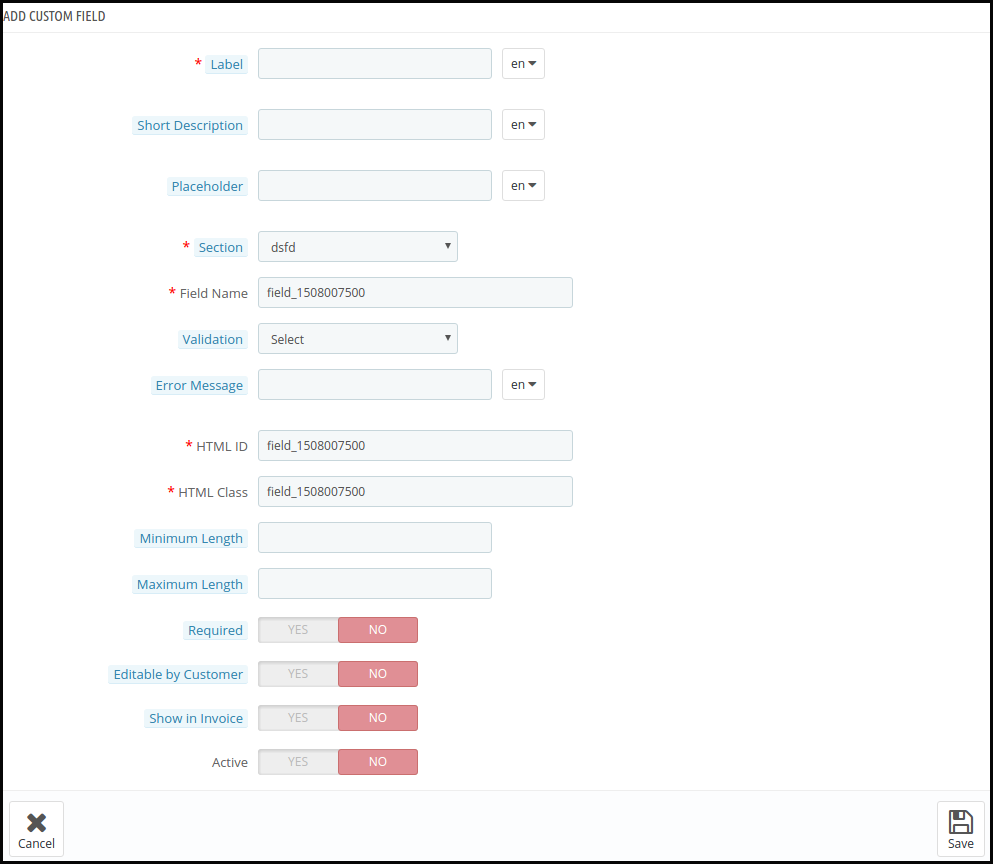
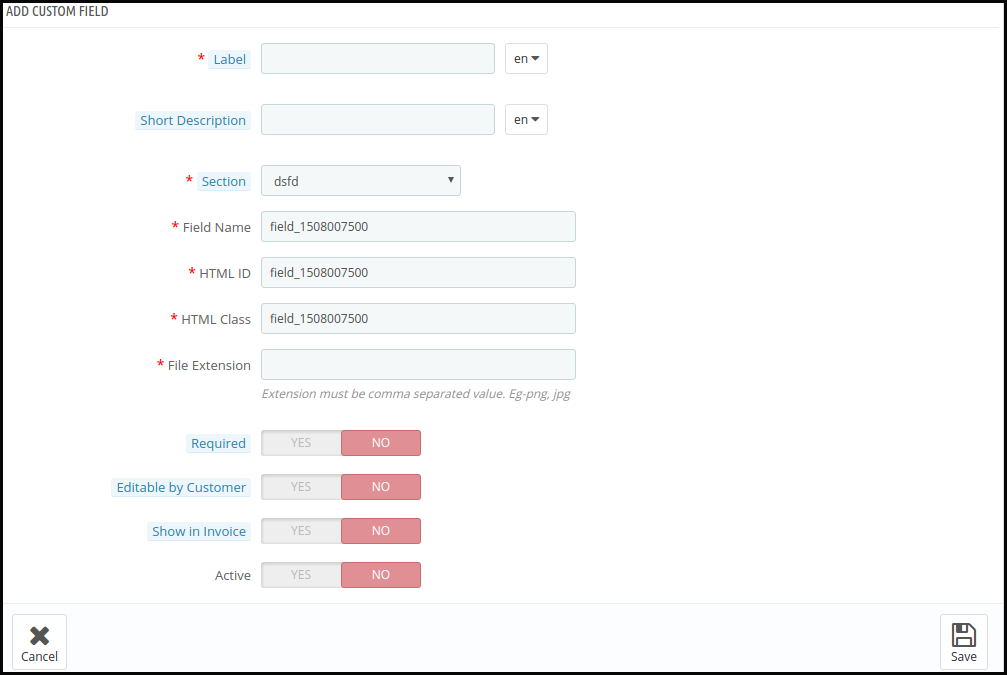
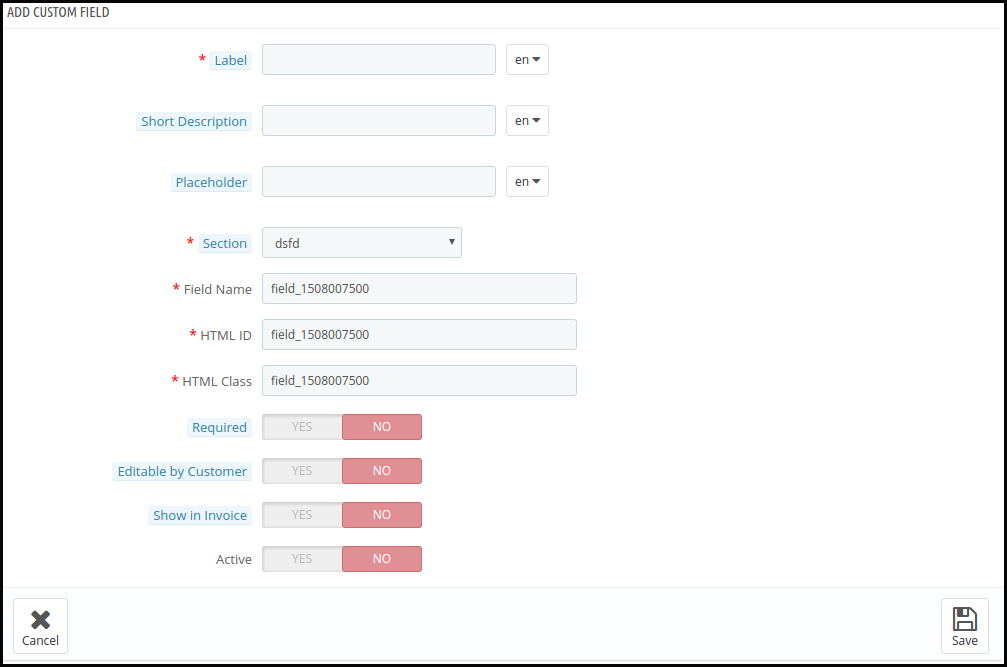
The Prestashop store admin can be asked to fill-up the form as shown in the image below.
Label: Label includes the name of the field that will be displayed on the front-end of the website.
Short Description: The short description will specify exactly what the customers are supposed to mention in that field.
Placeholder: The admin can enter the Placeholder in this section. All these inputs can be entered into multiple languages.
Section: Section allows the admin to select the block where he wants to place that particular field.
Field Name, HTML ID, HTML Class: This section will provide a unique identity to the fields. It will be the same for all three sections.
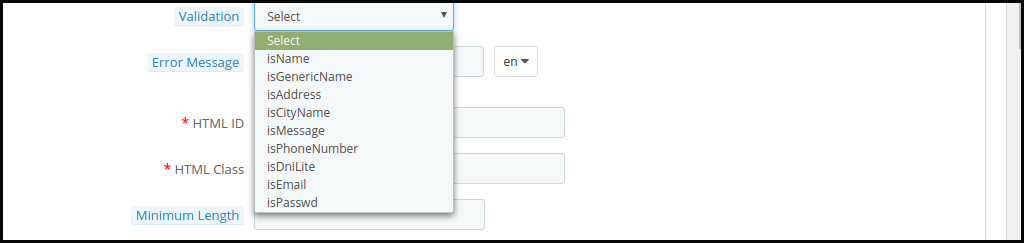
Validation: The admin can select the validation type for the various fields without making any query changes. The various validation options offered are mentioned below:
isName
isGenericName
isAddress
isCityName
isMessage
isPhoenNumber
isDniLite
isEmail
isPassword
In case the validation rules are not followed while entering the information, it will show an error message to the customers.
Using Prestashop Custom Registration Fields, the Prestashop store admin can select the validation type as per their requirement.
Error Message: Displays a custom error message in case the customer enters the wrong information. It supports multiple languages.
Maximum and Minimum Length: This section allows you to fix the word limit for the fields. In case, no value is entered, then, the text box will be able to intake as many characters and words.
Required Field Validator: Enabled this in the mandatory fields. In case the visitors leave it empty, the Prestashop custom registration field will show an error.
Editable by the Customer: Enable this feature will make the fields editable by the customers.
Show in Invoice: The information entered by the customers will be shown on the invoice if this field is enabled.
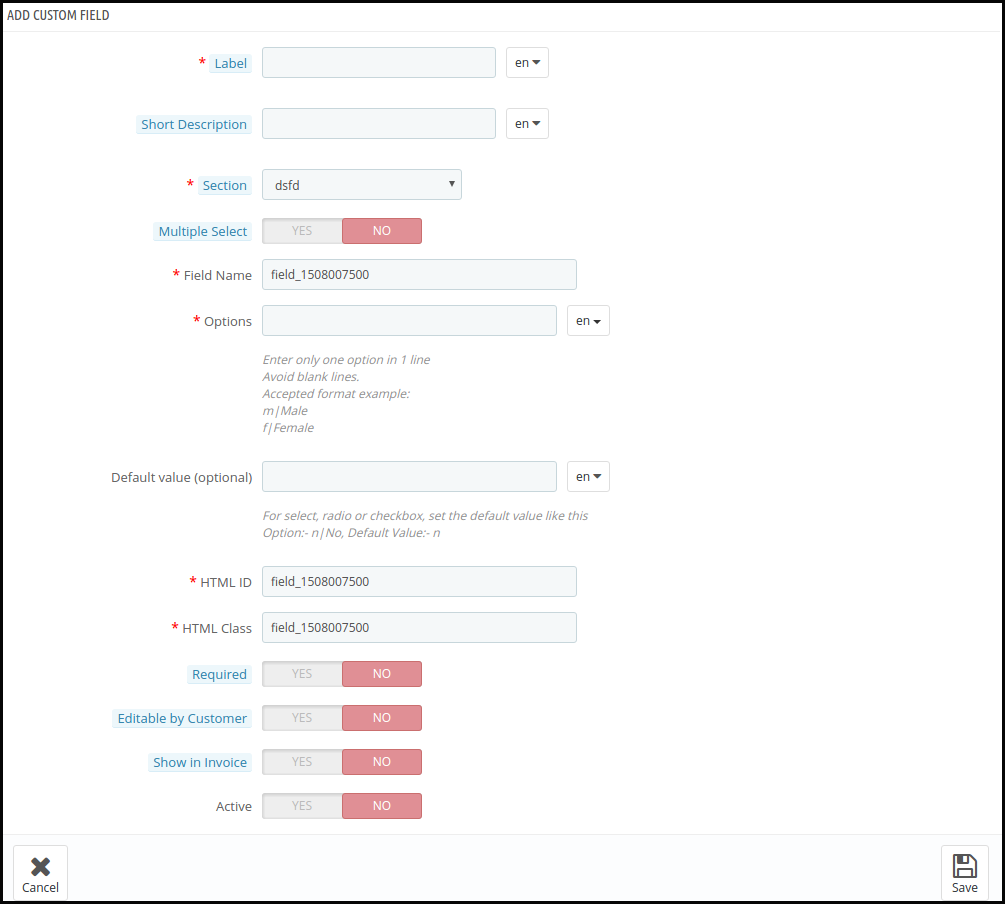
3.3.2 Select Field
This field allows the customers to choose an option from the multiple choices available. For instance, the ‘Gender’ field offers the option of ‘Male’ and ‘Female’.
The Label Name, Short Description, Section selection remains the same in this field type as the other ones. Here are the customization options offered to the Prestashop store admin.
Multiple Select: The store visitors can offer to select more than one choice by enabling this button.
Options: Enter varied options here. The multi-lingual support allows you to enter the choices in multiple languages.
Default Value: This is an optional field. The store admin can set the default value for the Radio, Select, or Checkbox options.
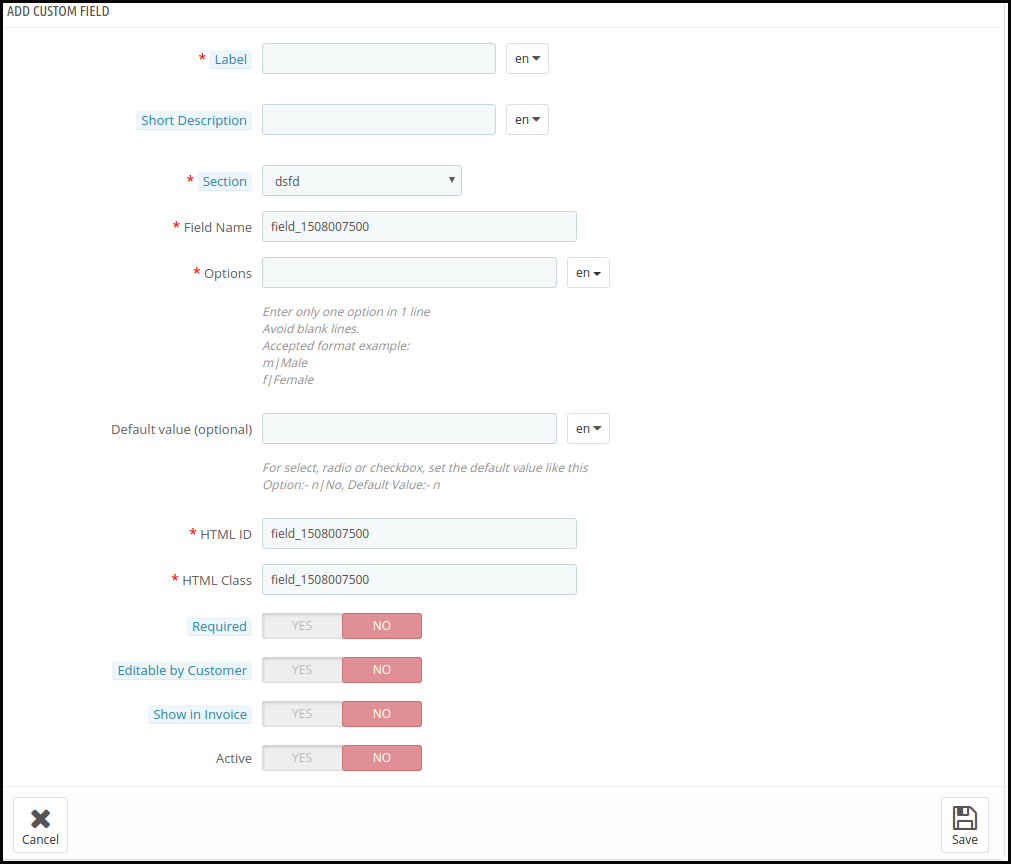
3.3.3 Radio Field
Radio buttons function as the channel presets on radios. While the Select field allows the customers to even choose more than one option, the radio buttons allow the visitors to choose only one option at a time.
The customization option of this field is the same as the ‘Select’ field only the ‘Multiple Select’ options is missing here.
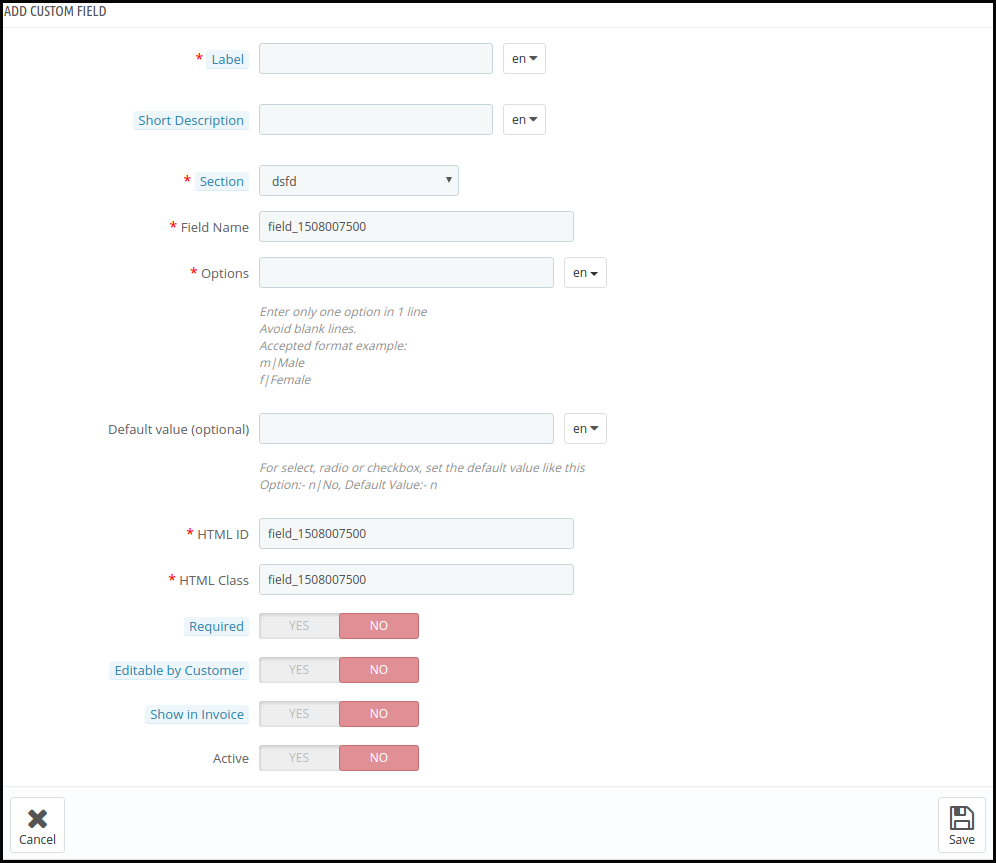
3.3.4 Check Box Field
The functionality of the check-boxes is the same as the radio buttons and select fields. The only difference is that the customers select the options by checking the boxes.
3.3.5 Text Area Field
Text field offers the only line to the store visitors to enter their information. Use it to gather Name, Surname, and others. However, use Text Field type when multiple lines are necessary to enter the information. Even in this as well, admin can fix the the maximum and minimum length of the characters.
3.3.6 File
This field allows the store visitors to upload a file such as images, documents, and others on the website. The e-merchant can enter the required file extensions. If customer uploads a file with a different extension, it will display an error message.
3.3.7 Date
This field allows the customers to enter the date in the format set at the backend of the admin panel. In case of the wrong format or false information, it displays an error message.
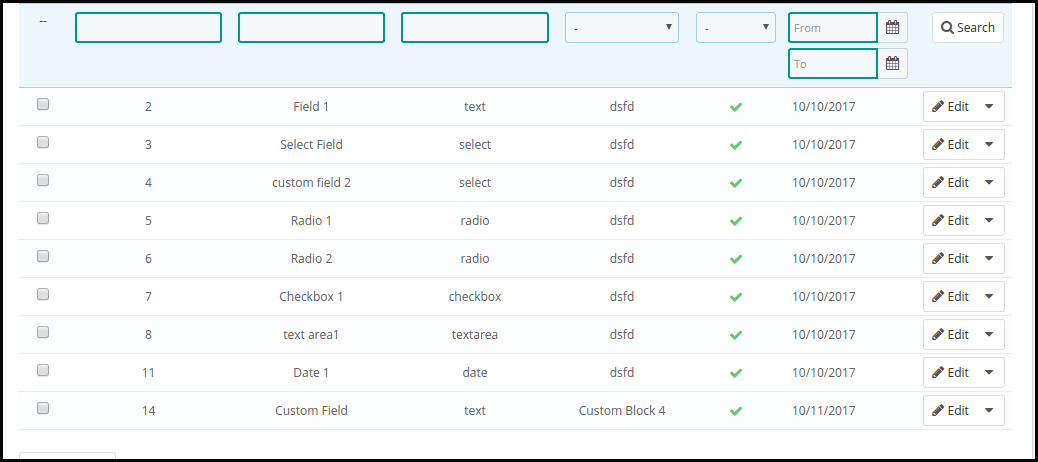
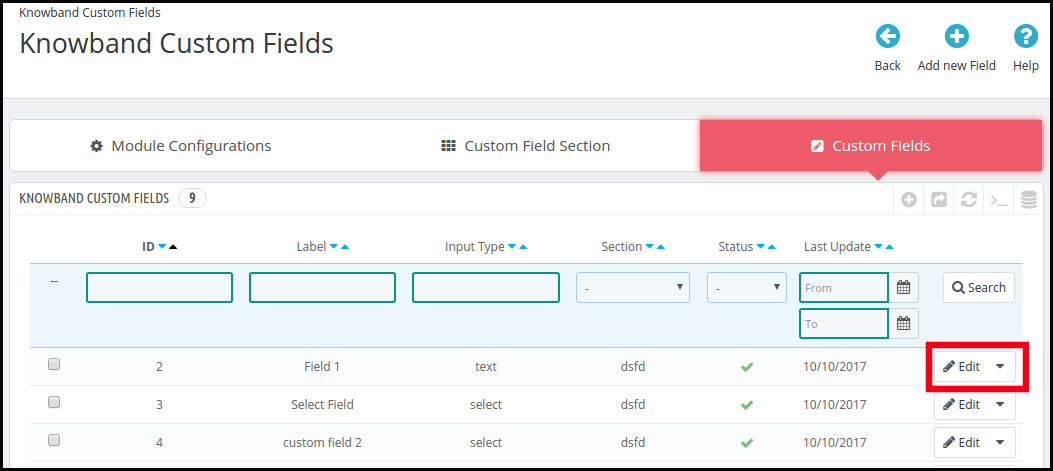
All the custom fields created by the Prestashop store admin will be shown in the admin panel.
In case you need to edit any already existing field, do it by clicking on the Edit buttons.
3.4 How can the custom field be exported in an Excel Sheet?
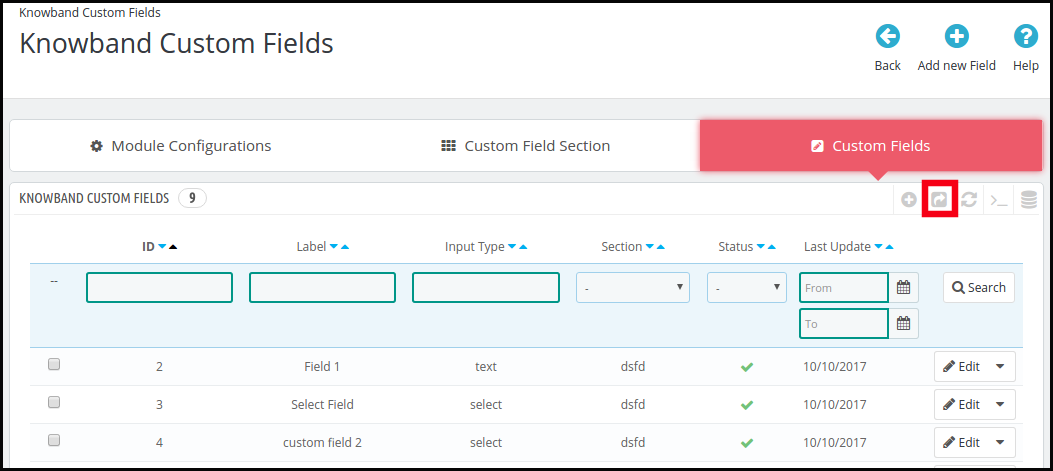
Prestashop custom field for registration field addon allows the store admin to export the list of the custom fields created in the back-end in an excel sheet. To do this, click on the arrow button on the top of the admin panel on the right side. The same is shown in the image below. Export the custom field sections just at a button click.
4.0 Front Interface for PrestaShop Custom Registration Fields
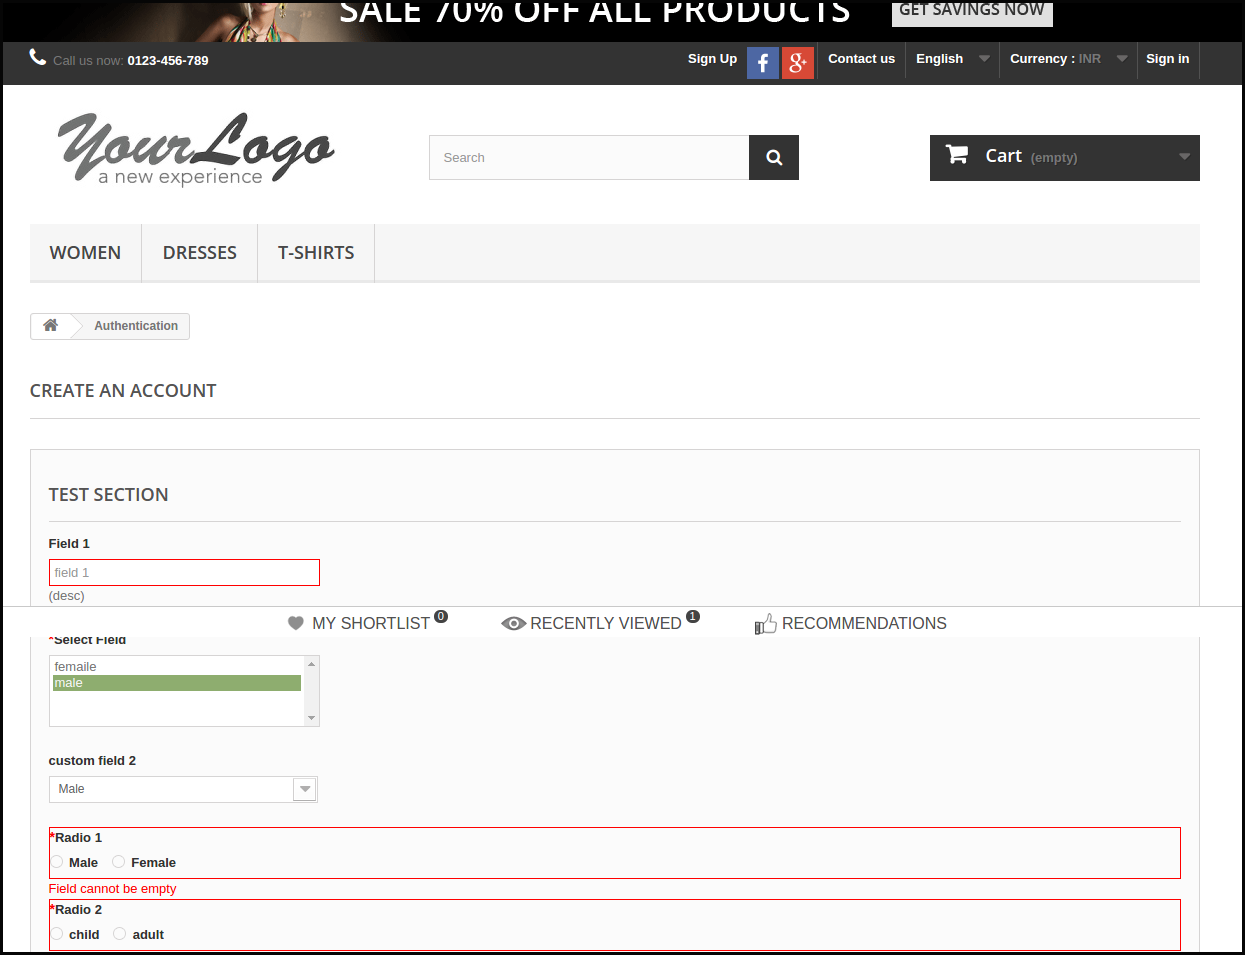
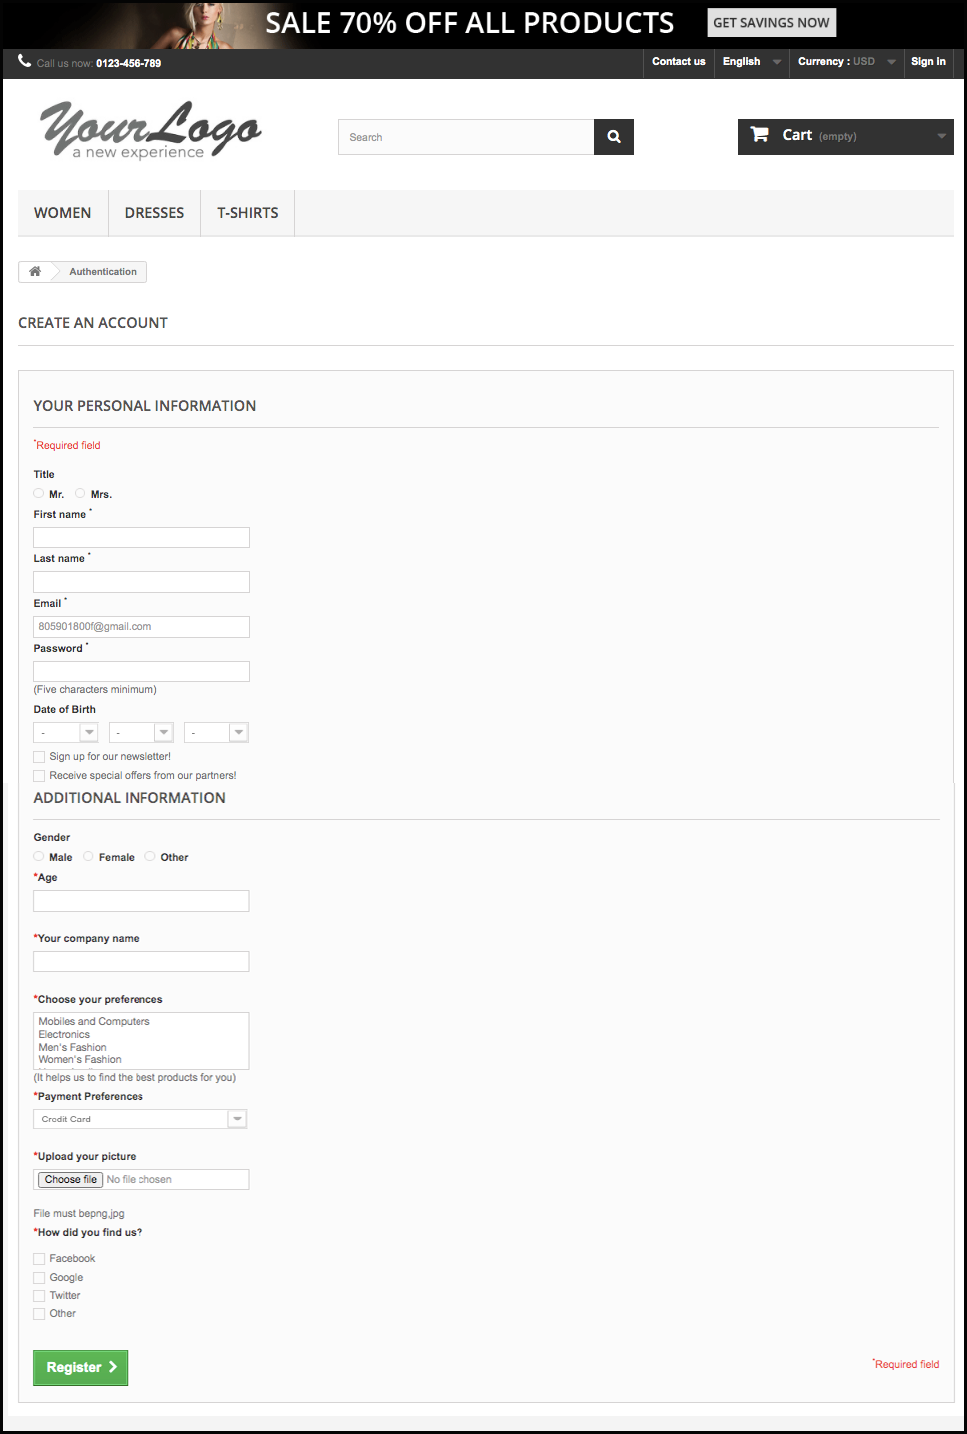
As soon as you create various custom fields and the custom field section, the registration form will be available for the store visitors.
This is how the registration form looks like:
No coding, no hassles. If you want to target your customers correctly, then you must have a good knowledge of your customers. Gathering their statistics at the time of registration provides a personalized experience to your customers and help you to know about user behavior. Additionally, you can easily utilize the collected data for your marketing and promotional campaigns.
5.0.0 Tutorial Video of Prestashop Custom Registration Field Module
Checkout our complete tutorial videos, which cover all the features from Installation to the complete frontend working.