
PrestaShop Security Manager is a completed PrestaShop security module developed to replace the work of single-purpose plugins most merchants end up installing one at a time: a two-factor authentication plugin, a CAPTCHA plugin, a separate firewall extension somewhere else. Instead, this module brings admin-side protection, frontend defence, and file-integrity scanning together in one configuration screen inside your PrestaShop back office.
If you’re looking for a Complete PrestaShop 2FA module, a PrestaShop firewall module, a PrestaShop brute force protection module, or simply a way to lock down your to secure the backend without juggling these five different extensions, this Prestashop Advanced Security Manager covers all.
This module is organised into three functional areas, each with its own set of tabs:
- Admin Security: The admin’s security includes the 2FA (Two-Factor Authentication), Brute-Force Protection, Admin IP Protection, Folder Rename(Hidden Admin URL), HTTP Authentication and login activity monitoring.
- Frontend Security: This includes Web Application Firewall, HTTP Security Headers, Spam Protection (CAPTCHA), Fake-Cart Protection, Content Protection, and Storefront HTTP Authentication.
- Anti-Malware: Scheduled scanning, threat detection, and historical scan reporting.
Each of these areas is documented in full later in this manual, with every field explained in plain language so you always know exactly what you’re turning on before you turn it on.
Update (July 8, 2026): New Features Added to the PrestaShop Security Module v1.0.1
The latest update to Knowband’s PrestaShop Security Module introduces a dashboard and a frontend security feature that is a HoneyPot Field and Project under Spam Protection. These additions give store owners a clearer view of their store’s safety and a stronger defence against automated attacks, all without any technical hassle.
1. New Security Dashboard
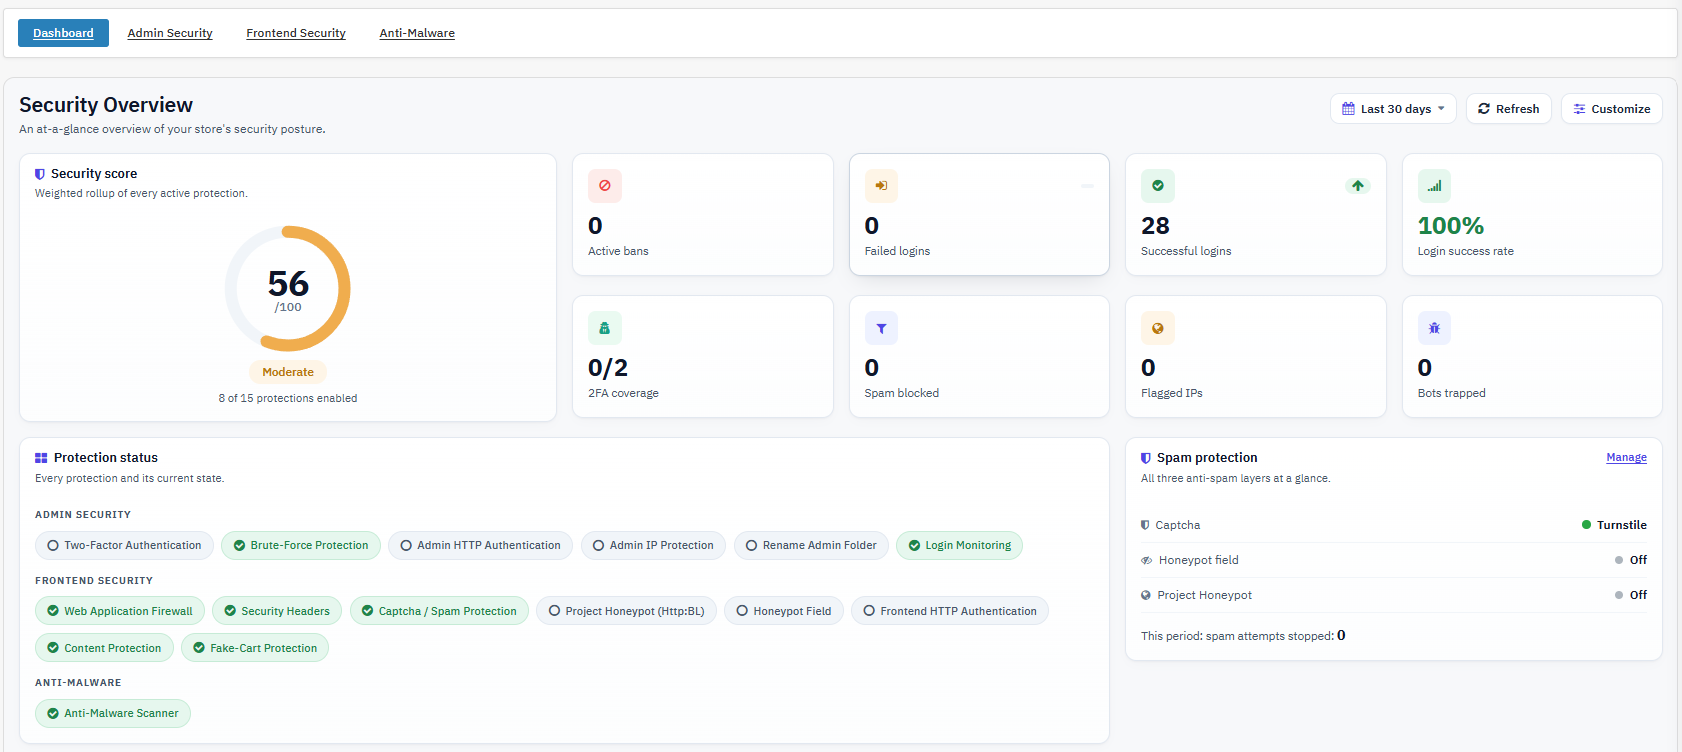
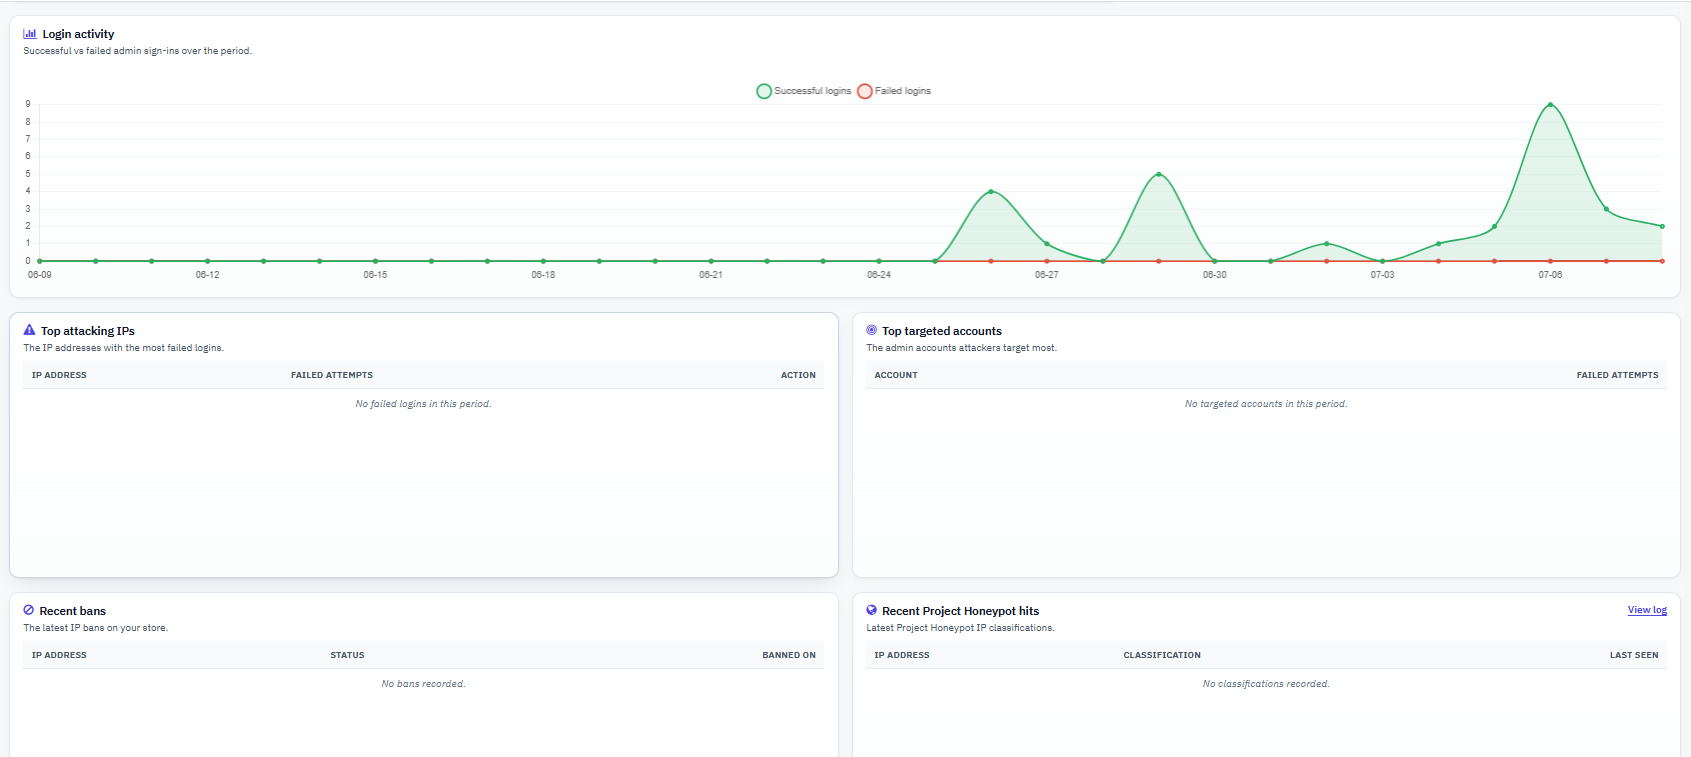
A centralised Security Dashboard has been added so store admins can see their store’s complete security status from one single screen.
The dashboard shows key details such as:
- Security Score
- Active Security Protections
- Failed and Successful Login Attempts
- Login Success Rate
- Two-Factor Authentication Coverage
- Active IP Bans
- Spam Protection Statistics
- Flagged IP Addresses
- Bot Trapping Activity
- Recent Project Honeypot Classifications
- Top Attacking IP Addresses
- Top Targeted Admin Accounts
This new feature makes it easy for merchants to keep an eye on security events in real time and spot problems before they grow.
2. Honeypot Protection
A new Honeypot feature adds an invisible first layer of defence against bots. It works by placing a hidden field inside select storefront forms, real visitors never notice it, but bots that fill in every field automatically get caught right away.
- Protects Registration, Login, Contact, Newsletter, and Product Comment forms
- Works without changing your store’s theme
- Needs no third-party service
- Stays invisible to genuine visitors
- Cuts down spam entries and fake sign-ups
For even stronger results, Honeypot works well together with the PrestaShop Captcha Module to stop more advanced bots.
3. Project Honeypot Integration
This update also connects the module with Project Honeypot a trusted global service that recognises known spammers and harmful IP addresses.
Unlike form-based protection alone, Project Honeypot checks a visitor’s reputation before they even reach your forms.
Main highlights include:
- Real-time IP reputation checks through the Http-bl service
- Observer Mode to watch suspicious visitors without blocking them
- Action Mode to automatically ban flagged IP addresses
- Custom ban duration settings
- IP whitelist support for trusted users, office networks, and CDN services
- Clear logs showing visitor reputation and the action taken
2. Key Features of PrestaShop Advanced Security Manager
Two-Factor Authentication (2FA)
Requires admins to confirm their identity with a time-based one-time code from an authenticator app, in addition to their password. This stops account takeover even if a password is leaked, guessed, or reused from another breach.
Brute-Force Protection
Temporarily blocks an IP address that racks up too many failed admin login attempts within a defined time window, neutralizing automated credential-stuffing and password-guessing scripts without requiring any manual intervention.
If an attacker’s script tries 50 password combinations against the admin login in under a minute, the IP is banned automatically after the configured retry limit, for the configured ban period.
Admin IP Protection
Restricts back-office access to a defined list of IP addresses; everyone else is blocked before they even reach the login page. This is the strongest single control against external admin access attempts, since it blocks the request before any credentials are checked.
Folder Rename (Hidden Admin URL)
This module can hides the real admin folder behind a secret virtual URL, so the actual back-office path returns a 404 to anyone who doesn’t know the virtual name. This removes your store from the pool of sites bots find by scanning for common admin folder names.
HTTP Authentication (Admin & Frontend)
Using this module, you can add an extra browser-level username and password prompt in front of either the back office, the storefront, or both, before PrestaShop’s own login screen even loads. This is a second authentication layer that operates entirely outside the application, useful for staging environments, pre-launch stores, or an additional admin gate.
Web Application Firewall (WAF)
Inspects incoming GET, POST, and cookie data for known SQL injection, cross-site scripting, and path-traversal attack patterns, blocking matches with an HTTP 403 response. This catches a large share of automated exploitation attempts before they ever reach PrestaShop’s own code.
HTTP Security Headers
Adds response headers (HSTS, clickjacking protection, content-sniffing protection, referrer policy, permissions policy) that instruct browsers to enforce additional security behavior. This is a no-downside way to harden how browsers handle your site, and it’s often required for PCI and security-audit checklists.
Spam Protection (CAPTCHA)
Adds CAPTCHA verification (Cloudflare Turnstile, Google reCAPTCHA, or hCaptcha) to the contact form and customer registration form, cutting down spam submissions and fraudulent account creation without requiring any theme changes.
Fake-Cart Protection
Blocks GET-based cart manipulation requests, a common bot technique that crawls and pre-loads carts using URL parameters rather than real add-to-cart actions. This keeps cart and inventory data clean of bot-driven noise without affecting real customers.
Content Protection
Discourages casual content copying through right-click, copy and paste, view-source, and DevTools key-combination blocking, raising the effort required for casual scraping of product descriptions and images.
Anti-Malware Scanning
Performs scheduled file-integrity scans of your PrestaShop installation, comparing files against a known-good baseline and flagging new or modified files as potential threats. This surfaces evidence of a compromise, such as injected code, modified core files, or unexpected new files, often well before it becomes visible on the storefront.
3. Module Installation of PrestaShop Security Manager
Uploading the Module
- Log in to the PrestaShop Back Office with an administrator account.
- Navigate to Modules > Module Manager.
- Click Upload a Module in the top-right corner.
- Select the module ZIP file you downloaded after purchase.
- Wait for the upload progress indicator to complete. Do not navigate away from the page during this step, as it can interrupt the file transfer on slower connections.
4. Admin Panel Overview of PrestaShop Advanced Security Manager
The module adds a new entry to your back-office menu, typically under your installed modules or a dedicated security menu item depending on your PrestaShop theme. Opening it brings you to a configuration screen organized into three top-level areas, each broken into its own tabs:
- Admin Security: controls that apply to your back-office login and admin sessions, including 2FA, Brute-Force Protection, Admin IP Protection, Folder Rename, HTTP Authentication, and Login Monitoring, which includes the Employees sub-view for managing individual 2FA enrollments.
- Frontend Security: controls that apply to customer-facing traffic, including the Web Application Firewall, HTTP Security Headers, Spam Protection, Fake-Cart Protection, Content Protection, and storefront HTTP Authentication.
- Anti-Malware: scan configuration and historical scan reports, including the CRON URL used for scheduled scanning and a searchable, filterable log of past scans.
At the top of the configuration page, regardless of which tab you’re on, you’ll find the emergency recovery URL, a permanent link that disables the module’s restrictive features in one click if you ever lock yourself out.
Important: This is the single most important piece of information of the module in this user manual. You can copy it now, before configuring anything else, and store it outside the admin panel where you can access this information.
5. Admin Security
Admin Security is the core of this PrestaShop admin security module: the set of controls protecting the back-office login itself, which is the single highest-value target on any store. A compromised admin account gives an attacker far more reach than any frontend vulnerability, so this section deserves the most attention during initial setup.
Two-Factor Authentication ( 2FA)
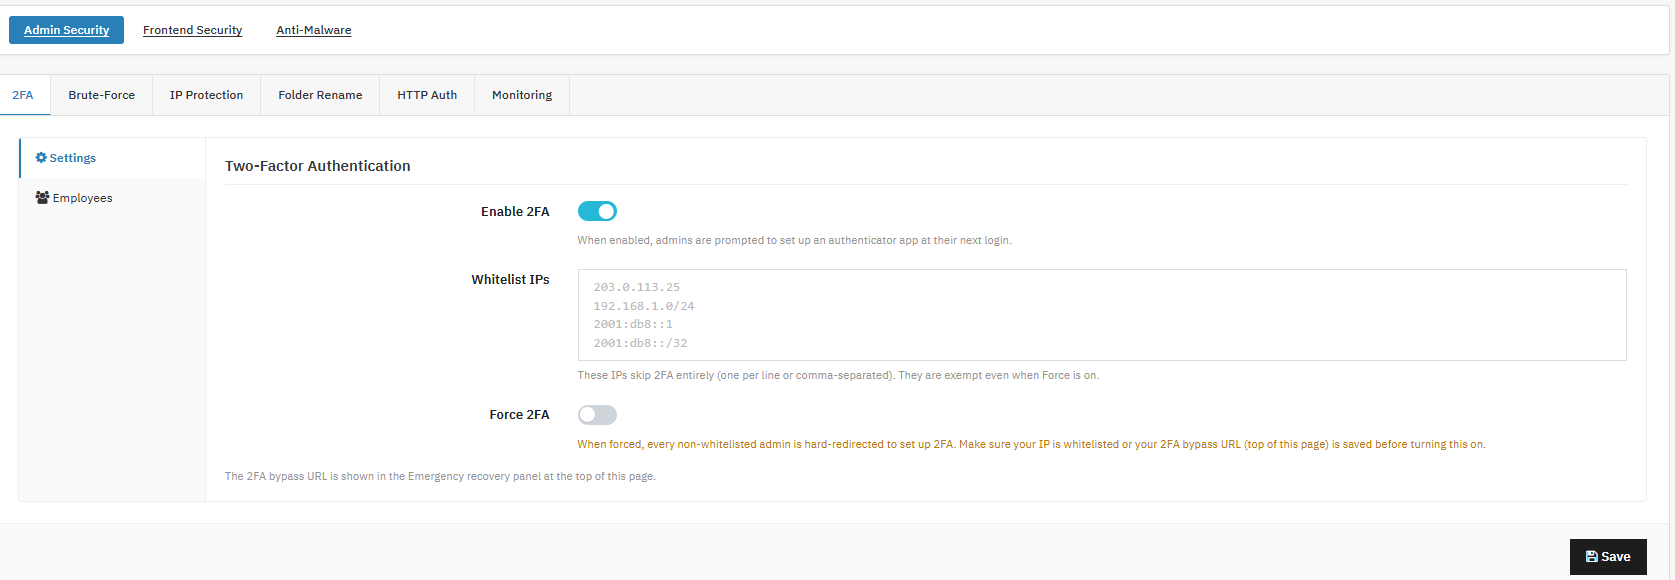
Store administrators can use this PrestaShop two factor authentication module to require a time-based one-time code from an authenticator app on top of the normal password, closing the
Enable 2FA: Turns on 2FA support using the toggle; admins are redirected to set up an authenticator app at their next login.
Enable for all stores, even if not yet forced.
Whitelist IPs: Store admins with added IPs that skip 2FA entirely, one per line or comma-separated; exempt even when Force is on.
It is recommended to add your office or home as a safety net before forcing 2FA.
Force 2FA: You can redirect every non-whitelisted admin to set up 2FA before they can proceed.
Also, enable only after whitelisting a trusted IP or confirming your recovery URL.
b) Employees
ID: Identifies the employee account.
2FA Status: Shows whether 2FA is currently set up for that employee or not using the 2FA status tab.
It is recommended to check periodically, especially after staff changes.
Actions: Resets (disables) a lost 2FA enrollment so the employee can set it up again.
Use immediately if an employee loses their authenticator device.
Enabling 2FA first in opt-in mode, then switching on Force 2FA once everyone has had time to enroll, is the recommended rollout path. Doing so stops account takeover from leaked, guessed, or reused passwords, since a stolen password alone is no longer enough to log in. It’s especially valuable for stores with remote or contractor access, multi-employee back offices, or any store that has experienced a previous login compromise.
Important: never force 2FA sitewide without first whitelisting at least one trusted IP or confirming the emergency recovery URL works, and keep the whitelisted-IP list short and reviewed regularly, since those addresses bypass 2FA completely. The Employees tab lets you recover a teammate’s account access without disabling 2FA protection for the whole store, which is useful for lost or replaced phones, app reinstalls, and employee offboarding. Resetting 2FA status is worth adding to your standard offboarding checklist whenever an employee leaves.
2. Brute-Force Protection
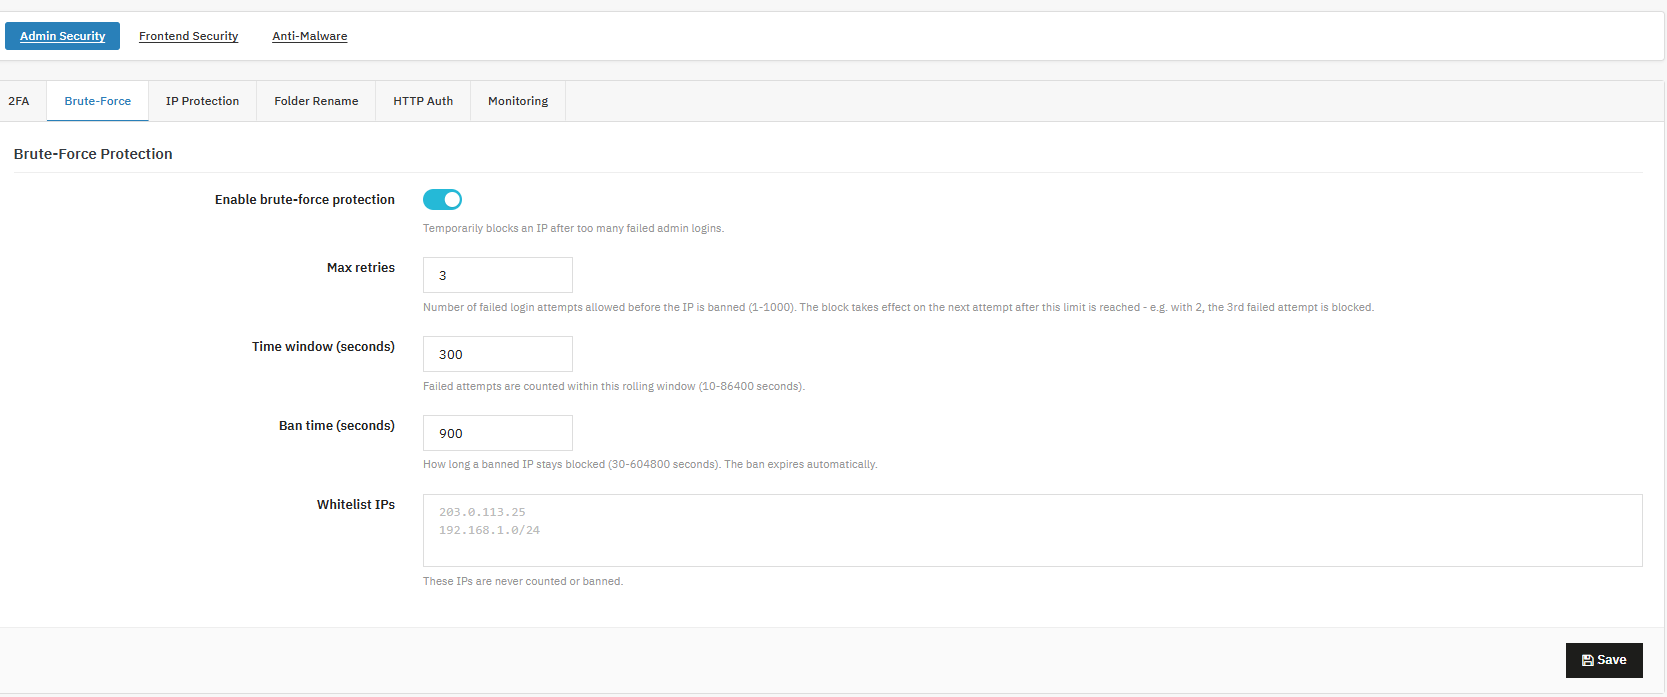
Store administrators can use this PrestaShop brute force protection module to automatically block IP addresses that exceed a defined number of failed login attempts, stopping credential-stuffing scripts without manual monitoring.
Enable brute-force protection: This feature temporarily blocks an IP after too many failed admin logins. It is recommended to enable the brute force protection on your production store.
Max retries: Max retries is the number of failed attempts allowed before a ban triggers on the next attempt after the limit.
You can add the value as 5 attempts as it is a reasonable default.
Time window (seconds): This Rolling window is time window in which failed attempts are counted.
Ban time (seconds): This ban time shows how long a banned IP stays blocked in the system, it also expired automatically.
Whitelist IPs: Add the IPs never counted or banned and add trusted office/VPN IPs.
Start with moderate values, review your login attempt log after a week, and tighten the settings if you still see repeated attack patterns from varied IPs. This is the core of the PrestaShop brute force module functionality: it directly neutralises automated password-guessing without requiring you to watch logs in real time. It’s worth combining with 2FA rather than relying on brute-force protection alone, since brute-force protection slows attackers down while 2FA stops them outright even if a password is eventually guessed. Bans are automatic and time-limited, so there’s no need to manually unban an IP; it clears itself once the ban time elapses.
3. Admin IP Protection
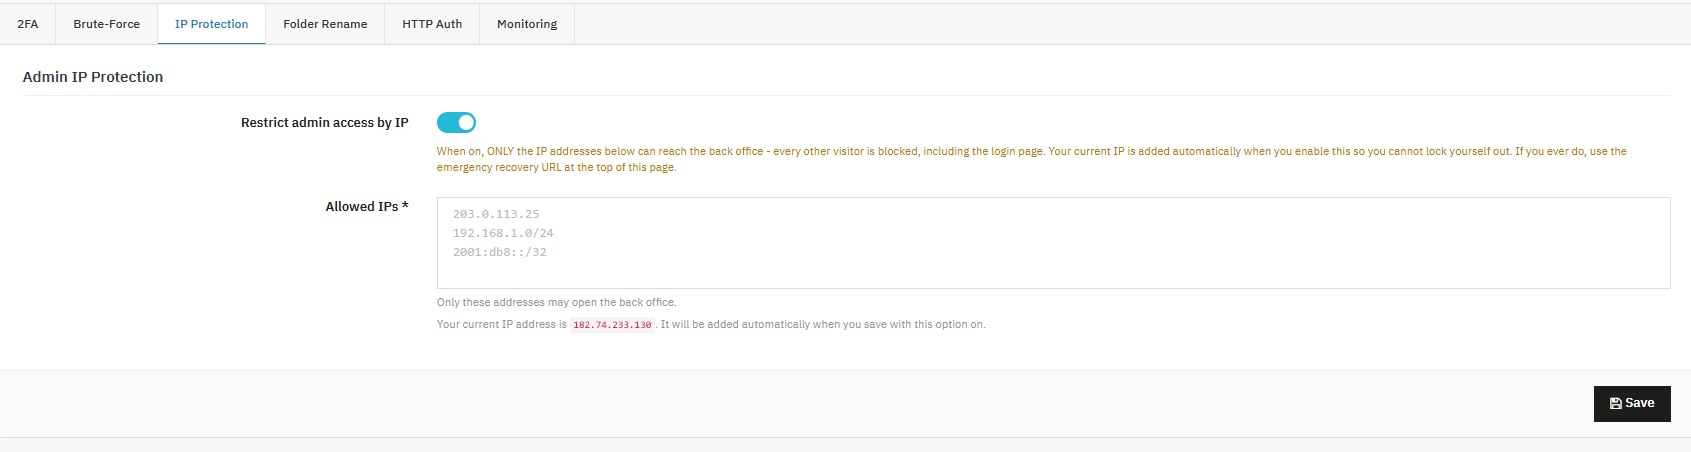
Store administrators can use this PrestaShop IP restriction modulehttps://www.knowband.com/prestashop-security-manager to limit back-office access to a fixed list of trusted IP addresses, blocking every other visitor, including bots that never even get to see the login page.
Restrict Admin Access by IP: This feature allows you to limit Back Office access to a specific list of trusted IP addresses.
How it works:
When this option is enabled, only the IP addresses listed below will be able to reach your Back Office, every other visitor, including anyone trying to reach the login page, will be blocked.
For your safety, your current IP address is automatically added to the allowed list the moment you enable this option, so you won’t accidentally lock yourself out.
Allowed IPs (required): Only the IP addresses entered here will be permitted to access the Back Office.
4. Rename Admin Folder
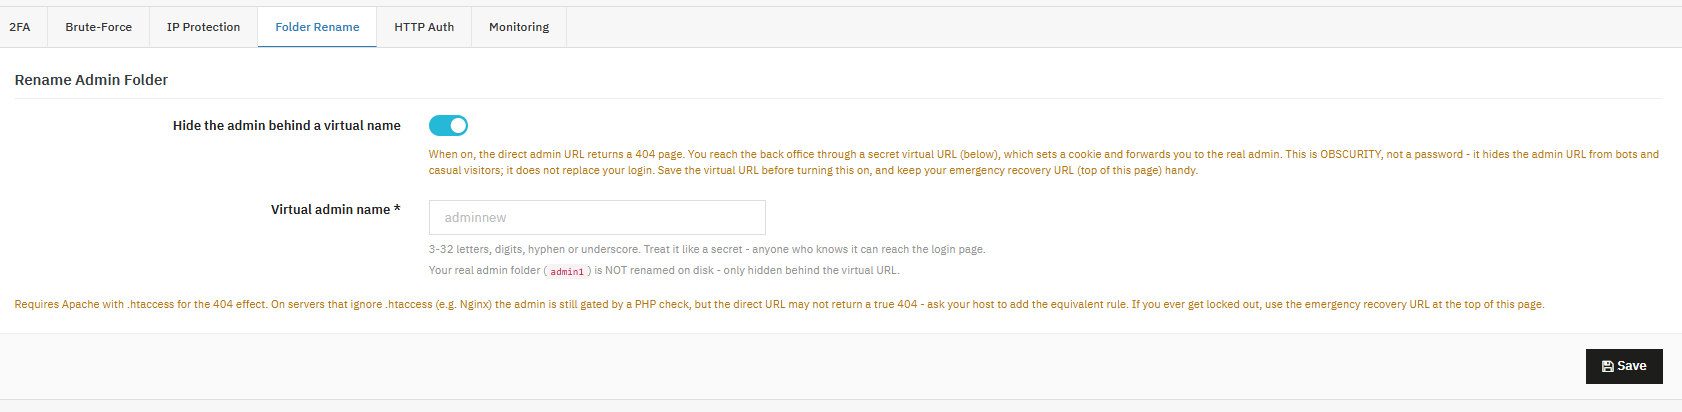
Hide Admin Folder Name: Store administrators can use this feature, part of the PrestaShop Security Module, to hide the real back-office URL behind a secret virtual address. This removes your store from the pool of sites that automated scanners find by guessing common admin folder names.
Hide the admin behind a virtual name: When this option is on, the direct admin URL returns a 404 error, and the back office can only be reached through the virtual URL you set below. Virtual admin name: Enter a name using 3 to 32 letters, digits, hyphens, or underscores. Use this name as a secret, just like a password
5. HTTP Authentication (Admin)
Store administrators can use this feature to add a browser-level username and password prompt in front of the entire back office, layered on top of the normal PrestaShop admin login as an additional gate.
Enable HTTP Authentication for the Admin
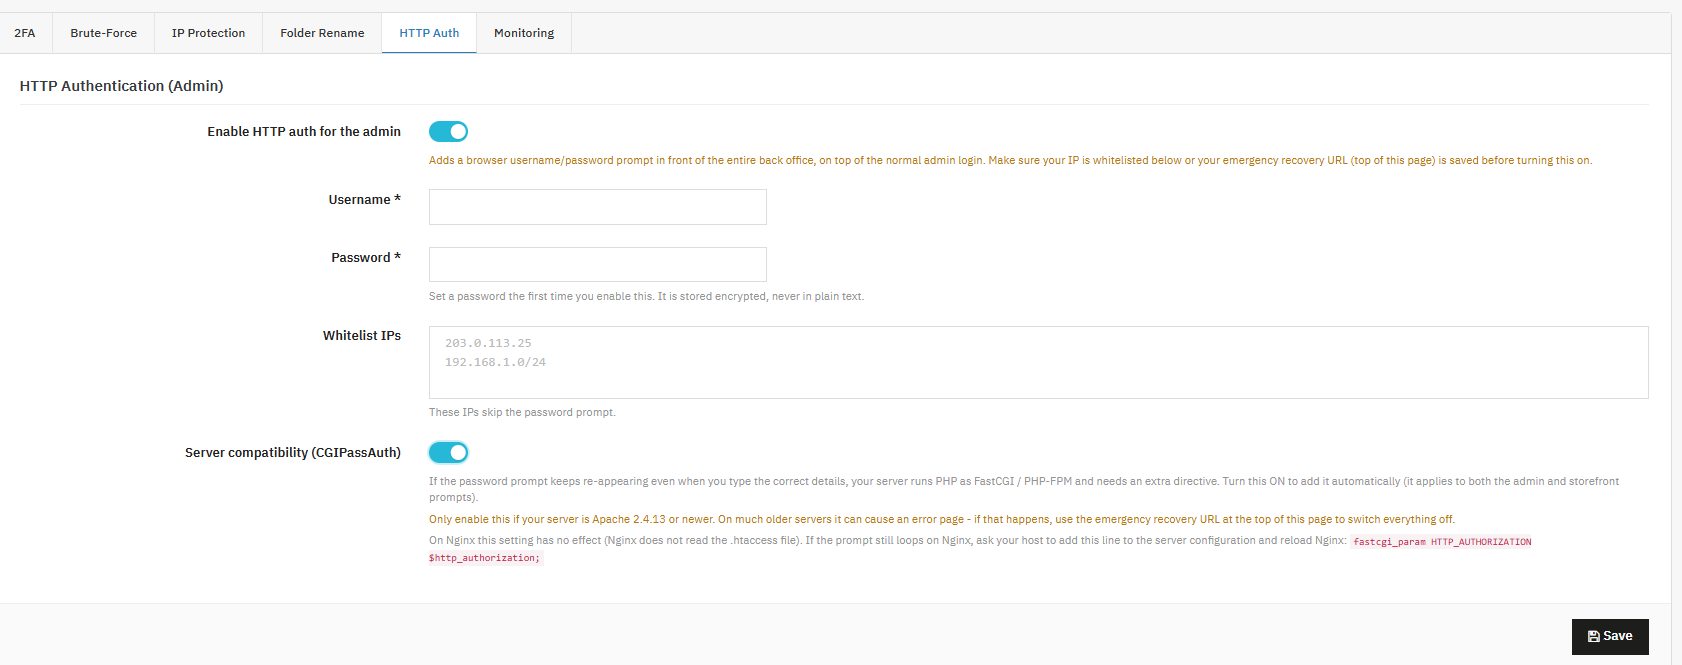
This feature is part of the PrestaShop security Module. This particular option adds a username/password prompt before the admin login screen even loads, giving you an extra layer of security on top of your regular admin credentials.
Enable HTTP auth for the admin: When this option is on, visitors must enter a username and password in a browser-level prompt before they can even see the admin login screen.
Username / Password: These are the credentials required for the HTTP auth prompt. The password is stored encrypted and is never saved in plain text.
Whitelist IPs: IP addresses listed here will skip the password prompt entirely.
Server Compatibility (CGIPassAuth): This adds a directive needed on servers running PHP as FastCGI/PHP-FPM, where the authentication header otherwise isn’t passed through correctly.
6. Login Monitoring
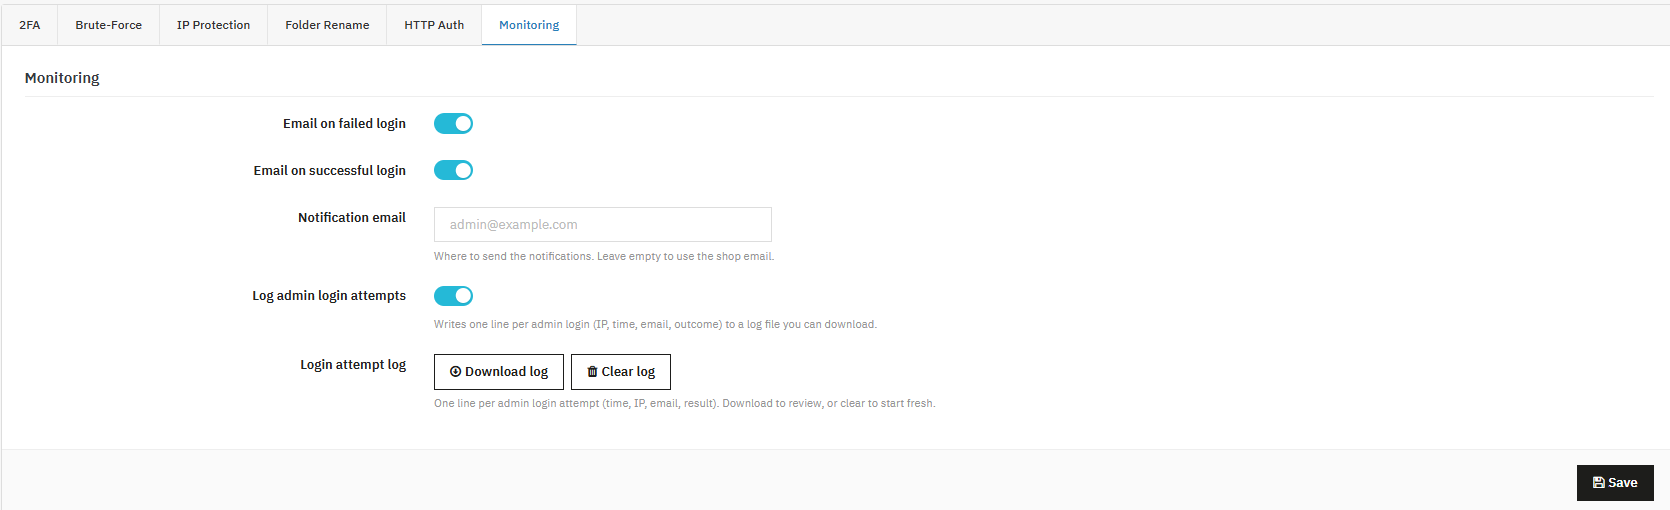
Store administrators can use this PrestaShop login security module feature to receive alerts on successful logins and maintain a downloadable audit log of every admin login attempt.
Login Notifications and Audit Log
Email on Successful Login: This option sends a notification email whenever an admin successfully logs in to the back office.
Notification Email: This is the address where login alerts are sent. If left blank, it defaults to your shop’s email address.
Log Admin Login Attempts: This option records one line per login attempt including the IP address, time, email, and outcome, to a downloadable log file.
Login Attempt Log: This is the log itself. Download buttons become active once entries exist.
6. Frontend Protection
Frontend Security protects your storefront, the part of your site every customer and every bot interacts with directly. This is where a PrestaShop firewall module, a PrestaShop captcha module, and a PrestaShop security headers module functionality all live side by side, each addressing a different category of customer-facing threat.
Web Application Firewall
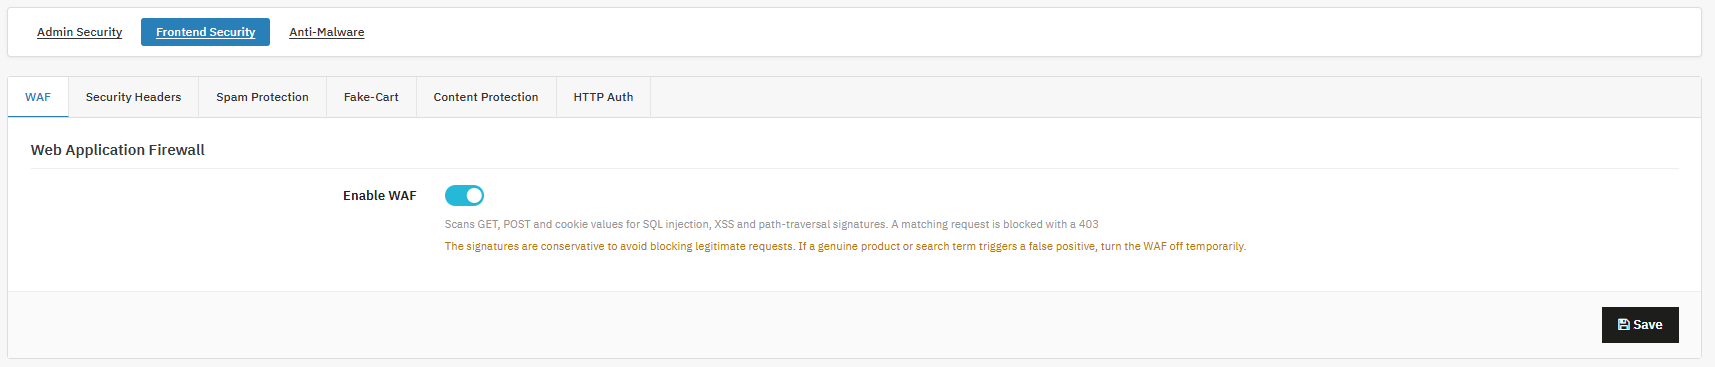
Store administrators can use this PrestaShop WAF module to automatically block requests containing known SQL injection, cross-site scripting, and path-traversal patterns before they reach the storefront’s own code.
HTTP Security Headers
Store administrators can use this PrestaShop security headers module to instruct visitor browsers to enforce additional protections automatically, with no visible change to the storefront itself.
Security Headers
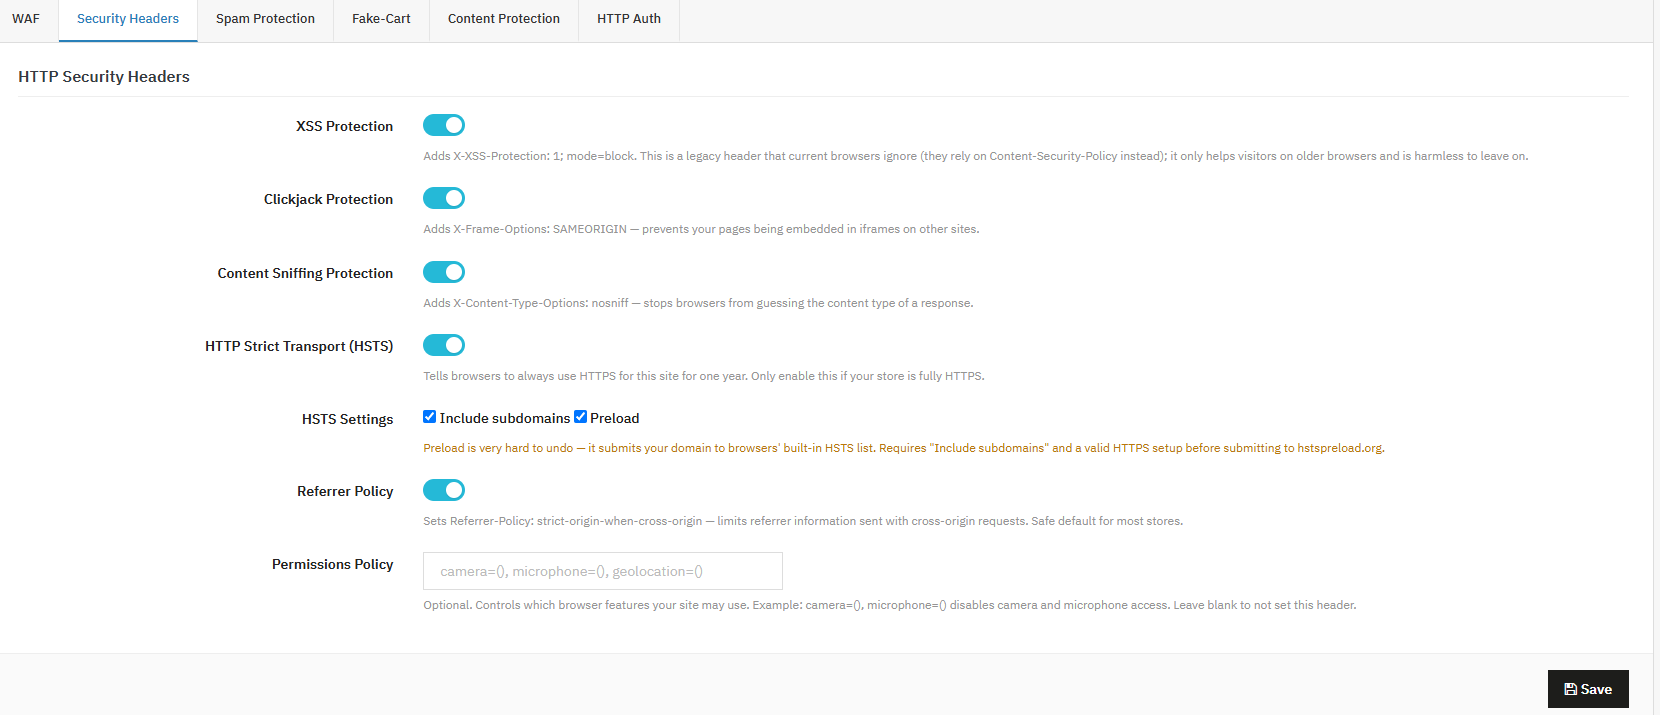
These settings add small, invisible instructions that tell web browsers how to handle your store safely. You don’t need to be technical to use them; most are safe to turn on and forget about.
XSS Protection
This is an older safety feature that helps block a certain type of attack. Most modern browsers have better built-in protection now, but turning this on doesn’t hurt anything; think of it as a backup lock for older browsers.
Clickjack Protection
This stops other websites from secretly displaying your store inside a hidden frame on their own page, a trick sometimes used to fool visitors into clicking things they didn’t mean to.
Content Sniffing Protection
Browsers sometimes try to “guess” what type of file they’re looking at, which can be exploited by attackers. This setting tells browsers to trust the file type your store specifies, instead of guessing.
HTTPS-Only Browsing (HSTS)
This tells browsers to always connect to your store using the secure, encrypted version of your site (HTTPS), never the unsecured version.
Include Subdomains / Preload
This extends that same secure-connection rule to any subdomains you use (like blog.yourstore.com), and can optionally register your store on a global list that browsers check automatically.
Referrer Policy
When someone clicks a link from your store to another site, browsers normally share some information about where the visitor came from. This setting limits how much of that information gets shared.
Permissions Policy
This setting allows you to control which device features, like the camera or microphone, your store’s pages are allowed to use in a visitor’s browser.
Spam Protection
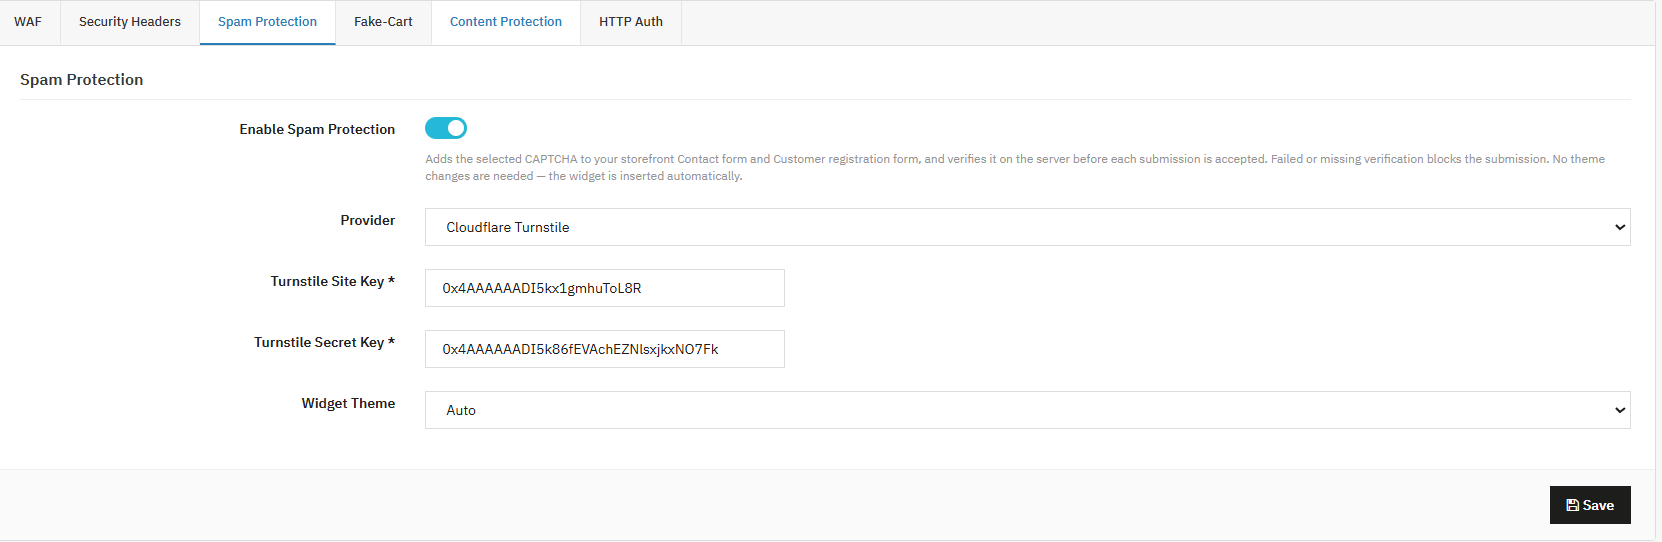
Store administrators can use this PrestaShop spam protection module and PrestaShop captcha module functionality to add CAPTCHA verification to the contact and customer registration forms automatically.
1. Spam Protection (CAPTCHA)
This feature is part of the PrestaShop Security Module, helping keep bots and spammers from flooding your contact and registration forms with junk submissions. As a built-in PrestaShop anti-spam module and PrestaShop captcha module, it works alongside other tools like a PrestaShop reCAPTCHA module, PrestaShop Cloudflare Turnstile module, and PrestaShop hCaptcha module, all designed to verify that a real visitor, not a bot, is submitting your forms.
Enable Spam Protection
When turned on, this adds a CAPTCHA check to your contact and registration forms. The check happens on the server before the form is accepted, so it can’t be bypassed.
Provider
This is where you choose which CAPTCHA service to use, Cloudflare Turnstile, Google reCAPTCHA, or hCaptcha. Each works a little differently, but all serve the same purpose: blocking automated spam.
Site Key / Secret Key
These are special codes provided by your chosen CAPTCHA service, which connect your store to that service securely.
Widget Theme
This controls how the CAPTCHA box looks like for example Auto, Light, or Dark.
2. [New] Honeypot Field
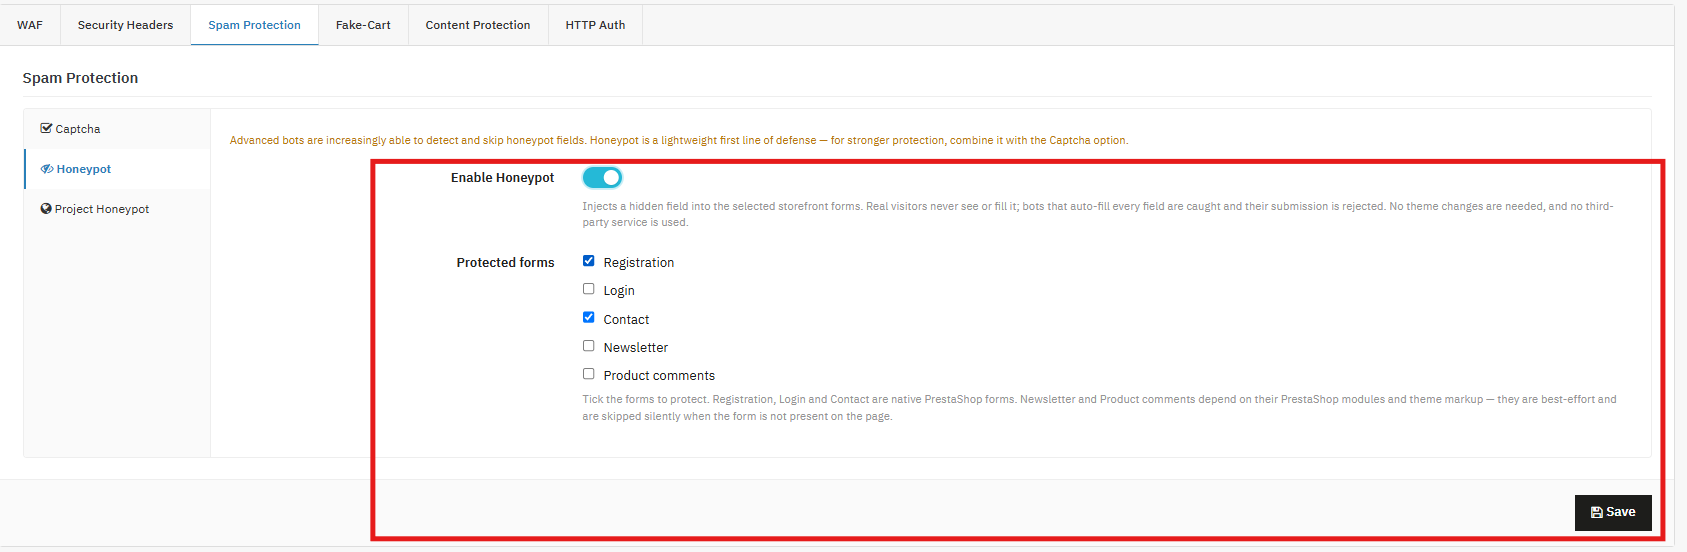
Honeypot adds an extra layer of spam protection on your frontendby placing invisible fields inside chosen frontend forms. Real visitors or customers never see these fields, but automated bots that try to fill in every field can be spotted and stopped. This light and simple protection reduces spam, fake accounts, and bot-driven logins, all while keeping the shopping experience smooth for real customers.
Enable Honeypot: Turn this setting on to activate Honeypot protection on your store.
Once enabled, the module quietly adds a hidden field to the forms you select. If a bot fills in that hidden field, its submission is marked as suspicious and blocked before it’s ever processed.
Protected Forms: Choose which forms should be covered by Honeypot protection. The module supports:
Registration – Stops automated account creation and fake sign-ups.
Login– Blocks automated login attempts and bot-based attacks.
Contact keeps spam messages and automated inquiries out of your inbox.
Newsletter– Prevents fake or automated newsletter subscriptions. Note: This depends on your newsletter module and theme setup. If the form isn’t found on a page, protection is skipped automatically.
Product Comments– Guards review and comment forms against spam and automated entries. Note: This depends on the Product Comments module and theme setup. If the form isn’t available, protection is skipped automatically.
3.0 HoneyPot Projects
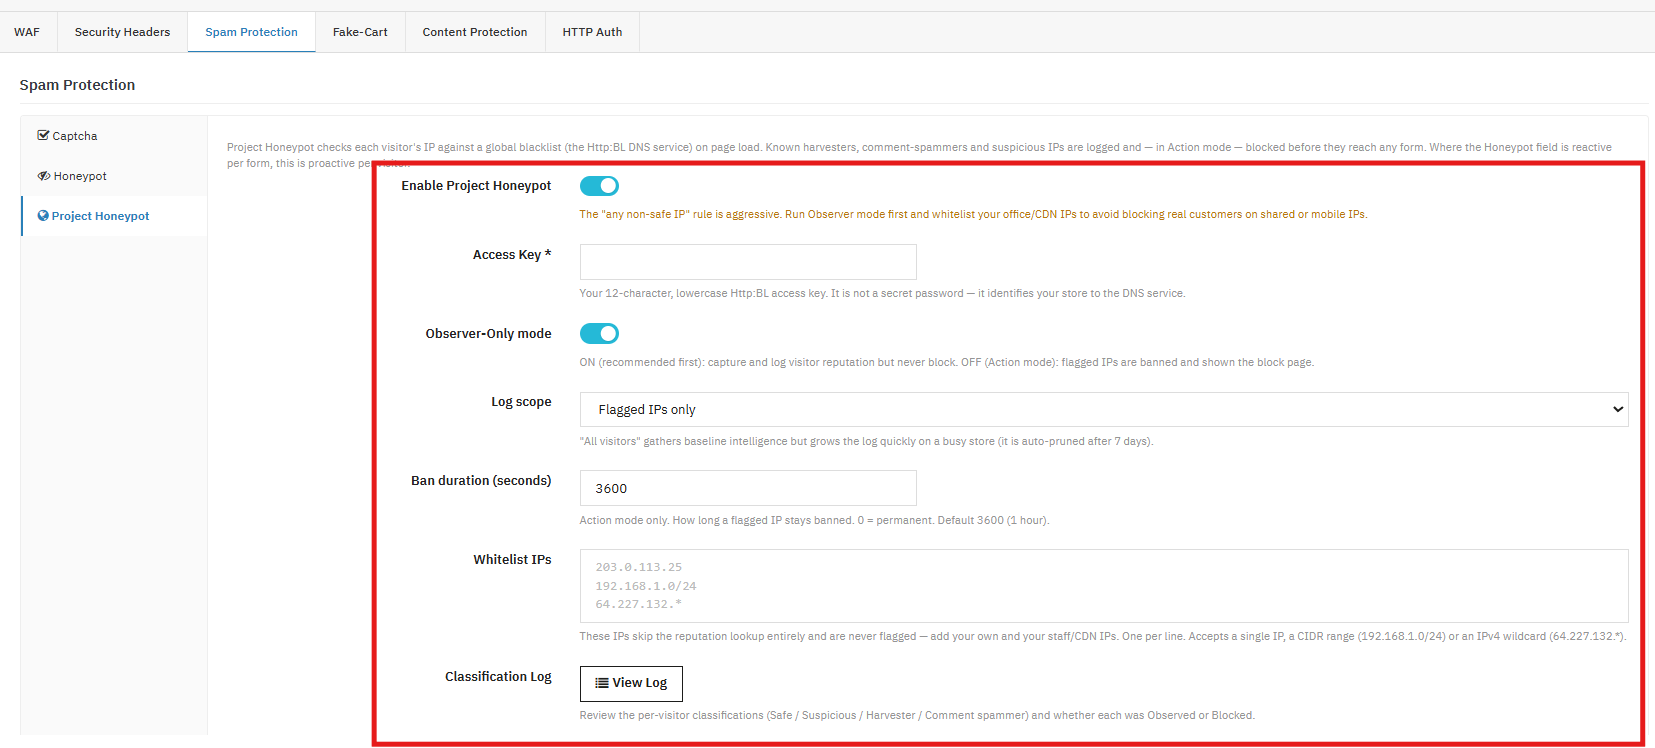
Enable Project Honeypot: Master on/off the tab for the whole feature. When enabled, every visitor’s IP is checked against Http: BL (Project Honeypot’s DNS-based blacklist) as soon as they load a page. This is what makes it “proactive” compared to a honeypot form field, which only reacts when someone actually submits a form.
Access Key: Access key is a 12-character, lowercase identifier issued by Project Honeypot that ties your HTTP:BL lookups to your account. It’s not a secret credential (it doesn’t grant access to anything), it just tells the DNS service which site is asking, similar to an API key used for attribution/rate-limiting rather than authentication.
Observer-Only mode: The IPs are looked up and classified, and everything is logged, but nobody is ever blocked. This is a data-gathering phase.
Log scope: Log Scope in the PrestaShop Security Module controls how much gets written to the Classification Log.
Flagged IPs only: lighter-weight, only logs visitors that Http: BL considers risky.
All visitors: logs every visitor’s classification, including “Safe” ones, which is useful for building a baseline picture of your traffic’s overall reputation mix. It grows faster, so entries are auto-pruned after 7 days.
Ban duration (seconds): Only relevant once you’re in Action mode(Flagged IP). Sets how long a blocked IP stays banned before it’s allowed to try again.
Whitelist IPs- You can whitelist the IPs so that these IPs will never be blocked.
Classification Log: This shows each visitor’s IP, its classification (Safe, Suspicious, Harvester, or Comment spammer), and whether the system merely observed it or actually blocked it. This is what you review during the Observer phase to check for false positives before flipping to Action mode.
Fake-Cart Protection
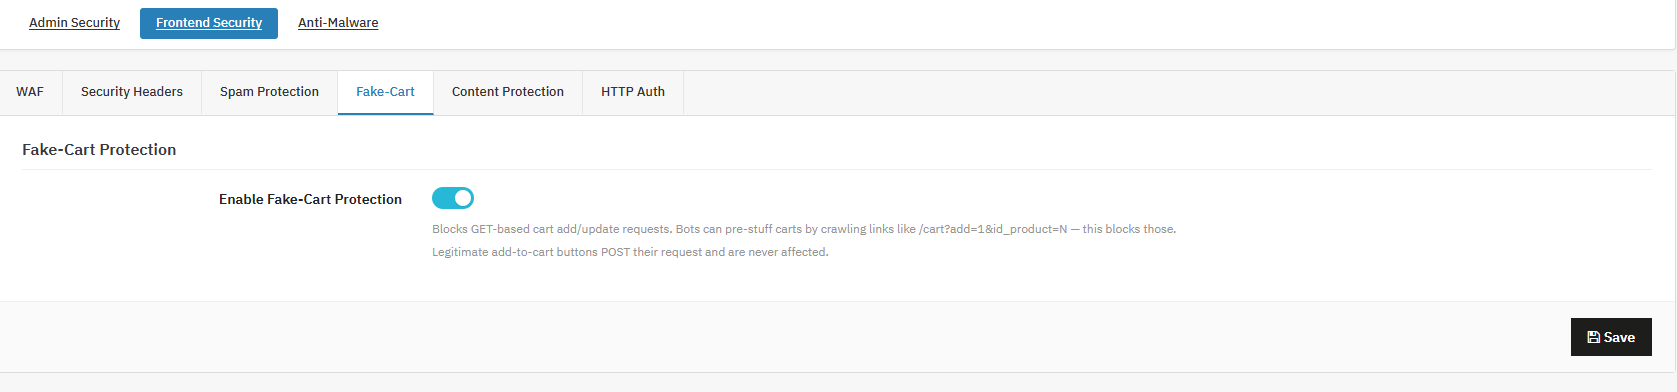
Cart Manipulation Protection
This feature is used to block automated, GET-based cart manipulation, a common scripted technique that’s distinct from genuine add-to-cart actions taken by real shoppers. Store admins can rely on this Knowband feature to protect their store from bots or scripts that try to add items to a cart by directly manipulating a URL, rather than clicking through the storefront normally.
Content Protection
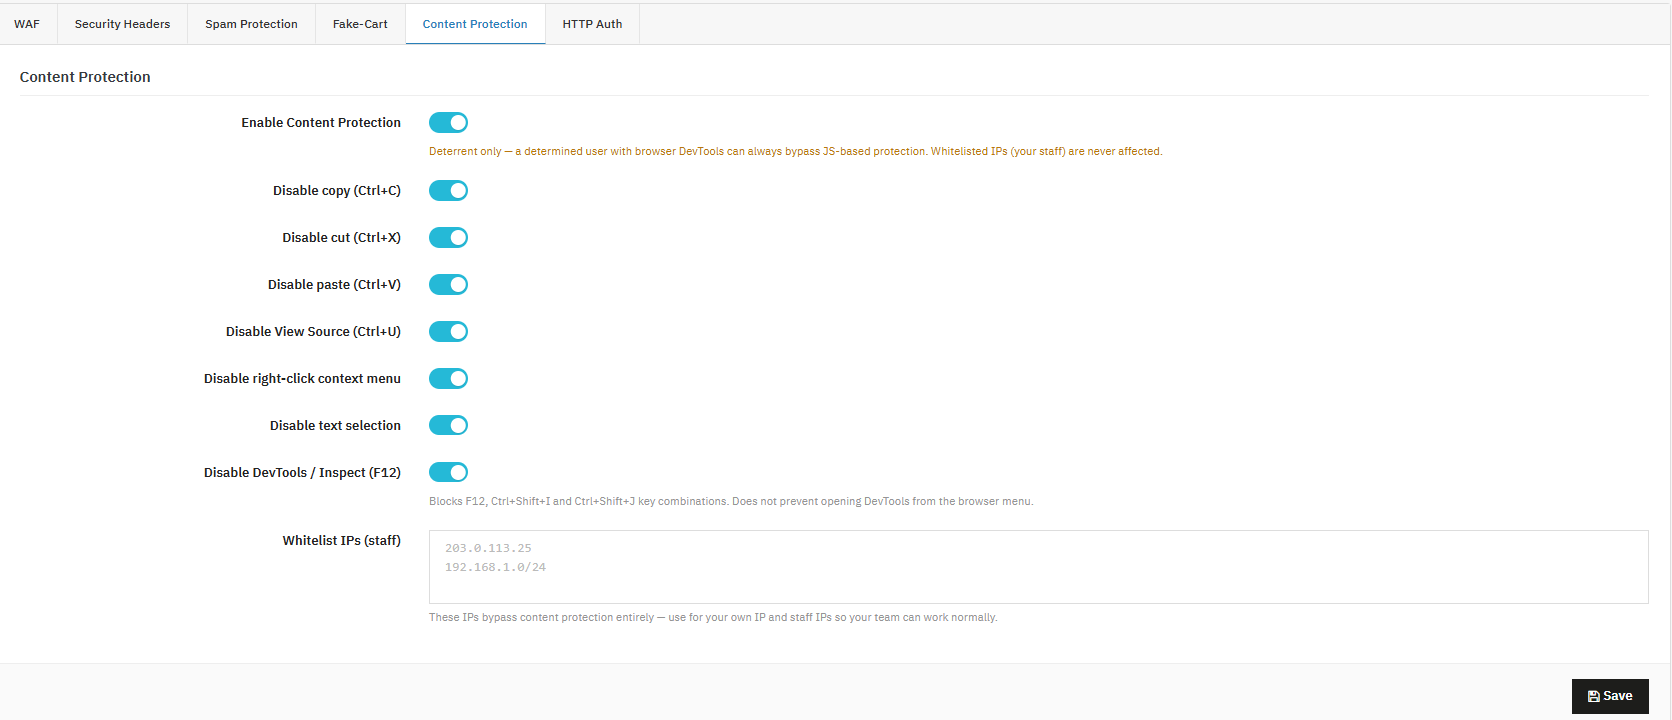
Store admins can use this PrestaShop content protection module to discourage casual copying of storefront text and images.
Enable Content Protection
This feature is used to act as the master toggle for content protection. Keep in mind this works only as a deterrent, a determined user can still bypass it using their browser’s developer tools.
Disable Copy / Cut / Paste
This feature is used to block the keyboard shortcuts visitors would normally use to copy, cut, or paste content from your pages.
Disable View Source (Ctrl+U)
This feature is used to block the browser shortcut that lets visitors view your page’s source code.
Disable Right-Click Context Menu
This feature is used to remove the right-click menu, so visitors can’t use it to save images or copy content.
Disable Text Selection
This feature is used to prevent visitors from highlighting or selecting text on the page.
Disable DevTools / Inspect (F12)
This feature is used to block the F12, Ctrl+Shift+I, and Ctrl+Shift+J shortcuts. Note that it does not stop someone from opening DevTools through the browser’s own menu.
Whitelist IPs (Staff)
Store admins can use this field to list IP addresses that bypass all content protection restrictions.
HTTP Authentication (Frontend)
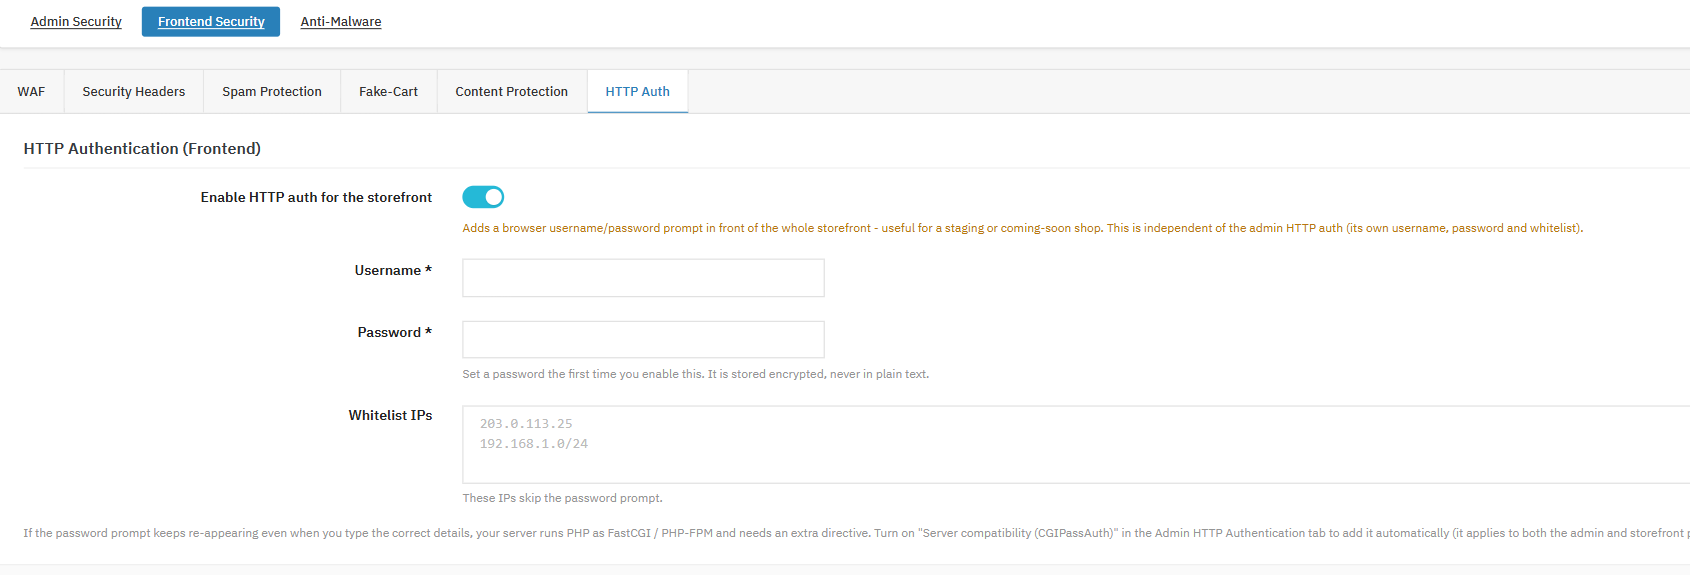
Store admins can use this Knowband Prestashop password protection module to gate the entire storefront behind a browser-level username and password prompt. This is separate from the admin HTTP authentication covered in Section 7.
Enable HTTP Auth for the Storefront
This feature is used to add a password prompt in front of the entire storefront, before any page can be viewed.
Username / Password
Store admins can use this field to set storefront-specific credentials, stored encrypted.
Whitelist IPs
Store admins can use this field to list IP addresses that skip the storefront password prompt entirely.
This feature is used to keep a pre-launch or staging store private from search engines and casual visitors. The friction is intentional, this setting is meant to gate access completely, not work invisibly in the background.
If the password prompt keeps looping even after a correct entry on a server running FastCGI/PHP-FPM, store admins can enable the CGIPassAuth setting under Admin HTTP Authentication in Section 7, Tab 5. That setting applies to both the admin and storefront prompts.
7. Anti-Malware Protection
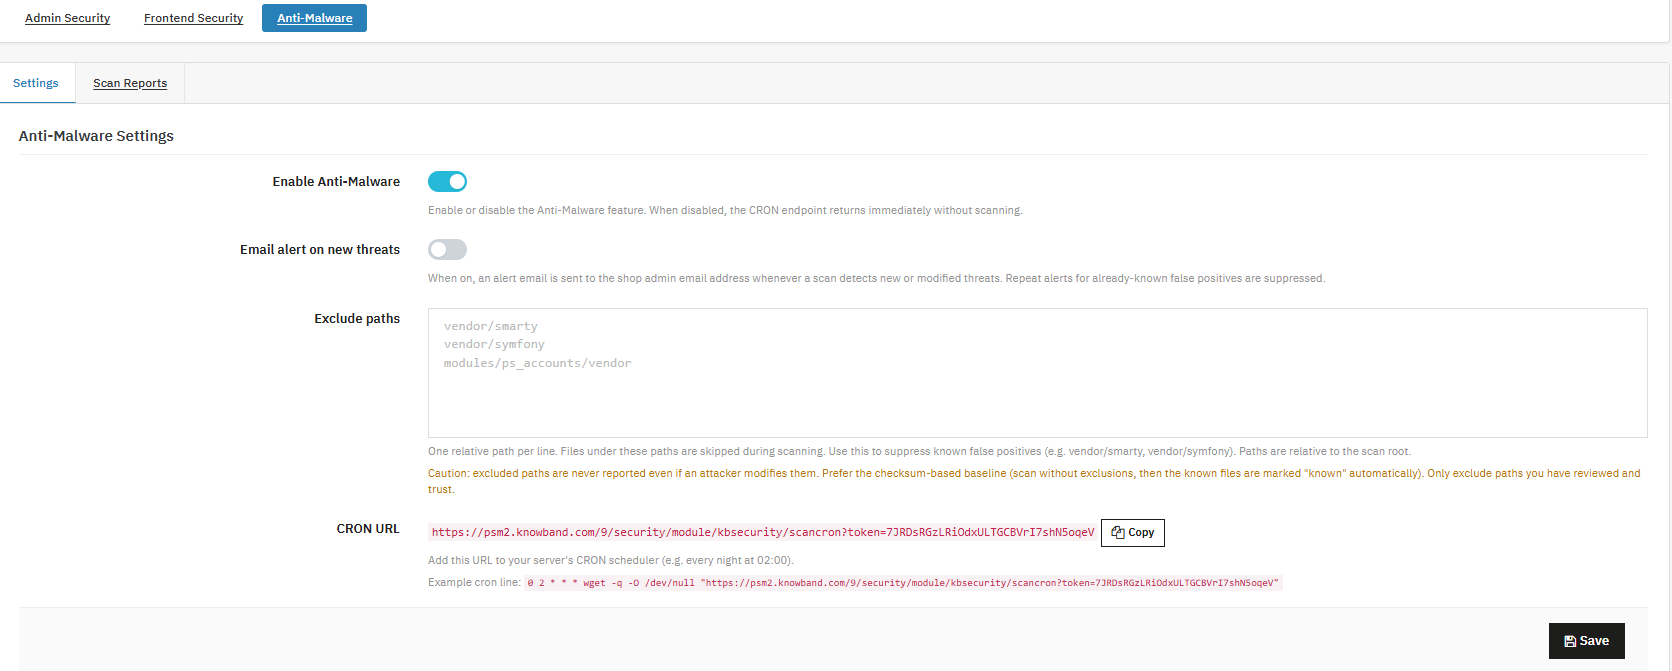
Anti-Malware Protection rounds out the module with scheduled file-integrity scanning, a layer that operates independently of login security and storefront protection, focused entirely on detecting unauthorized changes to your installation’s files.
Settings
Enable Anti-Malware
This feature is used to act as the master toggle for the anti-malware scanner. When disabled, the scan endpoint returns immediately without actually scanning anything.
Email Alert on New Threats
This feature is used to send an alert to the shop admin email whenever a scan finds new or modified threats. Repeat alerts for known false positives are automatically suppressed, so you won’t be notified about the same item twice.
Exclude Paths
Store admins can use this field to list relative paths, one per line, that should be skipped during scanning. This is useful for suppressing known false positives, such as vendor directories.
CRON URL
This feature is used to provide a unique, token-protected URL that triggers a scan whenever it’s requested by your server’s scheduler.
To set things up correctly, enable the feature, turn on email alerts, and add the CRON URL to your hosting control panel’s scheduled tasks (or directly to your server’s crontab if you manage it yourself), typically scheduled for off-peak hours such as 2 a.m. Alerts only fire for genuinely new or modified threats; once a file has been seen and either excluded or acknowledged, repeat alerts for that same known item are suppressed, so your inbox won’t be flooded with the same finding night after night
Scan Reports

ID
This feature is used to assign a sequential identifier to each scan run, making individual scans easy to reference.
Date
This feature is used to record when each scan was executed.
Triggered By
This feature is used to show whether a scan was run manually or by the scheduled CRON job.
Files Scanned
This feature is used to display the total number of files checked during that scan run.
Threats
This feature is used to show the number of new or modified files flagged during the scan.
Duration
This feature is used to record how long the scan took to complete.
Status
This feature is used to indicate the completion state of the scan.
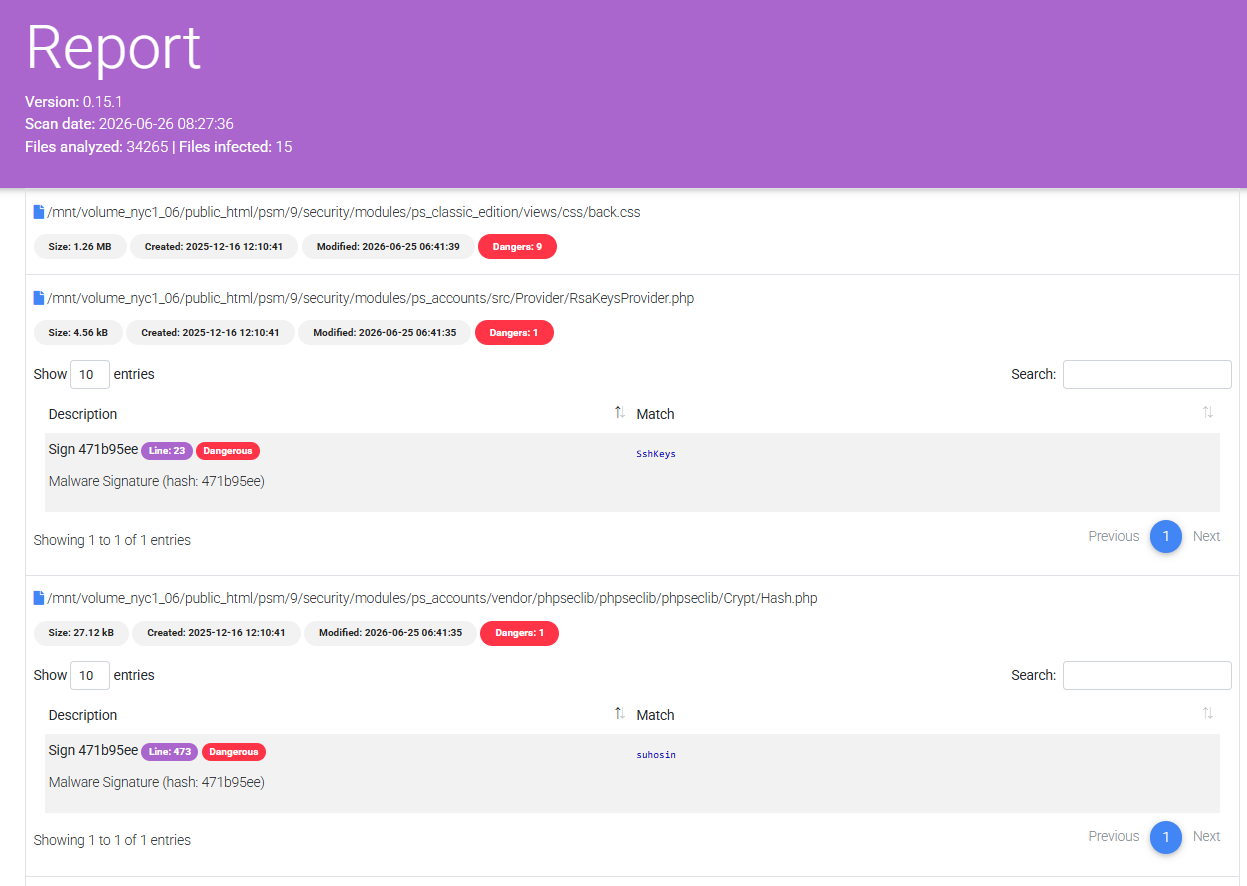
View Report
Store admins can use this option to open the detailed findings for that specific scan.
8. Conclusion
PrestaShop Security Manager brings together the protections most stores end up needing piecemeal, including a PrestaShop 2FA module, a PrestaShop brute force module, a PrestaShop firewall module, a PrestaShop captcha module, and file-integrity anti malware scanning, into a single, centrally configured PrestaShop secure backend. Configured thoughtfully, starting with login monitoring and the emergency recovery URL before layering on more restrictive controls, it meaningfully reduces the most common attack paths targeting PrestaShop stores without adding friction for genuine customers or your own team.
