Opencart Product Designer/Customizer Extension – User Manual

1.0 Introduction

Everybody loves a personal touch. This is especially true in today’s online shopping universe, which allows you to order the product of your choice from the comfort of your own sofa. Furthermore, the spectacular rise in the number of online stores has given customers a wide array of buying options. And this is where product customization comes into play. Companies that implement product customization, design, alter and market their items to the customer’s needs or desires. Opencart Product Designer/Customizer offers many benefits and generally leads to higher conversion rates.

Until a few years ago, personalized products were pretty much limited to a small circle of brands and items. It mainly comprised of gifting items, showcase products, or marketing merchandise. Figuratively speaking, you could count the amount of personalized items on the fingers of one hand. Luckily, a lot has changed. For the good. Sellers of pretty much everything, from dresses and shirts to handbags and even consumer packaged goods, are discovering the benefits and value of product customization. More and more brands are finding out that the personalization of items and services is a great way to enhance customer loyalty and engagement.

OpenCart Product Designer/Customizer is an easy way to let your customers customize any product according to their desire and place an Order with you. It gives your customer’s flexibility to get the Product they want and the way they want and hence increasing your sales. Customers can easily add rich colored texts with effects, upload their images with filters and add a QR code to make it suitable for their needs.

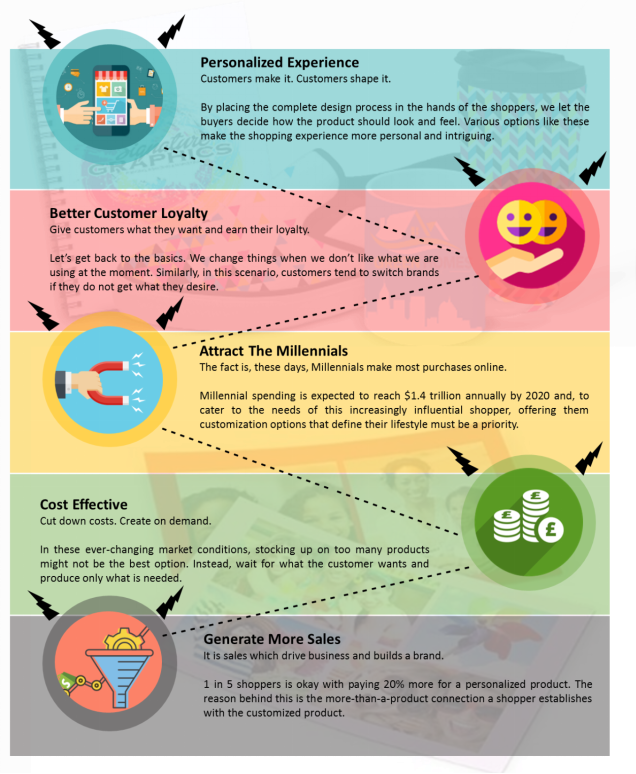
Why should you give Product Customization option to your customers?

If you are wondering why Product Customization? Then here is why it would make your Web store better.
picture1
2.0 Installation Guide

Before starting the installation process, you have to buy the Opencart Product Designer/Customizer by the Knowband store. Once purchased, you will receive the following files on your registered email.

1. Source code of Opencart product customization module in zipped file format.
2. User Manual of Opencart custom product designer extension.

Now in order to install this Opencart custom product designer extension on your online shop, follow the given steps:

Step 1: Unzip the zip file. You will get the folders as shown in the image below
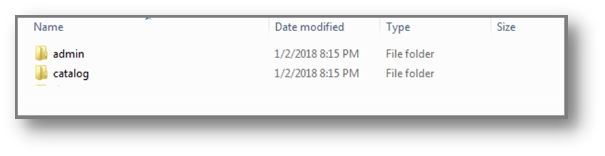

Step 2: Copy all the folders of the zip file in the Root Directory of OpenCart setup via FTP manager.

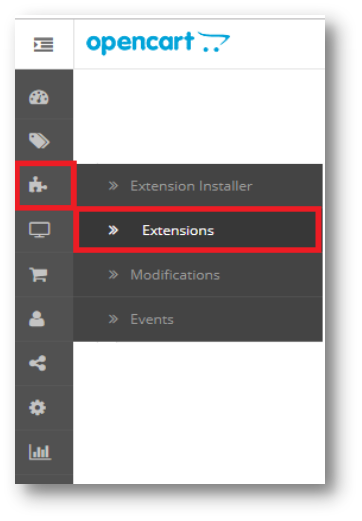
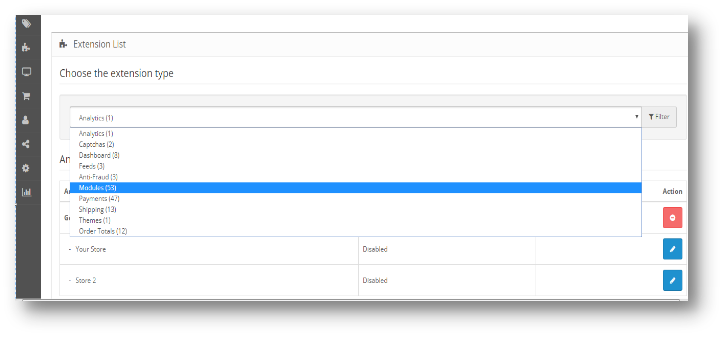
So, Opencart Custom Product Design module is now successfully installed and is ready to use at your store. Go to the admin menu and click on the extensions. Choose the Extension Type as Modules. You will find a list of modules. Select the Opencart Product Designer/Customizer.

3.0 Admin Interface of Opencart Product Designer Customizer

To configure the Product Designer/Customizer extension for OpenCart, Navigate the settings in the following order:
Admin Panel > Extensions >Modules> Product Designer/Customizer
The Admin Interface of OpenCart Product Designer/Customizer extension includes following main settings:

  • Configure
  • Colors
  • Font
  • Image Group

How to Customize a Product?

To customize a Product, Follow the following path:
Catalog>> Products>> Select a Product>> Edit>> Product Designer/Customizer
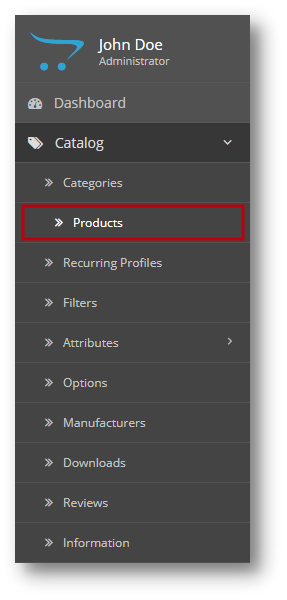
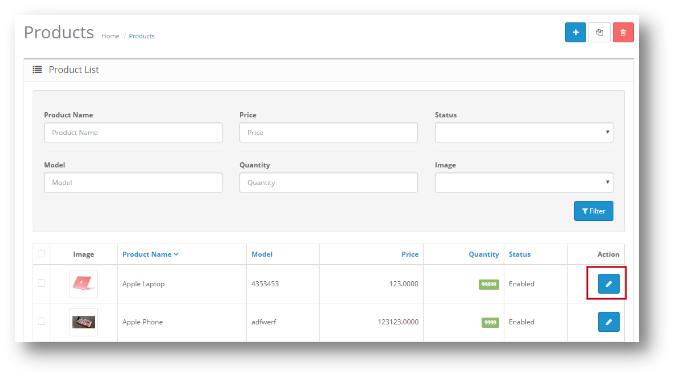
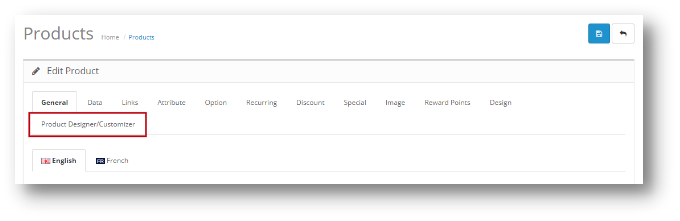
Once the User clicks on the Product Designer/Customizer, the User will have the following options in Opencart Extended Product Customization module:

3.0.1 Configuration

Through this setting of Opencart Custom Product Design module, the User can enable/disable the whole Module and make changes in the Customization of the Product.
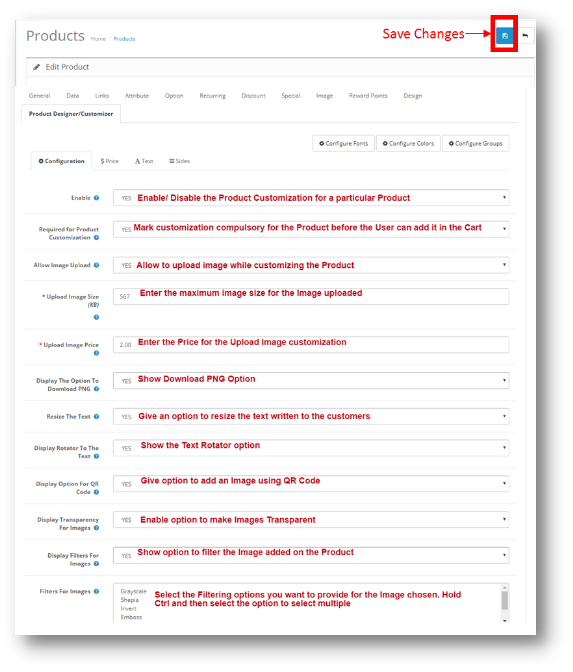
3.0.2 Price

This setting of Opencart Extended Product Customization module lets Admin decide the fixed price for each customization that has to be added in the Product. The screen for the same will look as shown below:
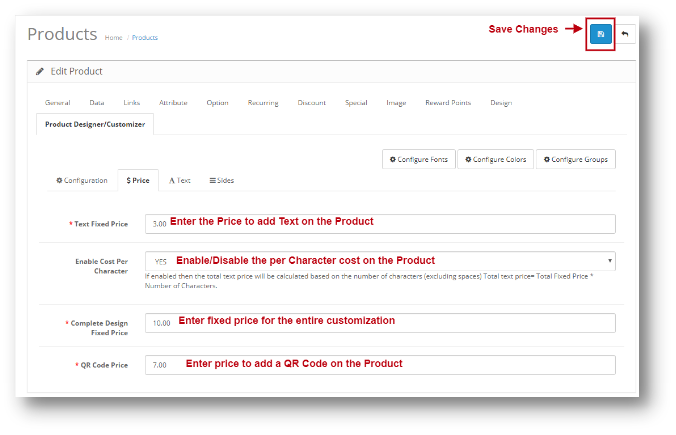

3.0.3 Text

Through this setting of Opencart Custom Product Design module, Admin can control the Text option in the Customization. The Screen for this option will look as shown below:
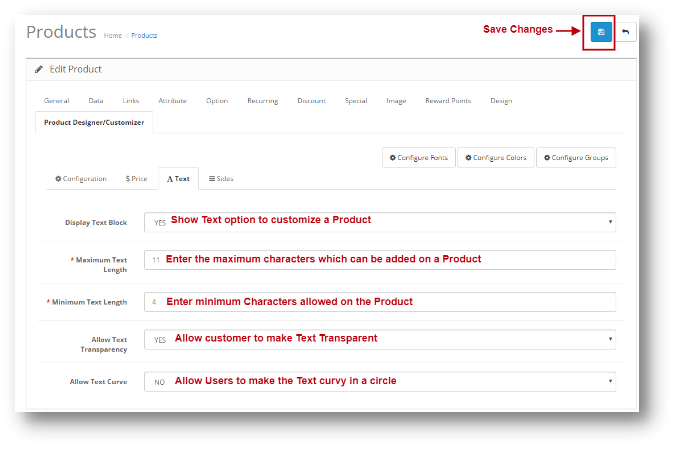
3.0.4 Sides

Sides Setting of Opencart custom product designer extension module lets Admin Add an Image of Different sides of the Product so that the User can customize the Product from any of the side they want. Admin can also name the Sides added.
The screen will look like as shown:
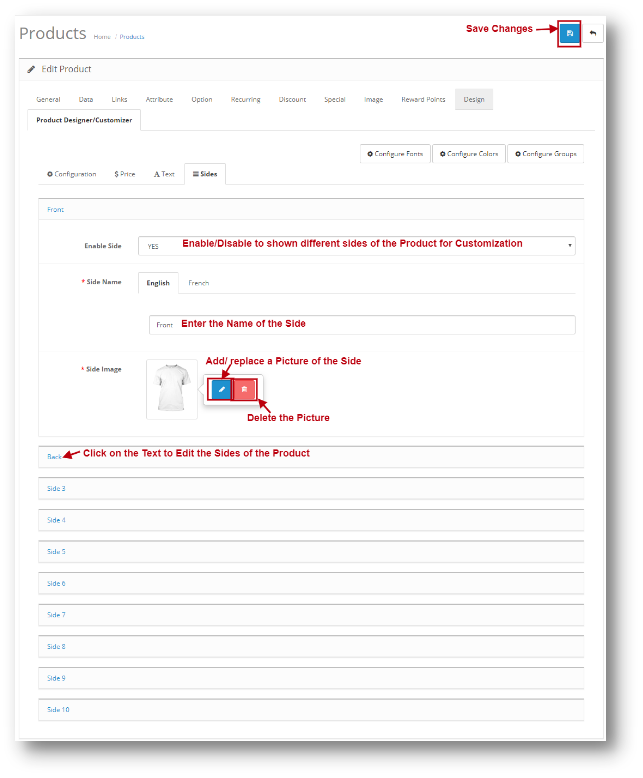
How to Configure Fonts, Colors, and Image Groups?
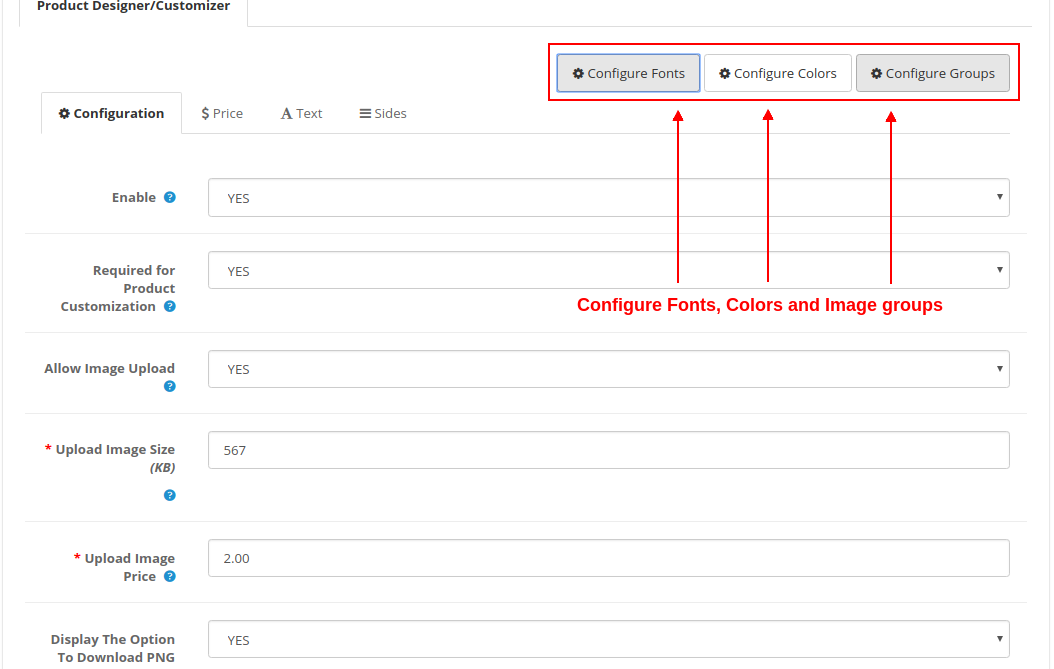
While you are changing the customization settings for a product, you will find the options to select different Fonts, Colors, Image Groups at the top right side of screen. You will find three options as:

1. Configure Fonts

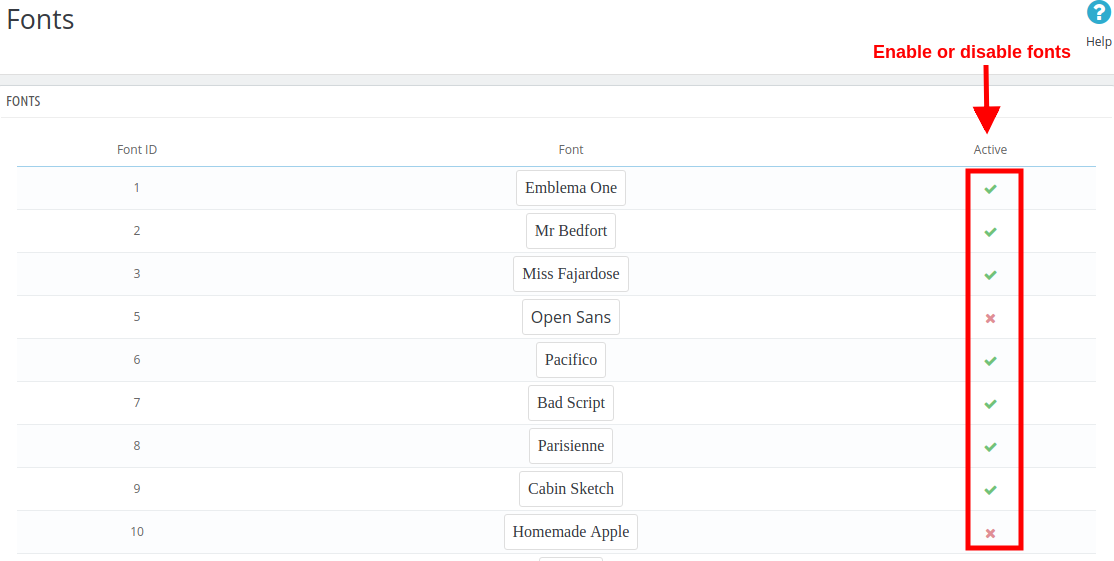
All the fonts that have been added from the module are listed here in this interface. You can directly enable or disable any font.
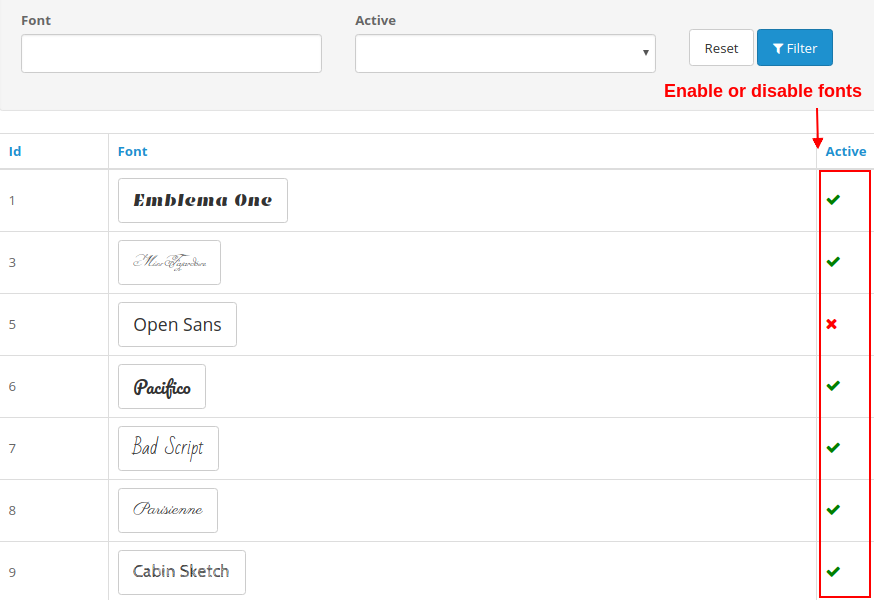

2. Configure Colors

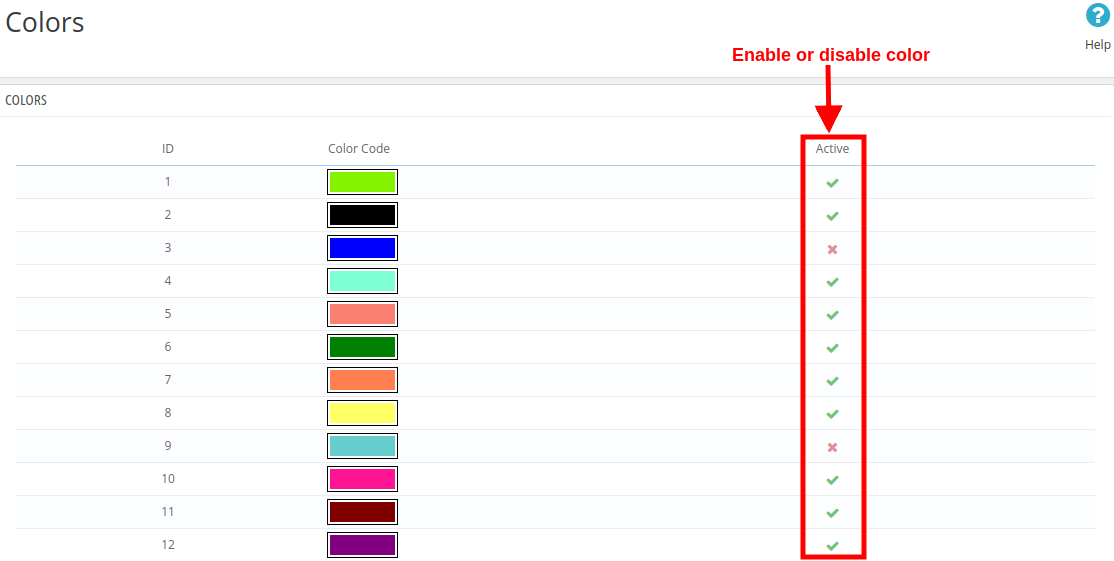
All the colors that have been added using the module are listed here in this interface. You can directly enable or disable any color.

3. Configure Image Groups
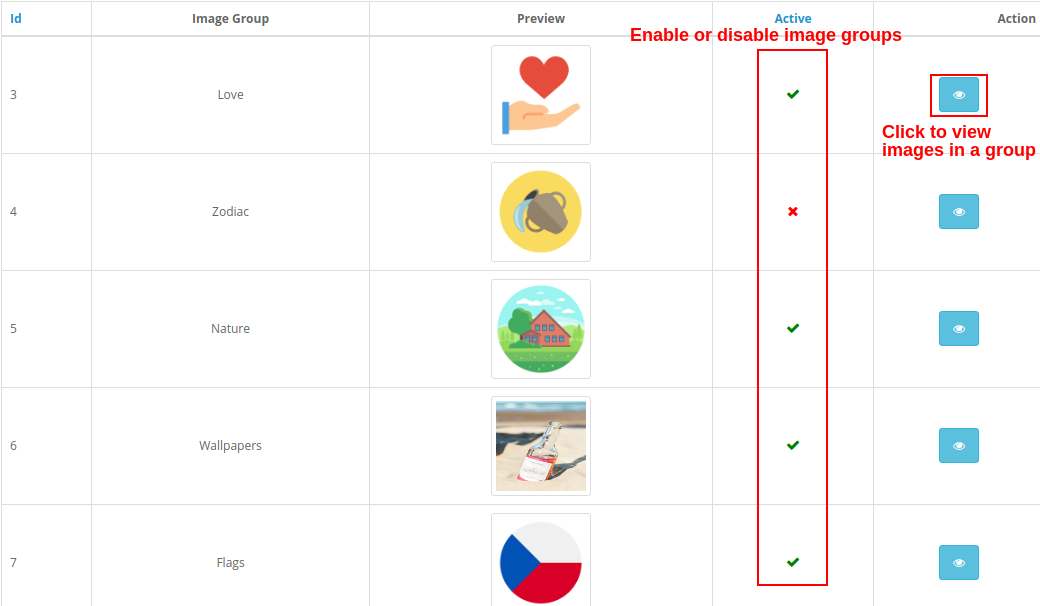

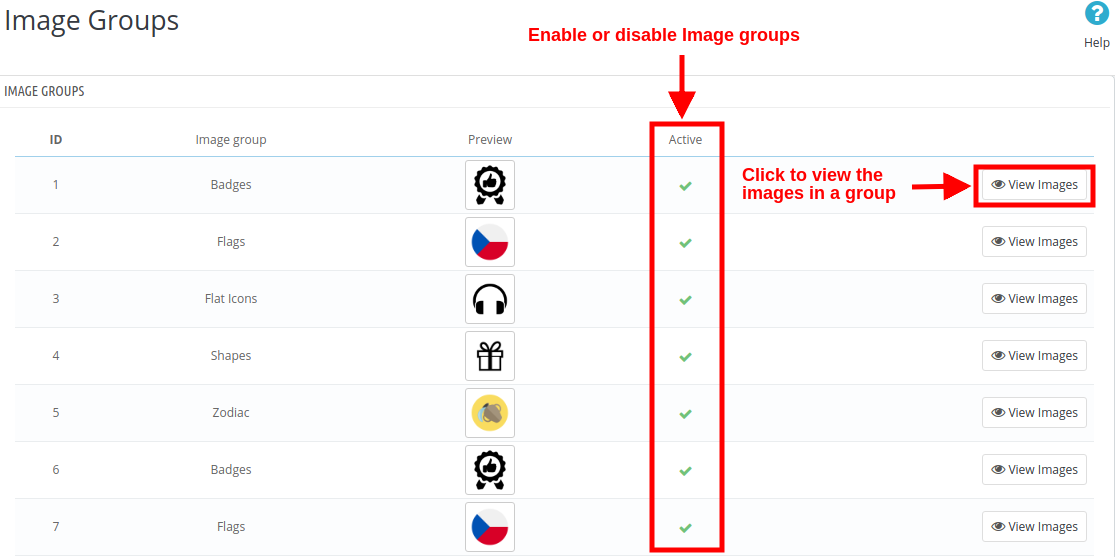
All the image groups that have been added are listed here in this interface. You can directly enable or disable any image group.

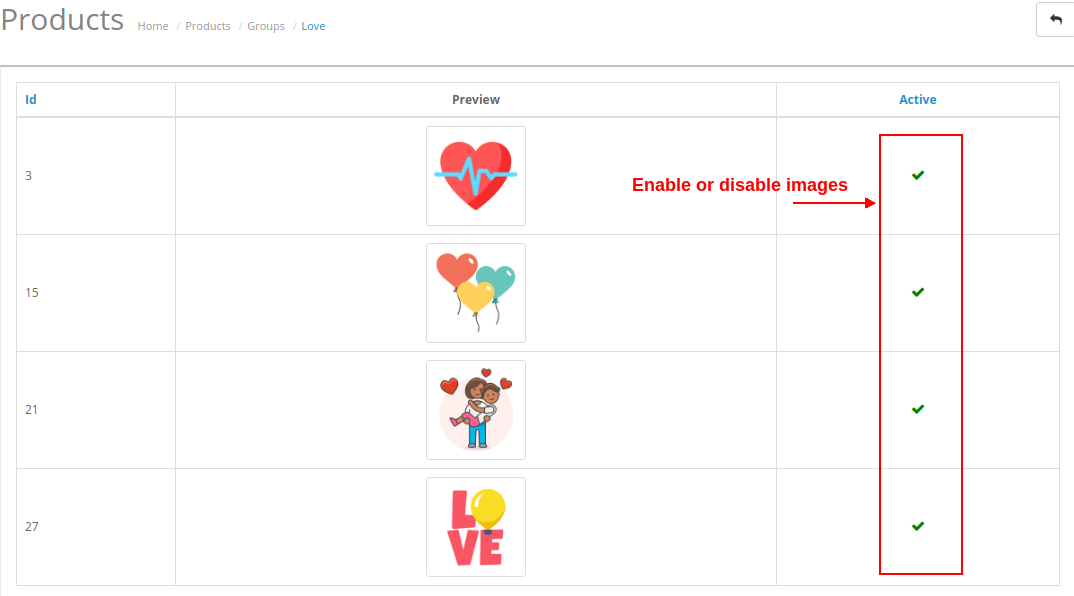
On clicking the “View Images” button, you will see the following screen.
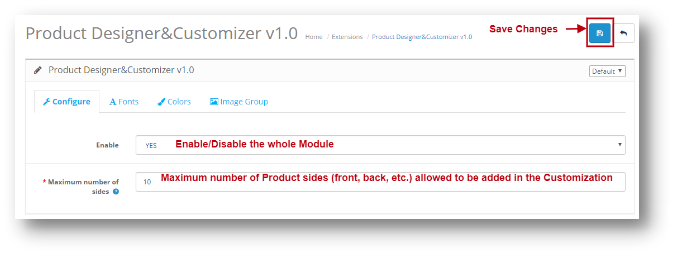
3.0.5 Configure

This option is given in the Admin Panel of the OpenCart custom product designer extension, Admin can Enable/Disable the whole module from this setting. The screen will look as shown below:

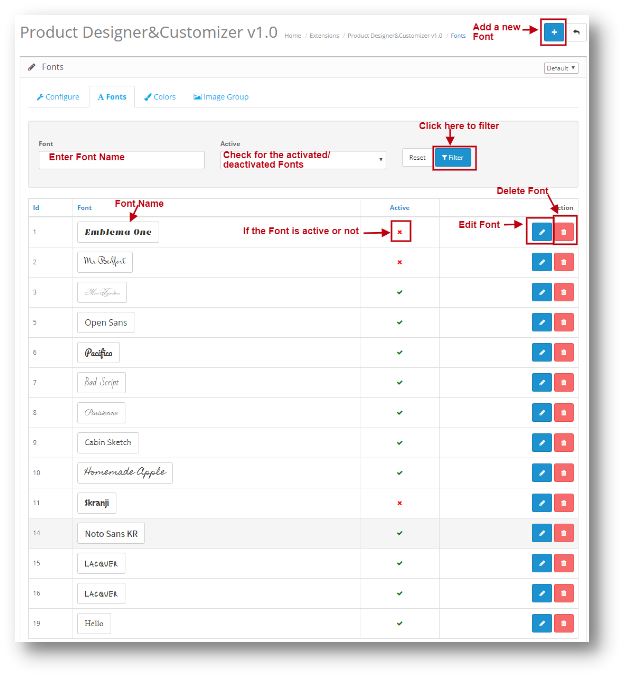
3.0.6 Fonts

Through this setting of OpenCart Extended Product Customization module, Admin can add a new font in the system and also edit the existing one. The screen will look as shown below:
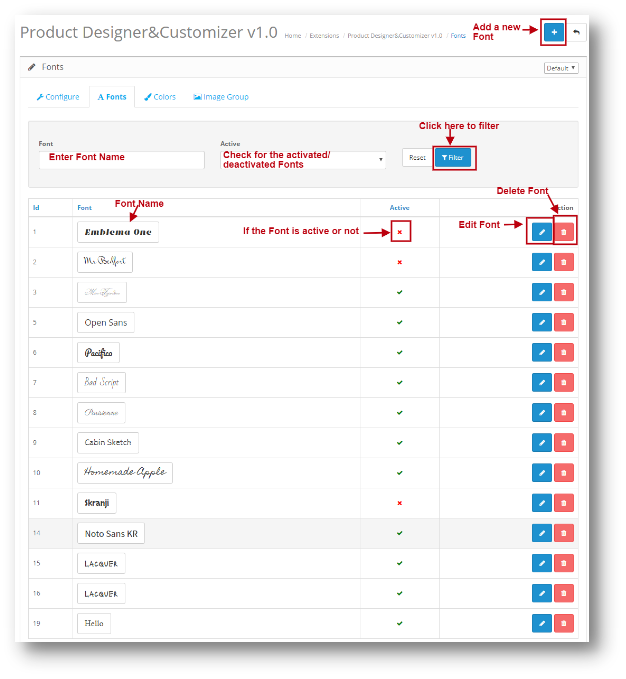
Edit Font: You can Edit an existing Font set using the Edit option. The screens for Editing Font will be same as Adding an Font. The only difference will be that Edit will have the fields already filled.

Delete Font: You can delete a Font by clicking on the ‘Trash’ Icon. A pop up will show up asking for the Confirmation. You can click yes and the Font will be deleted.

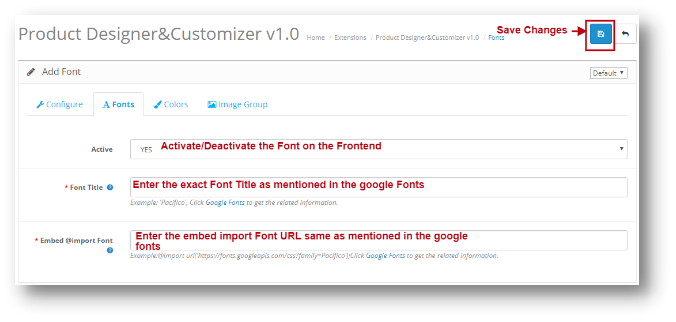
Add Font: You can add a Font in OpenCart Extended Product Customization module by clicking on the ‘+’ icon given at the top of the page. The screen will look as shown below:

3.0.7 Colors

Through this setting of OpenCart Extended Product Customization module, Admin can add a new Color in the system and also edit the existing one. The screen will look as shown below:
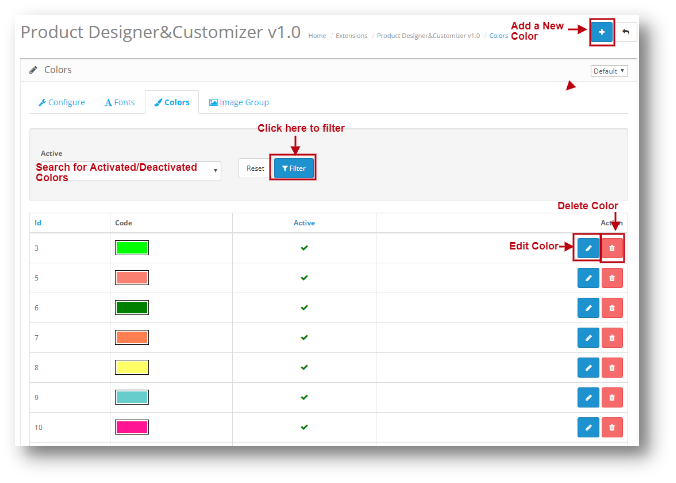

Edit Color: You can Edit an existing Color set using the Edit option. The screens for Editing Color will be same as Adding a Color. The only difference will be that Edit will have the fields already filled.

Delete Color: You can delete a Color by clicking on the ‘Trash’ Icon. A pop up will show up asking for the Confirmation. You can click yes and the Font will be deleted.

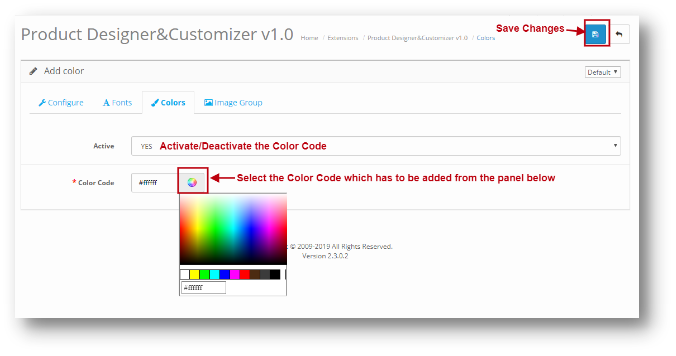
Add Color: You can add a Color in OpenCart Extended Product Customization module by clicking on the ‘+’ icon given at the top of the page. The screen will look as shown below:

3.0.8 Image Group

Image Group settings of OpenCart Extended Product Customization module lets Admin add a Group of Images to offer their customers for Product Customization. The screen will look as shown below:
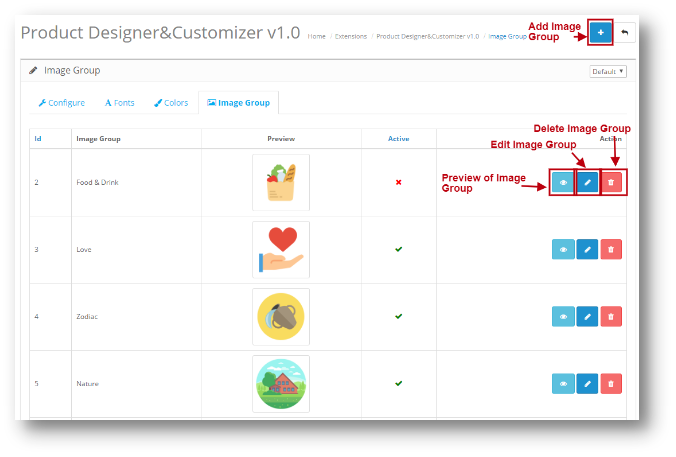
Edit Image Group: You can Edit an existing Image Group set using the Edit option. The screens for Editing Image Group will be same as Adding a Color. The only difference will be that Edit will have the fields already filled.

Delete Image Group: You can delete an Image Group by clicking on the ‘Trash’ Icon. A pop up will show up asking for the Confirmation. You can click yes and the Font will be deleted.

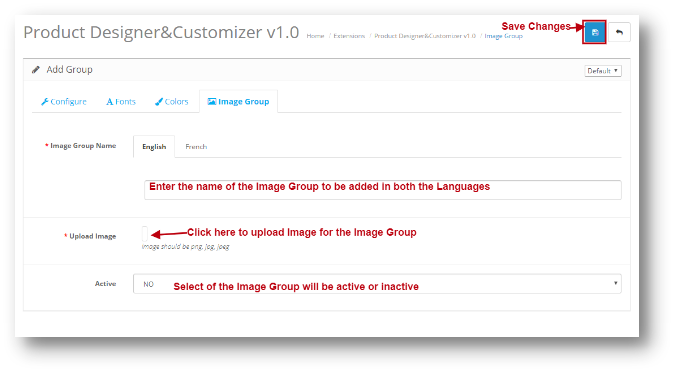
Add Image Group: You can add an Image Group in OpenCart Extended Product Customization module by clicking on the ‘+’ icon given at the top of the page. The screen will look as shown below:
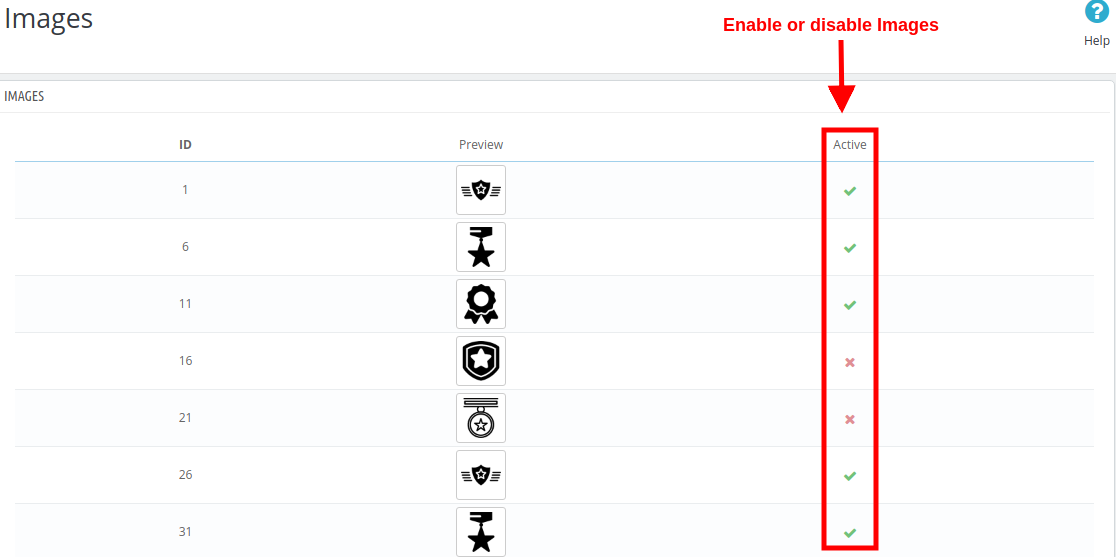
Preview of Image Group: You can view all the images within a group by clicking on the “Eye” icon corresponding to a particular group. It will show the below screen:
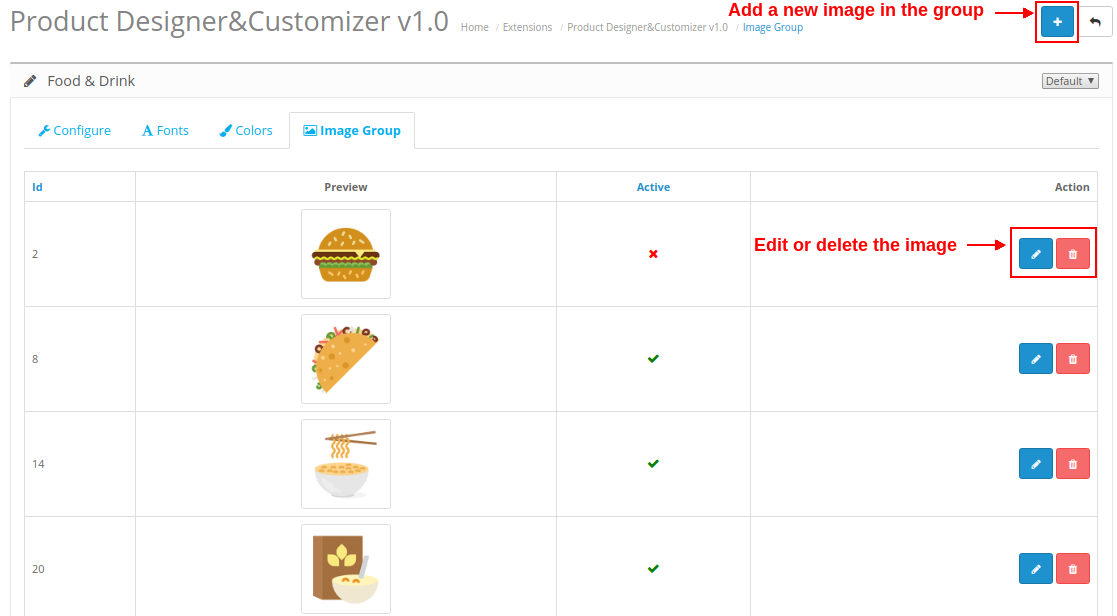

Here, you can add a new image into the group, edit/delete the existing image.

On clicking the Add button, you will see the following options as shown below:
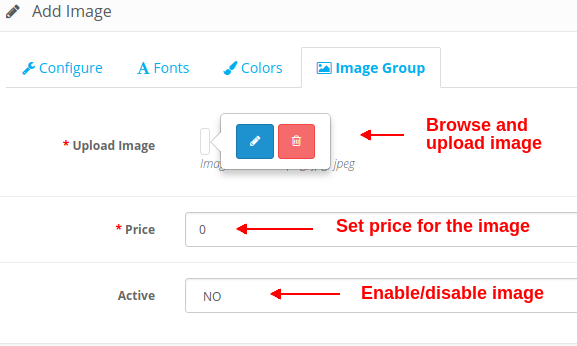
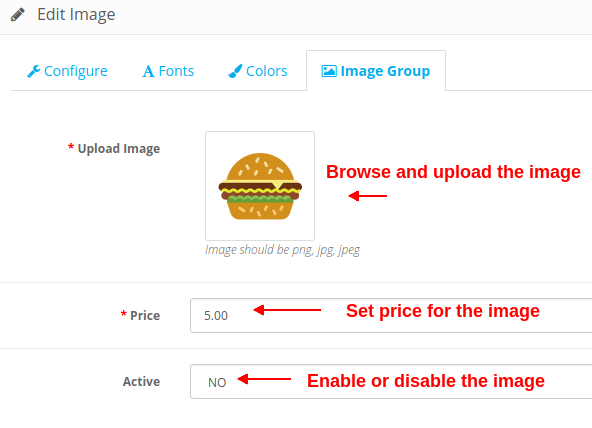
Upload Image: This option will allow you to browse a desired image from your local computer space and upload that here.

Price: This option sets the price for the selected image.

Active: This option enables or disables the image for the selected group. Set it to YES or NO.

Similarly, you can click on the Edit button corresponding to the image. The options will be same, the only difference is that the fields will be filled as shown in the image below.

Deleting an image is simple. Just click on the “Trash” icon corresponding to the image.

4.0 Front Interface of Opencart Product Designer Customizer Module

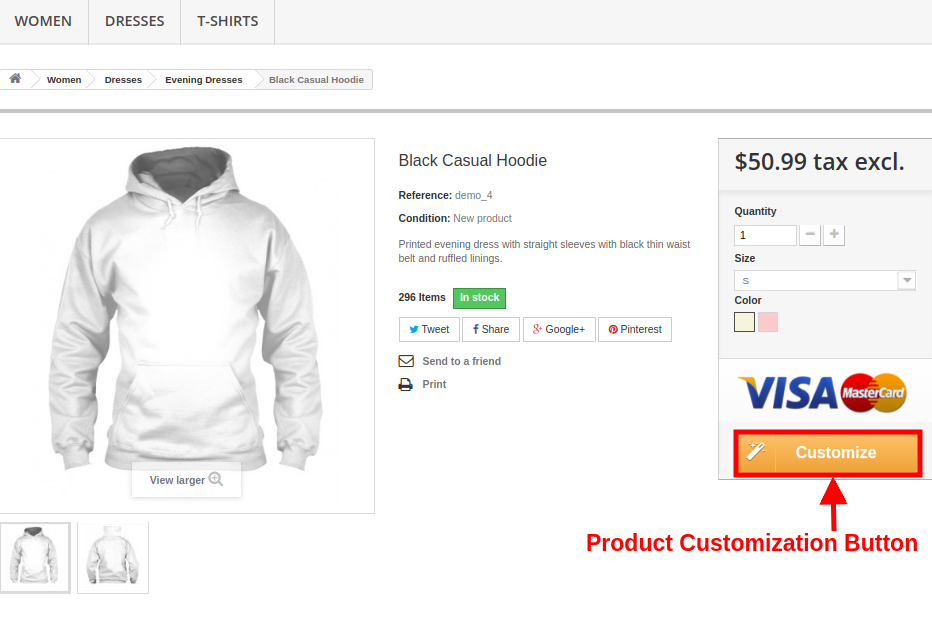
If the Opencart Product Designer/Customizer module is enabled, it will show a “Customize” button on the product page as shown below.
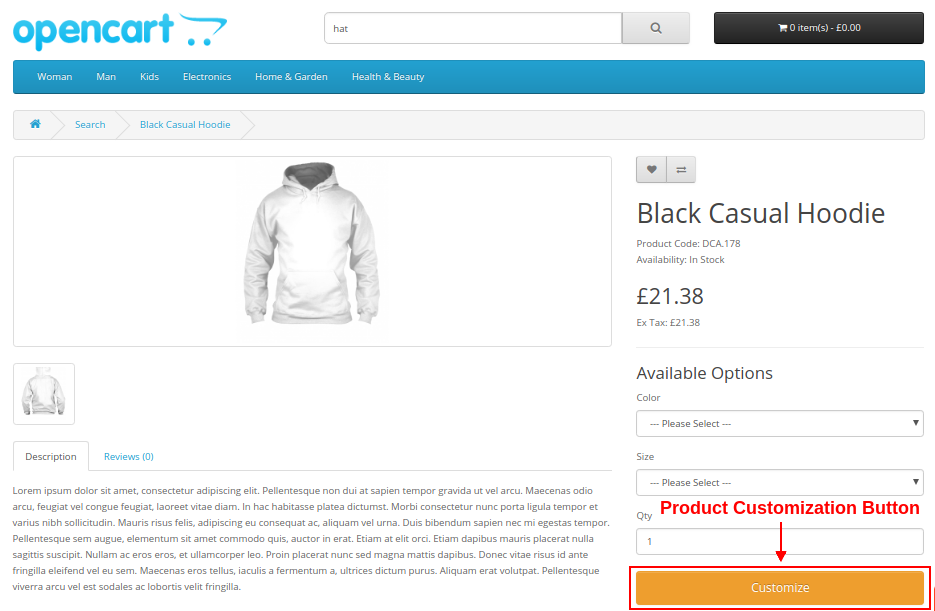
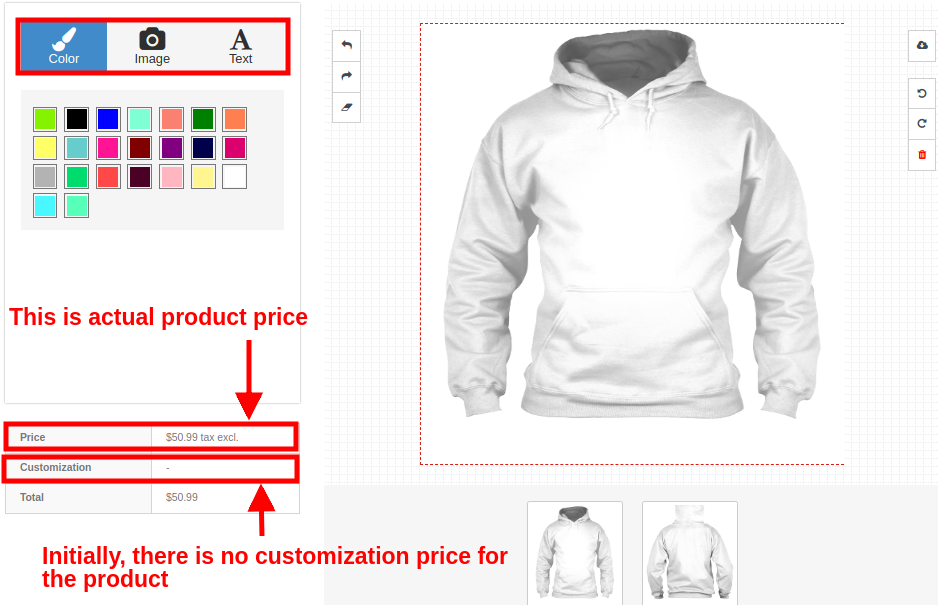
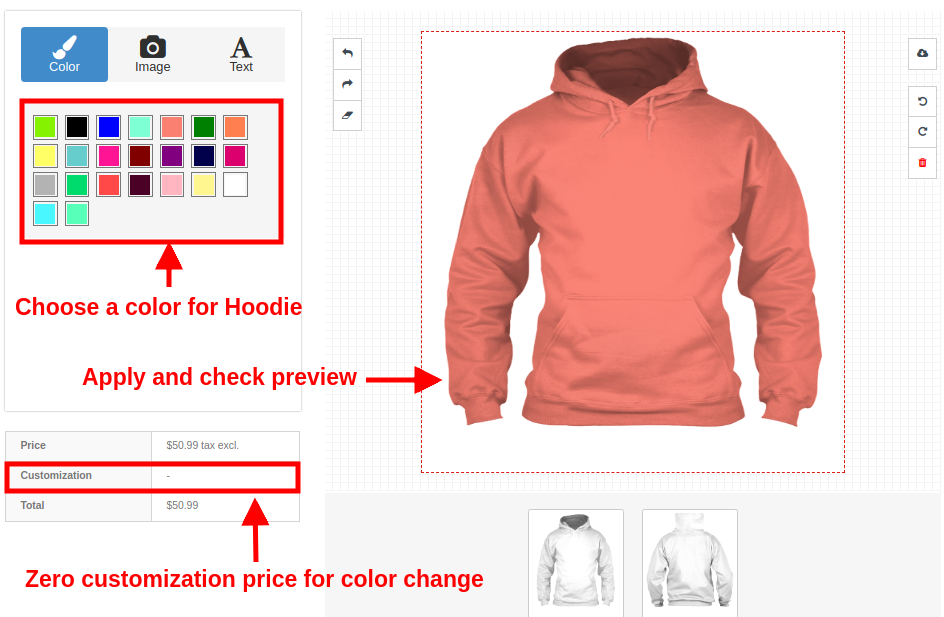
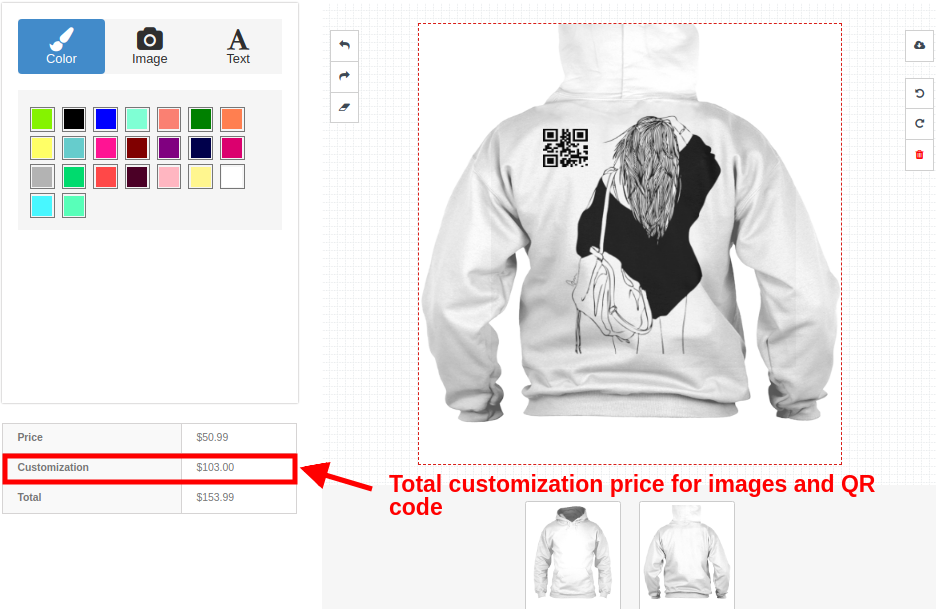
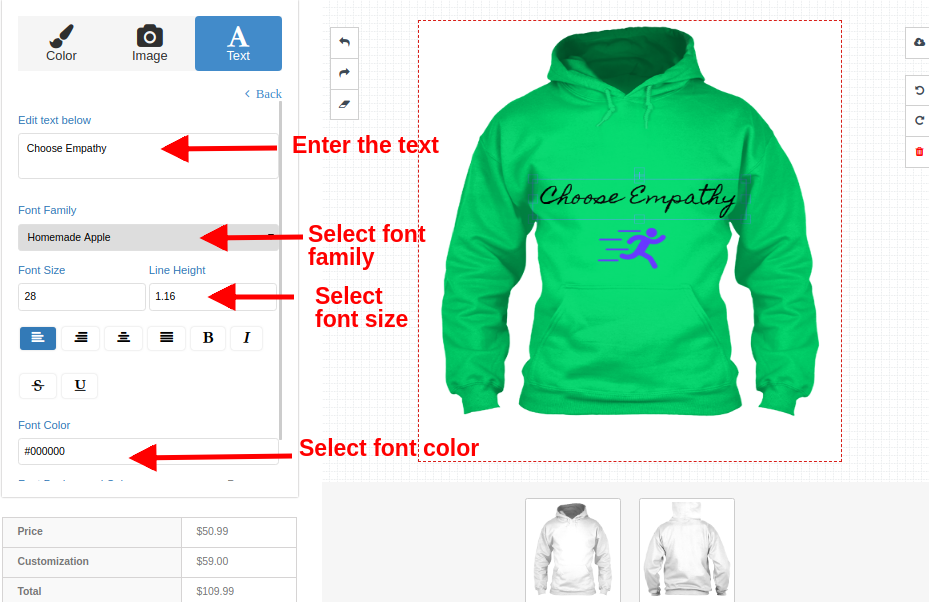
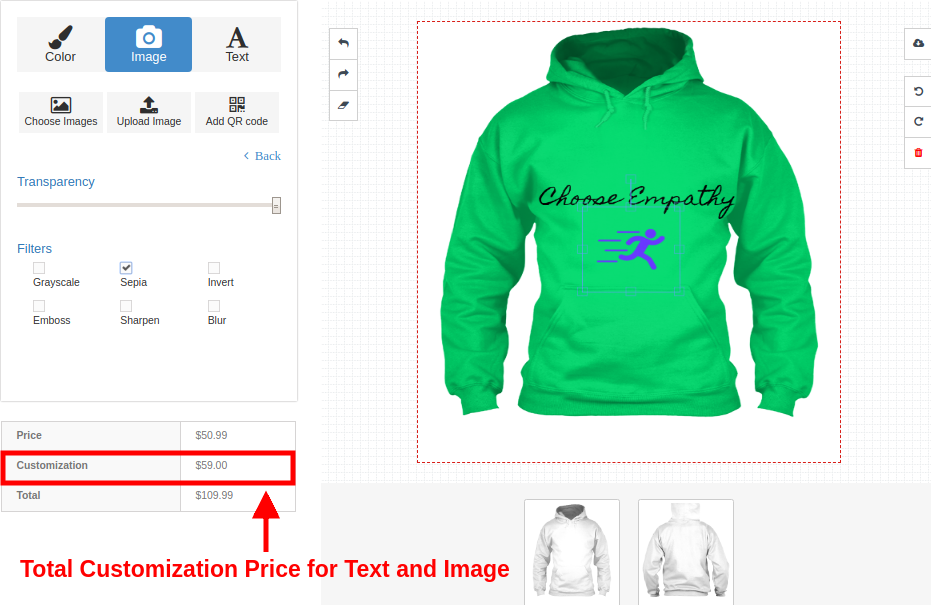
On clicking the Customize button, the customer will be shown a screen pop-up which will consists of various product design and customization settings. Customers can add any color, custom text, custom image or QR code for a product as per their shopping requirements.
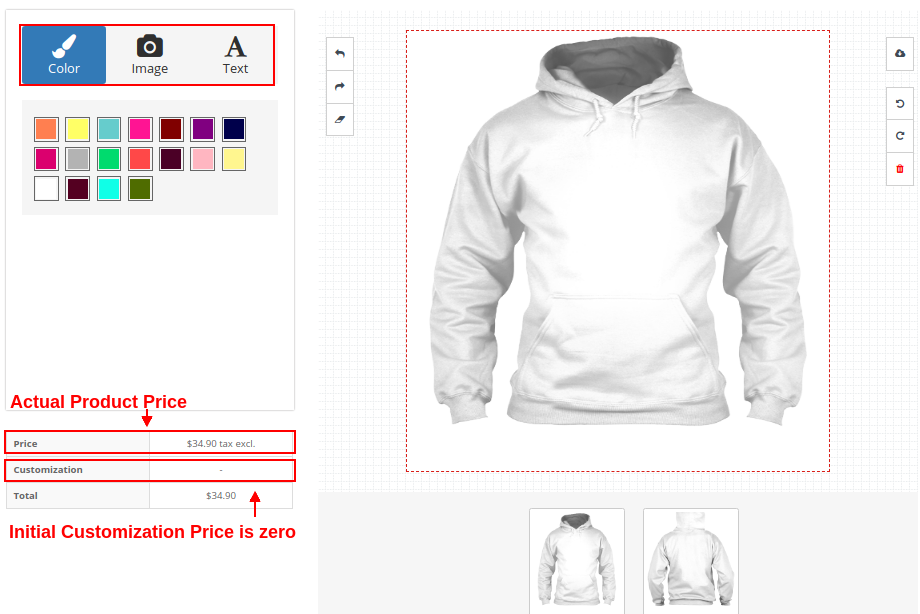
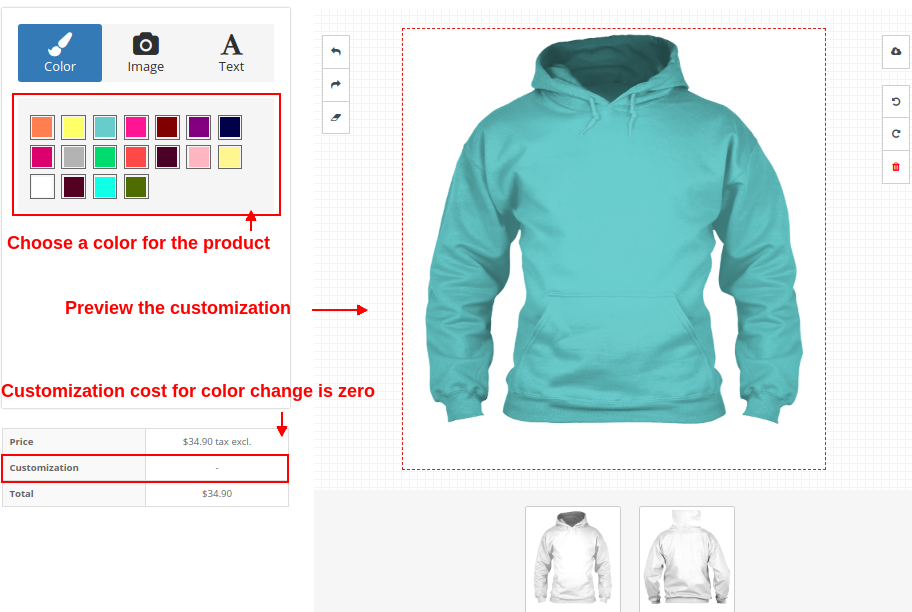
Customers can perform various kinds of customizations like:

1. Color
 

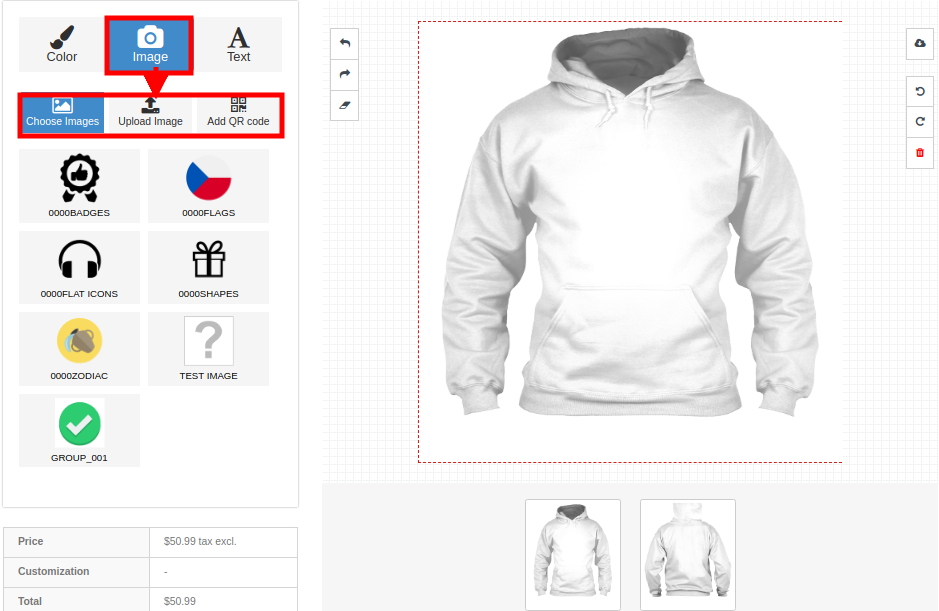
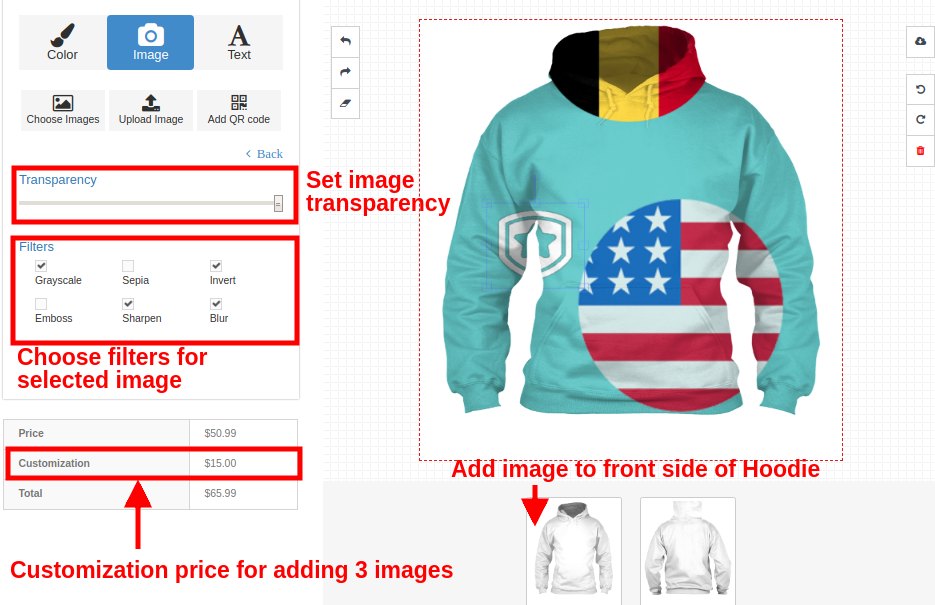
2. Image
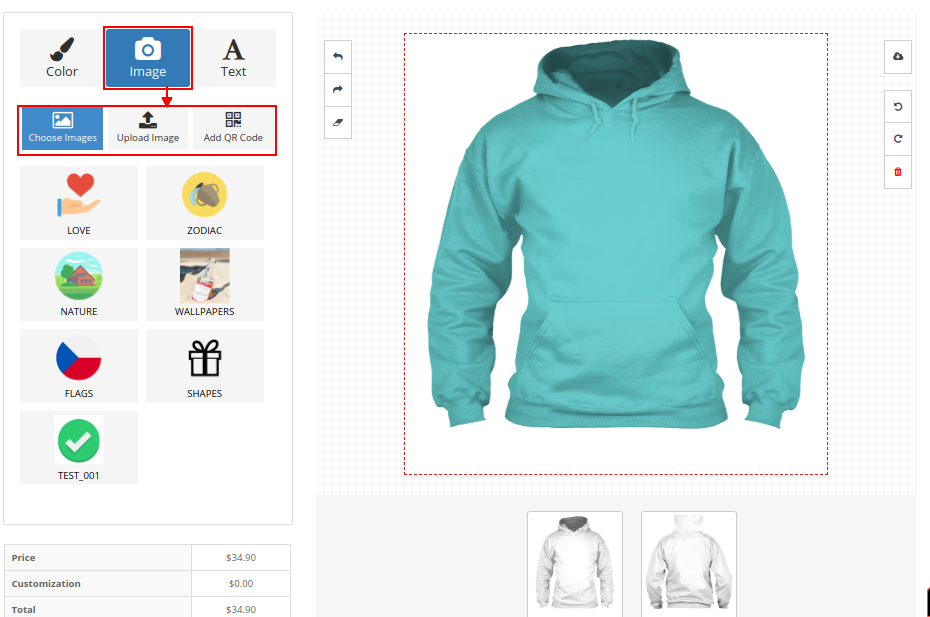
Customers can select an image of their choice from the provided image group options.
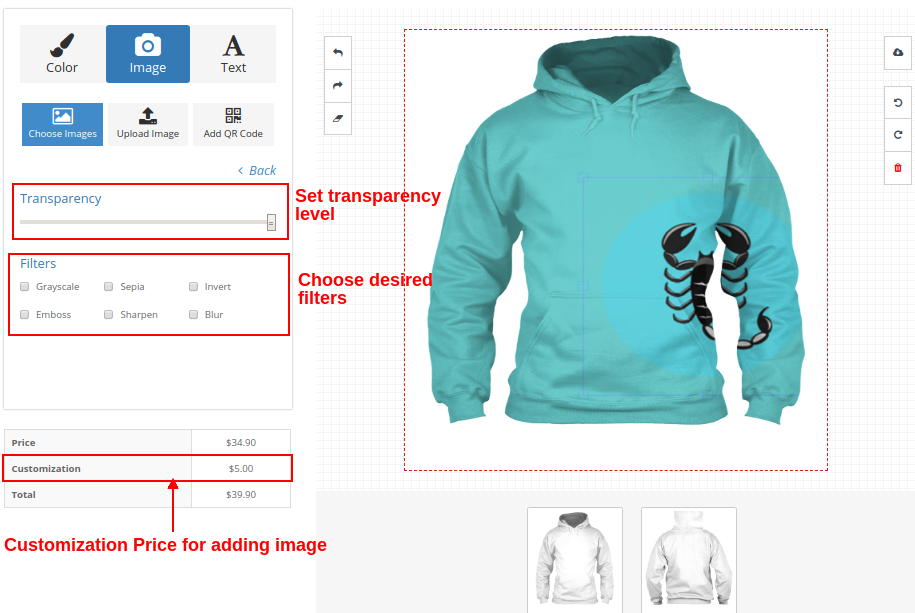
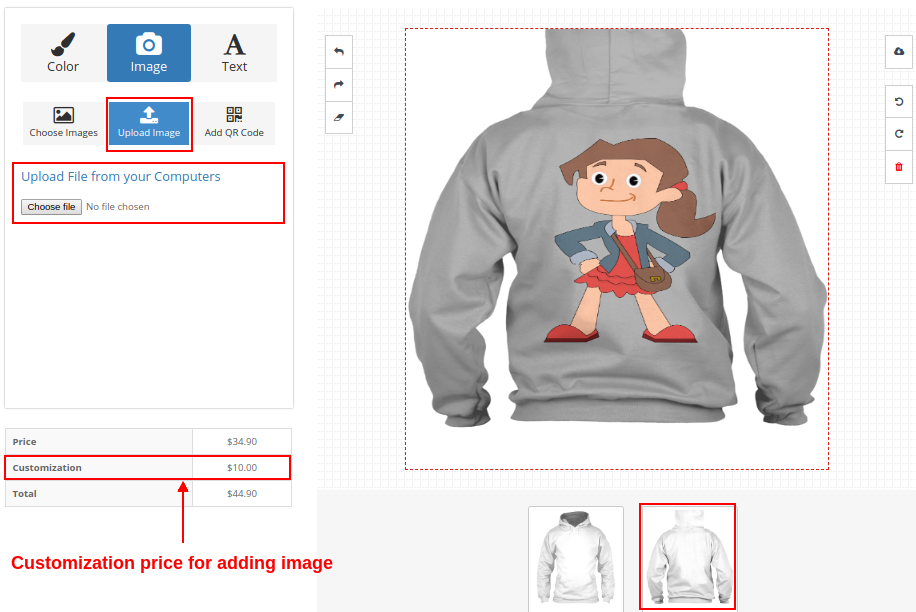
They can upload and print any other image of their choice from the local space.
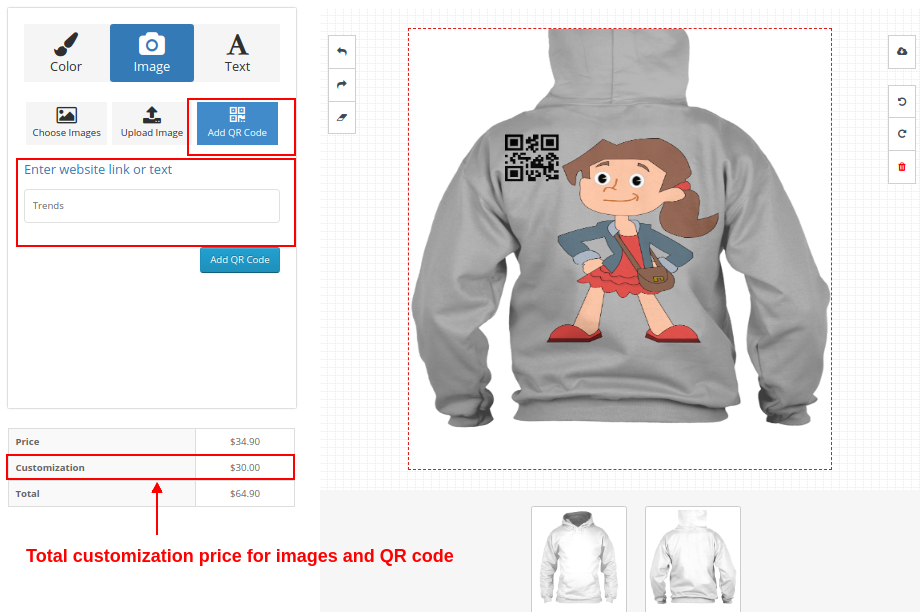
They can even print QR code for some hidden text or website link.
 

3. Text
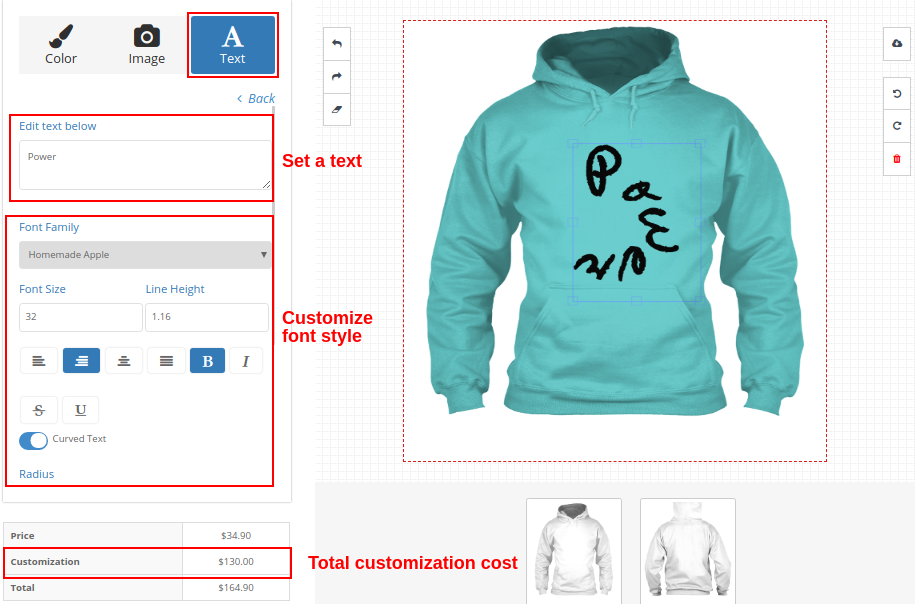

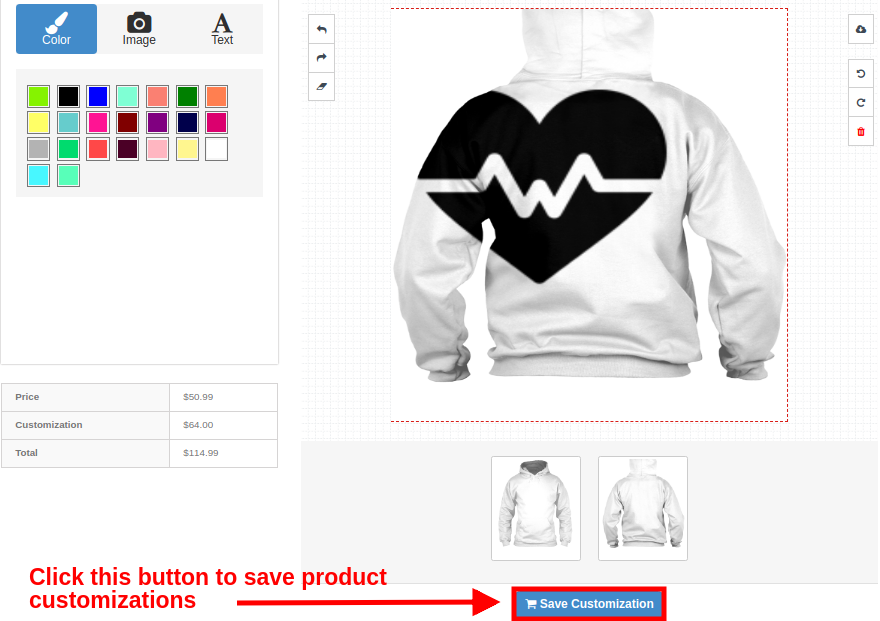
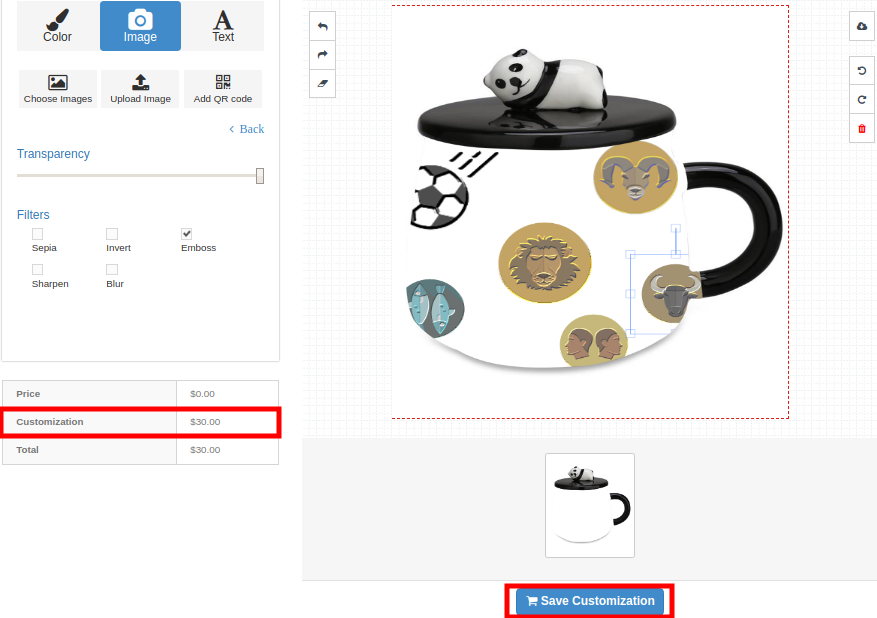
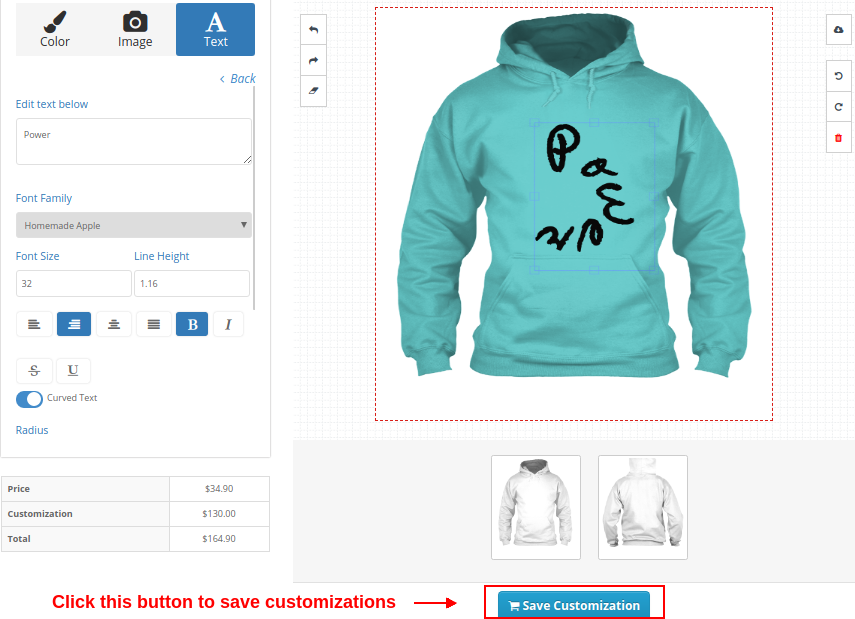
Customer can save all the customizations to their product by clicking on the Save button as shown below.
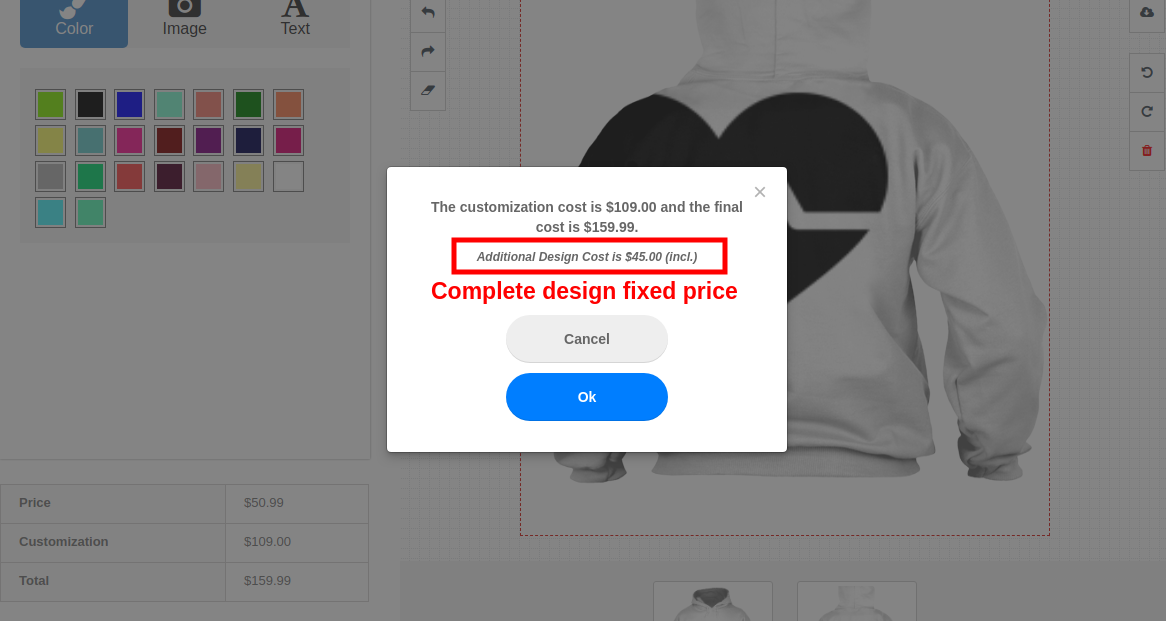
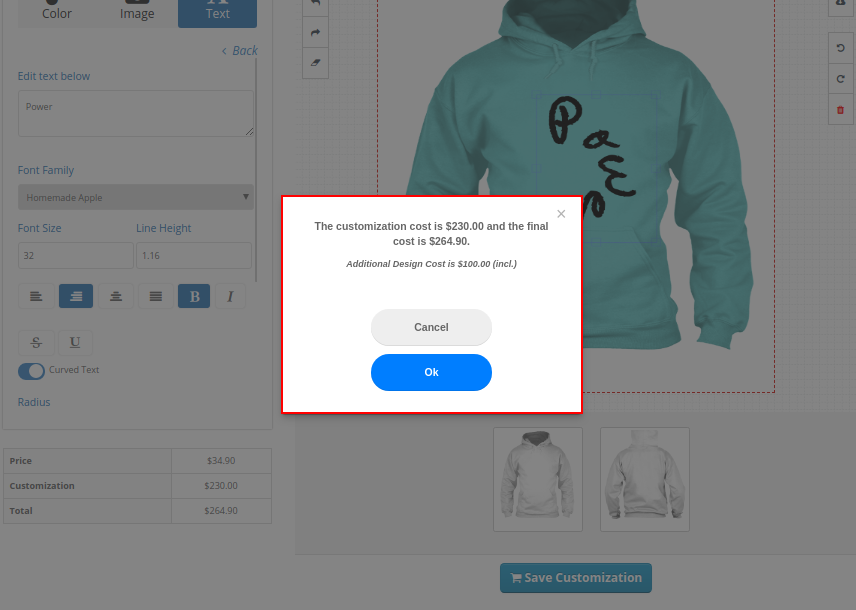
It will show the cost check box on the screen. Click OK to confirm.

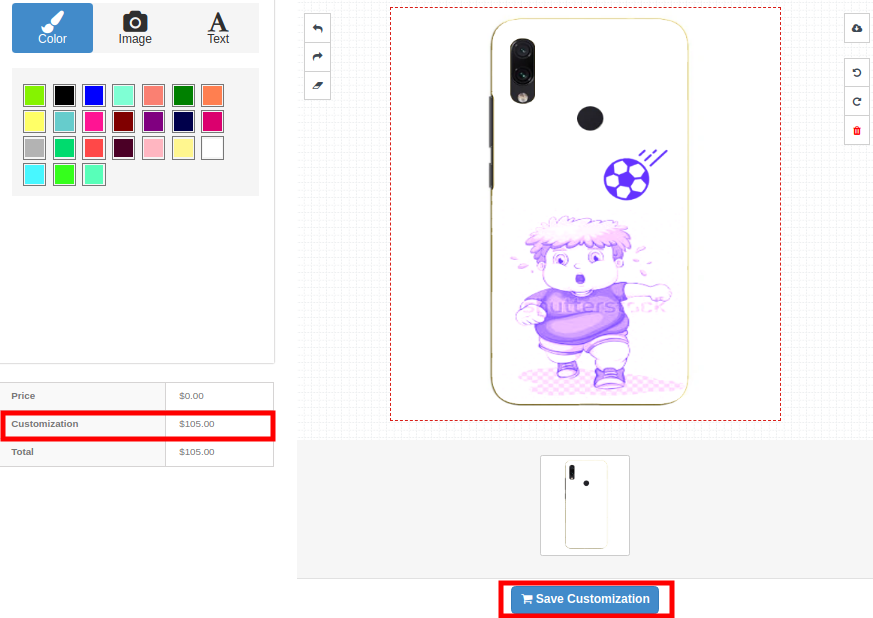
Similarly, these customizations are applicable to other products of the store like mug and phone cases.

Shopping Cart Summary Page for Customized Product

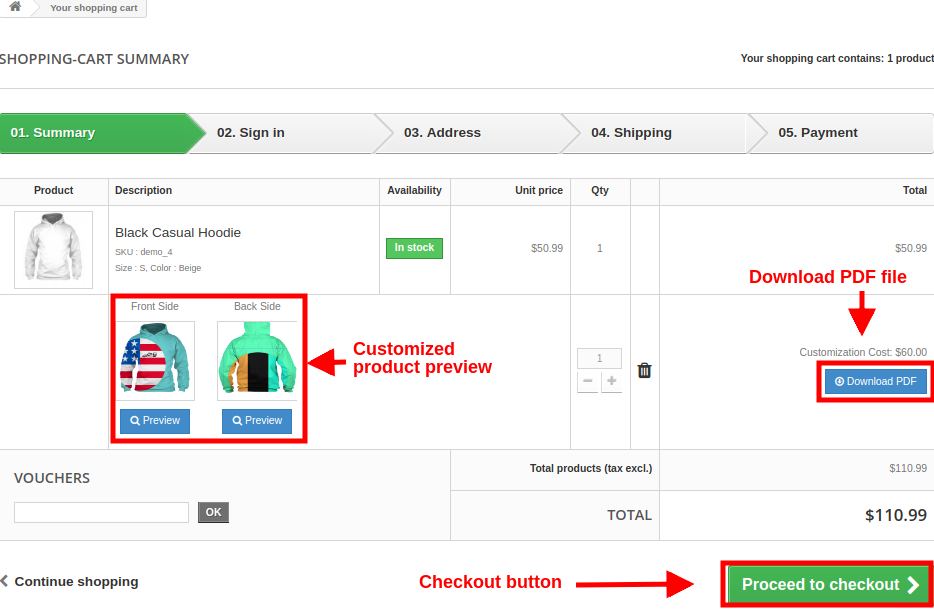
The below frontend image shows how the custom product displays on the cart page with different options to the customers after clicking on “Save Customization” button.
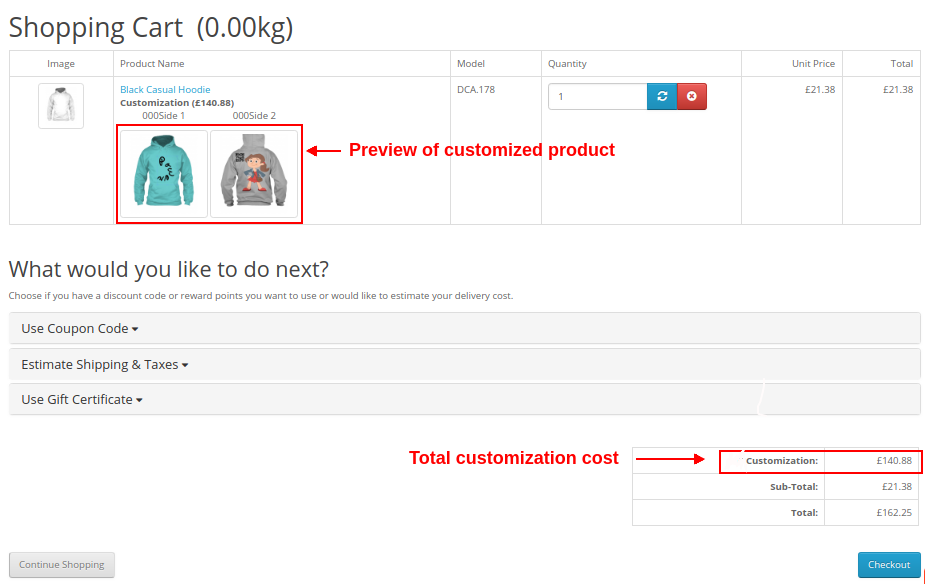

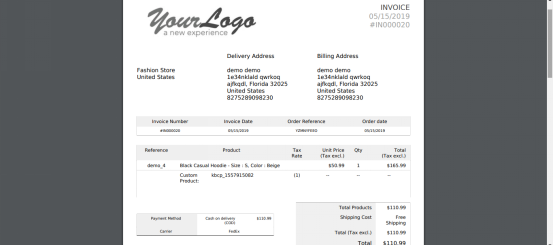
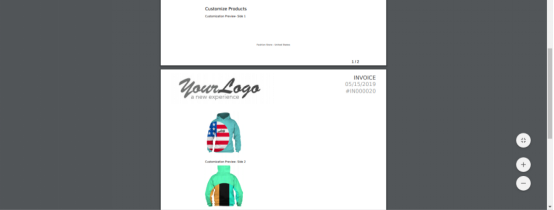
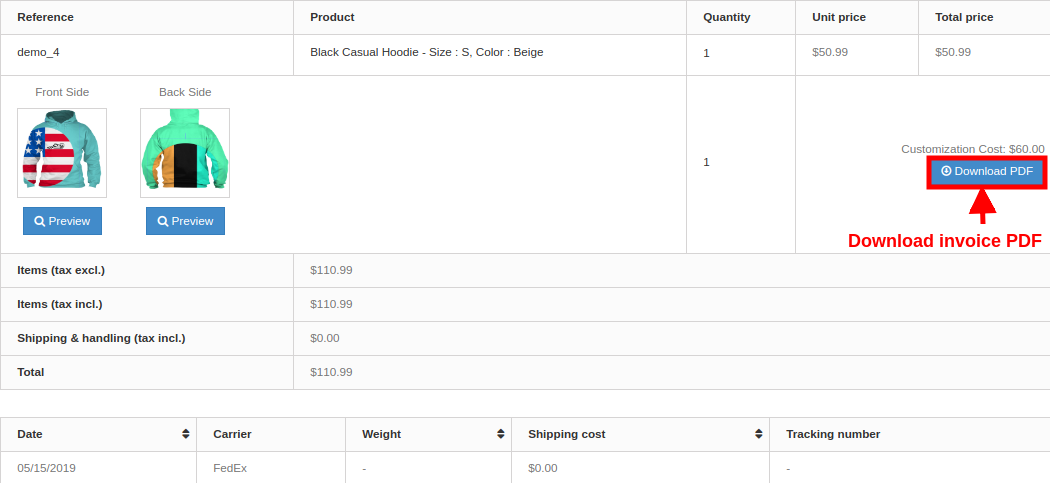
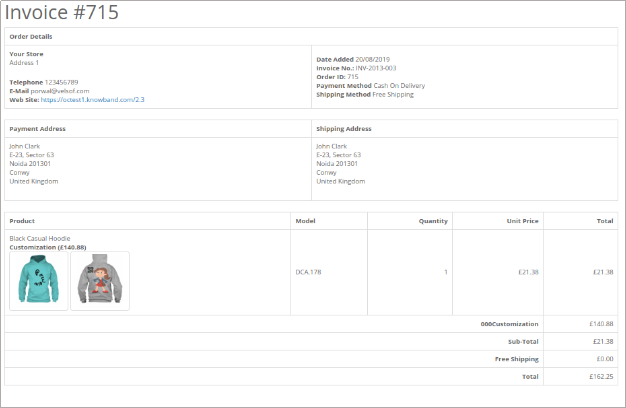
Customer can view the Invoice of this customized product as shown below.

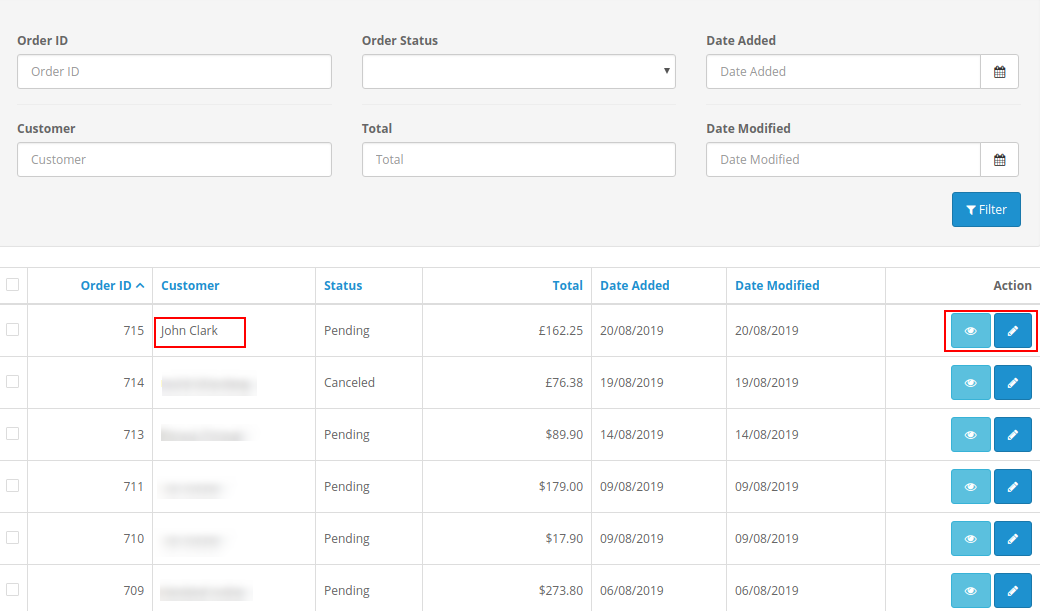
Order View from Admin Panel

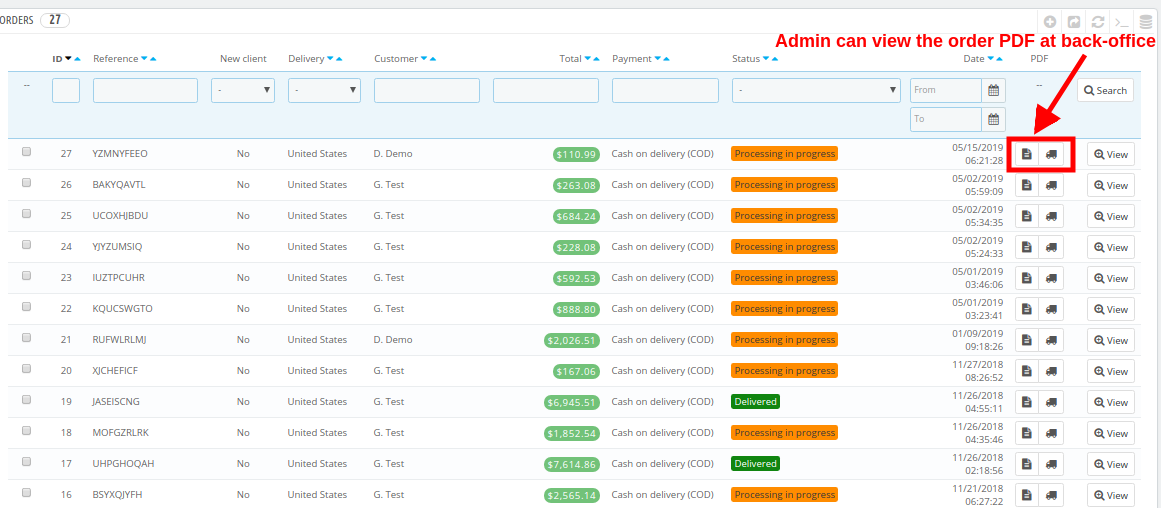
Admin can view the order invoice and all the configuration regarding the product customization from back-office. The details of an order can be viewed under the Orders section of Admin Panel.

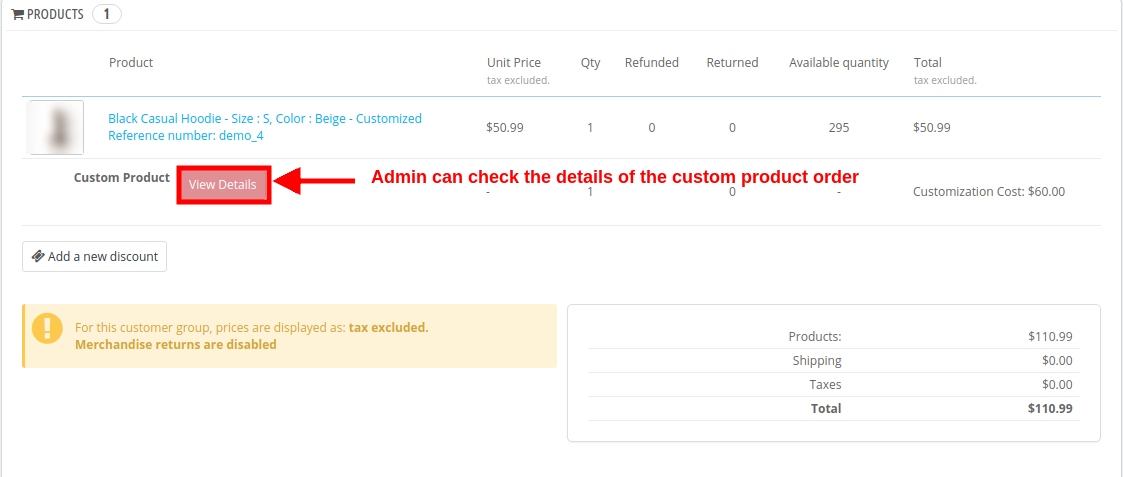
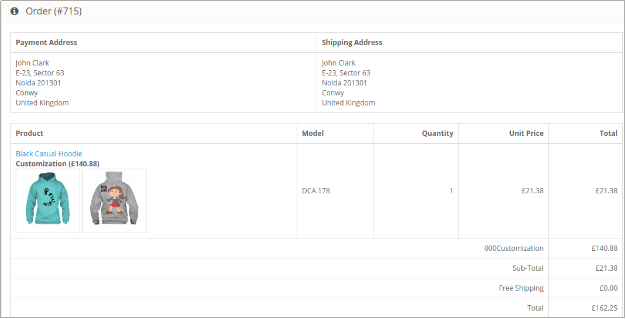
On clicking the View button corresponding to a product, admin can check the complete order details of the custom product.
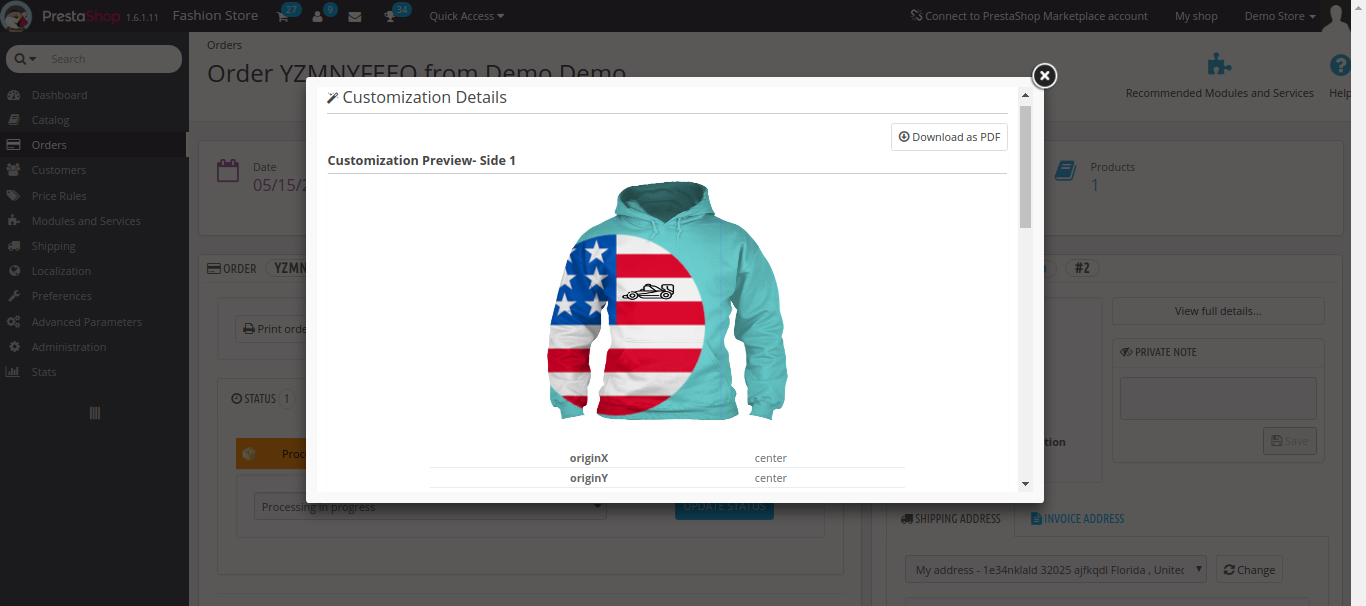
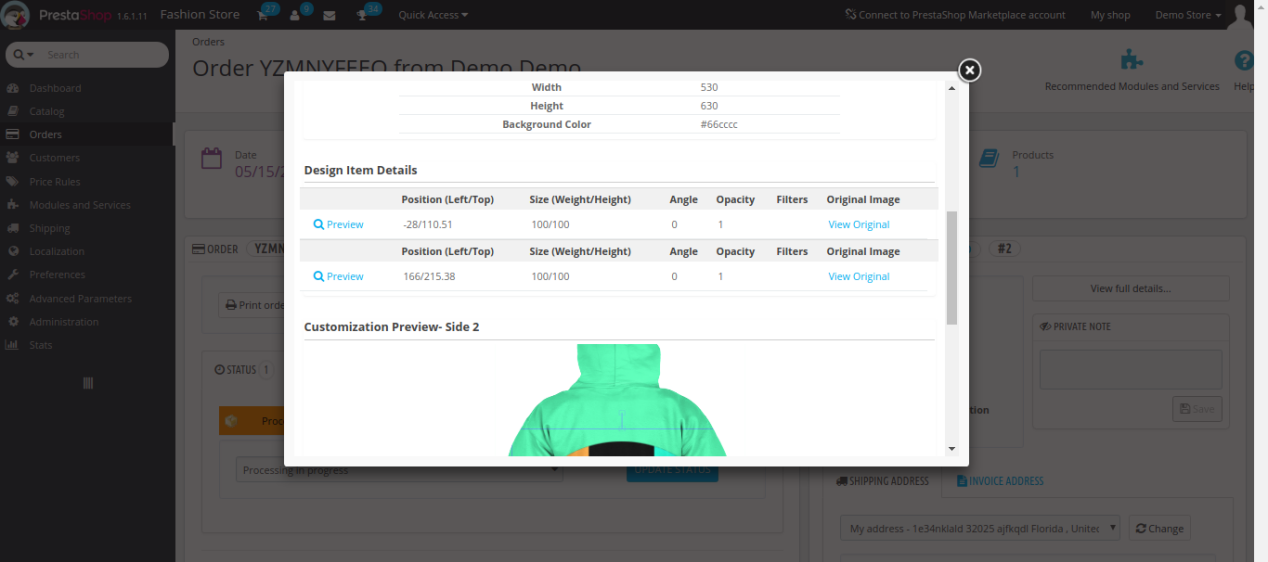
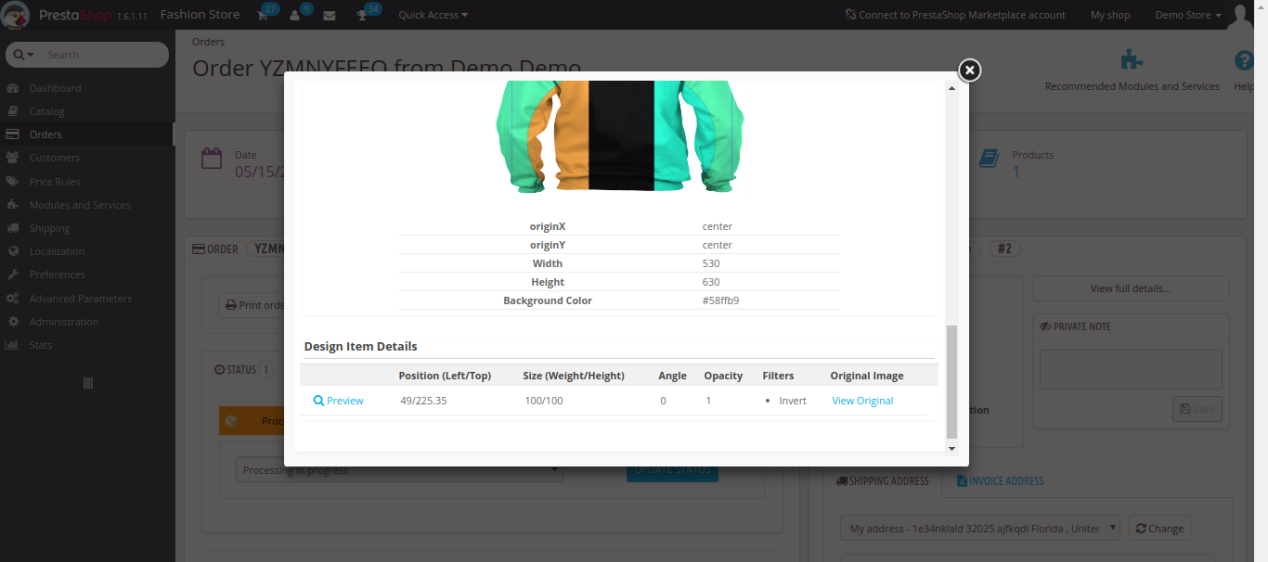
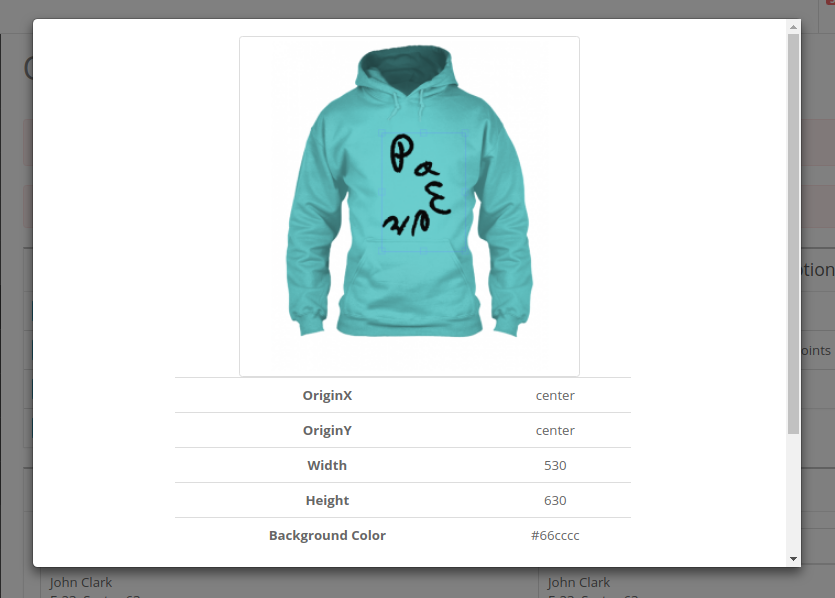
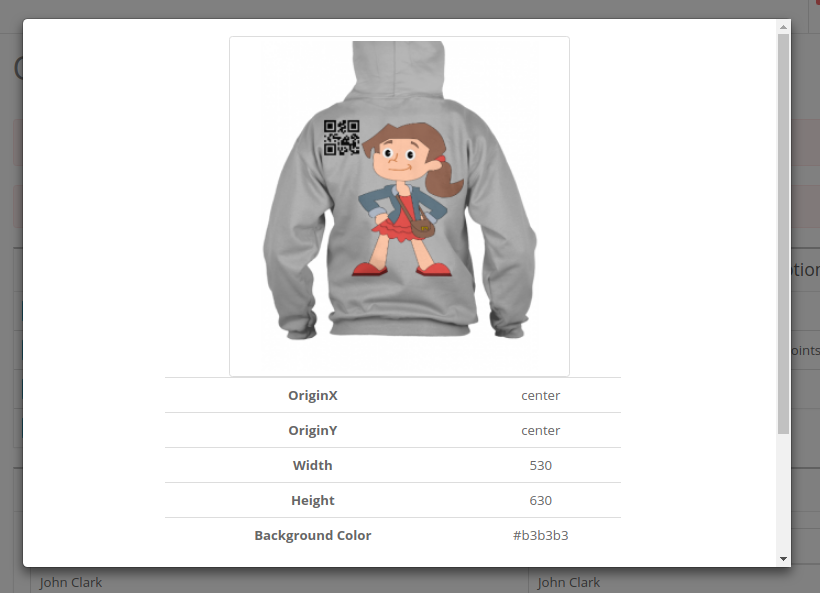
On clicking the product images, admin will see the complete details of personalized product in the form of a popup screen as shown below.
Prestashop Product Designer/Customizer Addon – User Manual

1.0 Introduction

Being a store owner you have always thought of multiplying your store conversions but not about the shopping experience of your customers. A happy and satisfied customer is the one who returns back to the store in search of some more items. So if you want returning customers on your store, make the customer experience lasts forever by integrating Prestashop Product Designer/Customizer addon at your eCommerce store.

With the help of Prestashop Custom Product Design module, store merchants can offer intuitive and creative online product customization options to their customers so that they can turn the basic version of the product into a modern, elegant and unique design. Prestashop product customization addon allows admin to show the product customization panel page as the user clicks over the Customize button on the product page. Customers can easily add rich colored texts with effects, upload their images with filters, add a QR code to make it suitable for their needs.

1.1 Striking Features of Prestashop Product Customization Addon

No coding technicalities are required to configure or modify the settings of the Prestashop Custom Product Design module. Everything comes easy with this module. Lets quickly check different features offered by this Prestashop addon.

  • Prestashop Product Designer/Customizer addon helps to offer a wide range of customizable products at your online shop.
    Using Prestashop custom product designer addon, customers can easily buy and take the benefits of the extended online products which can be personalized as per their needs.
  • Online Product Designer adds a designer view for products so that the potential buyers get an opportunity to customize the product in real time. Product configurator module lets Prestashop admin add a different set of customization options for each different product on the shop.
  • With the integration of Prestashop product designer module, customers can access the product customization panel with any product they wish to purchase like T-shirts, mug, rings or any other kind of product that can be personalized as per their needs.
  • Prestashop product customization addon shows a Customize button for every customizable product on the store. Admin can enable customization options for desired products only.
  • The complete functionality of Prestashop Product Designer/Customizer addon can be enabled or disabled. When this module is disabled, the standard product customization options are shown on the product page.
  • Advanced product customizer module shows the real-time customization price calculation on the product page.
  • With Prestashop custom product designer addon, admin can set the product design sides which are available to the user.
  • Product configurator module allows admin to enable or disable PDF file download options for the customers on the frontend.
  • Prestashop Extended Product Customization module gives an option to add pre-defined images for a product. The pre-defined images are usually defined into groups. Customers can upload and set any picture of their own.
  • Customer can flexibly use desired fonts, colors, and filters for the product using this Prestashop product designer module.
  • This Advanced product customizer module lets admin define prices for different customization options.
  • Prestashop product customization module also gives an option to personalize the product using QR code for which admin can define a separate price.
  • Prestashop custom product designer addon automatically adds a Complete Design Fixed Price to the final customized price for a product.
  • Prestashop Product Designer/Customizer addon supports multi-store and multi-lingual compatibility.
  • Prestashop custom product designer addon is mobile responsive and compatible with various Prestashop themes.

1.2 Technology for Development

  • Language: PHP
  • Frame Work: Prestashop

2.0 Installation Guide for Advanced Product Customizer module

The store admin can follow these simple steps for installing the Prestashop product customization addon on their eCommerce store:

1. Firstly, download the addon package from the Knowband store.
2. You will get a zipped file containing the source code and user manual. Unzip the complete package in the root directory of your Prestashop store through FTP manager (like Filezilla or WinSCP – download here: https://filezilla-project.org/). You’ll find the files and folders as shown in the image below:

The Prestashop custom product designer addon is now installed and ready for use. Now the admin can configure the various configuration settings in accordance with their Prestashop site.

3.0 Admin Interface of Prestashop Advanced Product Customizer module

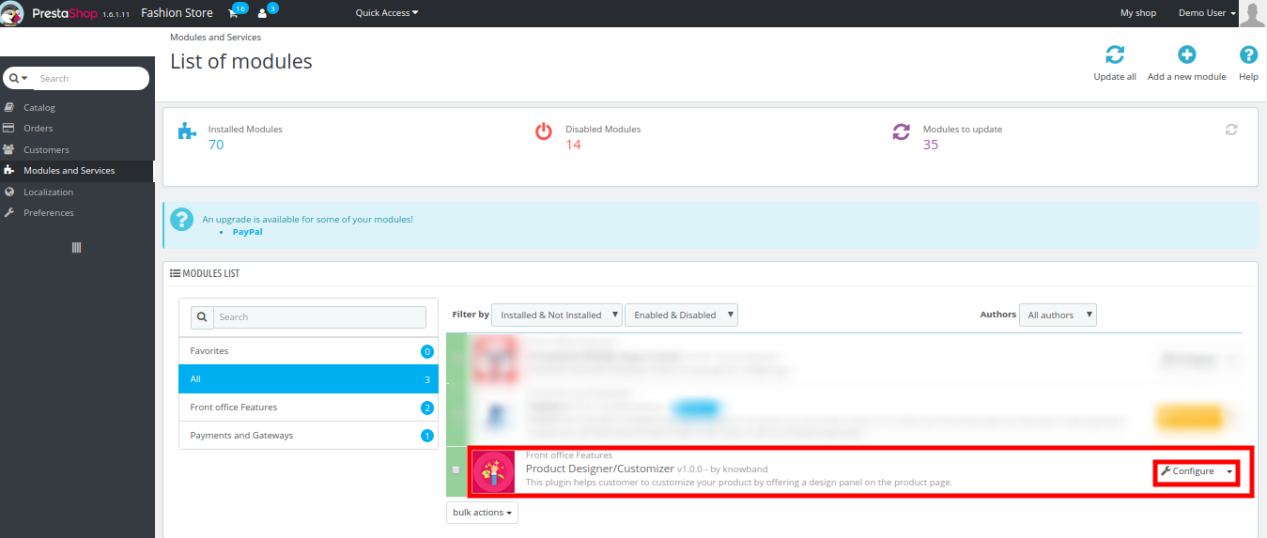
Just after successful installation of Prestashop Product Designer/Customizer addon at your website, you can configure product customization panel settings as per your needs. In the admin panel or dashboard, Click on “Modules and Services” and then on “Configure” button provided next to Knowband Product Designer/Customizer.

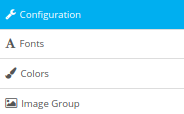
Here, in the next interface, you will find the complete settings of Product Designer/Customizer module along with its sub-sections as listed below.

This Knowband Product Customization module consists of four sub-sections which have been discussed further.
1.Configuration
2.Fonts
3.Colors
4.Image Group

Each Tab of the Prestashop Extended Product Customization module has been discussed below:

3.1 Configuration

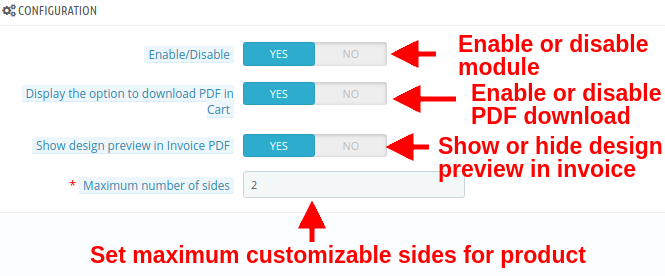
Under the configuration settings of Prestashop product customization addon, you can perform the basic settings for customization panel shown on the frontend to the customers.

  • Enable/Disable: With this option, you can completely enable or disable the functionality of Prestashop Extended Product Customization module for customers.
  • Display the option to download PDF in cart: You can enable or disable this option to download the design image in PDF on Admin Order Page.
  • Show design preview in invoice PDF: Enable or disable this option to display or hide the design preview in invoice PDF.
  • Maximum number of slides: Using this option, you can set maximum number of product sides that are allowed customization from frontend.

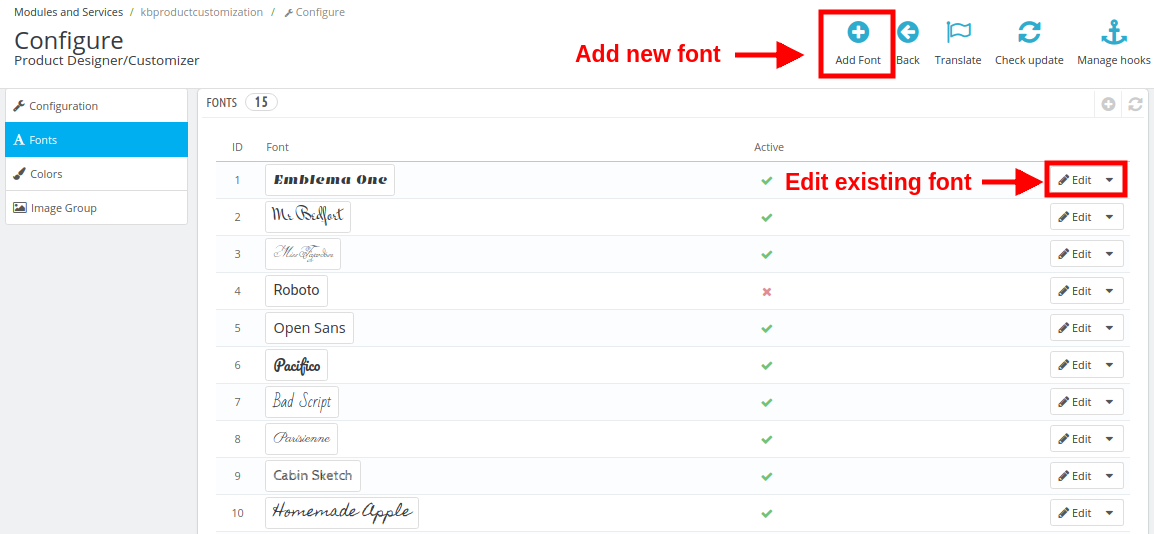
3.2 Fonts

Under this section of Prestashop product designer module, store owner gets the option to add several fonts that the customer can choose to print a styled text on the product.

The first interface shown below shows you a list of existing fonts that are available on frontend. A new font can be added or the existing font can be modified or deleted.

Here you can perform the other two actions as:

1. Adding a new font

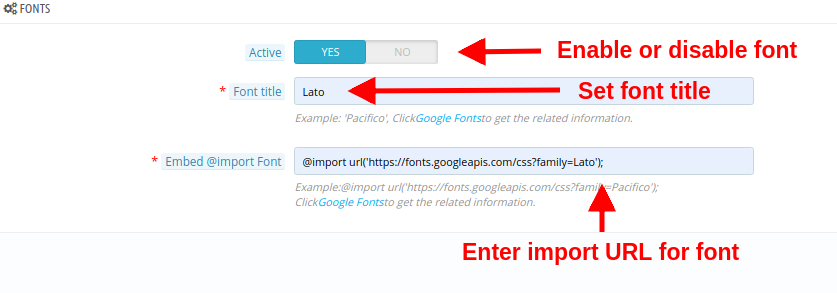
To add a new font style, perform the following steps:
Click on the Fonts tab and then on the “+” (Add Font) button at the backend panel. You will be shown the below interface.

  • Active: This option will enable or disable the font.
  • Font Title: Using this option, you can set the font title same as mentioned in Google Font.
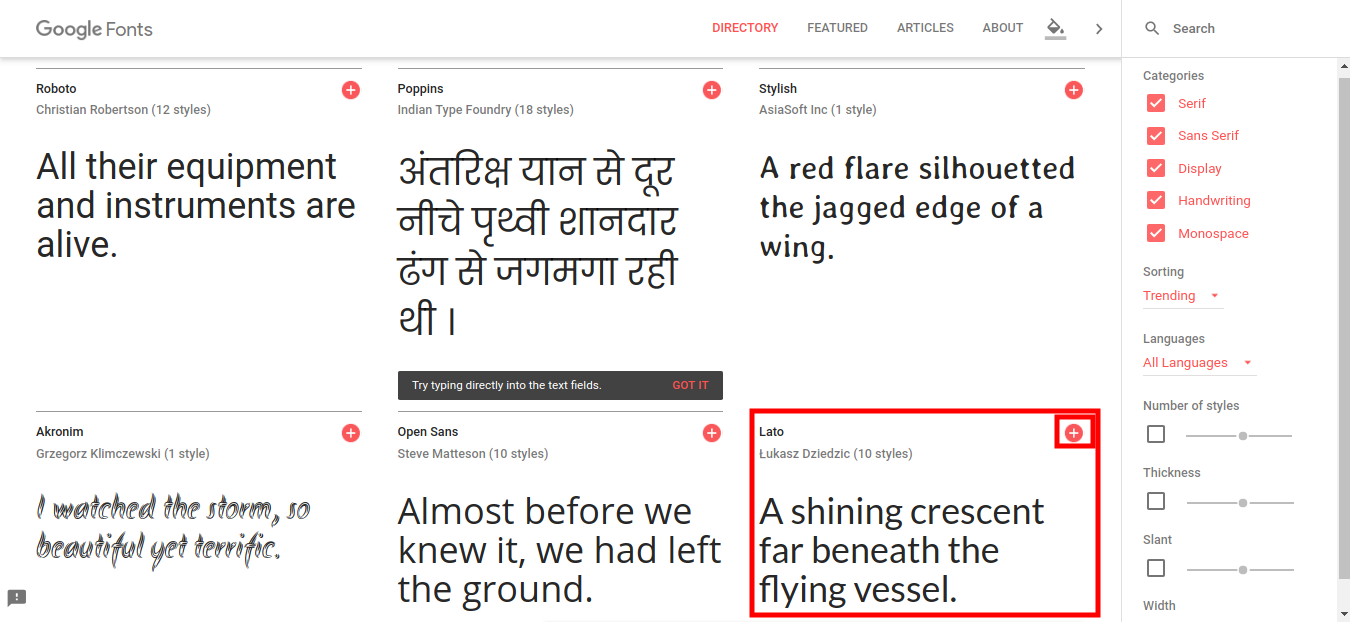
  • Embed @import Font: In order to use the Google Font, you have to embed the import Font class. For this, you have to:
  • Click on “Google Fonts” link provided just below the option. The below screen will be shown to you.
  • Choose any desired font and click on the Add “+” button for that font style.

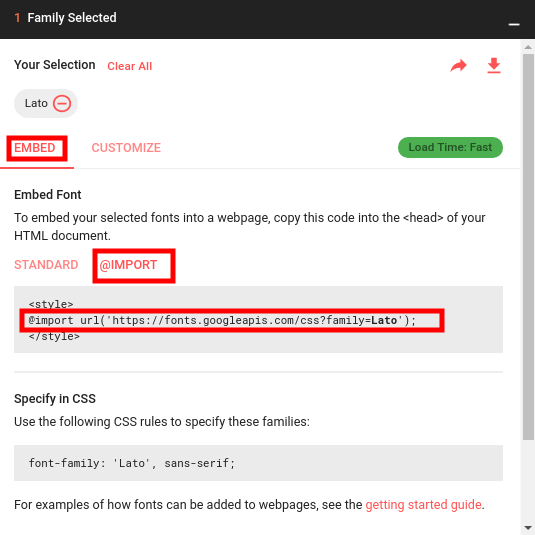
  • Upon adding a font, you will be shown a popup which will list you the font family you have selected. Click on Embed tab and then on @Import button.
  • Copy the @import URL for that font and paste it to the Embed @import Font field.

2. Edit an existing font

If you want to edit the existing font, simply click on Edit button given next to the font style. You will see the following options:

  • Active: Enable or disable the font style.
  • Font Style: Edit the font title using this option.
  • Embed @Import Font: Modify the import URL for that particular font.

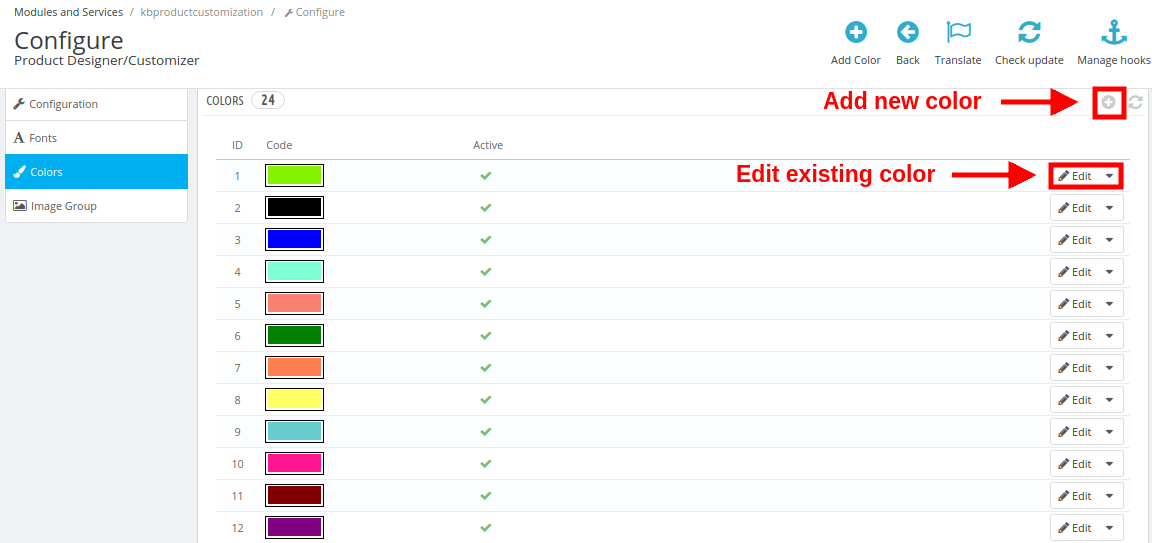
3.3 Colors

Under this section of Product configurator module, you can define your own color palette and allow your customers to pick any color for the selected product.

The following interface shows you a list of existing colors which can be edited or you can add a new color if required.

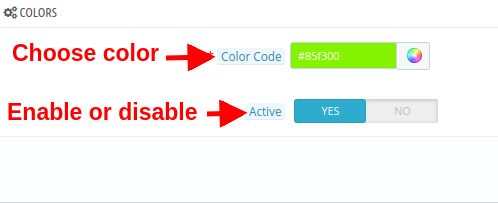
1. Adding a new color

  • Color Code: With this option, pick a desired color to be shown on product customization page.
  • Active: Enable or disable the color.

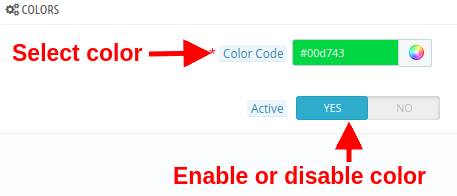
2. Edit an existing color

  • Color Code: With this option, pick a desired color to be shown on product customization page.
  • Active: Enable or disable the existing color.

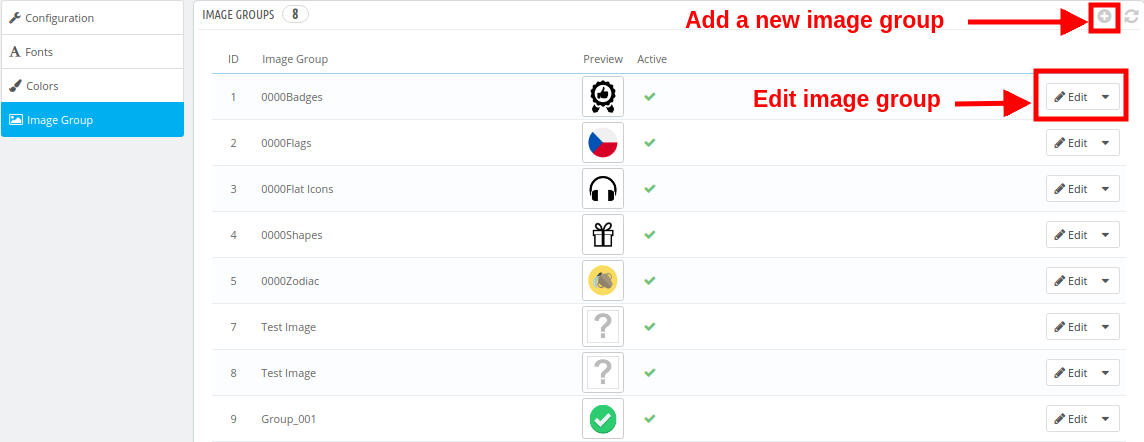
3.4 Image Groups

For a selected product, the customer can select any default images provided by the store owner or they can upload a new custom image for the product customization.
The default images have been categorized as image groups. These existing image groups can be edited or you can even add a new image group.

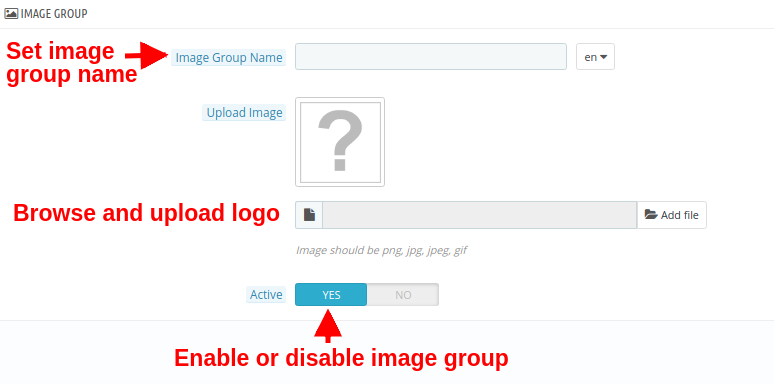
1. Adding a new image group

  • Image Group Name: You can set a desired name for the image group.
  • Upload Image: You can upload and set a image group logo image.
  • Active: This option will enable or disable the image group.

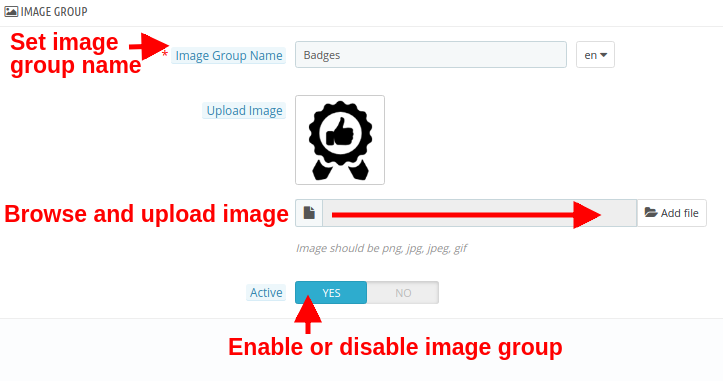
2. Edit an existing image group

  • Image Group Name: You can set a desired name for the image group.
  • Upload Image: You can upload and set a image group logo image.
  • Active: This option will enable or disable the image group.

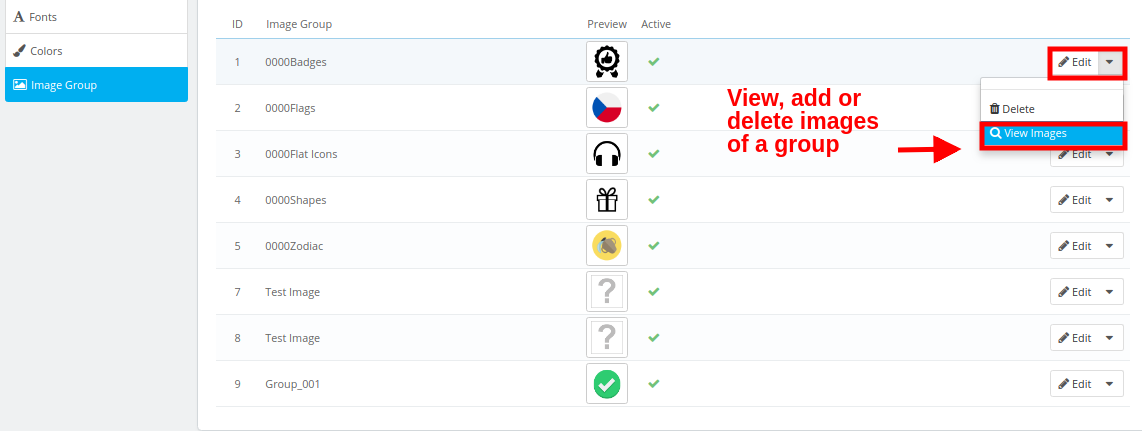
To view, add or delete the images inside any image group, click on the “View Images” option corresponding to the image group.

You will be shown the following interface.

Here, you can add a new image, delete or change the existing images within a group.

4.0 Customization Settings for Site Products

The configuration settings for fonts, colors, image groups discussed in section 3.2, 3.3. And 3.4 are applicable for all the site products. These settings can be referred to as Global settings. Other than this, the settings can be also be done on a product level. These settings are particular to the product which the admin has configured from the back-office. Below discussed are the product customization settings for individual products. The site admin can apply these settings differently for any product on the store. To configure the product customization settings for individual products, follow the listed steps:

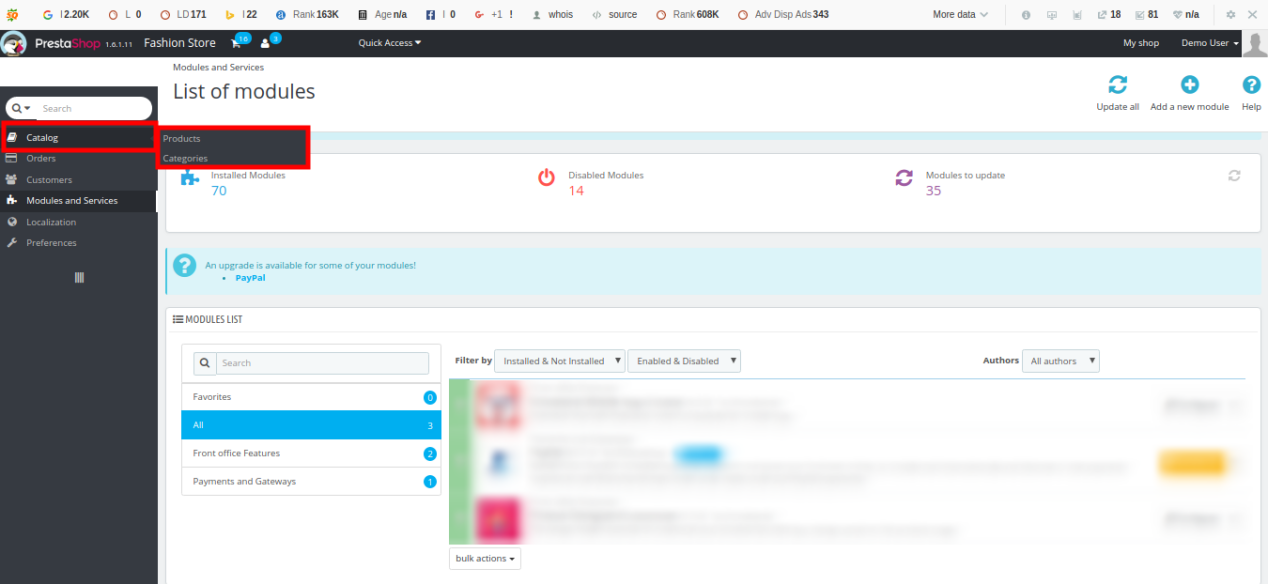
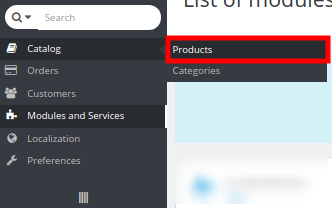
1.In the admin panel, go to “Catalog” option in the left Menu Bar of the interface.

2.Click on “Products” option under “Catalog”.

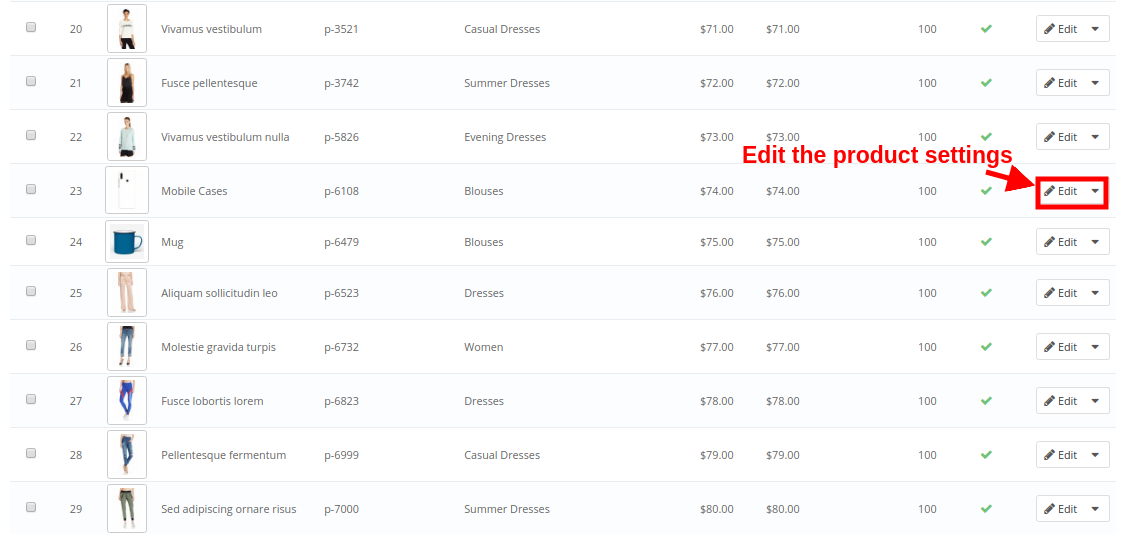
You will see a list of store products along with an option to edit or configure the product. The screen for store products has been shown below:

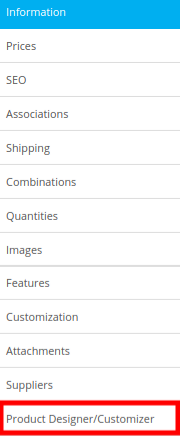
Upon clicking the “Edit” button for a product, you can will find the following configuration settings. Choose the Product Designer/Customizer tab.

Now, the complete product designer/customizer settings are divided into four groups namely:

  • Configuration
  • Prices
  • Text
  • Sides

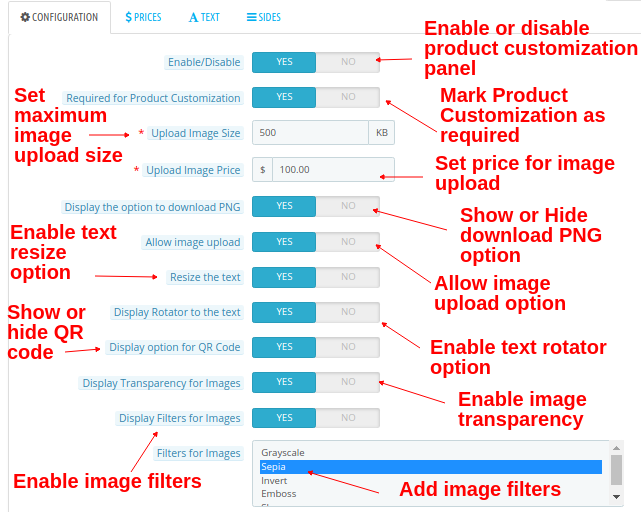
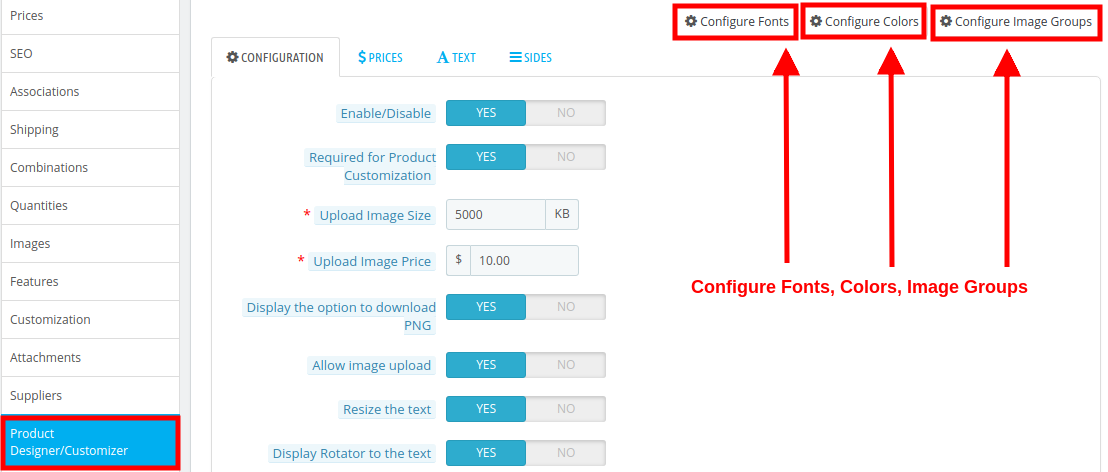
4.1 Configuration

  • Enable/Disable: This option will enable or disable the product customization panel on product page at frontend.
  • Required for Product Customization: Enable this option if you want to mandate product customization for customers.
  • Upload Image Size: This option will set maximum size for image upload.
  • Upload Image Price: This option will set the price for uploading an image.
  • Display the option to download PNG: Enable or disable the option to download PNG image.
  • Allow image upload: Enable or disable image upload option on product customizer page.
  • Resize the text: Enable this option to allow text resize.
  • Display Rotator to the text: Enable this option to allow text rotation.
  • Display option for QR Code: Enable or disable his option to add QR code on product.
  • Display Transparency for Images: Enable this option to display transparency option for images.
  • Display Filters for Images: With this option, you can enable or disable image filters.
  • Filters for Images: Select multiple filters that you want to show at frontend on product customization page.

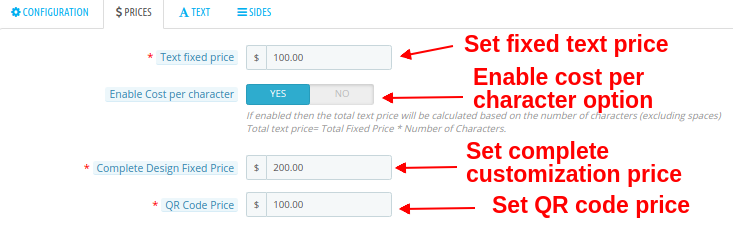
4.2 Prices

  • Text fixed price: This option allows you to set a fixed price for the text.
  • Enable Cost per character: You can enable this option if you want to charge cost per character.
  • Complete Design Fixed Price: This option allows you to set a fixed price for the complete design. This price is added to the total customization cost.
  • QR Code Price: You can set a price for QR code using this option.

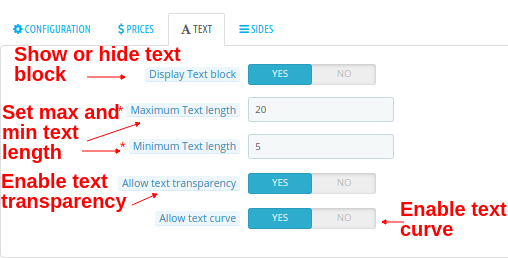
4.3 Text

  • Display Text block: You can show or hide the text block option on product customization page.
  • Maximum Text length: Using this option, you can set a maximum length for the text.
  • Minimum Text length: Using this option, you can set a minimum length for the text.
  • Allow text transparency: You can enable or disable this option for text transparency.
  • Allow text curve: You can enable or disable this option for text curve.

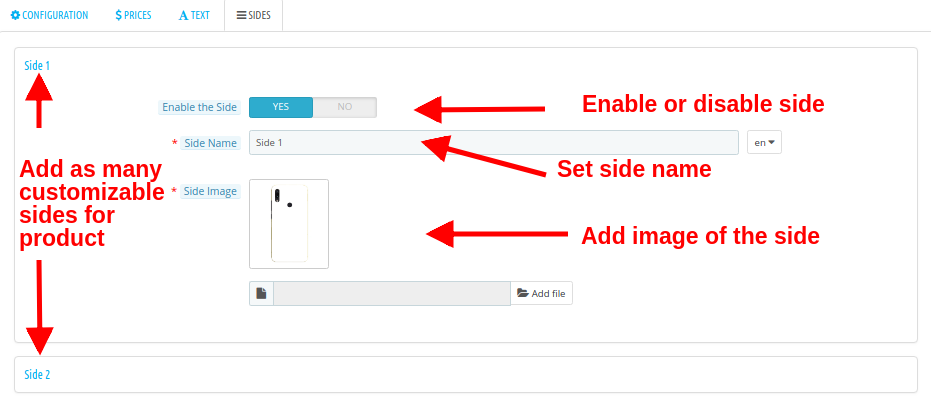
4.4 Sides

  • Enable the Side: With this option, you can enable or disable the side.
  • Side Name: This option lets you set the name for the side.
  • Side Image: This option allows you to upload an image showing the product side.
    These settings are for one side of a product. You can do the same settings for other sides of a product also.
    Note: Here, You can only configure the settings of the number of sides as mentioned in the “configuration settings” of product customizer module. For example, if you have set the “maximum no of sides” count as 2, then you can only configure the settings for side 1 and side 2.
How to Configure Fonts, Colors, and Image Groups?

While you are changing the customization settings for a product, you will find the options to select different Fonts, Colors, Image Groups at the top right side of screen. You will find three options as:

1. Configure Fonts
All the fonts that have been added in the section 3.2 are listed here in this interface. You can directly enable or disable any font.

2. Configure Colors
All the colors that have been added in the section 3.3 are listed here in this interface. You can directly enable or disable any color.

3. Configure Image Groups


All the image groups that have been added in the section 3.4 are listed here in this interface. You can directly enable or disable any image group.

On clicking the “View Images” button, you will see the following screen.

5.0 Front Interface of Prestashop Custom Product Design Module

Once the Online Product Designer has been installed and configured for the store, the Product Designer/Customizer settings tab is shown in the general settings of the store products. If you want to enable or disable the product customization page for a product, you can simply configure the product settings under the “Products catalog” at back-office.

When the Product Designer/Customizer module is enabled for a product, it will show a “Customize” button on its product page as shown below:

On clicking the Customize button, the customer will be shown a screen pop-up which will consists of various product design and customization settings. Customers can add any color, custom text, custom image or QR code for a product as per their shopping needs.

Your customers can perform any type of customization like:

1.Color

2.Image
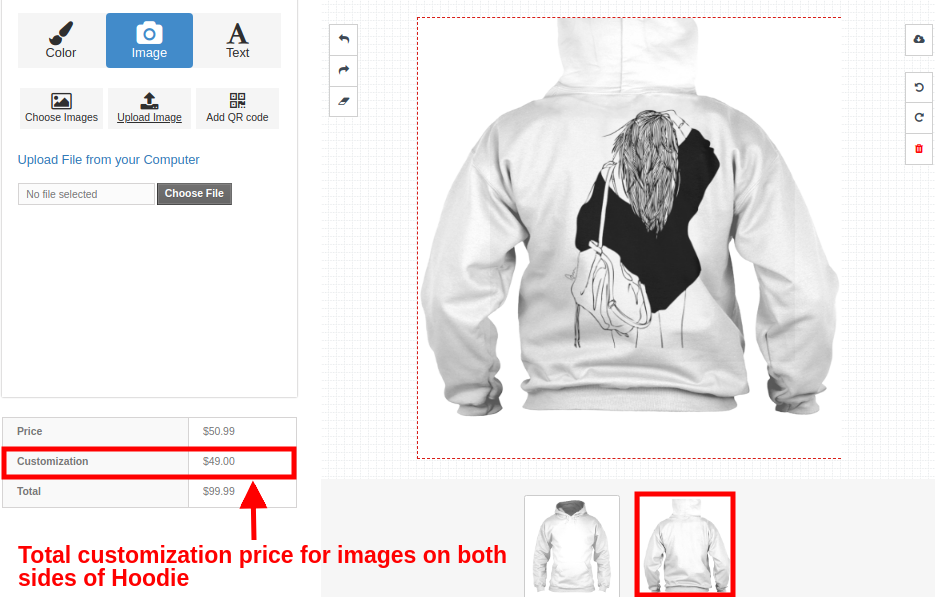
Customers can add an image to the product. They can choose any default image from image group or they can upload their own image or they can add a QR code to the product.

2a. Choose an image

2b. Upload image

Let’s suppose that the customer is adding the uploaded image on the back side of Hoodie.

2c. Add QR code

3.Text

Saving Product Customization

Similarly, the customer can apply customizations to other products of the store like mug and phone cases.

Shopping Cart Summary Page for Customized Product
The below frontend image shows how the custom product displays on the cart page with different options to the customers after clicking on “Save Customization” button.


Customer can view the Invoice of this customized product as shown below.


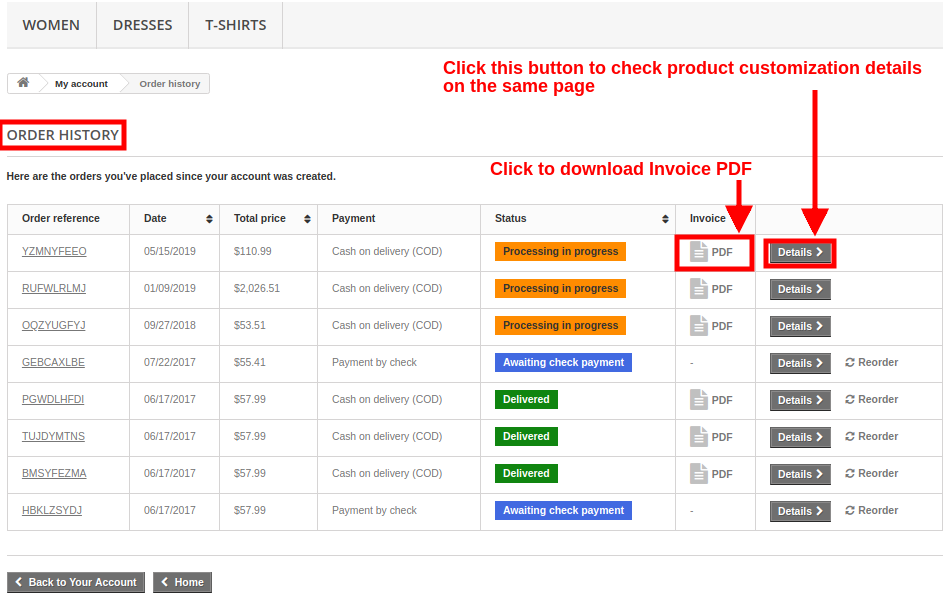
Order History Page with Invoice


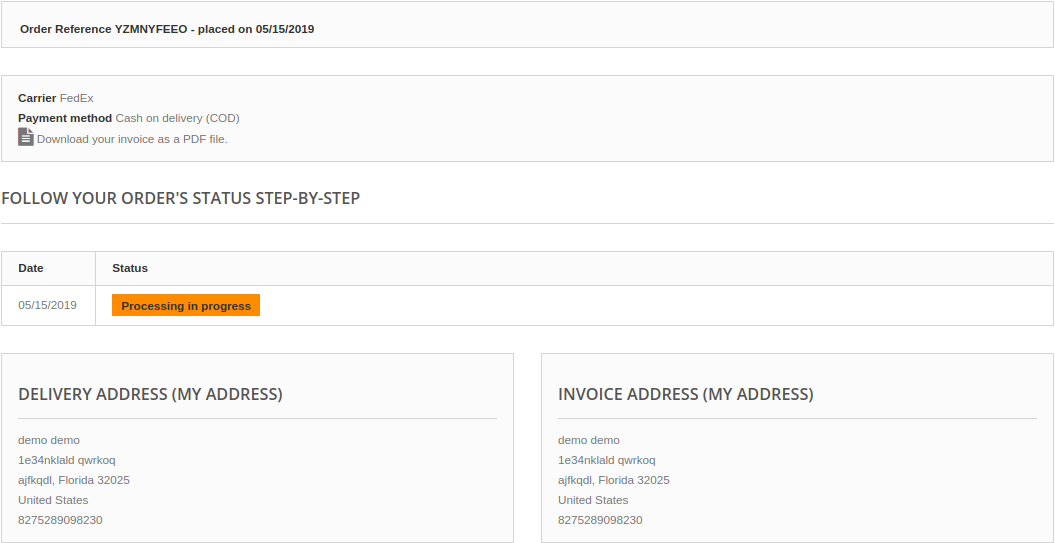
On clicking the Details button, customer will see the following screen:

Order View from Admin Panel
Admin can view the order invoice and all the configuration regarding the product customization from back-office. The details of an order can be viewed under the Orders section of Admin Panel.

On clicking the View button corresponding to a product, admin can check the complete order details of the custom product.

On clicking the View Details button, admin will see the complete details of personalized product in the form of a popup screen as shown below.

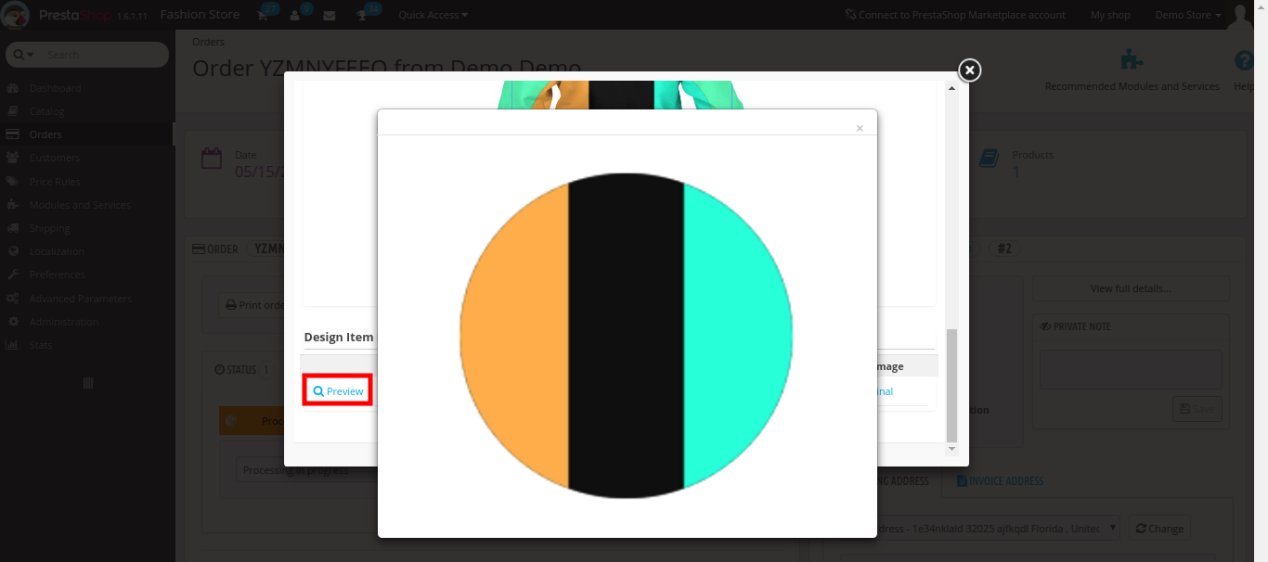
Admin can click the “Preview” option to see the custom image added to the product which looks like below.
Tutorial: Watch the Video Guide

To help you set up and use the PrestaShop Product Designer/Customizer Module, we have prepared a detailed YouTube tutorial video. This video walks you through the installation, configuration, and usage of the module step by step.
Watch the tutorial here:

For additional assistance, customisations, or queries, contact our support team at:
support@knowband.com