How to Migrate Magento Store From Localhost To Server?

After creating your dream Magento store on localhost when its time to move it to production server sometimes people get nervous. Its a piece of cake and we will help you in migrating your Magento store from localhost to production server.

Prerequisite

1. Working domain
2. Production ready for Magento

Working domain

By working domain means the domain on which you are going to host your store. For example https://mademo1.knowband.com

Production ready for Magento

It means there should be all the elements properly setup on the server which is required for a Magento to run. If you need any help regarding that then you can check the link https://www.knowband.com/blog/magento-tutorials/install-magento-using-command-line/

Steps for Migration

1. Export your localhost database

Export your localhost Magento store database. There are two ways of doing it

A) Via PhpMyAdmin
B) CLI

My personal favorite is via command line interface(CLI) as it is faster than the former one. We will see each way one by one.

a)PhpMyAdmin

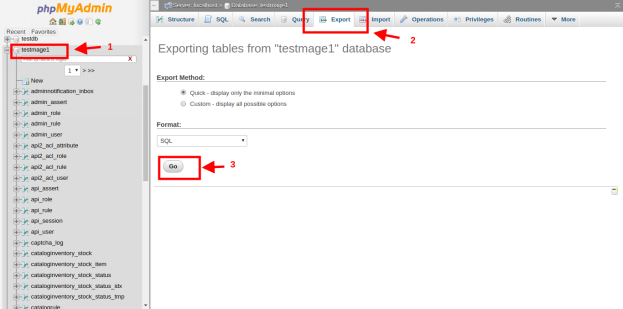
Login to you PhpMyAdmin and go to your database. There you will see option “Export” in the header. Here “testmage1” is the name of my database.

Check the below image for reference
PhpMyAdmin

b) CLI

CLI or command line interface is better than PhpMyAdmin as it is faster.

mysqldump -u root -p testmage1 > database_name.sql

Put the name of you database in the place of testmage1. This command will create the dump of your database with the name database_name.sql

2. Compress and upload your Magento files

After the database has been exported now its time to compress your Magento store files. Create the zip of all the files of your store. This way it will be easy to upload it on the server. Now open Filezilla and upload the zipped file over the server and extract it in the required folder.

3. Import Database

Now its time to import your database on your production. Now again there are two ways of doing it

a) PhpMyAdmin

Login to your PhpMyAdmin of production and create an empty database with the same name as on your localhost. After creating a database you will see “Import” option in the header.

Check Image for reference.

After clicking on the Import browser you file as shown in the image and click on GO. This will take a few minutes and your database will be imported.

b) CLI

For importing database via CLI you need to upload your database file via FTP and login to your server via terminal. Use following command to import the database

mysql -u username -p database_name < file.sql

Here database_name is the name of the database in which your file will be imported and file.sql is the file which you are importing.

4. Modify local.xml

Now we need to modify our local.xml file so that our Magento can access the database. Open Magento_Root/app/etc/local.xml
In it search for <connection> node.

<host><![CDATA[host_name]]></host>
<username><![CDATA[db_user_name]]></username>
<password><![CDATA[db_password]]></password>
<dbname><![CDATA[database_name]]></dbname>

Update these tags as per the production configuration. Your database connectivity is done now.

5. Update domain name

Now its time to make entry of domain name in the database. Open table core_config_data and update your domain in

1.web/unsecure/base_url
2.web/secure/base_url
as shown in the image.

6. Flush Cache

Now its time to refresh your cache as there might be some cache from your localhost machine. To refresh your cache go to

Magento_Root/var/cache

This folder contains your cache. Delete all the files and directory of this folder.

Now you are all set. Your Magento store has been successfully migrated from localhost to production server. Go to your web browser and enter your domain in address base and hit enter. Your website will open as it was in your localhost.

Bottomline

These are the steps to migrate your localhost Magento store to the production server. Always keep backup of your code and database in case anything goes wrong. If your website is not opening properly then go through the above-mentioned steps again and check if you missed anything. Happy Coding:)
How to Track Visitor’s Data on Magento?

Magento is one of the most powerful open source e-commerce platform based on PHP. One of its powerful features is user activity logging system. By using user’s data we can analyze the customers/visitors behaviour which ultimately helps in business. For example, if we know that the customers are frequently visiting a particular section of a category then you can run the campaign to increase the conversion rate in terms of an order placed on your Magento store.

Magento has a dedicated module Mage_Log to store the log of the customer/visitor.

It mainly stores the following data

1.Customers who logged in
2.Current Visitors
3.Past Visitors
4.Details like IP, First visit, Last visit etc

Two main tables in which data is stored are

1.log_customer
2.log_visitor

Every time a user visits the store the Magento generates a visitor_id and store it in a log_visitor table. When a registered customer visits the store using their credentials then a log_customer table is updated.

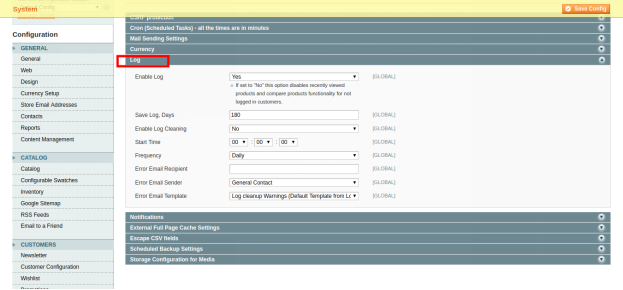
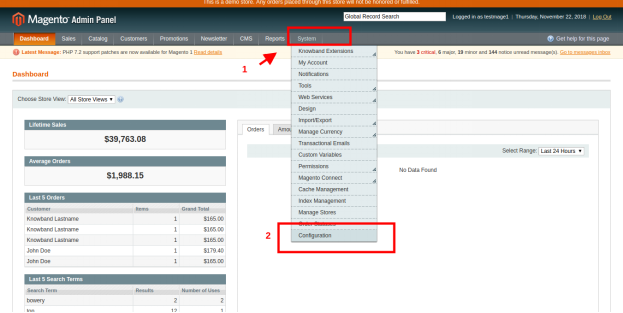
One can enable or disable logging option from Magento admin panel. Steps to do so are

Go to

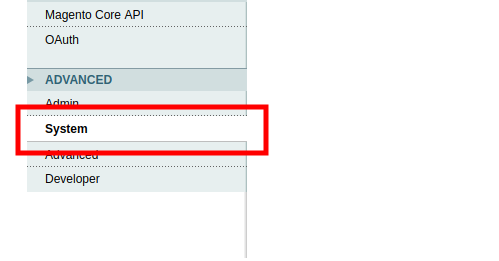
System -> Configuration -> System -> Log

We can get visitor’s data using the following code

$visitor_data = Mage::getSingleton(‘core/session’)->getVisitorData();

Here $visitor_data will return an array of the customer/visitor information which is stored in the session

Array
(
[] =>
[server_addr] => 197777237
[remote_addr] => 197777237
[http_secure] =>
[http_host] => www.testmage1.com
[http_user_agent] => Mozilla/5.0 (X11; Linux x86_64) AppleWebKit/537.36 (KHTML, like Gecko) Chrome/68.0.3440.84 Safari/537.36
[http_accept_language] => en-US,en;q=0.9
[http_accept_charset] =>
[request_uri] => /test
[session_id] => njt3e2cc4g5c85o8gccnjs1ep3
[http_referer] =>
[first_visit_at] => 2018-11-22 14:42:15
[is_new_visitor] =>
[last_visit_at] => 2018-11-22 14:42:20
[visitor_id] => 19
)

If you need some specific data like the first visitor last visit time then you can use its model too

echo $firstVisitAt = Mage::getModel('log/visitor')->getFirstVisitAt();
echo $lastVisitAt = Mage::getModel('log/visitor')->getLastVisitAt();

Hope this will help you in tracking visitor’s data on your Magento store. Happy Coding:)

How to programmatically create customer in Magento?

Magento is one of the most flexible and widely used e-commerce platforms nowadays. Many times during our development we need to create customers via our code. For example, if we are developing a Magento plugin to connect our Magento store to marketplaces like Walmart, Etsy etc then we create an order for the customer via our code. But to create an order we need to create customer if that customer does not exist on our Magento store. We can create customer in Magento simply by using the following code.

Code for creating a customer in Magento:

$_website = Mage::app()->getWebsite()-->getId();
        $store = Mage::app()->getStore();       
        $_firstName = 'Jhon';
        $_lastName = 'Doe';
        $_customerEmail = 'demo@demo.com';
        $_customerPassword = '#KnowbandPlugins';
        
        $_newCustomer = Mage::getModel("customer/customer");
        $_newCustomer->setWebsiteId($_website)
                     ->setStore($store)
                     ->setFirstname($_firstName)
                     ->setLastname($_lastName)
                     ->setEmail($_customerEmail)
                     ->setPassword($_customerPassword);
        try{
            $_newCustomer->save();
        }
        catch (Exception $e) {
            Mage::getSingleton('customer/session')->addException($e, $this->__('Error in creating customer'));
            Mage::logException($e);
        }
<a href="https://www.knowband.com/blog/wp-content/uploads/2018/10/untitled-26.png"><img class="alignnone size-medium wp-image-22306" src="https://www.knowband.com/blog/wp-content/uploads/2018/10/untitled-26-300x48.png" alt="creating-customer-in-magento" width="300" height="48" /></a>

But this customer only has very basic information like first name, last name, email etc. It does not have shipping or billing address. We can save complete address information of the customer via the following code.

Code for saving the address of the customer:

$_website = Mage::app();getWebsite();
$_customerEmail = 'demo@demo.com'; //Customer Email
$_countryId = 'IN';
        $_postCode = '201301';
        $_city = 'Noida';
        $_telephone = '1111111111';
        $_fax= '';
        $_company = 'Velocity Software Solutions';
        $_street = '';
        
        $_customer = Mage::getModel('customer/customer')
                ->setWebsiteId($_website->;getId())
                ->loadByEmail($_customerEmail);
        $_customerAddress = Mage::getModel("customer/address");
        $_customerAddress->setCustomerId($_customer->getId())
                ->setFirstname($_customer->getFirstname())
                ->setMiddleName($_customer->getMiddlename())
                ->setLastname($_customer->getLastname())
                ->setCountryId($_countryId)
                ->setPostcode($_postCode)
                ->setCity($_city)
                ->setTelephone($_telephone)
                ->setFax($_fax)
                ->setCompany($_company)
                ->setStreet($_street)
                ->setIsDefaultBilling('1')
                ->setIsDefaultShipping('1')
                ->setSaveInAddressBook('1');

        try{
            $_customerAddress->save();
        }
        catch (Exception $e) {
            Mage::getSingleton('customer/session')->addException($e, $this->__('Error in saving customer address.'));
            Mage::logException($e);
        }
<a href="https://www.knowband.com/blog/wp-content/uploads/2018/10/untitled-27.png"><img class="alignnone size-medium wp-image-22308" src="https://www.knowband.com/blog/wp-content/uploads/2018/10/untitled-27-300x133.png" alt="saving-address-of-customer" width="300" height="133" /></a>

Now the customer address information is complete. Hope the above-mentioned code will help you in adding a new customer to your Magento store.

How to install Magento using command line?

Magento is one of the best e-commerce based open-source platform which is written in PHP. Magento provides three different platforms:

  1. Magento Community Edition
  2. Magento Enterprise Edition
  3. Magento Enterprise Cloud Edition

Here we will be learning how to install Magento using the command line(CLI). Command line installation of Magento is one of the most efficient ways of installing if we are installing it on servers.

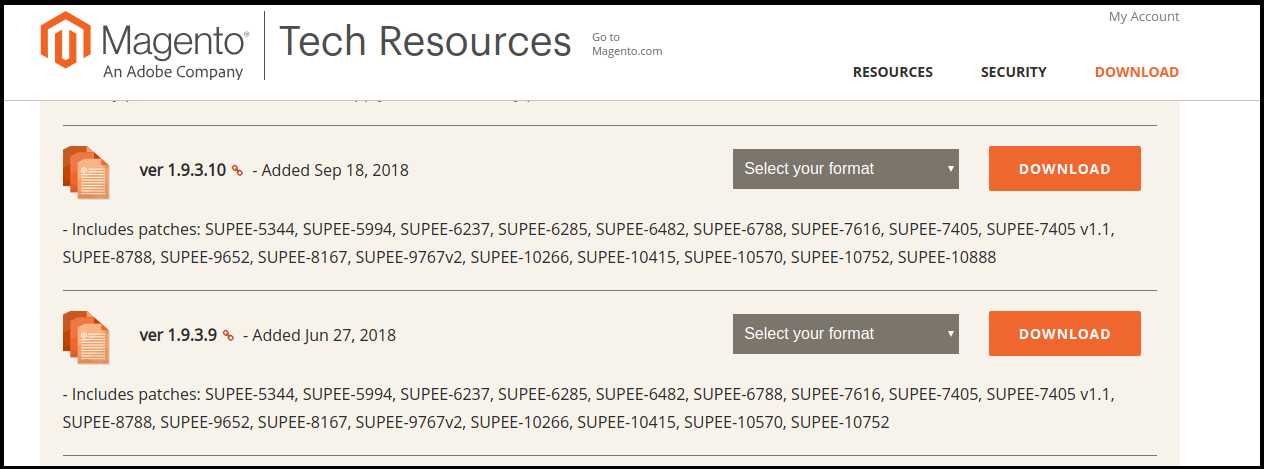
Download Magento Community Edition 1.X

One can download the required version of the Magento from the official website of the magneto. Use below link to download your package.

https://magento.com/tech-resources/download

It will ask to login. If you do not have an account then create an account and proceed further.

Uncompressing the downloaded file

Move the file to a directory where you want to install it and uncompress it.

a) If it is a zip file then using following way:

Syntax:- unzip file_name

e.g –

unzip magento-1.9.3.10-2018-09-18-03-21-10.zip

b) If it is a tar file then use the following way:

Syntax:- tar xf file_name

e.g –

tar xf magento-1.9.3.10-2018-09-18-03-21-10.tar.bz2

Prerequisite for Magento installation:

For the installation of the Magento, you will need to meet the standard system requirements. As per the documentation of Magento you need to meet the following requirement for the installation of the Magento.

a) Environment:

LAMP (Linux, Apache, MySQL, and PHP) or LNMP stack

b) Operating System:

Linux x 86, x86-64

c) Web Server:

  • Apache 2.x
  • Nginx 1.7.x

d) Server Hosting:

  • Ability to run scheduled jobs (crontab) with PHP 5.
  • Ability to override options in .htaccess files.

e) PHP:

  • PHP 5.6
  • PHP 5.5
  • PHP 5.4

f) Required extensions:

  • PDO_MySQL
  • Simplexml
  • Mcrypt
  • Hash
  • GD
  • DOM
  • Iconv
  • Curl
  • SOAP (for Webservices API)

g) Additional configuration:

  • safe_mode off
  • memory_limit no less than 256 MB (512 MB recommended)

h) Database:

  • MySQL 5.6 (Oracle or Percona)

For detailed information please check:

https://docs.magento.com/m1/ce/user_guide/magento/system-requirements.html

Setup Database

Now we will set up the database for our Magento. For setting up database one must have following things

  1. DB Host
  2. DB Name
  3. DB Username
  4. DB Password

Steps for creating a database:

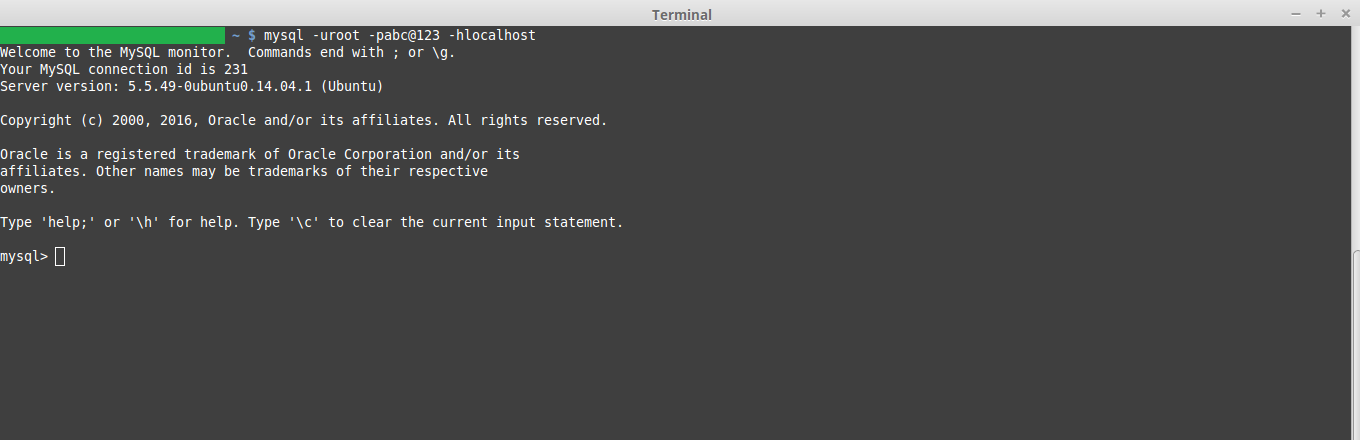
Step 1. Login to your MySQL:

MySQL -uDB_User -pDB_Password -hDB_Host

a) DB_User:- Username of the MySQL

b) DB_Password:- Password of the MySQL

c) DB_Host:- Hostname of the MySQL

Step 2. Create a database:

Syntax:- create database DB_NAME

E.g

create database kb_mage_db;

Here kb_mage_db is the name of the database which we are creating.

Step 3. Check the newly created database using below command

Show databases;

This will show the list of all the created database in your system. Here the name of the database which you created should show.

Step 3. Exit from your MySQL server using the following command

exit;

Installation of Magento

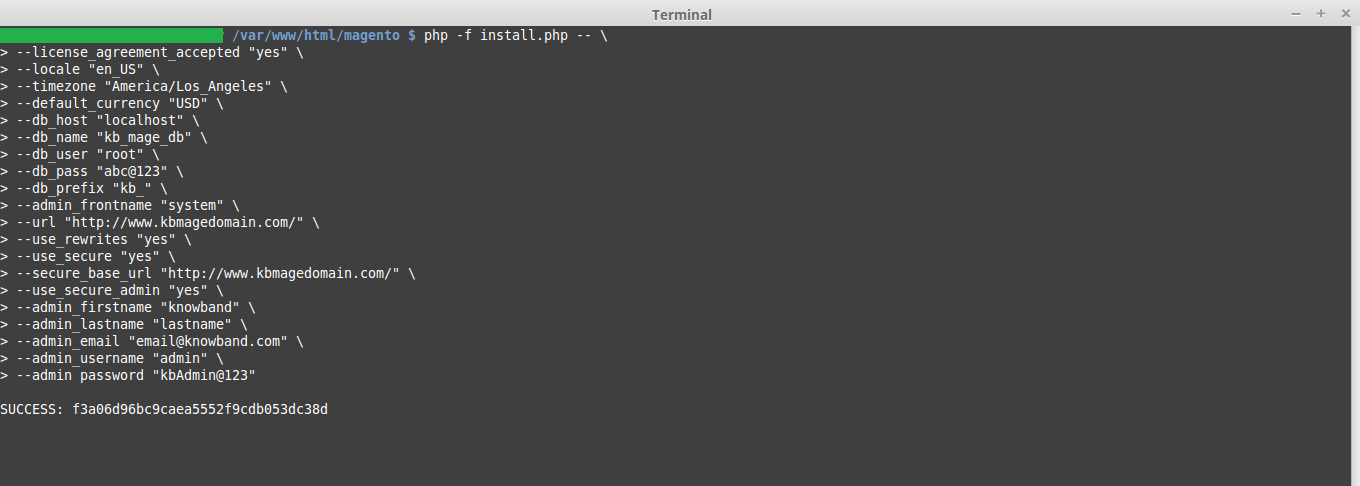
For CLI installation, we need to run the following command:

php -f install.php -- \
--license_agreement_accepted "yes" \
--locale "en_US" \
--timezone "America/Los_Angeles" \
--default_currency "USD" \
--db_host "DB_HOST" \
--db_name "DB_NAME" \
--db_user "DB_USER" \
--db_pass "DB_PASS" \
--db_prefix "DB_PREFIX" \
--admin_frontname "ADMIN_FRONT_NAME" \
--url "SITE_URL" \
--use_rewrites "yes" \
--use_secure "yes" \
--secure_base_url "SITE_URL" \
--use_secure_admin "yes" \
--admin_firstname "ADMIN_FIRST_NAME" \
--admin_lastname "ADMIN_FIRST_LAST_NAME" \
--admin_email "EMAIL" \
--admin_username "USERNAME" \
--admin_password "PASSWORD"

Explanation of the keywords used in the CLI command.

  1. Locale: Place language code like “en_US” which want to use in Magento.
  2. Timezone: Place timezone which wants to use in Magento. In this case, we have used “America/Los_Angeles”.
  3. Default_currency: Place currency which wants to use in Magento.
  4. DB_HOST – Database hostname, in case of a local system put localhost
  5. DB_NAME – The name of your database e.g. kb_mage_db
  6. DB_USER – The username with access rights to the database
  7. DB_PASS – The password for the database user
  8. SITE_URL – The path where Magento is installed, e.g. https://www.kbmagedomain.com/
  9. ADMIN_FIRST_NAME – First name of the admin
  10. ADMIN_LAST_NAME – Last name of the admin
  11. EMAIL – The store owner’s email address, e.g. email@knowband.com
  12. USERNAME – The administrator’s username. This will be used to login on magneto backend.
  13. PASSWORD – The administrator’s password. This will be used to login on magneto backend.

After the installation of the Magento, success message will show with the encryption id.

Now open your favorite browser and check you installed Magento using the URL you used.

How to programmatically create orders in Magento?

Sometimes we need to programmatically create orders in Magento. Suppose you are creating a Magento plugin for your store to connect it to the marketplace like Walmart or Etsy. In these cases, we need to create order on our Magneto store whenever a customer places an order on the marketplace. To do so we fetch the details of the item ordered and the customer details like shipping and billing details and create order on our Magento store programmatically.

So in today’s article, we will be learning how we can programmatically create an order for a customer for any particular item. We will follow the following steps for creating an order on the Magento store.

Steps involved in creating order:

  • We will define customer data like first name, last name, email.
  • Define Shipping and Billing address of the customer.
  • Define Shipping and Payment method of the customer.
  • Define product and the quantity which needs to be ordered on our Magento store.
  • Create a customer if the customer does not exist our Magento store. It’s an optional step.
  • Add product to the quote of the customer.
  • Add Shipping and Billing address to the quote of the customer.
  • Prepare and save quote of the customer.
  • The order is created on your Magento store.

Use the below code to create order in Magneto 1.x –

         $_store = Mage::app()->getStore();
         $_website = Mage::app()->getWebsite();
         $_firstName = John';
         $_lastName = 'doe;
         $_email = 'demo@demo.com';
        /*
         * Custom billing address
         */
        $billingAddress = array(
            'customer_address_id' => '',
                         'prefix' => '',
            'firstname' => $_firstName,
            'middlename' => '',
             'lastname' => $_lastName,
            'suffix' => '',
            'company' => '',
            'street' => array(
                 '0' => 'Sector 63', // Required
                '1' => 'Noida, UP' 
            ),
             'city' => 'Noida',
            'country_id' => 'IN', // Country code
            'region' => 'UP', 
            'region_id' => '',
            'postcode' => '201301',
            'telephone' => '888-888-8888',
            'fax' => '',
            'save_in_address_book' => 1
        );
 
        /*
         * Custom shipping address
         */
        $shippingAddress = array(
            'customer_address_id' => '',
            'prefix' => '',
            'firstname' => $_firstName,
            'middlename' => '',
            'lastname' => $_lastName,
            'suffix' => '',
            'company' => '',
            'street' => array(
                '0' => 'Sector 63', // Required
                '1' => 'Noida, UP' 
            ),
            'city' => 'Noida',
            'country_id' => 'IN', // Country code
            'region' => 'UP',
            'region_id' => '',
            'postcode' => '201301',
            'telephone' => '888-888-8888',
            'fax' => '',
            'save_in_address_book' => 1
        );
 
        /**
         * Enter the shipping method you want to use. Some of the other shipping
         * methods are tablerate_tablerate, freeshipping_freeshipping etc.
         * Here we are using flatrate_flatrate
         */
        $_shippingMethod = 'flatrate_flatrate';
 
        /**
         * Enter the payment method you want to use. Some of the order payment  
   	*methods are checkmo, free, banktransfer, ccsave, purchaseorder etc.
         */
        $_paymentMethod = 'cashondelivery';
 
        /**
         * Provide array of product and their qty.
         * $array = array(product_id => qty)
         */
        $productIds = array(905 => 1);
        $quote = Mage::getModel('sales/quote')
                ->setStoreId($_store->getId());
 
        $quote->setCurrency(Mage::app()->getStore()->getBaseCurrencyCode());
 
        $customer = Mage::getModel('customer/customer')
                ->setWebsiteId($_website->getId())
                ->loadByEmail($_email);
 
        /**
         * Preparing customer for the quote 
         * if the customer is not registered then we will create a new customer. This is  	*an optional process.
         */
        if (!$customer->getId()) {
            $customer = Mage::getModel('customer/customer');
 
            $customer->setWebsiteId($_website->getId())
                    ->setStore($_store)
                    ->setFirstname($_firstName)
                    ->setLastname($_lastName)
                    ->setEmail($_email);
 
            /**
             * Creating new customer
             * Skip try-catch if you don't want to create a new customer.
             */
            try {
                // Generating password for customer. You can also use any custom  // password for it.
                $password = $customer->generatePassword();
                $customer->setPassword($password);
                $customer->setForceConfirmed(true);
                $customer->save();
 
                $customer->setConfirmation(null);
                $customer->save();
                $customerId = $customer->getId();
                $customAddress = Mage::getModel('customer/address');
                $customAddress->setData($billingAddress)
                        ->setCustomerId($customerId)
                        ->setIsDefaultBilling('1')
                        ->setIsDefaultShipping('1')
                        ->setSaveInAddressBook('1');
                $customAddress->save();
 
            } catch (Mage_Core_Exception $e) {
                Mage::getSingleton('customer/session')->addException($e, $this- >__('Error in creating customer'));
                Mage::logException($e);
            } catch (Exception $e) {
                Mage::getSingleton('customer/session')->addException($e, $this- >__('Error in creating customer'));
                Mage::logException($e);
            }
        }
 
        // Assign customer to quote
        $quote->assignCustomer($customer);
 
        // Add products to quote
        foreach ($productIds as $productId => $qty) {
            $product = Mage::getModel('catalog/product')->load($productId);
            $quote->addProduct($product, $qty);
        }
 
        // Add billing address to quote
        $_billingAddressData = $quote->getBillingAddress()- >addData($billingAddress);
 
        // Add shipping address to quote
        $_shippingAddressData = $quote->getShippingAddress()- >addData($shippingAddress);
 
        /**
         * If the customer is a registered customer then you can fetch their billing or  *shipping address as below
         * 
         * $_customerBillingAddress = $customer->getPrimaryBillingAddress();
         * $_customerShippingAddress = $customer->getPrimaryShippingAddress();
         * 
         * $_billingAddressData = $quote->getBillingAddress()- >addData($_customerBillingAddress);
         * $_shippingAddressData = $quote->getShippingAddress()- >addData($_customerShippingAddress);
         */
 
        // Collect shipping rates on quote shipping address data
        $_shippingAddressData->setCollectShippingRates(true)
                ->collectShippingRates();
 
        // Set shipping and payment method on quote shipping address data
        $_shippingAddressData->setShippingMethod($_shippingMethod)
                ->setPaymentMethod($_paymentMethod);
 
        // Set payment method for the quote
        $quote->getPayment()->importData(array('method' => $_paymentMethod));
 
        try {
            $quote->collectTotals();
            $quote->save();
 
            // Preparing Order From Quote
            $service = Mage::getModel('sales/service_quote', $quote);
            $service->submitAll();
            
            // $incrementId is the increment id of the order created.
            $incrementId = $service->getOrder()->getRealOrderId();
 
            Mage::getSingleton('checkout/session')
                    ->setLastQuoteId($quote->getId())
                    ->setLastSuccessQuoteId($quote->getId())
                    ->clearHelperData();
 
           /*
           * $response is the Array of the response with the status of the order  creation.
           */
            $response['success'] = true;
            $response['error'] = false;
        $response['messages'] = 'Order number '.$incrementId.' created  successfully.';
        } catch (Mage_Core_Exception $e) {
            $response['success'] = false;
            $response['error'] = true;
            $response['messages'] = $e->getMessage();
            Mage::logException($e);
        } catch (Exception $e) {
            $response['success'] = false;
            $response['error'] = true;
            $response['messages'] = $this->__('Error in processing order. Please try  again later.');
 
            Mage::logException($e);
        }
        
        Mage::app()->getResponse()->setBody(Mage::helper('core')- >jsonEncode($response));

Please go through the above-mentioned code to create order on your store.  In the above example, we have placed an order of one simple item with quantity 1. We have used “cash on delivery” as the payment method and “flatrate_flatrate” as the shipping method. You can make any combination as per your requirement and your Magento store configuration. Hope this will help you in understanding the mechanism of creating order.

How to run Direct SQL Queries in Magento?

Today we will learn how to run direct SQL queries in the Magento 1.x. By default Magento usages data model to access and modify the database. The data model provides good abstraction which hides the tricky queries but they also make the operation slow. Direct SQL queries come very handily whenever we need to update/insert a large number of data. For example, you have to update the price of all the products of a manufacturer and there are 15k products in that manufacturer. Doing this via loading product model in Magento will take a lot of time.

We can also use Magento resource to directly run our SQL queries without loading the whole collection.

Get the core resource model –

$resource = Mage::getSingleton('core/resource');

After this we need to create read or write connection as per our need.

/**

* Retrieve the read connection

*/

$readConnection = $resource->getConnection('core_read');

/**

* Retrieve the write connection

*/

$writeConnection = $resource->getConnection('core_write');

Fetching the correct Table name –

In case you are unaware of the prefix of the table then you can use below code to fetch the correct table name.

$_tableName = $resource->getTableName('catalog_product_entity');

If the prefix is mage_ then the table name it will return will be mage_catalog_product_entity

Reading Data –

To read data from the table use the following code

$query = “select * from {$_tableName}”;

$query_result = $readConnection->fetchAll($query);

Here, $query_result will return the result of select query. In our case it will return the array of all the product. In case you need data of only product then use following command.

$query = “select * from {$_tableName} where entity_id={$_productId}”;

$query_result = $readConnection->fetchAll($query);

Here $_productId is the id of the product whose data we need.

Writing Data –

For inserting data into the table use the following code.

$insert_query = “INSERT INTO {$_tableName} (‘COL_NAME1’,’COL_NAME2’) VALUES                                                                 (‘COL_VALUE1’,’COL_VALUE2’)”;

$writeConnection->query($insert_query);

Updated Data –

If we have to update the type_id of a product to “configurable” then we can use following code. Here $_productId is the product id.

$update_query = “UPDATE {$_tableName} SET type_id=”configurable” WHERE 						entity_id={$_productId}”;
$writeConnection->query($update_query);

But Magento has provided the concept of the model for database connection as they provide abstraction and they are more secure that the direct SQL queries.