1.0 Introduction
Knowband offers PrestaShop Dynamic Pricing module which provides a facility to the store admin to calculate the dynamic prices of any product without any hassle. The online store merchant can allow the customers to customize their order and set product quantity accordingly.
The PrestaShop Dynamic Price management addon automatically calculates the exact customization cost according to the rules applied by the store admin. The Prestashop Customization Price Calculator is a highly customizable and fully-featured module that offers hassle-free rule creation for applying dynamic pricing.
1.1 Features of PrestaShop Dynamic Pricing addon
- Admin can set the maximum and minimum customization price value easily from the admin interface of this PrestaShop Dynamic Product Pricing.
- The PrestaShop Dynamic Pricing extension allows the admin to display or hide the weight and quantity input option from the product page.
- Admin can enable the settings to multiply the price and weight by quantity, in this case, the price and weight will be double if the customer selects product quantity 2.
- The store admin can add, delete, update the dynamic pricing rule easily from the admin interface of this PrestaShop Dynamic Product Pricing module.
- PrestaShop Dynamic Product Pricing module allows setting the priority of dynamic pricing rules.
- Multiple fields can be selected from the drop-down list available in the PrestaShop Dynamic Price management admin interface.
- The admin can not use Color Picker, Divider, Date, Text, Text Area fields in any formula.
- If the admin deleted any field which was used in any formula, then he has to create a new formula without including that field.
- The newly created field will be available for creating price, weight and quantity formulas.
- Admin can separately create price, weight and quantity formulas from the admin interface of the Prestashop Customization Price Calculator module.
- Admin can create any kind of formula using the various operators.
- After creating a formula, the admin needs to map the rule with products, categories, manufacturers and suppliers.
- After rule mapping, the formulas will be applicable to that particular product, category, manufacturer and supplier.
- Customers can view the customization price, weight and quantity easily on the same customization page.
2.0 Steps for Installation of PrestaShop Dynamic Pricing
Admin will get these files after purchasing this PrestaShop Dynamic Price management from the Knowband website:
1. The zipped file consists of the source code of the PrestaShop Dynamic Product Pricing module.
2. User Manual of this PrestaShop Dynamic Product Pricing addon.
Follow these steps to install the PrestaShop Dynamic Pricing plugin:
First of all, unzip the zipped file which includes some files and folders.
After that, copy the overall content of the folder and paste it into the “Modules” folder of the store’s directory. The admin can follow the path – Root Directory/modules/.
3. Now you can install the PrestaShop Dynamic Pricing addon. You can find that in Store Admin -> Modules and Services. It would be shown as below –
Click on the “Install” button to install the Prestashop Customization Price Calculator extension. A confirmation pop-up will be shown. Click on “Proceed with the installation” option. This step will install the Prestashop Customization Price Calculator plugin and show notification – “Module(s) installed successfully”.
3.0 Admin Settings
In the admin interface, some customization options are available by which the admin can set the dynamic pricing on the website.
The admin will get these customization options for settings:
- Basic Settings
- Dynamic Pricing Rules
3.1 Basic Settings
In Basic settings, you will get customization options as shown below:
- Enable: Activate or deactivate the functionality of the PrestaShop Dynamic Pricing module easily just by toggling the button.
- Minimum Customization Price Value: Set the lowest customization cost here. This will be the minimum customization cost for the customers.
- Maximum Customization Price Value: Fix the highest customization cost in this menu option. The customization cost cannot be more than this value.
- Display Weight on Product Page: You can enable the settings for showing the weight on the product page of the website. The customers can view the “customization weight” details on the product page.
- Hide Quantity Input: Enable this field if you don’t want the customers to set the product quantity. If you want to allow the customers to set order quantity, then, disable the “hide quantity input” settings from the admin interface of this Prestashop Customization Price Calculator addon.
- Multiple Price and Weight By quantity: Enable the settings to multiply the price and weight by quantity. For example, if the customer selects 1 product that costs 20$ and weighs 8 Kg and sets the quantity as 2, then, the price will automatically change to 40$ and the weight will be 16 kg automatically.
3.2 Dynamic Pricing Rules
The dynamic pricing rule section displays the list of dynamic pricing rules. One can view the price rule ID, rule name, status, rule creation date and rule update date. Here, the admin can add a new dynamic pricing rule, update any rule or delete the dynamic pricing rule easily.
3.2.1 How to Add a new Dynamic Pricing Rule?
For adding a new dynamic price rule, click on the “Add new” button available Right side on the top of the page as shown below:
After clicking on the “Add new” button, you will view multiple customization options. The customization settings are shown in 4.0 section.
3.2.2 How to Update Dynamic Pricing Rule?
For updating the dynamic price rules, you can click on the edit button as shown below:
3.2.3 How to delete Dynamic Pricing Rule?
Click on the “delete” button for removing any dynamic price rule.
4.0 Dynamic Price Rule Customization
Admin needs to click on the “Add New” button to add a new dynamic price rule as discussed in section 3.2.1. After clicking on this button, the admin can view these customization options:
- Dynamic Price Rule General Settings
- Fields
- Price Formula
- Weight Formula
- Quantity Formula
4.1 Dynamic Price Rule General Settings
For adding a new dynamic price rule, the admin needs to apply settings as described below:
- Enable: Enable the option to activate this dynamic pricing rule.
- Rule Name: Set the name of the rule here.
- Enable Global Settings: Apply the globally declared settings by enabling this option. If you want to apply different settings, then, enable this option. Similar options will display which will be applied to this rule only.
- Rule Priority: Set the priority of this new rule from the admin interface of this PrestaShop Dynamic Pricing plugin.
4.2 Fields
In this section, the admin can create different fields for settings the dynamic pricing rules. There are multiple field types available in this PrestaShop Dynamic Product Pricing rule.
- User Input
- Slider
- Dropdown
- Radio buttons
- Color list
- Checkbox
- Text
- Textarea
- Date
- Image
- Fixed Value
- Unit Price
- Divider
- Color picker
Admin can select field type easily from the admin interface and customize the fields accordingly.
4.2.1 User input Field
- Name: Enter the name of the field here.
- Label: Set the label in different languages.
- Type: Select the User Input field from the drop-down list.
- Value: Set the default value of the slider.
- Unit: Select unit, i.e., Centimeter, Meter, Kilogram, Gram.
- Values: Set the values of the user input field. For setting the field values, click on the below-mentioned option:
After clicking on this option, the admin can view a pop-up as shown below:
Now admin needs to enter these details as required in the popup shown above:
1. Initial value: This will be the default field value.
2. Minimum value: This will be the lowest value of the input field. There will be an error message on the product page If the customer enters any lower value.
3. Maximum value: Enter the maximum field value. The customer cannot enter the larger number.
5. Step: Admin can enter the steps with every click. If the value is 10 then after the next step the value will be 15 in the above-mentioned case.
6. Description: Admin needs to enter field descriptions in different languages. It is mandatory to enter a description in each field.
- Actions: Click on the “X” to enable this field. You can also delete this field by clicking on “bin”.
After enabling the field, it will look like the below-mentioned image:
Now, this field is enabled and can be used in formulas.
4.2.2 Slider Field
Slider field settings are the same as input field settings. The admin can follow the same steps to create the slider field. After set-up the field will look as below:
4.2.3 DropDown Field
You can select DropDown Field in which the customers can select their choice.
Settings are the same as the above-discussed field setting.
On clicking the values option, this pop-up will be shown on the same page. You can enter the dropdown field description and click on the “Add a New Option” button.
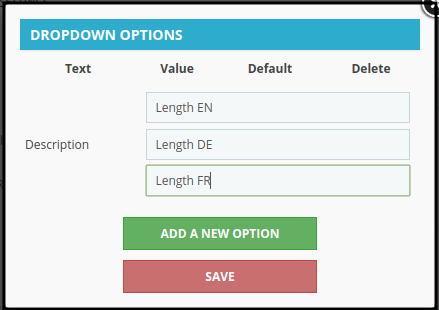
After Clicking on the “Add a New Option” button, you can view these options:
- Text: Enter the drop-down list options in different languages.
- Value: Enter the value for every dropdown option. This will be the customization cost for that option.
- Default: You can make any of the options as a default.
- Delete: You can delete any of the dropdown options anytime.
4.2.4 Radio Buttons Field
Radio buttons field setting is the same as drop-down field settings. The admin can select this Radio button field and set the name, label and field description.
In the pop-up page, the admin can enter the field description and also add new options.
After clicking on the “Add a New Option”, the admin can enter new options and set their values. You can also make a value as the default value.
4.2.5 Color List
In this colour list field, the admin can set the prices for colour selection. After setting field names and labels in different languages, the admin can click on the value icon for value settings.
On clicking the value icon, a pop-up will open where you can enter the field description and add a new option. Admin can set different values for various colours and also make colour the default colour.
4.2.6 Checkbox
Select the checkbox field from the drop-down list, enter the field name and label. After clicking on the value section, the admin can set the description of this field.
Now, the admin can enable this field from the admin interface of this PrestaShop Dynamic Pricing plugin.
This field setting is also the same as other fields.
After clicking on the value icon, a pop-up will open where you can set these menu options:
- Required: Admin can make this field a mandatory field.
- Initial Value: Admin can enter the field’s initial value here. It can be a character or numeric value.
- Min Characters: Enter the minimum characters required in this field.
- Max Characters: Set the maximum characters required in this field.
- Description: Enter the field description in different languages.
4.2.8 Text Area
Text area field settings are similar to text field settings. Admin can apply the settings for getting detailed information.
Admin can enable the field from the admin interface of the PrestaShop Dynamic Pricing addon.
Select the date field from the drop-down list.
After clicking the value button, the admin can set the field description and make it a required field.
4.2.10 Image
Admin can select the image field and apply the settings accordingly.
On clicking the value, the admin can make the field a required field.
Admin can also set the minimum and maximum width along with the maximum size settings.
4.2.11 Fixed Value
Admin can select the fixed value field. It is very easy to set field name, label and field value from the admin interface. The admin can set the fixed value that he wants to use in the formula.
4.2.12 Unit Price
Admin can set the unit price value after selecting this field from the drop-down list available on the admin interface of this PrestaShop Dynamic Price management module. Admin can set per piece price.
4.2.13 Divider
Admin can show a divider by selecting a divider field from the admin interface of this Prestashop Customization Price Calculator addon. This field will divide the page into two parts.
4.2.14 Color picker
Admin can select the color picker field from the drop-down list. The color picker will display below the divider.
Click on the value button for setting the initial value and description of the color picker field. Save the settings and enable the field from the admin interface of this Prestashop Customization Price Calculator module.
The overall list will look as shown below:
Before formula description, you need to know these points:
1. Color Picker, Divider, Date, Text, Text Area fields will not work in any formula.
2. If you delete any field which was included in any formula, then you have to create a new formula without including that field.
4.3 Price Formula
Admin can create a formula for price calculation from the admin interface of this PrestaShop Dynamic Product Price module.
There are +,-,(,),/ and * signs available for calculation.
Admin can also clear the formula and create a new one.
After the formula, setting click on the “save this formula” button.
This formula will calculate the customization cost and show this on the website.
4.4 Weight Formula
This formula will calculate the total customization weight on every customization.
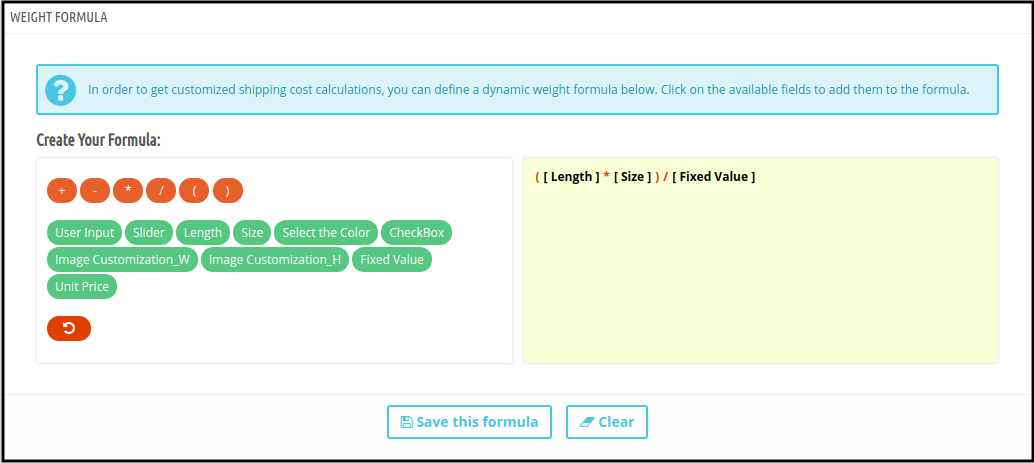
This functionality is available for setting the quantity from the admin interface. Once the admin sets the quantity, the customer can not change the quantity of the products.
After setting the formula, the admin needs to map the categories, products, manufacturers and suppliers. This rule will be applied to those categories, products, manufacturers and suppliers on which admin map it.
After clicking on the link, this page will open:
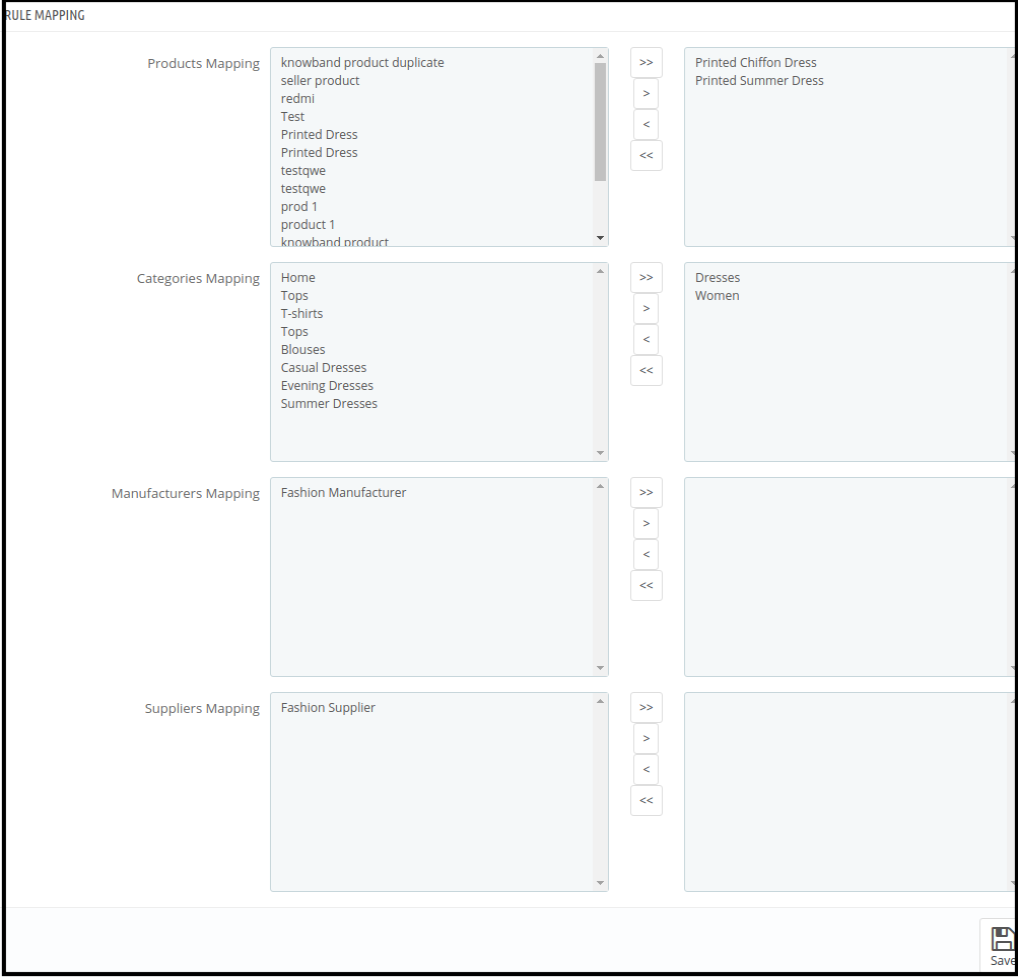
Select the category, product, manufacturer and supplier that you want to map with this rule. Click on the > button for mapping and < sign for removing it. For moving all the categories, product, manufacturer and supplier, click on the >> and << button.
The store admin needs to save these mapping settings every time.
5.0 Front-end Interface
After formula set-up, the store will display as shown below:
After customers customization, the customization cost will be calculated automatically.
After cost and weight calculation, the values will be set to their default value.
Admin can set the rule priority from the admin interface of this Prestashop Customization Price Calculator module.
It is mandatory to save the rule mapping settings every time.
This way the customers can view their product customization cost on the same product page easily and there is no need to calculate the cost every time. If any store admin is selling products that need required dimensions input from the user i.e wallpapers, flooring tiles, handloom products so the store merchant can use this PrestaShop Dynamic Pricing extension offered by Knowband. The best thing is that the admin needs to apply formulas a single time from the admin interface.
For more details about this PrestaShop Dynamic Pricing module, visit here:
PrestaShop Dynamic Price management module Product page Link
Admin Demo Link of PrestaShop Dynamic Pricing addon
Front-end Demo of PrestaShop Dynamic Pricing addon
Video of PrestaShop Dynamic Pricing addon
Prestashop Customization Price Calculator Module Addon Store Link