1.0 Introduction
The Magento store owner can now protect their eCommerce store from spams and bots. The Magento block user/bot by IP, country or user agent extension by Knowband allows the store owner to block the user/bot by restricting IP addresses, Country or User-agent. This way the eCommerce store admin can restrict or ban suspicious and unnecessary store users. The admin can show a customized message on the website for providing banishment notification.
Magento Block User by IP plugin provides an option to restrict the access of the users by IP, Country, and User-agent. The banishment can be enabled or disabled anytime from the admin interface. The online customers can also send a request to unblock them. They can send a message from the front-end, the admin can review the requests from the admin interface and take further decision to unblock the banned customers or deny the request.
1.1 Features of Magento block user by IP, country or user agent extension
- The eCommerce store owner has multiple options to block the bot by blocking IP address, country code and user agent.
- Admin can enter any particular IP for blocking the customer or a range of IP addresses.
- The Magento Block User Extension allows the admin to enable or disable the ban anytime.
- The store admin can display a custom message on the website for the banned customers.
- The e-merchant can show or hide header and footer to the blocked customers.
- The blocked customers can also send a request to unblock them.
- There is no need to change codes from the admin interface.
- It is very easy to configure this Magento Block bot by country extension.
- The Magento Block User/bot by IP plugin is multi-lingual compatible.
- Magento block user by IP, country or user agent extension can be installed and configured easily.
- The store owner can easily activate or deactivate this Magento block bot by IP, country or user agent extension just by a button toggle.
1.2 Admin benefits
- With this Magento Block User module, the store admin can take initiatives to protect the website from spammers and bots by blocking the suspicious customers and activities.
- The Magento Block User module helps the store admin to remove the irrelevant website.
- The admin can protect the store from malicious attacks by blocking the spammers and bots.
- This Magento Block bot by country extension is highly customizable and hassle-free.
- Multiple Blocking options are available to make sure that the genuine customer will not suffer.
- The customers can request to unblock them from the front-end interface.
- No technical help required for implementation.
2.0 Installation Steps
The store admin can follow these simple steps for installing the Magento Block User Extension:
1. First of all download the extension package from the Knowband store.
2. You will get a zipped file. Unzip the package on the root folder of your Magento setup via FTP manager (like Filezilla or WinSCP – download here: https://filezilla-project.org/). You’ll find the files and folders as shown in the image below:
3. The extension is now installed and ready for use. In the Admin Panel, go to “System > Knowband Extensions >Magento Blocker ”.
Now the store admin can now use and configure the Magento Block User Extension.
3.0 Admin interface
After successful installation, the store admin can configure the settings from the admin interface. The admin panel has five tabs as shown below:
- General Settings
- Block User by IP Address
- Block User by Country
- Block User by User Agent
- Blocked Customer Request
The admin can customize the Magento Block User/bot by country extension as per the requirement
3.1 General Settings
In general settings the admin can view below-mentioned customization options:
1. Enable/Disable this module: The store admin can activate or deactivate the functionality by toggling this button.
2. Display Custom Message: The online store admin can enable or disable this option for showing or hiding a custom message. This message will be displayed to the blocked customers.
3. Custom Message: The store admin can enter the custom message here. The admin can enter a ban notification to the customers in order to inform them about banishment.
4. Include Header/Footer on Page: If this option is enabled, then, the header and footer will be shown in the webpage that displays the ban message, otherwise, the visitors will only be able to view the block notification message.
5. Customer Email Notification: The admin can enable or disable the custom email notification option. The customers can request the admin to unblock them.
6. Mail Subject: The store admin can set the Mail subject form the admin interface that is to be send with the mail.
3.2 Block User by IP Address
Here the store admin can view the list of blocked IP addresses of the customers. Admin can delete, edit and add new IP address to block the users. The admin can enter particular IP address or a range of IP addresses.
3.2.1 How to block a user by IP address?
The store admin can click on the “Add New” option in order to stop a customer from accessing the site by restricting his/her IP address.
After clicking on the “Add New Option”, the admin can view the below-mentioned options:
- IP Address: The store admin can enter the IP address of the customers in order to restrict them. The admin can enter a range of IP addresses like 182.*.*.* if required.
- Activate: The store admin can activate or deactivate the settings to block or unblock the customers by IP address.
3.2.2 How to Edit “block user by IP address” settings?
The admin can click on the below-mentioned icon in order to edit the previously applied settings.
3.2.3 How to delete “block user by IP address” settings?
The admin can delete the settings by clicking on the below-mentioned icon. After that, the customers can access the website easily.
3.3 Block User by Country
Here the eCommerce store owner can view the list of blocked countries. The store admin can add, delete or modify the country.
3.3.1 How to block a user by Country
The store admin can block the users of any specific country. The admin can select the country from the drop-down list and block the customers of that country.
After clicking on the “Add New” option the admin can view the below-mentioned options:
- Select Country: The admin can select the country from the available drop-down list.
- Activate: The admin can activate or deactivate the banishment from the admin interface.
3.3.2 How to Edit “block user by Country” settings?
The admin can also edit the previous settings just by clicking on the “Edit Icon”.
3.3.3 How to delete “block user by Country” settings?
The store admin can also delete the settings by clicking on the below-mentioned icon:
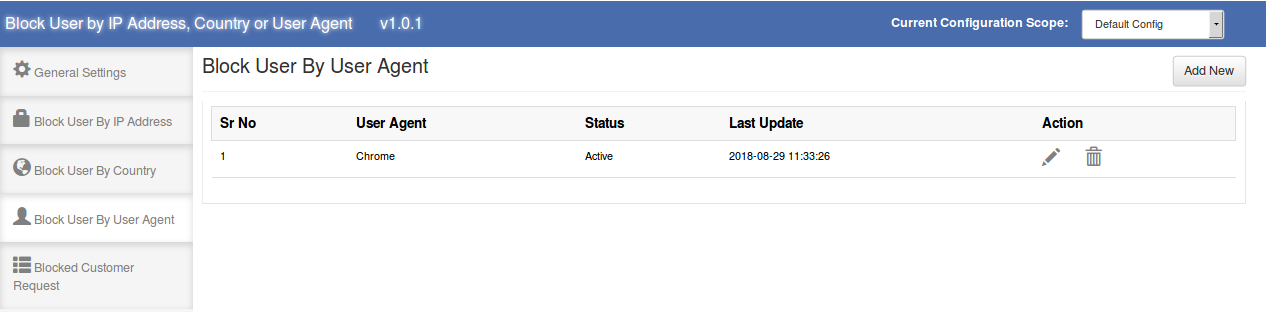
3.4 Block User by User Agent
The Magento Block User Extension allows the eCommerce store admin to block the user by user agent. Here the admin can view the list of blocked user agents as shown below:
3.4.1 How to block a user by User Agent
In order to block the customer by user agent, the admin can enter the user agent name and block the customers by user agent.
The admin can view below-mentioned information:
- User Agent: The e-merchant can enter the user agent name here.
- Activate: The admin can enable or disable blocking by activating and deactivating the option.
3.4.2 How to Edit “block user by User Agent” settings?
The eCommerce store admin can edit the previous settings by clicking on the “Edit Icon”. The store admin can click on this icon for editing the settings:
3.4.3 How to delete “block user by User Agent” settings?
The admin can delete the previous settings by clicking on the below-mentioned icon:
3.5 Blocked Customer Request
The online store users can send a request to unblock them from the admin interface. The admin can view these requests from the admin interface. Here in this “Blocked Customer Request” section, the admin can view the email id of the customers, message send by the blocked customers, IP address and user agent details. The admin can also view the details on which bases the customer has been blocked. The admin can view the request date from the admin interface.
The e-merchant can view the message and take appropriate actions.
4.0 Front-end Interface
If the admin blocks the customer, then the customers won’t be able to explore the website. The message will be displayed on the website as shown below:
If the store admin disables the settings to show header and footer, then the front-end interface will display as shown below:
The customers can send a request to the store admin in order to unblock them and allow accessing the website. The users can enter their email id and message. After submitting the message they will see a success message on the same page.
The store admin can view the request from the admin interface and decide to unblock the customer or deny the request.