Introduction:
Exit popup offering discounts in exchange for email Ids has become very important when it comes to the e-commerce business. Exit Intent popup nowadays are one of the most important factors in customer engagement and increase revenue. Most e-commerce store owners use Exit popups as a tool to engage customers with the store.
Exit pop-up uses Exit-intent technology which tracks the movement of the mouse cursor and soon as the customer tries to leave the page the Exit popup appears offering discounts in exchange of the email Ids.
We at Knowband has developed an Exit Intent popup for Magento 2 users popularly known as Magento 2 Exit popup extension. This Magento 2 extension offers various features which make this Exit Intent extension far better than other Exit intent popups used. This Magento 2 Exit Intent extension offers look and feel settings which allows admin to customize the Exit popup in endless ways.
Magento 2 Exit pop up(email subscription) extension displays a responsive newsletter pop up every time a visitor tries to leave the store. The Magento 2 extension offers discount coupons to the visitors who enters their email Id in the subscription pop up and subscribe them for a newsletter or register them for a new user.
Magento 2 Exit popup offers integration with popular email service providers like MailChimp, Klaviyo, and Constant contact. All the email Ids entered in the Exit intent newsletter popup are automatically synced to the databases of these email service providers. Magento 2 admin can use these email Ids for personalized promotions or Mail campaigns.
1.1. Features of Magento 2 Exit popup extension
- The Magento 2 Responsive exit popup extension incorporates the email subscription popup at Magento store front. The Newsletter popup appears as soon as the visitor tries to leave the website giving them one extra chance to engage with the store.
- Magento 2 Exit popup extension offers Email Recheck option to prevent the same user to avail the discount more than once.
- Magento 2 admin has an option to show the fireworks when a customer wins a discount by offering his/her email Id to make it more enticing and attractive.
- Magento 2 Exit popup extension also allows admin the control over the display of the Exit popup by allowing “Popup display option”, Magento 2 admin can enter the number of days after which the popup is to be displayed to the same customer.
- Magento 2 Exit Intent popup offers Custom CSS and JS for endless customizations without even touching the base code of the extension.
- Magento 2 extension offers display settings under which the admin can set the maximum screen size compatibility of the Exit popup. The Exit popup will work efficiently in all the screen sizes above the selected size.
- Magento 2 admin can also set the maximum display frequency for the Exit popup, the email subscription popup will appear as per the frequency selected from the dropdown.
- Magento 2 admin can set the date range between which s/he wants to display the Exit intent popup to the visitors by selecting the data from the date picker field.
- Magento 2 Exit popup extension allows admin to select the user group to whom s/he wants to display the Exit popup, the email subscription popup will be displayed to the selected user group only.
- Magento 2 Exit Intent email subscription popup allows the admin to select the GEO locations where s/he wants to display the Exit Intent popup. The popup will be displayed only in the selected GEO location.
- Magento 2 admin can also add a background image and website logo on the Exit intent popup.
- Magento 2 admin can customize the text on the popup as per the requirement by customizing the Text settings offered by the Exit popup extension.
- Magento 2 admin can set the discount being offered to the visitors using Discount settings, Magento admin can set the discount to be a percentage or fixed discount. Magento admin can also set the Coupon expiry time in days.
- This even engages visitors for a longer time on your eCommerce store and increases the percentage of the customer retention.
- Magento 2 exit intent popup offers integration with email service providers like Mailchimp, Klaviyo, and Constant contact.
- Magento 2 email subscription popup offers 5 Readymade email templates which can be later customized by the admin as per the requirement.
- Magento 2 Exit intent email subscription popup offers a detailed report for all the Generated and used coupons, country where the Exit popup was used and in which device and the details of the customers who have entered the email Id and won the discount in terms of beautiful Line and Pie charts.
- Magento 2 Exit Popup Plugin allows you to apply various appealing themes for the exit popup(email subscription popup). Theme preview option is also available for the admin before making it live.
- With this Magento exit popup extension, admin can generate fixed type coupons or new coupon every time.
- High Impact on sales, drastically increase store conversions
- Multi lingual support
- Compatible with all themes
- Desktop, Mobile and Tablet responsive design
1.2. Installation
Follow the following steps in order to install Magento 2 Exit Popup extension in your store:
- Download the Magento 2 Exit Popup module package from Knowband store.
- You’ll receive a zipped file containing the user manual and the source code of Magento 2 Exit Popup plugin. Unzip the package.
- Create a folder {Magento root}/app/code/Knowband/Exitpopup
- Upload the extracted content in the above folder via FTP manager (like Filezilla or WinSCP – download here: https://filezilla-project.org/).
- Now run below commands to install the plugin:
- php -f bin/magento module:enable –clear-static-content Knowband_Exitpopup
- php -f bin/magento setup:upgrade
- php -f bin/magento setup:di:compile
- php bin/magento setup:static-content:deploy
6. In Admin Panel go to the main menu -> Knowband -> Exit.
7. The Magento 2 Exit popup extension is now ready for use.
This User Manual will guide the users through the Magento 2 Exit popup extension configuration and settings.
2.0 Admin Interface
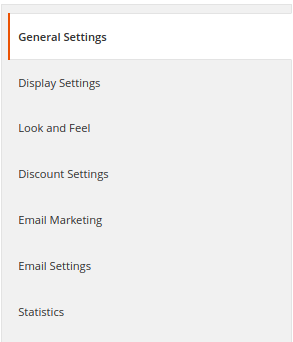
The admin Panel of Magento 2 Exit Popup module contains the 8 following tabs.
- General Settings
- Display Settings
- Look and Feel Settings
- Text Settings
- Discount Settings
- Email Marketing
- Email Settings
- Statistics
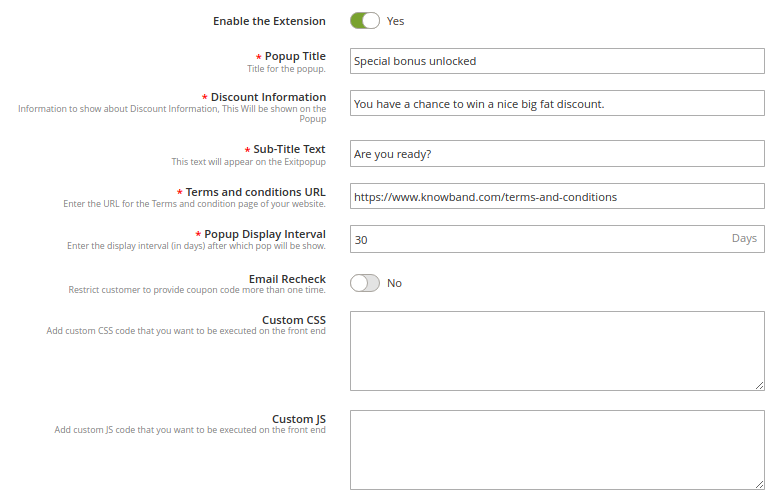
2.1. General Settings
1. Enable the Extension
Toggle this button in order to enable the Magento 2 Exit Intent email subscription popup extension. If enabled, the module and all its settings will work on the store.
2. Popup Title
This option allows you to set a custom title for the exit popup or email subscription popup.
3. Discount Information
Using this option, you can set any text which will be shown as discount information on the exit popup.
4. Sub-Title Text
This information is also shown on the exit popup below the main exit popup title.
5. Terms and Conditions URL
Using this option, you can set a URL for the Terms and Conditions page of your website.
6. Popup Display Interval
Using this setting Magento 2 admin can set the number of days after which the email subscription popup will display again to the same customer.
7. Email Recheck
Magento 2 Newsletter popup extension offers email recheck option to prevent same User/Email Id to avail the discount more than once. Toggle this button in order to enable/disable the Email recheck on the Exit Popup.
8. Custom CSS and JS
Magento 2 Exit Popup extension offers custom CSS and JS options to Magento admin for endless customization. The Newsletter popup can be completely customized and Magento 2 admin can match with the store theme.
2.2 Display Settings
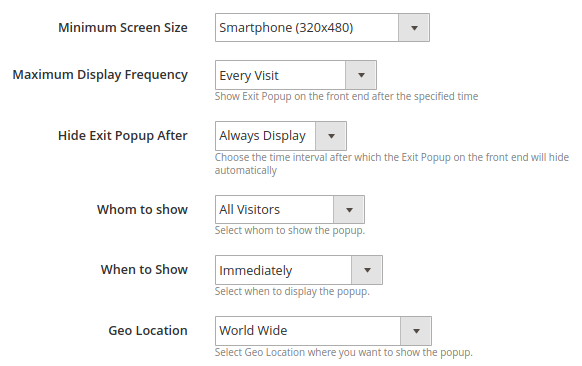
Magento 2 Exit popup extension by Knowband offers Display settings using which Magento 2 admin can control the display of the popup, like whom to show the newsletter subscription popup, in which country to show the newsletter popup etc. Let us see them in detail. But first please look at the screenshot below:
1. Minimum Screen Size
If mobile is selected as the Minimum screen size then the Exit Intent email subscription popup will work on all the screen sizes higher than the Mobile phone and on Mobile phone, if Desktop is selected as the Minimum size screen then the Newsletter popup will not display in the Mobile phone and any size screen smaller than the Desktop.
2. Maximum Display Frequency
Magento 2 Admin can set the Maximum Display Frequency of the Newsletter subscription popup using this option. The Admin can decide to show the Exit popup at every visit of the customer, or one visit per hour, per day, per week, and per month. If every visit is selected the Exit Intent popup will appear at every visit of the customer.
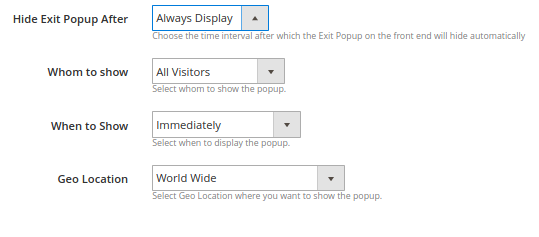
3. Hide Exit Popup After
This option of Magento 2 Exit Intent popup extension allows you to set the time interval after which the exit popup will automatically hide on the frontend.
4. Whom to Show
Magento 2 Exit popup extension offers store admin to choose the customer group whom to show the Newsletter popup using this setting. Magento 2 store admin can select to display the Exit intent popup only to the new visitors, only to the returning visitors or to all the visitors on the store. Please refer to the screenshot below:
6. When to Show
This option allows you to set the time after which the email subscription is shown to the user: immediately, after some time, after scroll down percentage or upon exit.
7. GEO Location
Magento 2 Exit Popup extension allows admin to select the GEO locations where s/he wants to display the Exit intent email subscription popup. Please refer to the screenshots below.
Screenshot 1
Screenshot 2
2.3 Look and Feel Settings
Magento 2 Exit popup extension gives an option to select and apply pre-defined templates for the exit popup.
1. Theme
Magento 2 store admin can choose any theme for the exit popup.
2. Preview:
The store admin can select any theme to see the preview. This option is helpful as they can check the theme before making it live on the store.
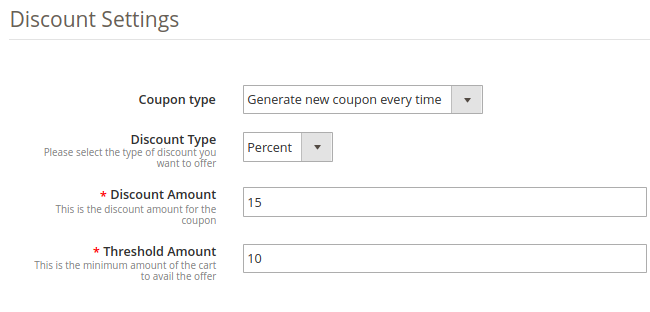
2.5 Discount Settings
Discount settings offered by this Magento 2 Exit Intent email subscription popup extension allows Magento store owner to set the discount offered to the visitor who enters his/her email Id in the email subscription popup. Admin can offer the discount randomly or some fixed discount. There are three choices that have been provided to the store owner to set the discount. These are discussed below:
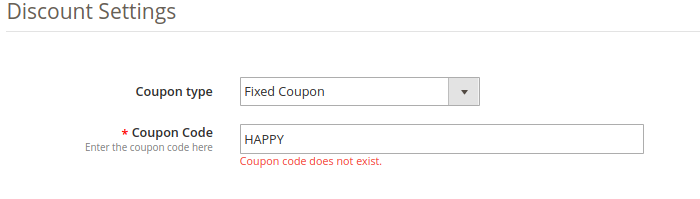
1. Coupon Type: Using this option, admin can set the coupon type as a fixed-type coupon or variable-type. In fixed type coupon, admin can specify the code which has to be first generated from the admin back-office under the Cart Price Rule Settings.
Note: If the admin tries to set a coupon code which has not been set under Cart Price Rule Settings, the following error will be shown to them:
2. Discount Type: With this option, admin can set the discount type as fixed or percentage which will be offered to the user through exit popup.
3. Discount Amount: If the admin has selected the discount type as fixed, they can set any value as a discount. If the discount type is selected as a percentage they have to set a percentage discount value.
4. Threshold Amount: This option sets the minimum cart threshold value which is required to avail the offer.
2.6 Email Marketing
Magento 2 Exit popup extension offers Integrations with popular email service providers like MailChimp, Klaviyo, and Constant Contact. The email Ids captured by this Email subscription popup are automatically synced to the database of these email service providers which can be later used by the store admin to send personalized or promotional emails. Let us see how we can configure them.
1. MailChimp Integration:
Magento store admin is required to enter the MailChimp API key in order to sync it with your web store. Follow the below mentioned steps for the API key:
Step 1: Log in to your MailChimp account at https://mailchimp.com.
Step 2: Click on your Username from the menu on the top right corner.
Step 3: Select the Account in the flyout menu.
Step 4: From the account page select Extras and then API Keys.
Step 5: Your API Key will be listed in the table labeled Your API Keys. Copy the API key from there and paste in the “MailChimp API key” field.
Once this is done, the MailChimp account is synchronized.
2. Klaviyo Integration:
In order to Integrate Klaviyo with the store, Magento admin have to add the Klaviyo API Key in the provided field.
Step 1: Log in to your Klaviyo account at https://www.klaviyo.com/
Step 2: Click on your Username from the menu on the top right corner.
Step 3: Select the Account in the flyout menu.
Step 4: From the account page select Settings and then API Keys.
Step 5: Your API Key will be listed in the table labeled Your API Keys. Copy the API key from there and paste in the “Klaviyo API key” field.
Once this is done, the Klaviyo account is synchronized.
3. Constant Contact Integration:
In order to enable Constant Contact integration, toggle the Enable Constant Contact button as shown in the image below:
Enter the API key, API token in order to set up the integration. Select the list in which you want to sync the captured email IDs.
In order to generate the API Key of Constant Contact, follow the steps mentioned-below:
Step1: Create or log in to the developer account. Click here to create the account: https://constantcontact.mashery.com/
Step 2: Enter the Application Name field. Scroll to the bottom of the page and check the box indicating you agree to the terms of service and click Register Application.
You will, then,get your API Key information.
Step 3: Click the Get Access Token button, in order to obtain the Access Token.
2.7 Email Settings
Magento 2 Exit popup extension offers Email Settings to manage the Email sent to the customer with discount coupon codes. The extension offers readymade email templates which can be customized further as per the requirement. There are three options in which admin can share the coupon code with the customers i.e. display the coupon code in the newsletter popup itself, share the coupon code in the email sent to the customer and an option to choose both. The coupon codes are generated automatically and the emails are sent automatically as soon as a customer enters the Email Id in the email subscription popup.
Coupon Display option: Magento 2 admin can choose how to display the coupon code to the customer i.e. either on the exit intent popup, either via email or admin can choose both the options.
Email Subject: Magento 2 exit popup allows store admin to set the Email subject for the email that is sent to the customer. Emails are sent automatically but the admin has full control over the customization of the Email template.
Email Template: Magento 2 exit popup extension offers 5 Readymade email templates. These email templates are fully customizable as per the requirement.
Test Email: Magento 2 newsletter subscription popup extension by Knowband offers Test email field option to test the functionality of the emails sent.
2.8 Statistics
Magento 2 Exit popup extension offers statistics of its performance. The statistics show the comparison between the total generated and used coupons. Magento 2 newsletter subscription popup extension offers interactive graphs for total generated and used coupons. Magento 2 admin can filter the stats by selecting the date range from the date picker field, refer to image below:
Not only this Email subscription popup extension also shows the statistics in a beautiful and interactive pie charts, in which country the Exit popup extension is used and in which device, refer to the screenshot below:
Tabular Report: Magento 2 Exit popup extension generates tabular reports which shows information of the customer who has entered the email Id in the Newsletter subscription popup. The information like Email Id, the Coupon code allotted, the country where the Exit Intent popups, the device on which it was used and if the customer has used the coupon or not, refer to the screenshot below:
3.0 Front Interface
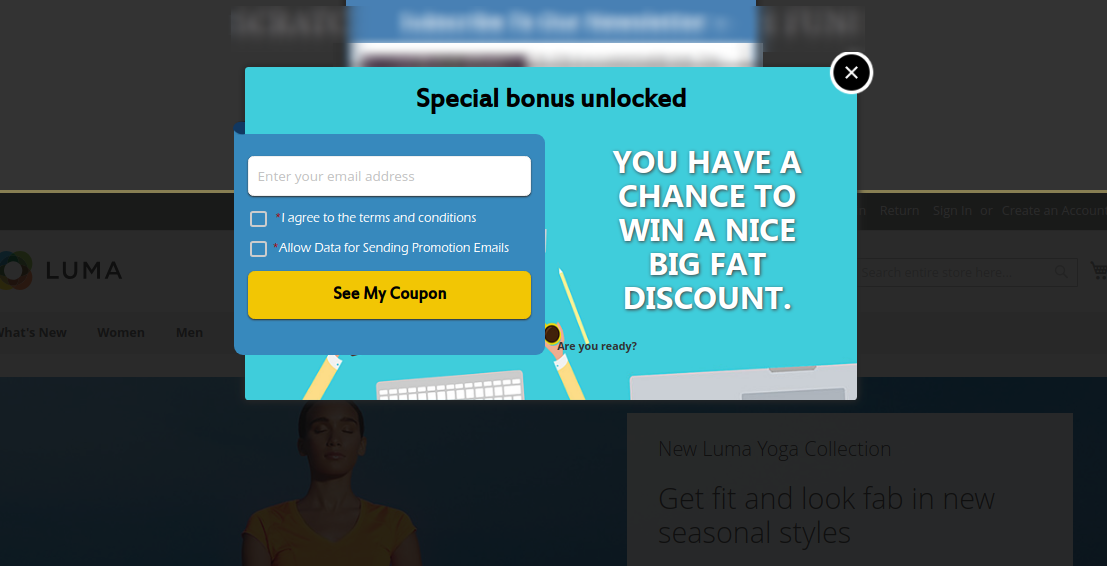
A) Magento 2 Exit popup with Theme 1
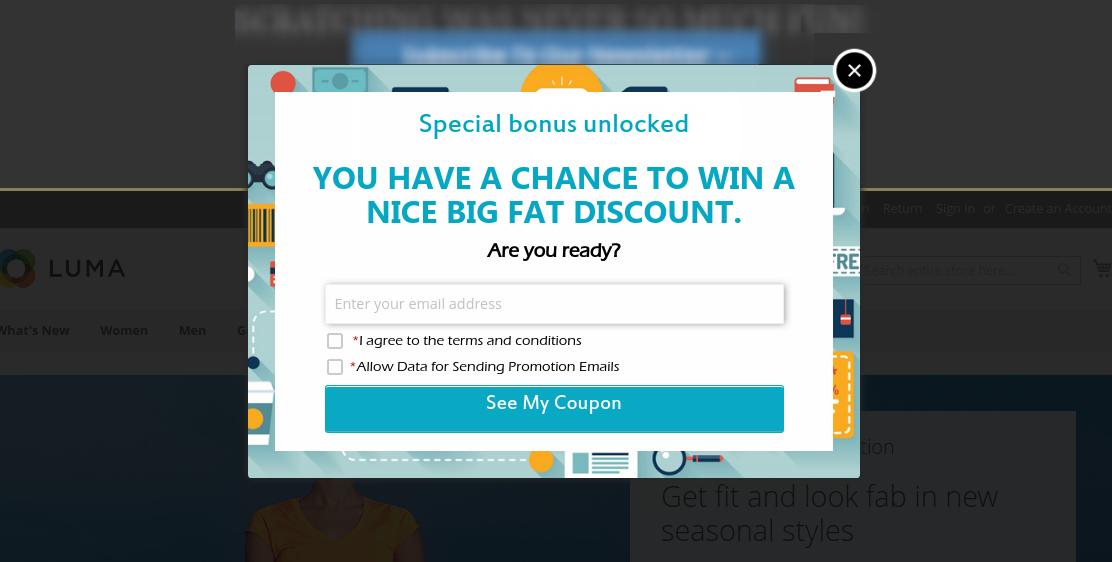
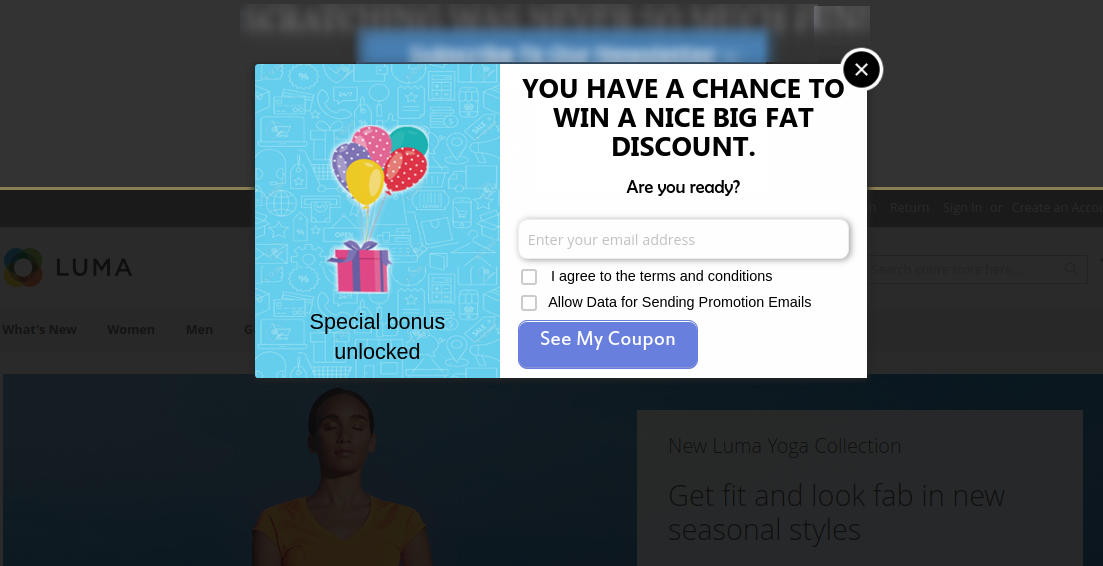
B) Magento 2 Exit popup with Theme 2
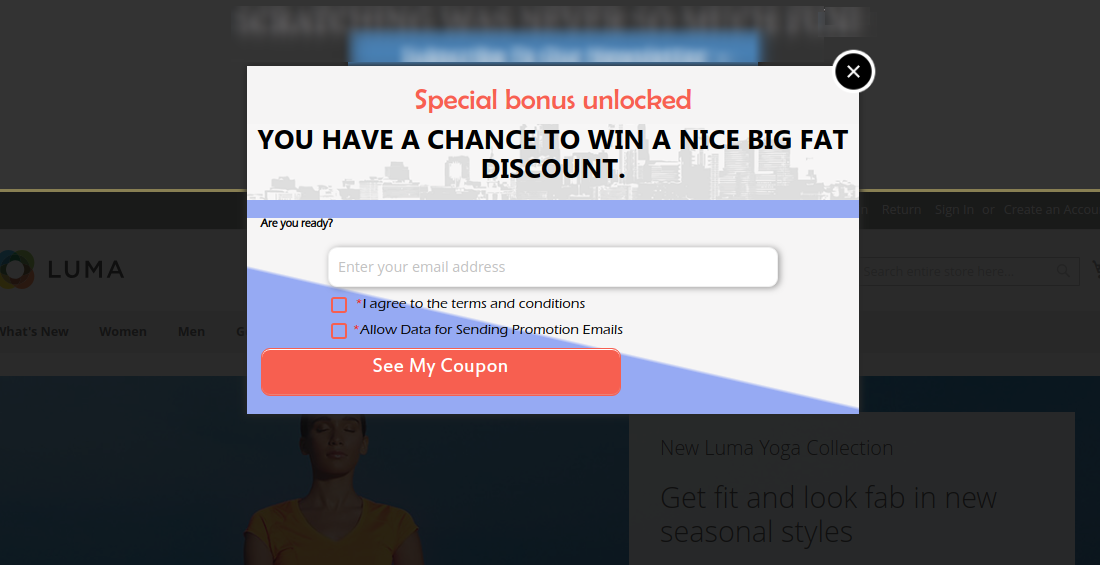
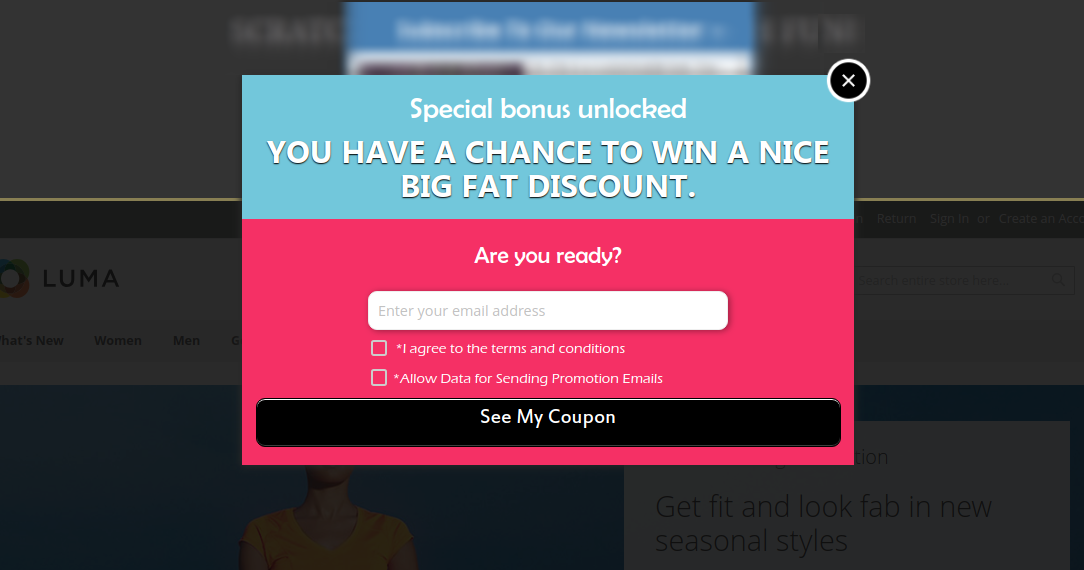
C) Magento 2 Exit popup with Theme 3
D) Magento 2 Exit popup with Theme 4
E) Magento 2 Exit popup with Theme 5
As the customer enters their email address, the following screen will be shown to them.
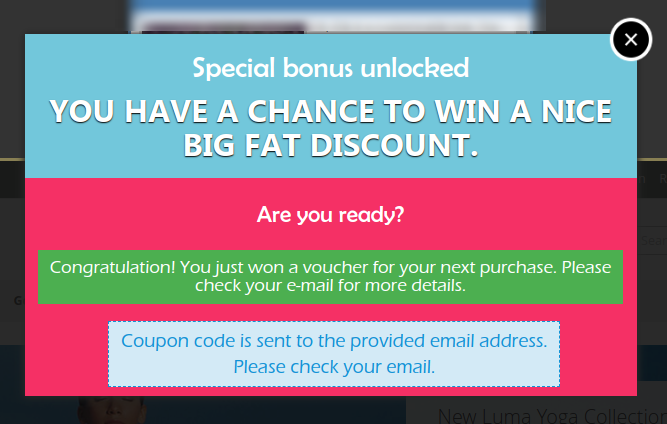
Disclaimer: In case the “Exit” popup does not display at the front, kindly clear the cache or delete the cookies. Sometimes cookies prevent the popup from displaying at front.