Introduction
We at Knowband are exceptionally skilled and proficient in converting your PrestaShop site into a wonderful feature packed mobile app for your targeted customers. You just have to specify your business requirements and expectations to our PrestaShop developers, rest will be assured by them. With our talent pool of programmers, designers, and other involved professionals, we can deliver a mobile app that closely matches your personal expectations and business requirements. If you are not sure about the utility of this mobile app for your PrestaShop store, let us throw some light on this amazing PrestaShop mobile app.
This is definitely one such mobile app that can take your eCommerce business to far off places. With the support of this PrestaShop mobile app, you can seamlessly target your multi-platform customers for your PrestaShop store for grabbing maximum sales and customer engagement. It can make your eCommerce business accessible to mobile based consumers in order to improve your chances of business growth and expansion. This mobile app lets PrestaShop store owners get their customized mobile app as per their business requirements and needs.
Working Process
In order to utilize the services of this mobile app, store owners have to implement the following steps:
Step 1. Once you purchase this module, download, install and enable the module on your store. This module enables communication between your mobile app and store.
Step 2. Contact us and share below requested details so that we can give generate your iOS app (IPA file) and can share it with you.
a. Splash image (1280×1920 png)
b. App icon (512×512 png)
c. Theme color (Blue, Orange, Green, Black)
d. Website URL
e. Website Name
f. Desired social login option name out of Facebook and Google.
g. GoogleInfo.plist file
h. Code snippet from Facebook developer console (Facebook App Id, Facebook App Name)
i. Provisioning Profiles (.mobileprovision files)
STEP 3. After receiving above requested information we will share an IPA file with you, which you can post on your “App Store” account so that your customers can download your app.
Read the document properly to know the process to get the required files.
Creating Facebook App
Prerequisites for creating Facebook App for iOS (Will be provided by Knowband)
- App Package Name (com.example.xxxx)
Creating Facebook App
- Go to https://developers.facebook.com/. If you have not registered yourself as a developer yet then Facebook will ask you to register as a developer. Simply register as a developer.
- From the top navigation menu hover over My Apps.
- Then click Add a New App.
- Enter a display name for the app. This name will be displayed to the user when he/she use Facebook login.
- Click on Create App ID. After verification, you will be redirected to the new page.
- On that page select the Facebook login and click on Set Up option.
- Then choose iOS and click on Next button until you reach on “Add your Bundle Identifier”step.
- Enter the bundle identifier (Application Package Name) for the iOS app. Bundle identifier will be provided by Knowband). Click on “Save” and then click on “Continue” button.
- Keep clicking on “Next” until you reach on “Configure Your info.plist” step.
- On “Configure Your info.plist” step, click on “Copy Code” button and paste the text into a text file.
- Click next till last step.
Making the App public
- Now to make this App accessible to all, you need to make it public.
- Now from the left menu, click on App Review.
- Turn the switch next to ‘Do you want to make this app and all its live features available to the general public?’ to Yes.
- Choose the category and click Confirm.
- Now your App will be publicly available.
- Please share the text you saved in text file (on “Configure Your info.plist” step) with Knowband. Make sure the text contains the following details –
<key>FacebookAppID</key>
<string>some_key</string>
<key>FacebookDisplayName</key>
<string>name_of_facebook_app_you_created</string>
Creating App IDs in Apple Developer Account
Prerequisites for creating App Id in Apple Developer Account (Will be provided by Knowband)
- App Package Name (com.example.xxxx)
- Package Name for Push Notification Service (com.example.xxxx.NauticaPrestashopNotificationServiceExtension)
Creating App Id in Apple developer account
- Sign in to developer.apple.com/account, and click Certificates, IDs & Profiles.
- Under Identifiers, select App IDs.
- Click the Add button (+) in the upper-right corner.
- Enter a name or description for the App ID in the Description field.
- To create an explicit App ID, select Explicit App ID and enter the app’s bundle ID in the Bundle ID field.
- Enter the bundle Id provided by Knowband (Enter App Package Name not the Package Name for Push Notification Service).
- Select the corresponding checkboxes to enable the app services you want to use. Check the Push Notifications options as well.
- Click Continue.
- Review the registration information, and click Register.
- Click Done.
- Repeat all the steps for Package Name for Push Notification Service as well.
- Now there will be two App IDs added in your account. One for App Package Name and Another one for Package Name for Push Notification Service.
Setting up Push Notification in Apple developer account
Prerequisites for creating App Id in Apple Developer Account (Will be provided by Knowband)
- App Package Name (com.example.xxxx)
Setting up the App Id for Push notifications
- On “iOS App IDs” page. Look for the App ID you just created (The same as provided by Knowband). Press on it and you should see a drop down of Application Services.
- Scroll down until you reach the end of the drop down and you should see an “Edit” button. Press that.
- The “iOS App ID Settings” page will show up. Now, it is the time to generate the CSR (Certificate Signing Request) that will be used to generate SSL certificate. The CSR file can only be generated from MacBook. However, default CSR will be provided by Knowband butif you wish to generate your own CSR file, then read How to Generate CSR (Certificate Signing Request) using MacBook.
- Now that we have our CSR generated, it is ready to go back to the “Add iOS Certificate” page.
- Scroll down. Press continue, and then click “Choose file…” Select the CSR file you just saved on your hard drive.
- Next, click “continue”again. Then the web page should say “Your certificate is ready.”. Download the certificate by clicking on the blue download button.
- Again follow all the steps from the point 1 to 7 shown above for Production certificates instead of Development certificates.
- Now you will have two certificates (.cer) files one for development and another one for production.
- Now this is the time to generate the private key p.12 file. Again, this can be generated by Knowband after sharing the certificates files with usby you or you can also generate it at own end. Read How to generate private key file (.p12) using MacBook.
- Now you will have the private key file (.p12) for development and production environment.
- Save these files for now. You need to upload these files on Firebase developer console.
Exporting the provisioning profile for Code signing
Prerequisites for creating App Id in Apple Developer Account (Will be provided by Knowband)
- App Package Name (com.example.xxxx)
- Package Name for Push Notification Service (com.example.xxxx.NauticaPrestashopNotificationServiceExtension)
Exporting the Provisioning Profile
- Sign in to developer.apple.com/account, and click Certificates, IDs & Profiles.
- Under Provisioning Profiles, select All option.
- Click the Add button (+) in the upper-right corner.
- Select App Store and click Continue.
- Select the App ID from the drop down created in Creating App IDs in Apple Developer Account step. You can identify the App ID by name or description you set in Creating App IDs in Apple Developer Account step. (Select the App Package Name not the Package Name for Push Notification Service)
- Click on Continue at the bottom of the page.
- Select the certificate
- Click Continue
- Give a Profile Name and click Continue.
- The you will see a success message saying “Your provisioning profile is ready”.
- Click on the Download button to download the Provisioning profile in your System.
- Repeat all the steps for Package Name for Push Notification Service as well.
- Now you will have two Provisioning Profiles. One for App Package Name and Another one for Package Name for Push Notification Service.
- You will have to share those two files (having extension as .mobileprovision) also with Knowband.
Creating a Project at Google Developers Console
Prerequisites for creating Google App for iOS (Will be provided by Knowband)
- App Package Name (com.example.xxxx)
Creating Google Project
- First, head over to https://firebase.google.com/. Sign in with your Google account to enter the console. If you don’t know how to switch to the console, there is a button at the very top right that says “Go to console.” Go ahead and click on that.
- Once you are at the console, click on the “CREATE A NEW PROJECT” button. Give a name to your project and click the “CREATE A NEW PROJECT” button to proceed.
- After that, you are redirected to the project overview page. Now click the “Add Firebase to your iOS” button. Enter the bundle ID provided by Knowband. Then click the “ADD APP” button.
- Follow the on-screen instruction to download the GoogleInfo.plist file. We are going to need this file later.
- Now lick “Continue” to proceed and click “Finish” to complete the configuration. You should then see your iOS app in the Firebase overview page.
- Look for the setting icon at the top right. Click the settings icon > Project settings.
- Select the Cloud Messaging tab.
- Scroll down, and click the “Upload Certificate” button.
- Then a pop should appear to ask you for your Development APNS certificate.
- Click browse and choose your APNs certificate (i.e. .p12 file for development) that you prepared in “Setting up Push Notification in Apple developer account” section (we got two .p12 files in that step one for development and another one for production). Then click on Upload button. Similarly on Production APNs certificate section, upload the certificate for production (i.e. .p12 production file).
- On same page, you can download the GoogleInfo.plist file (if not downloaded already). You will have to share the GoogleInfo.plist file to Knowband.
How to Generate CSR (Certificate Signing Request) using MacBook
- It is time for us to create a “Client SSL Certificate.” This will allow our notification server (Firebase) to connect to the Apple Push Notification Service. Under Development SSL Certificate, press on the “Create Certificate…” button.
- To generate a certificate, we would need a Certificate Signing Request (CSR) file from the Mac. We will get back to this page later, but now we need the CSR file.
- To generate the CSR file see the steps shown below.
- To generate a CSR file, press cmd + space and do a spotlight search for “Keychain Access.” Open Keychain Access, and go up to the menu to select Keychain Access > Certificate Assistant > Request a Certificate From a Certificate Authority…
- A “Certificate Assistant” pop up should appear.
- Fill in your email address and name. Choose “Saved to disk” and press Continue. Then save your CSR somewhere on your hard drive.
How to generate private key file (.p12) using MacBook.
- Double click on certificate (.cer) file and it will be automatically added in your keychain access certificates.
- Open up Keychain Access. Under the “My Certificates” category, you should see the certificate you just added. It should be called: Apple Development IOS Push Services: <your.bundle.id>
- Click the expand arrow to the left of the certificate’s name to reveal the private key option. Right click on the private key and press export.
- Once clicking Export, a pop up will prompt you to save your private key as a .p12 file. Go ahead and click save. Give some prefix as dev in the name to make sure that the file is for Development.
- Then leave the fields empty and click OK to confirm and a .p12 file will be saved on your device.
Enable Facebook login on the Firebase console
- We need to enable the facebook login from the firebase account as well in order to make the functionality work.
- First, go to the Facebook console then select the app you have created in “Creating Facebook App” step.
- You will be redirected to the Dashboard.
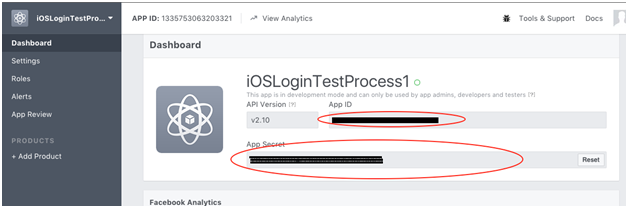
- There you will find App ID and App Secret
- Then go to the Firebase console and select the Authentication tab from the left menu.
- Go to “Sign-In Method” tab and enable the facebook from there.
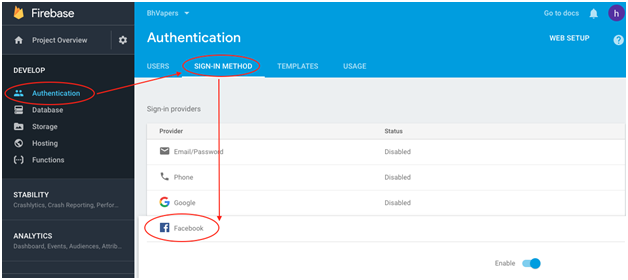
- You will have to enter the app secret and facebook id and then click on save button.
/***************************** End of document *******************************/