
How to install OpenCart One Page Checkout Pro plugin on your server
1. Download the zip from OpenCart & unzip into a folder. After unzip folder structure of Supercheckout Pro plugin will be similar as shown in below screen
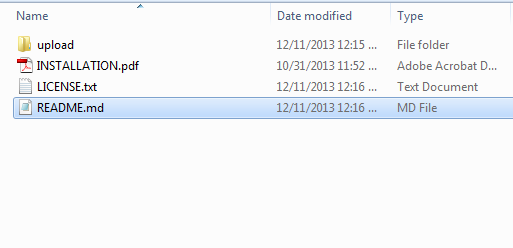
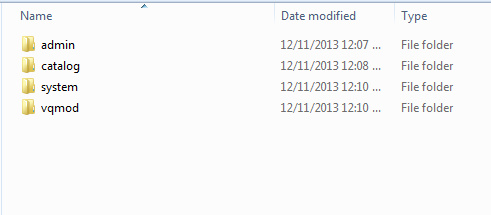
2. Open the upload directory & you will see following folder structure.
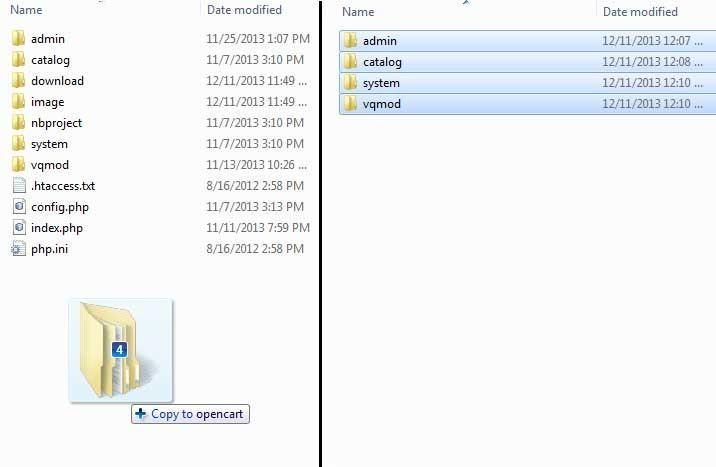
3. Login via FTP & Drag drop all the folders into your server root directory. You dont have the change the default theme folder name to your theme folder name.
You must have VQMOD installed for this plug-in to work. If VQMOD is not installed please download and install fromthe URL below:
https://code.google.com/p/vqmod/
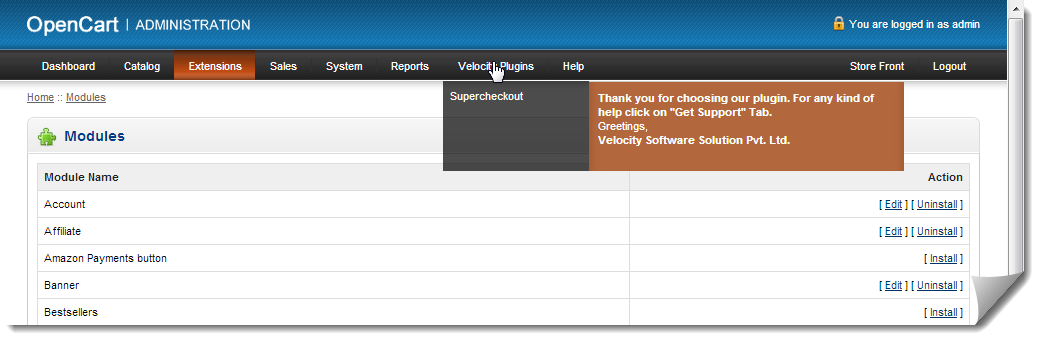
4. You will find the plugin ready to be installed in the Modules of your opencart.

5. Click on Install link to install the plugin. This will also add a dropdown option in your menu bar which will list all plugins by Velocity installed on your store for fast navigation. This dropdown also has a message box, using which we can inform you about new launched plugin or new update.
6. Delete the Vqcache files from the vqmod/vqcache folder.
7. To access Super Checkout plugin, Click on edit button which is just to the right of Supercheckout Pro module as shown below.

8. On clicking edit button the module for plugin will open. It contains navigational bar at the top, menu at the left and main content in the center as shown below.
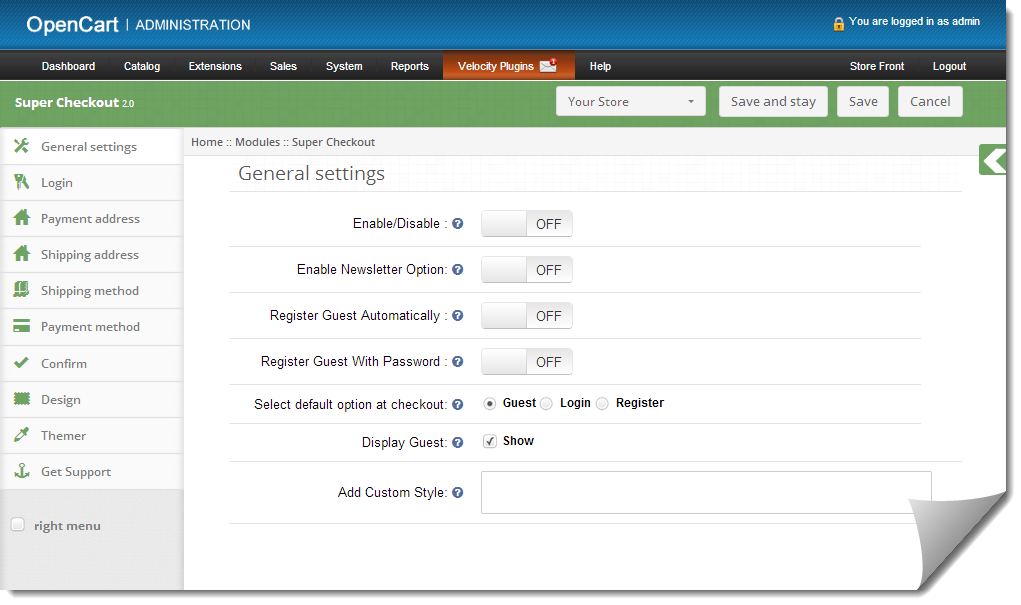
1. General Settings tab
1. To enable/disable plug-in, Switch the enable button OFF to ON / ON to OFF this is just to the right of Enable/Disable label. Refresh home page of your store every time you change enable/disable setting.
2. To change the default view from None to Banner or Related Product or vice-versa in pop-up dialog select an option from given radio button.
3. When you select banner radio button, a button Add Banner (Max 3) will appear on screen.
4. Click Add Banner button to add a banner, on clicking this button you will be asked to enter banner URL and select banner image.
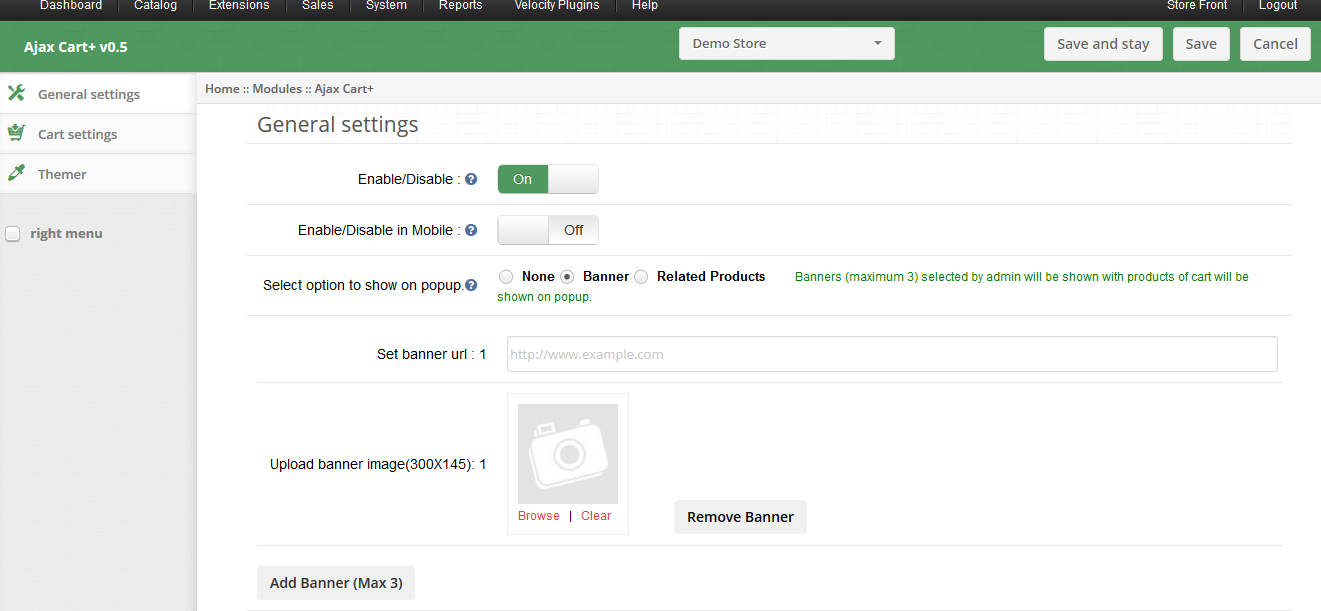
5. Write the complete URL of your web page where you wish to redirect user on clicking the banner.
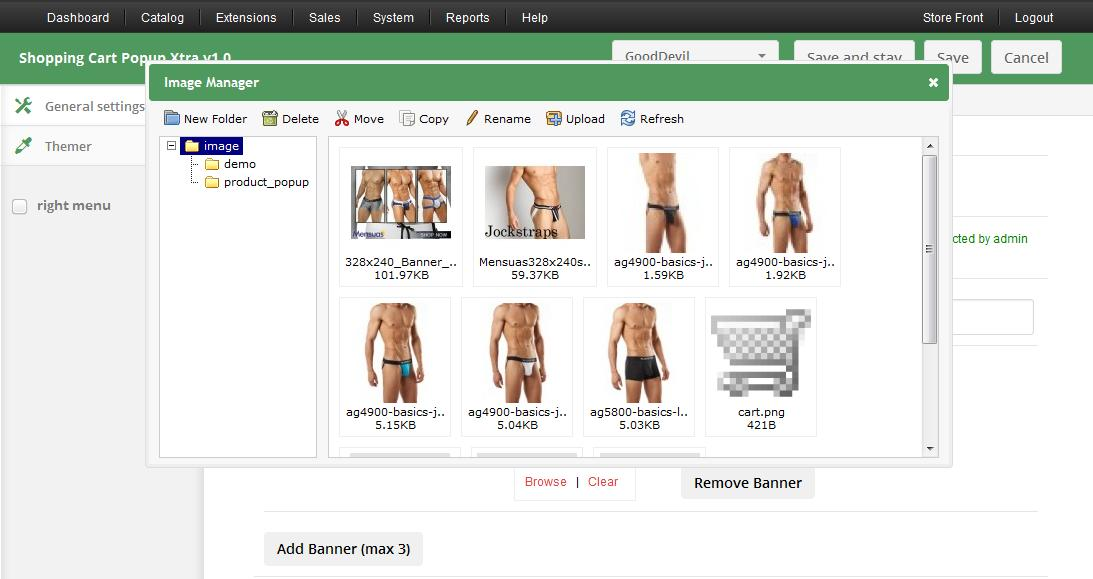
6. Select an image for banner to be shown on pop-up dialog from Image Manager as shown below. Click Browse to open Image Manager.
7. You can remove a banner by clicking Remove Banner button.
2. Login Tab
- This tab basically contains setting to enable /disable Facebook and Google registration & login as shown below.

- To enable Facebook Registration & Login switch the button from OFF to ON which is just to the right of Enable Facebook Login label. But before you do that do get Facebook APP ID and APP SECRET from www.developers.facebook.com.
- Enter the APP ID and APP SECRET in their respective fields and save. You will find Facebook login button on your checkout page.
- To enable Google Registration & Login switch the button from OFF to ON which is just to the right of Enable Google Login label. But before you do that do get Google APP ID, CLIENT ID and APP SECRET from https://code.google.com/apis/console. For detailed instructions to get the APP ID, download the Facebook & Google Setup guide from OpenCart account.
- Enter the APP ID, CLIENT ID and APP SECRET in their respective fields and save. You will find Google login button on your checkout page.
3. Payment Address Tab
- This tab contains setting for the fields which is to be shown in Payment or Billing Address section in checkout page as shown below.

- It consists of two sections. The one in the left if for Guest Customers and the right one for registered customers.
- To make a field display/hide in the checkout page check the checkbox just to the left of Show label.
- To make a field as mandatory (required field) check the checkbox just to the left of Require Label.
- The fields can also be rearranged according to the requirement. To rearrange just move the cursor to the drag icon and drag & drop the field wherever it is required as shown below.
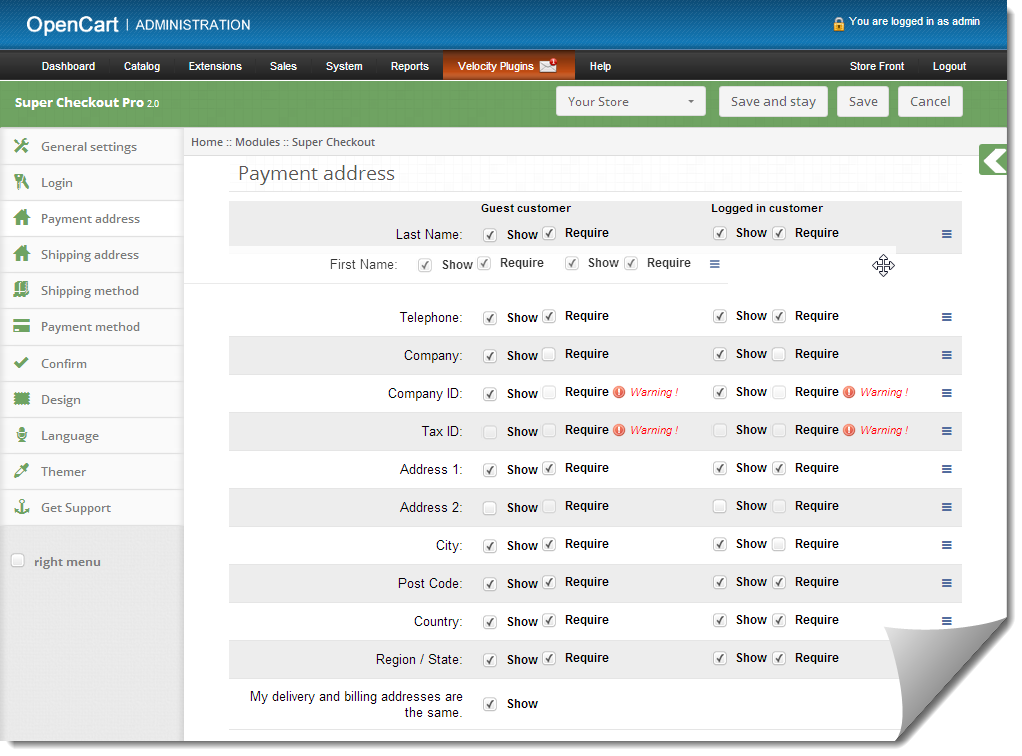
- On saving, the fields will be rearranged as per the changes.
4. Shipping Address Tab
- This tab contains setting for the fields which is to be shown in Shipping Address section in checkout page as shown below.
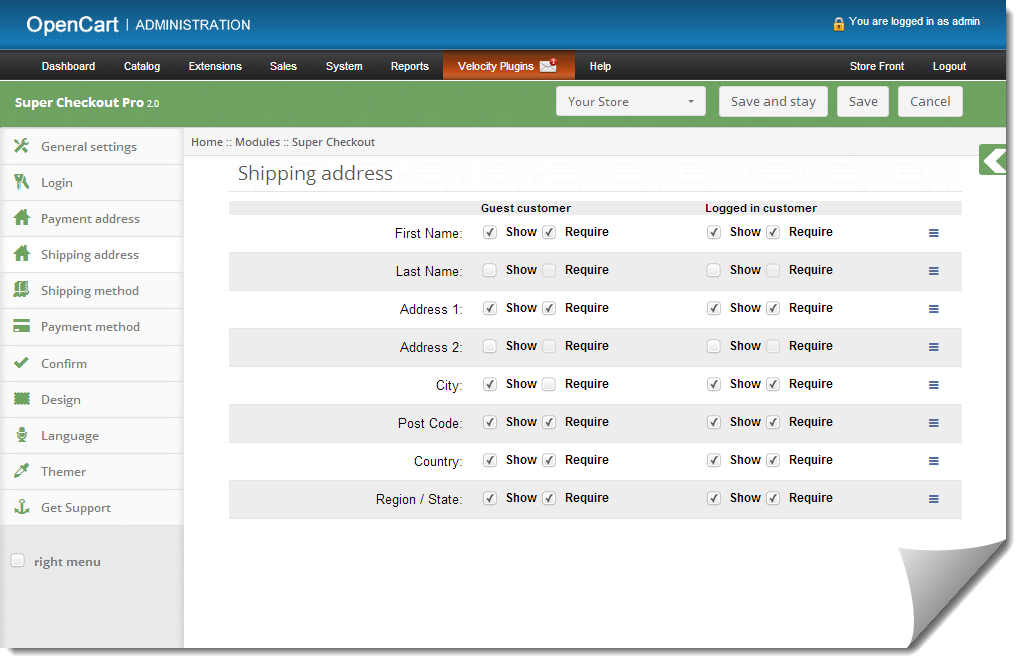
- It consists of two sections. The one in the left if for Guest Customers and the right one for registered customers.
- To make a field display/hide in the checkout page check the checkbox just to the left of Show label.
- To make a field as mandatory (required field) check the checkbox just to the left of Require Label.
- The fields can also be rearranged according to the requirement. To rearrange just move the cursor to the drag icon and drag & drop the field wherever it is required as shown below.
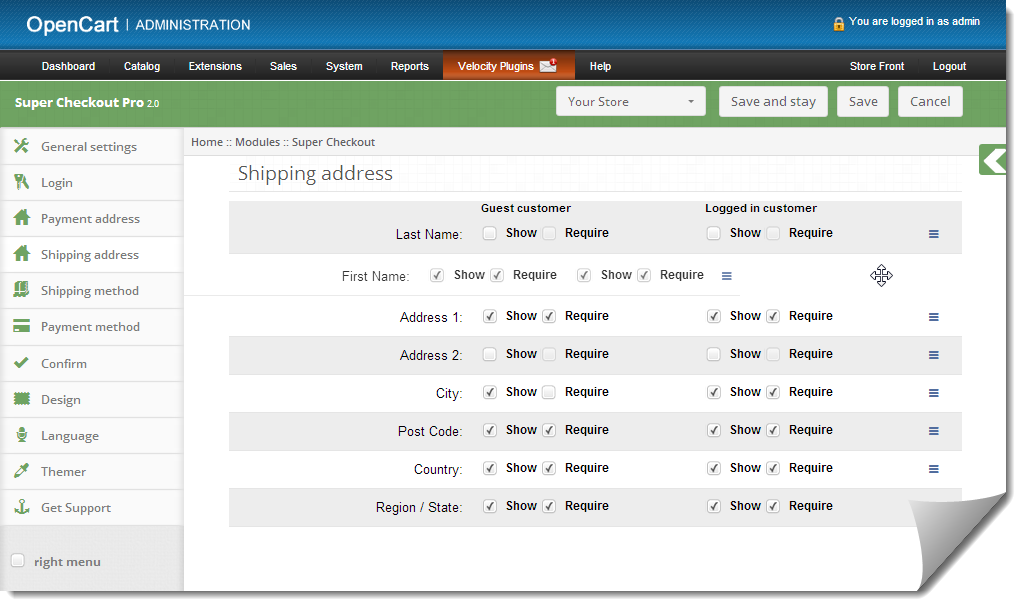
- On saving, the fields will be rearranged as per the changes.
5. Shipping Method Tab
- This tab contains settings for shipping method which is shown in checkout page. It basically contains settings for enabling/disabling and setting the default shipping method as shown below:
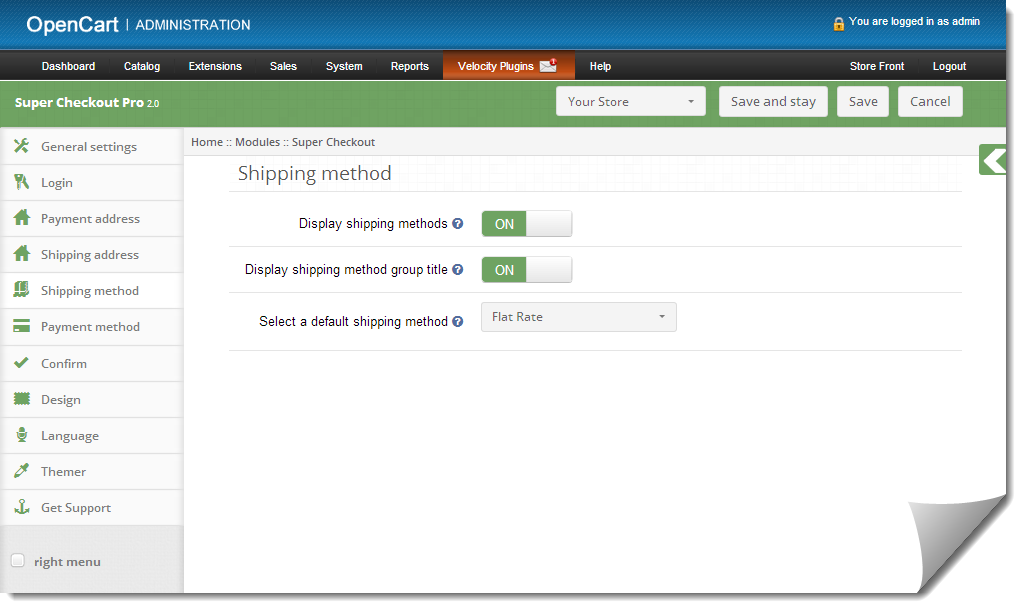
- To Enable/Disable the shipping methods from the checkout page switch the button from ON to OFF or vice-versa. This will disable the shipping method block from checkout page. But you should select a default shipping method (if any installed) to apply shipping charges to the order.
- To Enable/Disable Shipping Method title switch the button from ON to OFF or vice-versa. This will cause the title to of shipping to enable or disable from checkout page.
- To get a default shipping method selected in the checkout page select the default shipping method from the dropdown. If the selected shipping method is not installed it will automatically select from installed shipping method.
6. Payment Method tab
- This tab contains settings for payment methods shown in checkout page like enabling/disabling or selecting a default method.
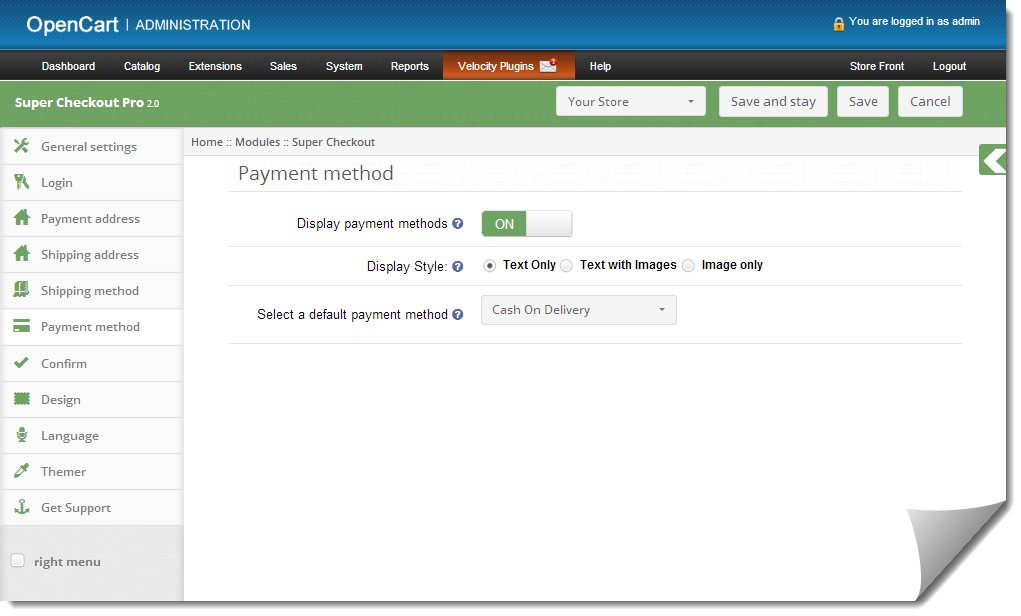
- To Enable/Disable the payment methods on the checkout page switch the button from ON to OFF or vice-versa. This will disable the payment method block from checkout page. But you should select a default payment method (if any installed) to get a payment method in the checkout
page. - Supercheckout also enables you to display payment method name with or without their logo. You can also set it to display Payment method image only. Select desired radio button which is just right of Display style label.
7. Confirm Tab
- This tab contains setting for the cart and confirming the order as shown below:
- Its divide in two section
a. Cart
b. Confirm
Cart:
- This tab is again divided into two sections, the left one is for Guest Customers and Right one for Registered or Logged in customers.
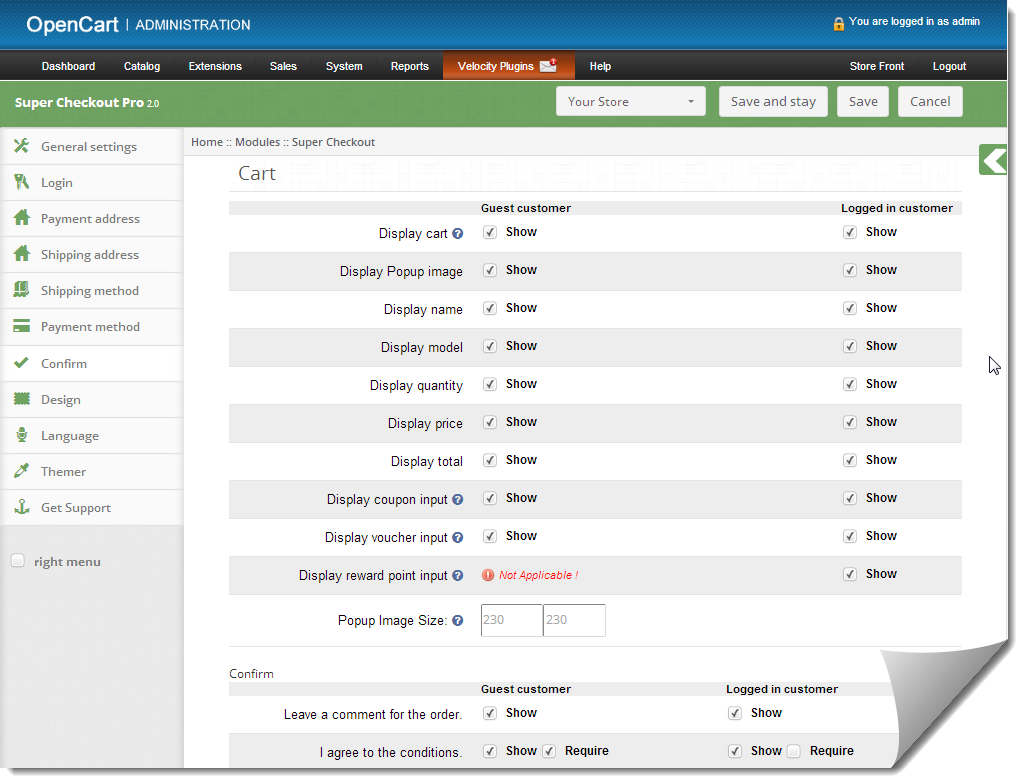
- To Display/Hide cart from the checkout page check uncheck the checkbox present in front of Display Cart label.
- To enable/ disable any column in the cart check/uncheck the checkbox in front of that respective column.
- To enable/disable the popup images for the product check/uncheck the checkbox in front of that respective column.
- To change the size of popup for images Enter the width and height of the popup in textbox in front of Pop Image Size label.
- Coupon , Reward Points and Voucher options can also be disabled or enable by checking/unchecking the checkbox in front of that respective field. Kindly note that rewards point text box will only be visible on Supercheckout page once following three conditions are fulfilled.
a.) Customer must be logged in.
b.) He must have at-least 1 reward point in his account.
c.) He must have a product in the cart which can be purchased with reward points.
Confirm:
- This tab is again divided into two sections, the left one is for Guest Customers and Right one for Registered or Logged in customers.
- To enable the comment box for the order by customer check the checkbox in front of that Leave a comment for the order label & to disable uncheck the same checkbox.
- To enable agree to the term or any other information saved in the admin for the store check/uncheck the checkbox in front of I agree to the conditions label.
8. Design Tab
- This tab contains the settings for the design of checkout page in the catalog as shown below:
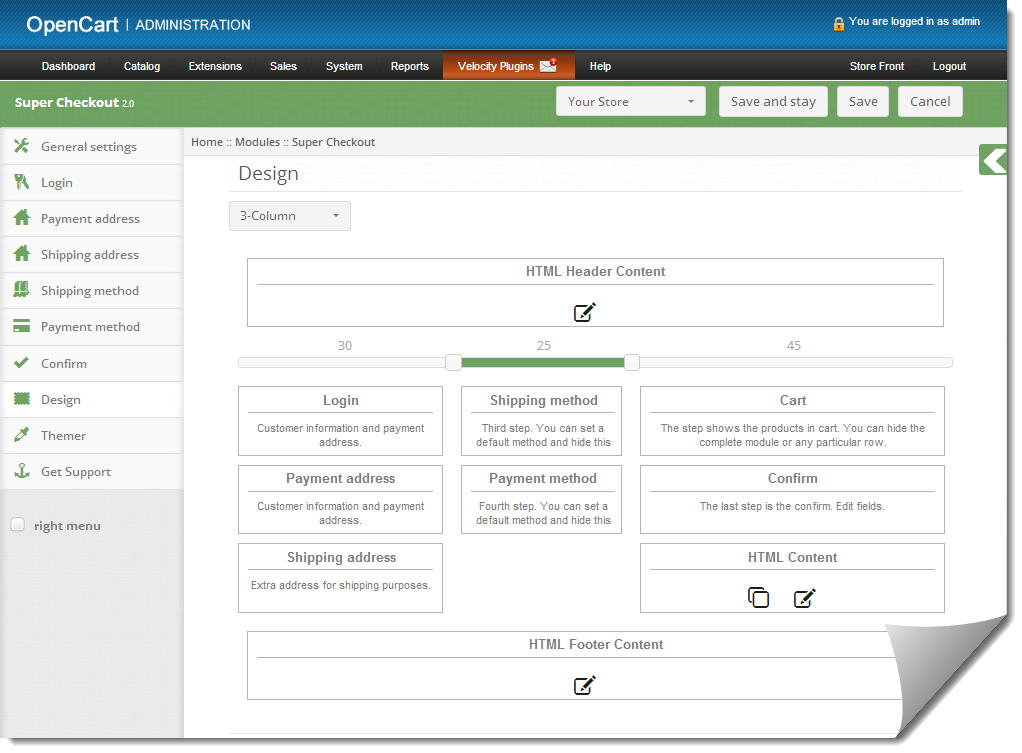
- To change the width of any column adjust the slider present at the top as shown below

- Block of different steps can also be rearranged from one column to the other or in the same column as shown below:
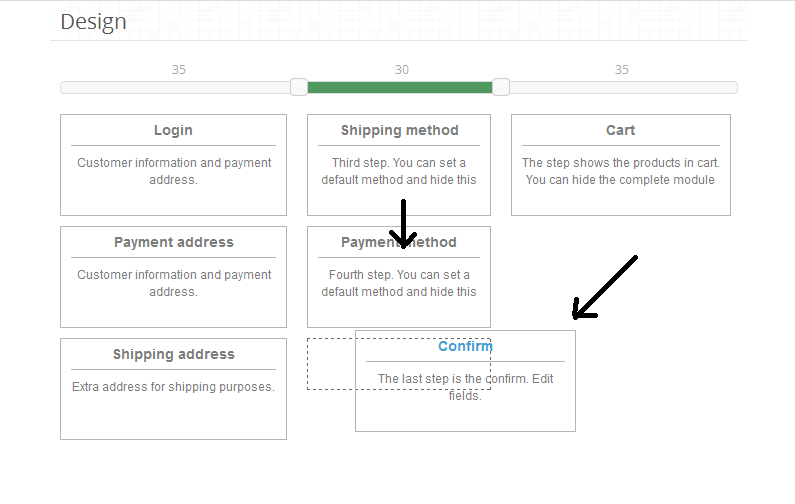
- On saving, the block will be rearranged in the checkout page as per the changes
9. Language tab
Using language tab, you can generate language translation of the supcheckout language file.
1. First you need to add a language in your OpenCart store. To add the new language to go System -> Localization -> Language & add now language.
2. Added language will be displayed in supercheckout module as displayed below.
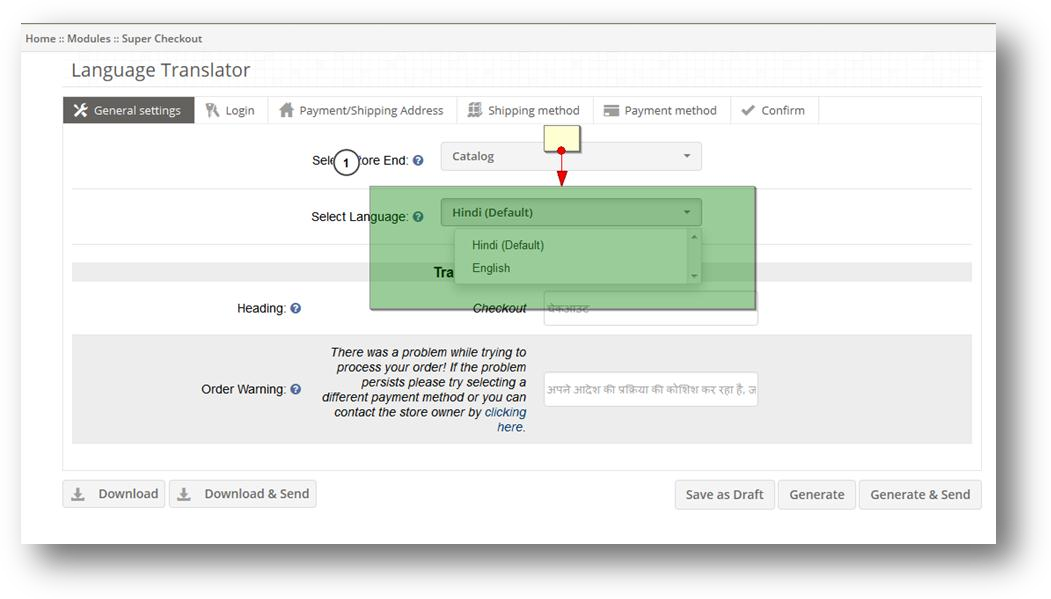
3. Choose the language in which you need to translate & choose the website i.e. Front End/Admin End which you need to translate.
4. Based on the selection, Various fields in Various tabs will be populated like in General Settings,Login, Payment/Shipping Address Setting etc.
5. By default it will display the English translation. Add translation of various texts.
6. After adding translation of text, you can perform following action using the buttons below.
a. Download: Download button will download the translated language file. You need to upload the file into your supercheckout language directory.
1.1: If case of front end, you need to upload the language file in catalog/language/[[YOUR_LANG]] /supercheckoutPro folder
2.1: In case of admin, you need to upload the downloaded language file in
admin/language//[[YOUR_LANG]] /module folder
b. Download & Share: Download & Share button will download the language file & a copy
of the language file will be shared with Velocity.
c. Save as Draft: Save as Draft button will save the translation for future use.
d. Generate: Generate button will try to upload the language file in desired directory if server permissions allow saving of the files.
e. Generate & Send: Generate button will try to upload the language file in desired directory if server permissions allow saving of the files & a copy of the files will be shared with Velocity
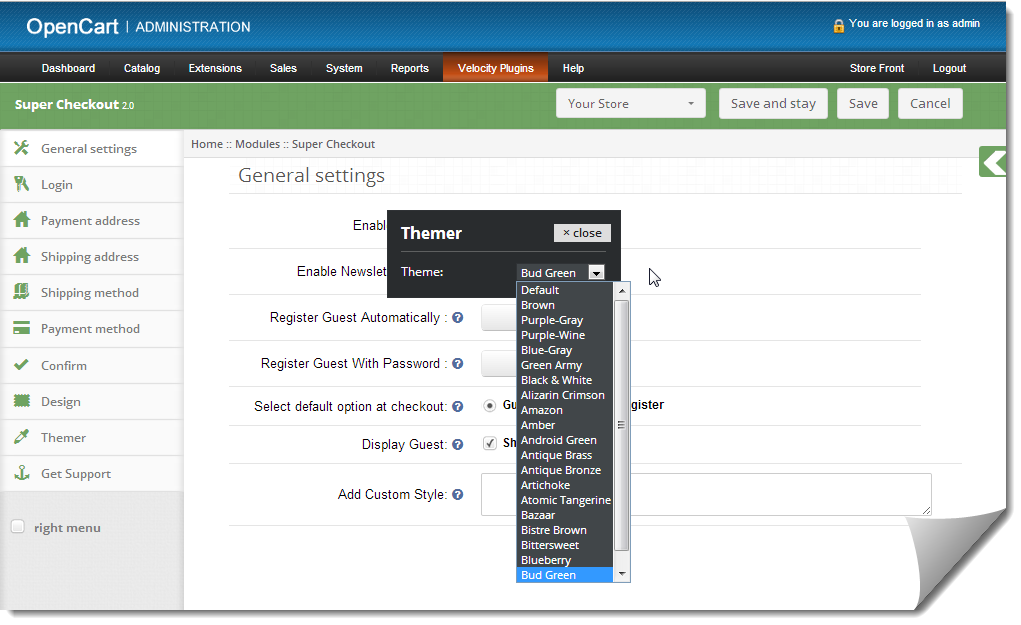
10. Themer tab
By clicking on themer tab, you will have an option to change the theme of Supercheckout admin panel.
11. Get Support tab
By clicking on Get Support tab, you will be redirected to our support website, where you can contact our support for help. Use this tab in case you have any query/issue or found some bug.
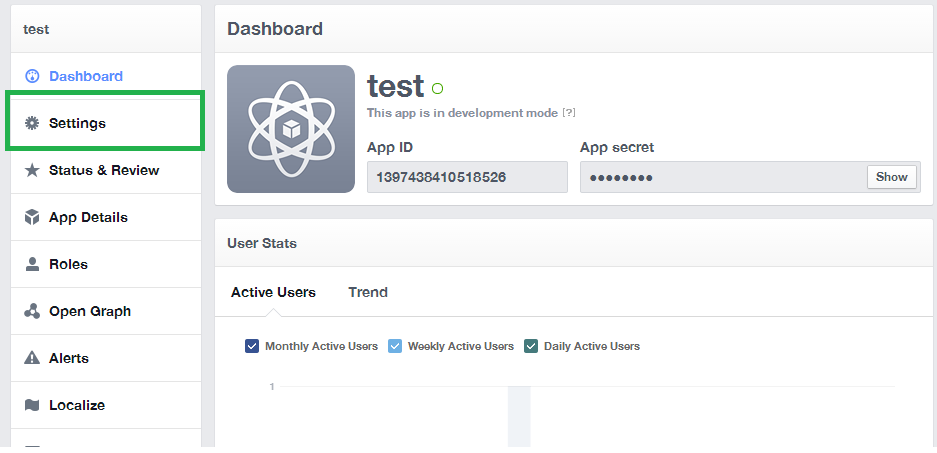
How to get Facebook API details?
Steps:
- Go to https://developers.facebook.com/
- Click on Apps -> Create a new app.
- Follow the instructions on the screen.
- You will get the API ID & App secret (Click show button)
- Now Go to Settings from the Left Menu
- Click on Add Plateform link as shown below
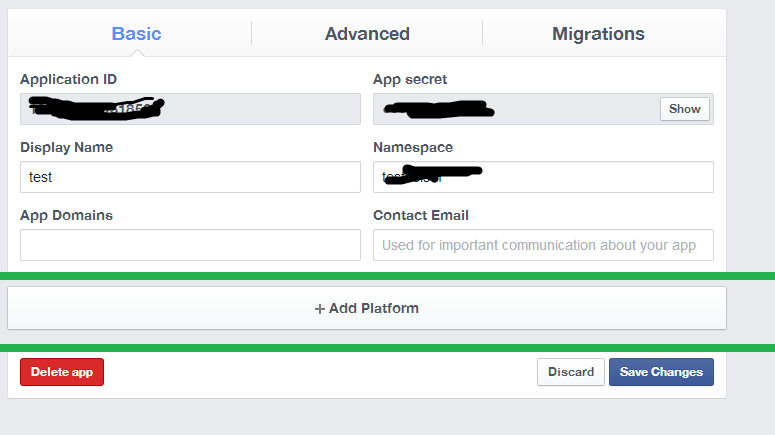
- Select Website.
- Enter App Domain & Site URL as shown in below screen.
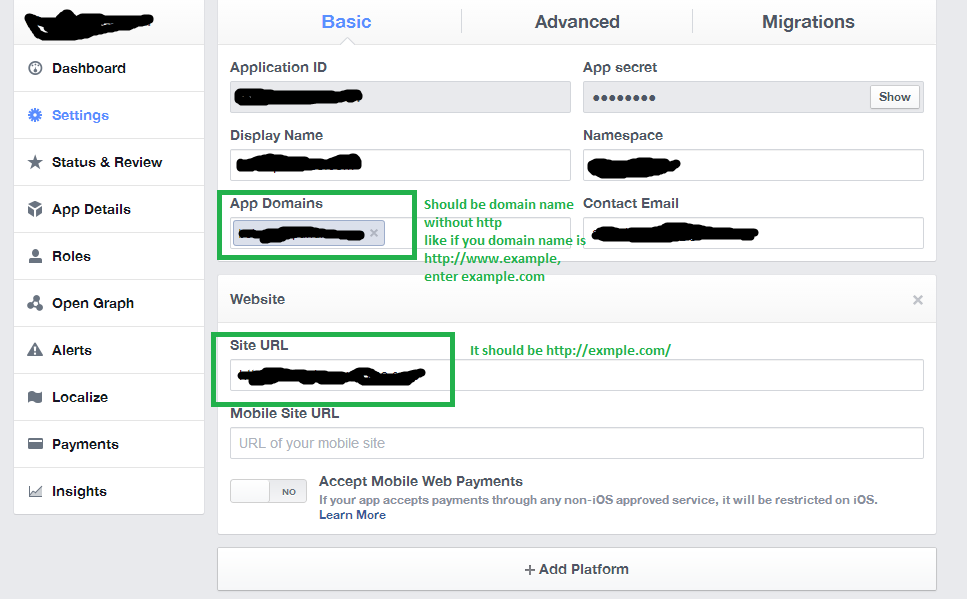
- Click Save Changes button.
- After that Go to Status & Review tab & make the application Live.
How to get Google API details?
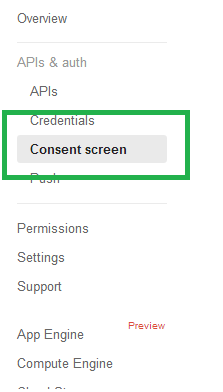
- Go to https://code.google.com/apis/console then click on Consent screen from the left.
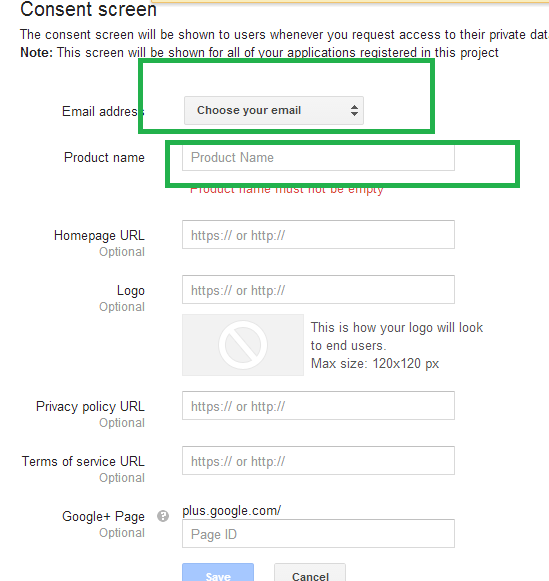
- On the Consent screen, Select Email Address, Enter Any Project Name & Press Save Button.
- Then click App & Auth -> Credentials from left column.
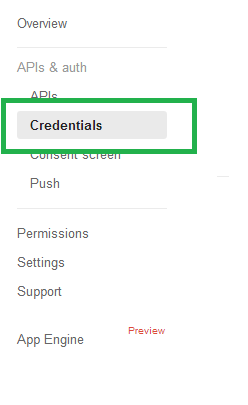
- A screen as below will appear.
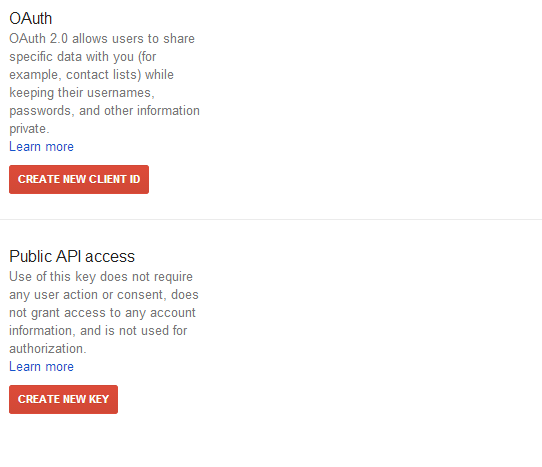
- Click on CREATE NEW CLIENT ID. A popup as below will appear.
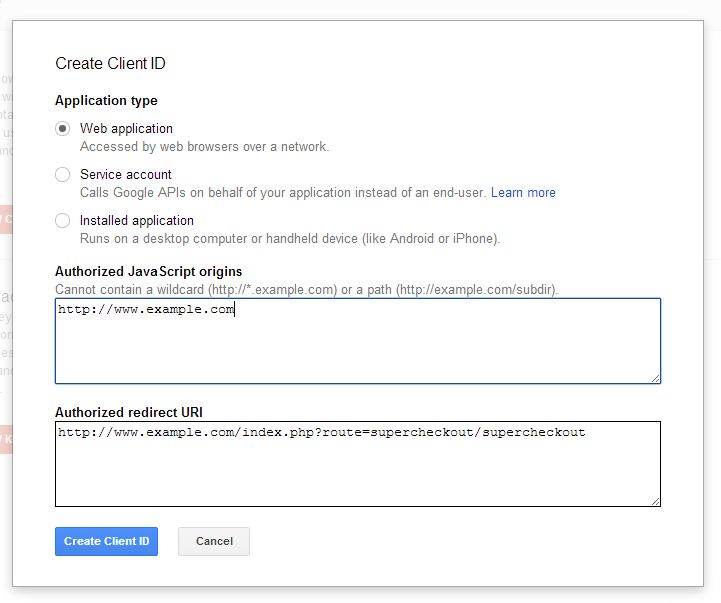
- Enter the details as shown in above screen.
- Application Type: Web Application
- Authorized JavaScript origins: Your domain name i.e. https://www.example.com
- Authorized redirect URI: Path of super checkout page
https://www.example.com/index.php?route=supercheckout/supercheckout
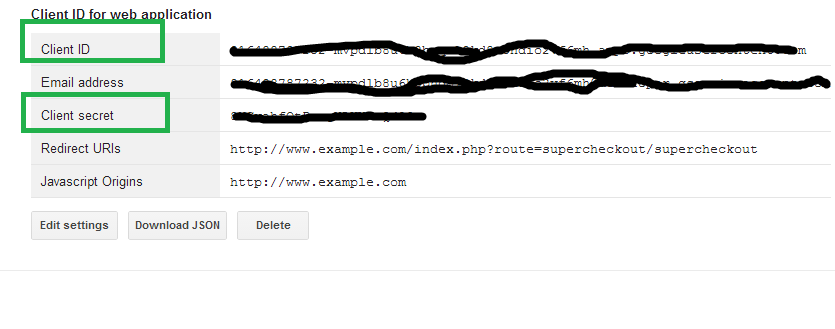
- Click Create Client ID. As screen as below will appear. Copy the Client ID, Client secret from the below screen.
- Click CREATE NEW KEY from public API access section. A popup will appear. Click on server key button then click on Create button without adding anything in input box.
- Above step will generate the API key.
This Would Also Interest You:
- A One Page Checkout for OpenCart to Grab Higher eCommerce Sales
- Boost Conversion Rates for your Site with One Page Checkout Module
- OpenCart Checkout Extensions to drive Sales and Conversions for your store
- What to look out for an engaging OpenCart checkout extension?
- Which OpenCart Extensions can help you in a Seamless Checkout Experience?
