
Admin Panel of OpenCart Make An Offer Extension
The admin panel has 6 tabs for configuring this plug-in, as listed below:
- General Settings
- Products Settings
- Email Settings
- Pending Requests
- Processed Requests
- Statistics
General Settings
General Settings tab has following options:
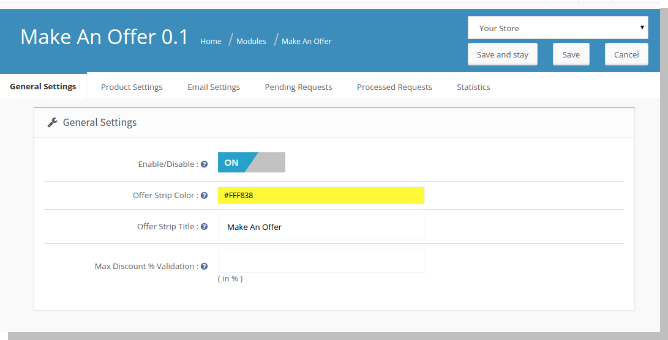
Enable/Disable (On/Off switch) :
This is the main switch to enable/disable the entire Module.
Offer Strip Colour :
You can change the colour of the strip that appears on the front end by clicking on this field and choosing the desired colour to suit your theme.
Offer Strip Title :
You can change the text on the strip that appears on the front end.
Maximum discount % validation :
The discount % you enter here decides the validating amount a customer can enter on front end and make request for a negotiable amount. This option minimizes the admins effort to review requests with absurdly low prices for each product.
Product Settings
This tab has following options:
All Products:
Admin can add the products that shall come under this scheme. Admin can either select all product to come under this scheme or only selected products.
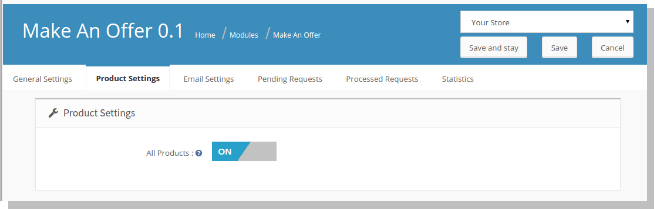
Disabling this switch adds a row below this option where you can add the products that shall come under this scheme.
Add Products:
If admin chooses to enable on only selected products, following fields will show up on page.

- Name : This will be an auto-suggest box
- Add: Button to add more similar rows for more products.
- Remove: Button to remove row.
Email Settings
This tab will help admin create mail bodies for different actions he/she might take for each request.
Rejecting Offer :
If all the products within a customer request are rejected, an email informing the same will be sent in response to the customers automatically, provided mail settings in admin have been configured properly. The subject and Email body for this email can be configured here.
Common Response :
If one or more product offers are accepted or negotiated, this email will be sent to the customers automatically which can be configured.

Pending Requests
This is the place where admin can view all requests that have been made by each customer. Also he/she can take actions as to whether accept/reject an offer, or to negotiate price with customer.
Admin can filter these requests based on the customers email ID.

After, you have decided to take actions on each product offer, you can submit the response. As soon as you submit the response, an email will be sent informing the status of all the product requests made.

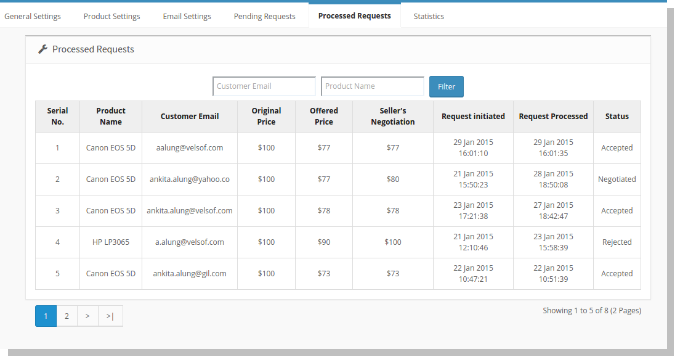
Processed Requests
This is the place where admin can view all requests that he/she has taken action on. Admin can view all these requests with filter options for customer email and product name.
Statistics
This is the place where admin can view the counts of requests made by each customer and corresponding responses to their requests made by the admin. There is also option to filter these statistics based on customer email. Here admin can also view the total sum of all the requests sent and responses taken by the admin as highlighted on the top.

Front End
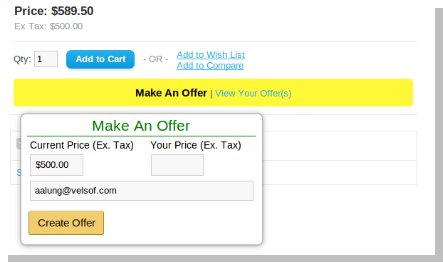
On the front end, the product layout will have a button to make an offer besides the add to cart button, if the product is added on admin panel to come under this scheme.
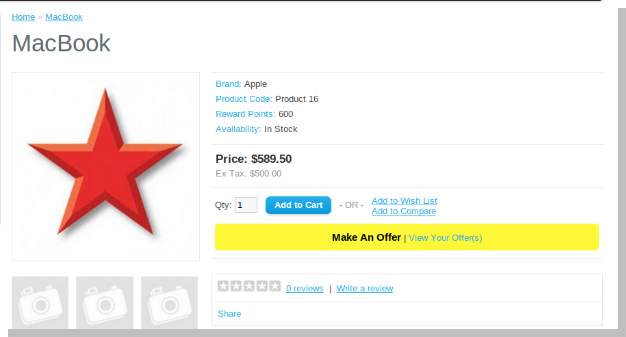
Clicking on make an offer opens up a pop up asking for an offer price you want to make. Once after entering that price and email ID, you may submit the request.
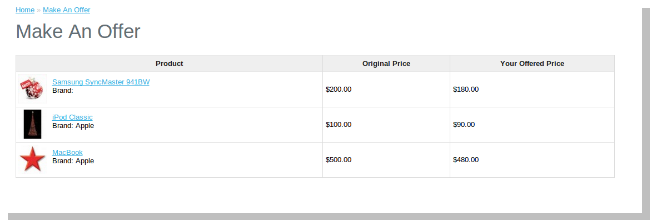
After submitting request, you can view page which shows all the products for which you have made offer. The link for the page is provided next to the option where one can create offers.
After submitting the request for all products, you will have to wait for response from admin via email on your submitted email ID.
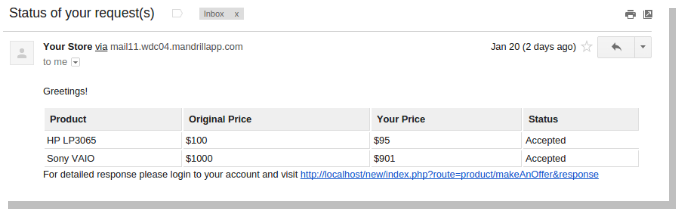
After the customer receives the response via email, clicking on the link provided in email will land user to the page where all requested products can be seen with status.
You can avail the discounted prices by visiting the product page via link with each product. On the product layout page, you can add a product to cart just the same way as before, that is, by clicking on add to cart button after selecting desired options.
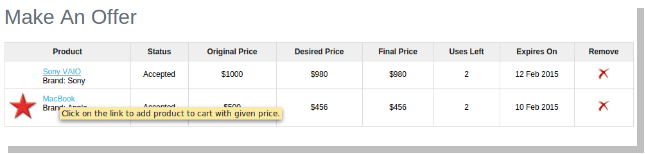
This page gives the detailed response to all your requests which can be used by you to avail discounted price.
After you use up this offered price, respective quantity of uses left will be subtracted. You can purchase product at the offered price until uses are exhausted or offer surpasses the expiry date.
We hope that we have covered all the concerns regarding the installation and product guide of this OpenCart Extension. If you are new to OpenCart you should check the Merits and Demerits of OpenCart.
